Embed Size (px)
Citation preview
Hills Hoist 8-Line, 7-Line, & 6-LineProduct Manual
2 Introduction
CongratulationsCongratulations on the purchase of your new Hills Hoist Clothesline which will bring you many years of trouble free and ecient outdoor drying.
It’s important that you read this Product Manual thoroughly before installation to benefit from the design features and enjoy safe use of this product.
Thank you for choosing Hills.
Warning• Do not allow children or pets to swing on
your Clothesline or items of laundry.
• Do not use for any purpose other than to hang and dry washing.
• Do not use your Hills Hoist if parts are worn or damaged.
• Fold up your Hills Hoist in the event of extreme winds to avoid any product damage.
• The assembly of the head into the Main Standard is permanent. The two pieces lock together and cannot be separated when assembled.
Patents and Registered Designs apply to this product.
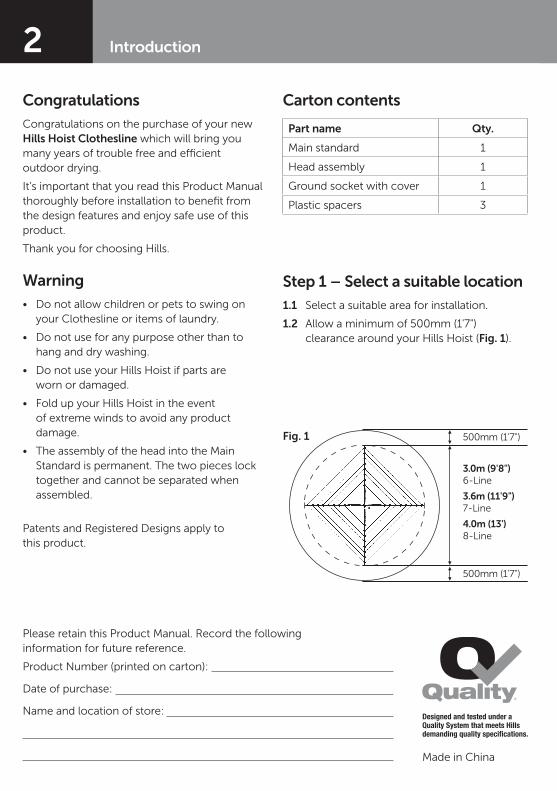
Carton contents
Part name Qty.
Main standard 1
Head assembly 1
Ground socket with cover 1
Plastic spacers 3
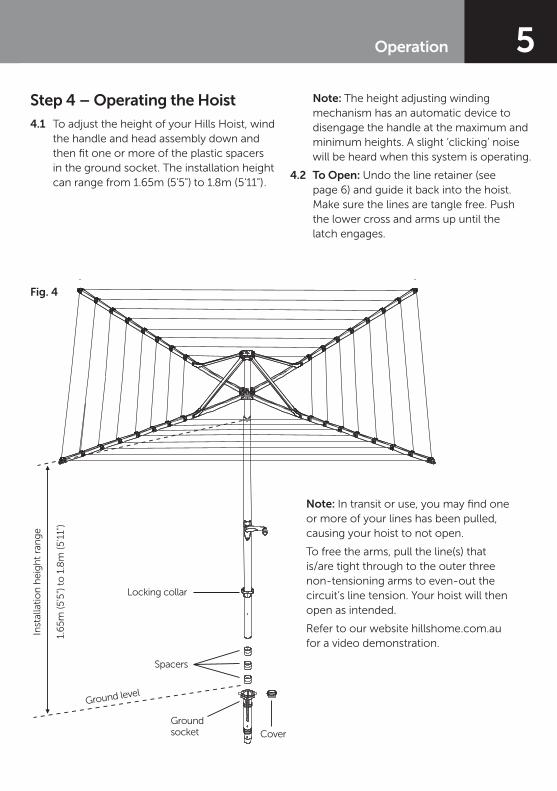
Step 1 – Select a suitable location1.1 Select a suitable area for installation.
1.2 Allow a minimum of 500mm (1'7") clearance around your Hills Hoist (Fig. 1).
Please retain this Product Manual. Record the following information for future reference.
Product Number (printed on carton):
Date of purchase:
Name and location of store:
Made in China
Fig. 1 500mm (1'7")
3.0m (9'8") 6-Line
3.6m (11'9") 7-Line
4.0m (13') 8-Line
500mm (1'7")
3Installation
Fig. 2
Check for level
Main standard
Locking collar
Engage into ground socket. Rotate to lock.
Close tabs to prevent entry of concrete
Top of socket approximately 6-12mm (1/4" - 1/2") above ground level
Ground socket
250mm (10")
650
mm
(26
")
450
mm
(18
")
con
cret
e20
0m
m (8
")
gra
vel
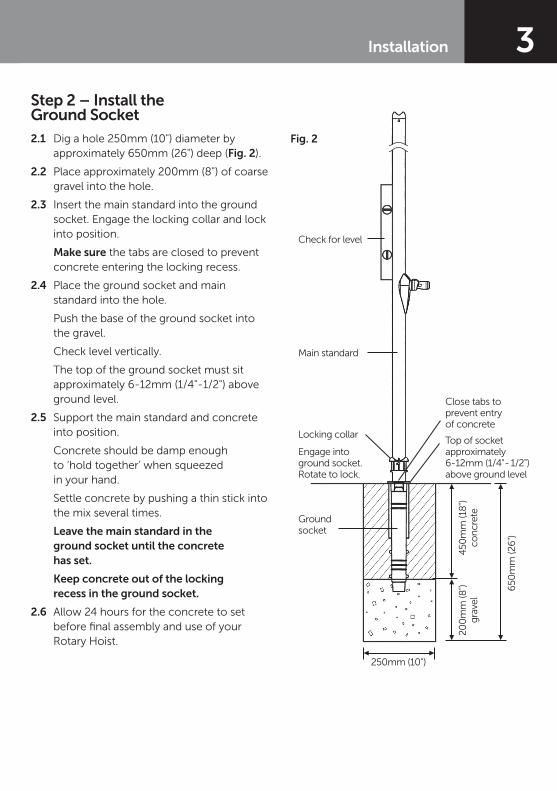
Step 2 – Install the Ground Socket2.1 Dig a hole 250mm (10") diameter by
approximately 650mm (26") deep (Fig. 2).
2.2 Place approximately 200mm (8") of coarse gravel into the hole.
2.3 Insert the main standard into the ground socket. Engage the locking collar and lock into position.
Make sure the tabs are closed to prevent concrete entering the locking recess.
2.4 Place the ground socket and main standard into the hole.
Push the base of the ground socket into the gravel.
Check level vertically.
The top of the ground socket must sit approximately 6-12mm (1/4"-1/2") above ground level.
2.5 Support the main standard and concrete into position.
Concrete should be damp enough to ‘hold together’ when squeezed in your hand.
Settle concrete by pushing a thin stick into the mix several times.
Leave the main standard in the ground socket until the concrete has set.
Keep concrete out of the locking recess in the ground socket.
2.6 Allow 24 hours for the concrete to set before final assembly and use of your Rotary Hoist.

4
Step 3 – Assemble the Hoist3.1 Place the main standard in the ground
socket.
3.2 Place the bottom of the head assembly into the top of the main standard and lower it gently until it stops (Fig. 3).
3.3 To engage, raise the head assembly by approximately 100mm (4") and lower until a ‘click’ is heard.
3.4 Check the head assembly is locked in position by lifting upwards (it should not move). If the head assembly is not engaged, repeat Step 3.3.
Note: There is a small amount of rotational movement between the wind brake and the lower cross latch. This is normal.
Note: Once the head is engaged into the main standard it cannot be removed.
Installation
Fig. 3
Head assembly
Lower cross Latch
Ground level
Insert head assembly
Engage by raising and lowering head until a ‘click’ is heard
Wind brake
Main standard
6 Operation
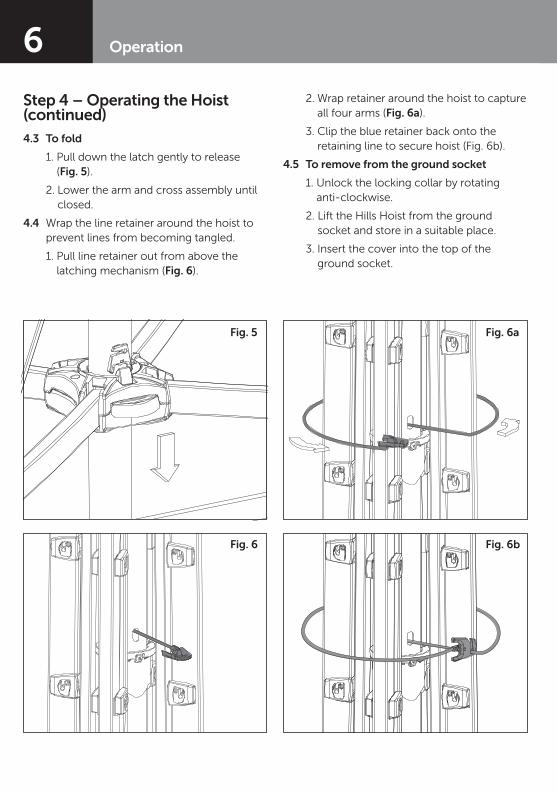
Step 4 – Operating the Hoist (continued)4.3 To fold
1. Pull down the latch gently to release (Fig. 5).
2. Lower the arm and cross assembly until closed.
4.4 Wrap the line retainer around the hoist to prevent lines from becoming tangled.
1. Pull line retainer out from above the latching mechanism (Fig. 6).
2. Wrap retainer around the hoist to capture all four arms (Fig. 6a).
3. Clip the blue retainer back onto the retaining line to secure hoist (Fig. 6b).
4.5 To remove from the ground socket
1. Unlock the locking collar by rotating anti-clockwise.
2. Lift the Hills Hoist from the ground socket and store in a suitable place.
3. Insert the cover into the top of the ground socket.
Fig. 5
Fig. 6
Fig. 6a
Fig. 6b
8 Line Tensioning
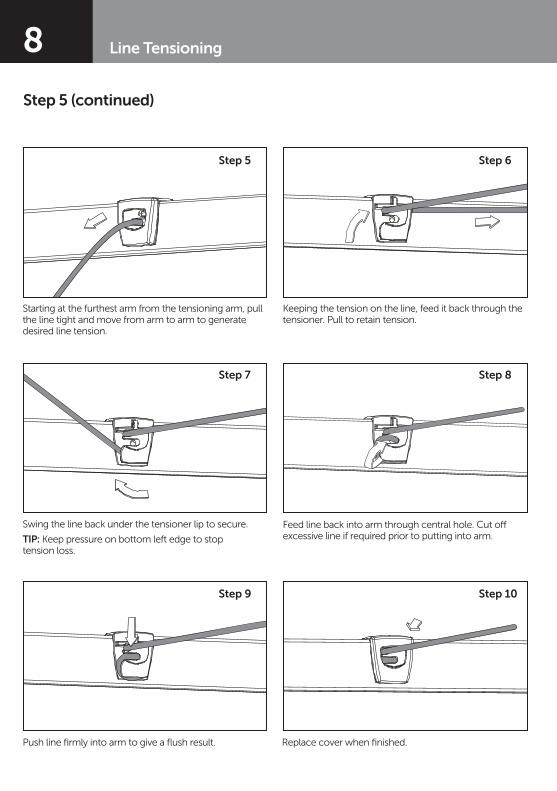
Step 5 (continued)
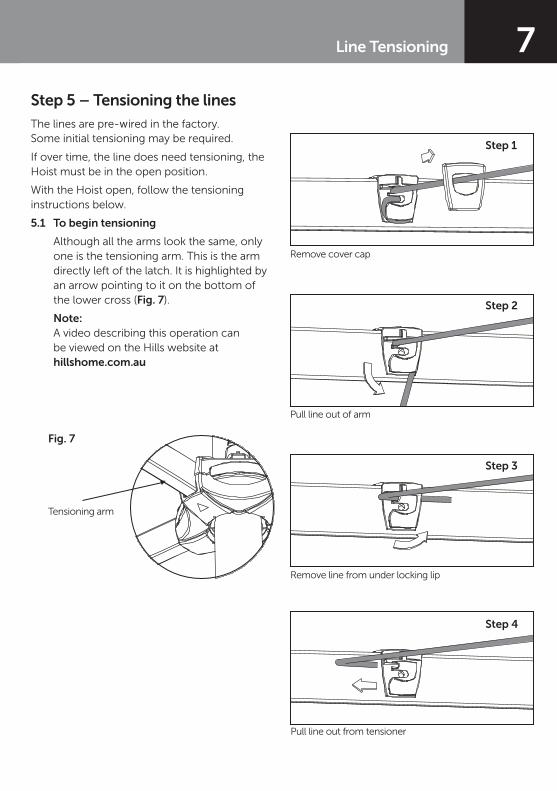
Starting at the furthest arm from the tensioning arm, pull the line tight and move from arm to arm to generate desired line tension.
Swing the line back under the tensioner lip to secure.
TIP: Keep pressure on bottom left edge to stop tension loss.
Push line firmly into arm to give a flush result. Replace cover when finished.
excessive line if required prior to putting into arm.
Keeping the tension on the line, feed it back through the tensioner. Pull to retain tension.
Step 5
Step 7
Step 9
Step 6
Step 8
Step 10
9Handy Hints
Hills handy hintsOne of the benefits of a Hills Hoist is that it spins naturally in the breeze, allowing the sun to shine on all your clothes and speed up the drying time.
Raise your hoist for maximum drying e�ciency and to ensure clearance for longer items.
The wind brake assists in the pegging and unpegging of clothes on windy days by restricting the free rotation of the Clothesline. It can be engaged by winding the ‘head’ of the hoist fully down.
Place smaller items of clothing on the lines nearest the centre and work your way outwards for larger items.
When hanging thick or bulky items, you may hang the item over more than one line.
When you do not expect to fill the capacity of your hoist, hang your clothes on the outer lines.
This will allow your Clothesline to spin more easily.
Care and maintenanceIt is a good idea to occasionally inspect all components and check for wear and tear or damage. If there is any damage, parts should be replaced with original Hills’ spares or the Hoist repaired before using again.
The hoist should be periodically wiped clean with a damp cloth and mild detergent.
To maintain appearance and durability of coating on metal components, we recommend a twice-yearly application of a reputable brand of car polish or wax.
Your Hills Hoist can be easily folded and removed from the ground socket to give you extra garden space.
The hoist should be easy to remove from the ground, but if left for a period of many years it may become more di�cult. It is recommended the hoist is lifted out of the ground at least every six months.

AMES Australasia Pty Ltd warrants to the purchaser
AMES Australasia Pty Ltd will, at its option, either:
AMES Australasia Pty Ltd.
AMES Australasia Pty Ltd under
AMES Australasia Pty Ltd(or its
AMES Australasia Pty Ltd
AMES Australasia Pty Ltd will comply with

11
Hills Contacts We are committed to providing you with complete customer satisfaction. If you have any questions or comments about our products or services please contact your nearest Customer Service Centre during their local business hours:
Australia 1300 300 564
New Zealand 0800 021 027
Hills Websites
hillshome.com.au Hills Home Living
hillshome.com.au/need-help/ Hills Consumer Advice
Contact Details

12
AMES Australasia Pty Ltd A.B.N. 89 169 427 061 Issue April 2019 HD10700f
![[XLS] · Web viewHOIST HOIST EQUIPMENT ACTUATOR, MLG HOIST HOIST EQUIPMENT - ACTUATOR, MLG HOIST HOIST - CARDAN PIN HOIST HOIST-CARDAN PIN HOIST HOIST-DEVICE,FLAP TRACK 2-5 HOIST](https://img.pdfslide.net/doc/110x75/5b1fa5177f8b9aa64c8b4800/xls-web-viewhoist-hoist-equipment-actuator-mlg-hoist-hoist-equipment-actuator.jpg)