Embed Size (px)
Citation preview
Hints and tips
Welcome to SurveyHub.
Let’s get started.
Step 1: Logging in
Following the link https://esurv.surveyhublive.net/Web/Account/Login
using Google Chrome and enter your email address and password
When you first log in, your password will be, $urveyHub1. If you don’t have Google Chrome installed on your PC or laptop, please contact the IT service desk on 01536 534000 or by raising a ticket through the Web Helpdesk portal.
Step 2: Changing your Password
Once you’ve successfully logged into SurveyHub, you will need to change your password. To do this:
Locate the drop down arrow in the top right.
Click ‘Reset Password’
The system will then ask you to create a new password.
Step 3: Reviewing your Permissions
Once you’ve completed steps 1 and 2, you’re ready to use SurveyHub.
If, based on your training, you notice that you haven’t been set up with the correct permissions, please e-mail [email protected] with details.
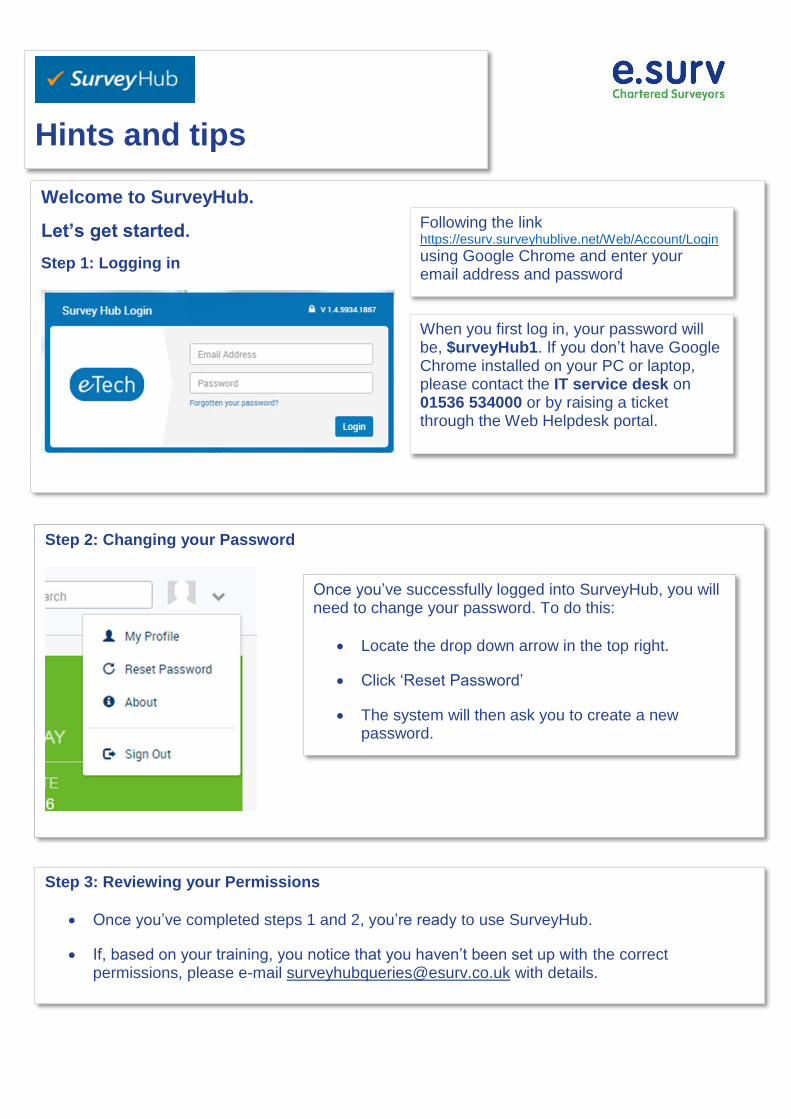
Help and Support
The FAQ section of the Pole Star website at http://askpolestar.esurv.info/ has been refreshed and updated to reflect frequently asked questions.
However, if you can’t find the answer you’re looking for in the FAQs, your first point of contact should be your Pole Star Champion.
Team Champion
Booking Sarah Jack
Booking Jodie Beeby
Booking Linda Richards
Booking Leann Dunham
B2C Shasna Begum
B2C Rose Poulter
Client Services Stacey Eady
Client Services Sharon Bates
Client Services Vikki Armit
PVTQ Laura Cave
PVTQ Karen Cook
PVQ Ellen Daniels
WACM Rebecca Thornton
Don’t forget to review your training notes and the detailed User Guide
If you are experiencing issues with your PC, please contact the IT Service Desk And finally, if you have a question that can’t be answered through any of the above channels, please contact the project team via email to [email protected]. Questions will be collated and answers will be published in the online FAQ at http://askpolestar.esurv.info/
New terminology
Instruction
source
Lender/other survey
instructor
Job Case/instruction e.g.
MV, HBR, Drive-by etc.
Client Anyone who sends us
work: Lender or panel
manager
Agreement Contract with lender,
determining product,
pricing and SLA
Firms Receives jobs. Includes
e.surv (internal) and
panel firms (external)
Allocation Selects firms for job
based on quotation,
coverage, product etc.
Resource e.surv surveyors
(including zero hours
and contractors)
Assignment Select surveyor by
capability, coverage,
capacity etc.
Exception Replaces a delay code.
Used to record a
reason for a delay
Product The type of survey
(MV, HBR, Drive by
etc.)
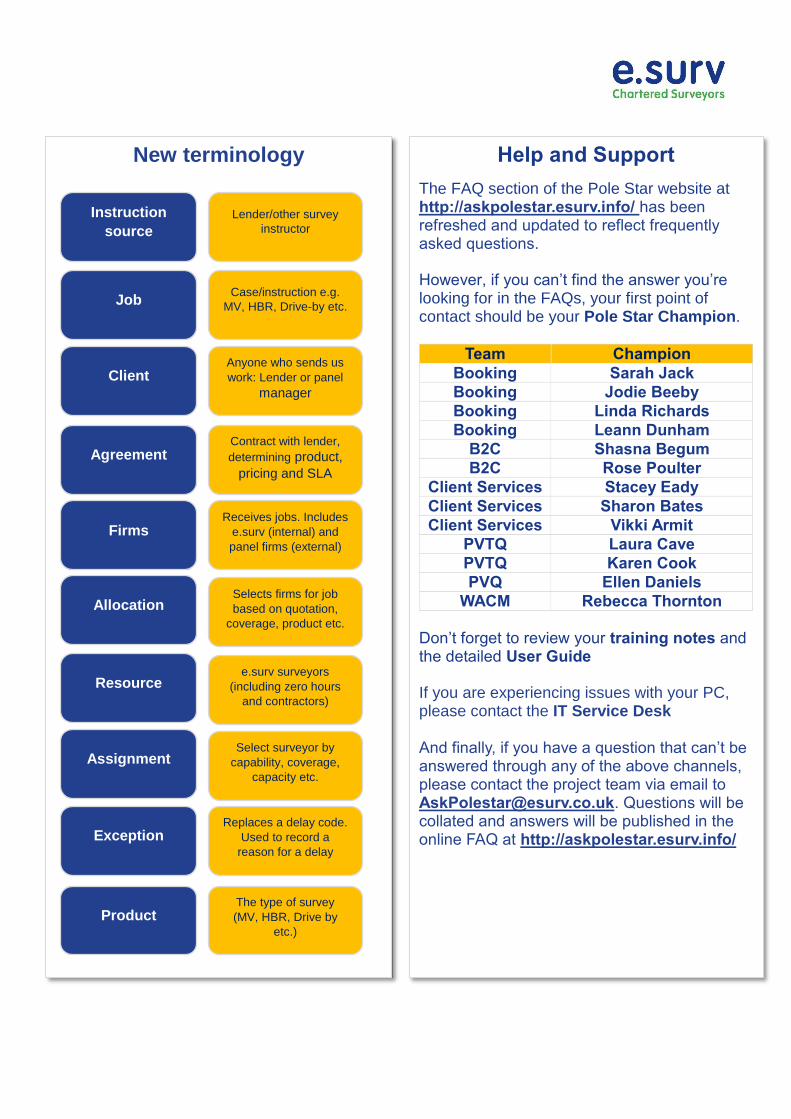
Top tips
Using SurveyHub to review jobs
The Job List is similar to Tram Lines. It’s a reference of all jobs received and their current status – whether they’re being managed internally or panelled externally
You can sort the data - e.g. by External Reference, Product, Status - and you can use the filter function to find a booking e.g. by postcode or reference
The Appointment Management screen is a ‘one stop shop’ for appointments. You’ll be assigned as Case Manager to your surveyors in order to see the jobs in their list
All surveyors that you case manage are shown on the Diary screen. The screen lists between three and seven days (this can be changed) of your surveyor’s diaries for booking am/pm/day slots or a specific time slot
Assignment of surveyors is only used for internal e.surv jobs. A list of rules is applied allowing you to see which surveyors are able to do the job: - Is the Resource active? e.g. holiday, sickness - Are they qualified to survey for this product? - Do they cover this postcode? - Do they have capacity? Points used, points available. - Are they eligible for this Lender / Agreement?
The Assigned Surveyor for a job is shown in green. Other surveyors who meet the business rules will also be displayed. On Hold surveyors are shown with grey striped blocks for the duration of the hold period
Manual assignment can be used where required, or to override an auto assigned surveyor (restricted by user role)
Different survey products appear in different colours in the diary
The Map feature allows you to view the location of the property, the home location of the assigned surveyor and the location of other local surveyors
The Correspondence function allows you to send SMS and emails. Manual SMS messages can be sent and emails can be sent from a ‘no reply’ central mailbox.
Incoming contact relating to the job will be recorded, with details held in the Notes screen of the job for future reference.
Top tips
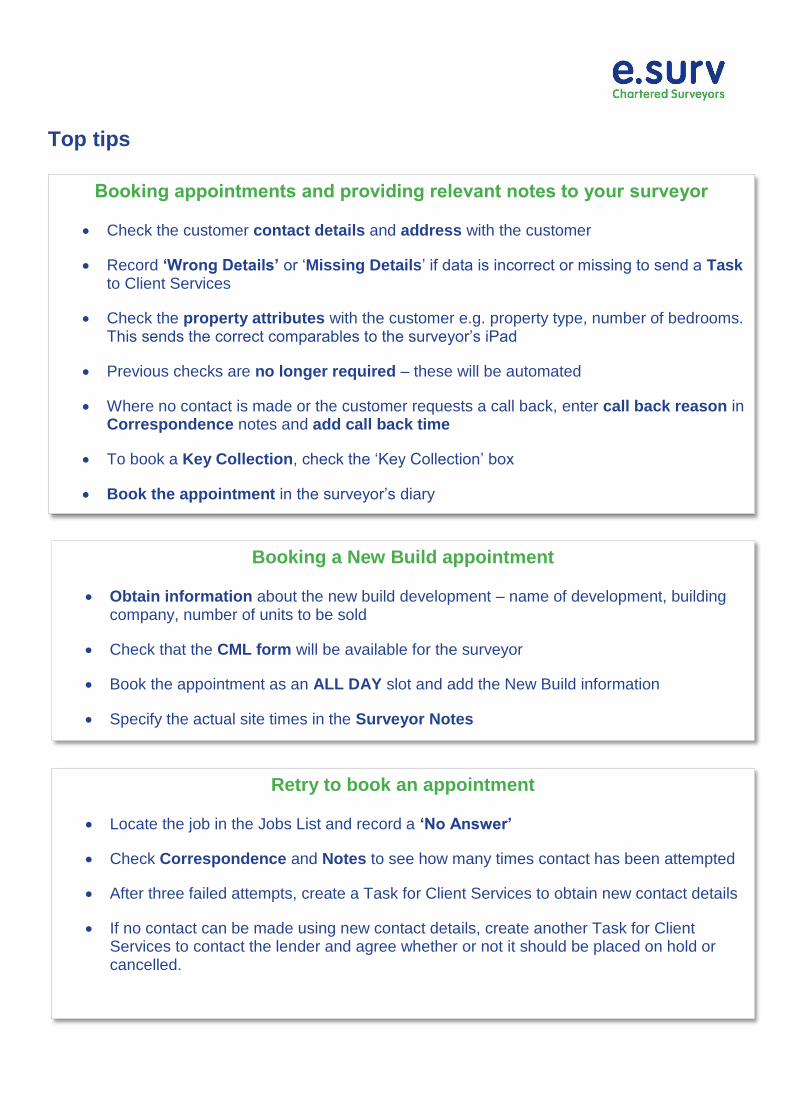
Booking appointments and providing relevant notes to your surveyor
Check the customer contact details and address with the customer
Record ‘Wrong Details’ or ‘Missing Details’ if data is incorrect or missing to send a Task to Client Services
Check the property attributes with the customer e.g. property type, number of bedrooms. This sends the correct comparables to the surveyor’s iPad
Previous checks are no longer required – these will be automated
Where no contact is made or the customer requests a call back, enter call back reason in Correspondence notes and add call back time
To book a Key Collection, check the ‘Key Collection’ box
Book the appointment in the surveyor’s diary
Booking a New Build appointment
Obtain information about the new build development – name of development, building company, number of units to be sold
Check that the CML form will be available for the surveyor
Book the appointment as an ALL DAY slot and add the New Build information
Specify the actual site times in the Surveyor Notes
Retry to book an appointment
Locate the job in the Jobs List and record a ‘No Answer’
Check Correspondence and Notes to see how many times contact has been attempted
After three failed attempts, create a Task for Client Services to obtain new contact details
If no contact can be made using new contact details, create another Task for Client Services to contact the lender and agree whether or not it should be placed on hold or cancelled.
Top tips
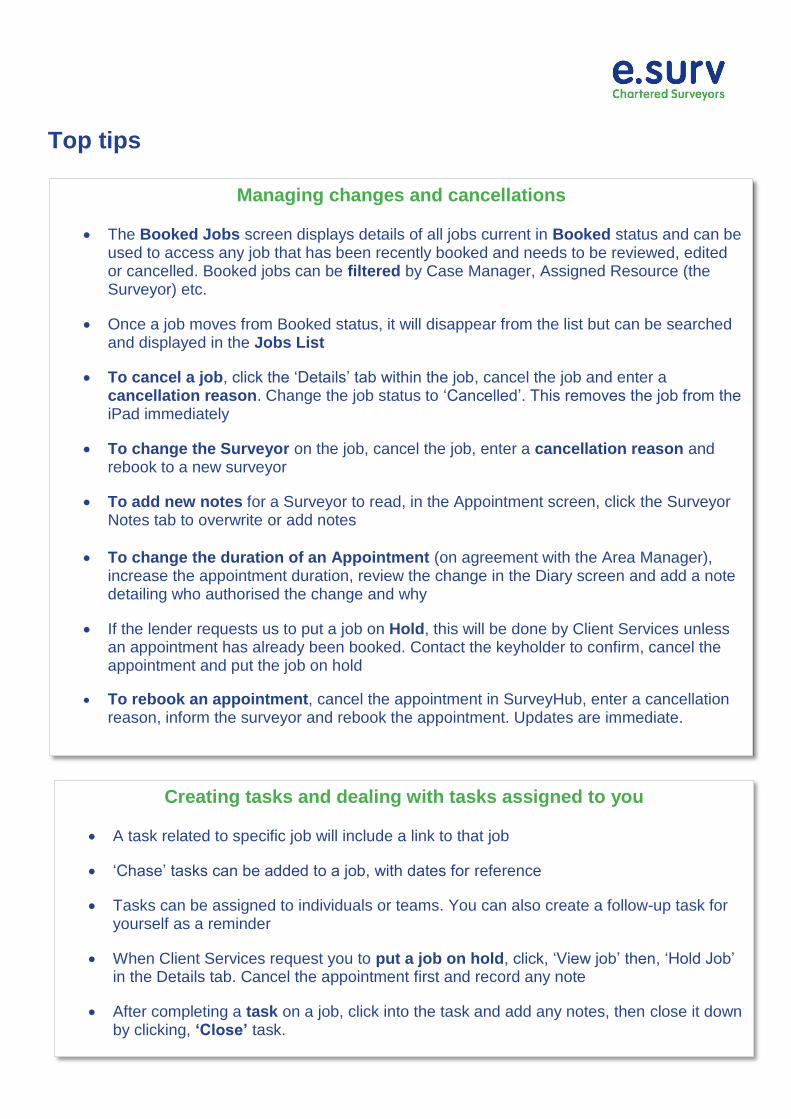
Creating tasks and dealing with tasks assigned to you
A task related to specific job will include a link to that job
‘Chase’ tasks can be added to a job, with dates for reference
Tasks can be assigned to individuals or teams. You can also create a follow-up task for yourself as a reminder
When Client Services request you to put a job on hold, click, ‘View job’ then, ‘Hold Job’ in the Details tab. Cancel the appointment first and record any note
After completing a task on a job, click into the task and add any notes, then close it down by clicking, ‘Close’ task.
Managing changes and cancellations
The Booked Jobs screen displays details of all jobs current in Booked status and can be used to access any job that has been recently booked and needs to be reviewed, edited or cancelled. Booked jobs can be filtered by Case Manager, Assigned Resource (the Surveyor) etc.
Once a job moves from Booked status, it will disappear from the list but can be searched and displayed in the Jobs List
To cancel a job, click the ‘Details’ tab within the job, cancel the job and enter a cancellation reason. Change the job status to ‘Cancelled’. This removes the job from the iPad immediately
To change the Surveyor on the job, cancel the job, enter a cancellation reason and rebook to a new surveyor
To add new notes for a Surveyor to read, in the Appointment screen, click the Surveyor Notes tab to overwrite or add notes
To change the duration of an Appointment (on agreement with the Area Manager), increase the appointment duration, review the change in the Diary screen and add a note detailing who authorised the change and why
If the lender requests us to put a job on Hold, this will be done by Client Services unless an appointment has already been booked. Contact the keyholder to confirm, cancel the appointment and put the job on hold
To rebook an appointment, cancel the appointment in SurveyHub, enter a cancellation reason, inform the surveyor and rebook the appointment. Updates are immediate.