Embed Size (px)
Citation preview

Health Insurance Oversight System
Portal User Manual
Version 32.00.00
December 2019
HIOS Portal User Manual v 32.00.00
HIOS Portal User Manual – Last Updated December 2019 Page 1
Table of Contents
Table of Contents .......................................................................................................................................... 1
Table of Figures ............................................................................................................................................. 3
Table of Tables .............................................................................................................................................. 7
Portal User Manual Change History .............................................................................................................. 8
1 Introduction ........................................................................................................................................ 9
1.1 Pre-requisites and Information for HIOS System Access .............................................................. 9
2 HIOS System Access .......................................................................................................................... 10
2.1 New User Registration ................................................................................................................ 10
2.2 Existing HIOS Users ..................................................................................................................... 18
3 HIOS Portal Home Page ..................................................................................................................... 21
3.1 Manage Account ......................................................................................................................... 21
3.2 Manage Organizations ................................................................................................................ 24
3.2.1 My Organizations ................................................................................................................. 25
3.2.1.1 Organization Details ................................................................................................... 27
3.2.1.2 Issuer Information ...................................................................................................... 30
3.2.1.2.1 Issuer Details .................................................................................................... 31
3.2.1.2.2 Issuer Users....................................................................................................... 34
3.2.1.3 Organization Users ..................................................................................................... 35
3.2.1.3.1 Organization Users – User Role Removal ......................................................... 36
3.2.1.4 Manage Relationships ................................................................................................ 40
3.3 Creating an Organization ............................................................................................................ 43
3.3.1 Company .............................................................................................................................. 45
3.3.2 Non Insurance Company ...................................................................................................... 48
3.3.3 Non-Federal Governmental Health Plans ............................................................................ 51
3.3.4 Other Organization Type ...................................................................................................... 54
3.4 Add an Issuer .............................................................................................................................. 62
3.5 Data Change Request ................................................................................................................. 66
3.5.1 Company Administrator – Data Changes ............................................................................. 72
3.5.1.1 Create Data Change Requests .................................................................................... 72
3.5.1.2 View Data Change Requests ....................................................................................... 75
3.5.2 Issuer Administrator – Data Changes ................................................................................... 76
3.5.2.1 Create Data Change Requests .................................................................................... 76
3.5.2.2 View Data Change Requests ....................................................................................... 78

HIOS Portal User Manual v 32.00.00
HIOS Portal User Manual – Last Updated December 2019 Page 2
3.5.3 Organization Administrator – Data Changes ....................................................................... 80
3.5.3.1 Create Data Change Requests .................................................................................... 80
3.5.3.2 View Data Change Requests ....................................................................................... 83
3.6 Add a Relationship ...................................................................................................................... 84
3.7 Organization Search .................................................................................................................... 89
3.7.1 Company/Organization Administrator view ........................................................................ 90
3.7.2 All HIOS users view ............................................................................................................... 91
3.8 Role Management ...................................................................................................................... 93
3.8.1 Manage Roles Page .............................................................................................................. 94
3.8.2 Requesting a Role ................................................................................................................. 97
3.9 Approvals .................................................................................................................................. 100
3.10 Knowledge Center .................................................................................................................... 104
3.10.1 Overview Page.................................................................................................................... 104
3.10.2 Browse by Module Page..................................................................................................... 105
3.10.3 Glossary Page ..................................................................................................................... 106
4 Trouble Shooting and FAQ .............................................................................................................. 108
4.1 FAQs .......................................................................................................................................... 108
4.2 Support ..................................................................................................................................... 108

HIOS Portal User Manual v 32.00.00
HIOS Portal User Manual – Last Updated December 2019 Page 3
Table of Figures
Figure 1: CMS Enterprise Portal Main Screen ............................................................................................. 10
Figure 2: Choose Your Application Page ..................................................................................................... 11
Figure 3: Register Your Information Page ................................................................................................... 11
Figure 4: Create User ID, Password & Challenge Questions Page .............................................................. 12
Figure 5: Registration Summary Page ......................................................................................................... 12
Figure 6: CMS Enterprise Portal - Login ...................................................................................................... 13
Figure 7: My Portal Page – Request/Add Apps ........................................................................................... 13
Figure 8: Access Catalog Page ..................................................................................................................... 14
Figure 9: Request New System Access Page ............................................................................................... 15
Figure 10: Identity Verification Screen ....................................................................................................... 15
Figure 11: Terms and Conditions Page ....................................................................................................... 16
Figure 12: Complete Step Up Page ............................................................................................................. 16
Figure 13: Multi-Factor Authentication Information Page ......................................................................... 16
Figure 14: Register Your Phone, Computer, or E-mail Page ....................................................................... 17
Figure 15: Successful Completion Page ...................................................................................................... 18
Figure 16: View and Manage My Access Page ............................................................................................ 18
Figure 17: CMS Enterprise Portal Page - Login with EIDM Credentials ...................................................... 19
Figure 18: My Portal Page ........................................................................................................................... 19
Figure 19: Access HIOS, Plan Management Landing Page .......................................................................... 20
Figure 20: HIOS Portal Home Page.............................................................................................................. 21
Figure 21: HIOS Home Page – Manage Account Link.................................................................................. 22
Figure 22: Manage Account Page ............................................................................................................... 23
Figure 23: HIOS Portal Home Page – Manage Organizations ..................................................................... 24
Figure 24: Manage Organizations Landing Page ......................................................................................... 25
Figure 25: My Organizations Page for User with Administrator Role ......................................................... 26
Figure 26: My Organizations Page for User without Administrator Role ................................................... 27
Figure 27: Organization Details ................................................................................................................... 28
Figure 28: Organization Details – TPA Information .................................................................................... 29
Figure 29: Organization Details Page - View ............................................................................................... 30
Figure 30: Issuer Information Page ............................................................................................................. 31
Figure 31: Issuer Details Page ..................................................................................................................... 32
Figure 32: Issuer Details Page - View .......................................................................................................... 33
Figure 33: Issuer Users ................................................................................................................................ 34

HIOS Portal User Manual v 32.00.00
HIOS Portal User Manual – Last Updated December 2019 Page 4
Figure 34: Organization Users ..................................................................................................................... 35
Figure 35: Organization Users with View Details button ............................................................................ 37
Figure 36: View User Details page .............................................................................................................. 38
Figure 37: View User Details - Confirmation Pop-up .................................................................................. 39
Figure 38: Organization Users - Confirmation message after removal is complete ................................... 40
Figure 39: Manage Relationships Page ....................................................................................................... 41
Figure 40: View Relationship Details Page – Approve/Deny ...................................................................... 42
Figure 41: Approve Relationship Confirmation .......................................................................................... 42
Figure 42: View Relationship Details .......................................................................................................... 43
Figure 43: Create an Organization – Step 1 ................................................................................................ 44
Figure 44: Create an Organization – Select Other ...................................................................................... 45
Figure 45: Create an Organization – Company – Step 2 ............................................................................. 46
Figure 46: Create an Organization – Company – Step 3 ............................................................................. 47
Figure 47: Create an Organization – Company – Step 4 ............................................................................. 48
Figure 48: Create an Organization – Non Insurance Company – Step 2 ..................................................... 49
Figure 49: Create an Organization – Non Insurance Company – Step 3 ..................................................... 50
Figure 50: Create an Organization – Non Insurance Company – Step 4 ..................................................... 51
Figure 51: Create an Organization – Non-Federal Governmental Health Plan – Step 2 ............................. 52
Figure 52: Create an Organization – Non-Federal Governmental Health Plan – Step 3 ............................. 53
Figure 53: Create an Organization – Non-Federal Governmental Health Plan – Step 4 ............................. 54
Figure 54: Create an Organization – Other Organization – Step 2 FEIN ..................................................... 55
Figure 55: Create an Organization – Other Organization – Step 2 Name ................................................... 56
Figure 56: Create an Organization – Other Organization – Step 2 Name Results ...................................... 57
Figure 57: Create an Organization – Other Organization – Name Results Error Message ......................... 58
Figure 58: Create an Organization – Other Organization – Organization Name Error Message ................ 59
Figure 59: Create an Organization – Other Organization – Step 3 ............................................................. 61
Figure 60: Create an Organization – Other Organization – Step 4 ............................................................. 62
Figure 61: Add an Issuer – Step 1 ................................................................................................................ 63
Figure 62: Add an Issuer – Step 2 ................................................................................................................ 64
Figure 63: Add an Issuer – Step 3 ................................................................................................................ 65
Figure 64: Add an Issuer – Step 4 ................................................................................................................ 66
Figure 65: Data Change Request – No Administrator Roles ....................................................................... 67
Figure 66: HIOS Portal – Manage Data Changes ......................................................................................... 68
Figure 67: Organization Details Page .......................................................................................................... 69

HIOS Portal User Manual v 32.00.00
HIOS Portal User Manual – Last Updated December 2019 Page 5
Figure 68: Issuer Details Page ..................................................................................................................... 70
Figure 69: Create Data Change Requests .................................................................................................... 72
Figure 70: Company Data Changes – Select the Company ......................................................................... 73
Figure 71: Company Data Changes – Select the Field to Change ............................................................... 73
Figure 72: Company or Non-Insurance to a Non-Federal Governmental Plan – Select Self-Funded or Fully Insured Radio Button ........................................................................................................................ 74
Figure 73: Confirmation Page for Change Request ..................................................................................... 75
Figure 74: Change Request Statuses ........................................................................................................... 75
Figure 75: View a Change Request.............................................................................................................. 76
Figure 76: Issuer Change Request ............................................................................................................... 77
Figure 77: Product Change Request ............................................................................................................ 77
Figure 78: Confirmation Page for Change Request ..................................................................................... 78
Figure 79: Change Request Statuses ........................................................................................................... 79
Figure 80: View Change Request ................................................................................................................ 80
Figure 81: Non-Federal Government Plans to Company ............................................................................ 81
Figure 82: Multiple Organizations ............................................................................................................... 81
Figure 83: Other Organization to a Company ............................................................................................. 82
Figure 84: Confirmation Page for Change Request ..................................................................................... 82
Figure 85: Change Request Statuses ........................................................................................................... 83
Figure 86: View Change Requests ............................................................................................................... 84
Figure 87: Add a Relationship – Step 1 ....................................................................................................... 85
Figure 88: Add a Relationship – Step 2 ....................................................................................................... 86
Figure 89: Add a Relationship – Step 3 ....................................................................................................... 87
Figure 90: Add a Relationship – Step 4 ....................................................................................................... 88
Figure 91: Add a Relationship – Confirmation Message ............................................................................. 89
Figure 92: Organization Search ................................................................................................................... 90
Figure 93: Organization Search Results ...................................................................................................... 90
Figure 94: Organization Search – Organization Details Page for All HIOS Users ........................................ 91
Figure 95: Organization Search - Issuer Information for all HIOS users ..................................................... 92
Figure 96: Organization Search - Issuer Details for all HIOS users .............................................................. 93
Figure 97: HIOS Portal Home Page – Manage Roles ................................................................................... 94
Figure 98: Manage Roles ............................................................................................................................. 95
Figure 100: View Role Details – Pending Role Request .............................................................................. 95
Figure 101: View Role Details – Approved Role Request ............................................................................ 96
Figure 102: Role Cancellation Confirmation ............................................................................................... 96

HIOS Portal User Manual v 32.00.00
HIOS Portal User Manual – Last Updated December 2019 Page 6
Figure 103: Role Deletion Confirmation ..................................................................................................... 96
Figure 104: Ratings/Reports Viewer Role Request ..................................................................................... 98
Figure 105: Organization Not Found – Navigate to Create an Organization .............................................. 99
Figure 106: Existing Association Error Message ......................................................................................... 99
Figure 107: Role Request Confirmation Page ........................................................................................... 100
Figure 108: HIOS Portal Home Page – Manage Approvals ....................................................................... 100
Figure 109: Approval Tabs – Request Status ............................................................................................ 101
Figure 110: User Role Request Approvals ................................................................................................. 102
Figure 111: Organizational User Role Approvals ...................................................................................... 103
Figure 112: User Role Request Approvals Confirmation Page .................................................................. 104
Figure 113: Knowledge Center – Overview Page ...................................................................................... 105
Figure 114: Knowledge Center – Browse by Module Page ....................................................................... 106
Figure 115: Knowledge Center – Browse by Module Expanded Accordion ............................................. 106
Figure 116: Knowledge Center – Glossary ................................................................................................ 107

HIOS Portal User Manual v 32.00.00
HIOS Portal User Manual – Last Updated December 2019 Page 7
Table of Tables
Table 1: Frequently Asked Questions ....................................................................................................... 108

HIOS Portal User Manual v 32.00.00
HIOS Portal User Manual – Last Updated December 2019 Page 8
Portal User Manual Change History
December 2019 Revisions
• Updated screenshots and added text within the document to reflect the minor design updates made throughout the HIOS Portal application.

HIOS Portal User Manual v 32.00.00
HIOS Portal User Manual – Last Updated December 2019 Page 9
1 Introduction
The Center for Consumer Information and Insurance Oversight (CCIIO), a division of the Department of Health and Human Services (HHS), is charged with helping implement many provisions of the Affordable Care Act. The Health Insurance Oversight System (HIOS) is a federal system of record and provides a centralized, multi-user interface for insurance issuers and state/territory regulators to submit, and CCIIO to store information on individual and small group major medical insurance. Information submitted to HIOS is transferred in accordance with CCIIO regulations to provide data updates to Healthcare.gov. The Healthcare.gov website displays this information to provide assistance to consumers in locating health insurance coverage available in the market.
1.1 Pre-requisites and Information for HIOS System Access
These technical instructions explain how the HIOS application works within any compatible Internet browser application such as:
1. Internet Explorer (version 7 or higher)
2. Mozilla Firefox (version 5 or higher)
Prior to accessing HIOS, users will need to obtain their Enterprise Identity Management System (EIDM) credentials. The credentials are obtained by completing registration through the EIDM secure authentication process. Once registered, these credentials will be used to access CMS Enterprise Portal.
CMS Enterprise Portal is used for accessing CMS systems. HIOS is one of the systems that can be accessed through the CMS Portal using EIDM authentication and authorization. Only users who are authenticated with the EIDM procedures will be allowed to access the HIOS system.
Enterprise Identity Management System (EIDM) provides authentication and authorization capabilities and is tightly integrated with the CMS Enterprise Portal. Users must register for an EIDM account and obtain an EIDM User ID and Password to access the CMS Enterprise Portal.
Pre-Requisites for HIOS Access:
• All users will be required to complete the Enterprise Portal registration process, which includes Identity Verification (ID Proofing).
• ID Proofing verifies that the individual referenced in the account is the same person creating the account.
• Additional information collected includes the following Personally Identifiable Information (PII) for purposes of the ID Proofing process: Social Security Number, Date of Birth, Home Address and Primary Phone Number.

HIOS Portal User Manual v 32.00.00
HIOS Portal User Manual – Last Updated December 2019 Page 10
2 HIOS System Access
All EIDM authorized and authenticated users will be able to access the HIOS system by navigating to the CMS Enterprise Portal using the secure URL: https://portal.cms.gov/. Users will be required to enter their credentials obtained by registering through the EIDM system to access HIOS.
This manual provides steps and instructions on how new and existing users can get access to HIOS and use its different functionalities.
Figure 1displays the CMS Enterprise Portal Home page.
Figure 1: CMS Enterprise Portal Main Screen
2.1 New User Registration
New users must complete the following steps to access HIOS.
1. Register for an EIDM account.
2. Request access to HIOS through the CMS Enterprise Portal.
To register for an EIDM account, new users will need to navigate to the CMS Enterprise Portal at http://www.portal.cms.gov to start the registration process. This registration process will require some personally identifiable information (PII) such as (Social Security number, Date of Birth, Home Address, Full name, Phone number, etc.).
Users must select New User Registration at the bottom of the CMS Enterprise Portal Home page, which will take them to the Step #1: Choose Your Application page (refer to Figure 2).

HIOS Portal User Manual v 32.00.00
HIOS Portal User Manual – Last Updated December 2019 Page 11
Figure 2: Choose Your Application Page
Users must select the HIOS application from the drop-down menu and must agree to the terms and conditions by selecting the ‘I agree to the terms and conditions’ checkbox. Once that checkbox is selected, the Next button will be made available.
On the Step #2: Register Your Information page, users must provide their personal information and select Next to continue with the registration process.
Figure 3 displays the Step #2: Register Your Information page:
Figure 3: Register Your Information Page

HIOS Portal User Manual v 32.00.00
HIOS Portal User Manual – Last Updated December 2019 Page 12
Users will then be navigated to the Step #3: Create User ID, Password & Challenge Questions page, where they must enter a user ID, password, and challenge questions and answers. Once that is completed, users must select Next to continue with the registration process.
Figure 4 displays the Step #3: Create User ID, Password & Challenge Questions:
Figure 4: Create User ID, Password & Challenge Questions Page
The user must review the information they have provided on the Registration Summary page. The user should make any necessary changes on this page and select Submit User.
Figure 5 displays the Registration Summary page:
Figure 5: Registration Summary Page

HIOS Portal User Manual v 32.00.00
HIOS Portal User Manual – Last Updated December 2019 Page 13
After completing the registration process, users will also receive an email acknowledging successful registration and the email will include the EIDM user ID.
Once users receive the acknowledgement email that contains their User ID, they will need to request access to the HIOS System by signing into CMS Enterprise Portal.
Figure 6 displays the CMS Enterprise Portal login screen:
Figure 6: CMS Enterprise Portal - Login
On the My Portal page, users must select Request/Add Apps (refer to Figure 7).
Figure 7: My Portal Page – Request/Add Apps
On the Access Catalog page, the user must select Request Access for the HIOS application (refer to Figure 8).
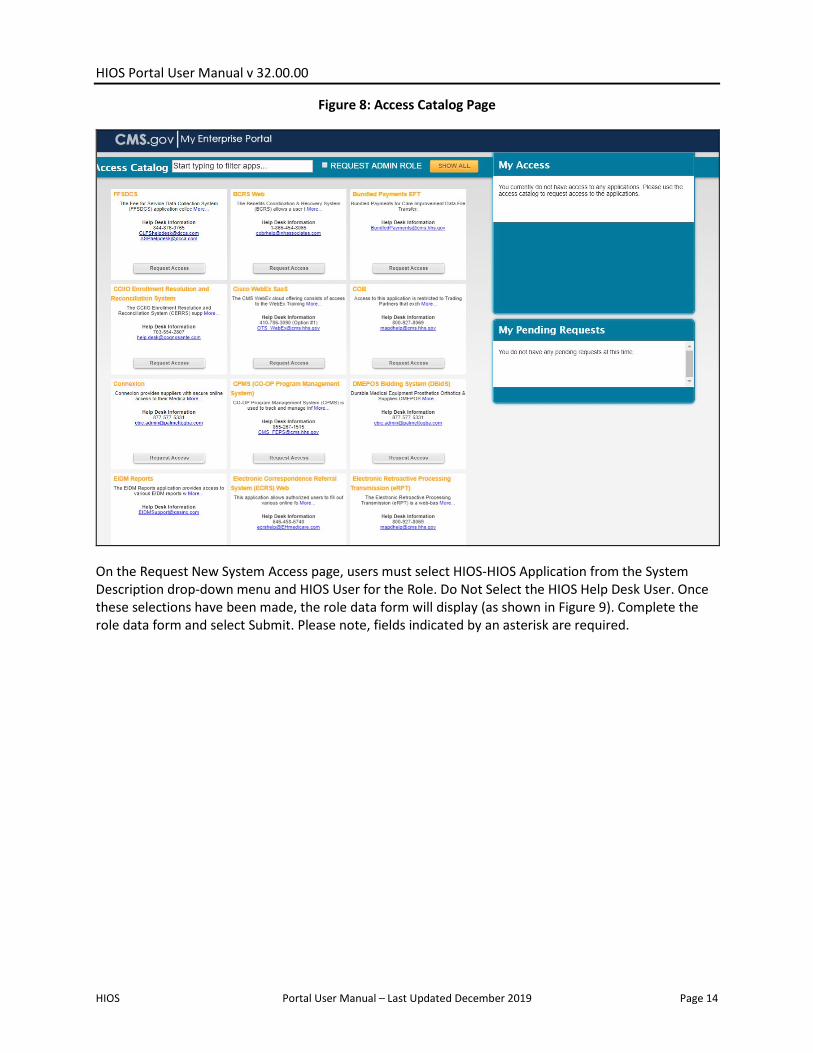
HIOS Portal User Manual v 32.00.00
HIOS Portal User Manual – Last Updated December 2019 Page 14
Figure 8: Access Catalog Page
On the Request New System Access page, users must select HIOS-HIOS Application from the System Description drop-down menu and HIOS User for the Role. Do Not Select the HIOS Help Desk User. Once these selections have been made, the role data form will display (as shown in Figure 9). Complete the role data form and select Submit. Please note, fields indicated by an asterisk are required.

HIOS Portal User Manual v 32.00.00
HIOS Portal User Manual – Last Updated December 2019 Page 15
Figure 9: Request New System Access Page
Once approved, the user will be navigated to the Identity Verification page. The user must review the information on the page and select Next to continue (refer to Figure 10).
Figure 10: Identity Verification Screen
On the Terms and Conditions page, users must select the checkbox “I agree to the terms and conditions” to accept the terms and conditions and select Next to continue.
Figure 11 displays the Terms and Conditions page.

HIOS Portal User Manual v 32.00.00
HIOS Portal User Manual – Last Updated December 2019 Page 16
Figure 11: Terms and Conditions Page
The user must review the information they have entered on the Your Information page, make any necessary updates, and select Next to continue. On the Verify Identity page, the user must answer questions to confirm their identity and select Next to continue. The user should receive the message displayed in Figure 12 once they have completed the Remote Identity Proofing process.
Figure 12: Complete Step Up Page
The user will be navigated to the Multi-Factor Authentication Information page (see Figure 13) and must select Next to continue with the process.
Figure 13: Multi-Factor Authentication Information Page

HIOS Portal User Manual v 32.00.00
HIOS Portal User Manual – Last Updated December 2019 Page 17
Users must associate a security code with their Phone, Computer, or E-mail. Users must select the device they wish to use to log in from the MFA Device Type drop-down menu, a Credential ID, and an MFA Device Description. Once that is complete, the user must select Next to continue.
Figure 14 displays the Register Your Phone, Computer, or E-mail page:
Figure 14: Register Your Phone, Computer, or E-mail Page
The user will receive a message that their device has been successfully registered to their user profile. Once the user selects OK on this page, they will receive a message that their request was successfully completed (refer to Figure 15). The user must select OK again to continue.

HIOS Portal User Manual v 32.00.00
HIOS Portal User Manual – Last Updated December 2019 Page 18
Figure 15: Successful Completion Page
The user will be able to see the HIOS application listed in the Manage Access tab of the View and Manage My Access page (refer to Figure 16).
Figure 16 displays the View and Manage My Access page:
Figure 16: View and Manage My Access Page
2.2 Existing HIOS Users
Existing HIOS Users will follow the steps below to access HIOS once they have completed the EIDM registration process. Users must first log out of the system for their profile updates to take effect. Users will then log back into the Enterprise Portal with their EIDM user ID and password.
Figure 17 displays the CMS Enterprise Portal Page.

HIOS Portal User Manual v 32.00.00
HIOS Portal User Manual – Last Updated December 2019 Page 19
Figure 17: CMS Enterprise Portal Page - Login with EIDM Credentials
After users have logged into the CMS Enterprise Portal, they must select HIOS from the My Portal page and then the Overview link.
Figure 18 displays the My Portal page.
Figure 18: My Portal Page
On the landing page, users must select the Access HIOS or the Access Plan Management & Market Wide Functions link to access the HIOS functionality.
Figure 19 displays the page that will allow the users to access the HIOS Home page. Users will select the ‘Access HIOS’ link to navigate to the HIOS Home page.

HIOS Portal User Manual v 32.00.00
HIOS Portal User Manual – Last Updated December 2019 Page 20
Figure 19: Access HIOS, Plan Management Landing Page

HIOS Portal User Manual v 32.00.00
HIOS Portal User Manual – Last Updated December 2019 Page 21
3 HIOS Portal Home Page
Upon successful login, the users will arrive on the HIOS Portal Home Page as shown in Figure 20.
Figure 20: HIOS Portal Home Page
3.1 Manage Account
Users with a HIOS user account can edit some of the information they entered when they first created a HIOS account. As illustrated in Figure 21 below, the Manage Account functionality can be accessed from the welcome user drop down on the HIOS home page.

HIOS Portal User Manual v 32.00.00
HIOS Portal User Manual – Last Updated December 2019 Page 22
Figure 21: HIOS Home Page – Manage Account Link
Once the users select the link, they will be navigated to the Manage Account page as illustrated below.

HIOS Portal User Manual v 32.00.00
HIOS Portal User Manual – Last Updated December 2019 Page 23
Figure 22: Manage Account Page

HIOS Portal User Manual v 32.00.00
HIOS Portal User Manual – Last Updated December 2019 Page 24
3.2 Manage Organizations
Users can access and view the Manage Organizations landing page from the HIOS Welcome drop-down menu. Please refer to Figure 23 below.
Figure 23: HIOS Portal Home Page – Manage Organizations
On the Manage Organizations landing page, users can view descriptions for and navigate to the following pages: My Organizations, Create an Organization, Add an Issuer, Data Change Request, Add a Relationship, and Organization Search. Users will also be able to see descriptions for the various types of Administrator Roles on the right side of the landing page. Please refer to Figure 24 below.

HIOS Portal User Manual v 32.00.00
HIOS Portal User Manual – Last Updated December 2019 Page 25
Figure 24: Manage Organizations Landing Page
3.2.1 My Organizations
The My Organizations page allows Company, Issuer, and Organization administrator users to view information for the organizations for which they have an administrative role. Each organization that a user has an administrator role for will appear as its own card with specific links on the My Organizations page. There is also a left-hand navigation menu that can take a user back to the Manage Organizations landing page, Create an Organization page, Add an Issuer page, and Data Change Request page. Please refer to Figure 25.
If an organization is an Insurance Company, company administrator users will have access to the Organization Details, Issuer Information, Organization Users, and Manage Relationships pages from the organization card. If a user is only an issuer administrator, they will not see the Organization Users page.

HIOS Portal User Manual v 32.00.00
HIOS Portal User Manual – Last Updated December 2019 Page 26
If an organization is a Non-Insurance Company, company administrator users will have access to the Organization Details, Organization Users, and Manage Relationships pages from the organization card.
If an organization is a Non-Federal Governmental Health Plan or an Other Organization, organization administrator users will have access to the Organization Details and Organization Users pages from the organization card.
Figure 25: My Organizations Page for User with Administrator Role
Organization Details allows users to view and edit some of the organization’s information. If a user is only an issuer administrator user, they will not be able to edit the organization’s information and will only see the information in a read-only format. Issuer Information allows users to view all of the issuers associated to the insurance company. Organization Users allows users to view a list of users who have a role associated to that organization. Manage Relationships allows users to view a list of relationships for the insurance or non-insurance company.
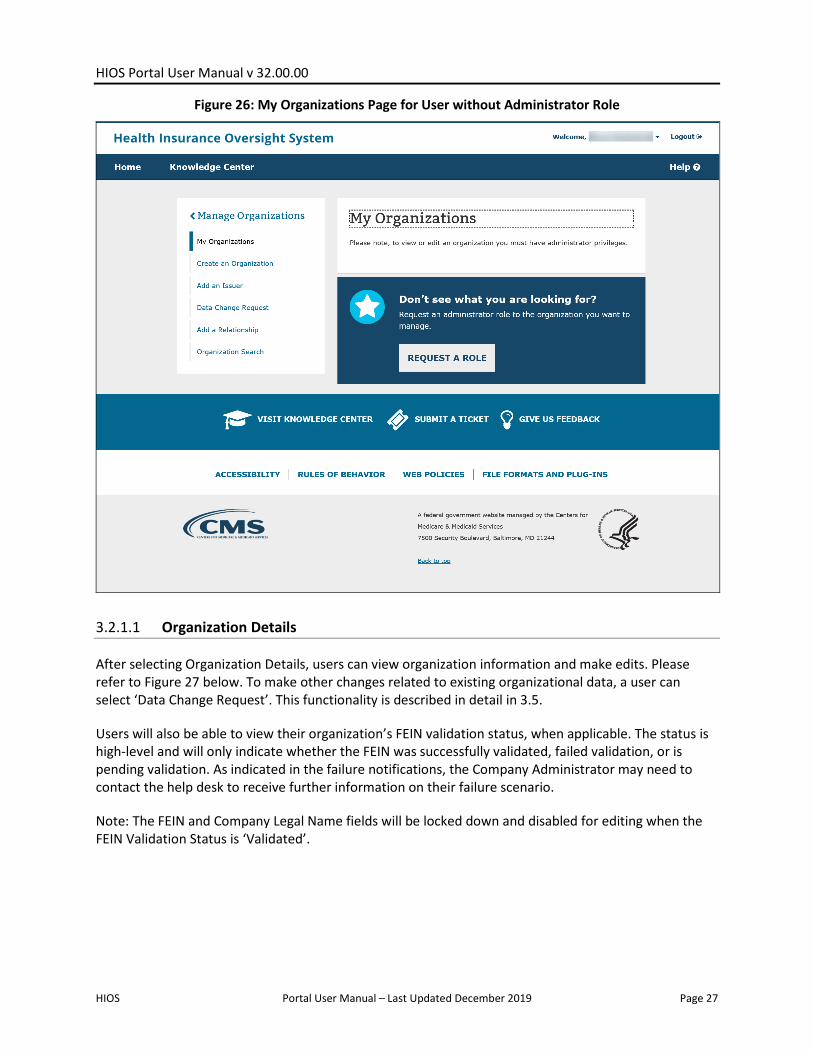
If a user does not have any administrator roles, the My Organizations page will appear with no organization cards. Users can navigate to the Request a Role page to request an administrator role. Please refer to Figure 26 below.
HIOS Portal User Manual v 32.00.00
HIOS Portal User Manual – Last Updated December 2019 Page 27
Figure 26: My Organizations Page for User without Administrator Role
3.2.1.1 Organization Details
After selecting Organization Details, users can view organization information and make edits. Please refer to Figure 27 below. To make other changes related to existing organizational data, a user can select ‘Data Change Request’. This functionality is described in detail in 3.5.
Users will also be able to view their organization’s FEIN validation status, when applicable. The status is high-level and will only indicate whether the FEIN was successfully validated, failed validation, or is pending validation. As indicated in the failure notifications, the Company Administrator may need to contact the help desk to receive further information on their failure scenario.
Note: The FEIN and Company Legal Name fields will be locked down and disabled for editing when the FEIN Validation Status is ‘Validated’.

HIOS Portal User Manual v 32.00.00
HIOS Portal User Manual – Last Updated December 2019 Page 28
Figure 27: Organization Details
For insurance and non-insurance companies, there is an additional set of information collected called Third Party Administrator (TPA) Information. If users select EDGE Server and/or Enrollment as the TPA type, they will be asked to provide additional information for the company. The screenshot below displays the additional information that needs to be provided.

HIOS Portal User Manual v 32.00.00
HIOS Portal User Manual – Last Updated December 2019 Page 29
Figure 28: Organization Details – TPA Information
Once the TPA information has been entered, users can submit their updates.
If a user is only an Issuer Administrator, they will only see a read-only page of the insurance company information after selecting Organization Details. Please refer to Figure 29 below.

HIOS Portal User Manual v 32.00.00
HIOS Portal User Manual – Last Updated December 2019 Page 30
Figure 29: Organization Details Page - View
3.2.1.2 Issuer Information
Users that are either a Company Administrator or an Issuer Administrator can view Issuers associated to the company on the Issuer Information page. Please refer to Figure 30 below. From the table, users also have access to the Issuer Details or the Issuer Users page.

HIOS Portal User Manual v 32.00.00
HIOS Portal User Manual – Last Updated December 2019 Page 31
Figure 30: Issuer Information Page
3.2.1.2.1 Issuer Details
From the Issuer Information page, Company and Issuer administrator users can view Issuer Details and make edits. Fields that are editable on this page are Issuer Marketing Name, Market Type and Line of Business, and Domiciliary Address. Please refer to Figure 31 below. To make other changes related to existing organizational data, a user can select ‘Data Change Request’.
If a user is not an Issuer administrator for the selected issuer, they will only see the information in a read-only page. Please refer to Figure 32 below.

HIOS Portal User Manual v 32.00.00
HIOS Portal User Manual – Last Updated December 2019 Page 32
Figure 31: Issuer Details Page

HIOS Portal User Manual v 32.00.00
HIOS Portal User Manual – Last Updated December 2019 Page 33
Figure 32: Issuer Details Page - View

HIOS Portal User Manual v 32.00.00
HIOS Portal User Manual – Last Updated December 2019 Page 34
3.2.1.2.2 Issuer Users
The Issuer Users page displays a table which lists all users that have a role associated at the issuer level. Users can view or sort by the User Name, Module Name, Role, Job Title, Contact Type, or Approved Date. Only users that have the Company or Issuer administrator role can view the Issuer Users page for their specific issuer. Please refer to Figure 33 below.
Figure 33: Issuer Users

HIOS Portal User Manual v 32.00.00
HIOS Portal User Manual – Last Updated December 2019 Page 35
3.2.1.3 Organization Users
The Organization Users page displays a table which lists all users that have a role associated to that organization. Users can view or sort by the User Name, Module Name, Role Name, Job Title, Contact Type, Requested Approved Date. Only users that have the Company or Organization administrator role can view the Organization Users page for their specific organization. If a user is only an Issuer administrator, then they will not have access to the Organization Users page. Please refer to Figure 34 below.
Figure 34: Organization Users

HIOS Portal User Manual v 32.00.00
HIOS Portal User Manual – Last Updated December 2019 Page 36
3.2.1.3.1 Organization Users – User Role Removal
Users with the Company and Organization Administrator has the ability to remove the user access from HIOS for a specific module and a specific role at the organization level. Please note, for roles not available for deletion on the Organization Users page, users may contact the Help Desk for assistance.
The Company and Organization Administrator can remove the user access for a specific role from the Organization Users page by selecting the ‘View Details’ button and selecting the ‘Remove Role’ button. The user will receive a confirmation message that the role has been deleted and is directed back to the Organization Users page. Once the role is removed, an email is sent out to the user whose role has been removed alerting them of the change. Additionally, once removed, the role will no longer appear on the Organization Users table. Please see Figures 35 – 38.

HIOS Portal User Manual v 32.00.00
HIOS Portal User Manual – Last Updated December 2019 Page 37
Figure 35: Organization Users with View Details button

HIOS Portal User Manual v 32.00.00
HIOS Portal User Manual – Last Updated December 2019 Page 38
Figure 36: View User Details page

HIOS Portal User Manual v 32.00.00
HIOS Portal User Manual – Last Updated December 2019 Page 39
Figure 37: View User Details - Confirmation Pop-up

HIOS Portal User Manual v 32.00.00
HIOS Portal User Manual – Last Updated December 2019 Page 40
Figure 38: Organization Users - Confirmation message after removal is complete
3.2.1.4 Manage Relationships
Users that are either a Company Administrator or an Issuer Administrator can view relationship information associated to the company or issuers on the Manage Relationships page. The relationship information will appear in a sortable table format with the following statuses: Pending, Approval Required, Approved, or Denied. Please refer to Figure 39 below.

HIOS Portal User Manual v 32.00.00
HIOS Portal User Manual – Last Updated December 2019 Page 41
Figure 39: Manage Relationships Page
Users have the option to select View Details from within the table to view additional details for the relationship. If the status of the relationship is Approval Required, users will have the option to Approve or Deny the relationship from the View Relationship Details page. Once Approve or Deny is selected, a pop-up confirmation will appear for users to confirm their action. Please refer to Figure 40 and Figure 41 below.

HIOS Portal User Manual v 32.00.00
HIOS Portal User Manual – Last Updated December 2019 Page 42
Figure 40: View Relationship Details Page – Approve/Deny
Figure 41: Approve Relationship Confirmation

HIOS Portal User Manual v 32.00.00
HIOS Portal User Manual – Last Updated December 2019 Page 43
If a relationship’s effective end date has passed or if a relationship is already in an Approved or Denied status, users will not have access to the Approve/Deny functionality on the View page. Please refer to Figure 42 below.
Figure 42: View Relationship Details
3.3 Creating an Organization
Users can access the Create an Organization functionality from the Manage Organizations landing page. Through the Create an Organization functionality, users can register an organization in HIOS by completing four steps. In Step 1, users must select the organization’s primary function. Users are required to select the type of organization from the available options: Company, Non-Insurance company, Non-federal, and Other Organization. Please refer to Figure 43 below.

HIOS Portal User Manual v 32.00.00
HIOS Portal User Manual – Last Updated December 2019 Page 44
Figure 43: Create an Organization – Step 1
If a user selects ‘Other’, an additional question will prompt the user to indicate if the organization has a Federal Employee Identification Number or Tax Identification Number (FEIN/TIN) or not. Please refer to Figure 44 below. Depending on if a user answers Yes or No, Step 2 will either be to Enter an FEIN or Enter an Organization Name.

HIOS Portal User Manual v 32.00.00
HIOS Portal User Manual – Last Updated December 2019 Page 45
Figure 44: Create an Organization – Select Other
3.3.1 Company
This section will cover the process of creating a new Company organization in HIOS.
In Step 1, users will select that they are an insurance company that is a legal entity licensed to sell health insurance products and plans, which is a Company in HIOS. Step 2 will require users to enter the FEIN/TIN. Please refer to below Figure 45.

HIOS Portal User Manual v 32.00.00
HIOS Portal User Manual – Last Updated December 2019 Page 46
Figure 45: Create an Organization – Company – Step 2
In Step 3, users will need to enter the organization details. For Company organization types, the following fields are required: Organization Legal Name, Incorporated State. They can enter details for the following fields: NAIC Company Code, NAIC Group Code, Group Name, AM Best Number, Not for Profit, Co-op, and Third Party Administrator information. Users are required to enter the following fields for the Domiciliary Address: Address Line 1, City, State, and ZIP. Please refer to Figure 46 below.

HIOS Portal User Manual v 32.00.00
HIOS Portal User Manual – Last Updated December 2019 Page 47
Figure 46: Create an Organization – Company – Step 3

HIOS Portal User Manual v 32.00.00
HIOS Portal User Manual – Last Updated December 2019 Page 48
Users will get a chance to review a high-level summary of their request in Step 4 as shown in Figure 47. Once a user has reviewed the information, they may submit their request for approval. The requesting users will receive an email once the new organization has been approved.
Figure 47: Create an Organization – Company – Step 4
3.3.2 Non Insurance Company
This section will cover the process of creating a new Non Insurance Company organization in HIOS.
In Step 1, users will select that they are a company whose primary business does not include selling licensed health insurance products or plans, which is a Non Insurance Company in HIOS. Step 2 will require users to enter the FEIN/TIN. Please refer to below Figure 48.

HIOS Portal User Manual v 32.00.00
HIOS Portal User Manual – Last Updated December 2019 Page 49
Figure 48: Create an Organization – Non Insurance Company – Step 2
In Step 3, users will need to enter the organization details. For Non Insurance Company organization types, the following fields are required: Organization Legal Name, Incorporated State, and Domiciliary Address. Users can also enter Third Party Administrator information. Please refer to Figure 49 below.

HIOS Portal User Manual v 32.00.00
HIOS Portal User Manual – Last Updated December 2019 Page 50
Figure 49: Create an Organization – Non Insurance Company – Step 3

HIOS Portal User Manual v 32.00.00
HIOS Portal User Manual – Last Updated December 2019 Page 51
Users will get a chance to review a high-level summary of their request in Step 4 as shown in Figure 50. Once a user has reviewed the information, they may submit their request for approval. The requesting users will receive an email once the new organization has been approved.
Figure 50: Create an Organization – Non Insurance Company – Step 4
3.3.3 Non-Federal Governmental Health Plans
This section will cover the process of creating a new Non-Federal Governmental Health Plan organization in HIOS.
In Step 1, users will select that they are a group health plan offered by a Non-Federal Governmental Organization to its non-federal governmental employees, which is a Non-Federal Governmental Health Plan in HIOS. Step 2 will require users to enter the FEIN/TIN. Please refer to below Figure 51.

HIOS Portal User Manual v 32.00.00
HIOS Portal User Manual – Last Updated December 2019 Page 52
Figure 51: Create an Organization – Non-Federal Governmental Health Plan – Step 2
In Step 3, users will need to enter the organization details. For Non-Federal Governmental Health Plan organization types, users will need to enter the Organization Legal Name, select Self Funded and/or Fully Insured as the Non-Fed Plan Type, and enter the Domiciliary Address. Please refer to Figure 52 below.

HIOS Portal User Manual v 32.00.00
HIOS Portal User Manual – Last Updated December 2019 Page 53
Figure 52: Create an Organization – Non-Federal Governmental Health Plan – Step 3
Users will get a chance to review a high-level summary of their request in Step 4 as shown in Figure 53. Once a user has reviewed the information, they may submit their request for approval. The requesting users will receive an email once the new organization has been approved.

HIOS Portal User Manual v 32.00.00
HIOS Portal User Manual – Last Updated December 2019 Page 54
Figure 53: Create an Organization – Non-Federal Governmental Health Plan – Step 4
3.3.4 Other Organization Type
This section will cover the process of creating a new Other Organization Type organization in HIOS.
In Step 1, users will select the option of Other – the above categories do not fit the organization’s primary business, which is an Other Organization type in HIOS. Step 2 will vary depending on if the organization indicates they have an FEIN/TIN. If they do have one, then Step 2 will be to enter the FEIN/TIN. If they do not have one, then Step 2 will be to enter the Organization Name. Please refer to below Figure 54 and Figure 55.

HIOS Portal User Manual v 32.00.00
HIOS Portal User Manual – Last Updated December 2019 Page 55
Figure 54: Create an Organization – Other Organization – Step 2 FEIN

HIOS Portal User Manual v 32.00.00
HIOS Portal User Manual – Last Updated December 2019 Page 56
Figure 55: Create an Organization – Other Organization – Step 2 Name
If a user needs to search by Organization Name, the system will check to confirm that the user’s organization is not already in the system based on resemblance to the name entered and display the results in a table. If the user sees that the listed organizations are not their intended organization, then they can proceed forward. Please refer to Figure 56 below.

HIOS Portal User Manual v 32.00.00
HIOS Portal User Manual – Last Updated December 2019 Page 57
Figure 56: Create an Organization – Other Organization – Step 2 Name Results
HIOS Portal User Manual v 32.00.00
HIOS Portal User Manual – Last Updated December 2019 Page 58
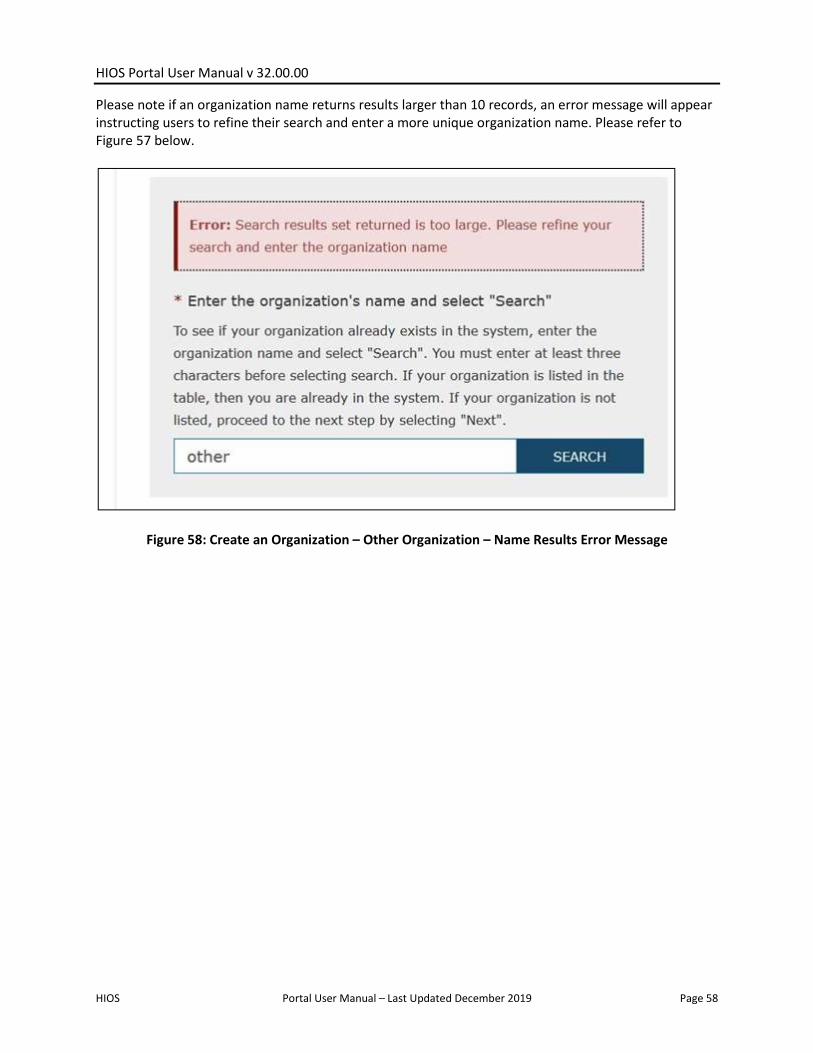
Please note if an organization name returns results larger than 10 records, an error message will appear instructing users to refine their search and enter a more unique organization name. Please refer to Figure 57 below.
Figure 58: Create an Organization – Other Organization – Name Results Error Message

HIOS Portal User Manual v 32.00.00
HIOS Portal User Manual – Last Updated December 2019 Page 59
When creating an Other Organization, in order to successfully check if your organization already exists within Portal, you must enter at least 3 characters within the Search field before selecting the Search button. Please note, if less than 3 characters are entered in the Search field, an error message will display informing users that a minimum of 3 characters are required to be entered in the Search field. Please refer to Figure 59 below.
Figure 60: Create an Organization – Other Organization – Organization Name Error Message
HIOS Portal User Manual v 32.00.00
HIOS Portal User Manual – Last Updated December 2019 Page 60
In Step 3, users will need to enter the organization details. For Other Organization types, users will need to provide the Organization Location (US Address or Non-US address), enter the Organization Legal Name, the FEIN/TIN unless provided in Step 2, select the Address Type (Domiciliary Address or Business Address), and enter the address of the previously selected address type. Please refer to Figure 59 below.

HIOS Portal User Manual v 32.00.00
HIOS Portal User Manual – Last Updated December 2019 Page 61
Figure 61: Create an Organization – Other Organization – Step 3

HIOS Portal User Manual v 32.00.00
HIOS Portal User Manual – Last Updated December 2019 Page 62
Users will get a chance to review a high-level summary of their request in Step 4 as shown in Figure 60. Once a user has reviewed the information, they may submit their request for approval. The requesting users will receive an email once the new organization has been approved.
Figure 62: Create an Organization – Other Organization – Step 4
3.4 Add an Issuer
Users can access the Add an Issuer functionality from the Manage Organizations landing page. Through the Add an Issuer functionality, users can register an issuer under an existing insurance company in HIOS by completing four steps. In Step 1, users must identify the insurance company by searching by the FEIN/TIN. Please refer to Figure 61 below.

HIOS Portal User Manual v 32.00.00
HIOS Portal User Manual – Last Updated December 2019 Page 63
Figure 63: Add an Issuer – Step 1
Users are required to identify the issuer’s registered state as part of Step 2 of the Add an Issuer process as shown in Figure 62 below.

HIOS Portal User Manual v 32.00.00
HIOS Portal User Manual – Last Updated December 2019 Page 64
Figure 64: Add an Issuer – Step 2
In Step 3 users will need to enter the Issuer Details. Users have the option to enter the Issuer Marketing Name. Users are required to enter information on if they offer coverage in the Individual Market, Small Group Market, and/or the Large Group Market by selecting ‘Yes’ or ‘No’. If users select ‘Yes’ to any of the market type coverages, additional fields will display for the lines of business. Users are also required to enter the Domiciliary Address. Once all the required fields are provided, users can proceed to step 4. Please refer to Figure 63 below.

HIOS Portal User Manual v 32.00.00
HIOS Portal User Manual – Last Updated December 2019 Page 65
Figure 65: Add an Issuer – Step 3
Users will view a summary of information that was provided as part of the Add an Issuer process which includes the organization FEIN, organization name, and registered state displayed in Step 4. If the user has selected a non-compliant state or territory (AL, AK, FL, GA, PA, WI, AS, GU, MP, VI), additional text will appear informing users they need to access the ERE module. If the information is deemed correct by the user, they can select ‘Submit’ for the request to be approved. Please refer to Figure 64 below.

HIOS Portal User Manual v 32.00.00
HIOS Portal User Manual – Last Updated December 2019 Page 66
Figure 66: Add an Issuer – Step 4
3.5 Data Change Request
Users can access the Data Change Request functionality from the Manage Organizations landing page. Users who do not have a company, issuer, or organization administrator role will not have access to submit a data change request. Instead, they can navigate to the Request a Role page on a separate Data Change Request page. Please refer to Figure 65 below.

HIOS Portal User Manual v 32.00.00
HIOS Portal User Manual – Last Updated December 2019 Page 67
Figure 67: Data Change Request – No Administrator Roles
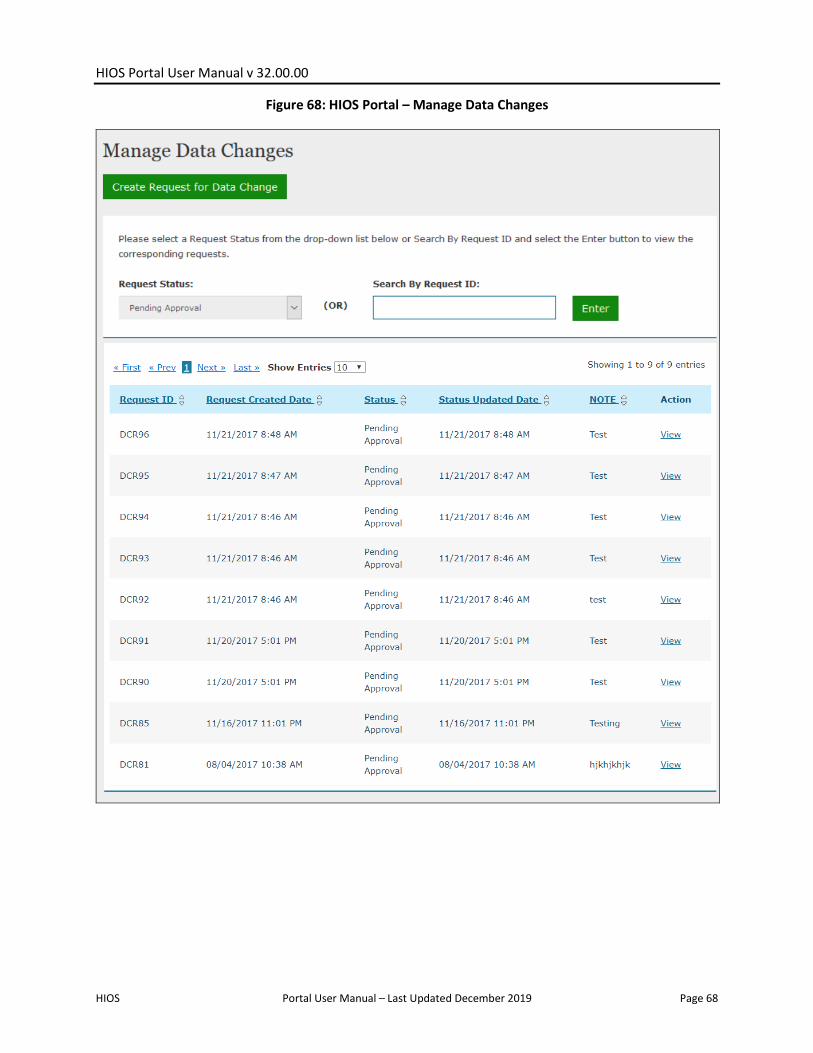
If the user has a company, issuer, or organization administrator role, they will be navigated to the Manage Data Changes tab. Administrator roles may create change requests for editing certain data elements related to Organization, Issuers, Products, etc. along with a reason for the change.
In addition to submitting data change requests, company, issuer, or organization administrators can view the latest status of their data change requests and view previous requests and request statuses.
To create new data change requests, users will select ‘Create Request for Data Change’ on the Manage Data Changes page as illustrated in Figure 66. In addition, ‘Data Change Request’ will also be available on the Organization Details page for Company Administrator, Issuer Administrator, and Organization Administrators. It can be accessed by navigating through the link demonstrated in Figure 67 and Figure 68.
HIOS Portal User Manual v 32.00.00
HIOS Portal User Manual – Last Updated December 2019 Page 68
Figure 68: HIOS Portal – Manage Data Changes

HIOS Portal User Manual v 32.00.00
HIOS Portal User Manual – Last Updated December 2019 Page 69
Figure 69: Organization Details Page

HIOS Portal User Manual v 32.00.00
HIOS Portal User Manual – Last Updated December 2019 Page 70
Figure 70: Issuer Details Page

HIOS Portal User Manual v 32.00.00
HIOS Portal User Manual – Last Updated December 2019 Page 71
HIOS Portal User Manual v 32.00.00
HIOS Portal User Manual – Last Updated December 2019 Page 72
3.5.1 Company Administrator – Data Changes
Company Administrators can create, review, and submit data change requests through the Manage Data Changes tab. Company Administrators can also create new data change requests through the ‘Data Change Request’ link available on the Organization Details page.
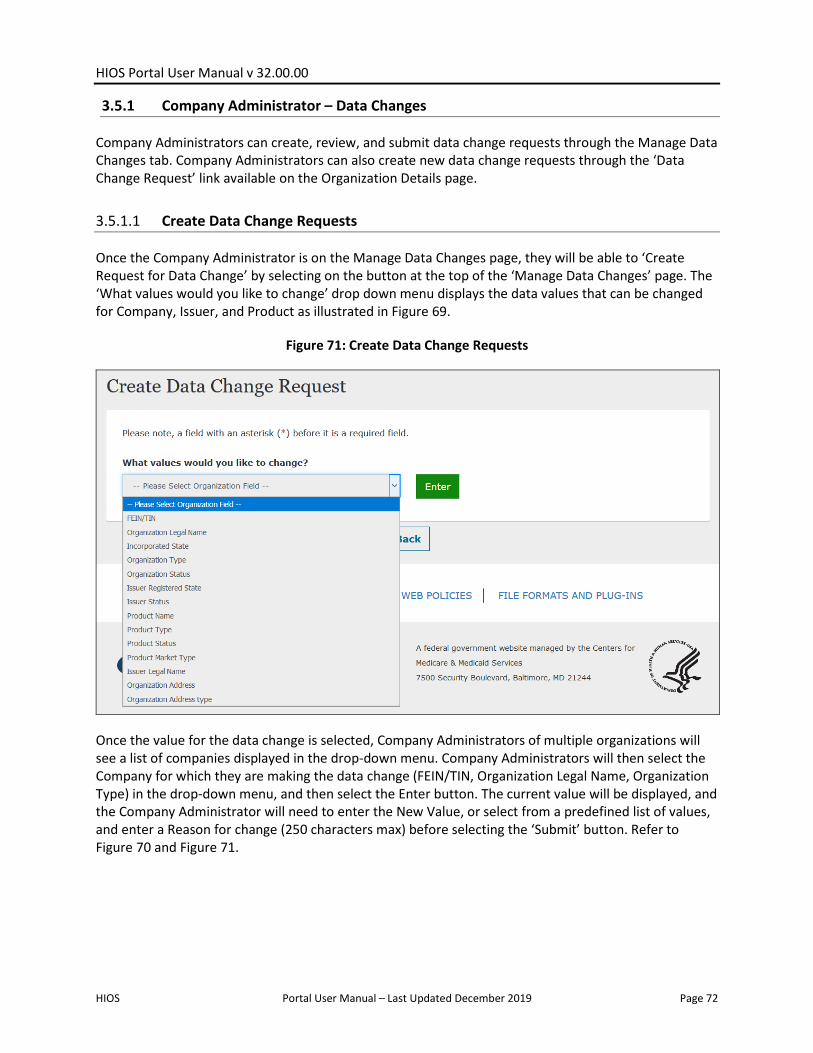
3.5.1.1 Create Data Change Requests
Once the Company Administrator is on the Manage Data Changes page, they will be able to ‘Create Request for Data Change’ by selecting on the button at the top of the ‘Manage Data Changes’ page. The ‘What values would you like to change’ drop down menu displays the data values that can be changed for Company, Issuer, and Product as illustrated in Figure 69.
Figure 71: Create Data Change Requests
Once the value for the data change is selected, Company Administrators of multiple organizations will see a list of companies displayed in the drop-down menu. Company Administrators will then select the Company for which they are making the data change (FEIN/TIN, Organization Legal Name, Organization Type) in the drop-down menu, and then select the Enter button. The current value will be displayed, and the Company Administrator will need to enter the New Value, or select from a predefined list of values, and enter a Reason for change (250 characters max) before selecting the ‘Submit’ button. Refer to Figure 70 and Figure 71.

HIOS Portal User Manual v 32.00.00
HIOS Portal User Manual – Last Updated December 2019 Page 73
Figure 72: Company Data Changes – Select the Company
Figure 73: Company Data Changes – Select the Field to Change
If a change to the Organization Type from Company or Non Insurance to Non-Federal Governmental Plans is needed, then the Company Administrator will need to select the ‘Self-Funded’ or ‘Fully Insured’ radio button before selecting the ‘Submit’ button as illustrated in Figure 72.

HIOS Portal User Manual v 32.00.00
HIOS Portal User Manual – Last Updated December 2019 Page 74
Figure 74: Company or Non-Insurance to a Non-Federal Governmental Plan – Select Self-Funded or Fully Insured Radio Button

HIOS Portal User Manual v 32.00.00
HIOS Portal User Manual – Last Updated December 2019 Page 75
Once the Company Administrator selects the ‘Submit’ button on the Manage Change Request page, a Request ID will be assigned, along with a ‘Pending Approval’ status. An on-screen Confirmation message will display as illustrated in Figure 73.
Figure 75: Confirmation Page for Change Request
3.5.1.2 View Data Change Requests
Company Administrators can view data change requests on the Manage Data Changes page. When the users select the status of the change request from the ‘Request Status’ drop-down menu or enter a valid Request ID in the ‘Request ID field’ and select the ‘Request ID Search’ button, a summary of the change requests and its statuses will be displayed in search results. The following statuses can be filtered as illustrated in Figure 74.
• Pending Approval
• Approved
• Denied
• Unable to Process
• Completed
Figure 76: Change Request Statuses
Company Administrators can select on the ‘View’ link of the Action column as shown in Figure 86 and review the details of the change request as illustrated in Figure 75.

HIOS Portal User Manual v 32.00.00
HIOS Portal User Manual – Last Updated December 2019 Page 76
Figure 77: View a Change Request
3.5.2 Issuer Administrator – Data Changes
Issuer Administrators can create, review, and submit data change requests through the Manage Data Changes tab. Issuer Administrators can also create new change requests through the ‘Data Change Request’ on the Issuer Details page.
3.5.2.1 Create Data Change Requests
Once the Issuer Administrator is on the Manage Data Changes page, they will be able to ‘Create Request for Data Change’ through the button at the bottom of the Manage Data Changes page. The ‘What values would you like to change’ drop-down menu displays the values for the Issuer, and Product. Once the value for the data change is selected, Issuers will be displayed in the ‘Choose the Issuer’ drop-down menu as illustrated in Figure 76.

HIOS Portal User Manual v 32.00.00
HIOS Portal User Manual – Last Updated December 2019 Page 77
Figure 78: Issuer Change Request
If the change value is selected for a Product, then ‘Choose the Issuer’ and ‘Choose the product’ drop-down menus will be displayed for selection as illustrated in Figure 77. Once all the required fields are selected, the current value of the field to be changed will be displayed and the Issuer Administrator will need to enter the New Value, or select from a predefined list of values, and enter a Reason for change (250 characters max) before selecting the ‘Submit’ button.
Figure 79: Product Change Request

HIOS Portal User Manual v 32.00.00
HIOS Portal User Manual – Last Updated December 2019 Page 78
Once the Issuer Administrator selects the ‘Submit’ button on the Manage Change Request page, a Request ID will be assigned, along with a ‘Pending Approval’ status. An on-screen Confirmation message will display as illustrated in Figure 78.
Figure 80: Confirmation Page for Change Request
3.5.2.2 View Data Change Requests
Issuer Administrators can view data change requests on Manage Data Changes page. When the users select the status of the change request from the ‘Request Status’ drop down menu or enter a valid request ID in the ‘Request ID field’ and select the ‘Request ID Search’ button a summary of the change requests and its statuses will be displayed in search results as illustrated in Figure 79. The following statuses can be filtered on the Manage Data Changes page.
• Pending Approval
• Approved
• Denied
• Unable to Process
• Completed

HIOS Portal User Manual v 32.00.00
HIOS Portal User Manual – Last Updated December 2019 Page 79
Figure 81: Change Request Statuses
Issuer Administrators can review the data of the change requests displayed through the ‘View’ link of the Action column as illustrated in Figure 80.

HIOS Portal User Manual v 32.00.00
HIOS Portal User Manual – Last Updated December 2019 Page 80
Figure 82: View Change Request
3.5.3 Organization Administrator – Data Changes
Organization Administrator can create, review, and submit data change requests through the Manage Data Changes tab. Organization Administrator can also create new change requests through the ‘Create Request for Data Change’ link available on the ‘Edit’ page for Organization Administrator.
3.5.3.1 Create Data Change Requests
Once the Organization Administrator is on the Manage Data Changes page, they will be able to ‘Create Request for Data Change’ through the button at the bottom of the Manage Data Changes page. The ‘What values would you like to change’ drop-down menu displays the values for that particular Organization. Once the value for the data change is selected, the current value of the field to be changed will be displayed and the Organization admin will need to enter the New Value, or select from a predefined list of values, and enter a Reason for change (250 characters max) before selecting the ‘Submit’ button.
Organization Administrator will have to select the incorporated state, if changing the Organization Type from Non Fed to either Company or Non Insurance Company as illustrated in Figure 81.

HIOS Portal User Manual v 32.00.00
HIOS Portal User Manual – Last Updated December 2019 Page 81
Figure 83: Non-Federal Government Plans to Company
Organization Administrator of ‘Other Org’ selects the fields displayed for that particular type of organization. For multiple organizations, the Organization Administrator will see a list of organizations displayed in the drop-down menu and will need to select the organization for making the data change as illustrated in Figure 80. The current value will be displayed, and the user will need to enter the New Value, or select from a predefined list of values, and enter a Reason for change (250 characters max) before selecting the ‘Submit’ button.
Figure 84: Multiple Organizations

HIOS Portal User Manual v 32.00.00
HIOS Portal User Manual – Last Updated December 2019 Page 82
If the Organization Administrator changes the Organization Type from Other organization to either Company or Non Insurance Company, then an FEIN is required, and the user needs to select an incorporated state drop-down menu as illustrated in Figure 83.
Figure 85: Other Organization to a Company
Once the Organization Administrator selects the ‘Submit’ button on the Manage Change Request page, a Request ID will be assigned, along with a ‘Pending Approval’ status. An on-screen Confirmation message will display as illustrated in Figure 84.
Figure 86: Confirmation Page for Change Request

HIOS Portal User Manual v 32.00.00
HIOS Portal User Manual – Last Updated December 2019 Page 83
3.5.3.2 View Data Change Requests
Organization Administrators can view data change requests on Manage Data Changes page. When the user selects the status of the change request from the ‘Request Status’ drop-down menu or enters a valid Request ID in the ‘Request ID field’ and selects the ‘Request ID Search’ button a summary of the change requests and its statuses will be displayed in search results as illustrated in Figure 85. The following statuses can be filtered on the Manage Data Changes page.
• Pending Approval
• Approved
• Denied
• Unable to Process
• Completed
Figure 87: Change Request Statuses
Organization Administrators can review the details of the data change request by selecting the ‘View’ link in the Action column as illustrated in Figure 86.

HIOS Portal User Manual v 32.00.00
HIOS Portal User Manual – Last Updated December 2019 Page 84
Figure 88: View Change Requests
3.6 Add a Relationship
Users can access the Add a Relationship functionality from the Manage Organizations landing page. Through the Add a Relationship functionality, users can add a relationship between a third-party administrator (TPA) organization and issuers in HIOS by completing four steps. The relationship can be initiated by either the TPA or the issuer(s). In Step 1, users must identify the relationship type and answer if they are providing or receiving TPA services. Please refer to Figure 87 below.

HIOS Portal User Manual v 32.00.00
HIOS Portal User Manual – Last Updated December 2019 Page 85
Figure 89: Add a Relationship – Step 1
Users will need to identify the other half of the relationship in Step 2, either the issuer(s) or the TPA depending on the answer provided in Step 1. Please refer to Figure 88 below.

HIOS Portal User Manual v 32.00.00
HIOS Portal User Manual – Last Updated December 2019 Page 86
Figure 90: Add a Relationship – Step 2
In Step 3, users will provide the relationship’s effective start date and the effective end date. Please refer to Figure 89 below.

HIOS Portal User Manual v 32.00.00
HIOS Portal User Manual – Last Updated December 2019 Page 87
Figure 91: Add a Relationship – Step 3
Users will view a summary of information that was provided as part of the Add a Relationship process which includes the relationship type, organization and issuer information, and the effective start and end date displayed in Step 4. If the information is deemed correct by the user, they can select ‘Submit’ for the request to be approved. Please refer to Figure 90 and Figure 91 below.

HIOS Portal User Manual v 32.00.00
HIOS Portal User Manual – Last Updated December 2019 Page 88
Figure 92: Add a Relationship – Step 4

HIOS Portal User Manual v 32.00.00
HIOS Portal User Manual – Last Updated December 2019 Page 89
Figure 93: Add a Relationship – Confirmation Message
3.7 Organization Search
On the Organization Search page, users can search and view details for organizations registered in HIOS with a valid Federal Employee Identification Number (FEIN). The organization details are displayed in an editable format for users who already have the company administrator and organization administrator for the specific organization that is returned in the search.

HIOS Portal User Manual v 32.00.00
HIOS Portal User Manual – Last Updated December 2019 Page 90
Figure 94: Organization Search
3.7.1 Company/Organization Administrator view
The organization details are displayed in an editable format for users who already have the company administrator and organization administrator for the specific organization that is returned in the search.
Figure 95: Organization Search Results

HIOS Portal User Manual v 32.00.00
HIOS Portal User Manual – Last Updated December 2019 Page 91
3.7.2 All HIOS users view
The organization details are displayed in a read-only format for all the HIOS users who do not have company administrator or organization administator role. The Issuer details are also displayed in a read-only format for all the HIOS users who do not have company administrator or organization administrator role.
Figure 96: Organization Search – Organization Details Page for All HIOS Users

HIOS Portal User Manual v 32.00.00
HIOS Portal User Manual – Last Updated December 2019 Page 92
Figure 97: Organization Search - Issuer Information for all HIOS users

HIOS Portal User Manual v 32.00.00
HIOS Portal User Manual – Last Updated December 2019 Page 93
Figure 98: Organization Search - Issuer Details for all HIOS users
3.8 Role Management
All module access and role requests are to be completed in the Role Management section. Users will be able to view their existing roles and access status. Users will also be able to submit module access permission requests and cross-reference requests to registered companies, issuers, and states (for state users only) all under Role Management.
The HIOS home page will display a Manage Roles link from the drop down as illustrated in Figure 97 below.

HIOS Portal User Manual v 32.00.00
HIOS Portal User Manual – Last Updated December 2019 Page 94
Figure 99: HIOS Portal Home Page – Manage Roles
3.8.1 Manage Roles Page
The users can view their existing roles and pending role requests on the Manage Roles page as displayed below in Figure 98 and Figure 100.
The table will display the pending role requests first and then the approved requests after.

HIOS Portal User Manual v 32.00.00
HIOS Portal User Manual – Last Updated December 2019 Page 95
Figure 101: Manage Roles
Users may select ‘View Details’ to view additional information about the Pending or Approved role request. Users will be navigated to the View Role Details page which will vary depending on the status of the role request. The two variations of the page are displayed below.
Figure 102: View Role Details – Pending Role Request

HIOS Portal User Manual v 32.00.00
HIOS Portal User Manual – Last Updated December 2019 Page 96
Figure 103: View Role Details – Approved Role Request
If the user selects Cancel Role Request or Delete Role Request from the View Role Details page, the following confirmation pop-ups will be displayed.
Figure 104: Role Cancellation Confirmation
Figure 105: Role Deletion Confirmation
To view existing roles, complete the following steps:
HIOS Portal User Manual v 32.00.00
HIOS Portal User Manual – Last Updated December 2019 Page 97
1. From the HIOS Portal Home Page, select the ‘Manage Roles’ link.
2. Users can view additional details for the role request by selecting View Details in the Actions column.
3. Users can cancel or delete their pending or approved role requests from the View Role Details page.
4. Users will need to confirm their action on the pop-up. Once the request is submitted, the system shall display a confirmation message on the Manage Roles page.
3.8.2 Requesting a Role
To request an additional role or module access, a role request must be submitted. Be sure to review the Browse by Module page to ensure that the correct module and role is requested within the module.
To request a role, complete the following steps:
1. From the HIOS Portal Home Page, select the ‘Request a Role’ link.
2. Select the Module needed.
3. Select the Requested Role. The system will only display the specific roles that apply to the module selected.
4. If applicable for the module and role selected, select the role type.
• The role type radio buttons shall NOT be displayed for the following modules:
ο ERE
ο Non-Fed
ο Financial Management
ο QHP Issuer Module
ο QHP Rating Module
ο QHP Benefits and Service Area
ο State Evaluation module
ο Unified Rate Review System
5. If applicable for the module, role, and role type selected, select the contact type.
6. Select the Association Type. Enter the information and select Search. If a search result is not displayed, the user must register the organization first or verify that the issuer, site, or state reference provided is accurate.
7. Review the role request and select the Submit button. The Reset button is also an option if the user wants to reset the steps and start over.
Figure 104 displays the role request for the Ratings/Reports Viewer role within the Marketplace Quality Management (MQM) module.
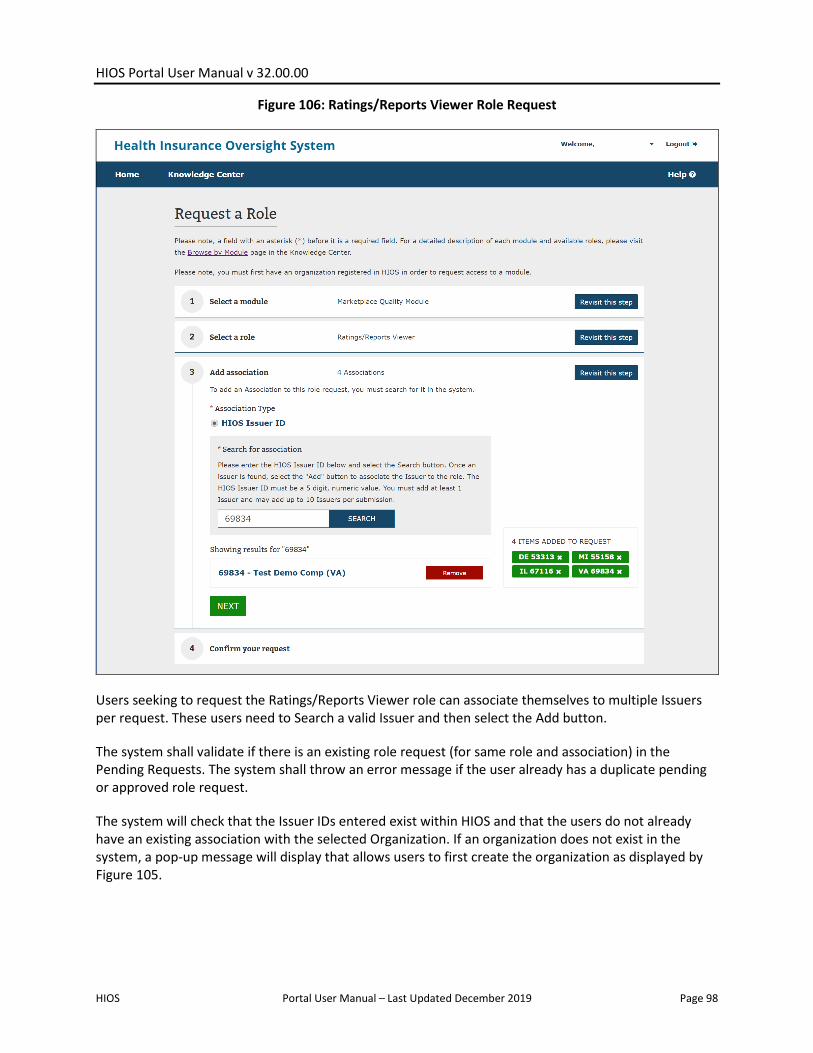
HIOS Portal User Manual v 32.00.00
HIOS Portal User Manual – Last Updated December 2019 Page 98
Figure 106: Ratings/Reports Viewer Role Request
Users seeking to request the Ratings/Reports Viewer role can associate themselves to multiple Issuers per request. These users need to Search a valid Issuer and then select the Add button.
The system shall validate if there is an existing role request (for same role and association) in the Pending Requests. The system shall throw an error message if the user already has a duplicate pending or approved role request.
The system will check that the Issuer IDs entered exist within HIOS and that the users do not already have an existing association with the selected Organization. If an organization does not exist in the system, a pop-up message will display that allows users to first create the organization as displayed by Figure 105.

HIOS Portal User Manual v 32.00.00
HIOS Portal User Manual – Last Updated December 2019 Page 99
Figure 107: Organization Not Found – Navigate to Create an Organization
The system shall display the error message as in Figure 106 if the user already has a role associated with the ID entered.
Figure 108: Existing Association Error Message
Once the users have submitted the desired role request, the system will display a Confirmation screen, displayed in Figure 107, to notify the users of the successful submission.

HIOS Portal User Manual v 32.00.00
HIOS Portal User Manual – Last Updated December 2019 Page 100
Figure 109: Role Request Confirmation Page
3.9 Approvals
Users, with the appropriate role for their module, have the ability to Approve or Deny user role requests at both the module and organizational level. Users with approval roles will have the Manage Approvals link displayed in the drop down on the HIOS Portal Home page as displayed in Figure 108.
Figure 110: HIOS Portal Home Page – Manage Approvals
Under the Approvals tabs, users will have the option to view all Pending Approval, Approved, and Denied requests as displayed in Figure 109.

HIOS Portal User Manual v 32.00.00
HIOS Portal User Manual – Last Updated December 2019 Page 101
Figure 111: Approval Tabs – Request Status
Users with the HIOS User Role Approver role will see the User Role Approvals tab, as displayed in Figure 110. Under this tab, users can approve or deny role requests for the modules for which they have permissions.

HIOS Portal User Manual v 32.00.00
HIOS Portal User Manual – Last Updated December 2019 Page 102
Figure 112: User Role Request Approvals
Figure 111 displays the Organizational User Role Approvals tab which only users with the Role Approver Administrator role will be able to see. This role allows users to approve or deny requested associations between a user and a module for a particular Organization.

HIOS Portal User Manual v 32.00.00
HIOS Portal User Manual – Last Updated December 2019 Page 103
Figure 113: Organizational User Role Approvals
In order to approve or deny a record within one of the approvals tabs, the users would need to select the checkboxes next to the record, and then select the Approve or Deny button to approve or deny the selected records.
Once the users have selected at least one record’s checkbox and selected the Approve or Deny button, the users will be redirected to a Confirmation page where the users will be notified of a successful request, and/or if the system encountered any errors in processing the request.
Figure 112 displays the User Role Approvals Confirmation page where the system encountered an error in processing an Approval or Denial request.
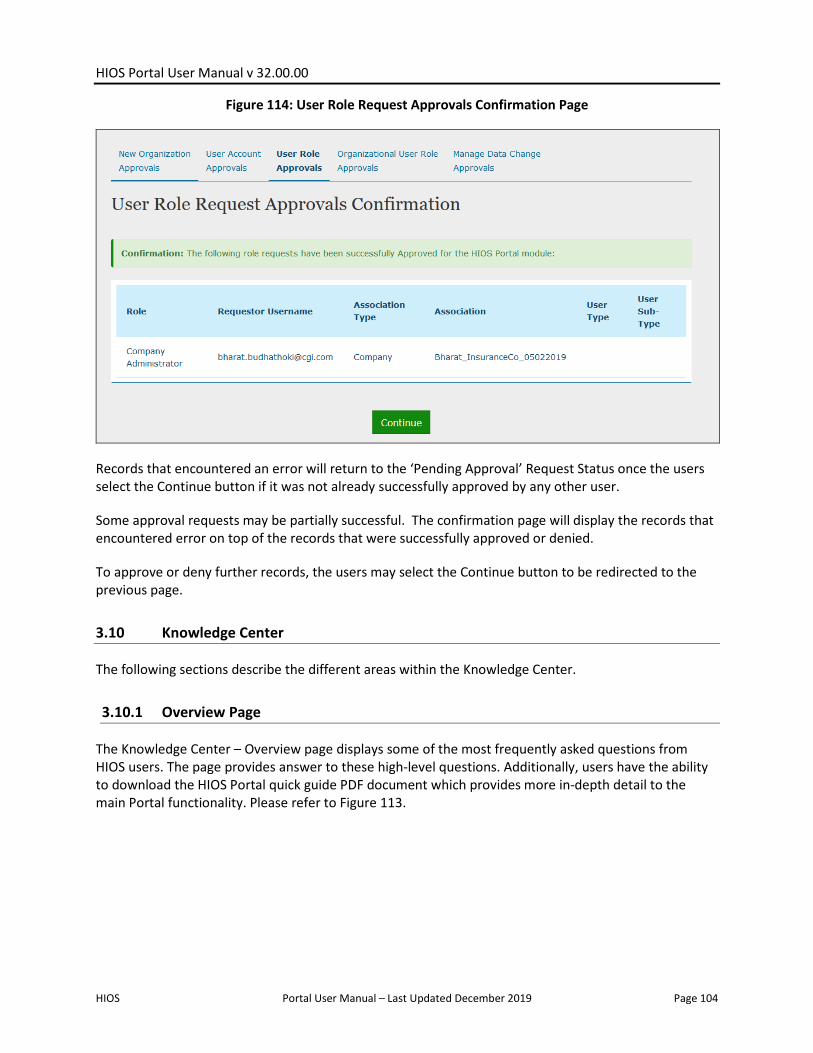
HIOS Portal User Manual v 32.00.00
HIOS Portal User Manual – Last Updated December 2019 Page 104
Figure 114: User Role Request Approvals Confirmation Page
Records that encountered an error will return to the ‘Pending Approval’ Request Status once the users select the Continue button if it was not already successfully approved by any other user.
Some approval requests may be partially successful. The confirmation page will display the records that encountered error on top of the records that were successfully approved or denied.
To approve or deny further records, the users may select the Continue button to be redirected to the previous page.
3.10 Knowledge Center
The following sections describe the different areas within the Knowledge Center.
3.10.1 Overview Page
The Knowledge Center – Overview page displays some of the most frequently asked questions from HIOS users. The page provides answer to these high-level questions. Additionally, users have the ability to download the HIOS Portal quick guide PDF document which provides more in-depth detail to the main Portal functionality. Please refer to Figure 113.

HIOS Portal User Manual v 32.00.00
HIOS Portal User Manual – Last Updated December 2019 Page 105
Figure 115: Knowledge Center – Overview Page
3.10.2 Browse by Module Page
The Knowledge Center – Browse by Module page displays the list of modules available within HIOS. When a user expands a module accordion, users may read about the purpose of the module, the roles available to request in the module, and documents available for download if applicable. Figure 114 displays a portion of the Knowledge Center – Browse by Module page and Figure 115 displays one of the expanded accordions.

HIOS Portal User Manual v 32.00.00
HIOS Portal User Manual – Last Updated December 2019 Page 106
Figure 116: Knowledge Center – Browse by Module Page
Figure 117: Knowledge Center – Browse by Module Expanded Accordion
3.10.3 Glossary Page
The Knowledge Center – Glossary page: A new tab has been added to the Knowledge Center called Glossary. When a user selects the Glossary tab, a page displays each of the HIOS terms with the definition underneath listed in alphabetical order.

HIOS Portal User Manual v 32.00.00
HIOS Portal User Manual – Last Updated December 2019 Page 107
Figure 118: Knowledge Center – Glossary

HIOS Portal User Manual v 32.00.00
HIOS Portal User Manual – Last Updated December 2019 Page 108
4 Trouble Shooting and FAQ
4.1 FAQs
Table 1: Frequently Asked Questions
Question Answer
I forgot my password. What do I do? Select the ‘Forgot Password’ link on the CMS Enterprise Portal.
I do not see the module access button for the application I would like to access. What do I do?
Refer to the User Role Request section.
I received an error stating that I am locked out of my account. What should I do?
Contact the Marketplace Service Desk (MSD) at 1-855-CMS-1515 or email them at [email protected].
I do not see the specific issuer or company information I am looking for within for a specific module. What should I do?
Refer to User Role Request section.
4.2 Support
For additional assistance, please contact the Marketplace Service Desk (MSD) at [email protected] or at 1-855-267-1515. This is the CMS Help Desk.