Embed Size (px)
Citation preview

������������ ���� ������� �������� ������� ��!� "������#���������#������$��%�$&�
History of Change
Version Date Status Owner
1.0 2009-02-04 Released for HiPath OpenOffice ME V1 F. Kneissl / K.-W. Weigt
1.1 2010-09-01 Update for OpenScape Office MX V2
and hints for Fax
F. Kneissl
1.2 2010-09-28 Update layout and provider hints F. Kneissl
1.3 2011-01-20 Additional information and update for V3 F. Kneissl / T. Ginis
1.4 2011-05-18 Update for new STUN Handling and Fax T. Ginis
Table of Content
1 Introduction���������������������������������������������������������������������������������������������������������� &
2 Internet Configuration ������������������������������������������������������������������������������������������ ' 2.1 OpenScape Office MX used as Router����������������������������������������������������������������� '
2.2 OpenScape Office with external Router��������������������������������������������������������������� (
3 Internet Telephony Configuration ������������������������������������������������������������������������ )
4 Appendix ������������������������������������������������������������������������������������������������������������ � 4.1 Fax Setup ����������������������������������������������������������������������������������������������������������� �
4.2 Codecs and RFC2833 Setup ������������������������������������������������������������������������������ �( 4.3 Provider Hints ���������������������������������������������������������������������������������������������������� �(
4.4 Configure STUN ������������������������������������������������������������������������������������������������� �(

������������ ���� ������� �������� ������� ��!� "����&�#���������#������$��%�$&�
1 Introduction This document describes how to set up the OpenScape Office MX communication system for Internet telephony via ITSP (Internet Telephony Service Provider) using Web-Based Man-agement (WBM). The guide covers mostly VoIP trunks with SIP protocol which provide a range of call numbers for business users (direct dialing inward, DDI).
General administration is covered by the respective WBM administrator documentation.
Prerequisite for the configuration is that the Internet Explorer at a PC has a LAN connection to OpenScape Office, the WBM is started, and you are logged on as an administrator. Please use the menu items as described below.
Current technical information on the products, applications and solutions available from Sie-mens Enterprise Communications can be found under the following link: http://wiki.siemens-enterprise.com
For general information see www.siemens-enterprise.com

������������ ���� ������� �������� ������� ��!� "����'�#���������#������$��%�$&�
2 Internet Configuration An internet connection from your ITSP or other from another Internet Service Provider (ISP) is required for Internet Telephony. The DSL bandwidth at the customer site determines the maximum number of concurrent calls (128 kbit/s for a G.711 call up- and downstream).
2.1 OpenScape Office MX used as Router
If you have an Internet connection with no router the OpenScape Office MX system is con-figured as a DSL router as described below. The connection to the DSL Router is done via WAN interface.
Please use the Internet Configuration wizard to set up your Internet access selecting a pre-defined provider or the most common type ‘Internet Service Provider PPPoE’.
1. In the navigation bar, click Setup.
2. In the navigation tree, click Wizards > Network / Internet.
Remark: The actual WBM displays the „OpenScape Office“ logo.
3. Click Edit to start the Internet Configuration wizard.
4. Activate the radio button DSL at WAN Port directly and click OK & Next.
5. From the Internet Service Provider Selection drop-down list, select the standard ISP Type Provider PPPoE.
6. The settings in the IP Parameters area depend on whether or not you obtain a dy-namic or fixed IP address from your ISP.
a) Dynamic IP address: Make sure that the IP Parameters check box is disabled.
b) Fixed IP address: Enable the IP Parameters check box. Under Remote IP Ad-dress of the PPP Connection, Local IP Address of the PPP Connection and

������������ ���� ������� �������� ������� ��!� "���� �#���������#������$��%�$&�
Max. Data Packet Size (bytes), enter the values that you have received from your ISP. From the IP Address Negotiation drop-down list, select the item Use con-figured IP address.
7. For Internet telephony set Full-Time Circuit to On in the Router Settings area. Un-der Forced Disconnect at (hour:min), enter the time (e.g., 04:59) at which the Internet connection is to be deactivated for a short time to avoid interruptions caused by internet provider’s resets.
8. The settings in the Authentication area depend on whether or not the ISP requires authentication via PPP.
c) Authentication required by ISP: Make sure that the check box PPP Authentica-tion is enabled. Enter the Internet access name of the ISP as the PPP user name. The customary standard is the CHAP Client authentication mode.
d) Authentication not required by ISP: Make sure that the check box PPP Authentica-tion is disabled.
9. Select the NAT check box in the Address Translation area if you want to use NAT (selected by default). Hint: Please keep in mind that if NAT is unchecked, then the system is open against the Internet. Therefore due to security reasons it is strongly recommended to keep this flag enabled.
10. Select the Address Mapping check box in the Address Translation area if you want to use IP mapping (cleared by default).
11. Set the following values in the QoS Parameters of Interface area:
e) Under Bandwidth for Downloads and Bandwidth for Uploads, enter the band-width in Kbps for downloads and uploads, respectively, as provided by your ISP.
f) If you want to use Internet Telephony as well, open the drop-down list Bandwidth Control for Voice Connections and select the item Upload only or Upload and Download, as required. In the field Bandwidth Used for Voice/Fax (%), enter how much bandwidth is to be reserved for voice and fax connections as a percent-age value (default value: 80%).
12. Click OK & Next. You are taken to the Configure DynDNS-Account window.
13. If you want to use a VPN or remote access, you will need to have already applied for and set up a DynDNS account (at DynDNS.org, for example).
g) Enter the data of your DynDNS account.
h) Test the DynDNS account with Connection test.
i) After the test succeeds, click OK.
j) Click OK & Next.
14. If you want to use neither a VPN nor remote access, click No DynDNS.
15. Click Finish to exit the Internet Configuration wizard. OpenScape Office MX per-forms a reboot.
������������ ���� ������� �������� ������� ��!� "����(�#���������#������$��%�$&�
2.2 OpenScape Office with external Router
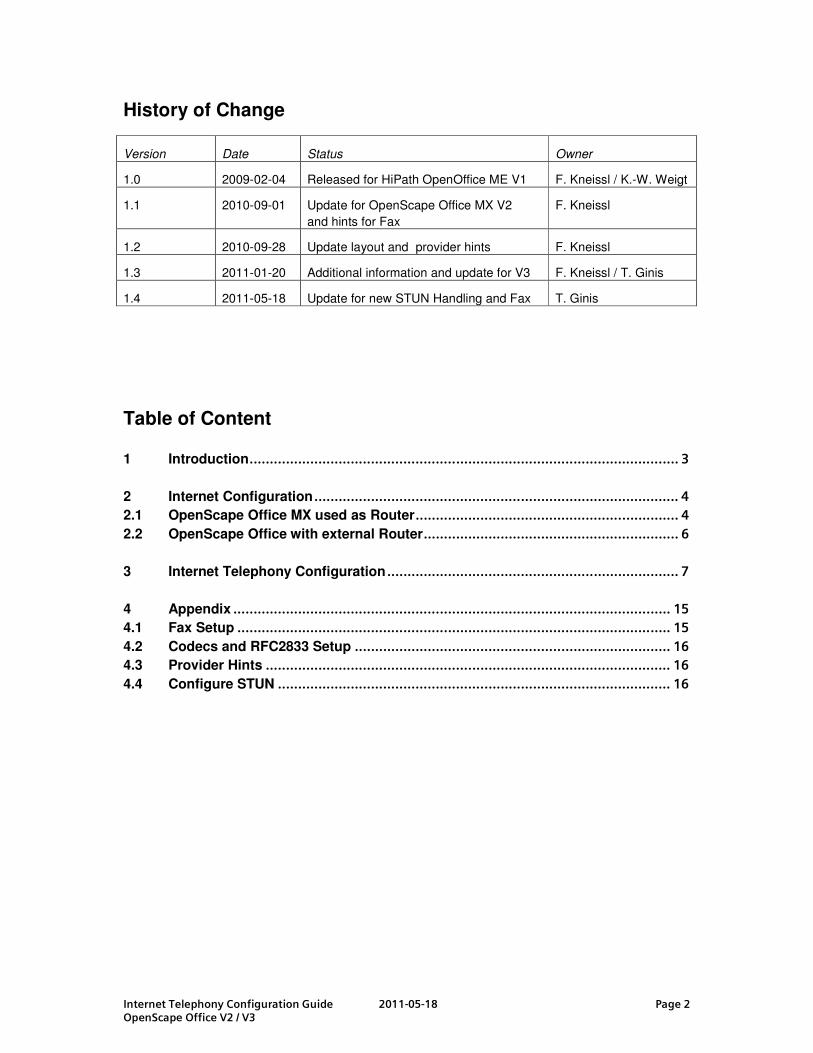
If you have an OpenScape Office LX or want to use the DSL router from your Provider or another external router, please enter its default Gateway IP address in the Network Con-figuration wizard - DHCP Global settings - Default Gateway. Connection to the external Router is done via LAN port. OpenScape Office does not support routers with symmetric NAT. An Application Layer Gateway (ALG) in the router should be disabled.
Please use the Internet Configuration wizard to set up your Network and Internet access.
1. Go to Setup > Wizards > Network / Internet. > Edit Internet Configuration
2. Choose “TCP/IP at LAN Port via an external router”
3. Configure the DNS server and the IP of your default router
4. Click Finish

������������ ���� ������� �������� ������� ��!� "����)�#���������#������$��%�$&�
3 Internet Telephony Configuration The Internet Telephony wizard can be used to activate a predefined Internet Telephony Service Provider (ITSP) for the Internet telephony user connection. You can configure Inter-net telephony stations for up to four ITSP.
1. In the navigation bar, click Setup.
2. In the navigation tree, click Wizards > Central Telephony.
3. Click Edit to start the Internet Telephony wizard.
4. Clear the No call via Internet check box. A list of the configured ITSPs is displayed. The list contains the predefined ITSPs and possibly any newly added ITSPs. If required, click Display Status to check which ITSPs have already been activated and which Internet telephony subscribers have already been configured under each ITSP. You can activate a maximum of four ITSPs. Click OK when finished
Remark: OpenScape Office V3 shows a country specific view. When selecting ‘all countries’ you can see all providers.
������������ ���� ������� �������� ������� ��!� "����!�#���������#������$��%�$&�
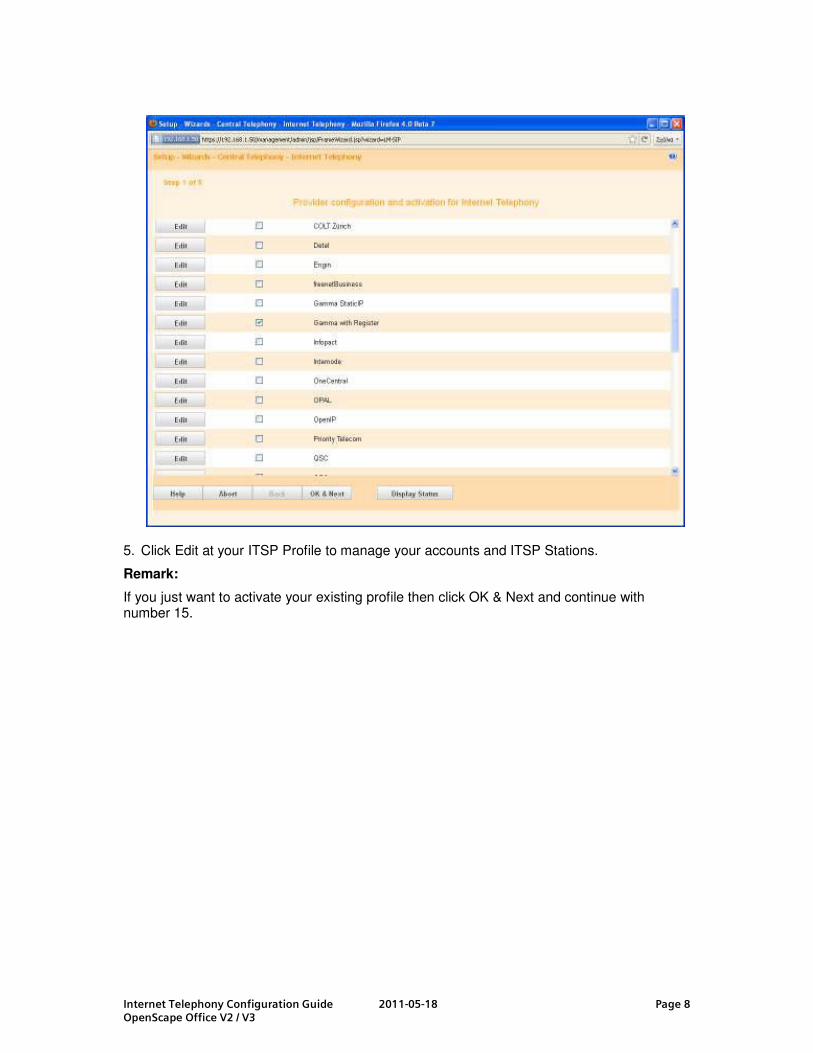
5. Click Edit at your ITSP Profile to manage your accounts and ITSP Stations.
Remark:
If you just want to activate your existing profile then click OK & Next and continue with number 15.

������������ ���� ������� �������� ������� ��!� "����*�#���������#������$��%�$&�
6. Click OK & Next
7. Click Add in this screen

������������ ���� ������� �������� ������� ��!� "�������#���������#������$��%�$&�
8. Enter the relevant account or number in Internet Telephony Station.
9. Enter the Authorization Name and Password which was given to you for the VoIP account by your provider, if necessary
10. a) For Accounts with single call numbers select the option Internet Telephony Phone Number
Enter the phone number and click Add for every phone number you received from your provider.
b) For DDI trunks / SIP trunking select the option Internet telephony system phone number in the Call number type area.
Enter System phone number e.g. +44203002221
Enter the DID number range for the Internet telephony station in the 'from' and 'to' fields after Direct inward dialing band. The range entered by default is 100 - 147.
11. Click OK & Next. An overview of your ITSP providers is shown. Click OK & Next
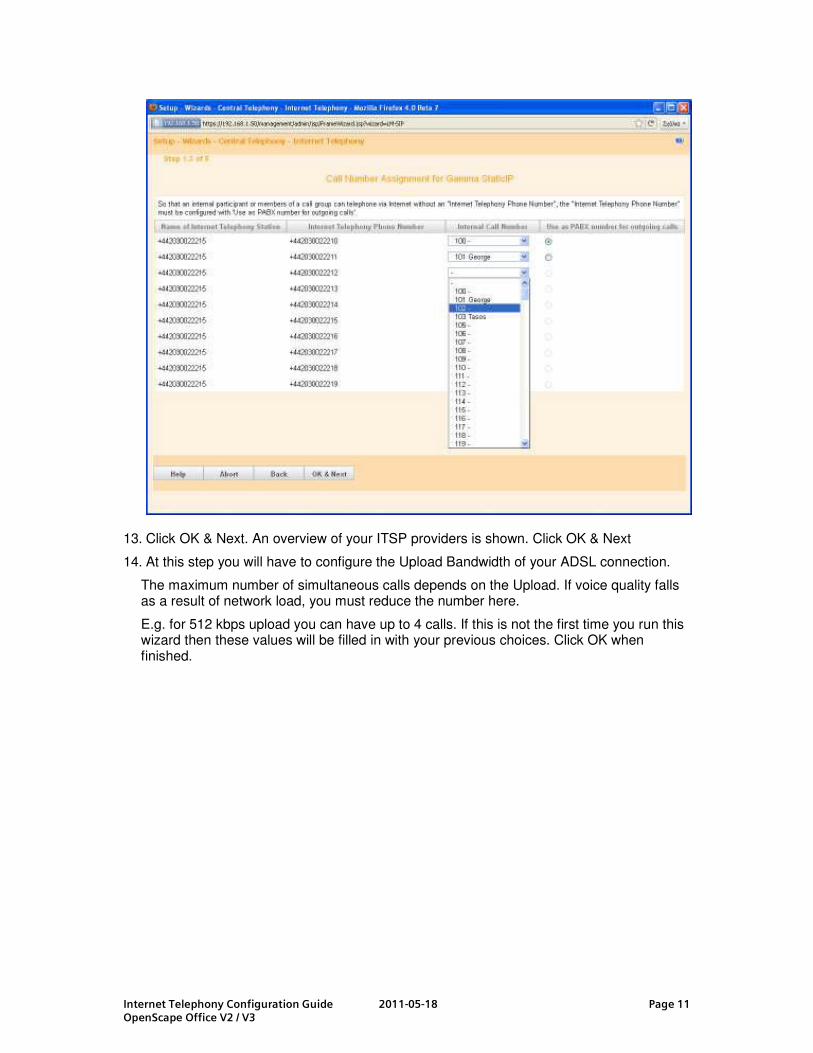
12. Assign one internal call number each to all Internet telephony phone numbers. For subscribers without Internet telephony phone number one number can be selected as PABX number for outgoing calls.
������������ ���� ������� �������� ������� ��!� "�������#���������#������$��%�$&�
13. Click OK & Next. An overview of your ITSP providers is shown. Click OK & Next
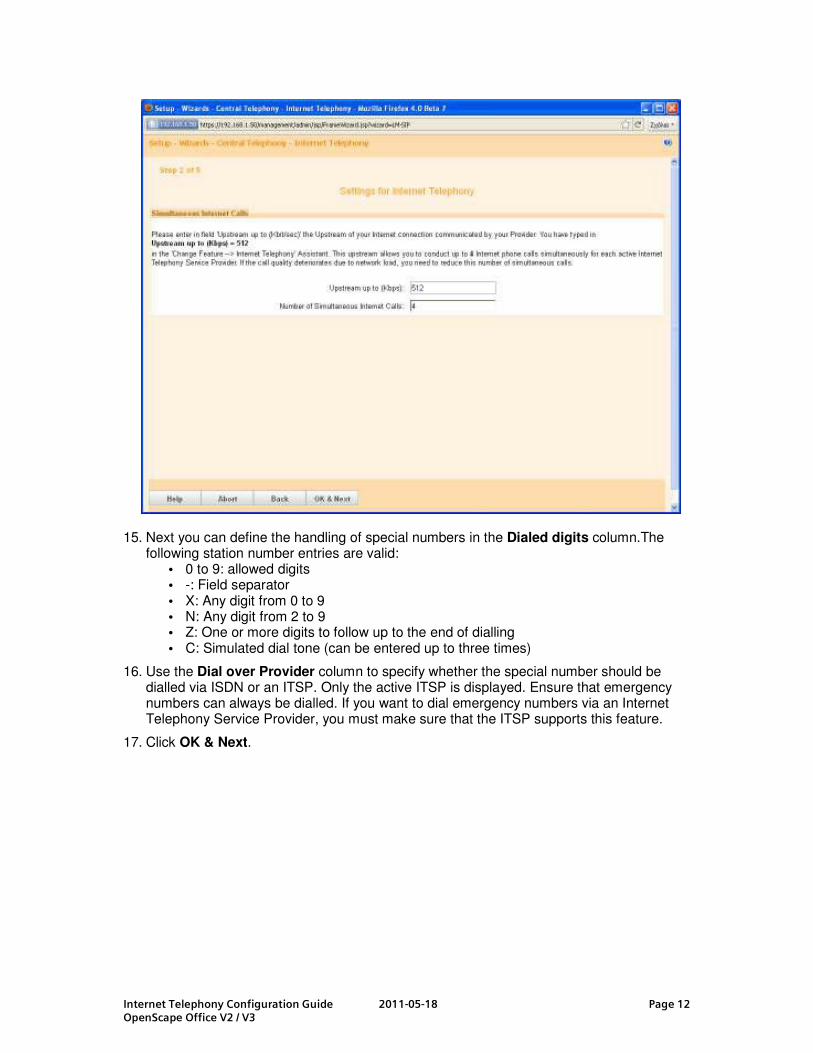
14. At this step you will have to configure the Upload Bandwidth of your ADSL connection.
The maximum number of simultaneous calls depends on the Upload. If voice quality falls as a result of network load, you must reduce the number here.
E.g. for 512 kbps upload you can have up to 4 calls. If this is not the first time you run this wizard then these values will be filled in with your previous choices. Click OK when finished.
������������ ���� ������� �������� ������� ��!� "�������#���������#������$��%�$&�
15. Next you can define the handling of special numbers in the Dialed digits column.The following station number entries are valid:
• 0 to 9: allowed digits • -: Field separator • X: Any digit from 0 to 9 • N: Any digit from 2 to 9 • Z: One or more digits to follow up to the end of dialling • C: Simulated dial tone (can be entered up to three times)
16. Use the Dial over Provider column to specify whether the special number should be dialled via ISDN or an ITSP. Only the active ITSP is displayed. Ensure that emergency numbers can always be dialled. If you want to dial emergency numbers via an Internet Telephony Service Provider, you must make sure that the ITSP supports this feature.
17. Click OK & Next.

������������ ���� ������� �������� ������� ��!� "�����&�#���������#������$��%�$&�
19. Here you can see the status of your ITSP. If the profile is succesfully activated then you should see the status in green color. If the status color is orange, then this means that the activation was not succesful. In this case please verify that you configured the correct credentials for your account. If the problem still exists then please check the STUN mode configuration. (For more details please see chapter 4.3)

������������ ���� ������� �������� ������� ��!� "�����'�#���������#������$��%�$&�
20. Click Next and then Finish to exit the Internet Telephony wizard.
21. Perform a data backup by clicking on Data Backup in the navigation bar and then on Backup- Immediate in the navigation tree.
Outgoing calls via the first configured provider can be made with default prefix 80. Further providers can be used via default prefixes 81, 82 and 83 respectively.

������������ ���� ������� �������� ������� ��!� "����� �#���������#������$��%�$&�
4 Appendix
4.1 Fax Setup
Fax is possible in two ways, either by protocol T.38 or by using clear channel with codec G.711. Fax over T.38 is more reliable and secure than fax over G.711.
� For fax T38, nothing special needs to be configured.
� If the ITSP does not support T38, then T38 needs to be disabled in order to send the fax via G.711:
Expert Mode > Telephony Server > Voice Gateway > Codec Parameters > Disable the flag “Fax T.38”. All the other settings should remain at the default values.
� It is strongly recommended to disable T.38 only if your provider does NOT support it.
� If the ITSP does not support T.38, then fax via the OpenScape Office application is NOT possible.
Restriction for OpenScape Office MX V2: Fax via VoIP Service Provider is only possible for Fax devices but not via OpenScape Office Application.

������������ ���� ������� �������� ������� ��!� "�����(�#���������#������$��%�$&�
4.2 Codecs and RFC2833 Setup
In the above screen you can also configure the codecs and its priorities for Gateway calls (calls via analog stations). If G729 is used by the provider, then both G.729A and G.729AB MUST be activated in OSO.
Also RFC2833 is configured here. The RFC2833 dynamic payload type is negotiated be-tween the OpenScape Office system and the ITSP. If the provider does not support negotia-tion and request for a specific value, this must be entered under "Payload Type for RFC2833"
4.3 Provider Hints
You can find configuration hints how to enter account data for a specific provider at http://wiki.siemens-enterprise.com/index.php/How_to_enter_SIP_Provider_Account_Data Please feel free to add information from your experience to this web page.
4.4 Configure STUN
Go to: "Expert Mode > Voice Gateway > Internet Telephony Service Provider > Edit STUN
Configuration"
Notes on setting STUN mode:
The necessary STUN mode depends on ITSP infrastructure and the used router. STUN is not required for ITSPs that resolve NAT traversal using infrastructure components in the pro-vider network such as Session Border Controller (SBC). See also:
http://wiki.siemens-enterprise.com/index.php/Network_Configuration_for_VoIP_Providers
• “Automatic”(Default) If no ITSP is active, STUN is fully disabled (same behavior as for
“Off”). With an active ITSP, STUN determines the used firewall type (NAT type) at sys-
tem startup and detects IP address changes during runtime. Depending on the detected
NAT type, STUN changes certain parameters in SIP messages (NAT traversal).
Please note: symmetric NAT is not supported.
• “Always” STUN is always active, even if no ITSP is active, for example.
Depending on the detected NAT type, some parameters in SIP messages (NAT tra-
versal) are adapted.
• “Use static IP” If you are using a static IP on your ADSL modem/router then use this
mode and enter here the static IP and port.
������������ ���� ������� �������� ������� ��!� "�����)�#���������#������$��%�$&�
• “Port Preserving Router” (Use this option if none of the above is working, there are
some specific Modem/Routers that have a special port for NAT and need this option to
work properly
Switching off STUN completely:
Up to OpenScapeOffice V3MR1: set STUN mode to “Off”. STUN is deactivated, IP ad-
dress changes are not detected.
Since OpenScapeOffice V3MR2: The usage of STUN can be activated / deactivated indi-vidually for each provider. This is possible with the new profile parameter: “Use STUN” Therefore STUN mode “Off” is no longer available in the global STUN modes.


![Document Change History - AUTOSAR · Document Change History Date Release Changed by Change Description ... 3.1 Acceptance criteria ... 7.4.1 [STS_PER_00001] Storing an integer in](https://img.pdfslide.net/doc/110x75/5b2637617f8b9a370b8b4598/document-change-history-autosar-document-change-history-date-release-changed.jpg)