Embed Size (px)
Citation preview

1
Projector
User's Manual (detailed) Network Guide
Thank you for purchasing this product.This manual is intended to explain only the network function. For proper use of this product, please refer to this manual and the other manuals for this product.
FeaturesThis projector has the network function that brings you the following main features.
WARNING
slightly from your projector.
this manual.
permitted without express written consent.
NOTE
Network Presentation : allows the projector to project computer images transmitted through a network. (76) Web Control : allows you to monitor and control the projector through a network from a
computer. (37) My Image : allows the projector to store up to four still images and project them. (80) Messenger : allows the projector to display text sent from a computer through a network.
(82) Network Bridge
computer. (85)
CP-X2541WN/CP-X3041WN/CP-X4041WN/CP-WX3041WN/CP-WX3541WN/CP-WX4041WN
product. After reading them, store them in a safe place for future reference.

2
Contents
Contents
Caution .......................................................................................... 41. Network Function ..................................................................... 5
1.1 Web Control ................................................................................................ 51.2 Network Presentation . ................................................................................ 61.3 My Image Function ..................................................................................... 71.4 Messenger Function ................................................................................... 8
............................................................................. 91.6 Other Functions ......................................................................................... 10
1.6.1 E-mail Alerts ................................................................................................................... 101.6.2 Projector Management using SNMP .............................................................................. 10
........................................................................................................... 10 ................................................................................ 10
2. Connection to the network .................................................... 112.1 System requirements ............................................................................... 112.2 ......................................................................... 122.3 ............................................................... 122.4 .................................................................... 14
2.4.1 Connection in Simple Access Point Mode ..................................................................... 152.4.2 Connection in Infrastructure Mode ................................................................................. 16
2.5 Applications .............................................................................................. 182.6 NETWORK Menu . .................................................................................... 20
3. Web Control ............................................................................ 373.1 Projector Web Control ............................................................................... 39
.............................................................................................................................. 393.1.2 Network Information ....................................................................................................... 403.1.3 Network Settings ............................................................................................................ 413.1.4 Port Settings .................................................................................................................. 463.1.5 Mail Settings .................................................................................................................. 483.1.6 Alert Settings .................................................................................................................. 493.1.7 Schedule Settings .......................................................................................................... 513.1.8 Date/Time Settings ......................................................................................................... 553.1.9 Security Settings ............................................................................................................ 573.1.10 Projector Control .......................................................................................................... 593.1.11 Remote Control ............................................................................................................ 633.1.12 Projector Status ........................................................................................................... 643.1.13 Network Restart ........................................................................................................... 653.1.14 Connection Test ........................................................................................................... 66

3
Contents
3.2 Crestron e-Control® .................................................................................. 67
3.2.1 Main window .................................................................................................................... 693.2.2 Tools window ................................................................................................................... 713.2.3 Info window ..................................................................................................................... 733.2.4 Help Desk window ........................................................................................................... 743.2.5 Emergency Alert .............................................................................................................. 75
4. Network Presentation ............................................................. 764.1 Outline ...................................................................................................... 764.2 Display Mode . ........................................................................................... 77
4.2.1 Single PC mode ............................................................................................................. 774.2.2 Multi PC mode ............................................................................................................... 77
4.3 Multi Projector Mode . ............................................................................... 784.4 Moderator Control Mode . ......................................................................... 784.5 Port Number . ............................................................................................ 79
5. My Image Function ................................................................. 806. Messenger Function ............................................................... 82
6.1 Outline ...................................................................................................... 82 .............................................................................. 83
6.3 Display Style ............................................................................................. 837. Network Bridge Function ....................................................... 85
.................................................................................. 857.2 Communication setup ............................................................................... 867.3 Communication port ................................................................................. 867.4 Transmission method ............................................................................... 87
.............................................................................................................. 87 ............................................................................................................... 88
8. Other Functions ...................................................................... 898.1 E-mail Alerts ............................................................................................. 898.2 Projector Management using SNMP ........................................................ 92
..................................................................................... 94 .......................................................... 97
8.5 Crestron ConnectedTM ............................................................................ 1029. Troubleshooting ................................................................... 10310. Warranty and after-sales service ...................................... 112

4
Caution
Caution-
less adapter sold as an option is required. For precautions according to the stan-dards and laws, refer to the documents that come with the adapter.[Restriction on plugging and unplugging the USB wireless adapter]
the power of the projector and pull out the power cord’s plug from the outlet. Do
[Security precautions when using wireless LAN]It is recommended that security settings, such as SSID and ENCRYPTION, are
3.1 Projector Web Control.
frequency band. You do not need a radio license to use the adapter, but you should be aware of the following:
which would result in a decrease in transmission speed or interruption, and
interference may occur, which may result in a decrease in transmission speed or interruption in communication. In particular, please be aware that using the
depending on the country or region you are in, the channels that you can use might be limited. Please consult your dealer for information on the usable channels.
country or region.
CAUTION
5
1. Network Function
1. Network Function
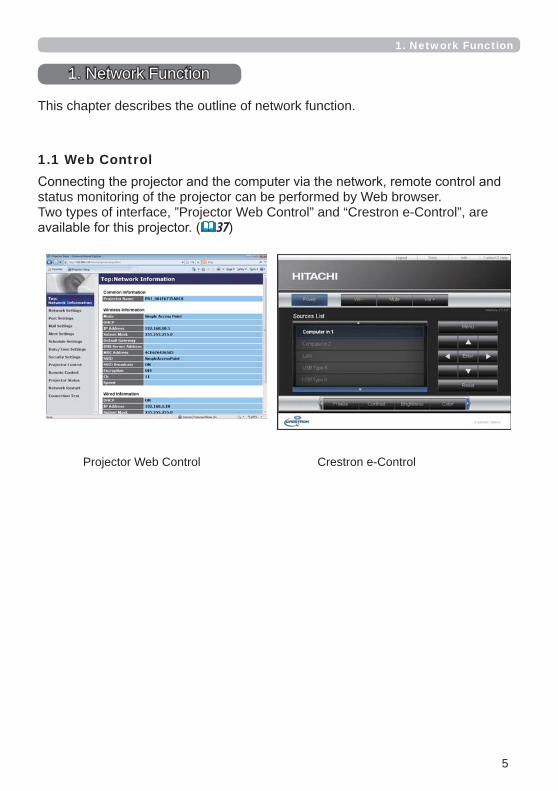
This chapter describes the outline of network function.
status monitoring of the projector can be performed by Web browser.Two types of interface, ”Projector Web Control” and “Crestron e-Control”, are
37)
1.1 Web Control
Projector Web Control Crestron e-Control

6
1.2 Network Presentation
The projector can display or play back the computer screen images and audio data that are transmitted through the network.
The following application is required to use Network Presentation.
1. Network Function
OS ApplicationWindows
iOS(iPhone/iPad) Projector Quick ConnectionAndroid Projector Quick Connection

7
1.3 My Image Function
1. Network Function
1
43
2
Transfer image data
Display image data (ex. )

8
1.4 Messenger Function
1. Network Function
play back audio data inside the projector.It is possible to store up to 12 text data.
Transfer text data
Display text data (ex. )
1
4
3
2
12

9
1.5 Network Bridge Function
1. Network Function
RS-232C communication using the projector as a network terminal.
RS-232C
RS-232C cable
CONTROL port
LAN port
Computer
Protocol changeTCP/IP data Serial data
USB TYPE A port

10
1.6 Other Functions
1. Network Function
addresses when the projector detects a certain condition that is requiring maintenance or detected an error. (89)
1.6.1 E-mail Alerts
The SNMP (Simple Network Management Protocol) enables to manage the projector information, which is a failure or warning status, from the computer on the network. The SNMP management software will be required on the computer to use this function. (92)
1.6.2 Projector Management using SNMP
power on / power off. It enables to be “self-management” projector.
in the projector. (94)
1.6.3 Event Scheduling
commands. (97)
1.6.4 Command Control via the Network

11
2. Connection to the network
2.1 System requirements
2. Connection to the network
The following equipments are required to connect the projector to your computer through the network.
The projector: 1 unit, Computer: 1 or more sets
1) For the wired connection *1
2) For the wireless connection *2 - Projector side IEEE802.11b/g/n (option : ): 1 unit *3 - Computer side
*4*1: The system for using the network function of the projector requires
*2:Infrastructure mode.
*3:connected to the wireless network using other encryption method.
Simple Access Point mode Infrastructure modeWPA2-PSK (AES) ✓ ✓WPA2-PSK (TKIP) ✓ ✓WPA-PSK (AES) ✓ ✓WPA-PSK (TKIP) ✓ ✓WEP 128bit - ✓WEP 64bit - ✓
*4:the projector may not be able to communicate properly with your computer,
Web browser is required to be installed in your computer to use Web control.
Network Presentation, My Image and Messenger. (18)
NOTE
For Mac users: Mac OS does not support some applications. Refer to System Requirements for Applications (18

12
2. Connection to the network
2.2 Connection via wired LAN
following the instructions of your network administrator when connecting to the existing network.
2) Press the MENU button on the remote control or the control panel of the projector.
DHCPIP ADDRESS
As for setting an IP address, refer to “About IP address”. (13)
ENTER
2.3 Connection setup of Wired LAN
hub

13
If the projector and the computer exist in the same network (i.e., same network
gateway must be set. Consult to the network administrator in detail.
NOTE
2. Connection to the network
[About IP address]
The Network address portion of the IP address setting on your computer must be the same as the setting on the projector. Also, the entire IP address on the
including the projector.
The projector’s settings are as follows.IP address: 192.168.1.254Subnet mask: 255.255.255.0(Network address: 192.168.1 in this case)Therefore, specify the computer’s IP address as follows.IP address: 192.168.1.xxx (xxx shows decimal number.)Subnet mask: 255.255.255.0(Network address: 192.168.1 in this case)
For exampleSelect from 1 to 254 for “xxx” not duplicating with any other equipments.In this case, since the IP address of the projector is “192.168.1.254”, specify a setting between 1 to 253 for the computer.

14
2. Connection to the network
2.4 Connection via wireless LAN
Infrastructure.
an access point to communicate. If communicating with existing network, consult with your network administrator.
Fig. 2.4.a Without an access point communication (Simple Access Point)
Fig. 2.4.b With an access point communication (Infrastructure)
Control
Mode: Simple Access PointDHCP: OffIP address: 192.168.10.1Subnet Mask: 255.255.255.0
SSID: SimpleAccessPoint ※
Encryption: OffChannel: 11※
NOTE

15
2.4.1 Connection in Simple Access Point Mode
Set the following when connecting the projector and the computer in Simple Access Point mode.
Projector setting
the power of the projector and pull out the power cord’s plug from the outlet. Do
projector.
USB TYPE A port of the projector.2) Turn on the projector.3) Press the MENU button on the remote control or the
control panel of the projector.
IP ADDRESSSSID
ENCRYPTIONCH
ENTERAbout network settings
.
Computer setting
setting of the computer.2) Select SSID set for the projector by following the procedure of wireless
connection of the computer. Enter encryption key by following the computer’s instruction if it is encrypted.
NOTE
2. Connection to the network

16
2.4.2 Connection in Infrastructure Mode
Set the following when connecting the projector and the computer in Infrastructure mode.
the power of the projector and pull out the power cord’s plug from the outlet. Do
projector.
USB TYPE A port of the projector.2) Turn on the projector.3) Press the MENU button on the remote control or the
control panel of the projector.
DHCPIP ADDRESS
SSIDENCRYPTIONCH
As for setting an IP address, refer to “About IP address”. (13)
ENTER
2. Connection to the network

17
Transmission speed may be slow depending on the settings of an access point.If the projector and the computer exist in the same network (i.e., same network
gateway must be set. Consult with the network administrator in detail.
administrator when connecting to the existing network.
Authentication is not supported. The authentication with an access point succeeds entering
illegal encryption key due to Open System Authentication, but data cannot actually be transmitted.
NOTE
The list of SSID in wireless network is displayed.
The display to enter the encryption key appears if it is encrypted. Enter the encryption key by using software keyboard.
3) The icon indicating “connected” ( when the connection is complete.
Connection in Infrastructure Mode (continued)
SSID SCAN LIST function
2. Connection to the network

18
2.5 Applications
below.
http://www.hitachi-america.us/projectors http://www.hitachidigitalmedia.com/ http://www.hitachi-dm.cn/ http://www.hitachi.co.jp/proj/
and downloads of Projector Quick Connection.
http://www.hitachi.co.jp/proj/
[System Requirements for Applications]Application Hardware and Software
[Windows]
OS:®
Windows 7Windows 8/8.1
Hard disk space:
2. Connection to the network

19
[System Requirements for Applications] (continued)Application Hardware and Software
[Mac]
Hard disk space:
Projector Quick Connection
[iOS]iOS 6 or later
[Android]Android OS 4.0 or later
Projector Image Tool (PJImg)
OS:®
Windows 7Windows 8/8.1
Hard disk space:
Projector Messenger Tool (PJMessenger)
OS:®
Windows 7Windows 8/8.1
Hard disk space:
for MAC is not included in the bundled
CD-ROM. Download it from the website.
NOTE
2. Connection to the network

20
2.6 NETWORK Menu
2. Connection to the network
Remember that incorrect network settings on this
to consult with your network administrator before connecting to an existing access point on your network.Select “NETWORK” from the main menu to access to the following functions.
remote control, or ENTER button on the remote control to execute the item. Then perform it according to the following table.
the same network.
initial installation.
NOTE

21
Item Description
PROJECTOR NAME
Any name can be set to the projector to identify it on the network.
(1) Select the PROJECTOR NAME and press the button. The PROJECTOR NAME dialog will be displayed.
NAME.
the entered characters.
characters.(2) The current PROJECTOR NAME will be displayed on the
Particular projector name is pre-assigned by default.
ENTER or INPUT button to select and enter characters.To erase 1 character at one time, press the RESET button
INPUT button at the same time. Also if
and push the ENTER or INPUT button, 1 character or
input for the PROJECTOR NAME.(3) To change an already inserted
character to be changed. After pressing the ENTER or INPUT button, the character is selected. Then, follow the same procedure as described at the
ENTER or INPUT button. To
ENTER or INPUT button.
2. Connection to the network
(continued on next page)

22
Item Description
WIRELESS SETUP
SSID SCAN LIST the list of SSID.
You can select SSID to connect from the list.
(continued on next page)
2. Connection to the network
NOTE
・The wireless network using the encryption method not supported by the projector is not displayed in the search list.・
NOTE
23
Item Description
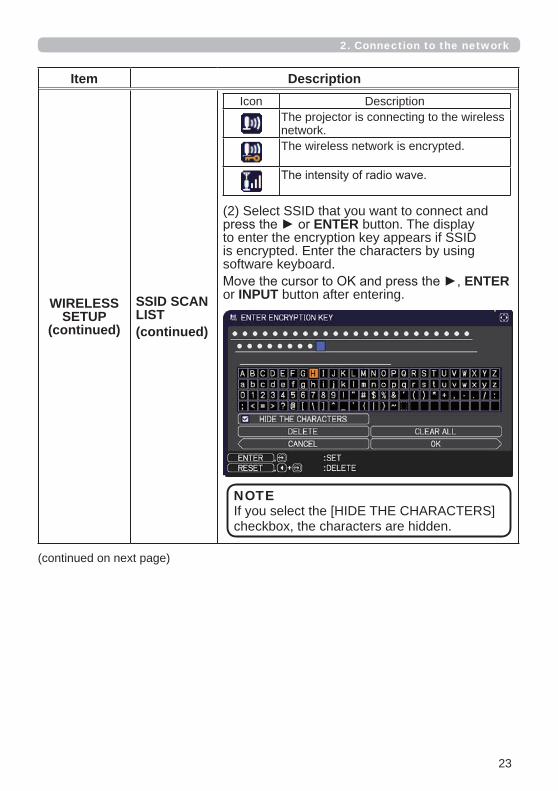
WIRELESS SETUP
(continued)
SSID SCAN LIST(continued)
Icon DescriptionThe projector is connecting to the wireless network.The wireless network is encrypted.
(2) Select SSID that you want to connect and ENTER button. The display
to enter the encryption key appears if SSID is encrypted. Enter the characters by using software keyboard.
ENTER or INPUT button after entering.
(continued on next page)
2. Connection to the network
If you select the [HIDE THE CHARACTERS] checkbox, the characters are hidden.
NOTE

24
Item Description
WIRELESS SETUP
(continued)
SSID SCAN LIST(continued)
The OSD below is displayed while the connection is in progress.
The keys other than Reset button are not
The connection process is interrupted when pressing the Reset button.The OSD below is displayed when the connection process is complete.
Connection succeeded
The message below is displayed when the connection is not established correctly.
Connection failed
The icon indicating the connection status ( connection is complete.
(continued on next page)
2. Connection to the network
・ Encryption settings cannot be changed when encryption lock is enabled in Network Settings – Wireless Setup in Projector Web Control. Refer to Encryption
42)
encryption, and Shared Key Authentication is not supported. The authentication with an access point is succeeded and it is regarded that the connection is established normally
due to Open System Authentication, but data cannot actually be transmitted.
NOTE

25
Item Description
WIRELESS SETUP
(continued)
SSID SCAN LIST(continued)
POINT mode.
MODE
Select the mode of the network communication system. Select according to the settings of your computer.
DHCP
obtained or not.
ON OFF
POINT mode.
(continued on next page)
2. Connection to the network
the meantime, the operating speed of the projector may be decreased and NETWORK INFORMATION may not be displayed correctly.
projector when switching MODE with the state
NOTE
26
Item Description
WIRELESS SETUP
(continued)
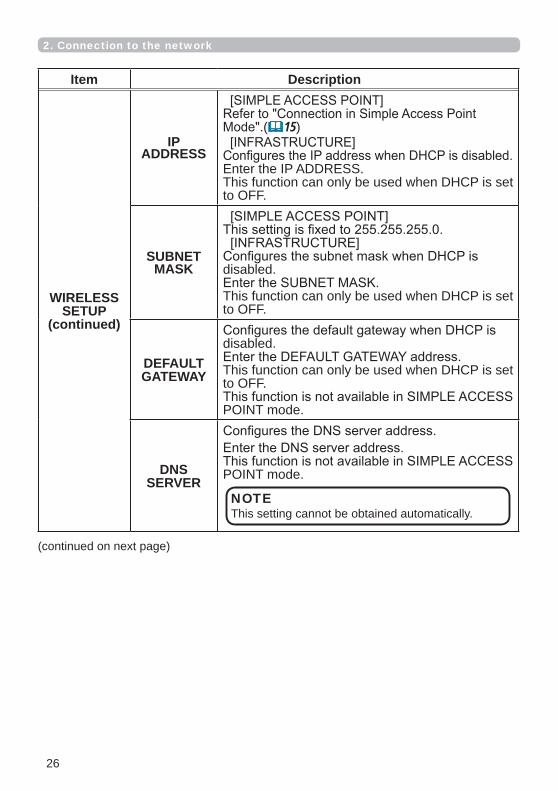
IP ADDRESS
(15)
Enter the IP ADDRESS. This function can only be used when DHCP is set to OFF.
SUBNET MASK disabled.
This function can only be used when DHCP is set to OFF.
DEFAULT GATEWAY
disabled.
This function can only be used when DHCP is set to OFF.
POINT mode.
DNS SERVER POINT mode.
(continued on next page)
2. Connection to the network
This setting cannot be obtained automatically.NOTE

27
Item Description
WIRELESS SETUP
(continued)SSID
Enter SSID by using software keyboard. Refer to PROJECTOR NAME (21) for how to use software keyboard.Default setting of SSID in Simple Access Point mode is [SimpleAccessPoint]. Change default
or ENTER button.To adjust CUSTOM
ENTER
menu will be appeared.Enter SSID by using software keyboard. Refer to PROJECTOR NAME (21) for how to use software keyboard.
(continued on next page)
2. Connection to the network

28
Item Description
WIRELESS SETUP
(continued)
SSID BROADCAST
Set this function to OFF when making SSID of a projector not to be displayed in wireless connection list of the computer.
ENCRYPTION
Select the encryption method to be used. WPA2-PSK(AES) WPA2-PSK(TKIP) OFF WPA-PSK(AES) WEP 64bitWEP 128bitWPA-PSK(TKIP)
It is required to enter the encryption key when selecting the encryption method other than
CH
used while MODE (25ACCESS POINT.
country.
(continued on next page)
2. Connection to the network
method of IEEE802.11n. Transmission speed in IEEE802.11n may be slow when other encryption method (WEP, WPA-PSK (TKIP), WPA2-PSK (TKIP)). Change the setting to “AES” if encryption other than “AES” is set.
NOTE
29
Item Description
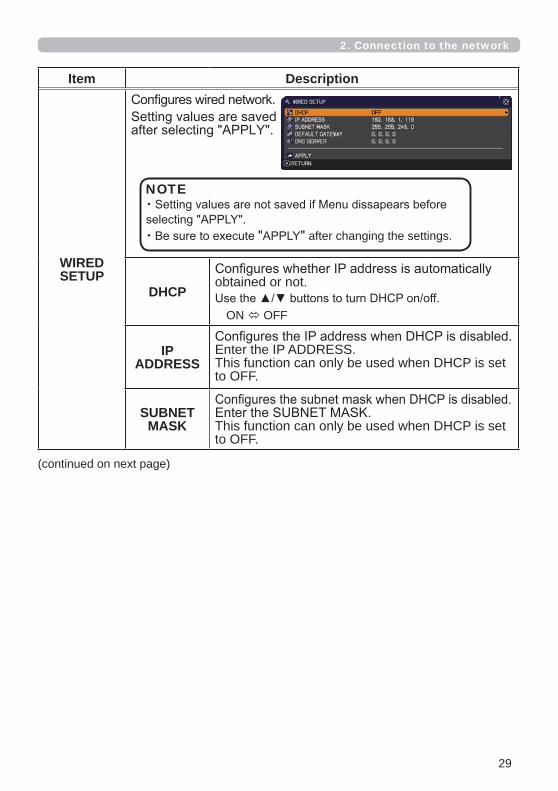
WIRED SETUP
.
DHCPobtained or not.
ON OFF
IP ADDRESS
Enter the IP ADDRESS. This function can only be used when DHCP is set to OFF.
SUBNET MASK This function can only be used when DHCP is set
to OFF.
(continued on next page)
2. Connection to the network
・
・ after changing the settings.
NOTE

30
Item Description
WIRED SETUP
(continued)
DEFAULT GATEWAY
disabled.
This function can only be used when DHCP is set to OFF.
DNS SERVER
(continued on next page)
2. Connection to the network
This setting cannot be obtained automatically.NOTE
31
Item Description
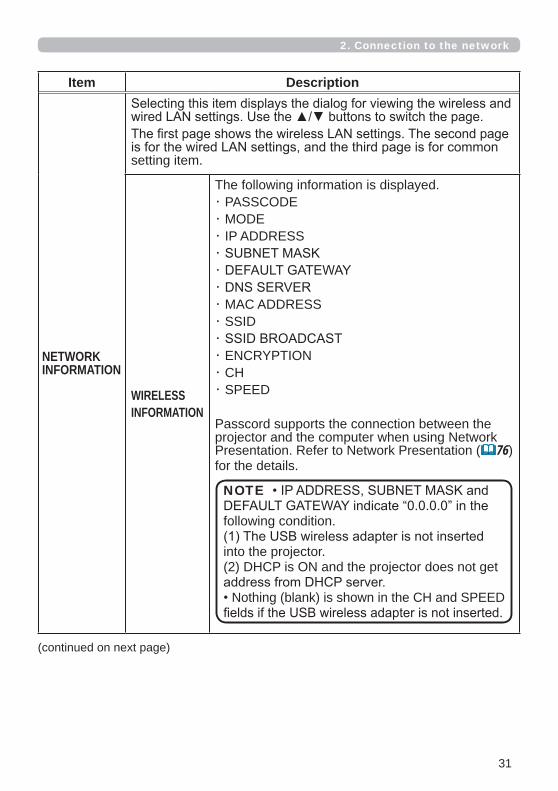
NETWORKINFORMATION
setting item.
WIRELESS INFORMATION
The following information is displayed.PASSCODEMODEIP ADDRESS
MAC ADDRESSSSID
ENCRYPTIONCHSPEED
Passcord supports the connection between the projector and the computer when using Network Presentation. Refer to Network Presentation (76) for the details.
(continued on next page)
2. Connection to the network
following condition.
into the projector.(2) DHCP is ON and the projector does not get
Nothing (blank) is shown in the CH and SPEED
NOTE

32
2. Connection to the network
DHCP is ON and the projector has not gotten
NOTE
Item Description
NETWORKINFORMATION(continued)
WIRED INFORMATION
The following information is displayed.PASSCODEIP ADDRESS
MAC ADDRESS
Passcord enables the projector and the computer to be connected to the network easily when using Network Presentation. Refer to Network Presentation (76) for details.
OTHER INFORMATION
The following information is displayed.PROJECTOR NAME DATE AND TIME
TIME DIFFERENCE
appear truncated if they are too long.
(continued on next page)

33
2. Connection to the network
Item Description
SNTP SETUP
SNTP SERVER
name.They are entered by using software keyboard. Refer to PROJECTOR NAME(21) for how to use software keyboard.
TIME DIFFERENCE
Enter the time difference.Set the same time difference as the one set on your computer. If unsure, consult your network administrator.
setting the TIME DIFFERENCE.
(continued on next page)
Set the time difference when using SNTP.NOTE

34
2. Connection to the network
Item Description
MY IMAGE
Selecting this item displays the MY menu.
image data. It can be downloaded from the web site.
Refer to 5. My Image Function (80) for the details of MY
ENTER button to display the image.
To switch the image displayed
To return to the menu
projector.(1) Press the RESET button on the
remote control while displaying an
AMX D.D.(AMX Device Discovery)
ON OFFWhen ON is selected, the projector can be detected by
(continued on next page)

35
2. Connection to the network
Item Description
PRESENTATION
required. It can be installed from the bundled application
information from the Hitachi website.Refer to 4. Network Presentation (76) for the details of Network Presentation.
QUIT PRESENTER
MODE
If you set a computer to the Presenter mode while its image is projected, the projector is occupied by the computer and access from any other computer is blocked.
allow other computers to access the projector.Select this item to display a dialog.
The Presenter mode is cancelled and a message is displayed indicating the result.
MULTI PC MODE
If you set one or more computers to the Multi PC mode and send their images to the projector, you can select the display mode on the projector from two options below. - Single PC mode: displays the image of the selected computer on full screen.
- Multi PC mode: displays the images sent from up to
sections.Select this item to display a dialog.
explained below.
select one of computers in the dialog using the ENTER or INPUT
button.
ENTER or INPUT again. The image for the selected computer is displayed on full screen.(continued on next page)
(continued on next page)

36
Item Description
PRESENTATION(continued)
MULTI PC MODE
(continued)
dialog and press the ENTER or INPUT button.The display mode is changed.
of the selected computer
display mode is changed toSingle PC mode. Also, the
the display mode is changed to Multi PC mode, regardless of the setting on the computers.
DISPLAY USER NAME
Selecting this item displays the user name. This function helps you identify from which computer the current image is sent.
2. Connection to the network

37
computer connected to the same network.
You can control the projector, collect the status such as lamp time, and set e-mail or schedule, etc. in Projector Web Control.
Recommended web browser・ Internet Explorer® 8/ 9/ 10/ 11
®
®
®.
projector may not process the data correctly.
NOTE
3. Web Control
3. Web Control
(continued on next page)
Crestron e-Control® is a control
by Crestron Electronics, Inc.Crestron e-Control® can control and monitor the projector.

38
® is created using Flash®. You need to install Adobe® Flash® Player on your computer to use Crestron e-Control®. Crestron e-Control® is not displayed in a web browser that does not support Flash®.
® in the Network Settings (45) is set to Disable, the
Control is displayed.
NOTE
3. Web Control
then start Web browser.
example below, and then press the Enter key or button.Example: If the IP address of the projector is set to 192.168.1.10:
Enter “http://192.168.1.10/” into the address bar of the web browser and press the Enter key or click button.
projector and your computer are connected to the same network correctly, the selection window will be displayed.
errors in the projector.
OSD on the projector. If you want to change it, you need to change the OSD language on the projector. (
NOTE

39
3. Web Control
3.1.1 LoginTo use the Projector Web Control function, you need to login with your user name and password.
name and password.
User name AdministratorPassword
Enter your user name and password, and then click the [OK]. If you login successfully, the screen below will be displayed.
Main menu
3.1 Projector Web Control

40
3.1.2 Network InformationDisplays the projector’s current network
Item DescriptionCommon Information
Projector Name Displays the projector name settings.Wireless Information
ModeDHCP Displays the DHCP setting.IP Address Displays the IP address.Subnet Mask Displays the subnet mask.Default Gateway Displays the default gateway.DNS Server AddressMAC Address Displays the MAC address.SSID Displays the SSID used by the projector.SSID BroadcastEncryption Displays the data encryption setting.ChSpeed
Wired InformationDHCP Displays the DHCP setting.IP Address Displays the IP address.Subnet Mask Displays the subnet mask.Default Gateway Displays the default gateway.DNS Server AddressMAC Address Displays the MAC address.
3. Web Control
3.1 Projector Web Control (continued)

41
3.1.3 Network Settings
Item DescriptionCommon Setup
Projector NameThe length of the Projector Name can be up to 64 alphanumeric characters. Only alphabets, numbers and following symbols can be used.
Particular projector name is pre-assigned by default.
sysLocation (SNMP) characters. be used.
sysContact (SNMP)using SNMP.The length of the sysContact can be up to 255 alphanumeric characters. be used.
AMX D.D.(AMX Device Discovery)
(continued on next page)
3. Web Control
3.1 Projector Web Control (continued)

42
3.1 Projector Web Control - Network Settings (continued)
3. Web Control
Item DescriptionWireless Setup
Mode
Encryption Lock
Permits or inhibits changes of the following settings related to wireless connection.
ModeSSID
EncryptionEncryption key (WEP key, WPA passphrase)
changed by the menu of the projector.
(continued on next page)
When switching MODE, it takes 60 seconds
operating speed of the projector may be decreased and NETWORK INFORMATION may not be displayed correctly.
NOTE
is performed only when it can be connected without changing the current settings.
NOTE

43
3.1 Projector Web Control - Network Settings (continued)
3. Web Control
Item DescriptionWireless Setup
Simple Access Point settings
IP AddressSubnet Mask
SSID
Input SSID. The maximum number of input characters is 32. Only alphabets, numbers and the following symbols can be used.
Default setting of SSID in Simple Access Point mode is [SimpleAccessPoint].
SSID Broadcast Set this function to OFF when making SSID of a projector not to be displayed in wireless connection list of the computer.
Encryption Select data encryption method.
WPA PassphraseInput WPA Passphrase.
alphabets, numbers and the following symbols can be used.
Ch
Select from “1” to “11”, a channel to use in the Simple Access Point mode.
(continued on next page)
country. In addition, depending on the country or region, it may be required to use a wireless network card that
region.
NOTE

44
3.1 Projector Web Control - Network Settings (continued)
3. Web Control
Item DescriptionWireless Setup
Infrastructure settings
DHCP ON Enables DHCP.DHCP OFF Disables DHCP.
IP AddressSubnet MaskDefault Gateway
DNS Server Address
SSID
Select an SSID from the list. If you require to set your unique SSID, select [Custom], then set your own SSID following the rules below. The maximum number of input characters is 32. Only alphabets, numbers and the following symbols can be used.
Encryption Select data encryption method.
WEP Key
Input the WEP key. Either ASCII characters or hexadecimal numbers can be
follows according to the WEP and character formats.Encryption ASCII charactersWEP 64bit 5 characters 10 charactersWEP 128bit 13 characters 26 characters
WPA PassphraseInput WPA Passphrase.
alphabets, numbers and the following symbols can be used.
(continued on next page)

45
Click the [Apply]
3.1 Projector Web Control - Network Settings (continued)
Item DescriptionWired Setup
DHCP ON Enables DHCP.DHCP OFF Disables DHCP.
IP AddressSubnet MaskDefault Gateway
DNS Server AddressOther Setup
Crestron e-ControlSet whether or not to use Crestron e-Control®.
3. Web Control
restart the network connection. You can restart the network connection from Network Restart on the main menu. (65)
characters are used.
the same network. Do not set the same network address for both wireless and
NOTE

46
3.1.4 Port Settings
settings.
Item DescriptionNetwork Control Port1 (Port:23)
Port open Click the [Enable] check box to use port 23.
Authentication Click the [Enable] check box when authentication is required for this port.
Network Control Port2 (Port:9715)
Port open Click the [Enable] check box to use port 9715.
Authentication Click the [Enable] check box when authentication is required for this port.
PJLink TM Port (Port:4352)
TM port (Port:4352).
Port open Click the [Enable] check box to use port 4352.
Authentication Click the [Enable] check box when authentication is required for this port.
My Image Port(Port:9716)
Port open Click the [Enable] check box to use port 9716.
Authentication Click the [Enable] check box when authentication is required for this port.
Messenger Port(Port:9719)
Port open Click the [Enable] check box to use port 9719.
Authentication Click the [Enable] check box when authentication is required for this port.
(continued on next page)
3. Web Control
3.1 Projector Web Control (continued)

47
Item DescriptionSNMP Port
Port open Click the [Enable] check box to use SNMP.
Trap address Network Settings. The maximum length of host or domain name is up to 255 characters.
Network Bridge Port
Port numberInput the port number. Except for 41794, 9715, 9716, 9719, 9720, 5900, 5500, 4352 between 1024 and 65535 can be set up. It is set to 9717 as the default setting.
Click the [Apply]
3.1 Projector Web Control - Port Settings (continued)
restart the network connection. You can restart the network connection from Network Restart on the main menu. (65)
NOTE
3. Web Control

48
3.1.5 Mail Settings
settings.
Item Description
Send MailClick the [Enable] check box to use the e-mail function.
Alert Settings.
SMTP Server Address Network Settings. The maximum length of host or domain name is up to 255 characters.
Sender E-mail address The length of the sender e-mail address can be up to 255 alphanumeric characters.
Recipient E-mail address can also specify the [to] or [cc] for each address. The length of the recipient e-mail address can be up to 255 alphanumeric characters.
Send Test Mail Sends a test e-mail to the set address.
Click the [Apply]
[Reset] button.
[Send Test Mail] button. Enable Send Mail setting before clicking the [Send Test Mail].
NOTE
3. Web Control
3.1 Projector Web Control (continued)

49
3.1.6 Alert Settings
errors/warnings.
Fan Error
Temp ErrorAir Flow ErrorCold ErrorFilter ErrorOther ErrorSchedule Execution Error
Filter Time AlarmTransition Detector AlarmCold StartAuthentication Failure
89
3. Web Control
3.1 Projector Web Control (continued)

50
The Alert Items are shown below.
Click the [Apply][Reset] button.
3.1 Projector Web Control - Alert Settings (continued)
3. Web Control
Item Description
Alarm Time (Only Lamp Time Alarm and Filter Time Alarm.)SNMP Trap Click the [Enable] check box to enable SNMP Trap alerts.
Send Mail Click the [Enable] check box to enable e-mail alerts.(Except Cold Start and Authentication Failure.)
Mail SubjectThe length of the subject line can be up to 100 alphanumeric
subject line.(Except Cold Start and Authentication Failure.)
Mail Text The length of the text is up to 1024 alphanumeric characters.
(Except Cold Start and Authentication Failure.)

51
3.1.7 Schedule Settings
3. Web Control
3.1 Projector Web Control (continued)
55)
of schedule settings. (94)
NOTE
1) Schedule ManagementItem Description
Sunday
Schedule settings executed on each day of the week.
MondayTuesdayWednesdayThursdayFridaySaturday

52
Item Description
Schedule Select the checkbox of the schedule to execute.
Program the bottom of the screen.
Date (Month/Day)Input the date (month/day) when the schedule is executed for
Click the [Apply]Click the [Refresh] button to update the screen to the latest status.Click the [Program Edit] button to display the program edit of the selected program.Click the [Copy to] button to copy the content of the program from which you copy (the list on the left) to the program to which you copy (the list on the right). The same program No. cannot be selected for both the program from which and the program to which you copy.
3. Web Control
3.1 Projector Web Control - Schedule Settings (continued)

53
3.1 Projector Web Control - Schedule Settings (continued)
Item DescriptionTimeEvent [Parameter]
Power STANDBYON
Input Source COMPUTER IN1COMPUTER IN2LANUSB TYPE AUSB TYPE BHDMI 1HDMI 2VIDEO
My ImageIMAGE-OFFIMAGE-1IMAGE-2IMAGE-3IMAGE-4
3. Web Control
the following items.
2) Program Edit
can be registered in 1 program.
NOTE

54
3.1 Projector Web Control - Schedule Settings (continued)
Item DescriptionMessenger
TEXT-OFFTEXT-1TEXT-2TEXT-3TEXT-4TEXT-5TEXT-6TEXT-7TEXT-8TEXT-9TEXT-10TEXT-11TEXT-12
Eco ModeOFFECO-1ECO-2INTELLIGENT ECOSAVER
BlankOFFON
SlideshowSTARTSTOP
Click the [Register]Click the [Delete]Click the [Delete All]selected program.Click the [Back] button to go back to the schedule management screen.
3. Web Control

55
3.1.8 Date/Time Settings
settings.
Item DescriptionCurrent Date year/month/day format.Current Time hour:minute:second format.
Daylight Savings Time Click the [ON]set the following items.
StartMonth
Week
Day (Sun, Mon, Tue, Wed, Thu, Fri, Sat).
Timehourminute
EndMonth
Week
Day (Sun, Mon, Tue, Wed, Thu, Fri, Sat).
Timehourminute
(continued on next page)
3. Web Control
3.1 Projector Web Control (continued)

56
Item Description
Time difference as the one set on your computer. If unsure, consult your IT manager.
SNTP
SNTP Server Address Settings. The maximum length of host or domain name is
up to 255 characters.
Cycle hour:minute).
Click the [Apply]
restart the network connection. You can restart the network connection from Network Restart on the main menu. (65)
to maintain accurate time.
setting date and time.
NOTE
3.1 Projector Web Control - Date/Time Settings (continued)
3. Web Control

57
3.1.9 Security Settings
security settings.
Item DescriptionUser Account
User name The length of the text can be up to 32 alphanumeric characters.
Password The length of the text can be up to 255 alphanumeric characters.
Re-enter Password
Network ControlNetwork Control
Port1 (Port: 23), Network Control Port2 (Port: 9715),
Messenger Port (Port: 9719). (46)
Authentication Password The length of the text can be up to 32 alphanumeric
characters.Re-enter Authentication Password
Network PresentationSetting an authentication password used in Network Presentation.The authentication function is disabled when an authentication password is not set.
Authentication Password The length of the text can be up to 15 alphanumeric
characters.Re-enter Authentication Password
SNMP
Community name be up to 64 alphanumeric characters.
Click the [Apply
3. Web Control
3.1 Projector Web Control (continued)

58
3. Web Control
3.1 Projector Web Control - Security Settings (continued)
restart the network connection. You can restart the network connection from Network Restart on the main menu. (65)
NOTE

59
3.1.10 Projector ControlOperations of the projector can be performed with the items on the screen.The categories of the items are shown in the main menu.Refer to the table below for details.
[Refresh] button.
NOTE
Item
MAIN
POWERINPUT SOURCEPICTURE MODEBLANK ON/OFFMUTEFREEZEMAGNIFYMAGNIFY POSITION VMAGNIFY POSITION HTEMPLATEMY IMAGEMY IMAGE DELETE
(continued on next page)
3. Web Control
3.1 Projector Web Control (continued)

60
3. Web Control
3.1 Projector Web Control - Projector Control (continued)
Item
PICTURE
BRIGHTNESSCONTRASTHDCRACCENTUALIZERGAMMACOLOR TEMPCOLORTINTSHARPNESSACTIVE IRISMY MEMORY
IMAGE
ASPECT The selected parameter cannot be set depending on the input signal.OVER SCANV POSITIONH POSITIONH PHASEH SIZEAUTO ADJUST EXECUTE
INPUT
PROGRESSIVEVIDEO NRCOLOR SPACEVIDEO FORMATHDMI FORMATHDMI RANGECOMPUTER INFRAME LOCK
(continued on next page)

61
3. Web Control
3.1 Projector Web Control - Projector Control (continued)
Item
SETUP
KEYSTONEAUTO KEYSTONE EXECUTEKEYSTONE VKEYSTONE H
PERFECT FITCorner PositionLine Distortion
LAMP & FILTERAUTO ECO MODEECO MODEFILTER MESSAGE
IMAGE OPTIMIZERINSTALLATIONSTANDBY MODE
AUDIO
VOLUMESPEAKERAUDIO SOURCEMIC LEVELMIC VOLUME
SCREEN
LANGUAGE Click the [Apply] button to switch the language on the Web screen according to the setting of the selected language in the projector.MENU POSITION VMENU POSITION HBLANKAUTO BLANKSTART UPMyScreen LockMESSAGETEMPLATEC.C. - DISPLAYC.C. - MODEC.C. - CHANNEL
(continued on next page)
NOTE

62
3. Web Control
3.1 Projector Web Control - Projector Control (continued)
Item
OPTION
AUTO SEARCHAUTO KEYSTONEDIRECT POWER ONAUTO POWER OFFMY BUTTON – 1 / 2MY SOURCEREMOTE FREQ.
SERVICEQuit Presenter Mode Quit compulsorily from the Presenter mode. Refer to Chapter 4 for the details of Presenter Mode. 77

63
3.1.11 Remote ControlThe functions on the bundled remote control are assigned to the Web Remote Control screen.
Do not control the projector with the projector's
the same time. It may cause some operational errors in the projector.
3. Web Control
3.1 Projector Web Control (continued)
COMPUTER IN1COMPUTER IN2LAN
HDMI 1HDMI 2VIDEO
FREEZE
ENTERMENURESET
One operation can be executed only with one click. The button should be clicked repeatedly to operate continuously.
When clicking the button repeatedly, some commands may not be sent
When the [ ]operation. To control the power, push [OK], otherwise push [Cancel].
NOTE

64
3.1.12 Projector StatusDisplays the current settings and status of the projector.
Item DescriptionError Status Displays the error status.Lamp Time Displays the usage time for the lamp.Filter TimePower Status Displays the power status.Input Status Displays the input signal source.Blank On/OffMute Displays the Mute on/off status.Freeze
3. Web Control
3.1 Projector Web Control (continued)

65
3.1.13 Network RestartRestarts the projector’s network connection.
Item Description
Restart Restarts the projector’s network connection in order to
clicking the [Restart] button to log on again.
NOTE
3. Web Control
3.1 Projector Web Control (continued)

66
3.1.14 Connection TestChecks if the network is connecting to DNS
Item Description
Destination IP Address Click the [Execute] button to test the connection after entering IP address to connect to.
properly when the packets for checking the connection are discarded before
NOTE
3. Web Control
3.1 Projector Web Control (continued)
Display example of the connection succeeded
Display example of the connection failed

67
3. Web Control
(71), a dialog prompting you to enter the password as shown on the right will be displayed, and no operation is enabled until
the preset password, the dialog disappears and the Main window will be displayed.As shown below, you can open a window by clicking the corresponding tab at the top right of the window.
3.2 Crestron e-Control®
Tab
Tab Description
Logout®.
enabled.Tools Opens Tools window. (71)Info Opens Info window. (73)Contact IT Help Opens Help Desk window. (74)

68
® in the Network Settings (45) is set to Disable, Crestron e-Control® cannot be used to operate the projector. Enable Crestron e-Control® and close the web browser. Next, restart the web browser, followed by entering the projector's IP address.
®.
connection between the projector and the computer, then return or refresh the Web page.
®
NOTE
3.2 Crestron e-Control® (continued)
3. Web Control

69
3. Web Control
3.2 Crestron e-Control® (continued)
3.2.1 Main window
You can operate the basic controls of the projector on this screen.
[Power] button can be operated.NOTE
1. Click a button and operate as follows.
Button DescriptionPower Turns the power on/off.Vol -/ Vol +Mute Turns Mute on/off.
2. Sources List
according to the currently selected input port.
Button DescriptionComputer in1 Selects input from COMPUTER IN1 port.Computer in2 Selects input from COMPUTER IN2 port.LAN Selects input from LAN port.USB Type A Selects input from USB TYPE A port.USB Type B Selects input from USB TYPE B port.HDMI 1 Selects input from HDMI 1 port.HDMI 2 Selects input from HDMI 2 port.Video Selects input from VIDEO port.
1
42
3

70
3. Web Control
3.2 Crestron e-Control® - Main window (continued)
Button DescriptionFreezeContrast Adjusts the contrast setting.Brightness Adjusts the brightness setting.Color Adjusts the color setting.Sharpness Adjusts the sharpness setting.
Magnifyto magnify.
Auto Performs the automatic adjustment.Blank
4. Click the button and operate in the same way as the bundled remote control.
Button DescriptionMenu Assigned the same operation as MENU button.Enter Assigned the same operation as ENTER button.Reset Assigned the same operation as RESET button.
Assigned the same operation as button.

71
3. Web Control
3.2 Crestron e-Control® (continued)
3.2.2 Tools window
between the projector and Crestron® control system.Click the [Exit] button to return to the Main window.
1. Crestron Control ®
Item DescriptionIP AddressIP ID
Port control system.
To apply the settings, click the [Send] button.
2. Projector
Item Description
Projector Name Projector Name can be up to 64 alphanumeric characters.
Location
Assigned To: user name up to 32 alphanumeric characters.
The usable symbols are space and the following: To apply the settings, click the [Send] button.
1 4
53
2
set correctly.NOTE

72
3. Web Control
3.2 Crestron e-Control® - Tools window (continued)
2. Projector (continued)
Item DescriptionDHCP Enables DHCP.IP AddressSubnet MaskDefault GatewayDNS Server
To apply the settings, click the [Send] button.
3. User Password
starting e-Control®, select the checkbox.Item Description
New Password You can specify a password up to 26 alphanumeric characters. The usable symbols are space and the following:
incorrect, an error message is displayed.
To apply the settings, click the [Send] button.
4. Admin Password
displaying the Tools window, select the checkbox.Item Description
New Password You can specify a password up to 26 alphanumeric characters. The usable symbols are space and the following:
incorrect, an error message is displayed.
To apply the settings, click the [Send] button.

73
3. Web Control
3.2 Crestron e-Control® (continued)
3.2.3 Info window
Displays the current settings and status of the projector.Click the [Exit] button to return to the Main window.
1. Projector Information
Item DescriptionProjector Name Displays the projector name settings.Location Displays the location name of the projector.MAC Address
Resolution selected on the projector.Lamp Hours Displays the usage time for the lamp.Assigned To: Displays the user name for the projector.
2. Projector Status
Item DescriptionPower Status Displays the power status.Input Source Displays the input signal source.Picture Mode Displays the picture mode setting.Installation Displays the installation setting.Eco Mode Displays the eco mode setting.Error Status Displays the error status.
1 2
appear truncated if they are too long.NOTE

74
3. Web Control
3.2 Crestron e-Control® (continued)
3.2.4 Help Desk window
® ®.
Button DescriptionSend Sends a message.

75
3. Web Control
3.2 Crestron e-Control® (continued)
3.2.5 Emergency Alert
® ® sends out an alert message, it will be displayed on the screen.
Input a message in the box below the alert message, and click the [Send] button.
® ®.® ® is displayed
on the screen of the projector in the way similar to the real-time text of the Messenger function. (82) If another real-time text is displayed on the screen,
time text is set to high, the alert message does not appear on the screen. For details, refer to the manual for the application of the Messenger.
NOTE

76
4. Network Presentation
4. Network Presentation
The projector can display or play back the computer screen images and audio data that are transmitted through the network. This Network Presentation feature helps you to smoothly make your presentations and conduct conferences.
4.1 Outline
It can be installed from the bundled application CD.
of H.
Refer to 2.5. Applications.
NOTE
77
4. Network Presentation
4.2 Display Mode
The Single PC mode can display images in full screen from one computer to the
4.2.1 Single PC mode
In the Single PC mode, the projector can be occupied by one computer and can block access from any other computers (if Presenter Mode is set to ON in
image on screen will be unexpectedly switched to an image sent by another
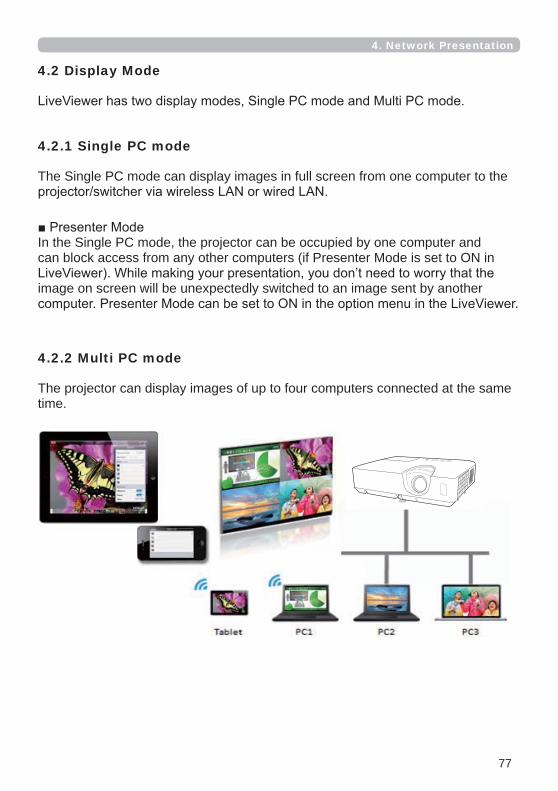
The projector can display images of up to four computers connected at the same time.
4.2.2 Multi PC mode

78
4. Network Presentation
In the Multi Projector/Multi Display mode, up to 12 projectors or switchers
simultaneously.
4.3 Multi Projector Mode
4.4 Moderator Control Mode
This function is for Windows users only.
This function is for Windows users only.
One computer can be assigned as Moderator (Host) to control all other computers
proceed with the program as arranged smoothly and safely.
Clien
Moderator (Host)
LA
LAN
Moderator (Host)
Clients

79
4. Network Presentation
4.5 Port Number
Port No. Protocol5500 TCP5900 TCP9720 TCP
Connection may not work.
NOTE

80
5. MyImage Function
For information on the necessary settings and operations for the computer and projector, refer to the manual for the application.
the NETWORK menu.
5. My Image Function

81
5. MyImage Function
image. (
browser.(94)
may not be able to process the data correctly.
NOTE

82
6. Messenger Function
play back audio data inside the projector.The text data can be displayed on the screen in two ways. One is to display the text transferred from the computer on real time, and the other is to choose the text data stored in the projector and display it.It is possible to store up to 12 text data.
6. Messenger Function
6.1 Outline
Transfer text data
Display text data (ex. )
1
4
3
2
12

83
transfer and display the text data, use the application.
For information on the necessary settings and operations for the computer and projector, refer to the manual for the application.
6. Messenger Function
The languages that can be displayed by Messenger function are shown below.
6.2 Supported Languages
There are 4 types of message display style. The following is the description of each type.
6.3 Display Style
1) ScrollThe message scrolls to the left in the message display area.
The message scrolls upwards in the square message display area.
The chemical class Today’s
84
6. Messenger Function
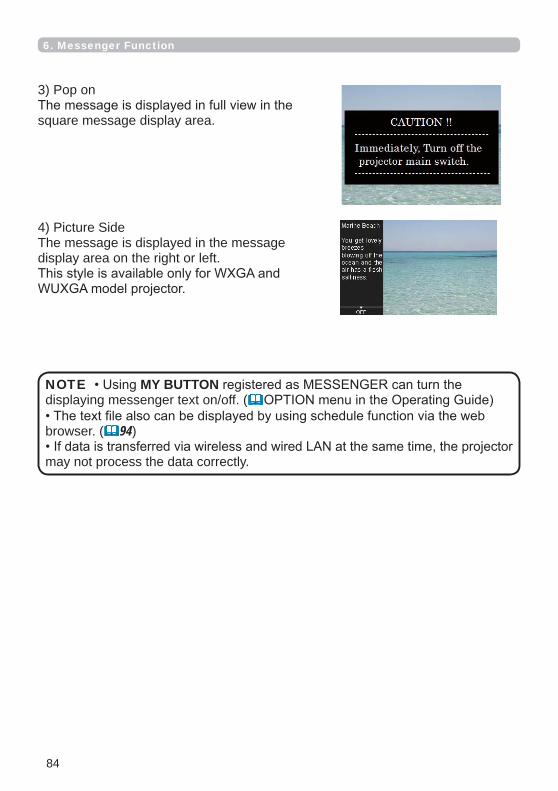
3) Pop on
square message display area.
4) Picture SideThe message is displayed in the message display area on the right or left.
MY BUTTONdisplaying messenger text on/off. (
browser. (94)
may not process the data correctly.
NOTE

85
7. Network Bridge Function
232C communication using the projector as a network terminal.
7.1 Connecting devices1) Connect the projector’s LAN
USB TYPE A port.2) Connect the projector’s CONTROL
RS-232C cable, for RS-232C communication.
ensure the connection. each port and use the suitable cable. (Connection to the ports in the Operating
NOTE
RS-232C
RS-232C cable
CONTROL port
LAN port
Computer
Protocol changeTCP/IP data Serial data
USB TYPE A port

86
7. Network Bridge Function
7.2 Communication setup
7.3 Communication port
CONTROL port.
for the CONTROL
web browser. (46)
CONTROL port according to your use.
setting.
that an unsuitable setup could cause malfunction of communication.
the CONTROL port.
is set to 9717 as the default setting.
NOTE
NOTE
Item Condition4800bps/9600bps/19200bps/38400bps
PARITYData length
Start bitStop bit
(OPTION menu )

87
7.4 Transmission method
7.4.1 HALF-DUPLEX
The transmission method can be selected from the menus, only when the
(OPTION menu )
This method lets the projector make two way communication, but only one
the instructions below.
(OPTION menu the )
OFF 1s 2s 3s ( OFF)
7. Network Bridge Function
RS-232C
RS-232C cableComputer
Protocol changeTCP/IP data Serial data
Transmitting data
Discarding data
Transmitting data
Response limit time
Discarding data
Response data
Response data

88
254 byte data at the maximum at a time.
The OFF is selected as the default setting.
processing of the projector.
NOTE
NOTE
7.4.2 FULL-DUPLEXThis method lets the projector make two way communication, transmitting and
7. Network Bridge Function
7.4 Transmission method (continued)

89
8. Other Functions
8.1 E-mail Alerts
addresses when the projector detects a certain condition that is requiring maintenance or detected an error.
power.
to send a mail.
using.
NOTE
8. Other Functions
Item DescriptionCover ErrorFan Error The cooling fan is not operating.
Lamp Error The lamp does not light, and there is a possibility that interior portion has become heated.
Temp Error There is a possibility that the interior portion has become heated.
Air Flow Error The internal temperature is rising.
Cold Error There is a possibility that the interior portion has
Filter Error
Other Error If this error is displayed, please contact your dealer.Schedule Execution ErrorLamp Time AlarmFilter Time AlarmTransition Detector Alarm Transition Detector Alarm
(continued on next page)

90
8. Other Functions
menu which
Lamp Time Alarm
an e-mail will be sent.Filter Time Alarm
will be sent.
NOTE

91
8. Other Functions
through a web browser.
Mail Settings (48) 1) Select [Mail Settings] on main menu in Projector Web Control.
(48) for further information. 3) Click the [Apply] 4) Click the [Send Test Mail]correct.
Text : Send Test Mail
Alert Settings (49) 1) Select [Alert Settings] on main menu in Projector Web Control.
49) for further information. 3) Click the [Apply]
Failure/Warning e-mails are formatted as follows:

92
8. Other Functions
8.2 Projector Management using SNMPThe SNMP (Simple Network Management Protocol) enables to manage the projector information, which is a failure or warning status, from the computer on the network.
administrator. NOTE
Standard MIB (MIB-2)
Item DescriptionsysName Projector name is set.
The information on where it is located. It has character string
Settings] - [Common Setup].sysContact The information on the administrator's contact information. It
has character string set in sysContact (SNMP) in Projector Web Control - [Network Settings] - [Common Setup].
Enhanced MIB
Projector Web Control.
Trap
In addition to e-mail alert shown in 8.1 Email Alerts (89), the following
Item DescriptionCold Start When the projector is supplied with the power, it works as
below.
power status changes from “OFF” to “Standby state”.
power status changes from “Standby state” to “ON (lamp is turned on)”.(
Authentication Failurecommunity.

93
8. Other Functions
projector by SNMP.
Port Settings (46)1) Select [Port Settings] on main menu in Projector Web Control.2) Click the 3) Click the [Enable] check box to open the SNMP Port. Set the address to send the SNMP trap to when a Failure/Warning occurs.
Security Settings (57)1) Select [Security Settings] on main menu in Projector Web Control.2) Click the [SNMP] and set the community name on the screen that is displayed.
Alert Settings (49)
1) Select [Alert Settings] on main menu in Projector Web Control.
3) Click the [Enable] check box to send out the SNMP trap for Failures/Warnings. Clear the [Enable] check box when SNMP trap transmission is not required.4) Click the [Apply]
[Port Settings] or [Security Settings] is changed.
NOTE

94
8.3 Event Scheduling
power off. It enables to be “self-management” projector. Installing the battery is required if you want to use under the conditions that
AC power is turned off. (
Note the following before setting the schedule.
projector. (
can be registered in 1 program.
date No. 2’ and so on.
at the same time.55)
to maintain accurate time.
My Image” and “Messenger” will not be executed appropriately and result in “schedule execution error” status when the lamp does not light and/or data to be displayed are not stored in the projector at the time when scheduled
Input Source” and “My Image” is not executed if security function is enabled and the projector is locked due to the function.
the USB TYPE A port.
displayed for the scheduled Slideshow.
NOTE
8. Other Functions

95
8. Other Functions
The procedure to set the schedule in Projector Web Control is described in the following.
with factory default settings. Set the program following the steps below.In the case that the program has already been set, skip to step 6).
1) Select [Schedule Settings] on main menu in Projector Web Control.
[Program Edit] button to display the following program edit display. The display for editing Program-1 is shown below.
[Register] to add the
Click the [Delete]Click the [Delete All]selected program.

96
4) When you want to edit the program with other number continuously, select the program you want to edit in dropdown list and click the [Select] button to display the display for editing the selected program.
5) Click the [Back] button to go back to schedule management screen after
described in the following.
6) Click the checkbox of the schedule to be executed (e.g. Click the checkbox of “Monday”, when it is to be executed on Mondays) in the schedule management screen.
information registered in each program in the program list on the bottom of the screen.
8) Click the [Apply]
The schedule settings are now complete.
When you copy the currently selected program to other program, click the checkbox under icon. Click the [Copy to] button after selecting the program to which you want to copy in dropdown list.
program to which you want to copy.
8. Other Functions
97
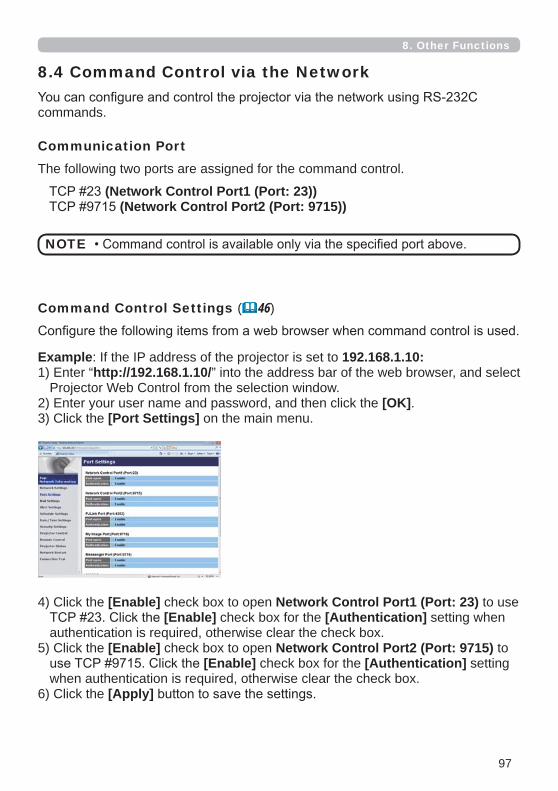
8.4 Command Control via the Network
commands.
Communication PortThe following two ports are assigned for the command control.
Command Control Settings (46)
4) Click the [Enable] check box to open Network Control Port1 (Port: 23) to use [Enable] check box for the [Authentication] setting when
authentication is required, otherwise clear the check box.5) Click the [Enable] check box to open Network Control Port2 (Port: 9715) to
[Enable] check box for the [Authentication] setting when authentication is required, otherwise clear the check box.
6) Click the [Apply]
Example: If the IP address of the projector is set to 192.168.1.10:1) Enter “http://192.168.1.10/” into the address bar of the web browser, and select
Projector Web Control from the selection window.2) Enter your user name and password, and then click the [OK].3) Click the [Port Settings] on the main menu.
8. Other Functions
(Network Control Port1 (Port: 23))(Network Control Port2 (Port: 9715))
NOTE

98
8.4 Command Control via the Network (continued)
When the authentication setting is enabled, the following settings are required. (57)
7) Click the [Security Settings] on the main menu.8) Click the [Network Control] and enter the desired authentication password.
* See NOTE.
9) Click the [Apply]
NOTE
8. Other Functions
Network Control Port1 (Port: 23), Network Control Port2 (Port: 9715), PJLink™ Port (Port: 4352), My Image Port (Port: 9716) and Messenger Port (Port: 9719).
the network connection. You can restart the network connection from Network Restart on the main menu. (65)

99
Command FormatCommand formats differ among the different communication ports.
You can use the RS-232C commands without any changes. The reply data format is the same as the RS-232C commands. (RS-232C Communication in
failure when authentication is enabled.
Header Data length RS-232Ccommand Check Sum Connection ID
0x02 0x0D 13 bytes 1 byte 1 byte
Reply Error code0x1F 0x04 0x00
(13 bytes)
lower 8 bits from the header to the checksum.
to the reply data)
Send Data formatThe following formatting is added to the header (0 x 02), Data length (0 x 0D), Checksum (1 byte) and Connection ID (1 byte) of the RS-232C commands.
8. Other Functions
8.4 Command Control via the Network (continued)

100
Reply Connection ID
0x06 1 byte
Reply Connection ID
0x15 1 byte
Reply Error code Connection ID
0x1C 2 bytes 1 byte
Reply Data Connection ID
0x1D 2 bytes 1 byte
Reply Status code Connection ID
0x1F 2 bytes 1 byte
Reply Authentication Error code
Connection ID
0x1F 0x04 0x00 1 byte
8. Other Functions
8.4 Command Control via the Network (continued)
Reply Data formatThe connection ID (the data is same as the connection ID data on the sending data format) is attached to the RS-232C commands reply data.

101
Automatic Connection BreakThe TCP connection will be automatically disconnected after there is no communication for 30 seconds after being established.
The projector does not accept commands without authentication success when authentication is enabled. The projector uses a challenge response type authentication with an MD5 (Message Digest 5) algorithm.
Password and digest this data with the MD5 algorithm and add this in front of the commands to send.
Following is a sample if the Authentication Password is set to “password” and the random 8 bytes are “a572f60c”.
Authentication
1) Connect the projector.
“password” and it becomes “a572f60cpassword”.4) Digest this bind “a572f60cpassword” with MD5 algorithm.
It will be “e3d97429adffa11bce1f7275813d4bde”.5) Add this “e3d97429adffa11bce1f7275813d4bde” in front of the commands
and send the data.
6) When the sending data is correct, the command will be performed and the reply data will be returned. Otherwise, an authentication error will be returned.
authentication data can be omitted when the same connection.NOTE
8. Other Functions
8.4 Command Control via the Network (continued)

102
8. Other Functions
8.5 Crestron ConnectedTM
Crestron ConnectedTM
by Crestron Electronics, Inc. It is an application for managing and controlling the
For details of Crestron ConnectedTM, refer to the Crestron® website.http://www.crestron.com
The following communication interfaces can be used to manage the entire facility.® ® ®
® ® ®
out alert messages. For details of the software, refer to the following website.
2) Crestron e-Control®
Crestron e-Control®browser. (67)

103
9. Troubleshooting
9. Troubleshooting
Phenomenon: Cannot communicate with the projector. (Wired network)
Item to be checked SolutionsTurn on the projector.
want to use the network function in the standby
Is MAC address displayed correctly in the NETWORK
Contact your dealer when MAC address on the label put on the projector does not match MAC address displayed in the NETWORK INFORMATION – WIRED menu.
Are the network settings such as Check the network settings in the NETWORK INFORMATION – WIRED menu. Consult with your network administrator for details.
Consult with your network administrator.
Is the same network address set The same network address cannot be used
Is the wired network adapter of Refer to the user’s manual for the computer and enable the wired network adapter.

104
9. Troubleshooting
Phenomenon: Cannot communicate with the projector. (Wireless network)
Item to be checked SolutionsTurn on the projector.
want to use the network function in the standby
Are the network settings such as Check the network settings in the NETWORK INFORMATION with your network administrator for details.
inserted into USB TYPE A port of
Is MAC address displayed correctly in the NETWORK INFORMATION
When MAC address displayed in NETWORK
wireless adapter again.
adapter may be broken. Contact your dealer.
adapter may be broken. Contact your dealer.

105
9. Troubleshooting
Item to be checked SolutionsConsult with your network administrator.
Is the wireless network to Set the encryption settings of the projector again and reconnect.
Is an encryption method which is not supported by the projector
The followings are encryption methods supported by the projector:
WPA2-PSK(AES)WPA2-PSK(TKIP)WPA-PSK(AES)WPA-PSK(TKIP)WEP128bit
WEP64bit
This projector cannot be connected to the wireless network using the encryption methods
Is signal strength of wireless network displayed in the SSID When the projector is near the steel door,
from the door.Consult with your network administrator
because there may be an interfering wireless
Is the same network address set The same network address cannot be used
Is the wireless network adapter Refer to the user’s manual for the computer and enable the wireless network adapter.
Phenomenon: Cannot communicate with the projector. (Wireless network) (continued)

106
9. Troubleshooting
Item to be checked Solutions・
connected to the projector in Simple Access Point mode.・When the projector is connected to the
Is the DHCP setting of the Enable the DHCP setting of the computer.Refer to the user’s manual of the computer or
of network and wireless connection of the computer.
It may be better by changing the channel setting.
Phenomenon: Cannot communicate with the projector. (Wireless network) (continued)

107
9. Troubleshooting
Item to be checked SolutionsIs the same network address set The same network address cannot be used
Are you trying to access to to different network.
Phenomenon: Web(Projector Web Control) is not displayed correctly.
Item to be checked SolutionsEnter the IP address of the projector in Web browser.
How to set is different depending on the Web browser. Refer to Help of Web browser, etc. for details.
Is recommended Web browser Recommended Web browsers are Internet Explorer 8/9/10/11.Projector Web Control may not displayed correctly except in recommended browser.
Is the cache of the screen Clear the cache.How to set is different depending on the Web browser. Refer to Help of Web browser, etc. for details.

108
9. Troubleshooting
Phenomenon: Crestron e-Control® is not displayed.
Item to be checked SolutionsHas Adobe® Flash® Player been Adobe® Flash® Player is required to display
Crestron e-Control®.Install Adobe® Flash® Player.
Is Web browser that does not support Adobe® Flash® Player
® Flash® Player.
Are Crestron e-Control® settings on Network Settings – Other Setup screen of the Projector
Enable Crestron e-Control® settings on Network Settings – Other Setup screen of the Projector Web Control.
Phenomenon: Cannot send an e-mail correctly.
Item to be checked SolutionsCheck if a test e-mail is sent correctly by pressing the [Send Test Mail] button on the Mail Settings screen of the Projector Web Control.
Check the settings on the Mail Settings screen of the Projector Web Control.
Are the settings of Sender E-mail
Is only e-mail regarding the be sent on the Mail Settings screen of the Projector Web Control.

109
9. Troubleshooting
Item to be checked SolutionsCheck the settings on the Mail Settings screen of the Projector Web Control.
the e-mail address in the mail Consult with your network administrator.
Phenomenon: The schedule is not executed correctly.
Item to be checked SolutionsTurn on the projector.
to use the schedule function in the standby
Check the settings of Date and Time.
Is the image data to be displayed in the schedule function
set.)
Register the image data to be displayed with
software.
Is the message data to be displayed in the schedule
set.)
Register the message data to be displayed with
software.
Is the lamp of the projector are not executed when the lamp is not lighting. Set the program of the schedule function so
lighting.

110
9. Troubleshooting
Item to be checked SolutionsIs the program to be executed Check the settings of Schedule Settings of the
Projector Web Control.
time.Set them to be executed at the different time or change the order.
* The schedule function may not operate correctly depending on the status of the projector.
Phenomenon: The time settings are not correct.
Item to be checked SolutionsSet the battery.The battery is considered to be exhausted if the time is off soon after setting date and time. In that case, replace the battery.
Check the settings of Date/Time Settings menu of the Projector Web Control or DATE AND TIME menu of the projector.
Is the projector connected to the network correctly when getting
Connect to the network.
Consult with your network administrator
Is the time difference set correctly the correct time is not displayed if the time difference is not set.Set the time difference.

111
9. Troubleshooting
Phenomenon:
Item to be checked Solutions
TYPE menu.
Are the serial settings set Check the serial settings of the projector and

112
10. Warranty and after-sales service
should occur, stop using the projector immediately.
company. They will tell you what warranty condition is applied.
for this projector.
http://www.hitachi-america.us/projectorshttp://www.hitachiserviceeu.com/support/guides/userguides.htm
Trademark acknowledgment® and Internet Explorer®, Windows® ® are registered trademark of
® and Flash® are registered trademarks of Adobe Systems Incorporated.® is a registered trademark of Intel Corporation.
® is a registered trademark of Sun Microsystems, Inc.TM
®, Crestron e-Control®, e-Control®,Crestron ConnectedTM ®,Crestron® TM are trademarks or registered trademarks of Crestron