Embed Size (px)
Citation preview

© Copyright Centrica Connected Home Limited con sede in Millstream,Maidenhead Road, Windsor, Berkshire, SL4 5GD, UK. Tutti i diritti riservati. IGHTGIT0917V1
Hai bisogno di aiuto? Se sei un tecnico qualificato e hai bisogno di assistenza per l’installazione di Hive Active Heating, consulta la pagina di assistenza tecnica hivehome.com/installationSe hai bisogno di ulteriore aiuto, invia un’email all’assistenza all’indirizzo [email protected]
Need help? If you’re a qualified professional installing Hive Active Heating yourself and need any help during the installation process, just visit our technical support page at hivehome.com/installationIf you need further help, you can email our support team at [email protected]
Questo termostato è classificato di categoria I per la regolazione della temperatura e contribuisce per l’1% al risparmio energetico stagionale ambientale.
This thermostat is a Class I temperature control and contributes 1% to seasonal space heating energy efficiency.
Hive Active HeatingTermostato Manuale d’installazioneThermostat installation guide
2
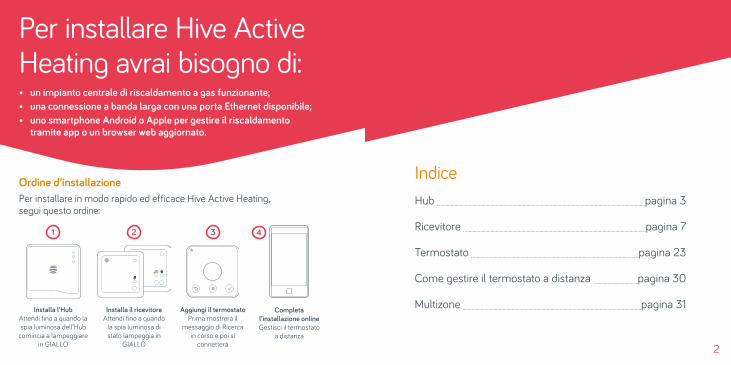
Ordine d’installazionePer installare in modo rapido ed efficace Hive Active Heating, segui questo ordine:
Per installare Hive Active Heating avrai bisogno di:• un impianto centrale di riscaldamento a gas funzionante;• una connessione a banda larga con una porta Ethernet disponibile;• uno smartphone Android o Apple per gestire il riscaldamento
tramite app o un browser web aggiornato.
Aggiungi il termostato Prima mostrerà il
messaggio di Ricerca in corso e poi si
connetterà
3
Completa l’installazione online Gestisci il termostato
a distanza
4
Installa l’Hub Attendi fino a quando la spia luminosa dell’Hub
comincia a lampeggiare in GIALLO
1
Ricordati che, per la tua sicurezza, Hive Active Heating dovrebbe essere sempre installato da un tecnico qualificato.
IndiceHub pagina 3
Ricevitore pagina 7
Termostato pagina 23
Come gestire il termostato a distanza pagina 30
Multizone pagina 31Installa il ricevitore Attendi fino a quando
la spia luminosa di stato lampeggia in
GIALLO
2
Status
Hotwater
Centralheating
Status
Hotwater
Centralheating
3 4
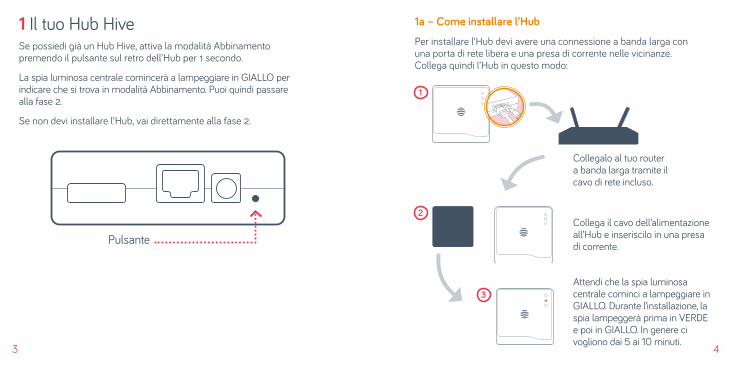
1 Il tuo Hub HiveSe possiedi già un Hub Hive, attiva la modalità Abbinamento premendo il pulsante sul retro dell’Hub per 1 secondo.
La spia luminosa centrale comincerà a lampeggiare in GIALLO per indicare che si trova in modalità Abbinamento. Puoi quindi passare alla fase 2.
Se non devi installare l’Hub, vai direttamente alla fase 2.
1a – Come installare l’Hub
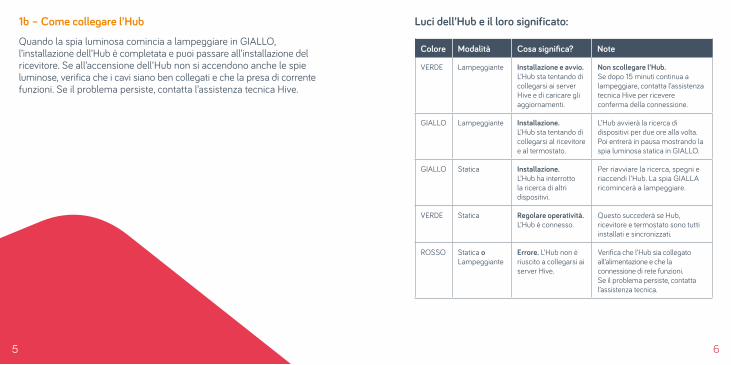
Per installare l’Hub devi avere una connessione a banda larga con una porta di rete libera e una presa di corrente nelle vicinanze. Collega quindi l’Hub in questo modo:
Collegalo al tuo router a banda larga tramite il cavo di rete incluso.
Collega il cavo dell’alimentazione all’Hub e inseriscilo in una presa di corrente.
Attendi che la spia luminosa centrale cominci a lampeggiare in GIALLO. Durante l’installazione, la spia lampeggerà prima in VERDE e poi in GIALLO. In genere ci vogliono dai 5 ai 10 minuti.
Pulsante
1
2
3
6
Luci dell’Hub e il loro significato:1b – Come collegare l’Hub
Quando la spia luminosa comincia a lampeggiare in GIALLO, l’installazione dell’Hub è completata e puoi passare all’installazione del ricevitore. Se all’accensione dell’Hub non si accendono anche le spie luminose, verifica che i cavi siano ben collegati e che la presa di corrente funzioni. Se il problema persiste, contatta l’assistenza tecnica Hive.
Colore Modalità Cosa significa? Note
VERDE Lampeggiante Installazione e avvio. L’Hub sta tentando dicollegarsi ai server Hive e di caricare gli aggiornamenti.
Non scollegare l’Hub.Se dopo 15 minuti continua a lampeggiare, contatta l’assistenza tecnica Hive per ricevere conferma della connessione.
GIALLO Lampeggiante Installazione. L’Hub sta tentando di collegarsi al ricevitoree al termostato.
L’Hub avvierà la ricerca di dispositivi per due ore alla volta. Poi entrerà in pausa mostrando la spia luminosa statica in GIALLO.
GIALLO Statica Installazione. L’Hub ha interrotto la ricerca di altri dispositivi.
Per riavviare la ricerca, spegni e riaccendi l’Hub. La spia GIALLA ricomincerà a lampeggiare.
VERDE Statica Regolare operatività. L’Hub è connesso.
Questo succederà se Hub, ricevitore e termostato sono tutti installati e sincronizzati.
ROSSO Statica o Lampeggiante
Errore. L’Hub non è riuscito a collegarsi ai server Hive.
Verifica che l’Hub sia collegato all’alimentazione e che la connessione di rete funzioni. Se il problema persiste, contatta l’assistenza tecnica.
5
7 8
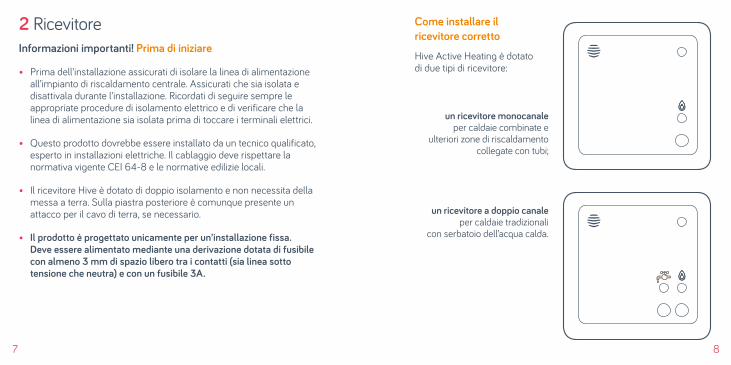
un ricevitore monocanaleper caldaie combinate e
ulteriori zone di riscaldamento collegate con tubi;
un ricevitore a doppio canaleper caldaie tradizionali
con serbatoio dell’acqua calda.
2 RicevitoreInformazioni importanti! Prima di iniziare
• Prima dell’installazione assicurati di isolare la linea di alimentazione all’impianto di riscaldamento centrale. Assicurati che sia isolata e disattivala durante l’installazione. Ricordati di seguire sempre le appropriate procedure di isolamento elettrico e di verificare che la linea di alimentazione sia isolata prima di toccare i terminali elettrici.
• Questo prodotto dovrebbe essere installato da un tecnico qualificato, esperto in installazioni elettriche. Il cablaggio deve rispettare la normativa vigente CEI 64-8 e le normative edilizie locali.
• Il ricevitore Hive è dotato di doppio isolamento e non necessita della messa a terra. Sulla piastra posteriore è comunque presente un attacco per il cavo di terra, se necessario.
• Il prodotto è progettato unicamente per un’installazione fissa. Deve essere alimentato mediante una derivazione dotata di fusibile con almeno 3 mm di spazio libero tra i contatti (sia linea sotto tensione che neutra) e con un fusibile 3A.
Come installare il ricevitore corretto
Hive Active Heating è dotato di due tipi di ricevitore:
Status
Hotwater
Centralheating
Status
Hotwater
Centralheating

Etichette cavi
Attacca le etichette ai cavi per aiutarti a distinguerli durante l’installazione.
L’etichetta va qui
2a – Come installare il ricevitore
Il ricevitore deve essere installato nelle vicinanze della caldaia o dell’impianto di riscaldamento centrale. Deve essere almeno a 30 cm di distanza da grandi oggetti in metallo, come la caldaia o il boiler dell’acqua calda, per evitare interferenze con i segnali radio. Assicurati anche di evitare cavi e tubature presenti nei muri. Dopo aver individuato la posizione ideale, installa il ricevitore seguendo queste istruzioni.
Allenta le viti sul fondo del ricevitore e rimuovi la placca posteriore separando la base dal pannello frontale.
9 10
1
Status
Hotwater
Centralheating
11 12
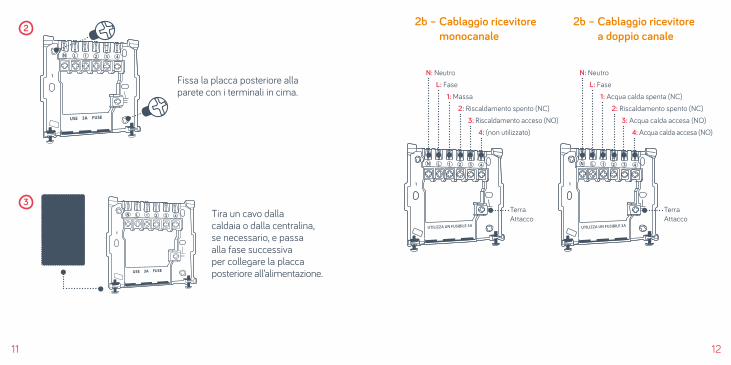
Tira un cavo dallacaldaia o dalla centralina,se necessario, e passaalla fase successivaper collegare la placca posteriore all’alimentazione.
Fissa la placca posteriore alla parete con i terminali in cima.
2b – Cablaggio ricevitore monocanale
2b – Cablaggio ricevitore a doppio canale
N: NeutroL: Fase
1: Massa
3: Riscaldamento acceso (NO)2: Riscaldamento spento (NC)
4: (non utilizzato)
Terra Attacco
N: NeutroL: Fase
1: Acqua calda spenta (NC)
3: Acqua calda accesa (NO)2: Riscaldamento spento (NC)
4: Acqua calda accesa (NO)
Terra Attacco
2
3

13 14
2c – Collaudo della caldaia
Per collaudare il collegamento tra caldaia e ricevitore segui queste istruzioni:
1 Verifica visivamente il cablaggio per assicurarti che i collegamenti siano stati eseguiti correttamente, facendo riferimento alle etichette che hai attaccato ai cavi e a eventuali foto effettuate prima dell’installazione
2 Assicurati che il pannello anteriore del ricevitore sia montato prima di avviare la caldaia
3 Verifica che la spia luminosa centrale dell’Hub lampeggi in GIALLO (se non è così, torna al passaggio 1)
4 Riattiva la corrente all’impianto di riscaldamento centrale: la spia luminosa di stato del ricevitore dovrebbe lampeggiare in GIALLO. Significa che è pronto a collegarsi all’Hub e al termostato
5 Collauda il collegamento del ricevitore all’impianto di riscaldamento premendo il pulsante del riscaldamento centrale
. La spia luminosa VERDE sopra il pulsante del riscaldamento centrale dovrebbe accendersi e la caldaia avviarsi.
Dopo aver completato questi collaudi, lascia il ricevitore acceso con la spia luminosa di stato lampeggiante: significa che è pronto a collegarsi all’Hub e al termostato. Quindi installa il termostato.
Informazioni importanti! Sostituire il pannello comandi esistente
Se è presente un timer a zona singola o un ricevitore wireless, sostituiscili con il ricevitore Hive. La placca posteriore dei ricevitori Hive è compatibile con un’ampia serie di pannelli di controllo per caldaie, tra cui probabilmente anche il tuo.
Se il pannello comandi esistente non è dotato di una placca posteriore compatibile, rimuovilo completamente sostituendolo con il ricevitore Hive.
Se il pannello comandi esistente è dotato di una placca posteriore compatibile, rimuovi solo il pannello frontale e sostituiscilo con quello del ricevitore Hive.
Informazioni importanti! Come sostituire il termostato esistente
Se devi sostituire un vecchio termostato cablato, assicurati che il cablaggio e gli allacciamenti esistenti siano sicuri. Puoi farlo scollegando o collegando in parallelo il vecchio termostato alla centralina o alla caldaia. Se rimangono dei cavi presso la postazione del termostato wireless, devono essere protetti e coperti per evitarne l’accesso. Se devi sostituire un termostato wireless, staccalo dalla parete e togli le batterie.
15 16
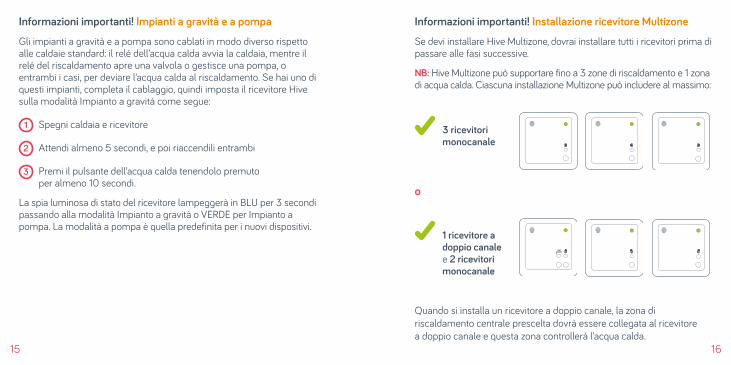
Informazioni importanti! Impianti a gravità e a pompa
Gli impianti a gravità e a pompa sono cablati in modo diverso rispetto alle caldaie standard: il relé dell’acqua calda avvia la caldaia, mentre il relé del riscaldamento apre una valvola o gestisce una pompa, o entrambi i casi, per deviare l’acqua calda al riscaldamento. Se hai uno di questi impianti, completa il cablaggio, quindi imposta il ricevitore Hive sulla modalità Impianto a gravità come segue:
1 Spegni caldaia e ricevitore
2 Attendi almeno 5 secondi, e poi riaccendili entrambi
3 Premi il pulsante dell’acqua calda tenendolo premuto per almeno 10 secondi.
La spia luminosa di stato del ricevitore lampeggerà in BLU per 3 secondi passando alla modalità Impianto a gravità o VERDE per Impianto a pompa. La modalità a pompa è quella predefinita per i nuovi dispositivi.
Informazioni importanti! Installazione ricevitore Multizone
Se devi installare Hive Multizone, dovrai installare tutti i ricevitori prima di passare alle fasi successive.
NB: Hive Multizone può supportare fino a 3 zone di riscaldamento e 1 zona di acqua calda. Ciascuna installazione Multizone può includere al massimo:
Quando si installa un ricevitore a doppio canale, la zona di riscaldamento centrale prescelta dovrà essere collegata al ricevitore a doppio canale e questa zona controllerà l’acqua calda.
1 ricevitore a doppio canale e 2 ricevitori monocanale
3 ricevitori monocanale
o
Consigli: consulta pagina 13 (sezione 2c) per verificare la corretta installazione dei ricevitori e la corretta gestione dell’impianto di riscaldamento. Etichetta i ricevitori, così saprai sempre quale ricevitore controlla quale zona.Consulta pagina 13 per l’installazione di Multizone.
Informazioni importanti! Installazione indipendente
In modalità Indipendente, il termostato funzionerà come un normale termostato wireless programmabile senza le funzionalità di gestione del riscaldamento a distanza di Hive Active Heating.
17 18

Per tornare alla modalità Riscaldamento a distanza:
a. Spegni e riaccendi l’Hub. Se comincia a lampeggiare in GIALLO, passa alla fase b. Se tutte le spie luminose si spengono e l’Hub non lampeggia in GIALLO, accedi a hivehome.com, apri la pagina Dispositivi e fai clic su Aggiungi dispositivi. L’Hub dovrebbe cominciare a lampeggiare in GIALLO.
b. Ora segui i passaggi 1-5 illustrati a pagina 19, tenendo presente che le spie luminose saranno diverse. Nel passaggio 3, la spia luminosa di stato del ricevitore lampeggerà inizialmente in BIANCO/ROSA e nel passaggio 4 diventerà GIALLA (per il Riscaldamento a distanza) dopo aver premuto il pulsante del riscaldamento centrale .
Puoi verificare in qualsiasi momento la modalità del ricevitore spegnendolo e riaccendendolo. Una volta riacceso, la spia luminosa di stato lampeggerà per 5 secondi, in GIALLO per Hive Active Heating, in BIANCO per la modalità Indipendente.
Attivazione della modalità Indipendente
1 Rimuovi le batterie dal termostato
2 Spegni caldaia e ricevitore.
3 Attendi almeno 5 secondi, quindi riaccendili entrambi. La spia luminosa di stato del ricevitore comincerà a lampeggiare in GIALLO.
4 Premi il pulsante del riscaldamento tenendolo premuto per almeno 10 secondi, finché la spia luminosa comincerà a lampeggiare in BIANCO. Il ricevitore si trova ora in modalità Indipendente e sta cercando un termostato.
5 Inserisci le batterie nel termostato, tieni premuto i pulsanti Menu e Indietro sul termostato, seguendo le istruzioni per l’impostazione di fabbrica mostrate sullo schermo. Dopo circa 10 secondi, sullo schermo saranno visualizzate le scritte “Benvenuto” e “Ricerca in corso...”. Se il termostato mostra la scritta “RICOLLEGA”, prova a eseguire nuovamente i passaggi 1 e 5.
19 20
21 22
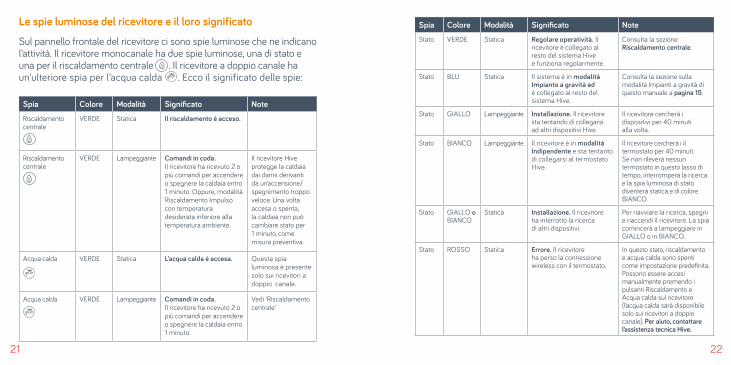
Spia Colore Modalità Significato Note
Riscaldamentocentrale
VERDE Statica Il riscaldamento è acceso.
Riscaldamentocentrale
VERDE Lampeggiante Comandi in coda. Il ricevitore ha ricevuto 2 o più comandi per accendere o spegnere la caldaia entro 1 minuto. Oppure, modalitàRiscaldamento Impulso con temperatura desiderata inferiore allatemperatura ambiente.
Il ricevitore Hive protegge la caldaia dai danni derivanti da un’accensione/spegnimento troppo veloce. Una volta accesa o spenta, la caldaia non può cambiare stato per 1 minuto, come misura preventiva.
Acqua calda
VERDE Statica L’acqua calda è accesa. Questa spia luminosa è presente solo sui ricevitori a doppio canale.
Acqua calda VERDE Lampeggiante Comandi in coda. Il ricevitore ha ricevuto 2 o più comandi per accendere o spegnere la caldaia entro 1 minuto.
Vedi ‘Riscaldamentocentrale’
Spia Colore Modalità Significato Note
Stato VERDE Statica Regolare operatività. Il ricevitore è collegato alresto del sistema Hivee funziona regolarmente.
Consulta la sezione Riscaldamento centrale.
Stato BLU Statica Il sistema è in modalità Impianto a gravità ed è collegato al resto del sistema Hive.
Consulta la sezione sulla modalità Impianti a gravità di questo manuale a pagina 15.
Stato GIALLO Lampeggiante Installazione. Il ricevitoresta tentando di collegarsiad altri dispositivi Hive.
Il ricevitore cercherà i dispositivi per 40 minuti alla volta.
Stato BIANCO Lampeggiante Il ricevitore è in modalità Indipendente e sta tentanto di collegarsi al termostato Hive.
Il ricevitore cercherà i il termostato per 40 minuti. Se non rileverà nessun termostato in questo lasso di tempo, interromperà la ricerca e la spia luminosa di stato diventerà statica e di colore BIANCO.
Stato GIALLO o BIANCO
Statica Installazione. Il ricevitoreha interrotto la ricercadi altri dispositivi.
Per riavviare la ricerca, spegnie riaccendi il ricevitore. La spia comincerà a lampeggiare in GIALLO o in BIANCO.
Stato ROSSO Statica Errore. Il ricevitoreha perso la connessionewireless con il termostato.
In questo stato, riscaldamento e acqua calda sono spenti come impostazione predefinita. Possono essere accesi manualmente premendo i pulsanti Riscaldamento e Acqua calda sul ricevitore (l’acqua calda sarà disponibile solo sui ricevitori a doppio canale). Per aiuto, contattare l’assistenza tecnica Hive.
Le spie luminose del ricevitore e il loro significato
Sul pannello frontale del ricevitore ci sono spie luminose che ne indicano l’attività. Il ricevitore monocanale ha due spie luminose, una di stato e una per il riscaldamento centrale . Il ricevitore a doppio canale ha un’ulteriore spia per l’acqua calda . Ecco il significato delle spie:
23 24
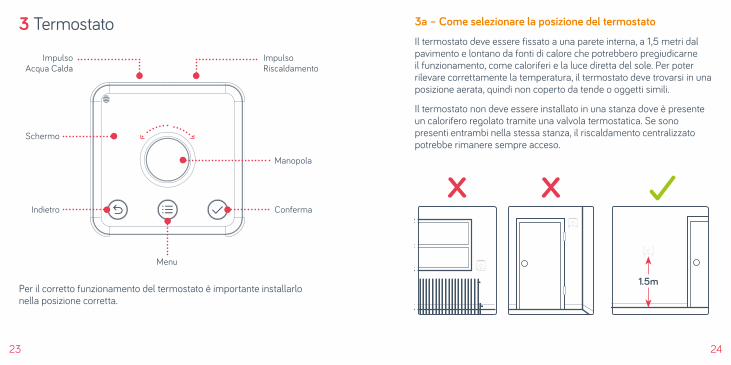
Per il corretto funzionamento del termostato è importante installarlo nella posizione corretta.
1.5m
XX
3a – Come selezionare la posizione del termostato
Il termostato deve essere fissato a una parete interna, a 1,5 metri dal pavimento e lontano da fonti di calore che potrebbero pregiudicarne il funzionamento, come caloriferi e la luce diretta del sole. Per poter rilevare correttamente la temperatura, il termostato deve trovarsi in una posizione aerata, quindi non coperto da tende o oggetti simili.
Il termostato non deve essere installato in una stanza dove è presente un calorifero regolato tramite una valvola termostatica. Se sono presenti entrambi nella stessa stanza, il riscaldamento centralizzato potrebbe rimanere sempre acceso.
3 Termostato
Impulso Riscaldamento
Impulso Acqua Calda
Menu
Manopola
Schermo
Indietro Conferma
25 26
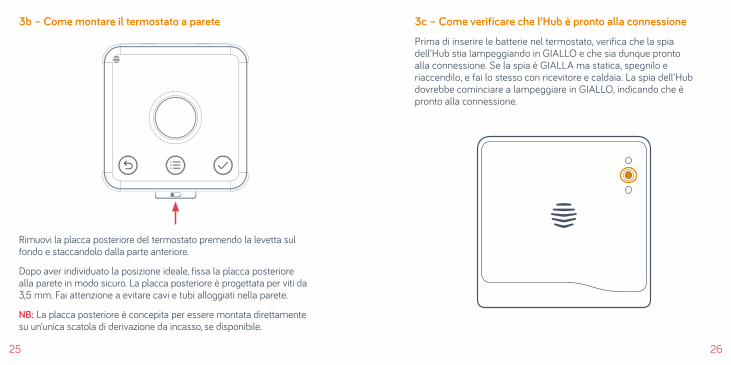
3b – Come montare il termostato a parete
Rimuovi la placca posteriore del termostato premendo la levetta sul fondo e staccandolo dalla parte anteriore.
Dopo aver individuato la posizione ideale, fissa la placca posteriore alla parete in modo sicuro. La placca posteriore è progettata per viti da 3,5 mm. Fai attenzione a evitare cavi e tubi alloggiati nella parete.
NB: La placca posteriore è concepita per essere montata direttamente su un’unica scatola di derivazione da incasso, se disponibile.
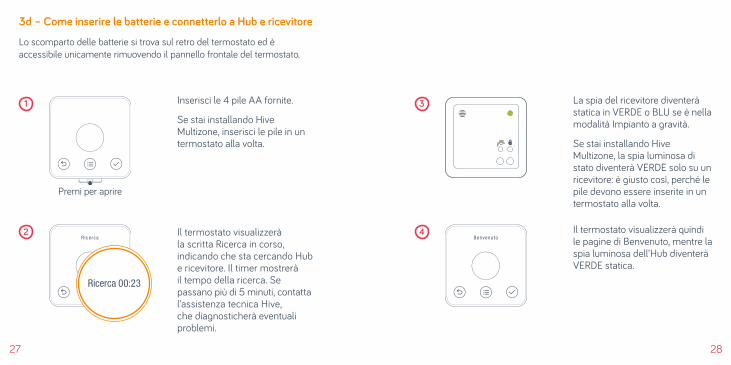
3c – Come verificare che l’Hub è pronto alla connessione
Prima di inserire le batterie nel termostato, verifica che la spia dell’Hub stia lampeggiando in GIALLO e che sia dunque pronto alla connessione. Se la spia è GIALLA ma statica, spegnilo e riaccendilo, e fai lo stesso con ricevitore e caldaia. La spia dell’Hub dovrebbe cominciare a lampeggiare in GIALLO, indicando che è pronto alla connessione.
27 28
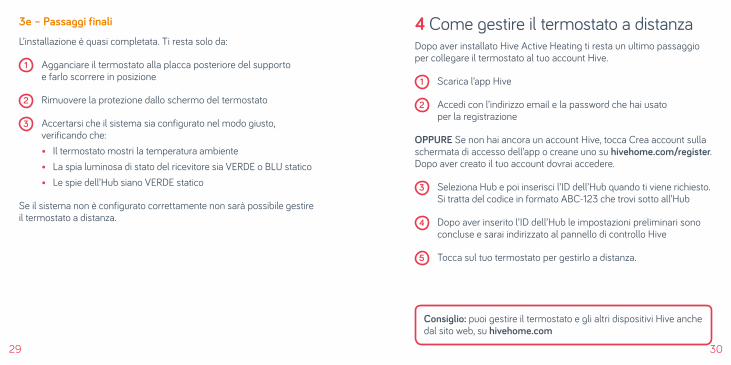
3d – Come inserire le batterie e connetterlo a Hub e ricevitore
Lo scomparto delle batterie si trova sul retro del termostato ed è accessibile unicamente rimuovendo il pannello frontale del termostato.
Inserisci le 4 pile AA fornite.
Se stai installando Hive Multizone, inserisci le pile in un termostato alla volta.
Il termostato visualizzerà la scritta Ricerca in corso, indicando che sta cercando Hub e ricevitore. Il timer mostrerà il tempo della ricerca. Se passano più di 5 minuti, contatta l’assistenza tecnica Hive, che diagnosticherà eventuali problemi.
La spia del ricevitore diventerà statica in VERDE o BLU se è nella modalità Impianto a gravità.
Se stai installando Hive Multizone, la spia luminosa di stato diventerà VERDE solo su un ricevitore: è giusto così, perché le pile devono essere inserite in un termostato alla volta.
Il termostato visualizzerà quindi le pagine di Benvenuto, mentre la spia luminosa dell’Hub diventerà VERDE statica.
Premi per aprire
1
Ricerca
Ricerca 00:23
2Benvenuto
4
3Status
Hotwater
Centralheating
30
3e – Passaggi finali
L’installazione è quasi completata. Ti resta solo da:
1 Agganciare il termostato alla placca posteriore del supporto e farlo scorrere in posizione
2 Rimuovere la protezione dallo schermo del termostato
3 Accertarsi che il sistema sia configurato nel modo giusto, verificando che:
• Il termostato mostri la temperatura ambiente • La spia luminosa di stato del ricevitore sia VERDE o BLU statico • Le spie dell’Hub siano VERDE statico
Se il sistema non è configurato correttamente non sarà possibile gestire il termostato a distanza.
4 Come gestire il termostato a distanzaDopo aver installato Hive Active Heating ti resta un ultimo passaggio per collegare il termostato al tuo account Hive.
1 Scarica l’app Hive
2 Accedi con l’indirizzo email e la password che hai usato per la registrazione
OPPURE Se non hai ancora un account Hive, tocca Crea account sulla schermata di accesso dell’app o creane uno su hivehome.com/register. Dopo aver creato il tuo account dovrai accedere.
3 Seleziona Hub e poi inserisci l’ID dell’Hub quando ti viene richiesto. Si tratta del codice in formato ABC-123 che trovi sotto all’Hub
4 Dopo aver inserito l’ID dell’Hub le impostazioni preliminari sono concluse e sarai indirizzato al pannello di controllo Hive
5 Tocca sul tuo termostato per gestirlo a distanza.
Consiglio: puoi gestire il termostato e gli altri dispositivi Hive anche dal sito web, su hivehome.com
29
31 32
Per completare l’installazione delle zone di riscaldamento rimanenti, serviti dell’Hub o dell’app Hive o del pannello di controllo online:
5a – Con l’Hub 1 Premi il pulsante sul retro dell’Hub
per 1 secondo e poi rilascialo. La spia luminosa centrale comincerà a lampeggiare in GIALLO
2 Ora inserisci le pile in uno dei termostati
3 Attendi finché il termostato non mostra più la scritta Ricerca in corso. Verifica che la spia luminosa di un ricevitore che prima lampeggiava in GIALLO sia ora VERDE statico
4 Se hai altre zone da installare, ripeti i passaggi 2-3
5 Dopo aver aggiunto tutte le zone, premi il pulsante sul retro dell’Hub per uscire dalla modalità Accoppiamento. La spia luminosa centrale smetterà di lampeggiare.
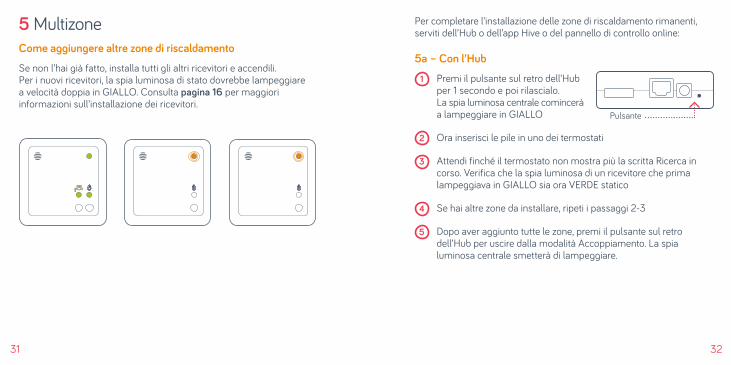
5 MultizoneCome aggiungere altre zone di riscaldamento
Se non l’hai già fatto, installa tutti gli altri ricevitori e accendili. Per i nuovi ricevitori, la spia luminosa di stato dovrebbe lampeggiare a velocità doppia in GIALLO. Consulta pagina 16 per maggiori informazioni sull’installazione dei ricevitori.
Pulsante
Status
Hotwater
Centralheating
33 34
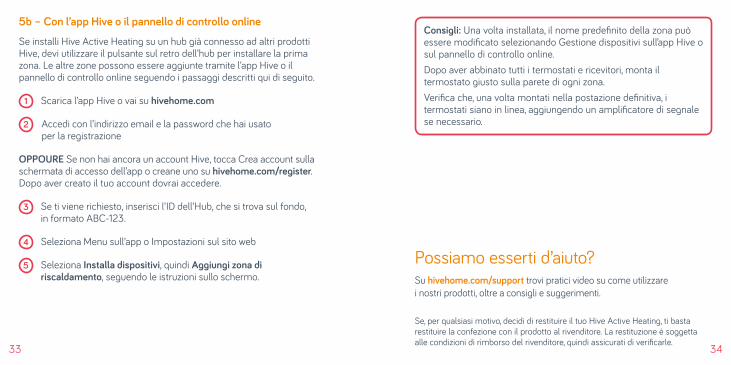
5b – Con l’app Hive o il pannello di controllo online
Se installi Hive Active Heating su un hub già connesso ad altri prodotti Hive, devi utilizzare il pulsante sul retro dell’hub per installare la prima zona. Le altre zone possono essere aggiunte tramite l’app Hive o il pannello di controllo online seguendo i passaggi descritti qui di seguito.
1 Scarica l’app Hive o vai su hivehome.com
2 Accedi con l’indirizzo email e la password che hai usato per la registrazione
OPPOURE Se non hai ancora un account Hive, tocca Crea account sulla schermata di accesso dell’app o creane uno su hivehome.com/register. Dopo aver creato il tuo account dovrai accedere.
3 Se ti viene richiesto, inserisci l’ID dell’Hub, che si trova sul fondo, in formato ABC-123.
4 Seleziona Menu sull’app o Impostazioni sul sito web
5 Seleziona Installa dispositivi, quindi Aggiungi zona di riscaldamento, seguendo le istruzioni sullo schermo.
Consigli: Una volta installata, il nome predefinito della zona può essere modificato selezionando Gestione dispositivi sull’app Hive o sul pannello di controllo online.Dopo aver abbinato tutti i termostati e ricevitori, monta il termostato giusto sulla parete di ogni zona.Verifica che, una volta montati nella postazione definitiva, i termostati siano in linea, aggiungendo un amplificatore di segnale se necessario.
Se, per qualsiasi motivo, decidi di restituire il tuo Hive Active Heating, ti basta restituire la confezione con il prodotto al rivenditore. La restituzione è soggetta alle condizioni di rimborso del rivenditore, quindi assicurati di verificarle.
Possiamo esserti d’aiuto? Su hivehome.com/support trovi pratici video su come utilizzare i nostri prodotti, oltre a consigli e suggerimenti.
36
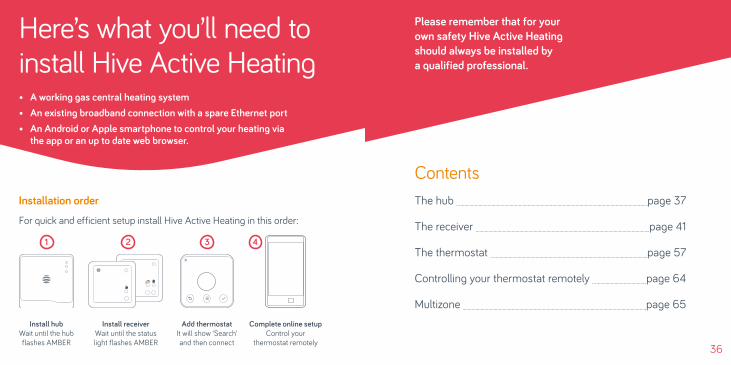
Installation order
For quick and efficient setup install Hive Active Heating in this order:
Install hub Wait until the hub flashes AMBER
Here’s what you’ll need to install Hive Active Heating• A working gas central heating system• An existing broadband connection with a spare Ethernet port• An Android or Apple smartphone to control your heating via
the app or an up to date web browser.
Add thermostat It will show ‘Search’ and then connect
3
Complete online setup Control your
thermostat remotely
Install receiver Wait until the status light flashes AMBER
4 1
Please remember that for your own safety Hive Active Heating should always be installed by a qualified professional.
ContentsThe hub page 37
The receiver page 41
The thermostat page 57
Controlling your thermostat remotely page 64
Multizone page 65
2
Status
Hotwater
Centralheating
Status
Hotwater
Centralheating
37 38
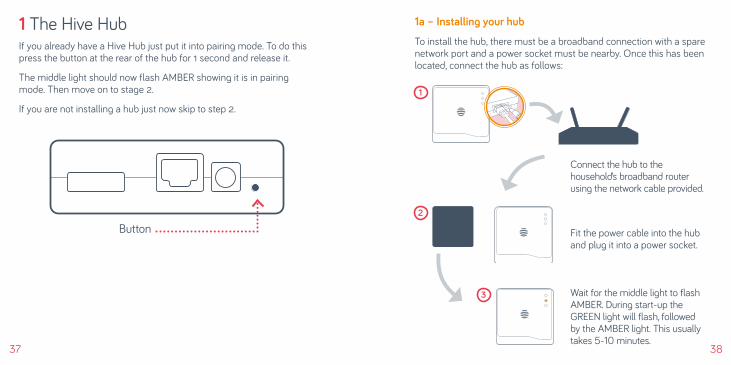
1 The Hive HubIf you already have a Hive Hub just put it into pairing mode. To do this press the button at the rear of the hub for 1 second and release it.
The middle light should now flash AMBER showing it is in pairing mode. Then move on to stage 2.
If you are not installing a hub just now skip to step 2.
1a – Installing your hub
To install the hub, there must be a broadband connection with a spare network port and a power socket must be nearby. Once this has been located, connect the hub as follows:
Button
Connect the hub to the household’s broadband router using the network cable provided.
Fit the power cable into the hub and plug it into a power socket.
Wait for the middle light to flash AMBER. During start-up the GREEN light will flash, followed by the AMBER light. This usually takes 5-10 minutes.
1
2
3

40
Hub lights and what they mean:1b – Connecting the hub
Once the AMBER light is flashing, the hub is set up and you can move onto installing the receiver. If no lights are displayed immediately after the hub has been turned on, check all cables are connected and the power socket works. If the problem still persists contact Hive Technical Support.
39
Colour Pattern What does this mean? Notes
GREEN Flashing Installation and start-up. The hub is attempting to connect to the Hive servers and update itself.
Do not disconnect the hub. If flashing continues after 15 minutes, contact Hive Technical Support to confirm that it has connected.
AMBER Flashing Installation. The hub is actively seeking to connect to the receiver and thermostat.
The hub will search for devices for 2 hours at a time. It will then pause, and show solid AMBER.
AMBER Solid Installation. The hub has paused its search for other devices.
To restart the search, simply turn the hub off then on. The AMBER flashing light should then return.
GREEN Solid Normal operation. The hub is connected.
This happens once the hub, receiver and thermostat are all installed and synchronised.
RED Solid or Flashing
Error. The hub has failed to connect to the Hive servers.
Check that the hub is plugged in and that the broadband is working. If the problem persists, call Technical Support.

41 42
Single channel receiver for combi boilers and additional
plumbed heating zones
Dual channel receiver for conventional boilers
with hot water tanks
2 The receiverImportant information: Before you get started
• Before fitting, isolate the mains electricity supply to the central heating system. Confirm it is isolated and secured in the off position for the duration of the installation. Remember to always follow appropriate safe electrical isolation procedures and test to confirm that the supply is isolated before touching any electrical connections.
• This product should only be installed by an electrically skilled person competent in the installation of electrical accessories. The wiring must comply to the current edition of CEI 64-8 and the appropriate Building Regulations or Standards in place.
• The Hive receiver is double insulated so doesn’t need an earth connection. You’ll find a tether on the backplate to secure an earth wire if needed.
• This product is designed for fixed wiring installation only. It must be supplied via a switched fused spur with a minimum contact separation of 3mm (both live and neutral) and fitted with a 3A fuse.
Installing the correct receiver
Hive Active Heating has two types of receiver:
Status
Hotwater
Centralheating
Status
Hotwater
Centralheating
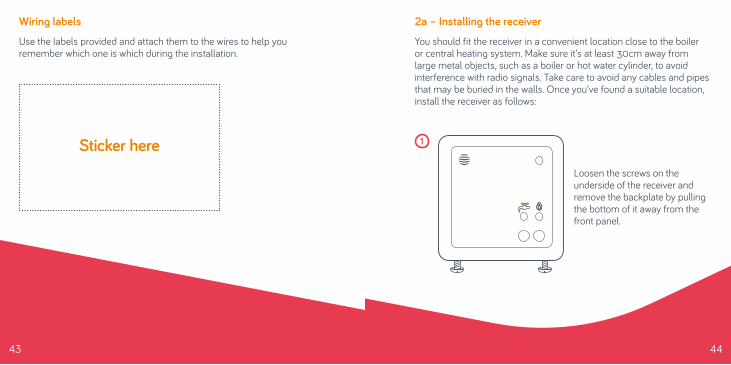
Wiring labels
Use the labels provided and attach them to the wires to help you remember which one is which during the installation.
Sticker here
2a – Installing the receiver
You should fit the receiver in a convenient location close to the boiler or central heating system. Make sure it’s at least 30cm away from large metal objects, such as a boiler or hot water cylinder, to avoid interference with radio signals. Take care to avoid any cables and pipes that may be buried in the walls. Once you’ve found a suitable location, install the receiver as follows:
Loosen the screws on the underside of the receiver and remove the backplate by pulling the bottom of it away from the front panel.
43 44
1
Status
Hotwater
Centralheating

45 46
Run cable from the boiler or wiring centre (if required), then continue on to the next section to wire up the backplate.
Fix the backplate to the wall with the terminals at the top.
2b – Single channel receiver wiring
2b – Dual channel receiver wiring
N: Permanent neutralL: Permanent live
1: Common
3: Heating on (NO)2: Heating off (NC)
4: (unused)
Earth tether
N: Permanent neutralL: Permanent live
1: Hot water off (NC)
3: Hot water on (NO)2: Heating off (NC)
4: Heating on (NO)
Earth tether
2
3
47 48
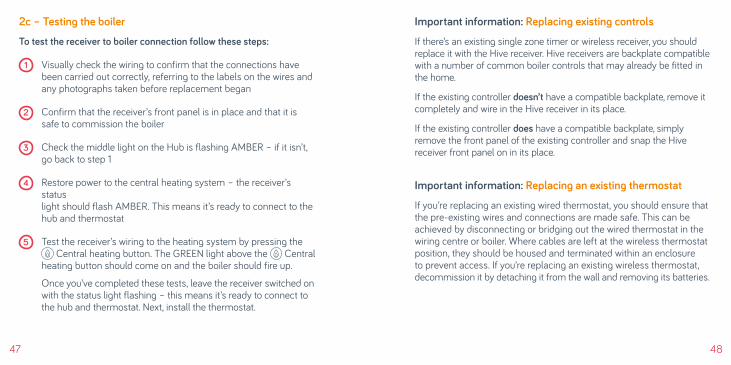
2c – Testing the boiler
To test the receiver to boiler connection follow these steps:
1 Visually check the wiring to confirm that the connections have been carried out correctly, referring to the labels on the wires and any photographs taken before replacement began
2 Confirm that the receiver’s front panel is in place and that it is safe to commission the boiler
3 Check the middle light on the Hub is flashing AMBER – if it isn’t, go back to step 1
4 Restore power to the central heating system – the receiver’s status light should flash AMBER. This means it’s ready to connect to the hub and thermostat
5 Test the receiver’s wiring to the heating system by pressing the Central heating button. The GREEN light above the Central
heating button should come on and the boiler should fire up.
Once you’ve completed these tests, leave the receiver switched on with the status light flashing – this means it’s ready to connect to the hub and thermostat. Next, install the thermostat.
Important information: Replacing existing controls
If there’s an existing single zone timer or wireless receiver, you should replace it with the Hive receiver. Hive receivers are backplate compatible with a number of common boiler controls that may already be fitted in the home.
If the existing controller doesn’t have a compatible backplate, remove it completely and wire in the Hive receiver in its place.
If the existing controller does have a compatible backplate, simply remove the front panel of the existing controller and snap the Hive receiver front panel on in its place.
Important information: Replacing an existing thermostat
If you’re replacing an existing wired thermostat, you should ensure that the pre-existing wires and connections are made safe. This can be achieved by disconnecting or bridging out the wired thermostat in the wiring centre or boiler. Where cables are left at the wireless thermostat position, they should be housed and terminated within an enclosure to prevent access. If you’re replacing an existing wireless thermostat, decommission it by detaching it from the wall and removing its batteries.

49 50
Important information: Gravity-fed and part-pumped systems
Gravity-fed and part-pumped systems are wired differently to standard boilers. With these, the hot water relay switches on the boiler, whilst the heating relay opens a valve, operates a pump, or both, to divert hot water to the heating. If you are installing into a gravity-fed or part pumped system, complete the wiring and then switch the Hive receiver to ‘gravity-fed’ mode as follows:
1 Switch off the power to the boiler and receiver
2 Wait at least 5 seconds, then switch the boiler and receiver back on
3 Press and hold the hot water button for at least 10 seconds
The receiver status light will flash BLUE for 3 seconds when entering ‘gravity-fed’ mode. Or GREEN for ‘fully pumped’ mode. Fully pumped mode is the default for new devices.
Important information: Multizone receiver installation
If you’re installing Hive Multizone, you’ll need to install all the receivers before proceeding to the next step.
Note: Hive Multizone can support up to three heating zones and one hot water zone. Each Multizone installation should include a maximum of:
When installing a dual channel receiver, the chosen central heating zone will need to be wired into the dual channel receiver and this zone will control the hot water.
One dual channel and two single channel receivers
Three single channel receivers
or
Hot tips: See page 47 (section 2c) on how to confirm receivers are installed and operating the heating system correctly. Label the receivers once you have installed them so that it’s clear which receiver controls which zone.See page 65 on how to set-up Multizone.
Important information: Stand-alone installation
In ‘stand-alone’ mode the thermostat acts as a standard wireless programmable thermostat without the remote heating control features and functionality of Hive Active Heating.
51 52

To switch back to ‘remote heating’ mode:
a. Switch the hub off and then on again. If it begins to flash AMBER continue on to step b. If all the lights go out and the hub does not flash AMBER, log into hivehome.com, open the ‘Devices’ page and click ‘Add devices’. The hub should now begin to flash AMBER.
b. Now follow steps 1-5 on page 53, but note that the lights will be different. At step 3 the receiver’s status light will initially flash WHITE/PINK and in step 4 it will change to AMBER (for ‘remote heating’) once you have held the Central heating button down.
At any time you can check what mode the receiver is set to by switching it off then on. When power is restored the status light will flash for 5 seconds – AMBER for Hive Active Heating, WHITE for ‘stand-alone’ mode.
Activating stand-alone mode 1 Remove the batteries from the thermostat
2 Switch off the boiler and receiver
3 Wait at least 5 seconds, then turn the boiler and receiver back on. The receiver’s status light will begin to flash AMBER
4 Press and hold the heating button for at least 10 seconds – until the status light begins to flash WHITE. The receiver is now in ‘stand-alone’ mode and is searching for a thermostat
5 Insert the batteries into the thermostat, press and hold down the menu and back buttons on the thermostat and follow the factory reset instructions on screen. After about 10 seconds, ‘Welcome’ and ‘Searching…’ will be displayed on screen. If the thermostat shows ‘REJOIN’ then try steps 1 and 5 again.
53 54
55 56
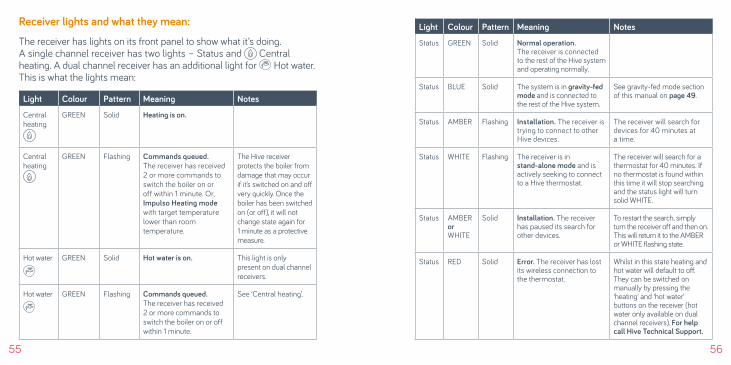
Light Colour Pattern Meaning Notes
Central heating
GREEN Solid Heating is on.
Central heating
GREEN Flashing Commands queued. The receiver has received 2 or more commands to switch the boiler on or off within 1 minute. Or, Impulso Heating mode with target temperature lower than room temperature.
The Hive receiver protects the boiler from damage that may occur if it’s switched on and off very quickly. Once the boiler has been switched on (or off), it will not change state again for 1 minute as a protective measure.
Hot water
GREEN Solid Hot water is on. This light is only
present on dual channel receivers.
Hot water
GREEN Flashing Commands queued.
The receiver has received 2 or more commands to switch the boiler on or off within 1 minute.
See ‘Central heating’.
Light Colour Pattern Meaning Notes
Status GREEN Solid Normal operation. The receiver is connected to the rest of the Hive system and operating normally.
Status BLUE Solid The system is in gravity-fed mode and is connected to the rest of the Hive system.
See gravity-fed mode section of this manual on page 49.
Status AMBER Flashing Installation. The receiver is trying to connect to other Hive devices.
The receiver will search for devices for 40 minutes at a time.
Status WHITE Flashing The receiver is in stand-alone mode and is actively seeking to connect to a Hive thermostat.
The receiver will search for a thermostat for 40 minutes. If no thermostat is found within this time it will stop searching and the status light will turn solid WHITE.
Status AMBER or WHITE
Solid Installation. The receiver has paused its search for other devices.
To restart the search, simply turn the receiver off and then on. This will return it to the AMBER or WHITE flashing state.
Status RED Solid Error. The receiver has lost its wireless connection to the thermostat.
Whilst in this state heating and hot water will default to off. They can be switched on manually by pressing the ‘heating’ and ‘hot water’ buttons on the receiver (hot water only available on dual channel receivers). For help call Hive Technical Support.
Receiver lights and what they mean:
The receiver has lights on its front panel to show what it’s doing. A single channel receiver has two lights – Status and Central heating. A dual channel receiver has an additional light for Hot water. This is what the lights mean:
57 58
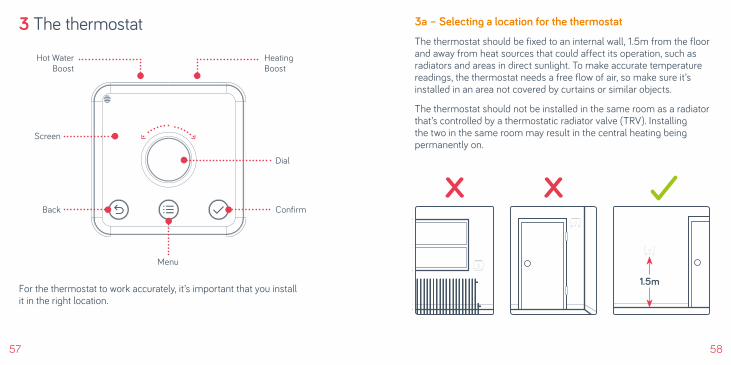
For the thermostat to work accurately, it’s important that you install it in the right location.
3a – Selecting a location for the thermostat
The thermostat should be fixed to an internal wall, 1.5m from the floor and away from heat sources that could affect its operation, such as radiators and areas in direct sunlight. To make accurate temperature readings, the thermostat needs a free flow of air, so make sure it’s installed in an area not covered by curtains or similar objects.
The thermostat should not be installed in the same room as a radiator that’s controlled by a thermostatic radiator valve (TRV). Installing the two in the same room may result in the central heating being permanently on.
3 The thermostat
1.5m
XX
Heating Boost
Hot Water Boost
Menu
Dial
Screen
Back Confirm

59 60
3b – Wall mounting the thermostat
Remove the backplate of the thermostat by pressing the lever at the bottom and pulling away from the front of the device.
Once you’ve found a suitable location, fix the backplate to the wall using the appropriate fixings. The backplate is designed for 3.5mm/size 6 or size 8 screws. Be careful to avoid any cables and pipes that may be buried in the wall.
Note: The backplate is designed to mount directly onto a single gang back box, if available.
3c – Confirming the hub is ready to connect
Before inserting the batteries into the thermostat, check the hub is flashing AMBER – this means it’s ready to connect. If it is showing a solid AMBER light, turn it off then on, and then switch the receiver and boiler off and then on again too. The hub should then begin to flash AMBER and be ready to connect.
6261
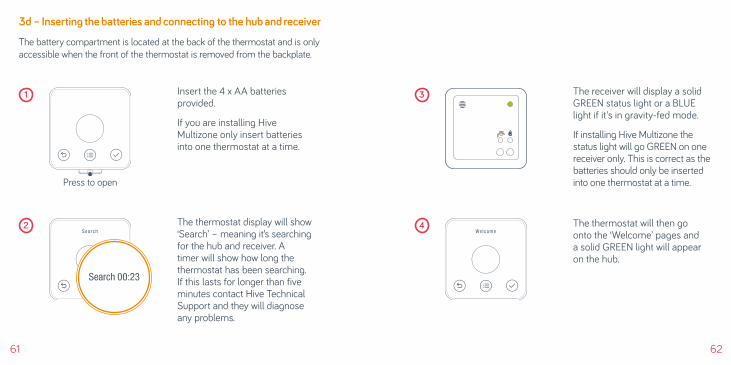
3d – Inserting the batteries and connecting to the hub and receiver
The battery compartment is located at the back of the thermostat and is only accessible when the front of the thermostat is removed from the backplate.
Insert the 4 x AA batteries provided.
If you are installing Hive Multizone only insert batteries into one thermostat at a time.
The thermostat display will show ‘Search’ – meaning it’s searching for the hub and receiver. A timer will show how long the thermostat has been searching. If this lasts for longer than five minutes contact Hive Technical Support and they will diagnose any problems.
The receiver will display a solid GREEN status light or a BLUE light if it’s in gravity-fed mode.
If installing Hive Multizone the status light will go GREEN on one receiver only. This is correct as the batteries should only be inserted into one thermostat at a time.
The thermostat will then go onto the ‘Welcome’ pages and a solid GREEN light will appear on the hub.
Press to open
1
Search
Search 00:23
2Welcome
4
3Status
Hotwater
Centralheating
64
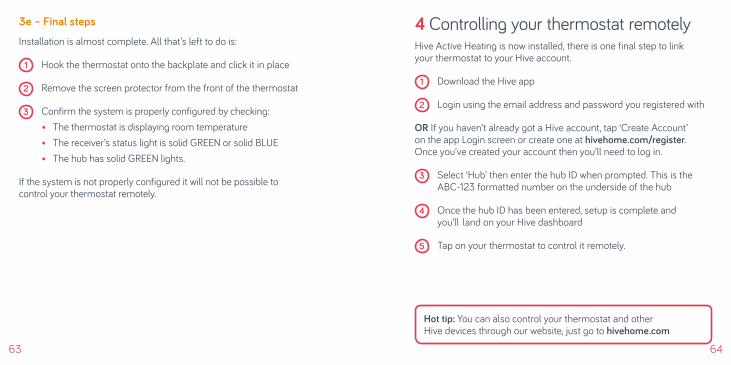
3e – Final steps
Installation is almost complete. All that’s left to do is:
1 Hook the thermostat onto the backplate and click it in place
2 Remove the screen protector from the front of the thermostat
3 Confirm the system is properly configured by checking: • The thermostat is displaying room temperature • The receiver’s status light is solid GREEN or solid BLUE • The hub has solid GREEN lights.
If the system is not properly configured it will not be possible to control your thermostat remotely.
4 Controlling your thermostat remotelyHive Active Heating is now installed, there is one final step to link your thermostat to your Hive account.
1 Download the Hive app
2 Login using the email address and password you registered with
OR If you haven’t already got a Hive account, tap ‘Create Account’ on the app Login screen or create one at hivehome.com/register. Once you’ve created your account then you’ll need to log in.
3 Select ‘Hub’ then enter the hub ID when prompted. This is the ABC-123 formatted number on the underside of the hub
4 Once the hub ID has been entered, setup is complete and you’ll land on your Hive dashboard
5 Tap on your thermostat to control it remotely.
Hot tip: You can also control your thermostat and other Hive devices through our website, just go to hivehome.com
63
65 66
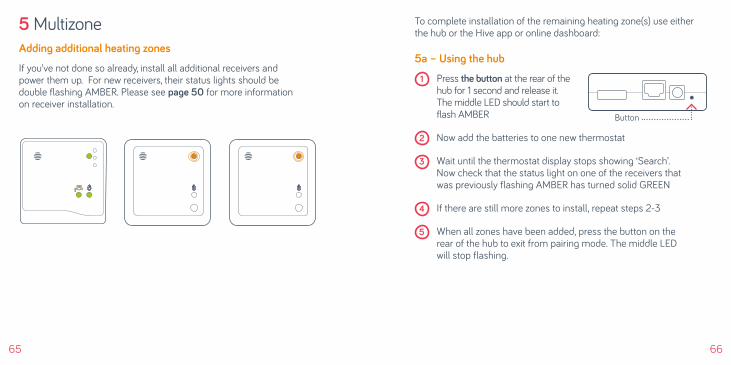
5 MultizoneAdding additional heating zones
If you’ve not done so already, install all additional receivers and power them up. For new receivers, their status lights should be double flashing AMBER. Please see page 50 for more information on receiver installation.
To complete installation of the remaining heating zone(s) use either the hub or the Hive app or online dashboard:
5a – Using the hub 1 Press the button at the rear of the
hub for 1 second and release it. The middle LED should start to flash AMBER
2 Now add the batteries to one new thermostat
3 Wait until the thermostat display stops showing ‘Search’. Now check that the status light on one of the receivers that was previously flashing AMBER has turned solid GREEN
4 If there are still more zones to install, repeat steps 2-3
5 When all zones have been added, press the button on the rear of the hub to exit from pairing mode. The middle LED will stop flashing.
Button
67 68
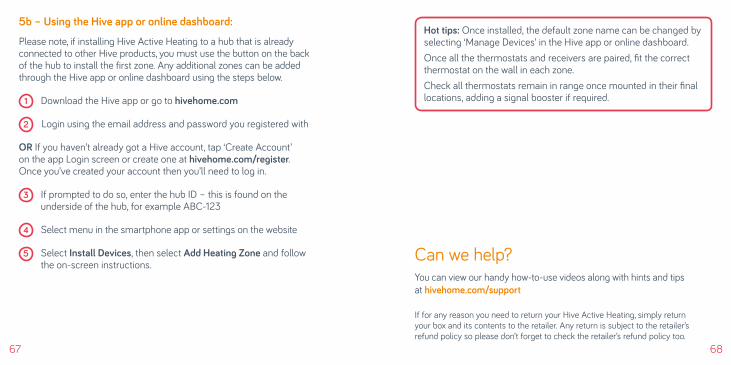
5b – Using the Hive app or online dashboard:
Please note, if installing Hive Active Heating to a hub that is already connected to other Hive products, you must use the button on the back of the hub to install the first zone. Any additional zones can be added through the Hive app or online dashboard using the steps below.
1 Download the Hive app or go to hivehome.com
2 Login using the email address and password you registered with
OR If you haven’t already got a Hive account, tap ‘Create Account’ on the app Login screen or create one at hivehome.com/register. Once you’ve created your account then you’ll need to log in.
3 If prompted to do so, enter the hub ID – this is found on the underside of the hub, for example ABC-123
4 Select menu in the smartphone app or settings on the website
5 Select Install Devices, then select Add Heating Zone and follow the on-screen instructions.
Hot tips: Once installed, the default zone name can be changed by selecting ‘Manage Devices’ in the Hive app or online dashboard.Once all the thermostats and receivers are paired, fit the correct thermostat on the wall in each zone.Check all thermostats remain in range once mounted in their final locations, adding a signal booster if required.
If for any reason you need to return your Hive Active Heating, simply return your box and its contents to the retailer. Any return is subject to the retailer’s refund policy so please don’t forget to check the retailer’s refund policy too.
Can we help? You can view our handy how-to-use videos along with hints and tips at hivehome.com/support