Embed Size (px)
Citation preview
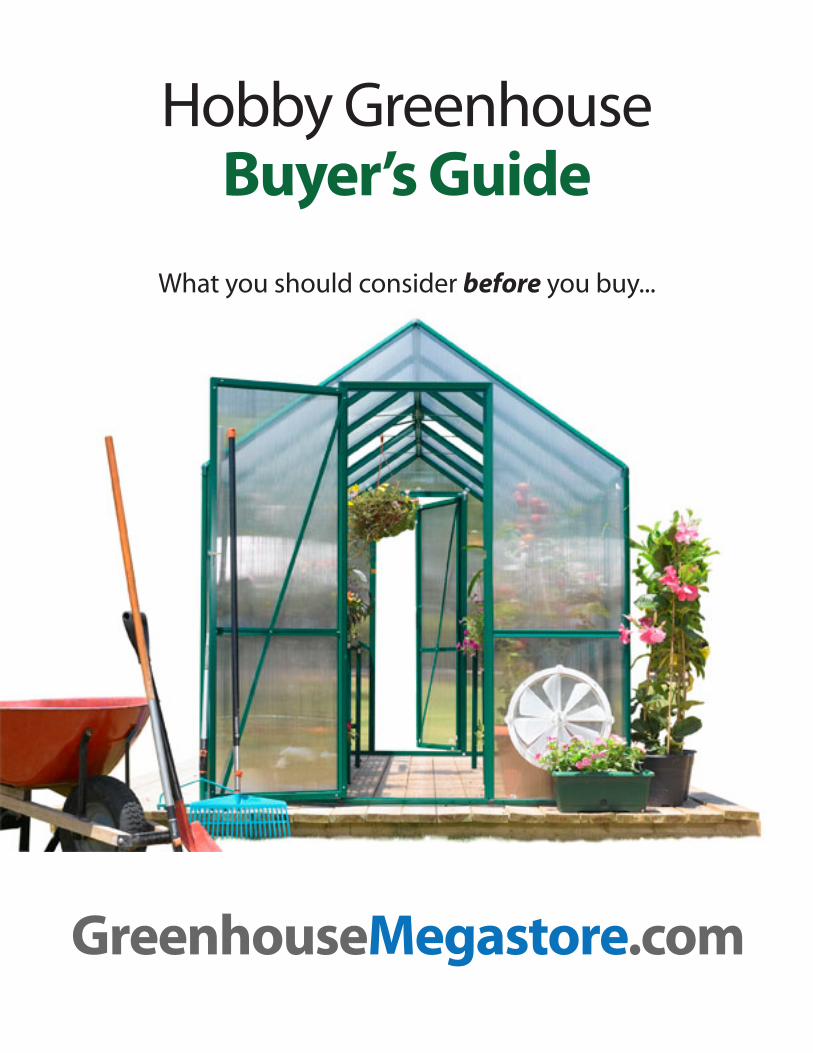
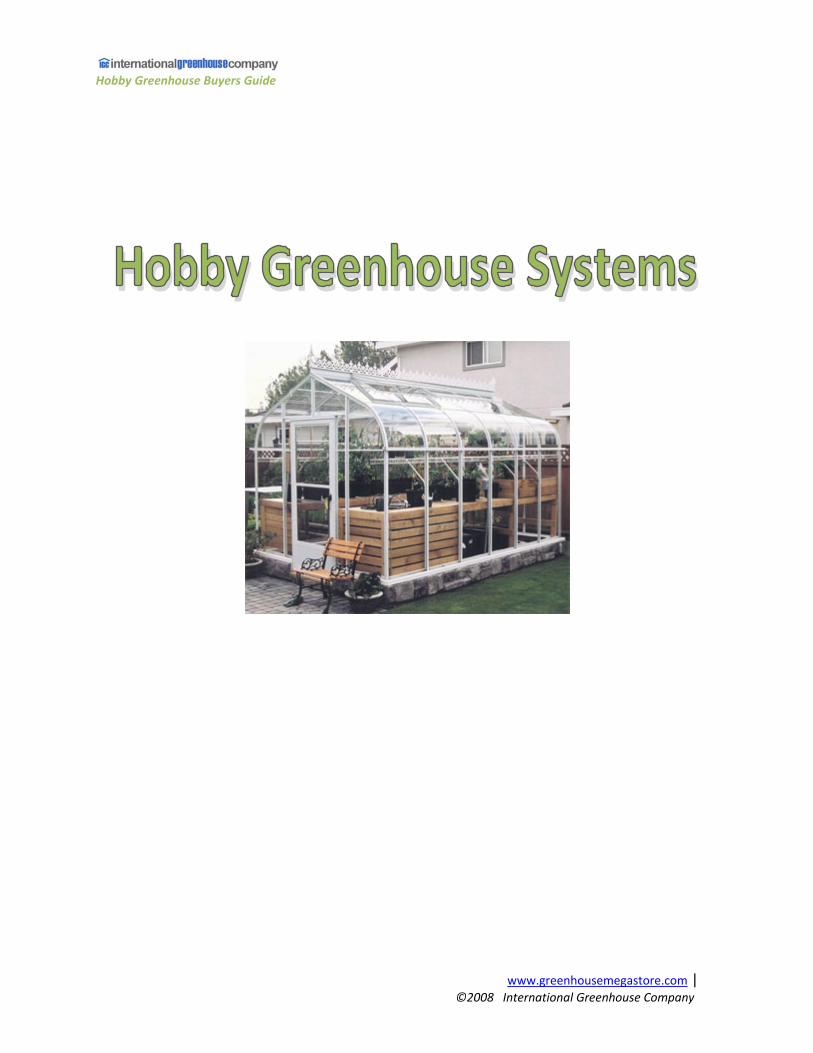
Hobby Greenhouse Buyers Guide
www.greenhousemegastore.com | 2 ©2008 International Greenhouse Company
So you want to buy a greenhouse? There are endless reasons why you may be considering a hobby greenhouse and just as
many options when it comes to finding, building, and equipping the structure. You may be a gardener who is looking to expand the growing season year round, or you may be a flower aficionado looking for the controlled conditions a backyard greenhouse can provide for your delicate and beautiful treasures. You may just simply want to add a sunroom to your home, and don’t even plan on growing anything. In all of these cases, and all of those in between, wading through the options available to you can be daunting. This is both good and bad. It’s good because this range of options allows you to customize your greenhouse to almost infinite levels. It’s bad because you have to sift through a mountain of information to find exactly what you want. The purpose of this guide is to help narrow down options available to you and will cover a variety of topics from permitting issues you may face, to size and price of your desired structure, to covering and frame materials, to the equipment necessary to carry on your day‐to‐day operations. If you have any questions, or would like information not found in this guide, please feel free to call us toll‐free at 1‐888‐281‐9337.
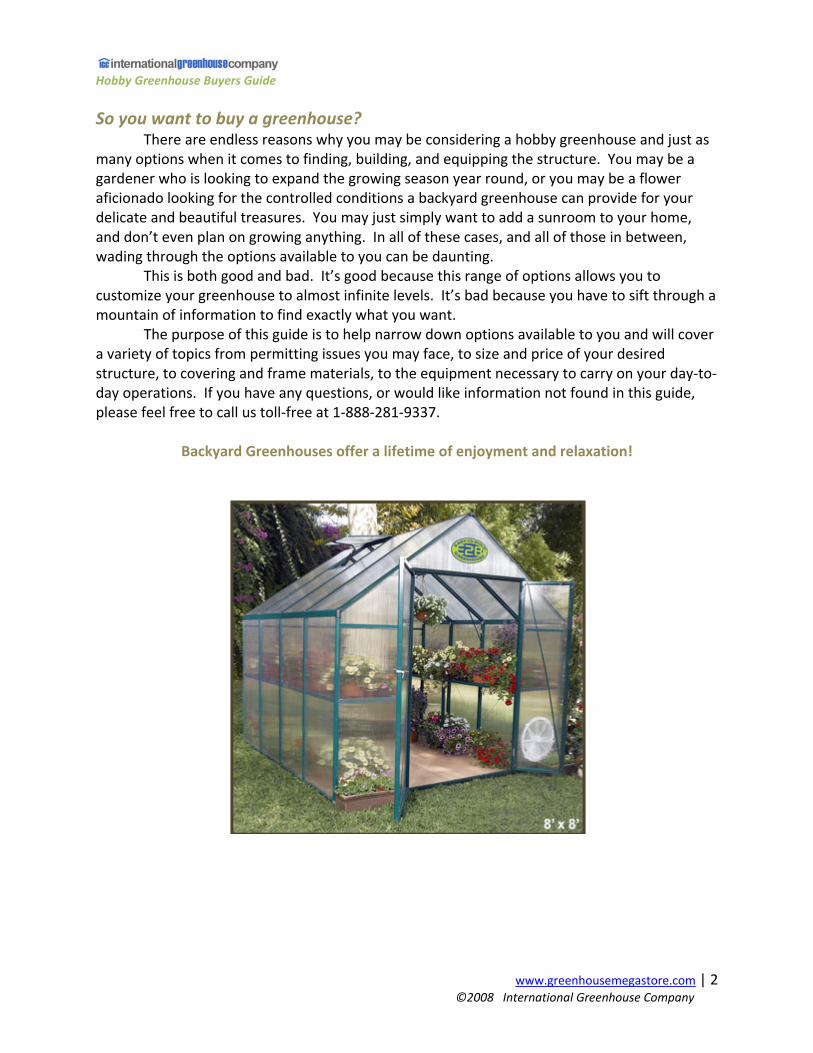
Backyard Greenhouses offer a lifetime of enjoyment and relaxation!
Hobby Greenhouse Buyers Guide
www.greenhousemegastore.com | 3 ©2008 International Greenhouse Company
Some advice and warnings on the obstacles you are about to face: Can you build? This may seem like a silly question as you flip through catalogues and browse websites, planning the contents of your precious greenhouse. But more than one homeowner’s plans have been complicated by zoning or permitting requirements. Only your local building department can tell you for sure whether you need a permit in one form or another. This is normally an agency within the city or county government. Call them and let them know the size and type of structure you are planning on building. Smaller hobby style greenhouses (under 120 square feet) typically do not require building permits, but it’s a good idea to check anyway. If a permit is required you might also have to provide a certified engineering drawing to building officials before construction can commence. If required we can supply, at an additional charge, certified engineering prints and calculations for most of our greenhouses. The type of foundation for the structure can also impact whether or not it needs a permit. Typically, if the building is mounted on a lumber or similar foundation it is considered a temporary or portable structure and probably won’t need special permits. If, however, the structure is to be placed on a concrete foundation it is usually considered permanent and may fall under the permitting requirements of such structures. In any case, it is important that this information be obtained prior to ordering. You alone are responsible for making sure that you are building in accordance with your local codes. Another consideration is whether or not any neighborhood associations you belong to will allow the construction of such buildings. If you are a member of a neighborhood homeowner’s association you should read your association agreement and speak with the person in charge to determine if such a structure is within the guidelines of the group. Finally, you may want to read the policy terms in your homeowner’s insurance just to be sure there isn’t something that bars the construction of a building like a greenhouse. Know your budget and your cost!
We have found that often a budget is established long before a realistic dollar amount for the price of the house and its operating costs are determined. These initial “guesstimates” for greenhouse projects can then become set in stone and carried out to the end of the project ‐ for better or worse. Avoid this potential pitfall by taking the time to understand your needs before purchasing your greenhouse. It’s not your job to know everything. Hobbyists aren’t expected to know everything about designing a greenhouse. That’s where we come in. It’s not uncommon to be unfamiliar with the entire project, but still want a greenhouse. For many years International Greenhouse Company has specialized in helping people choose and implement successful greenhouse projects. We look forward to offering any advice we can. Even if you don’t ultimately end up purchasing your greenhouse from us, we want you to know we are, “The people who know greenhouses.”
Hobby Greenhouse Buyers Guide
www.greenhousemegastore.com | 4 ©2008 International Greenhouse Company
Know your costs beyond the initial purchase. Too often we have sold a great greenhouse only to see it left unused for a period of time due to a lack of operating funds. To avoid this problem, consider the following when drawing up your initial budget:
• The costs to heat and cool a greenhouse can be significant and is directly related to the greenhouse size. Be sure to understand this cost before deciding upon how large of a greenhouse you can afford.
• Who will maintain the greenhouse? Can you perform any needed maintenance work yourself or will you be required to call on outside help if problems ever occur?
• Where will you be getting your supplies, what types of quantities are you going to be using and how much will you be spending on an annual basis?
Before sourcing a supplier you should know:
• Your first step is to investigate and research your options for suppliers before ever talking to them.
• Upon initial contact, don’t be shy to ask for references. This is not uncommon in the industry so stay clear of suppliers who do not provide them.
• Make sure the supplier you deal with has a good record with the Better Business Bureau. Online suppliers can be checked at www.bbbonline.org .
• Ask lots of questions and be sure to clearly understand everything that is being said to you. Don’t be afraid to sound uneducated; it’s their job to teach you.
• Double check that your project includes everything you need: heating, cooling, ventilation, benches, electrical work, concrete and so on.
Now you’re ready to determine your needs and begin designing your greenhouse!
* * *
Hobby Greenhouse Buyers Guide
www.greenhousemegastore.com | 5 ©2008 International Greenhouse Company
Some Important Things to Consider when Assessing Your Needs There are many options when it comes to hobby greenhouses, so it’s best to find a solution that will best suit the building’s desired purpose. Will you be starting and propagating vegetables or cuttings? Then a simple and inexpensive solution may be best for you. Will you be growing and maintaining delicate tropical plants, like orchids, for display? Then a more complex, permanent structure designed for the needs of these plants might be best. Would you like to grow vegetables or flowers in your greenhouse year round? Then you want a structure that can perform well in cold weather. Do you want your greenhouse to be a part of your home, or do you want a stand‐alone structure? Take some time to think about the specific use of your greenhouse before you dive in. If you form a clear idea of what you want beforehand, it will be less confusing once you start to sort through the different structure options.
1. Choosing a Location • In order for a greenhouse to work as intended, it needs plenty of exposure to
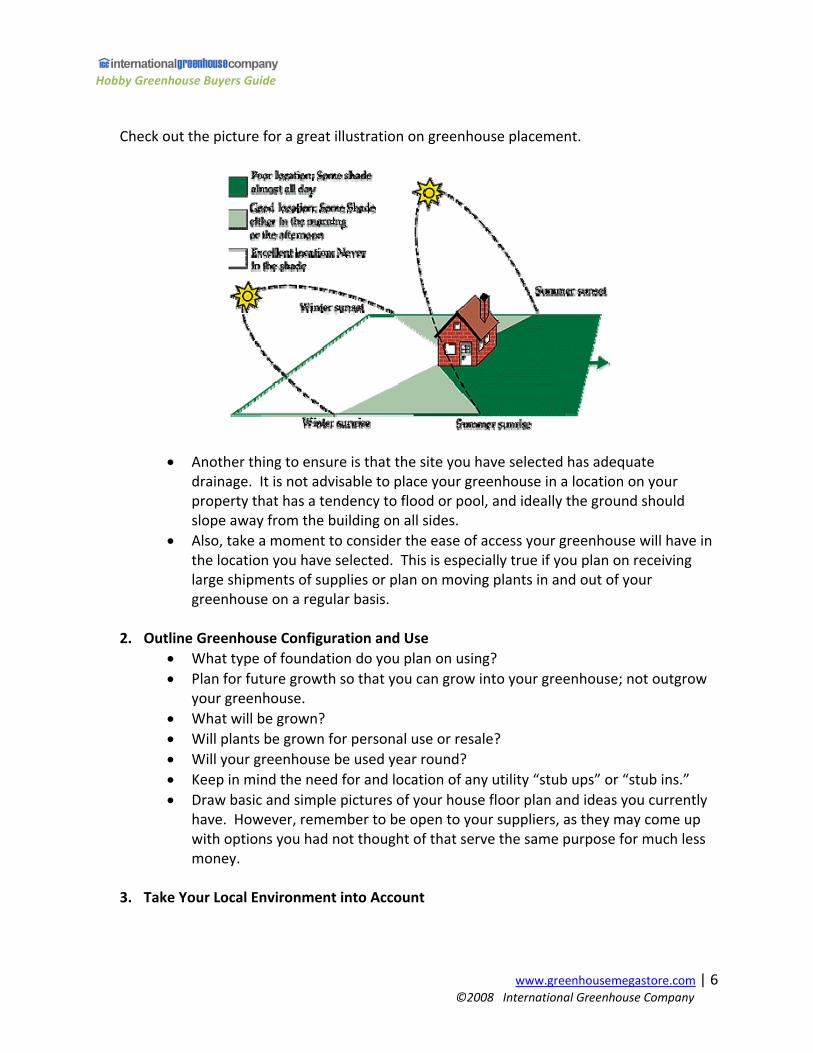
sunlight. This is especially true if you will be growing in the late fall or winter. As a rule, your greenhouse should receive about 6 hours of sunlight per day. If you are using your greenhouse only for propagation or seed germination, you may be able to get by with a site that receives less light and is partially shaded. Usually however, your greenhouse should be located on the south side of any large, light obstructing object, such as your home (if in the northern hemisphere). If the building is to be attached to your home, it would be best to attach it to a south facing side. If this is not possible, then an east or west facing side would be suitable, as long as there are no other major obstructions. Keep in mind that with this kind of sun exposure, your greenhouse will get pretty hot inside during the summer and some kind of cooling solution will probably be necessary if you plan on growing inside during these months (as opposed to just moving plants, seedlings, or cuttings outside in the summer).
• Something to consider is that if your greenhouse is positioned in a great location for sun exposure, but this positioning also exposes it to high winds, especially in winter, then you may want to consider either a different location or some type of wind block. This is especially true if you are growing or overwintering plants. The reasoning for this is that the wind will sap heat from your greenhouse, thus raising your heating costs and/or making it hard to maintain a proper temperature. If you decide to erect some kind of wind block, which can be in the form of trees, shrubs, or bushes, make sure this solution doesn’t obstruct your greenhouse’s exposure to sunlight.
Hobby Greenhouse Buyers Guide
www.greenhousemegastore.com | 6 ©2008 International Greenhouse Company
Check out the picture for a great illustration on greenhouse placement.
• Another thing to ensure is that the site you have selected has adequate drainage. It is not advisable to place your greenhouse in a location on your property that has a tendency to flood or pool, and ideally the ground should slope away from the building on all sides.
• Also, take a moment to consider the ease of access your greenhouse will have in the location you have selected. This is especially true if you plan on receiving large shipments of supplies or plan on moving plants in and out of your greenhouse on a regular basis.
2. Outline Greenhouse Configuration and Use
• What type of foundation do you plan on using? • Plan for future growth so that you can grow into your greenhouse; not outgrow
your greenhouse. • What will be grown? • Will plants be grown for personal use or resale? • Will your greenhouse be used year round? • Keep in mind the need for and location of any utility “stub ups” or “stub ins.” • Draw basic and simple pictures of your house floor plan and ideas you currently
have. However, remember to be open to your suppliers, as they may come up with options you had not thought of that serve the same purpose for much less money.
3. Take Your Local Environment into Account
Hobby Greenhouse Buyers Guide
www.greenhousemegastore.com | 7 ©2008 International Greenhouse Company
• How warm do you need to keep your greenhouse in the winter? • How cool do you need to keep your greenhouse in the summer? • Does the proposed location provide adequate exposure to the sun? • Does the greenhouse need to function as a barrier against local pests? What
pests need to be kept out? • Will vandalism or security be a concern?
4. Again, Be Familiar with Local Building Codes and Utility Requirements
• Will your Local County or city require a building permit? If so, will they require engineered calculations and plans stamped by a local professional engineer?
• Is the proposed site zoned for a greenhouse? If not, a conditional use permit may be required at considerable time and expense.
• What load ratings are required for your area? For example, most greenhouses come standard with a 10lb. live load and 70 mph wind rating. Higher rating requirements will add to the cost of the structure.
• If the greenhouse has a drain or sink, local codes may require connection to the sanitary system. Some municipalities may require expensive backflow prevention or water treatment systems if chemicals or pesticides will be used in the greenhouse.
• Does the proposed greenhouse site offer easy access to utilities? What will be the fuel source for heating? What types of electrical options are available to you? Where is your water supply?
* * *
Hobby Greenhouse Buyers Guide
www.greenhousemegastore.com | 8 ©2008 International Greenhouse Company
Weighing Your Options In addition to total square footage, the other major cost impact is found in the materials that are included with your greenhouse. Deciding which options are a necessary for your application can be a daunting task. To make things easier, we have broken down options into the following categories:
1. Styles – There are two main greenhouse styles. In hobby or backyard sized greenhouses, the difference between the two styles are mostly aesthetic:
a. Straight Eave or Gable Style. This where the “eave,” or the point where the roof meets the sidewalls, forms an angle. It can be called a more “traditional” style, and is one which most people are familiar with.
b. Curved or Rounded Eave. This is where the roof of the greenhouse curves at the eaves. These have been described as a more “modern” style. In addition to curved eaves, sometimes the roof itself is on a radius which can allow for more headroom.
2. Frame – the frames of modern hobby greenhouses are almost always constructed either from:
a. Aluminum – The main benefits of aluminum can be found in its resistance to corrosion and the fact that it is lighter than steel. Aluminum greenhouses are generally more aesthetically pleasing than steel and are often finished with a durable, baked‐on enamel powder coat (usually in green, brown or white) that can add to the beauty of the building. Since aluminum is generally more expensive than wood or plastic, aluminum framed greenhouses will be more expensive than plastic or wood framed buildings. Also since aluminum is lighter and structurally weaker than steel it takes more of it to achieve a particular load rating, if such a rating is necessary. As such, the columns of aluminum greenhouses may have to be spaced closer together and additional purlin runs (lateral bracing in the roof) installed to meet higher load ratings. This is generally only applicable in larger greenhouses.
b. Plastic – The main benefit of a plastic frame is that it is the most inexpensive option. When properly treated with a UV stabilizer, plastic framed greenhouses can provide at a minimum 5‐10 years of service and are usually available in a variety of colors. Plastic framed greenhouse kits are usually easier to assemble than metal kits and will not rust or anodize. However, none of the plastic framed greenhouses are guaranteed to meet a given load rating so buyers in high‐snow environments should be aware of this limitation. Again though, this should only be an issue in larger structures. A properly heated, typically sized greenhouse should have no performance issues.
c. Wood – There are a few styles that use a naturally corrosion resistant wood, such as
redwood, as a frame material. The main benefit of wood as a frame material is that it adds a rustic, organic look to your backyard greenhouse. These structures are very
Hobby Greenhouse Buyers Guide
www.greenhousemegastore.com | 9 ©2008 International Greenhouse Company
attractive, but the cost of the wood also makes them more expensive that a similar plastic framed structure.
3. Coverings – there are three options for greenhouse coverings:
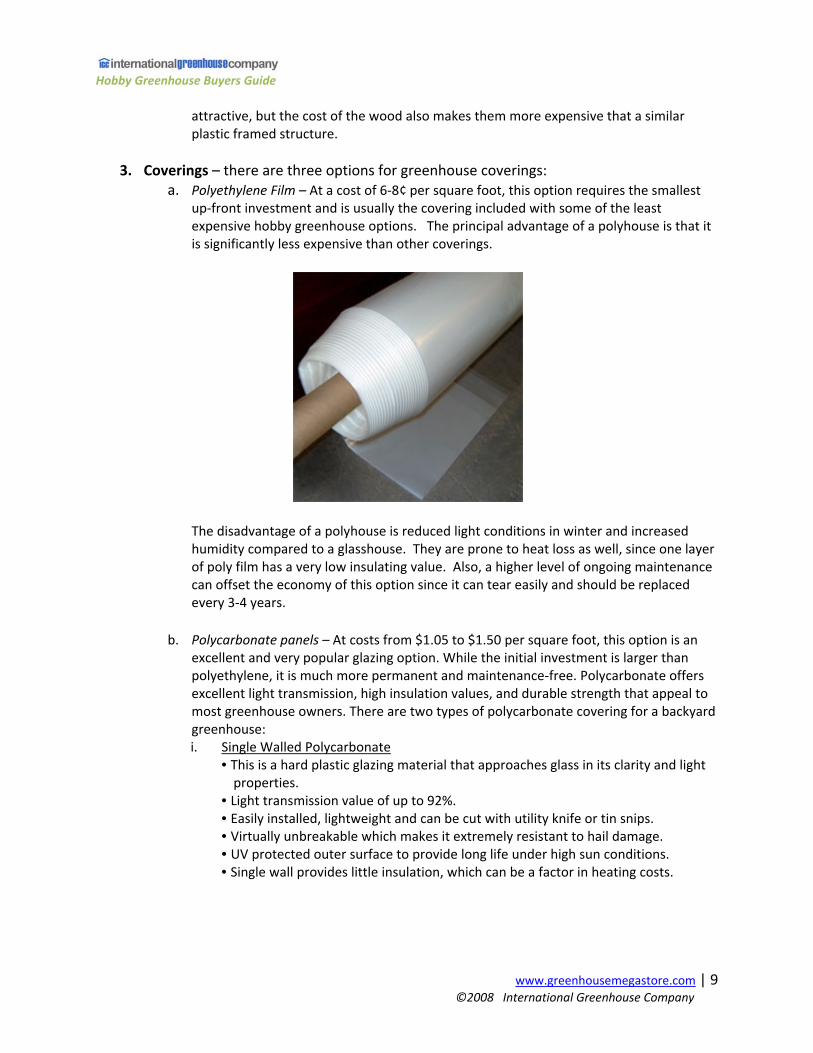
a. Polyethylene Film – At a cost of 6‐8¢ per square foot, this option requires the smallest up‐front investment and is usually the covering included with some of the least expensive hobby greenhouse options. The principal advantage of a polyhouse is that it is significantly less expensive than other coverings.
The disadvantage of a polyhouse is reduced light conditions in winter and increased humidity compared to a glasshouse. They are prone to heat loss as well, since one layer of poly film has a very low insulating value. Also, a higher level of ongoing maintenance can offset the economy of this option since it can tear easily and should be replaced every 3‐4 years.
b. Polycarbonate panels – At costs from $1.05 to $1.50 per square foot, this option is an excellent and very popular glazing option. While the initial investment is larger than polyethylene, it is much more permanent and maintenance‐free. Polycarbonate offers excellent light transmission, high insulation values, and durable strength that appeal to most greenhouse owners. There are two types of polycarbonate covering for a backyard greenhouse: i. Single Walled Polycarbonate
• This is a hard plastic glazing material that approaches glass in its clarity and light properties.
• Light transmission value of up to 92%. • Easily installed, lightweight and can be cut with utility knife or tin snips. • Virtually unbreakable which makes it extremely resistant to hail damage. • UV protected outer surface to provide long life under high sun conditions. • Single wall provides little insulation, which can be a factor in heating costs.
Hobby Greenhouse Buyers Guide
www.greenhousemegastore.com | 10 ©2008 International Greenhouse Company
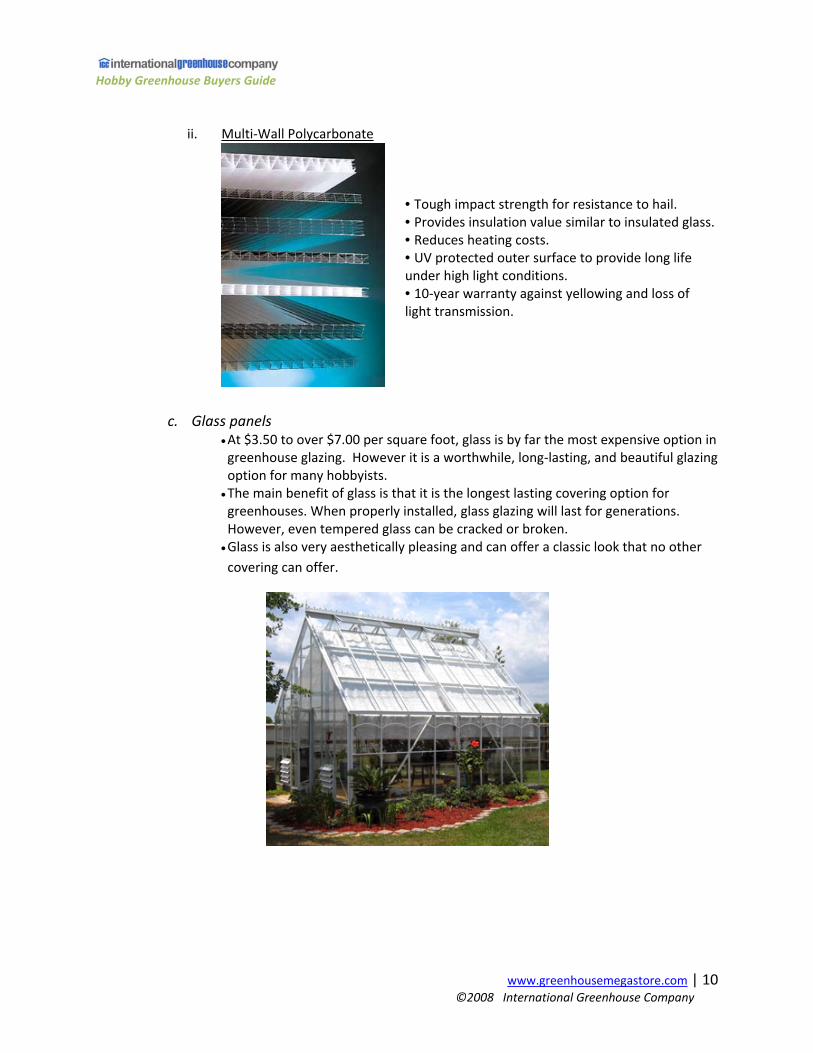
ii. Multi‐Wall Polycarbonate
• Tough impact strength for resistance to hail. • Provides insulation value similar to insulated glass. • Reduces heating costs. • UV protected outer surface to provide long life under high light conditions. • 10‐year warranty against yellowing and loss of light transmission.
c. Glass panels
• At $3.50 to over $7.00 per square foot, glass is by far the most expensive option in greenhouse glazing. However it is a worthwhile, long‐lasting, and beautiful glazing option for many hobbyists.
• The main benefit of glass is that it is the longest lasting covering option for greenhouses. When properly installed, glass glazing will last for generations. However, even tempered glass can be cracked or broken.
• Glass is also very aesthetically pleasing and can offer a classic look that no other covering can offer.
Hobby Greenhouse Buyers Guide
www.greenhousemegastore.com | 11 ©2008 International Greenhouse Company
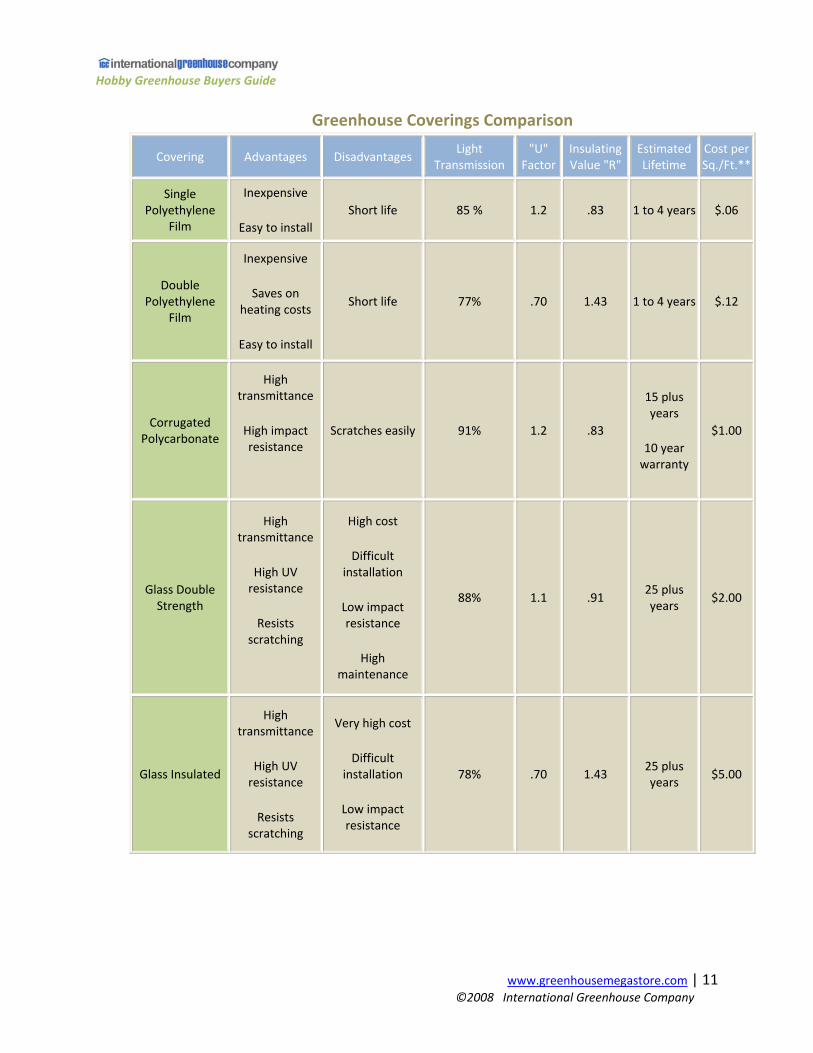
Greenhouse Coverings Comparison
Covering Advantages Disadvantages Light
Transmission "U"
FactorInsulating Value "R"
Estimated Lifetime
Cost per Sq./Ft.**
Single Polyethylene
Film
Inexpensive
Easy to install Short life 85 % 1.2 .83 1 to 4 years $.06
Double Polyethylene
Film
Inexpensive
Saves on heating costs
Easy to install
Short life 77% .70 1.43 1 to 4 years $.12
Corrugated Polycarbonate
High transmittance
High impact resistance
Scratches easily 91% 1.2 .83
15 plus years
10 year warranty
$1.00
Glass Double Strength
High transmittance
High UV resistance
Resists scratching
High cost
Difficult installation
Low impact resistance
High maintenance
88% 1.1 .91 25 plus years
$2.00
Glass Insulated
High transmittance
High UV resistance
Resists scratching
Very high cost
Difficult installation
Low impact resistance
78% .70 1.43 25 plus years
$5.00
Hobby Greenhouse Buyers Guide
www.greenhousemegastore.com | 12 ©2008 International Greenhouse Company
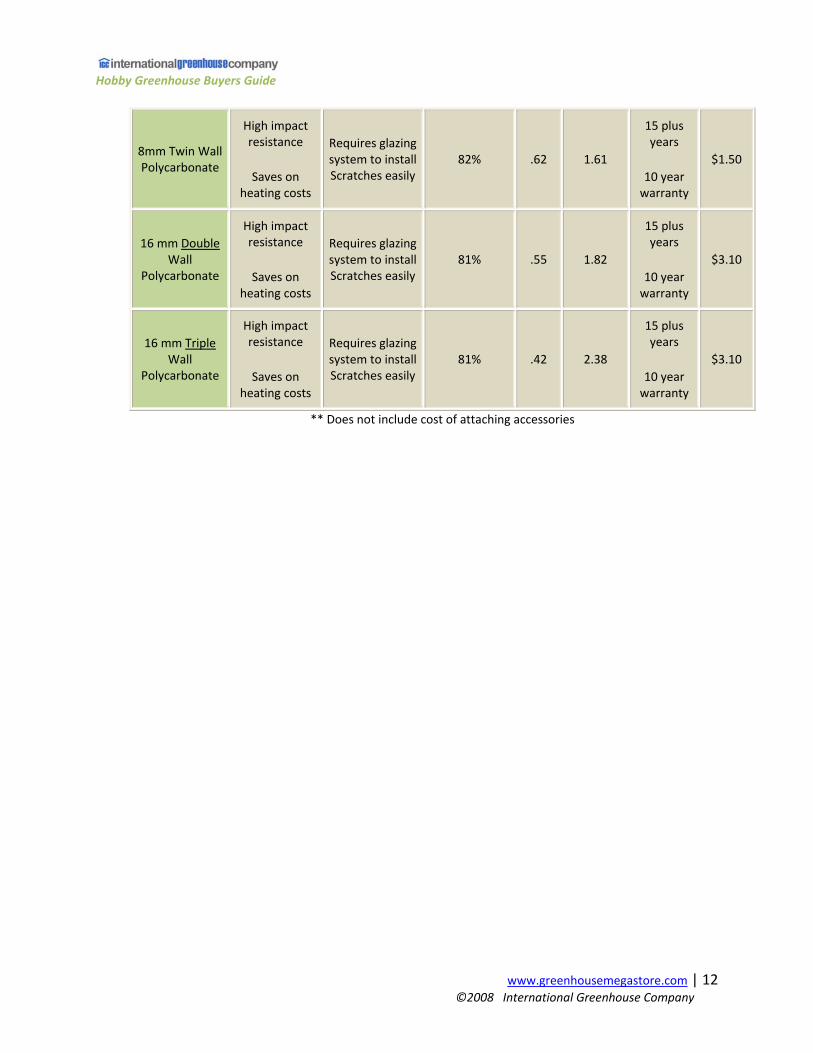
8mm Twin Wall Polycarbonate
High impact resistance
Saves on heating costs
Requires glazing system to install Scratches easily
82% .62 1.61
15 plus years
10 year warranty
$1.50
16 mm Double Wall
Polycarbonate
High impact resistance
Saves on heating costs
Requires glazing system to install Scratches easily
81% .55 1.82
15 plus years
10 year warranty
$3.10
16 mm Triple Wall
Polycarbonate
High impact resistance
Saves on heating costs
Requires glazing system to install Scratches easily
81% .42 2.38
15 plus years
10 year warranty
$3.10
** Does not include cost of attaching accessories

International Greenhouse Company www.igcusa.com
1
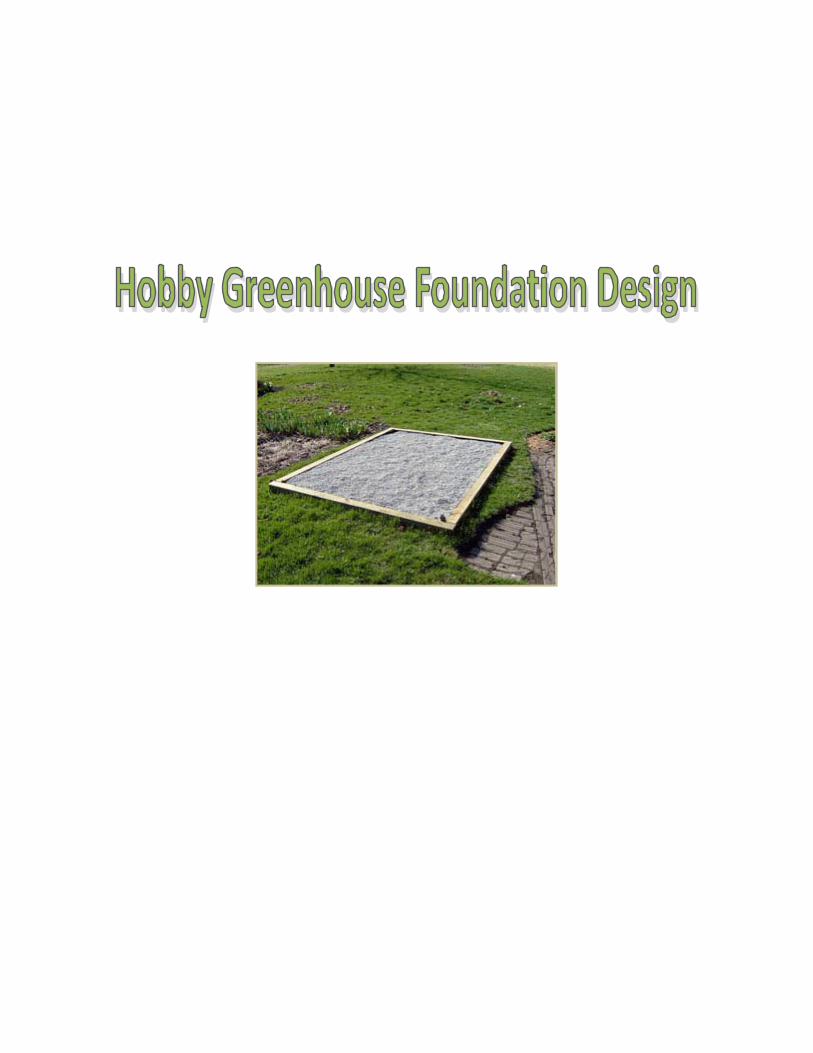
Greenhouse Foundation Design
As with any building, a good solid foundation is crucial for the long term durability and functionality of your greenhouse. A weak foundation will cause your greenhouse to settle over time causing components such as door or roof windows to not open or close correctly in addition to possibly damaging the frame. A poorly anchored foundation will increase the likelihood that your greenhouse will fail in high winds or adverse weather. For this reason it is crucial to take the time to construct a strong and stable foundation that is securely anchored to the ground.
The foundation design depends on greenhouse style, climate, site situation (soil, slope, etc.), desired thermal efficiency, budget, available materials and building codes. For convenience, we have listed some of the most commonly used options for securing your greenhouse to the ground. International Greenhouse Company does not make any claims – expressed or implied – as to the actual performance for any of these options.
Ground Stakes
Some greenhouse kits may be placed directly on a level patch of ground without an established base as long as “earth anchors” or ground stakes (see left) are used to secure the frame to the ground. Although this method requires the least amount of work it also runs the greatest risk of damage to the greenhouse frame structure since the structure will most likely settle and warp over time. In addition, ground stakes alone may not prevent your greenhouse from blowing over in high winds; particularly if the ground has been saturated by heavy rains. Ground stakes (or “swing set anchors”) can be purchased at most hardware stores.
Wood Foundation
Building a foundation out of wood is simple and inexpensive making it an excellent option for many hobby greenhouses. An excellent option is to use 4"x4" ACQ pressure treated wood for the base secured by steel stakes driven into the ground. ACQ is a nontoxic pressure treated wood product using copper based preservative with a high retention rate. Being biodegradable in soil, any leaching of the preservative that may occur is safe for plants and humans making it perfect for greenhouse applications. If ACQ wood is not available naturally resistant woods such as cedar, redwood, or cypress can also be used since these woods naturally inhibit decay.
Whatever wood is used should be cut to fit the exact perimeter dimensions of your greenhouse. Once the wood is cut, lay the boards together on the ground like you are going to set the greenhouse kit on top of them. At that point take the time to use a long carpenter’s level to ensure that each side of the greenhouse base is level. Add or remove soil as needed to level the site.
International Greenhouse Company www.igcusa.com
2
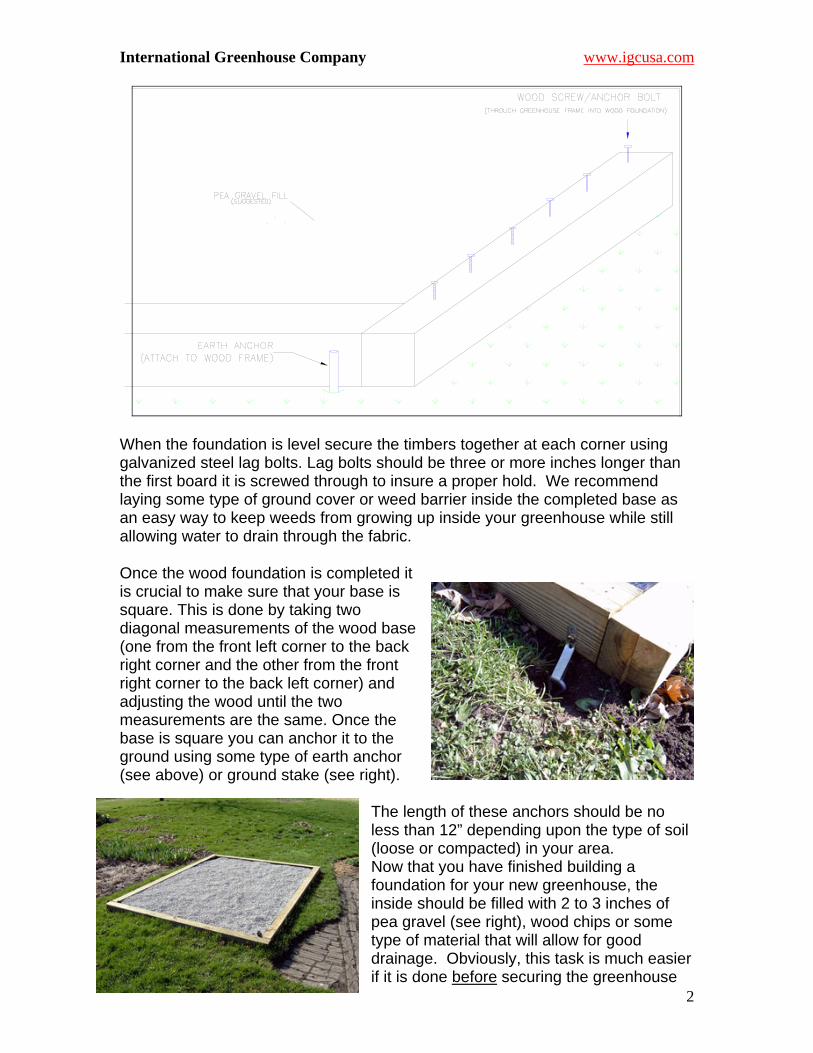
When the foundation is level secure the timbers together at each corner using galvanized steel lag bolts. Lag bolts should be three or more inches longer than the first board it is screwed through to insure a proper hold. We recommend laying some type of ground cover or weed barrier inside the completed base as an easy way to keep weeds from growing up inside your greenhouse while still allowing water to drain through the fabric.
Once the wood foundation is completed it is crucial to make sure that your base is square. This is done by taking two diagonal measurements of the wood base (one from the front left corner to the back right corner and the other from the front right corner to the back left corner) and adjusting the wood until the two measurements are the same. Once the base is square you can anchor it to the ground using some type of earth anchor (see above) or ground stake (see right).
The length of these anchors should be no less than 12” depending upon the type of soil (loose or compacted) in your area. Now that you have finished building a foundation for your new greenhouse, the inside should be filled with 2 to 3 inches of pea gravel (see right), wood chips or some type of material that will allow for good drainage. Obviously, this task is much easier if it is done before securing the greenhouse
International Greenhouse Company www.igcusa.com
3
to your new wood base. Once your floor has been completed, your greenhouse kit can now be secured to the wood base per the manufacturer’s instructions.
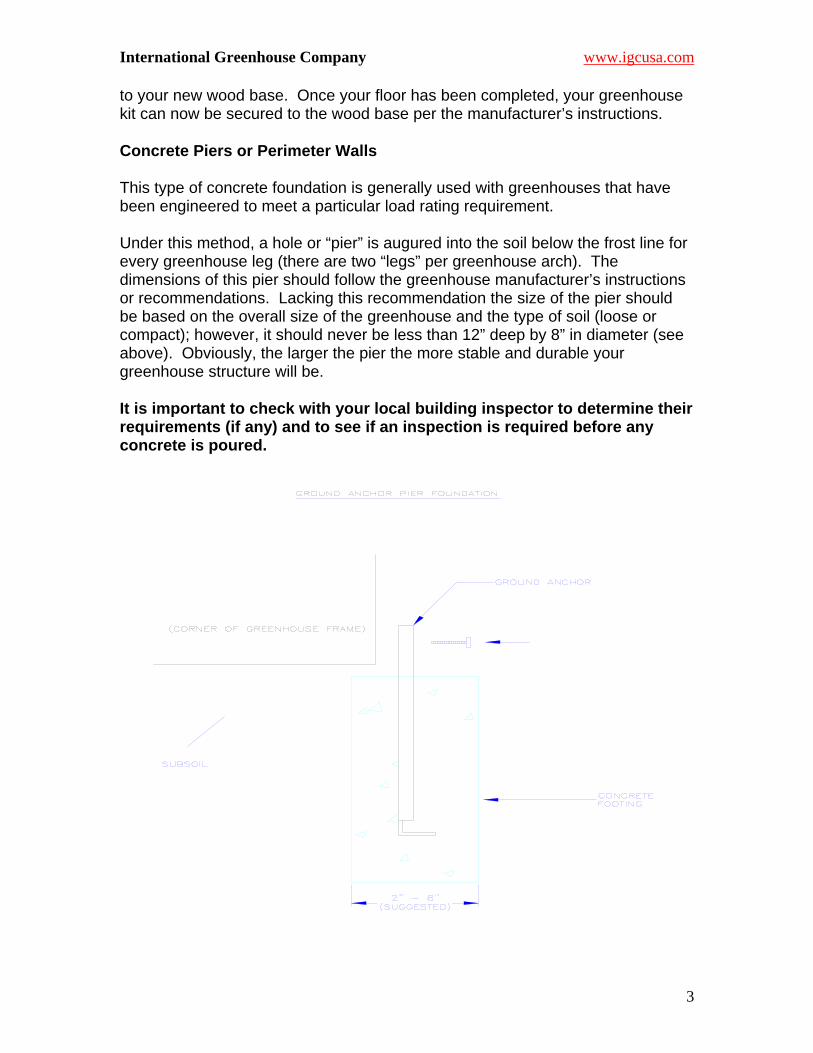
Concrete Piers or Perimeter Walls
This type of concrete foundation is generally used with greenhouses that have been engineered to meet a particular load rating requirement.
Under this method, a hole or “pier” is augured into the soil below the frost line for every greenhouse leg (there are two “legs” per greenhouse arch). The dimensions of this pier should follow the greenhouse manufacturer’s instructions or recommendations. Lacking this recommendation the size of the pier should be based on the overall size of the greenhouse and the type of soil (loose or compact); however, it should never be less than 12” deep by 8” in diameter (see above). Obviously, the larger the pier the more stable and durable your greenhouse structure will be.
It is important to check with your local building inspector to determine their requirements (if any) and to see if an inspection is required before any concrete is poured.
International Greenhouse Company www.igcusa.com
4
Once all holes are augured, each is filled with concrete with one of three structural components suspended in the concrete pier:
1. The leg or column of the greenhouse itself 2. Some type of ground stake or earth anchor (see above diagram) that is
then secured to the greenhouse frame 3. Foundation or “J” bolts that are then secured to the greenhouse column
Concrete Perimeter Footing and Wall
For some kits another option to pouring piers is to form a continuous concrete “perimeter footing and wall”. The footing is formed and poured first by digging a trench in the soil to below the frost line and set your forms. The footing is usually twice as wide as the wall and equally as thick; however, we strongly recommend that you check with your local building inspector to determine any sizing requirements and to see if an inspection is required before the footing is poured.
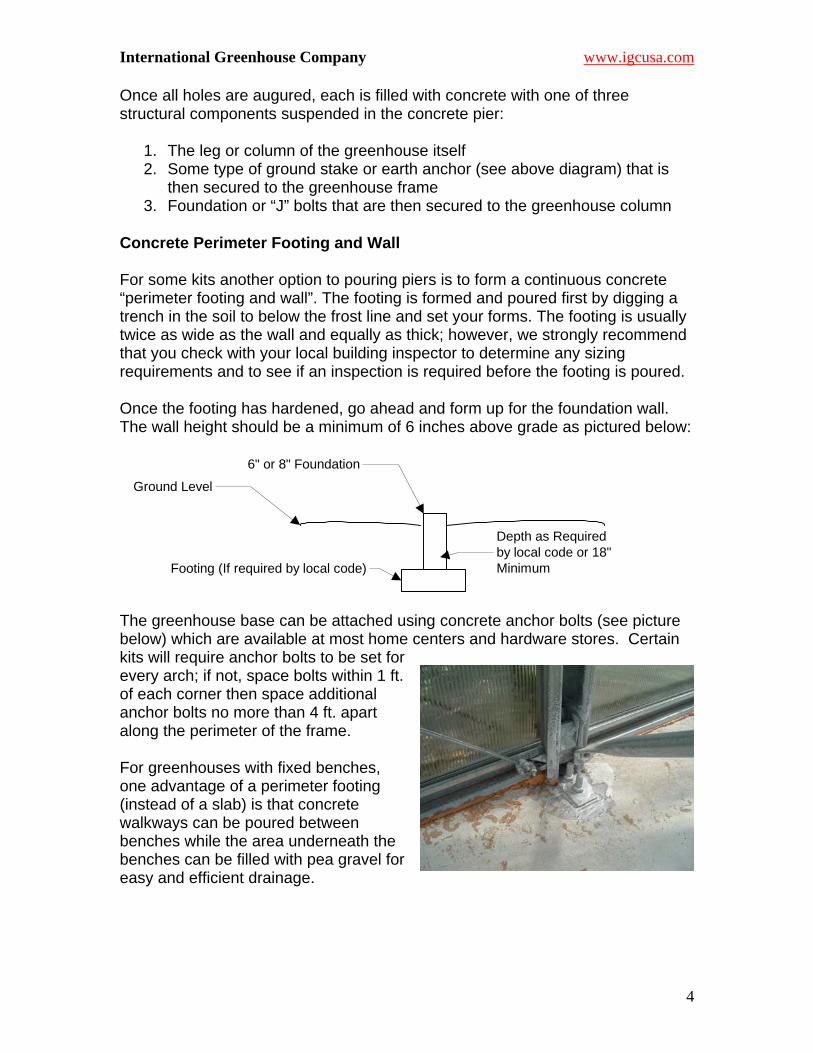
Once the footing has hardened, go ahead and form up for the foundation wall. The wall height should be a minimum of 6 inches above grade as pictured below:
Footing (If required by local code)
Ground Level
Depth as Requiredby local code or 18"Minimum
6" or 8" Foundation
The greenhouse base can be attached using concrete anchor bolts (see picture below) which are available at most home centers and hardware stores. Certain kits will require anchor bolts to be set for every arch; if not, space bolts within 1 ft. of each corner then space additional anchor bolts no more than 4 ft. apart along the perimeter of the frame.
For greenhouses with fixed benches, one advantage of a perimeter footing (instead of a slab) is that concrete walkways can be poured between benches while the area underneath the benches can be filled with pea gravel for easy and efficient drainage.
International Greenhouse Company www.igcusa.com
5
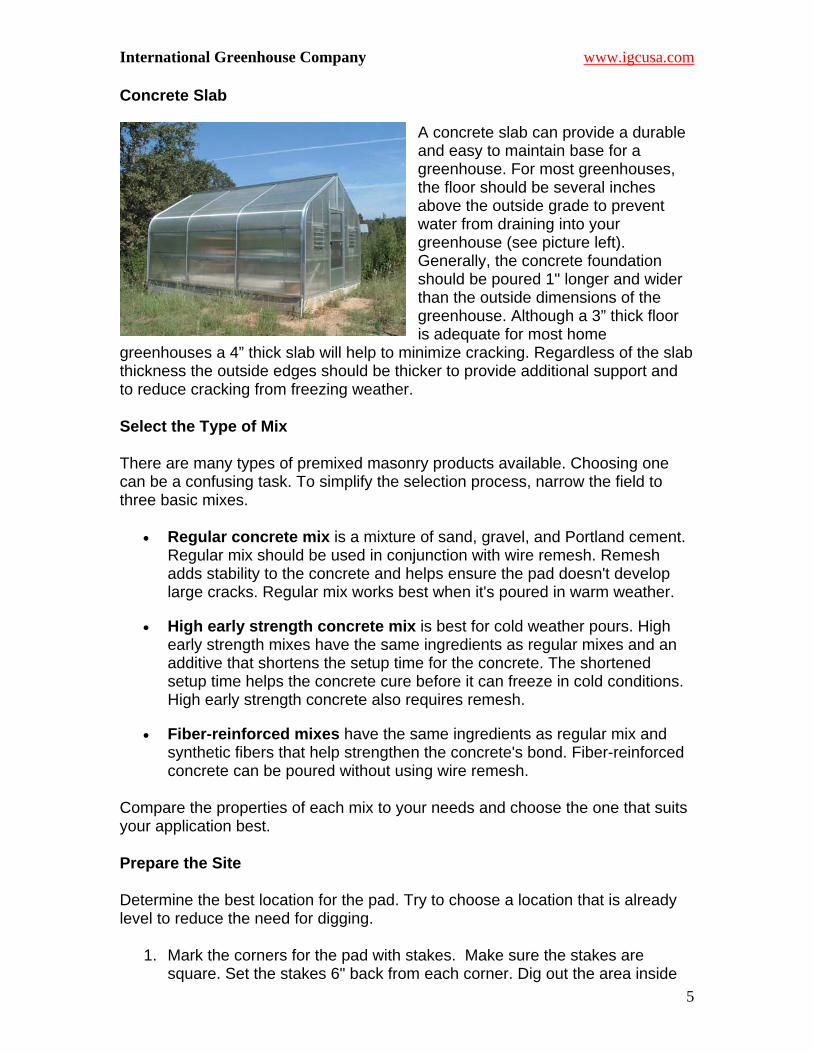
Concrete Slab
A concrete slab can provide a durable and easy to maintain base for a greenhouse. For most greenhouses, the floor should be several inches above the outside grade to prevent water from draining into your greenhouse (see picture left). Generally, the concrete foundation should be poured 1" longer and wider than the outside dimensions of the greenhouse. Although a 3” thick floor is adequate for most home
greenhouses a 4” thick slab will help to minimize cracking. Regardless of the slab thickness the outside edges should be thicker to provide additional support and to reduce cracking from freezing weather.
Select the Type of Mix
There are many types of premixed masonry products available. Choosing one can be a confusing task. To simplify the selection process, narrow the field to three basic mixes.
• Regular concrete mix is a mixture of sand, gravel, and Portland cement. Regular mix should be used in conjunction with wire remesh. Remesh adds stability to the concrete and helps ensure the pad doesn't develop large cracks. Regular mix works best when it's poured in warm weather.
• High early strength concrete mix is best for cold weather pours. High early strength mixes have the same ingredients as regular mixes and an additive that shortens the setup time for the concrete. The shortened setup time helps the concrete cure before it can freeze in cold conditions. High early strength concrete also requires remesh.
• Fiber-reinforced mixes have the same ingredients as regular mix and synthetic fibers that help strengthen the concrete's bond. Fiber-reinforced concrete can be poured without using wire remesh.
Compare the properties of each mix to your needs and choose the one that suits your application best.
Prepare the Site
Determine the best location for the pad. Try to choose a location that is already level to reduce the need for digging.
1. Mark the corners for the pad with stakes. Make sure the stakes are square. Set the stakes 6" back from each corner. Dig out the area inside
International Greenhouse Company www.igcusa.com
6
the stakes 6" deep. Most concrete pads are 4" deep; digging to 6" gives you enough room to lay a good base for the pad.
2. Use a tamper to compact the bottom of the hole. Fill in 2" of the bottom of the hole with gravel and fine sand. Compact the gravel and fine sand with a tamper.
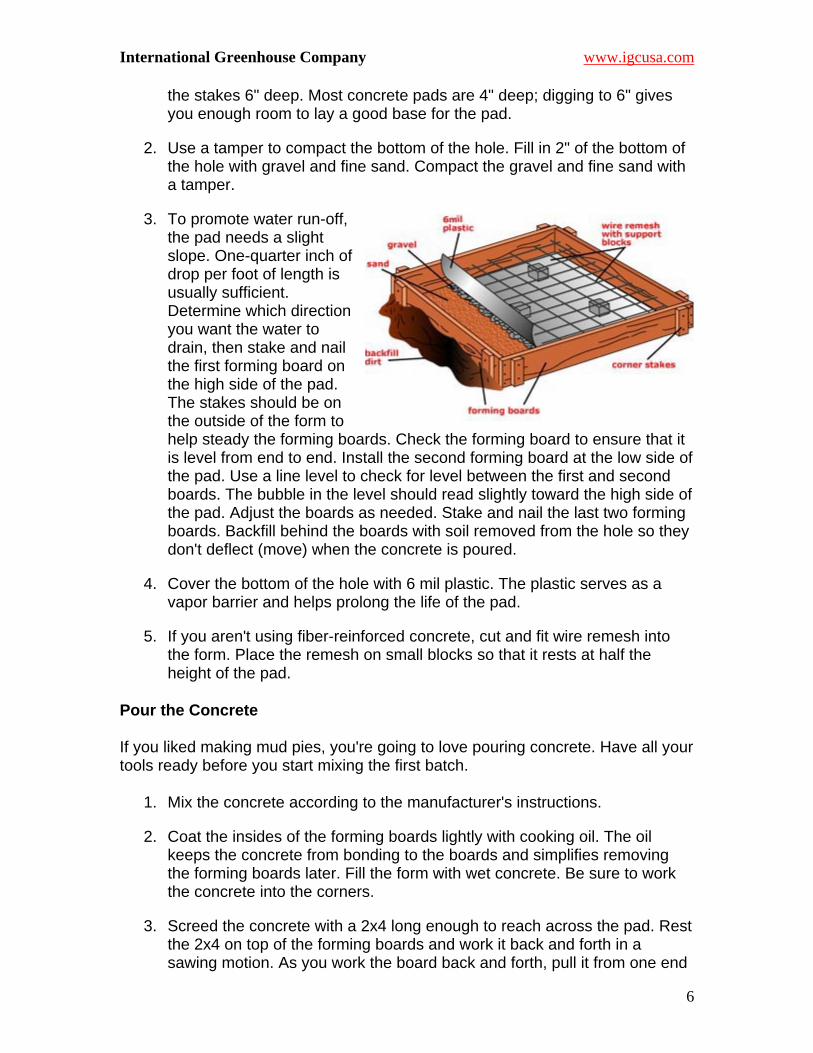
3. To promote water run-off, the pad needs a slight slope. One-quarter inch of drop per foot of length is usually sufficient. Determine which direction you want the water to drain, then stake and nail the first forming board on the high side of the pad. The stakes should be on the outside of the form to help steady the forming boards. Check the forming board to ensure that it is level from end to end. Install the second forming board at the low side of the pad. Use a line level to check for level between the first and second boards. The bubble in the level should read slightly toward the high side of the pad. Adjust the boards as needed. Stake and nail the last two forming boards. Backfill behind the boards with soil removed from the hole so they don't deflect (move) when the concrete is poured.
4. Cover the bottom of the hole with 6 mil plastic. The plastic serves as a vapor barrier and helps prolong the life of the pad.
5. If you aren't using fiber-reinforced concrete, cut and fit wire remesh into the form. Place the remesh on small blocks so that it rests at half the height of the pad.
Pour the Concrete
If you liked making mud pies, you're going to love pouring concrete. Have all your tools ready before you start mixing the first batch.
1. Mix the concrete according to the manufacturer's instructions.
2. Coat the insides of the forming boards lightly with cooking oil. The oil keeps the concrete from bonding to the boards and simplifies removing the forming boards later. Fill the form with wet concrete. Be sure to work the concrete into the corners.
3. Screed the concrete with a 2x4 long enough to reach across the pad. Rest the 2x4 on top of the forming boards and work it back and forth in a sawing motion. As you work the board back and forth, pull it from one end
International Greenhouse Company www.igcusa.com
7
of the pad to the other. Make several passes with the screed board to even out the pad and knock down the high spots. Make several passes with the screed board to even out the pad and knock down the high spots. Fill any low spots with fresh concrete and screed the pad until the top is flush with the form.
4. While the concrete is still wet, use a wooden or metal float to smooth the pad. Move the float in a semicircular motion along the top of the pad. Hold the leading edge of the float slightly above the concrete to avoid gouging the surface. As you float the surface, the gravel is forced down and excess water and air pockets rise to the top. Continue floating until the slab is smooth.
5. After the concrete begins to set, use an edging tool along the sides of the pad. The edging tool breaks the pad loose from the form and compacts the sides of the pad. For large pads, use a grooving tool every 6' to 8' to make control joints in the pad.
6. Surface the pad. One of the most popular and simplest surfaces for concrete is the broom finish. Dampen the bristles of an ordinary street broom and drag it lightly across the pad's entire surface. The broom makes small ridges in the concrete and provides traction to the surface of the pad.
Cure and Seal the Pad
Proper curing and sealing promotes high strength and long life in the concrete. Follow these steps to protect your pad:
1. Cover the pad with plastic for forty-eight hours to prevent it from flash drying on top.
2. Uncover the pad and remove the forming boards. Allow the pad to continue curing according to the manufacturer's instructions.
3. After the pad cures, apply concrete sealer to protect it.
The above section on concrete slabs was provided courtesy of Lowes.com
Anchoring Greenhouse to Pad
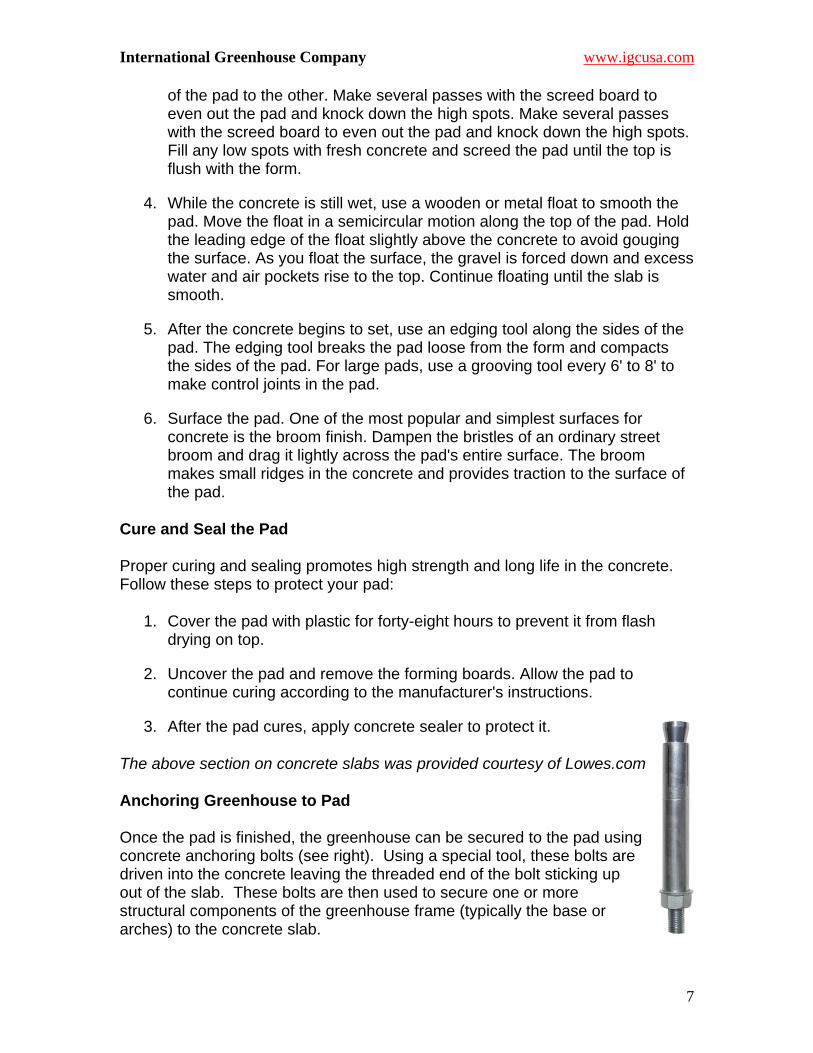
Once the pad is finished, the greenhouse can be secured to the pad using concrete anchoring bolts (see right). Using a special tool, these bolts are driven into the concrete leaving the threaded end of the bolt sticking up out of the slab. These bolts are then used to secure one or more structural components of the greenhouse frame (typically the base or arches) to the concrete slab.
International Greenhouse Company www.igcusa.com
8
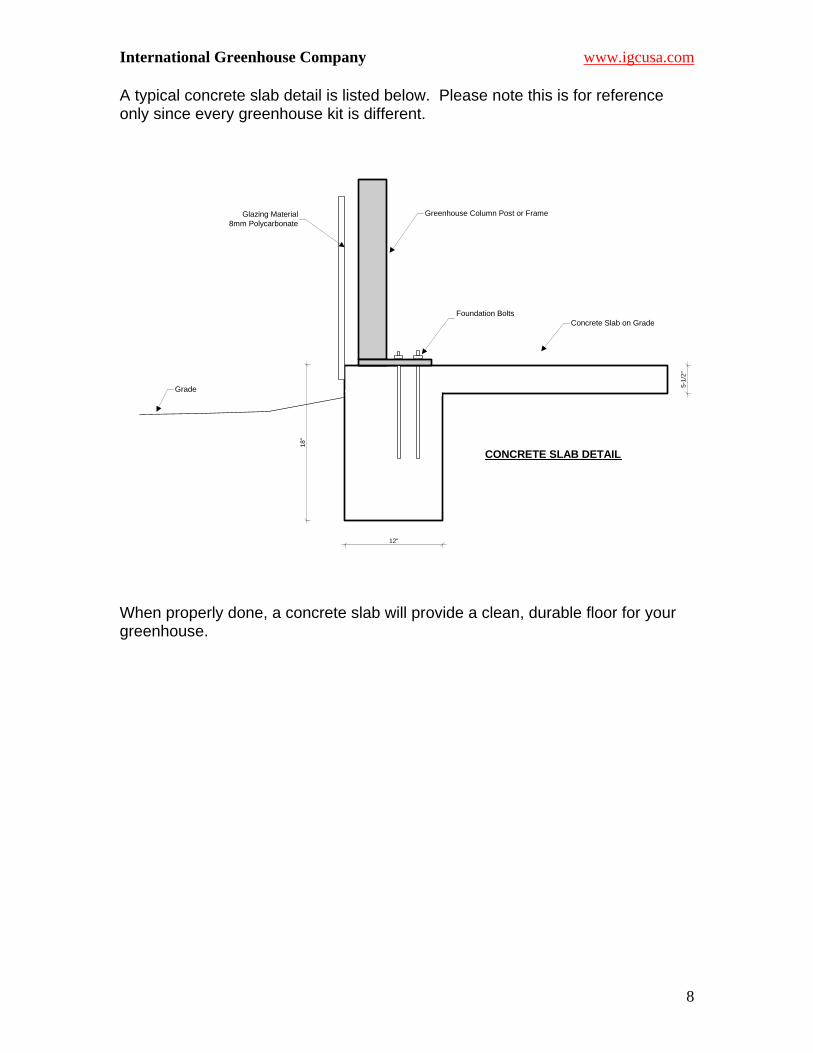
A typical concrete slab detail is listed below. Please note this is for reference only since every greenhouse kit is different.
Greenhouse Column Post or FrameGlazing Material8mm Polycarbonate
Concrete Slab on Grade
5-1/
2"
18"
12"
Grade
Foundation Bolts
CONCRETE SLAB DETAIL
When properly done, a concrete slab will provide a clean, durable floor for your greenhouse.
Hobby Greenhouse Buyers Guide
www.greenhousemegastore.com | ©2008 International Greenhouse Company
Hobby Greenhouse Buyers Guide
www.greenhousemegastore.com | 1 ©2008 International Greenhouse Company
Equipment, Systems, and Supplies…Oh my! There are a multitude of greenhouse equipment and systems options, some are necessary and some are merely conveniences. The kinds of systems you want to put in your backyard greenhouse really depend on what you will be using it for and the budget you are working on. Some of these systems can get expensive very quickly, so it’s best to start with systems that are generally critical to the success of a hobby greenhouse. That’s why this guide is organized with the most important systems first, and less critical systems follow in descending order. Once you have made a decision on the type of backyard greenhouse you would like to construct at your home, take a few moments to consider what systems, if any, you need to help your greenhouse realize its full growing potential.
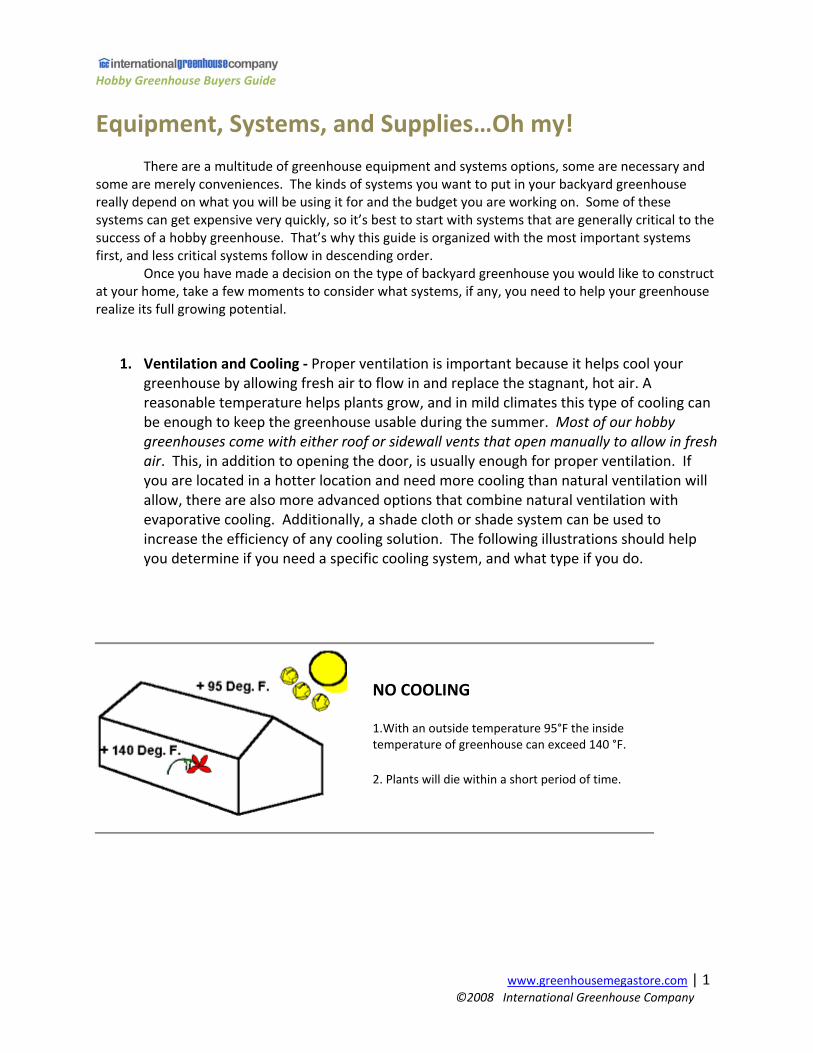
1. Ventilation and Cooling ‐ Proper ventilation is important because it helps cool your greenhouse by allowing fresh air to flow in and replace the stagnant, hot air. A reasonable temperature helps plants grow, and in mild climates this type of cooling can be enough to keep the greenhouse usable during the summer. Most of our hobby greenhouses come with either roof or sidewall vents that open manually to allow in fresh air. This, in addition to opening the door, is usually enough for proper ventilation. If you are located in a hotter location and need more cooling than natural ventilation will allow, there are also more advanced options that combine natural ventilation with evaporative cooling. Additionally, a shade cloth or shade system can be used to increase the efficiency of any cooling solution. The following illustrations should help you determine if you need a specific cooling system, and what type if you do.
NO COOLING 1.With an outside temperature 95°F the inside temperature of greenhouse can exceed 140 °F.
2. Plants will die within a short period of time.

Hobby Greenhouse Buyers Guide
www.greenhousemegastore.com | 2 ©2008 International Greenhouse Company
NATURAL VENTILATION 1. Roof vent opens to allow hot air to escape to outside.
2. Door or other opening must be left open to provide for incoming air from outside to replace exhausted air.
3. On hot summer days temperatures can rise 20 to 30 degrees above outside temperature.
4. Recommended for mild climate areas only.
FAN & SHUTTER COOLING 1. Outdoor air is introduced through motorized inlet shutters. 2. Hot air is exhausted by exhaust fans. 3. Temperature inside house can be maintained within 10 degrees of outdoor temperature with properly designed system. 4. Fans and shutters are controlled by thermostat.
FAN & SHUTTER COOLING WITH SHADE CLOTH 1. Outdoor air is introduced through motorized inlet shutters. 2. Hot air is exhausted by exhaust fans. 3. Shade cloth is placed over exterior of greenhouse or suspended from wires placed on inside. 4. Temperature inside house can be maintained within 3 to 4 degrees of outdoor temperature with properly designed system. 5. Fans and shutters are controlled by thermostat.
Hobby Greenhouse Buyers Guide
www.greenhousemegastore.com | 3 ©2008 International Greenhouse Company
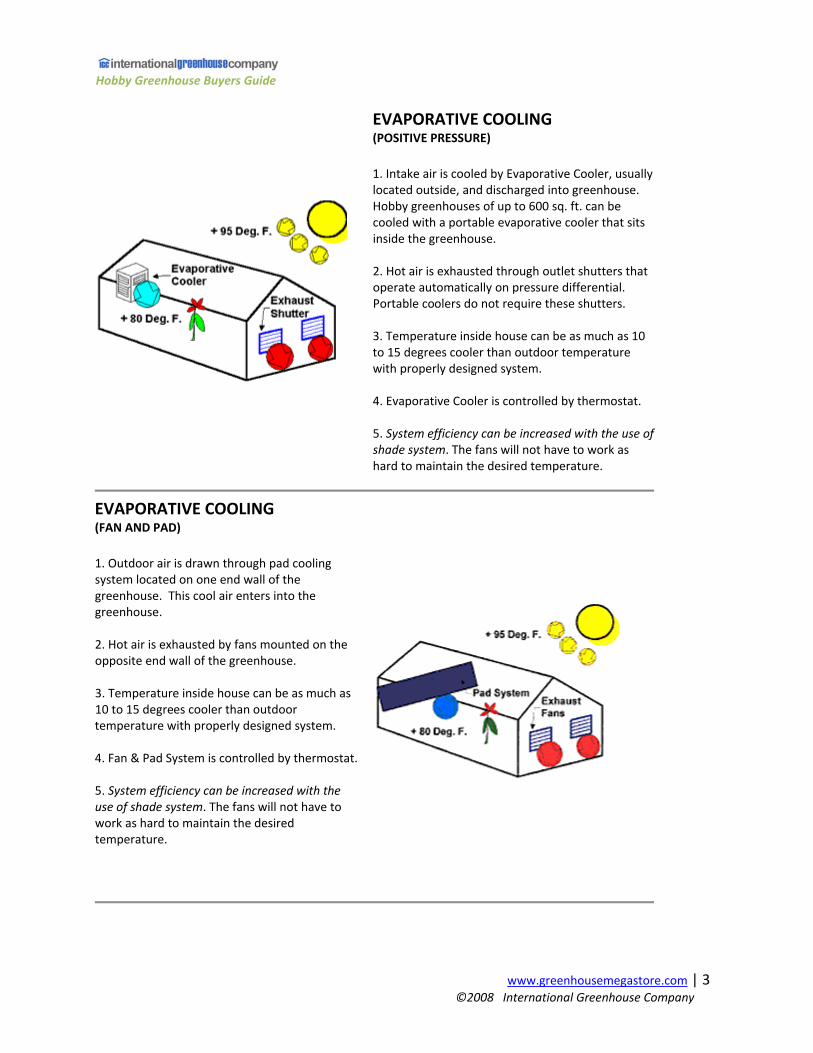
EVAPORATIVE COOLING (POSITIVE PRESSURE) 1. Intake air is cooled by Evaporative Cooler, usually located outside, and discharged into greenhouse. Hobby greenhouses of up to 600 sq. ft. can be cooled with a portable evaporative cooler that sits inside the greenhouse. 2. Hot air is exhausted through outlet shutters that operate automatically on pressure differential. Portable coolers do not require these shutters. 3. Temperature inside house can be as much as 10 to 15 degrees cooler than outdoor temperature with properly designed system. 4. Evaporative Cooler is controlled by thermostat. 5. System efficiency can be increased with the use of shade system. The fans will not have to work as hard to maintain the desired temperature.
EVAPORATIVE COOLING (FAN AND PAD) 1. Outdoor air is drawn through pad cooling system located on one end wall of the greenhouse. This cool air enters into the greenhouse. 2. Hot air is exhausted by fans mounted on the opposite end wall of the greenhouse. 3. Temperature inside house can be as much as 10 to 15 degrees cooler than outdoor temperature with properly designed system. 4. Fan & Pad System is controlled by thermostat. 5. System efficiency can be increased with the use of shade system. The fans will not have to work as hard to maintain the desired temperature.
Hobby Greenhouse Buyers Guide
www.greenhousemegastore.com | 4 ©2008 International Greenhouse Company
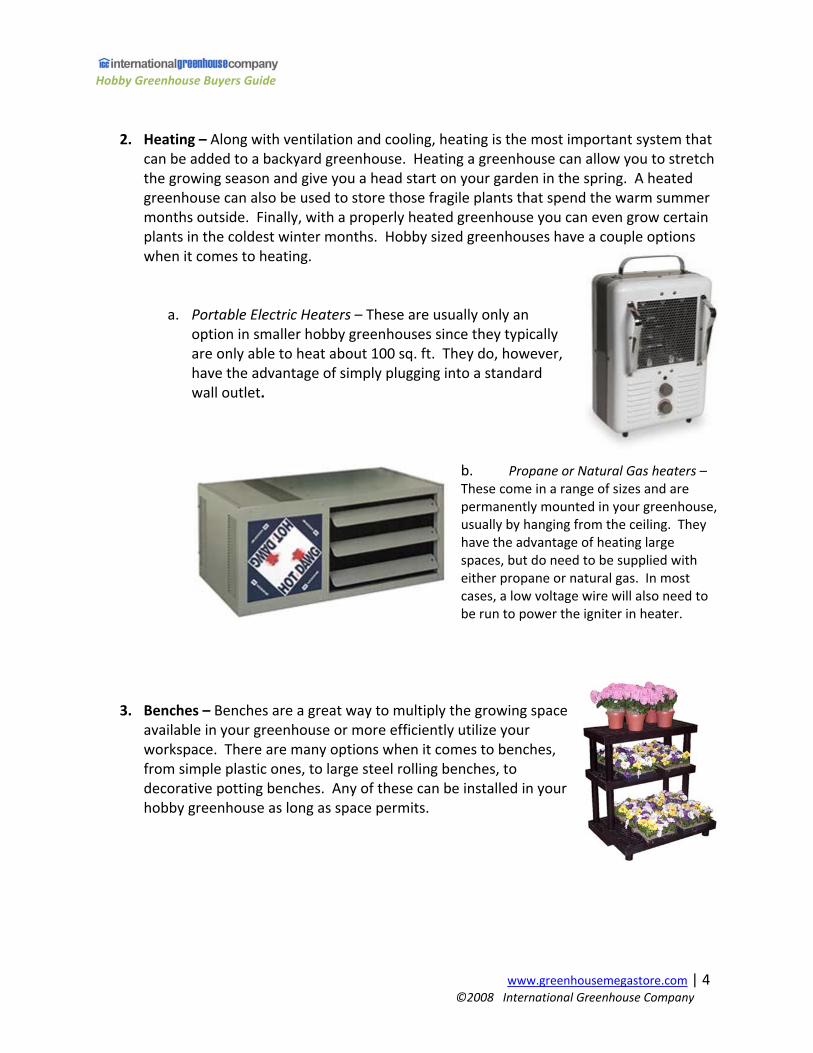
2. Heating – Along with ventilation and cooling, heating is the most important system that
can be added to a backyard greenhouse. Heating a greenhouse can allow you to stretch the growing season and give you a head start on your garden in the spring. A heated greenhouse can also be used to store those fragile plants that spend the warm summer months outside. Finally, with a properly heated greenhouse you can even grow certain plants in the coldest winter months. Hobby sized greenhouses have a couple options when it comes to heating.
a. Portable Electric Heaters – These are usually only an option in smaller hobby greenhouses since they typically are only able to heat about 100 sq. ft. They do, however, have the advantage of simply plugging into a standard wall outlet.
b. Propane or Natural Gas heaters – These come in a range of sizes and are permanently mounted in your greenhouse, usually by hanging from the ceiling. They have the advantage of heating large spaces, but do need to be supplied with either propane or natural gas. In most cases, a low voltage wire will also need to be run to power the igniter in heater.
3. Benches – Benches are a great way to multiply the growing space
available in your greenhouse or more efficiently utilize your workspace. There are many options when it comes to benches, from simple plastic ones, to large steel rolling benches, to decorative potting benches. Any of these can be installed in your hobby greenhouse as long as space permits.
Hobby Greenhouse Buyers Guide
www.greenhousemegastore.com | 5©2008 International Greenhouse Company
4. Air Circulation – Proper air circulation will ensure even heating and cooling throughout your greenhouse. In small hobby greenhouses this may not even be an issue. Or, the correct amount of air movement could be achieved with something as simple as a box fan or small clip on fan. However in large greenhouses, it is recommended that special circulation fans be installed to aide in evenly heating and cooling your greenhouse, and thereby reducing your maintenance costs.
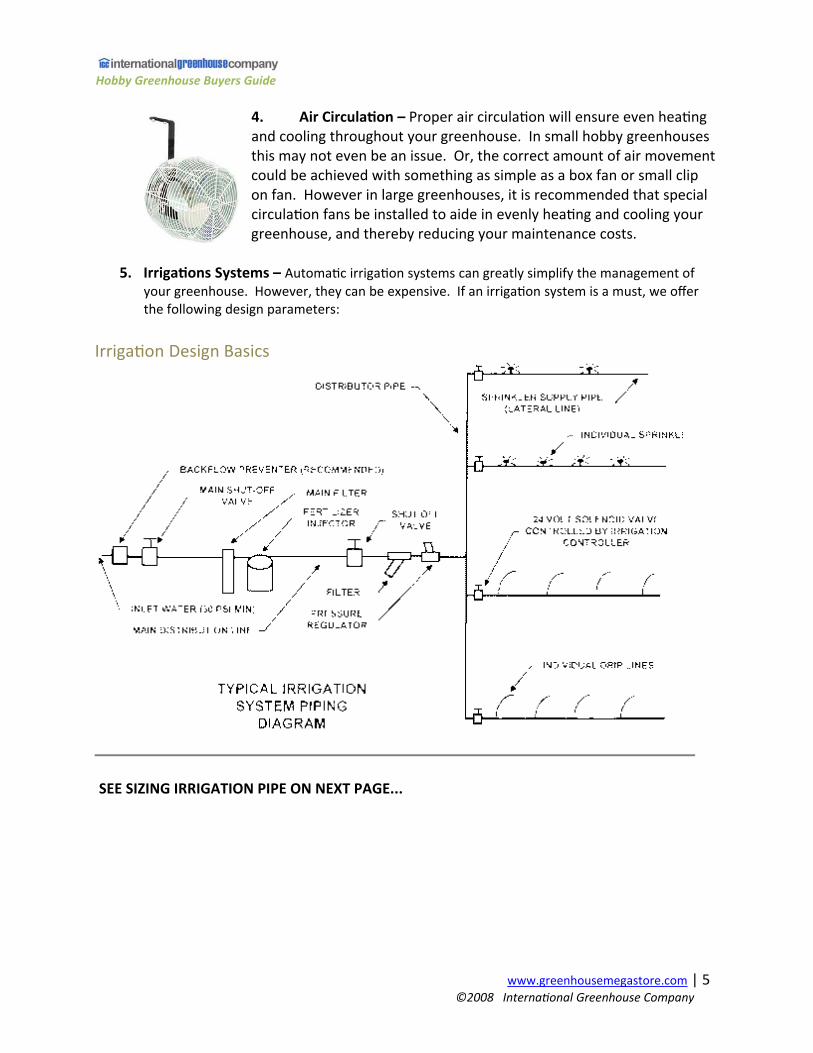
5. Irrigations Systems – Automatic irrigation systems can greatly simplify the management of
your greenhouse. However, they can be expensive. If an irrigation system is a must, we offer the following design parameters:
Irrigation Design Basics
SEE SIZING IRRIGATION PIPE ON NEXT PAGE...
Hobby Greenhouse Buyers Guide
www.greenhousemegastore.com | 6©2008 International Greenhouse Company
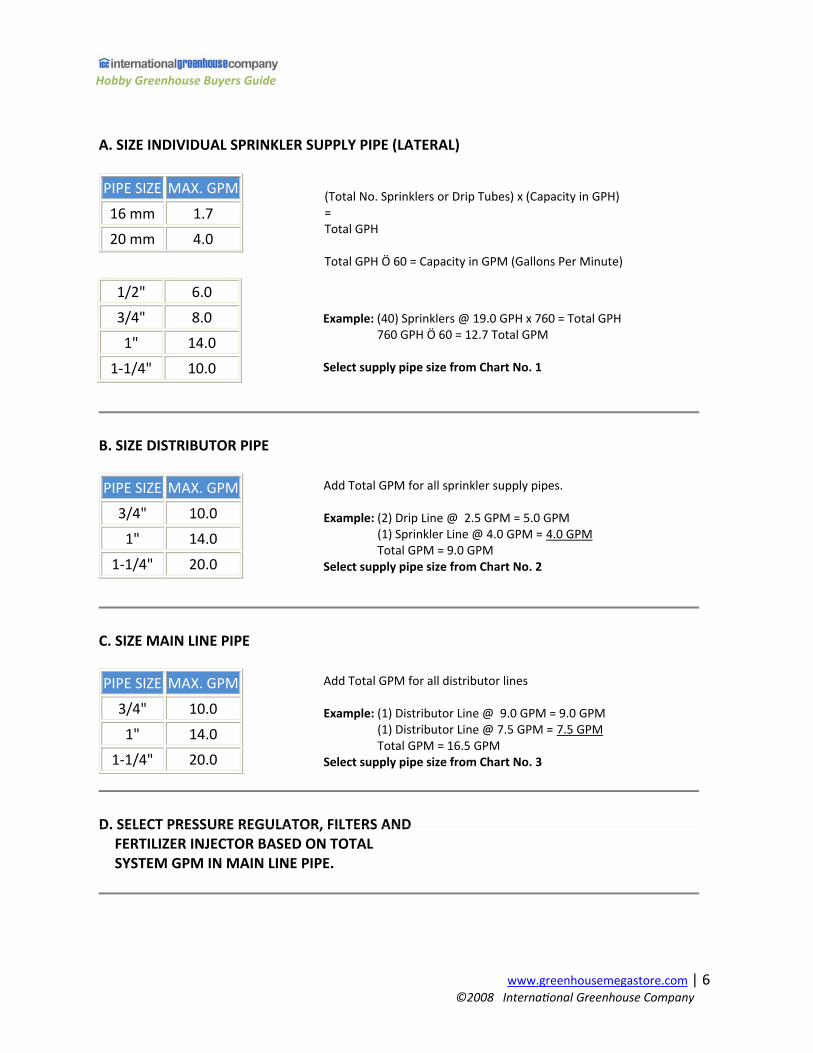
1/2" 6.0
3/4" 8.0
1" 14.0
1-1/4" 10.0
Example: (40) Sprinklers @ 19.0 GPH x 760 = Total GPHExample: 760 GPH Ö 60 = 12.7 Total GPM Select supply pipe size from Chart No. 1
A. SIZE INDIVIDUAL SPRINKLER SUPPLY PIPE (LATERAL)
PIPE SIZE MAX. GPM
16 mm 1.7
20 mm 4.0
(Total No. Sprinklers or Drip Tubes) x (Capacity in GPH) = Total GPH Total GPH Ö 60 = Capacity in GPM (Gallons Per Minute)
B. SIZE DISTRIBUTOR PIPE
PIPE SIZE MAX. GPM
3/4" 10.0
1" 14.0
1-1/4" 20.0
Add Total GPM for all sprinkler supply pipes. Example: (2) Drip Line @ 2.5 GPM = 5.0 GPM Example: (1) Sprinkler Line @ 4.0 GPM = 4.0 GPM Example: Total GPM = 9.0 GPM Select supply pipe size from Chart No. 2
C. SIZE MAIN LINE PIPE
PIPE SIZE MAX. GPM
3/4" 10.0
1" 14.0
1-1/4" 20.0
Add Total GPM for all distributor lines Example: (1) Distributor Line @ 9.0 GPM = 9.0 GPM Example: (1) Distributor Line @ 7.5 GPM = 7.5 GPM Example: Total GPM = 16.5 GPM Select supply pipe size from Chart No. 3
D. SELECT PRESSURE REGULATOR, FILTERS AND 4. FERTILIZER INJECTOR BASED ON TOTAL 4. SYSTEM GPM IN MAIN LINE PIPE.
Hobby Greenhouse Buyers Guide
www.greenhousemegastore.com | 7©2008 International Greenhouse Company
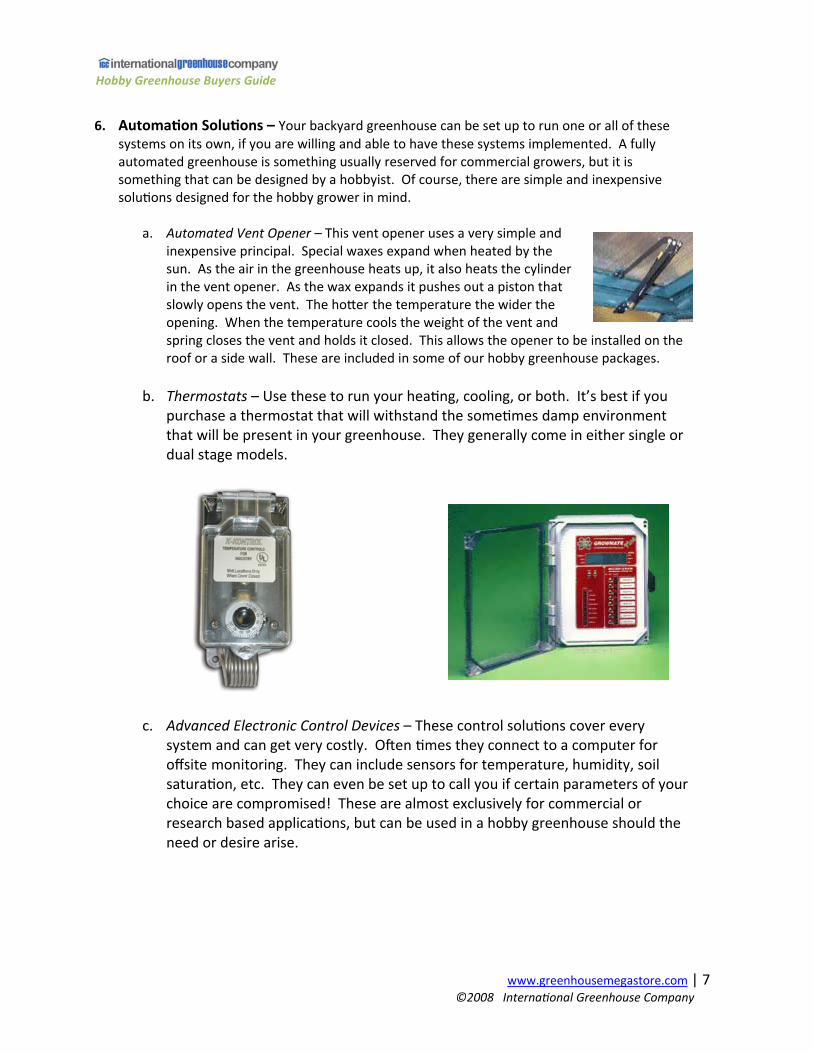
6. Automation Solutions – Your backyard greenhouse can be set up to run one or all of these systems on its own, if you are willing and able to have these systems implemented. A fully automated greenhouse is something usually reserved for commercial growers, but it is something that can be designed by a hobbyist. Of course, there are simple and inexpensive solutions designed for the hobby grower in mind.
a. Automated Vent Opener – This vent opener uses a very simple and
inexpensive principal. Special waxes expand when heated by the sun. As the air in the greenhouse heats up, it also heats the cylinder in the vent opener. As the wax expands it pushes out a piston that slowly opens the vent. The hotter the temperature the wider the opening. When the temperature cools the weight of the vent and spring closes the vent and holds it closed. This allows the opener to be installed on the roof or a side wall. These are included in some of our hobby greenhouse packages.
b. Thermostats – Use these to run your heating, cooling, or both. It’s best if you purchase a thermostat that will withstand the sometimes damp environment that will be present in your greenhouse. They generally come in either single or dual stage models.
c. Advanced Electronic Control Devices – These control solutions cover every system and can get very costly. Often times they connect to a computer for offsite monitoring. They can include sensors for temperature, humidity, soil saturation, etc. They can even be set up to call you if certain parameters of your choice are compromised! These are almost exclusively for commercial or research based applications, but can be used in a hobby greenhouse should the need or desire arise.

Hobby Greenhouse Buyers Guide
www.greenhousemegastore.com | у ©2008 International Greenhouse Company
Other things to consider We have sold and constructed hundreds of greenhouses for over the past thirteen years. Here are some tips we have learned that will hopefully save you time, money and hassle: Tips to Avoiding Expensive Delays and High Costs
• Make sure all necessary site, structure, electrical, plumbing, etc. permits are ready well before you purchase your kit.
• If you are hiring a contractor to build your greenhouse try to avoid making changes after the contract is signed. In addition to time delays, the cost impact of change orders can be considerable. Contractors know they have to be competitive when bidding a job but never have to be competitive with change orders on awarded projects.
• Purchase your greenhouse from a reputable company that can offer equipment and supply solutions for a variety of applications.
Finishing with the “BIG PICTURE”
• Stay in regular contact with your supplier. • Take pictures of the project from the very beginning; it is only going to be built once! • Be prepared to learn, experiment, and have fun!
A hobby greenhouse in your backyard can bring a lifetime of learning and enjoyment. Contact us today to discuss what is right for you!