Embed Size (px)
Citation preview
�������� ����������
�2012 Lennox Industries Inc.Dallas, Texas, USA
indoor temperature
indoor humidity is 41%
fan isOFF
9:39 am January 23, 2012
fan isAUTO
cool−to
set temp
75
heat to
72
heator
cool
fan isAUTO
awaymode
outdoortemperature
80
system is cooling
forecastHi 85Lo 60
20% chance of rain
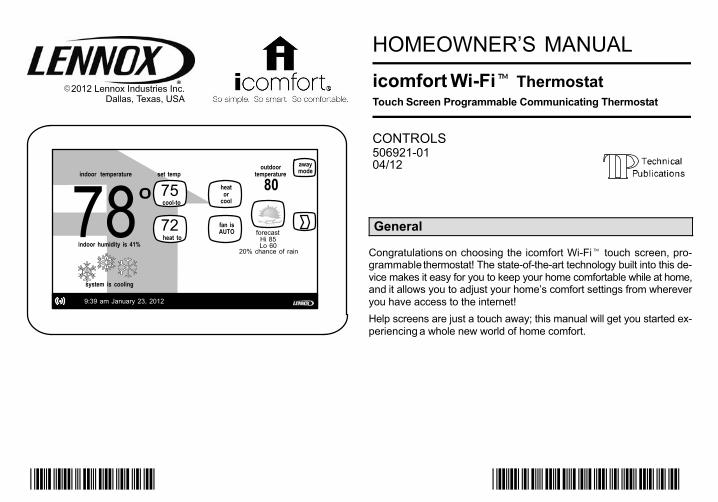
HOMEOWNER’S MANUAL
icomfort Wi−Fi� ThermostatTouch Screen Programmable Communicating Thermostat
CONTROLS506921−0104/12
General
Congratulations on choosing the icomfort Wi−Fi� touch screen, pro-grammable thermostat! The state−of−the−art technology built into this de-vice makes it easy for you to keep your home comfortable while at home,and it allows you to adjust your home’s comfort settings from whereveryou have access to the internet!
Help screens are just a touch away; this manual will get you started ex-periencing a whole new world of home comfort.
506921−01 04/12Page 2
Table of Contents
icomfort Wi−Fi� Thermostat 2. . . . . . . . . . . . . . . . . . . . . . . . . . . . . . Thermostat Lock−out 2. . . . . . . . . . . . . . . . . . . . . . . . . . . . . . . . . . . . Start up 3. . . . . . . . . . . . . . . . . . . . . . . . . . . . . . . . . . . . . . . . . . . . . . . User Preferences Quick Reference Chart 4. . . . . . . . . . . . . . . . . . . Tools used to change preferences 5. . . . . . . . . . . . . . . . . . . . . . . . . User Dashboard and HELP 6. . . . . . . . . . . . . . . . . . . . . . . . . . . . . . .
System Settings 6. . . . . . . . . . . . . . . . . . . . . . . . . . . . . . . . . . . . . . . . Clock Settings 7. . . . . . . . . . . . . . . . . . . . . . . . . . . . . . . . . . . . . . . . . . Display Settings 7. . . . . . . . . . . . . . . . . . . . . . . . . . . . . . . . . . . . . . . . Weather 8. . . . . . . . . . . . . . . . . . . . . . . . . . . . . . . . . . . . . . . . . . . . . . . Edit Programs 8. . . . . . . . . . . . . . . . . . . . . . . . . . . . . . . . . . . . . . . . . . Alerts 9. . . . . . . . . . . . . . . . . . . . . . . . . . . . . . . . . . . . . . . . . . . . . . . . . Reminders 11. . . . . . . . . . . . . . . . . . . . . . . . . . . . . . . . . . . . . . . . . . . . .
Service Information 13. . . . . . . . . . . . . . . . . . . . . . . . . . . . . . . . . . . . . . Adjust temperature and change programs�Program HOLD 14. . . Away button (Vacation mode) 14. . . . . . . . . . . . . . . . . . . . . . . . . . . . . Setting humidity controls 16. . . . . . . . . . . . . . . . . . . . . . . . . . . . . . . . . Enabling Wi−Fi from User Home Screen 17. . . . . . . . . . . . . . . . . . . . Registering icomfort Wi−Fi� from User Home Screen 18. . . . . . . . . Computer Login to icomfort Wi−Fi� Server 19. . . . . . . . . . . . . . . . . .
WARNINGDo not switch system to cool if the outdoor temperature is below45°F (7°C). This can damage the cooling system.
NOTICEUse this thermostat only as described in this manual.
icomfort Wi−Fi� Thermostat
The communicating icomfort Wi−Fi� thermostat is an electronic 7−dayprogrammable touch screen thermostat with color display. It also offersenhanced capabilities which include humidification measurement andcontrol, dew point adjustment control, dehumidification measurementand control, Humiditrol® Enhanced Dehumidification Accessory (EDA)capability, and equipment maintenance reminders. The thermostat’s au-tochangeover mode permits control of heating, cooling, humidification,and dehumidification without user involvement.
The icomfort Wi−Fi� thermostat can connect to the internet using yourhome’s wireless Wi−Fi access point. After online registration is com-pleted, weather information is automatically sent to the thermostat, andyou will have full access to the thermostat from anywhere using a remoteinternet connection via computer, smartphone, or iPad.
The thermostat stores system parameters in nonvolatile memory (re-tains data when electrical power fails or is turned off), and includes on-board help screens.
Indoor Air Quality accessories are supported with time-based notifica-tion of consumables including media filters, UVC bulbs, humidifier pads,and PureAir� catalyst service / replacement.
Thermostat Lock−out
A �lock" icon at the bottom centerscreen (shown in the picture), indi-cates the thermostat is either par-tially− or fully−locked.
Partially−locked, any user can adjust the temperature up or down to set a�hold" for a selectable time.
Fully−locked, no one can make any changes to the thermostat’s settings.To unlock, press and hold the �lock" icon for 5−6 seconds.
To lock the thermostat, access �Screen lockout" through the dash-board’s �display settings" described on Page 7.
icomfort Wi−Fi� 7−Day Programmable Communicating ThermostatPage 3
Start up
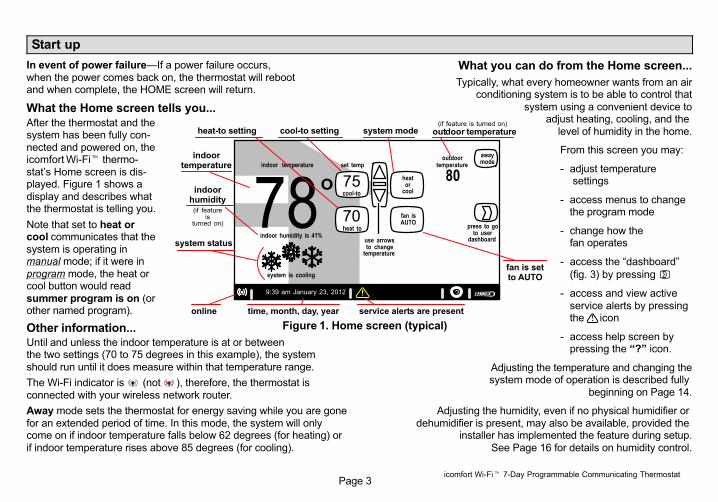
In event of power failure�If a power failure occurs, when the power comes back on, the thermostat will reboot and when complete, the HOME screen will return.
What the Home screen tells you...
After the thermostat and thesystem has been fully con-nected and powered on, theicomfort Wi−Fi� thermo-stat’s Home screen is dis-played. Figure 1 shows adisplay and describes whatthe thermostat is telling you.
Note that set to heat orcool communicates that thesystem is operating inmanual mode; if it were inprogram mode, the heat orcool button would readsummer program is on (orother named program).
Other information...Until and unless the indoor temperature is at or between the two settings (70 to 75 degrees in this example), the system should run until it does measure within that temperature range.
The Wi−Fi indicator is (not ), therefore, the thermostat is connected with your wireless network router.
Away mode sets the thermostat for energy saving while you are gonefor an extended period of time. In this mode, the system will onlycome on if indoor temperature falls below 62 degrees (for heating) orif indoor temperature rises above 85 degrees (for cooling).
What you can do from the Home screen...
Typically, what every homeowner wants from an air conditioning system is to be able to control that
system using a convenient device to adjust heating, cooling, and the
level of humidity in the home.
From this screen you may:
− adjust temperature settings
− access menus to changethe program mode
− change how the fan operates
− access the �dashboard"
(fig. 3) by pressing
− access and view activeservice alerts by pressingthe icon
− access help screen bypressing the �?" icon.
Adjusting the temperature and changing the system mode of operation is described fully
beginning on Page 14.
Adjusting the humidity, even if no physical humidifier or dehumidifier is present, may also be available, provided the
installer has implemented the feature during setup. See Page 16 for details on humidity control.
indoor temperature
indoor humidity is 41%
fan isOFF
9:39 am January 23, 2012
fan isAUTO
cool−to
set temp
75
heat to
70
heator
cool
fan isAUTO
awaymode
outdoortemperature
80
system is cooling
press to goto user
dashboarduse arrowsto change
temperature
?
indoortemperature
indoorhumidity
outdoor temperaturecool−to settingheat−to setting system mode
system status
fan is setto AUTO
service alerts are presentonline time, month, day, year
(if feature is turned on)
(if featureis
turned on)
Figure 1. Home screen (typical)
506921−01 04/12Page 4
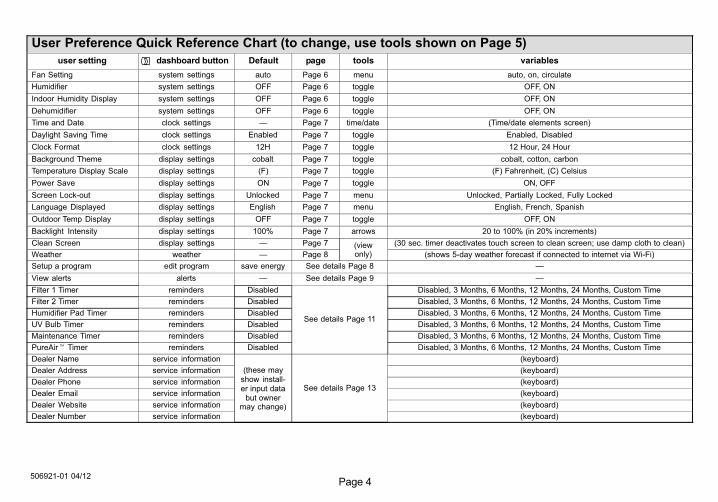
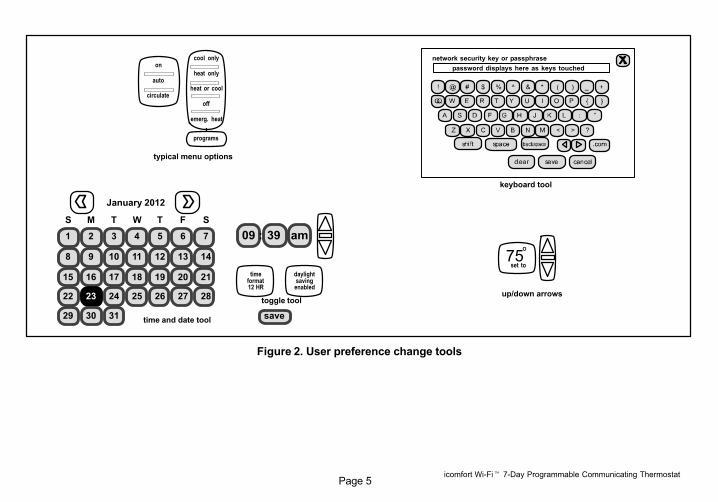
User Preference Quick Reference Chart (to change, use tools shown on Page 5)
user setting dashboard button Default page tools variables
Fan Setting system settings auto Page 6 menu auto, on, circulate
Humidifier system settings OFF Page 6 toggle OFF, ON
Indoor Humidity Display system settings OFF Page 6 toggle OFF, ON
Dehumidifier system settings OFF Page 6 toggle OFF, ON
Time and Date clock settings � Page 7 time/date (Time/date elements screen)
Daylight Saving Time clock settings Enabled Page 7 toggle Enabled, Disabled
Clock Format clock settings 12H Page 7 toggle 12 Hour, 24 Hour
Background Theme display settings cobalt Page 7 toggle cobalt, cotton, carbon
Temperature Display Scale display settings (F) Page 7 toggle (F) Fahrenheit, (C) Celsius
Power Save display settings ON Page 7 toggle ON, OFF
Screen Lock−out display settings Unlocked Page 7 menu Unlocked, Partially Locked, Fully Locked
Language Displayed display settings English Page 7 menu English, French, Spanish
Outdoor Temp Display display settings OFF Page 7 toggle OFF, ON
Backlight Intensity display settings 100% Page 7 arrows 20 to 100% (in 20% increments)
Clean Screen display settings � Page 7 (viewonly)
(30 sec. timer deactivates touch screen to clean screen; use damp cloth to clean)
Weather weather � Page 8 (shows 5−day weather forecast if connected to internet via Wi−Fi)
Setup a program edit program save energy See details Page 8 �
View alerts alerts � See details Page 9 �
Filter 1 Timer reminders Disabled
See details Page 11
Disabled, 3 Months, 6 Months, 12 Months, 24 Months, Custom Time
Filter 2 Timer reminders Disabled Disabled, 3 Months, 6 Months, 12 Months, 24 Months, Custom Time
Humidifier Pad Timer reminders Disabled Disabled, 3 Months, 6 Months, 12 Months, 24 Months, Custom Time
UV Bulb Timer reminders Disabled Disabled, 3 Months, 6 Months, 12 Months, 24 Months, Custom Time
Maintenance Timer reminders Disabled Disabled, 3 Months, 6 Months, 12 Months, 24 Months, Custom Time
PureAir� Timer reminders Disabled Disabled, 3 Months, 6 Months, 12 Months, 24 Months, Custom Time
Dealer Name service information
(these mayshow install-er input data
but ownermay change)
See details Page 13
(keyboard)
Dealer Address service information (keyboard)
Dealer Phone service information (keyboard)
Dealer Email service information (keyboard)
Dealer Website service information (keyboard)
Dealer Number service information (keyboard)
icomfort Wi−Fi� 7−Day Programmable Communicating ThermostatPage 5
keyboard tool
typical menu options
up/down arrows
network security key or passphrase
password displays here as keys touched
cool only
heat only
heat or cool
off
emerg. heat
programs
75º
set to
on
auto
circulate
S M T W T F S
January 2012
1 2 3 4 5 6 7
8 9 10 11 12 13 14
15 16 17 18 19 20 21
22 23 24 25 26 27 28
29 30 31 save
09 : 39 am
time and date tool
timeformat12 HR
daylightsaving
enabled
toggle tool
Figure 2. User preference change tools
506921−01 04/12Page 6
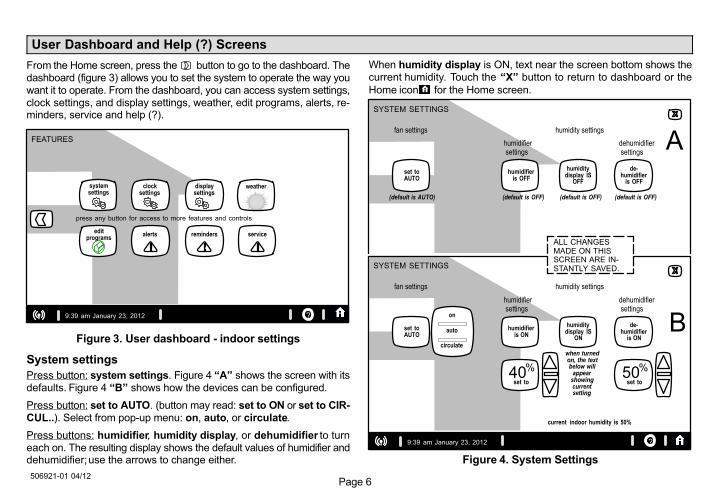
User Dashboard and Help (?) Screens
From the Home screen, press the button to go to the dashboard. Thedashboard (figure 3) allows you to set the system to operate the way youwant it to operate. From the dashboard, you can access system settings,clock settings, and display settings, weather, edit programs, alerts, re-minders, service and help (?).
9:39 am January 23, 2012
FEATURES
?
press any button for access to more features and controls
weathersystemsettings
clocksettings
displaysettings
serviceedit
programsalerts reminders
Figure 3. User dashboard − indoor settings
System settings
Press button: system settings. Figure 4 �A" shows the screen with itsdefaults. Figure 4 �B" shows how the devices can be configured.
Press button: set to AUTO. (button may read: set to ON or set to CIR-CUL..). Select from pop−up menu: on, auto, or circulate.
Press buttons: humidifier, humidity display, or dehumidifier to turneach on. The resulting display shows the default values of humidifier anddehumidifier; use the arrows to change either.
When humidity display is ON, text near the screen bottom shows thecurrent humidity. Touch the �X" button to return to dashboard or the
Home icon for the Home screen.
9:39 am January 23, 2012
SYSTEM SETTINGS
?
current indoor humidity is 50%
set toAUTO
humidifieris ON
humiditydisplay IS
ON
de−humidifier
is ON
fan settings humidity settings
humidifier settings
dehumidifier settings
on
auto
circulate
40%
set to50%
set to
when turnedon, the textbelow will
appearshowingcurrentsetting
SYSTEM SETTINGS
set toAUTO
humidifieris OFF
humiditydisplay IS
OFF
de−humidifier
is OFF
fan settings humidity settings
humidifier settings
dehumidifier settings
(default is OFF)(default is AUTO) (default is OFF) (default is OFF)
B
A
ALL CHANGESMADE ON THISSCREEN ARE IN-STANTLY SAVED.
Figure 4. System Settings
icomfort Wi−Fi� 7−Day Programmable Communicating ThermostatPage 7
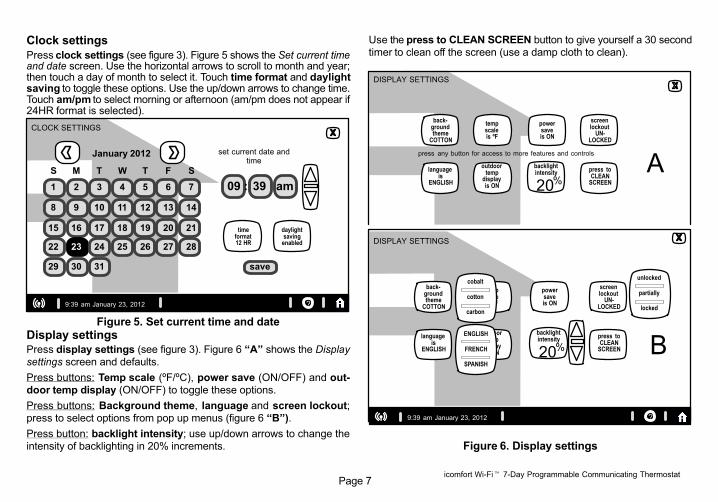
Clock settings
Press clock settings (see figure 3). Figure 5 shows the Set current timeand date screen. Use the horizontal arrows to scroll to month and year;then touch a day of month to select it. Touch time format and daylightsaving to toggle these options. Use the up/down arrows to change time.Touch am/pm to select morning or afternoon (am/pm does not appear if24HR format is selected).
9:39 am January 23, 2012
CLOCK SETTINGS
?
S M T W T F S
January 2012
1 2 3 4 5 6 7
8 9 10 11 12 13 14
15 16 17 18 19 20 21
22 23 24 25 26 27 28
29 30 31 save
09 : 39 am
set current date andtime
timeformat12 HR
daylightsaving
enabled
Figure 5. Set current time and date
Display settingsPress display settings (see figure 3). Figure 6 �A" shows the Displaysettings screen and defaults.
Press buttons: Temp scale (ºF/ºC), power save (ON/OFF) and out-door temp display (ON/OFF) to toggle these options.
Press buttons: Background theme, language and screen lockout;press to select options from pop up menus (figure 6 �B").
Press button: backlight intensity; use up/down arrows to change theintensity of backlighting in 20% increments.
Use the press to CLEAN SCREEN button to give yourself a 30 secondtimer to clean off the screen (use a damp cloth to clean).
9:39 am January 23, 2012
DISPLAY SETTINGS
?
back−groundtheme
COTTON
tempscaleis ºF
powersaveis ON
press toCLEAN
SCREEN
languageis
ENGLISH
screenlockout
UN−LOCKED
outdoortemp
displayis ON 20%
backlightintensity
cobalt
cotton
carbon
ENGLISH
FRENCH
SPANISH
unlocked
partially
locked
DISPLAY SETTINGS
press any button for access to more features and controls
back−groundtheme
COTTON
tempscaleis ºF
powersaveis ON
press toCLEAN
SCREEN
languageis
ENGLISH
screenlockout
UN−LOCKED
outdoortemp
displayis ON 20%
backlightintensity
B
A
Figure 6. Display settings

506921−01 04/12Page 8
Weather
Press button: weather (see fig. 3). Figure 7 shows a typical 5−day fore-cast screen. Use �X" button to return to the previous screen.
9:39 am January 23, 2012
WEATHER
?
5−day forecast for Richardson, TX
today tomorrow wednesday thursday friday
forecastHi 85Lo 60
20% chanceof rain
forecastHi 85Lo 60
50% chanceof rain
forecastHi 70Lo 60
100% chanceof rain
forecastHi 85Lo 60
20% chanceof rain
forecastHi 90Lo 60
Figure 7. Typical weather screen
Edit programPress button: edit program (see fig. 3). Figure 8 �A" shows edit programscreen. Figure 8 �B" shows pop up menus that appear when the selectionsare touched and it illustrates changes made to the program.
Edit the �season programs" to your preference. (Save energy uses high−effi-ciency EnergyStar settings to promote energy conservation).
select programs − select a preset program; or press and hold any button
for the keyboard and change button names to user preference.
select days − week/weekend, individual days, all 7 days.
time − up/down arrows to change time in 15 minute increments.
cool− & heat−to − up/down arrows to change temperature in 1º increments.
fan mode − on, auto, circulate.
Figure 8 �B" also shows that the evening time has been disabled; this isdone by pressing and holding the time button for that time period. (Touch add
setting to re−enable that time period). Use the restore button to restore de-faults for the preset programs. Press "X� button after changing; a pop−upprompts with back, discard and save options. Select save to save and re-turn to the dashboard.
EDIT PROGRAMS
summer
selectprograms
summerprogram will follow these settings on mon−fri
winter
spring fall
save energy
custom
06:00 am 78 70 AUTO
selectdays
time cool−to heat−to fan mode
85 6208:00 am AUTO
82 6210:00 pm AUTO
sat−sun
mon−fri
05:00 pm 78 70 AUTOchangedays
press and hold any time to enable or disable for the time periodrestore
press/holdprogrambutton torename
9:39 am January 23, 2012
EDIT PROGRAMS
?
summer
selectprograms
winter
spring fall
save energy
my program
06:00 am 76 70 ON
selectdays
time cool−to heat−to fan mode
85 6608:00 am AUTO
82 6208:30 pm AUTO
all 7 days
mon−fri
add settingchangedays
press and hold any time to enable or disable for the time periodrestore
on
auto
circulate
week/weekend
individual days
all 7 days
B
my programprogram will follow these settings on all 7 days
A
press/holdprogrambutton torename
Figure 8. Edit program screen
icomfort Wi−Fi� 7−Day Programmable Communicating ThermostatPage 9
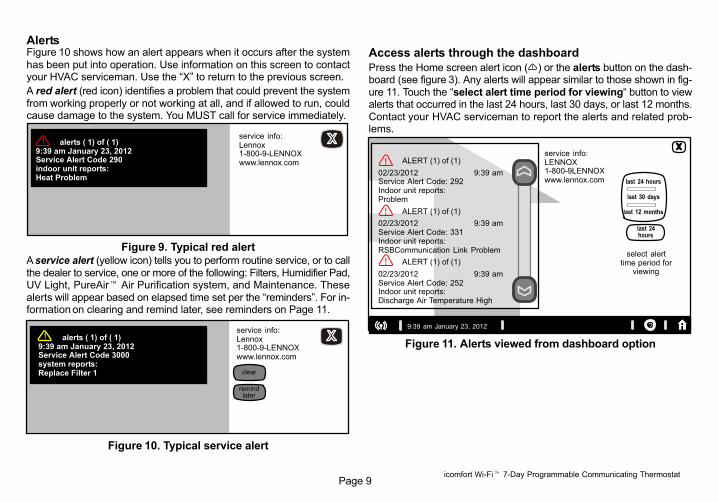
AlertsFigure 10 shows how an alert appears when it occurs after the systemhas been put into operation. Use information on this screen to contactyour HVAC serviceman. Use the �X" to return to the previous screen.
A red alert (red icon) identifies a problem that could prevent the systemfrom working properly or not working at all, and if allowed to run, couldcause damage to the system. You MUST call for service immediately.
alerts ( 1) of ( 1)9:39 am January 23, 2012Service Alert Code 290 indoor unit reports:Heat Problem
service info:Lennox1−800−9−LENNOXwww.lennox.com
Figure 9. Typical red alertA service alert (yellow icon) tells you to perform routine service, or to callthe dealer to service, one or more of the following: Filters, Humidifier Pad,UV Light, PureAir� Air Purification system, and Maintenance. Thesealerts will appear based on elapsed time set per the �reminders". For in-formation on clearing and remind later, see reminders on Page 11.
alerts ( 1) of ( 1)9:39 am January 23, 2012Service Alert Code 3000 system reports:Replace Filter 1
service info:Lennox1−800−9−LENNOXwww.lennox.com
clear
remindlater
Figure 10. Typical service alert
Access alerts through the dashboard
Press the Home screen alert icon ( ) or the alerts button on the dash-board (see figure 3). Any alerts will appear similar to those shown in fig-ure 11. Touch the �select alert time period for viewing� button to viewalerts that occurred in the last 24 hours, last 30 days, or last 12 months.Contact your HVAC serviceman to report the alerts and related prob-lems.
9:39 am January 23, 2012 ?
ALERT (1) of (1)
02/23/2012 9:39 amService Alert Code: 292Indoor unit reports:Problem
ALERT (1) of (1)
02/23/2012 9:39 amService Alert Code: 331Indoor unit reports:RSBCommunication Link Problem
ALERT (1) of (1)
02/23/2012 9:39 amService Alert Code: 252Indoor unit reports:Discharge Air Temperature High
service info:LENNOX1−800−9LENNOXwww.lennox.com
last 24hours
select alerttime period for
viewing
last 24 hours
last 30 days
last 12 months
Figure 11. Alerts viewed from dashboard option
506921−01 04/12Page 10
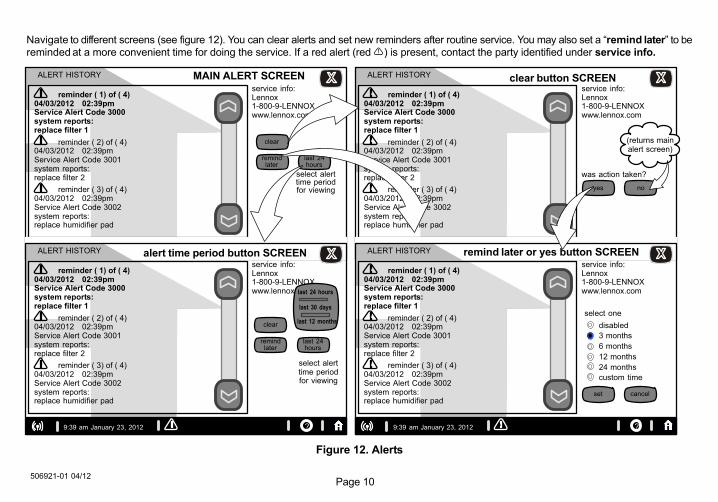
Navigate to different screens (see figure 12). You can clear alerts and set new reminders after routine service. You may also set a �remind later" to bereminded at a more convenient time for doing the service. If a red alert (red ) is present, contact the party identified under service info.
service info:Lennox1−800−9−LENNOXwww.lennox.com
reminder ( 1) of ( 4)04/03/2012 02:39pmService Alert Code 3000 system reports:replace filter 1
reminder ( 2) of ( 4) 04/03/2012 02:39pm Service Alert Code 3001 system reports:replace filter 2
reminder ( 3) of ( 4) 04/03/2012 02:39pm Service Alert Code 3002 system reports:replace humidifier pad
ALERT HISTORY
clear
last 24hours
remindlater
select alerttime periodfor viewing
MAIN ALERT SCREEN
noyes
was action taken?
(returns mainalert screen)
clear button SCREEN
cancelset
select one
disabled
3 months
6 months
12 months
24 months
custom time
remind later or yes button SCREENservice info:Lennox1−800−9−LENNOXwww.lennox.com
reminder ( 1) of ( 4)04/03/2012 02:39pmService Alert Code 3000 system reports:replace filter 1
reminder ( 2) of ( 4) 04/03/2012 02:39pm Service Alert Code 3001 system reports:replace filter 2
reminder ( 3) of ( 4) 04/03/2012 02:39pm Service Alert Code 3002system reports:replace humidifier pad
ALERT HISTORY
9:39 am January 23, 2012 ?
service info:Lennox1−800−9−LENNOXwww.lennox.com
select alerttime periodfor viewing
reminder ( 1) of ( 4)04/03/2012 02:39pmService Alert Code 3000 system reports:replace filter 1
reminder ( 2) of ( 4) 04/03/2012 02:39pm Service Alert Code 3001 system reports:replace filter 2
reminder ( 3) of ( 4) 04/03/2012 02:39pm Service Alert Code 3002 system reports:replace humidifier pad
ALERT HISTORY
9:39 am January 23, 2012 ?
clear
last 24hours
remindlater
last 24 hours
last 30 days
last 12 months
alert time period button SCREEN
Figure 12. Alerts
icomfort Wi−Fi� 7−Day Programmable Communicating ThermostatPage 11
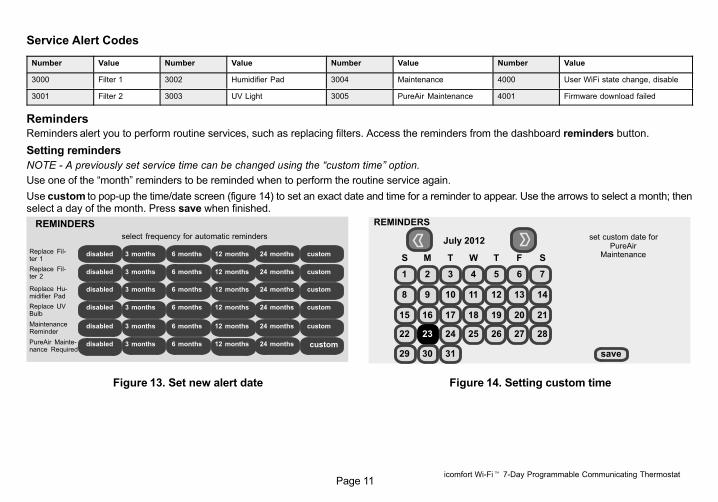
Service Alert Codes
Number Value Number Value Number Value Number Value
3000 Filter 1 3002 Humidifier Pad 3004 Maintenance 4000 User WiFi state change, disable
3001 Filter 2 3003 UV Light 3005 PureAir Maintenance 4001 Firmware download failed
RemindersReminders alert you to perform routine services, such as replacing filters. Access the reminders from the dashboard reminders button.
Setting reminders
NOTE − A previously set service time can be changed using the �custom time" option.
Use one of the �month" reminders to be reminded when to perform the routine service again.
Use custom to pop−up the time/date screen (figure 14) to set an exact date and time for a reminder to appear. Use the arrows to select a month; thenselect a day of the month. Press save when finished.
REMINDERS
select frequency for automatic reminders
back next
disabled 3 months 6 months 12 months 24 months customReplace Fil-ter 1
Replace Fil-ter 2
Replace Hu-midifier Pad
Replace UVBulb
MaintenanceReminder
PureAir Mainte-nance Required
disabled 3 months 6 months 12 months 24 months custom
disabled 3 months 6 months 12 months 24 months custom
disabled 3 months 6 months 12 months 24 months custom
disabled 3 months 6 months 12 months 24 months custom
disabled 3 months 6 months 12 months 24 months custom
Figure 13. Set new alert date
S M T W T F S
July 2012
REMINDERS
1 2 3 4 5 6 7
8 9 10 11 12 13 14
15 16 17 18 19 20 21
22 23 24 25 26 27 28
29 30 31 save
set custom date forPureAir
Maintenance
Figure 14. Setting custom time
506921−01 04/12Page 12
alerts ( 1) of ( 1)9:39 am January 23, 2012Service Alert Code 3000 system reports:Replace Filter 1
service info:Lennox1−800−9−LENNOXwww.lennox.com
clear
remindlater
9:39 am January 23, 2012 ?
alerts ( 1) of ( 1)9:39 am January 23, 2012Service Alert Code 3000 system reports:Replace Filter 1
service info:Lennox1−800−9−LENNOXwww.lennox.com
9:39 am January 23, 2012 ?
noyes
was action taken?
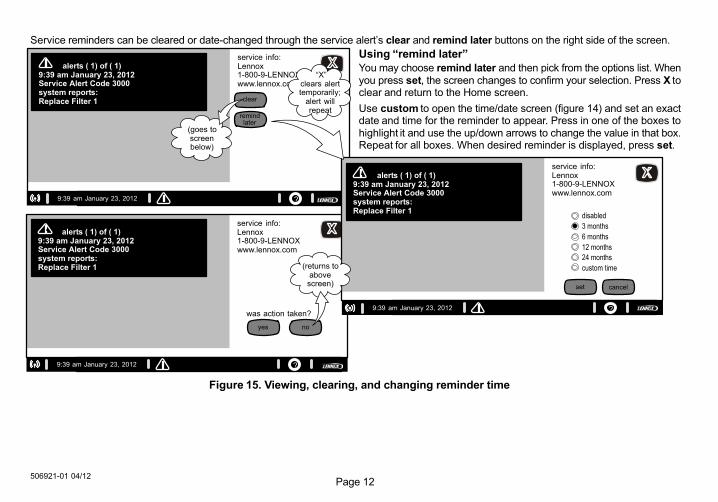
Using �remind later"
You may choose remind later and then pick from the options list. Whenyou press set, the screen changes to confirm your selection. Press X toclear and return to the Home screen.
Use custom to open the time/date screen (figure 14) and set an exactdate and time for the reminder to appear. Press in one of the boxes tohighlight it and use the up/down arrows to change the value in that box.Repeat for all boxes. When desired reminder is displayed, press set.
Service reminders can be cleared or date−changed through the service alert’s clear and remind later buttons on the right side of the screen.
(goes toscreenbelow)
alerts ( 1) of ( 1)9:39 am January 23, 2012Service Alert Code 3000 system reports:Replace Filter 1
service info:Lennox1−800−9−LENNOXwww.lennox.com
9:39 am January 23, 2012 ?
set cancel
disabled
3 months
6 months
12 months
24 months
custom time(returns toabove
screen)
�X"clears alerttemporarily;
alert willrepeat
Figure 15. Viewing, clearing, and changing reminder time
icomfort Wi−Fi� 7−Day Programmable Communicating ThermostatPage 13
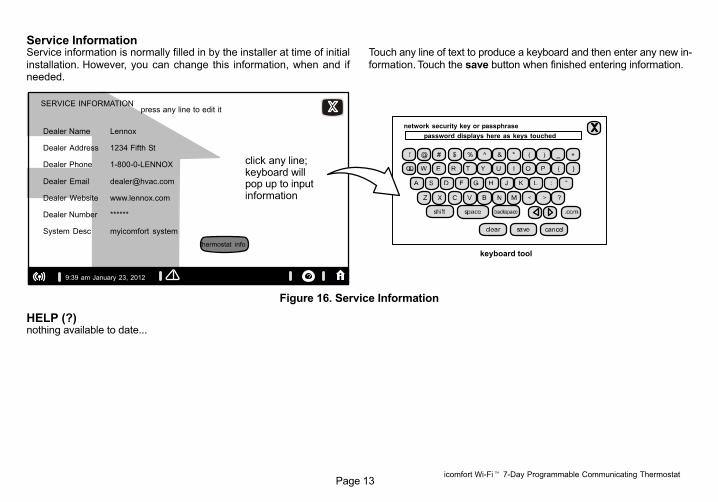
Service InformationService information is normally filled in by the installer at time of initialinstallation. However, you can change this information, when and ifneeded.
Touch any line of text to produce a keyboard and then enter any new in-formation. Touch the save button when finished entering information.
keyboard tool
network security key or passphrase
password displays here as keys touched
9:39 am January 23, 2012
SERVICE INFORMATION
?
Dealer Name Lennox
Dealer Address 1234 Fifth St
Dealer Phone 1−800−0−LENNOX
Dealer Email [email protected]
Dealer Website www.lennox.com
Dealer Number ******
System Desc myicomfort system
press any line to edit it
thermostat info
click any line;keyboard willpop up to inputinformation
Figure 16. Service Information
HELP (?)nothing available to date...
506921−01 04/12Page 14
Adjust temperature and change programs
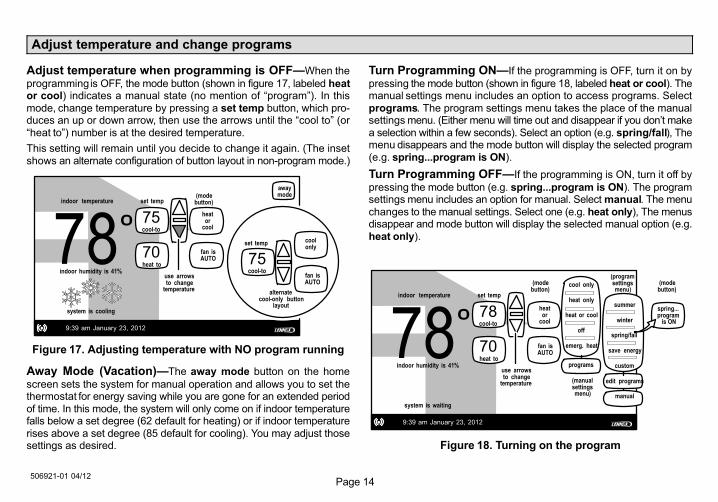
Adjust temperature when programming is OFF�When the
programming is OFF, the mode button (shown in figure 17, labeled heator cool) indicates a manual state (no mention of �program"). In thismode, change temperature by pressing a set temp button, which pro-duces an up or down arrow, then use the arrows until the �cool to" (or�heat to") number is at the desired temperature.
This setting will remain until you decide to change it again. (The insetshows an alternate configuration of button layout in non−program mode.)
use arrowsto change
temperature
?
touchcool−tobutton
indoor temperature
indoor humidity is 41%
fan isOFF
9:39 am January 23, 2012
fan isAUTO
cool−to
set temp
75
heat to
70
heator
cool
fan isAUTO
system is cooling
cool−to
set temp
75
coolonly
fan isAUTO
alternatecool−only button
layout
(modebutton)
awaymode
Figure 17. Adjusting temperature with NO program running
Away Mode (Vacation)�The away mode button on the home
screen sets the system for manual operation and allows you to set thethermostat for energy saving while you are gone for an extended periodof time. In this mode, the system will only come on if indoor temperaturefalls below a set degree (62 default for heating) or if indoor temperaturerises above a set degree (85 default for cooling). You may adjust thosesettings as desired.
Turn Programming ON�If the programming is OFF, turn it on by
pressing the mode button (shown in figure 18, labeled heat or cool). Themanual settings menu includes an option to access programs. Selectprograms. The program settings menu takes the place of the manualsettings menu. (Either menu will time out and disappear if you don’t makea selection within a few seconds). Select an option (e.g. spring/fall), Themenu disappears and the mode button will display the selected program(e.g. spring...program is ON).
Turn Programming OFF�If the programming is ON, turn it off by
pressing the mode button (e.g. spring...program is ON). The programsettings menu includes an option for manual. Select manual. The menuchanges to the manual settings. Select one (e.g. heat only), The menusdisappear and mode button will display the selected manual option (e.g.heat only).
use arrowsto change
temperature
?
touchcool−tobutton
indoor temperature
indoor humidity is 41%
fan isOFF
9:39 am January 23, 2012
fan isAUTO
cool−to
set temp
78
heat to
70
heator
cool
fan isAUTO
system is waiting
cool only
heat only
heat or cool
off
emerg. heat
programs
summer
winter
spring/fall
save energy
custom
edit programs
manual
spring...program
is ON
(modebutton)
(modebutton)
(manualsettingsmenu)
(programsettingsmenu)
Figure 18. Turning on the program
icomfort Wi−Fi� 7−Day Programmable Communicating ThermostatPage 15
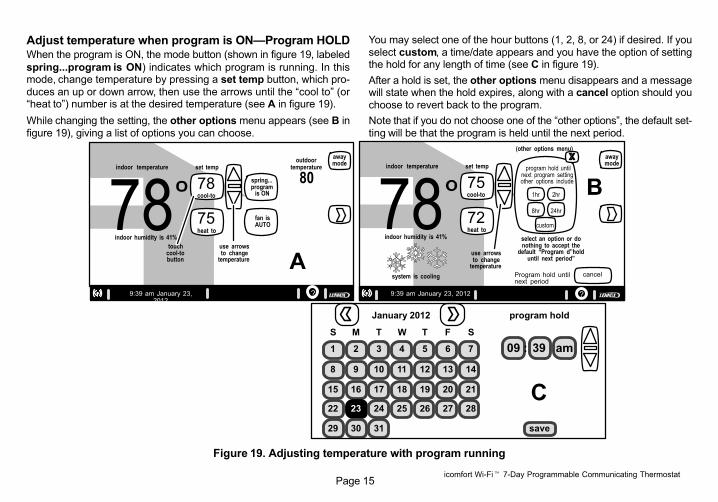
Adjust temperature when program is ON�Program HOLDWhen the program is ON, the mode button (shown in figure 19, labeled
spring...program is ON) indicates which program is running. In thismode, change temperature by pressing a set temp button, which pro-duces an up or down arrow, then use the arrows until the �cool to" (or�heat to") number is at the desired temperature (see A in figure 19).
While changing the setting, the other options menu appears (see B infigure 19), giving a list of options you can choose.
You may select one of the hour buttons (1, 2, 8, or 24) if desired. If youselect custom, a time/date appears and you have the option of settingthe hold for any length of time (see C in figure 19).
After a hold is set, the other options menu disappears and a messagewill state when the hold expires, along with a cancel option should youchoose to revert back to the program.
Note that if you do not choose one of the �other options", the default set-ting will be that the program is held until the next period.
indoor temperature
indoor humidity is 41%
fan isOFF
fan isAUTO
cool−to
set temp
78
heat to
75
spring...program
is ON
fan isAUTO
awaymode
outdoortemperature
80
use arrowsto change
temperature
touchcool−tobutton
indoor temperature
indoor humidity is 41%
fan isOFF
9:39 am January 23, 2012
fan isAUTO
cool−to
set temp
75
heat to
72
program hold untilnext program settingother options include
awaymode
system is cooling
use arrowsto change
temperature
?
1hr 2hr
8hr 24hr
custom
select an option or donothing to accept the
default �Program d"holduntil next period"
Program hold untilnext period
cancel
(other options menu)
9:39 am January 23,2012
?
S M T W T F S
January 2012
1 2 3 4 5 6 7
8 9 10 11 12 13 14
15 16 17 18 19 20 21
22 23 24 25 26 27 28
29 30 31 save
09 : 39 am
program hold
Figure 19. Adjusting temperature with program running
506921−01 04/12Page 16
Setting humidity controls
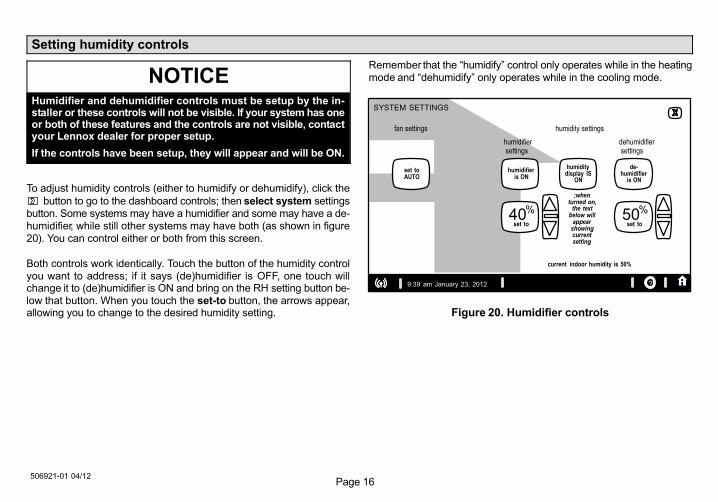
NOTICEHumidifier and dehumidifier controls must be setup by the in-staller or these controls will not be visible. If your system has oneor both of these features and the controls are not visible, contactyour Lennox dealer for proper setup.
If the controls have been setup, they will appear and will be ON.
To adjust humidity controls (either to humidify or dehumidify), click the
button to go to the dashboard controls; then select system settingsbutton. Some systems may have a humidifier and some may have a de-humidifier, while still other systems may have both (as shown in figure20). You can control either or both from this screen.
Both controls work identically. Touch the button of the humidity controlyou want to address; if it says (de)humidifier is OFF, one touch willchange it to (de)humidifier is ON and bring on the RH setting button be-low that button. When you touch the set−to button, the arrows appear,allowing you to change to the desired humidity setting.
Remember that the �humidify" control only operates while in the heatingmode and �dehumidify" only operates while in the cooling mode.
9:39 am January 23, 2012
SYSTEM SETTINGS
?
current indoor humidity is 50%
set toAUTO
humidifieris ON
humiditydisplay IS
ON
de−humidifier
is ON
fan settings humidity settings
humidifier settings
dehumidifier settings
40%
set to50%
set to
;whenturned on,
the textbelow will
appearshowingcurrentsetting
Figure 20. Humidifier controls
icomfort Wi−Fi� 7−Day Programmable Communicating ThermostatPage 17
Enabling the thermostat’s Wi-Fi feature from the Home screen
press any line to edit it
connect
password
securityis WPA2
network name (SSID)
type the network security key or passphrase for(locked Wi−Fi Access Point [AP])
network security key or passphrase
press here to enter network name
press here to enter Wi−Fi AP (router) password
displays information here as keys pressed
User Agreement
accept decline
connect
press here to enter Wi−Fi AP (router) password
next...
next...
5.2 CREATE NEW AP
1STARTHERE
WI−FI SETTINGS
WI−FI SETTINGS
NETWORK�SETTINGS
Wi−Fienable
NETWORKSETTINGS
Wi−Fidisable
createnew AP
none
WEP
WPA
WPA2
WEP
WPA
WPA2
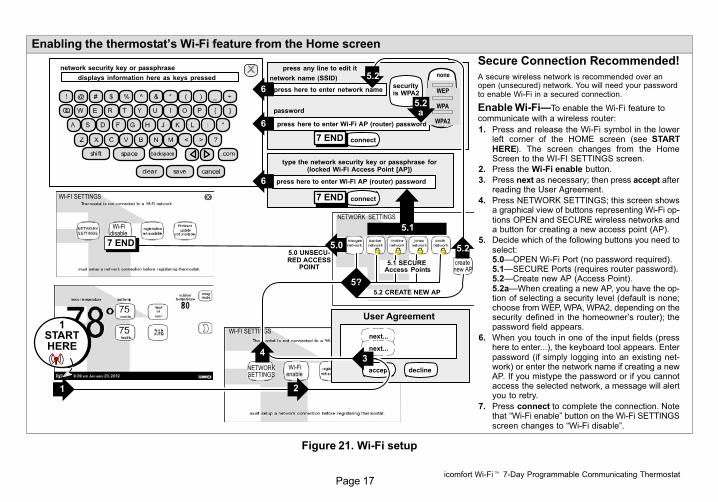
Secure Connection Recommended!
A secure wireless network is recommended over anopen (unsecured) network. You will need your passwordto enable Wi−Fi in a secured connection.
Enable Wi−Fi�To enable the Wi−Fi feature to
communicate with a wireless router:
1. Press and release the Wi−Fi symbol in the lowerleft corner of the HOME screen (see STARTHERE). The screen changes from the HomeScreen to the WI−FI SETTINGS screen.
2. Press the Wi−Fi enable button.
3. Press next as necessary; then press accept afterreading the User Agreement.
4. Press NETWORK SETTINGS; this screen showsa graphical view of buttons representing Wi−Fi op-tions OPEN and SECURE wireless networks anda button for creating a new access point (AP).
5. Decide which of the following buttons you need toselect:5.0�OPEN Wi−Fi Port (no password required).5.1�SECURE Ports (requires router password).5.2�Create new AP (Access Point). 5.2a�When creating a new AP, you have the op-tion of selecting a security level (default is none;choose from WEP, WPA, WPA2, depending on thesecurity defined in the homeowner’s router); thepassword field appears.
6. When you touch in one of the input fields (presshere to enter...), the keyboard tool appears. Enterpassword (if simply logging into an existing net-work) or enter the network name if creating a newAP. If you mistype the password or if you cannotaccess the selected network, a message will alertyou to retry.
7. Press connect to complete the connection. Notethat �Wi−Fi enable" button on the Wi−Fi SETTINGSscreen changes to �Wi−Fi disable".
7 END
7 END
7 END5.0 UNSECU-RED ACCESS
POINT5.1 SECURE
Access Points
6
2
4
5.25.0
5.2
5.1
3
1
6
6
5.2a
5?
Figure 21. Wi−Fi setup
506921−01 04/12Page 18
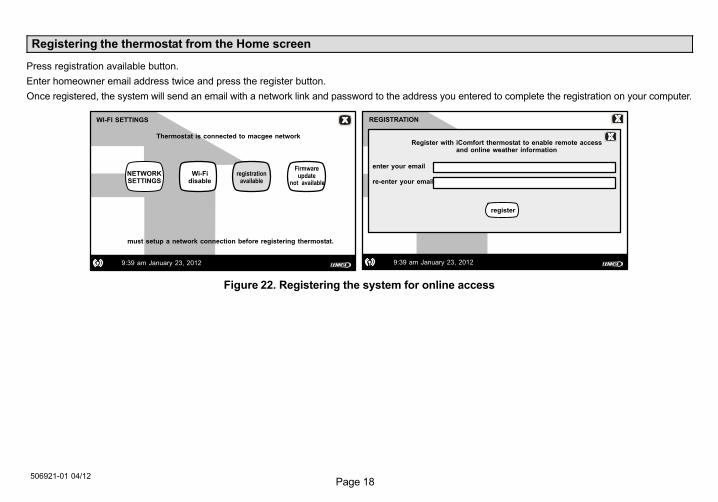
Registering the thermostat from the Home screen
Press registration available button.
Enter homeowner email address twice and press the register button.
Once registered, the system will send an email with a network link and password to the address you entered to complete the registration on your computer.
WI−FI SETTINGS
Thermostat is connected to macgee network
NETWORKSETTINGS
Wi−Fidisable
registrationavailable
must setup a network connection before registering thermostat.
Firmwareupdate
not available
9:39 am January 23, 2012
REGISTRATION
register
enter your email
re−enter your email
Register with iComfort thermostat to enable remote accessand online weather information
9:39 am January 23, 2012
Figure 22. Registering the system for online access
icomfort Wi−Fi� 7−Day Programmable Communicating ThermostatPage 19
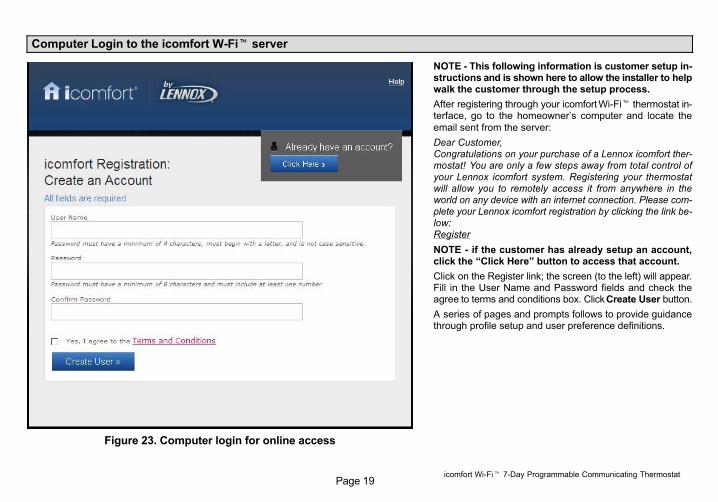
Computer Login to the icomfort W−Fi� server
NOTE − This following information is customer setup in-structions and is shown here to allow the installer to helpwalk the customer through the setup process.
After registering through your icomfort Wi−Fi� thermostat in-terface, go to the homeowner’s computer and locate the
email sent from the server:
Dear Customer,Congratulations on your purchase of a Lennox icomfort ther-mostat! You are only a few steps away from total control ofyour Lennox icomfort system. Registering your thermostatwill allow you to remotely access it from anywhere in theworld on any device with an internet connection. Please com-plete your Lennox icomfort registration by clicking the link be-low:Register
NOTE − if the customer has already setup an account,click the �Click Here" button to access that account.
Click on the Register link; the screen (to the left) will appear.Fill in the User Name and Password fields and check theagree to terms and conditions box. Click Create User button.
A series of pages and prompts follows to provide guidancethrough profile setup and user preference definitions.
Figure 23. Computer login for online access
506921−01 04/12Page 20
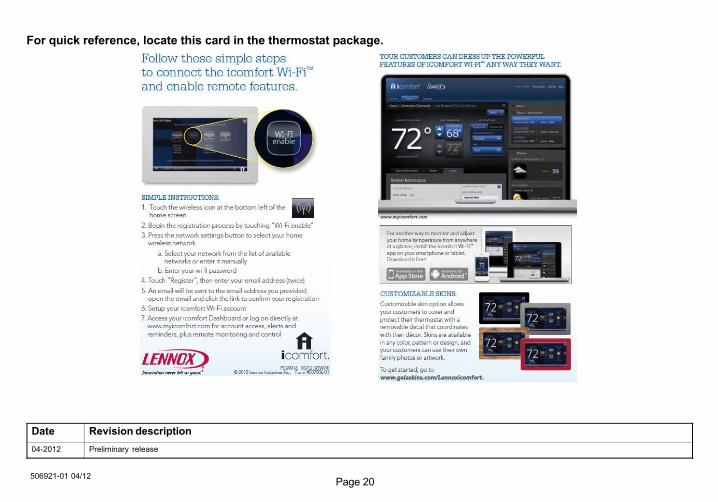
For quick reference, locate this card in the thermostat package.
Date Revision description
04−2012 Preliminary release