Embed Size (px)
Citation preview
HHoopp
ll ii tt eess
ppaa
gg.. 1
1 Introduction Hoplites is a fast card game based on the GMT’s SPQR board game. In Hoplites the player controls an army and fight against the computer (or a human adversary via PBEM) to the end. Each player (human and AI) use a deck of card that represent the units (infantry, cavalry…) and special commands (flank, rally): from these decks the cards are drawn and played on a “field” represented as three zones: the Centre and two wings (left and right). On the fields the units move, missile fire and shock with the enemy. Starting with version 1.4.0 Hoplites includes the Samurai module, based on the Samurai GBoH game. On the chapter 4.0 the specific Samurai rules are described: unless stated otherwise the basic mechanisms of Hoplites also apply to Samurai. Most of the rules of GMT’s Great Battles of History titles apply to Hoplites – the knowledge of the boardgame rules is not mandatory but VERY useful: in any cas I’ve tried to add some strategy & tips at the end of this document. 1.1 Deck composition Each deck is composed of two types of cards:
• units (infantry, cavalry, elephants..) • special cards (flanking, rally)
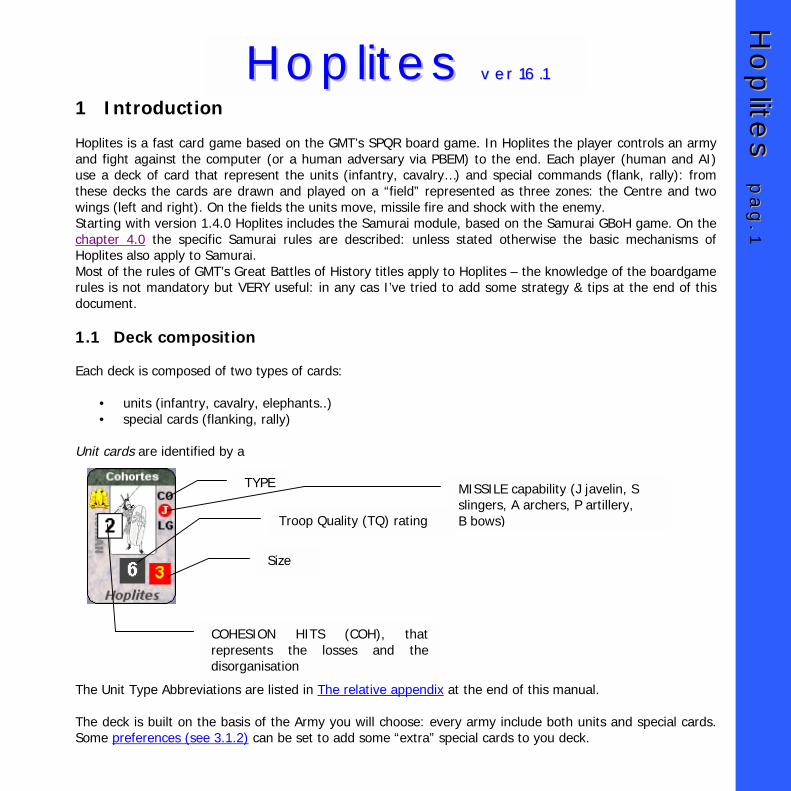
Unit cards are identified by a
The Unit Type Abbreviations are listed in The relative appendix at the end of this manual. The deck is built on the basis of the Army you will choose: every army include both units and special cards. Some preferences (see 3.1.2) can be set to add some “extra” special cards to you deck.
TYPE
Troop Quality (TQ) rating
Size
COHESION HITS (COH), that represents the losses and the disorganisation
MISSILE capability (J javelin, S slingers, A archers, P artillery, B bows)
HHoopplliitteess vveerr 11..66..11
HHoopp
ll ii tt eess
ppaa
gg.. 2
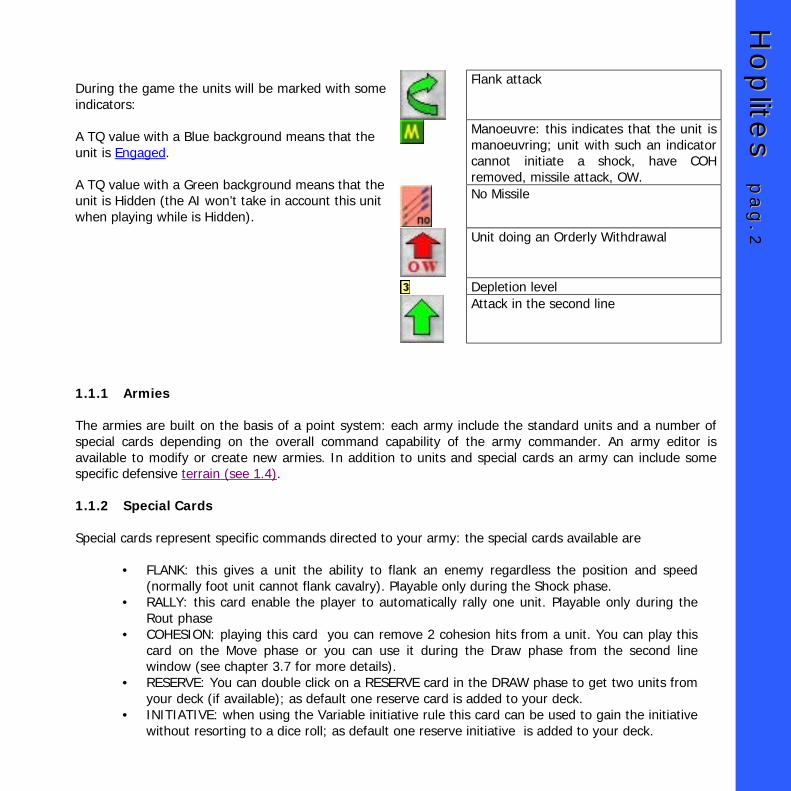
During the game the units will be marked with some indicators: A TQ value with a Blue background means that the unit is Engaged. A TQ value with a Green background means that the unit is Hidden (the AI won’t take in account this unit when playing while is Hidden).
1.1.1 Armies The armies are built on the basis of a point system: each army include the standard units and a number of special cards depending on the overall command capability of the army commander. An army editor is available to modify or create new armies. In addition to units and special cards an army can include some specific defensive terrain (see 1.4). 1.1.2 Special Cards Special cards represent specific commands directed to your army: the special cards available are
• FLANK: this gives a unit the ability to flank an enemy regardless the position and speed (normally foot unit cannot flank cavalry). Playable only during the Shock phase.
• RALLY: this card enable the player to automatically rally one unit. Playable only during the Rout phase
• COHESION: playing this card you can remove 2 cohesion hits from a unit. You can play this card on the Move phase or you can use it during the Draw phase from the second line window (see chapter 3.7 for more details).
• RESERVE: You can double click on a RESERVE card in the DRAW phase to get two units from your deck (if available); as default one reserve card is added to your deck.
• INITIATIVE: when using the Variable initiative rule this card can be used to gain the initiative without resorting to a dice roll; as default one reserve initiative is added to your deck.
Flank attack
Manoeuvre: this indicates that the unit is manoeuvring; unit with such an indicator cannot initiate a shock, have COH removed, missile attack, OW.
No Missile
Unit doing an Orderly Withdrawal
Depletion level
Attack in the second line
HHoopp
ll ii tt eess
ppaa
gg.. 3
• MISSILE SUPPLY: this card can be used in the missile phase to resupply SK or mounted troops. Click on this card and then select up to three units to be resupplied.
• CHALLENGE (Samurai): this card can be played in the field to start a Personal Combat segment.
• CALTROP: Caltrops are stakes planted in the ground, used to stop the Elephants. This card can be played during the PLAY phase on a enemy zone without any specific terrain to reveal the presence of the trap.
1.2 Leaders Leaders are represented in the game by a set of values that describe the command capability of the general. The main characteristics for a leader are
• Initiative: used to rally the units. • Command: used to set the max number of flanking and rally attempts • Clans (Samurai game): the max number of clans that a leader can activate each turn
1.3 Battleground The battleground is composed of two different “fields”, one for each player. Each field is composed of three areas
• LEFT WING: you can play a max of 2 units in the left wing • CENTER: you can play a max of 5 units in the left wing • RIGTH WING: you can play a max of 2 units in the left wing
Each player has an HAND composed of max 7 cards: you move the units from your deck to a specific area; when a unit is played you can only move it in the same area if there is no enemy adjacent. When using the combined move or when a unit is routed it is moved the SECOND LINE; the second line can hold a max of 8 units and is not visible in the main window of the game; you can access the second line in the RALLY and DRAW phase as explained later: alternatively you can click on the labels “Routed” or “Rallied” on the game window to visualise your second line or the AI one.
HHoopp
ll ii tt eess
ppaa
gg.. 4
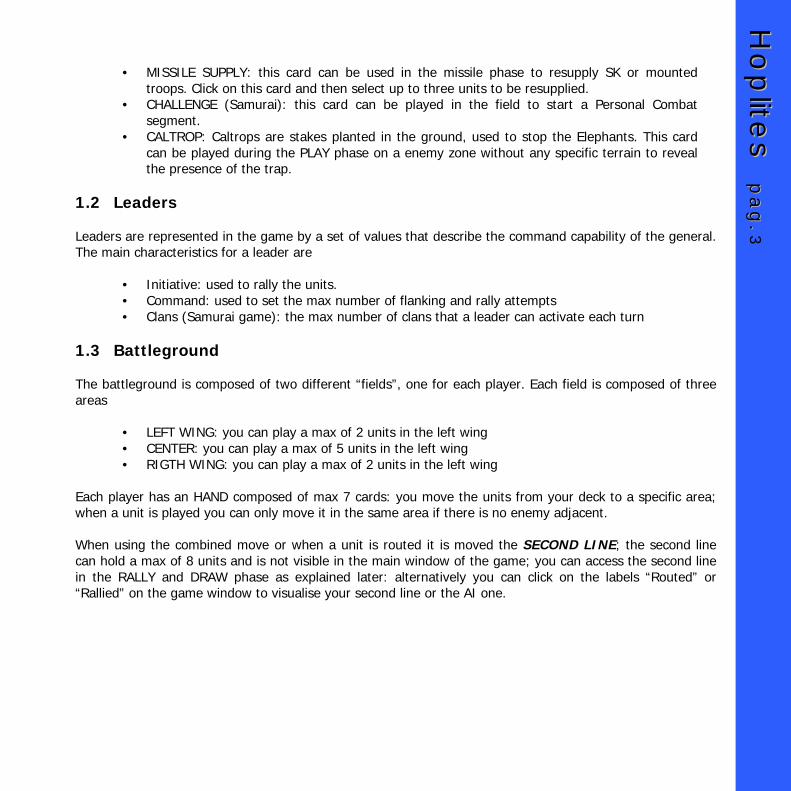
1.4 Terrain The standard battlefield is considered “Clear” terrain: no penalty or bonuses apply into the clear. At the start of each play you can choose to create a more variable battle introducing the terrain by clicking on the corresponding button
in the Game Selection Window. The Terrain dialog is used to specify which terrain you want to introduce in the next battle. The options are
♦ Do NOT use terrain: all the areas will be “Clear” ♦ Let the computer select a random terrain between
the following ♦ River: the leftmost or rightmost area will be occupied by an impassable river, protecting the
flank ♦ Woods: three areas on the left or on the right will be occupied by wood ♦ Stream: some random areas will be occupied by a stream ♦ Rough: some random areas will be occupied by a rough terrain ♦ Marsh: some random areas will be occupied by a marsh ♦ Forest: some random areas will be occupied by a wood ♦ Gorge: the rightmost and leftmost areas (one or two) will be occupied by a cliff
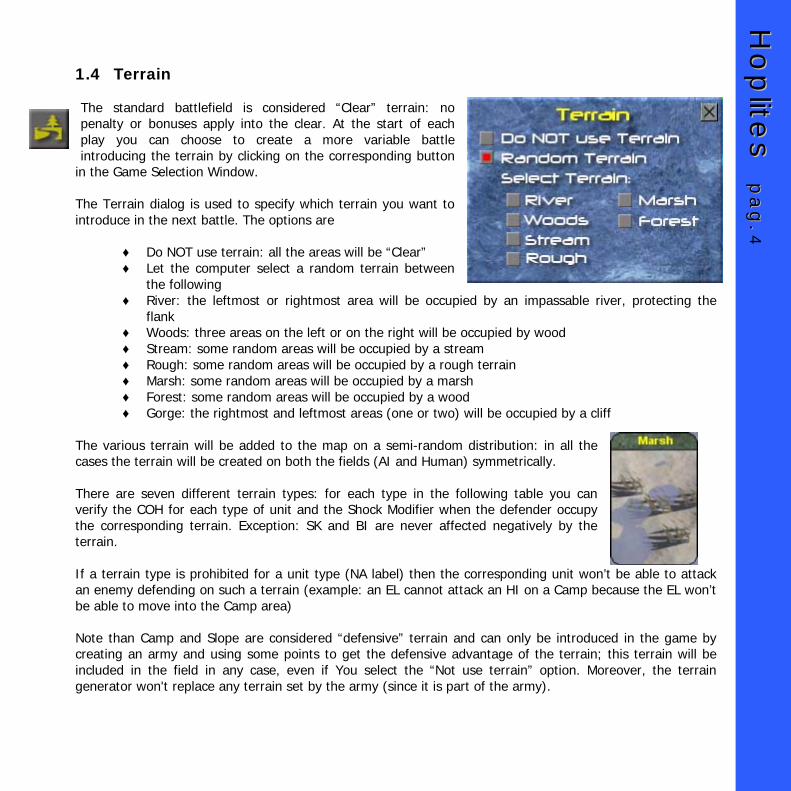
The various terrain will be added to the map on a semi-random distribution: in all the cases the terrain will be created on both the fields (AI and Human) symmetrically. There are seven different terrain types: for each type in the following table you can verify the COH for each type of unit and the Shock Modifier when the defender occupy the corresponding terrain. Exception: SK and BI are never affected negatively by the terrain. If a terrain type is prohibited for a unit type (NA label) then the corresponding unit won’t be able to attack an enemy defending on such a terrain (example: an EL cannot attack an HI on a Camp because the EL won’t be able to move into the Camp area) Note than Camp and Slope are considered “defensive” terrain and can only be introduced in the game by creating an army and using some points to get the defensive advantage of the terrain; this terrain will be included in the field in any case, even if You select the “Not use terrain” option. Moreover, the terrain generator won't replace any terrain set by the army (since it is part of the army).
HHoopp
ll ii tt eess
ppaa
gg.. 5
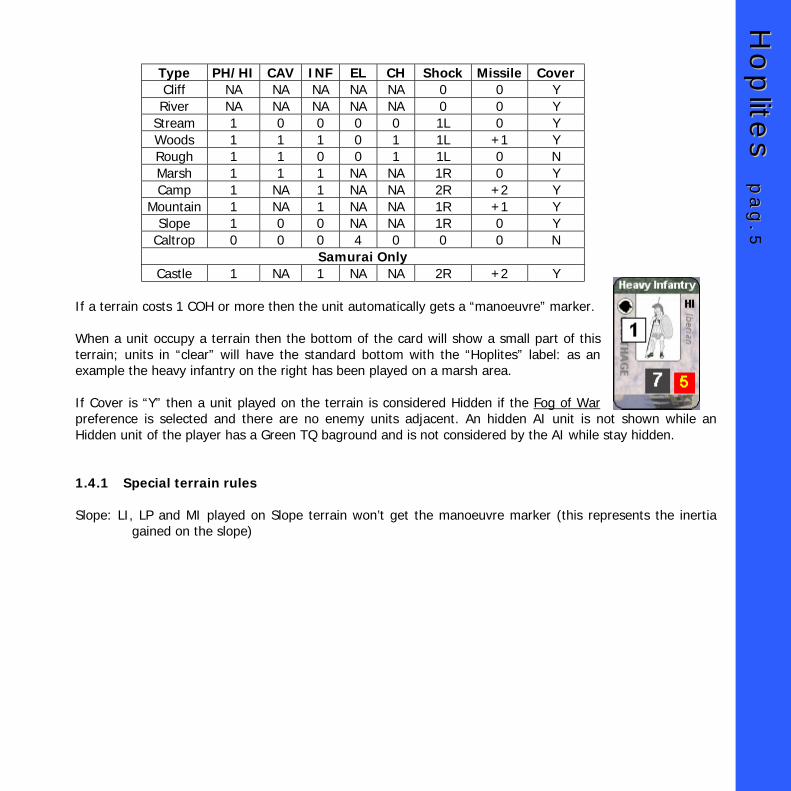
Type PH/HI CAV INF EL CH Shock Missile Cover Cliff NA NA NA NA NA 0 0 Y River NA NA NA NA NA 0 0 Y
Stream 1 0 0 0 0 1L 0 Y Woods 1 1 1 0 1 1L +1 Y Rough 1 1 0 0 1 1L 0 N Marsh 1 1 1 NA NA 1R 0 Y Camp 1 NA 1 NA NA 2R +2 Y
Mountain 1 NA 1 NA NA 1R +1 Y Slope 1 0 0 NA NA 1R 0 Y
Caltrop 0 0 0 4 0 0 0 N Samurai Only
Castle 1 NA 1 NA NA 2R +2 Y If a terrain costs 1 COH or more then the unit automatically gets a “manoeuvre” marker. When a unit occupy a terrain then the bottom of the card will show a small part of this terrain; units in “clear” will have the standard bottom with the “Hoplites” label: as an example the heavy infantry on the right has been played on a marsh area. If Cover is “Y” then a unit played on the terrain is considered Hidden if the Fog of War preference is selected and there are no enemy units adjacent. An hidden AI unit is not shown while an Hidden unit of the player has a Green TQ baground and is not considered by the AI while stay hidden. 1.4.1 Special terrain rules Slope: LI, LP and MI played on Slope terrain won’t get the manoeuvre marker (this represents the inertia
gained on the slope)
HHoopp
ll ii tt eess
ppaa
gg.. 6
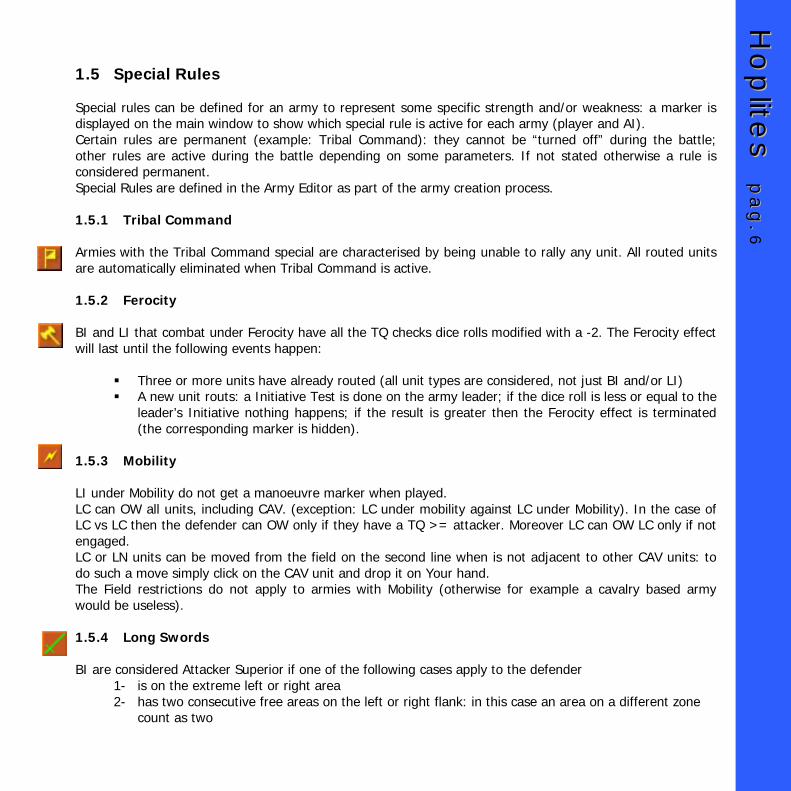
1.5 Special Rules Special rules can be defined for an army to represent some specific strength and/or weakness: a marker is displayed on the main window to show which special rule is active for each army (player and AI). Certain rules are permanent (example: Tribal Command): they cannot be “turned off” during the battle; other rules are active during the battle depending on some parameters. If not stated otherwise a rule is considered permanent. Special Rules are defined in the Army Editor as part of the army creation process. 1.5.1 Tribal Command Armies with the Tribal Command special are characterised by being unable to rally any unit. All routed units are automatically eliminated when Tribal Command is active. 1.5.2 Ferocity BI and LI that combat under Ferocity have all the TQ checks dice rolls modified with a -2. The Ferocity effect will last until the following events happen:
! Three or more units have already routed (all unit types are considered, not just BI and/or LI) ! A new unit routs: a Initiative Test is done on the army leader; if the dice roll is less or equal to the
leader’s Initiative nothing happens; if the result is greater then the Ferocity effect is terminated (the corresponding marker is hidden).
1.5.3 Mobility LI under Mobility do not get a manoeuvre marker when played. LC can OW all units, including CAV. (exception: LC under mobility against LC under Mobility). In the case of LC vs LC then the defender can OW only if they have a TQ >= attacker. Moreover LC can OW LC only if not engaged. LC or LN units can be moved from the field on the second line when is not adjacent to other CAV units: to do such a move simply click on the CAV unit and drop it on Your hand. The Field restrictions do not apply to armies with Mobility (otherwise for example a cavalry based army would be useless). 1.5.4 Long Swords BI are considered Attacker Superior if one of the following cases apply to the defender
1- is on the extreme left or right area 2- has two consecutive free areas on the left or right flank: in this case an area on a different zone
count as two
HHoopp
ll ii tt eess
ppaa
gg.. 7
1.5.5 No Leader Cohesion removal The Leader cannot remove the Cohesion Hits in the Rally Panel if this special rule is present. 1.6 Sequence of play Each game is played with a sequence of player turns: each turn is composed of the following phases
• PLAY PHASE: you can move units from your hand to the field only in this phase • MOVE PHASE: units in the field not adjacent to the enemy can be moved; cohesion hits can be
removed playing the special card • MISSILE PHASE: units capable of missile fire can do that on adjacent enemy • SHOCK PHASE: attacks are declared and resolved; units capable of orderly withdrawn can avoid
the combat • RALLY PHASE: units routed can be rallied automatically with the special card • DRAW PHASE: you can draw a card from your deck or from the second line
At the end of your Turn the AI will undergo the above sequence and then you’ll be able to start again. The Initiative mechanism can be used to modify this alternation, gaining two turns on a row. 1.7 Glossary
AREA: the individual space where the units are played; areas are grouped in ZONES. COH: Cohesion Hit – the general “damage” suffered by a UNIT because of movement, missile, shock or
terrain. FIELD: the section of the game where the army cards are deployed; each field (player and AI) is
divided in three ZONES HAND: the seven cards you keep in your possession and that you can play on the FIELD. ROUTED UNIT: a unit whose cohesion hits are greater or equal to the unit’s TQ SECOND LINE: the rear line of your army; can hold only 8 units UNIT: a card representing a section of the army ZONE: the field is divided in three zone – right, centre and left; each zone is divide in AREAS, two areas
for the left and right zone, five areas for the centre area
HHoopp
ll ii tt eess
ppaa
gg.. 8
2 Game interface
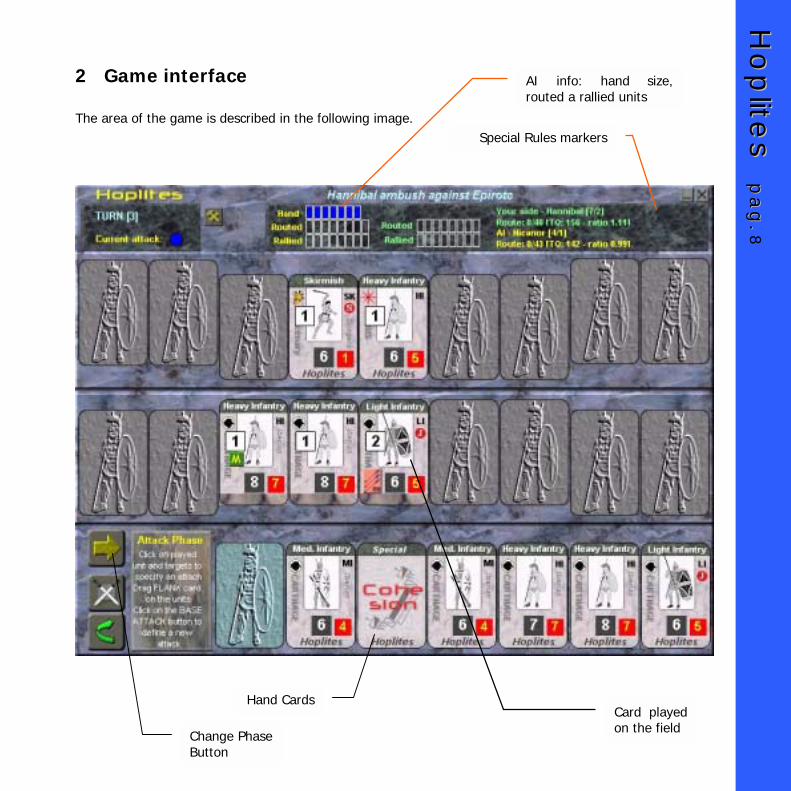
The area of the game is described in the following image.
Hand Cards
Change Phase Button
Card played on the field
AI info: hand size, routed a rallied units
Special Rules markers
HHoopp
ll ii tt eess
ppaa
gg.. 9
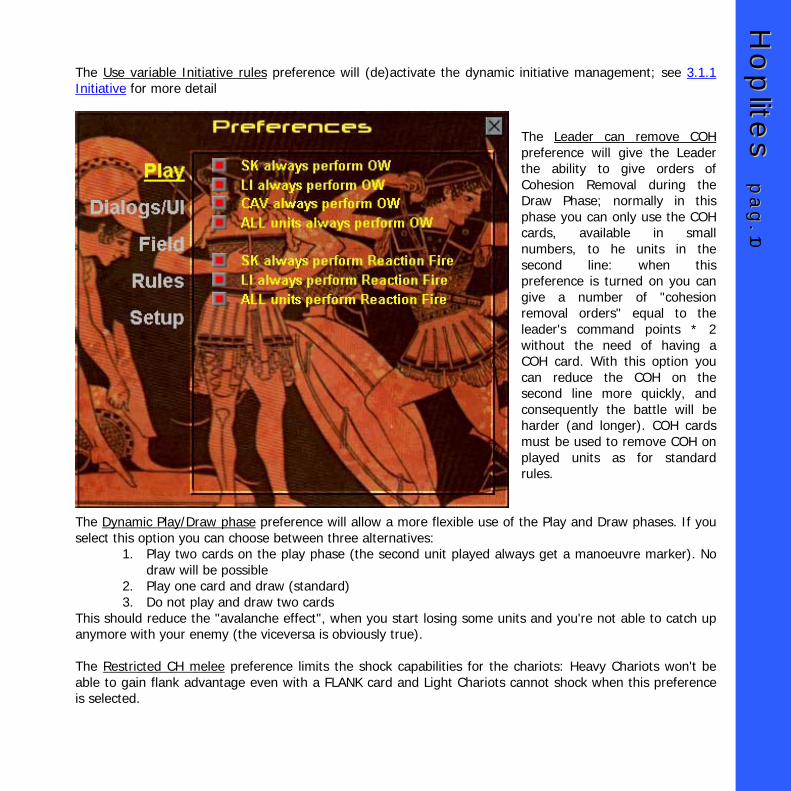
You drag the card in your Hand on the field on an empty area. To select a card on the field simply click on it. The Change Phase Button will move to the next phase of the turn – you can click on it when you’ve finished the actual phase. Under this button other buttons will be available depending on the phase. You can access the Second Line by clicking in the “Routed” or “Rallied” label of the AI Info panel. You can always reorganise your hand by dragging a card into a new position. 2.1 User interface The graphical windows (the ones without the title bar) can be moved by clicking on the window frame/items and moving the mouse while keeping pressed the button. Pressing the ESC/ENTER keys can quickly close all the dialogs. You can also use the "Y" and "N" keys in the dialogs where an answer is required: in this case the ENTER key will select the “Y” option. The graphical buttons have a ToolTip text to explain their use. Areas of the screen that are “hotspots” have a different cursor displayed when moving on them (a question mark with an arrow). The “Routed” and “Rallied” labels in the main window are an example of such “hotspots”. 2.1.1 Preferences The preferences can be set with a special dialogs: you can accees this dialog when starting a new battle and during the battle to specify some default commands to your units and general preferences. Both dialogs are structured around five main topics: Play preferences, Dialogs/User Interface, Field Restrictions, Rules and Setup preferences. By clicking on the Topic label on the left part of the panel you can access the specific preferences: some of the Topics are available only in the new battle For each preference you can access a quick on-line help by right-clicking on the preference label. In the Play Topic you can specify
# If SK, LI and/or CAV units will always Orderly Withdraw when attacked (see 3.5.1). The CAV preference also includes camels.
# If ALL available units will use Orderly Withdraw. # If SK and/or LI will always perform the Reaction Fire (see 3.4.1) # If ALL available units will perform the Reaction Fire.
The Quick attack dialog preference states if the AI attack will be shown only at the shock sub-phase or if the complete selection procedure will be displayed. In the Rules Topic you can specify some optional rules that will be introduced in the game:
HHoopp
ll ii tt eess
ppaa
gg.. 10
The Use variable Initiative rules preference will (de)activate the dynamic initiative management; see 3.1.1 Initiative for more detail
The Leader can remove COH preference will give the Leader the ability to give orders of Cohesion Removal during the Draw Phase; normally in this phase you can only use the COH cards, available in small numbers, to he units in the second line: when this preference is turned on you can give a number of "cohesion removal orders" equal to the leader's command points * 2 without the need of having a COH card. With this option you can reduce the COH on the second line more quickly, and consequently the battle will be harder (and longer). COH cards must be used to remove COH on played units as for standard rules.
The Dynamic Play/Draw phase preference will allow a more flexible use of the Play and Draw phases. If you select this option you can choose between three alternatives:
1. Play two cards on the play phase (the second unit played always get a manoeuvre marker). No draw will be possible
2. Play one card and draw (standard) 3. Do not play and draw two cards
This should reduce the "avalanche effect", when you start losing some units and you're not able to catch up anymore with your enemy (the viceversa is obviously true). The Restricted CH melee preference limits the shock capabilities for the chariots: Heavy Chariots won't be able to gain flank advantage even with a FLANK card and Light Chariots cannot shock when this preference is selected.
HHoopp
ll ii tt eess
ppaa
gg.. 11
Balance: Elephant worth TQ points; when this preference is selected elephants will worth the entire TQ, not just 2 points (the basic value). The Fog of War preference cause a unit to be hidden when played on a terrain that can give “cover” (see the terrain chapter for more details). The number of setup turns (default: 3) is also a preference that you can modify at the beginning of each new game. If you click on the No combat on setup checkbox in the setup turns won’t be possible to missile attack the enemy (shock combat is always forbidden in the setup phase). In the Field topic you can specify the field restrictions preferences: the Use Field Restrictions preference limit the placement of your units on the field: when this preference is selected by default CAV units can only be played on wings and PH/HI can only be played in the centre. You can modify the default unit type restrictions by clicking on each unit type on the Wing/Centre colum of the dialog. 2.1.2 Help on line Pressing F1 will open the manual (this document). If You right click on a card or on an empty area during the game you will be able to access a quick help window; the rightmost column on the windows describes the terrain effects (if any) for the different unit types. The main text panel will include some information about the unit type (characteristics, special rules applying to). Right clicking on a special rule marker will display a short help on the rule effects. Right clicking on a preference label in the Preferences dialog will display a short help on the preference effect. If you click on the “Current attack” label on the upper left panel of the Main Window a dialog will show the base column, the modifiers that will be applied and the final CRT column. You can access the main charts (CRT, Shock, Superiority, Missile and abbreviation list) by clicking on the Charts button on the Main window.
HHoopp
ll ii tt eess
ppaa
gg.. 12
3 Rules of play 3.1 Starting a new game
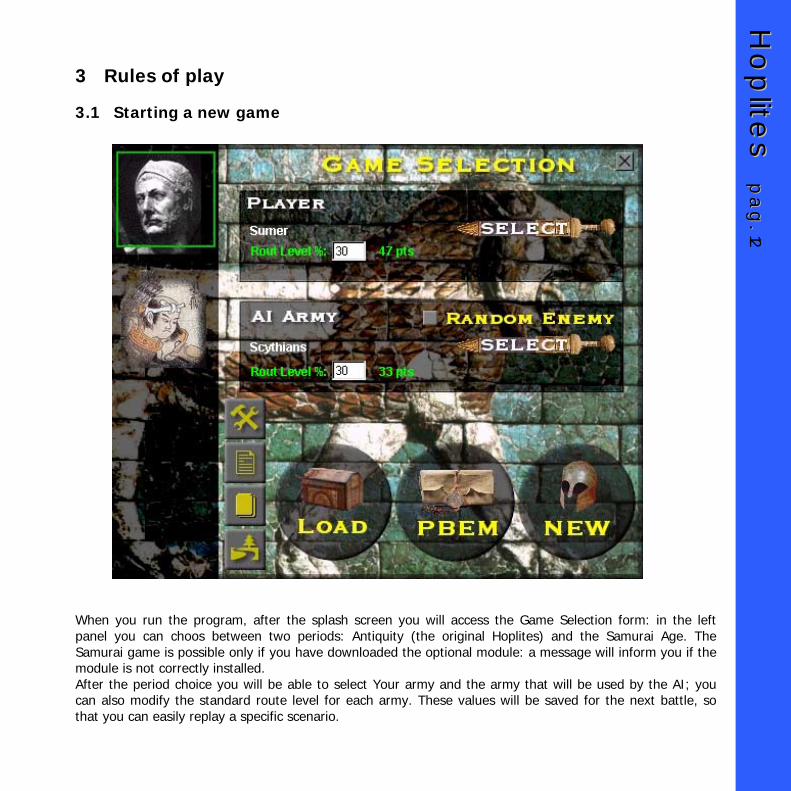
When you run the program, after the splash screen you will access the Game Selection form: in the left panel you can choos between two periods: Antiquity (the original Hoplites) and the Samurai Age. The Samurai game is possible only if you have downloaded the optional module: a message will inform you if the module is not correctly installed. After the period choice you will be able to select Your army and the army that will be used by the AI; you can also modify the standard route level for each army. These values will be saved for the next battle, so that you can easily replay a specific scenario.

HHoopp
ll ii tt eess
ppaa
gg.. 13
Some of the armies have a description associated to them: a small button is displayed in the Army Selection form when the description is available. If you select the “Random selection” checkbox when you start a New/PBEM game the program will choose a random army using the same route level you’ve indicated for your army. The AI army is selected just before you start a new game so you will know your adversary at the very last moment. The Terrain button can be used to create a battle with some specific/random terrain, while the different preferences will add more detail to the game or tune some interface mechanisms. You have three options to start a game:
1. Click on the NEW button to start a new game (after the selection of both armies) vs the AI 2. Click on the PBEM button to start a new game against a human adversary via email. (see 6.0
for more detalis on the PBEM) 3. Click on the LOAD button to load a previously saved game or continue a PBEM game. Load
games can be your own saved games or can be the last turn of a PBEM game.
The engine will automatically save the current battle in the Autosave savegame at the end of each AI turn: you can use this mechanism to interrupt a battle in your Play Phase and continue it later. At the beginning of each new game the army deck will be reshuffled and a new hand of seven cards will be prepared; the first hand is created so that will include at least 4 units: whenever is possible 2 of them will be chosen between SK, LI or LC with missile capability. In the first turns (normally three but you can specify a different value on the Preferences dialog) you won't be able to shock attack: you can start deploying your units and missile volley your enemy. 3.1.1 Initiative At the start of every battle each player will roll a D10+Leader Initiative: whom wins will go first. You can use this initiative for the rest of the game, so that the first player will always play “first” or you can use a more dynamic approach. In the Preferences (see 2.1.1) panel at the beginning of the game You can select the “Use variable Initiative rule” to activate the dynamic management of the Initiative. In this case the player who wins the initiative will play first only for 3-5 turns (randomly determined); after that period a new Initiative roll is done
# If the Initiative is kept by the same player nothing special happens # If the player who was “second” in the last turns wins the Initiative then a double turn is possible!
The turn is managed normally with one major exception: Shock Combat is not possible in the second (consecutive) turn.
HHoopp
ll ii tt eess
ppaa
gg.. 14
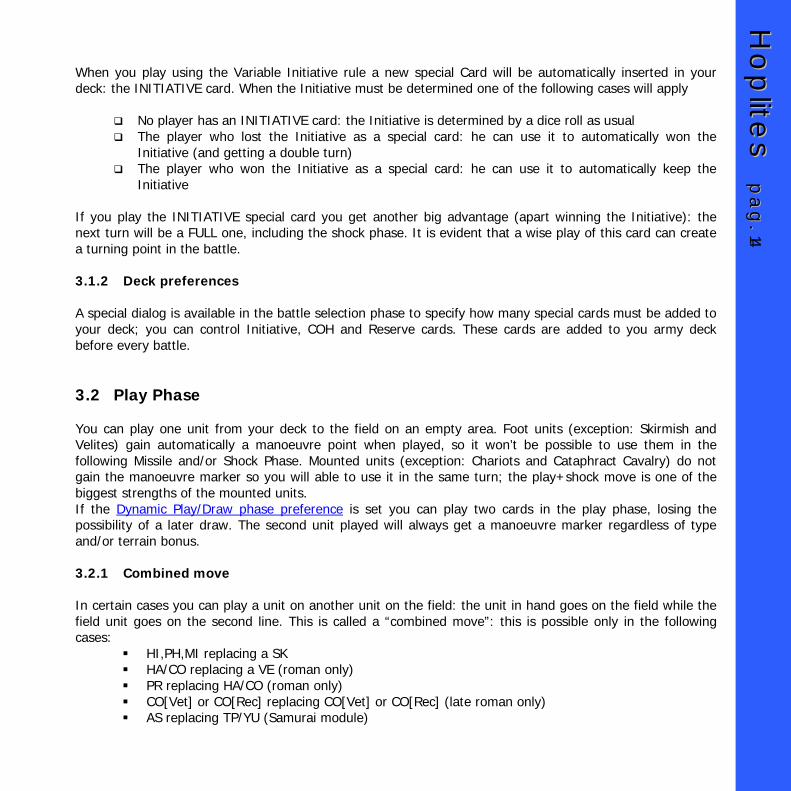
When you play using the Variable Initiative rule a new special Card will be automatically inserted in your deck: the INITIATIVE card. When the Initiative must be determined one of the following cases will apply
# No player has an INITIATIVE card: the Initiative is determined by a dice roll as usual # The player who lost the Initiative as a special card: he can use it to automatically won the
Initiative (and getting a double turn) # The player who won the Initiative as a special card: he can use it to automatically keep the
Initiative If you play the INITIATIVE special card you get another big advantage (apart winning the Initiative): the next turn will be a FULL one, including the shock phase. It is evident that a wise play of this card can create a turning point in the battle. 3.1.2 Deck preferences A special dialog is available in the battle selection phase to specify how many special cards must be added to your deck; you can control Initiative, COH and Reserve cards. These cards are added to you army deck before every battle. 3.2 Play Phase You can play one unit from your deck to the field on an empty area. Foot units (exception: Skirmish and Velites) gain automatically a manoeuvre point when played, so it won’t be possible to use them in the following Missile and/or Shock Phase. Mounted units (exception: Chariots and Cataphract Cavalry) do not gain the manoeuvre marker so you will able to use it in the same turn; the play+shock move is one of the biggest strengths of the mounted units. If the Dynamic Play/Draw phase preference is set you can play two cards in the play phase, losing the possibility of a later draw. The second unit played will always get a manoeuvre marker regardless of type and/or terrain bonus. 3.2.1 Combined move In certain cases you can play a unit on another unit on the field: the unit in hand goes on the field while the field unit goes on the second line. This is called a “combined move”: this is possible only in the following cases:
! HI,PH,MI replacing a SK ! HA/CO replacing a VE (roman only) ! PR replacing HA/CO (roman only) ! CO[Vet] or CO[Rec] replacing CO[Vet] or CO[Rec] (late roman only) ! AS replacing TP/YU (Samurai module)
HHoopp
ll ii tt eess
ppaa
gg.. 15
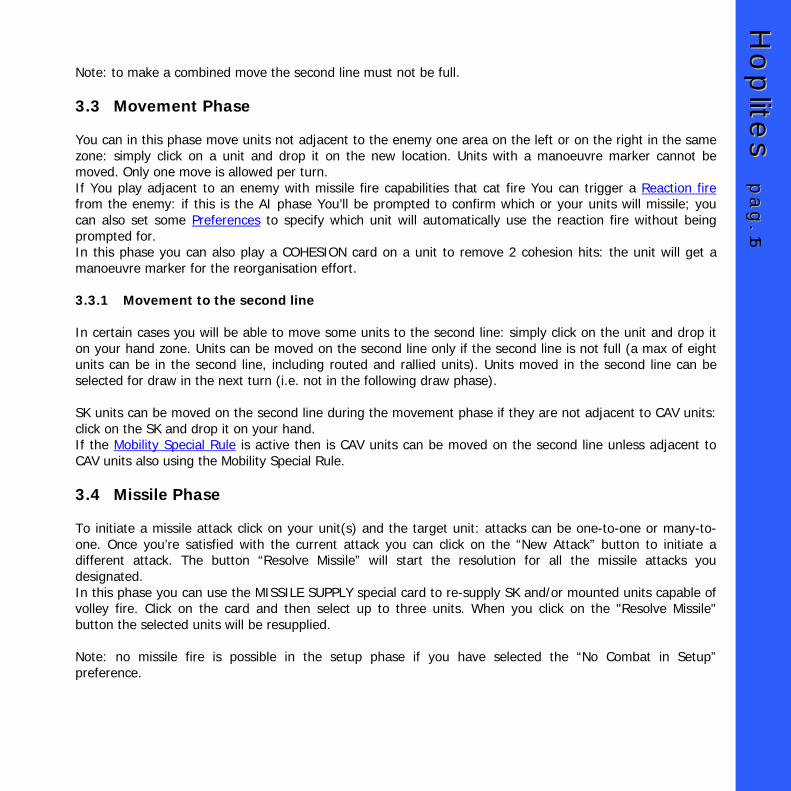
Note: to make a combined move the second line must not be full. 3.3 Movement Phase You can in this phase move units not adjacent to the enemy one area on the left or on the right in the same zone: simply click on a unit and drop it on the new location. Units with a manoeuvre marker cannot be moved. Only one move is allowed per turn. If You play adjacent to an enemy with missile fire capabilities that cat fire You can trigger a Reaction fire from the enemy: if this is the AI phase You’ll be prompted to confirm which or your units will missile; you can also set some Preferences to specify which unit will automatically use the reaction fire without being prompted for. In this phase you can also play a COHESION card on a unit to remove 2 cohesion hits: the unit will get a manoeuvre marker for the reorganisation effort. 3.3.1 Movement to the second line In certain cases you will be able to move some units to the second line: simply click on the unit and drop it on your hand zone. Units can be moved on the second line only if the second line is not full (a max of eight units can be in the second line, including routed and rallied units). Units moved in the second line can be selected for draw in the next turn (i.e. not in the following draw phase). SK units can be moved on the second line during the movement phase if they are not adjacent to CAV units: click on the SK and drop it on your hand. If the Mobility Special Rule is active then is CAV units can be moved on the second line unless adjacent to CAV units also using the Mobility Special Rule. 3.4 Missile Phase To initiate a missile attack click on your unit(s) and the target unit: attacks can be one-to-one or many-to-one. Once you’re satisfied with the current attack you can click on the “New Attack” button to initiate a different attack. The button “Resolve Missile” will start the resolution for all the missile attacks you designated. In this phase you can use the MISSILE SUPPLY special card to re-supply SK and/or mounted units capable of volley fire. Click on the card and then select up to three units. When you click on the "Resolve Missile" button the selected units will be resupplied. Note: no missile fire is possible in the setup phase if you have selected the “No Combat in Setup” preference.
HHoopp
ll ii tt eess
ppaa
gg.. 16
3.4.1 Reaction Fire When the opposing player plays a unit from his deck to the field then a reaction fire is possible if the adjacent units are missile capable: for such a unit You will prompted to confirm which or your units will missile; you can also set some Preferences to specify which unit will automatically use the reaction fire without being prompted for. 3.4.2 Missile fire resolution Units with a manoeuvre marker or with a NO MISSILE marker cannot missile attack. The attacks are resolved in the standard SPQR Missile chart at distance 1. The following modifiers apply:
• Attack against HI, PH, LG[HI] and CO[…] gets a +1 • SK attacking PH or HI gets a +3 • Attack against SK with size 1 gets a +2 • Cataphract units attacked by an Archer unit gets a +2 • Cataphract units attacked by a Javelin/Slinger unit gets a +1 • Light Chariots gets a -1
Depending on the unit type you can get a NO MISSILE marker on you unit if you get a bad dice roll (before any modification):
# Archers, Bows and Slingers are NO MISSILE whenever the die roll is 9 # Mounted Javelin, Velites and non-Roman foot are NO MISSILE whenever the die roll is 7 or more # Legion infantry is automatically NO MISSILE when they user their pilum # Any javelin-armed infantry is automatically NO MISSILE upon completion of Shock. # Artillery is never out of missile
At the end of the Draw phase units with a NO MISSILE marker not adjacent to any enemy will regain their missile capability 3.5 Shock Phase During the first turns (three by default) you won’t be able to shock combat – these turns must be used to deploy your army and eventually make some missile skirmish. Moreover the player that won the initiative at the beginning of the game cannot shock attack on the 4th turn. The number of setup turns can be specified in the Preferences dialog at the start of each game. To initiate a shock attack click on your unit(s) and the target unit(s): attacks can be one-to-one, one-to-many or many-to-one (max 2 to 1). Once you’re satisfied with the current attack you can click on the “Base Attack” button to initiate a different attack. The “Resolve shock” button will start the shock resolution for all
HHoopp
ll ii tt eess
ppaa
gg.. 17
the attacks that you designated. You can also verify the attack statistics by clicking on the “Current attack” label on the upper left panel of the Main Window: a dialog will show the base column, the modifiers that will be applied and the CRT column. Shock constraints:
# Manoeuvring units cannot shock attack. # You cannot attack an area where the unit could not normally move (see 1.4 Terrain for more
details) 3.5.1 Orderly withdrawal (OW) During the player turn when you designate which units will participate to each shock attack the AI will eventually decide for an OW – the OW manoeuvre allow a faster unit to retreat from the combat against a slower one. In the AI turn you will be prompted when OW is possible and you will decide when use this manoeuvre. The possible OW are:
• SK against all foot units (exception SK Vs SK) • Mounted units against foot (exception: engaged EL cannot OW) • LI against “heavy” infantry (HI, PH, LG) • LC and Camels against Heavy cavalry • Numidian LC against all cavalry • TP/YU/AS against foot units (Samurai module)
When a foot unit or a chariot use the OW it will get a “manoeuvre” marker, so won’t be possible to use it in the next combat round – this means that the OW must be carefully taken. Mounted units in OW make a TQ check: if they pass the test the manoeuvre marker won’t be put on the unit. For all the units making an OW a TQ check is done: if it is not successful the unit will lose 1 cohesion hit during the manoeuvre; if the attacker is trying a flanking the TQ check has a +2 modifier and the max COH are 2. Chariots have a +1 modifier in the OW check because of their poor mobility and they will get always 1 COH (even if the OW is successful). 3.5.2 Flanking The flank manoeuvre is one of the most important tactics, because when flanking you can use a better attack value (the second value on the Shock table) and double the COH on the enemy. Two conditions must be met to obtain a flank position:
• to flank an enemy the area on the left or the one in the right of the target must be empty; exception: the areas in the extreme left and right are always considered available for a flank attack.

HHoopp
ll ii tt eess
ppaa
gg.. 18
• Your unit must be a mounted unit against a foot unit (no need to play a special card) or you must play a FLANK card. (exception: PH or units with size ≥ 10 can never flank, CH cannot flank if the "Restricted CH melee" special rule is selected)
There are three ways to initiate a flank attack:
1. Play a FLANK card on a unit (dragging the card on the attacker or right-click on the card) 2. Press the “Flank” button when designating the attack (mounted units only) 3. Attacking a different zone (see below)
The number of attacks you can initiate with the “Flank” button depends on your Leader’s command ability (normally 1). The selected unit will undergo a TQ check; if fails this test the attack is aborted: the unit gets a manoeuvre marker. A “Flank” marker will be put on the flanking unit if the flank attack is legal. 3.5.3 Attacking a different zone To attacking a different zone the corresponding zone must be empty: when there are no enemies in the corresponding zone you can diagonally attack an area on a different zone gaining an automatic flank (this is the main reason why the zone division is important in the game); exception: CH can only flank when using a FLANK card. 3.5.4 Shock resolution The standard shocks are resolved with the following sequence:
1. TQ check for all the units; exception 1: attackers against SK didn’t make a TQ check; exception 2: heavy infantry attacked only by LI don’t’ make a TQ check.
2. Calculate size shift (1 column for each ratio above 1:1); exception: size is not considered in EL Vs non-EL and CH Vs non-CH attacks
3. Calculate the base attacker and defender 4. Determine flanking superiority 5. Calculate the base column in the shock table depending on the weapon system: if the attacker has
gained a flanking position the base column is the second value, otherwise the first value in the shock table is used.
6. Adjust the base column on the basis of the size ratio, depletion and terrain. 7. Determine weapon system superiority (if any): consult the Superiority table using the attacker and
defender type; an “A” will indicate an Attacker Superior combat, where a “D” will activate a Defender Superior combat.
8. Roll a dice and consult the Combat Result Table (CRT) on the column obtained at the step 6. of this sequence
HHoopp
ll ii tt eess
ppaa
gg.. 19
9. The CRT will give two numbers in the format ATT/DEF, where ATT are the COH for the attacker and DEF are the COH for the defender. ATT hits are tripled if the defender got a Defender Superiority on the step 7. DEF hits are doubled if the attacker is flanking or if the attacker got an Attacker Superior on the step 7. of this sequence.
10. Distribute hits on the attackers and defenders (see below for details) When a units has a number of cohesion hits equal or greater than the unit TQ it routs.
Exception 1: SK and CH do not rout, they are eliminated Exception 2: Elephants rampage – a sequence of random movements will be started immediately at the
rampage – see the special units paragraph 3.9.3 for more details on it.
If, as a result of a shock combat, ALL attacking and defending units would rout, the cohesion difference between hits and TQ for the attacker and the defender is compared. The side that has the unit with the greatest discrepancy routs. The opponent now has COH hits equal to his TQ minus one. If the difference between the hits and TQ is the same for both sides, the defender routs. In any case only one side will rout. 3.5.5 Collapse After all attacks have been completed the test for collapse is performed: all engaged units that are within one cohesion hit of automatic rout and adjacent to an enemy must roll one die. If this dieroll is equal to or greater than their TQ, they rout. If lower, they have the cohesion hits set to TQ-2.
3.5.6 Second line attack When You select to shock a unit that
1. doesn’t have any enemy in the frontal area 2. there are no adjacent enemies or the adjacent enemies are all in OW
a “Second Line Attack” marker will be put on the unit – in this case the shock resolution is easier: if the unit pass a TQ check it will be able to attack the second line. It there are no routed units in the second line the defender army gains an automatic 2 route points: this represents the damage on the army caused by a free enemy unit on the rear (a Preference can be used to make a second line attack worth 4 points instead than 2); if a routed unit is present in the second line a random unit will be selected to be eliminated. Exception: a unit cannot be eliminated by a second line attack on the same turn in which is routed.
HHoopp
ll ii tt eess
ppaa
gg.. 2
0
3.5.7 Engagement After the shock phase all the units involved on a shock that are adjacent to some enemy units (not necessary the one attacked) are considered “engaged”; engagement is marked by displaying the TQ value in blue. Units engaged do not have to make the pre-shock TQ check. When an engaged unit is no more adjacent to an enemy (as result of a shock or missile attack) it returns to the not engaged state (TQ value in black). A preference can be used to forbid Engaged units to missile attack. 3.5.8 Cavalry Pursuit You can enable this rule in the Rules panel of the Preferences window. When the Cavalry Pursuit rule is active if a CAV unit routs another unit there is a chance that the attacking cavarly will pursuit the routed unit. If a cavalry unit pursuit an enemy it will destroy it in the 80% of the cases. A label over the Player's second line stats will be displayed to show how many units are on pursuit for both players: it’s not possible to see the units in Pursuit of your adversary. During the Rally phase you can click on the Cavalry Pursuit button to show your own units in pursuit. Units in Pursuit are considered out of the battlefiled: a unit in Pursuit will get a variable (1-4) amount of Manoeuvre level: every turn this level is decremented and when is 0 (no marker in the card) you can select a unit and try to regroup it (using the leader initiative as percentage). If you're successful the unit goes in the "rallied" group (standard second line). The number of regroup attempts is equal to the Leader's command points: the same value is used for both Rally and Regroup operations so you have to choose between regrouping and/or ralling your units.
HHoopp
ll ii tt eess
ppaa
gg.. 2
1
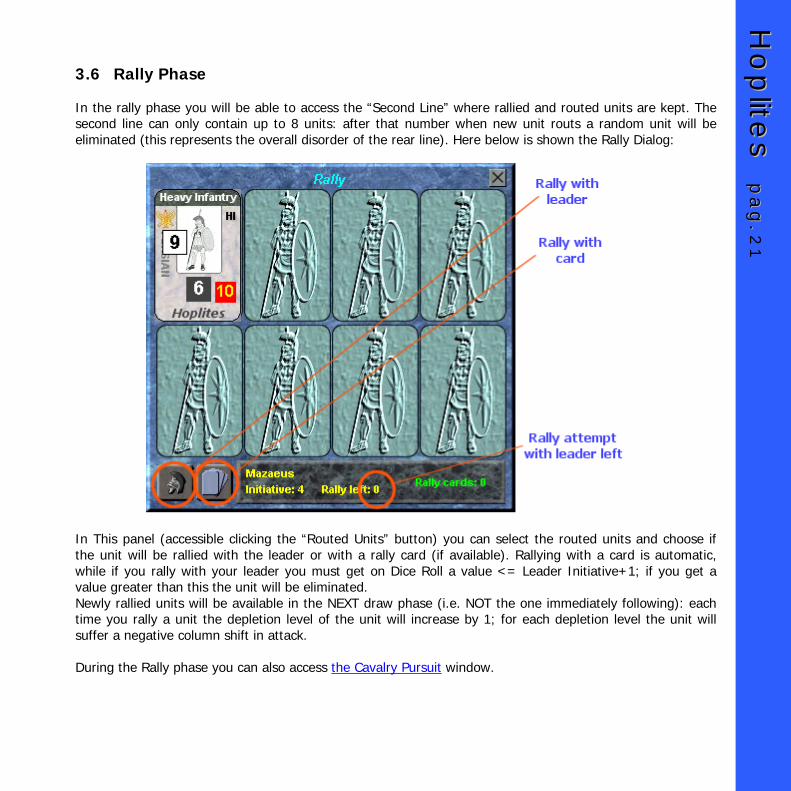
3.6 Rally Phase In the rally phase you will be able to access the “Second Line” where rallied and routed units are kept. The second line can only contain up to 8 units: after that number when new unit routs a random unit will be eliminated (this represents the overall disorder of the rear line). Here below is shown the Rally Dialog:
In This panel (accessible clicking the “Routed Units” button) you can select the routed units and choose if the unit will be rallied with the leader or with a rally card (if available). Rallying with a card is automatic, while if you rally with your leader you must get on Dice Roll a value <= Leader Initiative+1; if you get a value greater than this the unit will be eliminated. Newly rallied units will be available in the NEXT draw phase (i.e. NOT the one immediately following): each time you rally a unit the depletion level of the unit will increase by 1; for each depletion level the unit will suffer a negative column shift in attack. During the Rally phase you can also access the Cavalry Pursuit window.

HHoopp
ll ii tt eess
ppaa
gg.. 2
2
3.7 Draw Phase If your hand is full you cannot draw a new card: if you have less than seven cards you can choose to draw
from your deck (if not exhausted) or take a rallied unit from the second line. In this phase you can right-click on a card to discard it – this will eliminate the card. You can only discard special cards ad unused units (not considered for the route level). If the Dynamic Play/Draw phase preference is set you can draw up to two cards in this phase, providing that you haven't put any unit on the field on the play phase. Clicking on the “Second Line” button will show the dialog on the left; click on the unit You want to move on your hand and click on the button with the small deck. In the same dialog you will be also able to reduce the cohesion of the previously rallied units if you own a Cohesion Special Card: select the unit and click on
the leftmost button (with the two small hoplites icon). If the Leader can remove COH preference is active then you can remove the cohesion hits using the leader orders without the need of having a card; in each turn you will able to issue a number or cohesion removal orders equals to the leader command points * 2. At the end of the Draw phase units with a NO MISSILE marker not adjacent to any enemy will regain their missile capability 3.8 End of the Game The game ends when an army reach the relative route level; the route points needed to rout an army are normally the 50% of the total TQ of the army, counting 1pt for SK, 2pt for EL and CH, TQ*2 for PH and HI with size of ten or more, the base TQ for the rest. If playing the Samurai Module every bundori won on the Personal Combat is worth 5 points. You can change this level at the start of each game to play a harder or easier battle. In the final window a summary of the battle is displayed, with the final route levels: a button will allow you to access a more detailed debriefing.
HHoopp
ll ii tt eess
ppaa
gg.. 2
3
3.9 Unit detail Some special rules apply to the units depending on the type/class: during the game you can access a quick description of the unit characteristics by right clicking on it. 3.9.1 Cavalry Cavalry can be played on the field without getting a manoeuvre marker, so it is possible to use it to shock in the same turn in which you play it. (Exception: Cataphract Cavalry) Normally CAV units can always make a OW in front of Infantry; LC can OW in front of all the units, including HC/RC, except when attacked by another LC or Camels. Numides can always make an OW. When doing an OW the CAV unit makes a TQ check to see if it gets a manoeuvre marker. CAV cannot front attack an EL unit. When attacked by an EL unit the CAV unit undergoes a TQ with a +2 modifier. When the Mobility Special Rule is active CAV units can be moved on the second line by dragging them from the Field on the Hand on the Move Phase. 3.9.2 Cataphract Cavalry Cataphract cavalry is a class of Heavy Cavalry with some special abilities/restrictions:
• When a Cataphract cavalry is missile attacked by an archer units it gets a +2 modifier • When a Cataphract cavalry is missile attacked by a Slinger/Javelin units it gets a +1 modifier • A Cataphract cavalry always get a manoeuvre marker when played or when it does an OW • If an attacking group contains at least one Cataphract cavalry unit it gains a 2 columns right shift • If a defending group contains at least one Cataphract cavalry unit it gains a 2 columns left shift
3.9.3 German Cavalry German Cavalry is the combination of a LC and a LI unit. It's considered as a Mounted unit with foot javelin capabilities. The resulting size of the GC is the sum of the LC and LI with a single TQ. GC can OW in front of all foot units. GC is treated as LC for all the shock purposes but do not suffer Attacker Superiority when defending or Defender Superiority when attacking. GC routs when the COH are greater or equal to the double of the TQ. Victory Points: twice the TQ
HHoopp
ll ii tt eess
ppaa
gg.. 2
4
3.9.4 Elephants EL units do not rout, they rampage; the rampage segment is executed immediately; the EL unit move randomly for a max of 4 times: 1-3 move against the enemy, 4-5 move to left/right (friendly units), 6-7 no effect, 8-10 left or right the first time, end rampage otherwise. Cataphracted Elephants have the following missile modifiers:
• When a Cataphract elephant is missile attacked by an archer units it gets a +2 modifier • When a Cataphract elephant is missile attacked by a Slinger/Javelin units it gets a +1 modifier
Elephants have a special archer screen that can only missile during the reaction fire segment; archer screen are never NO MISSILE. Engaged Elephants cannot OW. Victory Points: 2 for each EL unit. 3.9.5 Chariots There are two types of chariots: heavy chariots (HCH), that correspond to the standard CH units in GboH, and Light Chariots (LCH). If not specified otherwise rules apply to both types. When played on the field the Chariots gains a manoeuvre marker even if they are considered as “mounted” units for the game mechanics. When doing an OW the CH gets an automatic 1 cohesion hit. CH cannot gain a “positional” flank advantage: the only way to gain a flank attack with a Chariot is by playing a FLANK card on it. Units attacked by a CH undergo a TQ check with a +1 modifier. Chariots ignore the pre-shock TQ check in the turn when they are played (this represents the attack inertia) CH units do not rout, they are instead eliminated. LCH got a -1 in the missile volley. In shock combat when attacking units except SK and other CH they have a base value of 2 points lower than the HCH. When defending LCH got a base value of one point lower than the HCH (exception: attacks by SK or other CH). HCH are considered AS against LCH If the special rule Restricted CH melee is selected only HCH can shock attack and they never can use a flank card (frontal attack). LCH in this case cannot shock attack but are used only to missile and the MISSILE SUPPLY card can be used on them. Victory Points: 2 for each CH unit. 3.9.6 Skirmish Skirmish can be played on the field without getting a manoeuvre marker, so it is possible to use it to missile/shock in the same turn in which you play it; moreover SK is never affected by COH due to terrain. SK units can be moved on the second line on the Movement Phase if they are not adjacent to CAV units: click on the SK and drop it on your hand. Units attacked only by SK don’t’ make a pre-shock TQ check. SK units do not rout, they are instead eliminated.
HHoopp
ll ii tt eess
ppaa
gg.. 2
5
See also the “Combined Move” paragraph for the skirmish replacement on field. Victory Points: 1 for each SK unit. 3.9.7 Light Infantry Heavy units attacked only by LI units (not LP) do not make a pre-shock TQ check. See also the “Combined Move” paragraph for the LI replacement on field. Velites (class LI) do not get a manoeuvre marker when played, so it is possible to use it to missile/shock in the same turn in which you play it. 3.9.8 Barbarian Infantry Barbarian Infantry is never affected by COH due to terrain. BI can be affected by the Ferocity special rule (see 1.5.2). 3.9.9 Cohortes Late roman Cohortes are divided in three classes
! [Vet] veteran: they act as LG in the shock combat ! [Rec] recruit: they act as HI in the shock combat ! [Con] conscripts: they act as MI in the shock combat
[Vet] and [Rec] can use the combined move rule (see 3.2.1). 3.9.10 Artillery Artillery units cannot be moved once played. Artillery can fire in the same turn in which is moved on the field (this represents the “surprise” of the artillery fire). Each artillery hits cause 2 hits. Artillery never gets an “Out of Missile” marker. Artillery units cannot initiate a shock attack: when attacked these units defend as LI. 3.9.11 Camels Camels are a very special type of light mounted units. Like LC camels do not get a manoeuvre marker when played and can OW if attacked by foot unit and by HC. Camels are treated as LC for shock purposes: cavalry units attacked by a Camel have a -2 TQ modifier while cavalry attacking a Camel has a -1 TQ modifier.
HHoopp
ll ii tt eess
ppaa
gg.. 2
6
4 Samurai Samurai is the first "expansion module" for the Hoplites engine, based on the GMT's Samurai boardgame. If not stated otherwise the standard Hoplites rules apply also for Samurai: in this chapter you'll find the specific rules for this module. Samurai and Hoplites armies cannot be mixed: when you start the game you must choose between the two periods, and then the appropriate list of armies (.army files) will be displayed. The Hoplites army editor cannot be used to edit Samurai armies: there is not at the moment an editor to manage the samurai armies. 4.1 Unit types There are only four unit types in Samurai:
# Ashigaru (AS), the main infantry force # Kibamusha (KB), cavalry # Teppo (TP), gun armed soldiers # Yumi (YU), bow armed soldiers. # Ozutsu (OZ), guns
TP,YU are missile capable, with a base value of 6, 7 and 7 respectively. OZ will score an hit with a roll of 2 or more: depending on the result you will cause from 1 to 3 COH in the target. Special unit characteristics:
• TP and YU doesn't get a manoeuvre marker when played. • TP,YU and AS can OW when attacked by any foot unit. • OZ can explode: if the missile result is a 9 and a second roll gets a 0 or 9 the OZ unit is
eliminated. 4.2 Command structure The biggest difference between Hoplites and Samurai is on the command structure: the Samurai armies are divided in "clans" (5 to 8 depending on the army); in every turn you can use units belonging to a certain number of clans, depending on your Daimyo clan value (shown on the leader panel near the standard initiative and command values). For example, a leader with clan=2 can activate up to two different clans. Units belonging to the same clan have the same banner image on the card: whenever you select a unit for play, move, missile, shock or rally purposes the corresponding clan banner is displayed in the leader panel to remind you that the clan has been activated. At the beginning of every turn the clan list is empty: every action you conduct will include a new clan on the list (if not yet present) up to the maximum number available for the current leader.
HHoopp
ll ii tt eess
ppaa
gg.. 2
7
4.3 Samurai special cards Samurai challenge: this card will give to you the possibility to start a samurai fight. You can control how many Challenge card will be added to your army using the Deck Defaults dialog.
5 Personal Combat 5.1 Samurai combat A personal combat can be initiated by playing a CHALLENGE card on the field on any phase. This action will trigger a sub-phase where two characters will fight. The samurai will be randomly chosen on a common pool so that You can’t be sure on the final outcome. Each samurai has two statistics: Stamina (hits) and Combat Ability. The fight will proceed as a series of turns where each player will roll a D10 adding the Combat Ability of the samurai: the loser will get one wound (two if the winner rolls a result that is twice or more than the score of his adversary). When one samurai has zero or less Stamina points the fight is over: the winner will get a bundori (severed head) that is worth five route points.
HHoopp
ll ii tt eess
ppaa
gg.. 2
8
6 PBEM Play-by-Email (PBEM hereafter) is possible in Hoplites with the following mechanisms: ! One of the two players must select both armies and start a new PBEM game by clicking on the
relative button in the Game Selection window. ! The player that starts the new PBEM game always get the Initiative and can start his turn. ! During the game the AI will manage the Reaction Fire process and Orderly Withdrawal of the human
adversary ! At the end of each turn a Save Button will be displayed: by clicking it you can specify the name of
the save game. At this point the PBEM session is over and you will be taken back to the Game Selection form.
You can now send via email to your adversary the file
<selected name>.savegame
that you will find in the Save folder (in your Hoplites directory). When you receive a savegame from your adversary simply save it on your Save folder and then start Hoplites: in the Game Selection Window click on the LOAD button, select the new savegame and continue the fight. At the end your turn you will be able to save the game to be sent back to your adversary. Note: I didn’t have inserted any check in the load/save process (even If technically possible) so is up to your honesty to NOT abuse of the mechanism. It’s very easy to load a PBEM game, play a bad turn and, instead of sending the new game, reload the old savegame and retry. Eventually, in case of a WorldWide Hoplites Championship, I will include a mechanism to take care of this eventuality.
HHoopp
ll ii tt eess
ppaa
gg.. 2
9
7 Strategy tips & tricks (work in progress) This section will try to give some help to those that are note familiar with the Great Battles of History. Some ideas are also valuable for the GBoH veterans since Hoplites introduces some simplifications and some new possibilities to the game system. 7.1 General tips The TQ value of each unit is the main indicator of the unit importance; units with high TQ must be kept under control, especially when routed since they contribute heavily to the global route level. PH worth double their TQ so when routed should be rallied as soon as possible. 7.2 Opening moves In the first three turns no shock attack is possible so it's a good idea to play units with missile capability to damage the enemy. SK are very useful in this phase since they can be moved on second line later by playing heavier units (see combined move rules for details). LI units are normally missile capable and can OW against heavy infantry so they are good candidates for early play. 7.3 Basic tactics The most basic tactic is very simple: flanking; you can flank using a FLANK card or using the native mobility of the unit; for this reason mounted units are very valuable, especially when played on the extreme left or right of the field, areas that are always considered available for a flanking. Mounted units can OW when attacked by foot units so it's very important to keep some mounted units to front the enemy attack. CAV units are generally poor when attacking frontally heavy infantry: PH and LG are defender superior (x3 COH) when attacked frontally by CAV so avoid a direct attack if possible. The OW for foot units (SK and LI) can be very useful to slow the attack from heavy infantry: the cost in terms of COH for the OW is quite small and can be effective while waiting for a more strong attack unit (played in combined move or adjacent). To avoid the "enemy escape" effect (PH or HI fruitless attacking LI or SK) you must use a SK or LI in a combined attack: the lighter infantry unit will "lock" the enemy while the heavy unit will crush them. Protect the flanks of you most valuable units (PH, HI) with LI or SK: do not give your enemy the possibility to exploit his mounted units to get a flank on your troops.
HHoopp
ll ii tt eess
ppaa
gg.. 3
0
7.4 Special attacks Chariots: play a chariot in the same turn in which you will use it to shock attack; this tactic will exploit the shock bonus of the chariot. Elephants: they can be very effective because of the mounted status and the strong shock values. Do not waste them leaving the unit under heavy missile fire.
HHoopp
ll ii tt eess
ppaa
gg.. 3
1
8 Data files and system parameters The main data files are
! Tables.dat: all the tables used by the game ! Armylist.dat: all the army types (more detail on in it on the army editor manual) ! Terrain.dat: terrain information and modifiers ! Images.dat: image info (filename and corresponding unit) ! Characters.dat: info on the samurai/heroes available. ! Sounds.dat: the names of the sound files.
All the files are in ASCII format and should not be too difficult to read the info on it. If you want you can also modify this files but please take note that the default .dat file will be overwritten when you install a new version. The HOPLITES.INI file will keep the info about your preferences and the last game data: this file is not overwritten.
HHoopp
ll ii tt eess
ppaa
gg.. 3
2
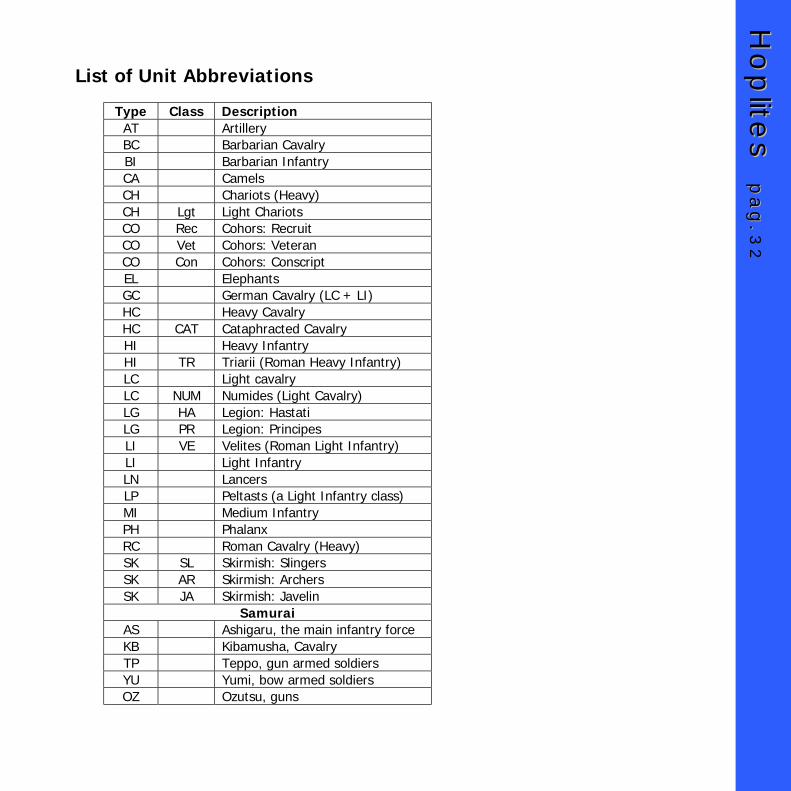
List of Unit Abbreviations
Type Class Description AT Artillery BC Barbarian Cavalry BI Barbarian Infantry CA Camels CH Chariots (Heavy) CH Lgt Light Chariots CO Rec Cohors: Recruit CO Vet Cohors: Veteran CO Con Cohors: Conscript EL Elephants GC German Cavalry (LC + LI) HC Heavy Cavalry HC CAT Cataphracted Cavalry HI Heavy Infantry HI TR Triarii (Roman Heavy Infantry) LC Light cavalry LC NUM Numides (Light Cavalry) LG HA Legion: Hastati LG PR Legion: Principes LI VE Velites (Roman Light Infantry) LI Light Infantry LN Lancers LP Peltasts (a Light Infantry class) MI Medium Infantry PH Phalanx RC Roman Cavalry (Heavy) SK SL Skirmish: Slingers SK AR Skirmish: Archers SK JA Skirmish: Javelin
Samurai AS Ashigaru, the main infantry force KB Kibamusha, Cavalry TP Teppo, gun armed soldiers YU Yumi, bow armed soldiers OZ Ozutsu, guns
HHoopp
ll ii tt eess
ppaa
gg.. 3
3
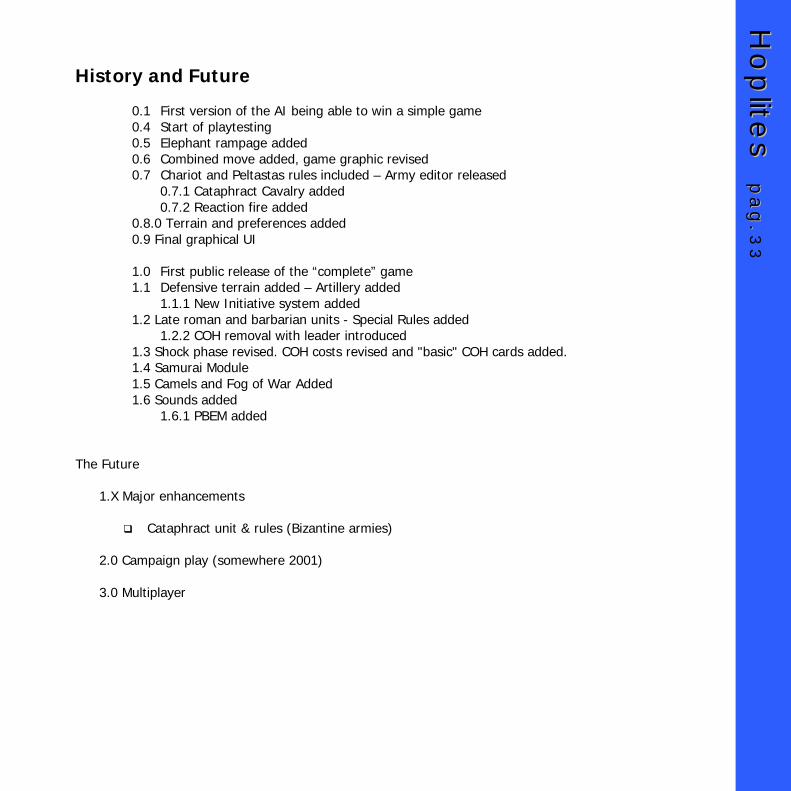
History and Future
0.1 First version of the AI being able to win a simple game 0.4 Start of playtesting 0.5 Elephant rampage added 0.6 Combined move added, game graphic revised 0.7 Chariot and Peltastas rules included – Army editor released
0.7.1 Cataphract Cavalry added 0.7.2 Reaction fire added
0.8.0 Terrain and preferences added 0.9 Final graphical UI 1.0 First public release of the “complete” game 1.1 Defensive terrain added – Artillery added
1.1.1 New Initiative system added 1.2 Late roman and barbarian units - Special Rules added
1.2.2 COH removal with leader introduced 1.3 Shock phase revised. COH costs revised and "basic" COH cards added. 1.4 Samurai Module 1.5 Camels and Fog of War Added 1.6 Sounds added 1.6.1 PBEM added
The Future
1.X Major enhancements
# Cataphract unit & rules (Bizantine armies)
2.0 Campaign play (somewhere 2001) 3.0 Multiplayer
HHoopp
ll ii tt eess
ppaa
gg.. 3
4
Acknowledgements First of all thanks to GMT for the great work on the GboH serie: without their effort Hoplites won’t exist and I would be a free man. A special thank goes to Dave Townsend for his help and support, especially at the very beginning of the Hoplites adventure. I also have to thank the users involved in the beta test phase and all the people continuously sending me feedbacks and suggestions; some special thanks goes to (strict randomic order): Gary author of the Dynamic Play/Draw rule
Robert Leonhard “Bob” for a lot of help and suggestions Roberto “Ruperto” Rodger RRidgeway Tim “Lord Gek” Tim Mc Coy for Atlantis and Conan Walter O’Hara