Embed Size (px)
Citation preview

HOPPER DUOSETUP
SETUPINSTRUCTIONS

• If you are not seeing the screens listed in this guide, try changing your TV’s input by pressing the “Source/Input” button on your TV.
• When you reach the activation stage of this guide, you will need either your account number or your previous receiver’s ID number.
• Account number: Located along the upper-right corner of your DISH bill or in the My Account Summary section of your mydish.com account.
• Receiver ID: Located on a label on the back of your previous receiver. It begins with “R.”
• To find your closest UPS dropoff location or to schedule a pickup at your cost, call 1-800-742-5877 or visit ups.com/dropoff.
Do you have questions?Take a look at the back cover of this guide to contact DISH!
2

Disconnect Your Cables
Locate the power cable for the Hopper Duo that you are replacing and unplug it from the wall.
Locate the cable connected to the “To Hub” port, and then unscrew it from the receiver. Do not unscrew it from the wall.
3
Locate the cable connected to the “Ethernet” port, and then unplug it from the receiver. Do not unplug it from the wall. (You may not have this cable.)
Disconnect Your Cables
HDMI 1Determine the cable you are using to receive audio/visual signal. Then, unplug it from the receiver but not from your TV.
L
R
AUDIO
VIDEO
OR
HDMI CABLE RCA CABLESEthernet
Ethernet
4
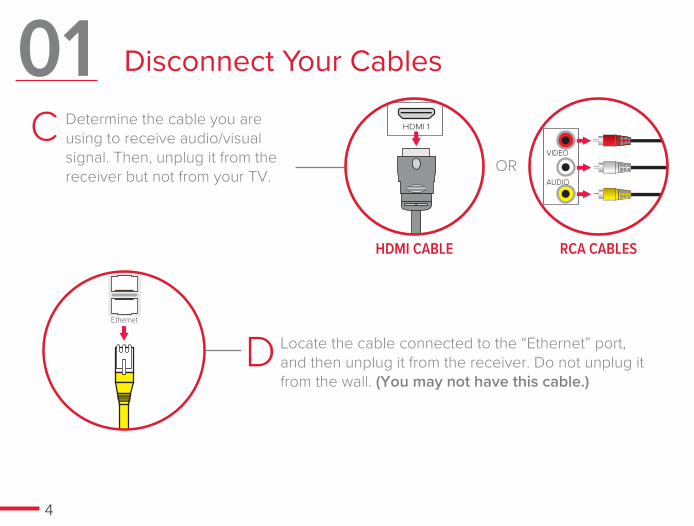
Connect the Home Video Network cable to the “To Hub” port on your replacement receiver.
Connect Your Cables
5

Ethernet
Ethernet Connect the Ethernet cable to the “Ethernet” port on your replacement receiver. (You may not have this cable.)
Connect either the RCA cables or the HDMI cable to the corresponding port(s) on your replacement receiver.
Connect Your Cables
OR
HDMI CABLE RCA CABLES
HDMI 1
L
R
AUDIO
VIDEO
6

03 Power Your Equipment
Plug the power cord from your Hopper Duo into a power outlet, and ensure that your TV is still plugged in. Turn on your TV. It could take up to 30 seconds for you to see any images.
Make sure that the SmartCard is secured firmly in the slot on the side of your Hopper Duo.
7

Power Your Equipment
You will see a loading screen, which could last for several minutes.
When the Install Wizard screen appears, go to step 4.
03
8

Pair Your Remote to Your Hopper
Press the SAT button on your remote control to pair it to your Hopper Duo. All of your previous receiver’s recording timers and other settings will be restored automatically.
Once your remote is paired, the Install Wizard will proceed to the next step automatically.
9

Set Up Text to Speech
If you would like to have a digital voice read the text onscreen, use your remote control to highlight the “Continue with Text to Speech” button. Then, press SELECT.
If you do not want a digital voice to read the text onscreen, use your remote control to highlight the “Next” button. Then, press SELECT.
10
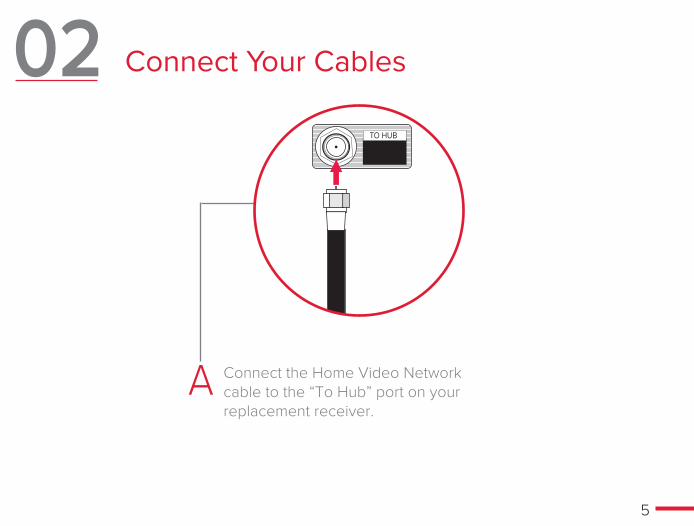
Set Your TV Resolution
If the image onscreen looks clear and correct, use your remote control to highlight the “Keep” button. Then, press SELECT.
If the image onscreen looks incorrect, use your remote to highlight the “Revert” button. Then, press SELECT.
Depending on your TV, you may not see this screen. If this screen does not appear, skip to step 7.
11
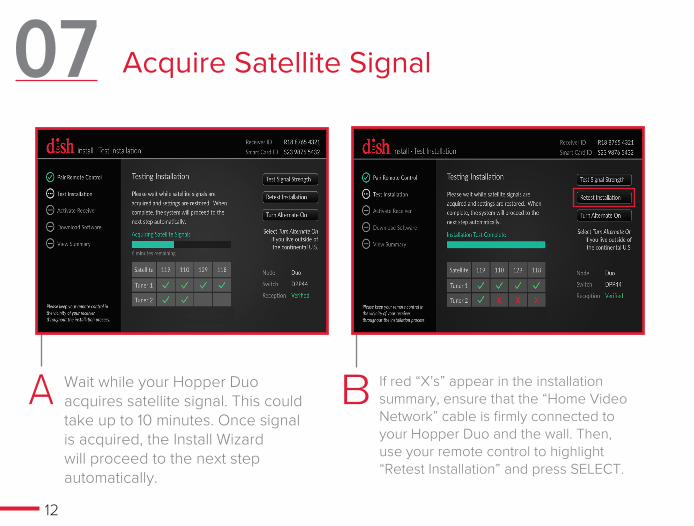
Acquire Satellite Signal
Wait while your Hopper Duo acquires satellite signal. This could take up to 10 minutes. Once signal is acquired, the Install Wizard will proceed to the next step automatically.
If red “X’s” appear in the installation summary, ensure that the “Home Video Network” cable is firmly connected to your Hopper Duo and the wall. Then, use your remote control to highlight “Retest Installation” and press SELECT.
12

Activate Your Hopper (Internet Connection)
Use your remote to highlight the “Zip Code” field and press SELECT. Then use the number pad on your remote control to enter your ZIP Code.
Use your remote control to highlight either the “DISH Account Number” field or the “Previous Receiver ID” field. Then, press SELECT and use the number pad to enter the selected number.
If your Hopper is not connected to the Internet, skip to step 8E.
13

Use your remote control to highlight the “Activate” button, and then press SELECT.
Once activated, you will see a screen confirming that you activated your Hopper Duo successfully. The Install Wizard will then advance to the next screen automatically. Go to step 9.
Activate Your Hopper (Internet Connection)
14

Activate Your Hopper (No Internet Connection)
If your Hopper Duo is not connected to the Internet, call 1-800-333-DISH (3474) to activate it with a DISH agent. You will need the Receiver ID and Smart Card ID located on the Activation screen.
Once activated, you will see a screen confirming that you activated your Hopper Duo successfully. The Install Wizard will then advance to the next screen automatically.
15

Download Hopper Software
Your Hopper Duo will start downloading software automatically. This process will take approximately 20 minutes.
Once your Hopper Duo completes the software download, the Install Wizard will advance to the next screen automatically.
16

Review the Summary Screen
Review the Summary screen. Any fields with green checkmarks are complete, and yellow fields are steps that need your attention. To change the information in a yellow field, highlight the dropdown tile and press SELECT. Then select an option from the dropdown menu.
When you have completed all of the steps on the Summary screen, select the “Watch TV” tile to start watching your favorite programming with DISH.
17

Return Your Original Receiver
Package your old receiver in the box that your new receiver came in. Using the above photo as reference, place the endcaps along each side of the receiver, and then place the receiver into the box.
Close the box by folding the flaps toward the center. Seal the box using clear packaging tape.
18
TO RETURN EQUIPMENT TO DISH NETWORK1. Remove Shipping Label Here
2. Tu
rn La
be
l Ove
r3
. Pe
el a
nd
Ap
ply R
etu
rn La
be
l to B
ox
RETURNS
LIFT HERE
SHIPTO:
DISH NETWORK(800) 894-9131
525 DUNNETT COURTSPARTANBURG SC 29303
BILLING: P/P
CUE 9.5 SCL412 96.5A 10/2009
20126944(111) 555-5555
13 MELO DRNORTH BANGOR NY 12966
1 LBS 1 OF 1
UPS 2ND DAY AIRTRACKING #: *** *** ** **** *** *1Z
A1Z*8463124*44*NY 136 1-01
2
TO RETURN EQUIPMENT TO DISH NETWORK1. Remove Shipping Label Here
2. Tu
rn La
be
l Ove
r3
. Pe
el a
nd
Ap
ply R
etu
rn La
be
l to B
ox
SHIPTO:
DISH NETWORK(800) 894-9131
525 DUNNETT COURTSPARTANBURG SC 29303
BILLING: P/P
CUE 9.5 SCL412 96.5A 10/2009
20126944(111) 555-5555
13 MELO DRNORTH BANGOR NY 12966
1 LBS
UPS 2ND DAY AIRTRACKING #: *** *** ** **** *** *1Z
A1Z*8463124*44*NY 136 1-01
2
RETURNS
LIFT HERE
PEEL
HER
E AN
D
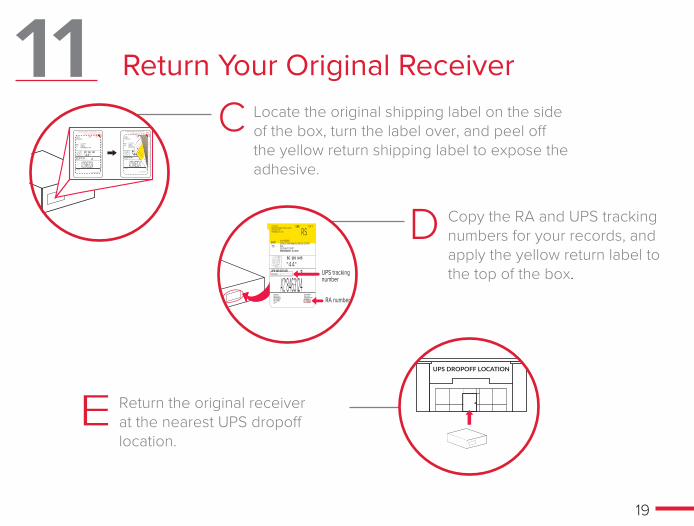
Locate the original shipping label on the side of the box, turn the label over, and peel off the yellow return shipping label to expose the adhesive.
SHIPTO:
SERVICE SPARTANBURG SERVICE CENTER(111) 555-5555
525 DUNNET COURTSPARTANBURG SC 29303
SERVICE SPARTANBURG SERVICE CENTER(111) 555-5555
NULL525 DUNNET COURTSPARTANBURG SC 29303
1 LBS 1 OF 1
UPS 2ND DAY AIRTRACKING #: *** *** ** **** *** *1Z
A1Z*8463124*44*SC 293 9-05
RS
2
DESC: RETURNBILLING: P/P
RETURN SERVICEREF1: XXXXXXXXREF2: XXXXXX
DOC: XXXXXXXORD: XXXXXXXX
SN:RREJXXXXXXXXXPN: XXXXXXRA: XXXXXXXXDEL: XXXXXXXXREQTYPE: AE
QTY: 1
UPS tracking number
RA number
UPS DROPOFF LOCATION
Copy the RA and UPS tracking numbers for your records, and apply the yellow return label to the top of the box.
Return the original receiver at the nearest UPS dropoff location.
Return Your Original Receiver
19

We want to hear from youso that we can keep delivering what you need to enjoy your TV service.
Share your thoughts at mydish.com/tunedintoyou.
Get product support information at mydish.com/support.
Have questions? Let us help!
Find helpful instructional videos at youtube.com/user/dish.
Chat with a human being by visiting us at mydish.com/chat.
- OR -
Call us at 1-800-333-DISH (3474).
DN010635