Embed Size (px)
DESCRIPTION
Installation and instruction manual for the Hotpod Unlimited multifuel stove
Citation preview
1
22
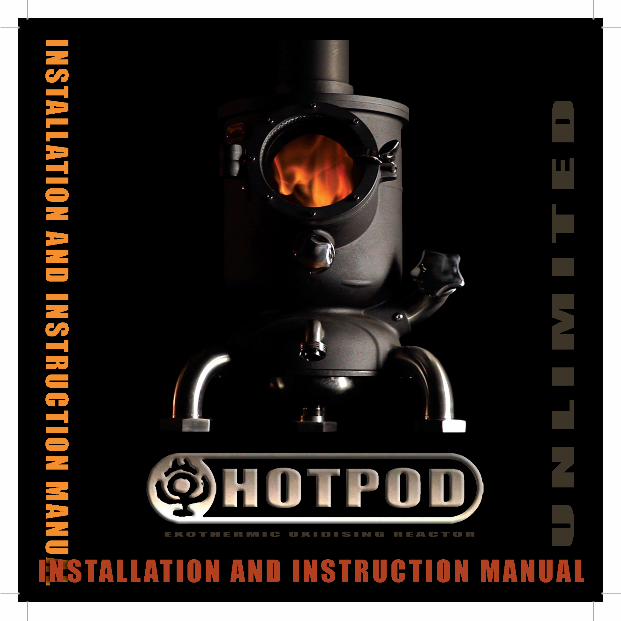
INSTALLATION AND INSTRUCTION
MANUAL
2
VERsION 3, jUNE 2011
33
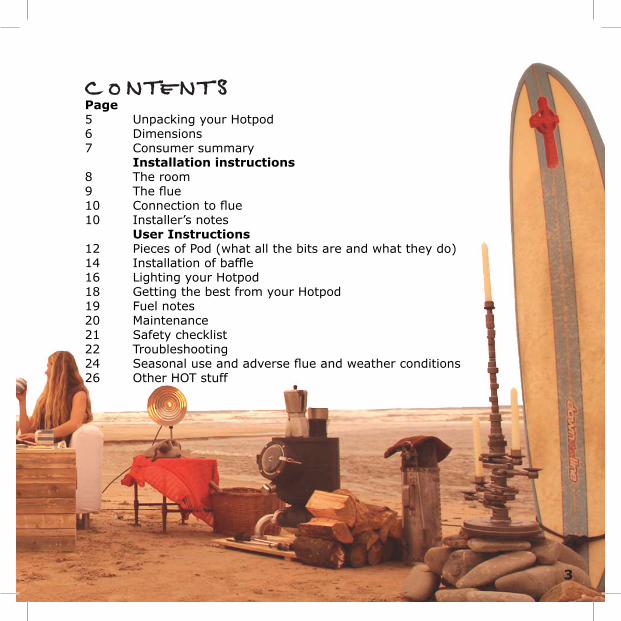
CONTENTSpage5 Unpacking your Hotpod6 Dimensions7 Consumer summary Installation instructions8 The room9 The fl ue10 Connection to fl ue10 Installer’s notes User Instructions12 Pieces of Pod (what all the bits are and what they do)14 Installation of baffl e 16 Lighting your Hotpod18 Getting the best from your Hotpod 19 Fuel notes20 Maintenance21 Safety checklist22 Troubleshooting 24 Seasonal use and adverse fl ue and weather conditions26 Other HOT stuff
3
4
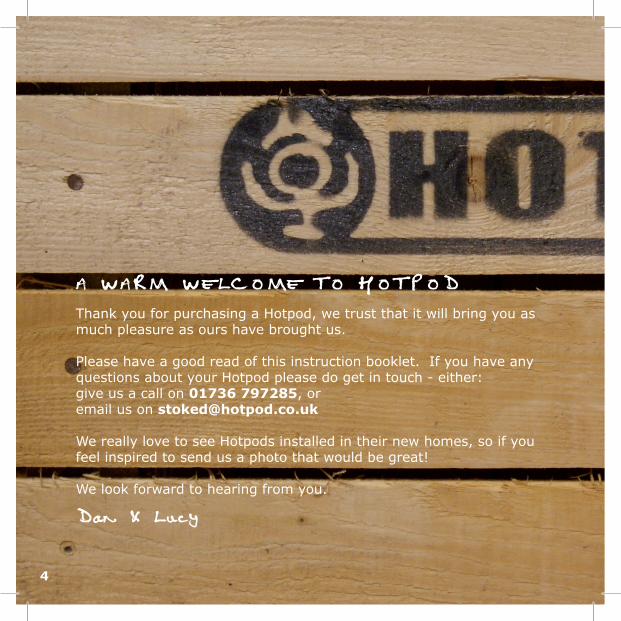
A WARM WELCOME TO HOTPOD
Thank you for purchasing a Hotpod, we trust that it will bring you as much pleasure as ours have brought us.
Please have a good read of this instruction booklet. If you have any questions about your Hotpod please do get in touch - either: give us a call on 01736 797285, oremail us on [email protected]
We really love to see Hotpods installed in their new homes, so if you feel inspired to send us a photo that would be great!
We look forward to hearing from you.
Dan & Lucy
4
5
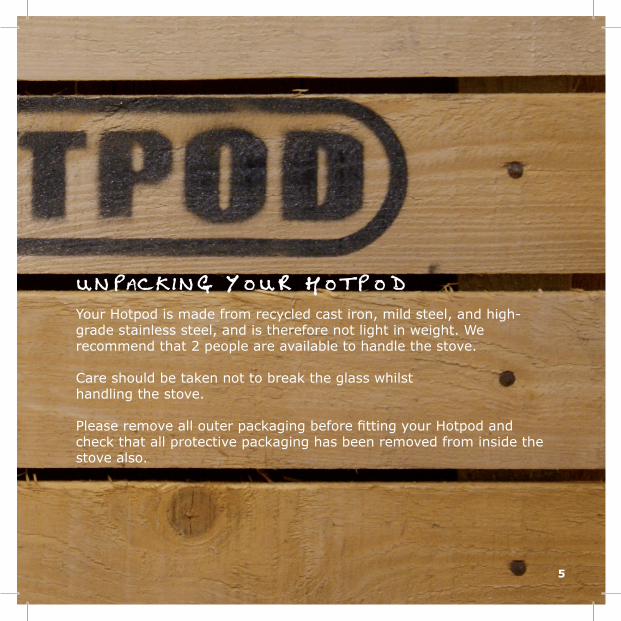
UNPACKING YOUR HOTPOD
Your Hotpod is made from recycled cast iron, mild steel, and high-grade stainless steel, and is therefore not light in weight. We recommend that 2 people are available to handle the stove.
Care should be taken not to break the glass whilst handling the stove.
Please remove all outer packaging before fitting your Hotpod and check that all protective packaging has been removed from inside the stove also.
5
6
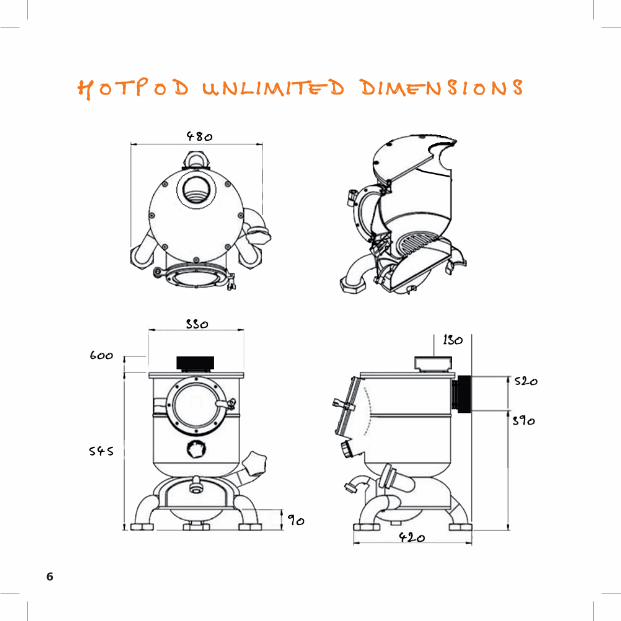
HOTPOD UNLIMITED DIMENSIONS
6
7
[ EXOTHERMIC OXIDIZING REACTOR - UNLIMITED
Intermittent burning solid fuel room heater for installation in single chimneysFlue spigot 125mm IDMinimum distance to combustibles: 500mmRecommended minimum clearance to non-combustibles: 100mm Output: (wood) 6.1kW. 6.1kW to room, 0kW to water (1.2kg wood per 45 minutes/1.9 kg per hour)CO: 0.24% @13% O2. Efficiency 81.3%
Output: (anthracite) 6.8kW. 6.8 kW to room, 0kW to water(0.9 kg anthracite per hour)CO: 0.10% @13% O2. Efficiency 75.7%
Hearth temperature does not exceed 100 °CFlue gas temperature directly downstream of the flue spigot: 350 °CRequired flue draught for correct operation: 12PaWeight of Hotpod: 56.3 kg
Conforms to EN13240 and is a DEFRA exempt appliance for use in smoke control areas
The Hotpod is designed for operation with the door closed. Heat is mainly diffused by infrared radiation from the main body and the window and by air convec-tion from the stove body and any exposed flue pipe.Combustion occurs on the grate, with draught (oxygen) entry through the primary and secondary air vents.
All local regulations, including those referring to national and European standards need to be complied with when installing the appliance.
THE HOTpOD sHOULD NOT bE MODIfIED IN ANy wAyUsE ONLy GENUINE HOTpOD REpLACEMENT pARTs
The Hotpod Unlimited has a 10 year warranty. Warranty terms and conditions can be found at: www.hotpod.co.uk/warranty.asp
7
8
INSTALLATION INSTRUCTIONSYour Hotpod should only be installed by competent personnel in the strict application of normal practices and all safety precautions. All local regulations, including those referring to national and European standards need to be complied with when installing the appliance.
An incorrectly installed stove can cause serious accidents.
The manufacturer’s responsibility shall be limited to the supply of the equipment only.
THE ROOMVENTILATION: For satisfactory operation with a natural draught, check that sufficient air for combustion is available in the room. The Hotpod should be installed in a room with a permanently open air vent (e.g. air brick) with an opening of at least 1100mm² (or 2350mm² if a draught stabiliser is fitted). The vent should be installed in such a way that it is not liable to blockage. It is a good idea where possible to position the air vent close to the Hotpod to prevent cold drafts travelling across the room.
Extractor fans must not be placed in the same room as the Hotpod.
fLOORs: Before installing the Hotpod, you must ensure that the load-bearing capacity of the floor can withstand the weight of the Hotpod plus the flue pipe and connections. If an existing construction doesn’t meet this prerequisite, suitable measures (e.g. load distributing plate ) should be taken to achieve it.
HEARTH: The hearth must be suitable for use with solid fuel burning appliances and must comply with Current Building Regulations. If in doubt, consult your local buildings inspector.
The Hotpod hearth temperature does not exceed 100 degrees Celsius and therefore may be placed on a 12mm non-constructional hearth directly onto the floor.

9
CLEARANCEs: The Hotpod should not be positioned close to combustible materials. The minimum distance to combustible materials is 500mm. This includes above the hotplate e.g. to a wooden mantelpiece or lintel.
The recommended minimum clearance to non-combustibles (e.g. the walls of the fireplace) is 100mm. This allows for free air movement around the Hotpod improving convection and therefore efficiency.
THE FLUEThe Hotpod has an outlet designed for 125mm (5”) flue pipe (or connecting pipe into an existing masonry chimney). It can be used with either a top or rear flue by swapping the flue spigot and the blanking plate. They should both be sealed to the Hotpod body with a suitable proprietary sealant such as fire cement.
THE fLUE MUsT NOT bE sHARED wITH OTHER AppLIANCEs.
The flue must not be supported by the stove.
The flue must be in good condition and must provide sufficient draught.
THE fLUE DRAUGHT sHOULD bE 12pA. A fLUE wITH A DRAUGHT MUCH AbOVE OR bELOw 12 pA CAN bE DANGEROUs THROUGH EITHER INEffICIENT OR OVER bURNING.
The flue must be suitable for the installation of solid fuel burning appliances and comply with Current Building Regulations.
The flue must be clean. It should be swept to remove soot and dislodge tar deposits.
If the chimney has any down draught tendency, due to its position in relation to nearby obstacles, then an anti-down draught cowl must be installed or the chimney height increased.
If the decompression in the chimney is excessive, a draught stabiliser should be installed.
10
CONNECTION TO fLUE:The Hotpod should be connected to the flue by a 125mm smoke pipe, approved for installation with combustible products. We recommend a minimum of 500mm of single walled pipe with cleaning access.
The joint between the connection pipe and the flue must be leak tight. Flue connections should be sealed with a suitable proprietary sealant such as fire cement or high temperature rope seal. Gunnable cartridge sealing compounds work well, and are easy to apply. For example, Fortafix Ceramix.
The minimum distance to combustibles for an uninsulated 125mm flue pipe is 375mm. The minimum distance to a non combustible shield is 187.5mm
The connection pipe and chimney/flue must have access for cleaning as the Hotpod is too small to effectively clean the flue through the appliance itself.
Installation notes:

11
12
Every piece with its own function,
combining beauty with use...
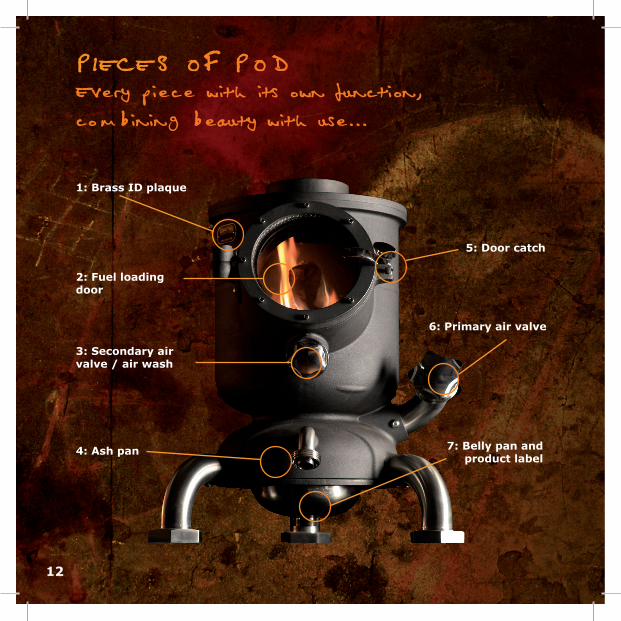
PIECES OF POD
1: brass ID plaque
2: fuel loading door
3: secondary air valve / air wash
4: Ash pan
5: Door catch
6: primary air valve
7: belly pan and product label
12
13
1: brass ID plaque. Chemically etched by Dan in his Garden shed using methods learned from friends at the Porthmeor Print Workshop in St. Ives . The plaques have the Hotpod logo and the edition type.
2: fuel loading door. Originally designed around a Pyrex saucepan lid with a hinge made from Volkswagen engine con-rods. Even today, the hinge pin is still made from a section of Volkswagen shock absorber strut.
3: secondary air valve / air wash. This is the only really complex bit of the Hotpod and the part which makes it so efficient. The air enters through the valve and is pre-heated in the hollow chamber around the door tube before entering the firebox through shaped slots at the top which direct the pre-heated air over the glass before feeding the flames. This is the best control for wood burning.
4: Ash pan. The stainless steel knob on the front of the ash pan isn’t for making coffee or anything like that. It is just the handle for the ash pan for easy ash removal. The knob, like the legs, air valves and door catch, are all dairy fittings. On the Prepods (Lucy’s original stove and the next 5 copies) they were all scrap from the St Ivel dairy which closed down a mile from Dan’s workshop. Nowadays we have to buy them new from Yorkshire.
5: Door catch. Pretty self explanatory we think. See above. Please do not over tighten. You will find that you can get the screw adjuster to a perfect spot so that it will shut the door securely while allowing you to simply uncatch without unscrewing to open the door - have a play.
6: primary air valve. This valve lets air in beneath the fire grate. This is very good for getting a good fire going and the main control when using mineral fuels. Both of the air valve knobs are machined at my local engineering shop from single pieces of stainless steel.
7: belly pan and product label. The original function of the belly pan was purely aesthetic. The Hotpods just don’t look right without them. They are made from the top of the fire extinguishers which go on to become the Podhopper coal scuttles. Now they finally have found their true use, which is to house the compulsory product labelling which hides away neatly inside.
13
14
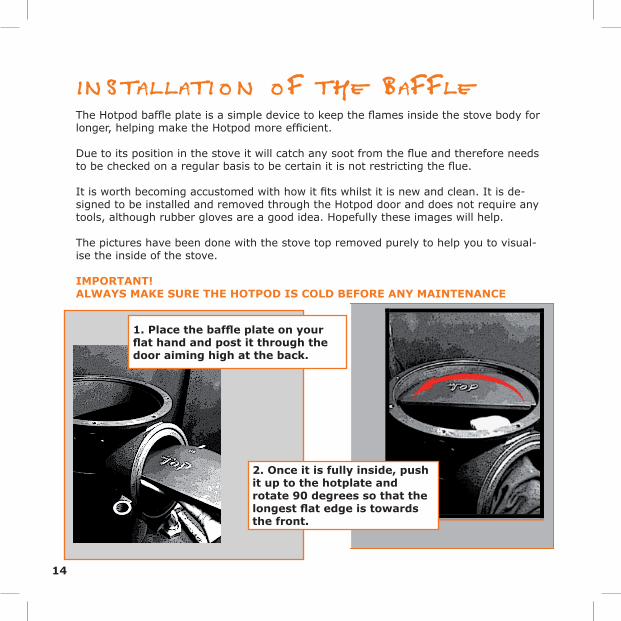
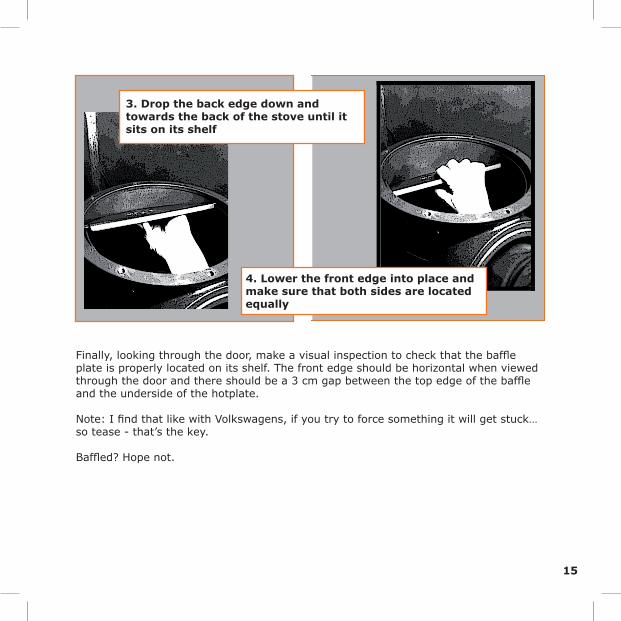
INSTALLATION OF THE BAFFLE The Hotpod baffle plate is a simple device to keep the flames inside the stove body for longer, helping make the Hotpod more efficient.
Due to its position in the stove it will catch any soot from the flue and therefore needs to be checked on a regular basis to be certain it is not restricting the flue.
It is worth becoming accustomed with how it fits whilst it is new and clean. It is de-signed to be installed and removed through the Hotpod door and does not require any tools, although rubber gloves are a good idea. Hopefully these images will help.
The pictures have been done with the stove top removed purely to help you to visual-ise the inside of the stove.
IMpORTANT! ALwAys MAKE sURE THE HOTpOD Is COLD bEfORE ANy MAINTENANCE
2. Once it is fully inside, push it up to the hotplate and rotate 90 degrees so that the longest flat edge is towards the front.
1. Place the baffle plate on your flat hand and post it through the door aiming high at the back.
15
Finally, looking through the door, make a visual inspection to check that the baffle plate is properly located on its shelf. The front edge should be horizontal when viewed through the door and there should be a 3 cm gap between the top edge of the baffle and the underside of the hotplate.
Note: I find that like with Volkswagens, if you try to force something it will get stuck…so tease - that’s the key.
Baffled? Hope not.
3. Drop the back edge down and towards the back of the stove until it sits on its shelf
4. Lower the front edge into place and make sure that both sides are located equally
16
LIGHTING YOUR HOTPODpLEAsE NOTE: When lighting your new Hotpod for the first time the paint will cure giving off some smoke and fumes. The paint manufacturer’s guidelines are as follows:
“For the first 3 times you use your appliance, open windows, doors and if necessary use fans to provide a fresh airflow as the paint will give off fumes and smoke.
Cure Process: Use kindling only on the first two fires, which should burn for 15-20 minutes with the second burn being started whilst the appliance is still warm. A full fire should be burnt for 45-60 minutes; again starting when the stove is still warm, then allowed to cool naturally. Your paint should now have cured and no longer give off fumes or smoke”
1 Empty the ash-pan prior to lighting, when your Hotpod is cold. Never allow the ash-pan to overfill as not only will this reduce the efficiency of your Hotpod it can also allow the grate to wear prematurely. Plus you will probably make a mess when trying to empty it.
wARNING: THE HOTpOD AsH-pAN Is DEsIGNED fOR REMOVAL Of AsH ONLy. IT Is NOT DEsIGNED As AN AIR VENT AND sHOULD NEVER bE UsED As sUCH. IT sHOULD REMAIN fIRMLy CLOsED DURING UsE. IMpROpER UsE COULD CAUsE THE HOTpOD TO OVER-HEAT CAUsING DAMAGE.
2 Use the poker to clear the top of the grate of ash (to avoid venting ash into the room, make sure that the ash pan and primary air valve are closed). It is not necessary or advisable to remove all of the ash from around the grate. A good bed of ash not only helps the fire burn more efficiently, but will also help prolong the life of the Hotpod. You need to clear the grate enough for the primary air to get through. (If you can see the gaps in the grate, then air will get through)
3 Lay fire-lighters or rolled up newspaper on top of the cleared grate with dry kindling wood on top. Place a small amount of required fuel on top of the kindling.
4 Light the newspaper or fire-lighters using a long taper and close the door.
17
5 Open the primary air valve (the big knob on the right) and the secondary air valve (the small one under the door) by turning anti-clockwise. Do not overturn: 3 or 4 rotations should suffice. Over turning may allow the knob to fall off.
6 When the fire is burning well, open the door and add further fuel, closing the door afterwards. Efficiency tests were carried out using 1.9kg of seasoned hardwood per hour and 0.9kg of anthracite per hour.
NEVER LOAD fUEL TO A HIGHER LEVEL THAN THE bOTTOM EDGE Of THE bAffLE pLATE
The Hotpod is only designed for use with the fuel loading door closed. The firebox should be kept closed except during ignition, refuelling and removal of residue to prevent fume spillage.
wARNING: THE HOTpOD bECOMEs HOT wHEN LIT; pLEAsE UsE GAUNTLETs pROVIDED wHEN HANDLING THE sTOVE (ADjUsTING AIR-VENT, OpENING DOOR AND ANy OTHER MANUAL ADjUsTMENTs REqUIRED fOR yOUR sTOVE)
bURNING wOOD:Once your wood is burning well, you should close the primary air valve and control the fire using the secondary air valve only.bURNING MINERAL fUELs:Mineral fuels rely on a supply of oxygen from underneath therefore the fire should be controlled with the primary air valve, with the secondary air valve closed to a gap of 4-5mm (for the airwash to work).
To slow the burning rate down turn the relevant air valve (see above) clockwise. To speed the burn rate up turn the air valve anti-clockwise.
REfUELLING:The Hotpod will be hot, please wear the Heat resistant gloves. Close the air valves, open the glass door and add the fuel. Close the door and return the air valves to desired position. See notes above on maximum fuel levels / efficient quantities.
yOUR HOTpOD DOEs NOT COME wITH A fIREGUARD. DO NOT LEAVE yOUR HOTpOD UNATTENDED EspECIALLy If CHILDREN ARE AROUND.

18
GETTING THE BEST FROM YOUR
HOTPOD
Use good fuelNever burn unseasoned or damp wood.
you must have a good chimney draughtNever use your Hotpod with a poor chimney draught (see page 9)
Refuelling on to a low fire bedIf there is insufficient burning material in the firebed to light a new fuel charge, excessive smoke emission can occur. Refuelling must be carried out onto a sufficient quantity of glowing embers and ash that the new fuel charge will ignite in a reasonable period. If there are too few embers in the fire bed, add suitable kindling to prevent excessive smoke.
fuel overloadingThe maximum amount of fuel specified in this manual should not be exceeded (see p17) overloading can cause excess smoke.
Operation with door left openOperation with the door open can cause excess smoke. The appliance must not be operated with the appliance door left open except as directed in the instructions.
Air controls left openOperation with the air controls open can cause excess smoke. The appliance must not be operated with air controls open except as directed in the instructions.
18
19
FUEL NOTES
RECOMMENDED wOOD fUEL:
• Ideally use well seasoned, kiln dried, hardwood (eg. Oak, Beech, or Ash) logs. • 23cm (9”) logs fit perfectly. Your Hotpod door tube is roughly 15cm (6”) diameter.
RECOMMENDED MINERAL fUEL:
Anthracite and smokeless fuels such as Sunbrite Doubles, Phurnacite, Ancit, Taybrite, Maxibrite, Supacite and Anthracite Large Nuts.
OTHER RECOMMENDED fUELs:Plant-based material compressed into briquettes or logs (NOT pellets).
NOT RECOMMENDED As fUEL:
• Green wood or re-claimed wood is not recommended as fuel.
• Unseasoned wood• Used timbers: Burning treated wood (railway sleepers, telegraph poles, off cuts of
plywood or chip board etc.) may quickly clog flue ways (soot, tar, etc.), pollute the environment (pollution and smell etc.) and could cause the fire to burn too quickly and overheat.
• THE HOTpOD sHOULD NOT bE UsED As AN INCINERATOR
• DO NOT UsE HOUsE COAL OR ANy pETROLEUM bAsED OR MIXED fUELs
• DO NOT UsE LIqUID fUELs Of ANy DEsCRIpTION
• DO NOT UsE wOOD pELLETs OR wOOD CHIps
Have a look at the Hotpod Owners pages on our website for more information on fuels.
19
20
MAINTENANCE
DAILy MAINTENANCE
• Empty the ash-pan• Check and clean light stains from the glass. Wipe the door glass using a lint-free
cloth and appropriate stove glass cleaner.
ANNUAL MAINTENANCE
• When the weather warms up and you stop using your Hotpod it is important to carry out an annual maintenance check.
• Empty your Hotpod of ash and clean.• Arrange for your chimney sweep to check and clean your chimney• Replace door glass and fibre rope if needed• Check the grate and replace if necessary
CHIMNEy MAINTENANCE & swEEpING
Very Important: To avoid accidents (chimney fire, etc.) regular maintenance should be carried out. If the stove is regularly used, the chimney should be inspected by a competent person at least once a year.
21
SAFETY CHECKLIST• Ensure proper ventilation (see page 8, ventilation section)
• Regular cleaning and sweeping (see page 21 )
• Always use the right fuel ( see page 20 )
• Regularly check the condition of wearing parts such as fire rope seals, glass and fire grate and replace when necessary. Use only Hotpod original parts available from www.hotpod.co.uk
• Always use a securely fitted fireguard when children are in the house.
• If your appliance begins to burn slowly, goes out frequently or if you smell or suspect fumes:
- Open doors and windows. - Carefully put out the fire, or allow it to burn itself out. Do not stay in the room any longer than necessary. - Do not attempt to re-light the appliance until a professional has checked it.
CHIMNEY FIRE
What to do:In the event of a chimney fire...• Dial 999 and ask for the Fire Service.
• Make sure that the Hotpod door, ash pan and air vents are firmly closed.
• Close any access hatches to the chimney
• Do not re-light the Hotpod until the chimney has been checked and inspected by a qualified chimney sweep.
ALwAys CALL THE fIRE AND REsCUE sERVICE fOR A CHIMNEy fIRE - IT HAs THE AbILITy TO DEsTROy yOUR HOME
22
TROUBLESHOOTING
THE HOTpOD wON’T LIGHT
Is your wood wet?Unseasoned or wet wood with too high moisture content can be difficult or impossible to light. This is not good for you, your neighbours, your Hotpod or the flue. If you do manage to get the fire lit, the tarry moisture which leaves the firebox can condense in your chimney and can eventually lead to blockages and increase the risk of a chimney fire. Only use dry well seasoned wood or solid mineral fuel in your Hotpod (see recommended fuels, page 19).
Is your grate blocked?If the grate is blocked, either with too much ash on top or an over-full ash pan blocking the air from below, it prevents combustion air from reaching the fire. Always ensure that the ash pan is not over-full and use the Hotrod poker to riddle the ash from on top of the grate.
Is your flue blocked?Insufficient flue draught can cause any stove to be sluggish and can be dangerous particularly if it causes flue gases to leak into the room instead of going up the chimney. If you smell smoke or smoke visibly vents into the room from the fire-door when open for lighting or refuelling, this would suggest insufficient draught either from a blockage in the stove itself or in the flue.
Check inside the Hotpod for any blockages, remove and clean the baffle plate (see pages 14 and 15). If there are definitely no blockages in the Hotpod body, then it is time to call the chimney sweep and have your flue inspected.
DO NOT UsE THE HOTpOD UNTIL THE pRObLEM Is fOUND AND REsOLVED.
sEE pAGEs 9 & 10 fOR INfORMATION ON THE fLUE.
23
THE HOTpOD GETs TOO HOT/ wON’T sHUT DOwN:
Are you using the correct fuels? See page 19 for fuel information
Is your ash-pan closing properly?Remove the ash-pan and clean out the ash compartment. Sometimes a build up of ash at the back can prevent the drawer from closing fully. Check the condition of the ash-pan rope seal and replace if necessary.
Is the primary air valve (the big one) able to close fully?When fully closed (turned clockwise) the primary air valve should have no air gap between the knob and the valve body. The secondary air valve (the small one) is made with a 4mm air gap for efficiency and the air wash so will never close fully.
Is your flue draught too high? Too much flue draught can draw too much air through the fire even when fully closed down. The Hotpod is designed for a flue draught of 12Pa (see page 9). This is a better problem to have than too little flue draught as it can be solved by fitting a flue draught regulator in the flue above the Hotpod which enables excess draught to be drawn into the flue from the room through an adjustable flap instead of through the Hotpod. Ask your stove installer or local chimney sweep for details.
Have a look at the Hotpod Owners pages on our website for frequently asked questions.

2424
CORRECT OpERATIONs fOR sEAsONAL UsE AND UNDER ADVERsE fLUE DRAUGHT OR ADVERsE wEATHER CONDITIONs:
Before a long period of non-use, empty the fuel and ash, remove and clean the baffl e plate and leave all the air controls open to allow ventilation to reduce condensation.
If lighting after a period of non-use, do check that the fl ueways and chimney are completely clear.
On days without wind or with fog, down draught may occur. If down draught happens this results in problems with lighting and maintaining the fi re. Use good quality kindling to start the fi re and run the stove at a higher heat setting than normal for a period after starting up. This will heat the chimney faster and improve the draught. If down draught is a consistent problem, then you should speak to your installer about fi tting an anti down draught device.
If a fl ue blockage or adverse weather conditions cause the Hotpod to emit smoke, do not treat it as merely a nuisance, this smoke will indicate that carbon monoxide is being emitted into the room.
If your chimney is in an exposed position or a place where high winds are common, this can create conditions with too much draught in the fl ue, causing the Hotpod to over-burn, and be diffi cult to control. In this situation, a fl ue draught stabiliser should be fi tted to the fl ue above the Hotpod which will stabilise the draught .
The fl ue draught should be 12Pa.
fINALLy:
This Hotpod has been carefully designed and constructed to give clean burning with optimum effi ciency and safety, but as with all appliances these standards will not be achieved unless it is installed and maintained regularly by qualifi ed persons. It mustalso be operated strictly with the procedures given in this manual. If you are unsure about anything concerning your appliance please contact us or your local professional for advice.
2525
2626
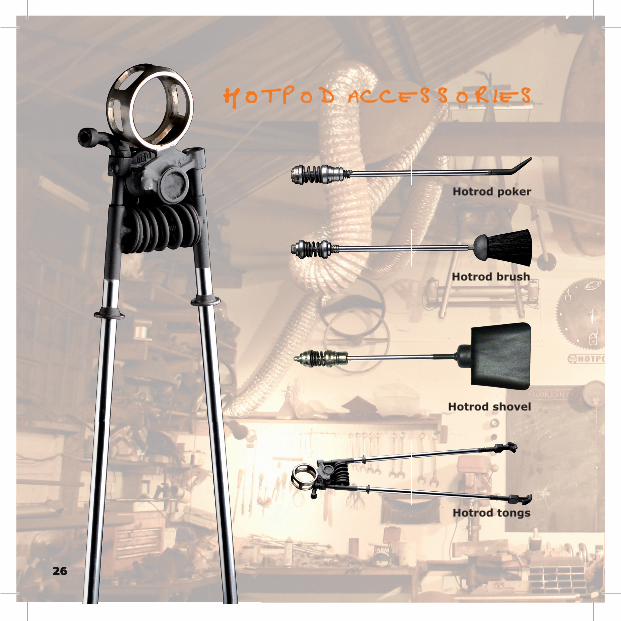
HOTPOD ACCESSORIES
26
HOTPOD ACCESSORIES
Hotrod poker
Hotrod tongs
Hotrod brush
Hotrod shovel
2727
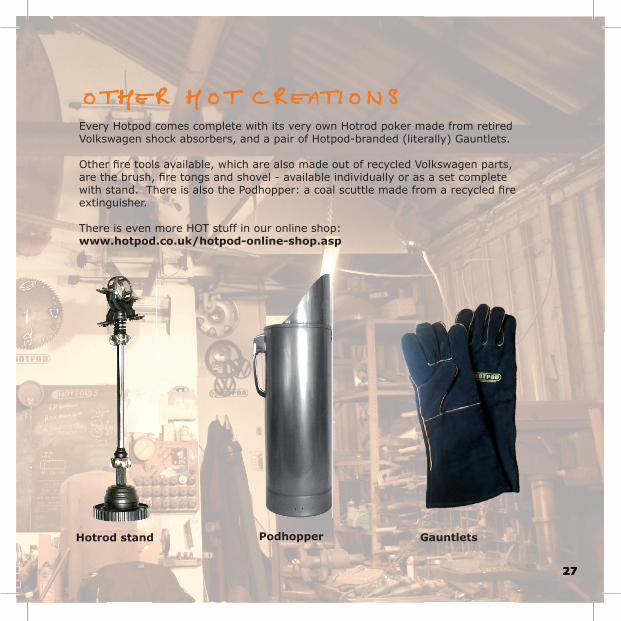
OTHER HOT CREATIONSEvery Hotpod comes complete with its very own Hotrod poker made from retired Volkswagen shock absorbers, and a pair of Hotpod-branded (literally) Gauntlets.
Other fi re tools available, which are also made out of recycled Volkswagen parts, are the brush, fi re tongs and shovel - available individually or as a set complete with stand. There is also the Podhopper: a coal scuttle made from a recycled fi re extinguisher.
There is even more HOT stuff in our online shop:www.hotpod.co.uk/hotpod-online-shop.asp
Hotrod stand podhopper Gauntlets
28
[email protected]+441736 797 285
HOTpODRegistered offi ce: The Old School, St Ives, Cornwall, TR26 1QURegistered in England OC337681VAT Registration Number 970 3178 17

![$FWLYLGDG GH HQWUHJD REOLJDWRULD...fxdwur gh flqfr hq flqfr gh vhlv hq vhlv gh vlhwh hq vlhwh gh rfkr hq rfkr gh qxhyh hq qxhyh \ gh glh] hq glh] kdvwd ho •(vfulelu ho qrpeuh gh](https://img.pdfslide.net/doc/110x75/5f0a21e57e708231d42a2b57/fwlylgdg-gh-hqwuhjd-reoljdwruld-fxdwur-gh-flqfr-hq-flqfr-gh-vhlv-hq-vhlv-gh.jpg)
![cpwd.gov.incpwd.gov.in/WriteReadData/deptexams_cir/25110.pdf · ZONE-PNB PROJECT DIVN Ill [Field] HQ-DG-HQ- HQ-HQ-HQ NR-RECìlONAL OFFICE- REGIONAL ... VS 104 1964JEC106 1 985 Copy](https://img.pdfslide.net/doc/110x75/5aa856407f8b9a95188b6e36/cpwdgov-project-divn-ill-field-hq-dg-hq-hq-hq-hq-nr-reclonal-office-regional.jpg)


![UNLIMITED ADVENTURES. UNLIMITED OPPORTUNITIES [INBOUND 2014]](https://img.pdfslide.net/doc/110x75/55d54daebb61ebd6228b4731/unlimited-adventures-unlimited-opportunities-inbound-2014.jpg)
