Embed Size (px)
Citation preview

HotSpot Network Manager
Quick Start Guide
Guide Version 4.0 May 2015
Software Version 4.0.x
PROMETEO S.p.A. Via Roma, 61 31010 Fonte Treviso Italy Tel: (+39) 0423 9292 Fax: (+39) 0423 929392 [email protected] www.hsnetworkmanager.com

Introduction
Quick Start Guide 2
THE SPECIFICATIONS AND INFORMATION CONTAINED IN THIS MANUAL ARE SUBJECT TO CHANGE WITHOUT ANY NOTICE. ALL STATEMENTS, INFORMATION AND RECOMMENDATIONS IN THIS MANUAL ARE INTENDED TO BE ACCURATE, BUT ARE PRESENTED WITHOUT WARRANTY OF ANY KIND, EITHER EXPRESS OR IMPLIED. USERS ASSUME FULL RESPONSIBILITY FOR THE USE. IN NO EVENT SHALL PROMETEO S.P.A. OR ITS SUPPLIERS BE LIABLE FOR ANY INDIRECT, SPECIAL, CONSEQUENTIAL OR INCIDENTAL DAMAGES, INCLUDING WITHOUT LIMITATION LOSS OF PROFITS OR LOSS OR DAMAGE TO DATA ARISING OUT OF THE USE OR INABILITY TO USE THE MANUAL THOUGH PROMETEO S.P.A. OR ITS SUPPLIERS HAVE BEEN ADVISED OF THE POSSIBILITY OF SUCH DAMAGES. Prometeo, HSNM, HsNetworkManager and logos Prometeo, HSNM and HsNetworkManager are trademarks of Prometeo S.p.A. The third party trademarks are the property of their respective owners. Copyright © 2015 PROMETEO S.p.A. All rights reserved.

Introduction
Quick Start Guide 3
Introduction This brief is a step by step guide that will help you to configure the HSNM and a hotspot to test thoroughly every product functionalities.
Installing the HSNM Software (VMware) This section will guide you through the procedure to follow for installing a software HSNM.
Content of the ZIP file (downloaded from our Website) The content of the zip file that you have downloaded from internet is as follows:
1 x HSNM (VMware Player 5.0 ready)
1 x Hotspot Network Manager for VMware Quick Start Guide
1 - Installing VMware Player 6.0 or Later Version on your Pc/Server First, it is necessary to install VMware Player 5.0 or later version on your pc. You can download it from the VMware website at: http://www.vmware.com/go/downloadplayer/ To install, run the downloaded file and follow the instructions.
2 – Unzipping the HSNM to your PC Unzip HSNM.ZIP file into a folder of your computer

Installing the HSNM Software (VMware)
Quick Start Guide 4
3 – Opening the HSNM with VMware Player Execute VMware Player, then open HSNM.vmx file inside the HSNM folder that you have unzipped before.

Installing the HSNM Software (VMware)
Quick Start Guide 5
4 – Powering the HSNM on Power HSNM on “Play virtual machine” link in the VMware Player. Answer “I moved it” to the window that appears. After, more or less, 1 minute the appliance turns on.

Installing the HSNM Software (VMware)
Quick Start Guide 6
5 - Connecting to the Computer for the First Configuration Connect a pc to the same switch of the computer where the HSNM is installed, then set its IP address to 192.168.0.0/24 class (e.g. 192.168.0.100).
Warning! Do not set PC IP address to 192.168.0.250 because this is the IP address of the HSNM.

Administration Interface
Quick Start Guide 7
Administration Interface Logging in to the HSNM Web Administration
To log in for the first time to the system and configure it according to your needs, open the web browser of the computer connected to the HSNM and enter http://192.168.0.250 in the address bar. The login page will appear in the HSNM web management interface.
Log in to the administration area
Enter as Username “admin” and password “0000" then press "Enter" or "Login" button.
Administration Interface
Quick Start Guide 8
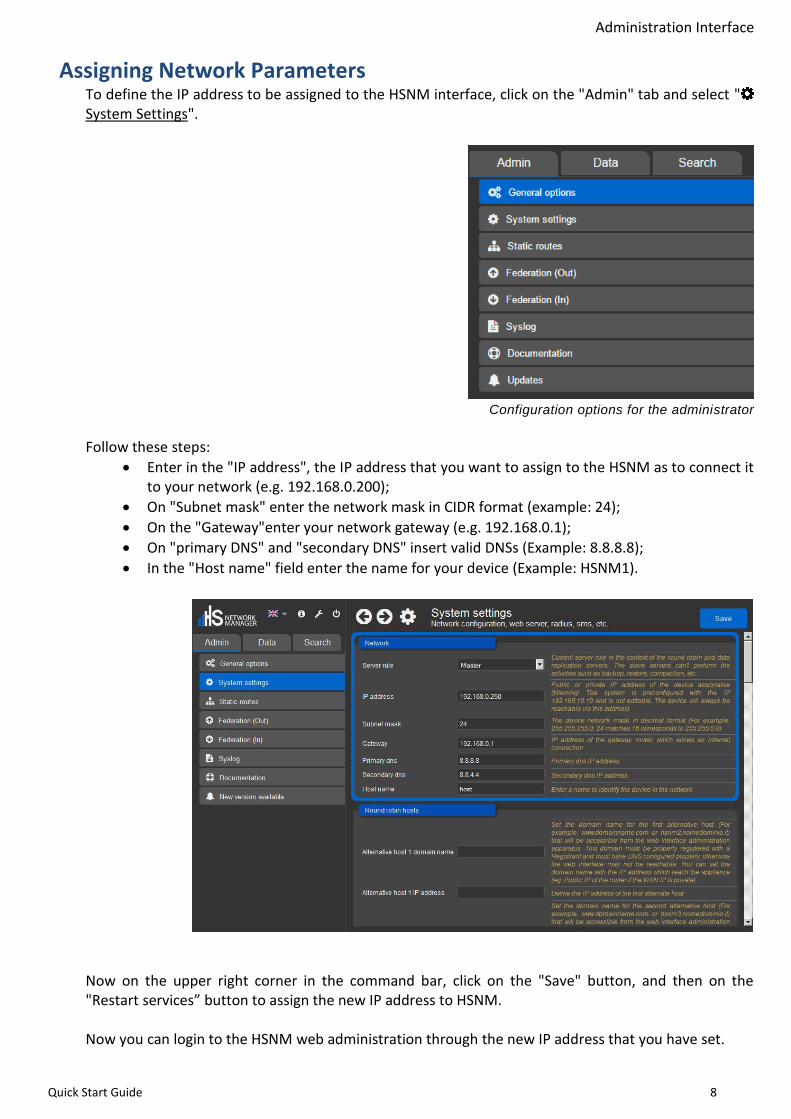
Assigning Network Parameters To define the IP address to be assigned to the HSNM interface, click on the "Admin" tab and select " System Settings".
Configuration options for the administrator
Follow these steps:
Enter in the "IP address", the IP address that you want to assign to the HSNM as to connect it to your network (e.g. 192.168.0.200);
On "Subnet mask" enter the network mask in CIDR format (example: 24);
On the "Gateway"enter your network gateway (e.g. 192.168.0.1);
On "primary DNS" and "secondary DNS" insert valid DNSs (Example: 8.8.8.8);
In the "Host name" field enter the name for your device (Example: HSNM1).
Now on the upper right corner in the command bar, click on the "Save" button, and then on the "Restart services” button to assign the new IP address to HSNM. Now you can login to the HSNM web administration through the new IP address that you have set.
Administration Interface
Quick Start Guide 9
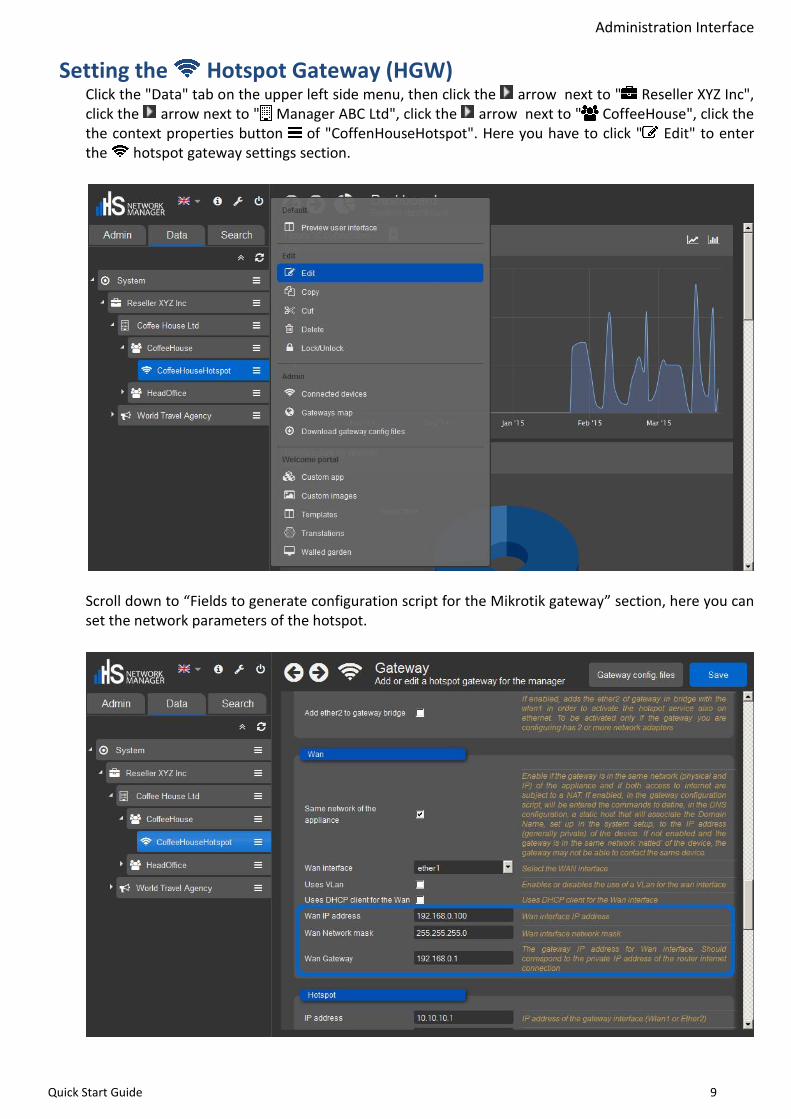
Setting the Hotspot Gateway (HGW) Click the "Data" tab on the upper left side menu, then click the arrow next to " Reseller XYZ Inc", click the arrow next to " Manager ABC Ltd", click the arrow next to " CoffeeHouse", click the the context properties button of "CoffenHouseHotspot". Here you have to click " Edit" to enter the hotspot gateway settings section.
Scroll down to “Fields to generate configuration script for the Mikrotik gateway” section, here you can set the network parameters of the hotspot.

Administration Interface
Quick Start Guide 10
In the “Wan” subsection: in “Wan IP Address” field, enter the IP address that has to be assigned to the hotspot Wan. This address has to be a part of your network. In the “Wan Network mask” field insert subnet mask, in the “Wan Gateway” field insert the gateway of your network. Following the example above, if your network is 192.168.1.0/24 and you configured your HSNM with 192.168.1.250 IP address, the WAN IP address field will be 192.168.1.240, “Wan Network mask” 255.255.255.0 and the “Wan Gateway” the IP address of your xDSL router.
Now click "Save" button on the top right side of page. A blue popup with the phrase “The data has been saved successfully” will appear.
By clicking on “Download files for configuring hotspot/PPPoE” it will be shown a warning screen about the RouterOS version needed for the configuration file to work. By clicking on OK, it starts a download of a zip file named “CoffeeHouse.zip” containing the needed files for configuring the Mikrotik RoterOS hotspot.

Configuring the Mikrotik Gateway
Quick Start Guide 11
Configuring the Mikrotik Gateway To configure the Mikrotik gateway, please follow these steps: 1) Unzip the file, that you have downloaded before, on your computer. 2) Download winbox from http://download2.mikrotik.com/winbox.exe
3) Power on Mikrotik routerboard.
4) Connect an Ethernet cable to ether1 of Mikrotik routerboard.

Configuring the Mikrotik Gateway
Quick Start Guide 12
5) Connect the other end of the cable to your computer.
6) Open Winbox and press on "..." button, then select your routerboard by clicking on its MAC Address and click on "connect" button (login=admin without password).
7) Go to "New Terminal" menu on the left and you should see "Terminal" window. Then, on it, write
this command: system reset-configuration no-defaults=yes After that click on “Y” to reset and reboot the device
and press the " ↵ Enter button" after that press on “y” to reset and reboot the device.

Configuring the Mikrotik Gateway
Quick Start Guide 13
8) Now it will be possible to configure Mikrotik Gateway. So login again with Winbox and click on "File" menu on the left and you should see "File list" of your mikrotik routerboard.
9) Open the folder on your PC where you have unzipped the file at step 1) and copy the .rsc file (in
case of HotSpot configuration the file name will be ConfigScriptHotSpotRouterOS.rsc, while in case of PPPoE Server configuration the name will be ConfigScriptPPPoERouterOS.rsc.

Configuring the Mikrotik Gateway
Quick Start Guide 14
10) Come back to winbox and paste "ConfigScriptHotSpotRouterOS.rsc" (in case of HotSpot configuration) or “ConfigScriptPPPoERouterOS.rsc“(in case of PPPoE Server configuration) file into "File List".
11) Open again the folder on your PC where you have unzipped the file at step 1) and copy the
“hotspot” folder in case you are configuring a HotSpot or the “roundrobindomains.txt” in case you are configuring a PPPoE Server.

Configuring the Mikrotik Gateway
Quick Start Guide 15
12) Come back to winbox, delete the “hotspot” folder if there is already one, and click on paste icon to copy “hotspot” folder or “roundrobindomains” file into "File List".
13) Click on "New Terminal" menù on the left and you should see "Terminal" window. Then on it write
this command: For HotSpot gateway
import ConfigScriptHotSpotRouterOS.rsc
For PPPoE gateway
import ConfigScriptPPPoERouterOS.rsc

Configuring the Mikrotik Gateway
Quick Start Guide 16
14) Go to "System->Password" menu and insert a password for admin user on both "New password" and "Confirmed Password" fields, then click the "Change" button.
Now your mikrotik routerboard is configured.

Connecting the Hotspot Gateway
Quick Start Guide 17
Connecting the Hotspot Gateway Connect the Mikrotik hotspot gateway that you have just configured to the same network where HSNM is connected.

Notebook Connection
Quick Start Guide 18
Notebook Connection Search for the Wi-Fi networks with a notebook and you will find a network called “CoffeeHouse”.
Connect to this network by clicking the "Connect" button.

Logging in to the Hotspot
Quick Start Guide 19
Logging in to the Hotspot In the notebook, open a web browser and try to load a website, you will be redirected to the hotspot Welcome Portal.
Documentation For further reading, please click the "Admin" tab on the upper left side menu, then press the “Documentation” button where you will find the “Administration Manual” and the “Set Up Your Mikrotik HotSpot or Your PPPoE Gateway” manual.