Embed Size (px)
Citation preview

Connecticut Department of Public HealthKeeping Connecticut Healthy
Reconciliation is the process of:
• Comparing all vaccine transactions entered in CT WiZ to the physical
inventory on-hand in your clinic.
✓If there are differences between the two, they must agree before
you can complete the reconciliation.
✓Make adjustments in the transactions so the two agree.
• You must do a separate reconciliation for each inventory location
(refrigerator, freezer, private-optional).
• Reconciliation is done by inventory location (refrigerator,
freezer or private-optional). If both CVP and private vaccine
are stored in the same inventory storage unit, both will have
to be reconciled.
• Reconciliation of vaccines are done by vaccine, lot number,
expiration date, CVX code, and Blended Public CVP (Funding
Source).

The following things should occur prior to the reconciliation
to ensure a smooth process:
• Resolve any immunizations added but not administered.
• Resolve any pending transfers or shipments.
• Document properly any wastage.
• Return any expired inventory.
• Make sure any past reconciliations are marked as "closed".
This slide set will go through each task.
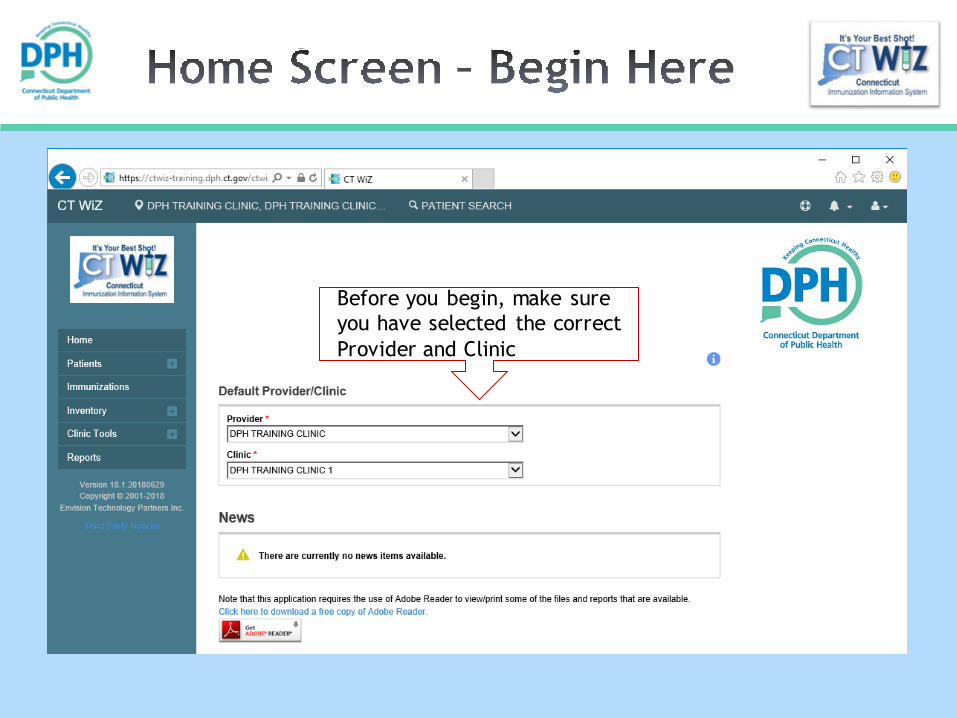
Before you begin, make sure
you have selected the correct
Provider and Clinic
Connecticut Department of Public HealthKeeping Connecticut Healthy
Resolve any immunizations
added but not administered

Click on
Reports

On the Reports page:
1. Navigate to the
Data Quality –User Section.
2. Click on Vaccines
Added but not
Administered.
1
2

1. Make sure you have the right
Provider and Clinic.
2. Specify a Vaccination Date
Range. The date range should
match the reconciliation
dates.
3. The report will automatically
generate as a .pdf file. If you
would like the report in Excel,
select the Extract option and
enter a comma (,) into the
delimiter field.
4. After you made your selection
click on Run Report.
This report will assist you in your inventory counts by identifying unaccounted doses.
1
2
3
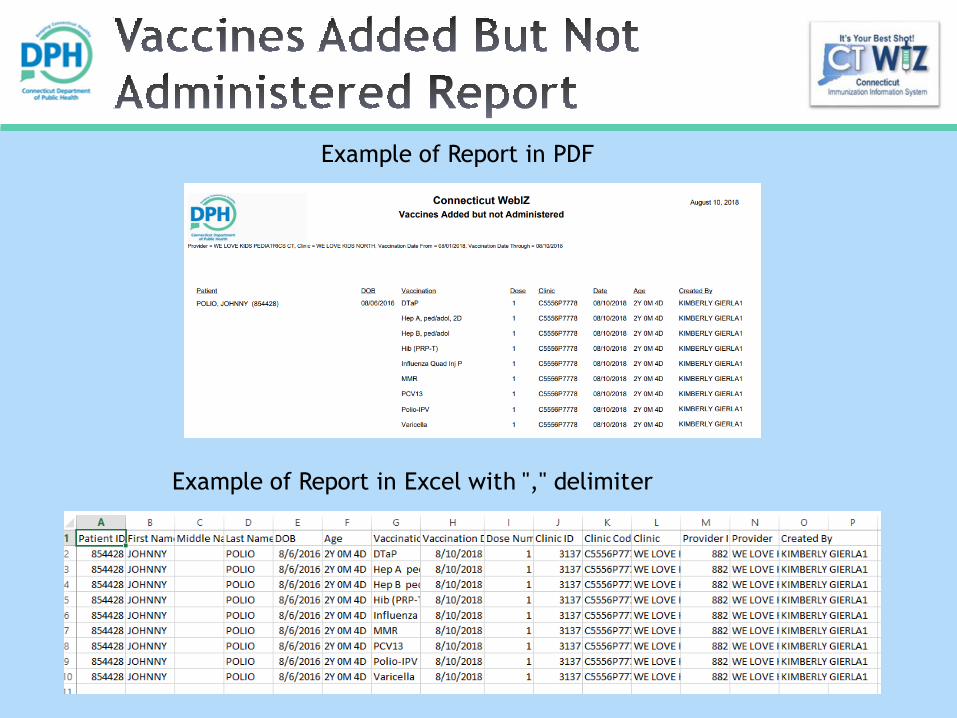
Example of Report in PDF
Example of Report in Excel with "," delimiter

For any vaccines that appear on this report:
Navigate to the patient’s Immunization Home screen by clicking on Patients, Search (type 2 letters in both the Last Name and First Name boxes and include the birth date). Once the patient has been located, click the down arrow key next to Demographics and select Immunizations to bring up the Immunization Home screen.
1. If the vaccines(s) were not administered, click Delete at the end of the vaccine line.
2. If the vaccine(s) were administered, click Administer Vaccines and complete the immunization.
Only the nurse or doctor who is listed in the Administered By box on the Administer Vaccine screen can delete or administer a vaccine.
Make sure the administration date is the actual date given.
2
1

Connecticut Department of Public HealthKeeping Connecticut Healthy
Resolve any pending
transfers and shipments
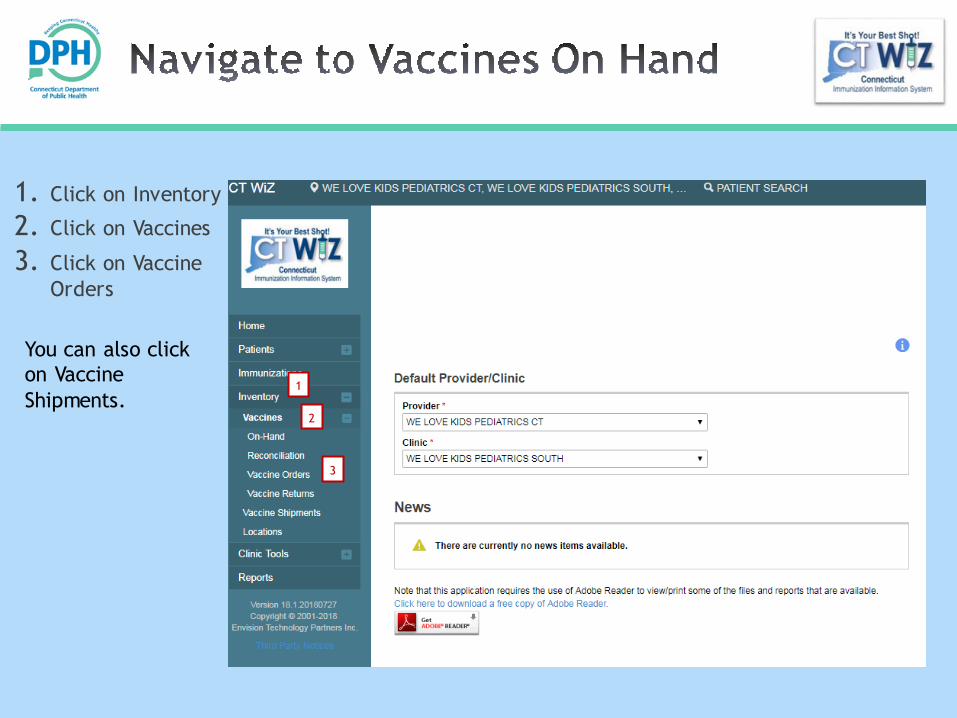
1. Click on Inventory
2. Click on Vaccines
3. Click on Vaccine
Orders
1
2
3
You can also click
on Vaccine
Shipments.

Click here to
view pending
transfers
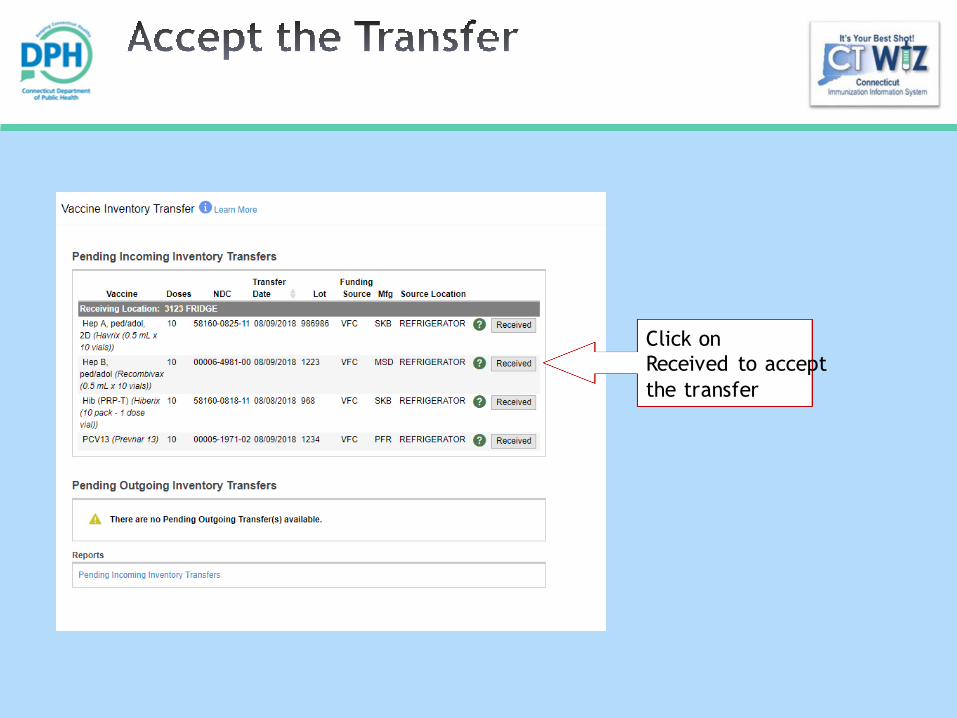
Click on
Received to accept
the transfer
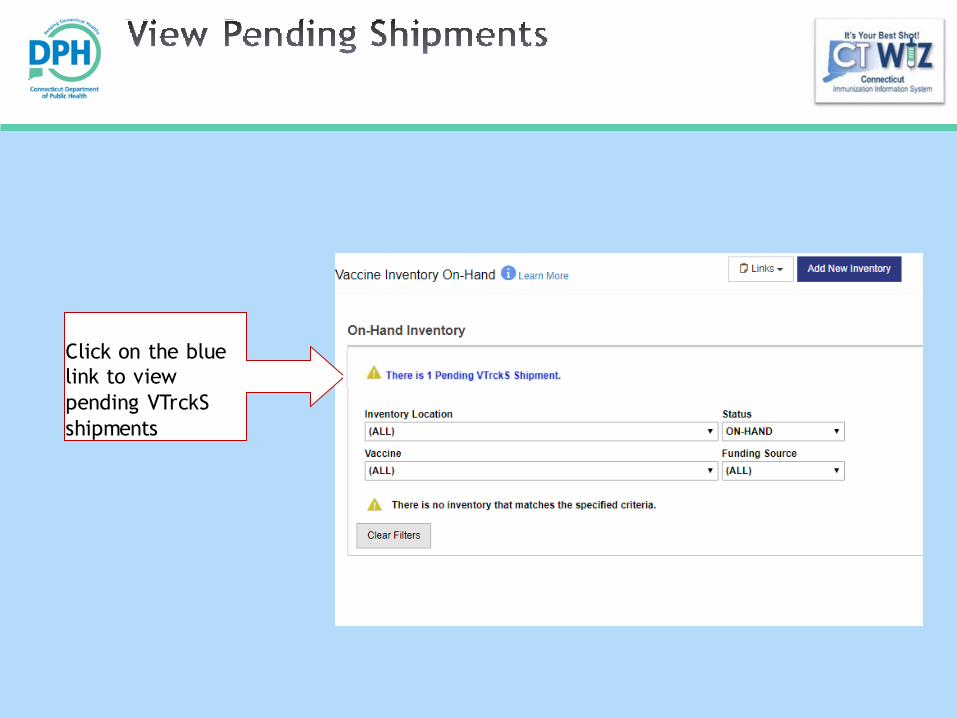
Click on the blue
link to view
pending VTrckS
shipments

1. Click Details to view the shipment information.
2. Click Receive for each vaccine to add to your
inventory on-hand.
OR
Click Dismiss to indicate the line item was never
shipped and received.
1 2

Connecticut Department of Public HealthKeeping Connecticut Healthy
Examples:
• Spoiled
• Partial multi-dose vial
• Lost vaccine
• Broken vial or syringe
• Drawn up dose not administered

1. Click on Inventory
2. Click on Vaccines
3. Click on On-Hand
1
2
3

Click on the Action
button for the wasted vaccine. Then, clickon Adjustment.
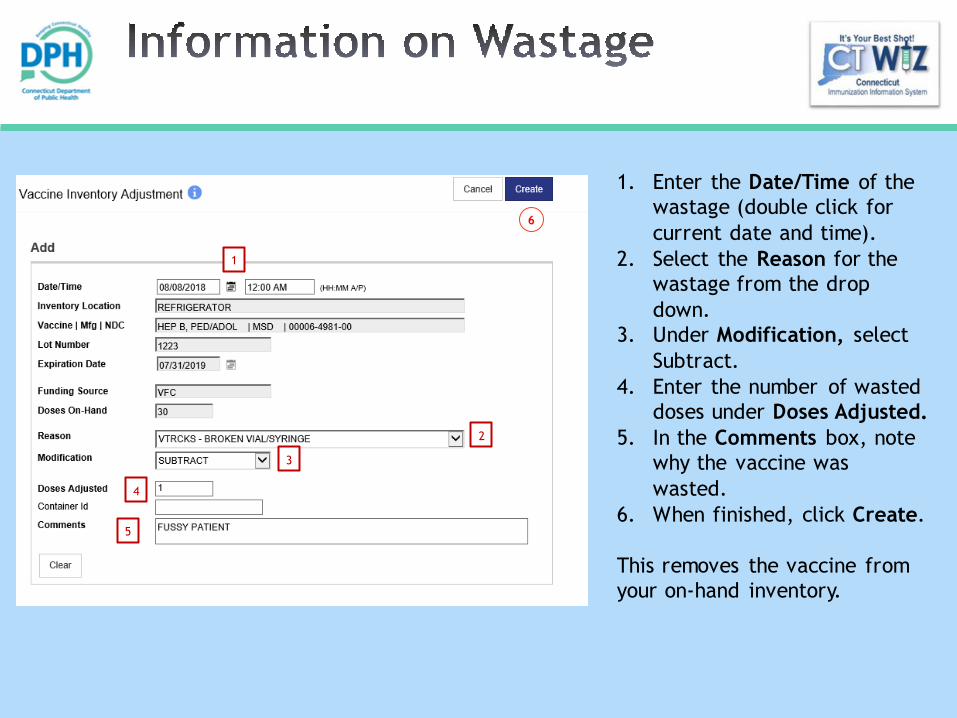
1. Enter the Date/Time of the
wastage (double click for
current date and time).
2. Select the Reason for the
wastage from the drop
down.
3. Under Modification, select
Subtract.
4. Enter the number of wasted
doses under Doses Adjusted.
5. In the Comments box, note
why the vaccine was
wasted.
6. When finished, click Create.
This removes the vaccine from
your on-hand inventory.
6
1
2
3
4
5
Connecticut Department of Public HealthKeeping Connecticut Healthy
According to VFC regulations, all expired vaccines
should be removed from your storage unit upon
expiration date, noted in CT WiZ, and returned to
McKesson according to VFC regulations.
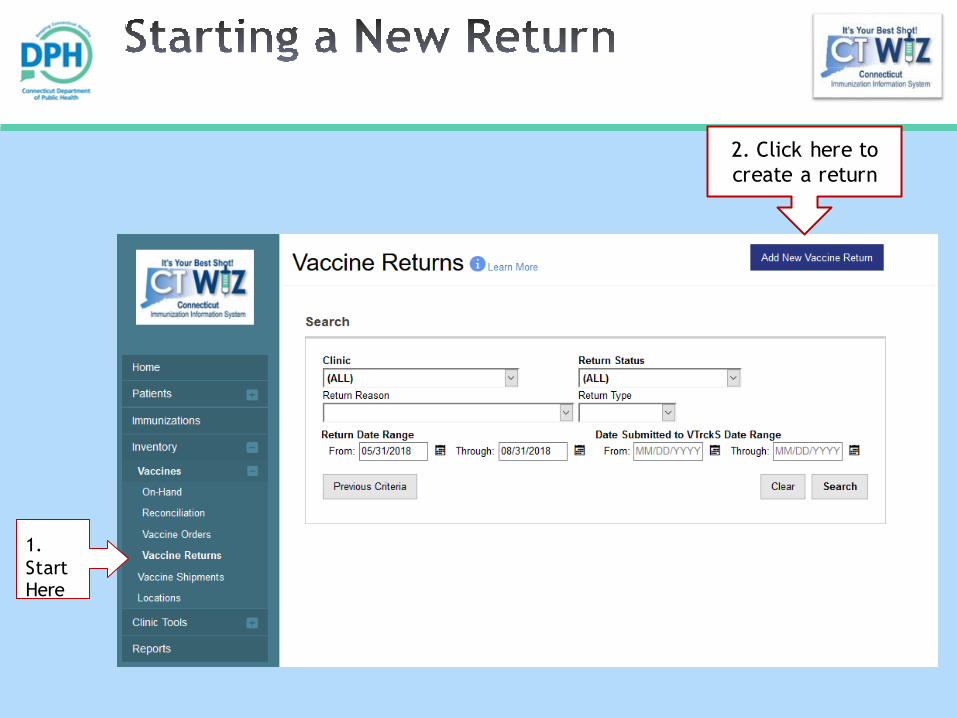
2. Click here to
create a return
1.
Start Here

1. Click this
drop down to select your clinic
2.
Click here
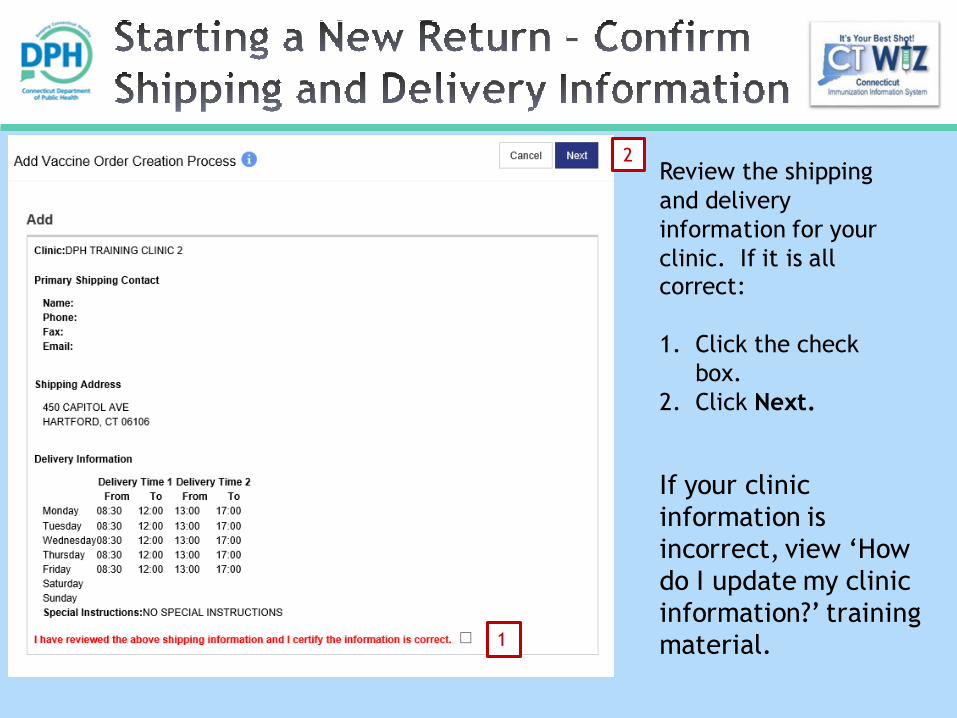
Review the shipping
and delivery
information for your
clinic. If it is all correct:
1. Click the check
box.
2. Click Next.
1
2
If your clinic
information is
incorrect, view ‘How
do I update my clinic
information?’ training
material.

1. Choose RETURN ONLY.
2. Select a Return Reason.
3. Enter the number of shipping labels
needed (usually 1 label is enough).
4. Choose whether the labels should be
emailed or sent by mail.
5. Enter any Comments about the
return to the VFC Program.
6. Choose the Vaccine to Return -
Begin typing Vaccine, NDC, Brand, or
Lot Number. Make sure you choose
the correct lot number.
7. Enter the number of doses being
returned.
8. Click Add Return.
Repeat steps 6-8 for other vaccines to
return.
9. Click Update to save the work.
To Submit the Return:
Click the Update down arrow and select
Submit to VFC Program.
1 2
3 4
5
6 8
9
7

Return Status shows:
SUBMITTED FOR APPROVAL

1. Click on Inventory
2. Click on Vaccines
3. Click on Vaccine
Returns
1
2
3

1 2
3 4
5
You can select the following fields to narrow the search for Returns by:
1. Clinic
2. Return Status: In Work (not submitted for approval), Submitted for Approval,
Rejected, Approved.3. Return Reason
4. Return Date Range (Date ordered)
5. Date Submitted to VTrckS Date Range (Date order was submitted to VTrckS)
6

Connecticut Department of Public HealthKeeping Connecticut Healthy

1
2
3
1. Click Inventory
2. Click Vaccines
3. Click
Reconciliation
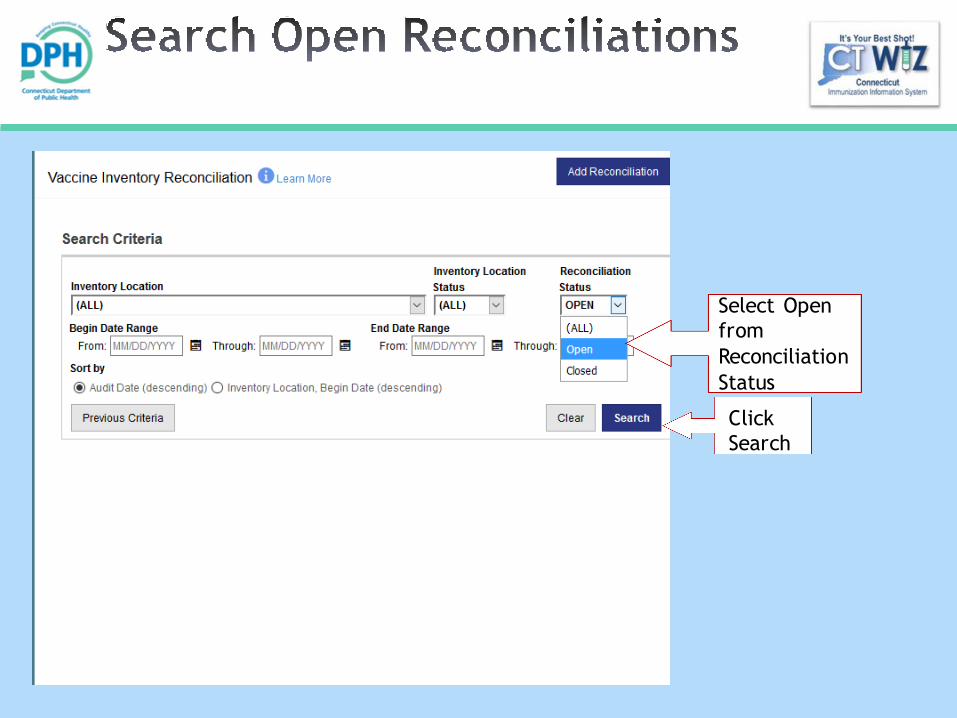
Select Open
from
Reconciliation
Status
Click
Search

Click here to
View the open
reconciliation
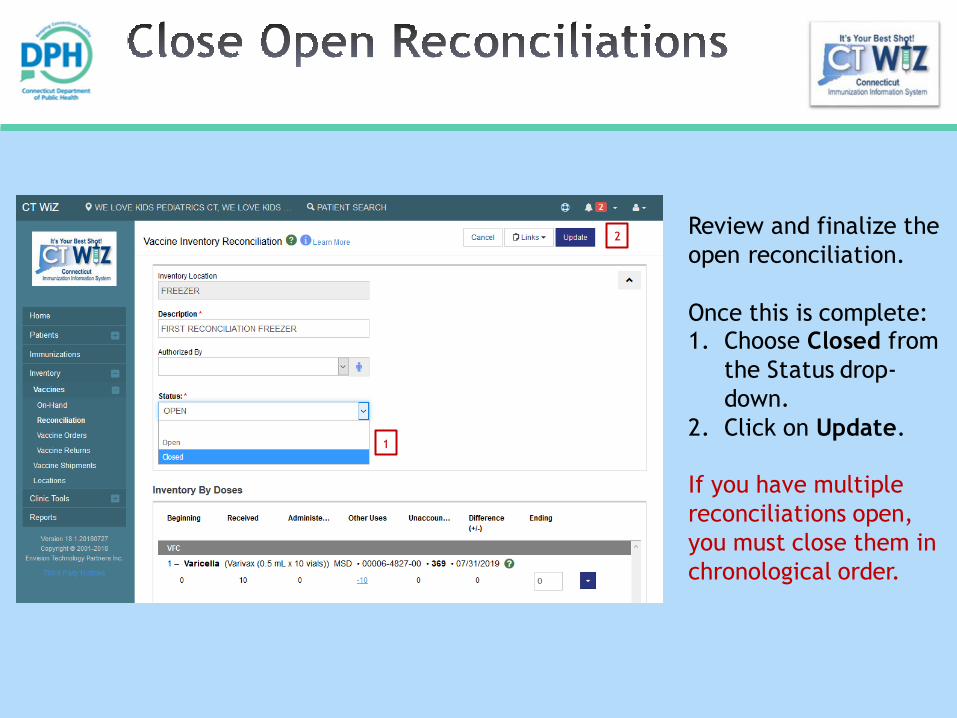
Review and finalize the
open reconciliation.
Once this is complete:1. Choose Closed from
the Status drop-
down.
2. Click on Update.
If you have multiple
reconciliations open,
you must close them in
chronological order.
1
2

• Click on the located at the top of the page to get a description of
whichever screen you are on.
• Some pages have a link. Click on this to see short "How To" videos.
These appear on a separate page so you can play videos while navigating through CT WiZ.
• Visit the CT WiZ training page here. The training page has numerous
documents and step by step videos to help you.
• Still can’t find an answer to your question? After you exhausted all of the
above options, submit a help desk ticket to get the quickest answer. You may do so by clicking here.