Embed Size (px)
Citation preview

Page 1 of 12
How to add a GlossaryA Moodle Glossary allows you to create a subject based resource that can be used to create a collaborative understanding of key concepts and terms. The autolinking feature will highlight any word in the subject and point to the glossary. You can also create a Block to display random entries from the glossary on your subject homepage.
Outline:
The purpose of this guide is to show users how to add a Glossary activity inside the LMS.
What will the guide cover?
The guide will cover how to create a Glossary, add entries, enable linking and adding a random entry block.
How long will this take?
This activity should take approximately 10 minutes to complete.
What technology will it use?
LMS
Materials needed?
A device that allows updating LMS content.
TABLE OF CONTENTSLast Modified 24 January 2018

Page 2 of 12
Adding a Glossary................................................................................................................................................................................... 3Navigate to the subject....................................................................................................................................................................... 3Add a Glossary.................................................................................................................................................................................... 4Fill in Glossary details.......................................................................................................................................................................... 4Entries................................................................................................................................................................................................. 5Appearance......................................................................................................................................................................................... 6RSS...................................................................................................................................................................................................... 7Grade.................................................................................................................................................................................................. 7Ratings................................................................................................................................................................................................ 7Edit the Module Settings..................................................................................................................................................................... 8Restrict Access.................................................................................................................................................................................... 8Activity Completion............................................................................................................................................................................. 8Tags.................................................................................................................................................................................................... 8Competencies..................................................................................................................................................................................... 8Save your Glossary.............................................................................................................................................................................. 8
Adding an entry to a Glossary................................................................................................................................................................ 9Navigate to glossary............................................................................................................................................................................ 9Browse Glossary page......................................................................................................................................................................... 9Add new entry................................................................................................................................................................................... 10Auto-link............................................................................................................................................................................................ 11
Rating a glossary entry........................................................................................................................................................................ 11Add a random entry block.................................................................................................................................................................... 12Further Support.................................................................................................................................................................................... 12End of guide......................................................................................................................................................................................... 12
Last Modified 24 January 2018

Page 3 of 12
Adding a Glossary
Navigate to the subject 1. On the top right of the page, select Turn editing on 2. Navigate to the week / section to which you would like to add a glossary and
select Add an activity or resource.
Last Modified 24 January 2018

Page 4 of 12
Add a Glossary1. From the menu that appears, select Glossary2. Select Add
Fill in Glossary details1. Add Name 2. Add Description if required3. Select if you want to Display description on subject page4. Select Glossary type
Last Modified 24 January 2018

Page 5 of 12
Entries1. Approved by default – allows you select if lecturer
approval is required for the glossary entry2. Always allow editing – sets whether students can
edit their entries always or for a set period of time only3. Duplicate entries allowed – if enabled, multiple
entries can have the same concept name.4. Allow comment on entries – if enabled, all
participants with permission to create comments will be able to add comments to glossary entries.
5. Automatically link glossary entries – if this setting is enabled, the "Add a new entry" form includes the option to automatically link the entry wherever the concept words and phrases appear throughout the rest of the subject.
AppearanceSet whether you want to display page description on subject homepage.
1. Display format – there are 7 display formats: Simple, dictionary style – no authors are
displayed and attachments are shown as links Continuous without author – entries are
displayed one after another without any separation apart from the editing icons
Full with author – a forum-like display format showing the author's data and with attachments shown as links
Last Modified 24 January 2018

Page 6 of 12
Full without author – a forum-like display format without authors and with attachments shown as links Encyclopedia – as for "Full with author" but attached images are shown inline Entry list – concepts are listed as links FAQ – the words QUESTION and ANSWER are appended to the concept and definition respectively.
2. Approval display format – when approving items you may want to select a different display format.3. Show entries per page – allows you to set how many entries appear on the glossary page.4. Show alphabet links – if enabled, participants can browse the glossary by letters of the alphabet.5. Show ‘ALL’ links – if enabled, participants can browse all entries at once.6. Show ‘Special’ link – if enabled, participants can browse the glossary by special characters, such as @ and #.7. Allow print view – if enabled, students are provided with a link to a printer-friendly version of the glossary. The link is
always available to lecturers.
RSSTo enable the RSS feed for this activity, select either concepts with author or concepts without author to be included in the feed.
GradeSelect if the glossary is a graded item, Graded category and Grade to pass.
RatingsIf you are grading the Glossary item, you can use rating to mark individual entries to aggregate into a final grade.
Last Modified 24 January 2018

Page 7 of 12
1. The Aggregate type defines how ratings are combined to form the final grade in the gradebook. Average of ratings – the mean of all ratings Count of ratings – the number of rated items becomes the final grade. Note that the total cannot exceed the maximum
grade for the activity. Maximum – the highest rating becomes the final grade Minimum – the smallest rating becomes the final grade Sum – all ratings are added together. Note that the total cannot exceed the maximum grade for the activity. If No ratings is selected, then the activity will not appear in the gradebook.
2. Select Scale type of grading used for this activity. If "scale" is chosen, you can then choose the scale from the "scale" dropdown. If using "point" grading, you can then enter the maximum grade available for this activity.
3. Add Maximum grade for activity4. If required Restrict ratings to items with dates in this range
Edit the Module SettingsUnder Common module settings select Show from drop down menu for the Visible option.
Restrict AccessRestrict access allow you to control access based on date, grade, users and activity completion.
Activity CompletionIf Activity completion has been activated in your subject settings, it will appear in your activity or resource settings. You can elect for a student to mark the activity as completed or for graded items automatically indicate completion to students. Activity completion is indicated by a check box to the right of the activity on the home page.
Last Modified 24 January 2018

Page 8 of 12
TagsTags not currently used.
CompetenciesFor more information on enabling Competencies, please refer to the Competences guide.
Save your GlossaryAt the bottom of the page, select Save and return to subject.
Adding an entry to a Glossary
Navigate to glossaryNavigate to the Glossary activity and click on the link.
Browse Glossary pageFrom the glossary page click on Add a new entry.
You can also use this page to search and browse entries.
Last Modified 24 January 2018

Page 9 of 12
Last Modified 24 January 2018

Page 10 of 12
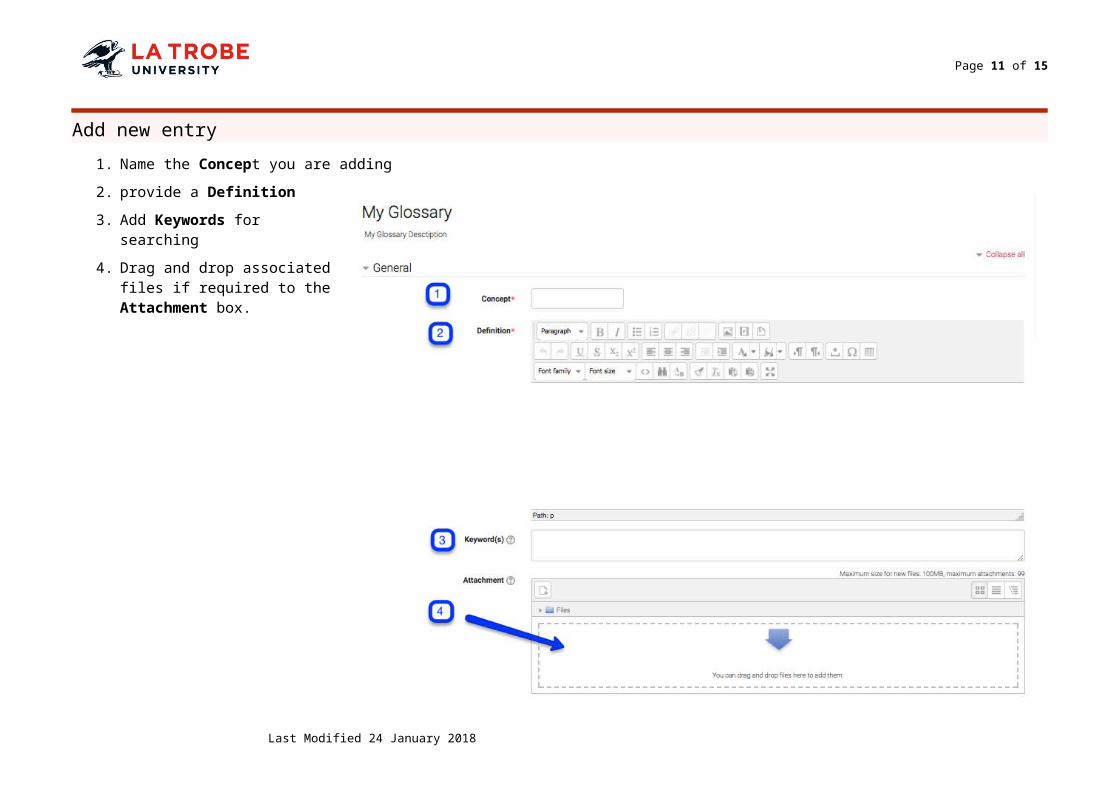
Add new entry1. Name the Concept you are adding2. provide a Definition3. Add Keywords for searching4. Drag and drop associated files
if required to the Attachment box.
Last Modified 24 January 2018
Page 11 of 12
Auto-linkFrom the auto-linking section choose your auto-linking preferences.
Select whether auto-linking should occur and criteria for linking.
Save changes
Rating a glossary entryIf you have enabled grade and ratings in your glossary settings then you can add ratings to individual student contributions.
On the Glossary entry page you will notice a Rate drop down box on the lower right of the entry. Click on this box and select the rating.
Last Modified 24 January 2018

Page 12 of 12
Add a random entry blockYou can add a block to your LMS subject homepage that will display random entries from your glossary. For further instructions on adding a random entry block see the How to add blocks guide.
Further SupportStaff For support in the use of the LMS, Echo360, Turnitin, PebblePad and Manage My Subjects contact ASK EDTECH.
StudentsGo to Student IT Support
End of guide
Copyright
Published in Australia By La Trobe University.
Unless otherwise stated this work is licensed under a Creative Commons Attribution-NonCommercial-ShareAlike 4.0 International License.
Last Modified 24 January 2018


![How to Use - helpguide.sony.net · Creating a highlight movie (MP4 format) with Highlight Movie Maker [32] Adding a highlight point during recording [33] Playing highlight movies](https://img.pdfslide.net/doc/110x75/5cbc22f788c99348568c2888/how-to-use-creating-a-highlight-movie-mp4-format-with-highlight-movie-maker.jpg)