Embed Size (px)
Citation preview
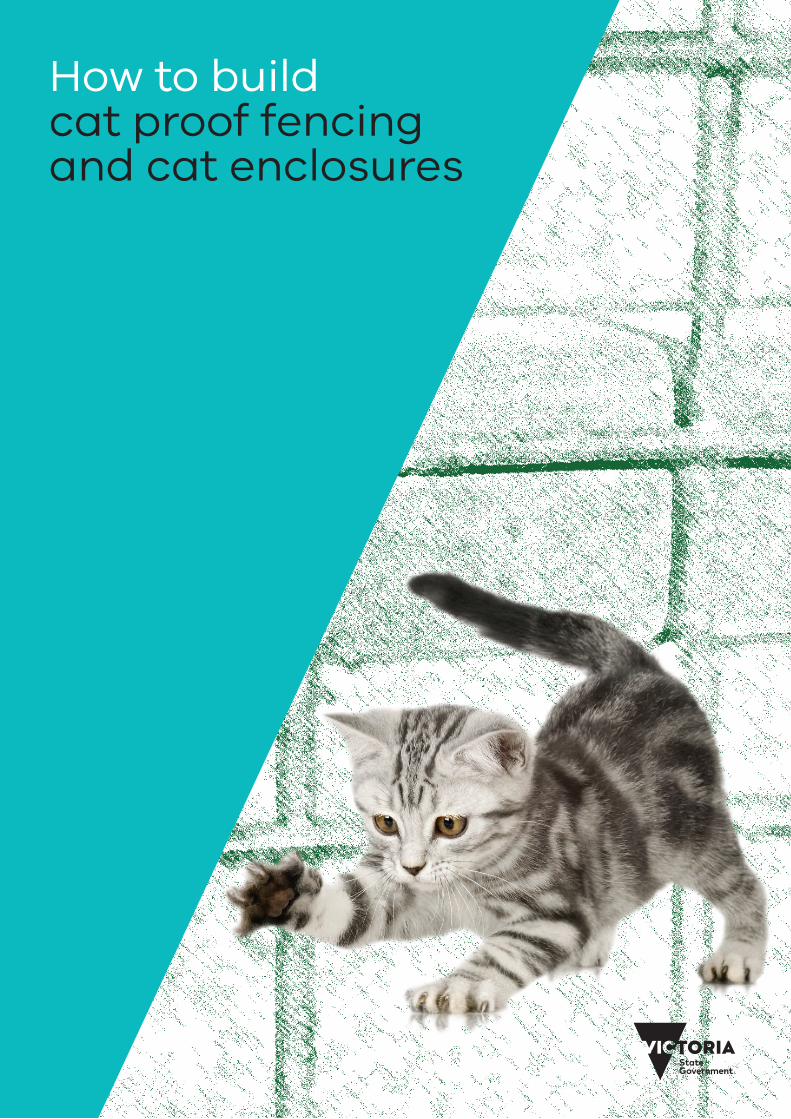
How to build cat proof fencing and cat enclosures
2 Department of Economic Development, Jobs, Transport and Resources
Introduction
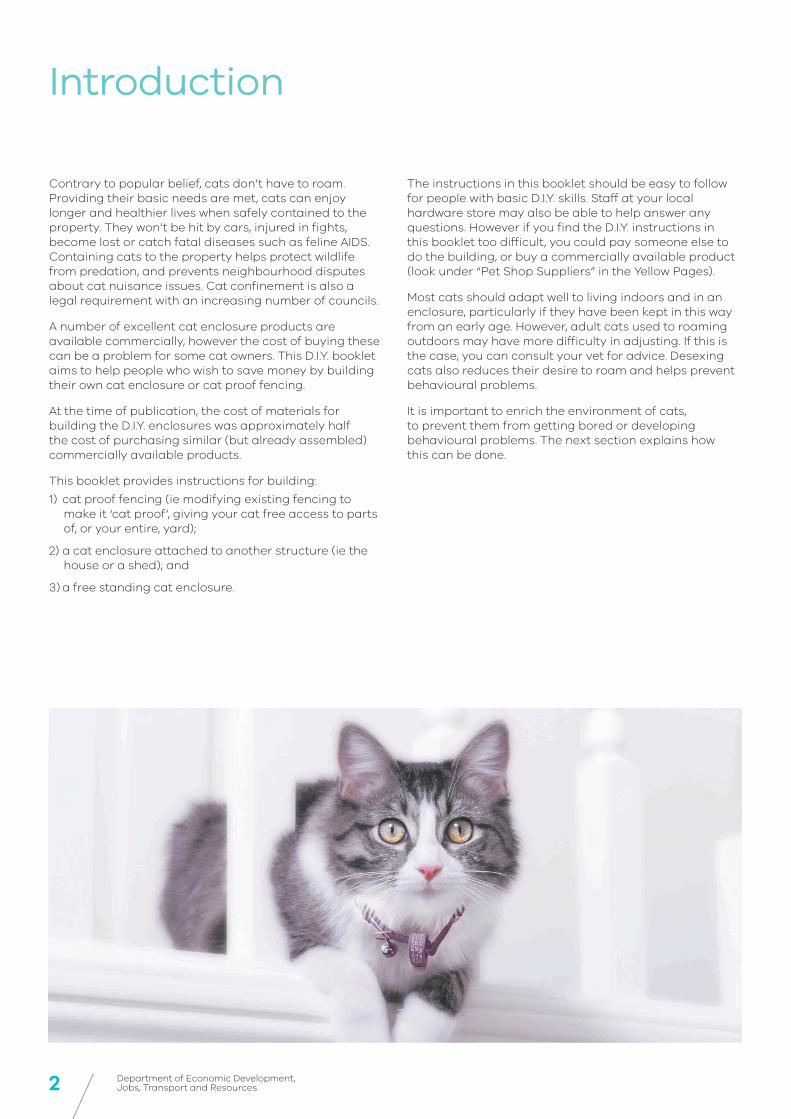
Contrary to popular belief, cats don’t have to roam. Providing their basic needs are met, cats can enjoy longer and healthier lives when safely contained to the property. They won’t be hit by cars, injured in fights, become lost or catch fatal diseases such as feline AIDS. Containing cats to the property helps protect wildlife from predation, and prevents neighbourhood disputes about cat nuisance issues. Cat confinement is also a legal requirement with an increasing number of councils.
A number of excellent cat enclosure products are available commercially, however the cost of buying these can be a problem for some cat owners. This D.I.Y. booklet aims to help people who wish to save money by building their own cat enclosure or cat proof fencing.
At the time of publication, the cost of materials for building the D.I.Y. enclosures was approximately half the cost of purchasing similar (but already assembled) commercially available products.
This booklet provides instructions for building:
1) cat proof fencing (ie modifying existing fencing to make it ‘cat proof’, giving your cat free access to parts of, or your entire, yard);
2) a cat enclosure attached to another structure (ie the house or a shed); and
3) a free standing cat enclosure.
The instructions in this booklet should be easy to follow for people with basic D.I.Y. skills. Staff at your local hardware store may also be able to help answer any questions. However if you find the D.I.Y. instructions in this booklet too difficult, you could pay someone else to do the building, or buy a commercially available product (look under “Pet Shop Suppliers” in the Yellow Pages).
Most cats should adapt well to living indoors and in an enclosure, particularly if they have been kept in this way from an early age. However, adult cats used to roaming outdoors may have more difficulty in adjusting. If this is the case, you can consult your vet for advice. Desexing cats also reduces their desire to roam and helps prevent behavioural problems.
It is important to enrich the environment of cats, to prevent them from getting bored or developing behavioural problems. The next section explains how this can be done.
3How to build cat proof fencing and cat enclosures
Cats have a number of basic needs that must be met if they are to stay happy and healthy.
1 Companionship. Cats require plenty of social contact with owners. This can be achieved by access to the house through a cat door (and tunnel if applicable). Set aside time each day to interact with your cat, for instance, patting, playing with, or grooming him/her.
2 A well-informed owner. You should find out as much as you can about cat behaviour and care. There are many useful books and websites available. For instance, do an Internet search to find information on cat care, indoor housing requirements, and solving behavioural problems. Talk to your vet about health and nutritional requirements for cats.
3 Space. Cats prefer to have their own ‘personal space’, and this is particularly important to prevent aggression in group housing situations. Each cat requires his/her own area that provides all the essentials (food, water, bed, resting places, litter tray etc).
4 Sleeping, resting and viewing areas. Cats like to spend a lot of time sleeping and resting in quiet areas where they feel safe and secure. Cat beds can be purchased, or blankets, towels, pillows etc can be provided. High sided cat beds and boxes are useful to give cats a sense of ‘privacy’.
Cats use elevated areas as vantage points from which to observe their surroundings. These are essential, and can be provided by access to platforms, shelves, climbing posts or window ledges. Some cats love to watch birds (you can place a bird bath/feeder outside the window or enclosure), insects (try planting flowers to attract them), fish in aquariums and even nature footage on TV!
5 Food and water. Ensure bowls are located away from the litter tray. Many cats like having their water bowl in a separate area to their food bowl. Cats can also be given grass to chew (non-toxic varieties such as oats, wheat, rye-grass).
6 Litter boxes. Each cat requires its own litter box, that is big enough for easy access and is located in a safe and private area (if a cat is startled while using the box, he/she may not use that box in future). You may have to experiment to find out your cat’s preferences for covered or uncovered boxes, type of litter and depth of litter.
Cats are very clean animals that do not like using dirty litter boxes, so boxes will need to be scooped daily, and cleaned with water and non-scented soap once a week. A thin layer of baking soda placed on the bottom of the box will help absorb odours between scoopings.
7 Scratching posts. Scratching is a natural behaviour for cats, that sharpens claws, stretches muscles and leaves scent marks. Your cat will need a scratching post, which can be horizontal or vertical, and can be made from sisal (a course natural fibre), carpet, cardboard or wood. You can encourage your cat to use the scratching post (rather than other things like the furniture!) by putting catnip on it. Cats have an excellent sense of smell, and many cats love catnip, which can be supplied as a dried herb or grown fresh in pots.
8 Toys and exercise. Exercise your cat through play (or even by training your cat to walk outside on a harness and leash!). Cats enjoy toys that move or make noise, and remind them of prey such as mice, birds and insects. They need a variety of toys they can roll, pounce on, capture and bite, and toys should be rotated regularly to prevent boredom.
Some examples of simple and cheap toys (that are safe for cats to play with) are crumpled paper balls, paper bags to explore, cardboard boxes and toilet paper tubes. Try stuffing old cotton socks with cotton balls and some catnip, and tying a knot in the end. You can also buy furry toys (eg in the shape of a mouse) that make noises and can be rolled, balls (eg ping pong balls or balls that can be filled with food or treats), sticks with toys dangling from the end of a string etc.
Environmental enrichment

4 Department of Economic Development, Jobs, Transport and Resources
Have you considered cat proof fencing to keep your cat contained and safe? ‘Cat proofing’ your fencing provides your cat with free access to all or part of your yard. As an example, see Figure 1 for a photo of a completed ‘cat proof’ fence.
If you have a small yard this may be a better and cheaper alternative to building a cat enclosure. An ideal spot for cat proof fencing is that narrow area between the house and a fence that can be closed off at each end by gates.
Some basic design considerations: Cats should have access to the house through a cat door. If there are times when they are not able to access the house, they require access to a weatherproof sleeping area with a bed, and an adequate supply of fresh water etc while in the yard. There must be no dangerous items in the yard or sharp edges used in the fencing.
In most instances, fence extensions are legal as long as they are entirely on your side of the fence (ie not directly above the fence, or intruding over to the neighbour’s side). However, some properties may have covenants in place restricting the height of fences – check with your local council to see if this applies to your property.
The first step in cat proofing your yard is to seal off all gaps in and underneath the existing fences and gates. Cats do not usually dig underneath fences. However, if your cat shares the yard (or is next to a yard) with a dog that digs, then you may need to put a concrete or wooden plinth in the soil under the fence to prevent the dog opening up an escape route. In addition to ‘cat proofing’ your gates, lock any gates that are used infrequently and fit self-closing springs and latches to all other gates around the yard.
If you have a problem with other cats coming into your yard, you will have to watch to see if they are able to climb over the cat proof fencing. Most cats should find the netting too unstable to climb on. However if they can get in, you will have to ask your neighbour to install the cat proof fencing on their side of the fence too (to avoid visiting cats becoming trapped in your yard).
1. Cat Proof Fencing
Figure 1: Completed fence
5How to build cat proof fencing and cat enclosures
Before considering any treatment it is best to observe your cat’s behaviour to see how it is escaping from the yard, including any possible jumping points that the cat may use to clear the fence, eg material, equipment or objects placed near or against it.
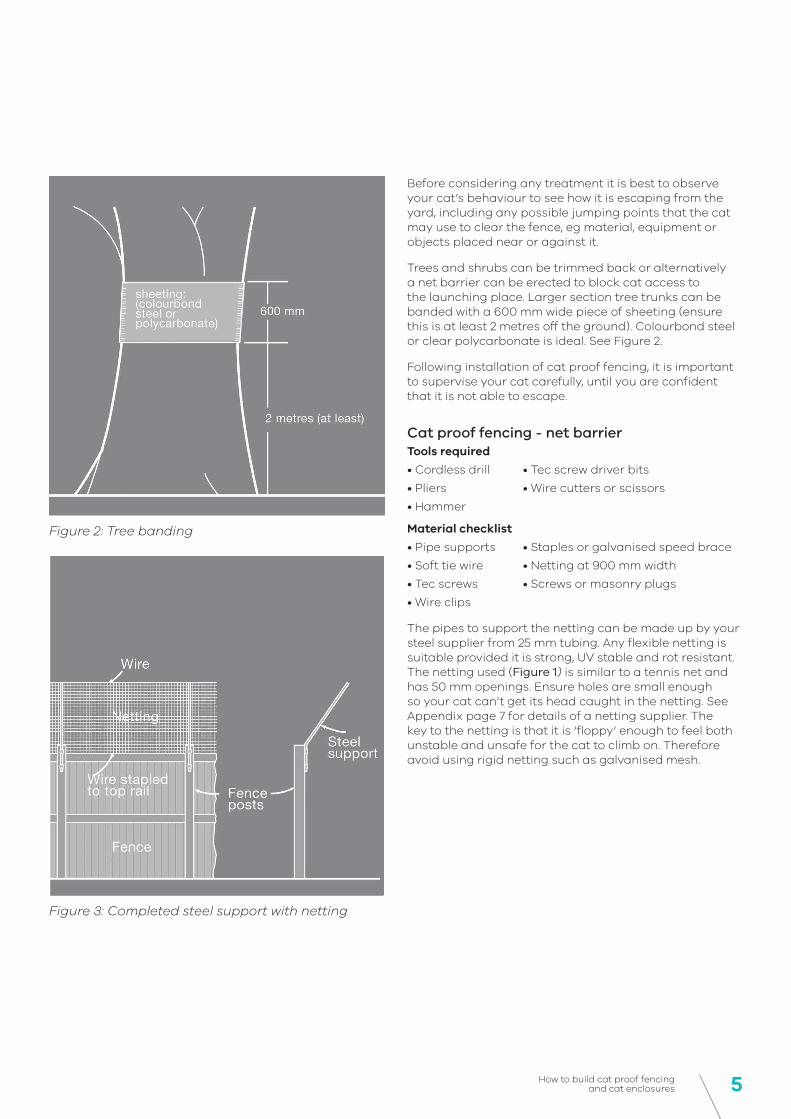
Trees and shrubs can be trimmed back or alternatively a net barrier can be erected to block cat access to the launching place. Larger section tree trunks can be banded with a 600 mm wide piece of sheeting (ensure this is at least 2 metres off the ground). Colourbond steel or clear polycarbonate is ideal. See Figure 2.
Following installation of cat proof fencing, it is important to supervise your cat carefully, until you are confident that it is not able to escape.
Cat proof fencing - net barrier Tools required
• Cordless drill • Tec screw driver bits
• Pliers • Wire cutters or scissors
• Hammer
Material checklist
• Pipe supports • Staples or galvanised speed brace
• Soft tie wire • Netting at 900 mm width
• Tec screws • Screws or masonry plugs
• Wire clips
The pipes to support the netting can be made up by your steel supplier from 25 mm tubing. Any flexible netting is suitable provided it is strong, UV stable and rot resistant. The netting used (Figure 1) is similar to a tennis net and has 50 mm openings. Ensure holes are small enough so your cat can’t get its head caught in the netting. See Appendix page 7 for details of a netting supplier. The key to the netting is that it is ‘floppy’ enough to feel both unstable and unsafe for the cat to climb on. Therefore avoid using rigid netting such as galvanised mesh.
Figure 2: Tree banding
Figure 3: Completed steel support with netting
6 Department of Economic Development, Jobs, Transport and Resources
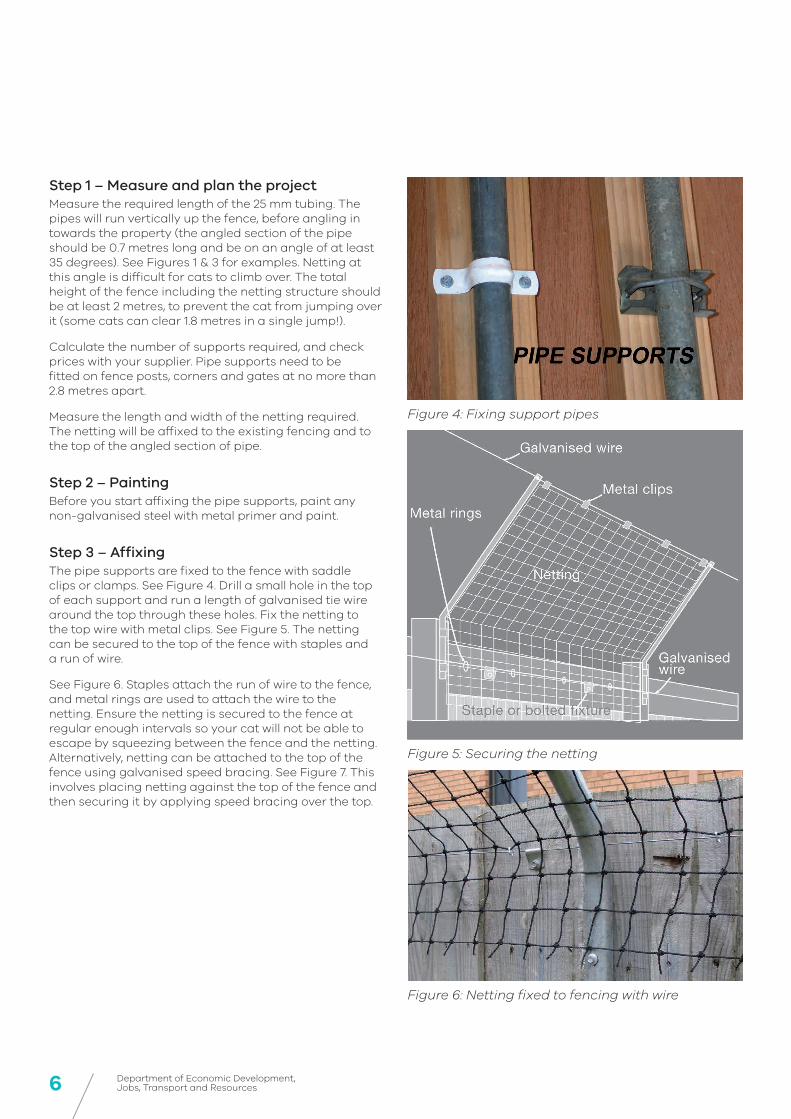
Step 1 – Measure and plan the project Measure the required length of the 25 mm tubing. The pipes will run vertically up the fence, before angling in towards the property (the angled section of the pipe should be 0.7 metres long and be on an angle of at least 35 degrees). See Figures 1 & 3 for examples. Netting at this angle is difficult for cats to climb over. The total height of the fence including the netting structure should be at least 2 metres, to prevent the cat from jumping over it (some cats can clear 1.8 metres in a single jump!).
Calculate the number of supports required, and check prices with your supplier. Pipe supports need to be fitted on fence posts, corners and gates at no more than 2.8 metres apart.
Measure the length and width of the netting required. The netting will be affixed to the existing fencing and to the top of the angled section of pipe.
Step 2 – Painting Before you start affixing the pipe supports, paint any non-galvanised steel with metal primer and paint.
Step 3 – Affixing The pipe supports are fixed to the fence with saddle clips or clamps. See Figure 4. Drill a small hole in the top of each support and run a length of galvanised tie wire around the top through these holes. Fix the netting to the top wire with metal clips. See Figure 5. The netting can be secured to the top of the fence with staples and a run of wire.
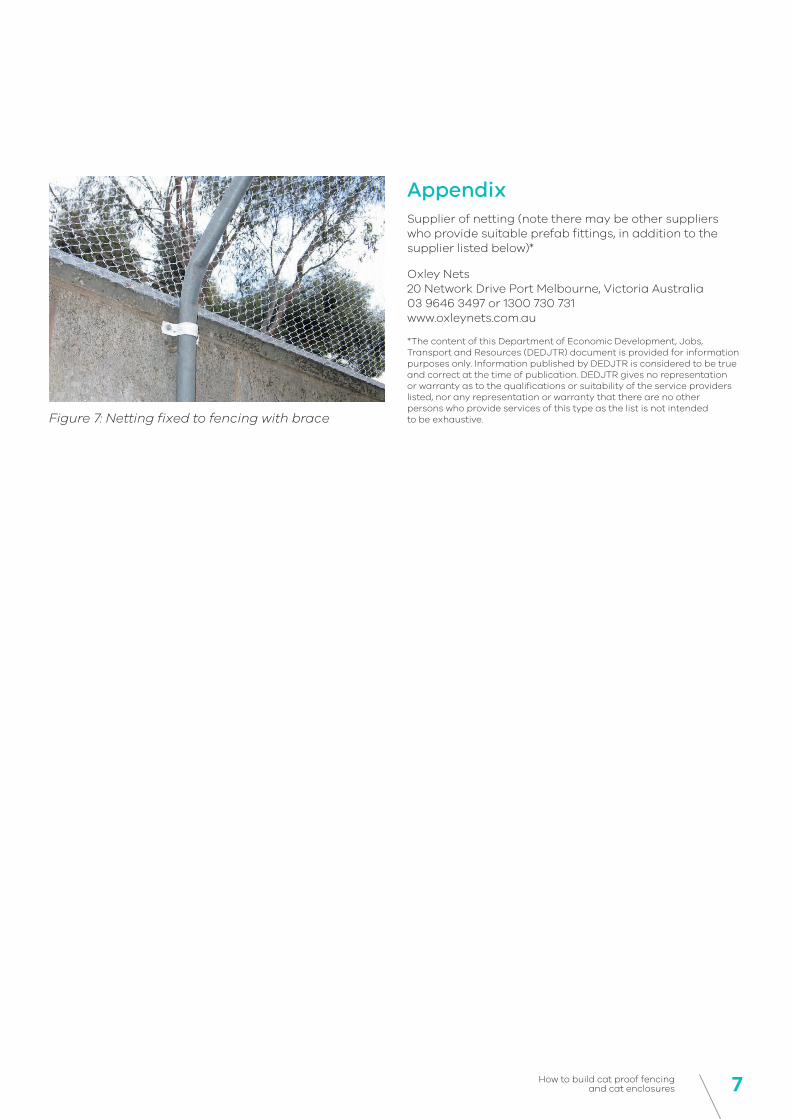
See Figure 6. Staples attach the run of wire to the fence, and metal rings are used to attach the wire to the netting. Ensure the netting is secured to the fence at regular enough intervals so your cat will not be able to escape by squeezing between the fence and the netting. Alternatively, netting can be attached to the top of the fence using galvanised speed bracing. See Figure 7. This involves placing netting against the top of the fence and then securing it by applying speed bracing over the top.
Figure 4: Fixing support pipes
Figure 6: Netting fixed to fencing with wire
Figure 5: Securing the netting
7How to build cat proof fencing and cat enclosures
Appendix Supplier of netting (note there may be other suppliers who provide suitable prefab fittings, in addition to the supplier listed below)*
Oxley Nets 20 Network Drive Port Melbourne, Victoria Australia 03 9646 3497 or 1300 730 731 www.oxleynets.com.au
*The content of this Department of Economic Development, Jobs, Transport and Resources (DEDJTR) document is provided for information purposes only. Information published by DEDJTR is considered to be true and correct at the time of publication. DEDJTR gives no representation or warranty as to the qualifications or suitability of the service providers listed, nor any representation or warranty that there are no other persons who provide services of this type as the list is not intended to be exhaustive. Figure 7: Netting fixed to fencing with brace
8 Department of Economic Development, Jobs, Transport and Resources
There are many options for this type of cat enclosure. The easiest solution can be to clad an existing pergola or patio with cat proof mesh, or fit a roof over a small enclosed area such as a path between the house and fence. If you do not have a suitable area then we will show you how to build your patio-style enclosure from the ground up and also show you a lightweight and inexpensive alternative that can be constructed from galvanised water pipe and netting.
Read through the brochure and examine your options, then go ahead and design your project to suit your needs.
Some basic design considerations: • Cats must have shelter from sun, wind and rain
(although they still require access to sunshine in the enclosure).
• Cats must have a weatherproof sleeping compartment with a raised bed (which must be kept in a clean and hygienic condition), along with a separate exercise area.
• The litter tray area must be well away from the cat’s eating and sleeping areas and must be kept dry and be easily cleaned. Litter trays must contain an appropriate litter material and be cleaned daily (many cats will not use soiled litter, and will therefore soil elsewhere in the enclosure).
• Disinfectants containing phenol must never be used around cats.
• To prevent disease, your cat must be regularly wormed and vaccinated (as per veterinary recommendations), and flea control must also be undertaken. Accommodation should provide good ventilation, as this is vital to prevent build up of odours that can cause respiratory problems in cats.
• Hygiene and odour shouldn’t be a problem as long as your cat uses its litter tray and the tray is cleaned regularly. However, in the event of your cat soiling the ground in the enclosure, you may have to consider adding some type of flooring. This could be as simple as installing small gauge wire mesh on the floor to prevent cats from digging and soiling in the dirt. Alternatively, you could install concrete or timber flooring that will be easy to hose down.
• Cats require plenty of social contact with owners. This can be achieved by providing access to the house through a cat door (and tunnel if applicable).
• Each enclosure should provide a scratching pole and be designed to provide cats with at least two platforms at different heights. The platforms should be connected by static (eg planks) or swinging walkways. Cats should also have access to climbing frames and an interesting visual outlook.
• In a group enclosure a number of hiding and escape areas should be provided to enable cats to avoid aggression from other cats.
• The size of your enclosure will depend on the number of cats you wish to house, and how well they get on. The floor area of an enclosure must be at least 2 square metres for each cat, with a minimum height of 2 metres, plus tunnels and auxiliary enclosures. These dimensions are based on the presumption that cats will also have regular access to the house.
The first and most simple solution is to span an existing area, such as a section between the house and fence, a veranda, patio or courtyard, with a lightweight support system and cover it with netting. If you are covering a small span, say between a wall and a fence to make a roof frame, take the measurements to your hardware supplier who can advise you on suitable materials and fixing components. Although this option doesn’t involve building a full patio-type structure, we recommend you still read through the following instructions, and apply those that may be relevant to your particular project.
2. Cat enclosure attached to an existing structure
9How to build cat proof fencing and cat enclosures
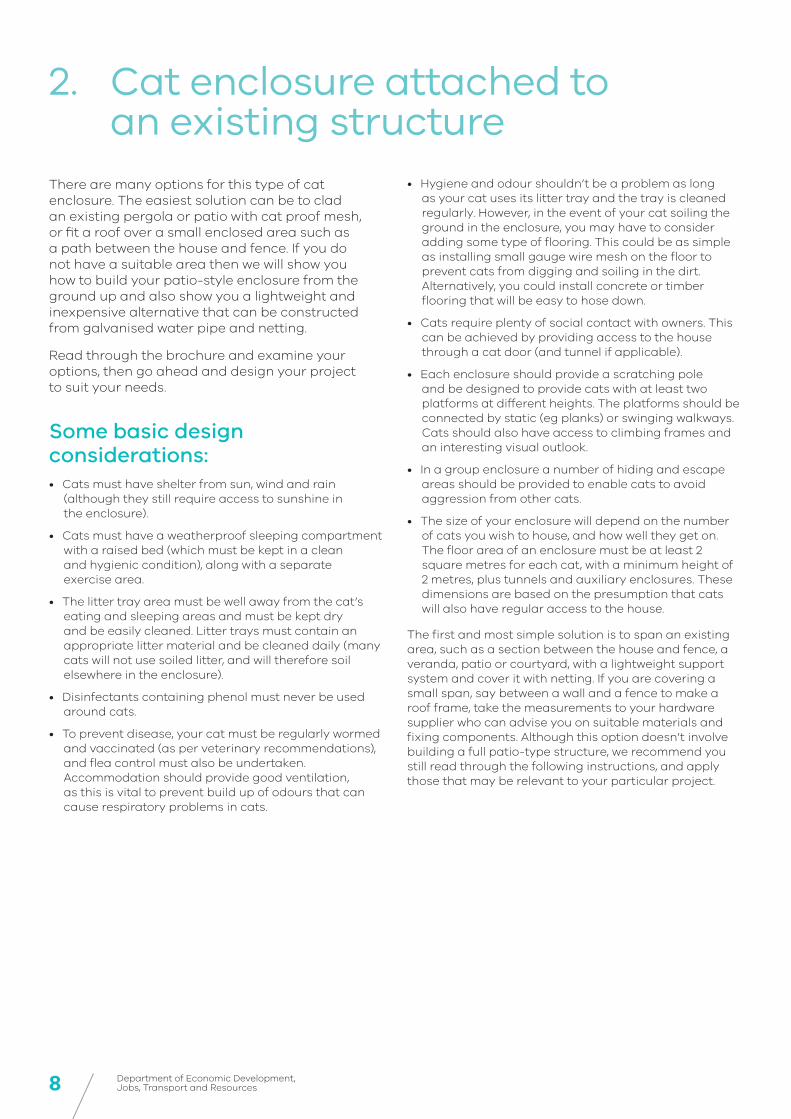
Patio-type structure To span a wide area you will need to consider a typical patio structure - see Figure 9 on page 14. The most common patio-type structure involves rafters fixed to the house or garage, and supported at the other end by posts. The posts are connected along the top by a timber plate, which supports the rafters. The best method of setting the posts into the ground is to bolt them in a galvanised stirrup set in a concrete footing. Battens are then nailed across these rafters and the cladding fixed directly to the battens. The basic structure is outlined in Figure 1.
Tools required
• Drop saw • Chisel • Handsaw
• Spirit level • Drill • String line
• Shifting wrench • Hammer • Shovel
• Eye protection • Tape measure • Ladder
• Hearing protection • Roofing square
• Tec screw driver, masonry/ wood bits
Material Checklist
Firstly, draw up a working sketch of your project and take it along to your local hardware supplier who will advise on the appropriate timber dimensions and spacings required for your particular application. Include this information in your drawing and check with your local council to see if a building permit is required.
Do not use treated pine in the structure as it may prove toxic to cats, especially if used as a scratching post. Typical timber and hardware requirements for an attached pergola with dimensions of 4.8 metres x 3.6 metres:
• Top plate (1) 200 x 50 mm • Framing brackets
• Posts (3) 100 x 100 mm • Rafters (6) 150 x 50 mm
• Braces (2) 75 x 50 mm • Post stirrups (3)
• Rails (2) 75 x 50 mm • Concrete pre-mix
• Wall plate (1) 150 x 38 mm • Galvanised nails and bolts
• Joist hangers (3) (attached to the wall plate as Figure 4A)
• Battens 45 x 22 mm, (typically fitted at 450 mm centres)
Figure 1: Typical roof structure – front view
10 Department of Economic Development, Jobs, Transport and Resources
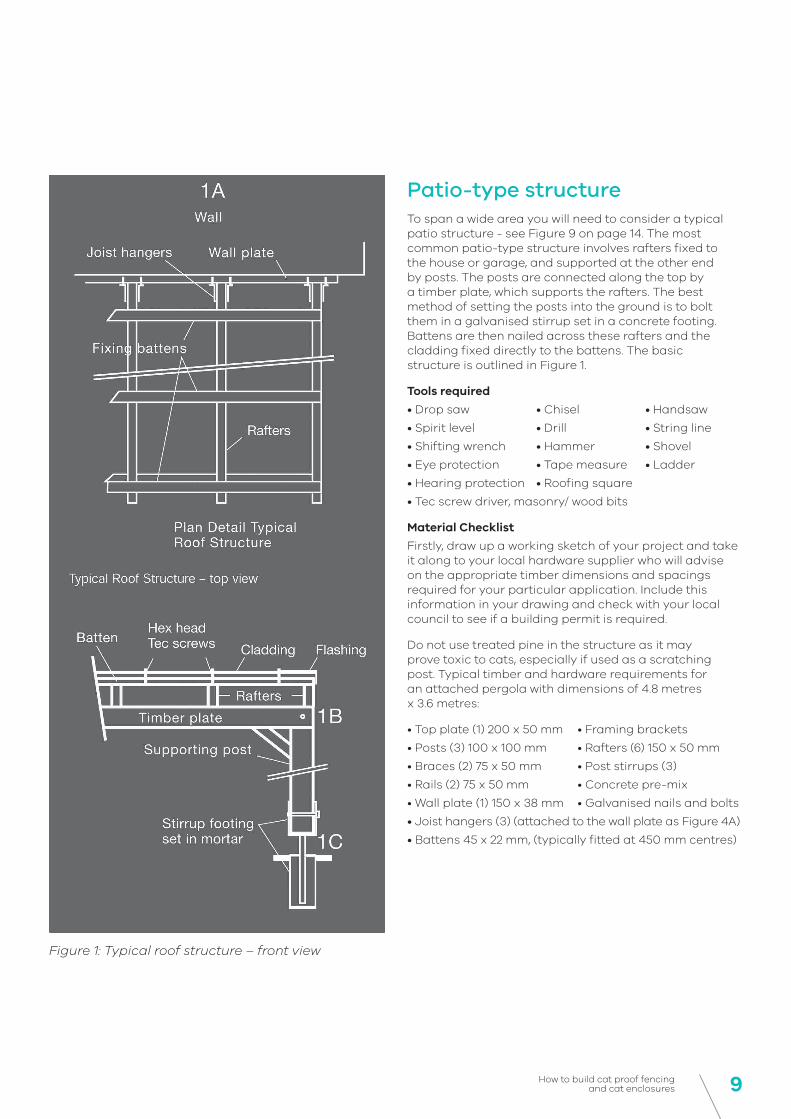
Construction Step 1 – Set out To set out the full size plan on the ground, place a string line parallel to the house along the outside edge of the patio. Now set two string lines at right angles to the house at each end of the enclosure. Check the set out is square by comparing corner-to-corner measurements, ensuring that they are equal. See Figure 2.
Allow spacing of three metres or less between posts and mark their position along the outer string line. Walk around your set out to check dimensions and proportions.
Step 2 – Setting the stirrup post supports Dig 200 x 200 mm holes to a depth of 300 mm for each post. See Figure 1 (point 1C). Prepare the pre-mixed concrete and fill the holes. Push the post supports into the concrete ensuring that the stirrup is above the ground level. This will allow water to drain away from the bottom of the posts and prevent rot. Align each post support to the string line ensuring that they are all level and square. Leave the concrete to cure to specification.
Drill and bolt the posts in position and secure each post upright with temporary bracing. House (check in) and bolt the 200 x 50 mm timber plate in position across the length of the posts and brace the end posts to the top plate with 150 x 50 mm bracing bolted at 45 degrees. See Figure 3.
Please Note: If you are fixing the posts onto an existing slab use post supports with a flat plate on the bottom. These are bolted in position with expanding masonry plugs. Your local hardware attendant can show you this method.
Step 3 – Attaching a pergola to the house and fixing rafters
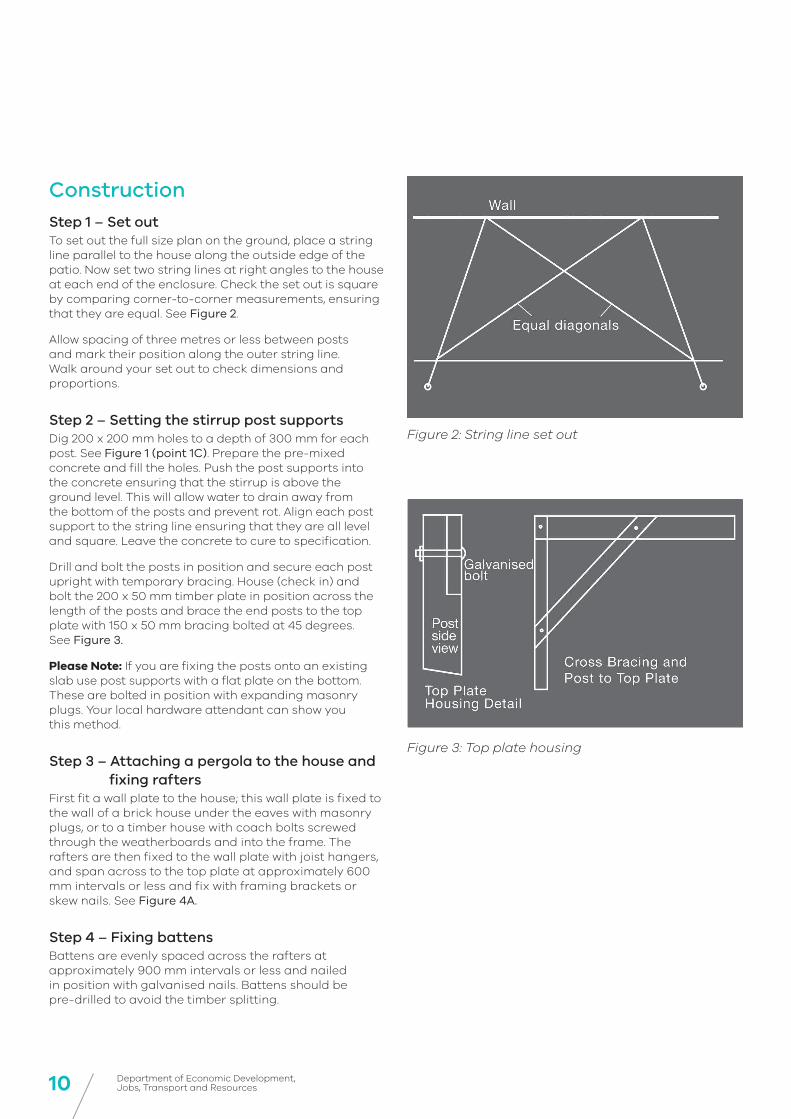
First fit a wall plate to the house; this wall plate is fixed to the wall of a brick house under the eaves with masonry plugs, or to a timber house with coach bolts screwed through the weatherboards and into the frame. The rafters are then fixed to the wall plate with joist hangers, and span across to the top plate at approximately 600 mm intervals or less and fix with framing brackets or skew nails. See Figure 4A.
Step 4 – Fixing battens Battens are evenly spaced across the rafters at approximately 900 mm intervals or less and nailed in position with galvanised nails. Battens should be pre-drilled to avoid the timber splitting.
Figure 3: Top plate housing
Figure 2: String line set out
11How to build cat proof fencing and cat enclosures
Step 5 – Access door The door is a simple brace and rail construction made from hardwood bolted together with galvanised bolts and clad with mesh. The door is hung between two vertical posts with a header bolted across at door height. If there are any children around then consider a childproof latch on the external door. See Figure 5.
Step 6 – Finishing the timber structure Remember that treated pine is not an option so you will need to seal the timber to protect it from weathering with a good quality exterior finish. Paint the internal faces of the joints before assembly.
Step 7 – Roofing/weather-proof cladding Note that in some cases it may be a legal requirement that a licensed plumber is required to fit the roofing and flashing (contact your local water supplier for details).
Corrugated steel products
Zincalume and Colourbond sheeting can be used for roof and partial wall cladding. If you live by the coast then specify corrosion-resistant steel sheeting. These products are easily fixed, however the structure must be sound. They are weather-proof and permanent but do restrict natural light, which is a consideration when enclosing an external wall containing windows. In this situation, clear polycarbonate sheeting such as Laserlight and Suntuff is an ideal solution. There is a wide range of grades available, which have differing light and heat transmission characteristics. Each product comes with specific fixing instructions, which must be followed. Remember that some part of the enclosure must provide cats with access to sunshine, while other areas must provide shelter from the sun.
If you are likely to climb on polycarbonate roof cladding, you may wish to install a safety barrier directly underneath the material to prevent accidental falls. Ask your supplier to recommend a light wire mesh that can be fixed on top of the battens. The sheeting and end flashing is then fixed to the battens with self-tapping Tec screws and rubber washers.
You may want to consider installing guttering and a downpipe, if excess water run-off from the enclosure roof is a problem. The gutter should be fixed just below the line of the roofing, across the outside of the end beam. Remember to allow for a second fall, so rainwater can run along a slight slope in the gutter and flow into the downpipe. The pipe needs to be attached to the nearest stormwater outlet. Seek advice from your local hardware store, or contact a qualified plumber if you need assistance with installing a gutter and downpipe.
Figure 4A: Fixing method for timber Figure 4B: Fixing method for galvanised steel tubing
4A
4B
Figure 5: Door detail
12 Department of Economic Development, Jobs, Transport and Resources
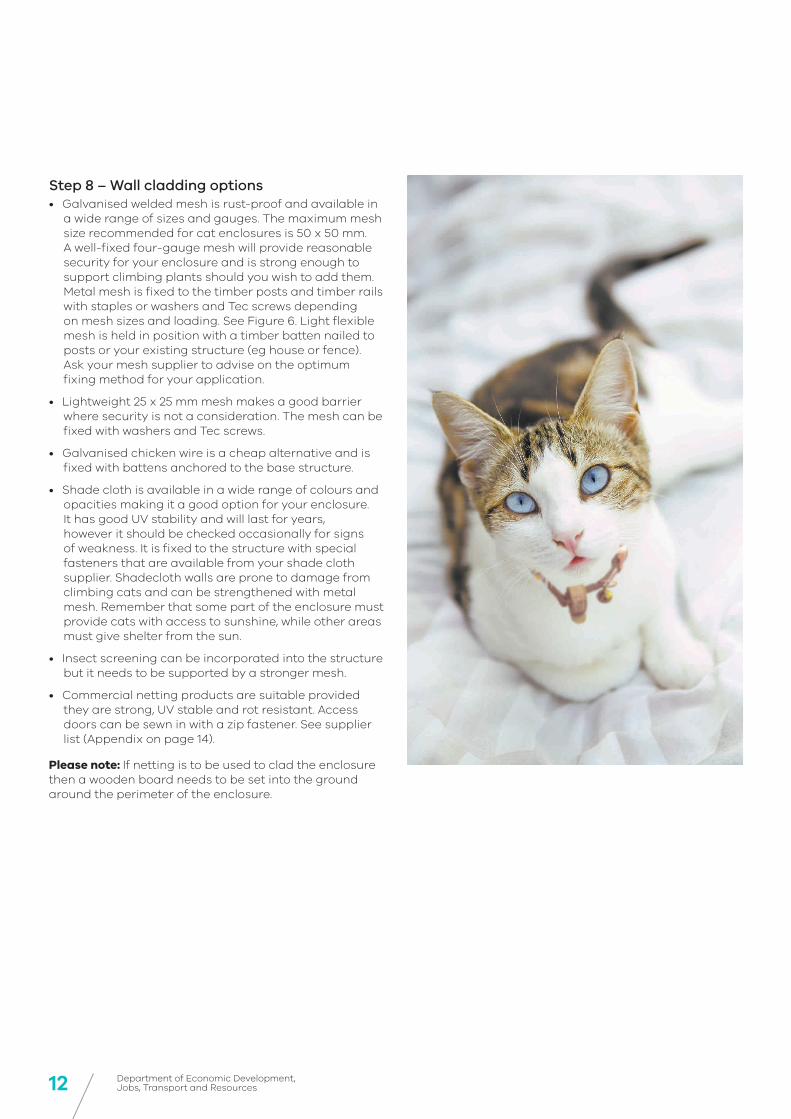
Step 8 – Wall cladding options • Galvanised welded mesh is rust-proof and available in
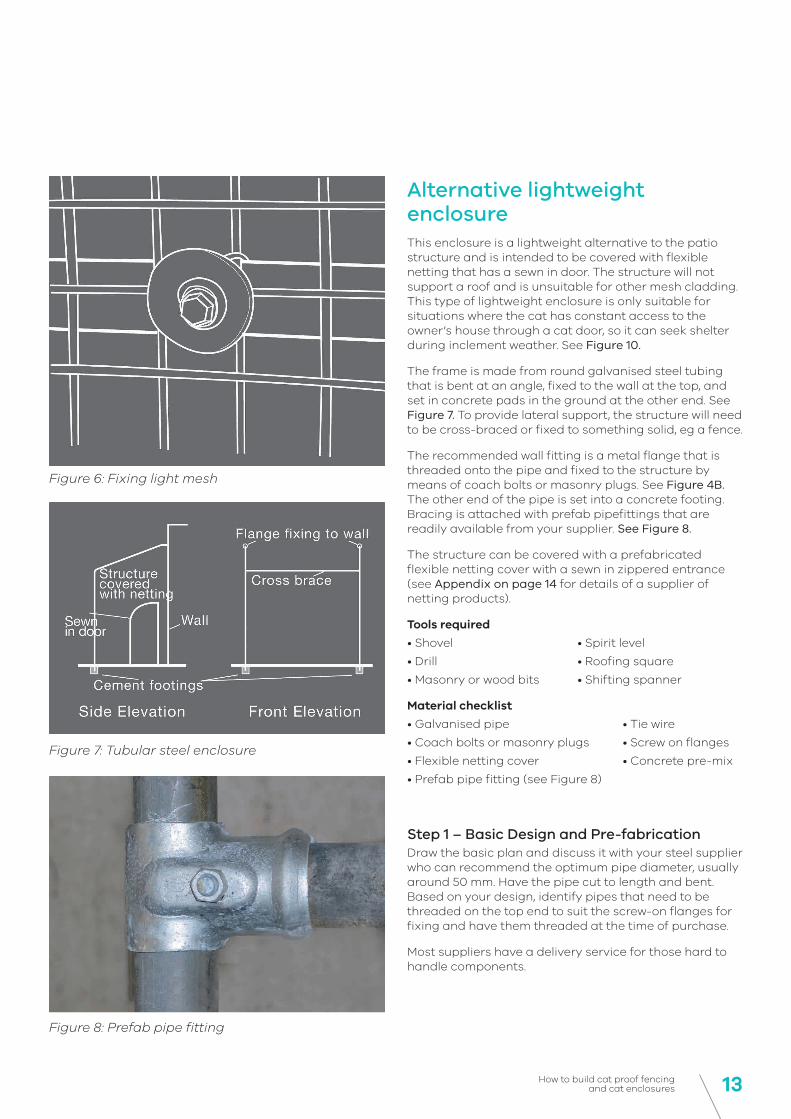
a wide range of sizes and gauges. The maximum mesh size recommended for cat enclosures is 50 x 50 mm. A well-fixed four-gauge mesh will provide reasonable security for your enclosure and is strong enough to support climbing plants should you wish to add them. Metal mesh is fixed to the timber posts and timber rails with staples or washers and Tec screws depending on mesh sizes and loading. See Figure 6. Light flexible mesh is held in position with a timber batten nailed to posts or your existing structure (eg house or fence). Ask your mesh supplier to advise on the optimum fixing method for your application.
• Lightweight 25 x 25 mm mesh makes a good barrier where security is not a consideration. The mesh can be fixed with washers and Tec screws.
• Galvanised chicken wire is a cheap alternative and is fixed with battens anchored to the base structure.
• Shade cloth is available in a wide range of colours and opacities making it a good option for your enclosure. It has good UV stability and will last for years, however it should be checked occasionally for signs of weakness. It is fixed to the structure with special fasteners that are available from your shade cloth supplier. Shadecloth walls are prone to damage from climbing cats and can be strengthened with metal mesh. Remember that some part of the enclosure must provide cats with access to sunshine, while other areas must give shelter from the sun.
• Insect screening can be incorporated into the structure but it needs to be supported by a stronger mesh.
• Commercial netting products are suitable provided they are strong, UV stable and rot resistant. Access doors can be sewn in with a zip fastener. See supplier list (Appendix on page 14).
Please note: If netting is to be used to clad the enclosure then a wooden board needs to be set into the ground around the perimeter of the enclosure.
13How to build cat proof fencing and cat enclosures
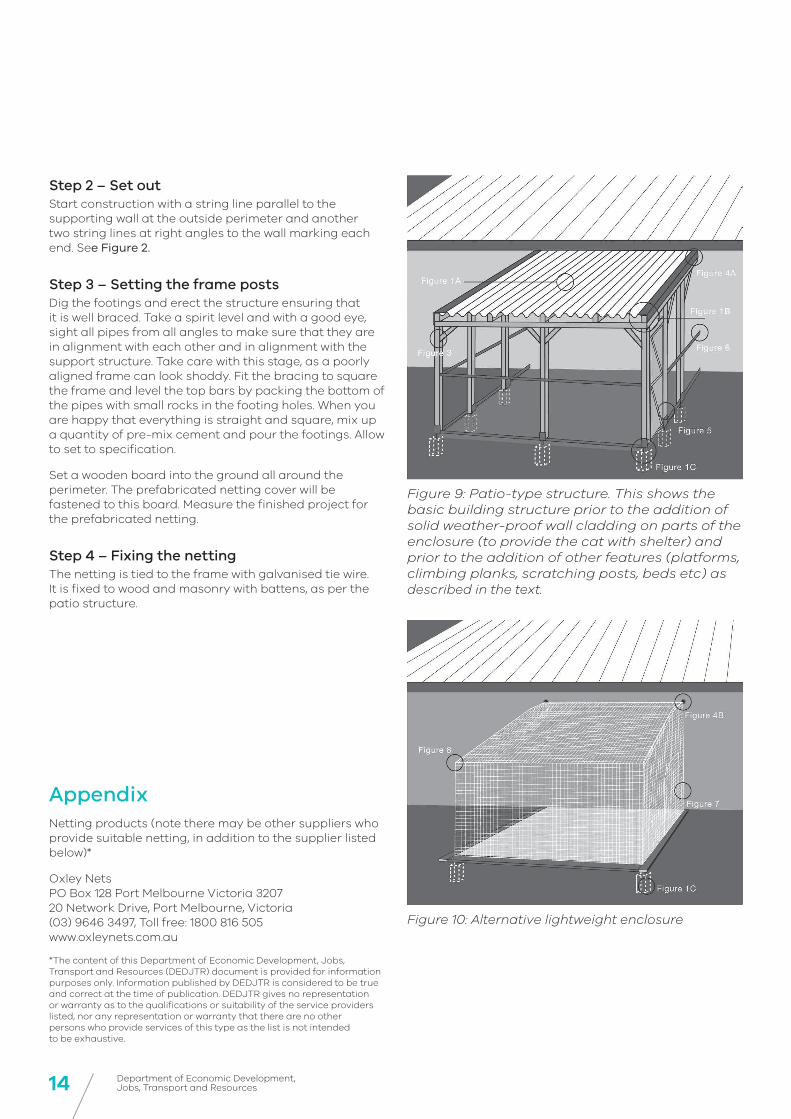
Alternative lightweight enclosure This enclosure is a lightweight alternative to the patio structure and is intended to be covered with flexible netting that has a sewn in door. The structure will not support a roof and is unsuitable for other mesh cladding. This type of lightweight enclosure is only suitable for situations where the cat has constant access to the owner’s house through a cat door, so it can seek shelter during inclement weather. See Figure 10.
The frame is made from round galvanised steel tubing that is bent at an angle, fixed to the wall at the top, and set in concrete pads in the ground at the other end. See Figure 7. To provide lateral support, the structure will need to be cross-braced or fixed to something solid, eg a fence.
The recommended wall fitting is a metal flange that is threaded onto the pipe and fixed to the structure by means of coach bolts or masonry plugs. See Figure 4B. The other end of the pipe is set into a concrete footing. Bracing is attached with prefab pipefittings that are readily available from your supplier. See Figure 8.
The structure can be covered with a prefabricated flexible netting cover with a sewn in zippered entrance (see Appendix on page 14 for details of a supplier of netting products).
Tools required
• Shovel • Spirit level
• Drill • Roofing square
• Masonry or wood bits • Shifting spanner
Material checklist
• Galvanised pipe • Tie wire
• Coach bolts or masonry plugs • Screw on flanges
• Flexible netting cover • Concrete pre-mix
• Prefab pipe fitting (see Figure 8)
Step 1 – Basic Design and Pre-fabrication Draw the basic plan and discuss it with your steel supplier who can recommend the optimum pipe diameter, usually around 50 mm. Have the pipe cut to length and bent. Based on your design, identify pipes that need to be threaded on the top end to suit the screw-on flanges for fixing and have them threaded at the time of purchase.
Most suppliers have a delivery service for those hard to handle components.
Figure 6: Fixing light mesh
Figure 7: Tubular steel enclosure
Figure 8: Prefab pipe fitting
14 Department of Economic Development, Jobs, Transport and Resources
Step 2 – Set out Start construction with a string line parallel to the supporting wall at the outside perimeter and another two string lines at right angles to the wall marking each end. See Figure 2.
Step 3 – Setting the frame posts Dig the footings and erect the structure ensuring that it is well braced. Take a spirit level and with a good eye, sight all pipes from all angles to make sure that they are in alignment with each other and in alignment with the support structure. Take care with this stage, as a poorly aligned frame can look shoddy. Fit the bracing to square the frame and level the top bars by packing the bottom of the pipes with small rocks in the footing holes. When you are happy that everything is straight and square, mix up a quantity of pre-mix cement and pour the footings. Allow to set to specification.
Set a wooden board into the ground all around the perimeter. The prefabricated netting cover will be fastened to this board. Measure the finished project for the prefabricated netting.
Step 4 – Fixing the netting The netting is tied to the frame with galvanised tie wire. It is fixed to wood and masonry with battens, as per the patio structure.
Figure 9: Patio-type structure. This shows the basic building structure prior to the addition of solid weather-proof wall cladding on parts of the enclosure (to provide the cat with shelter) and prior to the addition of other features (platforms, climbing planks, scratching posts, beds etc) as described in the text.
Figure 10: Alternative lightweight enclosure
Appendix Netting products (note there may be other suppliers who provide suitable netting, in addition to the supplier listed below)*
Oxley Nets PO Box 128 Port Melbourne Victoria 3207 20 Network Drive, Port Melbourne, Victoria (03) 9646 3497, Toll free: 1800 816 505 www.oxleynets.com.au
*The content of this Department of Economic Development, Jobs, Transport and Resources (DEDJTR) document is provided for information purposes only. Information published by DEDJTR is considered to be true and correct at the time of publication. DEDJTR gives no representation or warranty as to the qualifications or suitability of the service providers listed, nor any representation or warranty that there are no other persons who provide services of this type as the list is not intended to be exhaustive.
15How to build cat proof fencing and cat enclosures
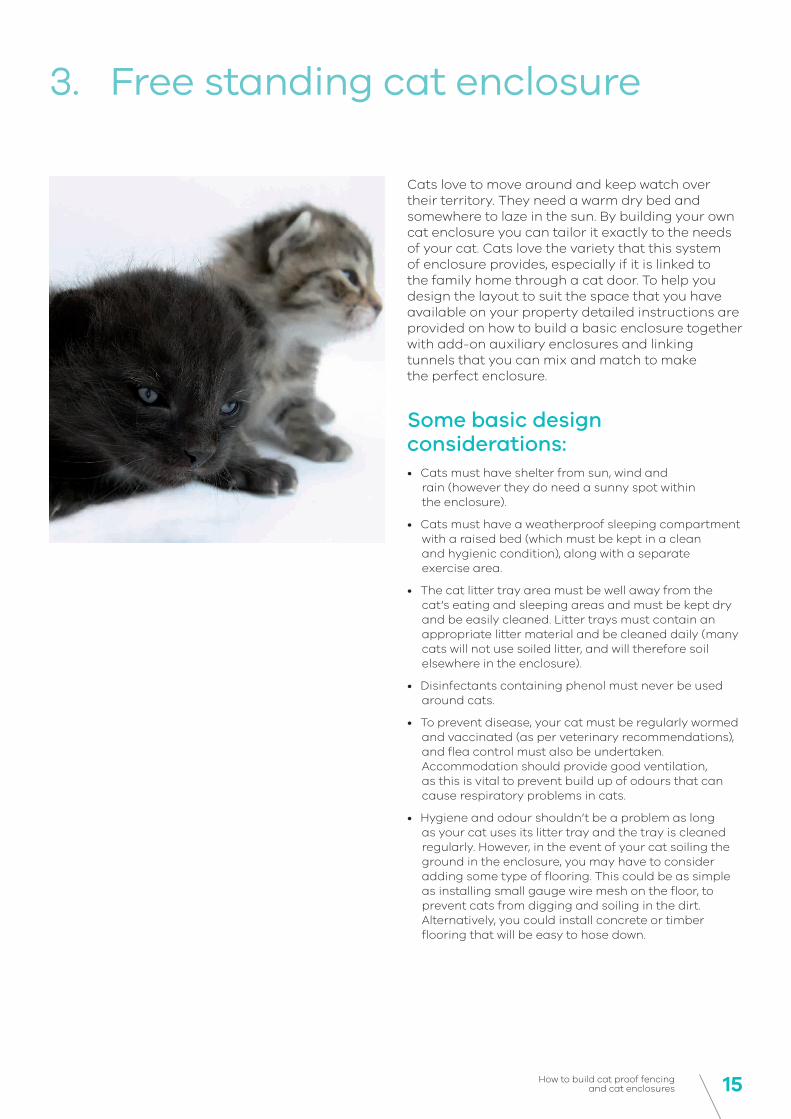
Cats love to move around and keep watch over their territory. They need a warm dry bed and somewhere to laze in the sun. By building your own cat enclosure you can tailor it exactly to the needs of your cat. Cats love the variety that this system of enclosure provides, especially if it is linked to the family home through a cat door. To help you design the layout to suit the space that you have available on your property detailed instructions are provided on how to build a basic enclosure together with add-on auxiliary enclosures and linking tunnels that you can mix and match to make the perfect enclosure.
Some basic design considerations: • Cats must have shelter from sun, wind and
rain (however they do need a sunny spot within the enclosure).
• Cats must have a weatherproof sleeping compartment with a raised bed (which must be kept in a clean and hygienic condition), along with a separate exercise area.
• The cat litter tray area must be well away from the cat’s eating and sleeping areas and must be kept dry and be easily cleaned. Litter trays must contain an appropriate litter material and be cleaned daily (many cats will not use soiled litter, and will therefore soil elsewhere in the enclosure).
• Disinfectants containing phenol must never be used around cats.
• To prevent disease, your cat must be regularly wormed and vaccinated (as per veterinary recommendations), and flea control must also be undertaken. Accommodation should provide good ventilation, as this is vital to prevent build up of odours that can cause respiratory problems in cats.
• Hygiene and odour shouldn’t be a problem as long as your cat uses its litter tray and the tray is cleaned regularly. However, in the event of your cat soiling the ground in the enclosure, you may have to consider adding some type of flooring. This could be as simple as installing small gauge wire mesh on the floor, to prevent cats from digging and soiling in the dirt. Alternatively, you could install concrete or timber flooring that will be easy to hose down.
3. Free standing cat enclosure
16 Department of Economic Development, Jobs, Transport and Resources
• Cats require plenty of social contact with owners. This can be achieved by providing access to the house through a cat door (and tunnel if applicable).
• Each enclosure should provide a scratching pole and be designed to provide cats with at least two platforms at different heights. The platforms should be connected by static (eg planks) or swinging walkways. Cats should also have access to climbing frames and an interesting visual outlook.
• In a group enclosure a number of hiding and escape areas should be provided to enable cats to avoid aggression from other cats.
• The size of your enclosure will depend on the number of cats you wish to house, and how well they get on. The floor area of an enclosure must be at least two square metres for each cat, with a minimum height of two metres, plus tunnels and auxiliary enclosures. These dimensions are based on the presumption that cats will also have regular access to the house.
A basic walk in unit is an essential start to your design and should incorporate a weatherproof sleeping compartment with a raised bed or hammock, together with a specific feeding area. Don’t forget to provide a separate bowl for each cat.
This basic unit can be linked to one or a number of auxiliary enclosures by means of wire tunnels – see Figure 10 for an example of a finished free standing cat enclosure. The enclosures are made from an open welded mesh and can be used to keep the litter tray well away from the main eating and sleeping area.
17How to build cat proof fencing and cat enclosures
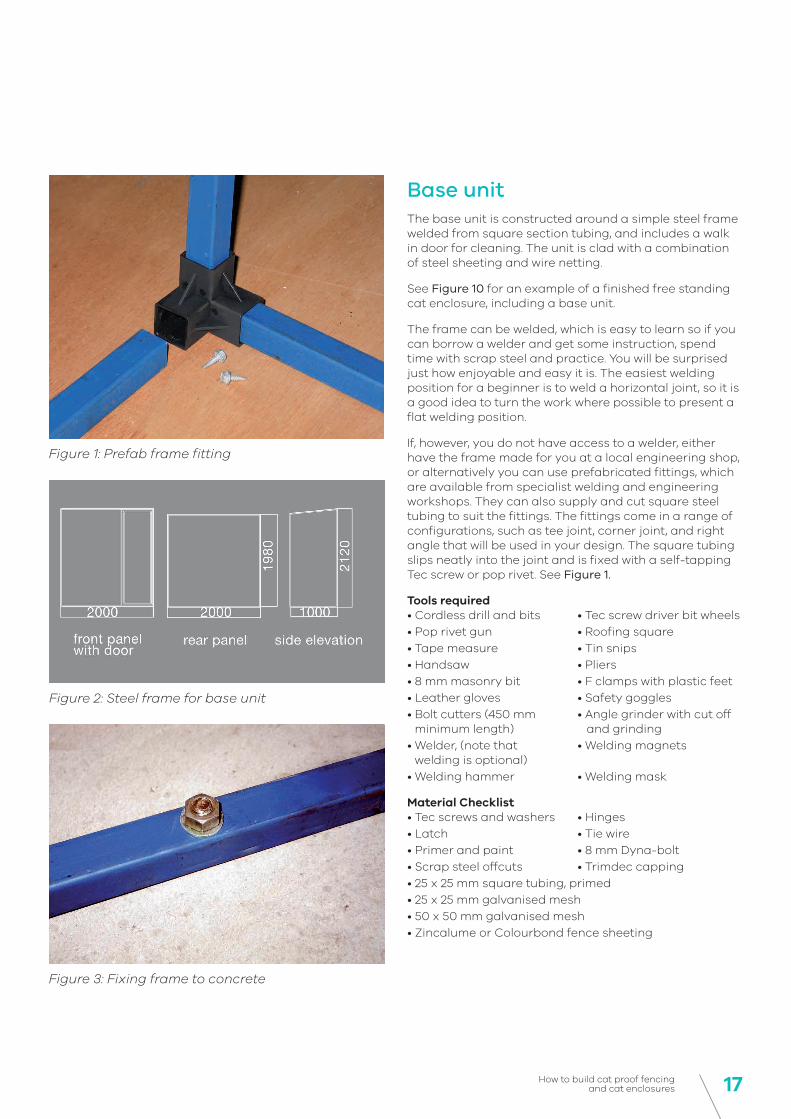
Base unit The base unit is constructed around a simple steel frame welded from square section tubing, and includes a walk in door for cleaning. The unit is clad with a combination of steel sheeting and wire netting.
See Figure 10 for an example of a finished free standing cat enclosure, including a base unit.
The frame can be welded, which is easy to learn so if you can borrow a welder and get some instruction, spend time with scrap steel and practice. You will be surprised just how enjoyable and easy it is. The easiest welding position for a beginner is to weld a horizontal joint, so it is a good idea to turn the work where possible to present a flat welding position.
If, however, you do not have access to a welder, either have the frame made for you at a local engineering shop, or alternatively you can use prefabricated fittings, which are available from specialist welding and engineering workshops. They can also supply and cut square steel tubing to suit the fittings. The fittings come in a range of configurations, such as tee joint, corner joint, and right angle that will be used in your design. The square tubing slips neatly into the joint and is fixed with a self-tapping Tec screw or pop rivet. See Figure 1.
Tools required • Cordless drill and bits • Tec screw driver bit wheels • Pop rivet gun • Roofing square • Tape measure • Tin snips • Handsaw • Pliers • 8 mm masonry bit • F clamps with plastic feet• Leather gloves • Safety goggles• Bolt cutters (450 mm • Angle grinder with cut off
minimum length) and grinding • Welder, (note that • Welding magnets
welding is optional) • Welding hammer • Welding mask
Material Checklist • Tec screws and washers • Hinges • Latch • Tie wire • Primer and paint • 8 mm Dyna-bolt • Scrap steel offcuts • Trimdec capping • 25 x 25 mm square tubing, primed • 25 x 25 mm galvanised mesh • 50 x 50 mm galvanised mesh • Zincalume or Colourbond fence sheeting
Figure 1: Prefab frame fitting
Figure 2: Steel frame for base unit
Figure 3: Fixing frame to concrete
18 Department of Economic Development, Jobs, Transport and Resources
Construction Step 1 – Design First read through the step-by-step instructions to familiarise yourself with the component units and the construction techniques and then establish the number and type of units that you require.
Go outside and decide on your preferred layout, marking it out with pegs, paint or tape. See page 10, Construction Step 1, for an example of a stringline set out. It is a good idea to leave this set out overnight, and return the next day with fresh eyes and ideas. Once you have decided on your layout, draw a simple plan to work from on 1 cm x 1 cm square graph paper to give you a 1:100 scale drawing. Use the plan to make up a materials and cutting list and begin work, following the simple step-by-step instructions.
Step 2 – Prepare a cutting list Working from your plan, prepare a materials and cutting list. Here is a sample-cutting list that has been taken from the drawing of the basic unit in Figure 2 which constructs an approximate 1 x 2 metre enclosure (which is the minimum size per cat – see “Design Considerations” on page 15 for details).
Prepare a similar cutting list from your plan.
Material 25 x 25 mm tubing Quantity Size
Front panel uprights 2 2050 mm
Door jamb 1 2050 mm
Top and bottom rails 2 2000 mm
Door 2 19800 mm
2 680 mm
Rear panel uprights 2 1900 mm
Top and bottom rails 2 2000 mm
Roof support 2 1060 mm
Bottom side rails 2 1000 mm
Cut 25 x 25 mm square tubing to length with an angle grinder and cut off wheel ensuring that all cuts are square. Alternatively, your steel supplier can provide tubing cut to size and give you clean accurate burr free joints that are easy to weld.

19How to build cat proof fencing and cat enclosures
Step 3 – Assembling the steel frame Welding
Lay out the components for the front frame on a flat surface and tack weld the joints. Check the joints are square with a roofing square and finish the welds. Make up a door to suit the opening. Lay the door in position and fix to the doorframe by welding hinges and latch.
Using this finished frame as a jig, lay out the back frame components on top and weld the joints.
To join the front to the back it is best to enlist another pair of hands to hold everything in position. Weld the two bottom rails in position, and gently tip the structure on its side and weld the roof joints, continually checking it is square as you go. Weld in the internal brackets for fixing points for beds, climbing ramps, feed or water stations. The structure may appear a little unstable at this stage, but there is no need to worry, as the cladding will provide adequate bracing when fixed. Check all joints and grind off any excess welds and burrs. Prime the joints with metal primer and then finish with a good quality exterior paint.
Welding tips
• Have water handy when welding to cool the welds.
• A welding magnet can be used to hold components in place when tack welding joints.
• If you are using an arc welder then pick off the slag from the welded joint as you go and weld again where necessary.
• If you live in a coastal area use a salt resistant sheet steel cladding.
Alternative to welding
When using prefabricated joiners (see Figure 1) follow the same construction order, fixing each joint as you go. Use self-drilling Tec screws or bolts to attach the door hinges, latch and fittings and finish the frame with a good quality exterior paint.
Step 4 – Installation If fixing on a concrete base, first check it is square by measuring corner to corner. See page 10, Construction Step 1, for an example of a stringline set out. Fix the bottom rails with 8 mm Dyna-bolt. See Figure 3.
Where there is no concrete base, fix the frame directly to the ground with tent pegs driven through holes drilled in the bottom rail.
Figure 4: Door closeup
Figure 5: Fixing light mesh
Figure 6: Cladding

20 Department of Economic Development, Jobs, Transport and Resources
Step 5 – Door If you find that the finished door lacks rigidity then clad the bottom section with metal cladding which will act as a brace. The hinges and latch are fitted to the frame on the outside with welds or self drilling Tec screws. See Figure 4. Give some thought to a childproof locking system.
Step 6 – Cladding First establish the shelter requirements for your base unit and plan which areas will be covered with sheet steel and wire mesh.
Mesh
Cut each metal mesh panel to size and fix with self drilling Tec screws and washers. See Figure 5. Do not fix the edges that will be later covered with the steel cladding.
Sheeting
Calculate the sheet sizes required, bearing in mind that the standard cover is 760 mm per sheet. The material is available in a range of stock lengths that you can cut to size with an angle grinder and cut off wheel. The cladding is fixed with self-tapping Tec screws and a cordless drill. Fix the first panel along the upright steel corner frame and check that the frame is square and then clamp the panel to the horizontal rails. Check again and then fix these edges with the Tec screws. Continue fixing around the frame until completed. See Figure 6.
Roof
Measure the roof opening from corner to corner to check it is square and fix the roof panels across the narrow width. When affixing roof sheets, Tec screws must be used on the high points of ridges in the roof cladding. Now cover the exposed edges of the roof cladding with ‘U’ section steel capping, using self drilling roofing Tec screws. See Figure 7.
Please note: Larger enclosures may require extra roof support.
Figure 7: Sheeting
21How to build cat proof fencing and cat enclosures
Auxiliary mesh enclosures These freestanding units are constructed from 50 x 50 mm galvanised welded mesh, wired together with galvanised tie wire. The size and shape of each enclosure will depend on your requirements and also the stock sizes of mesh that are available from your supplier. Common sheet sizes are 2400 x 1200 mm, 2000 x 1200 mm and 3000 x 2400 mm.
See Figure 10 for an example of a finished free standing cat enclosure, including an auxiliary unit.
Tools required for the job:
• Tape measure • F clamps
• Bolt cutters 450 mm • Roofing square
• Angle grinder • Hammer
• Pliers with wire cutter
Materials list
• Tent pegs or masonry plugs • Galvanised tie wire
• Hardwood post 50 x 50 mm
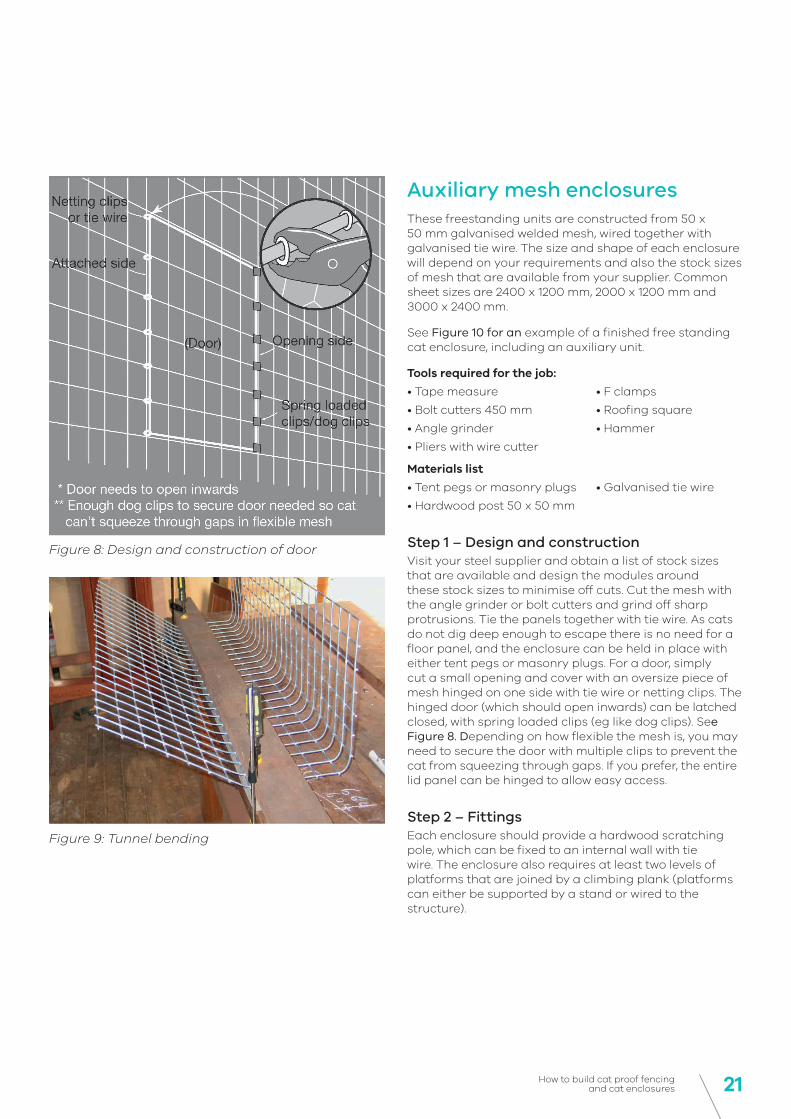
Step 1 – Design and construction Visit your steel supplier and obtain a list of stock sizes that are available and design the modules around these stock sizes to minimise off cuts. Cut the mesh with the angle grinder or bolt cutters and grind off sharp protrusions. Tie the panels together with tie wire. As cats do not dig deep enough to escape there is no need for a floor panel, and the enclosure can be held in place with either tent pegs or masonry plugs. For a door, simply cut a small opening and cover with an oversize piece of mesh hinged on one side with tie wire or netting clips. The hinged door (which should open inwards) can be latched closed, with spring loaded clips (eg like dog clips). See Figure 8. Depending on how flexible the mesh is, you may need to secure the door with multiple clips to prevent the cat from squeezing through gaps. If you prefer, the entire lid panel can be hinged to allow easy access.
Step 2 – Fittings Each enclosure should provide a hardwood scratching pole, which can be fixed to an internal wall with tie wire. The enclosure also requires at least two levels of platforms that are joined by a climbing plank (platforms can either be supported by a stand or wired to the structure).
Figure 8: Design and construction of door
Figure 9: Tunnel bending
22 Department of Economic Development, Jobs, Transport and Resources
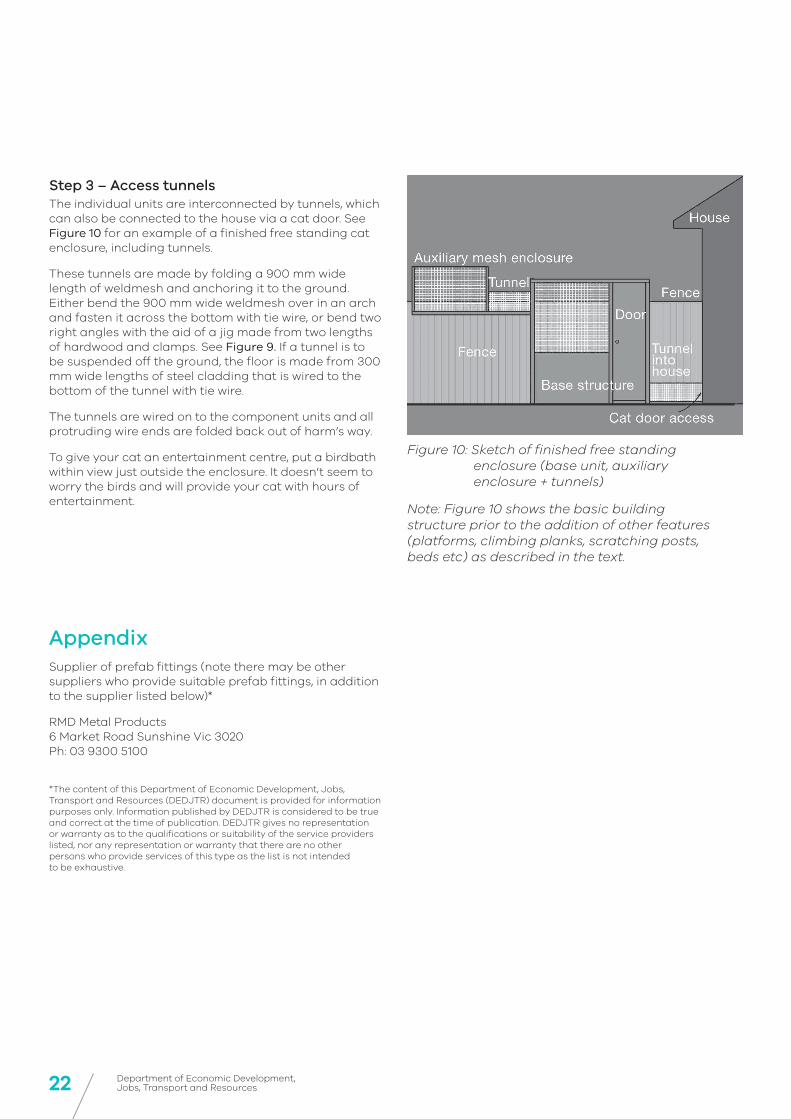
Step 3 – Access tunnels The individual units are interconnected by tunnels, which can also be connected to the house via a cat door. See Figure 10 for an example of a finished free standing cat enclosure, including tunnels.
These tunnels are made by folding a 900 mm wide length of weldmesh and anchoring it to the ground. Either bend the 900 mm wide weldmesh over in an arch and fasten it across the bottom with tie wire, or bend two right angles with the aid of a jig made from two lengths of hardwood and clamps. See Figure 9. If a tunnel is to be suspended off the ground, the floor is made from 300 mm wide lengths of steel cladding that is wired to the bottom of the tunnel with tie wire.
The tunnels are wired on to the component units and all protruding wire ends are folded back out of harm’s way.
To give your cat an entertainment centre, put a birdbath within view just outside the enclosure. It doesn’t seem to worry the birds and will provide your cat with hours of entertainment.
Appendix Supplier of prefab fittings (note there may be other suppliers who provide suitable prefab fittings, in addition to the supplier listed below)*
RMD Metal Products 6 Market Road Sunshine Vic 3020 Ph: 03 9300 5100
*The content of this Department of Economic Development, Jobs, Transport and Resources (DEDJTR) document is provided for information purposes only. Information published by DEDJTR is considered to be true and correct at the time of publication. DEDJTR gives no representation or warranty as to the qualifications or suitability of the service providers listed, nor any representation or warranty that there are no other persons who provide services of this type as the list is not intended to be exhaustive.
Figure 10: Sketch of finished free standing enclosure (base unit, auxiliary enclosure + tunnels)
Note: Figure 10 shows the basic building structure prior to the addition of other features (platforms, climbing planks, scratching posts, beds etc) as described in the text.
23How to build cat proof fencing and cat enclosures
This publication is funded by your cat registration fee In addition, your cat registration fee funds: • A council identification marker for your cat to wear.
• Lost and found service; a guarantee that if your cat is found wearing the council identification marker you will be notified.
• Council services to respond to calls about wandering dogs or dog attacks. This includes the removal of aggressive dogs from the streets, so you can walk in safety.
• Council services to deal with nuisance problems. These services manage issues like barking dogs, cat trespass, and unowned animals.
• Council control of ‘dangerous’, ‘menacing’ and ‘restricted breed’ dogs in your area. This ensures they do not pose a threat to the community.
• Council monitoring of pet shops, boarding kennels, catteries, pounds, shelters, and pet breeding and training businesses. This ensures they meet basic animal welfare standards required by law.
• A State Government education program for schools. This program makes visits to all primary schools in Victoria. It teaches children about how to be a responsible pet owner. For more information, see the website www.agriculture.vic.gov.au/pets/community-and-education
• A State Government education program for pre-schools. This program teaches children and parents how to avoid dog attacks in the home and in public places.
• A State Government education program for prospective and new parents, to teach them about safety with babies and pets. For more information visit wwww.agriculture.vic.gov.au/pets/community-and-education
• State Government research into cat and dog welfare and control issues.
Your local council may also provide any of the following: • Education on how to be a responsible pet owner. This
may include the publication of brochures etc.
• Pet care days or discount microchipping days.
• Programs to subsidise the desexing of pets.
• Rewards for responsible pet owners.
• Activities to encourage dog owners to pick up dog faeces in public places. This may include education, fines, or providing bins and/or scoop facilities in parks.
• Signs for dog on-leash and off-leash areas, and patrols to check that dog owners comply.
• Education to prevent dog attacks.
Every cat and dog three months of age and over must be registered with your local council. Existing registrations must be renewed by 10 April each year.
If you would like to receive this information/publication in an accessible format (such as large print or audio) please call the Customer Service Centre on 136 186, TTY 1800 122 969, or email customer.service@ ecodev.vic.gov.au.
Published by the Department of Economic Development, Jobs, Transport and Resources, January 2016.
© The State of Victoria 2016.
This publication is copyright. No part may be reproduced by any process except in accordance with the provisions of the Copyright Act 1968.
Authorised by the Department of Economic Development, Jobs, Transport and Resources, 1 Spring Street, Melbourne 3000.
ISBN 1 74146 684 9
Disclaimer This publication may be of assistance to you but the State of Victoria and its employees do not guarantee that the publication is without flaw of any kind or is wholly appropriate for your particular purposes and therefore disclaims all liability for any error, loss or other consequence which may arise from you relying on any information in this publication.
Animal Welfare - it’s your Duty to Care
For more advice or information Call your local council if you have questions about your rights and responsibilities as a pet owner. Your council will also deal with concerns about wandering or nuisance pets.
Advice is also available from animal welfare shelters, vets and pet clubs. Visit www.vic.gov.au/pets for contact details for such organisations, or call the DEDJTR Customer Service Centre on 136 186 for the cost of a local call. Call your local council to order free responsible pet ownership brochures on a range of topics. Fact sheets are also available online at www.vic.gov.au/pets.
Acknowledgments Thanks to Bill Plant ([email protected], phone 03 5722 1217), who prepared the building instructions for this booklet. Thanks to Annabel Woodward who volunteered to trial the cat proof fencing, and also to Wendy Height for trialing the cat proof fencing and in particular allowing us to test several different variations.
vic.gov.au/pets