Embed Size (px)
Citation preview

1
HOW TO CLEAN AND LUBE YOUR XJ IGNITION SWITCH
(and feel good about yourself doing it) Sometimes, you run into life’s little trouble spots. So does your ignition switch. Whether you’re having to change out a damaged key plug, the key doesn’t quite want to go in, or it just needs a good cleaning, that’s what we’re here for. (When you’re done, you can treat yourself to a pizza.) Before we break this down, you might want to get an idea of what’s inside. XJBikes.com user FlyGP has created a 3D model of what’s in the switch – it can be seen at http://www.youtube.com/watch?v=bRLEmM8GOY8. It may look intimidating, but as with most tasks on our bikes, it’s really not that difficult once you get into it. For the sake of simplicity, and because methods vary widely across models, we’ll start with the ignition switch module already removed from the bike. Our model unit comes off an ’82 650 Maxim.
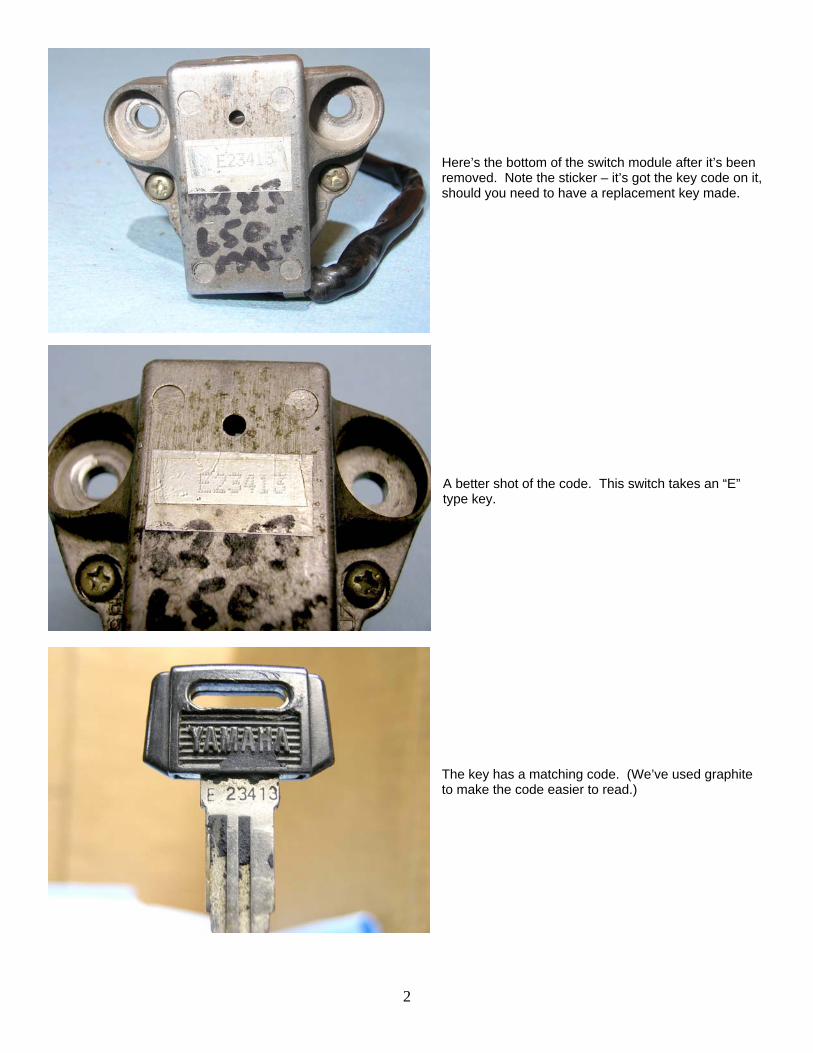
2
Here’s the bottom of the switch module after it’s been removed. Note the sticker – it’s got the key code on it, should you need to have a replacement key made. A better shot of the code. This switch takes an “E” type key. The key has a matching code. (We’ve used graphite to make the code easier to read.)
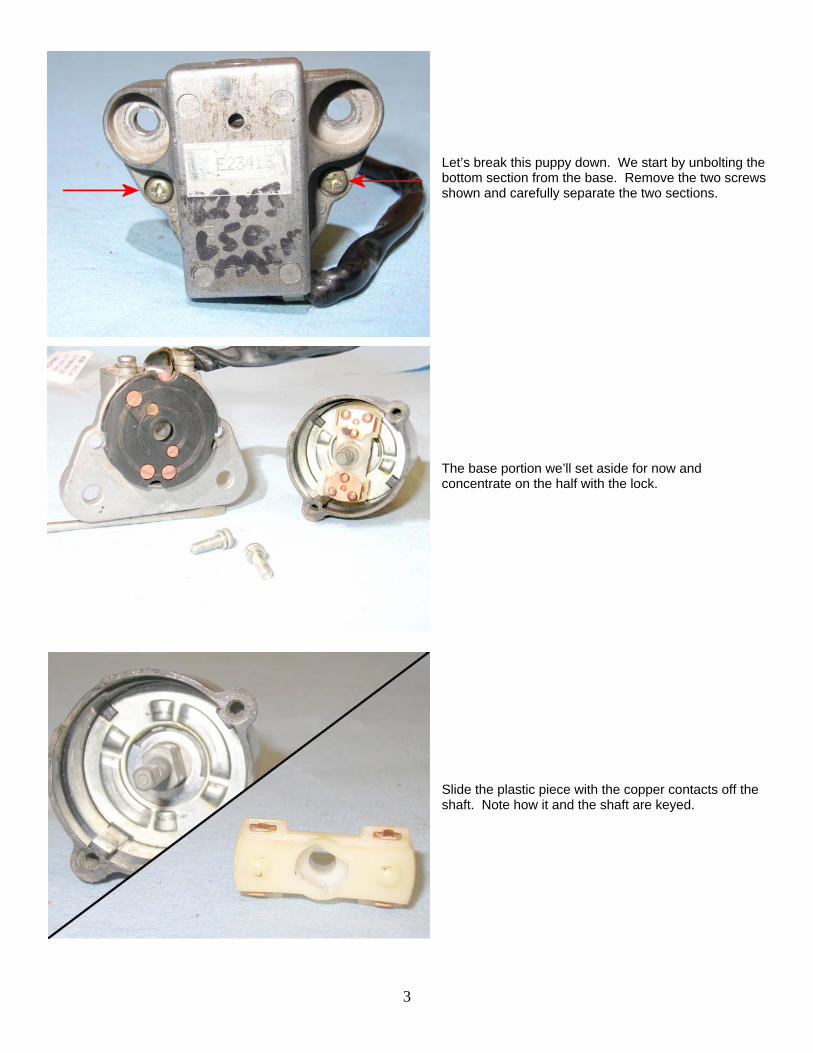
3
Let’s break this puppy down. We start by unbolting the bottom section from the base. Remove the two screws shown and carefully separate the two sections. The base portion we’ll set aside for now and concentrate on the half with the lock. Slide the plastic piece with the copper contacts off the shaft. Note how it and the shaft are keyed.
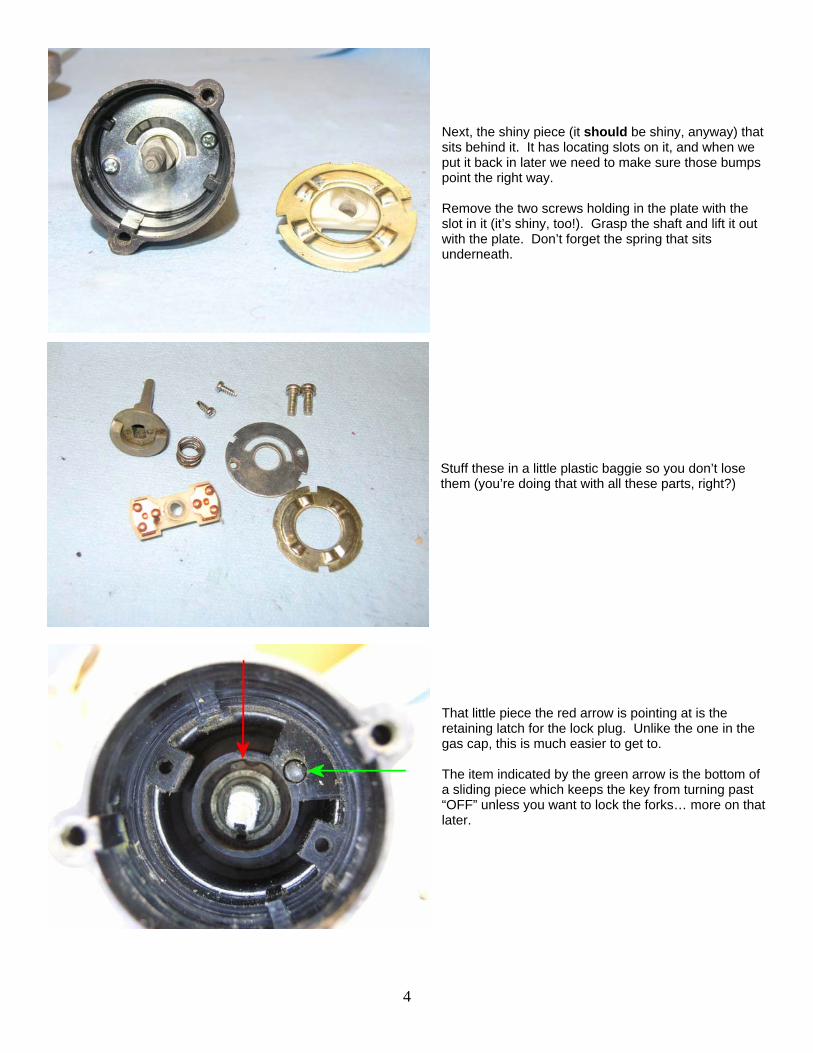
4
Next, the shiny piece (it should be shiny, anyway) that sits behind it. It has locating slots on it, and when we put it back in later we need to make sure those bumps point the right way. Remove the two screws holding in the plate with the slot in it (it’s shiny, too!). Grasp the shaft and lift it out with the plate. Don’t forget the spring that sits underneath. Stuff these in a little plastic baggie so you don’t lose them (you’re doing that with all these parts, right?) That little piece the red arrow is pointing at is the retaining latch for the lock plug. Unlike the one in the gas cap, this is much easier to get to. The item indicated by the green arrow is the bottom of a sliding piece which keeps the key from turning past “OFF” unless you want to lock the forks… more on that later.
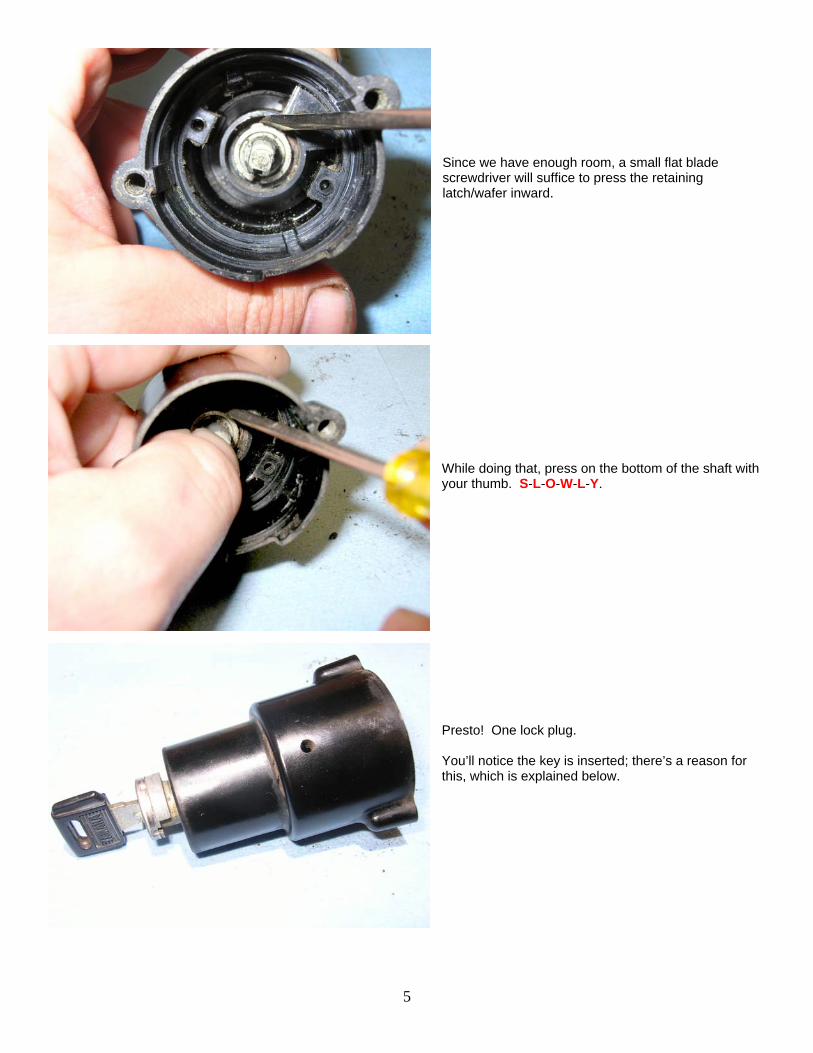
5
Since we have enough room, a small flat blade screwdriver will suffice to press the retaining latch/wafer inward. While doing that, press on the bottom of the shaft with your thumb. S-L-O-W-L-Y. Presto! One lock plug. You’ll notice the key is inserted; there’s a reason for this, which is explained below.
6
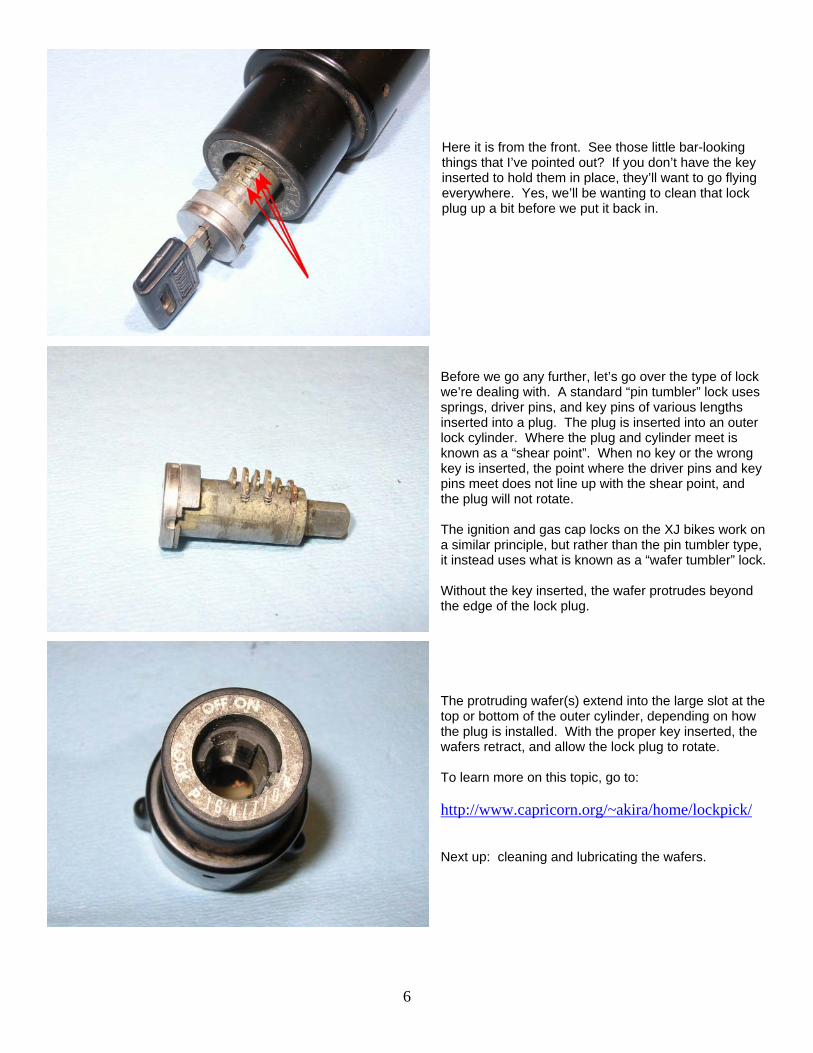
Here it is from the front. See those little bar-looking things that I’ve pointed out? If you don’t have the key inserted to hold them in place, they’ll want to go flying everywhere. Yes, we’ll be wanting to clean that lock plug up a bit before we put it back in. Before we go any further, let’s go over the type of lock we’re dealing with. A standard “pin tumbler” lock uses springs, driver pins, and key pins of various lengths inserted into a plug. The plug is inserted into an outer lock cylinder. Where the plug and cylinder meet is known as a “shear point”. When no key or the wrong key is inserted, the point where the driver pins and key pins meet does not line up with the shear point, and the plug will not rotate. The ignition and gas cap locks on the XJ bikes work on a similar principle, but rather than the pin tumbler type, it instead uses what is known as a “wafer tumbler” lock. Without the key inserted, the wafer protrudes beyond the edge of the lock plug. The protruding wafer(s) extend into the large slot at the top or bottom of the outer cylinder, depending on how the plug is installed. With the proper key inserted, the wafers retract, and allow the lock plug to rotate. To learn more on this topic, go to: http://www.capricorn.org/~akira/home/lockpick/ Next up: cleaning and lubricating the wafers.
7
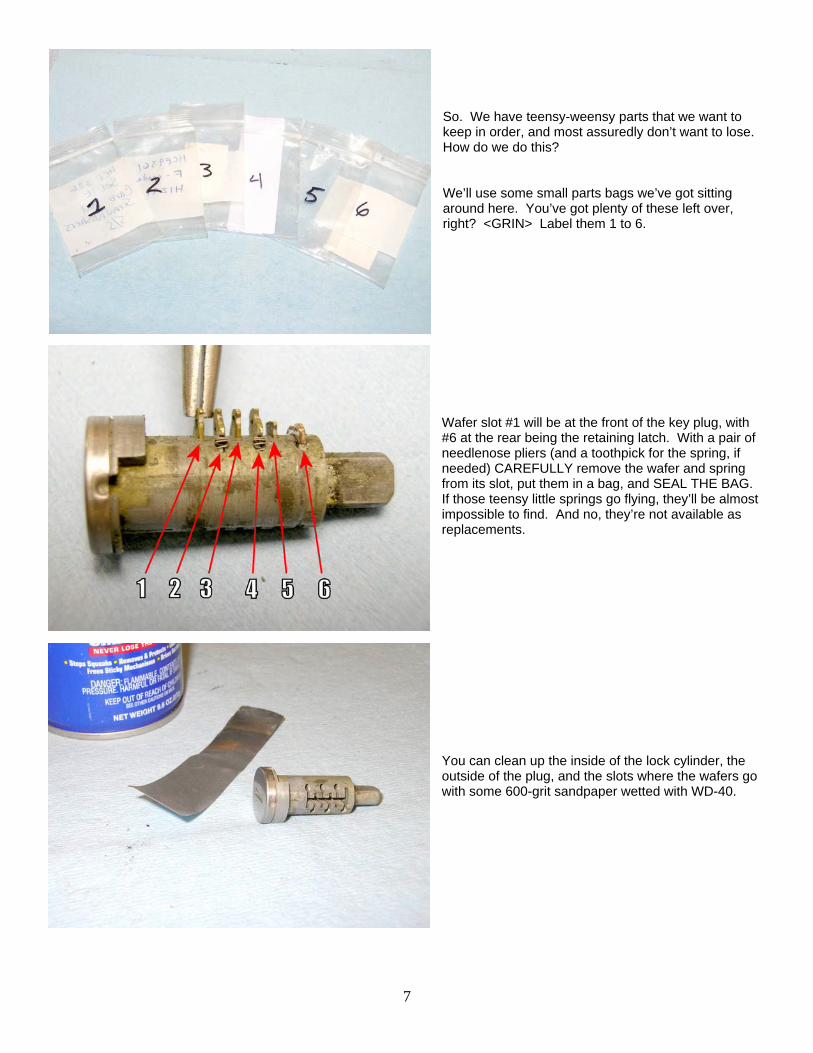
So. We have teensy-weensy parts that we want to keep in order, and most assuredly don’t want to lose. How do we do this? We’ll use some small parts bags we’ve got sitting around here. You’ve got plenty of these left over, right? <GRIN> Label them 1 to 6. Wafer slot #1 will be at the front of the key plug, with #6 at the rear being the retaining latch. With a pair of needlenose pliers (and a toothpick for the spring, if needed) CAREFULLY remove the wafer and spring from its slot, put them in a bag, and SEAL THE BAG. If those teensy little springs go flying, they’ll be almost impossible to find. And no, they’re not available as replacements. You can clean up the inside of the lock cylinder, the outside of the plug, and the slots where the wafers go with some 600-grit sandpaper wetted with WD-40.
8
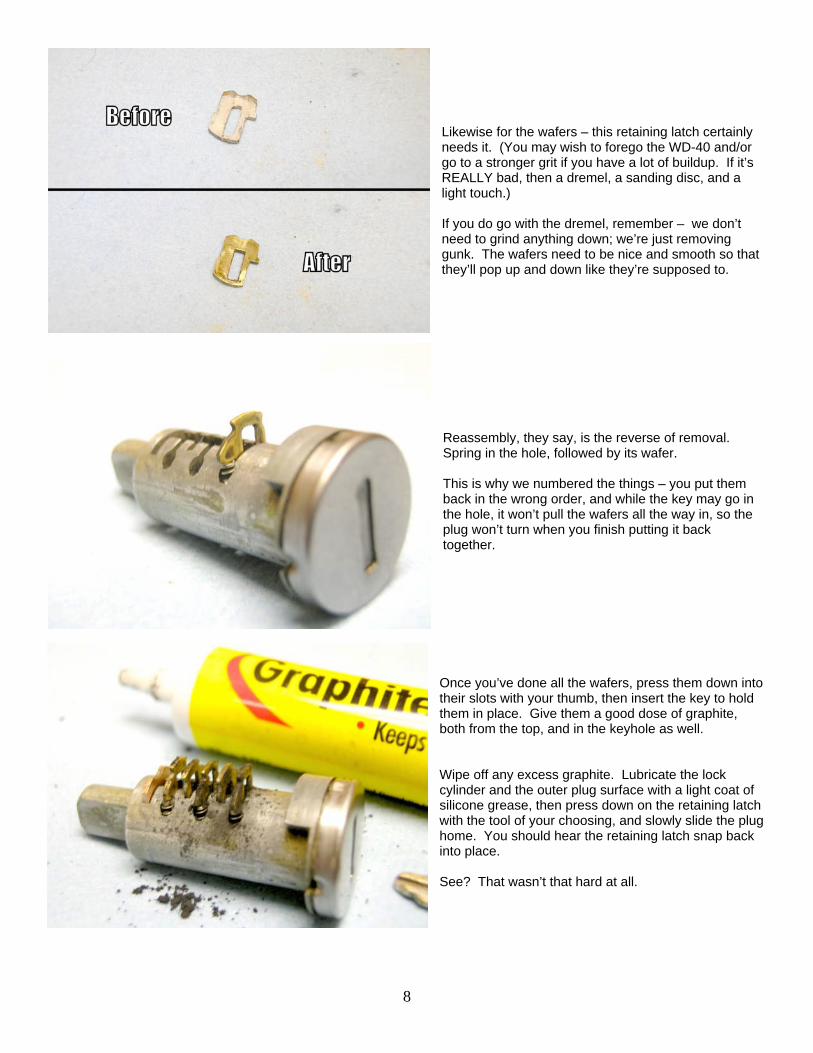
Likewise for the wafers – this retaining latch certainly needs it. (You may wish to forego the WD-40 and/or go to a stronger grit if you have a lot of buildup. If it’s REALLY bad, then a dremel, a sanding disc, and a light touch.) If you do go with the dremel, remember – we don’t need to grind anything down; we’re just removing gunk. The wafers need to be nice and smooth so that they’ll pop up and down like they’re supposed to. Reassembly, they say, is the reverse of removal. Spring in the hole, followed by its wafer. This is why we numbered the things – you put them back in the wrong order, and while the key may go in the hole, it won’t pull the wafers all the way in, so the plug won’t turn when you finish putting it back together. Once you’ve done all the wafers, press them down into their slots with your thumb, then insert the key to hold them in place. Give them a good dose of graphite, both from the top, and in the keyhole as well. Wipe off any excess graphite. Lubricate the lock cylinder and the outer plug surface with a light coat of silicone grease, then press down on the retaining latch with the tool of your choosing, and slowly slide the plug home. You should hear the retaining latch snap back into place. See? That wasn’t that hard at all.
9
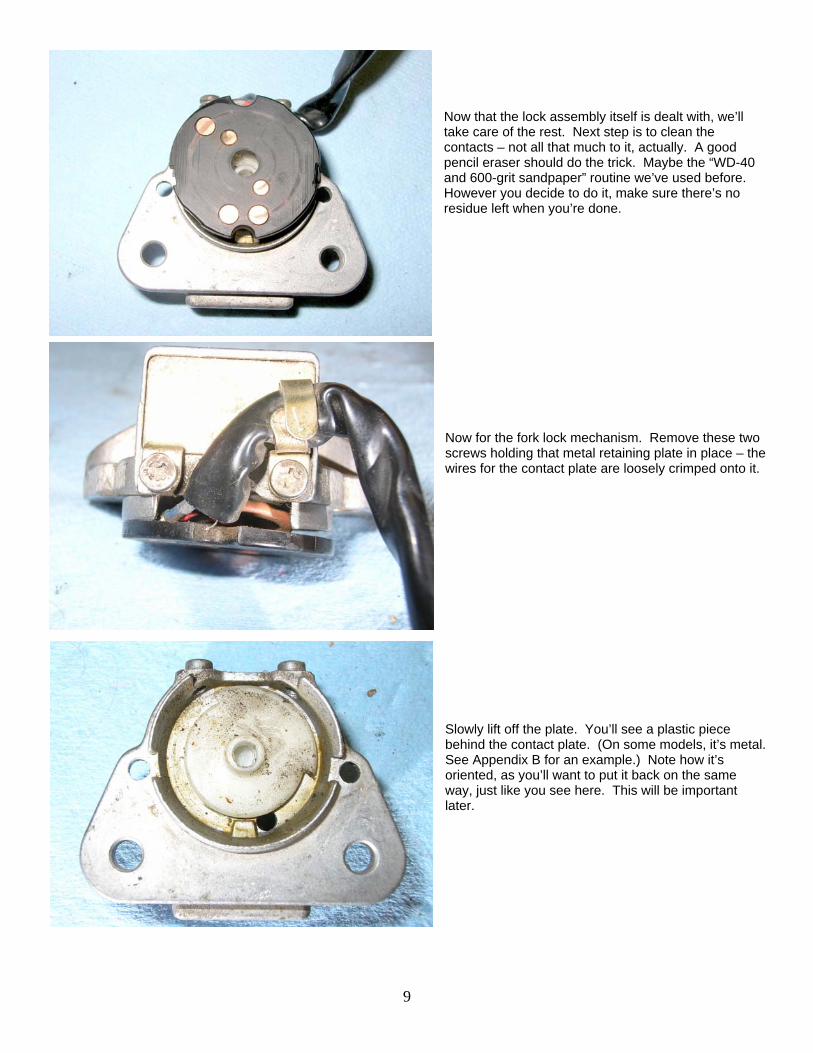
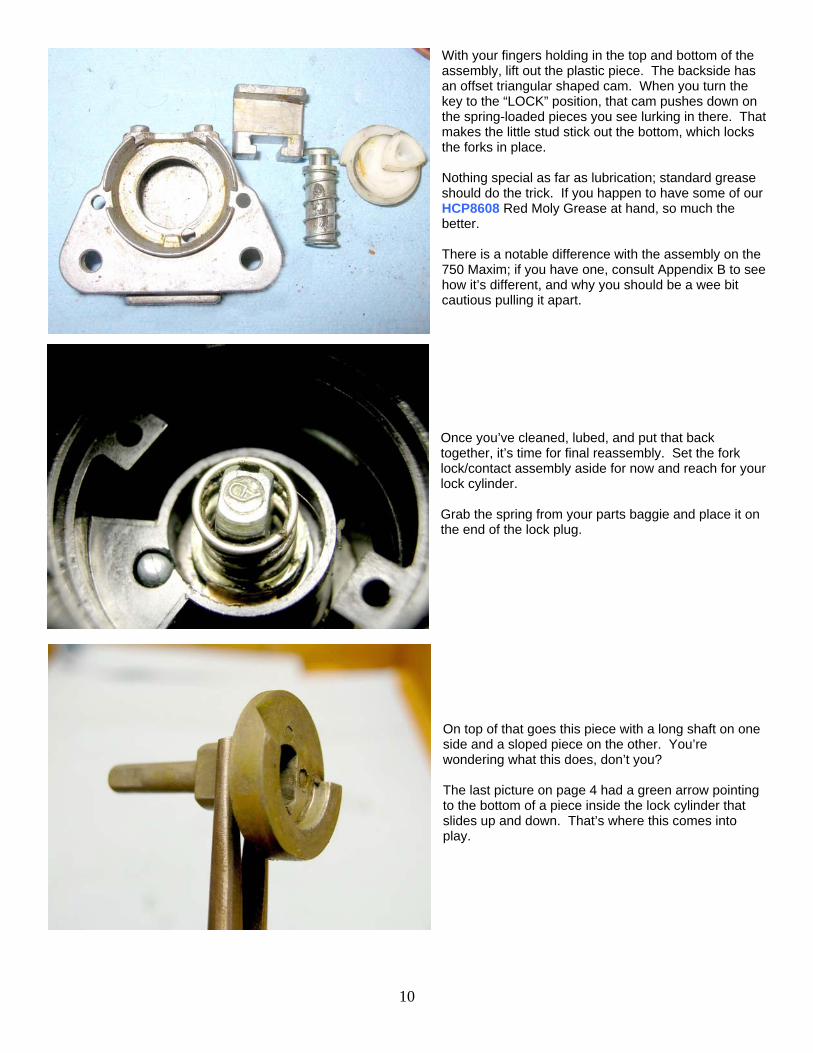
Now that the lock assembly itself is dealt with, we’ll take care of the rest. Next step is to clean the contacts – not all that much to it, actually. A good pencil eraser should do the trick. Maybe the “WD-40 and 600-grit sandpaper” routine we’ve used before. However you decide to do it, make sure there’s no residue left when you’re done. Now for the fork lock mechanism. Remove these two screws holding that metal retaining plate in place – the wires for the contact plate are loosely crimped onto it. Slowly lift off the plate. You’ll see a plastic piece behind the contact plate. (On some models, it’s metal. See Appendix B for an example.) Note how it’s oriented, as you’ll want to put it back on the same way, just like you see here. This will be important later.
10
With your fingers holding in the top and bottom of the assembly, lift out the plastic piece. The backside has an offset triangular shaped cam. When you turn the key to the “LOCK” position, that cam pushes down on the spring-loaded pieces you see lurking in there. That makes the little stud stick out the bottom, which locks the forks in place. Nothing special as far as lubrication; standard grease should do the trick. If you happen to have some of our HCP8608 Red Moly Grease at hand, so much the better. There is a notable difference with the assembly on the 750 Maxim; if you have one, consult Appendix B to see how it’s different, and why you should be a wee bit cautious pulling it apart. Once you’ve cleaned, lubed, and put that back together, it’s time for final reassembly. Set the fork lock/contact assembly aside for now and reach for your lock cylinder. Grab the spring from your parts baggie and place it on the end of the lock plug. On top of that goes this piece with a long shaft on one side and a sloped piece on the other. You’re wondering what this does, don’t you? The last picture on page 4 had a green arrow pointing to the bottom of a piece inside the lock cylinder that slides up and down. That’s where this comes into play.
11
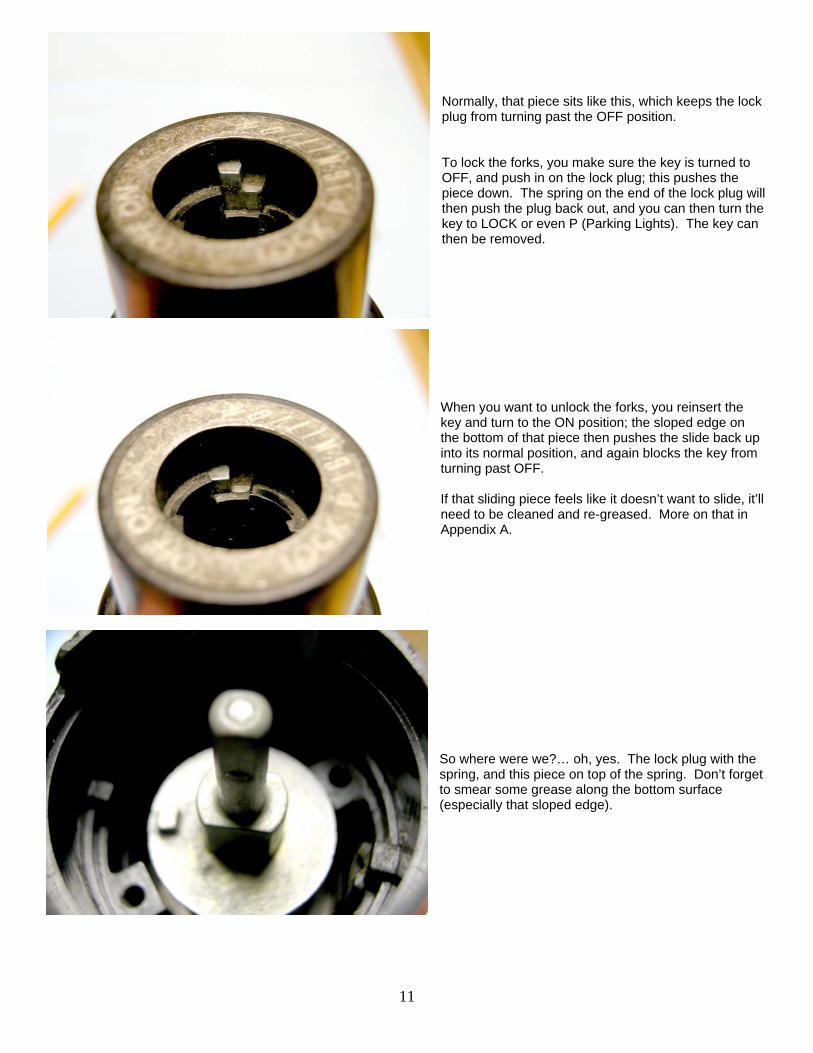
Normally, that piece sits like this, which keeps the lock plug from turning past the OFF position. To lock the forks, you make sure the key is turned to OFF, and push in on the lock plug; this pushes the piece down. The spring on the end of the lock plug will then push the plug back out, and you can then turn the key to LOCK or even P (Parking Lights). The key can then be removed. When you want to unlock the forks, you reinsert the key and turn to the ON position; the sloped edge on the bottom of that piece then pushes the slide back up into its normal position, and again blocks the key from turning past OFF. If that sliding piece feels like it doesn’t want to slide, it’ll need to be cleaned and re-greased. More on that in Appendix A. So where were we?… oh, yes. The lock plug with the spring, and this piece on top of the spring. Don’t forget to smear some grease along the bottom surface (especially that sloped edge).
12
Now, the flat shiny piece with the slot. There are two locating cutouts on the edge. Lightly snug down the two screws (some housings are metal, especially the newer ones, but most of the original ones are plastic, so be careful not to crossthread). Test your work before going further. Turn the key all the way to the right; it should be pointed at ON. You should not be able to turn it left past OFF. Push down on the key and allow it to spring back up; it should turn smoothly to LOCK and P. Turn the key back to the right to OFF. When you turn it back to ON, you should feel a bit of resistance and perhaps hear a click. You should again be unable to turn it past OFF.
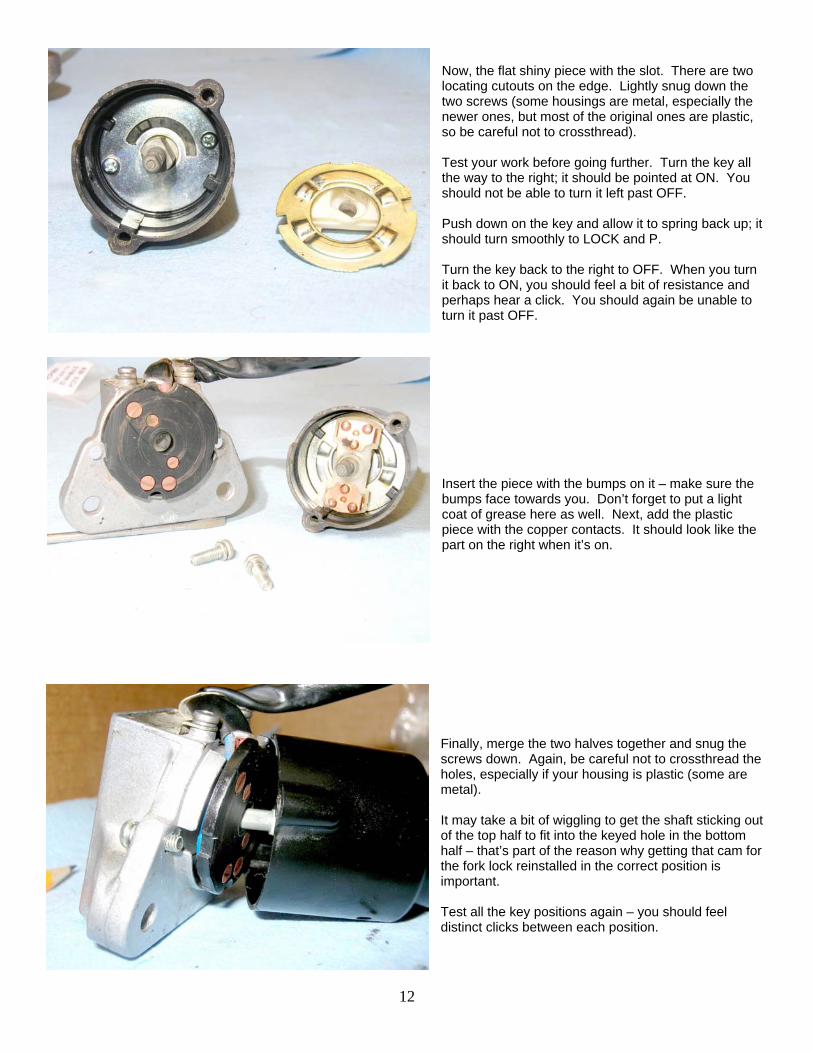
Insert the piece with the bumps on it – make sure the bumps face towards you. Don’t forget to put a light coat of grease here as well. Next, add the plastic piece with the copper contacts. It should look like the part on the right when it’s on.
Finally, merge the two halves together and snug the screws down. Again, be careful not to crossthread the holes, especially if your housing is plastic (some are metal). It may take a bit of wiggling to get the shaft sticking out of the top half to fit into the keyed hole in the bottom half – that’s part of the reason why getting that cam for the fork lock reinstalled in the correct position is important. Test all the key positions again – you should feel distinct clicks between each position.
13
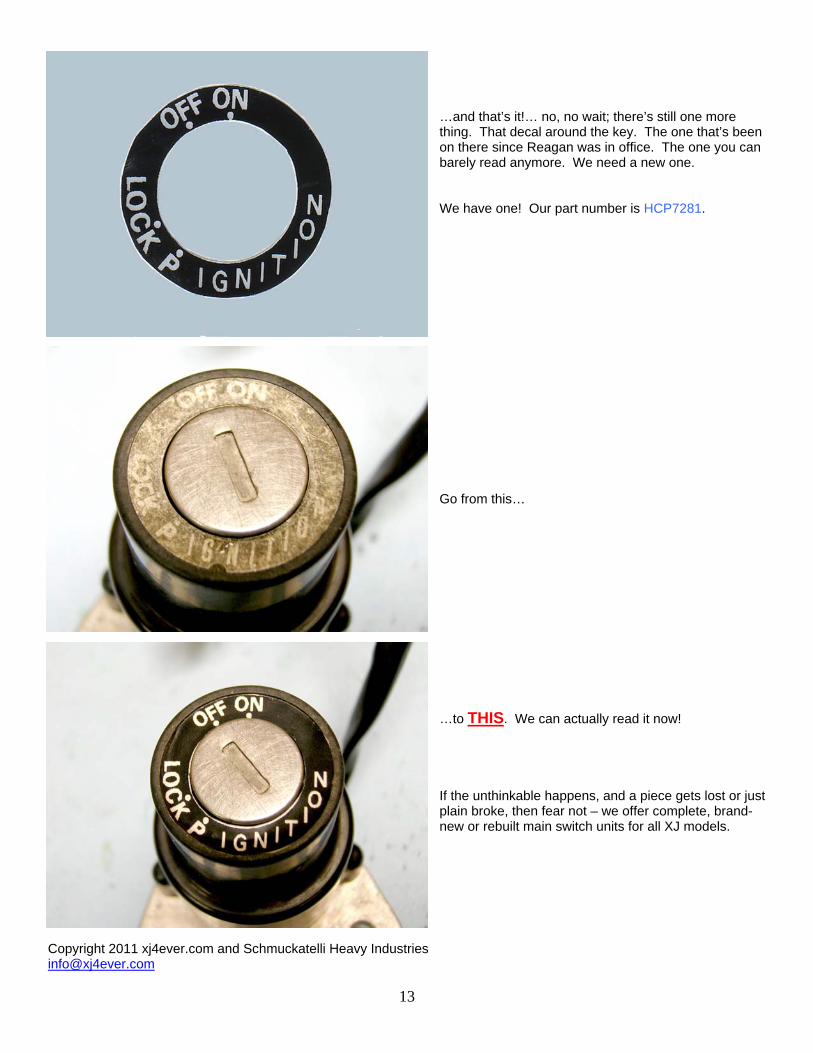
…and that’s it!… no, no wait; there’s still one more thing. That decal around the key. The one that’s been on there since Reagan was in office. The one you can barely read anymore. We need a new one. We have one! Our part number is HCP7281. Go from this… …to THIS. We can actually read it now! If the unthinkable happens, and a piece gets lost or just plain broke, then fear not – we offer complete, brand-new or rebuilt main switch units for all XJ models.
Copyright 2011 xj4ever.com and Schmuckatelli Heavy Industries [email protected]
14
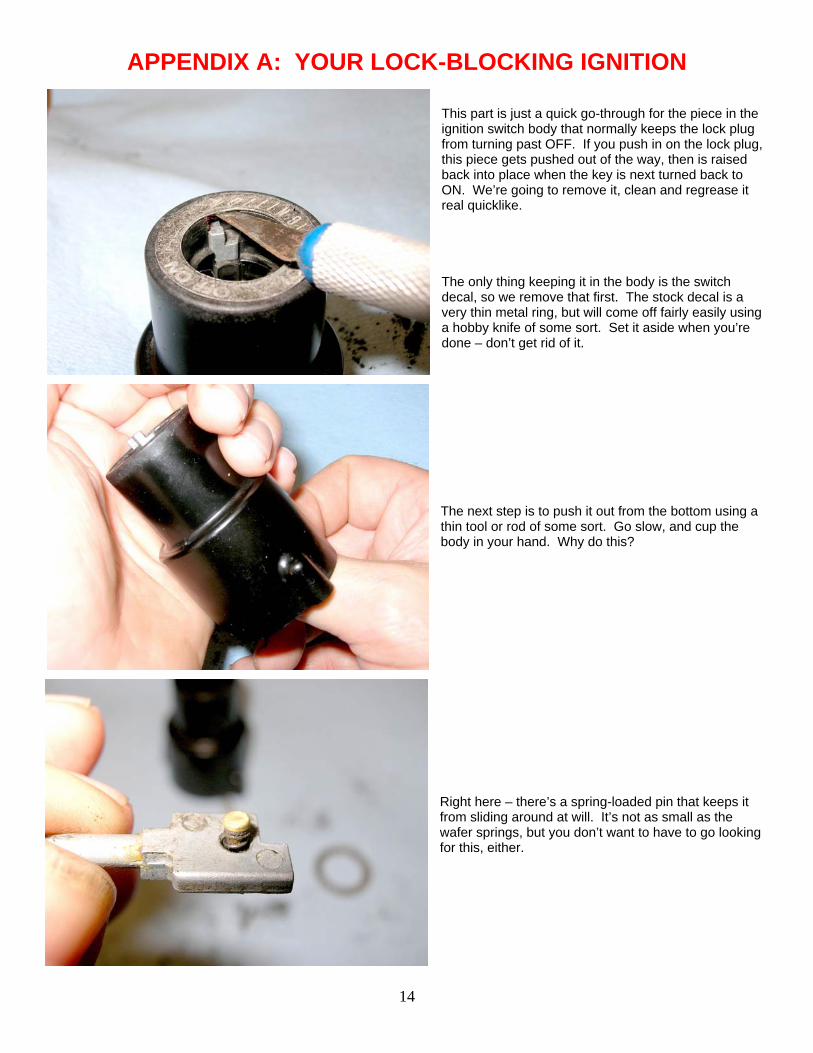
APPENDIX A: YOUR LOCK-BLOCKING IGNITION This part is just a quick go-through for the piece in the ignition switch body that normally keeps the lock plug from turning past OFF. If you push in on the lock plug, this piece gets pushed out of the way, then is raised back into place when the key is next turned back to ON. We’re going to remove it, clean and regrease it real quicklike. The only thing keeping it in the body is the switch decal, so we remove that first. The stock decal is a very thin metal ring, but will come off fairly easily using a hobby knife of some sort. Set it aside when you’re done – don’t get rid of it. The next step is to push it out from the bottom using a thin tool or rod of some sort. Go slow, and cup the body in your hand. Why do this? Right here – there’s a spring-loaded pin that keeps it from sliding around at will. It’s not as small as the wafer springs, but you don’t want to have to go looking for this, either.
15
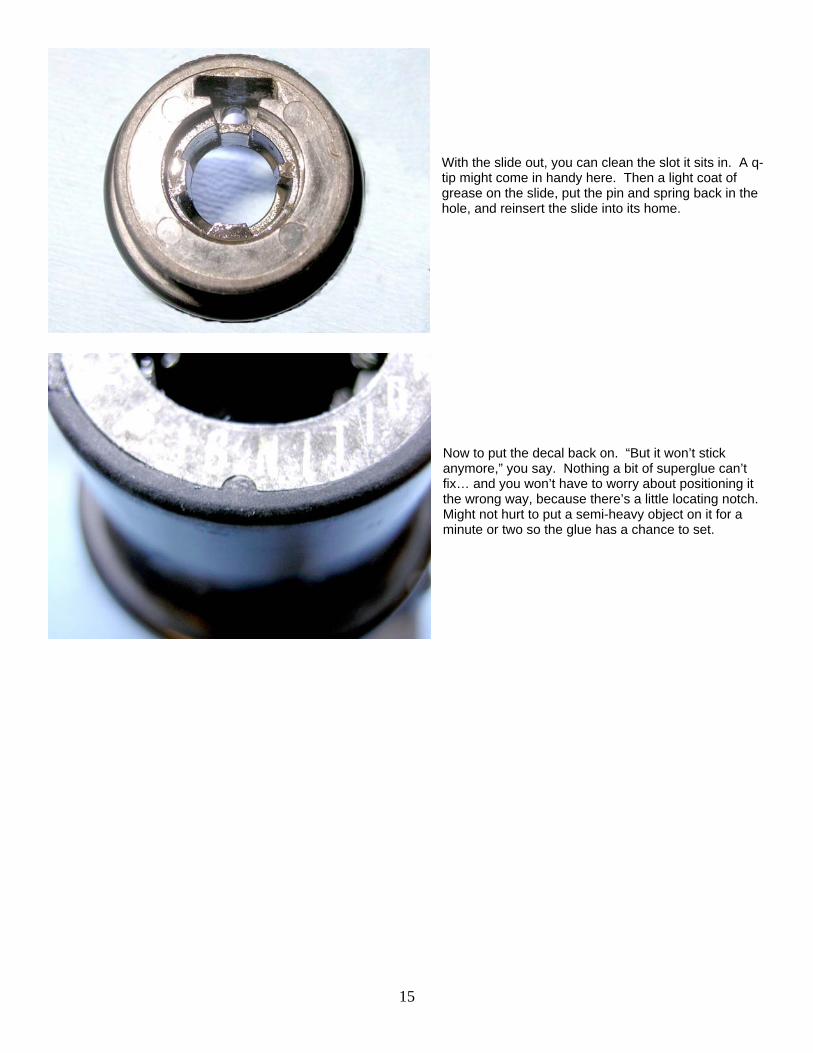
With the slide out, you can clean the slot it sits in. A q-tip might come in handy here. Then a light coat of grease on the slide, put the pin and spring back in the hole, and reinsert the slide into its home. Now to put the decal back on. “But it won’t stick anymore,” you say. Nothing a bit of superglue can’t fix… and you won’t have to worry about positioning it the wrong way, because there’s a little locating notch. Might not hurt to put a semi-heavy object on it for a minute or two so the glue has a chance to set.
16
APPENDIX B: THE 750 MAXIM IGNITION SWITCH AND WHY IT WILL EAT YOUR CHILDREN
(okay, not really) We mentioned earlier that the fork lock assembly differs from the one on our 650 Maxim model. Here’s a quick rundown.
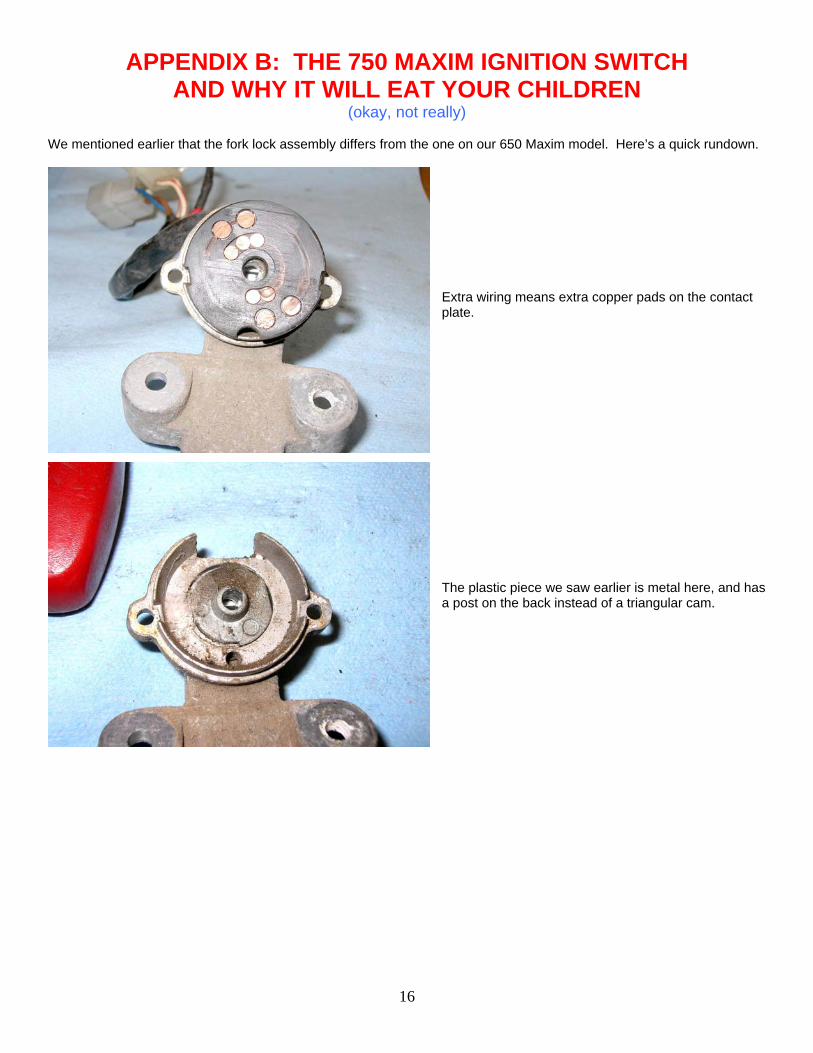
Extra wiring means extra copper pads on the contact plate. The plastic piece we saw earlier is metal here, and has a post on the back instead of a triangular cam.
17
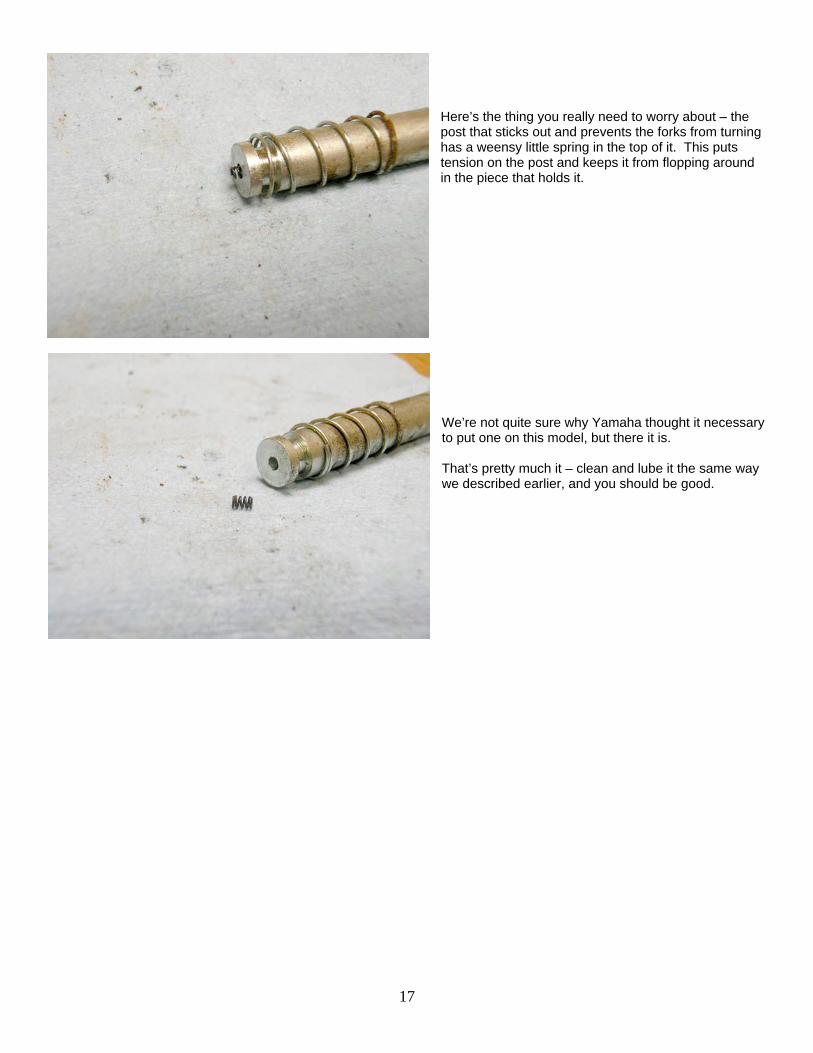
Here’s the thing you really need to worry about – the post that sticks out and prevents the forks from turning has a weensy little spring in the top of it. This puts tension on the post and keeps it from flopping around in the piece that holds it. We’re not quite sure why Yamaha thought it necessary to put one on this model, but there it is. That’s pretty much it – clean and lube it the same way we described earlier, and you should be good.