Embed Size (px)
Citation preview
HOW TO CREATE A
PERSONAL HISTORY PROFILE IN INSPIRA
When applying for UNIC local level posts
This is not an official United Nations document. It is an informal manual prepared by the
Information Centre Services of the United Nations Department of Public Information to provide
further practical assistance to candidates applying to local level posts in the global network of
United Nations Information Centres (global UNIC network). It offers step-by-step guidelines on
how to create a Personal History Profile (PHP) in Inspira, the talent management system of the
United Nations Secretariat. It is not intended to replace the “Applicant’s Manual: Manual for the
Applicant on the Staff Selection System (Inspira)” published by the United Nations Office for Human
Resources Management, which should be used when applying for job openings on the United
Nations Careers Portal (http://careers.un.org).
HOW TO CREATE A PERSONAL HISTORY PROFILE (PHP) IN INSPIRA
2
Table of Contents
1 Checklist ............................................................................................................................................................................. 3
1.1 Work Experience .................................................................................................................................................. 3
1.2 Education Details ................................................................................................................................................. 3
2 Accessing Inspira ........................................................................................................................................................... 3
2.1 Login or Register .................................................................................................................................................. 3
2.2 Inspira Account Registration ........................................................................................................................... 4
3 Your Profile....................................................................................................................................................................... 5
3.1 Accessing Your Profile ........................................................................................................................................ 5
3.2 Personal Details .................................................................................................................................................... 5
3.3 Family Details ........................................................................................................................................................ 6
3.4 Nationality and Residence ................................................................................................................................ 7
4 Building a PHP ................................................................................................................................................................. 8
4.1 Creating a New PHP ............................................................................................................................................ 8
4.2 Employment Preferences .................................................................................................................................. 9
4.3 Education and Work Experience ................................................................................................................. 11
4.3.1 Adding Work Experience ....................................................................................................................... 12
4.3.2 Adding Education Details ...................................................................................................................... 15
4.3.3 Searching for a Duty Station................................................................................................................. 17
4.3.4 Searching for an Educational Institution ........................................................................................ 18
4.4 Skills (Certificates, Languages, Publications) ......................................................................................... 19
4.4.1 Adding Certificates (obtained through the United Nations) ................................................... 19
4.4.2 Adding Certificates (not obtained through the United Nations) ........................................... 20
4.4.3 Adding Languages .................................................................................................................................... 21
4.4.4 Adding Publications ................................................................................................................................. 22
4.5 References ............................................................................................................................................................. 23
4.6 Cover Letter and Additional Information ................................................................................................. 24
5 Modifying or Deleting a PHP ................................................................................................................................... 26
5.1 Modifying or Deleting Work Experience .................................................................................................. 27
5.2 Modifying or Deleting an Education Detail .............................................................................................. 28
6 Downloading/Printing a PHP ................................................................................................................................. 29
HOW TO CREATE A PERSONAL HISTORY PROFILE (PHP) IN INSPIRA
3
1 Checklist
It is recommended to have the following information on hand before creating your PHP.
1.1 Work Experience
1. Current and previous jobs held.
2. Name, address and telephone number of current and previous employers.
3. Name and email address of current and previous supervisors.
4. Employment start date and end date, including salary history.
5. Job title (if relevant) and the main duties and responsibilities performed on a daily basis for
each job listed.
6. Summary of achievements for each job listed.
1.2 Education Details
1. Name of educational institutions attended from age 14.
2. Courses attended, including its start and end dates.
3. Diplomas and/or degrees obtained.
4. Postal and website addresses of educational institution attended.
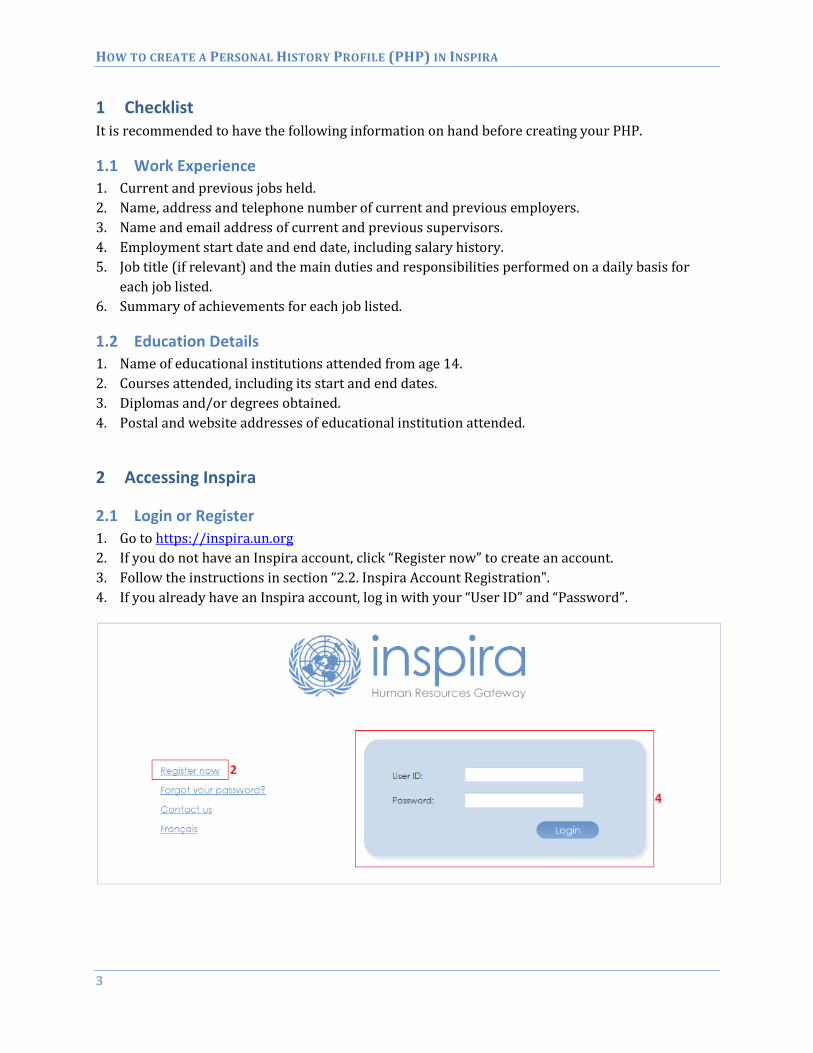
2 Accessing Inspira
2.1 Login or Register
1. Go to https://inspira.un.org
2. If you do not have an Inspira account, click “Register now” to create an account.
3. Follow the instructions in section “2.2. Inspira Account Registration".
4. If you already have an Inspira account, log in with your “User ID” and “Password”.
HOW TO CREATE A PERSONAL HISTORY PROFILE (PHP) IN INSPIRA
4
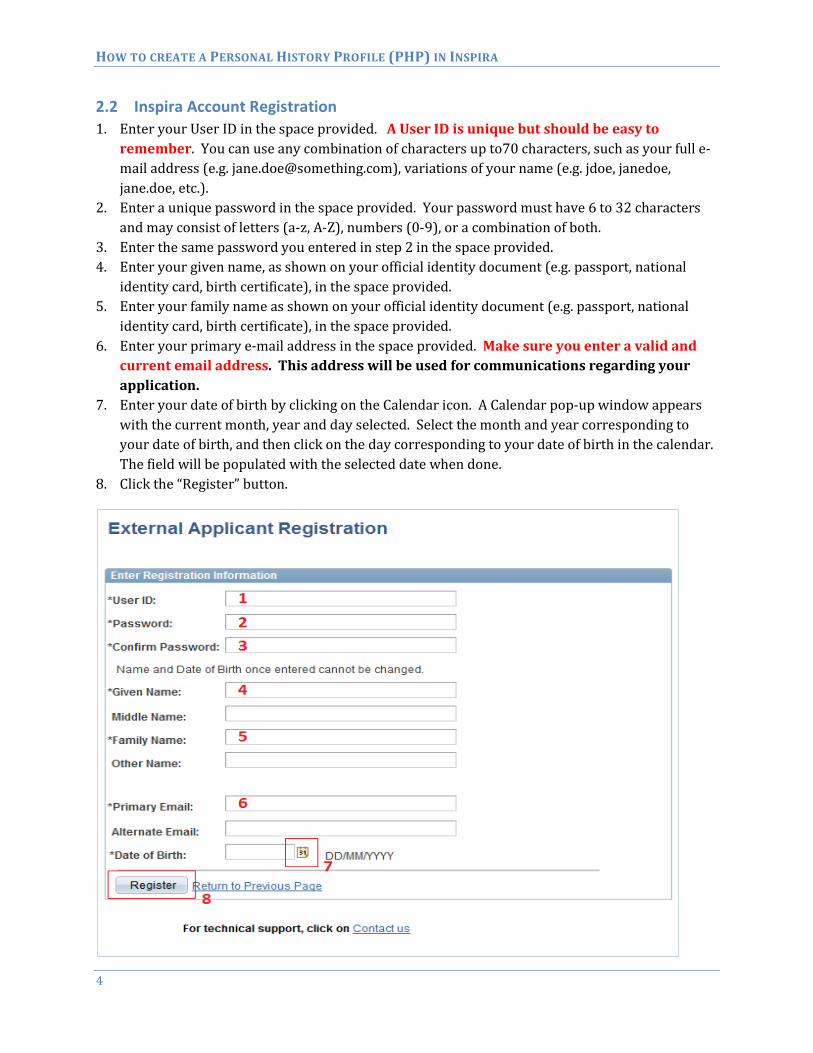
2.2 Inspira Account Registration
1. Enter your User ID in the space provided. A User ID is unique but should be easy to
remember. You can use any combination of characters up to70 characters, such as your full e-
mail address (e.g. [email protected]), variations of your name (e.g. jdoe, janedoe,
jane.doe, etc.).
2. Enter a unique password in the space provided. Your password must have 6 to 32 characters
and may consist of letters (a-z, A-Z), numbers (0-9), or a combination of both.
3. Enter the same password you entered in step 2 in the space provided.
4. Enter your given name, as shown on your official identity document (e.g. passport, national
identity card, birth certificate), in the space provided.
5. Enter your family name as shown on your official identity document (e.g. passport, national
identity card, birth certificate), in the space provided.
6. Enter your primary e-mail address in the space provided. Make sure you enter a valid and
current email address. This address will be used for communications regarding your
application.
7. Enter your date of birth by clicking on the Calendar icon. A Calendar pop-up window appears
with the current month, year and day selected. Select the month and year corresponding to
your date of birth, and then click on the day corresponding to your date of birth in the calendar.
The field will be populated with the selected date when done.
8. Click the “Register” button.
HOW TO CREATE A PERSONAL HISTORY PROFILE (PHP) IN INSPIRA
5
3 Your Profile
3.1 Accessing Your Profile
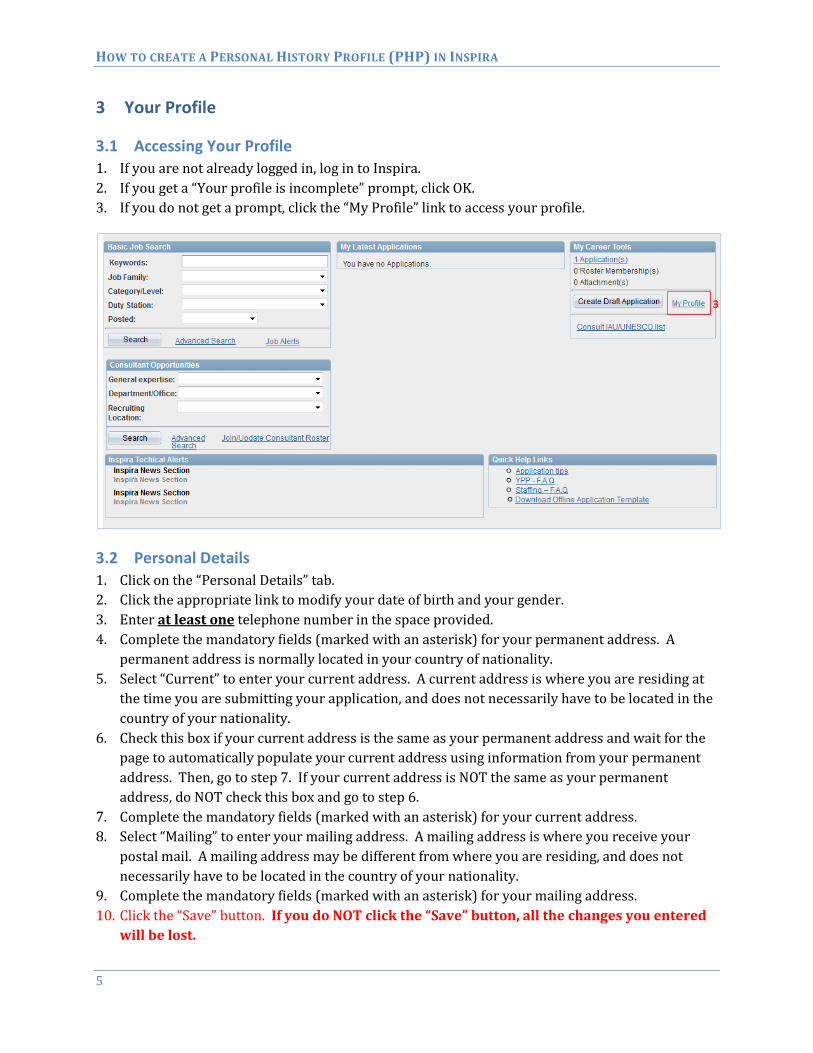
1. If you are not already logged in, log in to Inspira.
2. If you get a “Your profile is incomplete” prompt, click OK.
3. If you do not get a prompt, click the “My Profile” link to access your profile.
3.2 Personal Details
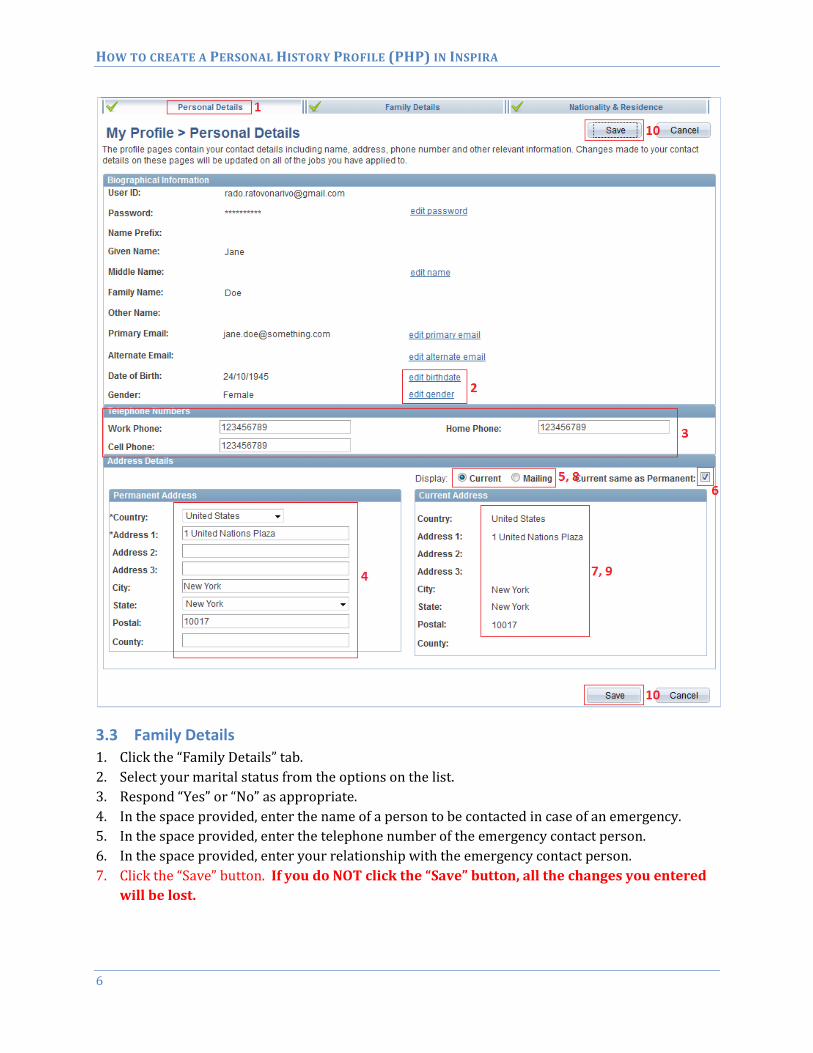
1. Click on the “Personal Details” tab.
2. Click the appropriate link to modify your date of birth and your gender.
3. Enter at least one telephone number in the space provided.
4. Complete the mandatory fields (marked with an asterisk) for your permanent address. A
permanent address is normally located in your country of nationality.
5. Select “Current” to enter your current address. A current address is where you are residing at
the time you are submitting your application, and does not necessarily have to be located in the
country of your nationality.
6. Check this box if your current address is the same as your permanent address and wait for the
page to automatically populate your current address using information from your permanent
address. Then, go to step 7. If your current address is NOT the same as your permanent
address, do NOT check this box and go to step 6.
7. Complete the mandatory fields (marked with an asterisk) for your current address.
8. Select “Mailing” to enter your mailing address. A mailing address is where you receive your
postal mail. A mailing address may be different from where you are residing, and does not
necessarily have to be located in the country of your nationality.
9. Complete the mandatory fields (marked with an asterisk) for your mailing address.
10. Click the “Save” button. If you do NOT click the “Save” button, all the changes you entered
will be lost.
HOW TO CREATE A PERSONAL HISTORY PROFILE (PHP) IN INSPIRA
6
3.3 Family Details
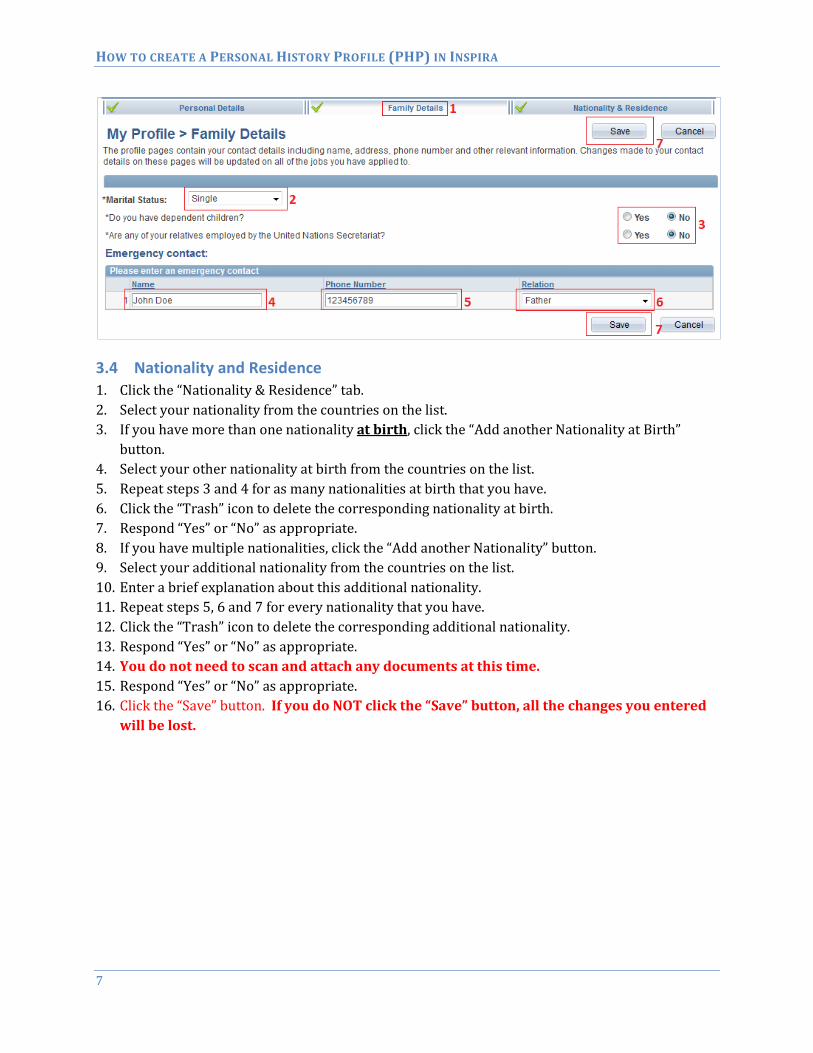
1. Click the “Family Details” tab.
2. Select your marital status from the options on the list.
3. Respond “Yes” or “No” as appropriate.
4. In the space provided, enter the name of a person to be contacted in case of an emergency.
5. In the space provided, enter the telephone number of the emergency contact person.
6. In the space provided, enter your relationship with the emergency contact person.
7. Click the “Save” button. If you do NOT click the “Save” button, all the changes you entered
will be lost.
HOW TO CREATE A PERSONAL HISTORY PROFILE (PHP) IN INSPIRA
7
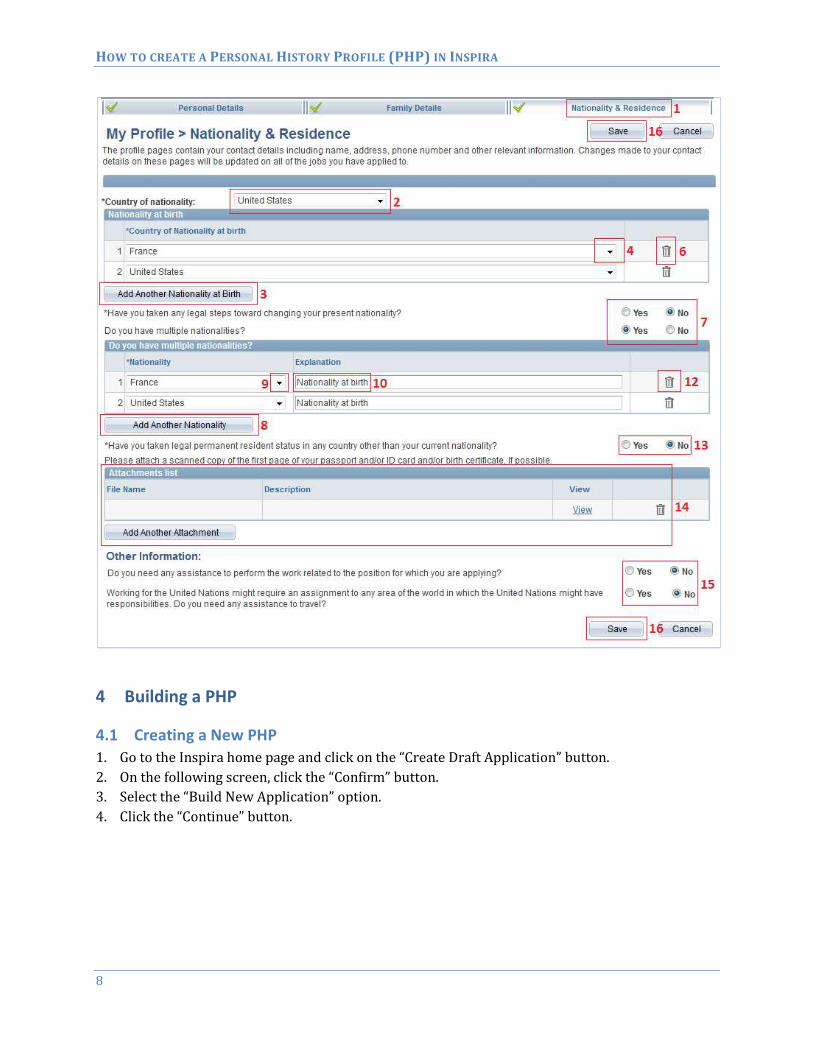
3.4 Nationality and Residence
1. Click the “Nationality & Residence” tab.
2. Select your nationality from the countries on the list.
3. If you have more than one nationality at birth, click the “Add another Nationality at Birth”
button.
4. Select your other nationality at birth from the countries on the list.
5. Repeat steps 3 and 4 for as many nationalities at birth that you have.
6. Click the “Trash” icon to delete the corresponding nationality at birth.
7. Respond “Yes” or “No” as appropriate.
8. If you have multiple nationalities, click the “Add another Nationality” button.
9. Select your additional nationality from the countries on the list.
10. Enter a brief explanation about this additional nationality.
11. Repeat steps 5, 6 and 7 for every nationality that you have.
12. Click the “Trash” icon to delete the corresponding additional nationality.
13. Respond “Yes” or “No” as appropriate.
14. You do not need to scan and attach any documents at this time.
15. Respond “Yes” or “No” as appropriate.
16. Click the “Save” button. If you do NOT click the “Save” button, all the changes you entered
will be lost.
HOW TO CREATE A PERSONAL HISTORY PROFILE (PHP) IN INSPIRA
8
4 Building a PHP
4.1 Creating a New PHP
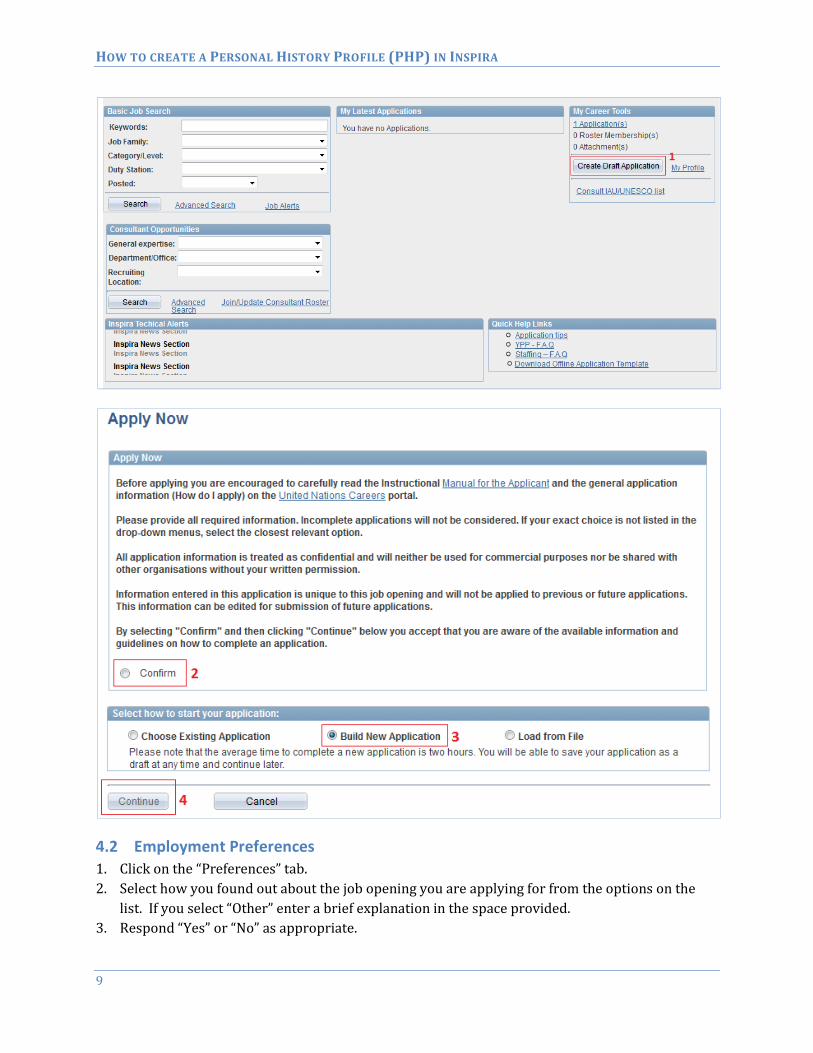
1. Go to the Inspira home page and click on the “Create Draft Application” button.
2. On the following screen, click the “Confirm” button.
3. Select the “Build New Application” option.
4. Click the “Continue” button.
HOW TO CREATE A PERSONAL HISTORY PROFILE (PHP) IN INSPIRA
9
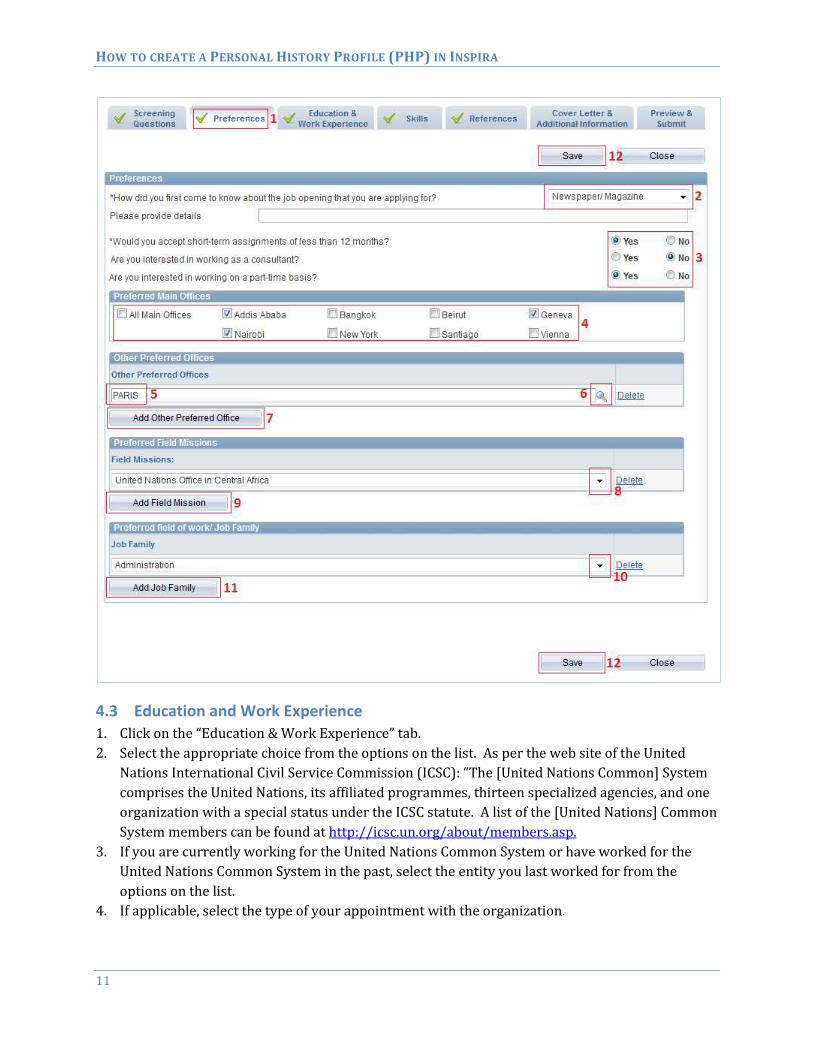
4.2 Employment Preferences
1. Click on the “Preferences” tab.
2. Select how you found out about the job opening you are applying for from the options on the
list. If you select “Other” enter a brief explanation in the space provided.
3. Respond “Yes” or “No” as appropriate.
HOW TO CREATE A PERSONAL HISTORY PROFILE (PHP) IN INSPIRA
10
4. If you are interested in working at a main UN office, select your preferred office from the
available choices. You may select more than one office.
5. If you are interested in working at another UN office, enter the name of the office by typing the
first few letters of the city where that office is located in the space provided. Then, wait for the
system to search for the office.
6. Alternatively, you may search for the office using the search tool in the system. To do so, click
the magnifying glass icon.
7. Click the “Add other Preferred Office” button and repeat step 5 and 6 add another UN office.
Repeat this step for as many UN offices as you would like to add.
8. If you are interested in working at a UN Field Mission, select the name of the Field Mission from
the Field Missions on the list.
9. Click the “Add Field Mission” button and repeat step 7 to add another Field Mission. Repeat this
step for as many field missions as you would like to add.
10. Select your preferred field of work from the option on the list.
11. Click the “Add Job Family” button and repeat step 10 to add another preferred field of work.
Repeat this step for as many field of work as you would like to add.
12. Click the “Save” button. If you do NOT click the “Save” button, all the changes you entered
will be lost.
HOW TO CREATE A PERSONAL HISTORY PROFILE (PHP) IN INSPIRA
11
4.3 Education and Work Experience
1. Click on the “Education & Work Experience” tab.
2. Select the appropriate choice from the options on the list. As per the web site of the United
Nations International Civil Service Commission (ICSC): “The [United Nations Common] System
comprises the United Nations, its affiliated programmes, thirteen specialized agencies, and one
organization with a special status under the ICSC statute. A list of the [United Nations] Common
System members can be found at http://icsc.un.org/about/members.asp.
3. If you are currently working for the United Nations Common System or have worked for the
United Nations Common System in the past, select the entity you last worked for from the
options on the list.
4. If applicable, select the type of your appointment with the organization.
HOW TO CREATE A PERSONAL HISTORY PROFILE (PHP) IN INSPIRA
12
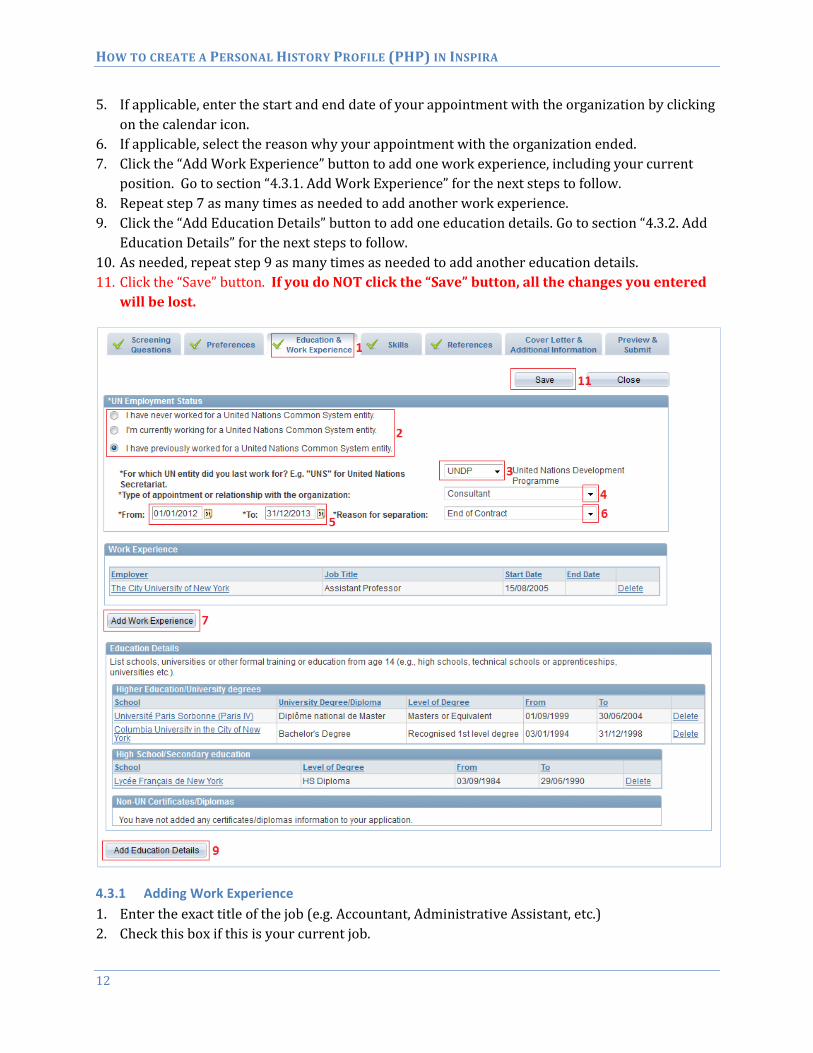
5. If applicable, enter the start and end date of your appointment with the organization by clicking
on the calendar icon.
6. If applicable, select the reason why your appointment with the organization ended.
7. Click the “Add Work Experience” button to add one work experience, including your current
position. Go to section “4.3.1. Add Work Experience” for the next steps to follow.
8. Repeat step 7 as many times as needed to add another work experience.
9. Click the “Add Education Details” button to add one education details. Go to section “4.3.2. Add
Education Details” for the next steps to follow.
10. As needed, repeat step 9 as many times as needed to add another education details.
11. Click the “Save” button. If you do NOT click the “Save” button, all the changes you entered
will be lost.
4.3.1 Adding Work Experience
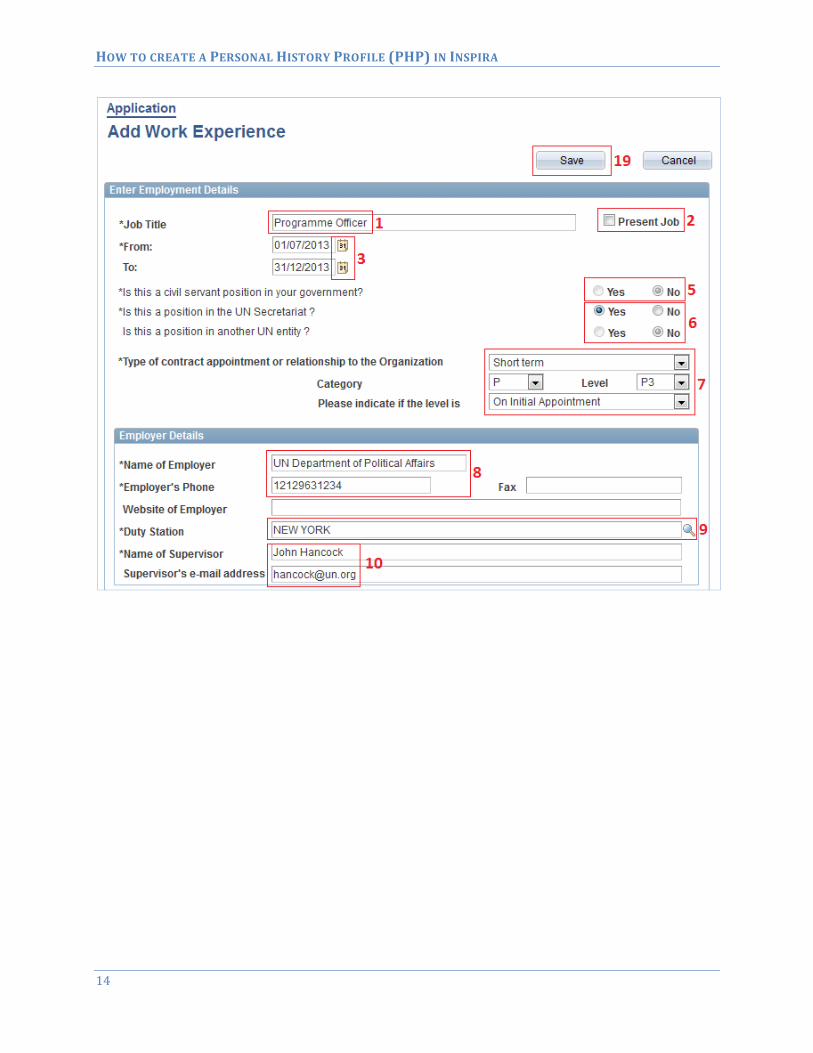
1. Enter the exact title of the job (e.g. Accountant, Administrative Assistant, etc.)
2. Check this box if this is your current job.
HOW TO CREATE A PERSONAL HISTORY PROFILE (PHP) IN INSPIRA
13
3. Enter the exact start and end date associated with the job by clicking on the appropriate
calendar icon (if this is your current job and the box in step 1 is checked, you will only need to
enter the start date). If you are not able to enter an exact date, enter as close an approximate as
possible. Overlaps and gaps in your employment history must be entered in the system
and clearly explained.
4. If applicable, enter the notice period you need to provide at this job (in number of weeks).
5. Respond “Yes” or “No” as appropriate.
6. Respond “Yes” or “No” as appropriate. If you respond “Yes” the page will reload to display new
fields to enter your appointment type, your category and your level.
7. If applicable, select your type of appointment, your category, your level and how your level was
determined from the option on the list.
8. Enter the name and telephone number of your employer in the space provided. A telephone
number is required. If a telephone number is not available, enter a placeholder numerical
value, such as “1234.” If a current telephone number to contact your employer is not
available, the email address of your supervisor as described in step 10 must be provided
(or vice versa).
9. If you responded “Yes” in step 6, enter the name of the duty station where you worked in the
space provided (after you type the first few letters of the exact name of the duty station, the
page will reload. Alternatively, you may search for the duty station using the search tool in the
system by clicking on the magnifying glass icon. Refer to section “4.3.3. Searching for a duty
station” for more details on how to use the search tool to find a duty station.
10. Enter the name and email address of your supervisor. If you did not provide a telephone
number in step 8, the email address of your supervisor is required.
11. Enter the appropriate address information for your employer.
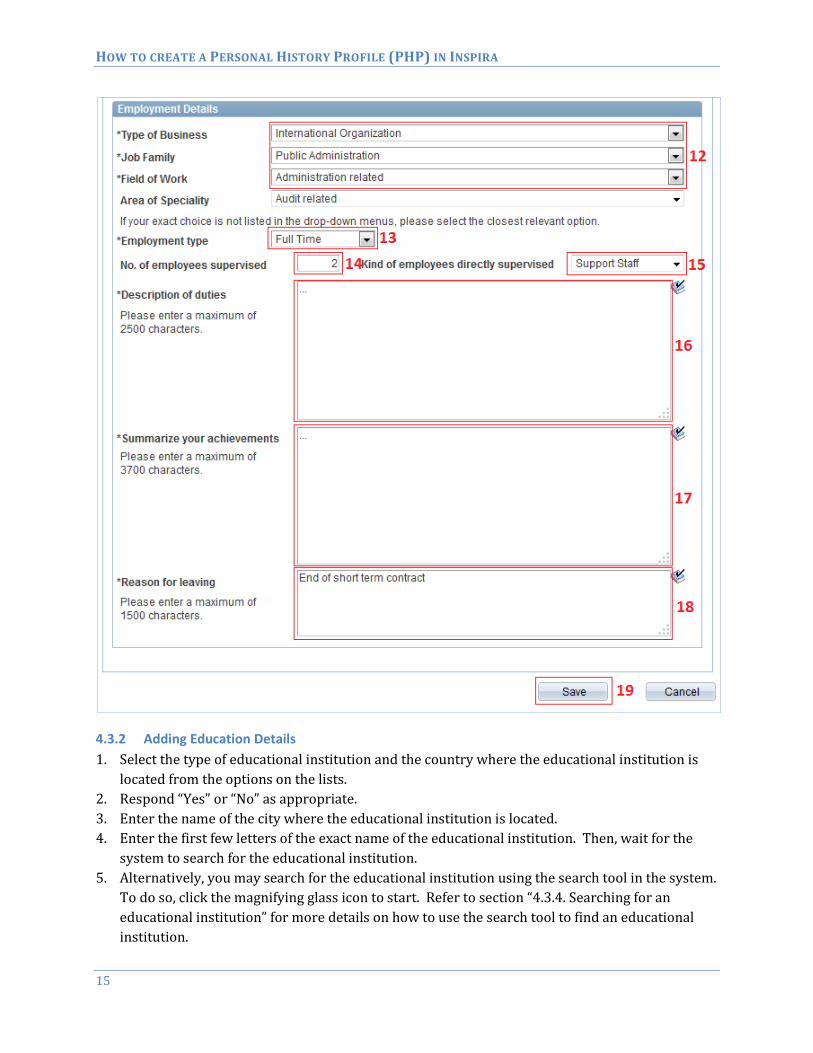
12. Select the type of business, your job family, and your field of work at this job from the options
on the lists.
13. Select the type of employment from the options on the list.
14. If applicable, enter the number of employees you supervised at this job in the space provided.
15. If applicable, select the type of employees you supervised at this job.
16. Describe all the duties and responsibilities you have undertaken at this job as precisely and as
detailed as possible. Enter multiple duties as bulleted lists or separate multiple entries with a
full stop or semi-colon. For part-time employment, clearly specify the total number of
hours worked per week in this field at the beginning of the list of duties and
responsibilities.
17. List any notable achievements you completed at this job, particularly if they are relevant to the
job opening you are applying for. Enter multiple achievements as bulleted lists or separate
multiple entries with a full stop or a semi-colon.
18. Clearly indicate the reason you had for leaving this job.
19. Click the “Save” button. If you do NOT click the “Save” button, all the changes you entered
will be lost.
HOW TO CREATE A PERSONAL HISTORY PROFILE (PHP) IN INSPIRA
14
HOW TO CREATE A PERSONAL HISTORY PROFILE (PHP) IN INSPIRA
15
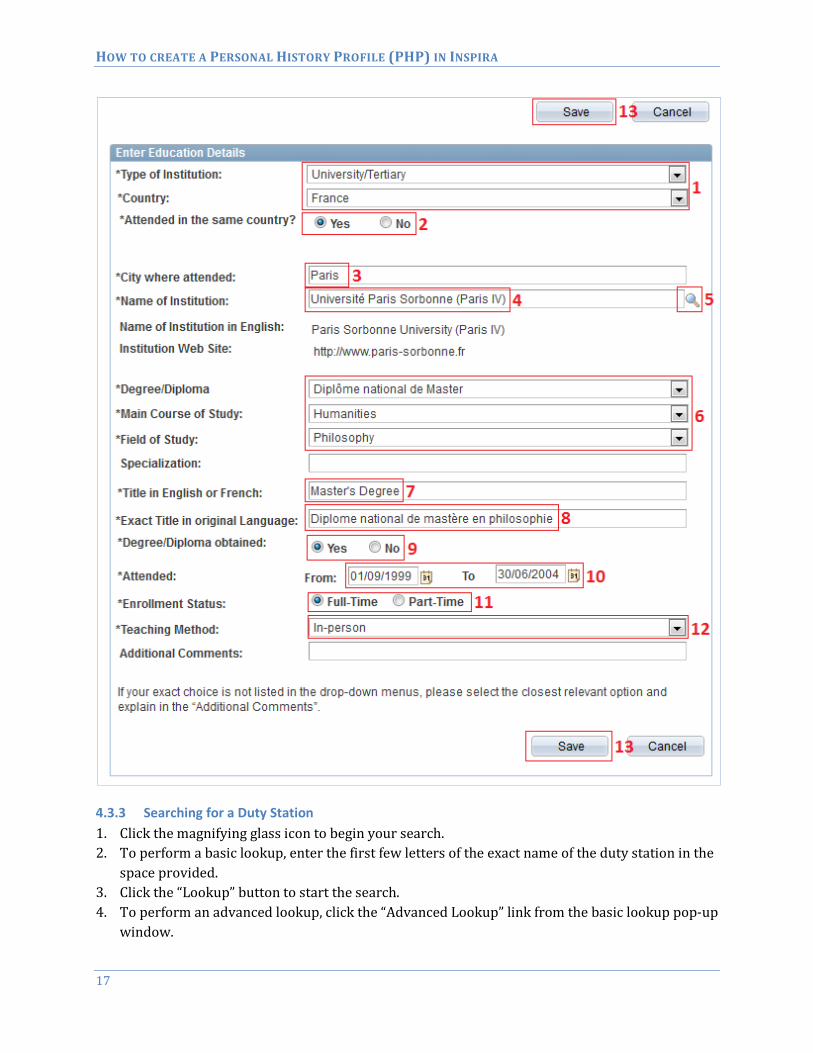
4.3.2 Adding Education Details
1. Select the type of educational institution and the country where the educational institution is
located from the options on the lists.
2. Respond “Yes” or “No” as appropriate.
3. Enter the name of the city where the educational institution is located.
4. Enter the first few letters of the exact name of the educational institution. Then, wait for the
system to search for the educational institution.
5. Alternatively, you may search for the educational institution using the search tool in the system.
To do so, click the magnifying glass icon to start. Refer to section “4.3.4. Searching for an
educational institution” for more details on how to use the search tool to find an educational
institution.
HOW TO CREATE A PERSONAL HISTORY PROFILE (PHP) IN INSPIRA
16
6. Select your degree or diploma, the main course of study and your field of study from the options
on the list.
7. Enter the English or French name of your diploma in the space provided.
8. Enter the exact name (in its original language) of your diploma in the space provided.
9. Respond “Yes” or “No” as appropriate. If you respond “No,” provide a clear explanation in the
space provided.
10. Enter the exact dates of attendance (or as close an approximate as possible) by clicking on the
calendar icon.
11. Select your enrolment status.
12. Select the teaching method from the options on the list.
13. Provide additional comments if needed.
14. Click the “Save” button. If you do NOT click the “Save” button, all the changes you entered
will be lost.
HOW TO CREATE A PERSONAL HISTORY PROFILE (PHP) IN INSPIRA
17
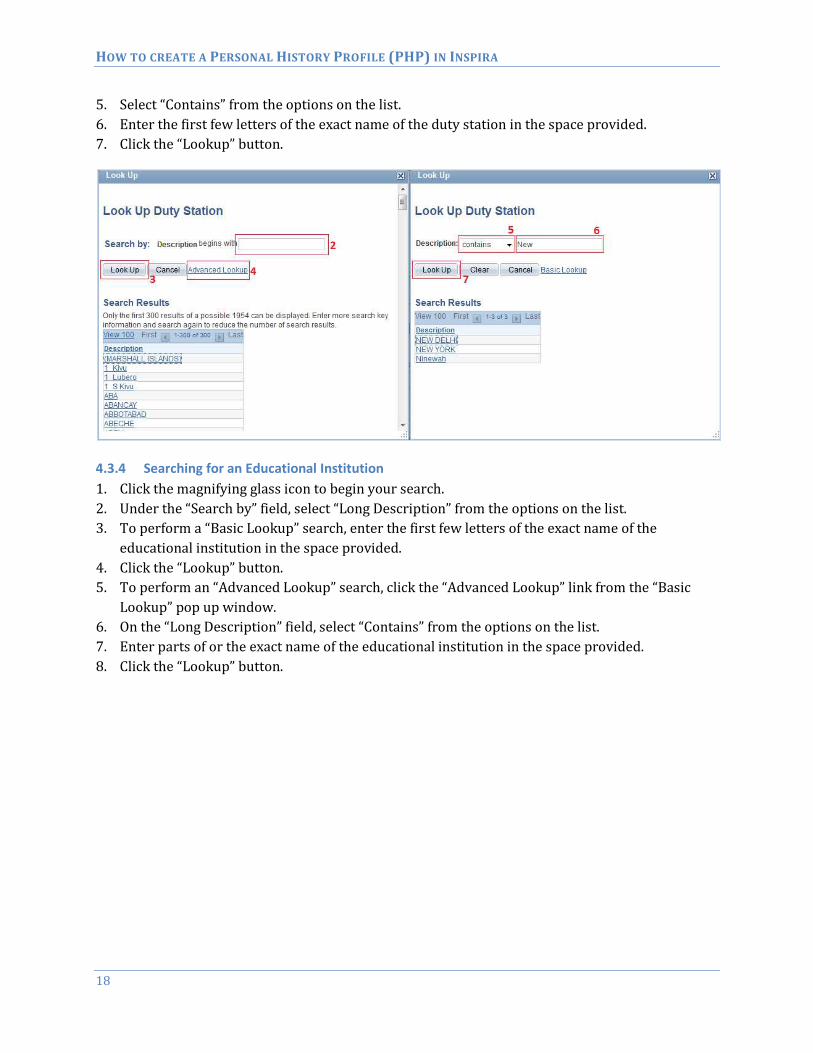
4.3.3 Searching for a Duty Station
1. Click the magnifying glass icon to begin your search.
2. To perform a basic lookup, enter the first few letters of the exact name of the duty station in the
space provided.
3. Click the “Lookup” button to start the search.
4. To perform an advanced lookup, click the “Advanced Lookup” link from the basic lookup pop-up
window.
HOW TO CREATE A PERSONAL HISTORY PROFILE (PHP) IN INSPIRA
18
5. Select “Contains” from the options on the list.
6. Enter the first few letters of the exact name of the duty station in the space provided.
7. Click the “Lookup” button.
4.3.4 Searching for an Educational Institution
1. Click the magnifying glass icon to begin your search.
2. Under the “Search by” field, select “Long Description” from the options on the list.
3. To perform a “Basic Lookup” search, enter the first few letters of the exact name of the
educational institution in the space provided.
4. Click the “Lookup” button.
5. To perform an “Advanced Lookup” search, click the “Advanced Lookup” link from the “Basic
Lookup” pop up window.
6. On the “Long Description” field, select “Contains” from the options on the list.
7. Enter parts of or the exact name of the educational institution in the space provided.
8. Click the “Lookup” button.
HOW TO CREATE A PERSONAL HISTORY PROFILE (PHP) IN INSPIRA
19
4.4 Skills (Certificates, Languages, Publications)
4.4.1 Adding Certificates (obtained through the United Nations)
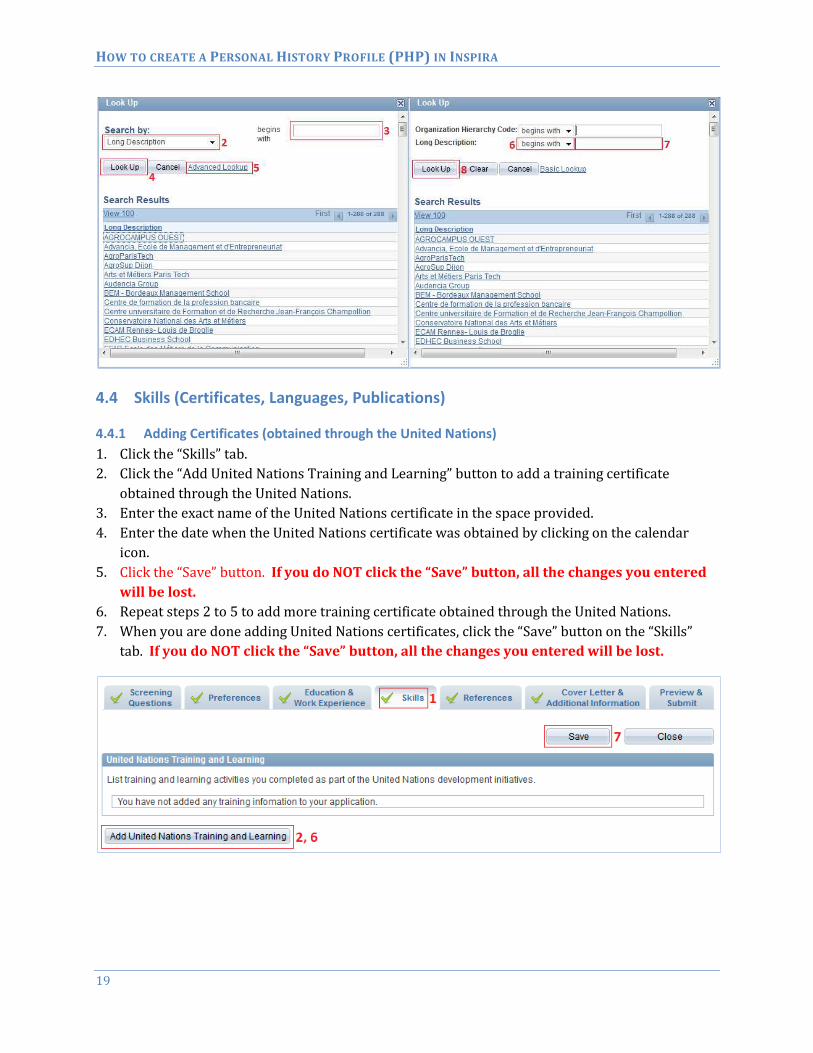
1. Click the “Skills” tab.
2. Click the “Add United Nations Training and Learning” button to add a training certificate
obtained through the United Nations.
3. Enter the exact name of the United Nations certificate in the space provided.
4. Enter the date when the United Nations certificate was obtained by clicking on the calendar
icon.
5. Click the “Save” button. If you do NOT click the “Save” button, all the changes you entered
will be lost.
6. Repeat steps 2 to 5 to add more training certificate obtained through the United Nations.
7. When you are done adding United Nations certificates, click the “Save” button on the “Skills”
tab. If you do NOT click the “Save” button, all the changes you entered will be lost.
HOW TO CREATE A PERSONAL HISTORY PROFILE (PHP) IN INSPIRA
20
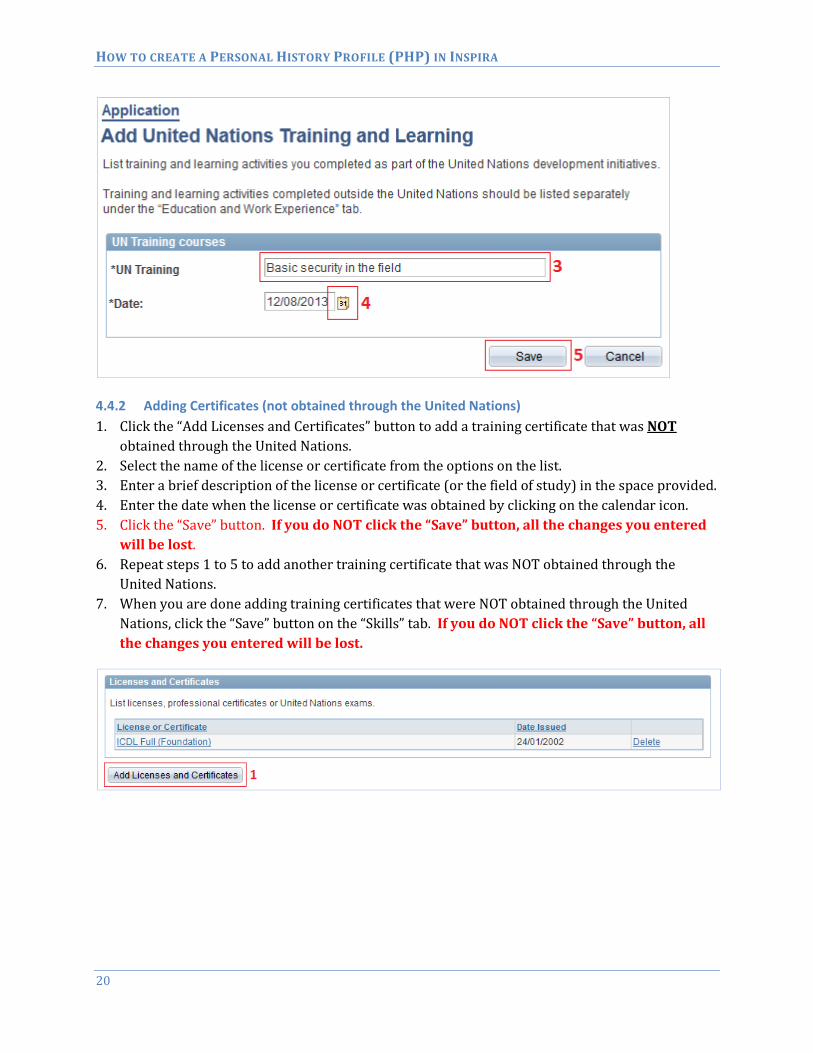
4.4.2 Adding Certificates (not obtained through the United Nations)
1. Click the “Add Licenses and Certificates” button to add a training certificate that was NOT
obtained through the United Nations.
2. Select the name of the license or certificate from the options on the list.
3. Enter a brief description of the license or certificate (or the field of study) in the space provided.
4. Enter the date when the license or certificate was obtained by clicking on the calendar icon.
5. Click the “Save” button. If you do NOT click the “Save” button, all the changes you entered
will be lost.
6. Repeat steps 1 to 5 to add another training certificate that was NOT obtained through the
United Nations.
7. When you are done adding training certificates that were NOT obtained through the United
Nations, click the “Save” button on the “Skills” tab. If you do NOT click the “Save” button, all
the changes you entered will be lost.
HOW TO CREATE A PERSONAL HISTORY PROFILE (PHP) IN INSPIRA
21
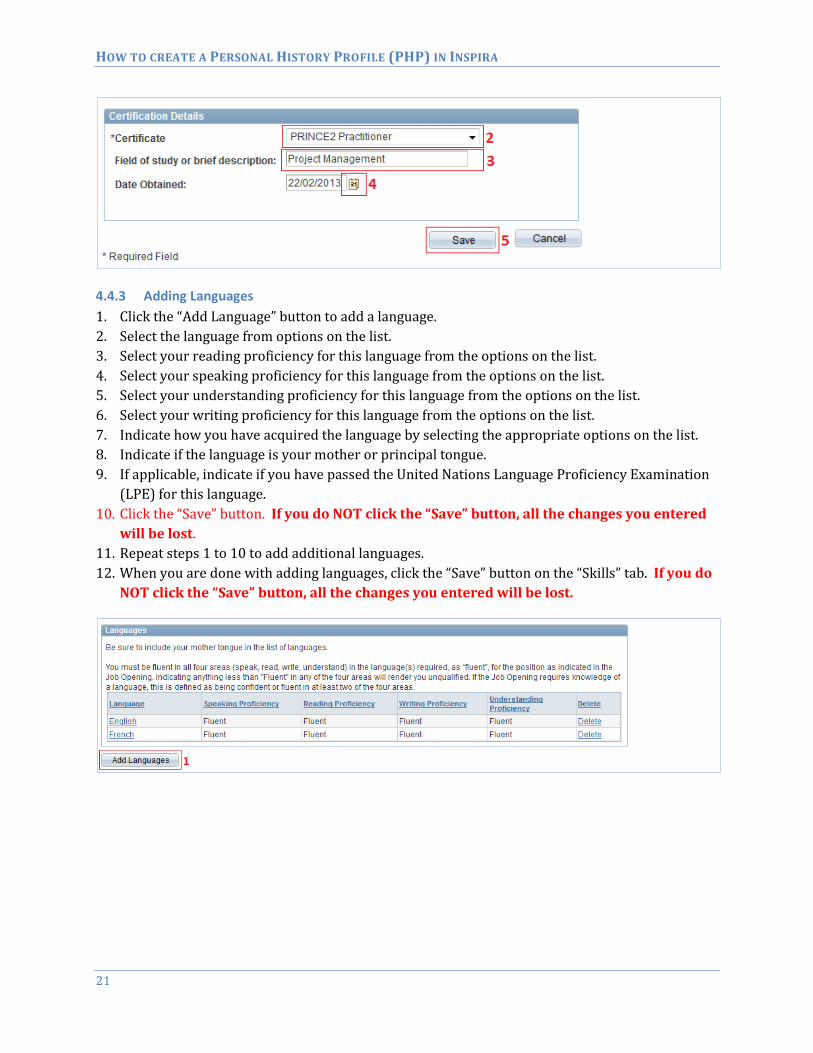
4.4.3 Adding Languages
1. Click the “Add Language” button to add a language.
2. Select the language from options on the list.
3. Select your reading proficiency for this language from the options on the list.
4. Select your speaking proficiency for this language from the options on the list.
5. Select your understanding proficiency for this language from the options on the list.
6. Select your writing proficiency for this language from the options on the list.
7. Indicate how you have acquired the language by selecting the appropriate options on the list.
8. Indicate if the language is your mother or principal tongue.
9. If applicable, indicate if you have passed the United Nations Language Proficiency Examination
(LPE) for this language.
10. Click the “Save” button. If you do NOT click the “Save” button, all the changes you entered
will be lost.
11. Repeat steps 1 to 10 to add additional languages.
12. When you are done with adding languages, click the “Save” button on the “Skills” tab. If you do
NOT click the “Save” button, all the changes you entered will be lost.
HOW TO CREATE A PERSONAL HISTORY PROFILE (PHP) IN INSPIRA
22
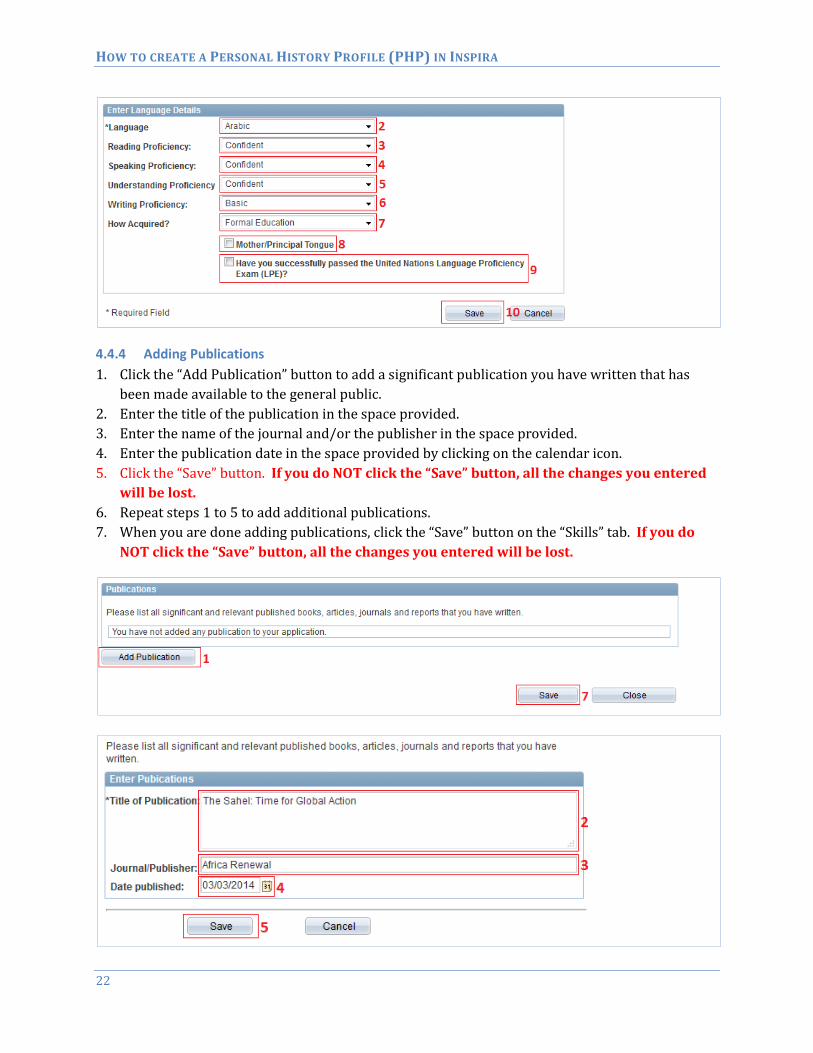
4.4.4 Adding Publications
1. Click the “Add Publication” button to add a significant publication you have written that has
been made available to the general public.
2. Enter the title of the publication in the space provided.
3. Enter the name of the journal and/or the publisher in the space provided.
4. Enter the publication date in the space provided by clicking on the calendar icon.
5. Click the “Save” button. If you do NOT click the “Save” button, all the changes you entered
will be lost.
6. Repeat steps 1 to 5 to add additional publications.
7. When you are done adding publications, click the “Save” button on the “Skills” tab. If you do
NOT click the “Save” button, all the changes you entered will be lost.
HOW TO CREATE A PERSONAL HISTORY PROFILE (PHP) IN INSPIRA
23
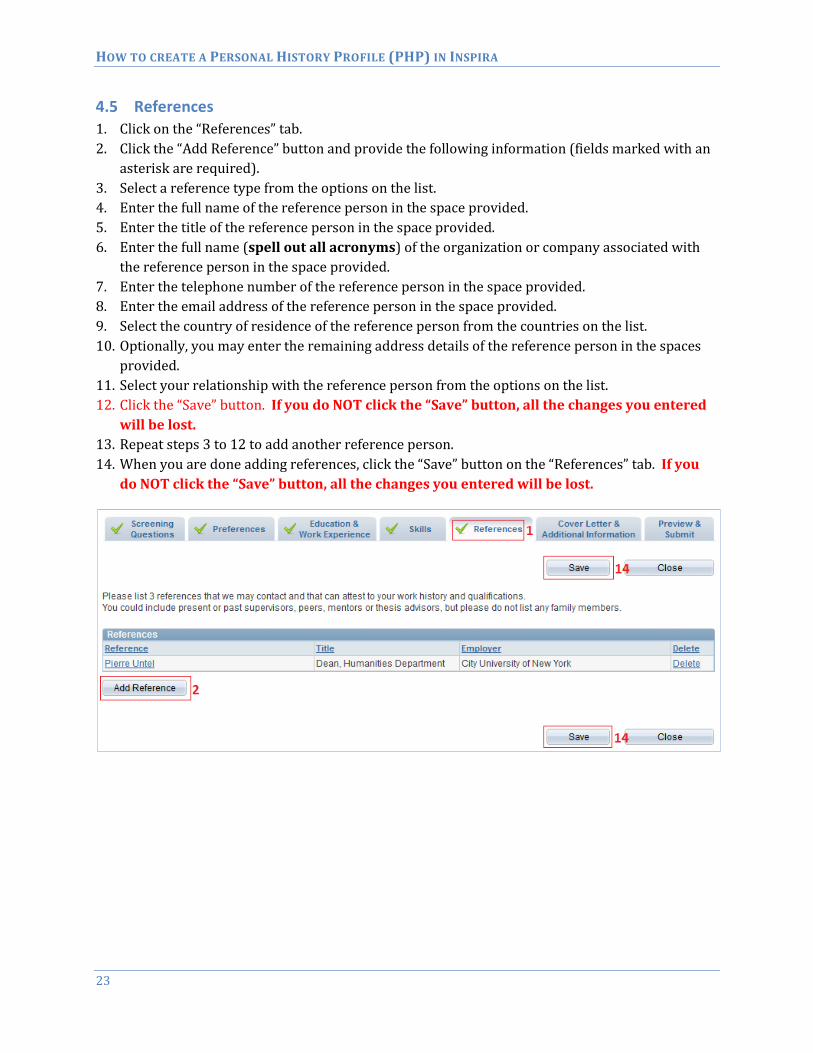
4.5 References
1. Click on the “References” tab.
2. Click the “Add Reference” button and provide the following information (fields marked with an
asterisk are required).
3. Select a reference type from the options on the list.
4. Enter the full name of the reference person in the space provided.
5. Enter the title of the reference person in the space provided.
6. Enter the full name (spell out all acronyms) of the organization or company associated with
the reference person in the space provided.
7. Enter the telephone number of the reference person in the space provided.
8. Enter the email address of the reference person in the space provided.
9. Select the country of residence of the reference person from the countries on the list.
10. Optionally, you may enter the remaining address details of the reference person in the spaces
provided.
11. Select your relationship with the reference person from the options on the list.
12. Click the “Save” button. If you do NOT click the “Save” button, all the changes you entered
will be lost.
13. Repeat steps 3 to 12 to add another reference person.
14. When you are done adding references, click the “Save” button on the “References” tab. If you
do NOT click the “Save” button, all the changes you entered will be lost.

HOW TO CREATE A PERSONAL HISTORY PROFILE (PHP) IN INSPIRA
24
4.6 Cover Letter and Additional Information
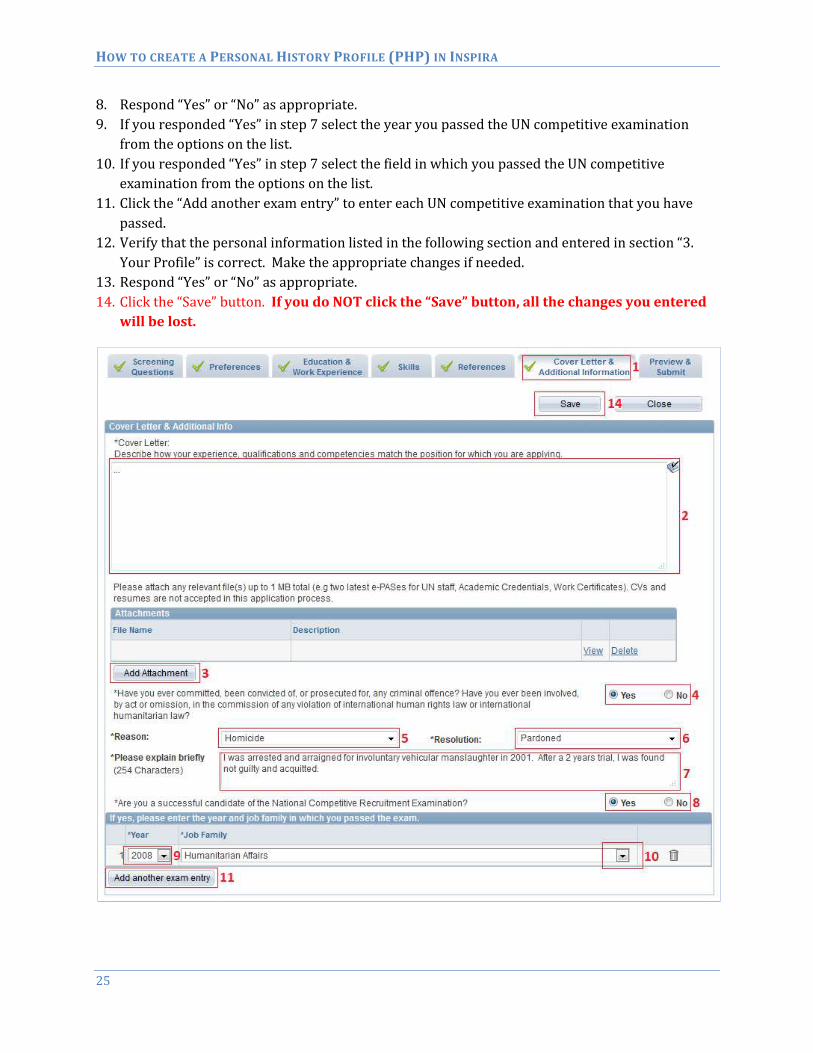
1. Click the “Cover Letter & Additional Information” tab.
2. Enter your cover letter in the space provided. It is strongly recommended that you include
your email address and primary telephone number in your signature in the cover letter
text.
3. Since you are not applying to a job directly via the Inspira system but will instead download and
sent your PHP via email, you are not required to add any attachments to your PHP.
4. Respond “Yes” or “No” as appropriate.
5. If you responded “Yes” in step 3, select the reason for the offence from the options on the list.
6. If you responded “Yes” in step 3, select the resolution for the offence from the options on the
list.
7. If you responded “Yes” in step 3, enter a clear and concise explanation of the offence in the
space provided.
HOW TO CREATE A PERSONAL HISTORY PROFILE (PHP) IN INSPIRA
25
8. Respond “Yes” or “No” as appropriate.
9. If you responded “Yes” in step 7 select the year you passed the UN competitive examination
from the options on the list.
10. If you responded “Yes” in step 7 select the field in which you passed the UN competitive
examination from the options on the list.
11. Click the “Add another exam entry” to enter each UN competitive examination that you have
passed.
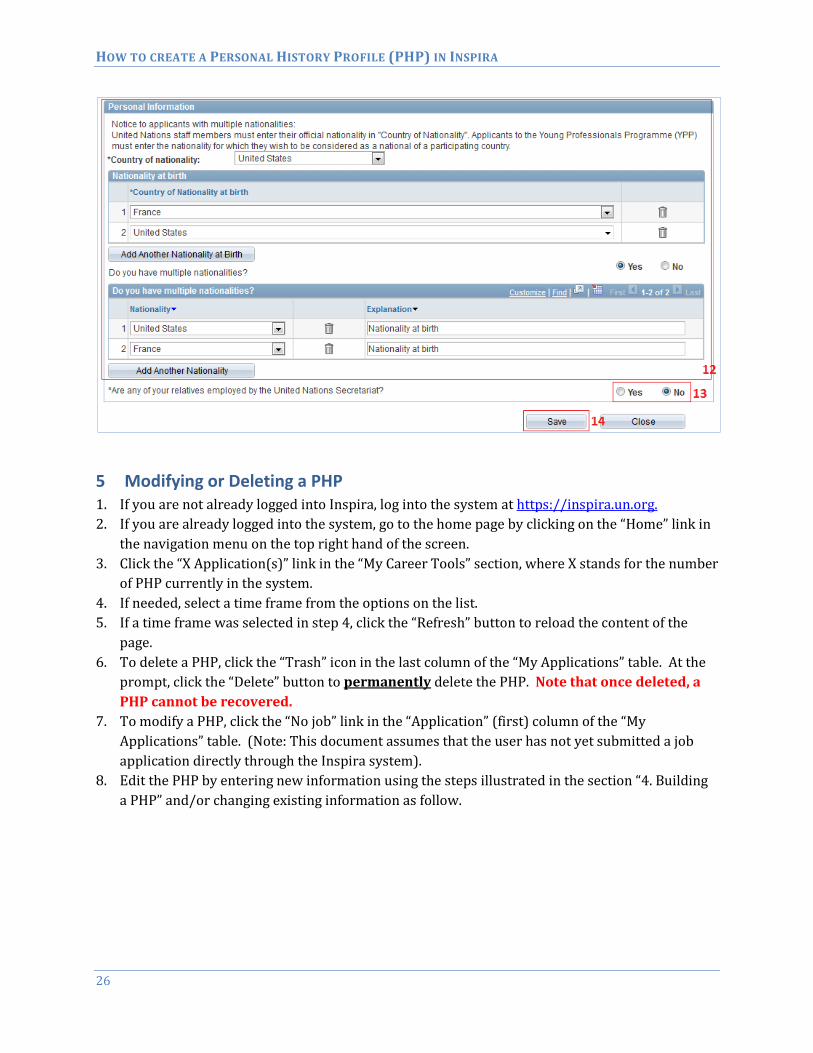
12. Verify that the personal information listed in the following section and entered in section “3.
Your Profile” is correct. Make the appropriate changes if needed.
13. Respond “Yes” or “No” as appropriate.
14. Click the “Save” button. If you do NOT click the “Save” button, all the changes you entered
will be lost.
HOW TO CREATE A PERSONAL HISTORY PROFILE (PHP) IN INSPIRA
26
5 Modifying or Deleting a PHP
1. If you are not already logged into Inspira, log into the system at https://inspira.un.org.
2. If you are already logged into the system, go to the home page by clicking on the “Home” link in
the navigation menu on the top right hand of the screen.
3. Click the “X Application(s)” link in the “My Career Tools” section, where X stands for the number
of PHP currently in the system.
4. If needed, select a time frame from the options on the list.
5. If a time frame was selected in step 4, click the “Refresh” button to reload the content of the
page.
6. To delete a PHP, click the “Trash” icon in the last column of the “My Applications” table. At the
prompt, click the “Delete” button to permanently delete the PHP. Note that once deleted, a
PHP cannot be recovered.
7. To modify a PHP, click the “No job” link in the “Application” (first) column of the “My
Applications” table. (Note: This document assumes that the user has not yet submitted a job
application directly through the Inspira system).
8. Edit the PHP by entering new information using the steps illustrated in the section “4. Building
a PHP” and/or changing existing information as follow.
HOW TO CREATE A PERSONAL HISTORY PROFILE (PHP) IN INSPIRA
27
5.1 Modifying or Deleting Work Experience
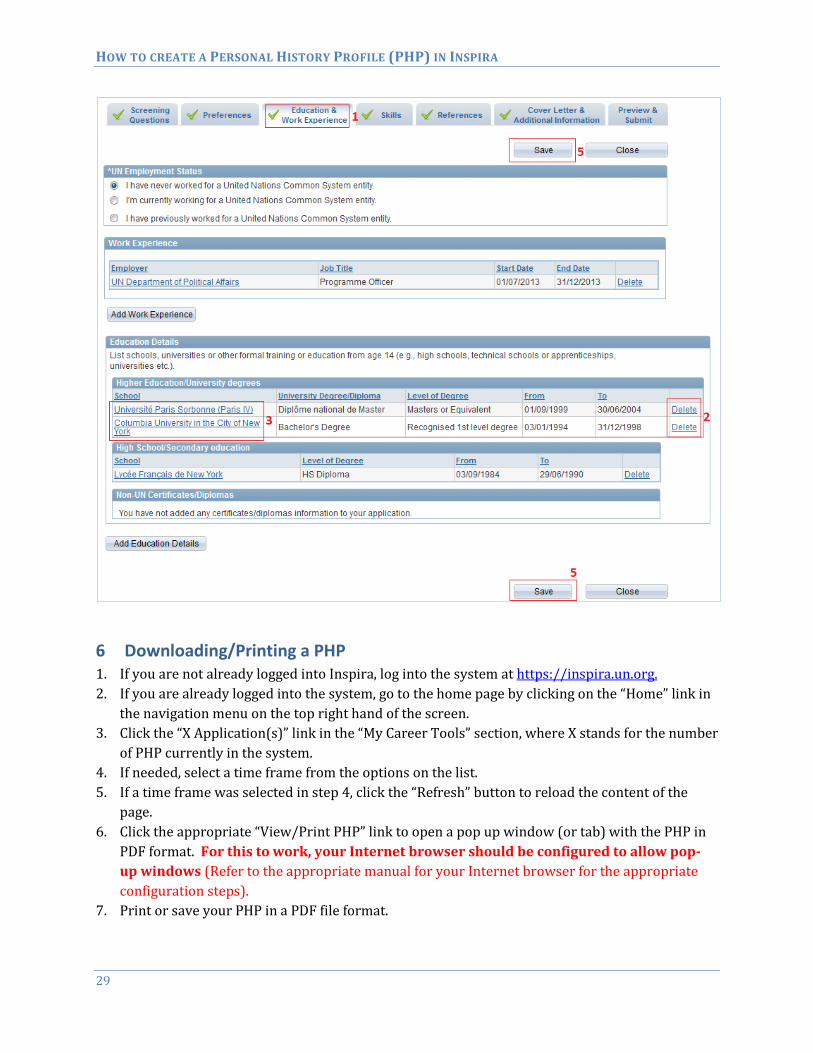
1. Click on the “Education & Work Experience” tab.
2. To delete a job entry, click the “Delete” link in the last column of the “Work Experience” table.
At the prompt, click “OK” to permanently delete the job entry. Note that once deleted, a job
entry cannot be recovered.
3. To modify your work experience, click the link in the “Employer” column that corresponds to
the job entry you would like to modify.
4. Make the appropriate changes following the steps illustrated in section “4.3.1. Add Work
Experience”.
5. When you finish making changes, click the “Save” button on the “Education & Work Experience”
tab. If you do NOT click the “Save” button, all the changes you entered will be lost.
6. Repeat steps 2 to 5 to modify or delete additional job entries.

HOW TO CREATE A PERSONAL HISTORY PROFILE (PHP) IN INSPIRA
28
5.2 Modifying or Deleting an Education Detail
1. Click on the “Education & Work Experience” tab.
2. To delete an education detail, click the “Delete” link in the last column of the “University” or
“High School” table. At the prompt, click “OK” to permanently delete the education detail.
Note that once deleted, an education detail cannot be recovered.
3. To modify an education detail, click the link in the “School” column that corresponds to the
entry you would like to modify.
4. Make the appropriate changes following the steps illustrated in section “4.3.2. Add Education
Details”.
5. When you finish making changes, click the “Save” button on the “Education & Work Experience”
tab. If you do NOT click the “Save” button, all the changes you entered will be lost.
6. Repeat steps 2 to 5 to modify or delete other education details.
HOW TO CREATE A PERSONAL HISTORY PROFILE (PHP) IN INSPIRA
29
6 Downloading/Printing a PHP
1. If you are not already logged into Inspira, log into the system at https://inspira.un.org.
2. If you are already logged into the system, go to the home page by clicking on the “Home” link in
the navigation menu on the top right hand of the screen.
3. Click the “X Application(s)” link in the “My Career Tools” section, where X stands for the number
of PHP currently in the system.
4. If needed, select a time frame from the options on the list.
5. If a time frame was selected in step 4, click the “Refresh” button to reload the content of the
page.
6. Click the appropriate “View/Print PHP” link to open a pop up window (or tab) with the PHP in
PDF format. For this to work, your Internet browser should be configured to allow pop-
up windows (Refer to the appropriate manual for your Internet browser for the appropriate
configuration steps).
7. Print or save your PHP in a PDF file format.

HOW TO CREATE A PERSONAL HISTORY PROFILE (PHP) IN INSPIRA
30