Embed Size (px)
Citation preview
How to Deploy SAP SCM with SAP liveCache in an HA Configuration on Oracle SuperCluster OR AC L E W H IT E P AP ER | N OV EM B ER 2 0 1 6
HOW TO DEPLOY SAP SCM WITH SAP LIVECACHE IN AN HA CONFIGURATION ON ORACLE SUPERCLUSTER
Disclaimer
The following is intended to outline our general product direction. It is intended for information
purposes only, and may not be incorporated into any contract. It is not a commitment to deliver any
material, code, or functionality, and should not be relied upon in making purchasing decisions. The
development, release, and timing of any features or functionality described for Oracle’s products
remains at the sole discretion of Oracle.
The functionality of non-Oracle products, including development, release, and timing of any features or
functionality described, is solely at the discretion of the non-Oracle vendors.
1 | HOW TO DEPLOY SAP SCM WITH SAP LIVECACHE IN AN HA CONFIGURATION ON ORACLE SUPERCLUSTER
Table of Contents
Introduction 1
Solution Overview 1
SAP SCM Overview 1
Overview of Oracle SuperCluster Configuration 1
External Oracle ZFS Storage Appliance 2
Oracle Solaris Cluster 3
Implementation Strategy 3
Defining the Implementation Environment 4
Defining the Network Environment 4
Configuring Storage 5
Naming Conventions 7
Installing Oracle Solaris Cluster 8
Creating a Cluster Using the Oracle Solaris Cluster BUI 21
Preparing the Environment 29
Preparing to Create Zone Clusters 30
Creating the Zone Clusters Using the BUI 34
Creating System Configuration Profiles for Zone Clusters 39
Creating the ASCS and PAS Zone Clusters 41
Configuring Logical Hostnames 43
Prepare Zone File Systems for SAP Installation 53
Installing SAP SCM Software Components 64
Preparing to Use the sapinst Client 64
Zone Clustering of ABAP Stack Instances 65
HOW TO DEPLOY SAP SCM WITH SAP LIVECACHE IN AN HA CONFIGURATION ON ORACLE SUPERCLUSTER
Zone Clustering of SAP liveCache 71
Preparing Zones for SAP liveCache 71
Modify the lcinit and xuser Script 71
Create Oracle Solaris Cluster Resources 73
Monitoring an Oracle SuperCluster Configuration 74
Testing and Troubleshooting 75
References 76
Appendix A: Installing SAP SCM 77
Installing the ASCS Instance 77
Installing the Oracle Database 79
Installing the Central Instance 84
Installing the Dialog Instance 87
Installing the SAP liveCache Server Instance 89
Installing the ERS Instance 91
Installation References 93
1 | HOW TO DEPLOY SAP SCM WITH SAP LIVECACHE IN AN HA CONFIGURATION ON ORACLE SUPERCLUSTER
Introduction
By using SAP Supply Chain Management (SAP SCM) software, businesses can more effectively and
efficiently manage their end-to-end supply chain processes, including partner collaboration and supply
network planning, execution, and coordination. In many SAP SCM deployments, SAP liveCache
technology is implemented because it can significantly accelerate the complex algorithmic processing
in data-intensive SCM applications, allowing companies to alter supply chain processes strategically
and quickly to achieve a competitive advantage.
Oracle SuperCluster is Oracle’s fastest, most secure, and most scalable engineered system. It is ideal
for consolidating a complete SAP landscape and providing high service levels. Consolidating the SAP
landscape can simplify and accelerate SCM application delivery, improve infrastructure utilization, and
create a highly available platform for mission-critical SAP-managed business processes.
This paper describes a SAP SCM with SAP liveCache deployment that was implemented as a proof-
of-concept on Oracle SuperCluster in an Oracle Solution Center. Located globally, Oracle Solution
Centers offer state-of-the-art systems, software, and expertise to develop architectures that support
specific requirements. Working closely with customer staff, Oracle experts develop and prototype
architectures to prove out solutions for real-world workloads. The goal of this particular proof-of-
concept was to document procedures and best practices to configure SAP SCM and SAP liveCache
services using a high availability (HA) architecture that meets stringent service level requirements.
Solution Overview
SAP SCM Overview
SAP SCM helps companies integrate business processes and comply with supply-related contractual agreements,
managing both supply-side and supplier-side requirements. The software includes components such as Advanced
Planning and Optimization (APO), Extended Warehouse Management, Event Management, and Supply Network
Collaboration. SAP liveCache technology is available for SAP SCM/APO. It speeds up processing for many runtime-
intensive functions of APO applications because it uses data cached in main memory w ith SAP liveCache.
Overview of Oracle SuperCluster Configuration
Oracle SuperCluster combines highly available and scalable technologies, such as Oracle Database 12c, Oracle
Database 11, and Oracle Real Application Clusters (Oracle RAC) with industry-standard hardware. All of the
integrated and optimized hardware (including Oracle’s SPARC M7 servers, Oracle Exadata Storage Servers, and
Oracle ZFS Storage Appliances) are integrated through a quad data rate (QDR) InfiniBand unif ied network. Oracle
SuperCluster is an Oracle engineered system, so all components are pre-configured, tested, integrated, tuned, and
performance-optimized, and the hardware configuration is designed with no single point of failure. (For more
information, see https://www.oracle.com/supercluster/.)
2 | HOW TO DEPLOY SAP SCM WITH SAP LIVECACHE IN AN HA CONFIGURATION ON ORACLE SUPERCLUSTER
The page Oracle Optimized Solution for SAP contains details for installing SAP on Oracle SuperCluster. For the
purpose of SCM functionality related to SAP liveCache, this document covers an example of an SCM/APO
configuration. To eliminate a single point of failure, engineers implemented a solution with zone clustering for high
availability (HA) of the SAP liveCache and SAP servers, as well as Oracle RAC for the database servers.
Oracle no-charge virtualization technologies safely consolidate SAP application and database services and control
the underlying compute, memory, I/O, and storage resources. Physical domains (PDOMs) are used to divide Oracle
SuperCluster resources into multiple electrically isolated hardware partitions that can be completely powered up or
down and manipulated without affecting each other. Each PDOM can be further divided using Oracle VM Server for
SPARC logical domain (LDOMs) that each run an independent instance of Oracle Solaris 11.
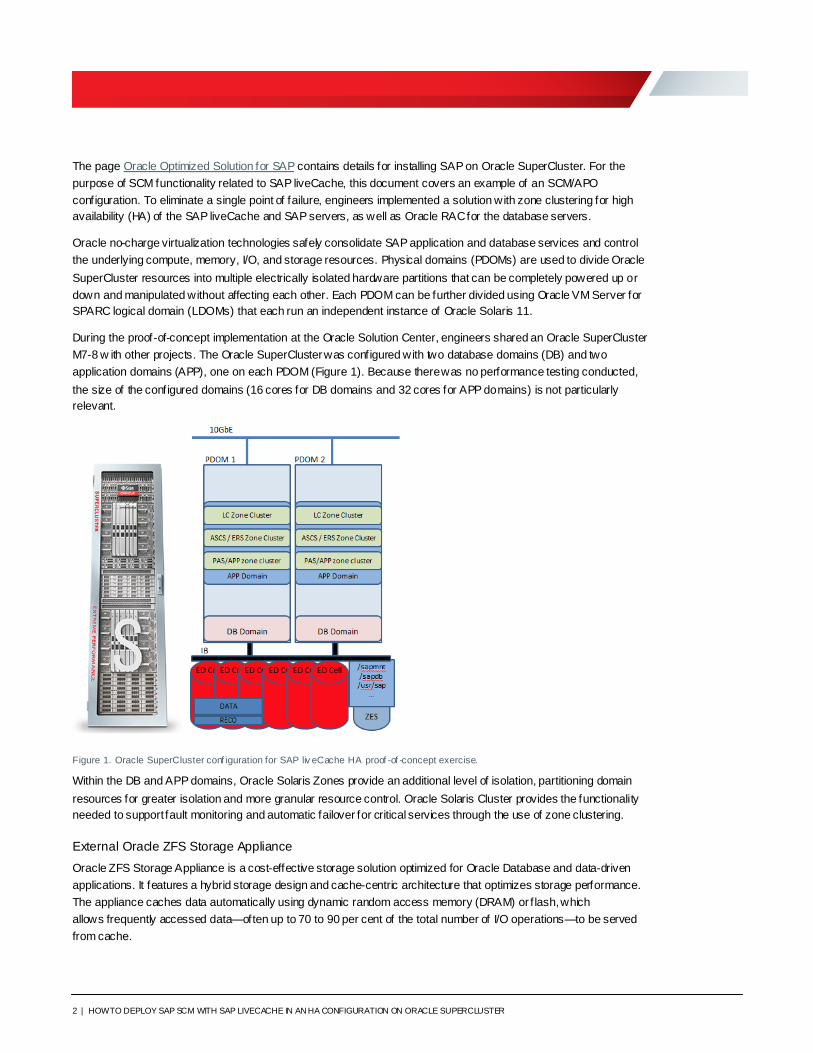
During the proof-of-concept implementation at the Oracle Solution Center, engineers shared an Oracle SuperCluster
M7-8 w ith other projects. The Oracle SuperCluster was configured with two database domains (DB) and two
application domains (APP), one on each PDOM (Figure 1). Because there was no performance testing conducted,
the size of the configured domains (16 cores for DB domains and 32 cores for APP domains) is not particularly
relevant.
Figure 1. Oracle SuperCluster conf iguration for SAP liv eCache HA proof -of -concept exercise.
Within the DB and APP domains, Oracle Solaris Zones provide an additional level of isolation, partitioning domain
resources for greater isolation and more granular resource control. Oracle Solaris Cluster provides the functionality
needed to support fault monitoring and automatic failover for critical services through the use of zone clustering.
External Oracle ZFS Storage Appliance
Oracle ZFS Storage Appliance is a cost-effective storage solution optimized for Oracle Database and data-driven
applications. It features a hybrid storage design and cache-centric architecture that optimizes storage performance.
The appliance caches data automatically using dynamic random access memory (DRAM) or f lash, which
allows frequently accessed data—often up to 70 to 90 per cent of the total number of I/O operations—to be served
from cache.

3 | HOW TO DEPLOY SAP SCM WITH SAP LIVECACHE IN AN HA CONFIGURATION ON ORACLE SUPERCLUSTER
Each Oracle SuperCluster has a built-in Oracle ZFS Storage Appliance configured with two clustered heads for high
availability and a tray of 8TB disks. The storage disks provided by the internal appliance are used as boot disks for
Oracle SuperCluster domains; Oracle Solaris boot environments for zones; and swap space. On a fully configured
Oracle SuperCluster, it is recommended to limit the use of the internal Oracle ZFS Storage Appliance to
application usage.
An external Oracle ZFS Storage ZS3-2 or ZS4-4 appliance can also be connected to the Infiniband network. The
recommendations for configuring an internal or external appliance are the same.
Oracle Solaris Cluster
Oracle Solaris Cluster is installed in Oracle Solaris global zones in the APP domains. During the Oracle
SuperCluster installation, Infiniband partitions are created to support dedicated traff ic for the Oracle Solaris Cluster
interconnect. An Oracle Solaris Cluster quorum device is implemented as an iSCSI LUN on the internal Oracle ZFS
Storage Appliance. (The quorum device helps to prevent data corruption caused by a catastrophic situation, such as
split brain or amnesia, which could otherwise result in data corruption.)
Oracle Solaris Zone Clusters
Oracle Solaris Zone clusters are non-global zones configured as virtual cluster nodes. Inside the zones, applications
are managed using resources and resource groups (Figure 2). Zone clusters are defined for SAP liveCache (LC),
SAP Central Services (ASCS), SAP Enqueue Replication Servers (ERS), SAP Primary Application Servers (PAS),
and additional SAP Application Servers (APP).
Figure 2. Oracle Solaris Zone clusters and resource groups.
Implementation Strategy
The proof-of-concept followed these general high-level steps, which are subsequently described in detail:
1. Install and configure Oracle Solaris Cluster. For some customers, Oracle Advanced Customer Support
(Oracle ACS) performs this step as a part of the initial Oracle SuperCluster setup and installation.
2. Create zone clusters, network resources (defining the logical hostnames), and resources to manage NFS
mount points.

4 | HOW TO DEPLOY SAP SCM WITH SAP LIVECACHE IN AN HA CONFIGURATION ON ORACLE SUPERCLUSTER
3. Install SAP components in zones on the logical hostnames by using the SAPINST_USE_HOSTNAME
parameter.
a. SAP SCM and SAP components (ASCS, ERS, DB, PAS, APP) are installed.
b. The SAP liveCache (LC) instance is installed.
c. SAP SCM is then configured to connect to the LC instance.
4. Start the SAP components (ASCS, ERS, DB, PAS, APP, LC) in both zones of each zone cluster.
5. Create Oracle Solaris Cluster resources and configure them to manage the SAP component instances,
including the LC instance.
6. Perform testing to validate the configuration and confirm service recovery. Restart all components and
simulate component failures, observing the timely sw itch-over of application components and ongoing
service availability.
Defining the Implementation Environment
The approach used to create a highly available SCM/APO deployment can differ from one installation to another.
Some configuration options—such as the specif ic number of Oracle Solaris Zones required to host SAP liveCache,
ASCS, and SAP application servers—are f lexible. Others, such as the virtual hosts for each component, are f ixed. In
the proof-of-concept implementation in the Oracle Solution Center, SAP liveCache, ASCS, and ABAP application
servers were deployed in separate zones. In actual deployments, customers can choose to run these components in
either one, two, or three separate zone clusters.
Defining the Network Environment
Another aspect that can vary from deployment to deployment is the number of separate networks configured in each
zone. By default, each zone has a 10GB client connection and an InfiniBand (IB) internal connection. The IB
connection is used to connect to the internal Oracle ZFS Storage Appliance (and the optional external appliance) to
the Oracle Database instance and zones in the DB domains. InfiniBand also provides high-bandwidth internal
communication between the SAP components. Additional backup and management networks are also typically
configured as needed.
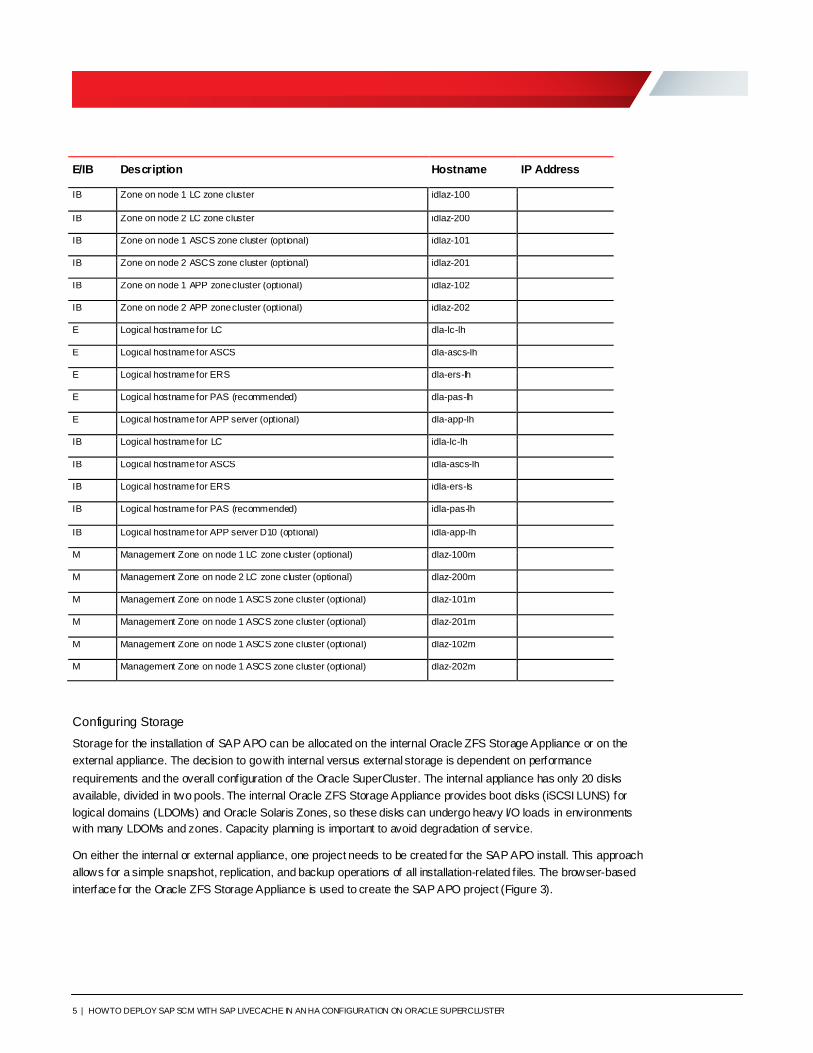
The table below shows an example of network and hostname configurations w ith a short description of their
function. The f irst column shows if the network is on an Infiniband (IB), 10GbE (E), or Management network (M). The
last column cab be completed to contain the corresponding IP address for each hostname (which is site-specif ic).
These hostnames and IP addresses are in addition to the hostnames and IP addresses configured during the initial
component installations (such as hostnames and IP addresses for the DB domain, the DB zones, the APP domains,
the Oracle ZFS Storage Appliance heads), along with any virtual IP addresses.
HOST AND NETWORK CONFIGURATION EXAMPLE
E/IB Description Hostname IP Address
E Zone on node 1 LC zone cluster dlaz-100
E Zone on node 2 LC zone cluster dlaz-200
E Zone on node 1 ASCS zone cluster (optional) dlaz-101
E Zone on node 2 ASCS zone cluster (optional) dlaz-201
E Zone on node 1 APP zone cluster (optional) dlaz-102
E Zone on node 2 APP zone cluster (optional) dlaz-202
5 | HOW TO DEPLOY SAP SCM WITH SAP LIVECACHE IN AN HA CONFIGURATION ON ORACLE SUPERCLUSTER
E/IB Description Hostname IP Address
IB Zone on node 1 LC zone cluster idlaz-100
IB Zone on node 2 LC zone cluster idlaz-200
IB Zone on node 1 ASCS zone cluster (optional) idlaz-101
IB Zone on node 2 ASCS zone cluster (optional) idlaz-201
IB Zone on node 1 APP zone cluster (optional) idlaz-102
IB Zone on node 2 APP zone cluster (optional) idlaz-202
E Logical hostname for LC dla-lc-lh
E Logical hostname for ASCS dla-ascs-lh
E Logical hostname for ERS dla-ers-lh
E Logical hostname for PAS (recommended) dla-pas-lh
E Logical hostname for APP server (optional) dla-app-lh
IB Logical hostname for LC idla-lc-lh
IB Logical hostname for ASCS idla-ascs-lh
IB Logical hostname for ERS idla-ers-ls
IB Logical hostname for PAS (recommended) idla-pas-lh
IB Logical hostname for APP server D10 (optional) idla-app-lh
M Management Zone on node 1 LC zone cluster (optional) dlaz-100m
M Management Zone on node 2 LC zone cluster (optional) dlaz-200m
M Management Zone on node 1 ASCS zone cluster (optional) dlaz-101m
M Management Zone on node 1 ASCS zone cluster (optional) dlaz-201m
M Management Zone on node 1 ASCS zone cluster (optional) dlaz-102m
M Management Zone on node 1 ASCS zone cluster (optional) dlaz-202m
Configuring Storage
Storage for the installation of SAP APO can be allocated on the internal Oracle ZFS Storage Appliance or on the
external appliance. The decision to go with internal versus external storage is dependent on performance
requirements and the overall configuration of the Oracle SuperCluster. The internal appliance has only 20 disks
available, divided in two pools. The internal Oracle ZFS Storage Appliance provides boot disks (iSCSI LUNS) for
logical domains (LDOMs) and Oracle Solaris Zones, so these disks can undergo heavy I/O loads in environments
with many LDOMs and zones. Capacity planning is important to avoid degradation of service.
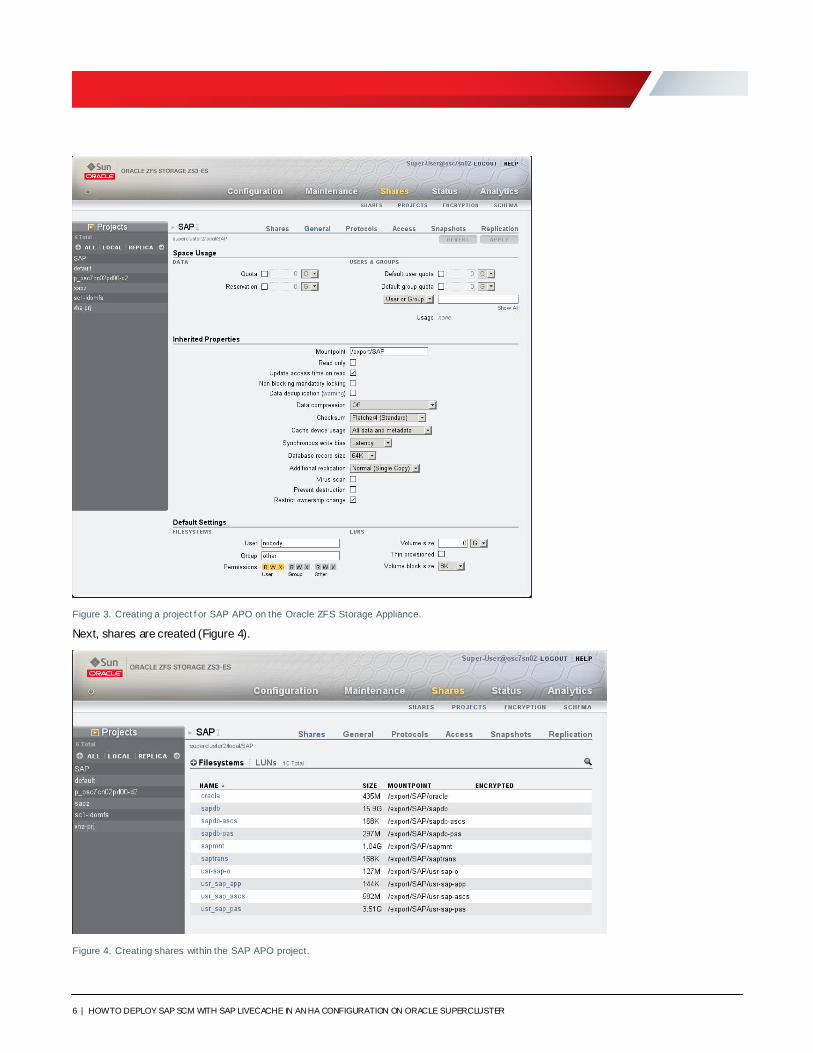
On either the internal or external appliance, one project needs to be created for the SAP APO install. This approach
allows for a simple snapshot, replication, and backup operations of all installation-related f iles. The browser-based
interface for the Oracle ZFS Storage Appliance is used to create the SAP APO project (Figure 3).
6 | HOW TO DEPLOY SAP SCM WITH SAP LIVECACHE IN AN HA CONFIGURATION ON ORACLE SUPERCLUSTER
Figure 3. Creating a project f or SAP APO on the Oracle ZFS Storage Appliance.
Next, shares are created (Figure 4).
Figure 4. Creating shares within the SAP APO project.
7 | HOW TO DEPLOY SAP SCM WITH SAP LIVECACHE IN AN HA CONFIGURATION ON ORACLE SUPERCLUSTER
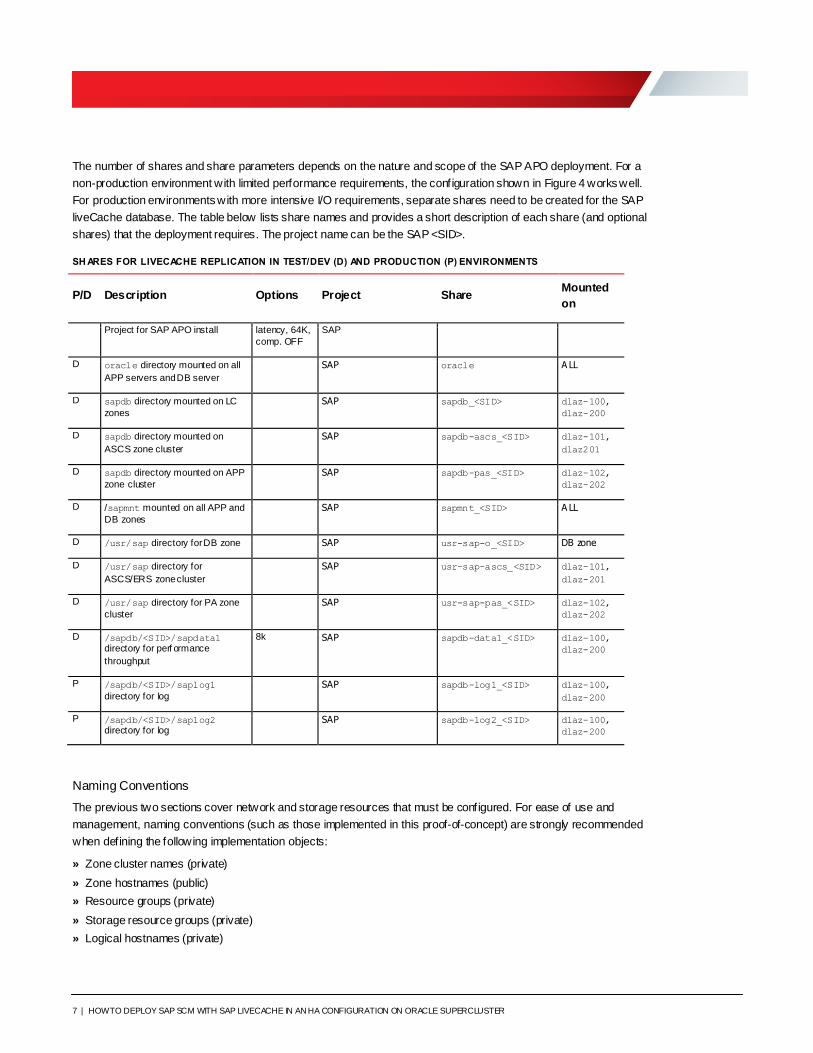
The number of shares and share parameters depends on the nature and scope of the SAP APO deployment. For a
non-production environment with limited performance requirements, the configuration shown in Figure 4 works well.
For production environments with more intensive I/O requirements, separate shares need to be created for the SAP
liveCache database. The table below lists share names and provides a short description of each share (and optional
shares) that the deployment requires. The project name can be the SAP <SID>.
SH ARES FOR LIVECACHE REPLICATION IN TEST/DEV (D) AND PRODUCTION (P) ENVIRONMENTS
P/D Description Options Project Share Mounted
on
Project for SAP APO install latency, 64K,
comp. OFF
SAP
D oracle directory mounted on all
APP servers and DB server
SAP oracle A LL
D sapdb directory mounted on LC
zones
SAP sapdb_<SID> dlaz-100,
dlaz-200
D sapdb directory mounted on
ASCS zone cluster
SAP sapdb-ascs_<SID> dlaz-101,
dlaz201
D sapdb directory mounted on APP
zone cluster
SAP sapdb-pas_<SID> dlaz-102,
dlaz-202
D /sapmnt mounted on all APP and
DB zones
SAP sapmnt_<SID> A LL
D /usr/sap directory for DB zone SAP usr-sap-o_<SID> DB zone
D /usr/sap directory for
ASCS/ERS zone cluster
SAP usr-sap-ascs_<SID> dlaz-101,
dlaz-201
D /usr/sap directory for PA zone
cluster
SAP usr-sap-pas_<SID> dlaz-102,
dlaz-202
D /sapdb/<SID>/sapdata1
directory for perf ormance
throughput
8k SAP sapdb-data1_<SID> dlaz-100,
dlaz-200
P /sapdb/<SID>/saplog1
directory for log
SAP sapdb-log1_<SID> dlaz-100,
dlaz-200
P /sapdb/<SID>/saplog2 directory for log
SAP sapdb-log2_<SID> dlaz-100,
dlaz-200
Naming Conventions
The previous two sections cover network and storage resources that must be configured. For ease of use and
management, naming conventions (such as those implemented in this proof-of-concept) are strongly recommended
when defining the following implementation objects:
» Zone cluster names (private)
» Zone hostnames (public)
» Resource groups (private)
» Storage resource groups (private)
» Logical hostnames (private)
8 | HOW TO DEPLOY SAP SCM WITH SAP LIVECACHE IN AN HA CONFIGURATION ON ORACLE SUPERCLUSTER
» Hostnames (public)
» Resource names (private)
» Storage resource names (private)
Some names are public and some are private, as indicated above. Naming conventions should take into
consideration security, ease of use (consistency and support of multiple SAP instances), and SAP-specif ic
requirements (such as the requirement that hostnames do not exceed 13 characters).
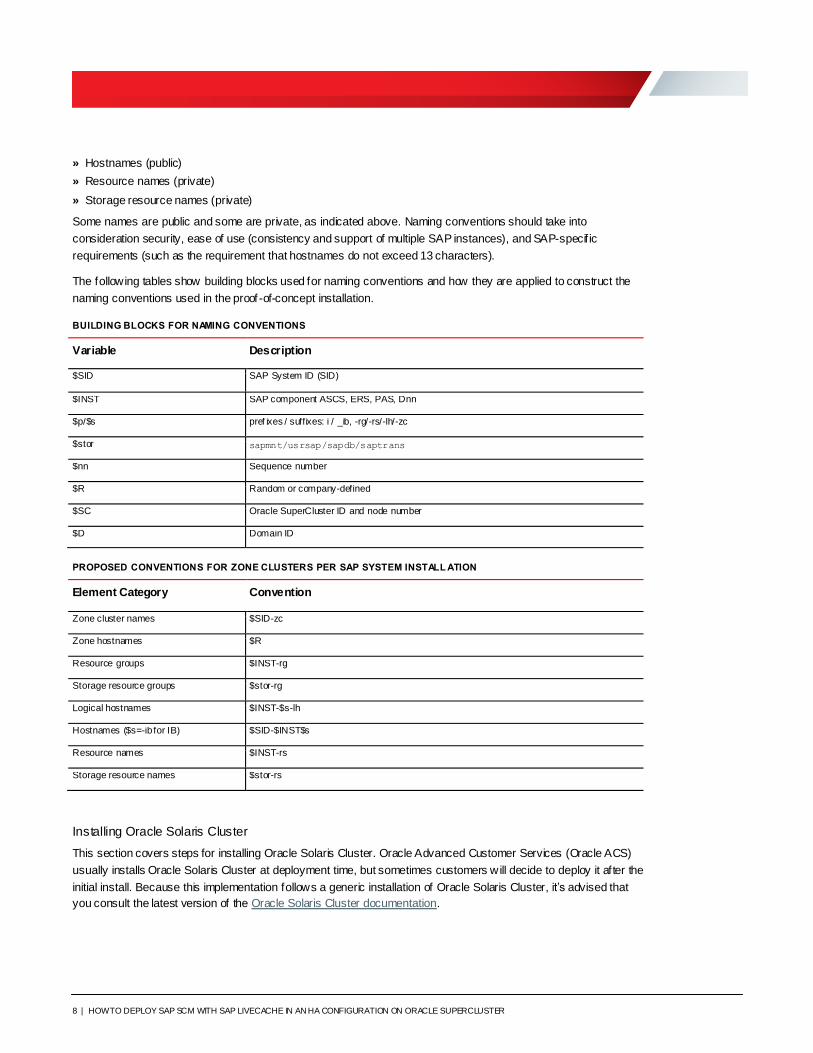
The following tables show building blocks used for naming conventions and how they are applied to construct the
naming conventions used in the proof -of-concept installation.
BUILDING BLOCKS FOR NAMING CONVENTIONS
Variable Description
$SID SAP System ID (SID)
$INST SAP component ASCS, ERS, PAS, Dnn
$p/$s pref ixes / suffixes: i / _ib, -rg/-rs/-lh/-zc
$stor sapmnt/usrsap/sapdb/saptrans
$nn Sequence number
$R Random or company-defined
$SC Oracle SuperCluster ID and node number
$D Domain ID
PROPOSED CONVENTIONS FOR ZONE CLUSTERS PER SAP SYSTEM INSTALL ATION
Element Category Convention
Zone cluster names $SID-zc
Zone hostnames $R
Resource groups $INST-rg
Storage resource groups $stor-rg
Logical hostnames $INST-$s-lh
Hostnames ($s=-ib for IB) $SID-$INST$s
Resource names $INST-rs
Storage resource names $stor-rs
Installing Oracle Solaris Cluster
This section covers steps for installing Oracle Solaris Cluster. Oracle Advanced Customer Services (Oracle ACS)
usually installs Oracle Solaris Cluster at deployment time, but sometimes customers will decide to deploy it after the
initial install. Because this implementation follows a generic installation of Oracle Solaris Cluster, it’s advised that
you consult the latest version of the Oracle Solaris Cluster documentation.
9 | HOW TO DEPLOY SAP SCM WITH SAP LIVECACHE IN AN HA CONFIGURATION ON ORACLE SUPERCLUSTER
Oracle Solaris Cluster is installed in two steps: f irst the environment is prepared, and then Oracle Solaris Cluster
browser-based user interface (BUI) is available to f inalize the installation and start the configuration of the SAP
software installation.
Installing and configuring Oracle Solaris Cluster requires four high-level steps:
1. Configuring network interconnects.
2. Defining the quorum device.
3. Installing software packages for Oracle Solaris and Oracle Solaris Cluster.
4. Using the Oracle Solaris Cluster BUI to f inish the installation.
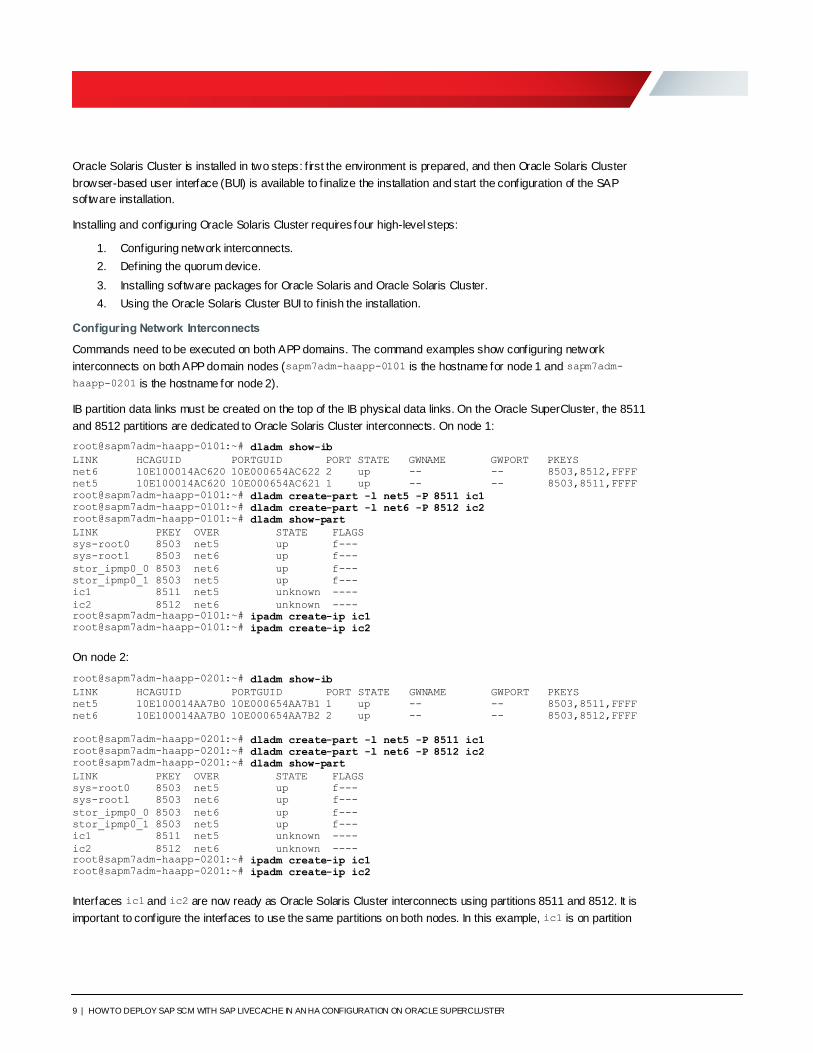
Configuring Network Interconnects
Commands need to be executed on both APP domains. The command examples show configuring network
interconnects on both APP domain nodes (sapm7adm-haapp-0101 is the hostname for node 1 and sapm7adm-
haapp-0201 is the hostname for node 2).
IB partition data links must be created on the top of the IB physical data links. On the Oracle SuperCluster, the 8511
and 8512 partitions are dedicated to Oracle Solaris Cluster interconnects. On node 1:
root@sapm7adm-haapp-0101:~# dladm show-ib
LINK HCAGUID PORTGUID PORT STATE GWNAME GWPORT PKEYS
net6 10E100014AC620 10E000654AC622 2 up -- -- 8503,8512,FFFF
net5 10E100014AC620 10E000654AC621 1 up -- -- 8503,8511,FFFF
root@sapm7adm-haapp-0101:~# dladm create-part -l net5 -P 8511 ic1
root@sapm7adm-haapp-0101:~# dladm create-part -l net6 -P 8512 ic2
root@sapm7adm-haapp-0101:~# dladm show-part
LINK PKEY OVER STATE FLAGS
sys-root0 8503 net5 up f---
sys-root1 8503 net6 up f---
stor_ipmp0_0 8503 net6 up f---
stor_ipmp0_1 8503 net5 up f---
ic1 8511 net5 unknown ----
ic2 8512 net6 unknown ----
root@sapm7adm-haapp-0101:~# ipadm create-ip ic1
root@sapm7adm-haapp-0101:~# ipadm create-ip ic2
On node 2:
root@sapm7adm-haapp-0201:~# dladm show-ib
LINK HCAGUID PORTGUID PORT STATE GWNAME GWPORT PKEYS
net5 10E100014AA7B0 10E000654AA7B1 1 up -- -- 8503,8511,FFFF
net6 10E100014AA7B0 10E000654AA7B2 2 up -- -- 8503,8512,FFFF
root@sapm7adm-haapp-0201:~# dladm create-part -l net5 -P 8511 ic1
root@sapm7adm-haapp-0201:~# dladm create-part -l net6 -P 8512 ic2
root@sapm7adm-haapp-0201:~# dladm show-part
LINK PKEY OVER STATE FLAGS
sys-root0 8503 net5 up f---
sys-root1 8503 net6 up f---
stor_ipmp0_0 8503 net6 up f---
stor_ipmp0_1 8503 net5 up f---
ic1 8511 net5 unknown ----
ic2 8512 net6 unknown ---- root@sapm7adm-haapp-0201:~# ipadm create-ip ic1 root@sapm7adm-haapp-0201:~# ipadm create-ip ic2
Interfaces ic1 and ic2 are now ready as Oracle Solaris Cluster interconnects using partitions 8511 and 8512. It is
important to configure the interfaces to use the same partitions on both nodes. In this example, ic1 is on partition

10 | HOW TO DEPLOY SAP SCM WITH SAP LIVECACHE IN AN HA CONFIGURATION ON ORACLE SUPERCLUSTER
8511 and ic2 is on partition 8512 on both nodes. The interfaces are configured on different ports connected to
different IB sw itches, preventing the failure of a single switch from disabling both interconnects.
Defining the Quorum Device
On Oracle SuperCluster M7-8, iSCSI LUNs are used as boot devices. The global zone is set up for accessing the
iSCSI LUNs from the internal Oracle ZFS Storage Appliance.
On node 1:
root@sapm7adm-haapp-0101:~# iscsiadm list initiator-node
Initiator node name: iqn.1986-03.com.sun:boot.00144ff828d4
Initiator node alias: -
Login Parameters (Default/Configured):
Header Digest: NONE/-
Data Digest: NONE/-
Max Connections: 65535/-
Authentication Type: NONE
RADIUS Server: NONE
RADIUS Access: disabled
Tunable Parameters (Default/Configured):
Session Login Response Time: 60/-
Maximum Connection Retry Time: 180/240
Login Retry Time Interval: 60/-
Configured Sessions: 1
On node 2:
root@sapm7adm-haapp-0201:~# iscsiadm list initiator-node
Initiator node name: iqn.1986-03.com.sun:boot.00144ff9a0f9
Initiator node alias: -
Login Parameters (Default/Configured):
Header Digest: NONE/-
Data Digest: NONE/-
Max Connections: 65535/-
Authentication Type: NONE
RADIUS Server: NONE
RADIUS Access: disabled
Tunable Parameters (Default/Configured):
Session Login Response Time: 60/-
Maximum Connection Retry Time: 180/240
Login Retry Time Interval: 60/-
Configured Sessions: 1
Notice the initiator node names ending in 28d4 (on node 1) and a0f9 (on node 2). Identify the host names for the
Oracle ZFS Storage Appliance cluster heads. In the example deployment, the host names are:
10.129.112.136 sapm7-h1-storadm
10.129.112.137 sapm7-h2-storadm
Log into each cluster head host and create the quorum iSCSI initiator group as follows:
sapm7-h1-storadm:configuration san initiators iscsi> ls
Initiators:
NAME ALIAS
initiator-000 init_sc1cn1dom0
|
+-> INITIATOR
iqn.1986-03.com.sun:boot.0010e0479e74
initiator-001 init_sc1cn1dom1
|
+-> INITIATOR
11 | HOW TO DEPLOY SAP SCM WITH SAP LIVECACHE IN AN HA CONFIGURATION ON ORACLE SUPERCLUSTER
iqn.1986-03.com.sun:boot.00144ff8faae
initiator-002 init_sc1cn1dom_ssccn1-io-sapm7adm-app-0102
|
+-> INITIATOR
iqn.1986-03.com.sun:boot.00144ff97c9b
initiator-003 init_sc1cn1dom_ssccn1-io-sapm7adm-haapp-0101
|
+-> INITIATOR
iqn.1986-03.com.sun:boot.00144ff828d4
initiator-004 init_sc1cn2dom0
|
+-> INITIATOR
iqn.1986-03.com.sun:boot.0010e0479e75
initiator-005 init_sc1cn2dom1
|
+-> INITIATOR
iqn.1986-03.com.sun:boot.00144ffbf174
initiator-006 init_sc1cn2dom_ssccn2-io-sapm7adm-app-0202
|
+-> INITIATOR
iqn.1986-03.com.sun:boot.00144ffb3b6c
initiator-007 init_sc1cn2dom_ssccn2-io-sapm7adm-haapp-0201
|
+-> INITIATOR
iqn.1986-03.com.sun:boot.00144ff9a0f9
Children:
groups => Manage groups
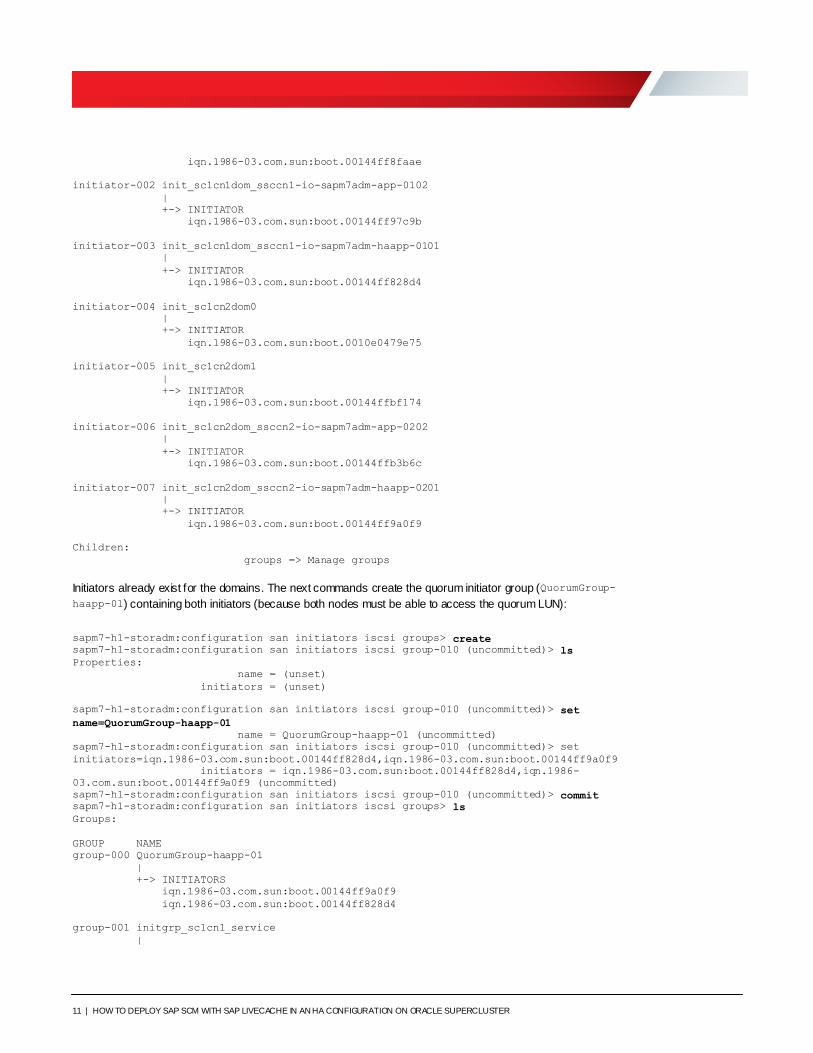
Initiators already exist for the domains. The next commands create the quorum initiator group (QuorumGroup-
haapp-01) containing both initiators (because both nodes must be able to access the quorum LUN):
sapm7-h1-storadm:configuration san initiators iscsi groups> create
sapm7-h1-storadm:configuration san initiators iscsi group-010 (uncommitted)> ls
Properties:
name = (unset)
initiators = (unset)
sapm7-h1-storadm:configuration san initiators iscsi group-010 (uncommitted)> set
name=QuorumGroup-haapp-01
name = QuorumGroup-haapp-01 (uncommitted)
sapm7-h1-storadm:configuration san initiators iscsi group-010 (uncommitted)> set
initiators=iqn.1986-03.com.sun:boot.00144ff828d4,iqn.1986-03.com.sun:boot.00144ff9a0f9
initiators = iqn.1986-03.com.sun:boot.00144ff828d4,iqn.1986-
03.com.sun:boot.00144ff9a0f9 (uncommitted)
sapm7-h1-storadm:configuration san initiators iscsi group-010 (uncommitted)> commit
sapm7-h1-storadm:configuration san initiators iscsi groups> ls
Groups:
GROUP NAME
group-000 QuorumGroup-haapp-01
|
+-> INITIATORS
iqn.1986-03.com.sun:boot.00144ff9a0f9
iqn.1986-03.com.sun:boot.00144ff828d4
group-001 initgrp_sc1cn1_service
|
12 | HOW TO DEPLOY SAP SCM WITH SAP LIVECACHE IN AN HA CONFIGURATION ON ORACLE SUPERCLUSTER
+-> INITIATORS
iqn.1986-03.com.sun:boot.00144ff8faae
iqn.1986-03.com.sun:boot.0010e0479e74
group-002 initgrp_sc1cn1dom0
|
+-> INITIATORS
iqn.1986-03.com.sun:boot.0010e0479e74
group-003 initgrp_sc1cn1dom1
|
+-> INITIATORS
iqn.1986-03.com.sun:boot.00144ff8faae
group-004 initgrp_sc1cn1dom_ssccn1-io-sapm7adm-app-0102
|
+-> INITIATORS
iqn.1986-03.com.sun:boot.00144ff97c9b
group-005 initgrp_sc1cn1dom_ssccn1-io-sapm7adm-haapp-0101
|
+-> INITIATORS
iqn.1986-03.com.sun:boot.00144ff828d4
group-006 initgrp_sc1cn2_service
|
+-> INITIATORS
iqn.1986-03.com.sun:boot.00144ffbf174
iqn.1986-03.com.sun:boot.0010e0479e75
group-007 initgrp_sc1cn2dom0
|
+-> INITIATORS
iqn.1986-03.com.sun:boot.0010e0479e75
group-008 initgrp_sc1cn2dom1
|
+-> INITIATORS
iqn.1986-03.com.sun:boot.00144ffbf174
group-009 initgrp_sc1cn2dom_ssccn2-io-sapm7adm-app-0202
|
+-> INITIATORS
iqn.1986-03.com.sun:boot.00144ffb3b6c
group-010 initgrp_sc1cn2dom_ssccn2-io-sapm7adm-haapp-0201
|
+-> INITIATORS
iqn.1986-03.com.sun:boot.00144ff9a0f9
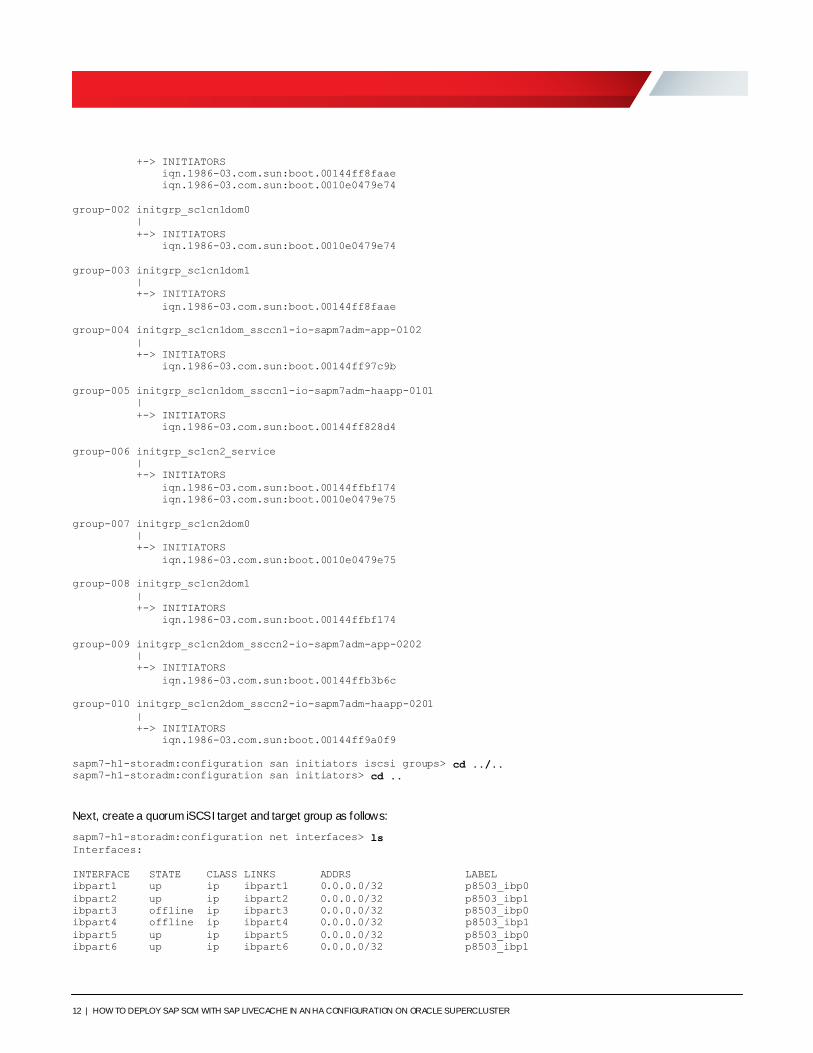
sapm7-h1-storadm:configuration san initiators iscsi groups> cd ../..
sapm7-h1-storadm:configuration san initiators> cd ..
Next, create a quorum iSCSI target and target group as follows:
sapm7-h1-storadm:configuration net interfaces> ls
Interfaces:
INTERFACE STATE CLASS LINKS ADDRS LABEL
ibpart1 up ip ibpart1 0.0.0.0/32 p8503_ibp0
ibpart2 up ip ibpart2 0.0.0.0/32 p8503_ibp1
ibpart3 offline ip ibpart3 0.0.0.0/32 p8503_ibp0
ibpart4 offline ip ibpart4 0.0.0.0/32 p8503_ibp1
ibpart5 up ip ibpart5 0.0.0.0/32 p8503_ibp0
ibpart6 up ip ibpart6 0.0.0.0/32 p8503_ibp1
13 | HOW TO DEPLOY SAP SCM WITH SAP LIVECACHE IN AN HA CONFIGURATION ON ORACLE SUPERCLUSTER
ibpart7 offline ip ibpart7 0.0.0.0/32 p8503_ibp0
ibpart8 offline ip ibpart8 0.0.0.0/32 p8503_ibp1
igb0 up ip igb0 10.129.112.136/20 igb0
igb2 up ip igb2 10.129.97.146/20 igb2
ipmp1 up ipmp ibpart1 192.168.24.9/22 ipmp_versaboot1
ibpart2
ipmp2 offline ipmp ibpart3 192.168.24.10/22 ipmp_versaboot2
ibpart4
ipmp3 up ipmp ibpart5 192.168.28.1/22 ipmp_stor1
ibpart6
ipmp4 offline ipmp ibpart7 192.168.28.2/22 ipmp_stor2
ibpart8
vnic1 up ip vnic1 10.129.112.144/20 vnic1
vnic2 offline ip vnic2 10.129.112.145/20 vnic2
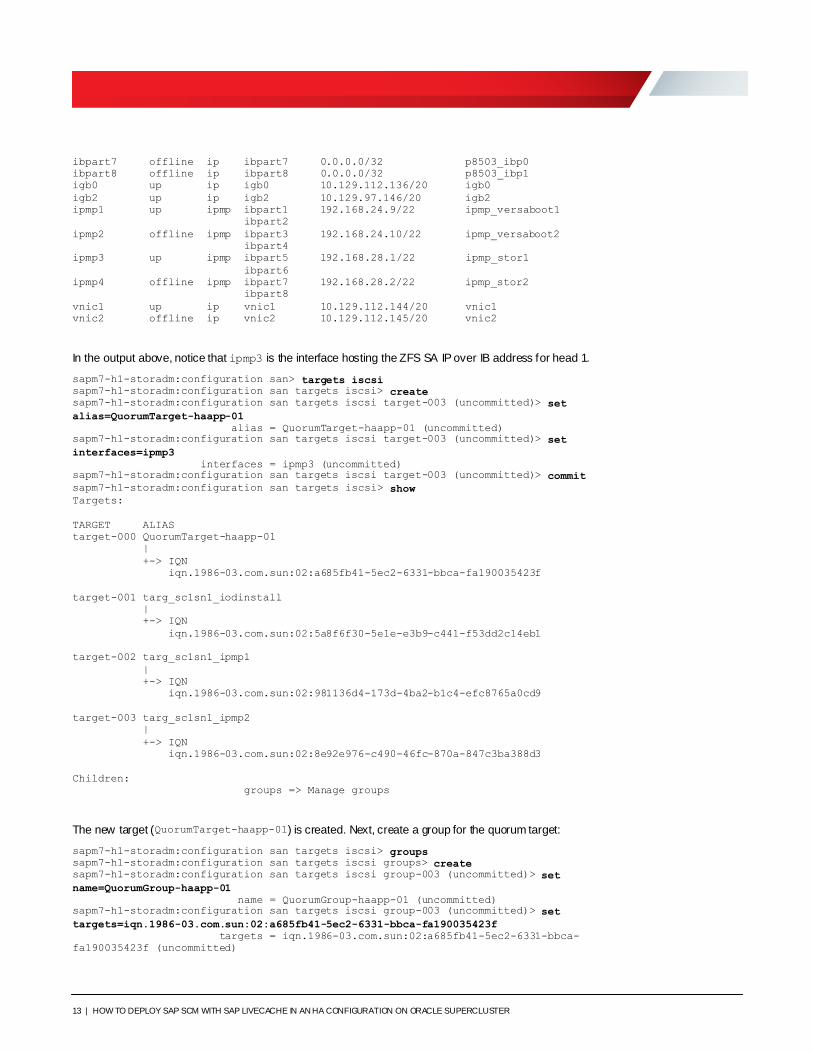
In the output above, notice that ipmp3 is the interface hosting the ZFS SA IP over IB address for head 1.
sapm7-h1-storadm:configuration san> targets iscsi
sapm7-h1-storadm:configuration san targets iscsi> create
sapm7-h1-storadm:configuration san targets iscsi target-003 (uncommitted)> set
alias=QuorumTarget-haapp-01
alias = QuorumTarget-haapp-01 (uncommitted) sapm7-h1-storadm:configuration san targets iscsi target-003 (uncommitted)> set
interfaces=ipmp3
interfaces = ipmp3 (uncommitted) sapm7-h1-storadm:configuration san targets iscsi target-003 (uncommitted)> commit
sapm7-h1-storadm:configuration san targets iscsi> show
Targets:
TARGET ALIAS
target-000 QuorumTarget-haapp-01
|
+-> IQN
iqn.1986-03.com.sun:02:a685fb41-5ec2-6331-bbca-fa190035423f
target-001 targ_sc1sn1_iodinstall
|
+-> IQN
iqn.1986-03.com.sun:02:5a8f6f30-5e1e-e3b9-c441-f53dd2c14eb1
target-002 targ_sc1sn1_ipmp1
|
+-> IQN
iqn.1986-03.com.sun:02:981136d4-173d-4ba2-b1c4-efc8765a0cd9
target-003 targ_sc1sn1_ipmp2
|
+-> IQN
iqn.1986-03.com.sun:02:8e92e976-c490-46fc-870a-847c3ba388d3
Children:
groups => Manage groups
The new target (QuorumTarget-haapp-01) is created. Next, create a group for the quorum target:
sapm7-h1-storadm:configuration san targets iscsi> groups
sapm7-h1-storadm:configuration san targets iscsi groups> create
sapm7-h1-storadm:configuration san targets iscsi group-003 (uncommitted)> set
name=QuorumGroup-haapp-01
name = QuorumGroup-haapp-01 (uncommitted)
sapm7-h1-storadm:configuration san targets iscsi group-003 (uncommitted)> set
targets=iqn.1986-03.com.sun:02:a685fb41-5ec2-6331-bbca-fa190035423f
targets = iqn.1986-03.com.sun:02:a685fb41-5ec2-6331-bbca-
fa190035423f (uncommitted)
14 | HOW TO DEPLOY SAP SCM WITH SAP LIVECACHE IN AN HA CONFIGURATION ON ORACLE SUPERCLUSTER
sapm7-h1-storadm:configuration san targets iscsi group-003 (uncommitted)> commit
sapm7-h1-storadm:configuration san targets iscsi groups> show
Groups:
GROUP NAME
group-000 QuorumGroup-haapp-01
|
+-> TARGETS
iqn.1986-03.com.sun:02:a685fb41-5ec2-6331-bbca-fa190035423f
group-001 targgrp_sc1sn1_iodinstall
|
+-> TARGETS
iqn.1986-03.com.sun:02:5a8f6f30-5e1e-e3b9-c441-f53dd2c14eb1
group-002 targgrp_sc1sn1_ipmp1
|
+-> TARGETS
iqn.1986-03.com.sun:02:981136d4-173d-4ba2-b1c4-efc8765a0cd9
group-003 targgrp_sc1sn1_ipmp2
|
+-> TARGETS
iqn.1986-03.com.sun:02:8e92e976-c490-46fc-870a-847c3ba388d3
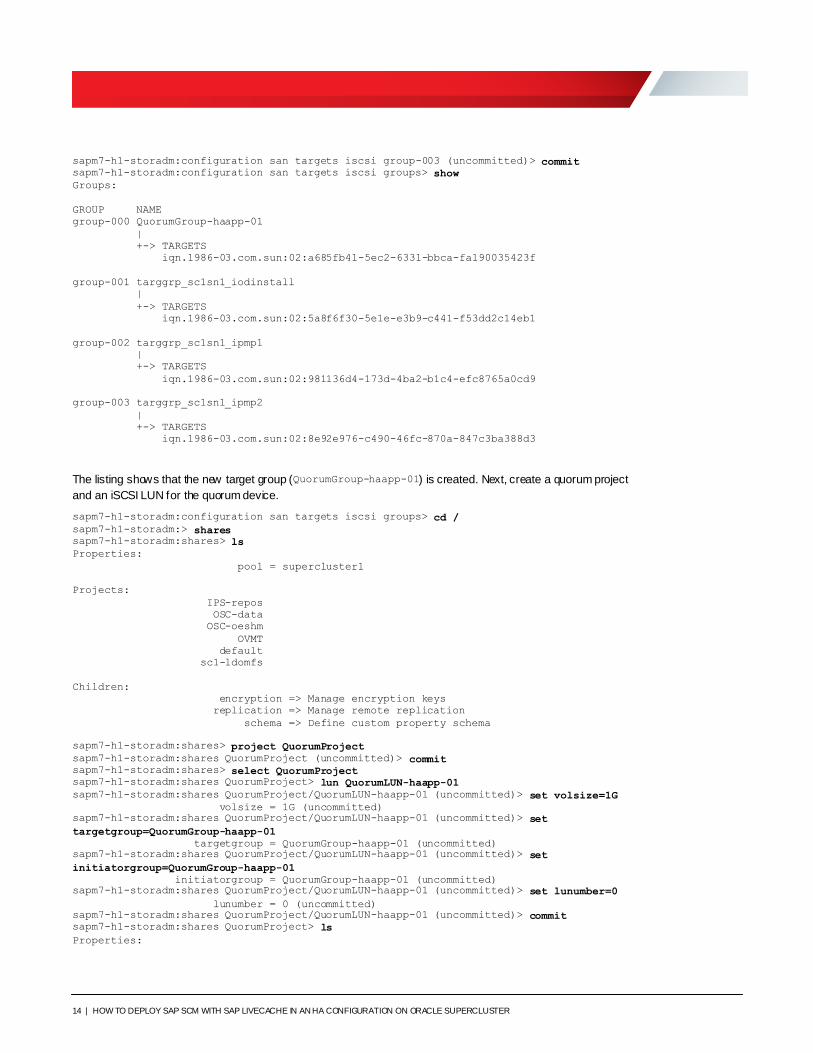
The listing shows that the new target group (QuorumGroup-haapp-01) is created. Next, create a quorum project
and an iSCSI LUN for the quorum device.
sapm7-h1-storadm:configuration san targets iscsi groups> cd /
sapm7-h1-storadm:> shares
sapm7-h1-storadm:shares> ls
Properties:
pool = supercluster1
Projects:
IPS-repos
OSC-data
OSC-oeshm
OVMT
default
sc1-ldomfs
Children:
encryption => Manage encryption keys
replication => Manage remote replication
schema => Define custom property schema
sapm7-h1-storadm:shares> project QuorumProject
sapm7-h1-storadm:shares QuorumProject (uncommitted)> commit
sapm7-h1-storadm:shares> select QuorumProject sapm7-h1-storadm:shares QuorumProject> lun QuorumLUN-haapp-01
sapm7-h1-storadm:shares QuorumProject/QuorumLUN-haapp-01 (uncommitted)> set volsize=1G
volsize = 1G (uncommitted)
sapm7-h1-storadm:shares QuorumProject/QuorumLUN-haapp-01 (uncommitted)> set
targetgroup=QuorumGroup-haapp-01
targetgroup = QuorumGroup-haapp-01 (uncommitted) sapm7-h1-storadm:shares QuorumProject/QuorumLUN-haapp-01 (uncommitted)> set
initiatorgroup=QuorumGroup-haapp-01
initiatorgroup = QuorumGroup-haapp-01 (uncommitted)
sapm7-h1-storadm:shares QuorumProject/QuorumLUN-haapp-01 (uncommitted)> set lunumber=0
lunumber = 0 (uncommitted)
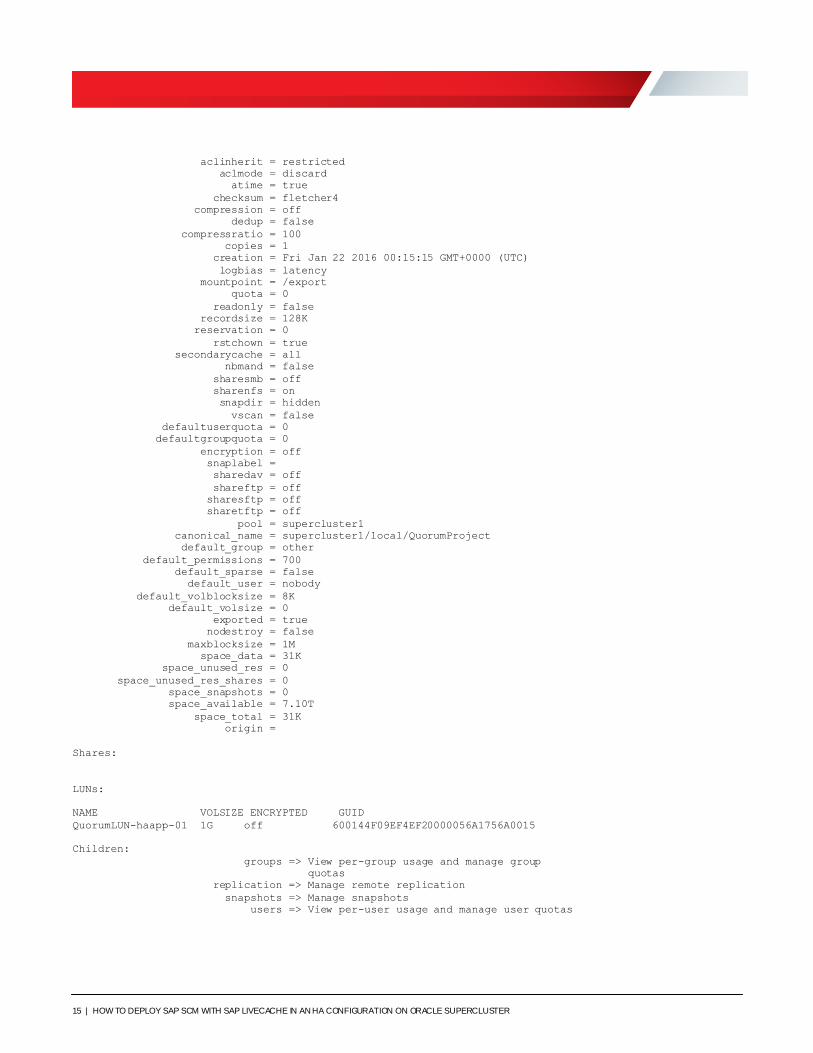
sapm7-h1-storadm:shares QuorumProject/QuorumLUN-haapp-01 (uncommitted)> commit
sapm7-h1-storadm:shares QuorumProject> ls
Properties:
15 | HOW TO DEPLOY SAP SCM WITH SAP LIVECACHE IN AN HA CONFIGURATION ON ORACLE SUPERCLUSTER
aclinherit = restricted
aclmode = discard
atime = true
checksum = fletcher4
compression = off
dedup = false
compressratio = 100
copies = 1
creation = Fri Jan 22 2016 00:15:15 GMT+0000 (UTC)
logbias = latency
mountpoint = /export
quota = 0
readonly = false
recordsize = 128K
reservation = 0
rstchown = true
secondarycache = all
nbmand = false
sharesmb = off
sharenfs = on
snapdir = hidden
vscan = false
defaultuserquota = 0
defaultgroupquota = 0
encryption = off
snaplabel =
sharedav = off
shareftp = off
sharesftp = off
sharetftp = off
pool = supercluster1
canonical_name = supercluster1/local/QuorumProject
default_group = other
default_permissions = 700
default_sparse = false
default_user = nobody
default_volblocksize = 8K
default_volsize = 0
exported = true
nodestroy = false
maxblocksize = 1M
space_data = 31K
space_unused_res = 0
space_unused_res_shares = 0
space_snapshots = 0
space_available = 7.10T
space_total = 31K
origin =
Shares:
LUNs:
NAME VOLSIZE ENCRYPTED GUID
QuorumLUN-haapp-01 1G off 600144F09EF4EF20000056A1756A0015
Children:
groups => View per-group usage and manage group
quotas
replication => Manage remote replication
snapshots => Manage snapshots
users => View per-user usage and manage user quotas
16 | HOW TO DEPLOY SAP SCM WITH SAP LIVECACHE IN AN HA CONFIGURATION ON ORACLE SUPERCLUSTER
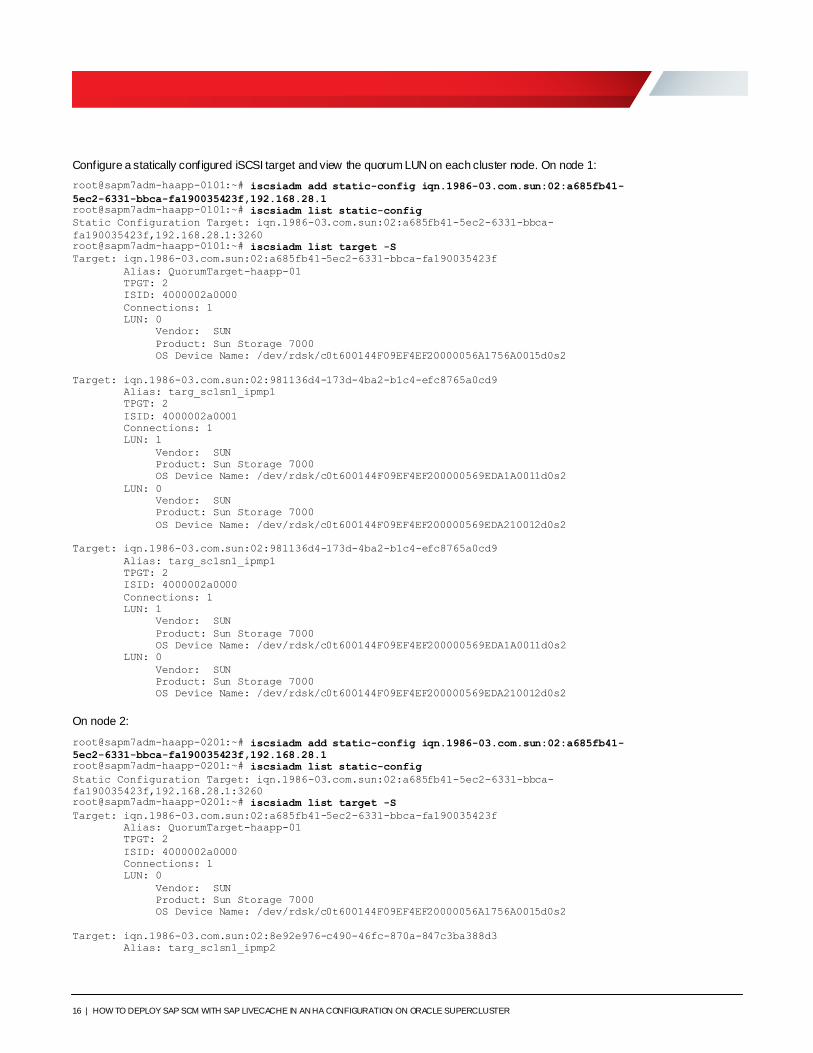
Configure a statically configured iSCSI target and view the quorum LUN on each cluster node. On node 1:
root@sapm7adm-haapp-0101:~# iscsiadm add static-config iqn.1986-03.com.sun:02:a685fb41-
5ec2-6331-bbca-fa190035423f,192.168.28.1
root@sapm7adm-haapp-0101:~# iscsiadm list static-config
Static Configuration Target: iqn.1986-03.com.sun:02:a685fb41-5ec2-6331-bbca-
fa190035423f,192.168.28.1:3260
root@sapm7adm-haapp-0101:~# iscsiadm list target -S
Target: iqn.1986-03.com.sun:02:a685fb41-5ec2-6331-bbca-fa190035423f
Alias: QuorumTarget-haapp-01
TPGT: 2
ISID: 4000002a0000
Connections: 1
LUN: 0
Vendor: SUN
Product: Sun Storage 7000
OS Device Name: /dev/rdsk/c0t600144F09EF4EF20000056A1756A0015d0s2
Target: iqn.1986-03.com.sun:02:981136d4-173d-4ba2-b1c4-efc8765a0cd9
Alias: targ_sc1sn1_ipmp1
TPGT: 2
ISID: 4000002a0001
Connections: 1
LUN: 1
Vendor: SUN
Product: Sun Storage 7000
OS Device Name: /dev/rdsk/c0t600144F09EF4EF200000569EDA1A0011d0s2
LUN: 0
Vendor: SUN
Product: Sun Storage 7000
OS Device Name: /dev/rdsk/c0t600144F09EF4EF200000569EDA210012d0s2
Target: iqn.1986-03.com.sun:02:981136d4-173d-4ba2-b1c4-efc8765a0cd9
Alias: targ_sc1sn1_ipmp1
TPGT: 2
ISID: 4000002a0000
Connections: 1
LUN: 1
Vendor: SUN
Product: Sun Storage 7000
OS Device Name: /dev/rdsk/c0t600144F09EF4EF200000569EDA1A0011d0s2
LUN: 0
Vendor: SUN
Product: Sun Storage 7000
OS Device Name: /dev/rdsk/c0t600144F09EF4EF200000569EDA210012d0s2
On node 2:
root@sapm7adm-haapp-0201:~# iscsiadm add static-config iqn.1986-03.com.sun:02:a685fb41-
5ec2-6331-bbca-fa190035423f,192.168.28.1
root@sapm7adm-haapp-0201:~# iscsiadm list static-config
Static Configuration Target: iqn.1986-03.com.sun:02:a685fb41-5ec2-6331-bbca-
fa190035423f,192.168.28.1:3260 root@sapm7adm-haapp-0201:~# iscsiadm list target -S
Target: iqn.1986-03.com.sun:02:a685fb41-5ec2-6331-bbca-fa190035423f
Alias: QuorumTarget-haapp-01
TPGT: 2
ISID: 4000002a0000
Connections: 1
LUN: 0
Vendor: SUN
Product: Sun Storage 7000
OS Device Name: /dev/rdsk/c0t600144F09EF4EF20000056A1756A0015d0s2
Target: iqn.1986-03.com.sun:02:8e92e976-c490-46fc-870a-847c3ba388d3
Alias: targ_sc1sn1_ipmp2
17 | HOW TO DEPLOY SAP SCM WITH SAP LIVECACHE IN AN HA CONFIGURATION ON ORACLE SUPERCLUSTER
TPGT: 2
ISID: 4000002a0001
Connections: 1
LUN: 2
Vendor: SUN
Product: Sun Storage 7000
OS Device Name: /dev/rdsk/c0t600144F09D4812E90000569EDF860009d0s2
LUN: 0
Vendor: SUN
Product: Sun Storage 7000
OS Device Name: /dev/rdsk/c0t600144F09D4812E90000569EDF8D000Ad0s2
Target: iqn.1986-03.com.sun:02:8e92e976-c490-46fc-870a-847c3ba388d3
Alias: targ_sc1sn1_ipmp2
TPGT: 2
ISID: 4000002a0000
Connections: 1
LUN: 2
Vendor: SUN
Product: Sun Storage 7000
OS Device Name: /dev/rdsk/c0t600144F09D4812E90000569EDF860009d0s2
LUN: 0
Vendor: SUN
Product: Sun Storage 7000
OS Device Name: /dev/rdsk/c0t600144F09D4812E90000569EDF8D000Ad0s2
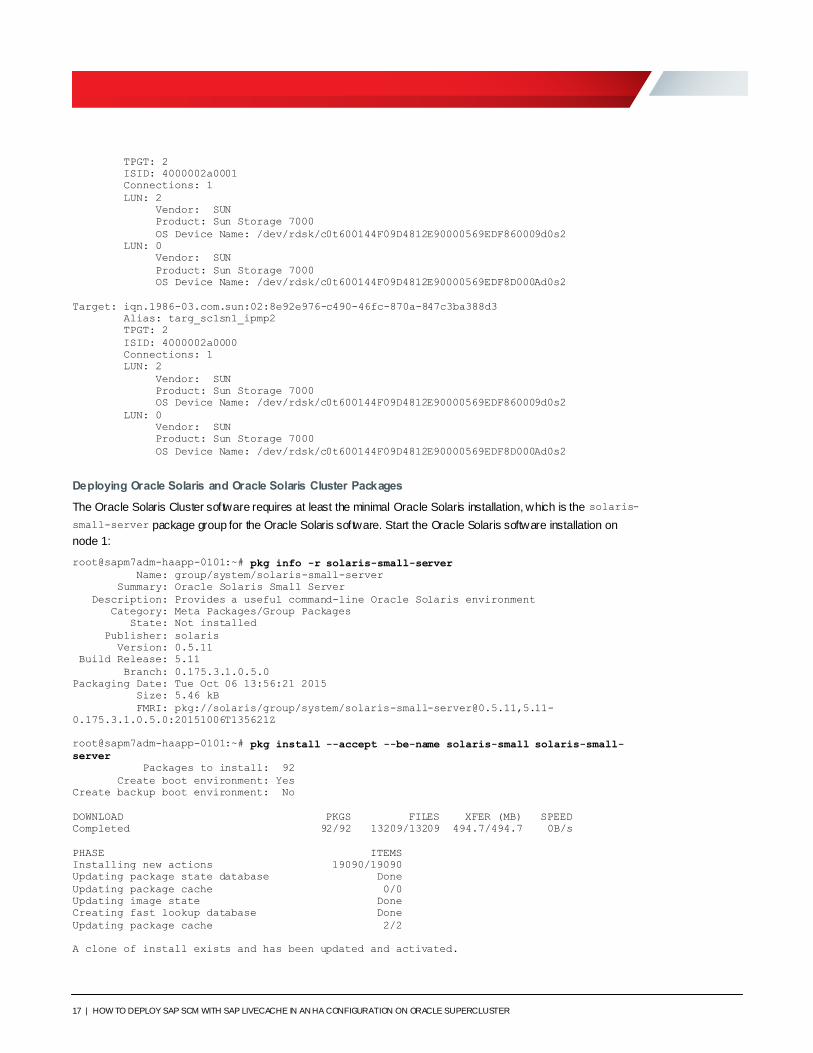
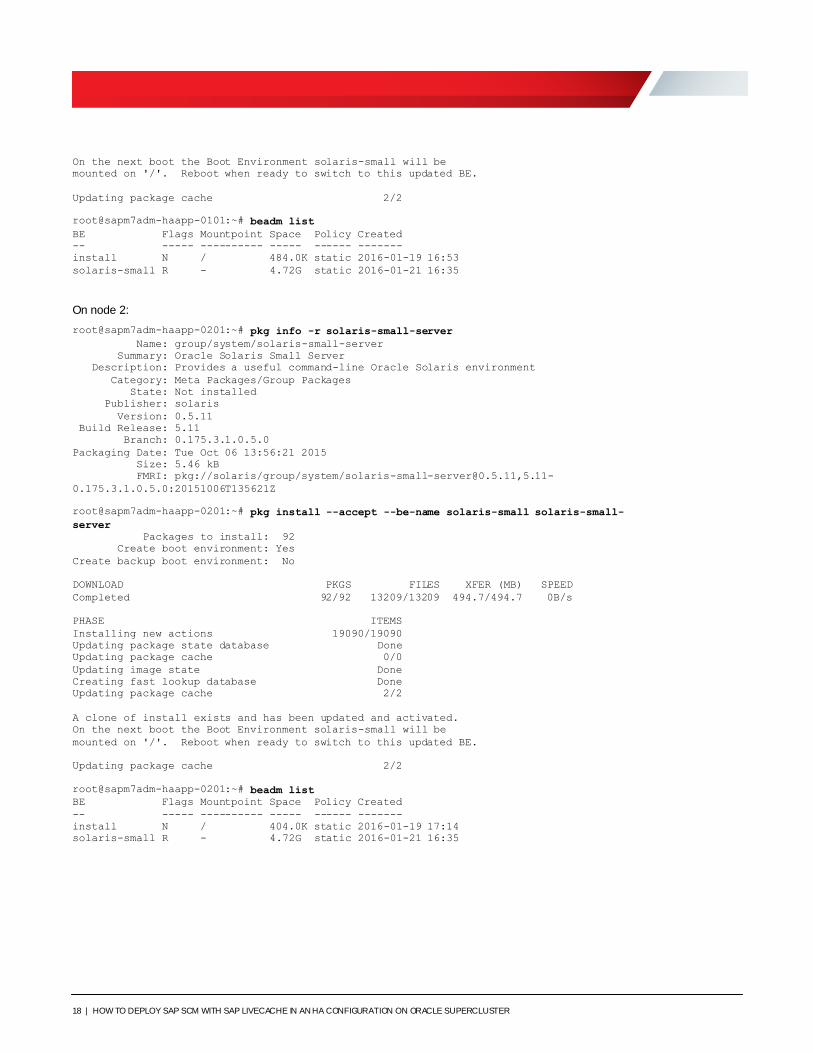
Deploying Oracle Solaris and Oracle Solaris Cluster Packages
The Oracle Solaris Cluster software requires at least the minimal Oracle Solaris installation, which is the solaris-
small-server package group for the Oracle Solaris software. Start the Oracle Solaris software installation on
node 1:
root@sapm7adm-haapp-0101:~# pkg info -r solaris-small-server
Name: group/system/solaris-small-server
Summary: Oracle Solaris Small Server
Description: Provides a useful command-line Oracle Solaris environment
Category: Meta Packages/Group Packages
State: Not installed
Publisher: solaris
Version: 0.5.11
Build Release: 5.11
Branch: 0.175.3.1.0.5.0
Packaging Date: Tue Oct 06 13:56:21 2015
Size: 5.46 kB
FMRI: pkg://solaris/group/system/[email protected],5.11-
0.175.3.1.0.5.0:20151006T135621Z
root@sapm7adm-haapp-0101:~# pkg install --accept --be-name solaris-small solaris-small-
server
Packages to install: 92
Create boot environment: Yes
Create backup boot environment: No
DOWNLOAD PKGS FILES XFER (MB) SPEED
Completed 92/92 13209/13209 494.7/494.7 0B/s
PHASE ITEMS
Installing new actions 19090/19090
Updating package state database Done
Updating package cache 0/0
Updating image state Done
Creating fast lookup database Done
Updating package cache 2/2
A clone of install exists and has been updated and activated.
18 | HOW TO DEPLOY SAP SCM WITH SAP LIVECACHE IN AN HA CONFIGURATION ON ORACLE SUPERCLUSTER
On the next boot the Boot Environment solaris-small will be
mounted on '/'. Reboot when ready to switch to this updated BE.
Updating package cache 2/2
root@sapm7adm-haapp-0101:~# beadm list
BE Flags Mountpoint Space Policy Created
-- ----- ---------- ----- ------ -------
install N / 484.0K static 2016-01-19 16:53
solaris-small R - 4.72G static 2016-01-21 16:35
On node 2:
root@sapm7adm-haapp-0201:~# pkg info -r solaris-small-server
Name: group/system/solaris-small-server
Summary: Oracle Solaris Small Server
Description: Provides a useful command-line Oracle Solaris environment
Category: Meta Packages/Group Packages
State: Not installed
Publisher: solaris
Version: 0.5.11
Build Release: 5.11
Branch: 0.175.3.1.0.5.0
Packaging Date: Tue Oct 06 13:56:21 2015
Size: 5.46 kB
FMRI: pkg://solaris/group/system/[email protected],5.11-
0.175.3.1.0.5.0:20151006T135621Z
root@sapm7adm-haapp-0201:~# pkg install --accept --be-name solaris-small solaris-small-
server
Packages to install: 92
Create boot environment: Yes
Create backup boot environment: No
DOWNLOAD PKGS FILES XFER (MB) SPEED
Completed 92/92 13209/13209 494.7/494.7 0B/s
PHASE ITEMS
Installing new actions 19090/19090
Updating package state database Done
Updating package cache 0/0
Updating image state Done
Creating fast lookup database Done
Updating package cache 2/2
A clone of install exists and has been updated and activated.
On the next boot the Boot Environment solaris-small will be
mounted on '/'. Reboot when ready to switch to this updated BE.
Updating package cache 2/2
root@sapm7adm-haapp-0201:~# beadm list
BE Flags Mountpoint Space Policy Created
-- ----- ---------- ----- ------ -------
install N / 404.0K static 2016-01-19 17:14
solaris-small R - 4.72G static 2016-01-21 16:35
19 | HOW TO DEPLOY SAP SCM WITH SAP LIVECACHE IN AN HA CONFIGURATION ON ORACLE SUPERCLUSTER
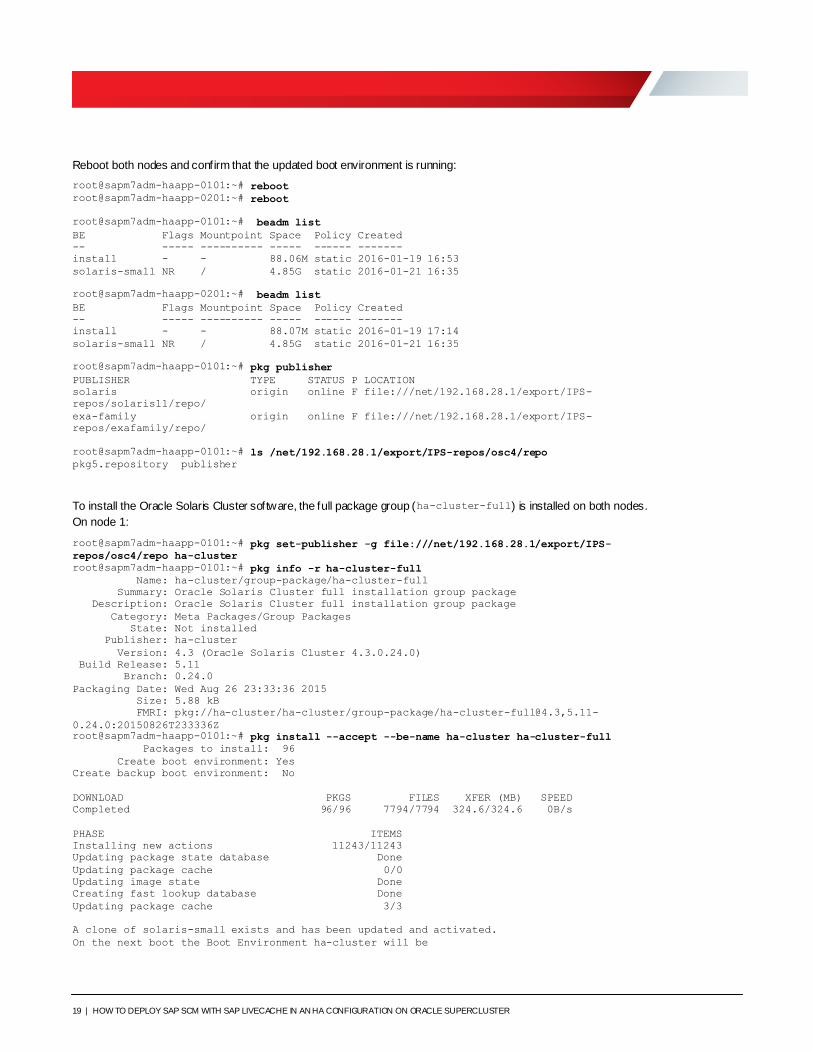
Reboot both nodes and confirm that the updated boot environment is running:
root@sapm7adm-haapp-0101:~# reboot
root@sapm7adm-haapp-0201:~# reboot
root@sapm7adm-haapp-0101:~# beadm list
BE Flags Mountpoint Space Policy Created
-- ----- ---------- ----- ------ -------
install - - 88.06M static 2016-01-19 16:53
solaris-small NR / 4.85G static 2016-01-21 16:35
root@sapm7adm-haapp-0201:~# beadm list
BE Flags Mountpoint Space Policy Created
-- ----- ---------- ----- ------ -------
install - - 88.07M static 2016-01-19 17:14
solaris-small NR / 4.85G static 2016-01-21 16:35
root@sapm7adm-haapp-0101:~# pkg publisher
PUBLISHER TYPE STATUS P LOCATION
solaris origin online F file:///net/192.168.28.1/export/IPS-
repos/solaris11/repo/
exa-family origin online F file:///net/192.168.28.1/export/IPS-
repos/exafamily/repo/
root@sapm7adm-haapp-0101:~# ls /net/192.168.28.1/export/IPS-repos/osc4/repo
pkg5.repository publisher
To install the Oracle Solaris Cluster software, the full package group (ha-cluster-full) is installed on both nodes.
On node 1:
root@sapm7adm-haapp-0101:~# pkg set-publisher -g file:///net/192.168.28.1/export/IPS-
repos/osc4/repo ha-cluster
root@sapm7adm-haapp-0101:~# pkg info -r ha-cluster-full
Name: ha-cluster/group-package/ha-cluster-full
Summary: Oracle Solaris Cluster full installation group package
Description: Oracle Solaris Cluster full installation group package
Category: Meta Packages/Group Packages
State: Not installed
Publisher: ha-cluster
Version: 4.3 (Oracle Solaris Cluster 4.3.0.24.0)
Build Release: 5.11
Branch: 0.24.0
Packaging Date: Wed Aug 26 23:33:36 2015
Size: 5.88 kB
FMRI: pkg://ha-cluster/ha-cluster/group-package/[email protected],5.11-
0.24.0:20150826T233336Z root@sapm7adm-haapp-0101:~# pkg install --accept --be-name ha-cluster ha-cluster-full
Packages to install: 96
Create boot environment: Yes
Create backup boot environment: No
DOWNLOAD PKGS FILES XFER (MB) SPEED
Completed 96/96 7794/7794 324.6/324.6 0B/s
PHASE ITEMS
Installing new actions 11243/11243
Updating package state database Done
Updating package cache 0/0
Updating image state Done
Creating fast lookup database Done
Updating package cache 3/3
A clone of solaris-small exists and has been updated and activated.
On the next boot the Boot Environment ha-cluster will be
20 | HOW TO DEPLOY SAP SCM WITH SAP LIVECACHE IN AN HA CONFIGURATION ON ORACLE SUPERCLUSTER
mounted on '/'. Reboot when ready to switch to this updated BE.
Updating package cache 3/3
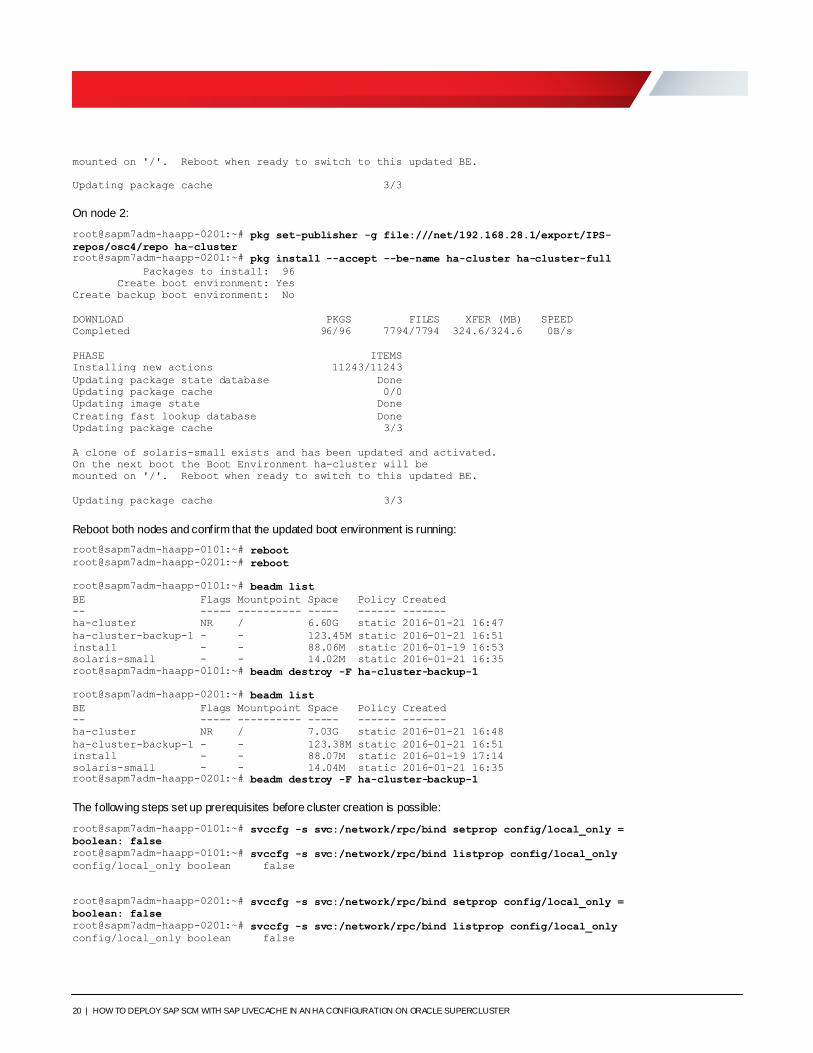
On node 2:
root@sapm7adm-haapp-0201:~# pkg set-publisher -g file:///net/192.168.28.1/export/IPS-
repos/osc4/repo ha-cluster
root@sapm7adm-haapp-0201:~# pkg install --accept --be-name ha-cluster ha-cluster-full
Packages to install: 96
Create boot environment: Yes
Create backup boot environment: No
DOWNLOAD PKGS FILES XFER (MB) SPEED
Completed 96/96 7794/7794 324.6/324.6 0B/s
PHASE ITEMS
Installing new actions 11243/11243
Updating package state database Done
Updating package cache 0/0
Updating image state Done
Creating fast lookup database Done
Updating package cache 3/3
A clone of solaris-small exists and has been updated and activated.
On the next boot the Boot Environment ha-cluster will be
mounted on '/'. Reboot when ready to switch to this updated BE.
Updating package cache 3/3
Reboot both nodes and confirm that the updated boot environment is running:
root@sapm7adm-haapp-0101:~# reboot
root@sapm7adm-haapp-0201:~# reboot
root@sapm7adm-haapp-0101:~# beadm list
BE Flags Mountpoint Space Policy Created
-- ----- ---------- ----- ------ -------
ha-cluster NR / 6.60G static 2016-01-21 16:47
ha-cluster-backup-1 - - 123.45M static 2016-01-21 16:51
install - - 88.06M static 2016-01-19 16:53
solaris-small - - 14.02M static 2016-01-21 16:35
root@sapm7adm-haapp-0101:~# beadm destroy -F ha-cluster-backup-1
root@sapm7adm-haapp-0201:~# beadm list
BE Flags Mountpoint Space Policy Created
-- ----- ---------- ----- ------ -------
ha-cluster NR / 7.03G static 2016-01-21 16:48
ha-cluster-backup-1 - - 123.38M static 2016-01-21 16:51
install - - 88.07M static 2016-01-19 17:14
solaris-small - - 14.04M static 2016-01-21 16:35
root@sapm7adm-haapp-0201:~# beadm destroy -F ha-cluster-backup-1
The following steps set up prerequisites before cluster creation is possible:
root@sapm7adm-haapp-0101:~# svccfg -s svc:/network/rpc/bind setprop config/local_only =
boolean: false
root@sapm7adm-haapp-0101:~# svccfg -s svc:/network/rpc/bind listprop config/local_only
config/local_only boolean false
root@sapm7adm-haapp-0201:~# svccfg -s svc:/network/rpc/bind setprop config/local_only =
boolean: false
root@sapm7adm-haapp-0201:~# svccfg -s svc:/network/rpc/bind listprop config/local_only
config/local_only boolean false
21 | HOW TO DEPLOY SAP SCM WITH SAP LIVECACHE IN AN HA CONFIGURATION ON ORACLE SUPERCLUSTER
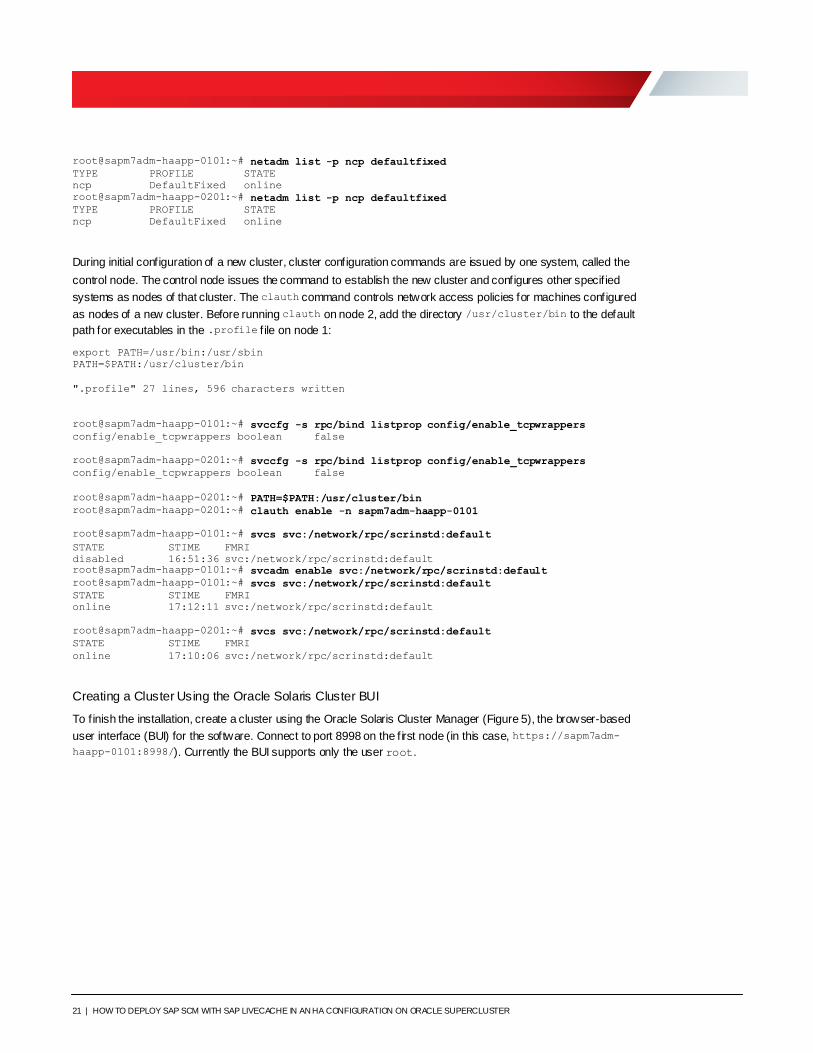
root@sapm7adm-haapp-0101:~# netadm list -p ncp defaultfixed
TYPE PROFILE STATE
ncp DefaultFixed online
root@sapm7adm-haapp-0201:~# netadm list -p ncp defaultfixed
TYPE PROFILE STATE
ncp DefaultFixed online
During initial configuration of a new cluster, cluster configuration commands are issued by one system, called the
control node. The control node issues the command to establish the new cluster and configures other specif ied
systems as nodes of that cluster. The clauth command controls network access policies for machines configured
as nodes of a new cluster. Before running clauth on node 2, add the directory /usr/cluster/bin to the default
path for executables in the .profile f ile on node 1:
export PATH=/usr/bin:/usr/sbin
PATH=$PATH:/usr/cluster/bin
".profile" 27 lines, 596 characters written
root@sapm7adm-haapp-0101:~# svccfg -s rpc/bind listprop config/enable_tcpwrappers
config/enable_tcpwrappers boolean false
root@sapm7adm-haapp-0201:~# svccfg -s rpc/bind listprop config/enable_tcpwrappers
config/enable_tcpwrappers boolean false
root@sapm7adm-haapp-0201:~# PATH=$PATH:/usr/cluster/bin
root@sapm7adm-haapp-0201:~# clauth enable -n sapm7adm-haapp-0101
root@sapm7adm-haapp-0101:~# svcs svc:/network/rpc/scrinstd:default
STATE STIME FMRI
disabled 16:51:36 svc:/network/rpc/scrinstd:default root@sapm7adm-haapp-0101:~# svcadm enable svc:/network/rpc/scrinstd:default
root@sapm7adm-haapp-0101:~# svcs svc:/network/rpc/scrinstd:default
STATE STIME FMRI
online 17:12:11 svc:/network/rpc/scrinstd:default
root@sapm7adm-haapp-0201:~# svcs svc:/network/rpc/scrinstd:default
STATE STIME FMRI
online 17:10:06 svc:/network/rpc/scrinstd:default
Creating a Cluster Using the Oracle Solaris Cluster BUI
To finish the installation, create a cluster using the Oracle Solaris Cluster Manager (Figure 5), the browser-based
user interface (BUI) for the software. Connect to port 8998 on the f irst node (in this case, https://sapm7adm-
haapp-0101:8998/). Currently the BUI supports only the user root.

22 | HOW TO DEPLOY SAP SCM WITH SAP LIVECACHE IN AN HA CONFIGURATION ON ORACLE SUPERCLUSTER
Figure 5. Connecting to the Oracle Solaris Cluster Manager BUI.
The cluster creation wizard guides you through the process of creating an Oracle Solaris Cluster configuration. It
gathers configuration details, displays checks before installing, and then performs an Oracle Solaris Cluster install.
The same BUI is used for managing and monitoring the Oracle Solaris Cluster configuration after installation. When
using the BUI to manage the configuration, the comparable CLI commands are shown as they are run on the nodes.
The w izard (Figure 6) f irst verif ies prerequisites for cluster creation. Specify the Creation Mode as "Typical", which
works well on Oracle SuperCluster for clustered SAP environments.
Figure 6. The Oracle Solaris Cluster wizard simplif ies the process of cluster creation.
23 | HOW TO DEPLOY SAP SCM WITH SAP LIVECACHE IN AN HA CONFIGURATION ON ORACLE SUPERCLUSTER
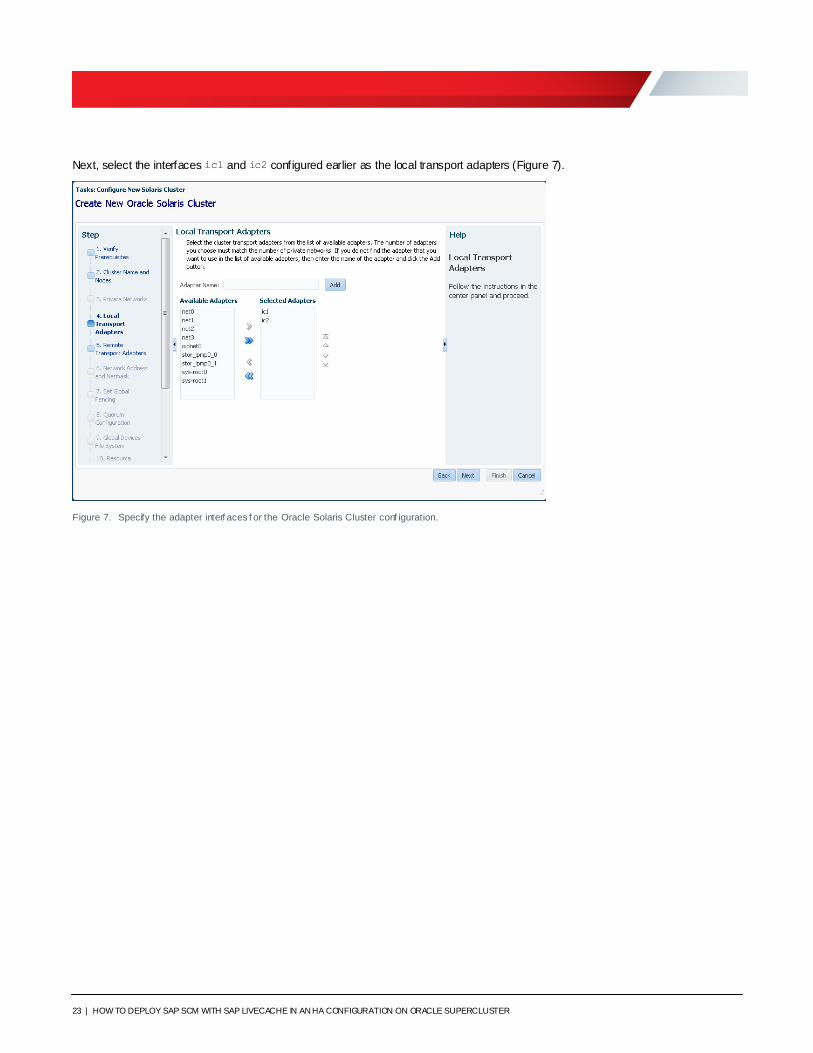
Next, select the interfaces ic1 and ic2 configured earlier as the local transport adapters (Figure 7).
Figure 7. Specify the adapter interf aces f or the Oracle Solaris Cluster conf iguration.
24 | HOW TO DEPLOY SAP SCM WITH SAP LIVECACHE IN AN HA CONFIGURATION ON ORACLE SUPERCLUSTER
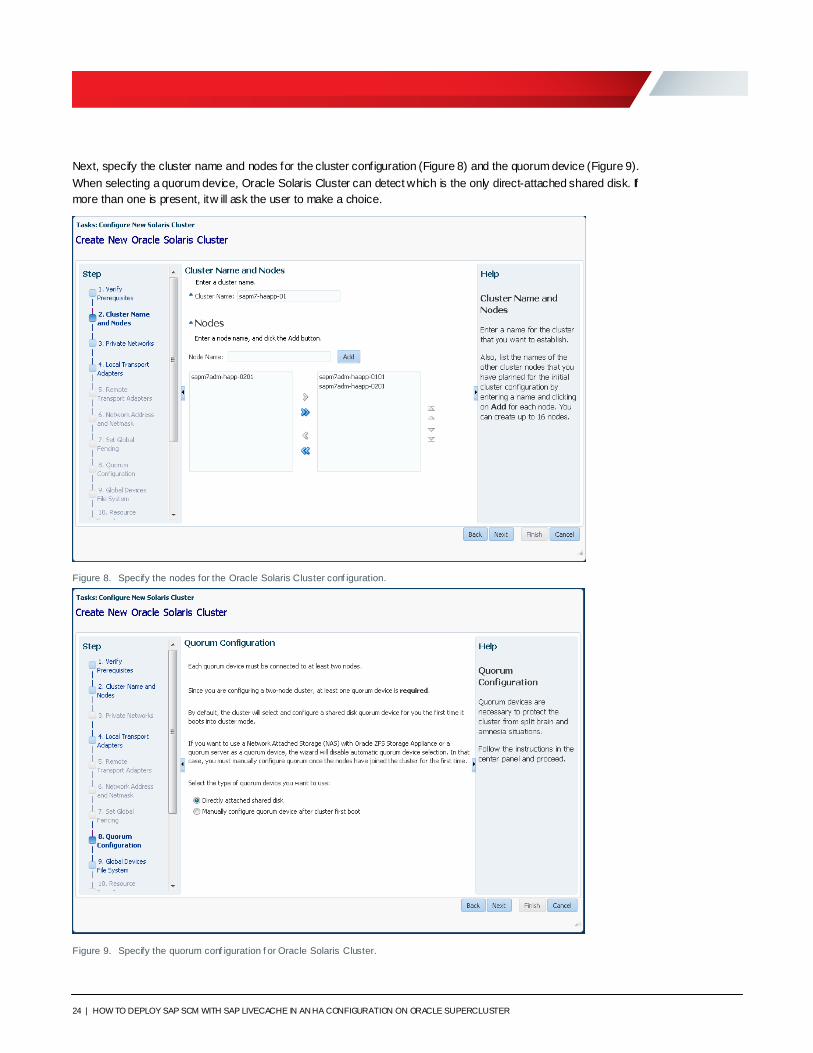
Next, specify the cluster name and nodes for the cluster configuration (Figure 8) and the quorum device (Figure 9).
When selecting a quorum device, Oracle Solaris Cluster can detect which is the only direct-attached shared disk. If
more than one is present, it w ill ask the user to make a choice.
Figure 8. Specify the nodes for the Oracle Solaris Cluster conf iguration.
Figure 9. Specify the quorum conf iguration f or Oracle Solaris Cluster.
25 | HOW TO DEPLOY SAP SCM WITH SAP LIVECACHE IN AN HA CONFIGURATION ON ORACLE SUPERCLUSTER
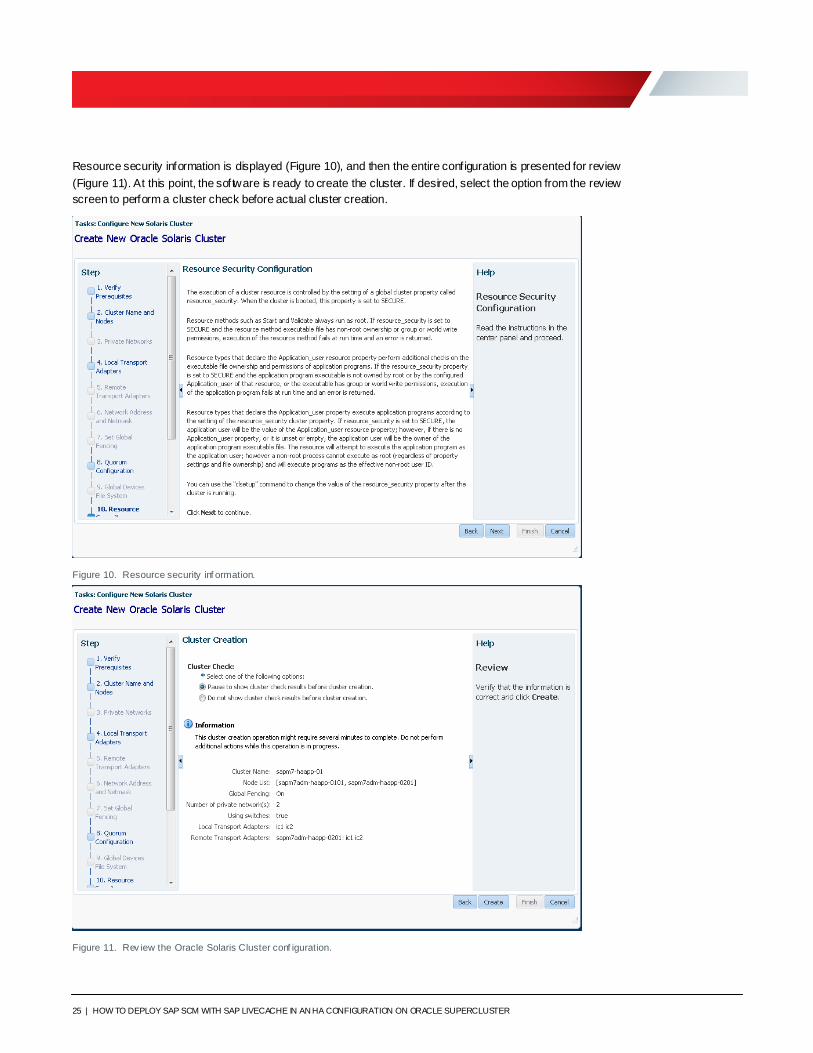
Resource security information is displayed (Figure 10), and then the entire configuration is presented for review
(Figure 11). At this point, the software is ready to create the cluster. If desired, select the option from the review
screen to perform a cluster check before actual cluster creation.
Figure 10. Resource security inf ormation.
Figure 11. Rev iew the Oracle Solaris Cluster conf iguration.
26 | HOW TO DEPLOY SAP SCM WITH SAP LIVECACHE IN AN HA CONFIGURATION ON ORACLE SUPERCLUSTER
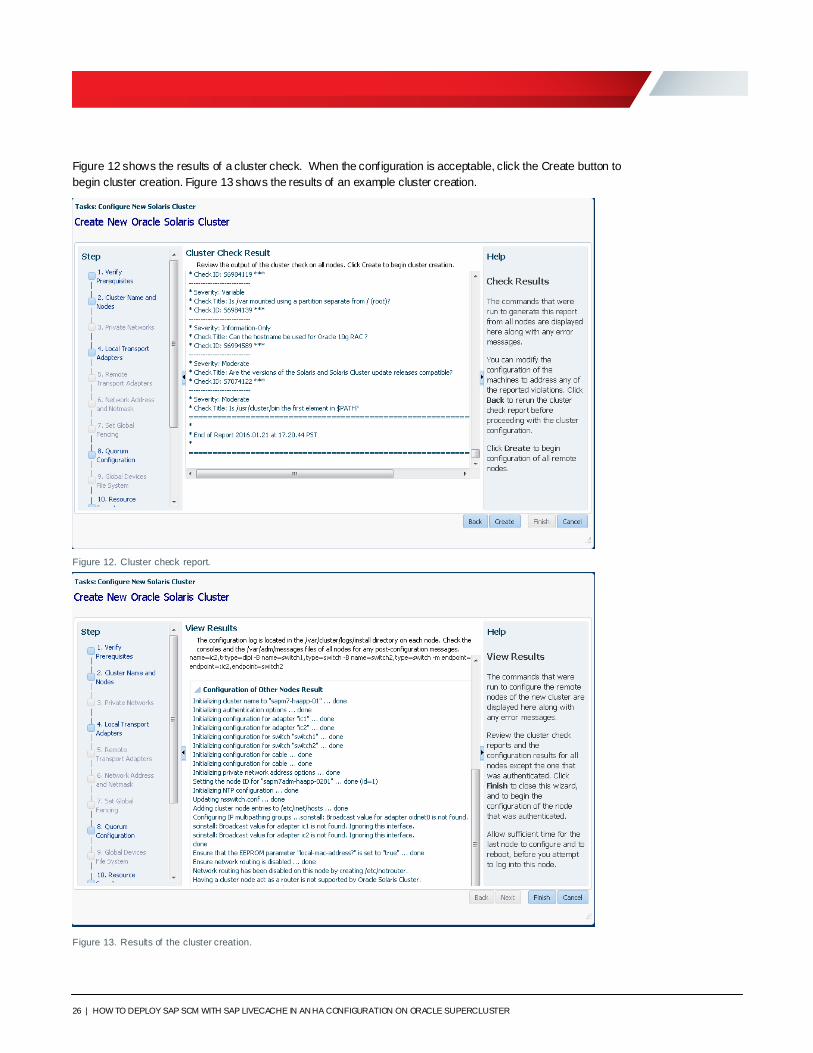
Figure 12 shows the results of a cluster check. When the configuration is acceptable, click the Create button to
begin cluster creation. Figure 13 shows the results of an example cluster creation.
Figure 12. Cluster check report.
Figure 13. Results of the cluster creation.
27 | HOW TO DEPLOY SAP SCM WITH SAP LIVECACHE IN AN HA CONFIGURATION ON ORACLE SUPERCLUSTER
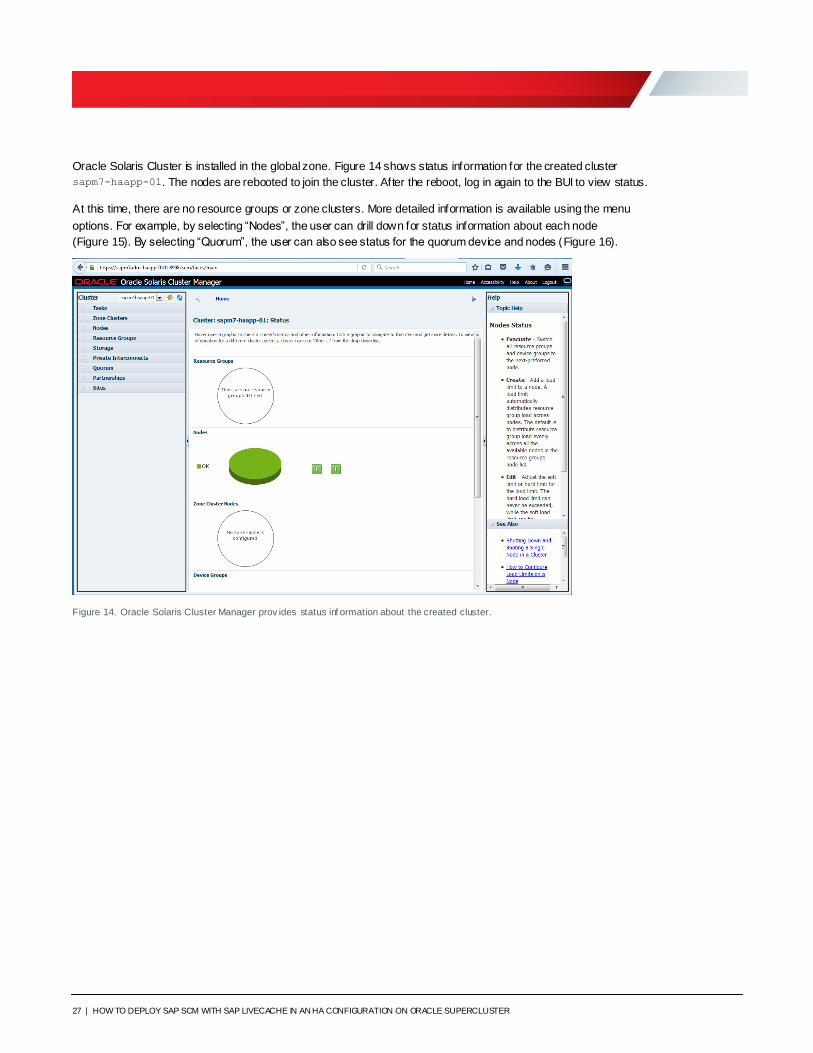
Oracle Solaris Cluster is installed in the global zone. Figure 14 shows status information for the created cluster
sapm7-haapp-01. The nodes are rebooted to join the cluster. After the reboot, log in again to the BUI to view status.
At this time, there are no resource groups or zone clusters. More detailed information is available using the menu
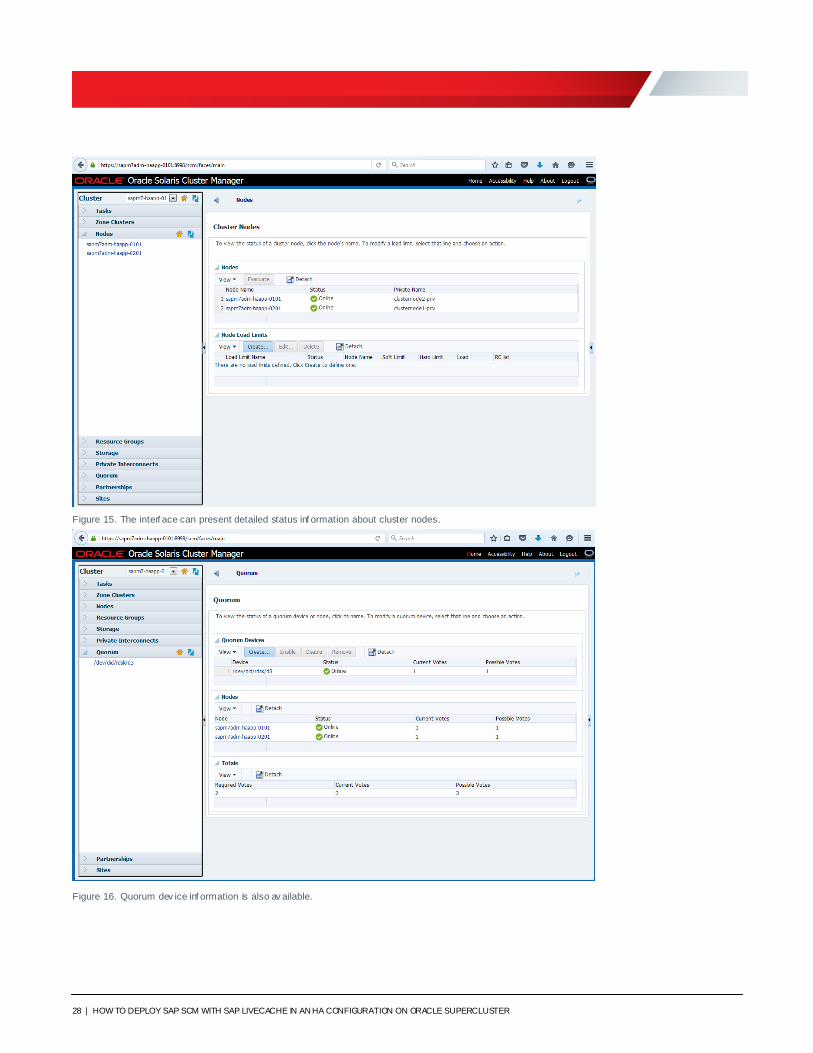
options. For example, by selecting “Nodes”, the user can drill down for status information about each node
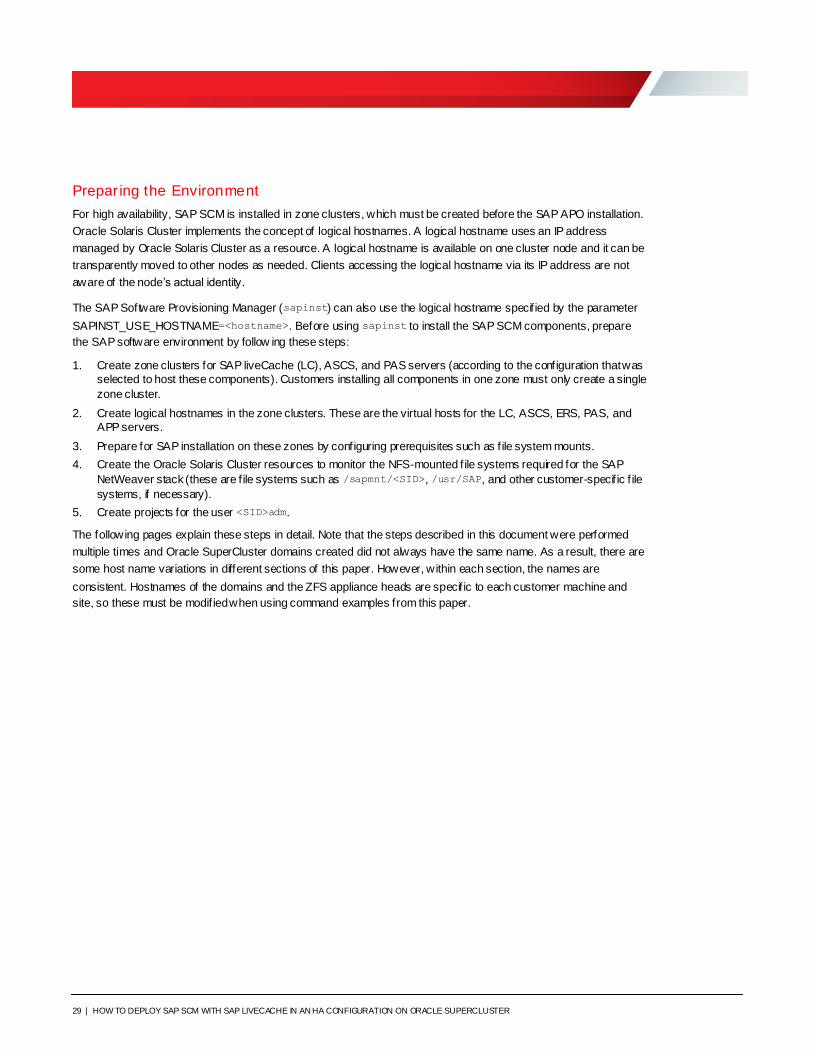
(Figure 15). By selecting “Quorum”, the user can also see status for the quorum device and nodes (Figure 16).
Figure 14. Oracle Solaris Cluster Manager prov ides status inf ormation about the created cluster.
28 | HOW TO DEPLOY SAP SCM WITH SAP LIVECACHE IN AN HA CONFIGURATION ON ORACLE SUPERCLUSTER
Figure 15. The interf ace can present detailed status inf ormation about cluster nodes.
Figure 16. Quorum dev ice inf ormation is also av ailable.
29 | HOW TO DEPLOY SAP SCM WITH SAP LIVECACHE IN AN HA CONFIGURATION ON ORACLE SUPERCLUSTER
Prepar ing the Environment
For high availability, SAP SCM is installed in zone clusters, which must be created before the SAP APO installation.
Oracle Solaris Cluster implements the concept of logical hostnames. A logical hostname uses an IP address
managed by Oracle Solaris Cluster as a resource. A logical hostname is available on one cluster node and it can be
transparently moved to other nodes as needed. Clients accessing the logical hostname via its IP address are not
aware of the node’s actual identity.
The SAP Software Provisioning Manager (sapinst) can also use the logical hostname specif ied by the parameter
SAPINST_USE_HOSTNAME=<hostname>. Before using sapinst to install the SAP SCM components, prepare
the SAP software environment by follow ing these steps:
1. Create zone clusters for SAP liveCache (LC), ASCS, and PAS servers (according to the configuration that was
selected to host these components). Customers installing all components in one zone must only create a single
zone cluster.
2. Create logical hostnames in the zone clusters. These are the virtual hosts for the LC, ASCS, ERS, PAS, and
APP servers.
3. Prepare for SAP installation on these zones by configuring prerequisites such as f ile system mounts.
4. Create the Oracle Solaris Cluster resources to monitor the NFS-mounted f ile systems required for the SAP
NetWeaver stack (these are f ile systems such as /sapmnt/<SID>, /usr/SAP, and other customer-specif ic f ile
systems, if necessary).
5. Create projects for the user <SID>adm.
The following pages explain these steps in detail. Note that the steps described in this document were performed
multiple times and Oracle SuperCluster domains created did not always have the same name. As a result, there are
some host name variations in different sections of this paper. However, within each section, the names are
consistent. Hostnames of the domains and the ZFS appliance heads are specif ic to each customer machine and
site, so these must be modif ied when using command examples from this paper.
30 | HOW TO DEPLOY SAP SCM WITH SAP LIVECACHE IN AN HA CONFIGURATION ON ORACLE SUPERCLUSTER
Preparing to Create Zone Clusters
Before creating zone clusters, it’s necessary to install the zfssa-client package on both nodes (alternatively, you
can add the package in each created zone). In either case, the command to install the package is pkg install
zfssa-client.
Creating LUNs on each Appliance Head
Root f ile systems for zones in APP and DB domains are iSCSI LUNs on the internal Oracle ZFS Storage appliance.
The LUNs can be created with CLI commands, using the appliance’s browser-based interface, or using a script
delivered as a part of the Oracle SuperCluster installation. The script, /opt/oracle.supercluster/bin/iscsi-
lun.sh, is used in the creation of DB zones, but can be also be used to create LUNs for zones in the APP domains.
Start by identifying the specif ic naming conventions used in the Oracle SuperCluster deployment. The script is run
against one Oracle ZFS Storage Appliance head at a time (in the examples below, against osc7sn01-storIB as
head 1 and against osc7sn02-storIB as head 2):
root@osc7cn02pd00-d2:/opt/oracle.supercluster/bin# ./iscsi-lun.sh list projects -z
osc7sn01-storib
Password:
IPS-repos
OSC-data
OSC-oeshm
QuorumProject
SAP
default
sc1-ldomfs
The steps below create a LUN in the sc1-ldomfs project. This project is used to provide storage for the rpools of
the logical domains (LDOMs) in the Oracle SuperCluster.
root@osc7cn02pd00-d2:/opt/oracle.supercluster/bin# ./iscsi-lun.sh list luns -z osc7sn01-
storib -a sc1-ldomfs
Password:
LUNs:
NAME VOLSIZE ENCRYPTED GUID
sc1cn1dom2_bpool 1.91G off 600144F09C1F8D64000057C89DD90009
sc1cn4dom2_bpool 1.91G off 600144F09C1F8D64000057C89DE4000C
sc1cn4dom1_bpool 1.91G off 600144F09C1F8D64000057C89DE1000B
sc1cn1dom0_bpool 1.91G off 600144F09C1F8D64000057C89DD20007
sc1cn4dom0_bpool 1.91G off 600144F09C1F8D64000057C89DDD000A
sc1cn1dom1_bpool 1.91G off 600144F09C1F8D64000057C89DD60008
sc1cn4dom2_rpool 262G off 600144F09C1F8D64000057C89DCF0006
sc1cn1dom2_rpool 212G off 600144F09C1F8D64000057C89DBE0003
sc1cn1dom1_rpool 212G off 600144F09C1F8D64000057C89DB80002
sc1cn4dom0_rpool 262G off 600144F09C1F8D64000057C89DC30004
sc1cn1dom0_rpool 262G off 600144F09C1F8D64000057C89DB20001
sc1cn4dom1_rpool 212G off 600144F09C1F8D64000057C89DC90005
lun0_osc7cn02pd01-d2 200G off 600144F09C1F8D64000057F226100007
The listing of LUNs shows the naming conventions for the LDOMs and that head 1 provides LUNs for cn1 and cn4,
which are PDOMs in an Oracle SuperCluster configuration with two SPARC M7 Servers. Head 2 provides LUNs for
PDOMs cn2 and cn3. In an Oracle SuperCluster configuration w ith a single SPARC M7 Server, only PDOMs cn1
and cn2 are present.
31 | HOW TO DEPLOY SAP SCM WITH SAP LIVECACHE IN AN HA CONFIGURATION ON ORACLE SUPERCLUSTER
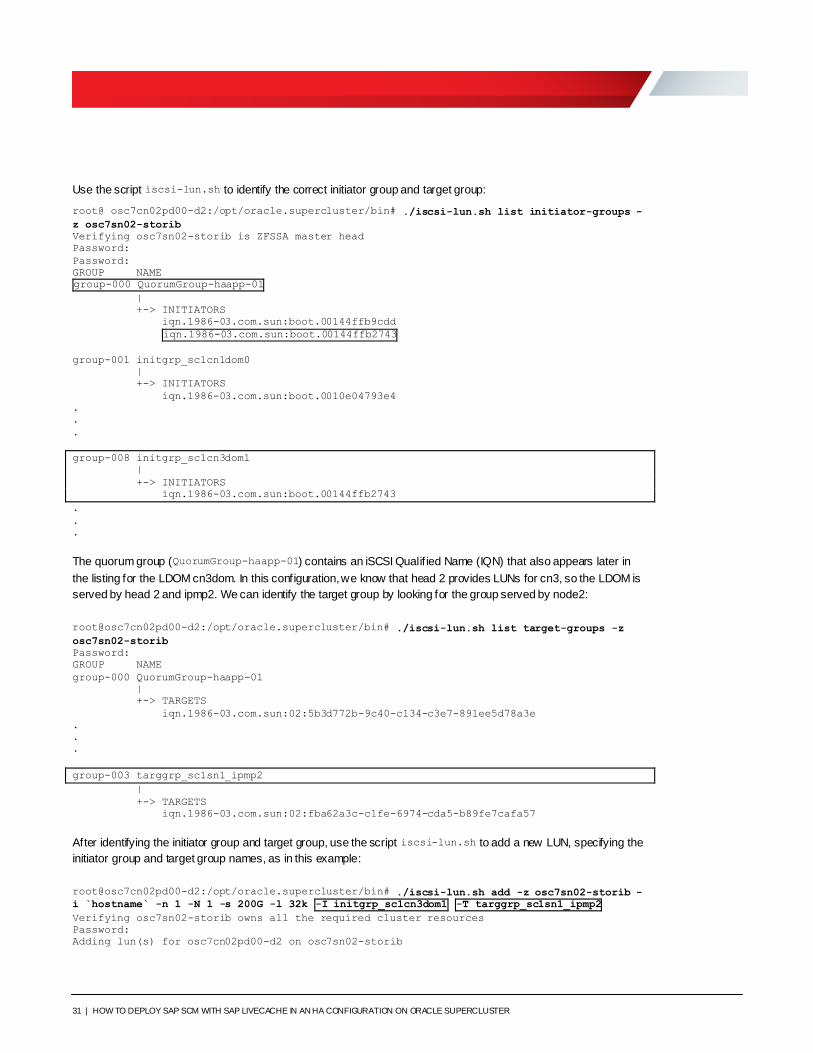
Use the script iscsi-lun.sh to identify the correct initiator group and target group:
root@ osc7cn02pd00-d2:/opt/oracle.supercluster/bin# ./iscsi-lun.sh list initiator-groups -
z osc7sn02-storib
Verifying osc7sn02-storib is ZFSSA master head
Password:
Password:
GROUP NAME
group-000 QuorumGroup-haapp-01
|
+-> INITIATORS
iqn.1986-03.com.sun:boot.00144ffb9cdd
iqn.1986-03.com.sun:boot.00144ffb2743
group-001 initgrp_sc1cn1dom0
|
+-> INITIATORS
iqn.1986-03.com.sun:boot.0010e04793e4
.
.
.
group-008 initgrp_sc1cn3dom1
|
+-> INITIATORS
iqn.1986-03.com.sun:boot.00144ffb2743
.
.
.
The quorum group (QuorumGroup-haapp-01) contains an iSCSI Qualif ied Name (IQN) that also appears later in
the listing for the LDOM cn3dom. In this configuration, we know that head 2 provides LUNs for cn3, so the LDOM is
served by head 2 and ipmp2. We can identify the target group by looking for the group served by node2:
root@osc7cn02pd00-d2:/opt/oracle.supercluster/bin# ./iscsi-lun.sh list target-groups -z
osc7sn02-storib
Password:
GROUP NAME
group-000 QuorumGroup-haapp-01
|
+-> TARGETS
iqn.1986-03.com.sun:02:5b3d772b-9c40-c134-c3e7-891ee5d78a3e
.
.
.
group-003 targgrp_sc1sn1_ipmp2
|
+-> TARGETS
iqn.1986-03.com.sun:02:fba62a3c-c1fe-6974-cda5-b89fe7cafa57
After identifying the initiator group and target group, use the script iscsi-lun.sh to add a new LUN, specifying the
initiator group and target group names, as in this example:
root@osc7cn02pd00-d2:/opt/oracle.supercluster/bin# ./iscsi-lun.sh add -z osc7sn02-storib -
i `hostname` -n 1 -N 1 -s 200G -l 32k -I initgrp_sc1cn3dom1 -T targgrp_sc1sn1_ipmp2
Verifying osc7sn02-storib owns all the required cluster resources
Password:
Adding lun(s) for osc7cn02pd00-d2 on osc7sn02-storib
32 | HOW TO DEPLOY SAP SCM WITH SAP LIVECACHE IN AN HA CONFIGURATION ON ORACLE SUPERCLUSTER
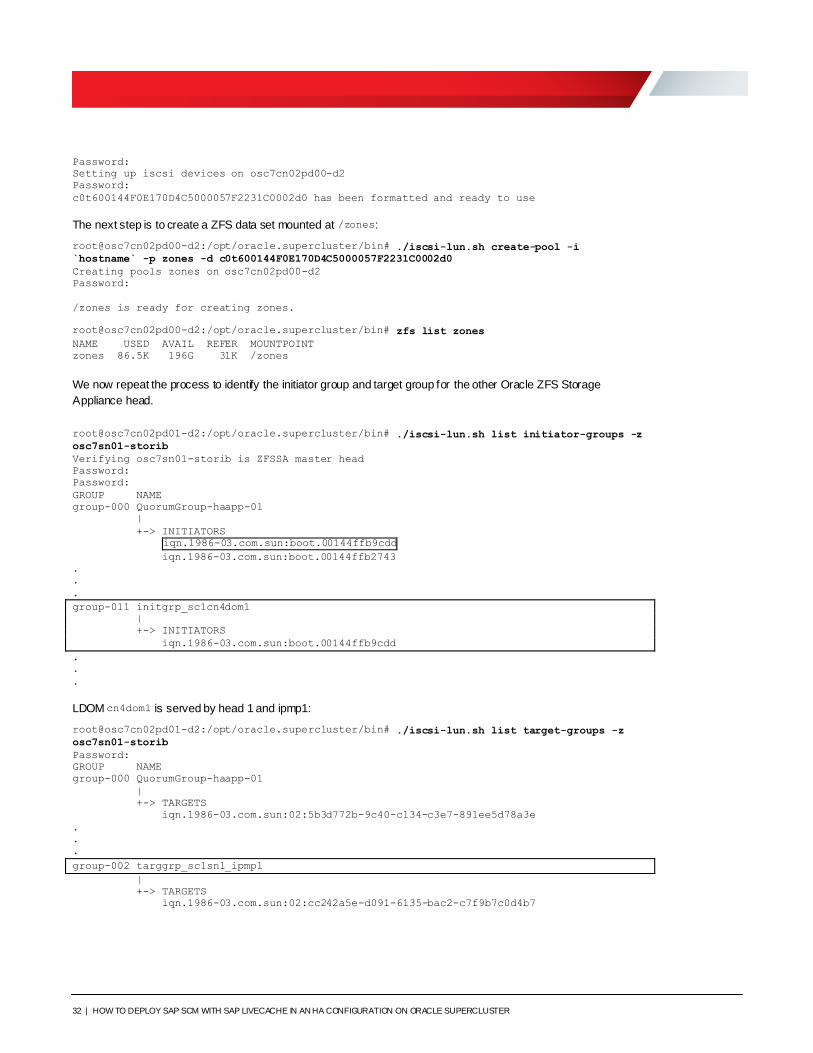
Password:
Setting up iscsi devices on osc7cn02pd00-d2
Password:
c0t600144F0E170D4C5000057F2231C0002d0 has been formatted and ready to use
The next step is to create a ZFS data set mounted at /zones:
root@osc7cn02pd00-d2:/opt/oracle.supercluster/bin# ./iscsi-lun.sh create-pool -i
`hostname` -p zones -d c0t600144F0E170D4C5000057F2231C0002d0
Creating pools zones on osc7cn02pd00-d2
Password:
/zones is ready for creating zones.
root@osc7cn02pd00-d2:/opt/oracle.supercluster/bin# zfs list zones
NAME USED AVAIL REFER MOUNTPOINT
zones 86.5K 196G 31K /zones
We now repeat the process to identify the initiator group and target group for the other Oracle ZFS Storage
Appliance head.
root@osc7cn02pd01-d2:/opt/oracle.supercluster/bin# ./iscsi-lun.sh list initiator-groups -z
osc7sn01-storib
Verifying osc7sn01-storib is ZFSSA master head
Password:
Password:
GROUP NAME
group-000 QuorumGroup-haapp-01
|
+-> INITIATORS
iqn.1986-03.com.sun:boot.00144ffb9cdd
iqn.1986-03.com.sun:boot.00144ffb2743
.
.
.
group-011 initgrp_sc1cn4dom1
|
+-> INITIATORS
iqn.1986-03.com.sun:boot.00144ffb9cdd
.
.
.
LDOM cn4dom1 is served by head 1 and ipmp1:
root@osc7cn02pd01-d2:/opt/oracle.supercluster/bin# ./iscsi-lun.sh list target-groups -z
osc7sn01-storib
Password:
GROUP NAME
group-000 QuorumGroup-haapp-01
|
+-> TARGETS
iqn.1986-03.com.sun:02:5b3d772b-9c40-c134-c3e7-891ee5d78a3e
.
.
.
group-002 targgrp_sc1sn1_ipmp1
|
+-> TARGETS
iqn.1986-03.com.sun:02:cc242a5e-d091-6135-bac2-c7f9b7c0d4b7
33 | HOW TO DEPLOY SAP SCM WITH SAP LIVECACHE IN AN HA CONFIGURATION ON ORACLE SUPERCLUSTER
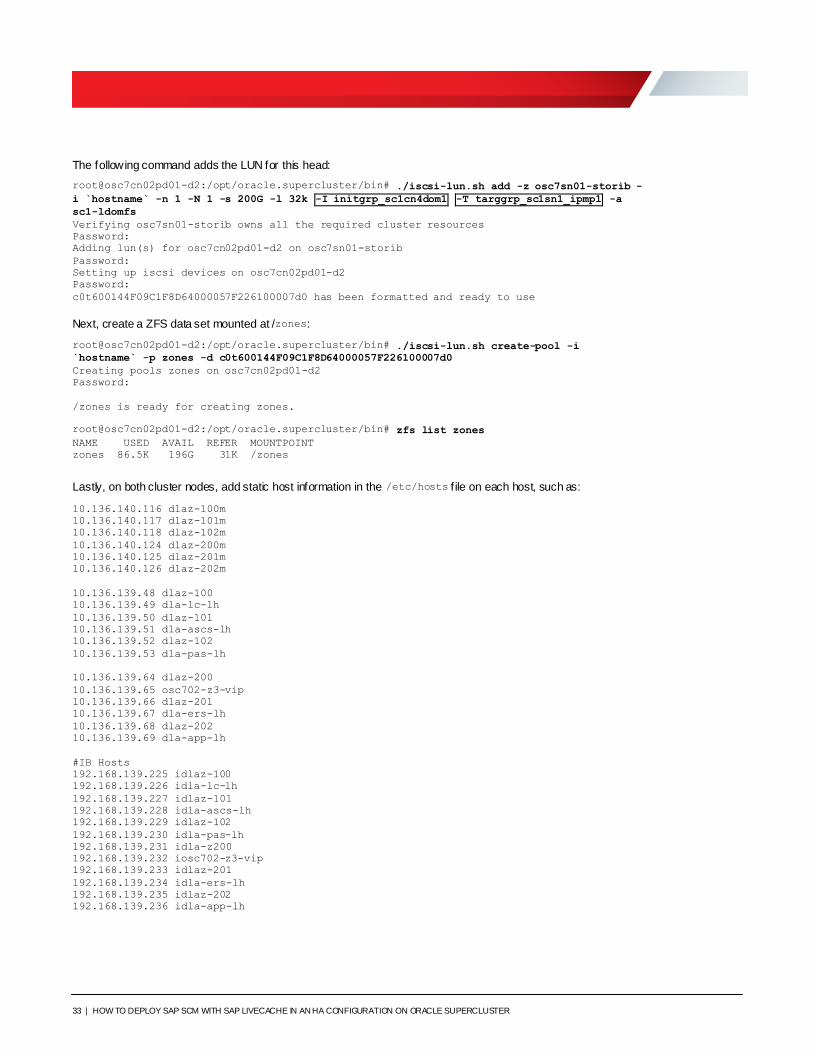
The following command adds the LUN for this head:
root@osc7cn02pd01-d2:/opt/oracle.supercluster/bin# ./iscsi-lun.sh add -z osc7sn01-storib -
i `hostname` -n 1 -N 1 -s 200G -l 32k -I initgrp_sc1cn4dom1 -T targgrp_sc1sn1_ipmp1 -a
sc1-ldomfs
Verifying osc7sn01-storib owns all the required cluster resources
Password:
Adding lun(s) for osc7cn02pd01-d2 on osc7sn01-storib
Password:
Setting up iscsi devices on osc7cn02pd01-d2
Password:
c0t600144F09C1F8D64000057F226100007d0 has been formatted and ready to use
Next, create a ZFS data set mounted at /zones:
root@osc7cn02pd01-d2:/opt/oracle.supercluster/bin# ./iscsi-lun.sh create-pool -i
`hostname` -p zones -d c0t600144F09C1F8D64000057F226100007d0
Creating pools zones on osc7cn02pd01-d2
Password:
/zones is ready for creating zones.
root@osc7cn02pd01-d2:/opt/oracle.supercluster/bin# zfs list zones
NAME USED AVAIL REFER MOUNTPOINT
zones 86.5K 196G 31K /zones
Lastly, on both cluster nodes, add static host information in the /etc/hosts f ile on each host, such as:
10.136.140.116 dlaz-100m
10.136.140.117 dlaz-101m
10.136.140.118 dlaz-102m
10.136.140.124 dlaz-200m
10.136.140.125 dlaz-201m
10.136.140.126 dlaz-202m
10.136.139.48 dlaz-100
10.136.139.49 dla-lc-lh
10.136.139.50 dlaz-101
10.136.139.51 dla-ascs-lh
10.136.139.52 dlaz-102
10.136.139.53 dla-pas-lh
10.136.139.64 dlaz-200
10.136.139.65 osc702-z3-vip
10.136.139.66 dlaz-201
10.136.139.67 dla-ers-lh
10.136.139.68 dlaz-202
10.136.139.69 dla-app-lh
#IB Hosts
192.168.139.225 idlaz-100
192.168.139.226 idla-lc-lh
192.168.139.227 idlaz-101
192.168.139.228 idla-ascs-lh
192.168.139.229 idlaz-102
192.168.139.230 idla-pas-lh
192.168.139.231 idla-z200
192.168.139.232 iosc702-z3-vip
192.168.139.233 idlaz-201
192.168.139.234 idla-ers-lh
192.168.139.235 idlaz-202
192.168.139.236 idla-app-lh
34 | HOW TO DEPLOY SAP SCM WITH SAP LIVECACHE IN AN HA CONFIGURATION ON ORACLE SUPERCLUSTER
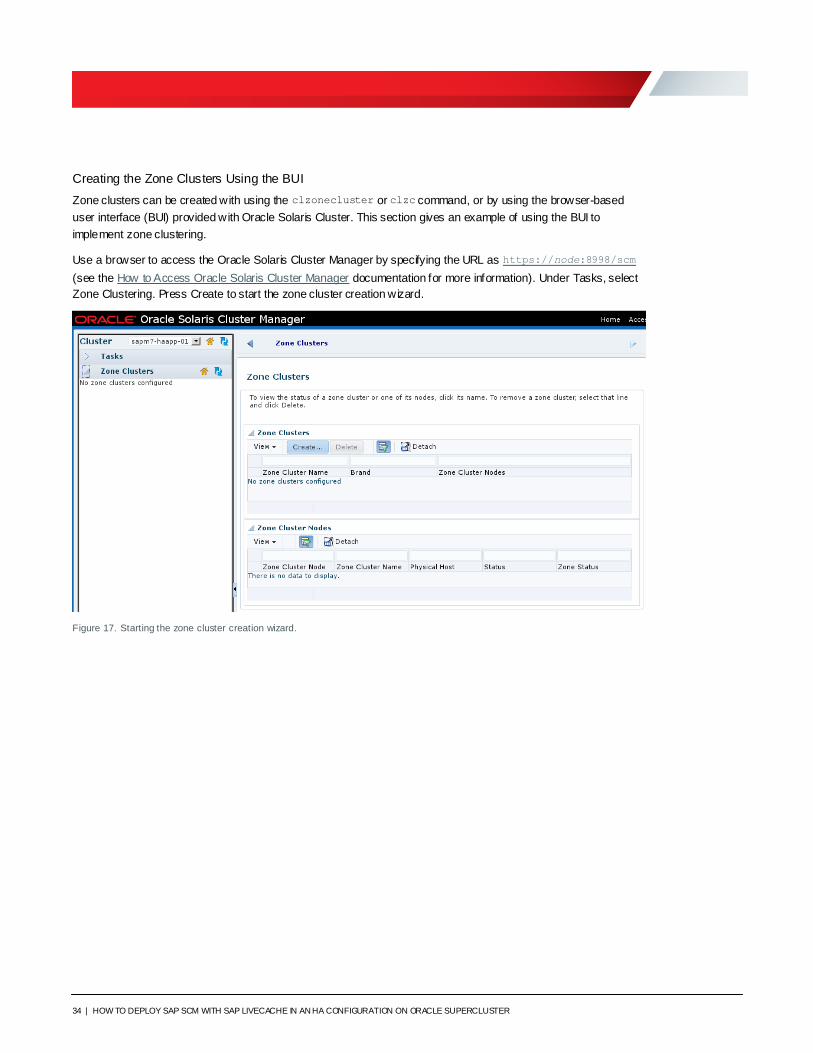
Creating the Zone Clusters Using the BUI
Zone clusters can be created with using the clzonecluster or clzc command, or by using the browser-based
user interface (BUI) provided with Oracle Solaris Cluster. This section gives an example of using the BUI to
implement zone clustering.
Use a browser to access the Oracle Solaris Cluster Manager by specifying the URL as https://node:8998/scm
(see the How to Access Oracle Solaris Cluster Manager documentation for more information). Under Tasks, select
Zone Clustering. Press Create to start the zone cluster creation wizard.
Figure 17. Starting the zone cluster creation wizard.
35 | HOW TO DEPLOY SAP SCM WITH SAP LIVECACHE IN AN HA CONFIGURATION ON ORACLE SUPERCLUSTER
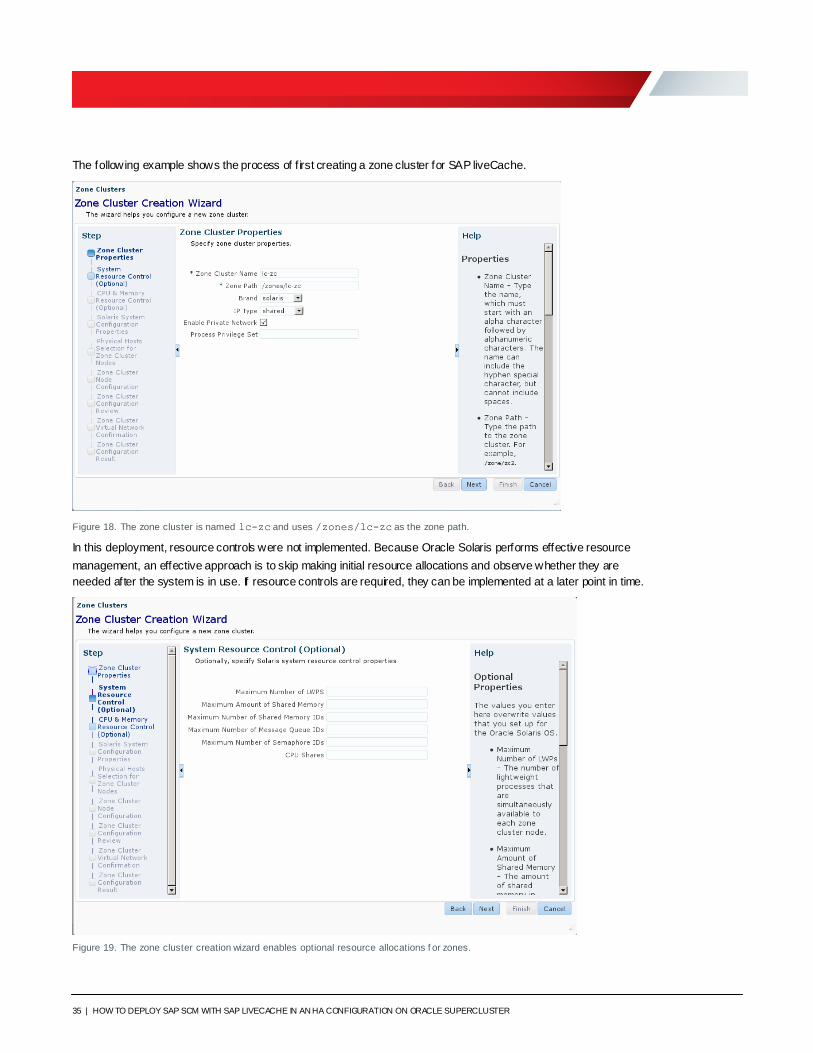
The following example shows the process of f irst creating a zone cluster for SAP liveCache.
Figure 18. The zone cluster is named lc-zc and uses /zones/lc-zc as the zone path.
In this deployment, resource controls were not implemented. Because Oracle Solaris performs effective resource
management, an effective approach is to skip making initial resource allocations and observe whether they are
needed after the system is in use. If resource controls are required, they can be implemented at a later point in time.
Figure 19. The zone cluster creation wizard enables optional resource allocations f or zones.
36 | HOW TO DEPLOY SAP SCM WITH SAP LIVECACHE IN AN HA CONFIGURATION ON ORACLE SUPERCLUSTER
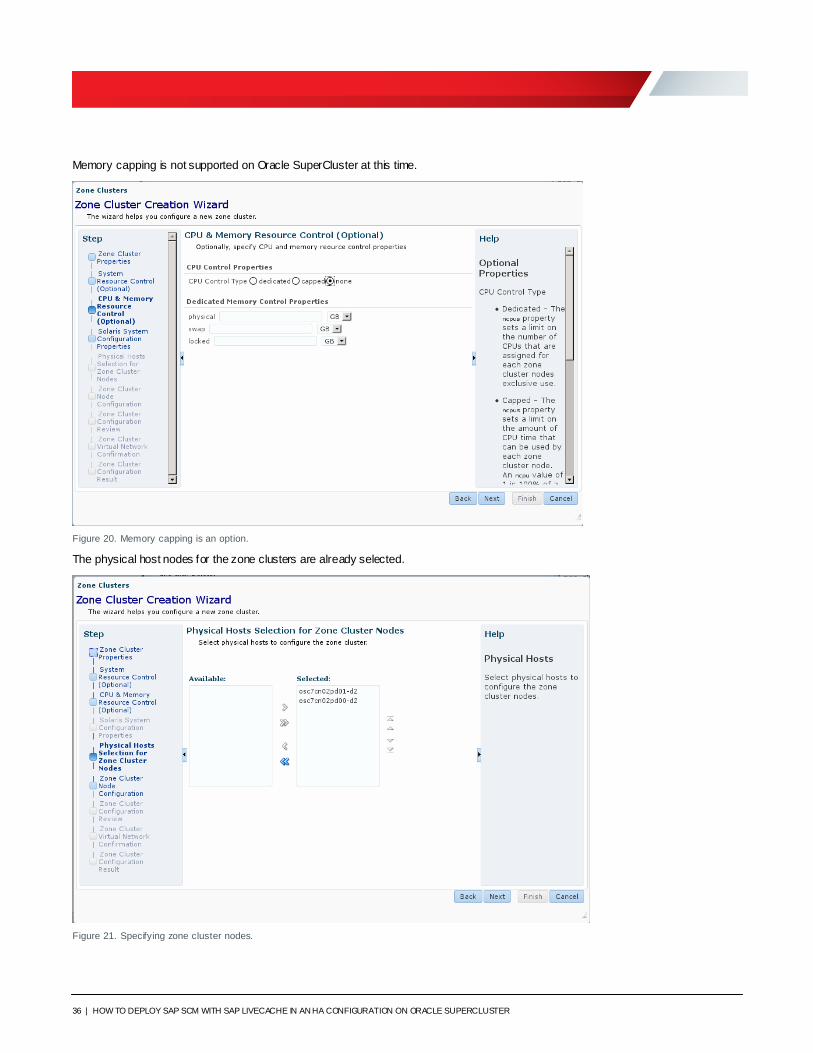
Memory capping is not supported on Oracle SuperCluster at this time.
Figure 20. Memory capping is an option.
The physical host nodes for the zone clusters are already selected.
Figure 21. Specifying zone cluster nodes.
37 | HOW TO DEPLOY SAP SCM WITH SAP LIVECACHE IN AN HA CONFIGURATION ON ORACLE SUPERCLUSTER
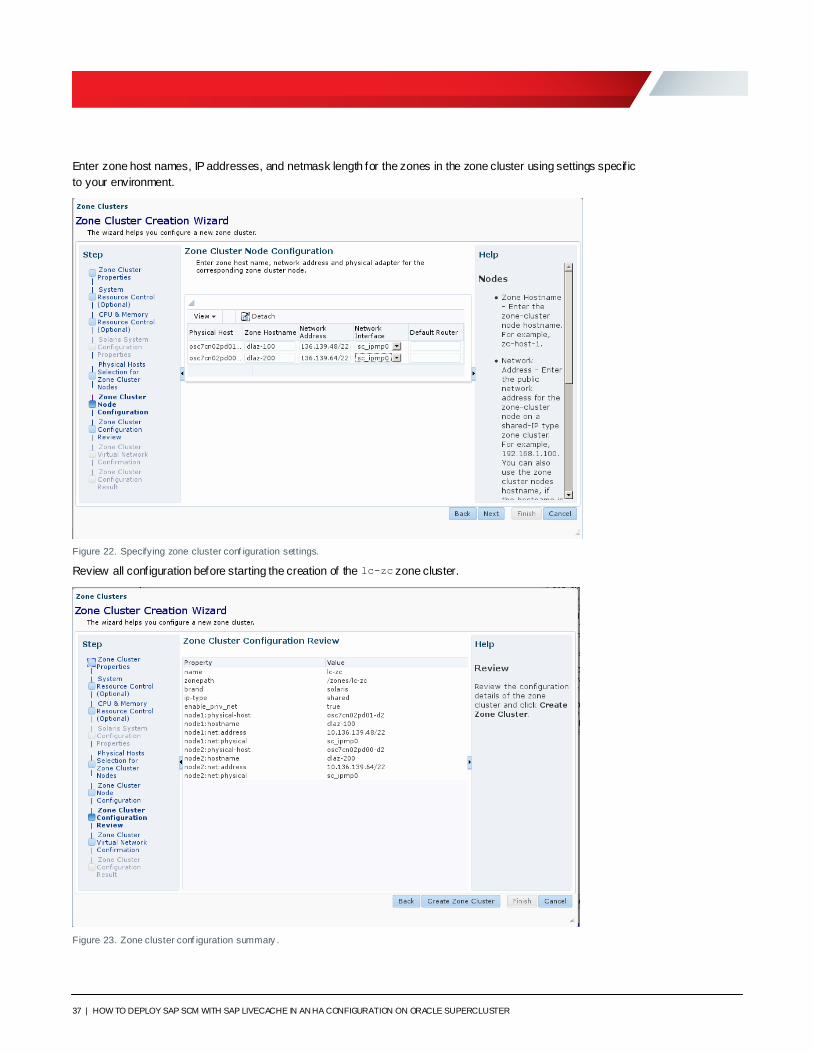
Enter zone host names, IP addresses, and netmask length for the zones in the zone cluster using settings specif ic
to your environment.
Figure 22. Specifying zone cluster conf iguration settings.
Review all configuration before starting the creation of the lc-zc zone cluster.
Figure 23. Zone cluster conf iguration summary .
38 | HOW TO DEPLOY SAP SCM WITH SAP LIVECACHE IN AN HA CONFIGURATION ON ORACLE SUPERCLUSTER
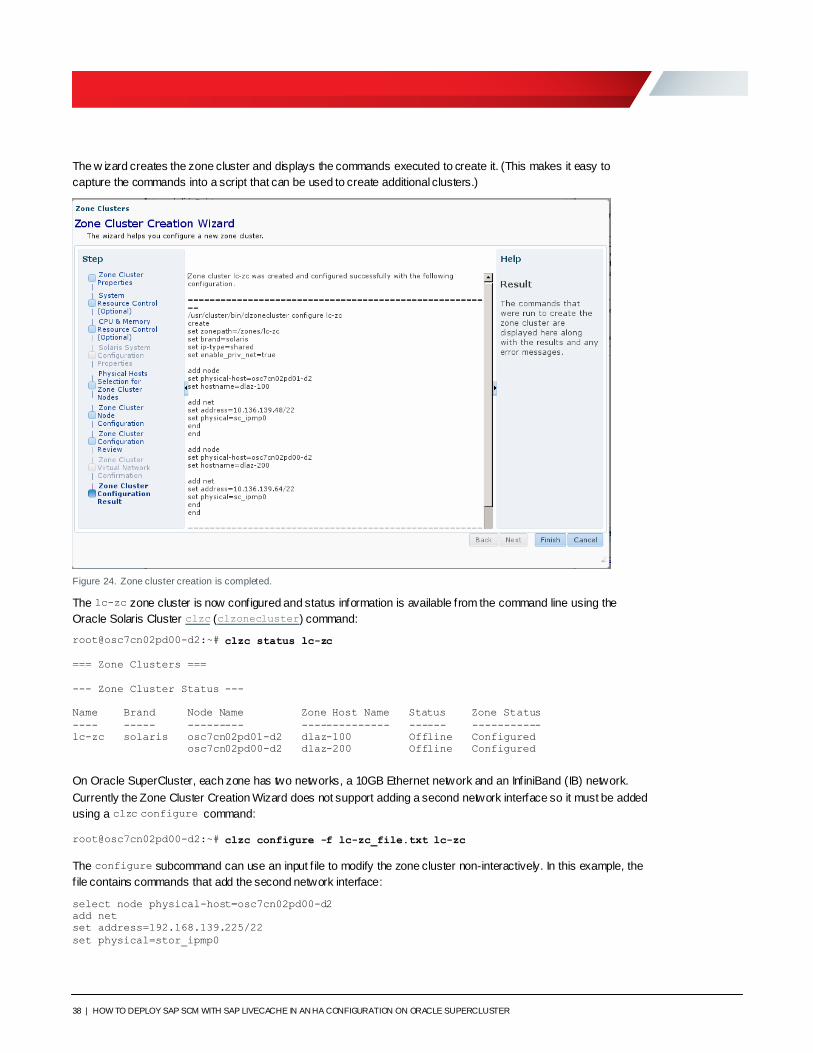
The w izard creates the zone cluster and displays the commands executed to create it. (This makes it easy to
capture the commands into a script that can be used to create additional clusters.)
Figure 24. Zone cluster creation is completed.
The lc-zc zone cluster is now configured and status information is available from the command line using the
Oracle Solaris Cluster clzc (clzonecluster) command:
root@osc7cn02pd00-d2:~# clzc status lc-zc
=== Zone Clusters ===
--- Zone Cluster Status ---
Name Brand Node Name Zone Host Name Status Zone Status
---- ----- --------- -------------- ------ -----------
lc-zc solaris osc7cn02pd01-d2 dlaz-100 Offline Configured
osc7cn02pd00-d2 dlaz-200 Offline Configured
On Oracle SuperCluster, each zone has two networks, a 10GB Ethernet network and an InfiniBand (IB) network.
Currently the Zone Cluster Creation Wizard does not support adding a second network interface so it must be added
using a clzc configure command:
root@osc7cn02pd00-d2:~# clzc configure -f lc-zc_file.txt lc-zc
The configure subcommand can use an input f ile to modify the zone cluster non-interactively. In this example, the
f ile contains commands that add the second network interface:
select node physical-host=osc7cn02pd00-d2
add net
set address=192.168.139.225/22
set physical=stor_ipmp0
39 | HOW TO DEPLOY SAP SCM WITH SAP LIVECACHE IN AN HA CONFIGURATION ON ORACLE SUPERCLUSTER
end
end
select node physical-host=osc7cn02pd01-d2
add net
set address=192.168.139.231/22
set physical=stor_ipmp0
end
end
commit
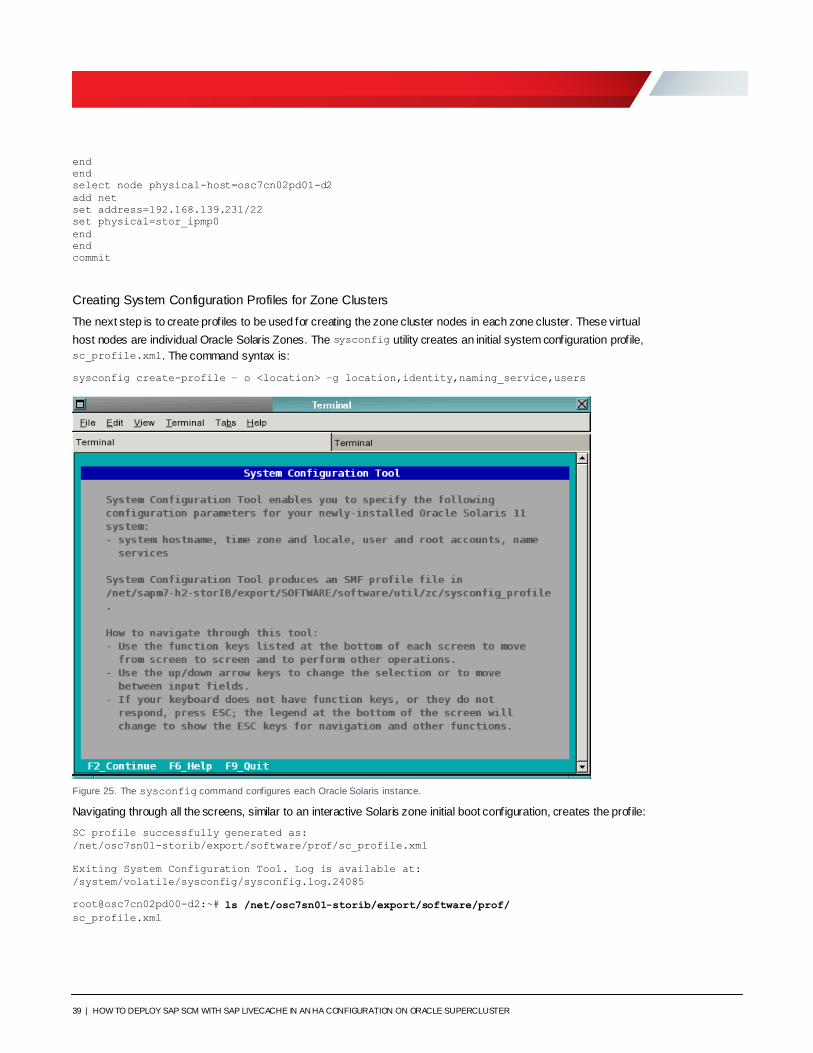
Creating System Configuration Profiles for Zone Clusters
The next step is to create profiles to be used for creating the zone cluster nodes in each zone cluster. These virtual
host nodes are individual Oracle Solaris Zones. The sysconfig utility creates an initial system configuration profile,
sc_profile.xml. The command syntax is:
sysconfig create-profile – o <location> –g location,identity,naming_service,users
Figure 25. The sysconfig command configures each Oracle Solaris instance.
Navigating through all the screens, similar to an interactive Solaris zone initial boot configuration, creates the profile:
SC profile successfully generated as:
/net/osc7sn01-storib/export/software/prof/sc_profile.xml
Exiting System Configuration Tool. Log is available at:
/system/volatile/sysconfig/sysconfig.log.24085
root@osc7cn02pd00-d2:~# ls /net/osc7sn01-storib/export/software/prof/
sc_profile.xml
40 | HOW TO DEPLOY SAP SCM WITH SAP LIVECACHE IN AN HA CONFIGURATION ON ORACLE SUPERCLUSTER
Duplicate this initial profile to create specif ic profiles for the zones dlaz-100, dlaz-200, dlaz-101, dlaz-201,
dlaz-102, and dlaz-202:
root@osc7cn02pd00-d2:~# ls /net/osc7sn01-storib/export/software/prof/
dlaz-100-profile.xml dlaz-200-profile.xml sc_profile.xml
dlaz-101-profile.xml dlaz-201-profile.xml
dlaz-102-profile.xml dlaz-202-profile.xml
Customize the profiles by replacing the nodename string with the corresponding hostname. The diff command
highlights this change from the original profile f ile:
root@osc7cn02pd00-d2:~# diff prof/sc_profile.xml prof/dlaz-101-profile.xml
22c22
< <propval type="astring" name="nodename" value="dlaz-100"/>
---
> <propval type="astring" name="nodename" value="dlaz-101"/>
Install the Oracle Solaris Zones using the customized profiles. On node 1:
root@osc7cn02pd00-d2:~# clzc install -c dlaz-100-profile.xml -n `hostname lc-zc
Waiting for zone install commands to complete on all the nodes of the zone cluster "lc-
zc"...
On node2:
root@osc7cn02pd01-d2:~# clzc install -c dlaz-200-profile.xml -n `hostname lc-zc
Waiting for zone install commands to complete on all the nodes of the zone cluster "lc-
zc"...
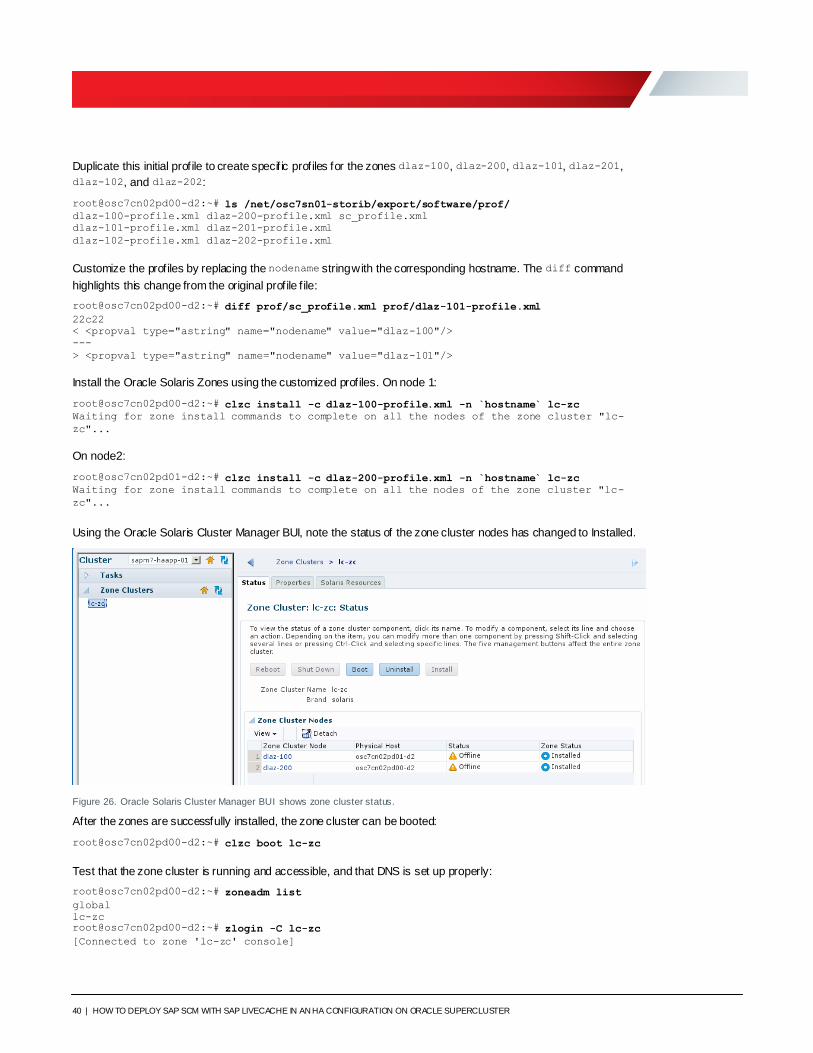
Using the Oracle Solaris Cluster Manager BUI, note the status of the zone cluster nodes has changed to Installed.
Figure 26. Oracle Solaris Cluster Manager BUI shows zone cluster status.
After the zones are successfully installed, the zone cluster can be booted:
root@osc7cn02pd00-d2:~# clzc boot lc-zc
Test that the zone cluster is running and accessible, and that DNS is set up properly:
root@osc7cn02pd00-d2:~# zoneadm list
global
lc-zc root@osc7cn02pd00-d2:~# zlogin -C lc-zc
[Connected to zone 'lc-zc' console]
41 | HOW TO DEPLOY SAP SCM WITH SAP LIVECACHE IN AN HA CONFIGURATION ON ORACLE SUPERCLUSTER
dlaz-200 console login: root
Password:
Oct 3 13:46:44 dlaz-200 login: ROOT LOGIN /dev/console
Oracle Corporation SunOS 5.11 11.3 March 2016 root@dlaz-200:~# nslookup
> dlaz-100
Server: 140.83.186.4
Address: 140.83.186.4#53
dlaz-100.us.osc.oracle.com canonical name = osc701-z3.us.osc.oracle.com.
Name: osc701-z3.us.osc.oracle.com
Address: 10.136.139.48
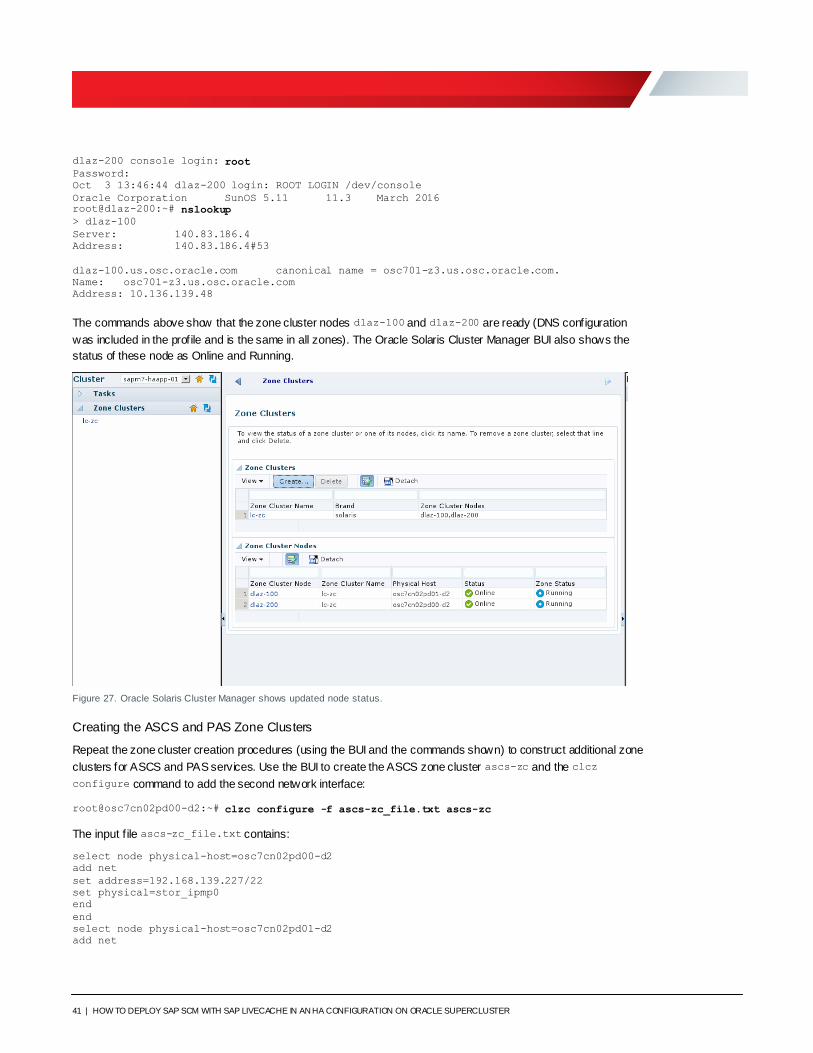
The commands above show that the zone cluster nodes dlaz-100 and dlaz-200 are ready (DNS configuration
was included in the profile and is the same in all zones). The Oracle Solaris Cluster Manager BUI also shows the
status of these node as Online and Running.
Figure 27. Oracle Solaris Cluster Manager shows updated node status.
Creating the ASCS and PAS Zone Clusters
Repeat the zone cluster creation procedures (using the BUI and the commands shown) to construct additional zone
clusters for ASCS and PAS services. Use the BUI to create the ASCS zone cluster ascs-zc and the clcz
configure command to add the second network interface:
root@osc7cn02pd00-d2:~# clzc configure -f ascs-zc_file.txt ascs-zc
The input f ile ascs-zc_file.txt contains:
select node physical-host=osc7cn02pd00-d2
add net
set address=192.168.139.227/22
set physical=stor_ipmp0
end
end
select node physical-host=osc7cn02pd01-d2
add net
42 | HOW TO DEPLOY SAP SCM WITH SAP LIVECACHE IN AN HA CONFIGURATION ON ORACLE SUPERCLUSTER
set address=192.168.139.233/22
set physical=stor_ipmp0
end
end
commit
Use the BUI to create the PAS zone cluster pas-zc and the clcz configure command to add the second network
interface:
root@osc7cn02pd00-d2:~# clzc configure -f pas-zc_file.txt pas-zc
The input f ile pas-zc_file.txt contains:
select node physical-host=osc7cn02pd00-d2
add net
set address=192.168.139.230/22
set physical=stor_ipmp0
end
end
select node physical-host=osc7cn02pd01-d2
add net
set address=192.168.139.236/22
set physical=stor_ipmp0
end
end
commit
Now we are ready to install and start zone clusters. On node 1:
root@osc7cn02pd00-d2:~# clzc install -c dlaz-101-profile.xml -n `hostname` ascs-zc
root@osc7cn02pd00-d2:~# clzc install -c dlaz-102-profile.xml -n `hostname` pas-zc
On node 2:
root@osc7cn02pd01-d2:~# clzc install -c dlaz-201-profile.xml -n `hostname ascs-zc root@osc7cn02pd01-d2:~# clzc install -c dlaz-202-profile.xml -n `hostname pas-zc
root@osc7cn02pd01-d2:~# clzc boot ascs-zc
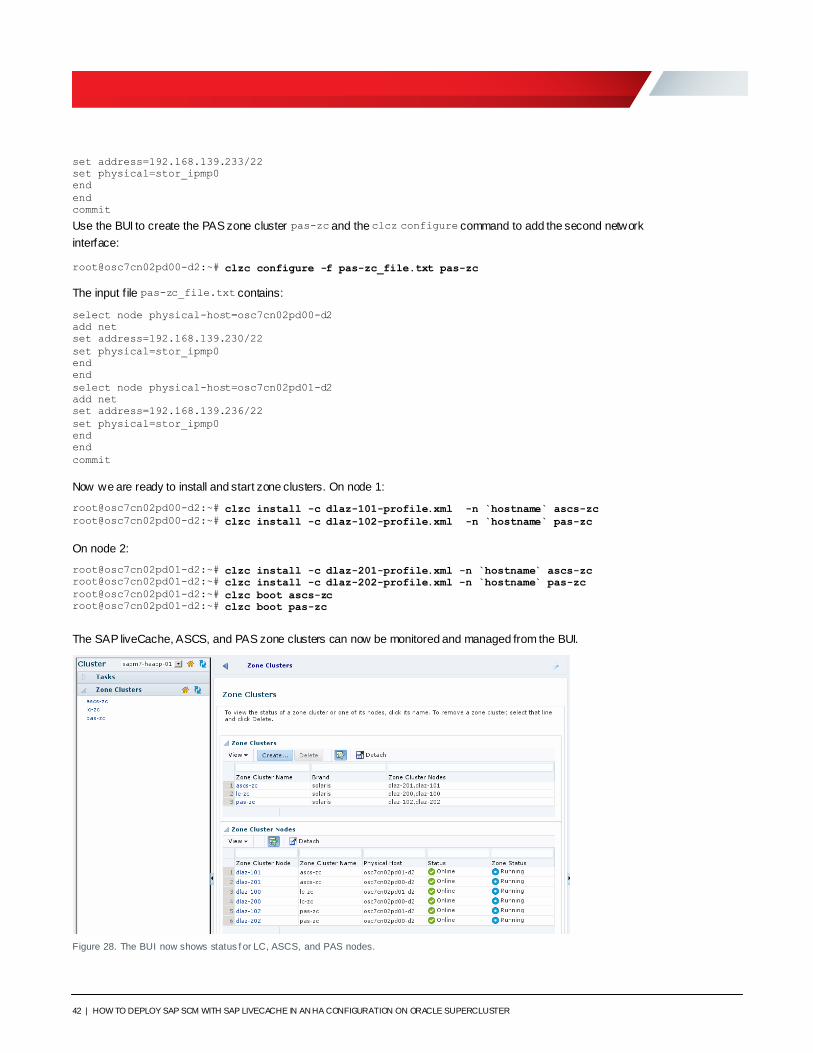
root@osc7cn02pd01-d2:~# clzc boot pas-zc
The SAP liveCache, ASCS, and PAS zone clusters can now be monitored and managed from the BUI.
Figure 28. The BUI now shows status f or LC, ASCS, and PAS nodes.
43 | HOW TO DEPLOY SAP SCM WITH SAP LIVECACHE IN AN HA CONFIGURATION ON ORACLE SUPERCLUSTER
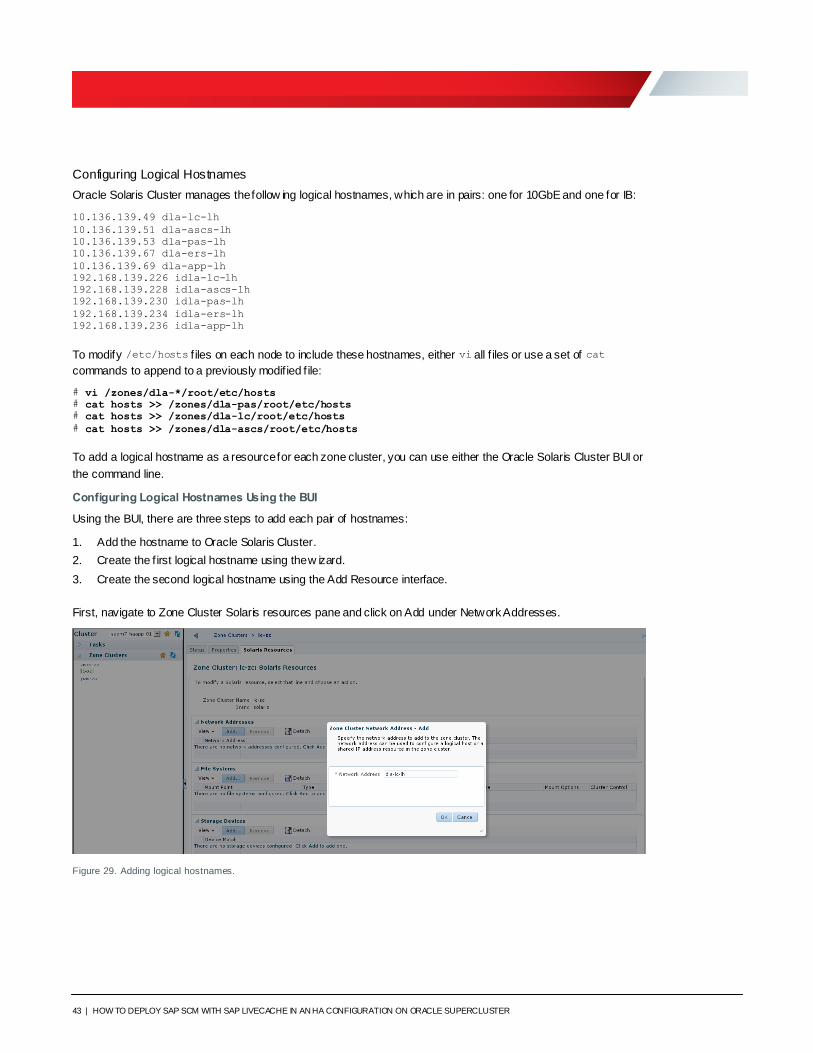
Configuring Logical Hostnames
Oracle Solaris Cluster manages the follow ing logical hostnames, which are in pairs: one for 10GbE and one for IB:
10.136.139.49 dla-lc-lh
10.136.139.51 dla-ascs-lh
10.136.139.53 dla-pas-lh
10.136.139.67 dla-ers-lh
10.136.139.69 dla-app-lh
192.168.139.226 idla-lc-lh
192.168.139.228 idla-ascs-lh
192.168.139.230 idla-pas-lh
192.168.139.234 idla-ers-lh
192.168.139.236 idla-app-lh
To modify /etc/hosts f iles on each node to include these hostnames, either vi all f iles or use a set of cat
commands to append to a previously modif ied f ile:
# vi /zones/dla-*/root/etc/hosts
# cat hosts >> /zones/dla-pas/root/etc/hosts # cat hosts >> /zones/dla-lc/root/etc/hosts
# cat hosts >> /zones/dla-ascs/root/etc/hosts
To add a logical hostname as a resource for each zone cluster, you can use either the Oracle Solaris Cluster BUI or
the command line.
Configuring Logical Hostnames Using the BUI
Using the BUI, there are three steps to add each pair of hostnames:
1. Add the hostname to Oracle Solaris Cluster.
2. Create the f irst logical hostname using the w izard.
3. Create the second logical hostname using the Add Resource interface.
First, navigate to Zone Cluster Solaris resources pane and click on Add under Network Addresses.
Figure 29. Adding logical hostnames.

44 | HOW TO DEPLOY SAP SCM WITH SAP LIVECACHE IN AN HA CONFIGURATION ON ORACLE SUPERCLUSTER
Figure 30. Adding all logical hostnames, one at a time, in the popup Network Address – Add window,
Figure 31. The logical hostnames are inserted in the zone cluster configuration and zone conf iguration on each node.
Next, navigate to the Tasks screen and select Logical hostname to create a resource for Oracle Solaris Cluster.
Figure 32. Creating a Logical hostname resource f or Oracle Solaris Cluster.
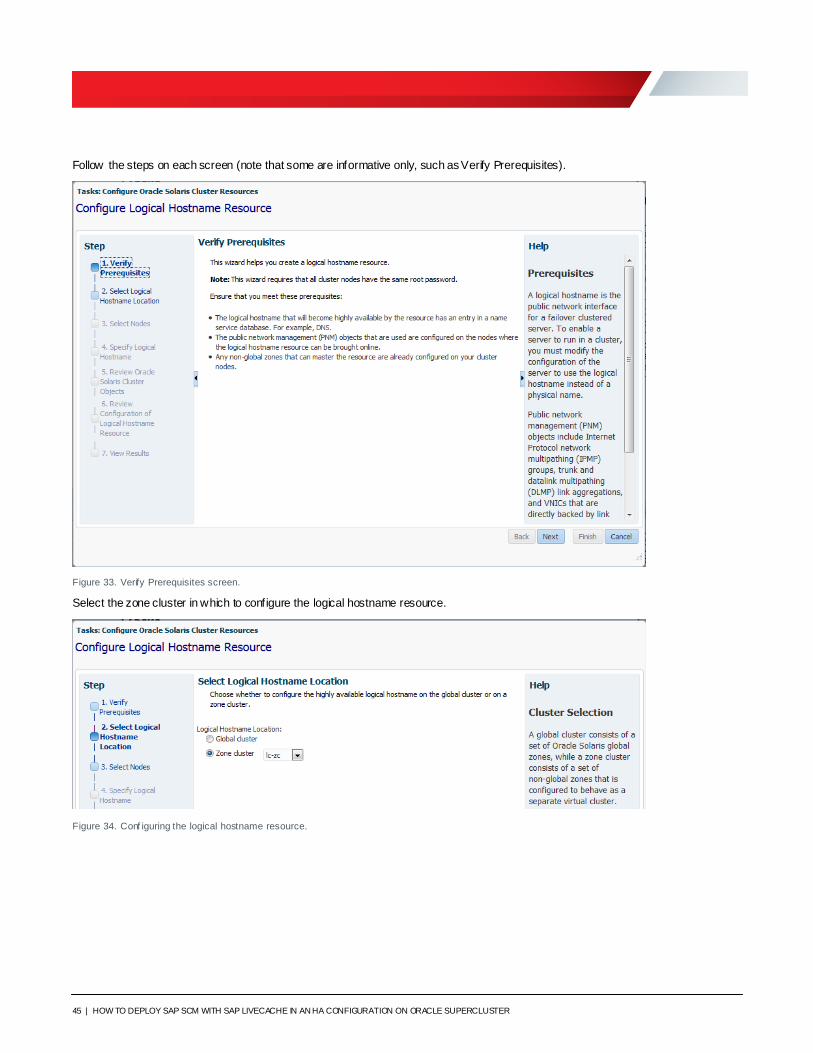
45 | HOW TO DEPLOY SAP SCM WITH SAP LIVECACHE IN AN HA CONFIGURATION ON ORACLE SUPERCLUSTER
Follow the steps on each screen (note that some are informative only, such as Verify Prerequisites).
Figure 33. Verify Prerequisites screen.
Select the zone cluster in which to configure the logical hostname resource.
Figure 34. Conf iguring the logical hostname resource.
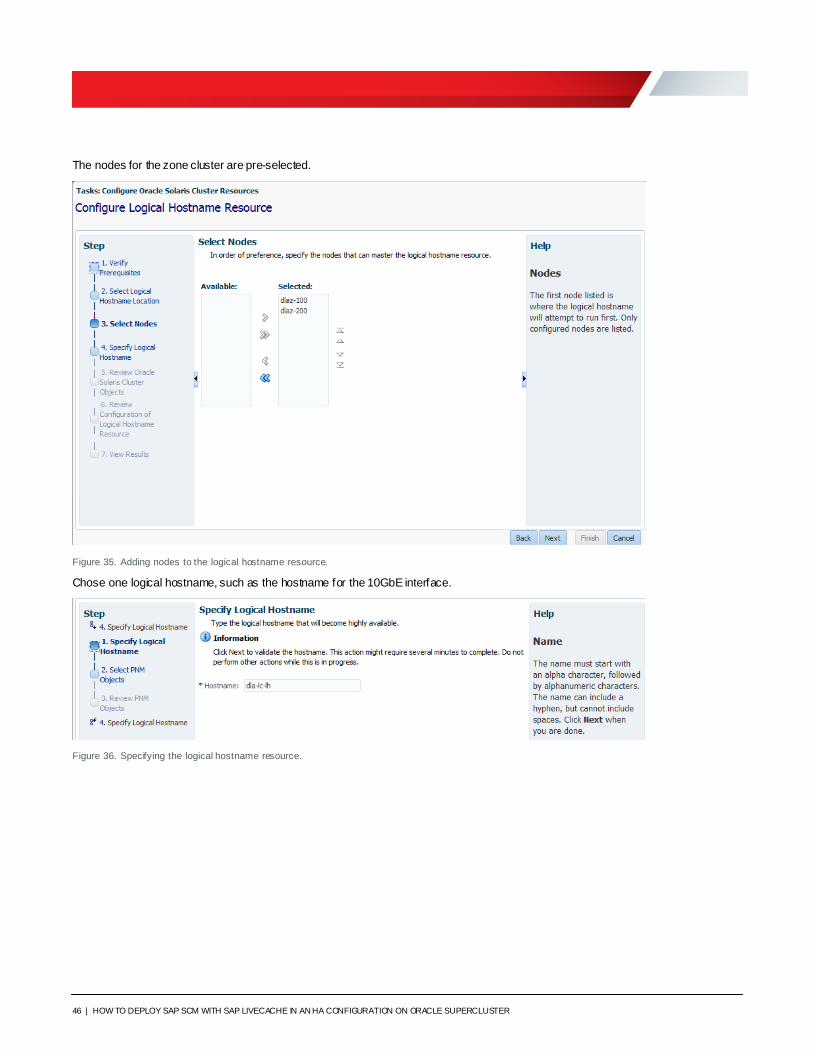
46 | HOW TO DEPLOY SAP SCM WITH SAP LIVECACHE IN AN HA CONFIGURATION ON ORACLE SUPERCLUSTER
The nodes for the zone cluster are pre-selected.
Figure 35. Adding nodes to the logical hostname resource.
Chose one logical hostname, such as the hostname for the 10GbE interface.
Figure 36. Specifying the logical hostname resource.
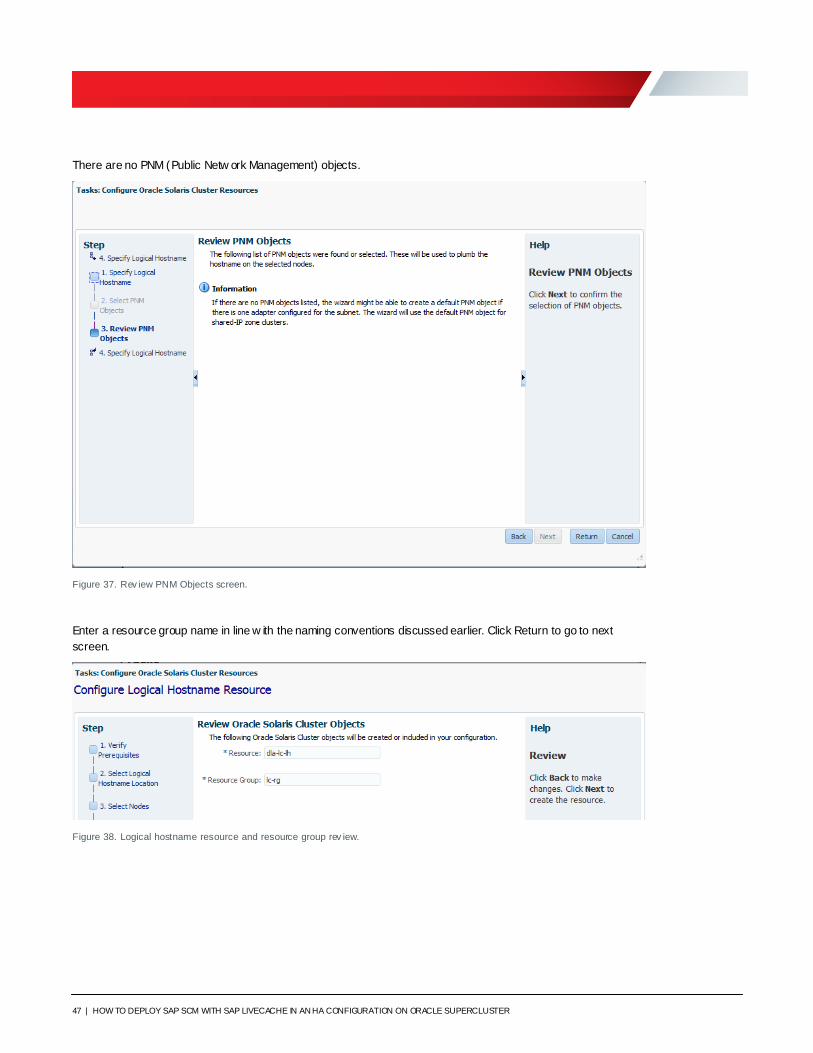
47 | HOW TO DEPLOY SAP SCM WITH SAP LIVECACHE IN AN HA CONFIGURATION ON ORACLE SUPERCLUSTER
There are no PNM (Public Netw ork Management) objects.
Figure 37. Rev iew PNM Objects screen.
Enter a resource group name in line w ith the naming conventions discussed earlier. Click Return to go to next
screen.
Figure 38. Logical hostname resource and resource group rev iew.
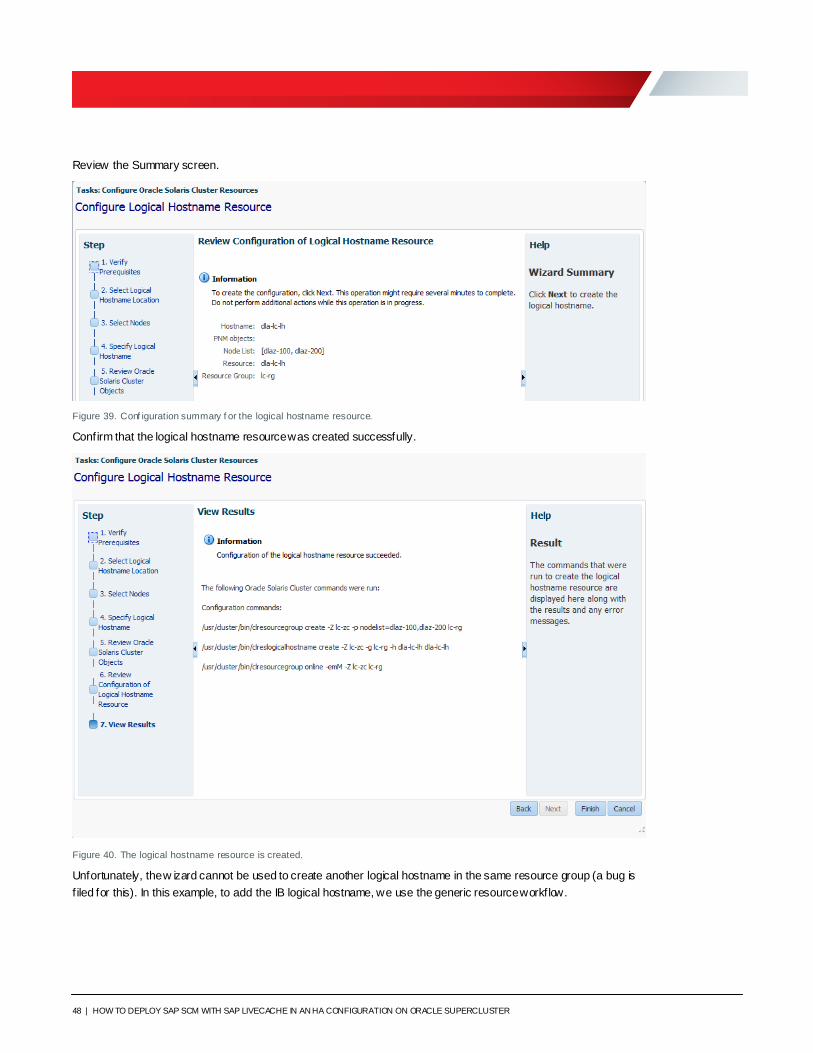
48 | HOW TO DEPLOY SAP SCM WITH SAP LIVECACHE IN AN HA CONFIGURATION ON ORACLE SUPERCLUSTER
Review the Summary screen.
Figure 39. Conf iguration summary f or the logical hostname resource.
Confirm that the logical hostname resource was created successfully.
Figure 40. The logical hostname resource is created.
Unfortunately, the w izard cannot be used to create another logical hostname in the same resource group (a bug is
f iled for this). In this example, to add the IB logical hostname, we use the generic resource workflow.
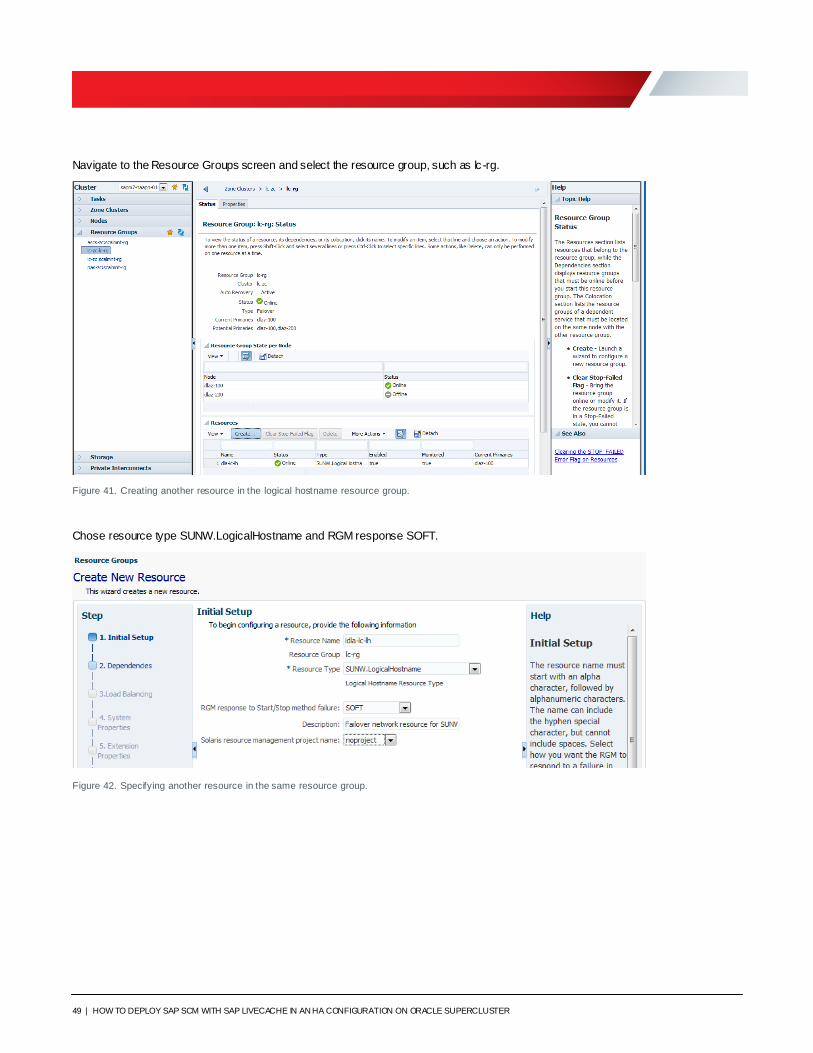
49 | HOW TO DEPLOY SAP SCM WITH SAP LIVECACHE IN AN HA CONFIGURATION ON ORACLE SUPERCLUSTER
Navigate to the Resource Groups screen and select the resource group, such as lc -rg.
Figure 41. Creating another resource in the logical hostname resource group.
Chose resource type SUNW.LogicalHostname and RGM response SOFT.
Figure 42. Specifying another resource in the same resource group.
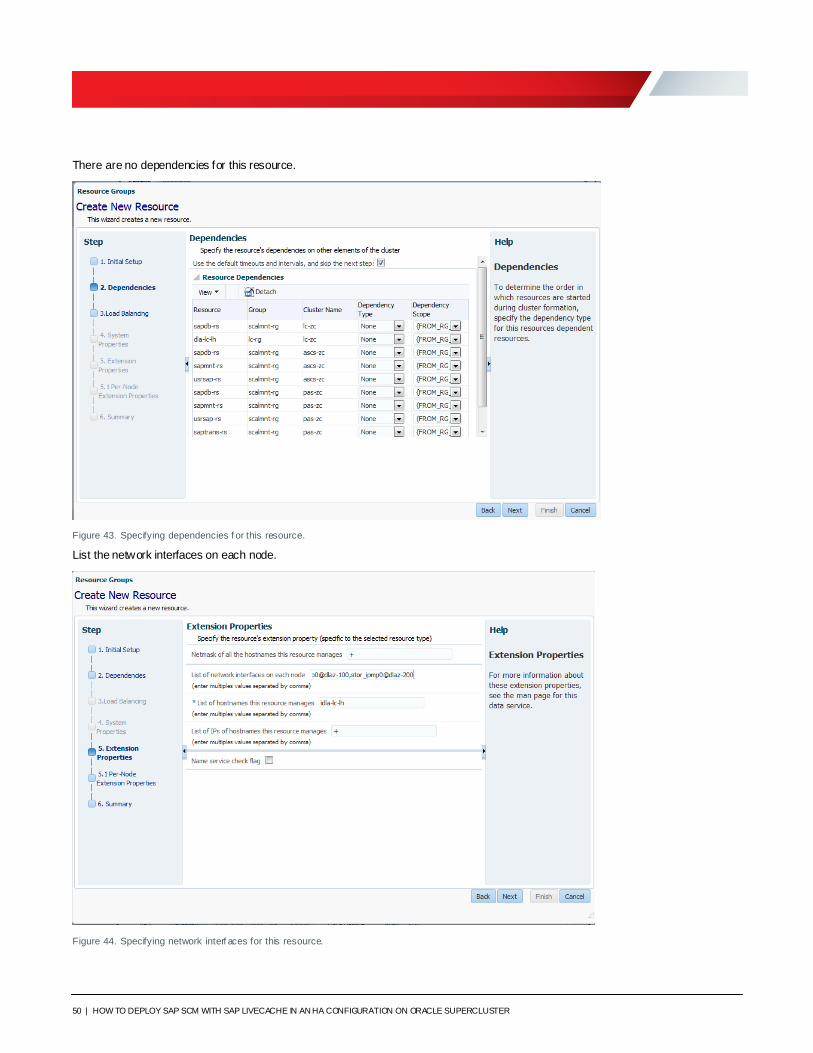
50 | HOW TO DEPLOY SAP SCM WITH SAP LIVECACHE IN AN HA CONFIGURATION ON ORACLE SUPERCLUSTER
There are no dependencies for this resource.
Figure 43. Specifying dependencies f or this resource.
List the network interfaces on each node.
Figure 44. Specifying network interf aces for this resource.

51 | HOW TO DEPLOY SAP SCM WITH SAP LIVECACHE IN AN HA CONFIGURATION ON ORACLE SUPERCLUSTER
Review the Summary screen.
Figure 45. Summary screen for this resource.
Confirm that a resource of type SUNW.LogicalHostname was created.
Figure 46. A new resource in the resource group is created and the resource group’s status is updated.
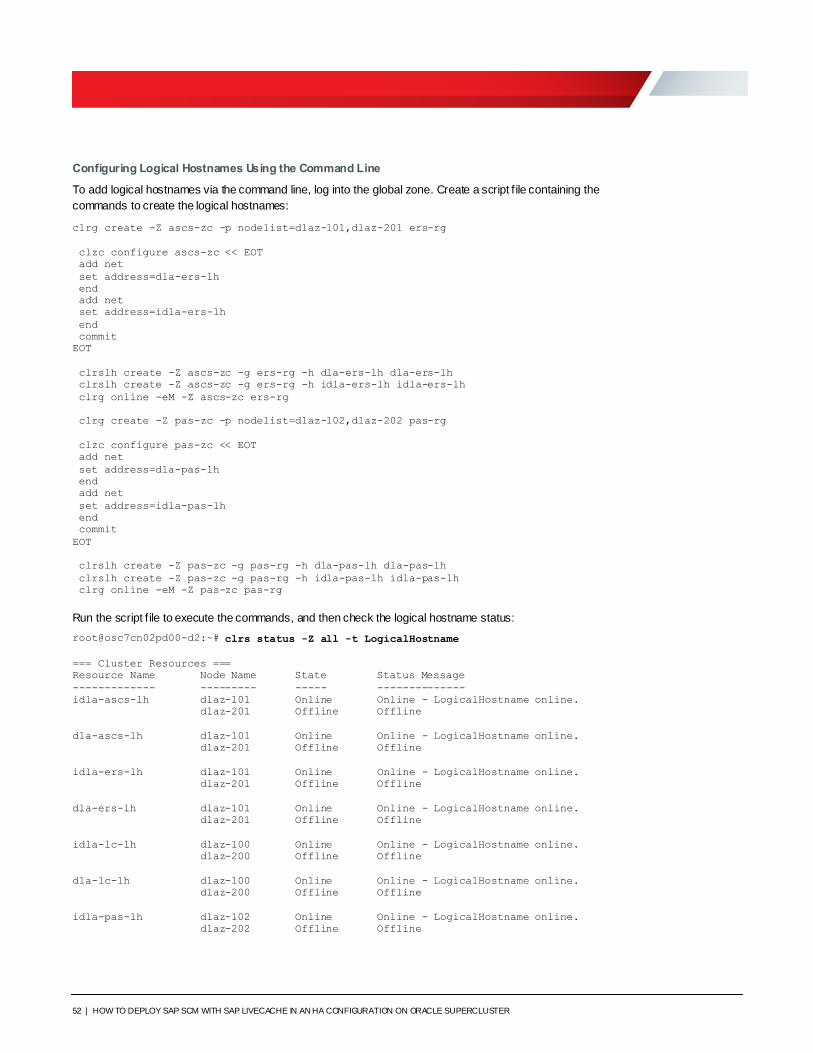
52 | HOW TO DEPLOY SAP SCM WITH SAP LIVECACHE IN AN HA CONFIGURATION ON ORACLE SUPERCLUSTER
Configuring Logical Hostnames Using the Command Line
To add logical hostnames via the command line, log into the global zone. Create a script f ile containing the
commands to create the logical hostnames:
clrg create -Z ascs-zc -p nodelist=dlaz-101,dlaz-201 ers-rg
clzc configure ascs-zc << EOT
add net
set address=dla-ers-lh
end
add net
set address=idla-ers-lh
end
commit
EOT
clrslh create -Z ascs-zc -g ers-rg -h dla-ers-lh dla-ers-lh
clrslh create -Z ascs-zc -g ers-rg -h idla-ers-lh idla-ers-lh
clrg online -eM -Z ascs-zc ers-rg
clrg create -Z pas-zc -p nodelist=dlaz-102,dlaz-202 pas-rg
clzc configure pas-zc << EOT
add net
set address=dla-pas-lh
end
add net
set address=idla-pas-lh
end
commit
EOT
clrslh create -Z pas-zc -g pas-rg -h dla-pas-lh dla-pas-lh
clrslh create -Z pas-zc -g pas-rg -h idla-pas-lh idla-pas-lh
clrg online -eM -Z pas-zc pas-rg
Run the script f ile to execute the commands, and then check the logical hostname status:
root@osc7cn02pd00-d2:~# clrs status -Z all -t LogicalHostname
=== Cluster Resources ===
Resource Name Node Name State Status Message
------------- --------- ----- --------------
idla-ascs-lh dlaz-101 Online Online - LogicalHostname online.
dlaz-201 Offline Offline
dla-ascs-lh dlaz-101 Online Online - LogicalHostname online.
dlaz-201 Offline Offline
idla-ers-lh dlaz-101 Online Online - LogicalHostname online.
dlaz-201 Offline Offline
dla-ers-lh dlaz-101 Online Online - LogicalHostname online.
dlaz-201 Offline Offline
idla-lc-lh dlaz-100 Online Online - LogicalHostname online.
dlaz-200 Offline Offline
dla-lc-lh dlaz-100 Online Online - LogicalHostname online.
dlaz-200 Offline Offline
idla-pas-lh dlaz-102 Online Online - LogicalHostname online.
dlaz-202 Offline Offline
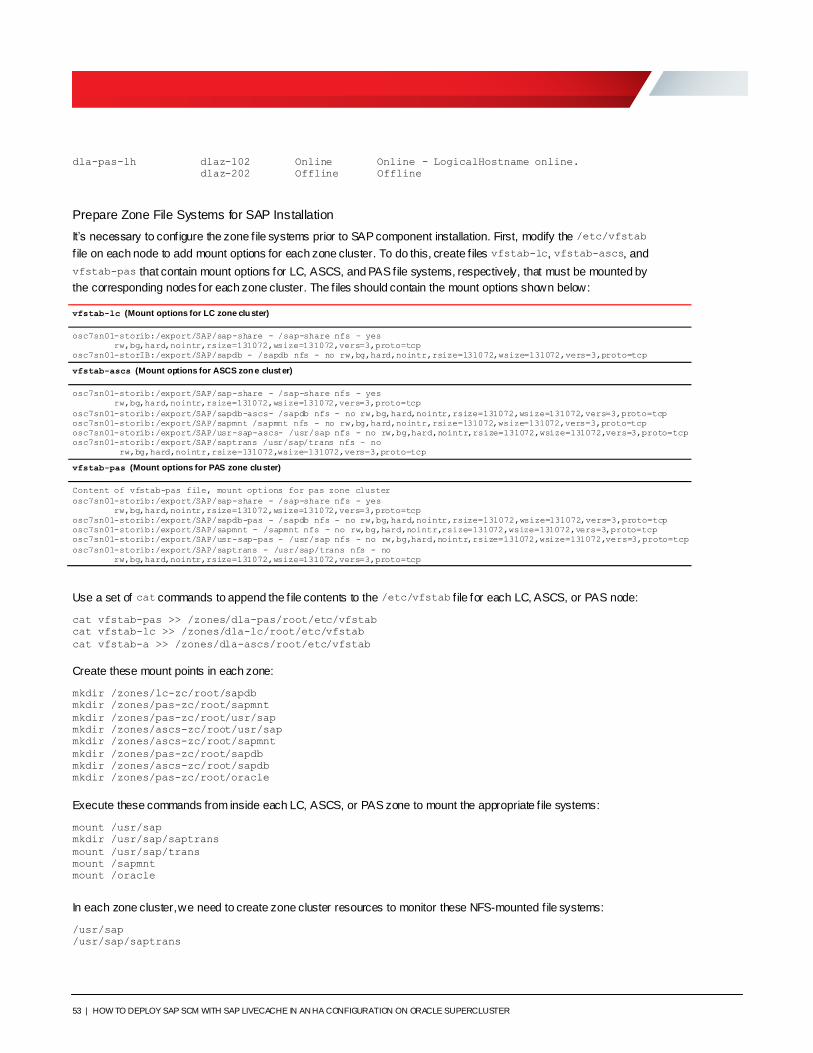
53 | HOW TO DEPLOY SAP SCM WITH SAP LIVECACHE IN AN HA CONFIGURATION ON ORACLE SUPERCLUSTER
dla-pas-lh dlaz-102 Online Online - LogicalHostname online.
dlaz-202 Offline Offline
Prepare Zone File Systems for SAP Installation
It’s necessary to configure the zone f ile systems prior to SAP component installation. First, modify the /etc/vfstab
f ile on each node to add mount options for each zone cluster. To do this, create f iles vfstab-lc, vfstab-ascs, and
vfstab-pas that contain mount options for LC, ASCS, and PAS file systems, respectively, that must be mounted by
the corresponding nodes for each zone cluster. The f iles should contain the mount options shown below:
vfstab-lc (Mount options for LC zone cluster)
osc7sn01-storib:/export/SAP/sap-share - /sap-share nfs – yes
rw,bg,hard,nointr,rsize=131072,wsize=131072,vers=3,proto=tcp
osc7sn01-storIB:/export/SAP/sapdb - /sapdb nfs - no rw,bg,hard,nointr,rsize=131072,wsize=131072,vers=3,proto=tcp
vfstab-ascs (Mount options for ASCS zone clust er)
osc7sn01-storib:/export/SAP/sap-share - /sap-share nfs - yes
rw,bg,hard,nointr,rsize=131072,wsize=131072,vers=3,proto=tcp
osc7sn01-storib:/export/SAP/sapdb-ascs- /sapdb nfs - no rw,bg,hard,nointr,rsize=131072,wsize=131072,vers=3,proto=tcp
osc7sn01-storib:/export/SAP/sapmnt /sapmnt nfs - no rw,bg,hard,nointr,rsize=131072,wsize=131072,vers=3,proto=tcp
osc7sn01-storib:/export/SAP/usr-sap-ascs- /usr/sap nfs - no rw,bg,hard,nointr,rsize=131072,wsize=131072,vers=3,proto=tcp
osc7sn01-storib:/export/SAP/saptrans /usr/sap/trans nfs – no
rw,bg,hard,nointr,rsize=131072,wsize=131072,vers=3,proto=tcp
vfstab-pas (Mount options for PAS zone cluster)
Content of vfstab-pas file, mount options for pas zone cluster
osc7sn01-storib:/export/SAP/sap-share - /sap-share nfs - yes
rw,bg,hard,nointr,rsize=131072,wsize=131072,vers=3,proto=tcp
osc7sn01-storib:/export/SAP/sapdb-pas - /sapdb nfs - no rw,bg,hard,nointr,rsize=131072,wsize=131072,vers=3,proto=tcp
osc7sn01-storib:/export/SAP/sapmnt - /sapmnt nfs - no rw,bg,hard,nointr,rsize=131072,wsize=131072,vers=3,proto=tcp
osc7sn01-storib:/export/SAP/usr-sap-pas - /usr/sap nfs - no rw,bg,hard,nointr,rsize=131072,wsize=131072,vers=3,proto=tcp
osc7sn01-storib:/export/SAP/saptrans - /usr/sap/trans nfs - no
rw,bg,hard,nointr,rsize=131072,wsize=131072,vers=3,proto=tcp
Use a set of cat commands to append the f ile contents to the /etc/vfstab f ile for each LC, ASCS, or PAS node:
cat vfstab-pas >> /zones/dla-pas/root/etc/vfstab
cat vfstab-lc >> /zones/dla-lc/root/etc/vfstab
cat vfstab-a >> /zones/dla-ascs/root/etc/vfstab
Create these mount points in each zone:
mkdir /zones/lc-zc/root/sapdb
mkdir /zones/pas-zc/root/sapmnt
mkdir /zones/pas-zc/root/usr/sap
mkdir /zones/ascs-zc/root/usr/sap
mkdir /zones/ascs-zc/root/sapmnt
mkdir /zones/pas-zc/root/sapdb
mkdir /zones/ascs-zc/root/sapdb
mkdir /zones/pas-zc/root/oracle
Execute these commands from inside each LC, ASCS, or PAS zone to mount the appropriate f ile systems:
mount /usr/sap
mkdir /usr/sap/saptrans
mount /usr/sap/trans
mount /sapmnt
mount /oracle
In each zone cluster, we need to create zone cluster resources to monitor these NFS-mounted f ile systems:
/usr/sap
/usr/sap/saptrans
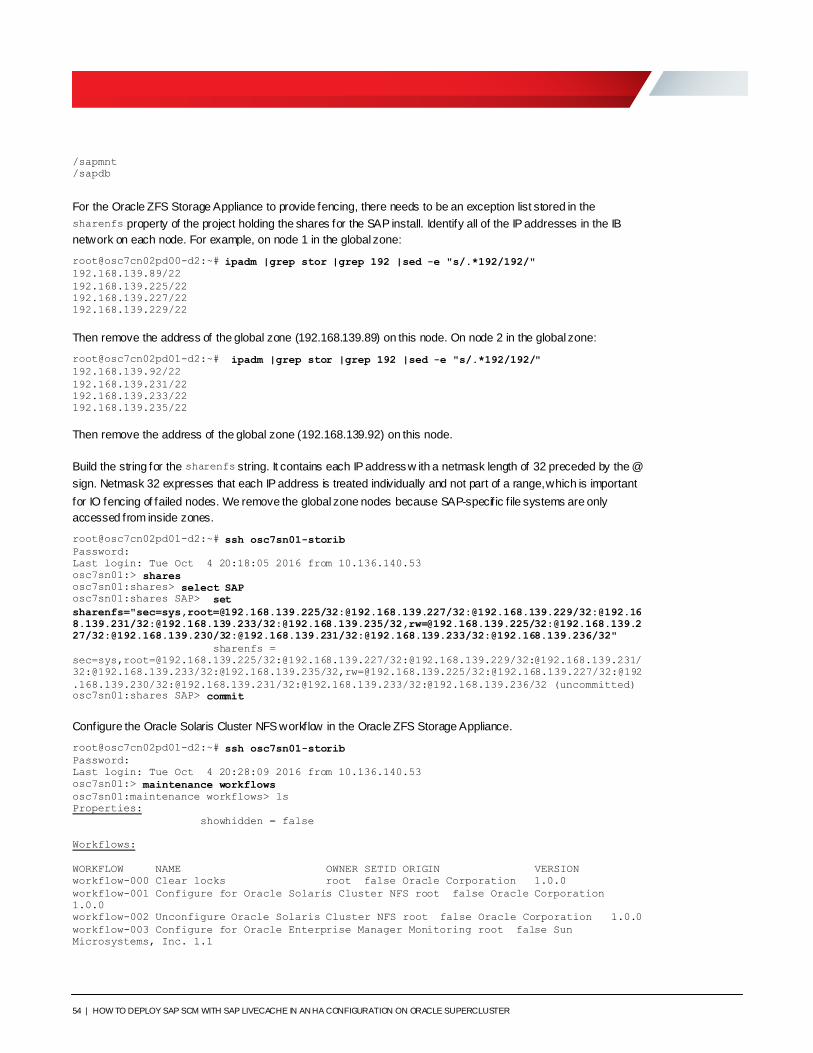
54 | HOW TO DEPLOY SAP SCM WITH SAP LIVECACHE IN AN HA CONFIGURATION ON ORACLE SUPERCLUSTER
/sapmnt
/sapdb
For the Oracle ZFS Storage Appliance to provide fencing, there needs to be an exception list stored in the
sharenfs property of the project holding the shares for the SAP install. Identify all of the IP addresses in the IB
network on each node. For example, on node 1 in the global zone:
root@osc7cn02pd00-d2:~# ipadm |grep stor |grep 192 |sed -e "s/.*192/192/"
192.168.139.89/22
192.168.139.225/22
192.168.139.227/22
192.168.139.229/22
Then remove the address of the global zone (192.168.139.89) on this node. On node 2 in the global zone:
root@osc7cn02pd01-d2:~# ipadm |grep stor |grep 192 |sed -e "s/.*192/192/"
192.168.139.92/22
192.168.139.231/22
192.168.139.233/22
192.168.139.235/22
Then remove the address of the global zone (192.168.139.92) on this node.
Build the string for the sharenfs string. It contains each IP address w ith a netmask length of 32 preceded by the @
sign. Netmask 32 expresses that each IP address is treated individually and not part of a range, which is important
for IO fencing of failed nodes. We remove the global zone nodes because SAP-specif ic f ile systems are only
accessed from inside zones.
root@osc7cn02pd01-d2:~# ssh osc7sn01-storib
Password:
Last login: Tue Oct 4 20:18:05 2016 from 10.136.140.53
osc7sn01:> shares
osc7sn01:shares> select SAP
osc7sn01:shares SAP> set
sharenfs="sec=sys,[email protected]/32:@192.168.139.227/32:@192.168.139.229/32:@192.16
8.139.231/32:@192.168.139.233/32:@192.168.139.235/32,[email protected]/32:@192.168.139.2
27/32:@192.168.139.230/32:@192.168.139.231/32:@192.168.139.233/32:@192.168.139.236/32"
sharenfs =
sec=sys,[email protected]/32:@192.168.139.227/32:@192.168.139.229/32:@192.168.139.231/
32:@192.168.139.233/32:@192.168.139.235/32,[email protected]/32:@192.168.139.227/32:@192
.168.139.230/32:@192.168.139.231/32:@192.168.139.233/32:@192.168.139.236/32 (uncommitted) osc7sn01:shares SAP> commit
Configure the Oracle Solaris Cluster NFS workflow in the Oracle ZFS Storage Appliance.
root@osc7cn02pd01-d2:~# ssh osc7sn01-storib
Password:
Last login: Tue Oct 4 20:28:09 2016 from 10.136.140.53
osc7sn01:> maintenance workflows
osc7sn01:maintenance workflows> ls
Properties:
showhidden = false
Workflows:
WORKFLOW NAME OWNER SETID ORIGIN VERSION
workflow-000 Clear locks root false Oracle Corporation 1.0.0
workflow-001 Configure for Oracle Solaris Cluster NFS root false Oracle Corporation
1.0.0
workflow-002 Unconfigure Oracle Solaris Cluster NFS root false Oracle Corporation 1.0.0
workflow-003 Configure for Oracle Enterprise Manager Monitoring root false Sun
Microsystems, Inc. 1.1
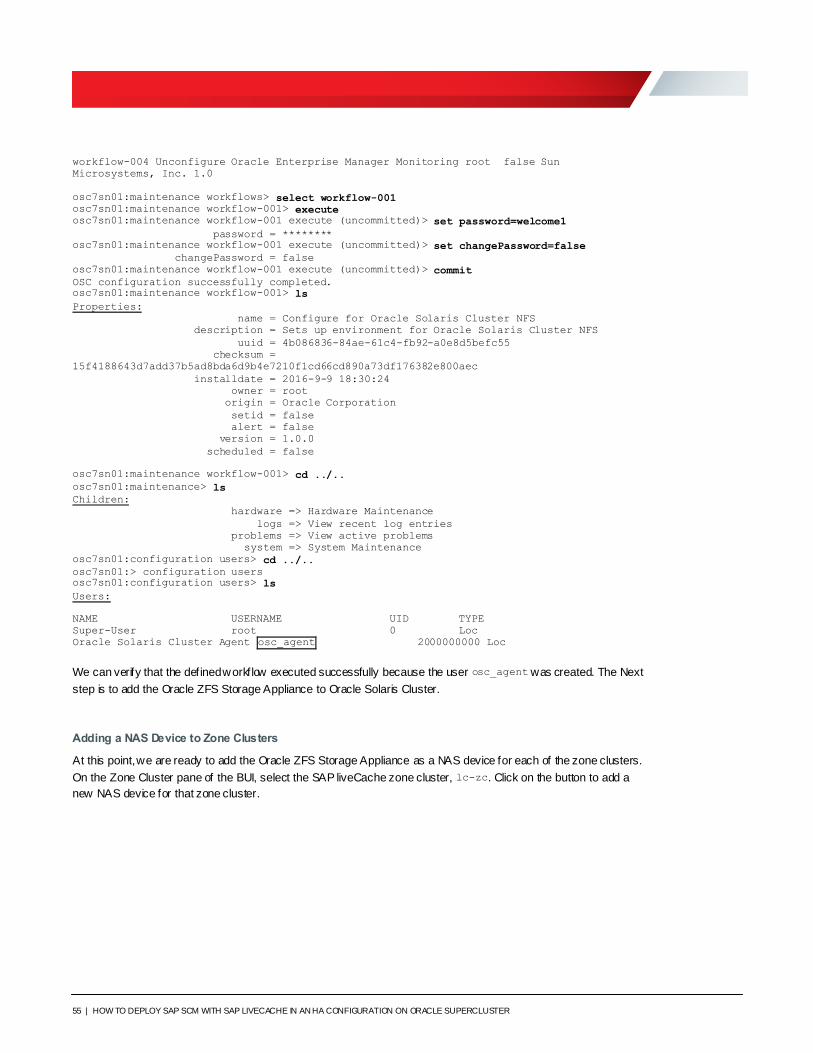
55 | HOW TO DEPLOY SAP SCM WITH SAP LIVECACHE IN AN HA CONFIGURATION ON ORACLE SUPERCLUSTER
workflow-004 Unconfigure Oracle Enterprise Manager Monitoring root false Sun
Microsystems, Inc. 1.0
osc7sn01:maintenance workflows> select workflow-001
osc7sn01:maintenance workflow-001> execute
osc7sn01:maintenance workflow-001 execute (uncommitted)> set password=welcome1
password = ******** osc7sn01:maintenance workflow-001 execute (uncommitted)> set changePassword=false
changePassword = false
osc7sn01:maintenance workflow-001 execute (uncommitted)> commit
OSC configuration successfully completed. osc7sn01:maintenance workflow-001> ls
Properties:
name = Configure for Oracle Solaris Cluster NFS
description = Sets up environment for Oracle Solaris Cluster NFS
uuid = 4b086836-84ae-61c4-fb92-a0e8d5befc55
checksum =
15f4188643d7add37b5ad8bda6d9b4e7210f1cd66cd890a73df176382e800aec
installdate = 2016-9-9 18:30:24
owner = root
origin = Oracle Corporation
setid = false
alert = false
version = 1.0.0
scheduled = false
osc7sn01:maintenance workflow-001> cd ../..
osc7sn01:maintenance> ls
Children:
hardware => Hardware Maintenance
logs => View recent log entries
problems => View active problems
system => System Maintenance
osc7sn01:configuration users> cd ../..
osc7sn01:> configuration users
osc7sn01:configuration users> ls
Users:
NAME USERNAME UID TYPE
Super-User root 0 Loc
Oracle Solaris Cluster Agent osc_agent 2000000000 Loc
We can verify that the defined workflow executed successfully because the user osc_agent was created. The Next
step is to add the Oracle ZFS Storage Appliance to Oracle Solaris Cluster.
Adding a NAS Device to Zone Clusters
At this point, we are ready to add the Oracle ZFS Storage Appliance as a NAS device for each of the zone clusters.
On the Zone Cluster pane of the BUI, select the SAP liveCache zone cluster, lc-zc. Click on the button to add a
new NAS device for that zone cluster.
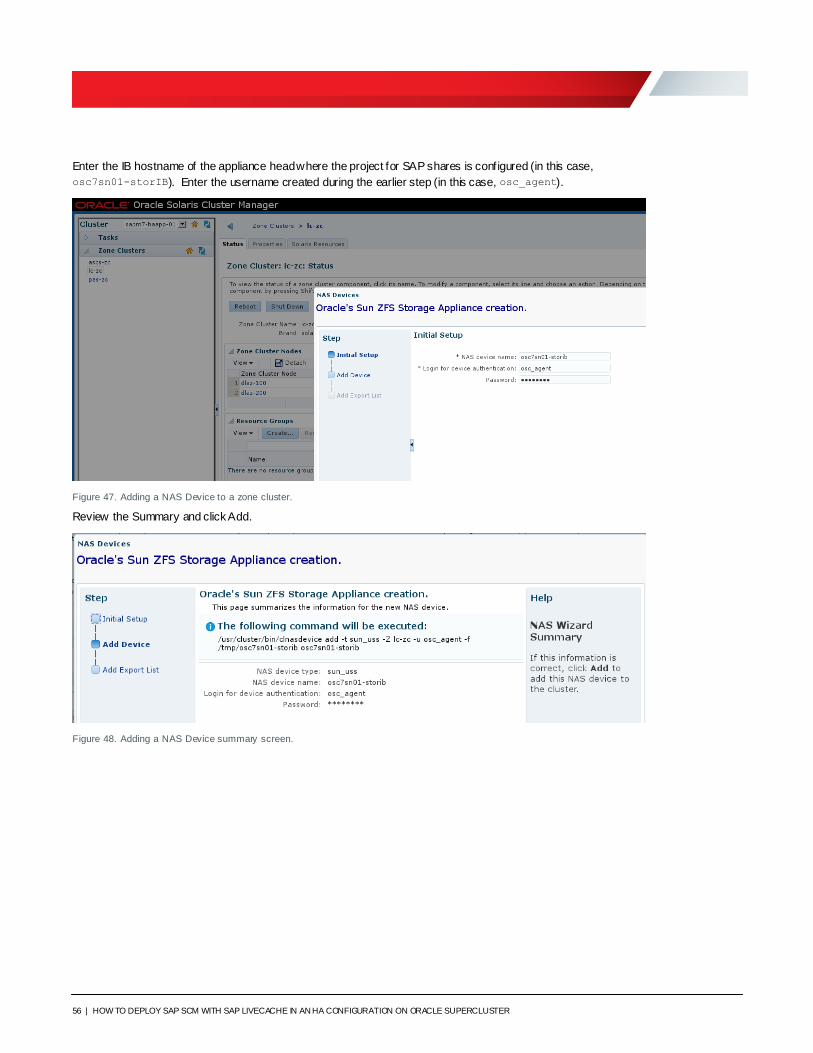
56 | HOW TO DEPLOY SAP SCM WITH SAP LIVECACHE IN AN HA CONFIGURATION ON ORACLE SUPERCLUSTER
Enter the IB hostname of the appliance head where the project for SAP shares is configured (in this case,
osc7sn01-storIB). Enter the username created during the earlier step (in this case, osc_agent).
Figure 47. Adding a NAS Device to a zone cluster.
Review the Summary and click Add.
Figure 48. Adding a NAS Device summary screen.
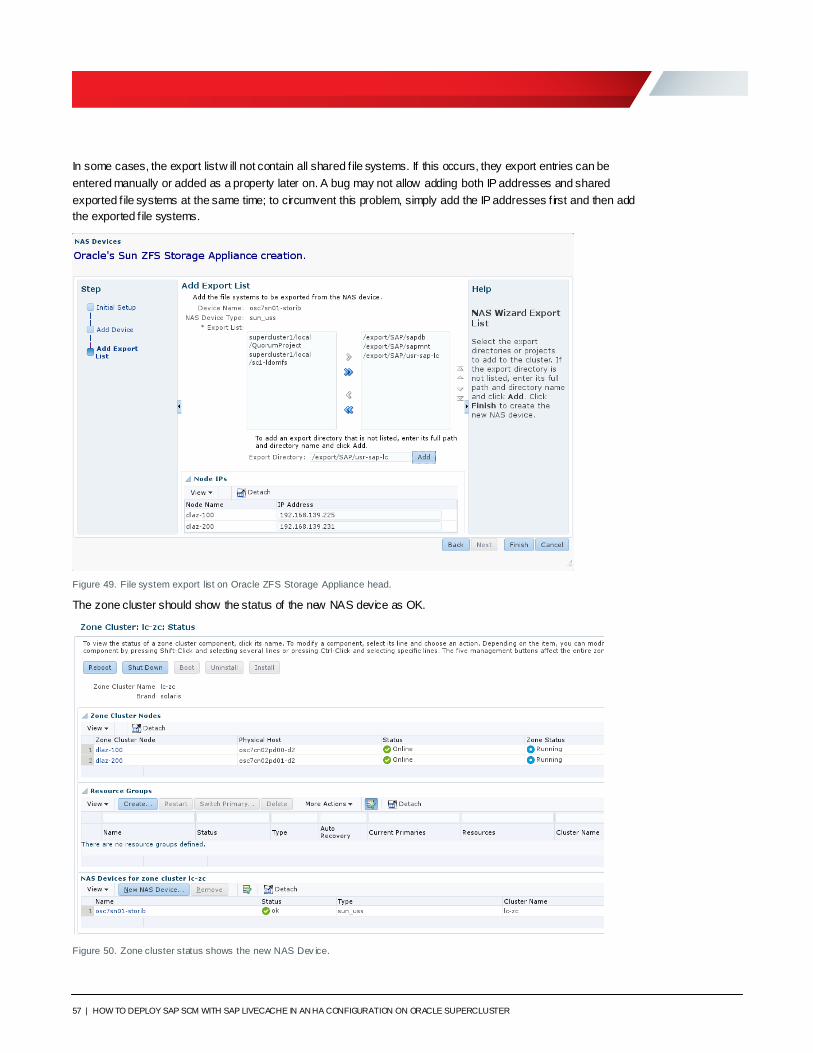
57 | HOW TO DEPLOY SAP SCM WITH SAP LIVECACHE IN AN HA CONFIGURATION ON ORACLE SUPERCLUSTER
In some cases, the export list w ill not contain all shared f ile systems. If this occurs, they export entries can be
entered manually or added as a property later on. A bug may not allow adding both IP addresses and shared
exported f ile systems at the same time; to circumvent this problem, simply add the IP addresses f irst and then add
the exported f ile systems.
Figure 49. File system export list on Oracle ZFS Storage Appliance head.
The zone cluster should show the status of the new NAS device as OK.
Figure 50. Zone cluster status shows the new NAS Dev ice.
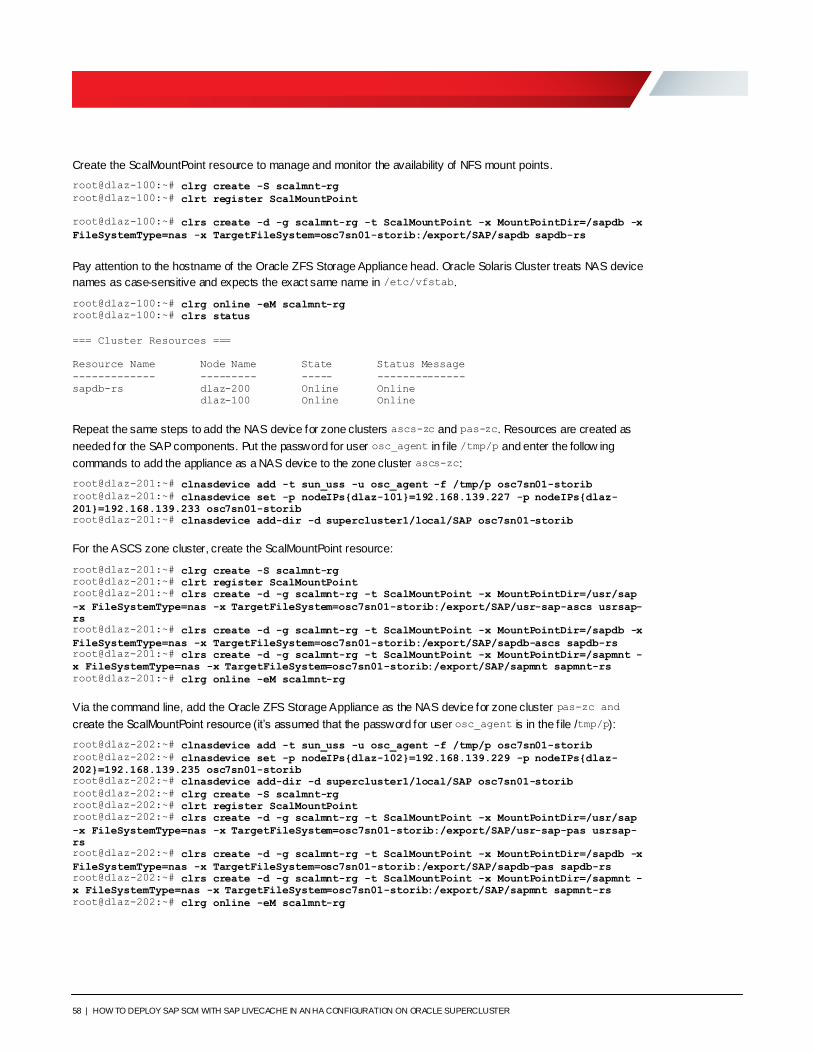
58 | HOW TO DEPLOY SAP SCM WITH SAP LIVECACHE IN AN HA CONFIGURATION ON ORACLE SUPERCLUSTER
Create the ScalMountPoint resource to manage and monitor the availability of NFS mount points.
root@dlaz-100:~# clrg create -S scalmnt-rg
root@dlaz-100:~# clrt register ScalMountPoint
root@dlaz-100:~# clrs create -d -g scalmnt-rg -t ScalMountPoint -x MountPointDir=/sapdb -x
FileSystemType=nas -x TargetFileSystem=osc7sn01-storib:/export/SAP/sapdb sapdb-rs
Pay attention to the hostname of the Oracle ZFS Storage Appliance head. Oracle Solaris Cluster treats NAS device
names as case-sensitive and expects the exact same name in /etc/vfstab.
root@dlaz-100:~# clrg online -eM scalmnt-rg
root@dlaz-100:~# clrs status
=== Cluster Resources ===
Resource Name Node Name State Status Message
------------- --------- ----- --------------
sapdb-rs dlaz-200 Online Online
dlaz-100 Online Online
Repeat the same steps to add the NAS device for zone clusters ascs-zc and pas-zc. Resources are created as
needed for the SAP components. Put the password for user osc_agent in f ile /tmp/p and enter the follow ing
commands to add the appliance as a NAS device to the zone cluster ascs-zc:
root@dlaz-201:~# clnasdevice add -t sun_uss -u osc_agent -f /tmp/p osc7sn01-storib
root@dlaz-201:~# clnasdevice set -p nodeIPs{dlaz-101}=192.168.139.227 -p nodeIPs{dlaz-
201}=192.168.139.233 osc7sn01-storib root@dlaz-201:~# clnasdevice add-dir -d supercluster1/local/SAP osc7sn01-storib
For the ASCS zone cluster, create the ScalMountPoint resource:
root@dlaz-201:~# clrg create -S scalmnt-rg
root@dlaz-201:~# clrt register ScalMountPoint
root@dlaz-201:~# clrs create -d -g scalmnt-rg -t ScalMountPoint -x MountPointDir=/usr/sap
-x FileSystemType=nas -x TargetFileSystem=osc7sn01-storib:/export/SAP/usr-sap-ascs usrsap-
rs root@dlaz-201:~# clrs create -d -g scalmnt-rg -t ScalMountPoint -x MountPointDir=/sapdb -x
FileSystemType=nas -x TargetFileSystem=osc7sn01-storib:/export/SAP/sapdb-ascs sapdb-rs
root@dlaz-201:~# clrs create -d -g scalmnt-rg -t ScalMountPoint -x MountPointDir=/sapmnt -
x FileSystemType=nas -x TargetFileSystem=osc7sn01-storib:/export/SAP/sapmnt sapmnt-rs
root@dlaz-201:~# clrg online -eM scalmnt-rg
Via the command line, add the Oracle ZFS Storage Appliance as the NAS device for zone cluster pas-zc and
create the ScalMountPoint resource (it’s assumed that the password for user osc_agent is in the f ile /tmp/p):
root@dlaz-202:~# clnasdevice add -t sun_uss -u osc_agent -f /tmp/p osc7sn01-storib
root@dlaz-202:~# clnasdevice set -p nodeIPs{dlaz-102}=192.168.139.229 -p nodeIPs{dlaz-
202}=192.168.139.235 osc7sn01-storib
root@dlaz-202:~# clnasdevice add-dir -d supercluster1/local/SAP osc7sn01-storib
root@dlaz-202:~# clrg create -S scalmnt-rg root@dlaz-202:~# clrt register ScalMountPoint
root@dlaz-202:~# clrs create -d -g scalmnt-rg -t ScalMountPoint -x MountPointDir=/usr/sap
-x FileSystemType=nas -x TargetFileSystem=osc7sn01-storib:/export/SAP/usr-sap-pas usrsap-
rs root@dlaz-202:~# clrs create -d -g scalmnt-rg -t ScalMountPoint -x MountPointDir=/sapdb -x
FileSystemType=nas -x TargetFileSystem=osc7sn01-storib:/export/SAP/sapdb-pas sapdb-rs
root@dlaz-202:~# clrs create -d -g scalmnt-rg -t ScalMountPoint -x MountPointDir=/sapmnt -
x FileSystemType=nas -x TargetFileSystem=osc7sn01-storib:/export/SAP/sapmnt sapmnt-rs
root@dlaz-202:~# clrg online -eM scalmnt-rg
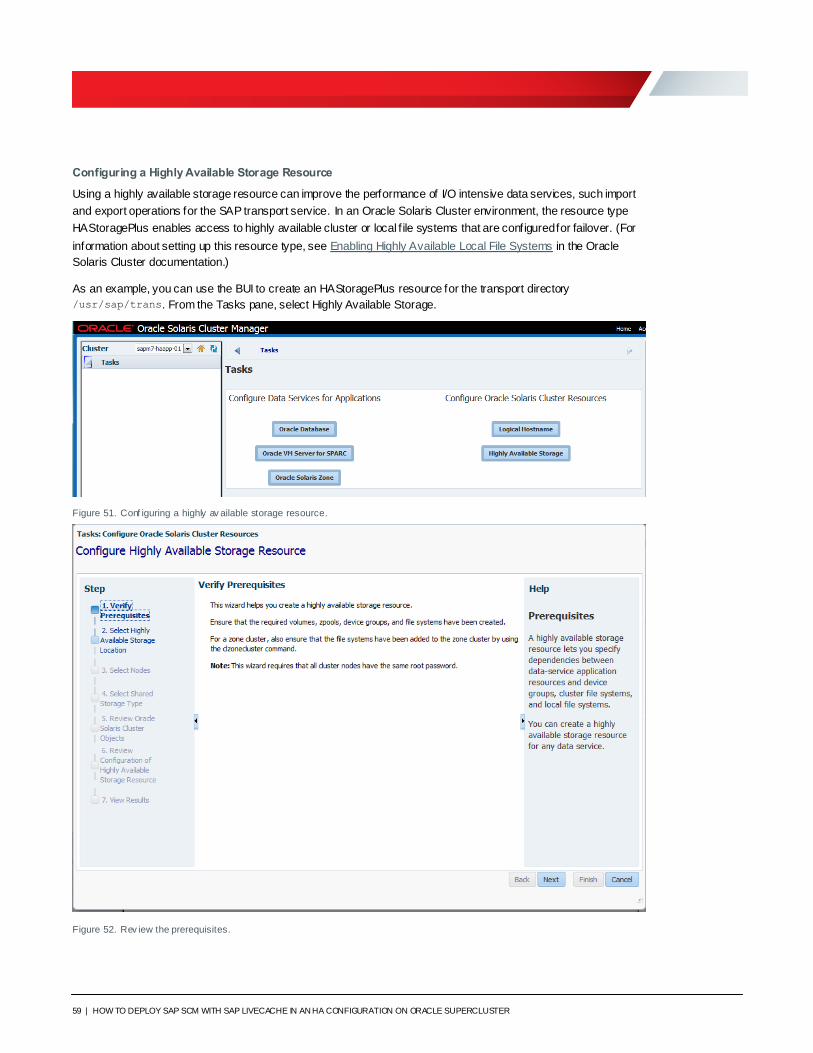
59 | HOW TO DEPLOY SAP SCM WITH SAP LIVECACHE IN AN HA CONFIGURATION ON ORACLE SUPERCLUSTER
Configuring a Highly Available Storage Resource
Using a highly available storage resource can improve the performance of I/O intensive data services, such import
and export operations for the SAP transport service. In an Oracle Solaris Cluster environment, the resource type
HAStoragePlus enables access to highly available cluster or local f ile systems that are configured for failover. (For
information about setting up this resource type, see Enabling Highly Available Local File Systems in the Oracle
Solaris Cluster documentation.)
As an example, you can use the BUI to create an HAStoragePlus resource for the transport directory
/usr/sap/trans. From the Tasks pane, select Highly Available Storage.
Figure 51. Conf iguring a highly av ailable storage resource.
Figure 52. Rev iew the prerequisites.
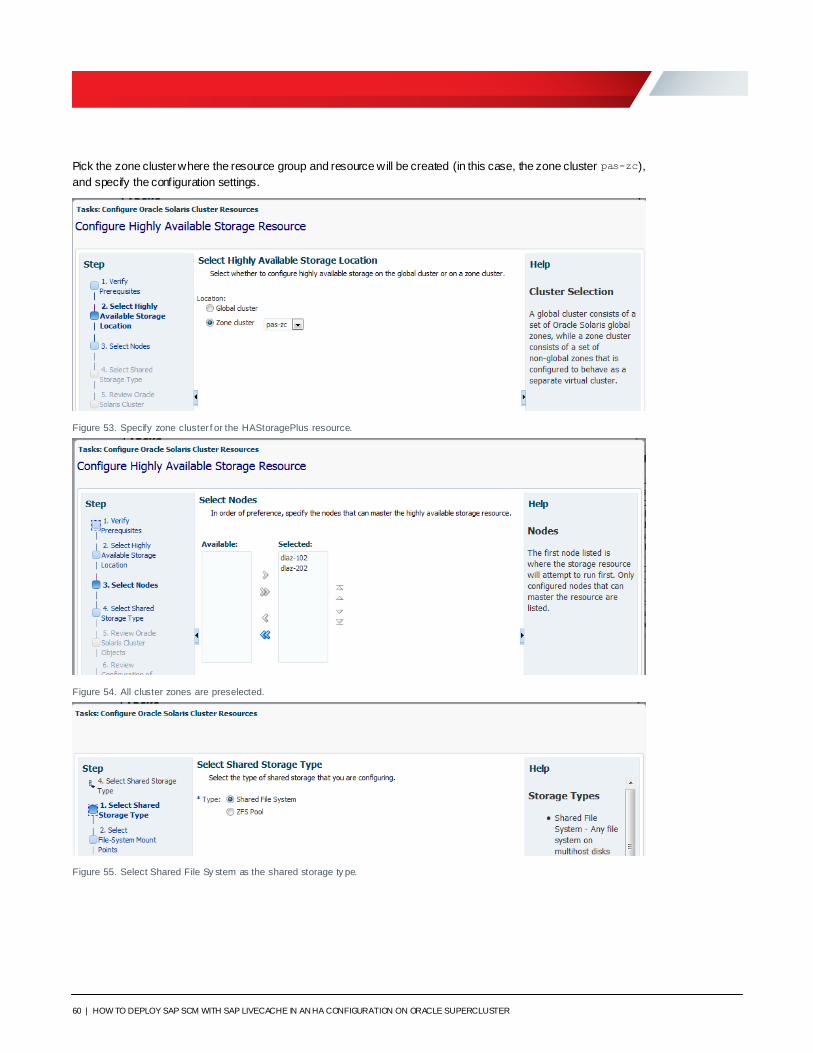
60 | HOW TO DEPLOY SAP SCM WITH SAP LIVECACHE IN AN HA CONFIGURATION ON ORACLE SUPERCLUSTER
Pick the zone cluster where the resource group and resource will be created (in this case, the zone cluster pas-zc),
and specify the configuration settings.
Figure 53. Specify zone cluster f or the HAStoragePlus resource.
Figure 54. All cluster zones are preselected.
Figure 55. Select Shared File Sy stem as the shared storage ty pe.
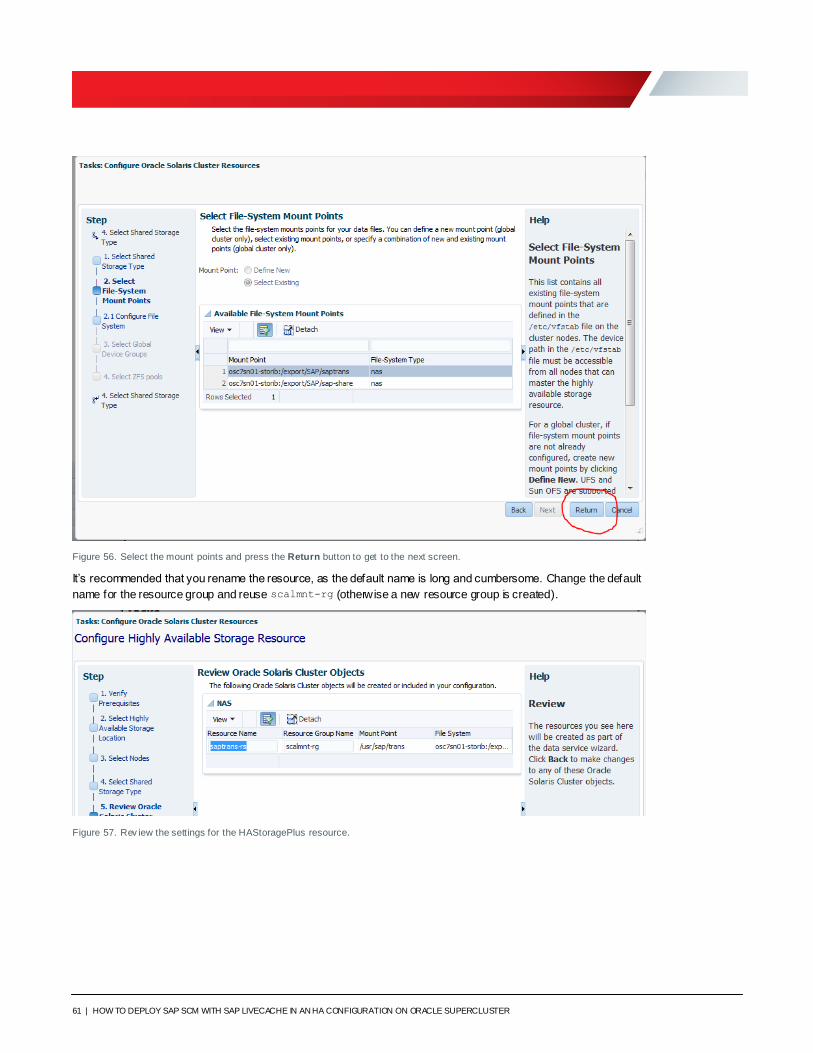
61 | HOW TO DEPLOY SAP SCM WITH SAP LIVECACHE IN AN HA CONFIGURATION ON ORACLE SUPERCLUSTER
Figure 56. Select the mount points and press the Return button to get to the next screen.
It’s recommended that you rename the resource, as the default name is long and cumbersome. Change the default
name for the resource group and reuse scalmnt-rg (otherwise a new resource group is created).
Figure 57. Rev iew the settings for the HAStoragePlus resource.

62 | HOW TO DEPLOY SAP SCM WITH SAP LIVECACHE IN AN HA CONFIGURATION ON ORACLE SUPERCLUSTER
.
Figure 58. Rev iew the conf iguration choices and press Next to create the resource.
.
Figure 59. The Result screen shows that the resource conf iguration succeeded.
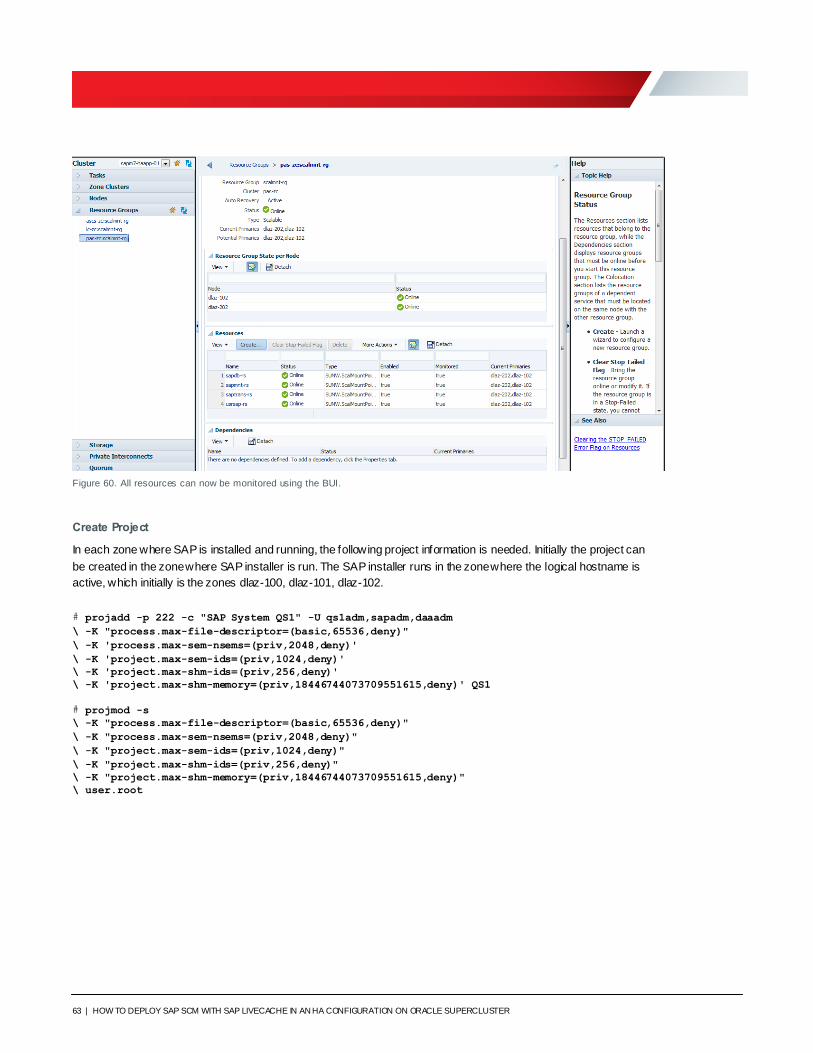
63 | HOW TO DEPLOY SAP SCM WITH SAP LIVECACHE IN AN HA CONFIGURATION ON ORACLE SUPERCLUSTER
Figure 60. All resources can now be monitored using the BUI.
Create Project
In each zone where SAP is installed and running, the following project information is needed. Initially the project can
be created in the zone where SAP installer is run. The SAP installer runs in the zone where the logical hostname is
active, which initially is the zones dlaz-100, dlaz-101, dlaz-102.
# projadd -p 222 -c "SAP System QS1" -U qs1adm,sapadm,daaadm
\ -K "process.max-file-descriptor=(basic,65536,deny)"
\ -K 'process.max-sem-nsems=(priv,2048,deny)'
\ -K 'project.max-sem-ids=(priv,1024,deny)'
\ -K 'project.max-shm-ids=(priv,256,deny)'
\ -K 'project.max-shm-memory=(priv,18446744073709551615,deny)' QS1
# projmod -s
\ -K "process.max-file-descriptor=(basic,65536,deny)"
\ -K "process.max-sem-nsems=(priv,2048,deny)"
\ -K "project.max-sem-ids=(priv,1024,deny)"
\ -K "project.max-shm-ids=(priv,256,deny)"
\ -K "project.max-shm-memory=(priv,18446744073709551615,deny)"
\ user.root
64 | HOW TO DEPLOY SAP SCM WITH SAP LIVECACHE IN AN HA CONFIGURATION ON ORACLE SUPERCLUSTER
Installing SAP SCM Software Components
Many readers are already familiar w ith installing the SAP NetWeaver ABAP stack. For this reason, this guide
summarizes procedures for installing the SAP SCM components in an appendix (“Appendix A: Installing SAP
SCM”). This appendix is based on detailed ABAP installation and LC installation steps performed as a part of the
sample installation in the Oracle Solution Center. It outlines the steps (using the graphical sapinst client interface)
for installing the following software components:
» The ABAP SAP Central Services (ASCS) instance
» Oracle Database (the primary Oracle RAC node)
» The Primary Application Server (PAS) instance
» The dialog instance
» The SAP liveCache instance
» The SAP Enqueue Replication Services (ERS) instance
Before following the procedures outlined in the appendix, there are a few steps necessary to prepare the
environment for the SAP software installation.
Preparing to Use the sapinst Client
By default, Oracle Solaris is initially installed with the minimum set of required packages. Because the X11
packages are not included in a standard minimized Oracle Solaris installation, by default it is not possible to display
an X-Windows client application (like the graphical sapinst client) remotely to another host. To be able run the
sapinst client to install the SAP instances listed above, either install the Oracle Solaris desktop package group or
add these individual packages:
# pkg install xauth
# pkg install x11/diagnostic/x11-info-clients
# pkg install library/motif
# pkg install terminal/xterm
When using Oracle RAC for the SAP database, the following generated shell scripts create HA services for each
application server:
#!/bin/sh
#Generated shell script to create oracle RAC services on database host.
#Login as the owner of the oracle database software (typically as user 'oracle') on the
database host.
#Set the $ORACLE_HOME variable to the home location of the database.
#
$ORACLE_HOME/bin/srvctl add service -db QS1 -service QS1_DVEBMGS00 -preferred QS
1001 -available QS1002 -tafpolicy BASIC -policy AUTOMATIC -notification TRUE -failovertype
SELECT -failovermethod BASIC -failoverretry 3 -failoverdelay 5 $ORACLE_HOME/bin/srvctl
start service -db QS1 -service QS1_DVEBMGS00
#!/bin/sh
#Generated shell script to create oracle RAC services on database host.
#Login as the owner of the oracle database software (typicaly os user 'oracle') on the
database host.
#Set the $ORACLE_HOME variable to the home location of the database.
#
$ORACLE_HOME/bin/srvctl add service -db QS1 -service QS1_D10 -preferred QS1001 -available
QS1002 -tafpolicy BASIC -policy AUTOMATIC -notification TRUE -failovertype SELECT -
failovermethod BASIC -failoverretry 3 -failoverdelay 5 $ORACLE_HOME/bin/srvctl start
service -db QS1 -service QS1_D10
65 | HOW TO DEPLOY SAP SCM WITH SAP LIVECACHE IN AN HA CONFIGURATION ON ORACLE SUPERCLUSTER
Set the following parameters for the root user to control where SAP installation logs are created: root@dlaz-202> export TMP=/sap-share/install/app/temp
root@dlaz-202> export TMPDIR=/sap-share/install/app/temp
root@dlaz-202> export TEMP=/sap-share/install/app/temp
Finally, start the sapinst client interface to install the required SAP instances. Use the option
SAPINST_USE_HOSTNAME=<LOGICAL HOSTNAME> to install the ASCS, ERS, and APP servers to run in the zone
where the corresponding logical hostname is active:
root@dlaz-202> ./sapinst GUISERVER_DIALOG_PORT=21201 SAPINST_DIALOG_PORT=21213
SAPINST_USE_HOSTNAME=<LogicalHost>
Zone Clustering of ABAP Stack Instances
This section describes the steps to put the ABAP stack instances (ASCS, ERS, and PAS servers) under Oracle
Solaris Cluster management. It is assumed that the SAP SCM software components have already been installed as
described in Appendix A.
First, modify the SAP directory structure to have the hostctrl directory local to each node. On node 1:
cd /usr
mkdir local
mkdir local/sap
su - qs1adm
cd /usr/sap
mv hostctrl/ hostctrl.old
cp -r hostctrl.old ../local/sap/hostctrl
ln -s ../local/sap/hostctrl .
On node 2:
mkdir /usr/local
mkdir /usr/local/sap
cd /usr/sap
cp -r hostctrl.old ../local/sap/hostctrl
Add profile variables for the SAP HA framework:
# in DEFAULT.PFL
service/halib = /usr/sap/QS1/SYS/exe/run/saphascriptco.so
service/halib_cluster_connector =
/opt/ORCLscsapnetw/saphacmd/bin/sap_orcl_cluster_connector
service/halib_debug_level = 1
SAP is installed on the node where the logical hostname is running—by default, this is node 1. To be able to start
SAP manually on either node, it’s necessary to create SAP users also on node 2. Manually creating home
directories and adding entries in /etc f iles is one approach to doing this. An alternative approach is to create scripts
that create the users, running the scripts on both nodes prior to starting the SAP install; in this approach, sapinst
recognizes that users are already defined and does not attempt to create new ones.
To manually create SAP users on node 2, start by connecting to the zone containing the ASCS instance
(dlaz-201):
mkdir -p /export/home/qs1adm
mkdir -p /export/home/sapadm
Use the same values from /etc/hosts on dlaz-101.
66 | HOW TO DEPLOY SAP SCM WITH SAP LIVECACHE IN AN HA CONFIGURATION ON ORACLE SUPERCLUSTER
echo "qs1adm:x:100:101:SAP System Administrator:/export/home/qs1adm:/bin/csh"
>>/etc/passwd
echo "sapadm:x:101:101:SAP System Administrator:/export/home/sapadm:/bin/false"
>>/etc/passwd
echo "sapinst::100:root,qs1adm" >>/etc/group
echo "sapsys::101:" >>/etc/group
chown qs1adm:sapsys /export/home/qs1adm
chown sapadm:sapsys /export/home/sapadm
echo "qs1adm:EdOJfJZVXKbyY:::::::" >>/etc/shadow
echo "sapadm:ZpP7UFAyrYnks:::::::" >>/etc/shadow
Copy content of the home directory from node 1 to node 2:
scp -rp root@dlaz-101:/export/home/qs1adm /export/home
scp -rp root@dlaz-101:/export/home/sapadm /export/home
chown -R qs1adm:sapsys /export/home/qs1adm
chown -R sapadm:sapsys /export/home/sapadm
Connect to the APP zone (dlaz-202):
mkdir -p /export/home/qs1adm
mkdir -p /export/home/sapadm
mkdir -p /export/home/sdb
Use the same values from /etc/hosts on dlaz-102:
echo "qs1adm:x:100:101:SAP System Administrator:/export/home/qs1adm:/bin/csh"
>>/etc/passwd
echo "sapadm:x:101:101:SAP System Administrator:/export/home/sapadm:/bin/false"
>>/etc/passwd
echo "sdb:x:102:102:Database Software Owner:/export/home/sdb:/usr/bin/bash" >>/etc/passwd
echo "sapinst::100:root,qs1adm" >>/etc/group
echo "sapsys::101:" >>/etc/group
echo "sdba::102:" >>/etc/group
chown qs1adm:sapsys /export/home/qs1adm
chown sapadm:sapsys /export/home/sapadm
chown sdb:sdba /export/home/sdb
echo "qs1adm:EdOJfJZVXKbyY:::::::" >>/etc/shadow
echo "sapadm:ZpP7UFAyrYnks:::::::" >>/etc/shadow
echo "sdb:UP:::::::" >>/etc/shadow
scp -rp root@dlaz-102:/export/home/qs1adm /export/home
scp -rp root@dlaz-102:/export/home/sapadm /export/home
scp -rp root@dlaz-102:/export/home/sdb /export/home
chown -R qs1adm:sapsys /export/home/qs1adm
chown -R sapadm:sapsys /export/home/sapadm
chown -R sdb:sdba /export/home/sdb
Modify /etc/services and copy all SAP-related services. These entries are the same in all zones:
saphostctrl 1128/tcp # SAPHostControl over SOAP/HTTP
saphostctrl 1128/udp # SAPHostControl over SOAP/HTTP
saphostctrls 1129/tcp # SAPHostControl over SOAP/HTTPS
saphostctrls 1129/udp # SAPHostControl over SOAP/HTTPS
sapmsQS1 3600/tcp # SAP System Message Server Port
sapdp00 3200/tcp # SAP System Dispatcher Port
...
67 | HOW TO DEPLOY SAP SCM WITH SAP LIVECACHE IN AN HA CONFIGURATION ON ORACLE SUPERCLUSTER
sapgw98s 4898/tcp # SAP System Gateway Security Port
sapgw99s 4899/tcp # SAP System Gateway Security Port
Update environment f iles that are dependent on a hostname using a script such as the follow ing:
#!/bin/sh
for s1 in /export/home/qs1adm/.??*101*
do
s2=`echo $s1 | sed 's/101/201/'`
echo mv "$s1" "$s2"
mv "$s1" "$s2"
done
At this point in time, SAP <sid>adm users exist on both nodes and SAP can be started on either node. Next, it’s
recommended to test the ability to start and stop instances on both nodes and w ithin all zones (ASCS, PAS, and
LC). To start SAP in a zone, f irst make sure that the logical hostname for the application that needs to be started is
running on that node (run these commands in dlaz-202):
clrg status pas-rg
clrg switch -n dlaz-202 pas-rg
su - qs1adm
startsap -i DVBEMSG00
SAP-specif ic agents are implemented as resource types in Oracle Solaris Cluster and are made available during the
installation. The SAP-specif ic resource types must only be registered. Once registered, they are available in zone
clusters and in the global zone cluster of each node. Resource types are registered as needed.
clrt register ORCL.sapstartsrv
clrt register ORCL.sapcentr
clrt register ORCL.saprepenq
clrt register ORCL.saprepenq_preempt
Create resource groups, resources, and aff inities to manage the instances in the SAP ABAP stack using Oracle
Solaris Cluster.
ASCS
#ASCS resources
clrs create -d -g ascs-rg -t ORCL.sapstartsrv \ -p SID=QS1 \
-p sap_user=qs1adm \
-p instance_number=00 \
-p instance_name=ASCS00 \
-p host=dla-ascs-lh \
-p child_mon_level=5 \
-p resource_dependencies_offline_restart=usrsap-rs,sapmnt--rs \
-p timeout_return=20 \
ascs-startsrv-rs
clrs create -d -g ascs-rg -t ORCL.sapcentr \
-p SID=QS1 \
-p sap_user=qs1adm \
-p instance_number=00 \
-p instance_name=ASCS00 \
-p host=dla-ascs-lh \
-p retry_count=0 \
-p resource_dependencies=ascs-startsrv-rs \
-p resource_dependencies_offline_restart=usrsap-rs,sapmnt-rs \
-p yellow=20 \
ascs-rs
68 | HOW TO DEPLOY SAP SCM WITH SAP LIVECACHE IN AN HA CONFIGURATION ON ORACLE SUPERCLUSTER
ERS
clrs create -d -g ers-rg -t saprepenq \
-p sid=QS1 \
-p sap_user=qs1adm \
-p instance_number=15 \
-p instance_name=ERS15 \
-p host=dla-ers-lh \
-p debug_level=0 \
-p resource_dependencies=dla-rep-startsrv-rs \
-p resource_dependencies_offline_restart= \
usrsap-ascs-rs, sapmnt-rs \
-p START_TIMEOUT=300 \
dla-rep-rs
clrs create -d -g ascs-rg -t saprepenq_preempt \
-p sid=QS1 \
-p sap_user=qs1adm \
-p repenqres=dla-rep-rs \
-p enq_instnr=00 \
-p debug_level=0 \
-p resource_dependencies_offline_restart=dla-ascs-rs \
preempter-rs
#Weak affinity - ASCS restart on ERS
clrg set -p RG_affinities=+ers-rg ascs-rg
Check the Oracle Solaris Cluster configuration of the ASCS and ERS resource types:
clrg show -p RG_affinities ascs-rg
#Positive affinity to storage rg
clrg set -p RG_affinities+=++scalmnt-rg ascs-rg
clrg show -p RG_affinities ascs-rg
clrg set -p RG_affinities+=++scalmnt-rg ers-rg
clrg show -p RG_affinities ers-rg
clrg set -p pingpong_interval=600 ascs-rg
clrg set -p pingpong_interval=600 ers-rg
clrs enable +
PAS
The Primary Application Server connects to the Oracle Database:
# clrt list
SUNW.LogicalHostname:5
SUNW.SharedAddress:3
SUNW.ScalMountPoint:4
ORCL.oracle_external_proxy
ORCL.sapstartsrv:2
ORCL.sapcentr:2
ORCL.saprepenq:2
ORCL.saprepenq_preempt:2
Create the Orac le Database monitoring agent. The agent can be configured to monitor either an Oracle
Database single instance or Oracle RA C.
clrt register ORCL.sapdia
clrs create -d -g pas-rg -t ORCL.sapstartsrv \
-p SID=QS1 \
-p sap_user=qs1adm \
69 | HOW TO DEPLOY SAP SCM WITH SAP LIVECACHE IN AN HA CONFIGURATION ON ORACLE SUPERCLUSTER
-p instance_number=00 \
-p instance_name=DVEBMGS00 \
-p host=dla-pas-lh \
-p child_mon_level=5 \
-p resource_dependencies_offline_restart=\
scalosc7sn02-storIB_export_SAP_usr_sap_pas-rs, sapmnt-rs,\
scalosc7sn02-storIB_export_SAP_sapdb_pas-rs \
-p timeout_return=20 \
pas-startsrv-rs
## Comment PAS was installed using IB host im7pr1-pas-lh
clrs create -d -g pas-rg -t ORCL.sapdia \
-p SID=QS1 \
-p sap_user=qs1adm \
-p instance_number=00 \
-p instance_name=DVEBMGS00 \
-p host=dla-pas-lh \
-p resource_project_name=QS1 \
-p resource_dependencies=pas-startsrv-rs,scalosc7sn02-storIB_export_SAP_sapdb_pas-rs \
-p resource_dependencies_offline_restart=\
scalosc7sn02-storIB_export_SAP_usr_sap_pas-rs, sapmnt-rs \
-p yellow=20 \
pas-rs
clrg set -p RG_affinities+=++scalmnt-rg pas-rg
Oracle Solaris Cluster provides the HA for Oracle External Proxy resource type that interrogates an Oracle
Database or Oracle RAC service and interprets the availability of that service as a part of an Oracle Solaris Cluster
configuration. To configure this resource type, connect to one of the database zones as the user oracle and create
a user that will be used by the Oracle External Proxy resource:
oracle@osc7cn01-z1:~$ srvctl status database -d LEX
Instance QS1001 is running on node osc7cn01-z1
Instance QS1002 is running on node osc7cn02-z1 oracle@osc7cn01-z1:~$ export ORACLE_HOME=/oracle/QS1/121
oracle@osc7cn01-z1:~$ export ORACLE_SID=QS1001
oracle@osc7cn01-z1:~$ sqlplus "/as sysdba" SQL> create user hauser identified by hauser;
SQL> grant create session to hauser; SQL> grant execute on dbms_lock to hauser;
SQL> grant select on v_$instance to hauser;
SQL> grant select on v_$sysstat to hauser;
SQL> grant select on v_$database to hauser; SQL> create profile hauser limit PASSWORD_LIFE_TIME UNLIMITED;
SQL> alter user hauser identified by hauser profile hauser;
SQL> exit
In each zone where the agent is running and connecting to the Oracle Database, it is necessary to set up
tnsnames.ora and encrypted password f iles. Create /var/opt/oracle/tnsnames.ora as the default location for
tnsnames.ora:
mkdir -p /var/opt/oracle
cat << EOF >/var/opt/oracle/tnsnames.ora
QS1 =
(DESCRIPTION =
(ADDRESS_LIST =
(ADDRESS = (PROTOCOL = TCP)(HOST = osc7cn01-z1-vip)(PORT = 1521))
(ADDRESS = (PROTOCOL = TCP)(HOST = osc7cn02-z1-vip)(PORT = 1521))
)
(CONNECT_DATA =
(SERVER = DEDICATED)
(SERVICE_NAME = QS1)
)
)
EOF
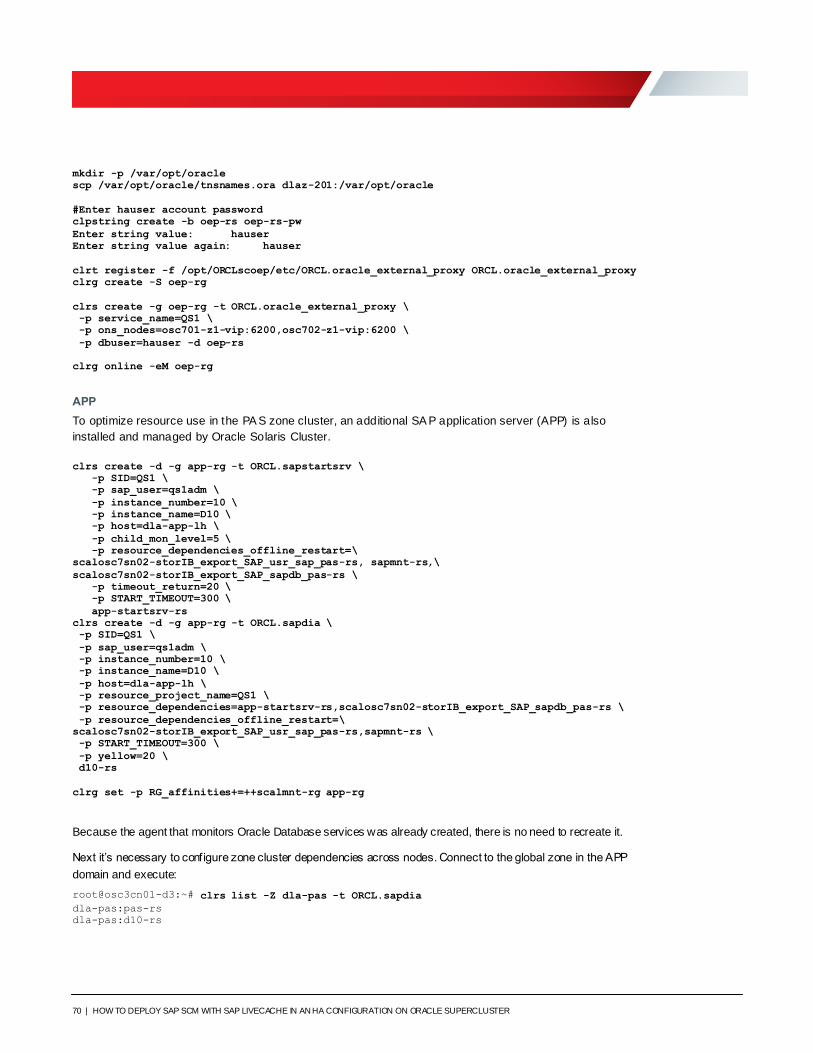
70 | HOW TO DEPLOY SAP SCM WITH SAP LIVECACHE IN AN HA CONFIGURATION ON ORACLE SUPERCLUSTER
mkdir -p /var/opt/oracle
scp /var/opt/oracle/tnsnames.ora dlaz-201:/var/opt/oracle
#Enter hauser account password
clpstring create -b oep-rs oep-rs-pw
Enter string value: hauser
Enter string value again: hauser
clrt register -f /opt/ORCLscoep/etc/ORCL.oracle_external_proxy ORCL.oracle_external_proxy
clrg create -S oep-rg
clrs create -g oep-rg -t ORCL.oracle_external_proxy \
-p service_name=QS1 \
-p ons_nodes=osc701-z1-vip:6200,osc702-z1-vip:6200 \
-p dbuser=hauser -d oep-rs
clrg online -eM oep-rg
APP
To optimize resource use in the PA S zone cluster, an additional SA P application server (APP) is also
installed and managed by Oracle Solaris Cluster.
clrs create -d -g app-rg -t ORCL.sapstartsrv \
-p SID=QS1 \
-p sap_user=qs1adm \
-p instance_number=10 \
-p instance_name=D10 \
-p host=dla-app-lh \
-p child_mon_level=5 \
-p resource_dependencies_offline_restart=\
scalosc7sn02-storIB_export_SAP_usr_sap_pas-rs, sapmnt-rs,\
scalosc7sn02-storIB_export_SAP_sapdb_pas-rs \
-p timeout_return=20 \
-p START_TIMEOUT=300 \
app-startsrv-rs
clrs create -d -g app-rg -t ORCL.sapdia \
-p SID=QS1 \
-p sap_user=qs1adm \
-p instance_number=10 \
-p instance_name=D10 \
-p host=dla-app-lh \
-p resource_project_name=QS1 \
-p resource_dependencies=app-startsrv-rs,scalosc7sn02-storIB_export_SAP_sapdb_pas-rs \
-p resource_dependencies_offline_restart=\
scalosc7sn02-storIB_export_SAP_usr_sap_pas-rs,sapmnt-rs \
-p START_TIMEOUT=300 \
-p yellow=20 \
d10-rs
clrg set -p RG_affinities+=++scalmnt-rg app-rg
Because the agent that monitors Oracle Database services was already created, there is no need to recreate it.
Next it’s necessary to configure zone cluster dependencies across nodes. Connect to the global zone in the APP
domain and execute:
root@osc3cn01-d3:~# clrs list -Z dla-pas -t ORCL.sapdia
dla-pas:pas-rs
dla-pas:d10-rs
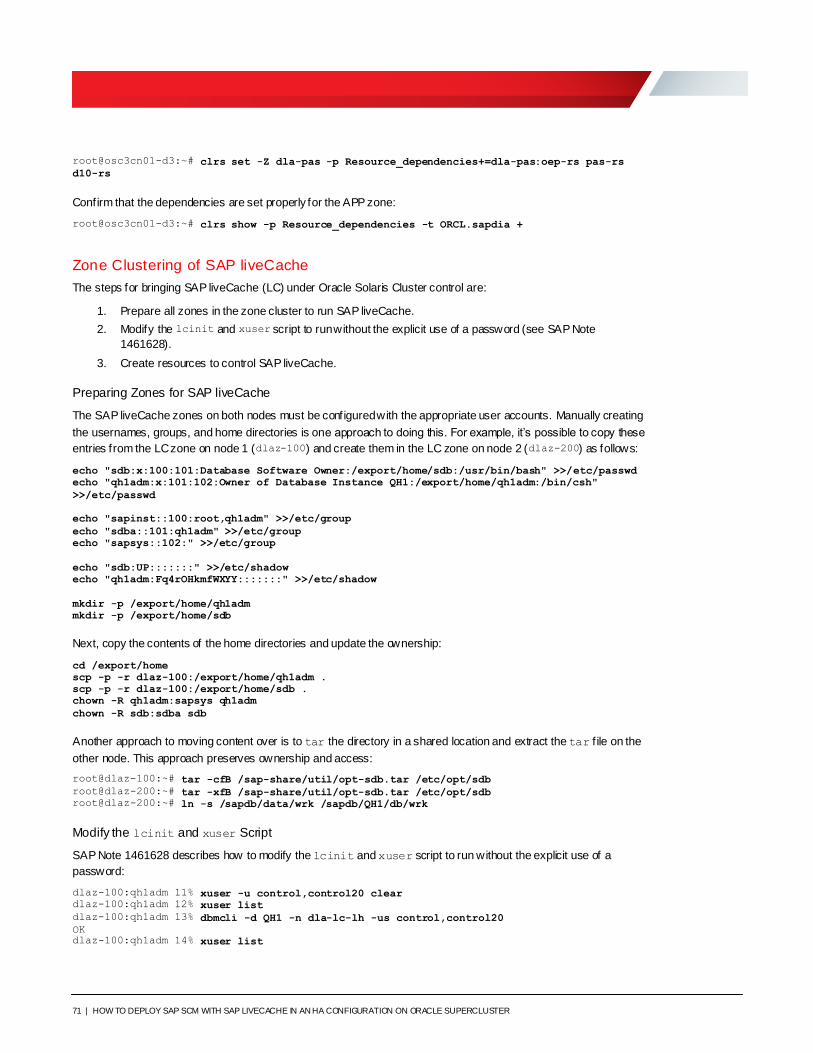
71 | HOW TO DEPLOY SAP SCM WITH SAP LIVECACHE IN AN HA CONFIGURATION ON ORACLE SUPERCLUSTER
root@osc3cn01-d3:~# clrs set -Z dla-pas -p Resource_dependencies+=dla-pas:oep-rs pas-rs
d10-rs
Confirm that the dependencies are set properly for the APP zone:
root@osc3cn01-d3:~# clrs show -p Resource_dependencies -t ORCL.sapdia +
Zone Clustering of SAP liveCache
The steps for bringing SAP liveCache (LC) under Oracle Solaris Cluster control are:
1. Prepare all zones in the zone cluster to run SAP liveCache.
2. Modify the lcinit and xuser script to run without the explicit use of a password (see SAP Note
1461628).
3. Create resources to control SAP liveCache.
Preparing Zones for SAP liveCache
The SAP liveCache zones on both nodes must be configured with the appropriate user accounts. Manually creating
the usernames, groups, and home directories is one approach to doing this. For example, it’s possible to copy these
entries from the LC zone on node 1 (dlaz-100) and create them in the LC zone on node 2 (dlaz-200) as follows:
echo "sdb:x:100:101:Database Software Owner:/export/home/sdb:/usr/bin/bash" >>/etc/passwd
echo "qh1adm:x:101:102:Owner of Database Instance QH1:/export/home/qh1adm:/bin/csh"
>>/etc/passwd
echo "sapinst::100:root,qh1adm" >>/etc/group
echo "sdba::101:qh1adm" >>/etc/group
echo "sapsys::102:" >>/etc/group
echo "sdb:UP:::::::" >>/etc/shadow
echo "qh1adm:Fq4rOHkmfWXYY:::::::" >>/etc/shadow
mkdir -p /export/home/qh1adm
mkdir -p /export/home/sdb
Next, copy the contents of the home directories and update the ownership:
cd /export/home
scp -p -r dlaz-100:/export/home/qh1adm .
scp -p -r dlaz-100:/export/home/sdb .
chown -R qh1adm:sapsys qh1adm
chown -R sdb:sdba sdb
Another approach to moving content over is to tar the directory in a shared location and extract the tar f ile on the
other node. This approach preserves ownership and access:
root@dlaz-100:~# tar -cfB /sap-share/util/opt-sdb.tar /etc/opt/sdb
root@dlaz-200:~# tar -xfB /sap-share/util/opt-sdb.tar /etc/opt/sdb
root@dlaz-200:~# ln -s /sapdb/data/wrk /sapdb/QH1/db/wrk
Modify the lcinit and xuser Script
SAP Note 1461628 describes how to modify the lcinit and xuser script to run without the explicit use of a
password:
dlaz-100:qh1adm 11% xuser -u control,control20 clear
dlaz-100:qh1adm 12% xuser list
dlaz-100:qh1adm 13% dbmcli -d QH1 -n dla-lc-lh -us control,control20
OK dlaz-100:qh1adm 14% xuser list
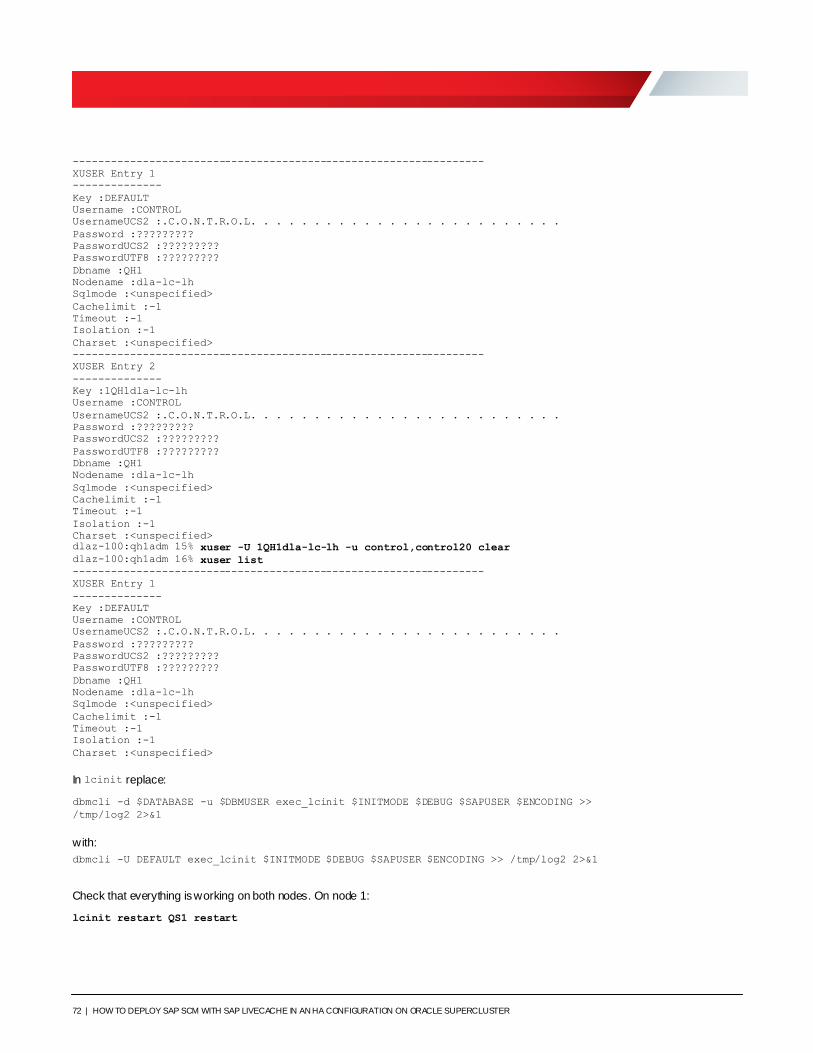
72 | HOW TO DEPLOY SAP SCM WITH SAP LIVECACHE IN AN HA CONFIGURATION ON ORACLE SUPERCLUSTER
-----------------------------------------------------------------
XUSER Entry 1
--------------
Key :DEFAULT
Username :CONTROL
UsernameUCS2 :.C.O.N.T.R.O.L. . . . . . . . . . . . . . . . . . . . . . . . .
Password :?????????
PasswordUCS2 :?????????
PasswordUTF8 :?????????
Dbname :QH1
Nodename :dla-lc-lh
Sqlmode :<unspecified>
Cachelimit :-1
Timeout :-1
Isolation :-1
Charset :<unspecified>
-----------------------------------------------------------------
XUSER Entry 2
--------------
Key :1QH1dla-lc-lh
Username :CONTROL
UsernameUCS2 :.C.O.N.T.R.O.L. . . . . . . . . . . . . . . . . . . . . . . . .
Password :?????????
PasswordUCS2 :?????????
PasswordUTF8 :?????????
Dbname :QH1
Nodename :dla-lc-lh
Sqlmode :<unspecified>
Cachelimit :-1
Timeout :-1
Isolation :-1
Charset :<unspecified>
dlaz-100:qh1adm 15% xuser -U 1QH1dla-lc-lh -u control,control20 clear
dlaz-100:qh1adm 16% xuser list
-----------------------------------------------------------------
XUSER Entry 1
--------------
Key :DEFAULT
Username :CONTROL
UsernameUCS2 :.C.O.N.T.R.O.L. . . . . . . . . . . . . . . . . . . . . . . . .
Password :?????????
PasswordUCS2 :?????????
PasswordUTF8 :?????????
Dbname :QH1
Nodename :dla-lc-lh
Sqlmode :<unspecified>
Cachelimit :-1
Timeout :-1
Isolation :-1
Charset :<unspecified>
In lcinit replace:
dbmcli -d $DATABASE -u $DBMUSER exec_lcinit $INITMODE $DEBUG $SAPUSER $ENCODING >>
/tmp/log2 2>&1
with:
dbmcli -U DEFAULT exec_lcinit $INITMODE $DEBUG $SAPUSER $ENCODING >> /tmp/log2 2>&1
Check that everything is working on both nodes. On node 1:
lcinit restart QS1 restart
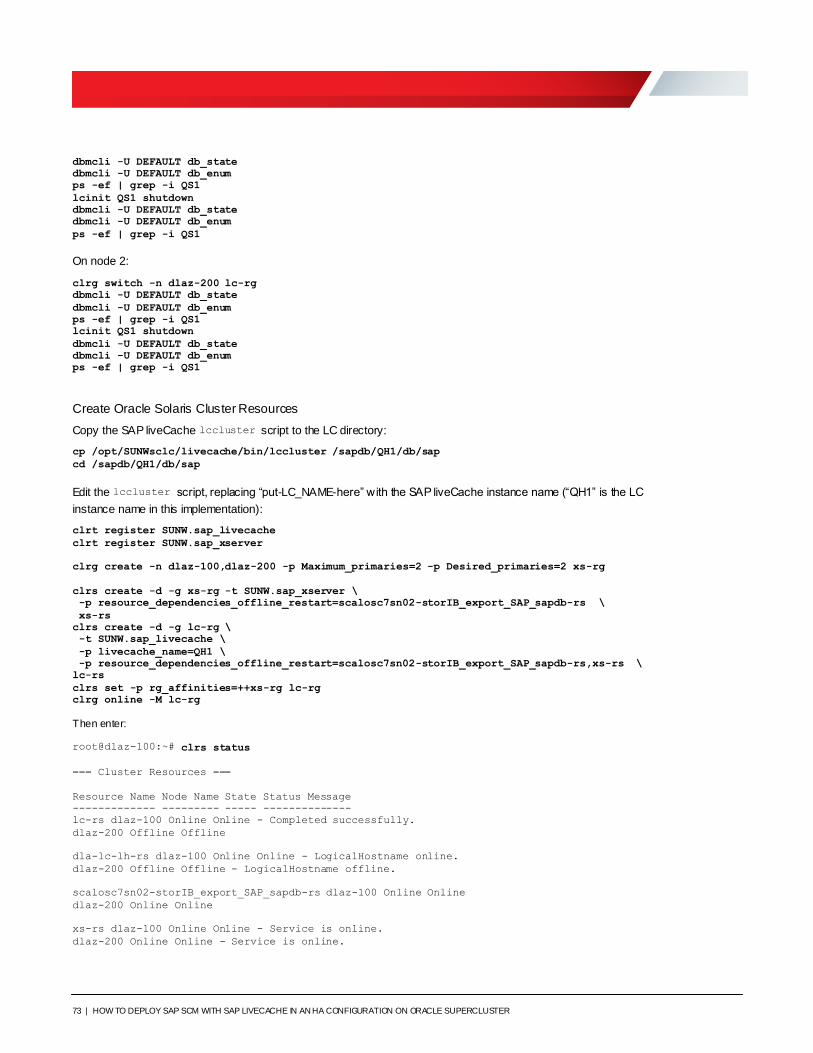
73 | HOW TO DEPLOY SAP SCM WITH SAP LIVECACHE IN AN HA CONFIGURATION ON ORACLE SUPERCLUSTER
dbmcli -U DEFAULT db_state
dbmcli -U DEFAULT db_enum
ps -ef | grep -i QS1
lcinit QS1 shutdown
dbmcli -U DEFAULT db_state
dbmcli -U DEFAULT db_enum
ps -ef | grep -i QS1
On node 2:
clrg switch -n dlaz-200 lc-rg
dbmcli -U DEFAULT db_state
dbmcli -U DEFAULT db_enum
ps -ef | grep -i QS1
lcinit QS1 shutdown
dbmcli -U DEFAULT db_state
dbmcli -U DEFAULT db_enum
ps -ef | grep -i QS1
Create Oracle Solaris Cluster Resources
Copy the SAP liveCache lccluster script to the LC directory:
cp /opt/SUNWsclc/livecache/bin/lccluster /sapdb/QH1/db/sap
cd /sapdb/QH1/db/sap
Edit the lccluster script, replacing “put-LC_NAME-here” with the SAP liveCache instance name (“QH1” is the LC
instance name in this implementation):
clrt register SUNW.sap_livecache
clrt register SUNW.sap_xserver
clrg create -n dlaz-100,dlaz-200 -p Maximum_primaries=2 -p Desired_primaries=2 xs-rg
clrs create -d -g xs-rg -t SUNW.sap_xserver \
-p resource_dependencies_offline_restart=scalosc7sn02-storIB_export_SAP_sapdb-rs \
xs-rs
clrs create -d -g lc-rg \
-t SUNW.sap_livecache \
-p livecache_name=QH1 \
-p resource_dependencies_offline_restart=scalosc7sn02-storIB_export_SAP_sapdb-rs,xs-rs \
lc-rs
clrs set -p rg_affinities=++xs-rg lc-rg
clrg online -M lc-rg
Then enter:
root@dlaz-100:~# clrs status
=== Cluster Resources ===
Resource Name Node Name State Status Message
------------- --------- ----- --------------
lc-rs dlaz-100 Online Online - Completed successfully.
dlaz-200 Offline Offline
dla-lc-lh-rs dlaz-100 Online Online - LogicalHostname online.
dlaz-200 Offline Offline - LogicalHostname offline.
scalosc7sn02-storIB_export_SAP_sapdb-rs dlaz-100 Online Online
dlaz-200 Online Online
xs-rs dlaz-100 Online Online - Service is online.
dlaz-200 Online Online - Service is online.
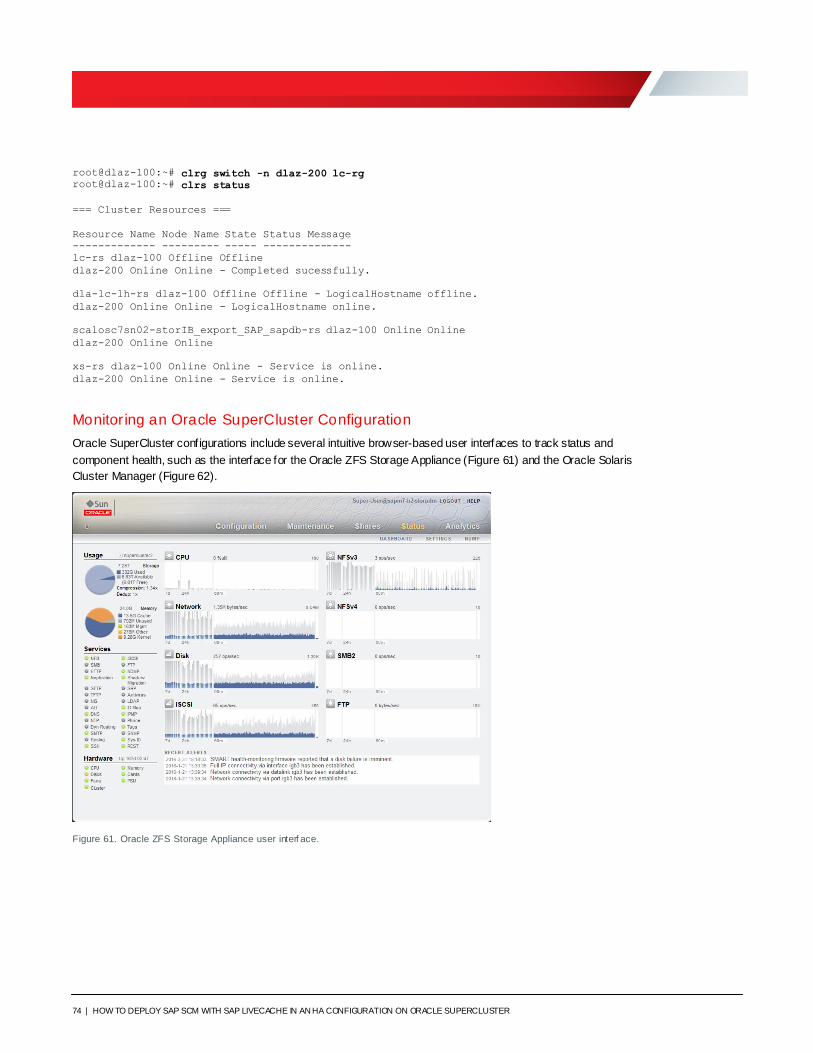
74 | HOW TO DEPLOY SAP SCM WITH SAP LIVECACHE IN AN HA CONFIGURATION ON ORACLE SUPERCLUSTER
root@dlaz-100:~# clrg switch -n dlaz-200 lc-rg root@dlaz-100:~# clrs status
=== Cluster Resources ===
Resource Name Node Name State Status Message
------------- --------- ----- --------------
lc-rs dlaz-100 Offline Offline
dlaz-200 Online Online - Completed sucessfully.
dla-lc-lh-rs dlaz-100 Offline Offline - LogicalHostname offline.
dlaz-200 Online Online - LogicalHostname online.
scalosc7sn02-storIB_export_SAP_sapdb-rs dlaz-100 Online Online
dlaz-200 Online Online
xs-rs dlaz-100 Online Online - Service is online.
dlaz-200 Online Online - Service is online.
Monitor ing an Oracle SuperCluster Configuration
Oracle SuperCluster configurations include several intuitive browser-based user interfaces to track status and
component health, such as the interface for the Oracle ZFS Storage Appliance (Figure 61) and the Oracle Solaris
Cluster Manager (Figure 62).
Figure 61. Oracle ZFS Storage Appliance user interf ace.
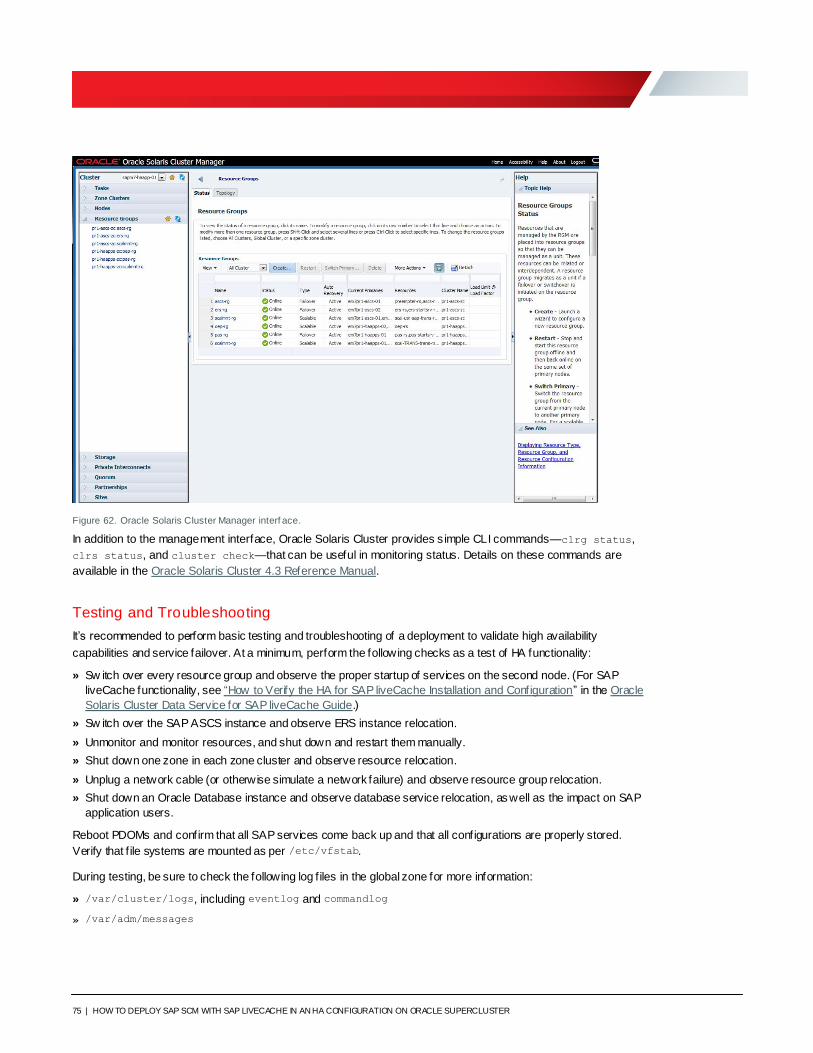
75 | HOW TO DEPLOY SAP SCM WITH SAP LIVECACHE IN AN HA CONFIGURATION ON ORACLE SUPERCLUSTER
Figure 62. Oracle Solaris Cluster Manager interf ace.
In addition to the management interface, Oracle Solaris Cluster provides s imple CLI commands—clrg status,
clrs status, and cluster check—that can be useful in monitoring status. Details on these commands are
available in the Oracle Solaris Cluster 4.3 Reference Manual.
Testing and Troubleshooting
It’s recommended to perform basic testing and troubleshooting of a deployment to validate high availability
capabilities and service failover. At a minimum, perform the following checks as a test of HA functionality:
» Sw itch over every resource group and observe the proper startup of services on the second node. (For SAP
liveCache functionality, see “How to Verify the HA for SAP liveCache Installation and Configuration” in the Oracle
Solaris Cluster Data Service for SAP liveCache Guide.)
» Sw itch over the SAP ASCS instance and observe ERS instance relocation.
» Unmonitor and monitor resources, and shut down and restart them manually.
» Shut down one zone in each zone cluster and observe resource relocation.
» Unplug a network cable (or otherwise simulate a network failure) and observe resource group relocation.
» Shut down an Oracle Database instance and observe database service relocation, as well as the impact on SAP
application users.
Reboot PDOMs and confirm that all SAP services come back up and that all configurations are properly stored.
Verify that f ile systems are mounted as per /etc/vfstab.
During testing, be sure to check the following log f iles in the global zone for more information:
» /var/cluster/logs, including eventlog and commandlog
» /var/adm/messages
76 | HOW TO DEPLOY SAP SCM WITH SAP LIVECACHE IN AN HA CONFIGURATION ON ORACLE SUPERCLUSTER
References
For more information about SAP applications on Oracle infrastructure, visit these sites:
» Oracle Solution Centers for SAP, http://www.oracle.com/us/solutions/sap/services/overview/index.html
» Oracle Solaris Cluster Data Service for SAP liveCache Guide,
https://docs.oracle.com/cd/E56676_01/html/E63549/index.html
» Oracle Solaris Cluster 4.3 documentation, https://docs.oracle.com/cd/E56676_01/
» Oracle Solaris Cluster Downloads, http://www.oracle.com/technetwork/server-storage/solaris-
cluster/downloads/index.html
» Oracle Technology Network article series: Best Practices for Migrating SAP Systems to Oracle Infrastructure
» Oracle Database and IT Infrastructure for SAP:
http://www.oracle.com/us/solutions/sap/introduction/overview/index.html
» Oracle SuperCluster: oracle.com/supercluster
» Oracle ZFS Storage Appliance: oracle.com/storage/nas/
» Oracle Solaris: https://www.oracle.com/solaris/
» Oracle Optimized Solution for SAP: https://www.oracle.com/solutions/optimized-solutions/sap.html
» SAP Community Netw ork (SCN) on Oracle site: https://go.sap.com/community/topic/oracle.html
» SAP Community Netw ork (SCN) on Oracle Solaris: https://go.sap.com/community/topic/oracle-solaris.html
» Additional collateral: oracle.com/us/solutions/sap/it-infrastructure/resources/
The procedures and solution configuration described in this document are based on an actual customer
implementation. Oracle acknow ledges and is grateful for how this customer generously shared information and
contributed tested procedures from their deployment experience.
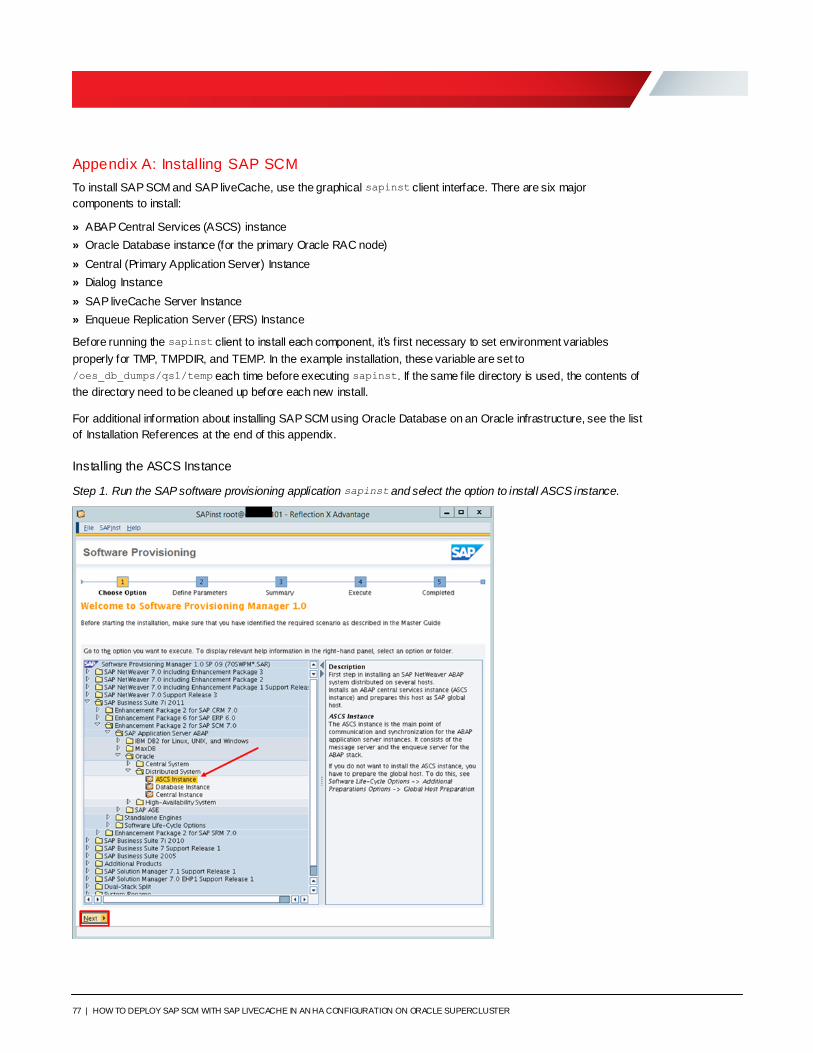
77 | HOW TO DEPLOY SAP SCM WITH SAP LIVECACHE IN AN HA CONFIGURATION ON ORACLE SUPERCLUSTER
Appendix A: Installing SAP SCM
To install SAP SCM and SAP liveCache, use the graphical sapinst client interface. There are six major
components to install:
» ABAP Central Services (ASCS) instance
» Oracle Database instance (for the primary Oracle RAC node)
» Central (Primary Application Server) Instance
» Dialog Instance
» SAP liveCache Server Instance
» Enqueue Replication Server (ERS) Instance
Before running the sapinst client to install each component, it’s f irst necessary to set environment variables
properly for TMP, TMPDIR, and TEMP. In the example installation, these variable are set to
/oes_db_dumps/qs1/temp each time before executing sapinst. If the same file directory is used, the contents of
the directory need to be cleaned up before each new install.
For additional information about installing SAP SCM using Oracle Database on an Oracle infrastructure, see the list
of Installation References at the end of this appendix.
Installing the ASCS Instance
Step 1. Run the SAP software provisioning application sapinst and select the option to install ASCS instance.
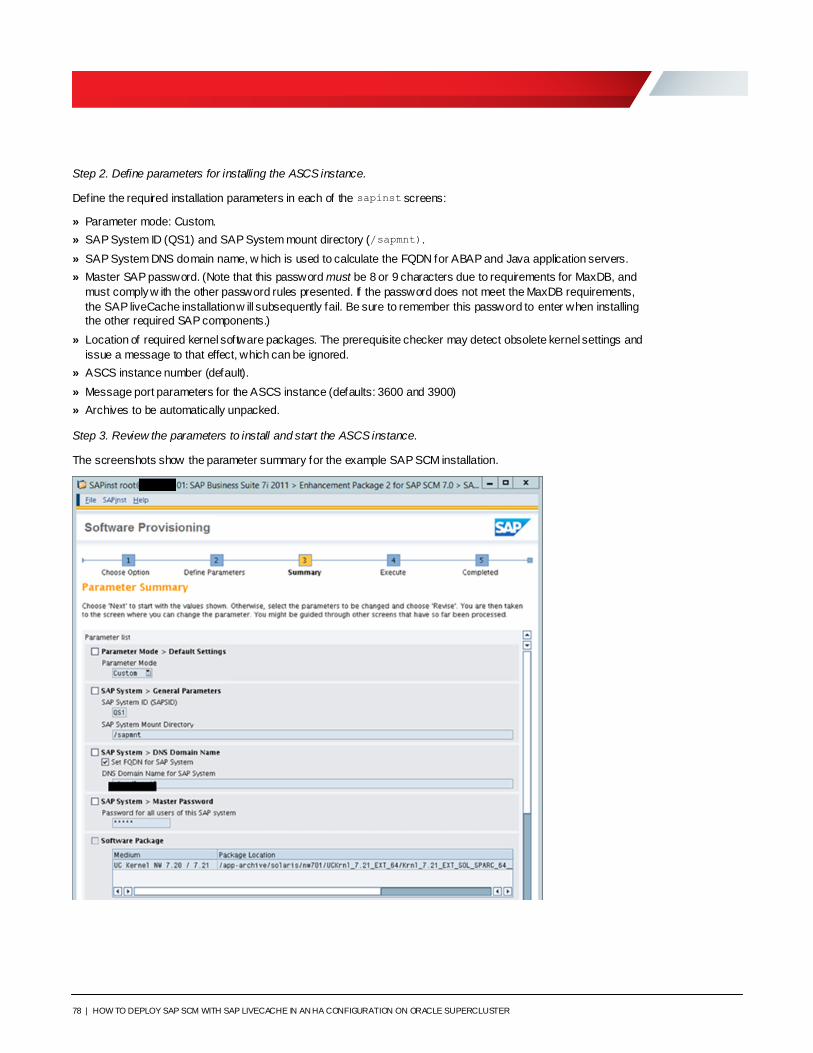
78 | HOW TO DEPLOY SAP SCM WITH SAP LIVECACHE IN AN HA CONFIGURATION ON ORACLE SUPERCLUSTER
Step 2. Define parameters for installing the ASCS instance.
Define the required installation parameters in each of the sapinst screens:
» Parameter mode: Custom.
» SAP System ID (QS1) and SAP System mount directory (/sapmnt).
» SAP System DNS domain name, w hich is used to calculate the FQDN for ABAP and Java application servers.
» Master SAP password. (Note that this password must be 8 or 9 characters due to requirements for MaxDB, and
must comply w ith the other password rules presented. If the password does not meet the MaxDB requirements,
the SAP liveCache installation w ill subsequently fail. Be sure to remember this password to enter when installing
the other required SAP components.)
» Location of required kernel software packages. The prerequisite checker may detect obsolete kernel settings and
issue a message to that effect, which can be ignored.
» ASCS instance number (default).
» Message port parameters for the ASCS instance (defaults: 3600 and 3900)
» Archives to be automatically unpacked.
Step 3. Review the parameters to install and start the ASCS instance.
The screenshots show the parameter summary for the example SAP SCM installation.
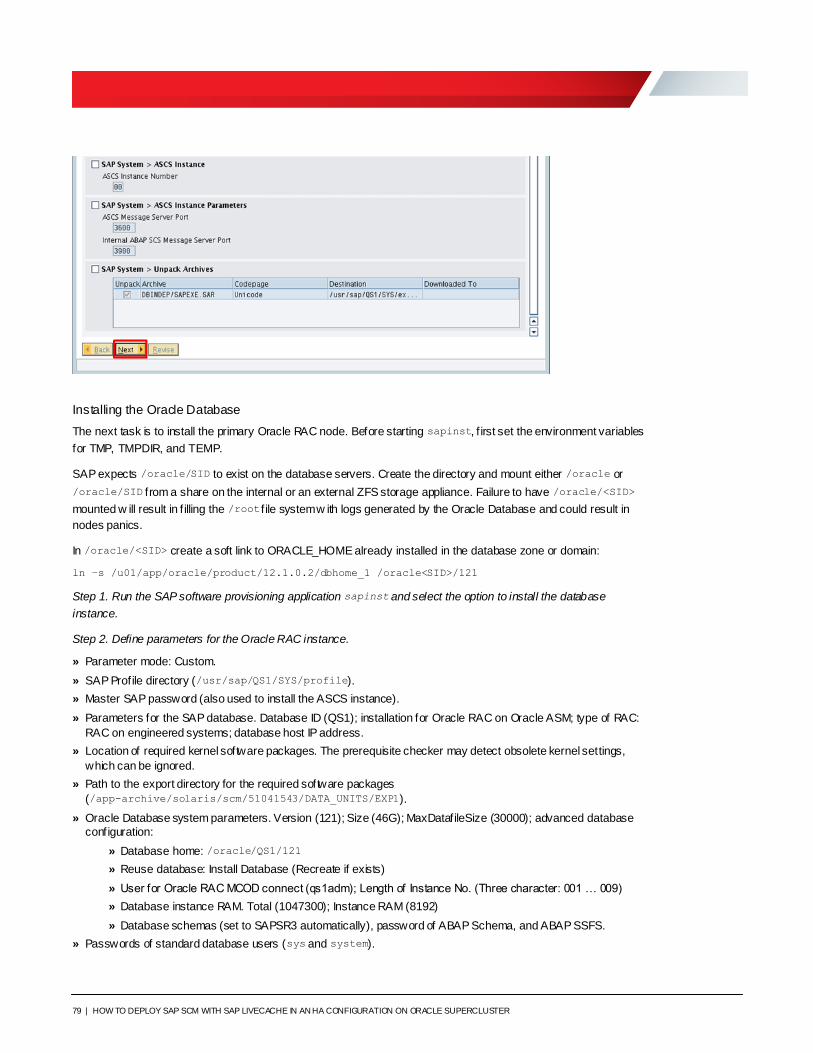
79 | HOW TO DEPLOY SAP SCM WITH SAP LIVECACHE IN AN HA CONFIGURATION ON ORACLE SUPERCLUSTER
Installing the Oracle Database
The next task is to install the primary Oracle RAC node. Before starting sapinst, f irst set the environment variables
for TMP, TMPDIR, and TEMP.
SAP expects /oracle/SID to exist on the database servers. Create the directory and mount either /oracle or
/oracle/SID from a share on the internal or an external ZFS storage appliance. Failure to have /oracle/<SID>
mounted w ill result in f illing the /root f ile system w ith logs generated by the Oracle Database and could result in
nodes panics.
In /oracle/<SID> create a soft link to ORACLE_HOME already installed in the database zone or domain:
ln –s /u01/app/oracle/product/12.1.0.2/dbhome_1 /oracle<SID>/121
Step 1. Run the SAP software provisioning application sapinst and select the option to install the database
instance.
Step 2. Define parameters for the Oracle RAC instance.
» Parameter mode: Custom.
» SAP Profile directory (/usr/sap/QS1/SYS/profile).
» Master SAP password (also used to install the ASCS instance).
» Parameters for the SAP database. Database ID (QS1); installation for Oracle RAC on Oracle ASM; type of RAC:
RAC on engineered systems; database host IP address.
» Location of required kernel software packages. The prerequisite checker may detect obsolete kernel settings,
which can be ignored.
» Path to the export directory for the required software packages
(/app-archive/solaris/scm/51041543/DATA_UNITS/EXP1).
» Oracle Database system parameters. Version (121); Size (46G); MaxDatafileSize (30000); advanced database
configuration:
» Database home: /oracle/QS1/121
» Reuse database: Install Database (Recreate if exists)
» User for Oracle RAC MCOD connect (qs1adm); Length of Instance No. (Three character: 001 … 009)
» Database instance RAM. Total (1047300); Instance RAM (8192)
» Database schemas (set to SAPSR3 automatically), password of ABAP Schema, and ABAP SSFS.
» Passwords of standard database users (sys and system).
80 | HOW TO DEPLOY SAP SCM WITH SAP LIVECACHE IN AN HA CONFIGURATION ON ORACLE SUPERCLUSTER
» Listener configuration. Name (LISTENER); port (1521); network configuration f iles (keep listener.ora and tnsnames.ora)
» Parameters for Oracle Grid. Path to the software (/u01/app/12.1.0.2/grid); ORACLE_SID for Grid (*ASM1).
» Configuration of the available Oracle ASM diskgroups. Names (+DATAC1, +REC0C1, +REC0C1); parameter
compatible in init.ora 11.2.0.2.0.
» Parameters for Oracle RAC. Database Name (QS1); number of instances (2); Scan listener IP address; Scan
listener port (1521); Length of instance No. (Three character: 001 … 009)
» Parameters for the secondary RAC node: Host name, init.ora parameters (including IP address of
remote_listener)
» Advanced configuration (select SAPDATA Directory Mapping).
» Parameters for additional SAPDATA directories, if needed.
» General load parameters: SAP Code page (4102); Number of Parallel jobs (3).
» Create database statistics at the end of the import using the program call
brconnect –u / -c –o summary –f stats –o SAPSR3 –t all -p 0
» Location of the Oracle Database 12c client software packages:
/app-archive/solaris/oracle12c/51050177/OCL_SOLARIS_SPARC
» Archives to be automatically unpacked.
» Location of the SAP liveCache software:
/app-archive/solaris/scm/SAP_SCM_7.0_EHP2_liveCache_7.9_/DATA_UNITS/LC_SOLARIS_SPARC
Step 3. Review the parameters to install the Oracle Database instance.
The screenshots show the parameter summary for the example SAP SCM installation.
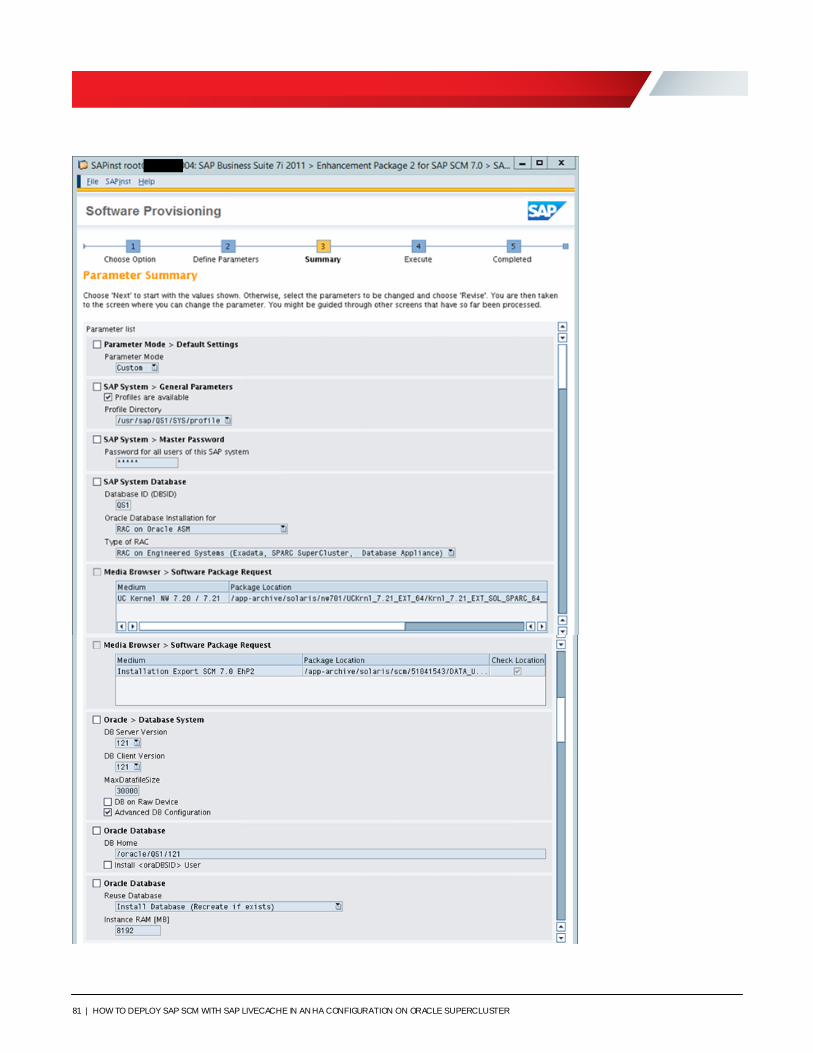
81 | HOW TO DEPLOY SAP SCM WITH SAP LIVECACHE IN AN HA CONFIGURATION ON ORACLE SUPERCLUSTER
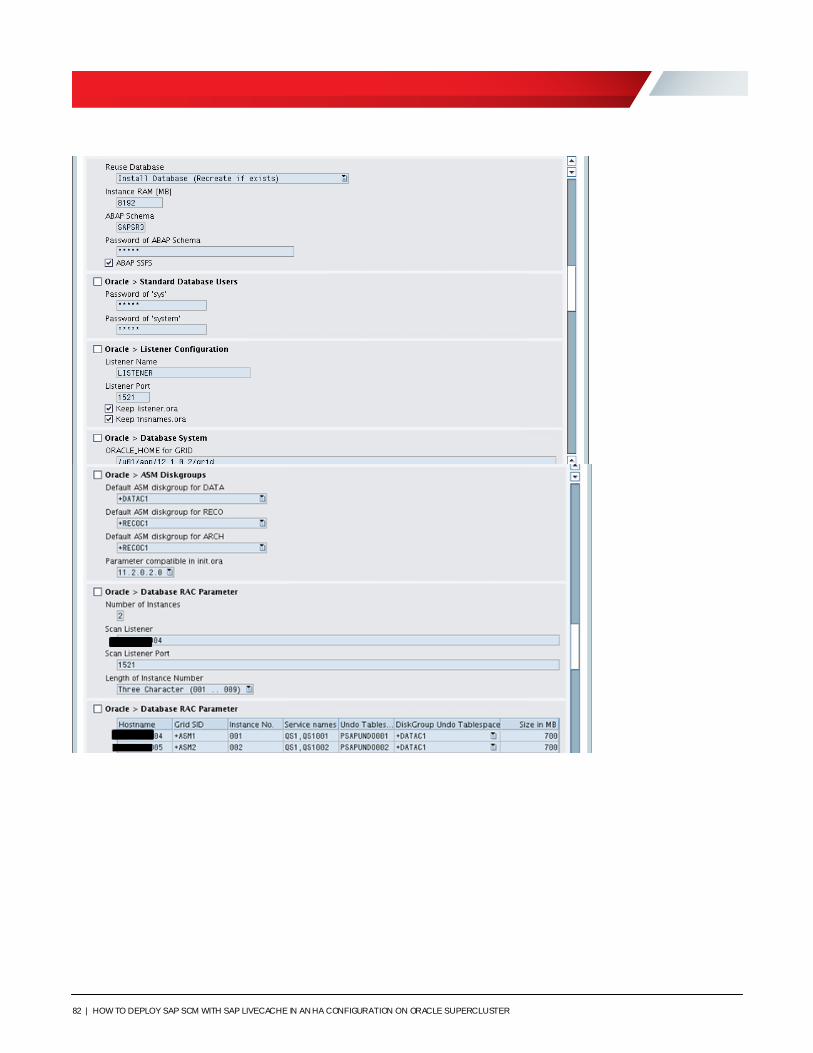
82 | HOW TO DEPLOY SAP SCM WITH SAP LIVECACHE IN AN HA CONFIGURATION ON ORACLE SUPERCLUSTER
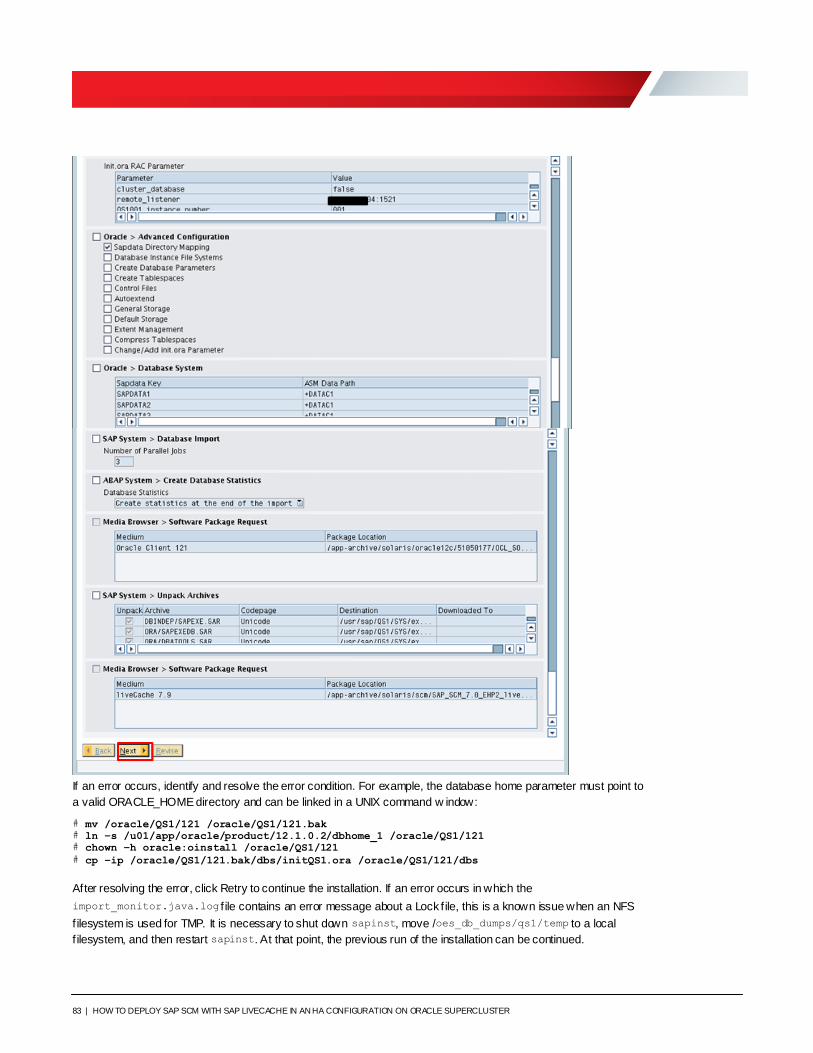
83 | HOW TO DEPLOY SAP SCM WITH SAP LIVECACHE IN AN HA CONFIGURATION ON ORACLE SUPERCLUSTER
If an error occurs, identify and resolve the error condition. For example, the database home parameter must point to
a valid ORACLE_HOME directory and can be linked in a UNIX command w indow:
# mv /oracle/QS1/121 /oracle/QS1/121.bak # ln –s /u01/app/oracle/product/12.1.0.2/dbhome_1 /oracle/QS1/121
# chown –h oracle:oinstall /oracle/QS1/121
# cp –ip /oracle/QS1/121.bak/dbs/initQS1.ora /oracle/QS1/121/dbs
After resolving the error, click Retry to continue the installation. If an error occurs in which the
import_monitor.java.log f ile contains an error message about a Lock f ile, this is a known issue when an NFS
filesystem is used for TMP. It is necessary to shut down sapinst, move /oes_db_dumps/qs1/temp to a local
f ilesystem, and then restart sapinst. At that point, the previous run of the installation can be continued.
84 | HOW TO DEPLOY SAP SCM WITH SAP LIVECACHE IN AN HA CONFIGURATION ON ORACLE SUPERCLUSTER
Another important aspect of the install is the size (number of threads and total memory) of the database domain.
The SAP installer will install a database that takes advantage of a large percentage of the available resources,
regardless of other installed databases or requirements for more SAP systems to be installed afterwards. One way
of reducing the resources allocated to the database is to add a custom parameter max_parallel_servers during the
installation. Calculate the value assigned to this parameter based on the maximum number of cores allocated to
SCS database. Remember that each core has 8 threads.
An example of how to set max_parallel_servers starting from SAPS allocated to the database is:
max_parallel _servers= SAPS/3000*8
For 5000 SAPS, set max_parallel_servers=16 because each SPARC core is rated at approximatively 3000 SAPS.
Installing the Central Instance
The Central Primary Application Server Instance is the next component to be installed. Before starting sapinst, be
sure to set the environment variables for TMP, TMPDIR, and TEMP.
Step 1. Run the SAP software provisioning application sapinst and select the option to install the Central Instance.
Step 2. Define parameters for installing the Central Instance.
Define the required parameters in each of the sapinst screens:
» Parameter mode: Custom.
» SAP System Profile directory (/usr/sap/QS1/SYS/profile)
» Master SAP password (same as in the installations of the ASCS and database instances).
» SAP database parameters. Database ID (QS1); database host IP address; database on Oracle RAC.
» Location of the required kernel software packages. The prerequisite checker may detect obsolete kernel settings,
which can be ignored.
» Parameters of ABAP database system. Database schema (SAPSR3); DB server version (121); DB client version
(121).
» Location of the SCAN listener (the host name of primary Oracle RAC node).
» Host names for primary and secondary Oracle RAC nodes.
» User and group information for liveCache database software owner.
» Location of the liveCache software: /app-archive/solaris/scm/SAP_SCM_7.0_EHP2_liveCache_7.9_/
DATA_UNITS/LC_SOLARIS_SPARC (depends on the location where the SAP bits where downloaded an unpacked
prior to the install).
» Central Instance number (default).
» Password for the DDIC user (default).
» Parameters for the Oracle RAC service instance (default).
» Path to the Oracle Database 12c client software:
/app-archive/solaris/oracle12c/51050177/OCL_SOLARIS_SPARC
» Archives to be unpacked to the SAP global host.
» Parameters for the liveCache server connection. LC used in SAP system; LC ID (QH1); LC host; password of
user ‘control’; LC user name (SAPQH1) and password.
» Installation of SMD diagnostics agent (for SAP Solution Manager diagnostics) can be performed later, after the
creation of the smdadm user.
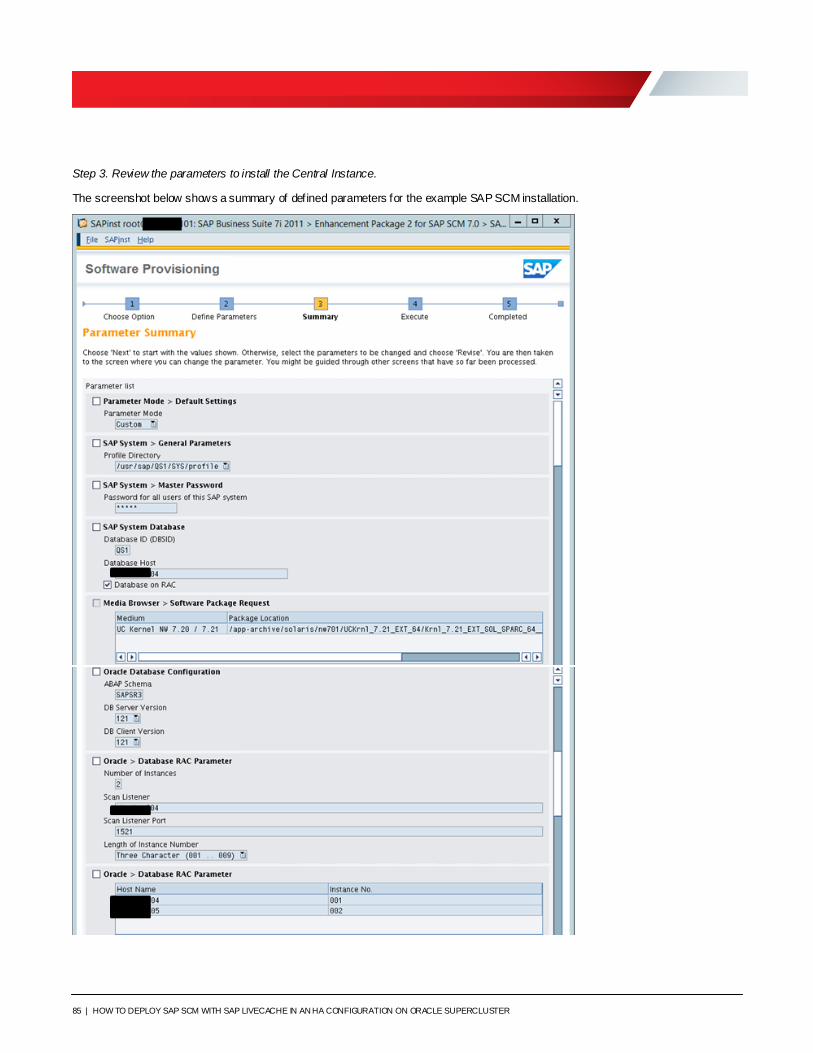
85 | HOW TO DEPLOY SAP SCM WITH SAP LIVECACHE IN AN HA CONFIGURATION ON ORACLE SUPERCLUSTER
Step 3. Review the parameters to install the Central Instance.
The screenshot below shows a summary of defined parameters for the example SAP SCM installation.
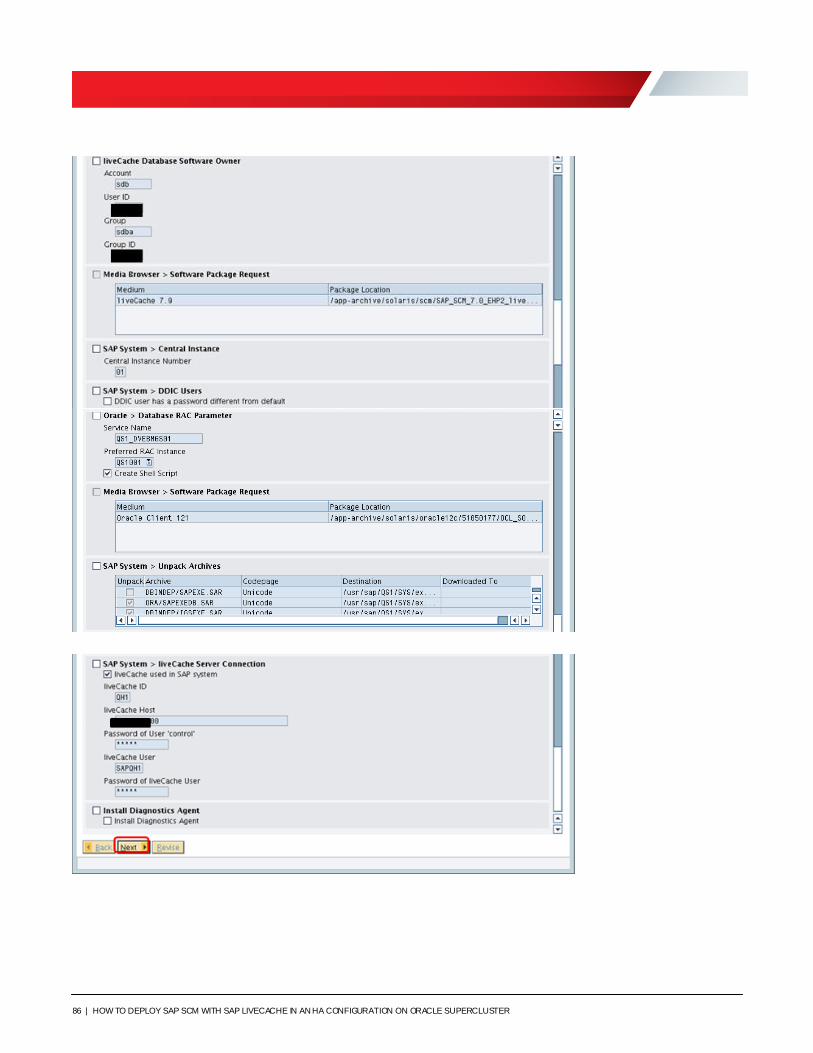
86 | HOW TO DEPLOY SAP SCM WITH SAP LIVECACHE IN AN HA CONFIGURATION ON ORACLE SUPERCLUSTER
87 | HOW TO DEPLOY SAP SCM WITH SAP LIVECACHE IN AN HA CONFIGURATION ON ORACLE SUPERCLUSTER
Step 3. Run the script when prompted to update service in the Oracle RAC environment.
A message appears in the “Update service parameter in RAC environment” phase. Run the generated script
(QS1_DVEBMGS01.sh) to create the Oracle RAC service on the database host. Afterwards, continue with the
sapinst installation of the Central Instance. If errors occur in the “Start Instance” phase, check the log f iles. (If a
hostname is assigned to the loopback host 127.0.0.1, then an error may occur. This can be resolved by f ixing the
localhost entry in /etc/hosts.) After resolving any errors, click Retry in the sapinst window to continue.
Installing the Dialog Instance
Next, use the sapinst provisioning interface to install the Dialog Instance. Be sure to set the environment variables
f irst for TMP, TMPDIR, and TEMP.
Step 1. Run the SAP software provisioning application sapinst and select the option to install the Dialog Instance.
Step 2. Define parameters for installing the Dialog Instance.
Define the required installation parameters in each of the sapinst screens:
» SAP Profile directory (/usr/sap/QS1/SYS/profile)
» Master SAP password (same as in previous component installations).
» SAP database parameters. DBSID (QS1); database host; database on Oracle RAC.
» Path to the kernel software. The prerequisite checker may detect obsolete kernel settings, which can be ignored.
» Parameters of ABAP database system. Database schema (SAPSR3); DB server version (121); DB client version
(121).
» Location of the SCAN listener (host name of primary Oracle RAC node).
» Hostnames for primary and secondary Oracle RAC nodes.
» User and group information for the liveCache database software owner created previously.
» Path to the liveCache software:
/app-archive/solaris/scm/SAP_SCM_7.0_EHP2_liveCache_7.9_/DATA_UNITS/LC_SOLARIS_SPARC
» Dialog Instance number (default).
» Parameters for Oracle RAC service instance (default).
» Location of the Oracle Database 12c client software:
/app-archive/solaris/oracle12c/51050177/OCL_SOLARIS_SPARC
» Archives to be unpacked to the SAP global host.
» Installation of the SMD diagnostics agent (for SAP Solution Manager diagnostics) can be performed later, after
the creation of the smdadm user.
Step 3. Review the parameters to install the Dialog instance.
The screenshot below shows a summary of defined parameters for the example SAP SCM installation.
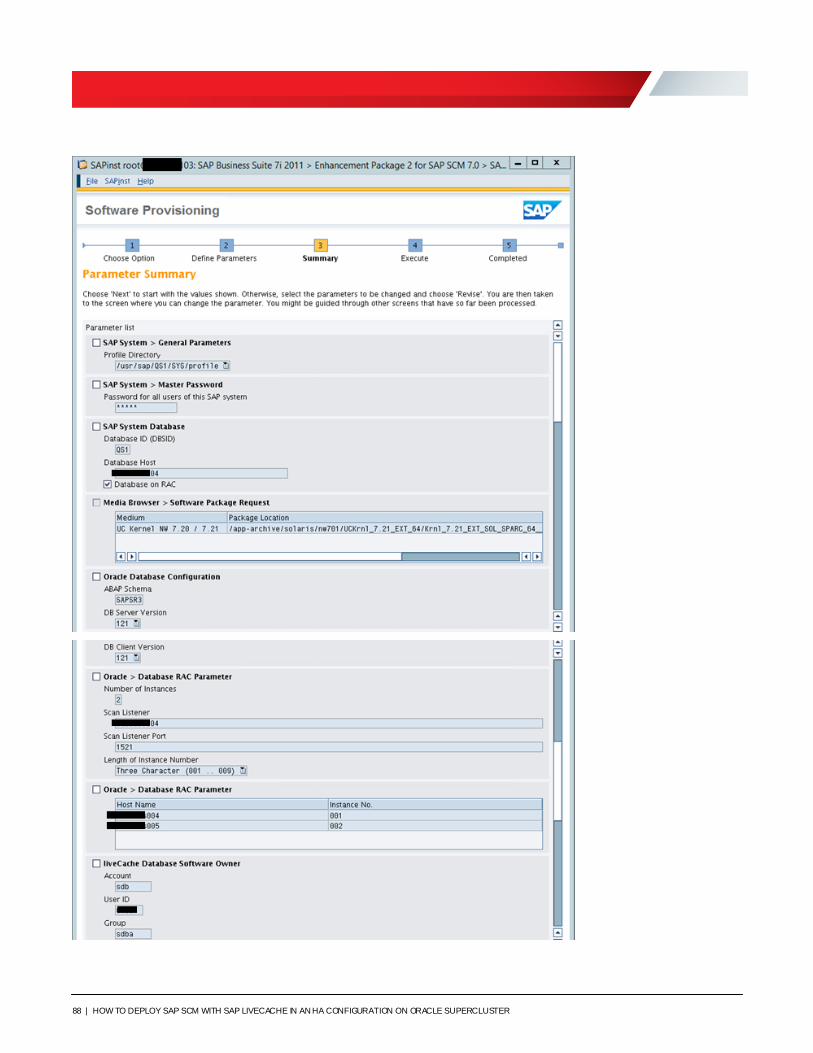
88 | HOW TO DEPLOY SAP SCM WITH SAP LIVECACHE IN AN HA CONFIGURATION ON ORACLE SUPERCLUSTER
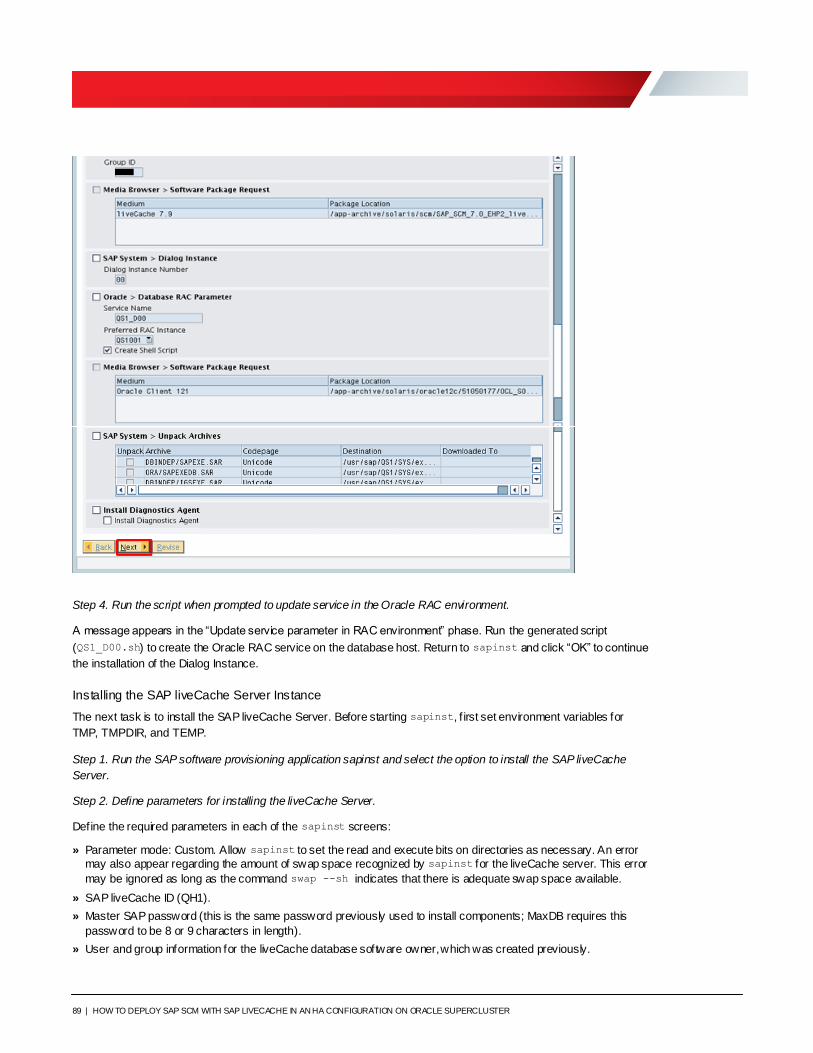
89 | HOW TO DEPLOY SAP SCM WITH SAP LIVECACHE IN AN HA CONFIGURATION ON ORACLE SUPERCLUSTER
Step 4. Run the script when prompted to update service in the Oracle RAC environment.
A message appears in the “Update service parameter in RAC environment” phase. Run the generated script
(QS1_D00.sh) to create the Oracle RAC service on the database host. Return to sapinst and click “OK” to continue
the installation of the Dialog Instance.
Installing the SAP liveCache Server Instance
The next task is to install the SAP liveCache Server. Before starting sapinst, f irst set environment variables for
TMP, TMPDIR, and TEMP.
Step 1. Run the SAP software provisioning application sapinst and select the option to install the SAP liveCache
Server.
Step 2. Define parameters for installing the liveCache Server.
Define the required parameters in each of the sapinst screens:
» Parameter mode: Custom. Allow sapinst to set the read and execute bits on directories as necessary. An error
may also appear regarding the amount of swap space recognized by sapinst for the liveCache server. This error
may be ignored as long as the command swap --sh indicates that there is adequate swap space available.
» SAP liveCache ID (QH1).
» Master SAP password (this is the same password previously used to install components; MaxDB requires this
password to be 8 or 9 characters in length).
» User and group information for the liveCache database software owner, which was created previously.
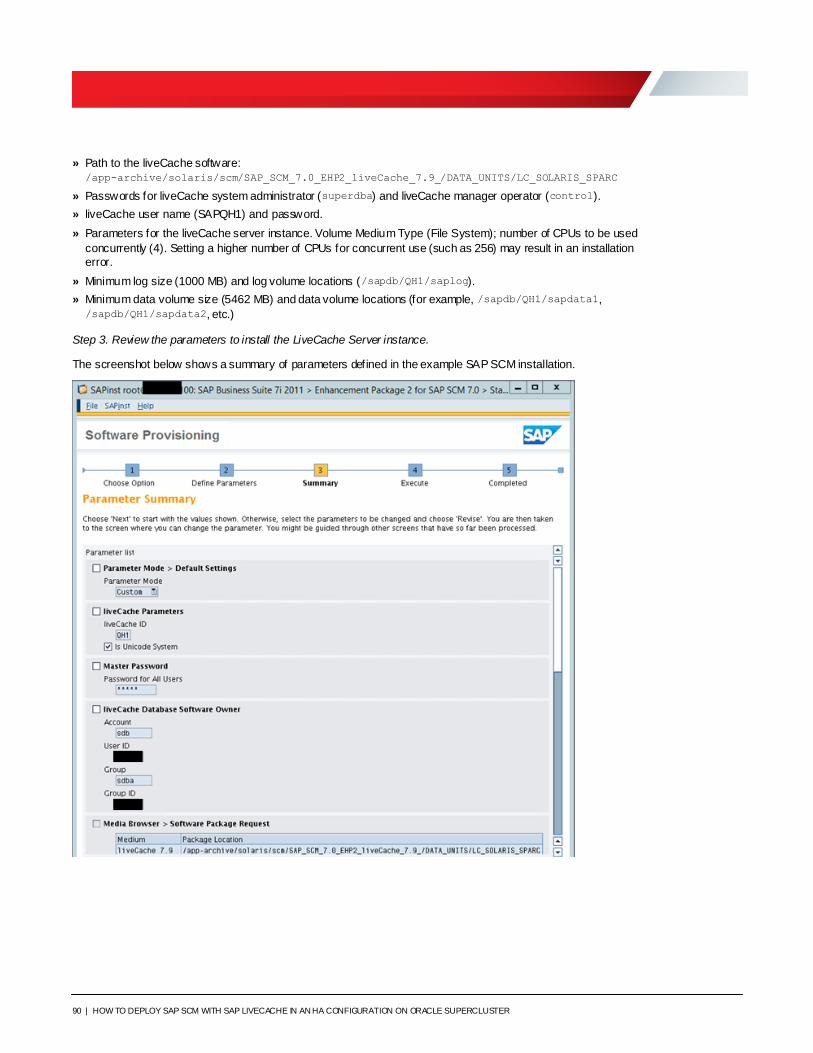
90 | HOW TO DEPLOY SAP SCM WITH SAP LIVECACHE IN AN HA CONFIGURATION ON ORACLE SUPERCLUSTER
» Path to the liveCache software:
/app-archive/solaris/scm/SAP_SCM_7.0_EHP2_liveCache_7.9_/DATA_UNITS/LC_SOLARIS_SPARC
» Passwords for liveCache system administrator (superdba) and liveCache manager operator (control).
» liveCache user name (SAPQH1) and password.
» Parameters for the liveCache server instance. Volume Medium Type (File System); number of CPUs to be used
concurrently (4). Setting a higher number of CPUs for concurrent use (such as 256) may result in an installation
error.
» Minimum log size (1000 MB) and log volume locations (/sapdb/QH1/saplog).
» Minimum data volume size (5462 MB) and data volume locations (for example, /sapdb/QH1/sapdata1,
/sapdb/QH1/sapdata2, etc.)
Step 3. Review the parameters to install the LiveCache Server instance.
The screenshot below shows a summary of parameters defined in the example SAP SCM installation.

91 | HOW TO DEPLOY SAP SCM WITH SAP LIVECACHE IN AN HA CONFIGURATION ON ORACLE SUPERCLUSTER
If an error occurs, make sure that the maximum number of concurrently used CPUs is set to 4. SAP Note 1656325
also suggests replacing /sapdb/QH1/db/env/cserv.pcf w ith the f ile provided.
Installing the ERS Instance
The final component to install in the SAP SCM installation w ith liveCache is the ERS instance. Before starting
sapinst, f irst set environment variables for TMP, TMPDIR, and TEMP.
Step 1. Run the SAP software provisioning application sapinst and select the option to install the ERS instance.
Step 2. Define parameters for installing the ERS Instance.
Define the required installation parameters in each of the sapinst screens:
» SAP instance profile directory (/usr/sap/QS1/SYS/profile). If there are any backup copies of the instance
profile that are detected, select the checkbox to ignore them.
» Central service instance for which you want to install an ERS instance.
» Location of the kernel software. The prerequisite checker may detect obsolete kernel settings, which can be
ignored.
» ERS Instance number (default).
» ASCS instance that sapinst can automatically restart to activate the changes.
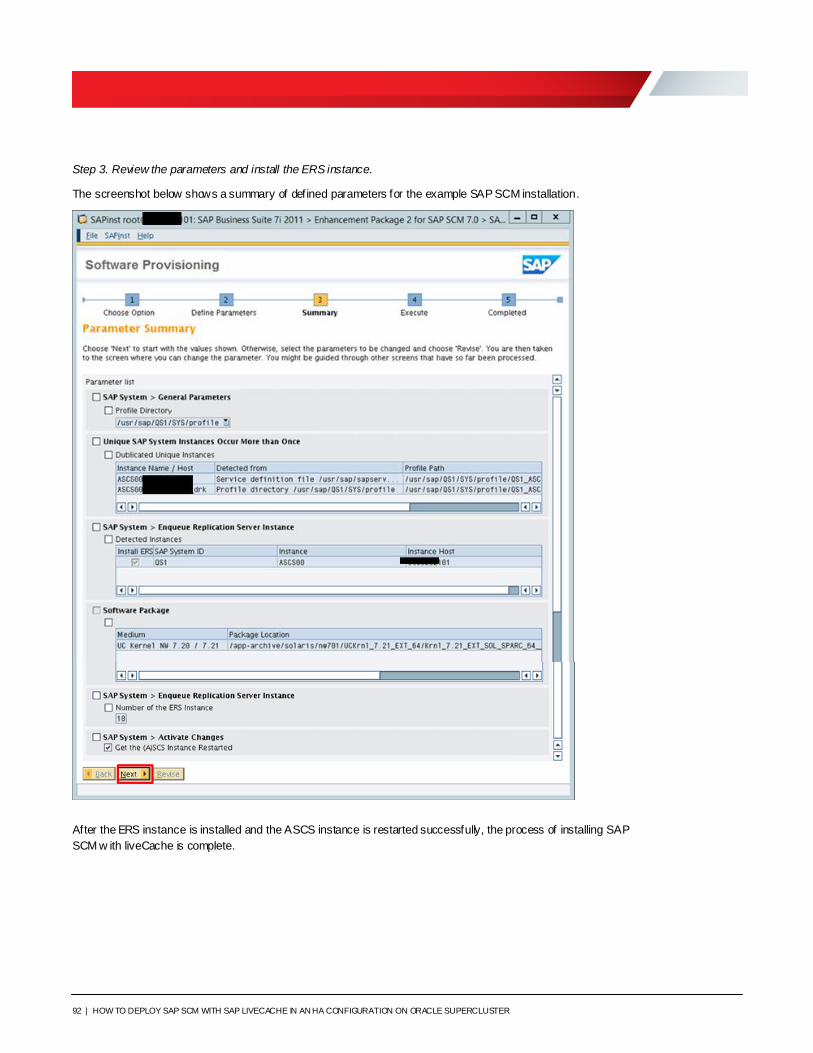
92 | HOW TO DEPLOY SAP SCM WITH SAP LIVECACHE IN AN HA CONFIGURATION ON ORACLE SUPERCLUSTER
Step 3. Review the parameters and install the ERS instance.
The screenshot below shows a summary of defined parameters for the example SAP SCM installation.
After the ERS instance is installed and the ASCS instance is restarted successfully, the process of installing SAP
SCM w ith liveCache is complete.
93 | HOW TO DEPLOY SAP SCM WITH SAP LIVECACHE IN AN HA CONFIGURATION ON ORACLE SUPERCLUSTER
Installation References
Refer to the follow ing resources for more information:
» Oracle Solution Centers for SAP, http://www.oracle.com/us/solutions/sap/services/overview/index.html
» Oracle Optimized Solution for SAP, http://www.oracle.com/technetwork/server-storage/hardware-solutions/oo-
soln-sap-supercluster-1846193.html
» Implementation Guide for Highly Available SAP on Oracle SuperCluster T5-8,
https://community.oracle.com/docs/DOC-1001148
» Implementation Guide for Highly Available SAP on Oracle SPARC SuperCluster T4-4,
http://www.oracle.com/technetwork/server-storage/hardware-solutions/sap-ssc-oos-implementation-1897823.pdf
Oracle Corporation, World Headquarters Worldwide Inquiries
500 Oracle Parkway Phone: +1.650.506.7000
Redwood Shores, CA 94065, USA Fax: +1.650.506.7200
Copyright © 2016, Oracle and/or its affiliates. All rights reserved. This document is provided for information purposes only, and the contents hereof are subject to change without notice. This document is not warranted to be error-free, nor subject to any other warranties or conditions, whether expressed orally or implied in law, including implied warranties and conditions of merchantability or fitness for a particular purpose. We specifically disclaim any liability with respect to this document, and no contractual obligations are formed either directly or indirectly by this document. This document may not be reproduced or transmitted in any form or by any means, electronic or mechanical, for any purpose, without our prior written permission. Oracle and Java are registered trademarks of Oracle and/or its affiliates. Other names may be trademarks of their respective owners. Intel and Intel Xeon are trademarks or registered trademarks of Intel Corporation. All SPARC trademarks are used under license and are trademarks or registered trademarks of SPARC International, Inc. AMD, Opteron, the AMD logo, and the AMD Opteron logo are trademarks or registered trademarks of Advanced Micro Devices. UNIX is a registered trademark of The Open Group. 0615 How to Deploy SAP SCM with SAP liveCache in an HA Configuration on Oracle SuperCluster November 2016 Author: Victor Gails
C ON N EC T W ITH U S
blogs.oracle.com/oracle
f acebook.com/oracle
twitter.com/oracle
oracle.com/sap