Embed Size (px)
Citation preview

TeamViewer is a great free program, whether you want to access your computer from afar or help out
friends and relatives with their computer. But its default settings are remarkably insecure, instead
favoring ease of use. Here’s how to lock down TeamViewer so you can make use of its features without
opening yourself up to attack.
The Problem with TeamViewer
Recently, TeamViewer has been in the news because there has been a rash of computers compromised
through the remote access tool. As of this tutorial, we haven’t seen any evidence that indicates a
system-wide security breach at TeamViewer, but something is certainly fishy. Right now, we are inclined
to reluctantly agree with TeamViewer’s press release: it’s very easy for a TeamViewer user to have their
computer compromised if they don’t have all the right settings in order. And apart from a few users who
had all the right settings, most victims were using an unsecured setup.
If evidence comes to light that TeamViewer experienced a security breach, we’ll certainly update this
information. But for now, since many people have to use TeamViewer for one reason or another, we’ll
show you how to do it in the most secure way possible.
By default, TeamViewer isn’t a particularly secure application. It favors ease of use over difficult-to-
navigate security procedures. This is useful when you’re trying to help your dad solve his computer woes
from across the country: you can have him download a single file, run that file, have him give you the
simple numeric computer ID and password, and boom, you’re controlling his computer and solving the
crisis. But leaving TeamViewer in that simple first-run mode (which really should only be used in such a
simple state for those one off emergencies) is just asking for trouble.
TeamViewer has tons of security options you can toggle on and tweak, however, and it’s really easy to
go from a not-secure TeamViewer experience to a very secure TeamViewer experience with only a little
tinkering.
Before we proceed, however, there are a few things we’d like you to keep in mind while reading through
the tutorial. First, not every person needs to turn on every option we suggest. You need to balance your
needs and workflow against the security changes you make–you wouldn’t want to, for example, turn on
the feature that requires a user at the computer to accept the incoming TeamViewer request if you’re
How to Lock Down TeamViewer for More Secure Remote
Access
Friday, June 3, 2016 3:18 PM

the feature that requires a user at the computer to accept the incoming TeamViewer request if you’re
using TeamViewer to connect to your own unattended computer.
Second, if TeamViewer is installed on your computer through your work, by a tech support company
you’ve hired, or by a relative who helps troubleshoot and maintain your computer, we’d encourage you
to read over this article (and potentially take advantage of some of the tips) but to also consult with the
person in charge of your TeamViewer experience.
Finally, we’re using the Windows desktop application for the tutorial, but many (if not most) of the
settings we’re changing apply across the other desktop applications for OS X, Linux, and Chrome OS.
Basic Security Practices
Before we get into the nitty-gritty of TeamViewer’s settings, let’s talk about a few basic security
practices (that, frankly, apply to almost any program, not just TeamViewer).
Exit TeamViewer, and Run It Only When You Need It
Our first suggestion is both an immediate action you need to take and a general suggestion for future
use. First, because the source of the computer compromises appears to be poor security practices,
we’re going to do one thing right away: shut TeamViewer temporarily off and update it, and, while the
application is turned off, we’re going to update the security on your TeamViewer account through the
company’s webpage. (More on this in the next section.)
As a general future consideration, only run the TeamViewer application when you need it. Let’s say that
a year from now there is, in fact, a major security breach on the TeamViewer side of things. An
application that isn’t running can’t cause any trouble for you. While we understand that some people
keep TeamViewer on 24/7 as part of their workflow, and if you absolutely have to, fine. But if you only
use it occasionally in your home, or you’re one of the people who only turns it on to occasionally
troubleshoot a relative’s computer, then don’t leave it running all day, every day. This is the single best
way to avoid giving someone access to your machine.
With that in mind, shut down your TeamViewer application if it is currently running before proceeding
onto the next steps.
Create a Strong Password
After shutting down the TeamViewer app, it’s time to log into your TeamViewer account at
https://login.teamviewer.com. If you use TeamViewer without an account, we would strongly
encourage you to sign up for a free account, as it’s much more secure. Not only do many of the security
tips we’re going to highlight over the course of this tutorial rely on features only available to account
holders, but you can’t take advantage of the recently rolled out behind-the-scenes security features–
account monitoring and trusted devices–without an account.

Once logged in, click on your name in the upper right corner of the screen and, from the drop down
menu, select “Edit profile”.
You’ll be in the “General” section of the “Profile settings” menu. There are two sections here immediate
interest to us: the “Change password” link and the two factor authentication (which we’ll get to in a
moment). Select “Change password”.
Enter your current password and replace it with a long, strong new password. Confirm the password and

Enter your current password and replace it with a long, strong new password. Confirm the password and
then select “Change password”. Need to brush up on your strong password crafting skills? We’ve got
you covered.
Enable Two-Factor Authentication
Before we proceed there is something we must strongly emphasize. Enabling two factor authentication
on your TeamViewer account increases the security for the login credentials for your TeamViewer
account. It does not, by default, apply the two factor system to the actual client. You could set a very
strong password on your TeamViewer account and turn on two factor authentication, but if you leave
the client password set to the default 4 digit numeric password then the two factor authentication
would do nothing to protect you.
It is critically important that you complete the entire tutorial here and (as we demonstrate in the later
sections) either set a very strong password on your TeamViewer client or, better yet, lock your client to
your account (thus locking it to the two factor authentication).
After you change your password you, as you did in the previous step, you will be automatically signed
out of your TeamViewer account. Log back in and return to the same location in the Profile > General
menu. Select the link “Activate”, next to “Two factor authentication”.
If you’re unfamiliar with two factor authentication, you can read up on it here. In short, two factor
authentication adds another layer of identification to the login process (instead of just your email and
password, you need your email, password, and the unique code generated by the authentication app on
your cellphone). TeamViewer supports several authenticators, including Google Authenticator
(iOS/Android) and Authy (iOS/Android). Take a moment to install one of the aforementioned
applications, if you aren’t already using one.
Once you’ve selected “Activate”, you’ll see this little menu describing two factor authentication. Click
“Start activation”.

At this point, you’ll see a screen like the one below, with a large black QR code in the center. Open up
your authenticator of choice, press the button to add a new service, and scan the QR code.
If for some reason scanning it doesn’t work, you can always click the “enter the secret key manually” link

If for some reason scanning it doesn’t work, you can always click the “enter the secret key manually” link
and type it in instead of scanning it. Once you’ve successfully added it to your authenticator, click
“Next”.
Check the security code for TeamViewer within your authenticator app and enter it now. Click “Activate”
to confirm.

On the final step, print the emergency recovery code. Store this code in a safe place. If you lose access
to your authenticator, this is the only way you will be able to remove the two factor authentication.
At this point we’re now done with the website. After printing the emergency code you can log out of the
site.
Update TeamViewer
If you run TeamViewer infrequently, or if automatic updates got turned off somewhere along the line,
you may not be running the most up to date version. The TeamViewer installation file is really small,
however, so it’s trivial to grab the freshest copy and run it to ensure your TeamViewer application is up
to date before we even open it up again.
You can download an updated version of the desktop application here. Run the application and select
“Basic” installation (to prevent TeamViewer from installation as a Windows Service), and then run
TeamViewer and log into the application with your new password.
You’ll be prompted, immediately after logging in, to enter the security code from your two factor
security code. Reference your authenticator app and enter it now.

To play it extra safe, after completing the login process, you can select Help > Check For New Version
from the toolbar to confirm you’re running the most up-to-date version number.
Lock Down TeamViewer’s Security Settings
At this point, you’re already ahead of the game by simply replacing your password with a new and
stronger one, as well as turning on two-factor authentication. While that secures your TeamViewer
account in general, however, we still need to do a little work in the actual TeamViewer application itself.
We want to emphasize something we highlighted at the beginning of the tutorial: the settings and
options you select are highly dependent on how you use TeamViewer. If you’re configuring TeamViewer
as a way to remotely access your own computer while you’re away from home, then you’ll make
different choices than if you’re setting up the TeamViewer client on your elderly parents’ computer. We
would encourage you to secure the highest number of settings you can without reducing the utility of
TeamViewer to the point that it is more of a hindrance than a help.
To get started, head to Extras > Options from the menu bar.
All the setting changes we’ll make are located within the extension Options menu. To help cut down on
confusion, we’re going to work our way right down the options menu, submenu by submenu.
General: No Automatic Startup and Account Assignment
To start, select the “General” tab, from the left hand navigation pane.
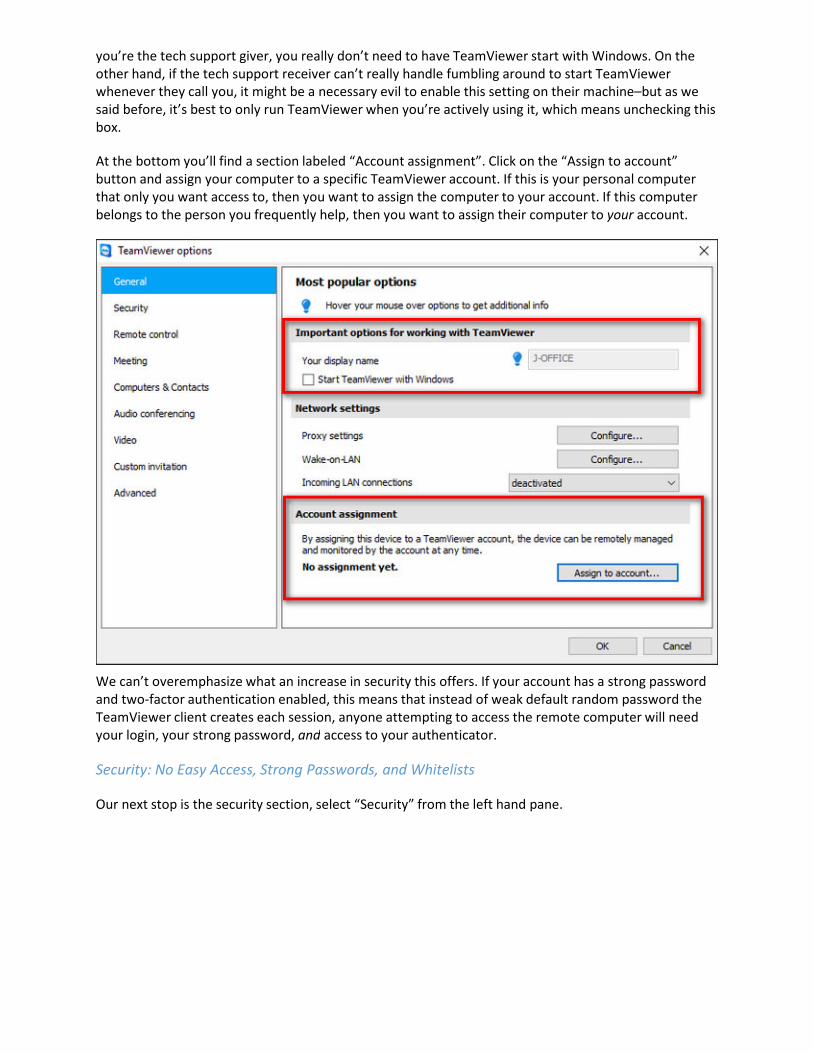
There are two big settings you want to configure here. First, you want to confirm that “Start
TeamViewer with Windows” is not checked unless you have a very pressing reason to have it on. If
you’re the tech support giver, you really don’t need to have TeamViewer start with Windows. On the
you’re the tech support giver, you really don’t need to have TeamViewer start with Windows. On the
other hand, if the tech support receiver can’t really handle fumbling around to start TeamViewer
whenever they call you, it might be a necessary evil to enable this setting on their machine–but as we
said before, it’s best to only run TeamViewer when you’re actively using it, which means unchecking this
box.
At the bottom you’ll find a section labeled “Account assignment”. Click on the “Assign to account”
button and assign your computer to a specific TeamViewer account. If this is your personal computer
that only you want access to, then you want to assign the computer to your account. If this computer
belongs to the person you frequently help, then you want to assign their computer to your account.
We can’t overemphasize what an increase in security this offers. If your account has a strong password
and two-factor authentication enabled, this means that instead of weak default random password the
TeamViewer client creates each session, anyone attempting to access the remote computer will need
your login, your strong password, and access to your authenticator.
Security: No Easy Access, Strong Passwords, and Whitelists
Our next stop is the security section, select “Security” from the left hand pane.

Here you have some choices to make regarding password access and Windows access. First, we have the
“Personal password” section. Here you can set a personal password for this TeamViewer client (for
remote access) and you can grant “easy access” (wherein the listed account doesn’t need to enter a
password to access the machine as long as they are logged into their TeamViewer account).
Some people prefer to manually set a very strong password for their machine (rather than rely on the
randomly generated ones that TeamViewer uses by default). As long as you set a very strong password,
and use the Whitelist function we’ll get to in a moment, this a secure option. Without the whitelist,
though, the personal password opens up another vector of attack, since someone would only need your
TeamViewer ID and password to access the machine–they wouldn’t even need a two-factor
authentication token.
We’d discourage you from using the “easy access” function unless you have a very strong password on
your TeamViewer account and you’ve enabled two-factor authentication, as this removes the need for a
manually or randomly generated password to access the machine (as long as you’re logged into your
TeamViewer account). Again, you need to balance security concerns against ease of use.
If you’re sticking with the randomly generated passwords (wherein the end user, like your mom, will
need to give you the password each time), we would encourage you to change from the weaker default
password length to “Very secure (10 characters)”. Alternatively, you can disable this function if you’ve
opted for a strong manual password in the previous step.
Under the “Rules for connections to this computer” section, you can specify two things: Windows login
credentials and a black/white list. We would strongly recommend leaving the “Windows logon” option
as “Now Allows”. If you enable this setting, TeamViewer will accept the login credentials that are valid
on the computer as a valid access code for the application. If the user on the computer has a weak
password this is very problematic, and it’s best to leave it disabled.
Finally, you definitely want to set a whitelist for the computer. Click on the “Configure” button next to
the “Black and whitelist” entry.

the “Black and whitelist” entry.
Select “Allow access only for the following partners” and then click “Add”. You’ll be presented with a list
of your TeamViewer contacts to select from. By default you are the only person in your contact list. If
you’re only using TeamViewer to access your own machines then this is perfect, you can just whitelist
your and call it good.
If you’re setting up a computer for a relative, however, you’ll need to add yourself as a contact to their
TeamViewer account if you want to use the Whitelist function. You can do so by closing the options
menu here, returning to the main TeamViewer window, and clicking on the little double arrow icon next
to their name at the bottom right corner of the screen (this expands the Computers and Contacts list).
Click “Add contact” at the bottom of the list to add yourself as a contact.
If you need to add anyone else (like, say, a sibling who also helps out with mom and dad’s computer)
now is the time to do so.
Once the extra people, if required, are in the contact list, you can simply return to the previous menu,
select “Add” and then select all the TeamViewer accounts you wish to add to the whitelist. Click “OK” to
confirm.
Advanced Options: Granular Control Over Remote Access Functionality
If you’ve come this far–settings up two-factor authentication, using strong passwords, setting up a
whitelist–you’re in great shape, and might not need to do anymore advanced tweaking. The advanced
settings menu, however, offers really granular control over aspects of the TeamViewer experience that

settings menu, however, offers really granular control over aspects of the TeamViewer experience that
allow you to both protect your own computers and the computers the the people you help from both
outside tampering (as well as user error).
To access the advanced settings select the “Advanced” tab from the left hand navigation pane.
There’s a warning that you should really read the manual before you make any changes. That’s true. You
should definitely read the manual if you plan on mucking around with any settings we aren’t specifically
walking you through. Failure to read documentation is the path to sorrow.
To access the advanced options, click “Show advanced options”. There is a lot going on in here, but
we’re only interested in one particular section in the advanced menu “Advanced settings for
connections to this computer”.
Here you will find an entry for “Access Control” that, by default, is set to “Full Access”. Instead of leaving
it set to “Full Access”, we would strongly encourage you to select “Custom settings” from the drop down
menu.
After selecting “Custom settings” click the “Configure” button directly under the box.

After selecting “Custom settings” click the “Configure” button directly under the box.
Here you will find a wide array of granular permissions for your remote access session that can be
configured as “allow”, “after confirmation”, or “denied”. How you configure these settings is highly
dependent on your needs, and the settings we have in the above screenshot are simply to show the
different states the entries can be in.
If, for example, you are configuring a computer on your own home network for easy remote access, it
would be foolish to toggle “Connect and view my screen” to “After confirmation”, because you’d have
to trudge all the way down to the basement server to manually confirm remote access. And at that
point, who needs remote access…you’re already standing there.
On the other hand, though, if you have friend, family member, for client, who is worried about privacy
and about you being able to just randomly connect to their computer unannounced, then turning on
“After confirmation” allows you to say “Look, this way I can only connect to your computer to help you if
you explicitly click OK and allow it.”
Transfer files: Set this one to “After confirmation” for remote computers you service. Why give an
intruder an easy way to download your parents’ tax returns or upload something to their
machine?
•
Establish a VPN connection to this computer: There’s rarely any need to set up an actual virtual
network between computers, and unless you have a really good reason to keep this on, you
should turn it off for security purposes. Set this one to “Denied”.
•
Control the local TeamViewer: If you’re setting this up on a relative’s machine, you want to set
this to “After confirmation”, in case you do actually need to make some remote changes to the
TeamViewer client down the road. If you’re setting it up on your own machine, you should set it to
“Denied”. How often will you need to remotely connect to your own machine and make big
changes to TeamViewer?
•
File transfer using the file box: Just like the transfer files settings, this one should be set to “After •
The individual Access Control toggles are detailed on page 72 of the TeamViewer 11 manual (PDF), but
we’ll highlight the settings here that should be generally switched to “After confirmation” under nearly
every circumstance:

File transfer using the file box: Just like the transfer files settings, this one should be set to “After
confirmation”. If any files are leaving the remote computer, somebody should be confirming it.
•
In addition to the other security precautions we put in place, these additional precautions ensure that if
someone were to gain access to TeamViewer, they wouldn’t be able to siphon up files or transfer
malware to the machine.
Our next stop is important if you’re using the randomly generated passwords to keep the remote
computer safe. Beneath the Access Control section there is an entry labeled “Random password after
each session”. From the dropdown menu, select “Generate new” to create a new random password
each time someone tries to connect to TeamViewer.
Again, like all the options we’ve gone over, adjust this one to fit the scenario you’re using TeamViewer
for. If reading you a long and random password over the phone isn’t viable for the person you’re
helping, then opt instead to use the strong manual password option we looked at under the “Security”
tab, earlier in the tutorial.
Finally, if you’ve configured the remote computer with a limited user account (a wise choice if you’ve set
up a computer for a non-tech savvy relative), you can scroll down to the “TeamViewer options” and
check “Changes require administrative rights on this computer”.
This ensures that only someone on the computer with administrative access (whether that’s you or an
adult in the remote household) will be able to make changes to the TeamViewer settings. Additionally
(or alternatively), you can also set a password right within the TeamViewer application with the “Protect
options with a password”.
For the Wary: TeamViewer Alternatives
Windows Remote Desktop: Available for Windows and OS X (as a client to access Windows
machines). It’s free and pretty easy to set up, but has a big limitation: users of any version of
Windows can connect to other Windows PCs using Remote Desktop but Windows home editions
can’t host a connection. For help setting up Windows Remote Desktop, see our tutorial here.
•
As we mentioned in the introduction of the tutorial, there has been a rash of computers compromised
via TeamViewer. Given that there isn’t strong evidence at the moment that it was a system-wide breach
or a serious security flaw in the TeamViewer client, we’re not personally in any rush to abandon
TeamViewer. That said, however, we completely understand if you’re interested in trying an alternative
remote desktop application. Here are some alternative applications you might consider:

can’t host a connection. For help setting up Windows Remote Desktop, see our tutorial here.
Splashtop: Free for personal use if you’re just using it over the local network, but $16.99 a year for
the “Anywhere Access Pack” that enables true remote access. Desktop clients available for
Windows, OS X, and Ubuntu Linux. Splashtop offers a similar experience to TeamViewer including
remote desktop control, file transfer, and so on.
•
Chrome Remote Desktop: A relatively new offering from Google, Chrome Remote Desktop is a
free Chrome browser extension that sets up a secure remote desktop connection between the
user’s Chrome browser and the remote computer. It’s cross platform and works wherever Chrome
does. The big shortcoming is that it has a more limited feature set, and if the system you’re trying
to fix is having web browser problems, you’ll need an alternative way to access the remote
desktop.
•
We’ve suggested the three alternatives here because of their similar ease of use and solid track records,
not because they are inherently better than TeamViewer or immune to potential exploits. As always,
weigh your options carefully and apply the same principles we talked about regarding TeamViewer–
leave the tool off when not in use, use strong passwords, etc.–when using an alternative remote
desktop solution.
Although configuring TeamViewer as intensively as we just did is way more work than just running the
application in its default state, let’s be real here. Your data and security (and the data and security of the
people you help with TeamViewer) is worth it. When there’s dozens of security options right at your
fingertips, like we just demonstrated, there is no excuse for running TeamViewer with no user account,
no two factor authentication, and a weak password.
Clipped from: http://www.howtogeek.com/257376/how-to-lock-down-teamviewer-for-more-secure-
remote-access/