Embed Size (px)
Citation preview

How to Make an HPLC Sequence File
The HPLC software needs to „know‟ where
to find your samples in the autosampler
tray. This is accomplished by creating a
sequence file which associates a given vial
in the autosampler tray with a sample
description, amount injected, data file
name, and HPLC conditions for the
analysis.
1
How to Make an HPLC Sequence File
• After you have placed your samples in
vials, a TA will assist you to place them in
an autosampler tray.
• A representation of the tray is shown on
the right. Notice the markings 1-12 on the
top and A-H on the left side.
• Place your samples in a row in the tray
(keep them together as a group). If you
have more samples than the row will
contain just keep going into the next row
starting in column 1.
• Note the grid location of your first
sample and write it down. In this case it
is D1 (row D, column 1). You will use the
location of your first sample when you
create the sequence file.
2

Load the CASPiE Instrument Site
• To open the the HPLC software launch your web browser and navigate to the
CASPiE instrument website at https://instruments.caspie.org.
• Enter your account information to login.
3
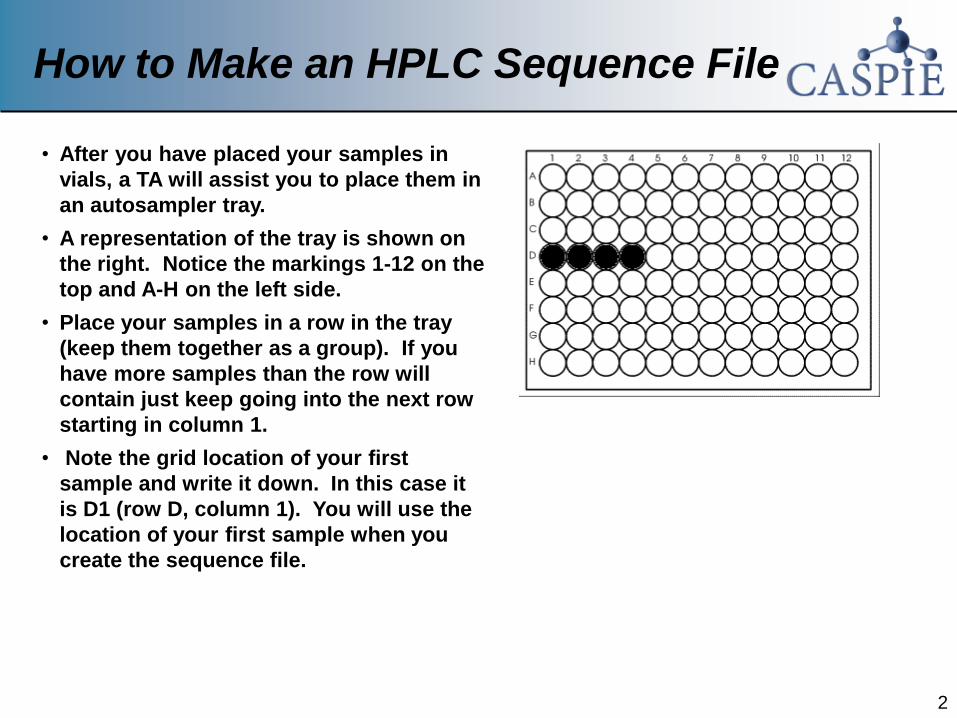
The HPLC Data Processing Software
You will use a copy of the HPLC
software that is not attached to the
instrument to produce the sequence
file. The version of the software not
attached to an instrument is called the
„HPLC Data Processing‟.
You will always have access to the
HPLC data processing software during
a CASPiE module. You will only have
access to the instrument for remote
control during your scheduled hours.
You will need the Citrix client installed
on the computer you are using to
proceed. If you are using a lab
computer it will already be installed.
4
Launch HPLC Data Processing Software
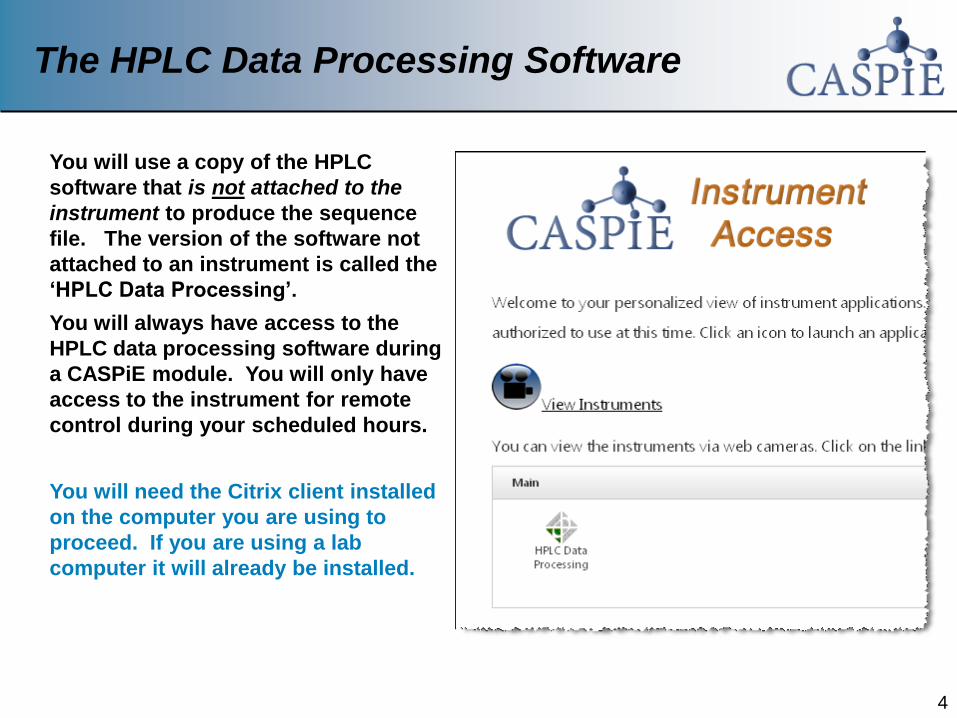
• You should see one icon in the
„Applications” box.
• Launch the HPLC data processing
software by clicking once on the icon.
• If the „HPLC Data Processing‟ icon is
not present ask your TA for help.
5
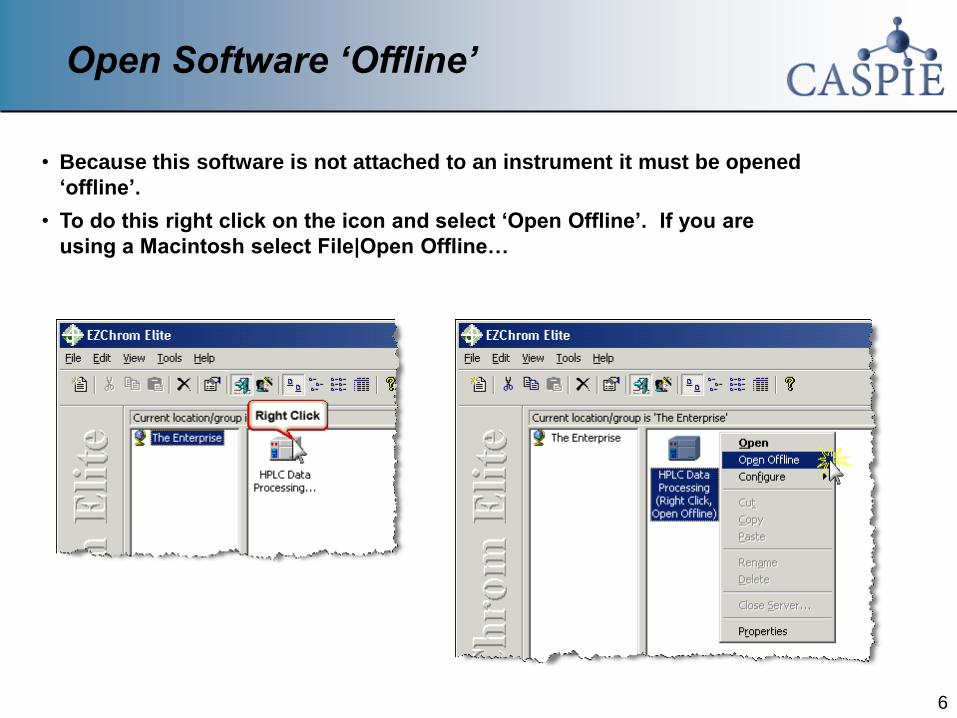
Open Software ‘Offline’
• Because this software is not attached to an instrument it must be opened
„offline‟.
• To do this right click on the icon and select „Open Offline‟. If you are
using a Macintosh select File|Open Offline…
6
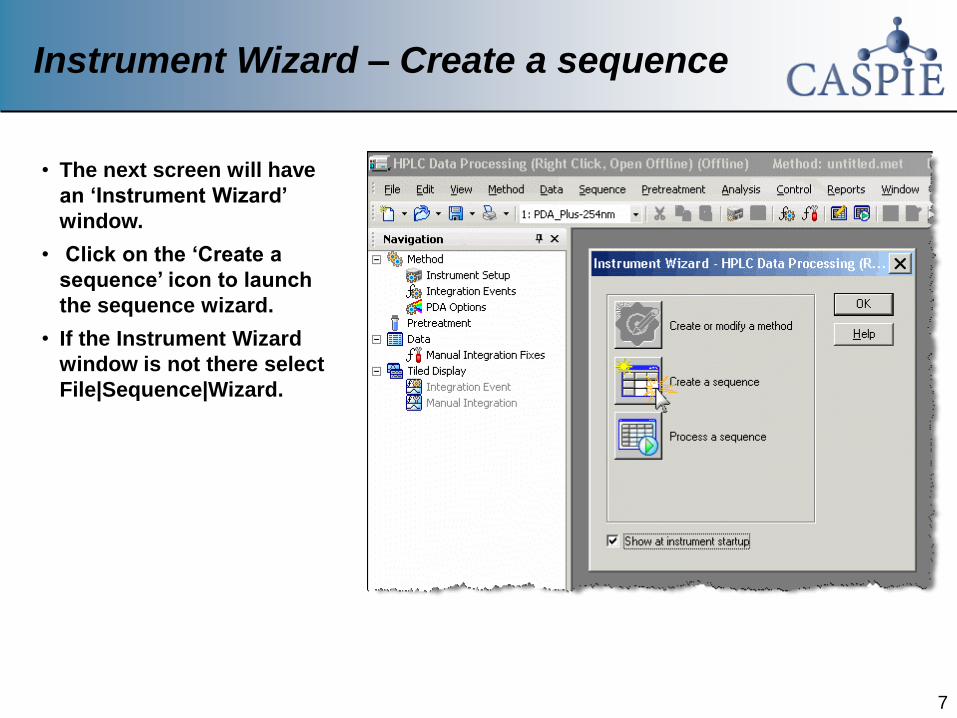
Instrument Wizard – Create a sequence
• The next screen will have
an „Instrument Wizard‟
window.
• Click on the „Create a
sequence‟ icon to launch
the sequence wizard.
• If the Instrument Wizard
window is not there select
File|Sequence|Wizard.
7
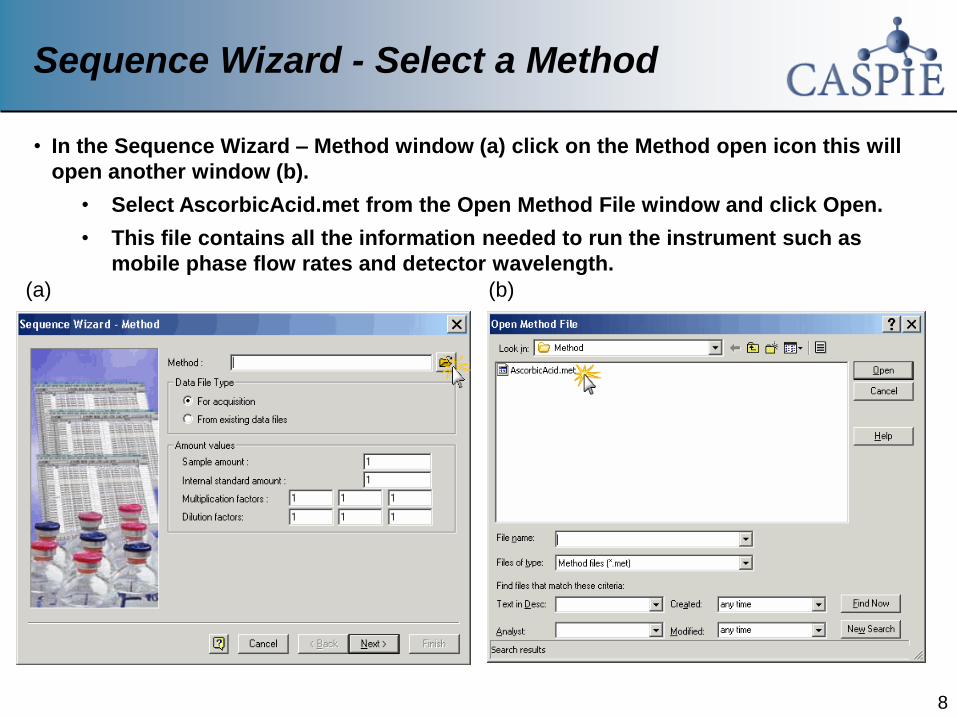
Sequence Wizard - Select a Method
• In the Sequence Wizard – Method window (a) click on the Method open icon this will
open another window (b).
• Select AscorbicAcid.met from the Open Method File window and click Open.
• This file contains all the information needed to run the instrument such as
mobile phase flow rates and detector wavelength.
(a) (b)
8
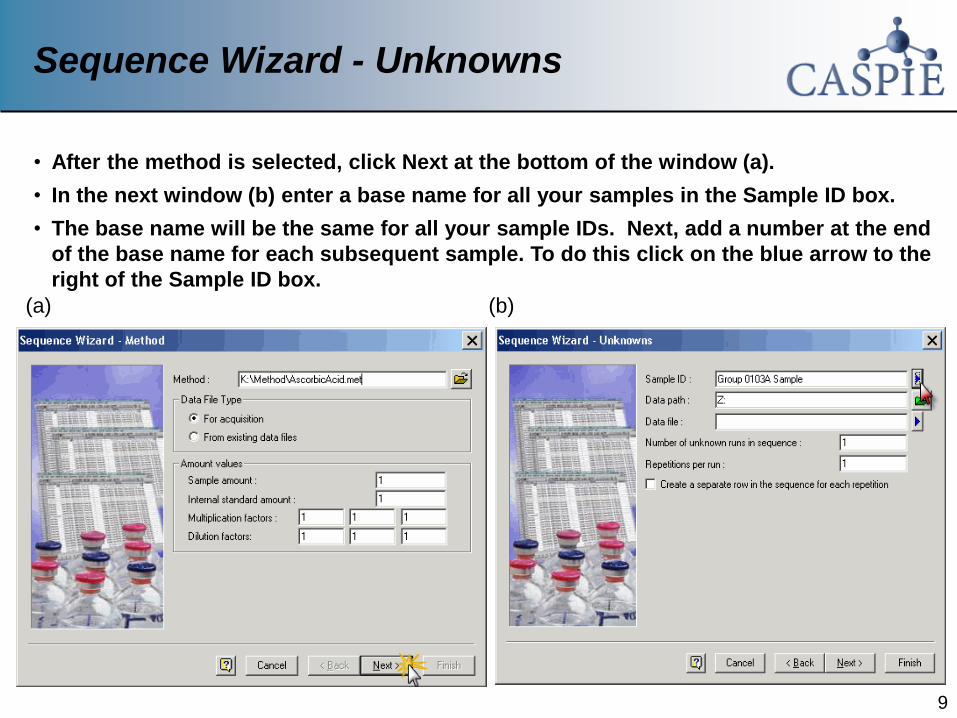
Sequence Wizard - Unknowns
• After the method is selected, click Next at the bottom of the window (a).
• In the next window (b) enter a base name for all your samples in the Sample ID box.
• The base name will be the same for all your sample IDs. Next, add a number at the end
of the base name for each subsequent sample. To do this click on the blue arrow to the
right of the Sample ID box.
(a) (b)
9
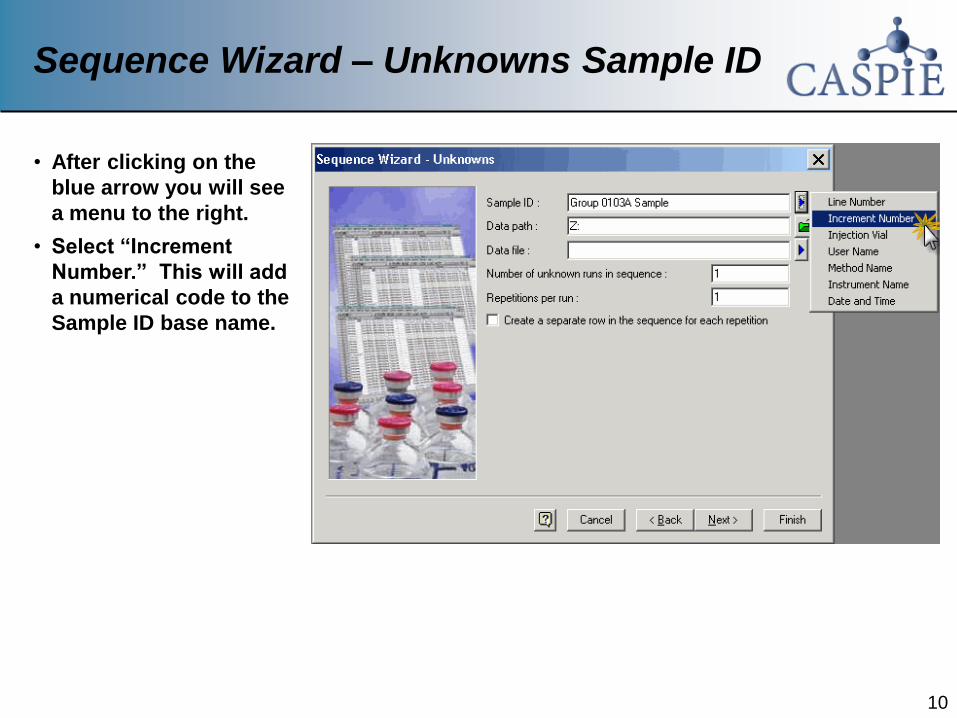
Sequence Wizard – Unknowns Sample ID
• After clicking on the
blue arrow you will see
a menu to the right.
• Select “Increment
Number.” This will add
a numerical code to the
Sample ID base name.
10

Sequence Wizard – Unknowns File Name
• In the box to the right of
“Data file” enter a base
name for the data file
names for your samples.
The base file name will
be the same for all your
files.
• Add a unique number to
the base name by
clicking on the blue
arrow. Then select
“Increment Number.”
11
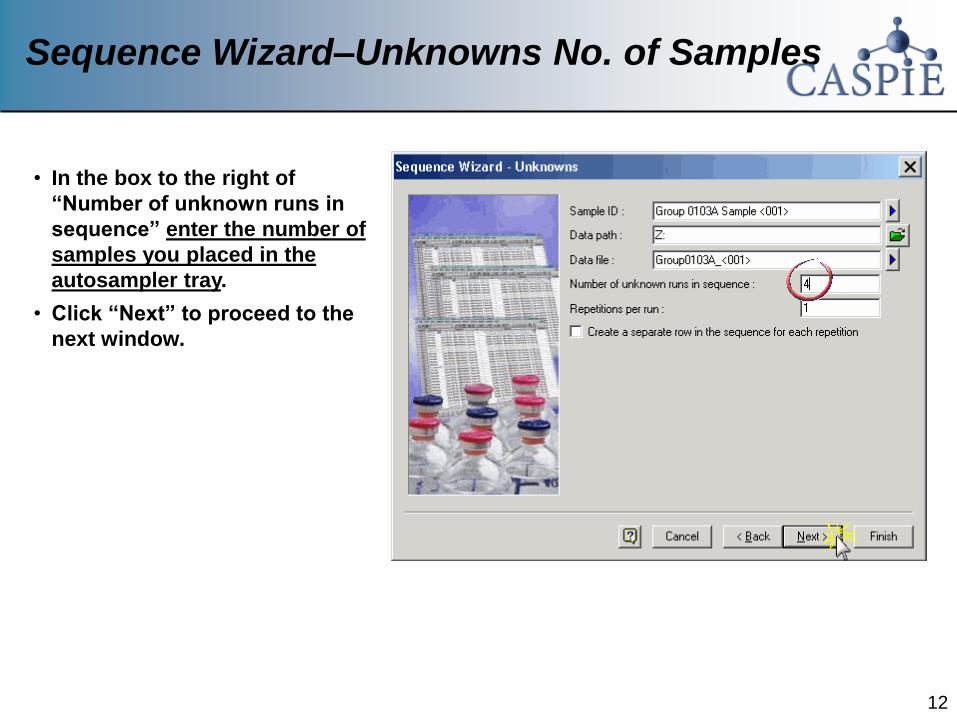
Sequence Wizard–Unknowns No. of Samples
• In the box to the right of
“Number of unknown runs in
sequence” enter the number of
samples you placed in the
autosampler tray.
• Click “Next” to proceed to the
next window.
12

Sequence Wizard – Autosampler
• In the box to the right of
“First vial” enter the location
in the autosampler tray where
you placed your first sample.
In this example the first vial
was in row D column 1.
• The grid location must be
preceded by the letter A and a
colon(;). This is important as
this tells the autosampler
which of 3 tray slots the tray
is located.
• Nothing else need to be
modified in this window so
click “Next” to proceed to the
next window.
13

Sequence Wizard – Calibration, Reports
Do not change anything in these next two windows; just click “Next” in the
Calibration window and “Finish” in the Reports window.
14
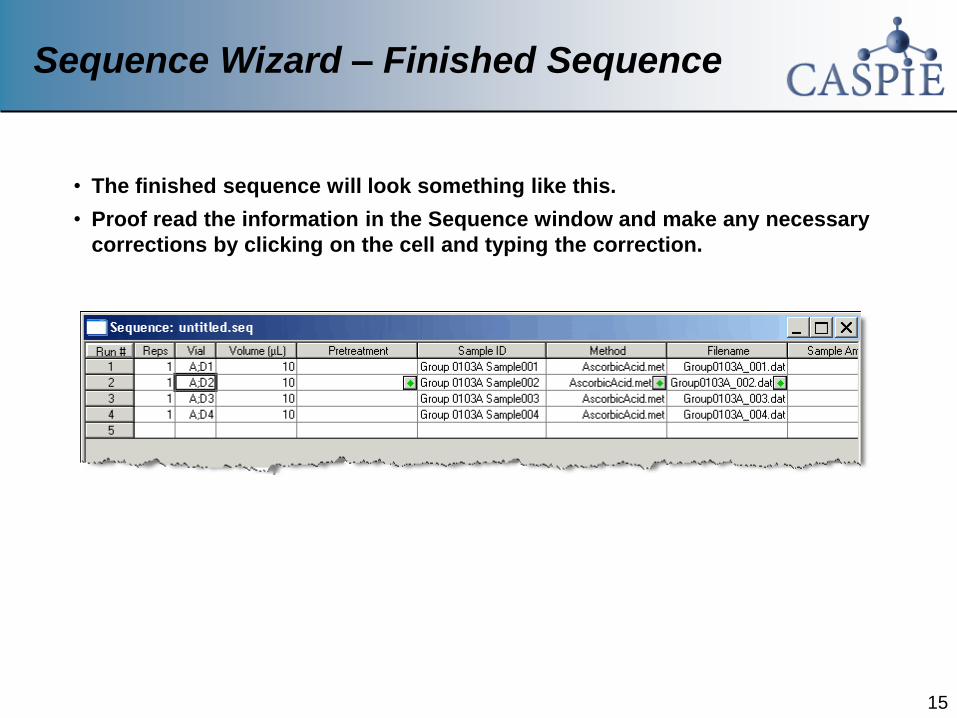
Sequence Wizard – Finished Sequence
• The finished sequence will look something like this.
• Proof read the information in the Sequence window and make any necessary
corrections by clicking on the cell and typing the correction.
15

Sequence Wizard – Save Sequence File
• Save the sequence file by selecting File| Sequence| Save As…
• In the next window type a sequence file name in the box to the right of “File
name” then click “Save”.
16

Sequence Wizard – Saved Sequence
• After the sequence is saved the file name will appear at the top of the
Sequence window.
• You are now finished; exit the program.
• When you are ready to remotely control the HPLC you will retrieve your
sequence file and initiate a „sequence run‟ to collect data for your samples.
• Instructions for running the HPLC are given in another tutorial.
17

Close Windows
18
When you have saved the sequence file exit all EZChrom Elite HPLC software
windows.


![[PPT]Liquid Chromatography Fundamentals - Theory · Web viewLiquid Chromatography Fundamentals - Theory Keywords HPLC, LC, HPLC theory, HPLC fundamentals, teaching HPLC, learning](https://img.pdfslide.net/doc/110x75/5b1aa2c67f8b9a3c258de481/pptliquid-chromatography-fundamentals-theory-web-viewliquid-chromatography.jpg)