Embed Size (px)
Citation preview

— 3 7 9 —
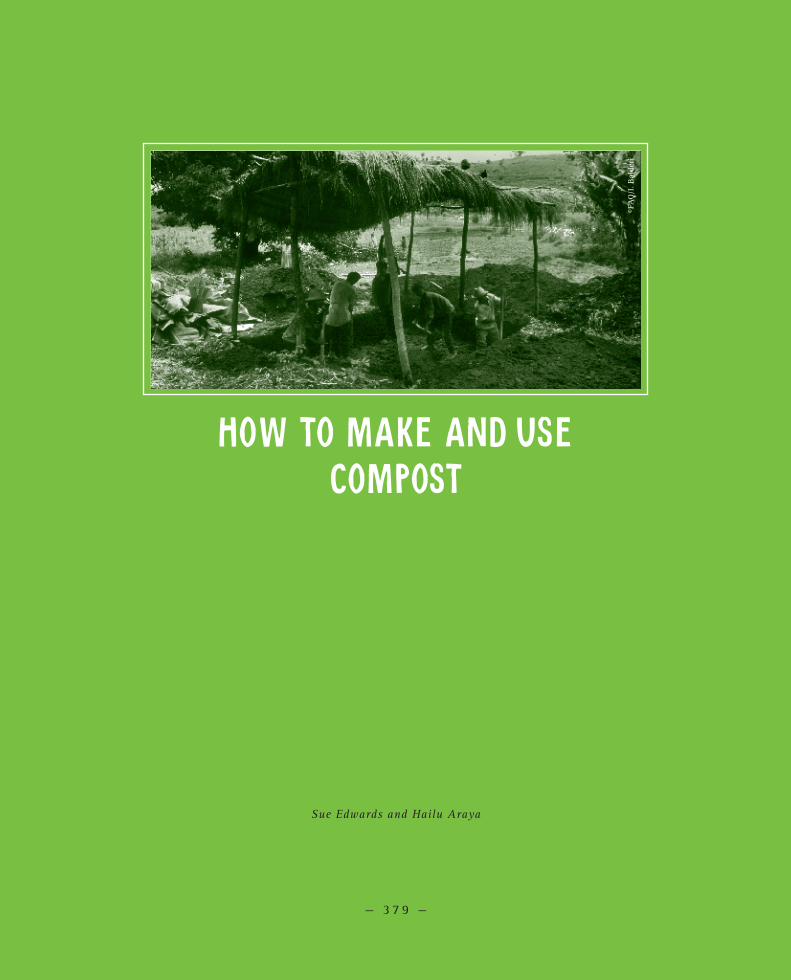
HOW TO MAKE AND USE COMPOST
Sue Edwards and Hailu Araya
©FA
O/I
. Bal
deri
— 3 8 0 —
CLIMATE CHANGE AND FOOD SYSTEMS RESILIENCE IN SUB-SAHARAN AFRICA
CONTENTS
NATURAL FERTILIZER AND HEALTHY SOIL ..................................................................385Fertilizers ...........................................................................................................................................385Soil .....................................................................................................................................................386
THE CHARACTER OF COMPOST .....................................................................................389Why is compost important? ............................................................................................................389What can compost be used for? ......................................................................................................389What is needed to make compost? ................................................................................................. 391The contributions of the different compost-making materials ...................................................394
CONDITIONS TO BE FULFILLED BEFORE PREPARING COMPOST ...................................399Points to remember when making compost in a heap ................................................................. 401Points to remember when making compost in a pit ..................................................................... 401
INDORE COMPOST PREPARATION METHODS ................................................................402Indore Piling Method .......................................................................................................................402Indore Pit Method .............................................................................................................................406
BANGALORE COMPOST PREPARATION METHODS ........................................................ 413Bangalore Piling Method ................................................................................................................. 414Bangalore Pit Method ...................................................................................................................... 418
TRENCH COMPOSTING ................................................................................................... 421How to prepare and fill the trench .................................................................................................422How to turn over trench compost ...................................................................................................423
THE NADEP METHOD .....................................................................................................424Selecting and preparing the site for the NADEP tank ..................................................................424Building the NADEP tank ................................................................................................................425Filling the tank .................................................................................................................................426Following up on the NADEP compost making process ................................................................427
FOLLOWING UP ON CONDITIONS IN THE COMPOST MAKING PROCESS .......................428Checking heat and moisture ............................................................................................................429Correcting the problems ..................................................................................................................429
QUALITIES AND USE OF GOOD COMPOST .....................................................................430Using compost .................................................................................................................................. 431Problems in using compost ............................................................................................................. 431
— 3 81 —
HOW TO MAKE AND USE COMPOST
AMOUNT OF COMPOST FOR ONE HECTARE ..................................................................432A rough guide on amounts of compost that can be made and used by farmers in Ethiopia ......433Planning to make good quality compost .......................................................................................434
SOURCES AND FURTHER READING ...............................................................................436
TABLES
Table 1: The nitrogen and carbon content of some selected composting materials .......................394Table 2: Sequence of activities for digging, filling and turning over compost in pits ....................411
FIGURES
Figure 1: Types of soils showing different texture .............................................................................387Figure 2: Some examples of soil organisms that help make compost and keep soil healthy ........388Figure 3: Diagram showing the components of compost ................................................................... 391Figure 4: Diagram showing the sequence of filling pits A, B and C with compost materials. ........411Figure 5: Sequence in making a compost heap ................................................................................... 414Figure 6: Diagram showing the layers in a Bangalore compost heap .............................................. 417Figure 7: A full NADEP tank built from bricks or blockettes ............................................................425
BOXES
Box 1: Examples of some plant materials for making compost ........................................................396Box 2: Mamma Yohannesu and finger millet ......................................................................................400Box 3: Farmers solving the problem of carrying compost .................................................................432

— 3 8 2 —
CLIMATE CHANGE AND FOOD SYSTEMS RESILIENCE IN SUB-SAHARAN AFRICA
ABOUT THE AUTHORS
SUE EDWARDS is the Director of the Institute for Sustainable Development (ISD),
Addis Ababa, Ethiopia, and has been co-editor of the eight-volume “Flora of
Ethiopia and Eritrea” since 1984. She is a taxonomic botanist, teacher and science
editor by profession.
HAILU ARAYA is the Sustainable Community Development team leader of the
ISD. He is a geographer who joined ISD after completing his Masters degree in
community resource management at Addis Ababa University in 2001, and, in 2010,
obtained a doctorate in soil science from University of Hohenheim, Germany.
ACKNOWLEDGEMENTS
The Institute for Sustainable Development (ISD) wishes to thank the Third World
Network, based in Penang, Malaysia, for its consistent support since 1996 to the
Project on “Sustainable Development through Ecological Land Management by
Some Rural Communities in Tigray, Northern Ethiopia”, also known as the “Tigray
Project”. The information in this document is based on experiences in training
farmers and their associated agricultural professionals from the Bureau of Agriculture
and Rural Development of Tigray in making and using compost for use with field
crops. ISD also promotes and trains students in environment clubs in government
schools as well as self-organized youth groups in organic vegetable gardening
and the raising of tree seedlings. The feedback from all these partners of ISD has
helped improve the present version. The original drawings were made by Solomon
Demlie and edited with PhotoShop by Martha Mesfin and Samuel Tesfaye.
— 3 8 3 —
HOW TO MAKE AND USE COMPOST
EDITORIAL NOTES
The information in this guide to making and using compost has been developed
from working with Ethiopian smallholder farmers since 1996, particularly in the
dry and degraded highlands of northern Ethiopia. It is based on the Tigrinya booklet
by Arefayne Asmelash (1994 EC/2002 GC), the ISD Project Officer based in Mekele,
Tigray. It is hoped that smallholder farmers and local agricultural experts in many
parts of the world, and particularly in Sub-Saharan Africa, will be able to identify
and use the most appropriate and applicable method for making compost in their
own areas.

CLIMATE CHANGE AND FOOD SYSTEMS RESILIENCE IN SUB-SAHARAN AFRICA
— 3 8 5 —
HOW TO MAKE AND USE COMPOST
NATURAL FERTILIZER AND HEALTHY SOIL
Fertilizers
Natural fertilizer provides the food needed for a plant to grow after a seed has
germinated in the soil. This food consists of plant nutrients. The most important
of these nutrients are nitrogen (N), phosphorus (P) and potassium (K). There are
also many other chemicals needed by plants in small quantities, e.g. copper (Cu),
manganese (Mn), magnesium (Mg), iron (Fe), sulphur (S) and others. These are
called micronutrients or trace elements. Natural fertilizer also provides organic
matter called humus for the soil. Humus is a black or brown spongy or jelly-like
substance. It helps the soil have a good structure to hold water and air. One of the
best natural fertilizers is mature compost because it feeds the soil with humus and
plant nutrients. The growing plants take their nutrients from the top layer of the
soil where their roots grow.
Plant nutrients are lost from the soil when they are washed down (leached)
below the top soil, or when the top soil is eroded. Plant nutrients are also lost with
the crops when these are harvested. When the surface of the land is broken up for
farming, the soil is often eroded: it is blown away by the wind or washed away
by rain and floods. The soil also loses much of its carbon content as carbon dioxide
(CO2) into the atmosphere, thus contributing to climate change. The soil that is left
becomes poor in plant nutrients so the crops do not grow well and give a good
yield. But if the plant nutrients and carbon are returned to the soil, it can continue
to grow good crops as well as contribute to slowing down the negative impacts
of climate change.
Farmers can replace the lost plant nutrients by using fertilizers. Natural fertilizer
comes from animal wastes and plants; for example, cow dung, sheep, goat or
chicken droppings, urine, decomposed weeds and other plant or animal remains,
e.g. waste from preparing food. The fertilizer can also be made of chemicals in a
factory. Farmers have to buy this type of fertilizer from the market or through
farmers’ service cooperatives.
— 3 8 6 —
CLIMATE CHANGE AND FOOD SYSTEMS RESILIENCE IN SUB-SAHARAN AFRICA
Therefore fertilizers are of two types:
} Natural fertilizer, including compost; and
} Human-made chemical fertilizer.
Throughout the world there are many options for replacing the plant nutrients
lost from soil, but, in our case in Ethiopia and in many other parts of Sub-Saharan
Africa where most of the agriculture is done by smallholder farmers, the best option
is compost produced by human labour using the natural materials available to
farmers and others, such as students and youth, from their surroundings. Good
quality compost can be made from organic household wastes in urban areas and
be used to grow healthy vegetables in gardens at home or by school environment
club or youth group members.
Soil
The soil is a complex mixture of the following:
} Non-living materials – solid particles from broken down rocks, air and water;
} Living organisms – bacteria, fungi, many small and very small (microscopic)
animals, plants such as algae and plant roots; and
} The decayed and decomposed remains of living organisms – humus.
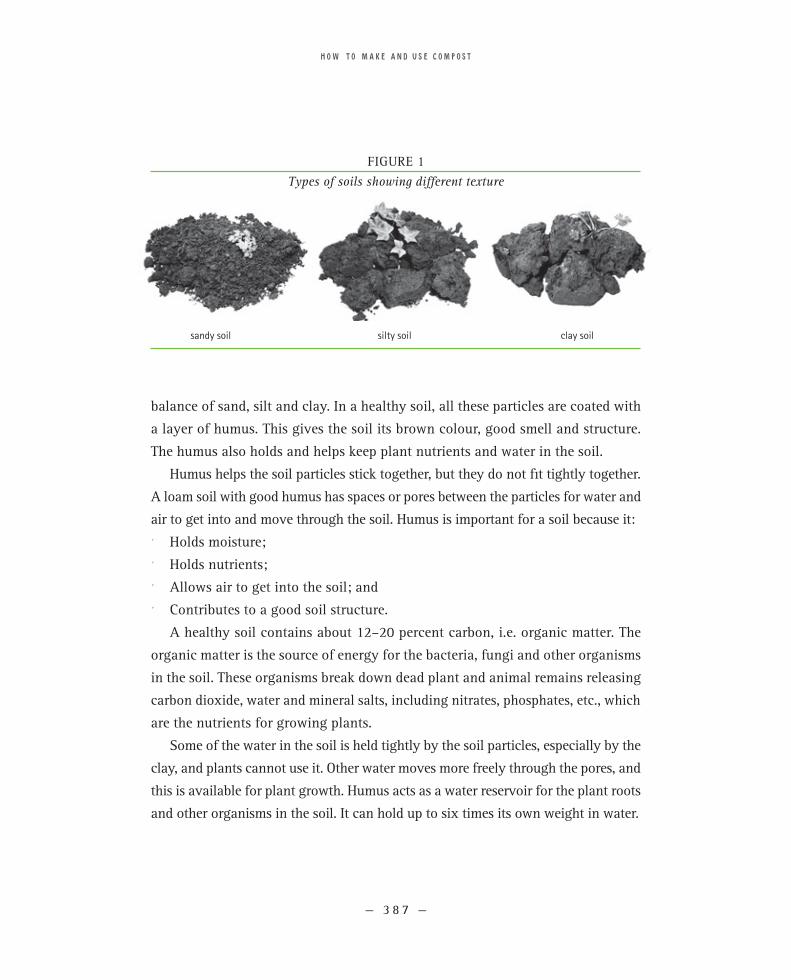
The solid particles provide the basic structure or skeleton of the soil. Generally
three types of particles are recognized: sand, silt and clay. Sandy soil is rough to
feel because it is made of large grains. Sandy soil does not hold much water. Silty
soil is finer to feel than sandy soil. When it is moist, the particles stick together in
crumbs. Clay soil is very soft when wet as the particles are very small. They stick
together even when the soil is dry and hard. Clay particles swell when they get
wet and water cannot pass through easily (see Figure 1).
Natural soils consist of combinations of sand, silt and clay. The sand holds
some plant nutrients and helps provide good drainage of excess water from a soil.
Silt holds more plant nutrients and helps to hold water in the soil. Clay holds even
more plant nutrients and water, but has little air. Loam or loamy soil contains a
— 3 8 7 —
HOW TO MAKE AND USE COMPOST
balance of sand, silt and clay. In a healthy soil, all these particles are coated with
a layer of humus. This gives the soil its brown colour, good smell and structure.
The humus also holds and helps keep plant nutrients and water in the soil.
Humus helps the soil particles stick together, but they do not fit tightly together.
A loam soil with good humus has spaces or pores between the particles for water and
air to get into and move through the soil. Humus is important for a soil because it:
} Holds moisture;
} Holds nutrients;
} Allows air to get into the soil; and
} Contributes to a good soil structure.
A healthy soil contains about 12–20 percent carbon, i.e. organic matter. The
organic matter is the source of energy for the bacteria, fungi and other organisms
in the soil. These organisms break down dead plant and animal remains releasing
carbon dioxide, water and mineral salts, including nitrates, phosphates, etc., which
are the nutrients for growing plants.
Some of the water in the soil is held tightly by the soil particles, especially by the
clay, and plants cannot use it. Other water moves more freely through the pores, and
this is available for plant growth. Humus acts as a water reservoir for the plant roots
and other organisms in the soil. It can hold up to six times its own weight in water.
FIGURE 1
Types of soils showing different texture
sandy soil silty soil clay soil

— 3 8 8 —
CLIMATE CHANGE AND FOOD SYSTEMS RESILIENCE IN SUB-SAHARAN AFRICA
The air in the soil has much more carbon dioxide than the above ground atmosphere.
This is because the plant roots and the other living things in the soil produce carbon
dioxide when they ‘breathe’, but the movement of air in the soil is slow and the carbon
dioxide does not move out into the air as fast as from animals living above ground.
There are many organisms that live in the soil (see Figure 2). The bacteria and
fungi are particularly important in breaking down plant and animal waste materials,
and making plant nutrients available. Many fungi and bacteria also help in
transferring nutrients from the soil to the roots of plants. The larger animals,
worms, beetles, etc. help break down dead things into a condition that the bacteria
and fungi can digest. These animals also move and mix the soil, sometimes
dramatically like earthworms and termites. In a healthy soil, there is a very large
mixed population of all these organisms. They each have a role to play in keeping
the soil healthy, and hence, also the crops that grow on the soil. Pests are not
usually a problem in a healthy soil. Thus, healthy soil produces healthy food.
FIGURE 2
Some examples of soil organisms that help make compost and keep soil healthy
earthworm mushroom
beetlewoodlouse antspringtail
millipede
— 3 8 9 —
HOW TO MAKE AND USE COMPOST
THE CHARACTER OF COMPOST
Why is compost important?
Compost is important because it:
} Contains the main plant nutrients – nitrogen (N), phosphorus (P) and potassium (K),
often written as NPK;
} Improves the organic matter in the soil by providing humus;
} Helps the soil hold both water and air for plants; and
} Makes trace elements or micronutrients available to plants.
What can compost be used for?
Because compost is made up of humus, it can be used for improving soil as follows:
1. It provides plant nutrients that are released throughout the growing season.
} The plant nutrients are released when organic matter decomposes and is
changed into humus.
} The plant nutrients dissolve in the water in the soil and are taken in by the
roots of the crops.
2. It improves soil structure so that plant roots can easily reach down into the soil.
} In sandy soil the humus makes the sand particles stick together. This reduces
the size of the spaces (pores) so that water stays longer in the soil.
} In clay soils, the humus surrounds the clay particles making more spaces
(pores) in the soil so the root systems of plants can reach the water and
nutrients that they need, and air can also move through the soil.
} Therefore, because heavy clay soils become lighter and sandy soils become
heavier, soil that has had compost added to it is easier to work, i.e. to
plough and dig.
3. It improves the moisture-holding capacity of soil.
} The humus is a dark brown or black soft spongy or jelly-like substance that
holds water and plant nutrients. One kilogram of humus can hold up to six
litres of water.
— 3 9 0 —
CLIMATE CHANGE AND FOOD SYSTEMS RESILIENCE IN SUB-SAHARAN AFRICA
} In dry times, soil with good humus in it can hold water longer than soil with
little humus. In Ethiopia, crops grown on soil with compost can go on
growing for two weeks longer after the rains have stopped than crops grown
on soil given chemical fertilizer.
} When it rains, water easily gets into the soil instead of running off over
the surface.
} Water gets into the subsoil and down to the water table, runoff and thus
flooding is reduced, and springs do not dry up in the dry season.
4. It helps to control weeds, pests and diseases.
} When weeds are used to make compost, the high temperature of the
compost-making process kills many, but not all, of the weed seeds. Even the
noxious weed, Parthenium, has most of its seeds killed when it is made into
compost following the instructions given in this document.
} Fertile soil produces strong plants able to resist pests and diseases.
} When crop residues are used to make compost, many pests and diseases
cannot survive to infect the next season’s crops.
5. It helps the soil resist erosion by wind and water. This is because:
} Water can enter the soil better and this can stop showers building up into a
flood. This also reduces splash and sheet erosion.
} Soil held together with humus cannot be blown away so easily by wind.
6. Compost helps farmers improve the productivity of their land and their income.
It is made without having to pay cash or borrow money, i.e. farmers do not
have to take credit and get into debt like they do for taking chemical fertilizer.
But, to make and use compost properly farmers, either individually or working
in groups, have to work hard.
— 3 91 —
HOW TO MAKE AND USE COMPOST
What is needed to make compost?Plant materials, both dry and green
1. Weeds, grasses and any other plant materials cut from inside and around fields,
in clearing paths, in weeding, etc.
2. Wastes from cleaning grain, cooking and cleaning the house and compound,
making food and different drinks, particularly coffee, tea, home-made beer, etc.
3. Crop residues: stems, leaves, straw and chaff1 of all field crops – both big and
small – cereals, pulses, oil crops, horticultural crops and spices, from threshing
grounds and from fields after harvesting.
4. Garden wastes – old leaves, dead flowers, hedge trimmings, grass cuttings, etc.
5. Dry grass, hay and straw left over from feeding and bedding animals. Animal
bedding is very useful because it has been mixed with the urine and droppings
of the animals.
1 Chaff = covering of grain crops left after threshing or pounding.
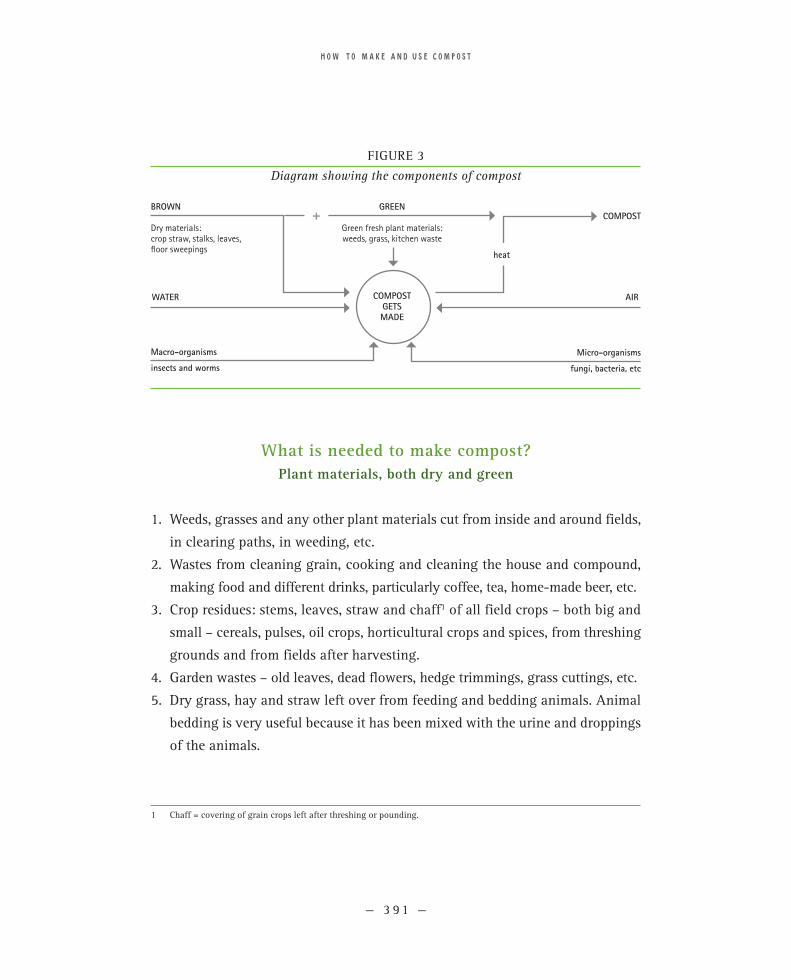
FIGURE 3
Diagram showing the components of compost
brown
Dry materials:crop straw, stalks, leaves, floor sweepings
compost
water compost gets made
air
macro-organisms
insects and worms
micro-organisms
fungi, bacteria, etc
heat
green
Green fresh plant materials:weeds, grass, kitchen waste
+
— 3 9 2 —
CLIMATE CHANGE AND FOOD SYSTEMS RESILIENCE IN SUB-SAHARAN AFRICA
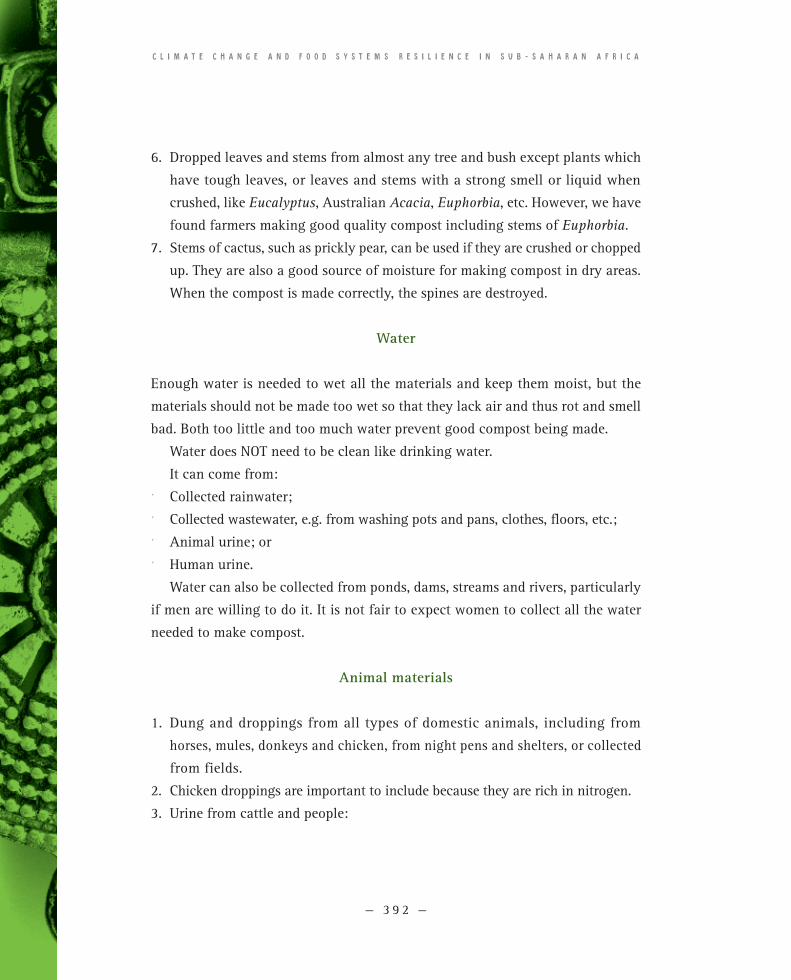
6. Dropped leaves and stems from almost any tree and bush except plants which
have tough leaves, or leaves and stems with a strong smell or liquid when
crushed, like Eucalyptus, Australian Acacia, Euphorbia, etc. However, we have
found farmers making good quality compost including stems of Euphorbia.
7. Stems of cactus, such as prickly pear, can be used if they are crushed or chopped
up. They are also a good source of moisture for making compost in dry areas.
When the compost is made correctly, the spines are destroyed.
Water
Enough water is needed to wet all the materials and keep them moist, but the
materials should not be made too wet so that they lack air and thus rot and smell
bad. Both too little and too much water prevent good compost being made.
Water does NOT need to be clean like drinking water.
It can come from:
} Collected rainwater;
} Collected wastewater, e.g. from washing pots and pans, clothes, floors, etc.;
} Animal urine; or
} Human urine.
Water can also be collected from ponds, dams, streams and rivers, particularly
if men are willing to do it. It is not fair to expect women to collect all the water
needed to make compost.
Animal materials
1. Dung and droppings from all types of domestic animals, including from
horses, mules, donkeys and chicken, from night pens and shelters, or collected
from fields.
2. Chicken droppings are important to include because they are rich in nitrogen.
3. Urine from cattle and people:
— 3 9 3 —
HOW TO MAKE AND USE COMPOST
} Catch urine in a container from animals when they wake up and start moving
around in the morning.
} Provide a container – like an old clay pot or plastic jerry can – in the toilet
or latrine where people can pass or put their urine.
} Night soil (human faeces): almost all human parasites and other disease
organisms in human faeces are killed by the high temperatures when good
compost is made.
Compost making aids – “farmers’ friends”
Micro-organisms (fungi and bacteria) and smaller animals (many types of worms,
including earthworms, nematodes, beetles and other insects) turn waste materials
into mature compost. These are found naturally in good fertile soils like those from
forests, old animal dung and old compost. Adding any of these to new compost
helps in the decomposition process.
Adding compost making aids is like adding yeast to the dough to make bread.
The farmers in Ethiopia call these materials the ‘spices’ to make good compost.
Air
Including dry materials in the compost, e.g. old leaves and stalks, provides space
for air to circulate inside the compost. Air is needed because the soil organisms
need oxygen.
Heat
Decomposition of organic wastes produces heat. Compost needs to be kept hot and
moist so the plant and animal materials can be broken down quickly and thoroughly.
Heat destroys most of the weed seeds, fungal diseases, pests and parasites.

— 3 9 4 —
CLIMATE CHANGE AND FOOD SYSTEMS RESILIENCE IN SUB-SAHARAN AFRICA
TABLE 1
The nitrogen and carbon content of some selected composting materials
type of composting material nitrogen content (%) carbon-to-nitrogen ratio (c:1n)
Urine 15–18 0.8:1
Blood 10–14 3:1
Horn 12 not found
Bone 3 8:1
Chicken manure 3–6 10–12:1
Sheep manure 3.8 not found
Horse and donkey manure 3.8 25:1
Manure in general 1.7 18:1
Manure from animal pens = farmyard manure (FYM) 2.15 14:1
Maize stalks and leaves 0.7–0.8 55–70:1
Wheat straw and chaff 0.4–0.6 80–100:1
Fallen leaves 0.4 45:1
Young grass hay 4 12:1
Grass clippings 2.4 20:1
Straw from peas and beans 1.5 not found
Sources: Dalzell and Riddlestone (1987), Gershuny and Martin (1992)
The contributions of the different compost-making materials A good balance of carbon and nitrogen
Both carbon and nitrogen are needed to make good compost. They are used by
the micro-organisms to grow and multiply, and to get energy. Some of the carbon
is converted to carbon dioxide, and this escapes to the atmosphere. Most of it
remains and becomes humus, and the nitrogen becomes nitrates. Methane is not
produced if there is a good supply of air to the organisms carrying out the
decomposition process.
Materials with good nitrogen content help in making good compost, but they
should be less than the carbon-containing materials. Carbon-containing materials
should always be more than those containing high nitrogen. A good balance of
carbon and nitrogen is needed to make good compost. Table 1 gives the
carbon-to-nitrogen balance for some types of composting materials.
— 3 9 5 —
HOW TO MAKE AND USE COMPOST
With Nitrogen as 1, high figures for the carbon in the carbon-to-nitrogen
column indicate high carbon content. These items are good for making compost.
Items with low carbon content, like urine and chicken manure, are useful to provide
nitrogen. But they must be mixed with materials with high carbon content.
1. When there is enough air and moisture in the compost, nitrogen-containing
materials are broken down and the nitrogen is changed to nitrates that can be
used by plants.
2. When there is too much water and little air, the nitrogen is changed into ammonia.
This is a gas that escapes from the compost, and gives the compost a bad smell.
3. When there is a bad smell, the compost needs to be turned over bringing the
top to the bottom and the bottom to the top, and mixing in more dry materials
and some good soil. This puts more air into the compost, which stops the process
of making ammonia so that proper mature compost can be made.
The contributions of dry and green plant materials
Dry materials give structure to the compost making process; they provide space
for air to circulate so that the micro-organisms can be active and make heat.
Green plant materials provide moisture for compost making; they give water
and nutrients to the micro-organisms so that they multiply and break down the
organic materials into humus.
The importance of good water/moisture and air balance
Water is essential for compost preparation.
1. Sufficient moisture helps for quicker decomposition because it is essential for
micro-organisms to be active.
2. Excess water causes rotting of the materials and creates a bad smell.
3. Without enough moisture the decomposition process slows down and the
materials will not be changed into compost.
— 3 9 6 —
CLIMATE CHANGE AND FOOD SYSTEMS RESILIENCE IN SUB-SAHARAN AFRICA
This shows that moisture and air must be balanced to make good compost.
Farmers quickly learn how to judge the amount of water needed to be added in
making compost.
The importance of air
Compost should have sufficient air.
1. When there is sufficient air, oxygen enters the compost heap. When there is
enough oxygen, special bacteria can convert nitrogen into nitrate, the materials
are decomposed properly and there is a good smell.
2. If there is not enough air and too much water, the nitrogen is converted into
ammonia. The ammonia escapes into the air removing nitrogen from the compost
and making it smell bad.
3. If there is excess air and too little water, the materials dry up and do not
decompose to become compost.
BOX 1EXAMPLES OF SOME PLANT MATERIALS FOR MAKING COMPOST
Crop straws absorb water without changing their physical structure. They are
good for keeping air in the compost, but they do not mix easily with other materials
and decompose slowly.
Grass and other green materials have usually lost water and wilted before they
are put into the compost. They can hold moisture longer in a compost pit than in
a compost heap.
Farmers in Ethiopia have found it is best to thoroughly mix the dry and green plant
materials together before they are put into the compost pit or compost heap.
— 3 9 7 —
HOW TO MAKE AND USE COMPOST
Quality compost with animal dung and urine
1. Animal dung contains water, nitrogen, phosphorous and potassium, as well as
micro-nutrients.
2. Animal dung and urine are very necessary to prepare good quality compost –
urine especially is high in potassium and nitrogen.
3. Both dung and urine help to produce a high temperature so that the materials
decompose into compost easily.
4. Urine, in particular, accelerates decomposition.
Important compost making aids
Compost making aids are farmers’ friends as they help speed up the process of
decomposition. They are like the yeast in making bread and beer or wine, or the
salt and spices in making tasty food. They include:
1. Good top soil and old compost: These contain bacteria, fungi and many small
animals to work on breaking down the materials into mature compost.
2. Ashes from wood and charcoal are good to mix in because they contain phosphorous,
potassium, and many micro-nutrients like zinc, iron and magnesium.
3. Heat is produced by the action of bacteria and fungi on the plant and animal
materials, and their activity keeps the compost hot. Covering compost with a
black plastic sheet can also absorb the heat from the sun and stop it escaping
so that the compost making process goes fast.
4. Larger organisms: Look for larger organisms, like earthworms and beetles, in
old moist compost, old animal dung or good top soil and add these to the
compost making materials without drying and sieving them.
5. Composting facilitators/promoters are important because:
} They provide key bacteria, fungi and micro-organisms to make the compost;
} They provide nutrients for the organisms in the soil so they remain in a good
condition and reproduce rapidly; and
— 3 9 8 —
CLIMATE CHANGE AND FOOD SYSTEMS RESILIENCE IN SUB-SAHARAN AFRICA
} They help speed up the composting process and ensure that good quality
compost is produced.
Methods for using compost making aids include any or all of the following:
1. Make a mixture of dry top soil, old compost and ashes. Then crush it and, if
possible, sieve it so it is like salt or a fine powder.
2. Mix the powder with fresh composting materials, particularly with dry or green plant
materials like grass and/or straw, and put this in layers between other materials.
3. Do NOT put the compost making aid material as a layer by itself. It needs to be mixed
with the other materials so it can accelerate the compost making process.
4. Ash is good as it contains minerals, BUT if you put a high quantity in one layer,
the minerals are strongly concentrated and can slow down or stop the micro-
organisms from making compost.
How micro- and macro-organisms work
The production of good quality mature compost depends on the number and types
of micro- and macro-organisms living in the soil. These are living organisms that
require air, moisture and heat in the compost heap so that they can live, work and
multiply/reproduce.
Compost materials supply food and energy (starch, soluble sugars, carbohydrates,
amino acids) for the micro-organisms.
In the presence of air supplying oxygen and moisture, the micro-organisms
convert the available food into humus and soluble plant nutrients, which stay in
the compost heap, and carbon dioxide, which diffuses out into the atmosphere.
Most of the carbon in compost materials stays in the humus and only a small
amount leaves as carbon dioxide.
As the micro-organisms grow and multiply, they produce heat which speeds
up the compost making process. Heat also kills many weed seeds, pests, parasites
and diseases from the fields, and in the animal dung and human faeces.
The heat ensures that healthy mature compost is produced.
— 3 9 9 —
HOW TO MAKE AND USE COMPOST
CONDITIONS TO BE FULFILLED BEFORE PREPARING COMPOST
There are two main methods for preparing compost. One is called the Indore method
and the other is the Bangalore method. The names come from districts in India
where the compost making processes were first developed. The difference between
the two methods is in the way the materials are put together and in the time taken
for completing the compost heap or filling the pit.
The Indore method can be prepared either in a pit or as a heap or pile above
the ground, but its preparation must be completed in less than a week.
The complete Indore method uses a sequence of three layers of materials: dry plant
materials, green plant materials, animal manure and some soil. It is suitable for times
and places where there are plenty of materials to make the mature compost, and
labour, such as in a school or with a farmers’ group, to put them together quickly.
The NADEP method is like the Indore method except that the tank is filled in
one or two days and it always includes animal manure. This method needs a lot
of work, but it produces very high quality mature compost without any more
labour after the NADEP tank has been filled and sealed.
The Bangalore method is prepared in areas where composting materials and
water availability are limited, and labour is also limited. The materials can be collected
over a week or more, and then the new layers are made until either the heap is about
1 to 1.5 metre tall, or the pit is full. The Bangalore method uses only two layers of
materials: dry plant materials and green plant materials. It is very suitable for making
compost from household wastes, or in farms where there are no domestic animals.
Both the Indore and the Bangalore methods can include animal manure as an
additional layer. Including animal manure ensures the best quality compost. But
good quality compost can be made even without animal manure, i.e. just from
plant materials and kitchen wastes.
Preparing compost needs dedication. Therefore:
} Decide when and what method to use to make the compost.
} Look out and search for composting materials that can be collected and carried
to the compost-making place.
— 4 0 0 —
CLIMATE CHANGE AND FOOD SYSTEMS RESILIENCE IN SUB-SAHARAN AFRICA
BOX 2MAMMA YOHANNESU AND FINGER MILLET
Mamma Yohannesu was an old woman living with her grandson. She had a very
small field of about 10 x 25 m. The soil was rather sandy. She managed to make
about five sacks of compost, which she put on this field when her neighbour
ploughed it for her. She planted the field with finger millet. In most of the field
she scattered the seed, but in a plot of 5 x 5 m she brought and planted young
finger millet seedlings she had grown in her house garden. She got a fantastic
yield for her efforts – equivalent to 2.8 tonnes/ha for the directly sown finger
millet and 7.8 tonnes/ha from the transplanted seedlings.
} Find out who will provide the water, and how.
} Decide if it is possible to collect and use urine.
} Be prepared to give time and effort, i.e. work hard, to prepare good quality
compost.
} Set a target for the area of farmland or garden to be covered by the mature compost.
Adding mature compost to a small field or even a small area in a field and then
planting it with a high value crop can show good economic returns in a year.
} Collecting composting materials, layering or piling, and mixing are the main
tasks during compost making. These need physical and mental preparation
to overcome the burden of hard work, but it is only for a short time.
} Seeing good crops grow well and getting good yields from well-composted soil
is very rewarding.
In Ethiopia, and other places with warm to hot climates, mature compost can
be prepared in three to four months. In colder places, decomposition to make
mature compost can take from six months to a year.
— 4 01 —
HOW TO MAKE AND USE COMPOST
Points to remember when making compost in a heap
1. It is good to make a heap in the rainy season when there is plenty of green
plants, such as weeds, getting water is easy or the materials are naturally wet,
or where there is plenty of water available.
2. The compost heap will be on the ground with its base in a shallow trench to
hold the foundation layer.
3. It should be in a place where it can be protected and get covered with leaves or straw
or plastic during the rains so that the materials are not damaged or washed away.
4. It can be made under the shade of a tree and covered with wide leaves or plastic
in order to protect the heap from high winds.
5. After the rains stop, keep the heap covered and check regularly to see if the
moisture and temperature are correct, as described later in the section on
follow-up.
Points to remember when making compost in a pit
1. This is good anytime of the year where moisture is limiting, and is the best way
to make compost after the rains have finished and during the dry season.
2. Prepare and dig the pit, or better still, a series of three pits, when the land is moist
and easier to dig, and/or when there is a gap between other farming activities.
3. If possible, make the compost immediately at the end of the rainy season while
there are plenty of green and moist plant materials.
4. In the dry season, make the pit near a place where water can be added, e.g. next
to the home compound where waste water and urine can be thrown on the
compost materials, or near a water point, e.g. a pond, or near a stream where
animals come to drink.
5. Mark the place of the pit with a ring of stones or a small fence so people and
animals do not fall into it accidentally.
— 4 0 2 —
CLIMATE CHANGE AND FOOD SYSTEMS RESILIENCE IN SUB-SAHARAN AFRICA
INDORE COMPOST PREPARATION METHODS
The Indore compost preparation method is done over a short period of time and
in a systematic way of putting the materials together.
This method is most suitable for the rainy season when there are plenty of
materials, e.g. weeds, to put into the compost. However, the place for making
compost should be well-drained and easy to protect from floods and excess rain.
The compost can be made either by piling in a heap or heaps, or in a pit or pits.
This method can also be used by vegetable growers when they clean their fields
before the next crop is planted. The residues left after the crop is finished and
harvested, such as stems and leaves from pumpkins, potatoes, tomatoes, chilli
peppers and courgettes/zucchini, leaves and stalks from cabbage, etc. and any
damaged crops that cannot be sold or eaten, can be collected together and organized
for making compost.
Indore Piling MethodSelecting the site
The following factors need to be considered:
1. The site should be accessible for receiving the materials, including water and/
or urine, and for frequent watching/monitoring and follow-up.
2. The site should be protected from strong sunlight and wind, e.g. in the shade
of a tree, or on the west or north side of a building or wall.
3. The site should be protected from high rainfall and flooding.
Preparing the site
1. Clear the site of stones, weeds and grasses, but do not cut down any young
trees. Instead, put the site so it is in the shade of the tree(s). The tree(s) will
grow, provide shade and protect the compost heap.
— 4 0 3 —
HOW TO MAKE AND USE COMPOST
2. Mark out the area for the compost heap. A minimum area is 1.25 m x 1.25 m.
If it is smaller than this, the heap will dry out quickly so compost will not be
made properly. The area can be larger, up to 3 m x 2.5 m.
3. Dig a shallow trench in the ground the same size as the compost heap. Make the
trench about 20–25 cm deep. The bottom and sides of the trench should be
smeared with water or a mixture of cow dung and water. This seals the pit so that
moisture with nutrients does not leak out of the base of the compost heap.
4. The foundation layer of compost making materials is placed in the trench or pit.
5. The trench holds moisture during the dry season.
6. Materials are added in layers to make the heap, as shown in Figure 6 and
described in more detail below.
The layers in making the compost heap
The foundation layer
1. Dry plant materials, e.g. strong straw and stalks of maize and sorghum, which
are thick and long, are used for the foundation. These need to be broken into
short lengths (about 10–15 cm long). The stalks can be crushed, and then chopped.
If possible let cattle lie down or sleep on them for one night. Walking cattle over
the stems and stalks, as in threshing, is a good way of breaking up the stalks.
2. Spread the dry materials evenly over the bottom of the trench to make a layer
15–25 cm thick, as deep as a hand. Then sprinkle water with a watering can or
scatter water evenly by hand over the dry plant materials so they are moist,
but not wet.
3. The foundation layer provides ventilation for air to circulate, and excess water
to drain out of the upper layers.
The three basic layers
1. The compost heap is built up of layers of materials, like in a big sandwich. The
basic sequence is:
— 4 0 4 —
CLIMATE CHANGE AND FOOD SYSTEMS RESILIENCE IN SUB-SAHARAN AFRICA
} Layer 1: A layer of dry plant materials, or mixture of dry plant materials
with compost making aids like good soil, manure and/or some ashes. The
layer should be 20–25 cm thick, i.e. as deep as a hand. The compost making
aids can be mixed with the water to make slurry. Water or slurry should be
scattered by hand or sprinkled with a watering can evenly over this layer
making it moist but not soaking wet.
} Layer 2: A layer of moist (green) plant materials, either fresh or wilted, e.g.
weeds or grass, plants from clearing a pathway, stems and leaves left over
from harvesting vegetables, damaged fruits and vegetables. Leafy branches
from woody plants can also be used as long as the materials are chopped
up. The layer should be 20–25 cm thick. Water should NOT be sprinkled or
scattered over this layer.
} Layer 3: A layer of animal manure collected from fresh or dried cow dung,
horse, mule or donkey manure, sheep, goat or chicken droppings. The animal
manure can be mixed with soil, old compost and some ashes to make a layer
5–10 cm thick. If there is only a small quantity of animal manure, it is best to
mix it with water to make slurry, and then spread it over as a thin layer 1–2 cm
thick.
2. Layers are added to the heap in the sequence, Layer 1, Layer 2, Layer 3, until the
heap is about 1–1.5 metres tall. The layers should be thicker in the middle than at
the sides so the heap becomes dome-shaped. If the heap is much taller than
1.5 metres, the microbes at the bottom of the heap will not be able to work well.
3. Layers 1 and 2 are essential to make good compost, but Layer 3 can be left out
if there is a shortage or absence of animal manure.
4. Place one or more ventilation and/or testing sticks vertically in the compost heap
remembering to have the stick long enough to stick out of the top of the heap.
Ventilation and testing sticks are used to check if the decomposition process is
going well, or not. A hollow stick of bamboo grass (Arundo donax) or bamboo
makes a good ventilation stick as it allows carbon dioxide to diffuse out of and
oxygen to diffuse into the heap. A testing stick is needed as it can be taken out
at regular intervals to check on the progress of decomposition in the heap.
— 4 0 5 —
HOW TO MAKE AND USE COMPOST
Making the covering layer
The finished heap needs to be protected from drying out, and also from animals
pushing into it and disturbing it.
1. The covering layer can be made of wet mud mixed with grass or straw, with or
without cow dung, or wide leaves of pumpkin, banana, fig trees, etc., or from
plastic, or any combination of these materials, i.e. mud plaster covered with
leaves or plastic, or leaves covered with plastic.
2. The cover should be put on both the sides and the top of the heap with only
the ventilation stick coming out of the top.
3. The covering layer:
} Prevents rain water from getting into the heap and damaging the compost
making process; and
} Helps keep heat inside the compost making heap. See the section on follow-
up for how to check on the heat and moisture in the compost.
4. The compost heap can also be protected by putting a ring of stones or making
a small fence around it.
5. The compost heap is best left untouched until there is mature compost inside
it, or it can be turned over, as described for the pit method. If the compost is
turned over, water should be sprinkled over the layers to keep all the materials
moist. It is not necessary to try and keep the original different layers when
turning over the compost – it is best if all the materials can be well mixed
together, then added in layers about 20–25 cm thick and water sprinkled or
splashed over them.
6. A mature compost heap is about half the height of the original heap, and
the inside is full of dark brown or black substance, humus, which smells
good. When the compost is mature, it should be very difficult to see the
original materials.
7. This mature compost can be used immediately in the field, or it can be covered
and stored until the growing season. When it is put in the field, it should be
covered quickly by soil so the sun and wind do not damage it, and the nitrogen
— 4 0 6 —
CLIMATE CHANGE AND FOOD SYSTEMS RESILIENCE IN SUB-SAHARAN AFRICA
does not escape to the atmosphere. Therefore, it is best to put compost on the
field just before ploughing, or at the same time as sowing the crop. For row
planted crops, it can be put in the furrow with the seed. For transplanted crops,
it can be put in the hole with the seedling.
Indore Pit Method
The Indore pit method is best done at the end of the rainy season or during the
dry season. It is important to make the pits where there is sufficient water available;
for example, by a pond, small dam, run-off from a road or track, etc. Women
should not be expected to carry water just for making compost. Waste water and
urine from people and animals can be collected in old containers, and used in
making compost.
The main reasons for making pit compost in the dry season are as follows:
1. After harvesting is complete, farmers can arrange their time to make compost
including working together in groups according to their local traditions to share
their labour.
2. If farmers have a biogas digester, the bioslurry from the digester can be used
to make high quality compost at any time of the year, but particularly during
the dry season.
3. The pits can be filled two or more times so that a large quantity of compost
can be made over the duration of the dry season.
4. If pit compost is made during the rainy season or in very wet areas, water can
get into the bottom of the pit. This will rot the materials producing a bad smell
and poor quality compost. In wet areas it is better to make compost through
the piling method.
5. Poor quality compost will not be productive and this can discourage farmers
and others from trying to make better quality compost.
6. It is very important to have frequent follow-up and control of the balance of
air and water in the materials being decomposed to make compost.

— 4 07 —
HOW TO MAKE AND USE COMPOST
Selecting and preparing the site
1. The site should be accessible for receiving the composting materials, including
water and urine, and for frequent watching/monitoring and follow-up.
2. The site should be protected from strong sunlight and wind. It should be in a
protected area, for example, in the shade of a tree, or on the west or north side
of a building or wall.
3. The pit or pits should be marked or have a ring of stones or small fence around
it or them so that people and animals do not fall into it or them.
4. The site should NOT be where floods can come.
Digging the pits
The aim is to have a series of three pits, one next to the other. The minimum size
for each pit should be:
} 1 metre deep (pits should NOT be deeper than 1 metre).
} 1–1.5 metres wide.
} 1–1.5 metres long (or longer).
However:
} The pits can be dug as they are needed – see Table 2 showing the flow of work.
} If a farmer and his/her family feel they have limited capacity, they can dig one
pit of the above size, but then they should probably make compost using the
Bangalore method (see next section).
} Smaller pits usually dry out too quickly so good quality compost is not made,
and this will discourage the farmer from making and using compost.
} Pits deeper than 1 metre can be cold at the bottom and the micro-organisms
cannot get enough oxygen to work properly.
} If compost is prepared by a group of farmers or students in an environment
club or youth group, they can make a wider and/or longer pit that can supply
all the families in the group. It also depends on the amount of composting
— 4 0 8 —
CLIMATE CHANGE AND FOOD SYSTEMS RESILIENCE IN SUB-SAHARAN AFRICA
materials they are able to collect and bring to the pit. See also the sections on
trench composting and the NADEP method, which are more suitable for compost
making by groups, and where large quantities of composting materials are
readily available.
} After the pit or pits are dug, they should be checked carefully to make sure there
is no leakage of water into the pit which could spoil the compost making process.
Layers for filling the pit
Before the pit is filled, the bottom and sides should be covered with a mixture of
animal dung and water – a slurry. If animal dung is not available, a mixture of
top soil and water can be used. This plaster helps seal the sides of the pit so that
moisture stays in the compost making materials.
The foundation layer
1. Dry plant materials, e.g. strong straw and stalks of maize and sorghum, which
are thick and long, are used for the foundation. These need to be broken into
short lengths (about 10–15 cm long). The stalks can be crushed, and then
chopped. If possible let cattle lie down or sleep on them for one or two nights.
Walking cattle over the stems and stalks, as in threshing, is a good way of
breaking up the stalks. The cattle will add their dung and urine to the stalks
making them more valuable for making compost.
2. Spread the dry materials evenly over the bottom of the pit to make a layer
20–25 cm thick. Then sprinkle water with a watering can or scatter water evenly
by hand over the dry plant materials so they are moist, but not wet.
3. This is a very important layer in making pit compost as it makes sure that air
can circulate through to the bottom of the pit.
— 4 0 9 —
HOW TO MAKE AND USE COMPOST
The three basic layers
1. The compost pit is filled with layers of materials, like in a big sandwich. The
basic sequence is:
} Layer 1: A layer of dry plant materials, or mixture of dry plant materials
with compost making aids like good soil, manure and/or some ashes. The
layer should be 20–25 cm thick, i.e. about the depth of a hand at the sides.
The compost making aids can be mixed with the water to make slurry. Water
or slurry should be scattered by hand or sprinkled with a watering can evenly
over this layer. The layer should be moist but not soaked.
} Layer 2: A layer of moist (green) plant materials, either fresh or wilted, e.g.
weeds or grass, plants from clearing a pathway, stems and leaves left over
from harvesting vegetables, damaged fruits and vegetables. Leafy branches
from woody plants can also be used as long as the materials are chopped
up. The layer should be 20–25 cm thick at the sides. Water should NOT be
sprinkled or scattered over this layer.
} Layer 3: A layer of animal manure collected from fresh or dried cow dung,
horse, mule or donkey manure, sheep, goat or chicken droppings. The animal
manure can be mixed with soil, old compost and some ashes to make a layer
5–10 cm thick. If there is only a small quantity of animal manure, it is best
to make slurry by mixing the dung in water, and then spread it over as a
thin layer 1–2 cm thick.
2. Layers are added to the pit in the sequence, Layer 1, Layer 2, Layer 3, until the pit
is full to the top with the middle about 30–50 cm higher than the sides. The layers
should be thicker in the middle than at the sides so the top becomes dome-shaped.
Layers 1 and 2 are essential to make mature compost, but Layer 3 can be
left out if there is a shortage or absence of animal manure.
3. Place one or more ventilation and/or testing sticks vertically in the compost
pit remembering to have the stick long enough to stick out of the top of the
pit. Ventilation and testing sticks are used to check if the decomposition process
is going well, or not.
— 410 —
CLIMATE CHANGE AND FOOD SYSTEMS RESILIENCE IN SUB-SAHARAN AFRICA
A hollow stick of bamboo grass (Arundo donax) or bamboo makes a good
ventilation stick as it allows oxygen to diffuse into the pit. A solid stick is
important as it can be taken out every few days to check on the progress of
decomposition of the materials in the pit.
Covering the pit
After the pit is full of compost making materials, the top should be covered with
wet mud mixed with grass and/or cow dung, and/or wide leaves such as those of
banana, pumpkin or even from fig trees, and/or plastic so the moisture stays inside
the pit, and rain does not get in to damage the decomposition process.
Note: Mark the place and/or cover the top with branches so animals and people
do not tread on the cover and break it.
The progress in making compost should be checked regularly by taking out the
ventilation or testing stick and checking it for heat, smell and moisture. The inside
of the pit should be hot and moist with a good smell. The top of the pit will also
sink down as the composting materials get decomposed.
Turning over and making compost throughout the dry season
1. In warm climates, about one month after the pit has been filled the compost
can be turned over and checked.
2. In cold climates, the compost making materials take two or more months to
start to decompose well. The rate of decomposition can be checked through the
use of the testing stick.
3. A good farmer or gardener will soon learn how to judge the best time to turn
over her or his compost.
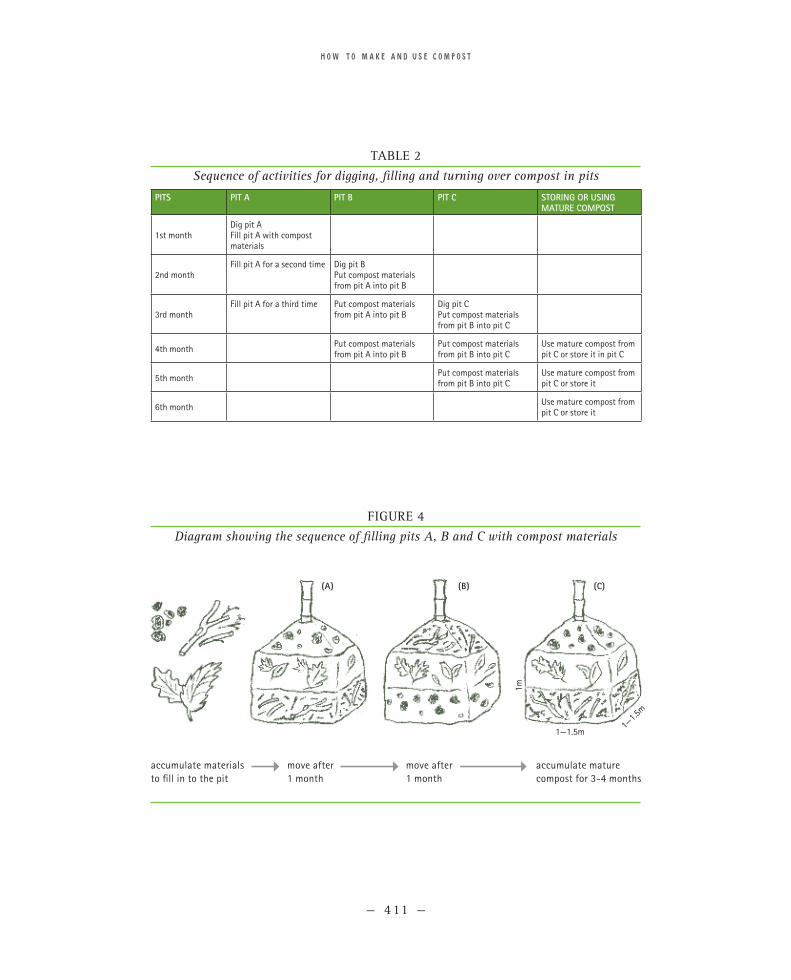
Table 2 and Figure 4 show the sequence of activities for digging, filling and
turning over compost in the three-pit system. This system spreads out the work
so that a farmer who wants to have a good quantity of quality compost can plan
and prepare it before the growing season.
— 411 —
HOW TO MAKE AND USE COMPOST
TABLE 2
Sequence of activities for digging, filling and turning over compost in pits
pits pit a pit b pit c storing or using mature compost
1st monthDig pit AFill pit A with compost materials
2nd monthFill pit A for a second time Dig pit B
Put compost materials from pit A into pit B
3rd monthFill pit A for a third time Put compost materials
from pit A into pit BDig pit C Put compost materials from pit B into pit C
4th month Put compost materials from pit A into pit B
Put compost materials from pit B into pit C
Use mature compost from pit C or store it in pit C
5th month Put compost materials from pit B into pit C
Use mature compost from pit C or store it
6th month Use mature compost from pit C or store it
1—1.5m1—
1.5m
1m
(a) (b) (c)
FIGURE 4
Diagram showing the sequence of filling pits A, B and C with compost materials
accumulate materials to fill in to the pit
accumulate mature compost for 3-4 months
move after 1 month
move after 1 month
— 41 2 —
CLIMATE CHANGE AND FOOD SYSTEMS RESILIENCE IN SUB-SAHARAN AFRICA
The sequence for making a good quantity of quality compost using the three-pit
method is as follows:
1. The cover is removed and all the materials are turned over into the second pit,
i.e. from pit A to pit B. It is important to put the materials from the top of pit
A into the bottom of pit B, and so on, with the materials from the bottom of
pit A getting to the top of pit B. The materials can be mixed together, but they
should be added in layers 20–25 cm thick and sprinkled with water to make
sure they stay moist, but NOT soaked.
2. At the same time check that the moisture and air balance is correct. If the
materials are too dry, more water should be sprinkled over them as they are
put into the pit. If the materials are too wet, add more dry plant material in
layers between the wet decomposing materials.
3. If the compost making is going well, you will find that the materials from pit
A do not completely fill pit B. You will also see the white threads of fungi and
many kinds of small organisms that are living on and decomposing the
composting materials. The composting materials will have started to turn dark
brown or black.
4. Pit A can now be filled for a second time with a new lot of composting materials
as described above. Both pits should be closed with a layer of mud or leaves
and/or plastic, as described above.
5. Again after about another month, the cover over pit B can be opened and the
materials turned into pit C, and the cover to pit A removed and the materials
in pit A turned over into pit B. At the same time check that the moisture and
air balance in the materials is good.
6. If the compost-making process is going well, after two months the materials in
pit B should be well decomposed, i.e. dark brown or black, with a good smell.
7. Pit A can now be filled for a third time with new composting materials, if they
are available.
— 41 3 —
HOW TO MAKE AND USE COMPOST
8. After a third or fourth month in warm climates, it should be possible to find
fully matured compost in pit C. The material should look like good dark soil
without any of the original materials visible. However, pit C may be only half
full after the first lot from pit B is put into it. In fact, pit C can store all the
compost until it is needed. Pit C should always be covered to prevent rain
getting in, nutrients getting out and the compost being spoiled.
9. Or, the mature compost can be taken out, piled up and covered to be stored in
a dry, cool and shady place until it is needed. It must be covered so that it does
not blow away or the nutrients would be destroyed by sunlight or rain.
10. The mature compost can be taken out and put on the field just before
ploughing, or mixed into the soil immediately by hand. The compost must
be covered with soil so that the nutrients, particularly nitrates, are not
destroyed by the sunlight.
With enough moisture and heat, compost making is fast under Ethiopian
conditions. Four months after filling the first pit, it is possible to have compost to
use on the land. By the sixth month, a good farmer can accumulate three lots of
compost, enough for half a hectare of land.
BANGALORE COMPOST PREPARATION METHODS
The Bangalore method is not as precise or as demanding as the Indore method
because the composting materials are added as they become available. It is highly
suitable where there is a shortage of both composting materials and water. The
Bangalore method can be used for both piling and pit methods, but the pit method
is preferred in Ethiopia. This is because the pit holds moisture better than the heap,
and the wind cannot blow away the materials so easily in the dry season. However,
inside house compounds, the piling method is also convenient.
— 41 4 —
CLIMATE CHANGE AND FOOD SYSTEMS RESILIENCE IN SUB-SAHARAN AFRICA
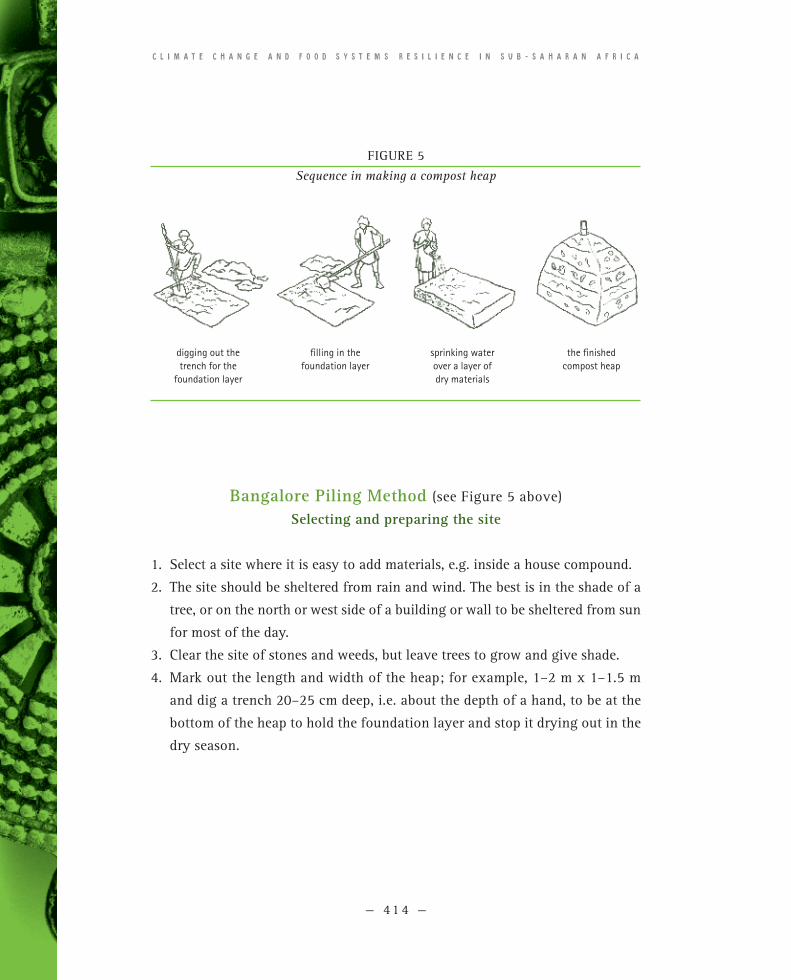
Bangalore Piling Method (see Figure 5 above)
Selecting and preparing the site
1. Select a site where it is easy to add materials, e.g. inside a house compound.
2. The site should be sheltered from rain and wind. The best is in the shade of a
tree, or on the north or west side of a building or wall to be sheltered from sun
for most of the day.
3. Clear the site of stones and weeds, but leave trees to grow and give shade.
4. Mark out the length and width of the heap; for example, 1–2 m x 1–1.5 m
and dig a trench 20–25 cm deep, i.e. about the depth of a hand, to be at the
bottom of the heap to hold the foundation layer and stop it drying out in the
dry season.
FIGURE 5
Sequence in making a compost heap
digging out the trench for the
foundation layer
sprinking water over a layer of dry materials
filling in the foundation layer
the finished compost heap
— 41 5 —
HOW TO MAKE AND USE COMPOST
Making the heap
The foundation layer
1. Prepare the foundation layer from dry plant materials such as old straw,
stalks of maize and sorghum, or old cabbage stalks, rose and hedge trimmings
from gardens.
2. Use straw and maize and sorghum stalks as livestock bedding for one or two
nights so that they get broken up and mixed with urine and dung.
3. Collect the materials and put them into the trench to make an even layer 15–25 cm
deep. Sprinkle or scatter some water over the layer so it is moist but not wet.
4. Cover the layer with a little soil and some large leaves from banana, or pumpkin,
or a fig tree, or even a sheet of plastic to prevent the materials drying out or
being blown away.
Making the other layers
1. During the week, collect materials and put them in a convenient container such
as an old jerry can, or next to the compost heap. Dry plant materials can be
mixed with fresh moist ones, or the two types of plant material can be kept
separately. The farmers in Ethiopia prefer to mix the dry and moist plant
materials together. These materials can come from spoiled animal feed where
animals have been stall fed, from cleaning the house and compound, clearing
paths, weeding, stems and leaves after harvesting vegetables, preparing vegetables
for making food, damaged fruits and vegetables, etc.
2. The dry materials can be used as livestock bedding for one or two nights so they
collect urine and dung, and the animals can walk over them to break them up.
3. At the end of a week, remove the large leaves or plastic covering the top of the
foundation layer so they can be used again, or leave the leaves to become part
of the compost if they are too damaged to be used again.
— 41 6 —
CLIMATE CHANGE AND FOOD SYSTEMS RESILIENCE IN SUB-SAHARAN AFRICA
4. Make a mixture of compost making aids like good soil, old manure and/or some
ashes as a fine powder. Mix these with the dry plant material, or with the mixture
of dry and moist plant material.
5. First add the layer of dry plant materials that have been used as bedding with
the animal urine and dung in them, and then put the layer of green plant
materials on top, OR add a layer of the mixed dry and moist plant materials.
Make each layer 15–25 cm thick with the middle thicker than at the sides so
that the heap becomes dome-shaped (see Figure 5).
6. Cover each layer with a thinner layer of animal manure or soil and/or big leaves
like those from banana or pumpkin or fig trees so that the composting materials
do not dry out. Animal manure can be left out if it is not easy to get, but the
soil is important.
7. Repeat this process each week, or whenever there are enough materials
collected to make one or two new layers, until the heap is about 1–1.5 metres
tall. Make the centre of the heap higher than the sides so that the heap has a
dome shape (see Figure 6).
8. Put a testing and/or ventilation stick into the middle of the heap.
Making the covering layer
The finished heap needs to be protected from drying out, and also from animals
pushing into it and disturbing it.
1. The covering layer can be made of wet mud mixed with grass or straw, with or
without cow dung, or wide leaves of pumpkin, banana, fig trees, etc., or from
plastic, or any combination of these materials, i.e. mud plaster covered with
leaves or plastic, or leaves covered with plastic.
2. The cover should be put on both the sides and the top of the heap with only
the ventilation stick coming out of the top. The covering layer:
} Prevents rain water from getting into the heap and damaging the compost
making process; and
} Helps keep heat inside the compost making heap. See the section on follow-
up for how to check on the heat and moisture in the compost.
— 41 7 —
HOW TO MAKE AND USE COMPOST
3. The compost heap can also be protected by making a small fence around it
from branches.
4. The compost heap is best left untouched until there is mature compost inside
it, or it can be turned over, as described for the pit method. If the compost is
turned over, water should be sprinkled over the layers to keep all the materials
moist. It is not necessary to make the different layers when turning over the
compost – all the materials can be well mixed together, then added in layers
about 20–25 cm thick and water sprinkled or splashed over them.
Where the climate is warm, mature compost can be ready in about four months.
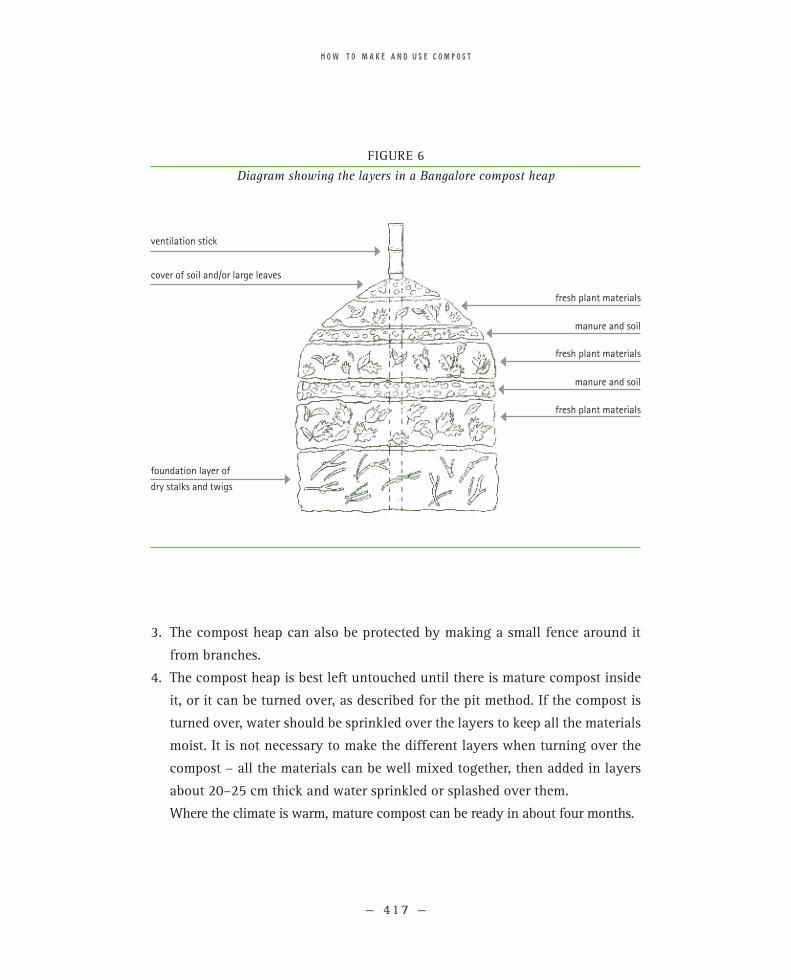
FIGURE 6
Diagram showing the layers in a Bangalore compost heap
cover of soil and/or large leaves
ventilation stick
foundation layer of
dry stalks and twigs
fresh plant materials
manure and soil
fresh plant materials
manure and soil
fresh plant materials
— 41 8 —
CLIMATE CHANGE AND FOOD SYSTEMS RESILIENCE IN SUB-SAHARAN AFRICA
Bangalore Pit MethodSelecting and preparing the site
1. It should be in a place that is easy to take the materials, including water and
urine, to the pit as well as for watching and follow-up.
2. The site should be protected from strong sunlight and wind. It can thus be, for
example, in the shade of a tree, or on the west or north side of a building or wall.
3. The pit should be marked or have a ring of stones or a fence of branches around
it so that people and animals do not fall into it.
4. The site should be protected and away from where floods can come.
Digging the pit
1. The minimum size of a pit should be:
} 1 metre deep (pits should NOT be deeper than 1 metre)
} 1–2 metres wide
} 1–2 metres long
2. If a farmer and his/her family, or urban household, can collect more compost
making materials, the pit can be made longer, but NOT either wider
or deeper.
3. If a pit is deeper than 1 metre, the material at the bottom does not get decomposed
because many of the micro-organisms cannot live so deep down as the oxygen
they need will not reach them.
4. Before any materials are put into the pit, the sides and bottom should be checked
to make sure no water is leaking into the pit.
5. The bottom and sides should be plastered with a mixture of fresh animal dung
and water, or top soil and water, to seal the surface so that the moisture in the
compost materials is kept in the pit.
— 41 9 —
HOW TO MAKE AND USE COMPOST
Filling the pit
The foundation layer
1. Dry plant materials, e.g. strong straw, stalks of maize and sorghum or tall grasses,
as well as rose and hedge clippings from gardens, are used for the foundation. These
need to be crushed or chopped or broken into short lengths (about 10–15 cm). If
possible, let the domestic animals walk over them and sleep on them for one or
two nights so the materials get broken up and mixed with urine and dung.
2. Spread the materials evenly over the bottom of the pit to make a layer 15–25 cm
thick. Then sprinkle/scatter water evenly so that the materials are moist, but
not wet.
3. This is a very important layer in making compost in a pit as it makes sure that
air can circulate to the bottom.
4. Cover the foundation layer with large leaves, e.g. those of pumpkin, banana,
fig leaves etc., and/or plastic to keep the material moist.
Putting the other layers into the pit
1. Each week, collect materials and put them in a container such as an old jerry
can or pile them next to the compost pit. Mix the fresh moist materials with
dry ones. These materials can come from spoiled animal feed, old animal
bedding, from cleaning the house and compound, preparing vegetables for
food, clearing paths, weeding, stems and leaves after harvesting vegetables,
damaged fruits and vegetables, etc.
2. If the farmer has a biogas digester, the bioslurry can be collected also to be mixed
with the other materials. The bioslurry is an excellent compost making aid.
3. At the end of a week, remove the large leaves or plastic covering the top of the
foundation layer so they can be used again, or leave the leaves to become part
of the compost if they are too damaged to be used again.
— 4 2 0 —
CLIMATE CHANGE AND FOOD SYSTEMS RESILIENCE IN SUB-SAHARAN AFRICA
4. Make a mixture of compost making aids like good soil, manure and/or some
ashes as a fine powder. Mix these with the dry plant material, or with the mixture
of dry and moist plant material.
5. Add the prepared composting materials in layers. Each layer is 15–25 cm thick
at the edge and a bit thicker in the middle so that the heap becomes dome-
shaped (see Figure 6).
6. Cover each of the layers with a thin layer of soil and/or big leaves like those from
banana or pumpkin or fig trees so that the composting materials do not dry out.
7. Repeat this process each week, or whenever there are enough materials collected
to make one or two new layers, until the pit is full. Make the centre of the layers
in the pit higher than the sides so that the top has a dome shape.
8. Put a ventilation and/or testing stick into the middle of the pit.
Making the covering layer
The pit full of composting materials needs to be protected from drying out, and
also from animals disturbing it.
1. The covering layer should be made of mud plaster, with or without cow dung,
with only the ventilation stick coming out of the top. It is then covered with
wide leaves of pumpkin, banana, fig trees, etc. or plastic can also be used to
protect the top of the pit. The leaves or plastic:
} Prevent rainwater from getting inside the pit; and
} Help keep heat inside the pit.
2. The compost pit can be left untouched until there is mature compost inside it,
or it can be turned over and checked for the progress in decomposition. The
top of the pit will sink down as the compost materials get decomposed. However,
if the compost is turned over, it will lose moisture. So, it is best only to turn
compost over if there is enough water and/or urine to make it moist again while
it is being turned over.
3. The process for turning over the compost from the pit is the same as that
described for the Indore pit method.
— 4 21 —
HOW TO MAKE AND USE COMPOST
4. In a warm climate, mature compost can be made in three to four months. In
colder climates, decomposition can take six months or a year.
5. The mature compost can be left covered and stored in the pit until it is needed
for adding to the soil.
TRENCH COMPOSTING
Trench composting is suitable for groups. These can be groups of farming households,
environmental clubs in schools, or youth group members who agree to work
together to collect the materials, make the compost, and then share it among the
members, or use it in their common garden.
Trench composting is good for mixed groups of men and women because men
can do the heavy work of digging the trench and turning the compost materials,
while the women can contribute materials and help carry the mature compost to
where it is needed, including their own fields and gardens.
1. Plan to make compost in a trench at the end of the rainy season when there is
plenty of suitable compost making materials available from clearing paths and
compounds, etc., so that the mature compost is ready for the next growing
season, or for making nursery beds for raising tree and vegetable seedlings.
2. The trench should be made at a convenient place for the members of the group
to bring the collected materials; for example, near a path used by the members.
It should also be under the shade of a tree to protect the people working to
make the compost from getting too hot in the sun. In some communities, the
people making and turning the compost do it in the evening or even at night
to prevent getting overheated. The strong smell that can come from decomposing
materials is also reduced in the cool of the evening or night.
3. A good size for the trench is as follows:
} 0.5–1 metre deep, but not deeper than 1 metre
} 1–1.5 metres wide
} 2.5 metres or longer if there are plenty of materials, even up to 10 metres long
— 4 2 2 —
CLIMATE CHANGE AND FOOD SYSTEMS RESILIENCE IN SUB-SAHARAN AFRICA
How to prepare and fill the trench
1. Mark out the size of the trench. Note: the length of the trench can be increased
as more materials become available.
2. Dig down to 0.5–1 m and put the soil in a pile to one side of the trench. The
soil is added in layers between the composting materials and/or used to cover
the top of the filled trench.
3. The group members collect and bring materials from their houses, home
compounds, cleaning paths, weeding, after harvesting vegetables, etc., if possible
after having animals lie on the materials for one or more nights.
4. Look for and collect dry plant materials, such as long grasses and matting,
sorghum and maize stalks to make a foundation layer. Get them broken up by
animals walking and lying down on them. Put these materials as a bottom layer
in the trench. Sprinkle/scatter water over the dry materials until they are moist,
but not wet.
5. Mix all the collected materials together. Some or all of the following are suitable:
} Cleanings from the house and from cooking;
} Crop residues – leaves and stalks from harvesting and clearing/cleaning
vegetable fields;
} Grasses;
} Chicken and goat and sheep droppings, cow dung; and
} Ashes, etc.
Add some old compost as a starter (like yeast).
6. Put the mixed materials in the trench in layers, each 20–25 cm thick at the
sides and thicker in the middle.
7. Sprinkle/scatter water, or urine mixed with water over the materials, until
they are moist but not wet. Any type of wastewater, even after washing clothes
with hard washing soap, (but NOT with powder or liquid detergents) can be
used for wetting.
8. Cover this layer with a thin layer of the soil taken from digging the trench.

— 4 2 3 —
HOW TO MAKE AND USE COMPOST
9. Repeat this process of making layers until the trench is full and the middle is
25–50 cm higher than the surrounding ground.
10. Mix the soil that was dug out from the trench with straw, grasses, cow dung
and water, in the same way as making a mud plaster to cover the walls of a
house. Use this mixture to make a complete cover and seal over the top of the
compost materials. Regularly check the mud plaster cover and repair cracks or
other types of damage.
11. Put ventilation/testing sticks in the compost materials at about 1 metre intervals.
12. Finally, cover the trench with thatching grass or wide leaves of banana or
pumpkin or fig trees, and/or plastic to keep in the moisture and heat.
13. Regularly use the testing sticks to monitor the progress of compost making.
14. The covered trench can be left untouched for three to four months, or longer,
by which time mature compost will have been made. Evidence of compost
making is seen first in the heat, and then in the fact that the heap shrinks down,
and weeds start to grow on the mud cover.
How to turn over trench compost
1. After two months, the cover can be opened and the compost turned over. At
the same time, the moisture balance and decomposition process can be checked.
However, if the decomposition process is not complete, the compost will have
a strong smell. It is best to do the turning over process during the early morning,
or in the evening, or even at night to reduce the smell.
2. Turning over the compost is best done by digging out all the compost from about
50 cm at one end of the trench, and putting this outside the trench. Then the
remaining compost is turned over in units of 50 cm into the trench so the materials
at the top are put at the bottom and those at the bottom are put on top. The materials
taken out from the first 50 cm strip are put back at the end of the trench.
This is the same method as that used in double digging a vegetable bed.
3. If the materials are not well decomposed and too dry, water can be sprinkled
over the materials as they are turned over.
— 4 2 4 —
CLIMATE CHANGE AND FOOD SYSTEMS RESILIENCE IN SUB-SAHARAN AFRICA
4. If the materials are too wet and smelling of ammonia, more dry materials can
be added in the turning over process.
5. After turning over, the materials need to be covered and sealed as described above.
THE NADEP METHOD
The NADEP method is a development of the Indore method. It is named after its
inventor, Narayanrao Pandaripade who was also called ‘Nadepkaka’. This system
is suitable for organized groups, such as growers associations, cooperatives, school
environment clubs and youth groups, to make large quantities of high quality
compost which they can use for themselves, or sell, for example, to vegetable
growers, where high levels of nutrients are required.
The NADEP method produces nitrogen-rich compost using the least possible amount
of cow dung. The system also minimizes problems from pests and diseases, and does
not pollute the surrounding area because the compost is made in a closed tank.
After the NADEP tank has been filled with compost making materials and
sealed, it is left for the decomposition process to take place without any further
handling until the mature compost is required.
Selecting and preparing the site for the NADEP tank
The NADEP method uses a permanently built tank of mud or clay bricks, or cement
blockettes. It is, therefore, important to choose the permanent site for the tank
with care.
1. Select a site where there is enough space to collect the materials together before
filling the tank, and where mature compost can be stored until it is needed.
2. The site needs to be near a source of water.
3. The site should be sheltered from rain, floods and wind. The best is in the shade
of a tree, or on the north or west side of a building or wall. However, air must
be able to circulate all round the tank.
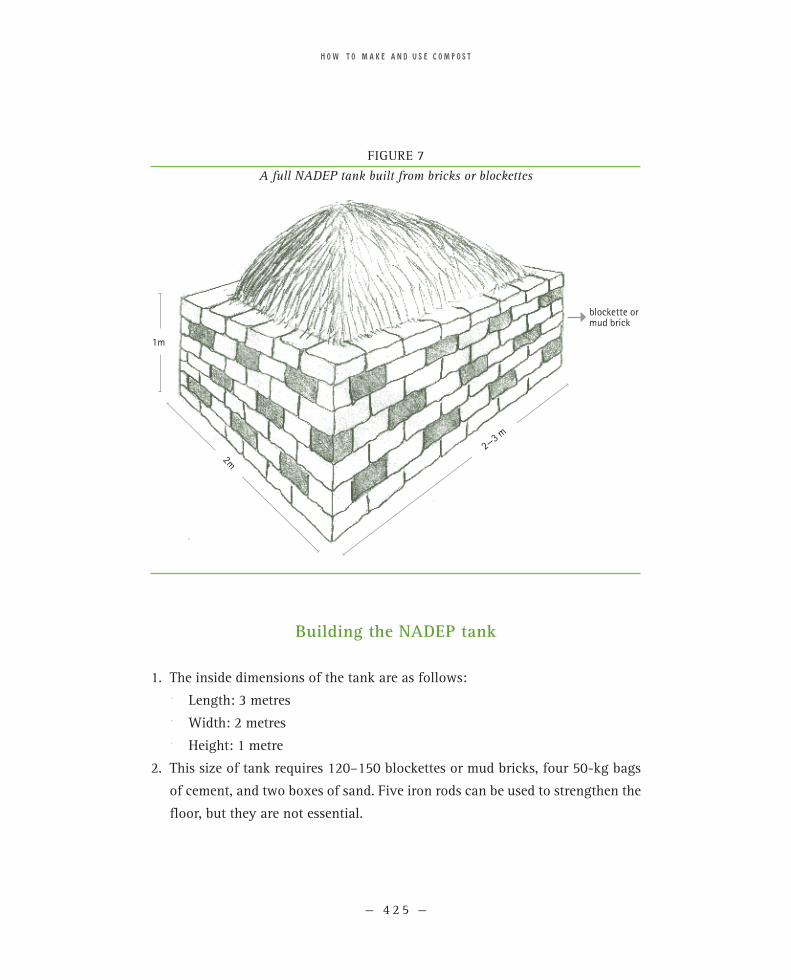
— 4 2 5 —
HOW TO MAKE AND USE COMPOST
2m
1m
2—3 m
Building the NADEP tank
1. The inside dimensions of the tank are as follows:
} Length: 3 metres
} Width: 2 metres
} Height: 1 metre
2. This size of tank requires 120–150 blockettes or mud bricks, four 50-kg bags
of cement, and two boxes of sand. Five iron rods can be used to strengthen the
floor, but they are not essential.
FIGURE 7
A full NADEP tank built from bricks or blockettes
blockette or mud brick
— 4 2 6 —
CLIMATE CHANGE AND FOOD SYSTEMS RESILIENCE IN SUB-SAHARAN AFRICA
3. The building should be done by a properly qualified mason, i.e. someone who
knows how to build such a structure.
4. The floor of the tank is made of bricks or blockettes laid on the ground and
covered with a layer of cement.
5. Each of the four walls has three rows of holes or gaps between the bricks or
blockettes, as shown in Figure 7.
6. After the tank is built, the walls and floor are covered with a light plaster of
fresh cow dung mixed with water, and then the plaster is left to dry.
Filling the tank
A NADEP tank is filled in one or two days of hard work. It has to be done by a team.
Before filling the tank, the following materials must be collected together:
1. Dry and green plant materials: 1 400–1 500 kg (or 14–15 sacks) are needed.
Grass, hay or straw that has left over from feeding animals, or that has been
damaged by rain, is very suitable.
2. Cow dung or partly dried bioslurry (the discharge from a biogas digester):
90–100 kg or 10 sacks.
3. Dried soil that has been collected from cattle pens, cleaning drains, paths, etc.:
1 750 kg are needed. The soil should be sieved to remove old tins, plastic, glass,
stones, etc. Soil that contains cattle urine makes it very productive in the
compost making process.
4. Water: the amount varies with the season and the proportion of dry to green
plant materials available. However, usually an equivalent amount to plant
materials is needed, i.e. 140–150 litres.
5. If urine from cattle and/or people is available, it should be diluted in the
proportion of 1 part urine for 10 parts water (1 jug of urine put into 10 jugs of
water in a bucket).
6. Before starting to fill the tank, the sides and floor of the tank are thoroughly
wetted with slurry made from fresh cow dung mixed into water.
7. The three layers used to fill the tank are as follows:
— 4 2 7 —
HOW TO MAKE AND USE COMPOST
} First layer: use 100–150 kg of dry or mixed dry and green plant materials to
make a layer 15–25 cm thick at the sides, and slightly thicker in the middle.
} Second layer: Mix 4 kg of cow dung or 10 kg of fresh biogas slurry in
25–50 litres of water and sprinkle or scatter it over the plant materials so
they get completely moistened.
} Third layer: Cover the wet plant waste and cow dung or slurry layer with
50–60 kg of clean, sieved top soil.
8. Continue to fill the tank like a sandwich with these three layers put in sequence.
Put more materials in the middle of the tank than around the sides. This will
give a dome shape to the filled tank with the centre 30–50 cm higher than
the sides (see Figure 7).
9. Cover the last layer of plant materials with a layer of soil 7–8 cm thick. Make
a cow dung plaster and cover the soil so that there are no cracks showing. The
top of the filled tank can also be covered with plastic, particularly to protect
the compost making process during rainy seasons.
10. After the tank is filled, the progress of compost making can be tested by pushing
a stick into the tank through the gaps in the wall. In a school or agricultural
college, the students can monitor the changes in temperature by inserting a
long thermometer, e.g. a soil thermometer.
11. As the materials decompose in the compost making process, the top of the filled
tank will shrink down below the sides of the tank.
Following up on the NADEP compost making process
It is important to keep the contents of the tank moist, i.e. with a moisture content
of 15–20 percent.
1. Check the mud plaster seal on the top of the tank and fill any cracks that appear
with cow dung plaster.
2. Pull out any weeds if they start to grow on the surface, as their root systems
can damage the cover and take water out of the compost.

— 4 2 8 —
CLIMATE CHANGE AND FOOD SYSTEMS RESILIENCE IN SUB-SAHARAN AFRICA
3. If the atmosphere gets very dry and hot, such as in the dry season, water can
be sprayed through the gaps in the walls of the tank.
The decomposition process for compost to be made takes about three to four months
in a warm climate. When it is mature, it is dark brown, moist, and with a pleasant
earthy smell: little can be seen of the original materials that were put into the tank.
This mature compost should not be allowed to dry out or it will lose a lot of its
nitrogen. However, before the compost is mixed to make nursery soil, it should be
sieved. The sieved compost is used in making the soil for the nursery beds, and the
remainder is kept and added to a new compost-making process. One NADEP tank
of the size described here can produce about 300 tonnes of high quality compost.
FOLLOWING UP ON CONDITIONS IN THE COMPOST MAKING PROCESS
When the compost pit has been filled or the piling of materials is complete, it
should be checked regularly to make sure that there is enough but not too much
moisture, and that it is getting hot, at least in the first two to three weeks.
For compost made by piling materials on the ground:
} The stick can be inserted or pushed in horizontally between two layers about
half way up the pit; or
} The stick can be pushed in vertically in the centre of the heap so it goes through
all the layers. However, it is best if the stick or length of bamboo is placed in
the centre after the foundation layer has been laid and then the layering process
is completed with the stick remaining vertical.
} The stick must be longer than the height of the heap so that it can be pulled
out and examined.
For compost made in a pit:
} The stick or length of bamboo is pushed in vertically through the whole layer,
or put in place while the compost pit is being filled.
} The stick must be longer than the depth of the pit.

— 4 2 9 —
HOW TO MAKE AND USE COMPOST
Checking heat and moisture
One week after all the materials have been put in a heap or pit, and it has been
covered, remove the inserted stick and immediately place it on the back of
your hand.
1. If the stick feels warm or hot and the smell is good, the temperature is normal
for the compost and good decomposition has started.
2. If the stick feels cool or cold and there is little smell, the temperature is too low
for good composition. This usually means that the materials are too dry, and
some water and/or urine should be added.
3. If the stick is warm and wet, and there is a bad smell like ammonia, this indicates
that there is too little air and too much water in the compost. The materials will
be rotting and not making good compost.
Correcting the problems If the materials are cool and dry
1. Lift up the top layers and put them to the side of the pit or heap.
2. Sprinkle water or cattle urine or cattle urine diluted with water on the material
in the bottom.
3. Then put back the material in layers of about 25 cm each sprinkling water or
a mixture of water and urine over each.
4. Replace the testing stick and cover the heap or top of the pit with soil, leaves,
plastic etc., as described earlier.
If the materials are too wet
1. Collect some more dry plant materials and/or some old dry compost. Break up
and mix the materials. If old dry compost is not available, use only the dry
plant materials.
— 4 3 0 —
CLIMATE CHANGE AND FOOD SYSTEMS RESILIENCE IN SUB-SAHARAN AFRICA
2. Lift off the top of the heap or take out the top half of the materials from the pit
and put them to one side.
3. Mix the new dry materials with the wet compost materials in the bottom.
4. Put back the materials from the side of the heap or pit. If these materials are
wet and decaying, put in alternate layers of new dry plant materials with the
wet materials.
5. If the top materials are moist and brown showing compost making has started,
put them back as they are.
6. Put back the vertical testing stick.
7. Do NOT seal the top but make a new test after a week.
} If the stick is warm or hot and the smell is good, good compost making has
started and the heap or top of the pit can be sealed and covered.
} Testing for heat and moisture should be done every week to 10 days until
mature compost is made.
QUALITIES AND USE OF GOOD COMPOST
Although the quality of compost is best evaluated through the growth and
productivity of the plants grown on soil treated with it, it is possible to evaluate
compost quality through seeing, touching and smelling:
} Good quality compost is rich in plant nutrients and has a crumb-like structure,
like broken up bread.
} It is black or dark brown and easily holds moisture, i.e. water stays in it, and
it does not dry out fast.
} It has a good smell, like clean newly-ploughed soil, with a smell somewhat like
that of lime or lemon.

— 4 31 —
HOW TO MAKE AND USE COMPOST
Using compost
} Mature compost is best stored in a pit or heap until it is needed. If it is kept dry
and covered, mature compost can be stored for several weeks without deteriorating.
} The stored mature compost should be kept in a sheltered place, e.g. under the
shade of a tree or in a shed, and covered with leaves and/or soil and sticks to
prevent the nutrients escaping to the atmosphere, and animals trampling on
and damaging the mature compost heap.
} Mature compost should be taken to the field early in the morning or late in the
afternoon.
} For crops sown by broadcasting, the compost should be spread equally over
the field, or the part of the field chosen to be treated with compost. The compost
should be ploughed in immediately to mix it with the soil and prevent loss of
nutrients from exposure to the sun and wind.
} For row planted crops, e.g. maize, sorghum and vegetables, the compost can
be put along the row with the seeds or seedlings.
} For trees, compost is put in the bottom of the planting hole and covered by
some soil when the seedling is planted out. It can also be dug into the soil
around the bottom of a tree seedling after it has been planted.
} Time and effort are needed to make good compost, so it is worthwhile to also
put in time and effort into using it properly in the field.
Problems in using compost
Improper use: The aim of preparing compost is to increase soil fertility and crop yields.
Sometimes, a farmer will try and spread a small amount of compost over a wide area,
and then be disappointed when he/she does not see any improvements to his/her soil
and crops. If only a small amount of compost has been made, it is best to put it on a
small area of land than spread it thinly over a wide area. Every farmer must aim to

— 4 3 2 —
CLIMATE CHANGE AND FOOD SYSTEMS RESILIENCE IN SUB-SAHARAN AFRICA
produce enough compost for her/his particular farmland to get a better yield (return).
A guide on how much to add is given in the next section. Compost should not be left
exposed to sun and wind on the surface of the soil, but buried immediately. Compost
should not be added to empty fields. This is a waste of time and effort. By the time
the crop gets sown, the compost will have lost a lot of its nutrients and make the
farmer disappointed with his/her effort to make and use compost.
Carrying compost: Compost is bulky. For best results a farmers needs to carry up
to 30 to 70 sacks (3–7 tonnes) of compost to cover a one-hectare field.
BOX 3FARMERS SOLvING THE PROBLEM OF CARRYING COMPOST
The farmers of Adi Abo Mossa near Lake Hashengi in Ofla of Tigray and in Gimbichu
of Oromiya Regions have solved this problem by using their donkeys to carry the
sacks containing mature compost from the compost pit to the field. Other farmers, in
Adi Nefas, have organized the making of compost to be near their fields so they only
need to carry the mature compost a short distance. If farmers are seriously convinced
about the usefulness of compost, they find their own ways to solve these problems.
AMOUNT OF COMPOST FOR ONE HECTARE
Where soil fertility has been lost through many years of land degradation,
100–150 kg of chemical fertilizer, such as urea and DAP recommended by the
Ethiopian government, can improve the yield, often dramatically if there is enough
rain, in just one year. However, the effects of chemical fertilizer last for only one
growing season, so it has to be added every year.
— 4 3 3 —
HOW TO MAKE AND USE COMPOST
One tonne of compost is not enough to get the same increase in yield immediately
in the year it is added to the soil for the first time. This is because the amount of
main plant nutrients (NPK) found in one tonne of compost is lower than those in
100 kg of chemical fertilizer. However, the effects of compost last for two or more
growing seasons.
In Europe, where the soils are cold and there is much rain, the general guideline
is that 20–25 tonnes of compost are needed to replace 100–150 kg of chemical fertilizer.
The range is because the nutrient content of compost depends on the materials used
to make the compost. Compost made only with plant materials usually has a lower
nutrient content than compost made by including animal dung and urine.
In Ethiopia, more research is needed to find out how much compost is needed
to get good yields in the different agro-ecological zones of the country. However,
in Tigray, it has been found that compost added at the rate of 3.2–6 tonnes per
hectare can give greatly improved yields, which are as good as, if not better than
those from chemical fertilizer (see Edwards et al., 2007). In wetter areas, farmers
find that 5–8 tonnes per hectare can improve crop yields.
A rough guide on amounts of compost that can be made and used by farmers in Ethiopia
The following is a guide on the amount of compost to aim to produce under
different environmental conditions:
} Mature compost to give a rate of 8–10 tonnes per hectare can be achieved in
areas where there are plenty of composting materials, a good water supply and
labour. Farmers working in groups are more likely to be able to produce large
quantities of good quality compost than farmers working alone. These quantities
have been achieved in Adi Abo Mossa village in Southern Tigray and Gimbichu
district in Oromiya Regions.
} Mature compost to give a rate of around 6 tonnes per hectare can be achieved
where there are medium amounts of composting materials, and water and labour
— 4 3 4 —
CLIMATE CHANGE AND FOOD SYSTEMS RESILIENCE IN SUB-SAHARAN AFRICA
are available. These quantities have been achieved by farmers working in Central
Tigray near the town of Axum.
} Mature compost to give a rate of around 3.5 tonnes per hectare can bring
improved yields. This can be achieved even in areas with low availability of
composting materials, as long as there is enough water to moisten the composting
materials. These rates have been achieved by farmers in the semi-arid eastern
parts of Tigray.
} Where there are only small amounts of composting materials, e.g. for farmers
who have very small plots of land and for women-headed households, working
together to fill a common pit can make better quality compost than working
alone.
} If only a small quantity of compost is made, it is important to apply it properly
to a small piece of land to make it as useful as possible, instead of spreading it
thinly over a wider area.
} Soil given compost in one year will not need it again in the next year as the
good effects last for more than one growing season. The new compost can then
be used for the part of the field that had no compost the previous year. Farmers
that are able to apply the equivalent of 8–10 tonnes per hectare say that the
good effects last for up to three years.
Planning to make good quality compost
The following factors need to be discussed and decisions made in order to prepare
enough compost for a chosen piece of land:
} Making and using compost correctly needs labour, so farmers and their families
have to be prepared to work hard to make good compost, and get good results
from using it correctly.
} Every farmer, agricultural agent, supervisor and expert working in the area
should be convinced about the use and importance of compost. If everyone is
convinced, then all will be willing to work hard to get good results.
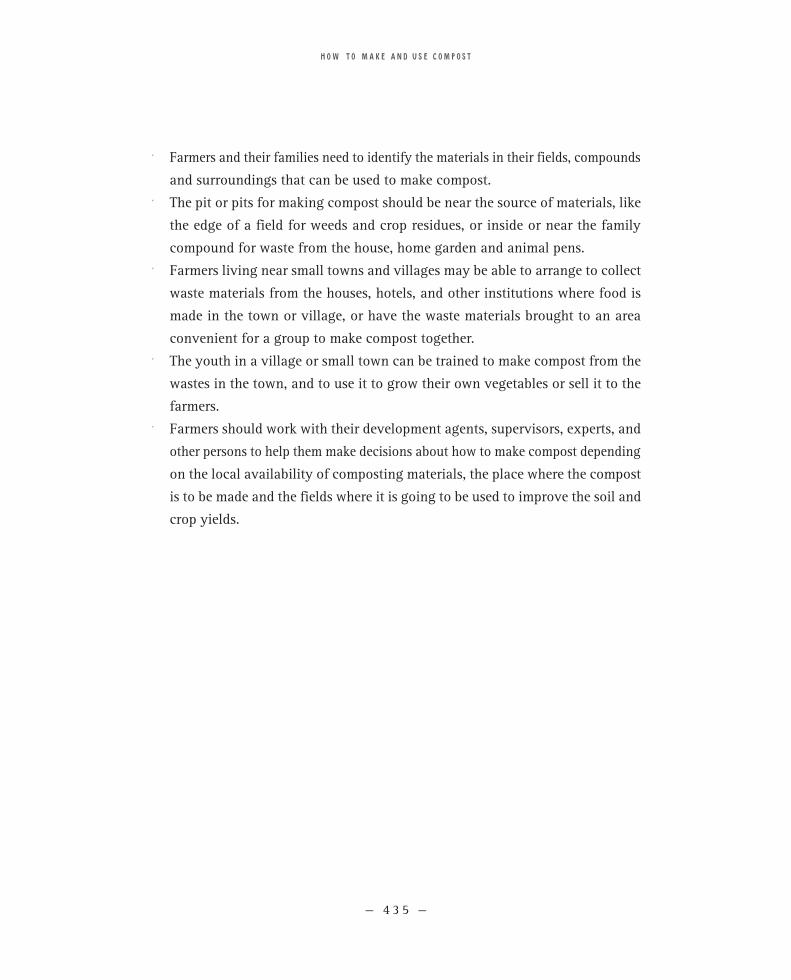
— 4 3 5 —
HOW TO MAKE AND USE COMPOST
} Farmers and their families need to identify the materials in their fields, compounds
and surroundings that can be used to make compost.
} The pit or pits for making compost should be near the source of materials, like
the edge of a field for weeds and crop residues, or inside or near the family
compound for waste from the house, home garden and animal pens.
} Farmers living near small towns and villages may be able to arrange to collect
waste materials from the houses, hotels, and other institutions where food is
made in the town or village, or have the waste materials brought to an area
convenient for a group to make compost together.
} The youth in a village or small town can be trained to make compost from the
wastes in the town, and to use it to grow their own vegetables or sell it to the
farmers.
} Farmers should work with their development agents, supervisors, experts, and
other persons to help them make decisions about how to make compost depending
on the local availability of composting materials, the place where the compost
is to be made and the fields where it is going to be used to improve the soil and
crop yields.

— 4 3 6 —
CLIMATE CHANGE AND FOOD SYSTEMS RESILIENCE IN SUB-SAHARAN AFRICA
SOURCES AND FURTHER READING
Arefaine Asmelash. 1994 EC/2002 GC. Dekuaie tefetro: intayn bkhmeyn (Making compost: what it is, and how is it made). In Tigrinya. Tigray Bureau of Agriculture and Natural Resources and Institute for Sustainable Development, Addis Ababa, Ethiopia.
Assefa Mitiku Tegegn & Sisay Kebede Haile. 1991 EC/1999 GC. Yebsebashe Azegedgadget leanesetenya geberyewotch (Compost making for smallholder farmers). In Amharic. AgriService, Addis Ababa, Ethiopia.
Brandjes, P., P. van Dongen & A. van der Veer, 1995. Green manuring and other forms of soil improvement in the tropics. (English translation by H Huf.) Agrodok-series No. 28. Agromisa, Wageningen, The Netherlands. Distributed by CTA (Technical Centre for Agricultural and Rural Cooperation, ACP/EEC).
Dalzell, N,A. & S. Riddlestone. 1987. Soil management: Compost production and use in tropical and subtropical environments. Bernan Associates, USA.
Edwards, S., Arefayne Asmelash, Hailu Araya & Tewolde Berhan Gebre Egziabher, 2007. Impact of compost use on crop yields in Tigray, Ethiopia, 2000-2006 inclusive. FAO, Rome. Available at: http://www.fao.org/documents/pub_dett.asp?lang=en&pub_id=237605
Gershuny, G. & D.L. Martin (eds). 1992. The Rodale book of composting: Easy methods for every gardener. Rodale Press & St Martin’s Press, USA.
Howard, A. 1940. An agricultural testament. Seventh Impression 1956. The Other India Press, Goa, in association with Earthcare Books, Bombay and Third World Network, Penang.
Inckel, M., P. de Smet, T. Tersmette & T. Veldamp, 1980. Revised by M. Louis & M. Leijdens, 1999. The preparation and use of compost. Agrodok-series No. 8. Agromisa, Wageningen, The Netherlands. Distributed by CTA (Technical Centre for Agricultural and Rural cooperation, ACP/EEC).
Roulac, J. 1996. Backyard composting. Green Earth Books, Totnes, England.
Vasanthrao Bombatkar (1996). The miracle called compost (An introduction to the art of making NADEP compost). (Translated into English by Smt Sharada Swamy & Dr S M Ramachandra Swamy, edited by Norman Dantas.) The Other India Press, Mapusa Goa, India.
Design | Layout | I l lus t rat ionsPie t ro Bar to leschi and Ar ianna Guida
studio@barto leschi .com Pr inted in I ta ly on ecologica l paper, 2011