Embed Size (px)
Citation preview

How to Make Balloon Animals: Beginners Addition
Prepared by:
Fred Scott, Peyton Steele, Sam Taggart, and Christian Tapia TEMC 2700.006 MWF 10-10:50
i

Table of Contents
Contents Table of Contents ............................................................................................................................ ii Introduction .................................................................................................................................... iii
Warning: ................................................................................................................................ iii Chapter One: .................................................................................................................................. iv
Three-Twist Dog ............................................................................................................................ iv
Materials: ................................................................................................................................... iv
Warning: ................................................................................................................................ iv
Chapter Two: ................................................................................................................................. ix
The Swan ....................................................................................................................................... ix
Materials: ................................................................................................................................... ix
Warning: ................................................................................................................................ ix
Chapter Three: .............................................................................................................................. 16
The Spotted Giraffe....................................................................................................................... 16
Materials: .................................................................................................................................. 16
Warning: ............................................................................................................................... 16
Chapter Four: ................................................................................................................................ 25
The One-Petal Flower ................................................................................................................... 25
Materials: .................................................................................................................................. 25
Warning: ............................................................................................................................... 25
Frequently Asked Questions: ........................................................................................................ 30
ii

Introduction In this instruction manual, you will learn how to make balloon animals at the beginner level. Children ages 12 and up will efficiently learn how to make a dog, swan, giraffe, and flower balloon animal. The materials needed to complete each animal varies and will be listed at the beginning of each chapter. Warning:
• Since this manual uses latex balloons, balloons should stay out of reach of children younger than 12 years of age. If swallowed, seek medical attention right away.
• Be aware that balloons have latex texture. People with latex allergies should stay away from balloons.
• The air pump is for pumping air into balloons only. The pump cannot resuscitate air into lungs, tires, etc.
• Balloons with too much air can burst when twisting or pumping. When making balloon animals, makers should keep pump balloons away from nearby ears.
iii

Chapter One: Three-Twist Dog The set of instructions below will show how to construct a dog in three simple twists.
Materials: • 1 balloon of any color • 1 balloon animal pump
Warning: • Since this manual uses latex balloons, balloons should stay out of reach of children
younger than 12 years of age. If swallowed, seek medical attention right away. • Be aware that balloons have latex texture. People with latex allergies should stay away
from balloons. • The air pump is for pumping air into balloons only. The pump cannot resuscitate air into
lungs, tires, etc.
Step 1: Inflate the balloon using either a balloon air pump, or manually with your mouth. Inflate the balloon leaving 6 inches at the end uninflated (Side B). The balloon air pump will take about 10-12 pumps, depending on how hard you pump the air. Tie off the end of the balloon from where you pumped the air (Side A).
A
B
iv
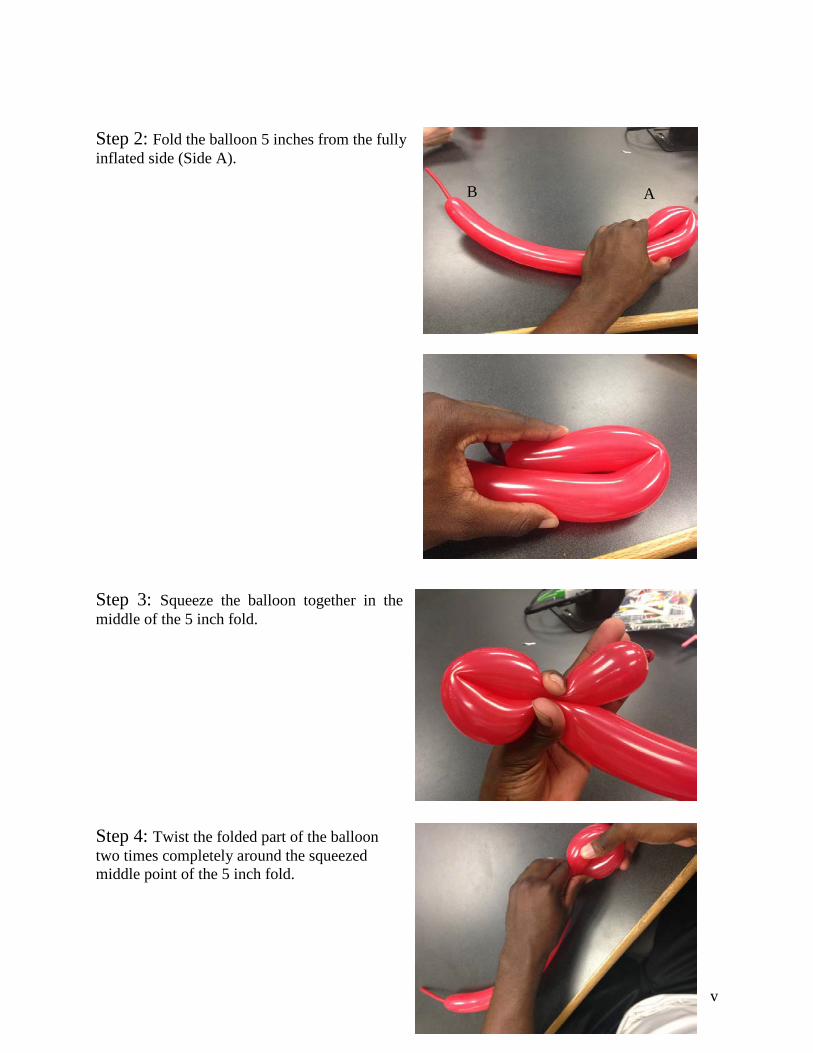
Step 2: Fold the balloon 5 inches from the fully inflated side (Side A).
Step 3: Squeeze the balloon together in the middle of the 5 inch fold.
Step 4: Twist the folded part of the balloon two times completely around the squeezed middle point of the 5 inch fold.
A
B A
A
2X
v

Step 5: After twisting the folded part around the middle point of the 5 inch fold, there will be a rounded top, and an extended point that was not squeezed. Face the rounded top towards the extended point, which is also side A, to form the head of the dog.
Step 6: Fold the head of the balloon back towards the body 6 inches down from the head.
A B
A
A
A
vi

Step 7: Squeeze the balloon together in the middle of the 6 inch fold.
Step 8: Twist the folded part of the balloon two times around the squeezed middle point as in step 4 to form the front legs.
2X
A
A
A
vii
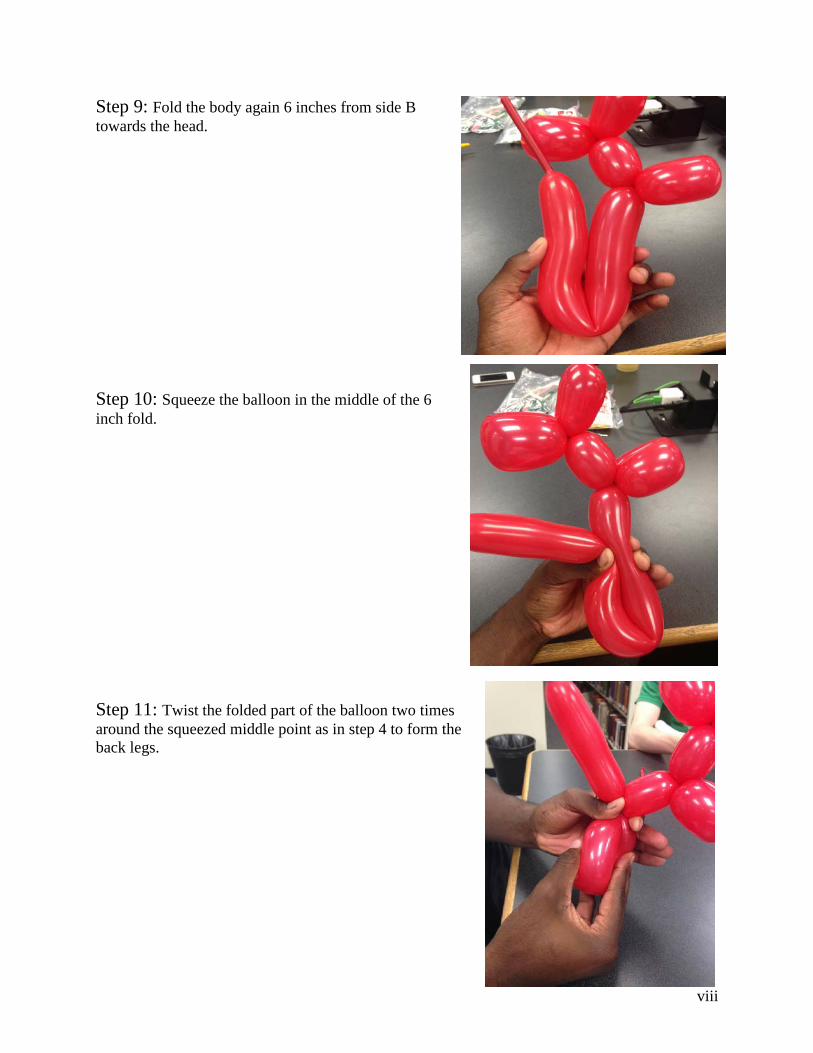
Step 9: Fold the body again 6 inches from side B towards the head.
Step 10: Squeeze the balloon in the middle of the 6 inch fold.
Step 11: Twist the folded part of the balloon two times around the squeezed middle point as in step 4 to form the back legs.
A
A
2X
B
viii

Step 12: The 3-twist dog is now complete
Chapter Two: The Swan In this chapter……. Refer to chapter one for how to summarize what they will make. Materials:
• How many balloons will they need? Any color? • How many pumps? • Will they need a marker to draw a face? • Anything else?
Warning: • Put a few warnings from above that apply to your animal
Step 1: Pick out the balloon.
B A
ix

Step 2: inflate the balloon with air pump 18 times.
Step 3: Pinch and hold 1 inch of the balloon and twist it 3 times
.
Step 4: At about 6 inches of the first knot, fold the ballon together.
x

Step 5: On the opposite of the first twist, twist the balloon 3 times and hold it in your hand.
Step 6: Hold the top of the balloon and the 1 inch with your right hand, and with your left hand
twist the balloon together counter clockwise 3 times.
xi
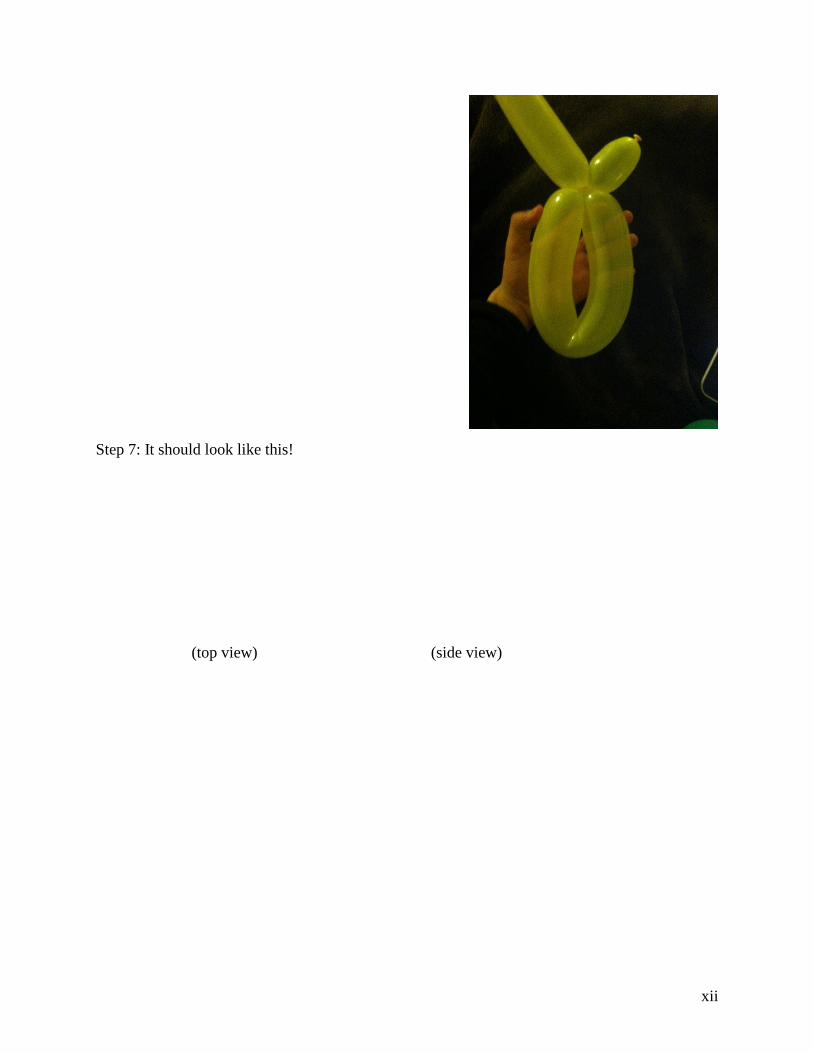
Step 7: It should look like this!
(top view) (side view)
xii

Step 8: Fold the longer part of the balloon over “0” shaped piece.
Step 9: Tuck in 5 inches of the balloon into the “0” to form the Swan’s neck.
xiii

Step 10: At the opposite end of the base will be the head of the swan
Step 11: Twist and fold the head downwards towards the base of the swan, until you reach about an inch from the bottom of the swan.
xiv

Step 12: Let go after a few seconds, your swan should look something like this.
Step 13: Readjust to your prefrence of a swan, and tada! You’re done.
xv

Chapter Three: The Spotted Giraffe Materials:
• 1 Balloon of any color • 1 Pump • 1 Black marker
Warning: • Avoid twisting over recommended
amount specified in this chapter to prevent the balloon from popping.
• Do not use the latex balloon if you’re allergic to latex.
• Balloon pump should only be used for inflation of the balloon.
Step 1: Place the end of the balloon onto the tip of the pump
16

Step 2: Begin inflating the balloon by pumping 30 times.
Step 3: Once inflated, pinch the balloon above the tip of the pump, and remove the pump. This will keep the balloon from losing any air.
Step 4: Tie a knot where you began inflating the balloon to seal the air in.
Step 5: 2 inches from the knot, pinch and twist to create a bubble. Twist the bubble 3 times and hold.
Your Balloon should now look like this
1
17

Step 6: Pinch and twist two, 1 inch bubbles. Twist the bubbles 3 times. Remember to hold onto each bubble so that they don’t come undone.
Step 7: Fold the balloon placing the 1 inch
You should now have 3 bubbles
3 2 1
1 2
3
1
2 & 3 2 & 3
1
18

bubbles side by side. Twist completely around to lock and make ears (2&3). Twist 3 times.
Step 8: Pinch and twist around a 5 inch bubble to create the neck (4) of the giraffe. Twist 3 times. Make sure to hold onto the bubble.
The head and ears of the Giraffe
1 2&3
1
2 & 3
2 & 3
19
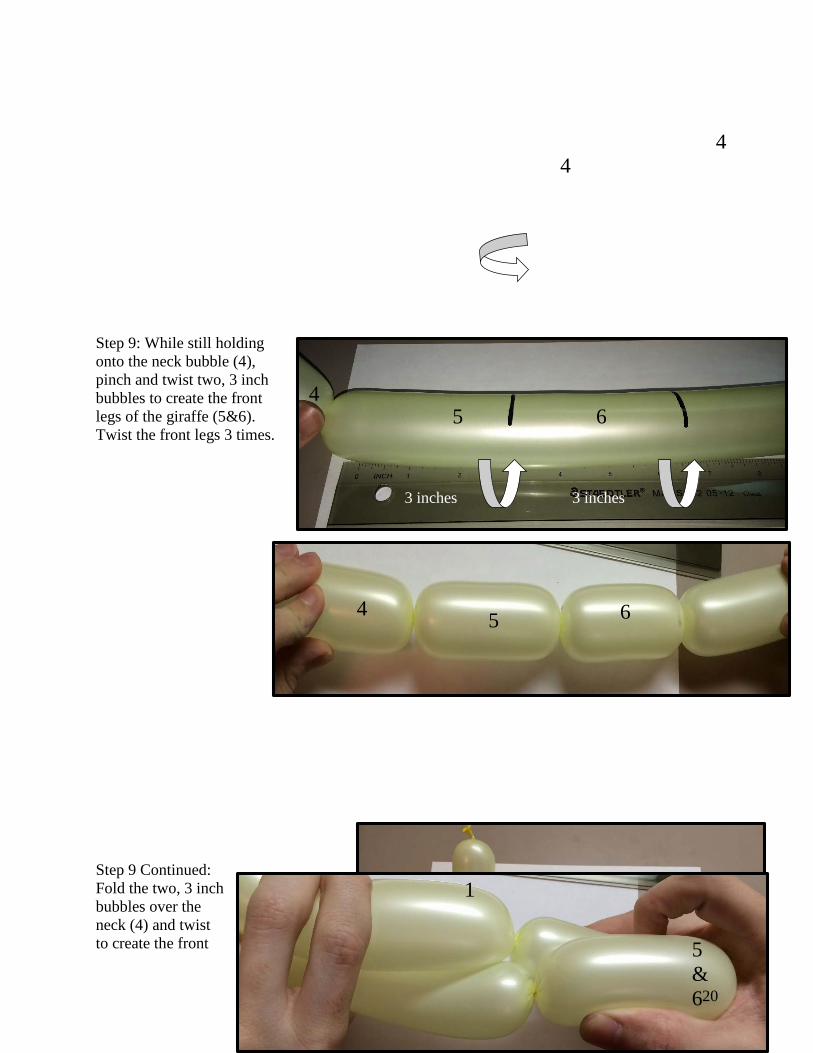
Step 9: While still holding onto the neck bubble (4), pinch and twist two, 3 inch bubbles to create the front legs of the giraffe (5&6). Twist the front legs 3 times.
Step 9 Continued: Fold the two, 3 inch bubbles over the neck (4) and twist to create the front
4
4 5 6
4 5 6
4
5 in
ches
3 inches 3 inches
5 & 6
1
20
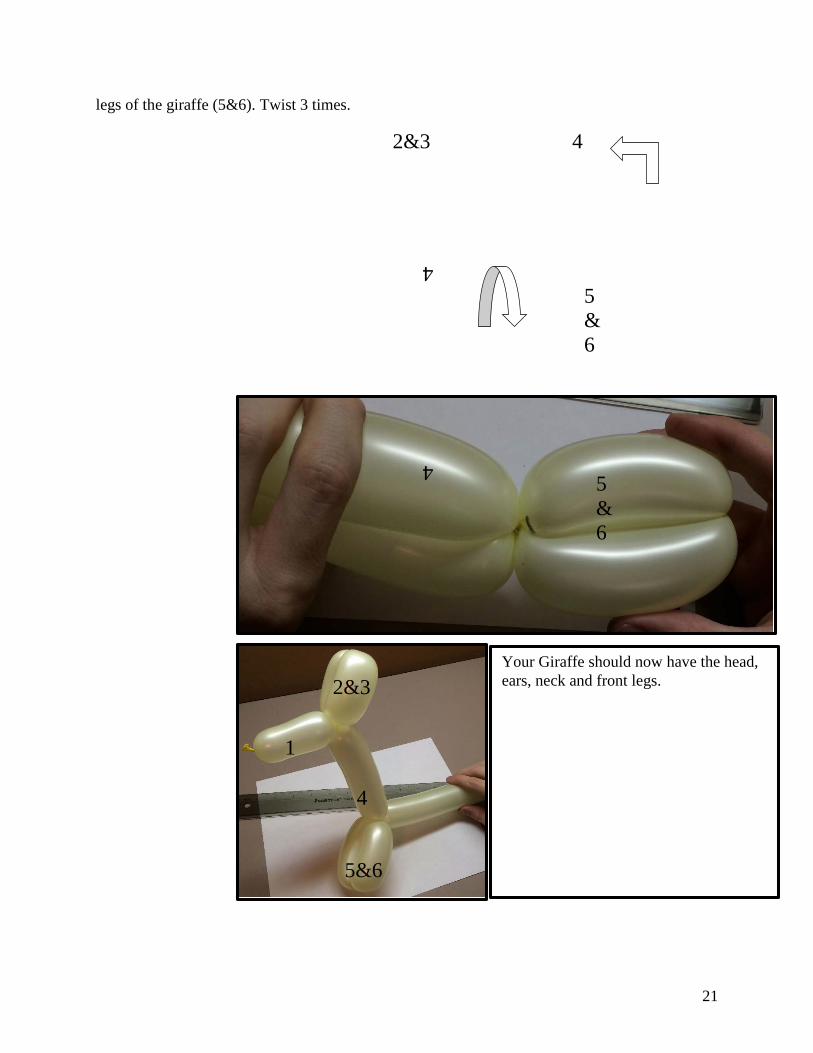
legs of the giraffe (5&6). Twist 3 times.
Your Giraffe should now have the head, ears, neck and front legs.
4
2&3
4
5 & 6
5 & 6
4
1
2&3
4
5&6
21

Step 10: Pinch and twist a 4 inch bubble to create the body of the giraffe (7). Twist 3 times.
Step 11:While holding onto the body of the giraffe (7), pinch and twist two, 3 inch bubbles to create the legs (8&9). Twist each bubble around 3 times.
.
Step 11 continued: Fold the two, 3 inch bubbles over the body (7) and twist to create the rear legs (8&9) and tail of the giraffe (10). Twist around 3 times.
Creating the body and rear legs of the giraffe are the exact same steps as the neck and front legs.
4
5&6
7
7 8 9
3 inches 3 inches
7 8 9
4
2&3 1
4 inches
22

You should now have the body, rear legs, and tail of the giraffe
8 & 9 7
8 & 9 7
8 & 9 7
10
10
10
10
7 5 & 6
23

Your giraffe is now complete; you may add your own design using a marker to complete the look.
10 7
4
2&3
1
24

Chapter Four: The One-Petal Flower Materials:
• Two balloon animal balloons of any color. • One balloon animal pump.
Warning:
How to Make the Petals: 1. Choose one colored balloon and connect the balloon to
the tip of the pump.
2. While holding the balloon onto the tip with one hand, pump 20 full air pumps into the balloon with the other hand. There should be about four inches of deflated balloon left.
3. Remove the balloon from the pump, and tie a knot to keep the air in the balloon.
25

4. Bring the two ends together to form a ring and tie them together.
5. Push the knot you just tied together and the parallel side together.
6. Twist the two sections together by holding one hand on one side of the loop and the other hand on the other side, and turn one of the balloon loops two 360 degree turns.
7. Your oval will turn into a figure 8 shape, and should look like this.
8. Now, take one of the two loops, and pinch the outer rim to the center.
26

9. Twist the sections you pinched together into two 360 degree turns.
10. This will form your first two petals.
11. Repeat steps eight and nine to form the adjacent petals. Your flower should now have four petals and look like this.
How to Make the Stem: 1. Choose one colored balloon and connect the balloon to the tip of the pump.
2. While holding the balloon onto the tip with one hand, pump 20 full
air pumps into the balloon with the other hand. There should be about 1 inch of deflated balloon left.
3. Tie a knot in place of the pump to seal in the air.
4. Take either end side of the balloon, and insert the end in between one of the petals on your flower.
27

5. Push your stem to the center of the petal. You may have to move
the other petals by twisting by moving them over to make room for the stem. Since all of your petals were twisted to the same center, the stem will give an allusion that it is in the center like this.
6. Once your stem is in the center of your flower, take the bottom side of the stem and fold it in half.
7. Twist the half with two 360 degree turns to form a petal.
8. You should now have completed a stem with a petal that looks like this.
28

9. You now have a complete flower.
29

Frequently Asked Questions: If you have problems completing one of the mentioned balloon animals, a solution may be available for you.
1. What do I do if my balloon pops while I am twisting? a. You may have too much air in your balloon. Consider putting fewer pumps in
your balloon then the advised amount of pumps. 2. When I twist my balloon animal, my turns will not stay. What do I do?
a. Try twisting the turns three to four 360 degree turns instead of the advised two. 3. If I put a turn too close together, do I have to start over?
a. No, you can simply untwist the turn, and start over. 4. One of my balloons popped in someone’s ear. What do I do?
a. Go to a quiet area, and rest the ear. If hearing does not return, you should seek medical attention.
5. A child has swallowed a balloon. What do I do? a. If the balloon is visible, you can attempt to remove the balloon from the airway. If
the balloon is invisible, you should seek medical attention immediately.
30