Embed Size (px)
Citation preview

1 V3.16.1
How to Submit
Royalty Report Part I and
Royalty Report Part II
2 V3.16.1
Table of Contents
1. Introduction ...................................................................................................................................... 3
2. New User Registration ...................................................................................................................... 3
3. Welcome Page .................................................................................................................................. 4
4. User Settings ..................................................................................................................................... 5
5. Royalties ............................................................................................................................................ 6
6. Royalty Report Part II ...................................................................................................................... 14
7. Additional Assistance ...................................................................................................................... 15
3 V3.16.1
1. Introduction The purpose of this document is to explain how to submit Royalty Report Part I using the Licensing Portal.
This site is secure and requires registration. Reporting is required by your contract on a quarterly, semi-annual, or annual basis and this site will provide an enhanced reporting function that will validate your data.
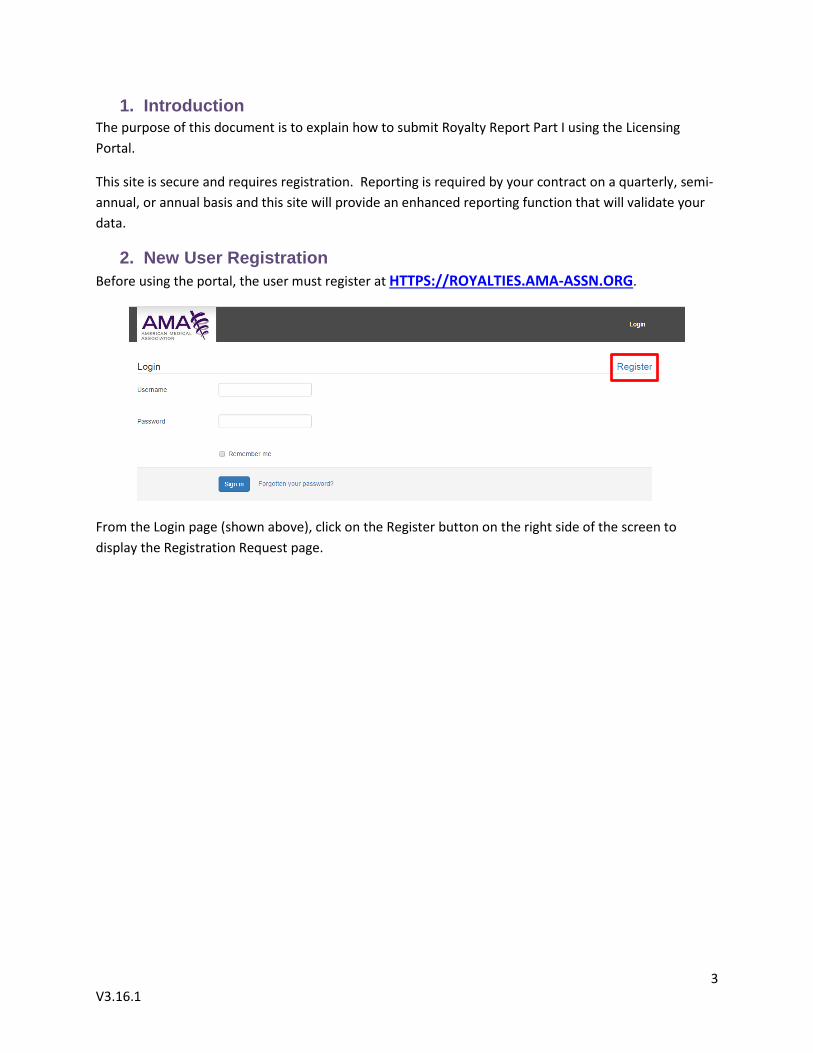
2. New User Registration Before using the portal, the user must register at HTTPS://ROYALTIES.AMA-ASSN.ORG.
From the Login page (shown above), click on the Register button on the right side of the screen to display the Registration Request page.

4 V3.16.1
On the Registration Request page enter information in the text boxes, and read and accept the terms and conditions. In the Company text box, please be sure to enter the company name listed on your CPT® Distribution Agreement. Note that the Email address entered in the Email text box will be the Username to be entered on the Login page.
After all information has been entered, click on the Send Request button. When the registration is accepted by the Portal Administrator, you will receive two emails, one contains your temporary password and the other will have personalized templates for Royalty Report Part I and Part II.
3. Welcome Page The Welcome Page is the first page you will see every time you log in. Here you can access links that will help make the reporting process quicker and more efficient as well as information regarding Royalty Report Part II and remittance information for payment.
5 V3.16.1
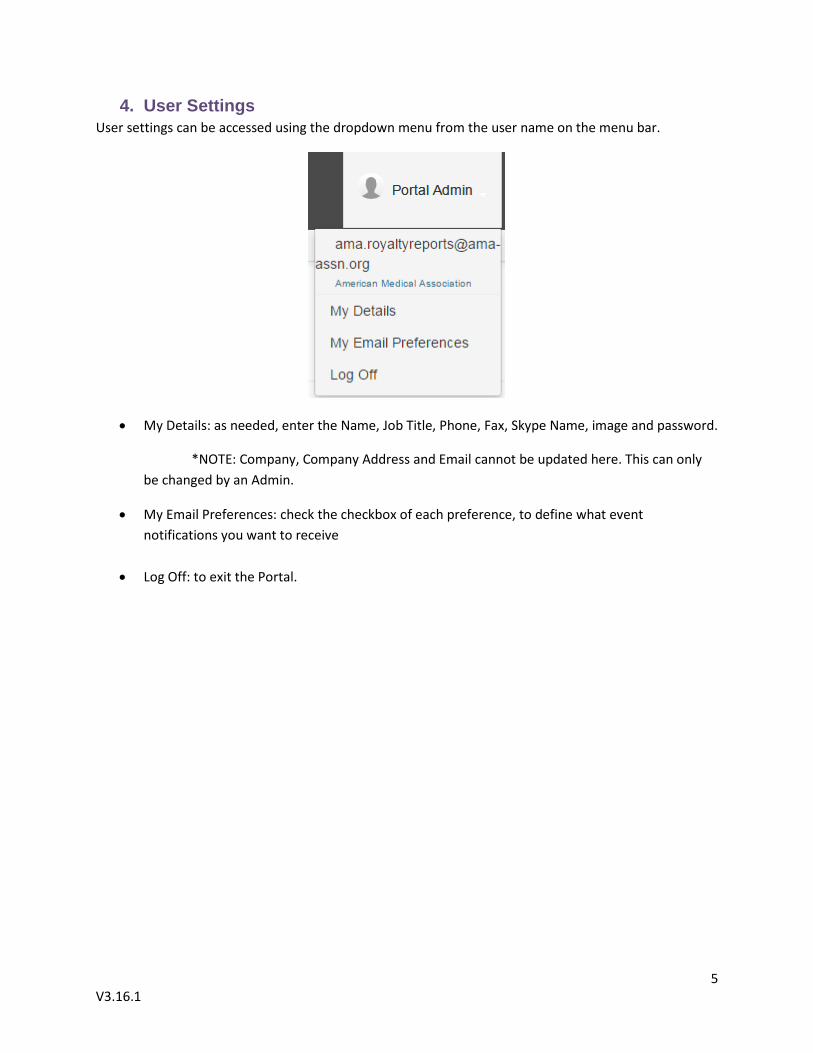
4. User Settings User settings can be accessed using the dropdown menu from the user name on the menu bar.
• My Details: as needed, enter the Name, Job Title, Phone, Fax, Skype Name, image and password.
*NOTE: Company, Company Address and Email cannot be updated here. This can only be changed by an Admin.
• My Email Preferences: check the checkbox of each preference, to define what event notifications you want to receive
• Log Off: to exit the Portal.
6 V3.16.1
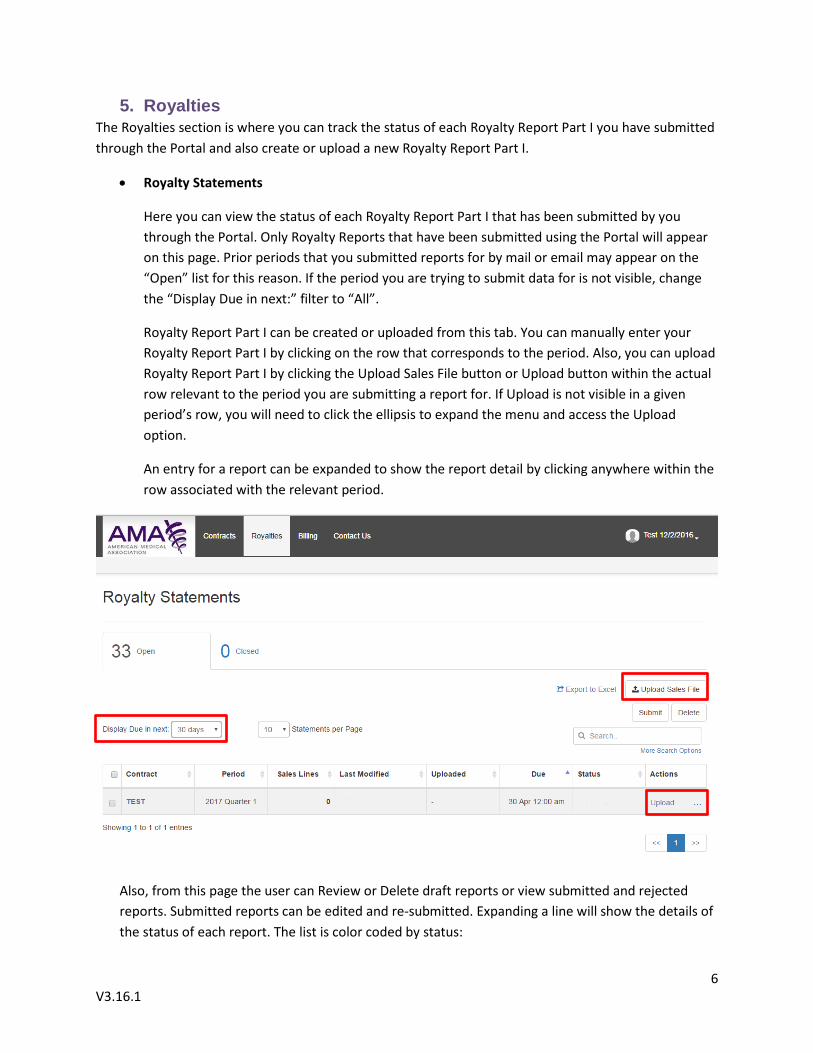
5. Royalties The Royalties section is where you can track the status of each Royalty Report Part I you have submitted through the Portal and also create or upload a new Royalty Report Part I.
• Royalty Statements
Here you can view the status of each Royalty Report Part I that has been submitted by you through the Portal. Only Royalty Reports that have been submitted using the Portal will appear on this page. Prior periods that you submitted reports for by mail or email may appear on the “Open” list for this reason. If the period you are trying to submit data for is not visible, change the “Display Due in next:” filter to “All”.
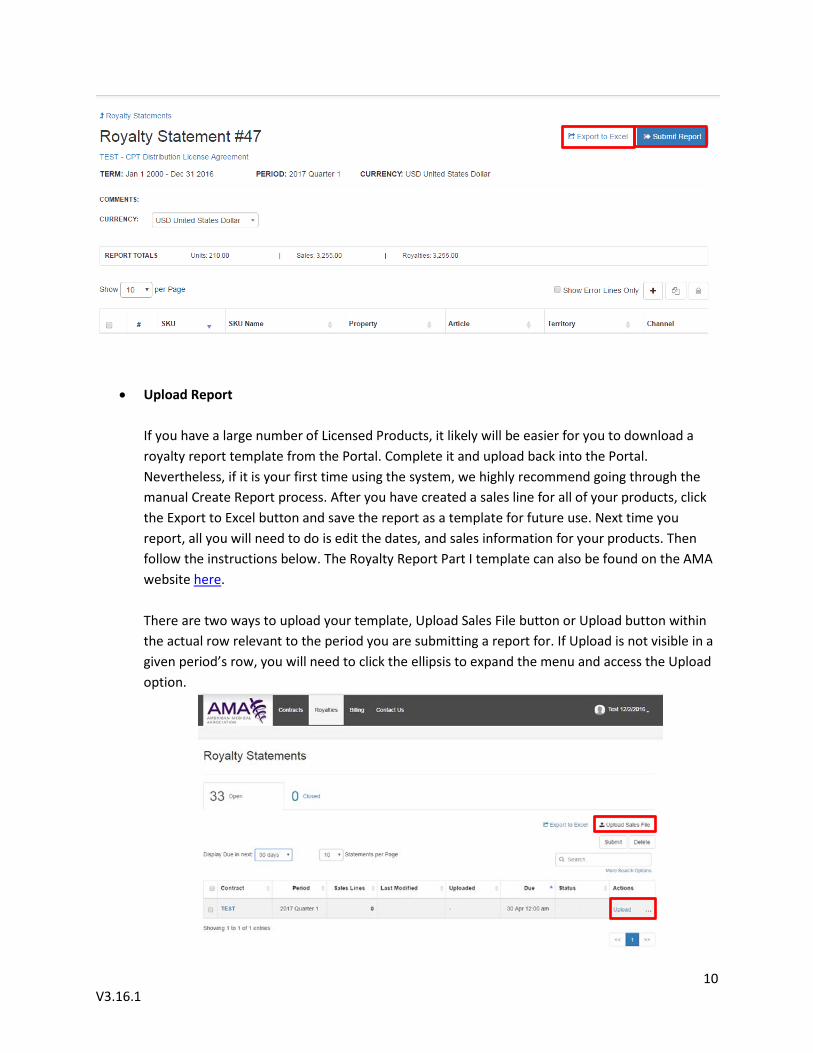
Royalty Report Part I can be created or uploaded from this tab. You can manually enter your Royalty Report Part I by clicking on the row that corresponds to the period. Also, you can upload Royalty Report Part I by clicking the Upload Sales File button or Upload button within the actual row relevant to the period you are submitting a report for. If Upload is not visible in a given period’s row, you will need to click the ellipsis to expand the menu and access the Upload option.
An entry for a report can be expanded to show the report detail by clicking anywhere within the row associated with the relevant period.
Also, from this page the user can Review or Delete draft reports or view submitted and rejected reports. Submitted reports can be edited and re-submitted. Expanding a line will show the details of the status of each report. The list is color coded by status:
7 V3.16.1
o New: a report that has been created by the licensee but not yet submitted o Pending: a report that was submitted online but has not yet been processed by the AMA o Posted: a report that has been processed by the AMA o Rejected: a report that has been rejected by the AMA and needs to be corrected (if your
report is rejected, an AMA representative will contact you to explain the reasons why)
NOTE: A report can be modified after the initial submission, in order to amend or append additional lines. To do that, follow the same process for the initial creation for the relevant reporting period you want to modify.
8 V3.16.1
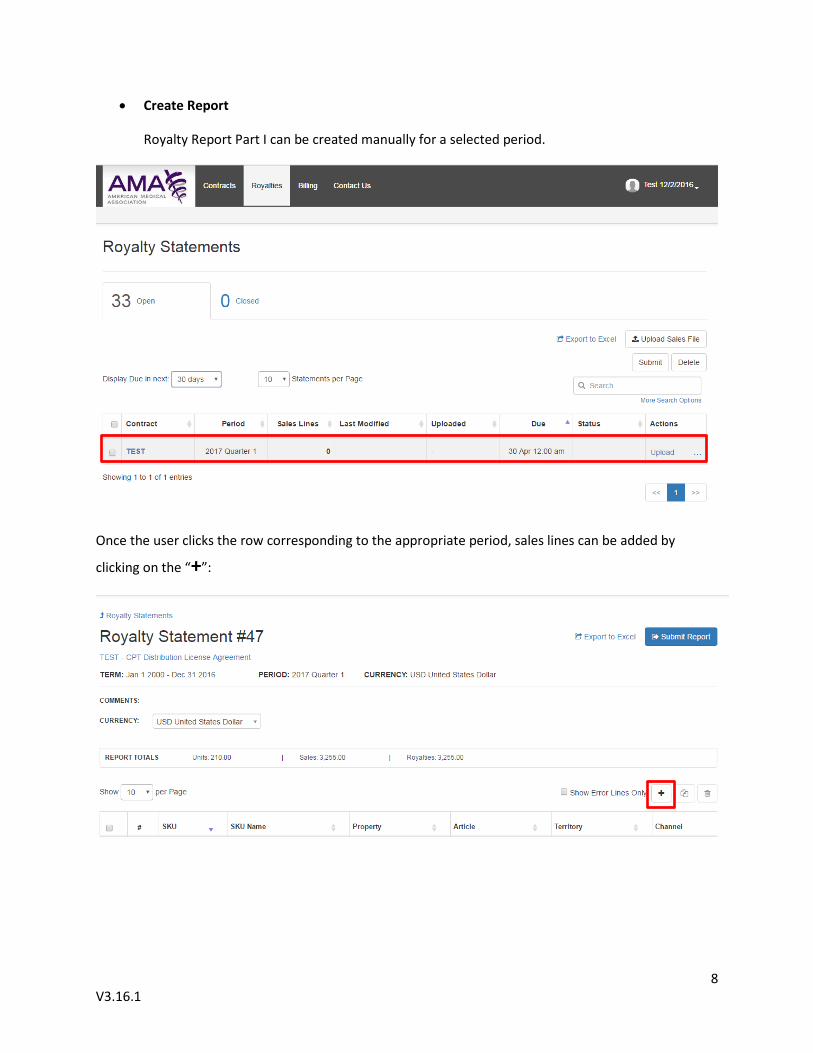
• Create Report
Royalty Report Part I can be created manually for a selected period.
Once the user clicks the row corresponding to the appropriate period, sales lines can be added by
clicking on the “+”:
9 V3.16.1
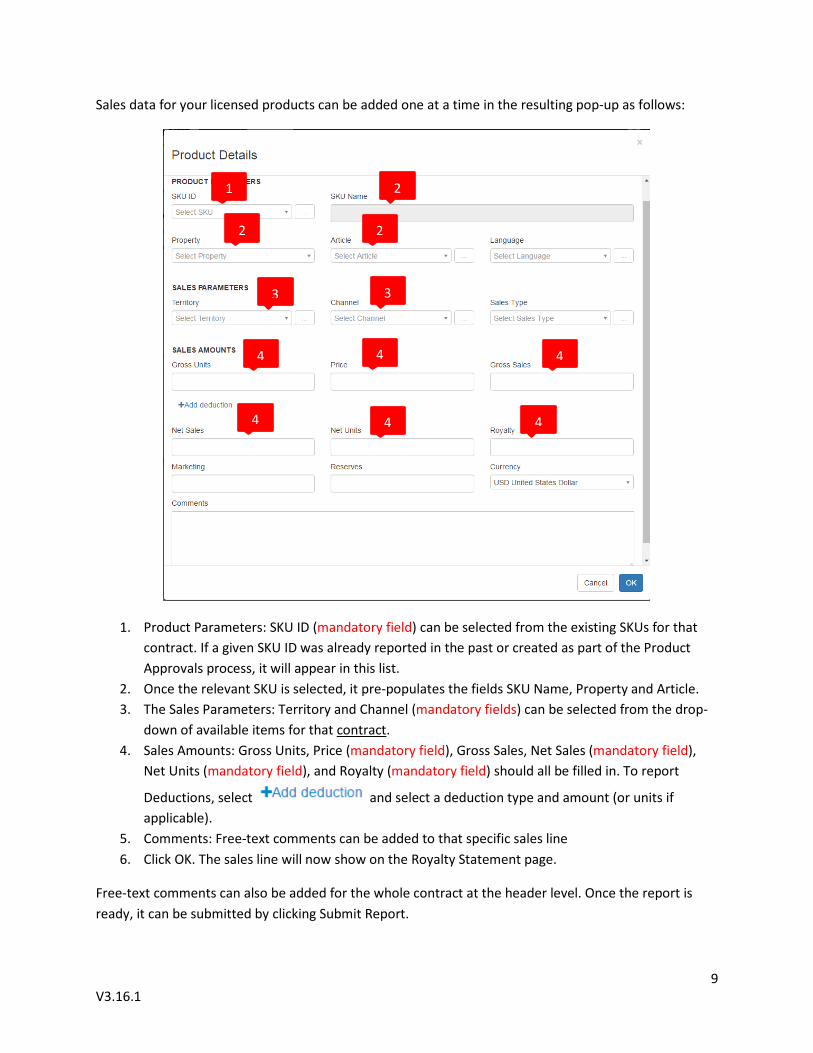
Sales data for your licensed products can be added one at a time in the resulting pop-up as follows:
1. Product Parameters: SKU ID (mandatory field) can be selected from the existing SKUs for that contract. If a given SKU ID was already reported in the past or created as part of the Product Approvals process, it will appear in this list.
2. Once the relevant SKU is selected, it pre-populates the fields SKU Name, Property and Article. 3. The Sales Parameters: Territory and Channel (mandatory fields) can be selected from the drop-
down of available items for that contract. 4. Sales Amounts: Gross Units, Price (mandatory field), Gross Sales, Net Sales (mandatory field),
Net Units (mandatory field), and Royalty (mandatory field) should all be filled in. To report
Deductions, select and select a deduction type and amount (or units if applicable).
5. Comments: Free-text comments can be added to that specific sales line 6. Click OK. The sales line will now show on the Royalty Statement page.
Free-text comments can also be added for the whole contract at the header level. Once the report is ready, it can be submitted by clicking Submit Report.
4
3
2
1 2
2
3
4 4
4 4 4
10 V3.16.1
• Upload Report If you have a large number of Licensed Products, it likely will be easier for you to download a royalty report template from the Portal. Complete it and upload back into the Portal. Nevertheless, if it is your first time using the system, we highly recommend going through the manual Create Report process. After you have created a sales line for all of your products, click the Export to Excel button and save the report as a template for future use. Next time you report, all you will need to do is edit the dates, and sales information for your products. Then follow the instructions below. The Royalty Report Part I template can also be found on the AMA website here. There are two ways to upload your template, Upload Sales File button or Upload button within the actual row relevant to the period you are submitting a report for. If Upload is not visible in a given period’s row, you will need to click the ellipsis to expand the menu and access the Upload option.
11 V3.16.1
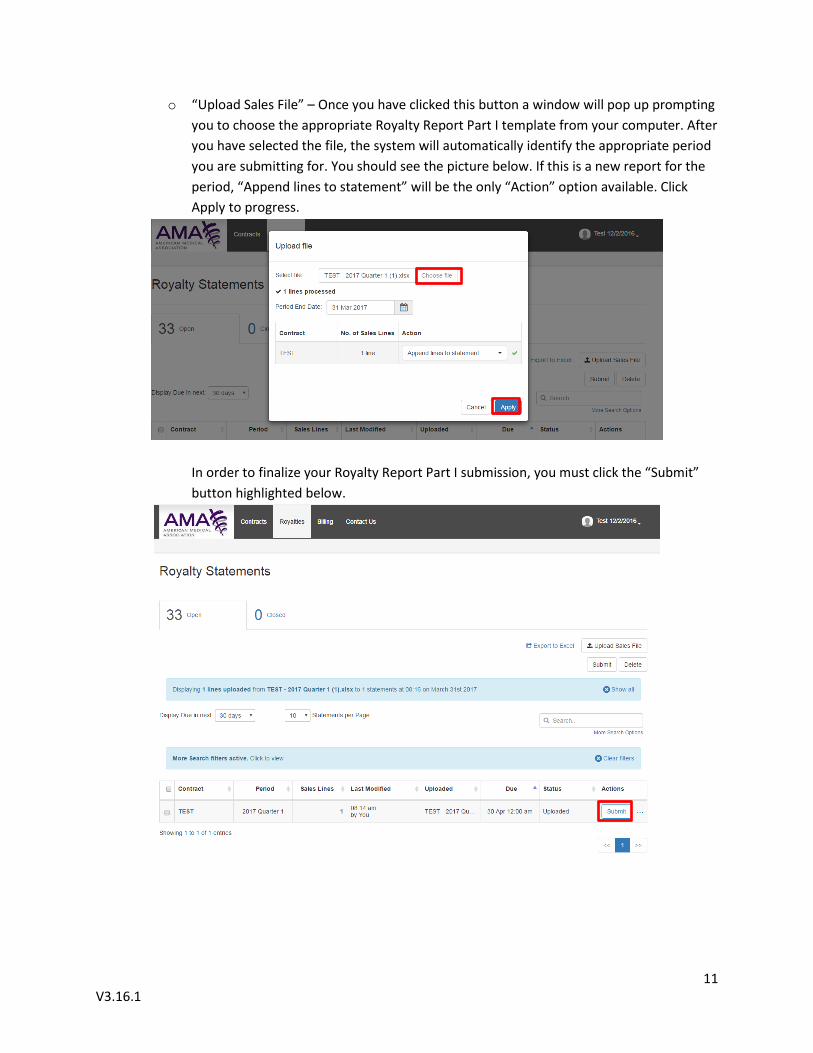
o “Upload Sales File” – Once you have clicked this button a window will pop up prompting you to choose the appropriate Royalty Report Part I template from your computer. After you have selected the file, the system will automatically identify the appropriate period you are submitting for. You should see the picture below. If this is a new report for the period, “Append lines to statement” will be the only “Action” option available. Click Apply to progress.
In order to finalize your Royalty Report Part I submission, you must click the “Submit” button highlighted below.
12 V3.16.1
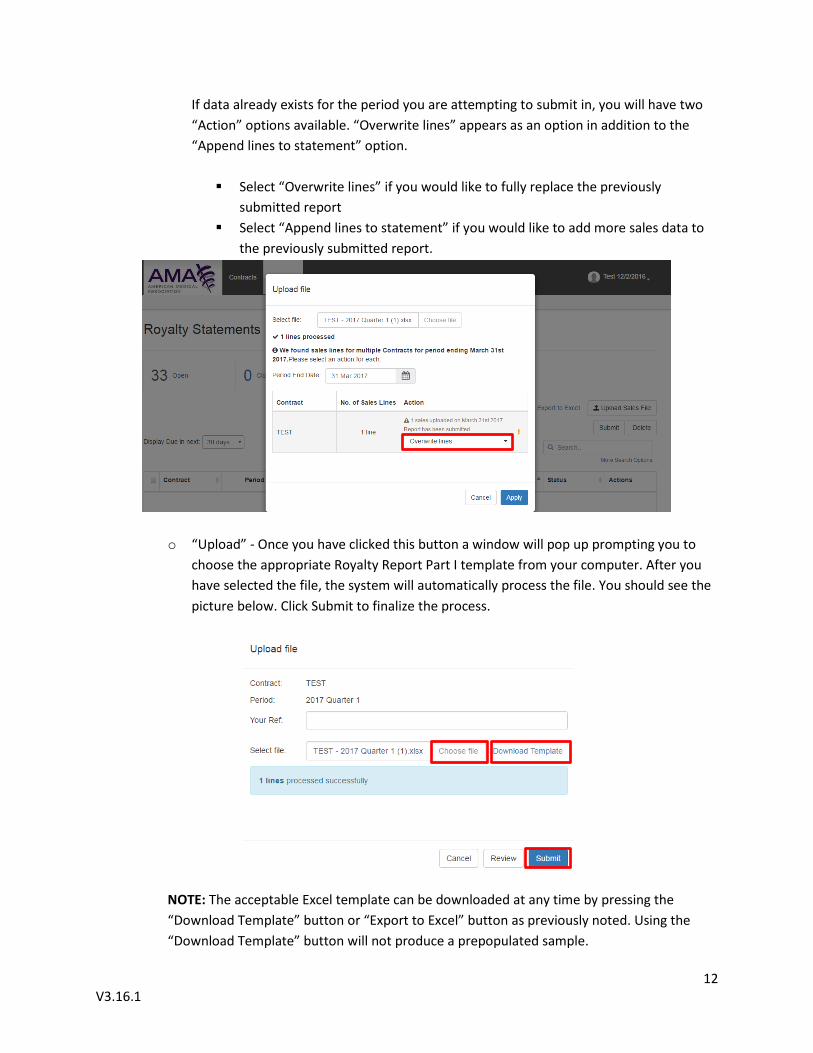
If data already exists for the period you are attempting to submit in, you will have two “Action” options available. “Overwrite lines” appears as an option in addition to the “Append lines to statement” option. Select “Overwrite lines” if you would like to fully replace the previously
submitted report Select “Append lines to statement” if you would like to add more sales data to
the previously submitted report.
o “Upload” - Once you have clicked this button a window will pop up prompting you to choose the appropriate Royalty Report Part I template from your computer. After you have selected the file, the system will automatically process the file. You should see the picture below. Click Submit to finalize the process.
NOTE: The acceptable Excel template can be downloaded at any time by pressing the “Download Template” button or “Export to Excel” button as previously noted. Using the “Download Template” button will not produce a prepopulated sample.
13 V3.16.1
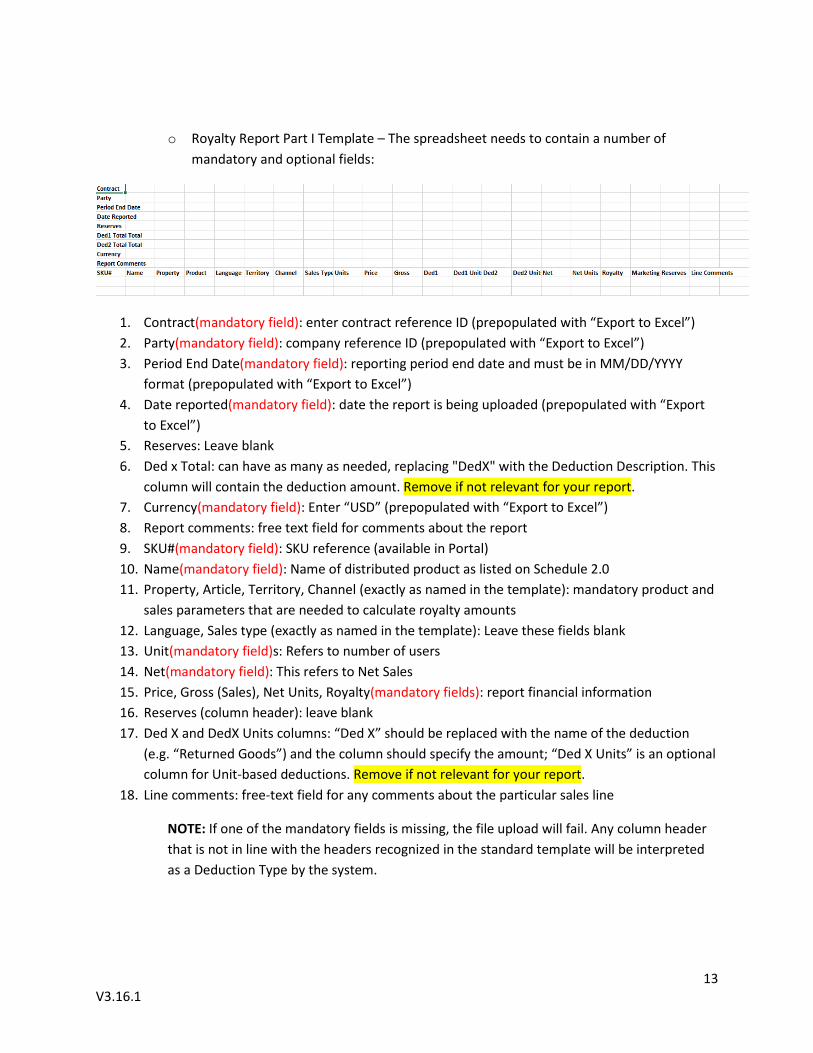
o Royalty Report Part I Template – The spreadsheet needs to contain a number of mandatory and optional fields:
1. Contract(mandatory field): enter contract reference ID (prepopulated with “Export to Excel”) 2. Party(mandatory field): company reference ID (prepopulated with “Export to Excel”) 3. Period End Date(mandatory field): reporting period end date and must be in MM/DD/YYYY
format (prepopulated with “Export to Excel”) 4. Date reported(mandatory field): date the report is being uploaded (prepopulated with “Export
to Excel”) 5. Reserves: Leave blank 6. Ded x Total: can have as many as needed, replacing "DedX" with the Deduction Description. This
column will contain the deduction amount. Remove if not relevant for your report. 7. Currency(mandatory field): Enter “USD” (prepopulated with “Export to Excel”) 8. Report comments: free text field for comments about the report 9. SKU#(mandatory field): SKU reference (available in Portal) 10. Name(mandatory field): Name of distributed product as listed on Schedule 2.0 11. Property, Article, Territory, Channel (exactly as named in the template): mandatory product and
sales parameters that are needed to calculate royalty amounts 12. Language, Sales type (exactly as named in the template): Leave these fields blank 13. Unit(mandatory field)s: Refers to number of users 14. Net(mandatory field): This refers to Net Sales 15. Price, Gross (Sales), Net Units, Royalty(mandatory fields): report financial information 16. Reserves (column header): leave blank 17. Ded X and DedX Units columns: “Ded X” should be replaced with the name of the deduction
(e.g. “Returned Goods”) and the column should specify the amount; “Ded X Units” is an optional column for Unit-based deductions. Remove if not relevant for your report.
18. Line comments: free-text field for any comments about the particular sales line
NOTE: If one of the mandatory fields is missing, the file upload will fail. Any column header that is not in line with the headers recognized in the standard template will be interpreted as a Deduction Type by the system.
14 V3.16.1
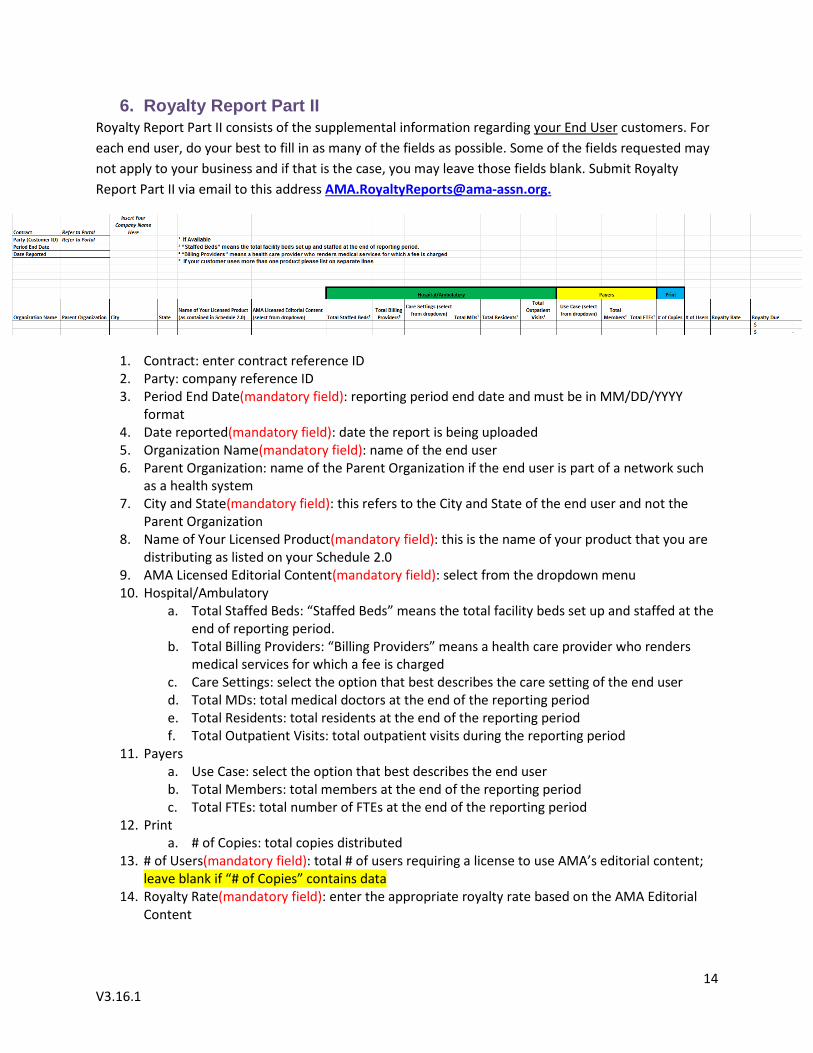
6. Royalty Report Part II Royalty Report Part II consists of the supplemental information regarding your End User customers. For each end user, do your best to fill in as many of the fields as possible. Some of the fields requested may not apply to your business and if that is the case, you may leave those fields blank. Submit Royalty Report Part II via email to this address [email protected].
1. Contract: enter contract reference ID 2. Party: company reference ID 3. Period End Date(mandatory field): reporting period end date and must be in MM/DD/YYYY
format 4. Date reported(mandatory field): date the report is being uploaded 5. Organization Name(mandatory field): name of the end user 6. Parent Organization: name of the Parent Organization if the end user is part of a network such
as a health system 7. City and State(mandatory field): this refers to the City and State of the end user and not the
Parent Organization 8. Name of Your Licensed Product(mandatory field): this is the name of your product that you are
distributing as listed on your Schedule 2.0 9. AMA Licensed Editorial Content(mandatory field): select from the dropdown menu 10. Hospital/Ambulatory
a. Total Staffed Beds: “Staffed Beds” means the total facility beds set up and staffed at the end of reporting period.
b. Total Billing Providers: “Billing Providers” means a health care provider who renders medical services for which a fee is charged
c. Care Settings: select the option that best describes the care setting of the end user d. Total MDs: total medical doctors at the end of the reporting period e. Total Residents: total residents at the end of the reporting period f. Total Outpatient Visits: total outpatient visits during the reporting period
11. Payers a. Use Case: select the option that best describes the end user b. Total Members: total members at the end of the reporting period c. Total FTEs: total number of FTEs at the end of the reporting period
12. Print a. # of Copies: total copies distributed
13. # of Users(mandatory field): total # of users requiring a license to use AMA’s editorial content; leave blank if “# of Copies” contains data
14. Royalty Rate(mandatory field): enter the appropriate royalty rate based on the AMA Editorial Content
15 V3.16.1
7. Additional Assistance If you have any questions regarding Royalty Reporting or would like to schedule a walkthrough of the process please email the address below.
AMA Contact - [email protected]


![DISK104:[17ZAK1.17ZAK47601]BA47601A.;4 · Permian Basin Royalty Trust 2911 Turtle Creek Boulevard Suite 850 Dallas, Texas 75219 ... Gross Royalty Income Line 4, Part I, Schedule E](https://img.pdfslide.net/doc/110x75/5b7bf9a47f8b9a9d078b54f5/disk10417zak117zak47601ba47601a4-permian-basin-royalty-trust-2911-turtle.jpg)