Embed Size (px)
Citation preview
Office of Instructional Technology | www.pnw.edu/oit Page 1 Last Revised 11/14/2017
How to Use Camtasia Table of Contents How Do I Get Camtasia on my Computer?.............................................................................. 2
Accessing Camtasia................................................................................................................ 2
Camtasia Help ....................................................................................................................... 2
Record a Screen ..................................................................................................................... 3
Saving and Producing a Recording……………………………………………………………………………………......5
Uploading to Kaltura ............................................................................................................. 9
Setting Up Camtasia for Speech Recognition ........................................................................ 12
Adding Words to Speech Recognition Dictionary .................................................................. 18
Adding Captions .................................................................................................................. 22
Adding a Quiz to your Camtasia Lecture ............................................................................... 27
Producing a Recorded Lecture with Quizzing ........................................................................ 31
Uploading a Recorded Lecture with Quizzing to Blackboard ................................................. 36
Office of Instructional Technology | www.pnw.edu/oit Page 2 Last Revised 11/14/2017
How Do I Get Camtasia on my Computer?
Request access on your personal or university-owned computer
Put in a ticket to customer service to install the software on your computer
Accessing Camtasia
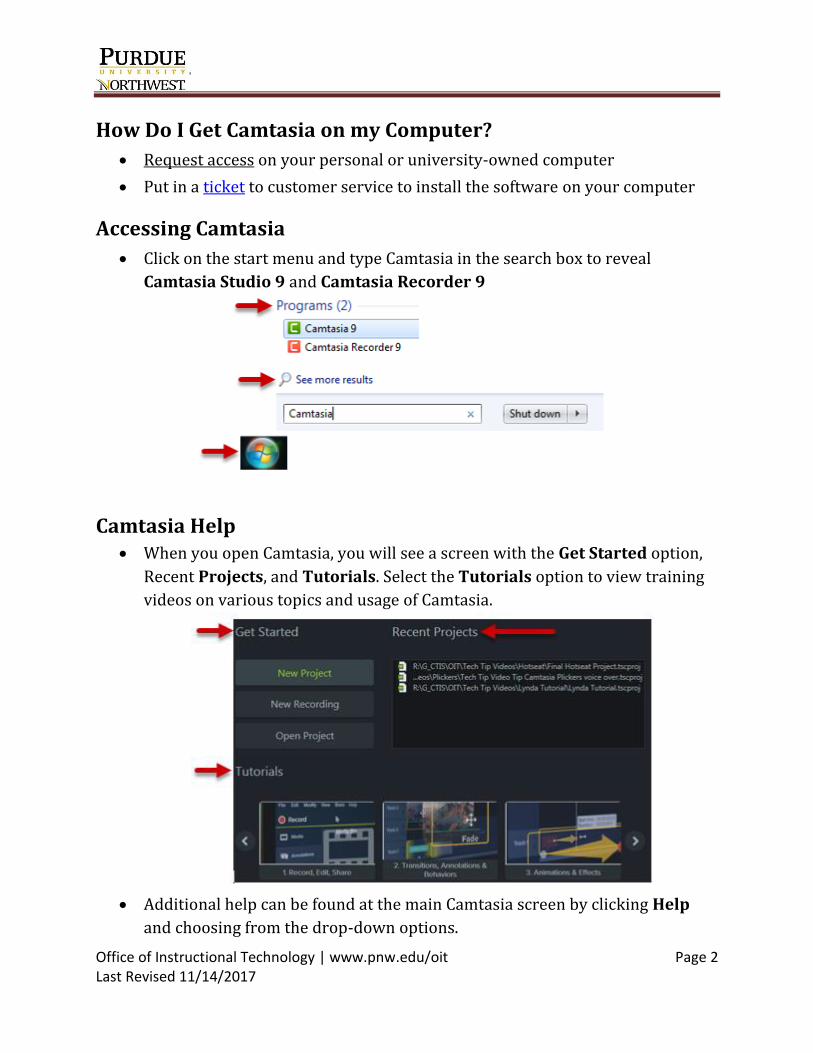
Click on the start menu and type Camtasia in the search box to reveal
Camtasia Studio 9 and Camtasia Recorder 9
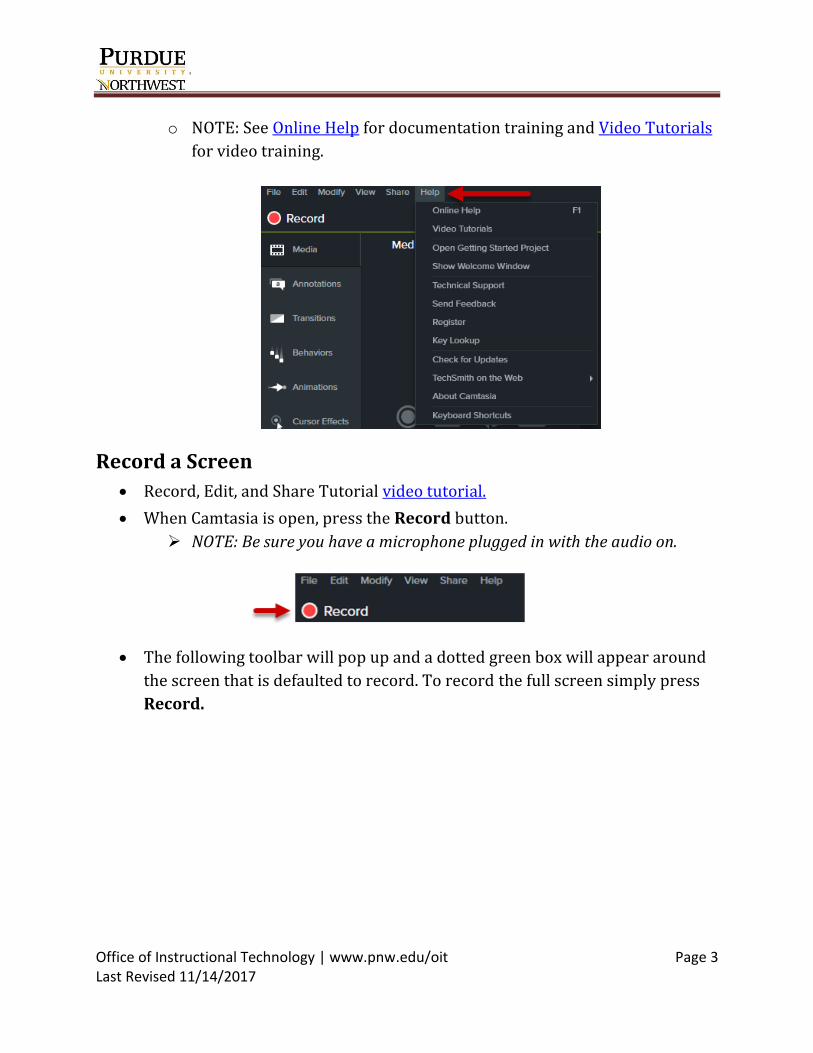
Camtasia Help When you open Camtasia, you will see a screen with the Get Started option,
Recent Projects, and Tutorials. Select the Tutorials option to view training
videos on various topics and usage of Camtasia.
Additional help can be found at the main Camtasia screen by clicking Help
and choosing from the drop-down options.
Office of Instructional Technology | www.pnw.edu/oit Page 3 Last Revised 11/14/2017
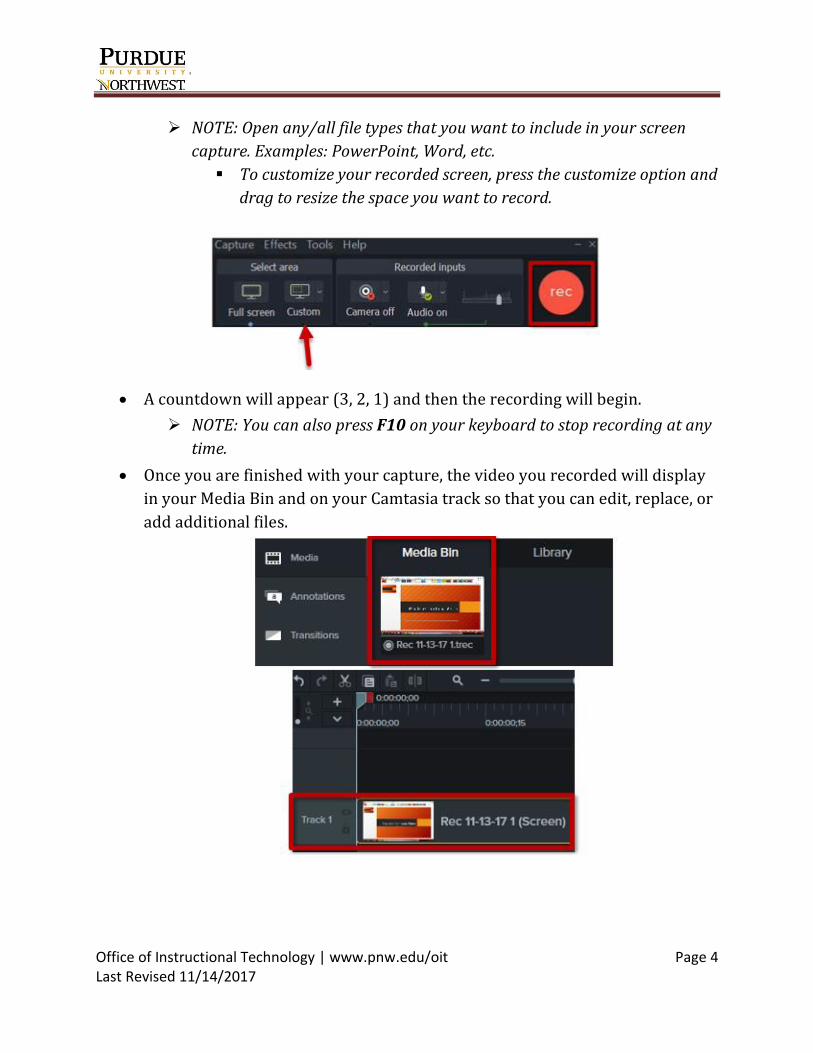
o NOTE: See Online Help for documentation training and Video Tutorials
for video training.
Record a Screen
Record, Edit, and Share Tutorial video tutorial.
When Camtasia is open, press the Record button.
NOTE: Be sure you have a microphone plugged in with the audio on.
The following toolbar will pop up and a dotted green box will appear around
the screen that is defaulted to record. To record the full screen simply press
Record.
Office of Instructional Technology | www.pnw.edu/oit Page 4 Last Revised 11/14/2017
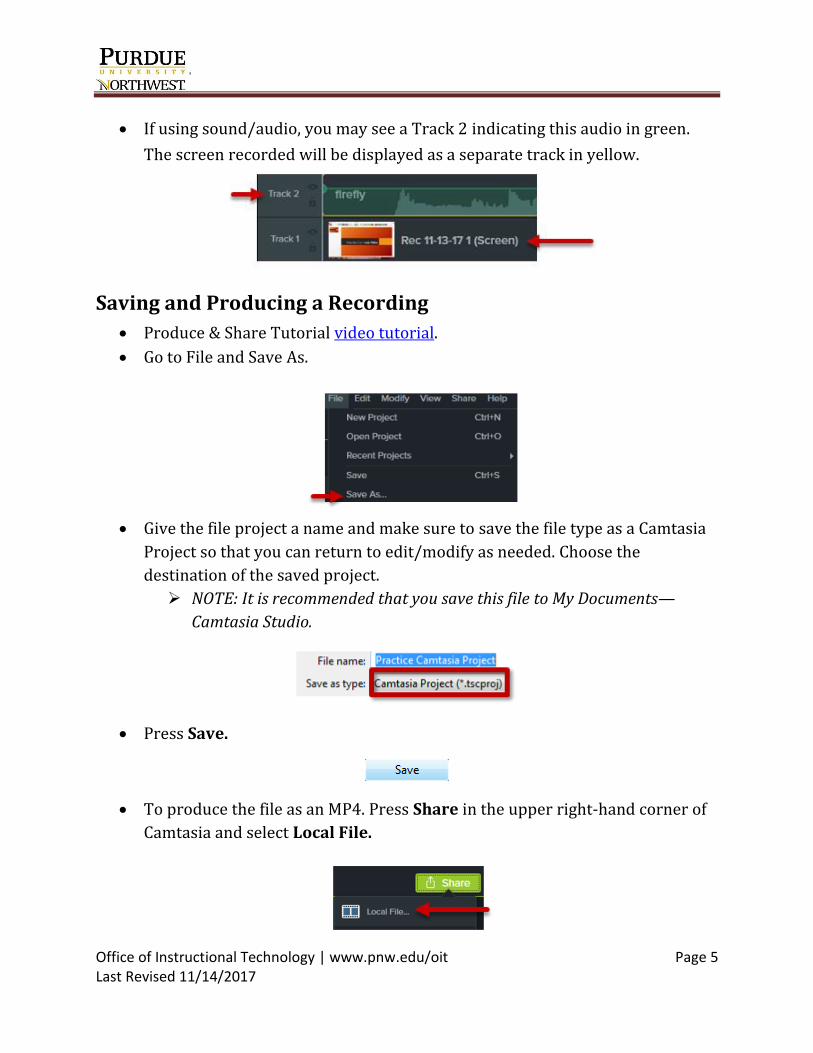
NOTE: Open any/all file types that you want to include in your screen
capture. Examples: PowerPoint, Word, etc.
To customize your recorded screen, press the customize option and
drag to resize the space you want to record.
A countdown will appear (3, 2, 1) and then the recording will begin.
NOTE: You can also press F10 on your keyboard to stop recording at any
time.
Once you are finished with your capture, the video you recorded will display
in your Media Bin and on your Camtasia track so that you can edit, replace, or
add additional files.
Office of Instructional Technology | www.pnw.edu/oit Page 5 Last Revised 11/14/2017
If using sound/audio, you may see a Track 2 indicating this audio in green.
The screen recorded will be displayed as a separate track in yellow.
Saving and Producing a Recording
Produce & Share Tutorial video tutorial.
Go to File and Save As.
Give the file project a name and make sure to save the file type as a Camtasia
Project so that you can return to edit/modify as needed. Choose the
destination of the saved project.
NOTE: It is recommended that you save this file to My Documents—
Camtasia Studio.
Press Save.
To produce the file as an MP4. Press Share in the upper right-hand corner of
Camtasia and select Local File.
Office of Instructional Technology | www.pnw.edu/oit Page 6 Last Revised 11/14/2017
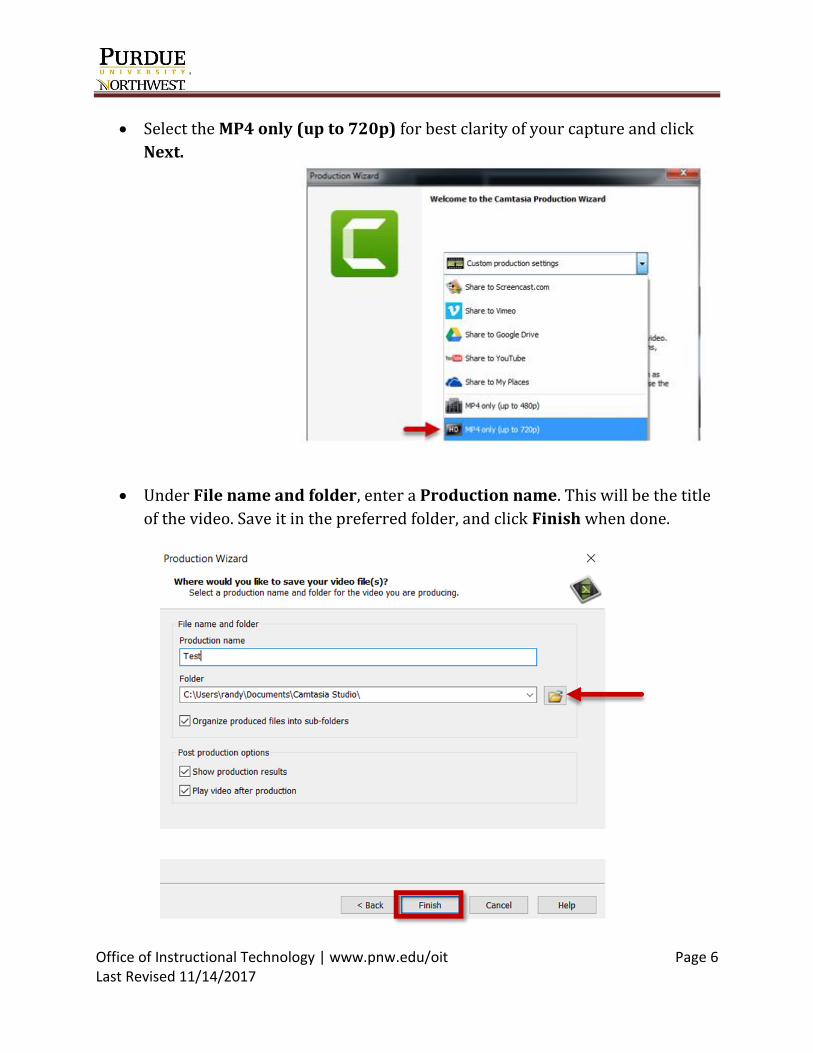
Select the MP4 only (up to 720p) for best clarity of your capture and click
Next.
Under File name and folder, enter a Production name. This will be the title
of the video. Save it in the preferred folder, and click Finish when done.
Office of Instructional Technology | www.pnw.edu/oit Page 7 Last Revised 11/14/2017
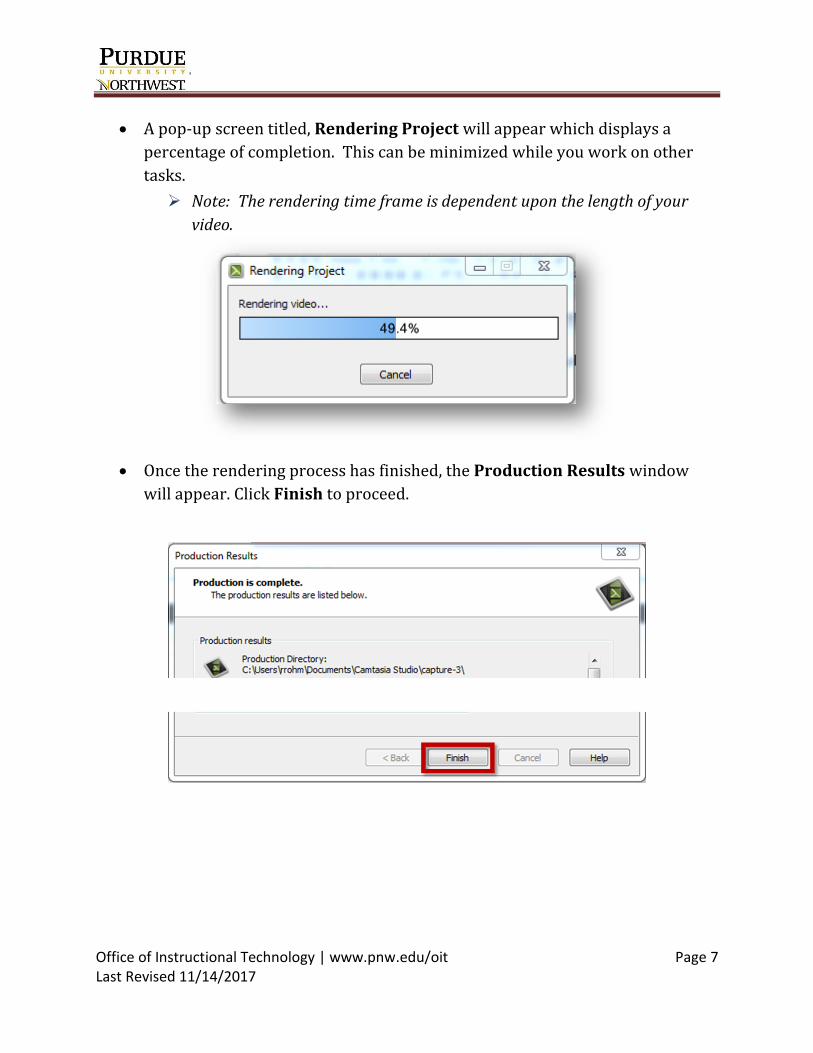
A pop-up screen titled, Rendering Project will appear which displays a
percentage of completion. This can be minimized while you work on other
tasks.
Note: The rendering time frame is dependent upon the length of your
video.
Once the rendering process has finished, the Production Results window
will appear. Click Finish to proceed.
Office of Instructional Technology | www.pnw.edu/oit Page 8 Last Revised 11/14/2017
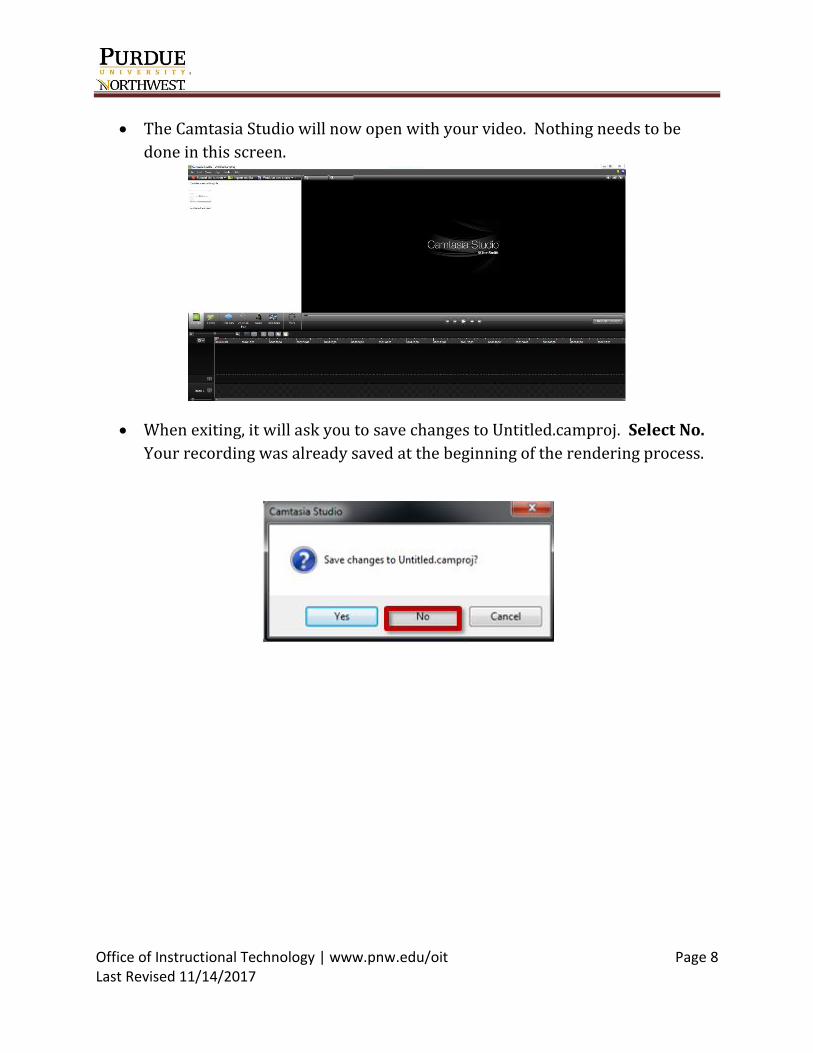
The Camtasia Studio will now open with your video. Nothing needs to be
done in this screen.
When exiting, it will ask you to save changes to Untitled.camproj. Select No.
Your recording was already saved at the beginning of the rendering process.

Office of Instructional Technology | www.pnw.edu/oit Page 9 Last Revised 11/14/2017
Uploading to Kaltura
Go to the course menu item where the file will be located (i.e. Learning
Materials, etc.…)
Click Build Content and select Kaltura Media.
Scroll over to the upper right hand part of the screen and select Add New >
Media Upload > Choose a file to upload
Office of Instructional Technology | www.pnw.edu/oit Page 10 Last Revised 11/14/2017
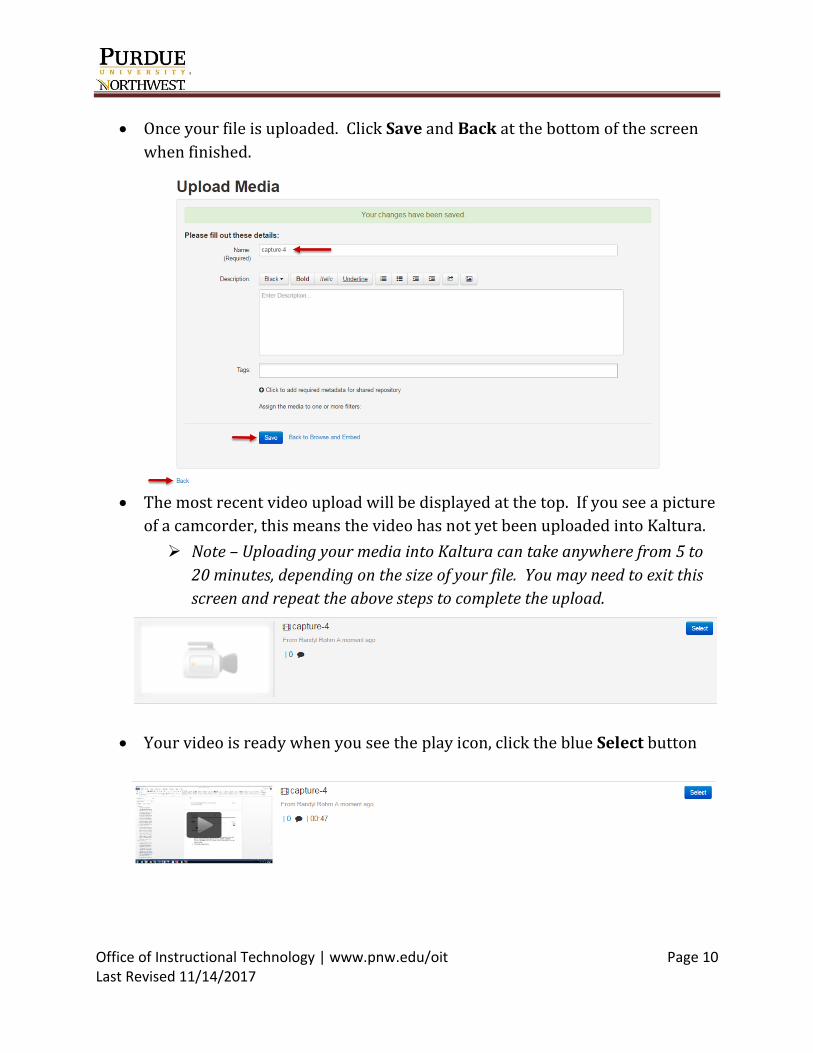
Once your file is uploaded. Click Save and Back at the bottom of the screen
when finished.
The most recent video upload will be displayed at the top. If you see a picture
of a camcorder, this means the video has not yet been uploaded into Kaltura.
Note – Uploading your media into Kaltura can take anywhere from 5 to
20 minutes, depending on the size of your file. You may need to exit this
screen and repeat the above steps to complete the upload.
Your video is ready when you see the play icon, click the blue Select button
Office of Instructional Technology | www.pnw.edu/oit Page 11 Last Revised 11/14/2017
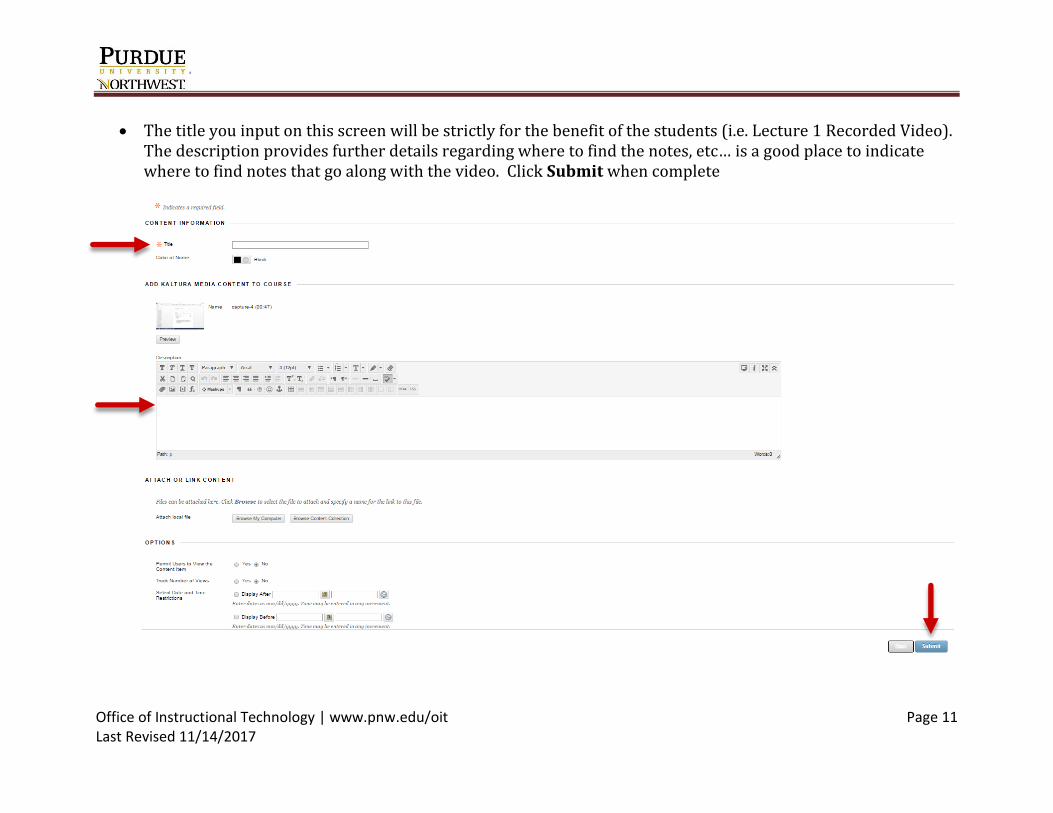
The title you input on this screen will be strictly for the benefit of the students (i.e. Lecture 1 Recorded Video). The description provides further details regarding where to find the notes, etc… is a good place to indicate where to find notes that go along with the video. Click Submit when complete
Camtasia
Office of Instructional Technology | www.pnw.edu/oit Page 12 Last Revised 11/16/2017
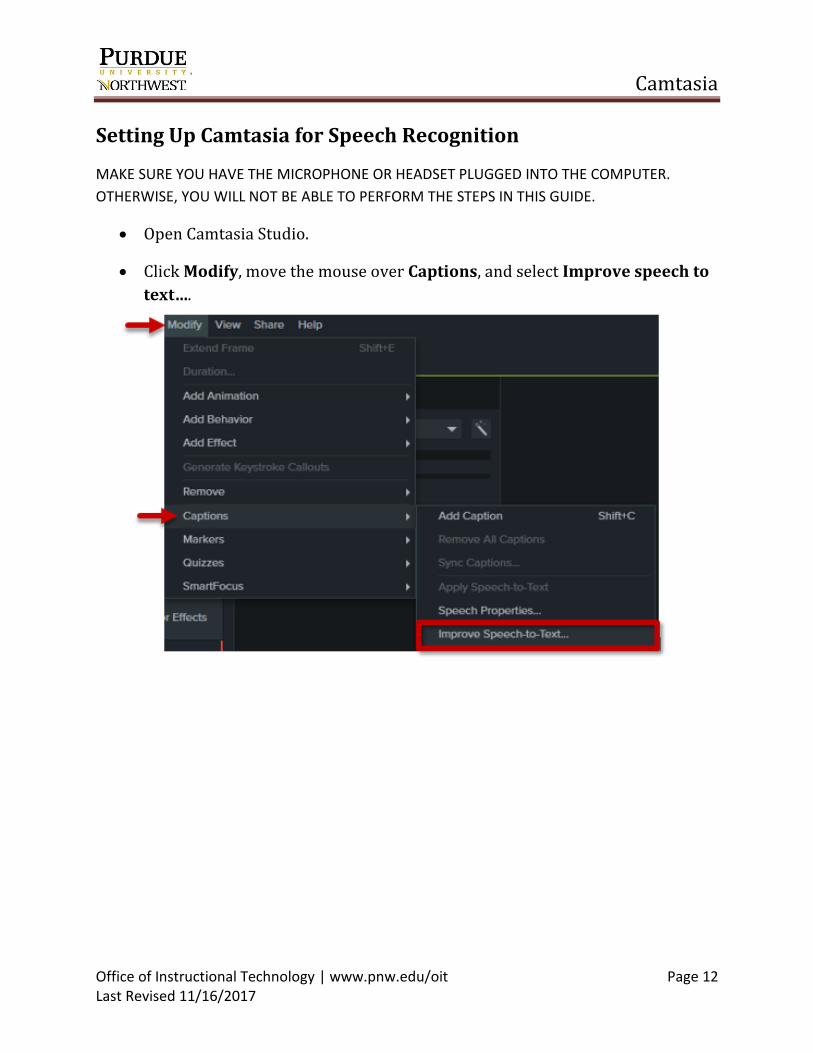
Setting Up Camtasia for Speech Recognition
MAKE SURE YOU HAVE THE MICROPHONE OR HEADSET PLUGGED INTO THE COMPUTER.
OTHERWISE, YOU WILL NOT BE ABLE TO PERFORM THE STEPS IN THIS GUIDE.
Open Camtasia Studio.
Click Modify, move the mouse over Captions, and select Improve speech to
text….
Camtasia
Office of Instructional Technology | www.pnw.edu/oit Page 13 Last Revised 11/16/2017
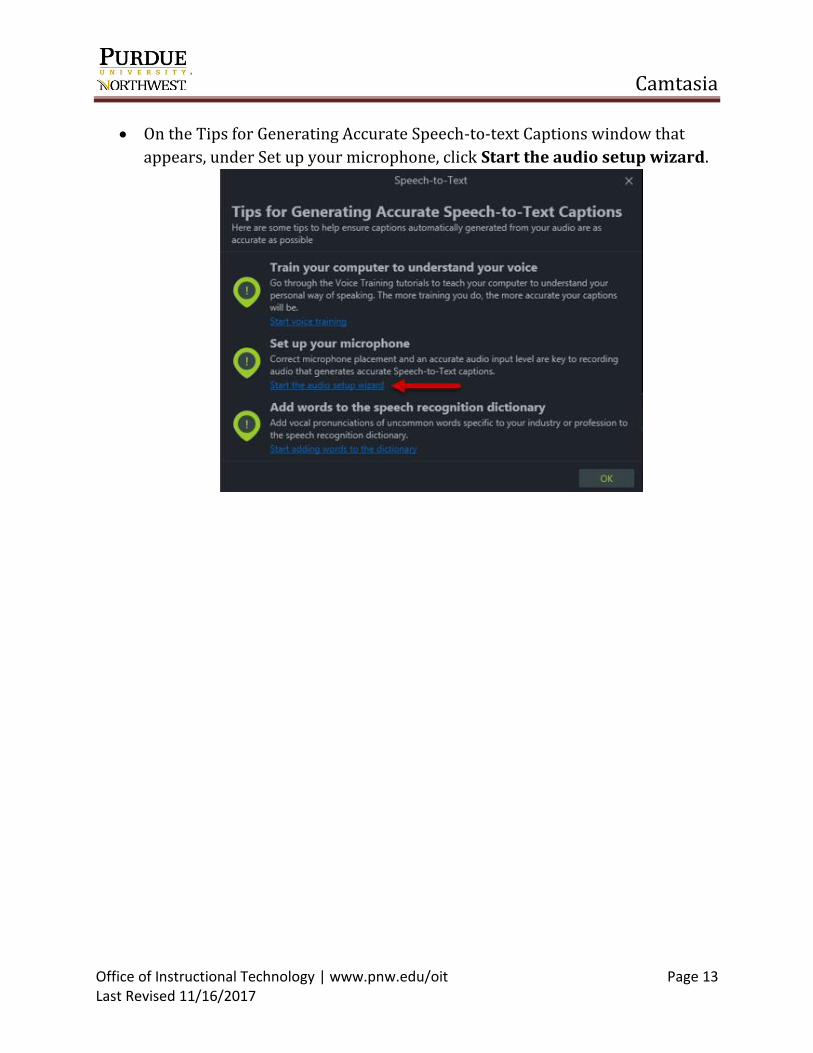
On the Tips for Generating Accurate Speech-to-text Captions window that
appears, under Set up your microphone, click Start the audio setup wizard.
Camtasia
Office of Instructional Technology | www.pnw.edu/oit Page 14 Last Revised 11/16/2017
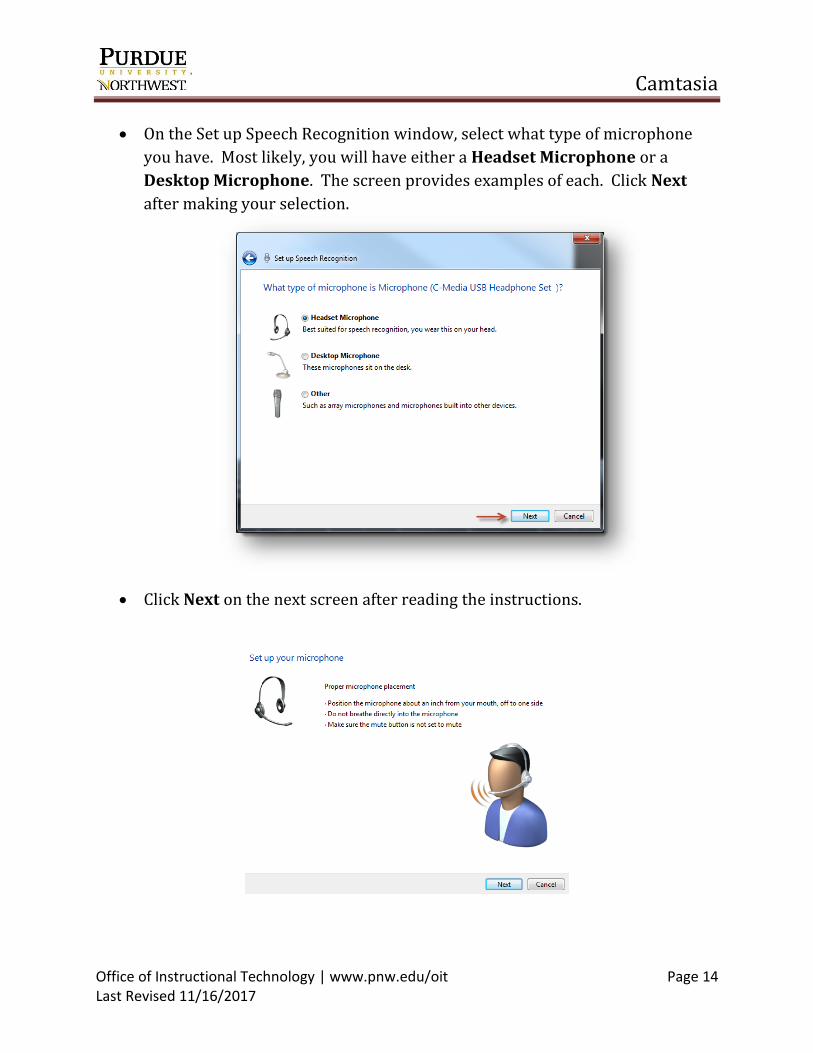
On the Set up Speech Recognition window, select what type of microphone
you have. Most likely, you will have either a Headset Microphone or a
Desktop Microphone. The screen provides examples of each. Click Next
after making your selection.
Click Next on the next screen after reading the instructions.
Camtasia
Office of Instructional Technology | www.pnw.edu/oit Page 15 Last Revised 11/16/2017
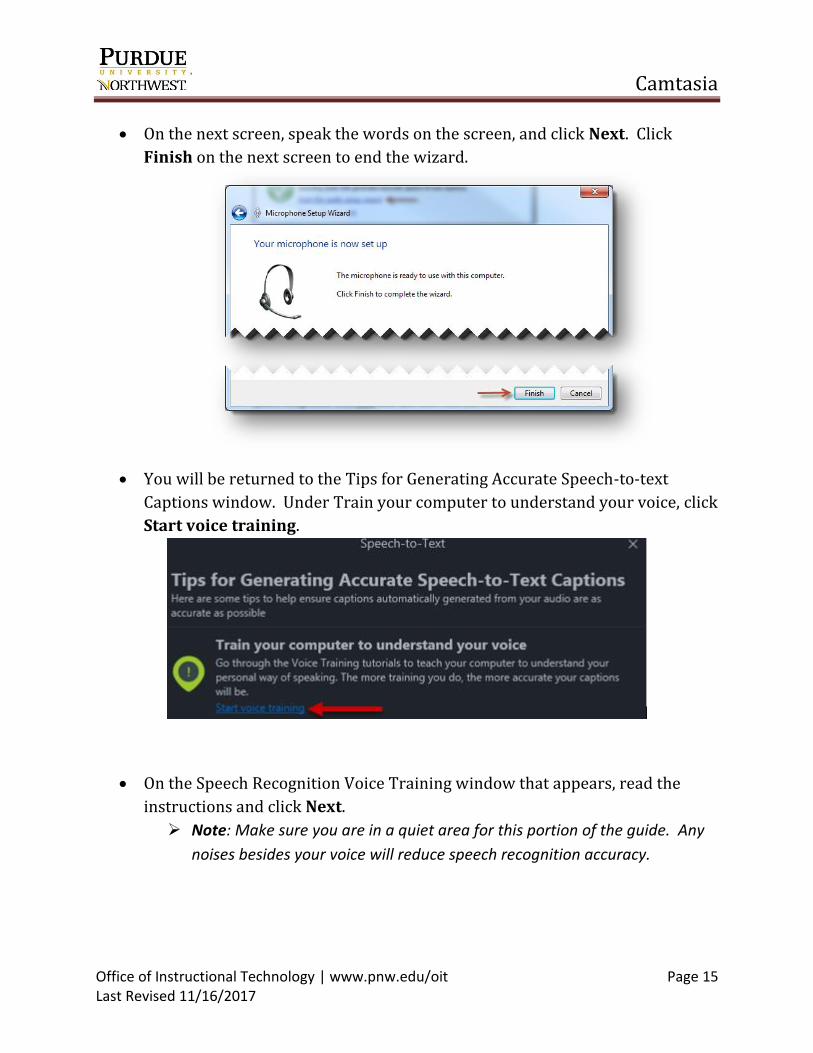
On the next screen, speak the words on the screen, and click Next. Click
Finish on the next screen to end the wizard.
You will be returned to the Tips for Generating Accurate Speech-to-text
Captions window. Under Train your computer to understand your voice, click
Start voice training.
On the Speech Recognition Voice Training window that appears, read the
instructions and click Next.
Note: Make sure you are in a quiet area for this portion of the guide. Any
noises besides your voice will reduce speech recognition accuracy.
Camtasia
Office of Instructional Technology | www.pnw.edu/oit Page 16 Last Revised 11/16/2017
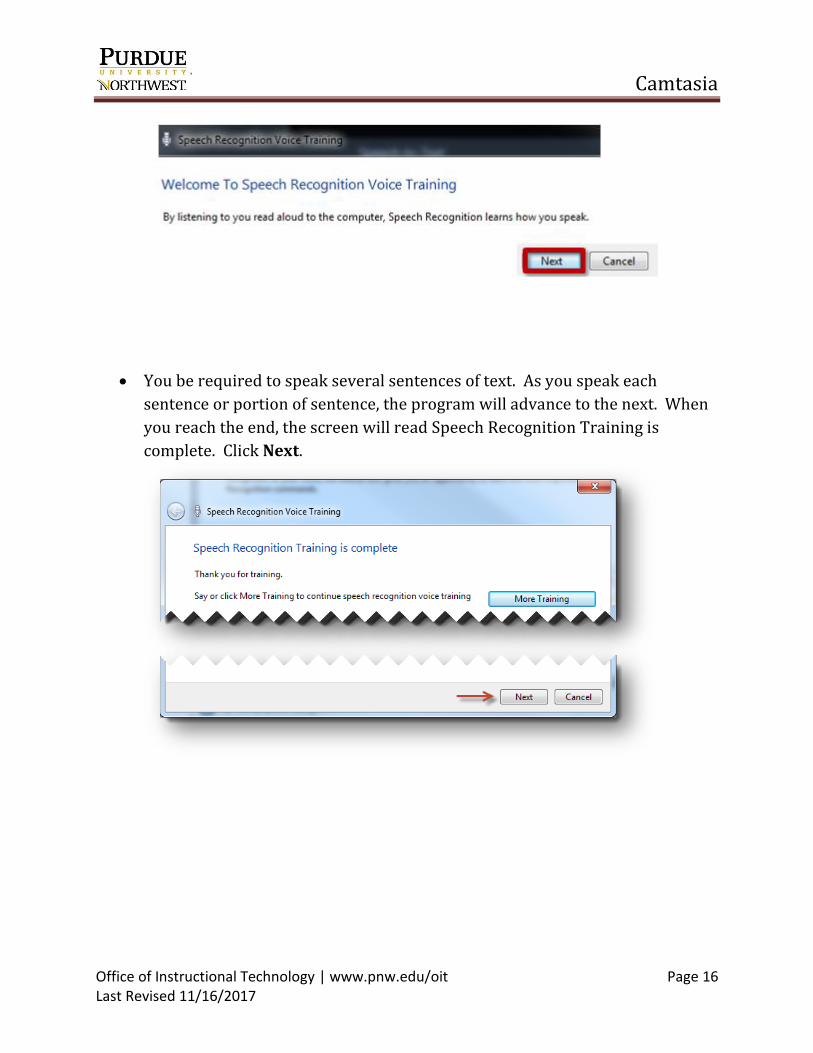
You be required to speak several sentences of text. As you speak each
sentence or portion of sentence, the program will advance to the next. When
you reach the end, the screen will read Speech Recognition Training is
complete. Click Next.
Camtasia
Office of Instructional Technology | www.pnw.edu/oit Page 17 Last Revised 11/16/2017
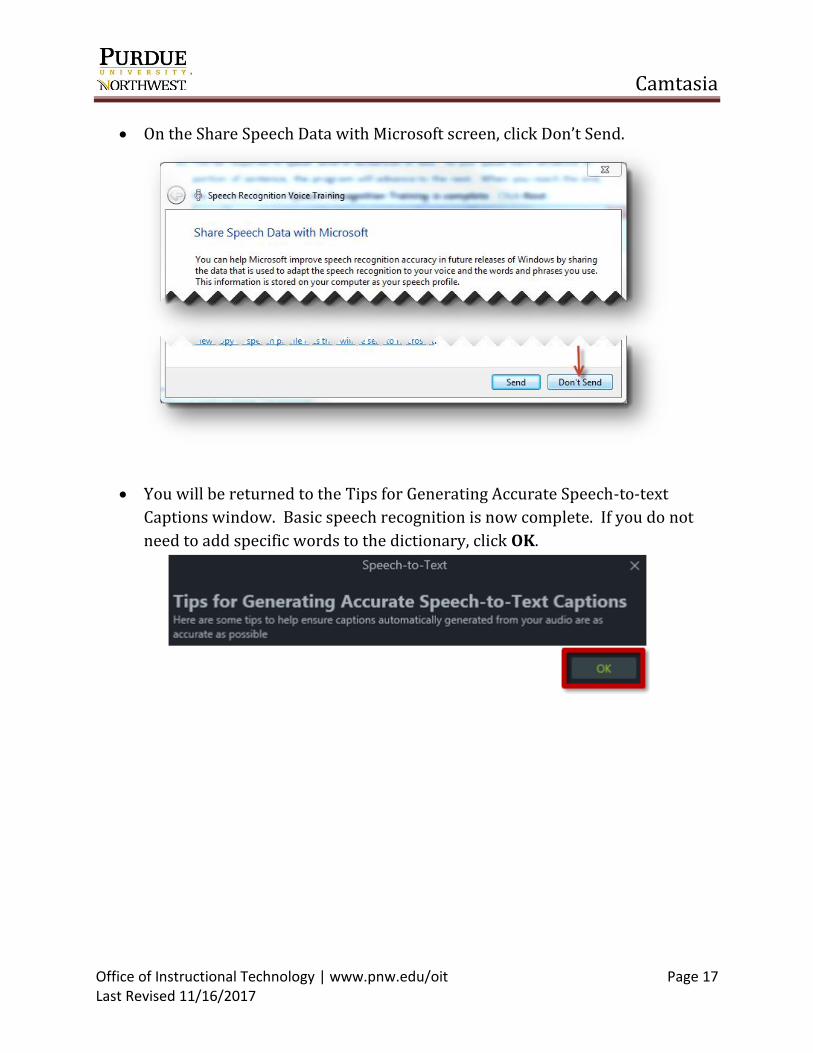
On the Share Speech Data with Microsoft screen, click Don’t Send.
You will be returned to the Tips for Generating Accurate Speech-to-text
Captions window. Basic speech recognition is now complete. If you do not
need to add specific words to the dictionary, click OK.
Camtasia
Office of Instructional Technology | www.pnw.edu/oit Page 18 Last Revised 11/16/2017
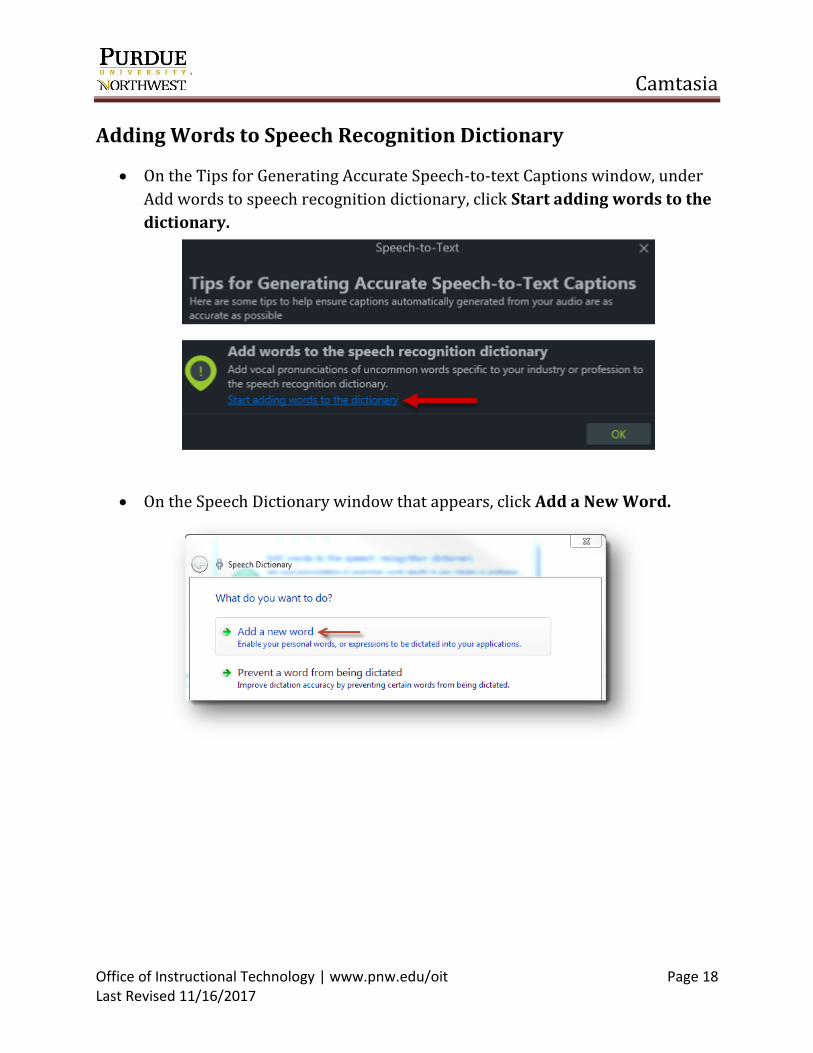
Adding Words to Speech Recognition Dictionary
On the Tips for Generating Accurate Speech-to-text Captions window, under
Add words to speech recognition dictionary, click Start adding words to the
dictionary.
On the Speech Dictionary window that appears, click Add a New Word.
Camtasia
Office of Instructional Technology | www.pnw.edu/oit Page 19 Last Revised 11/16/2017
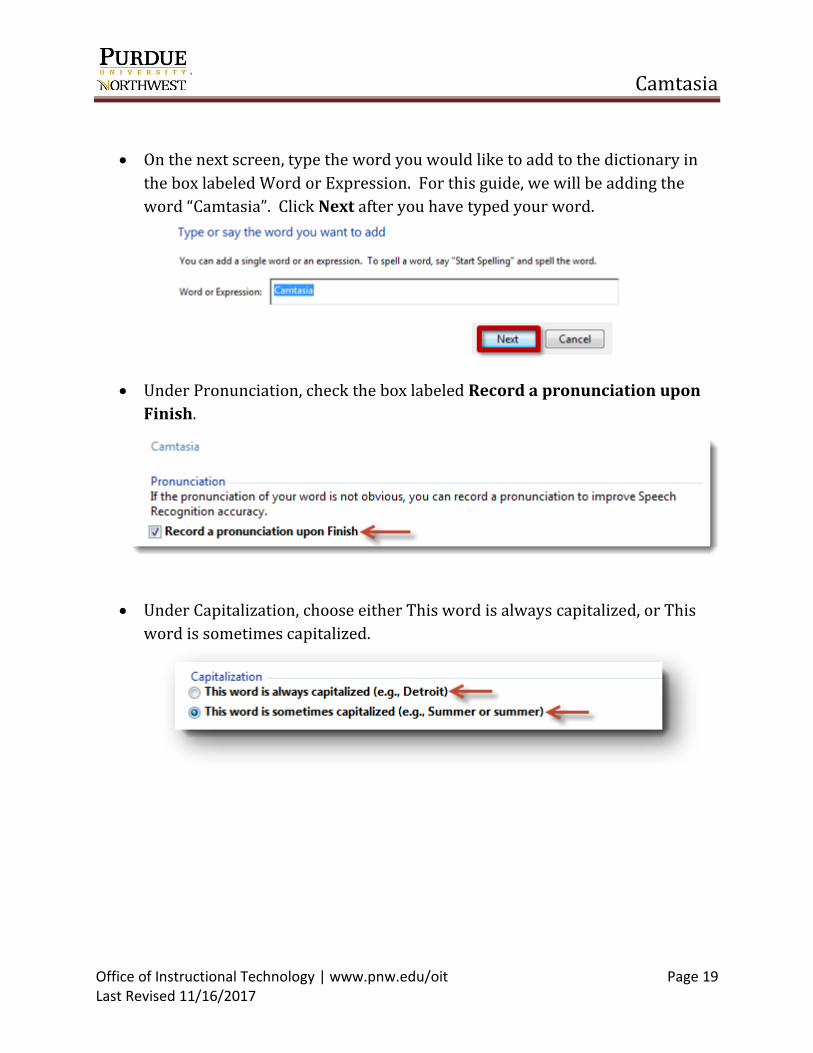
On the next screen, type the word you would like to add to the dictionary in
the box labeled Word or Expression. For this guide, we will be adding the
word “Camtasia”. Click Next after you have typed your word.
Under Pronunciation, check the box labeled Record a pronunciation upon
Finish.
Under Capitalization, choose either This word is always capitalized, or This
word is sometimes capitalized.
Camtasia
Office of Instructional Technology | www.pnw.edu/oit Page 20 Last Revised 11/16/2017
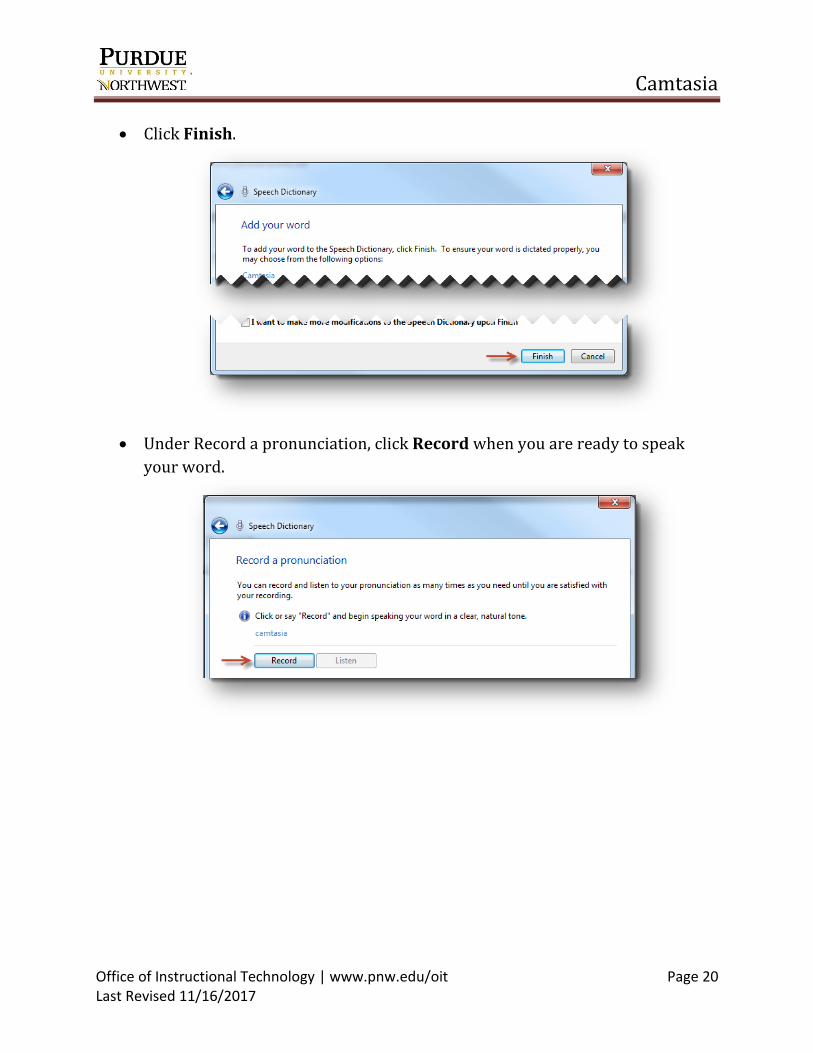
Click Finish.
Under Record a pronunciation, click Record when you are ready to speak
your word.
Camtasia
Office of Instructional Technology | www.pnw.edu/oit Page 21 Last Revised 11/16/2017
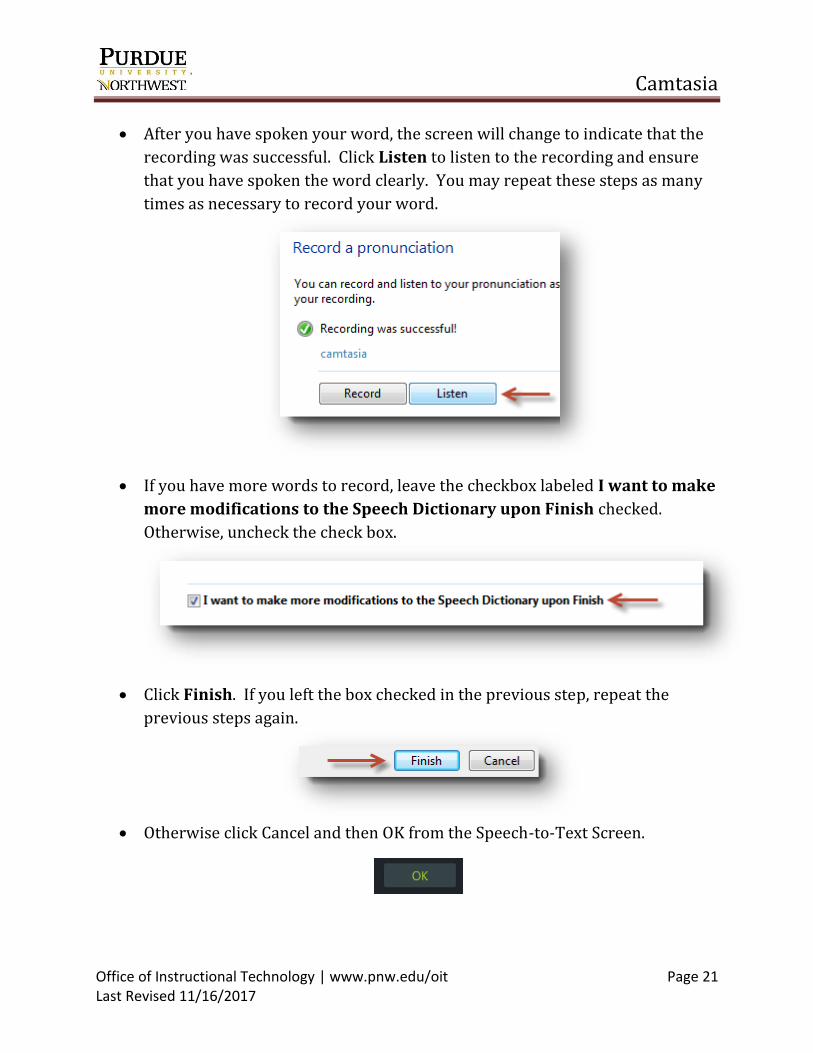
After you have spoken your word, the screen will change to indicate that the
recording was successful. Click Listen to listen to the recording and ensure
that you have spoken the word clearly. You may repeat these steps as many
times as necessary to record your word.
If you have more words to record, leave the checkbox labeled I want to make
more modifications to the Speech Dictionary upon Finish checked.
Otherwise, uncheck the check box.
Click Finish. If you left the box checked in the previous step, repeat the
previous steps again.
Otherwise click Cancel and then OK from the Speech-to-Text Screen.
Camtasia
Office of Instructional Technology | www.pnw.edu/oit Page 22 Last Revised 11/16/2017
Add Captions
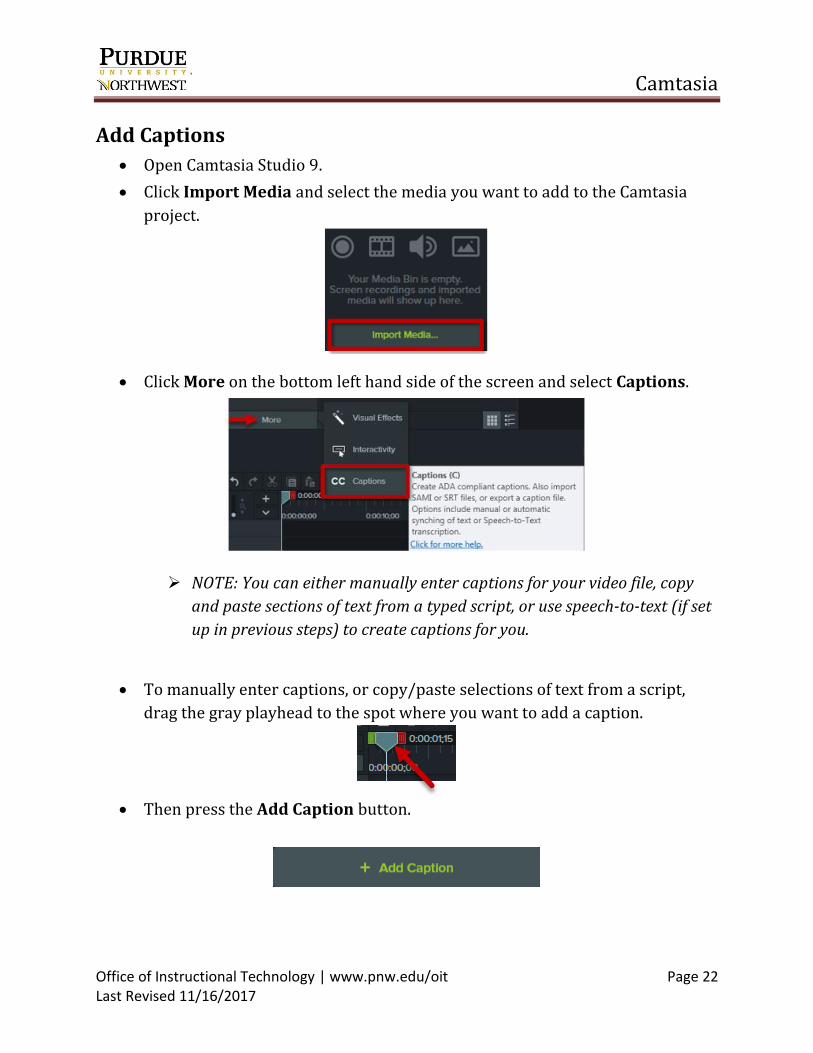
Open Camtasia Studio 9.
Click Import Media and select the media you want to add to the Camtasia
project.
Click More on the bottom left hand side of the screen and select Captions.
NOTE: You can either manually enter captions for your video file, copy
and paste sections of text from a typed script, or use speech-to-text (if set
up in previous steps) to create captions for you.
To manually enter captions, or copy/paste selections of text from a script,
drag the gray playhead to the spot where you want to add a caption.
Then press the Add Caption button.
Camtasia
Office of Instructional Technology | www.pnw.edu/oit Page 23 Last Revised 11/16/2017
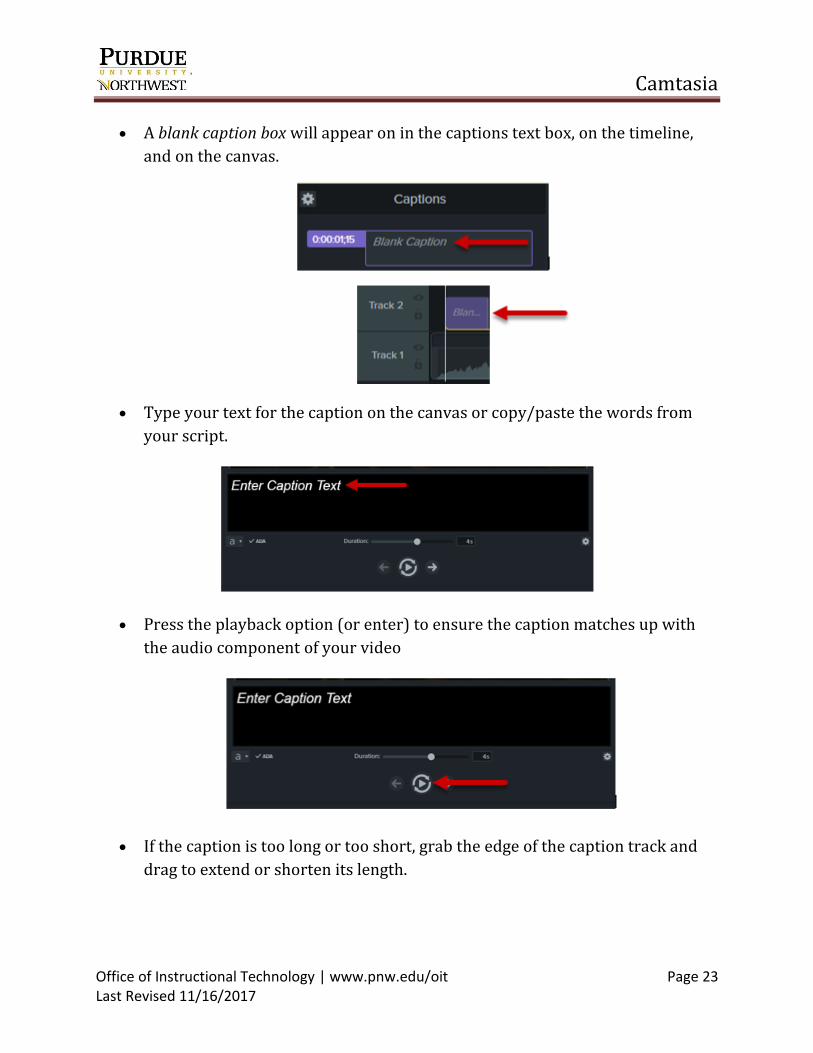
A blank caption box will appear on in the captions text box, on the timeline,
and on the canvas.
Type your text for the caption on the canvas or copy/paste the words from
your script.
Press the playback option (or enter) to ensure the caption matches up with
the audio component of your video
If the caption is too long or too short, grab the edge of the caption track and
drag to extend or shorten its length.
Camtasia
Office of Instructional Technology | www.pnw.edu/oit Page 24 Last Revised 11/16/2017
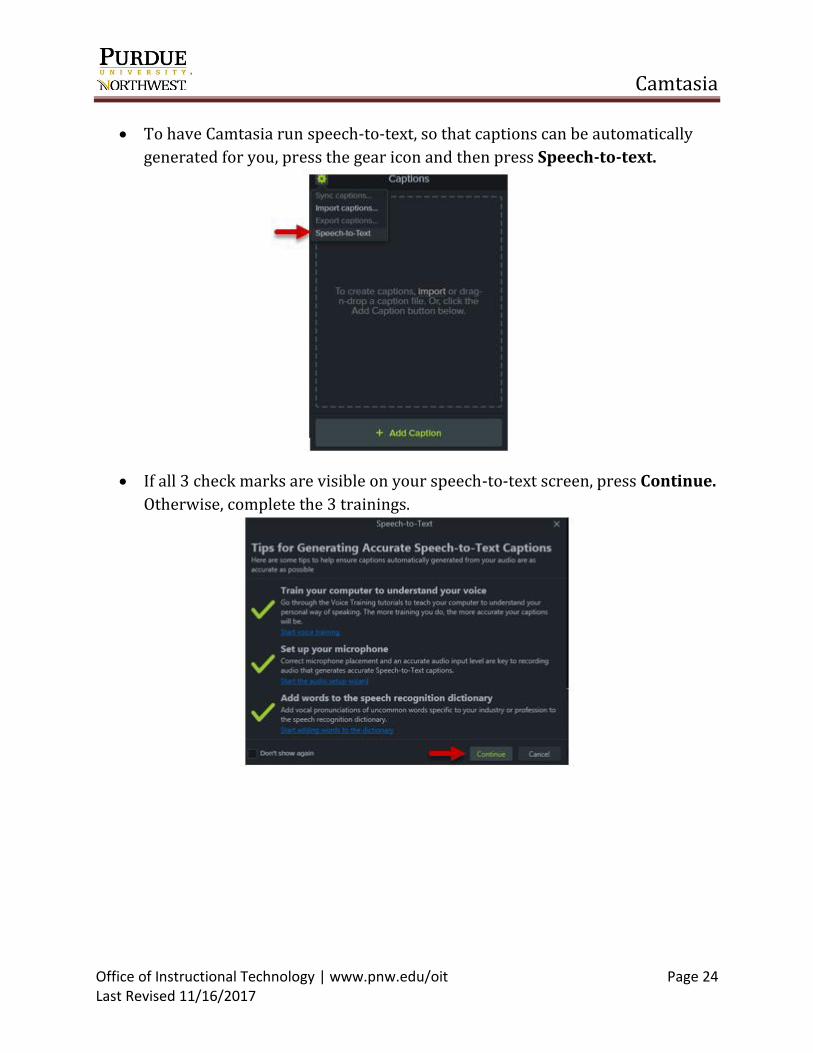
To have Camtasia run speech-to-text, so that captions can be automatically
generated for you, press the gear icon and then press Speech-to-text.
If all 3 check marks are visible on your speech-to-text screen, press Continue.
Otherwise, complete the 3 trainings.
Camtasia
Office of Instructional Technology | www.pnw.edu/oit Page 25 Last Revised 11/16/2017
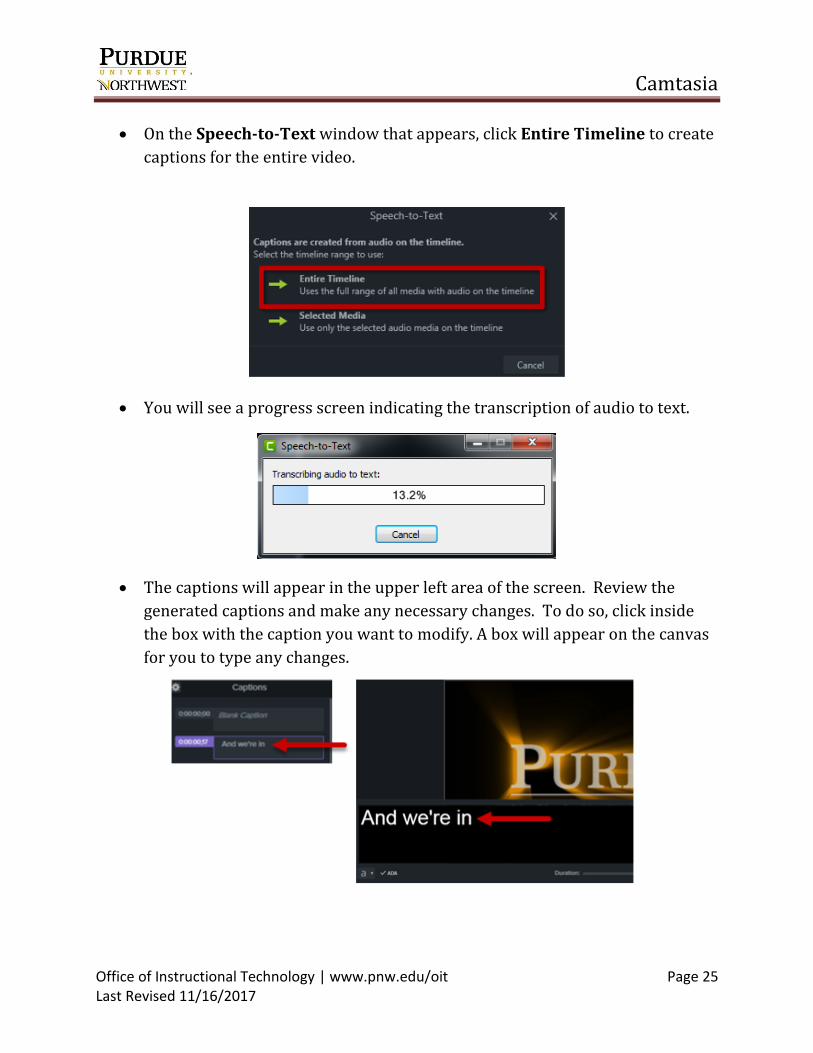
On the Speech-to-Text window that appears, click Entire Timeline to create
captions for the entire video.
You will see a progress screen indicating the transcription of audio to text.
The captions will appear in the upper left area of the screen. Review the
generated captions and make any necessary changes. To do so, click inside
the box with the caption you want to modify. A box will appear on the canvas
for you to type any changes.
Camtasia
Office of Instructional Technology | www.pnw.edu/oit Page 26 Last Revised 11/16/2017
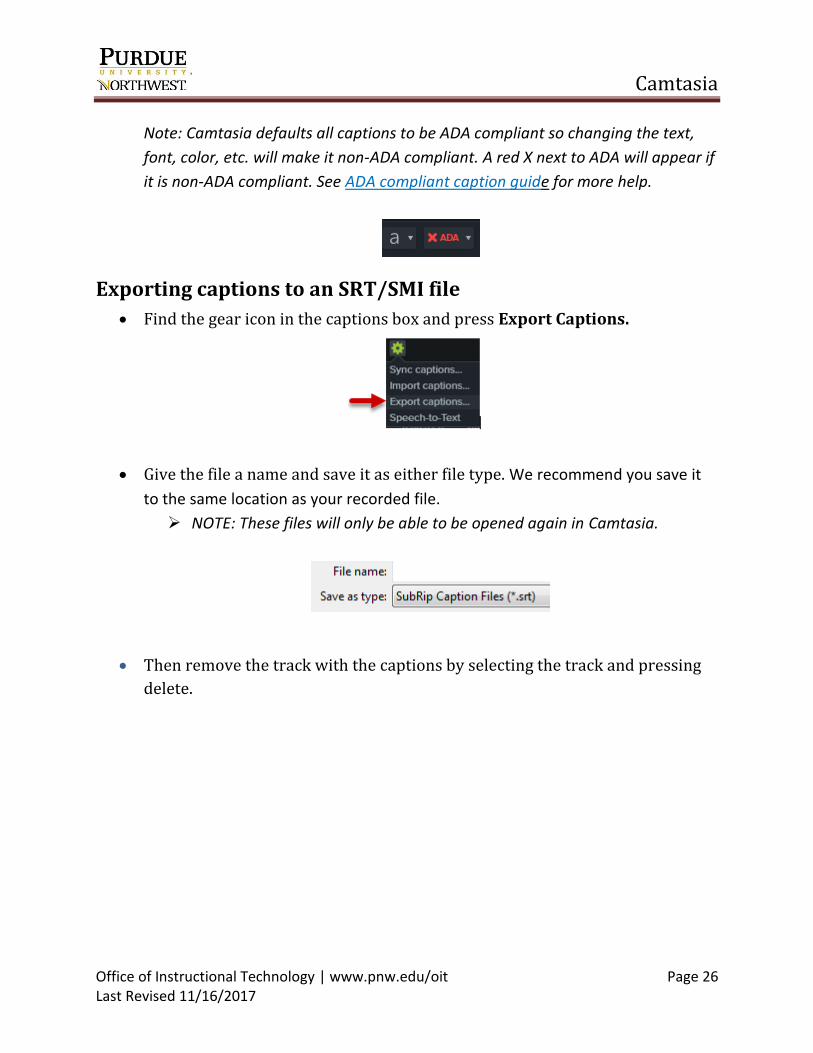
Note: Camtasia defaults all captions to be ADA compliant so changing the text,
font, color, etc. will make it non-ADA compliant. A red X next to ADA will appear if
it is non-ADA compliant. See ADA compliant caption guide for more help.
Exporting captions to an SRT/SMI file
Find the gear icon in the captions box and press Export Captions.
Give the file a name and save it as either file type. We recommend you save it
to the same location as your recorded file.
NOTE: These files will only be able to be opened again in Camtasia.
Then remove the track with the captions by selecting the track and pressing
delete.
Camtasia
Office of Instructional Technology | www.pnw.edu/oit Page 27 Last Revised 11/16/2017
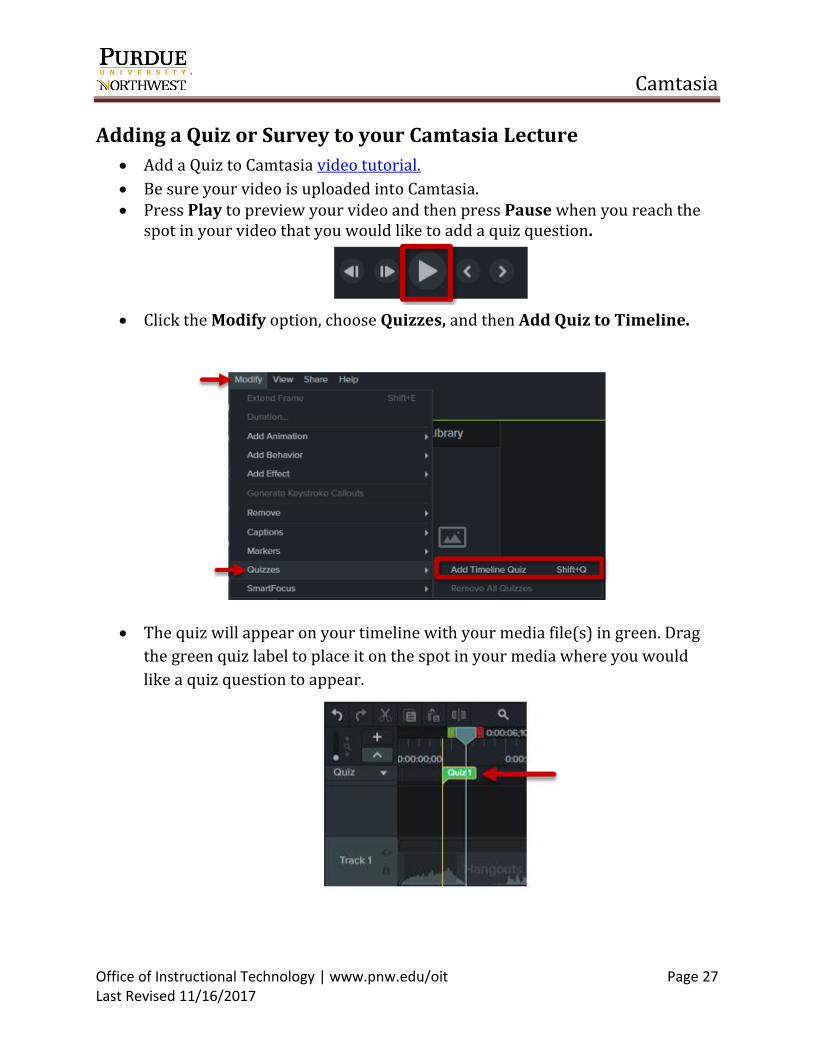
Adding a Quiz or Survey to your Camtasia Lecture
Add a Quiz to Camtasia video tutorial.
Be sure your video is uploaded into Camtasia. Press Play to preview your video and then press Pause when you reach the
spot in your video that you would like to add a quiz question.
Click the Modify option, choose Quizzes, and then Add Quiz to Timeline.
The quiz will appear on your timeline with your media file(s) in green. Drag
the green quiz label to place it on the spot in your media where you would
like a quiz question to appear.
Camtasia
Office of Instructional Technology | www.pnw.edu/oit Page 28 Last Revised 11/16/2017
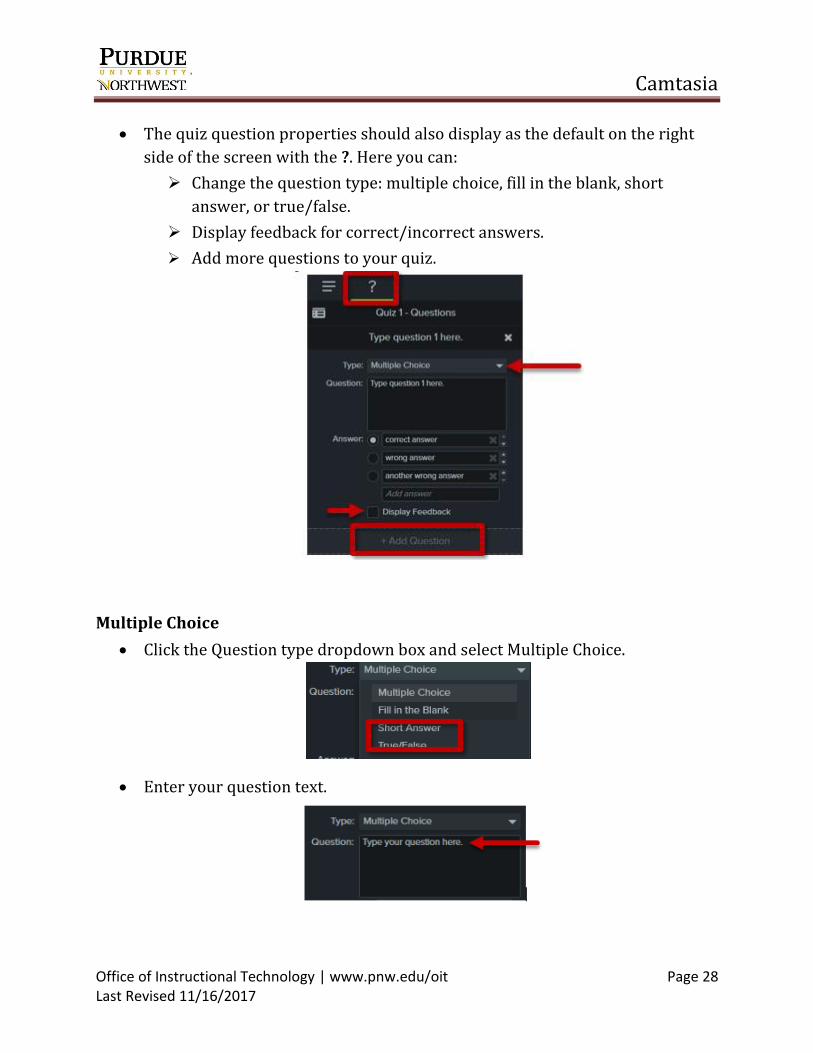
The quiz question properties should also display as the default on the right
side of the screen with the ?. Here you can:
Change the question type: multiple choice, fill in the blank, short
answer, or true/false.
Display feedback for correct/incorrect answers.
Add more questions to your quiz.
Multiple Choice
Click the Question type dropdown box and select Multiple Choice.
Enter your question text.
Camtasia
Office of Instructional Technology | www.pnw.edu/oit Page 29 Last Revised 11/16/2017
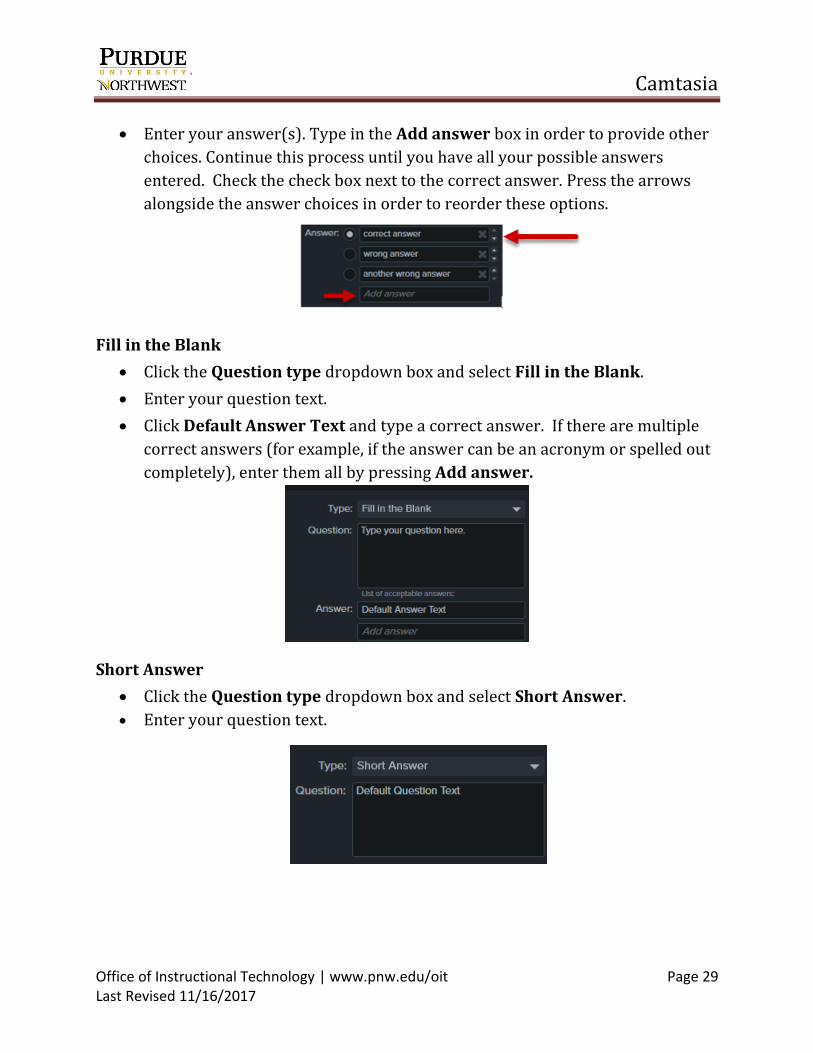
Enter your answer(s). Type in the Add answer box in order to provide other
choices. Continue this process until you have all your possible answers
entered. Check the check box next to the correct answer. Press the arrows
alongside the answer choices in order to reorder these options.
Fill in the Blank
Click the Question type dropdown box and select Fill in the Blank.
Enter your question text.
Click Default Answer Text and type a correct answer. If there are multiple
correct answers (for example, if the answer can be an acronym or spelled out
completely), enter them all by pressing Add answer.
Short Answer
Click the Question type dropdown box and select Short Answer.
Enter your question text.
Camtasia
Office of Instructional Technology | www.pnw.edu/oit Page 30 Last Revised 11/16/2017
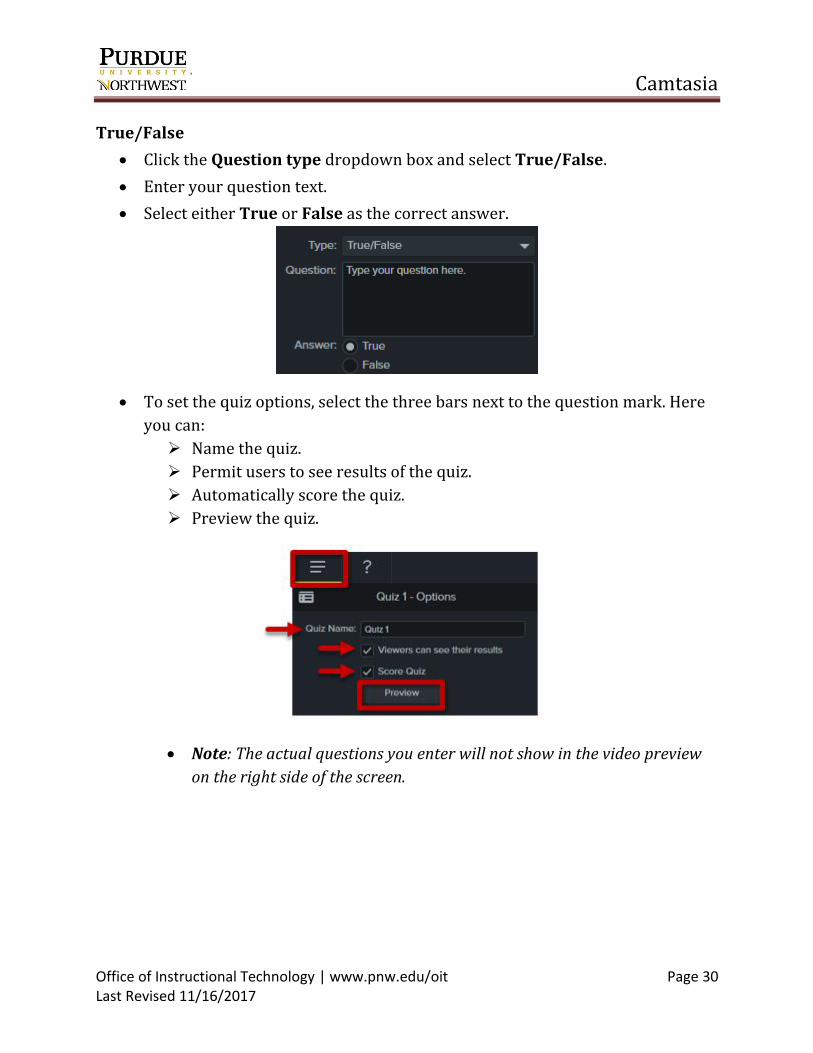
True/False
Click the Question type dropdown box and select True/False.
Enter your question text.
Select either True or False as the correct answer.
To set the quiz options, select the three bars next to the question mark. Here
you can:
Name the quiz.
Permit users to see results of the quiz.
Automatically score the quiz.
Preview the quiz.
Note: The actual questions you enter will not show in the video preview
on the right side of the screen.
Camtasia
Office of Instructional Technology | www.pnw.edu/oit Page 31 Last Revised 11/16/2017
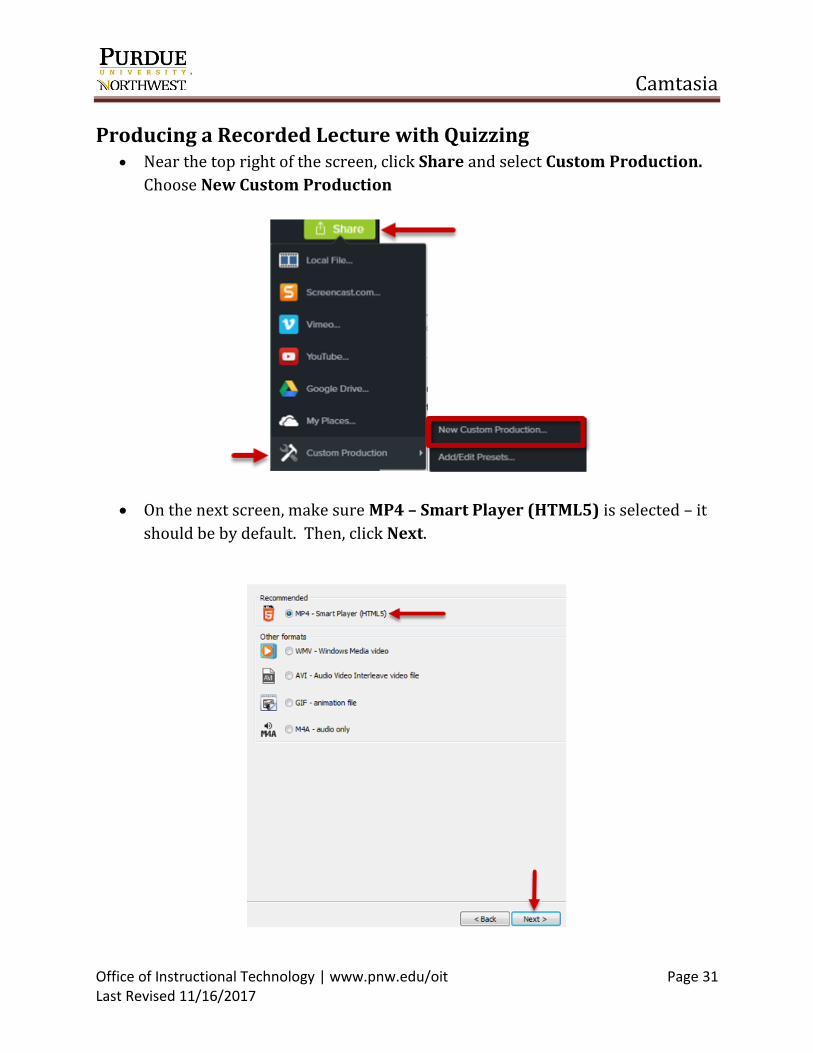
Producing a Recorded Lecture with Quizzing Near the top right of the screen, click Share and select Custom Production.
Choose New Custom Production
On the next screen, make sure MP4 – Smart Player (HTML5) is selected – it
should be by default. Then, click Next.

Camtasia
Office of Instructional Technology | www.pnw.edu/oit Page 32 Last Revised 11/16/2017
On the next screen, select the Options tab. Make sure that the check box
labeled Quizzing is checked. Then, click Next.
Click Next again.
On the Quiz Reporting Options screen, make sure the radio button labeled
Report quiz results using SCORM is selected. Then, click SCORM options….
Camtasia
Office of Instructional Technology | www.pnw.edu/oit Page 33 Last Revised 11/16/2017
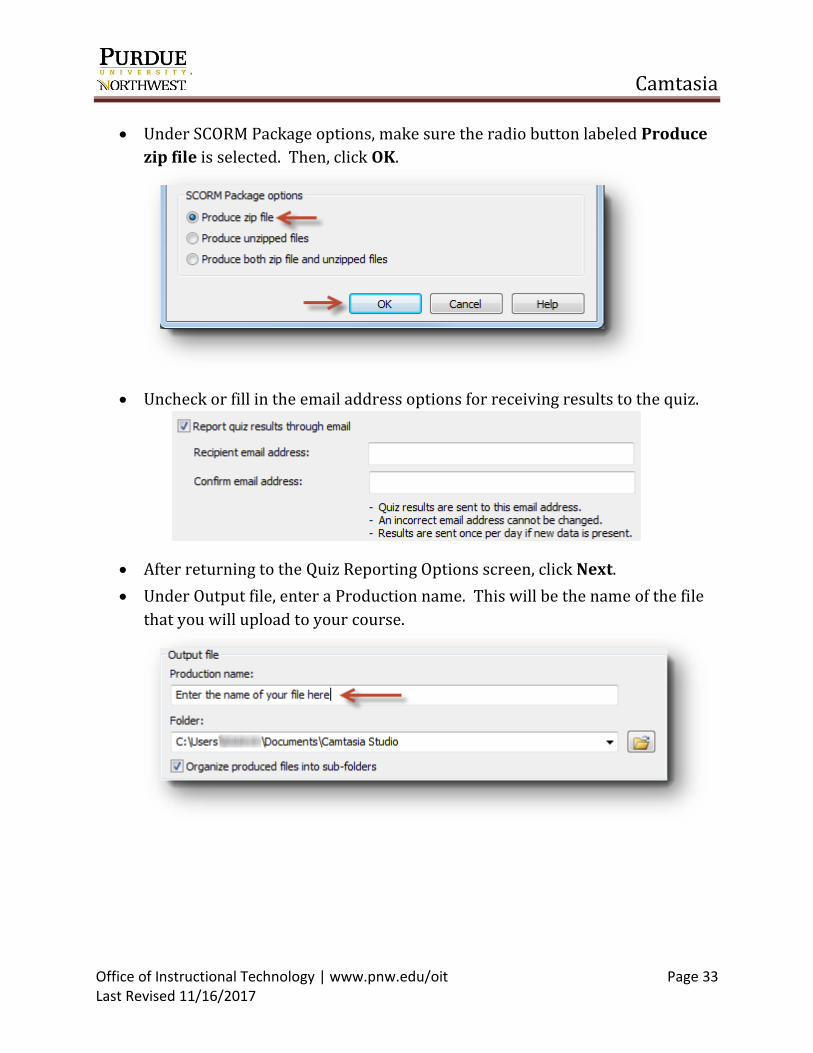
Under SCORM Package options, make sure the radio button labeled Produce
zip file is selected. Then, click OK.
Uncheck or fill in the email address options for receiving results to the quiz.
After returning to the Quiz Reporting Options screen, click Next.
Under Output file, enter a Production name. This will be the name of the file
that you will upload to your course.
Camtasia
Office of Instructional Technology | www.pnw.edu/oit Page 34 Last Revised 11/16/2017
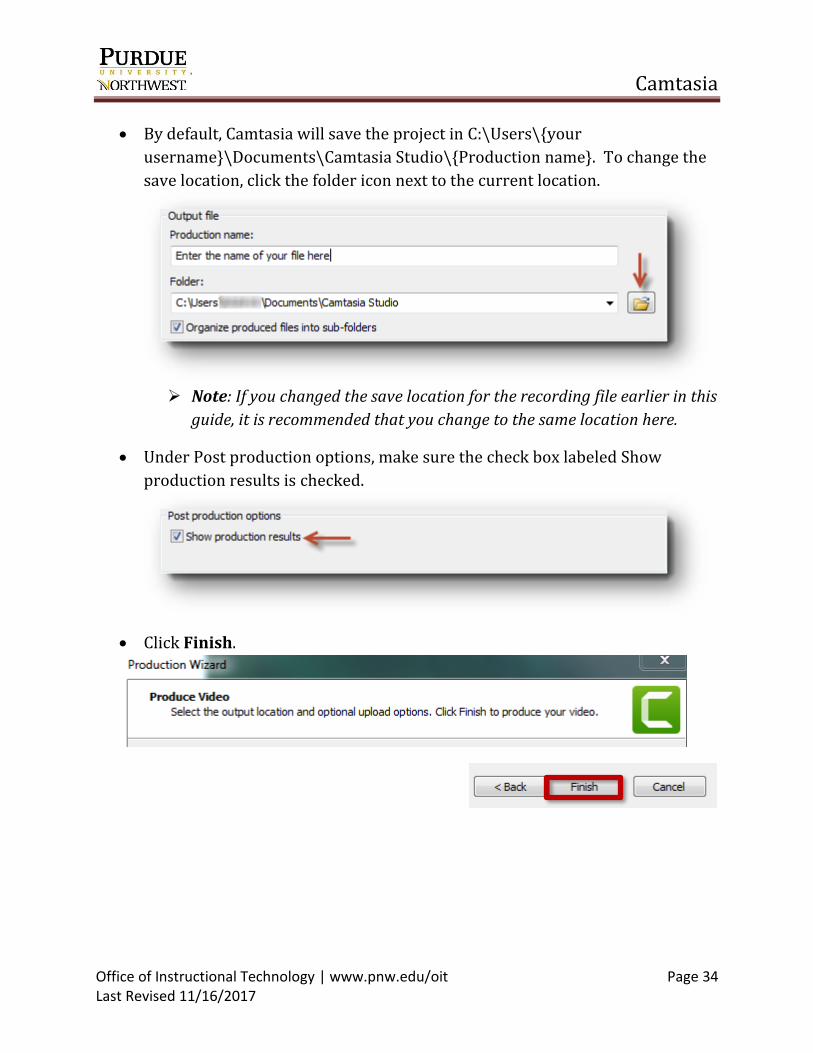
By default, Camtasia will save the project in C:\Users\{your
username}\Documents\Camtasia Studio\{Production name}. To change the
save location, click the folder icon next to the current location.
Note: If you changed the save location for the recording file earlier in this
guide, it is recommended that you change to the same location here.
Under Post production options, make sure the check box labeled Show
production results is checked.
Click Finish.
Camtasia
Office of Instructional Technology | www.pnw.edu/oit Page 35 Last Revised 11/16/2017
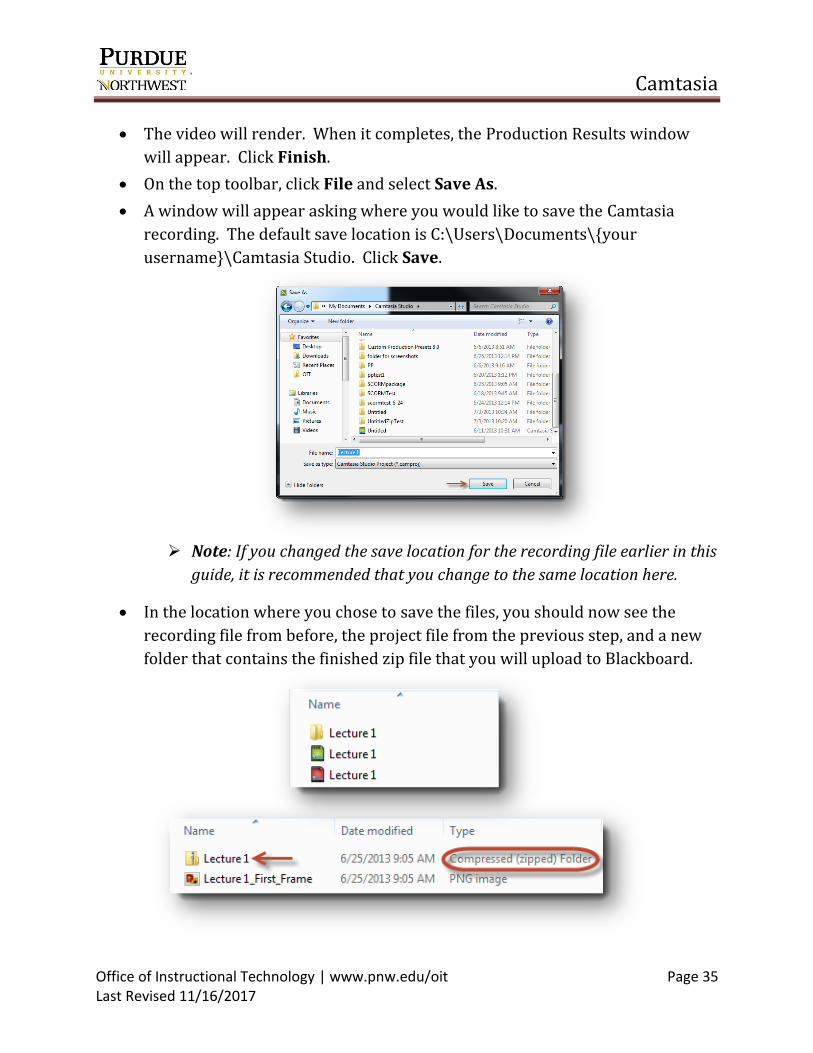
The video will render. When it completes, the Production Results window
will appear. Click Finish.
On the top toolbar, click File and select Save As.
A window will appear asking where you would like to save the Camtasia
recording. The default save location is C:\Users\Documents\{your
username}\Camtasia Studio. Click Save.
Note: If you changed the save location for the recording file earlier in this
guide, it is recommended that you change to the same location here.
In the location where you chose to save the files, you should now see the
recording file from before, the project file from the previous step, and a new
folder that contains the finished zip file that you will upload to Blackboard.
Camtasia
Office of Instructional Technology | www.pnw.edu/oit Page 36 Last Revised 11/16/2017
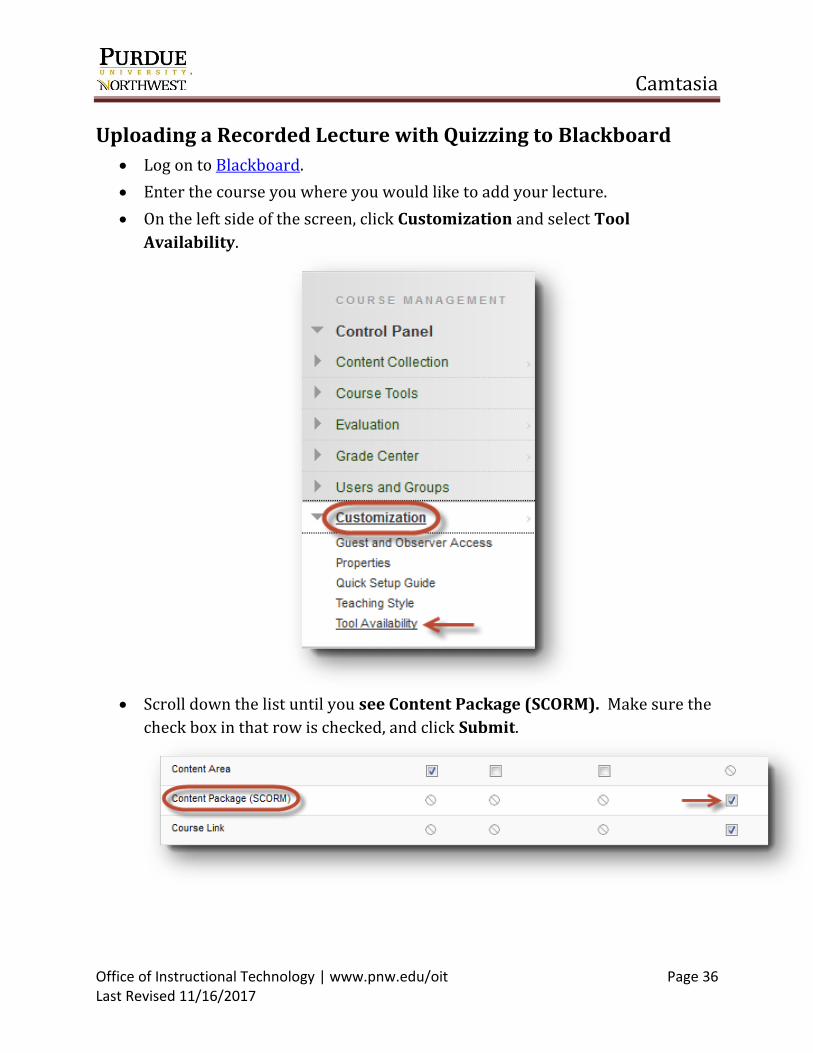
Uploading a Recorded Lecture with Quizzing to Blackboard
Log on to Blackboard.
Enter the course you where you would like to add your lecture.
On the left side of the screen, click Customization and select Tool
Availability.
Scroll down the list until you see Content Package (SCORM). Make sure the
check box in that row is checked, and click Submit.
Camtasia
Office of Instructional Technology | www.pnw.edu/oit Page 37 Last Revised 11/16/2017
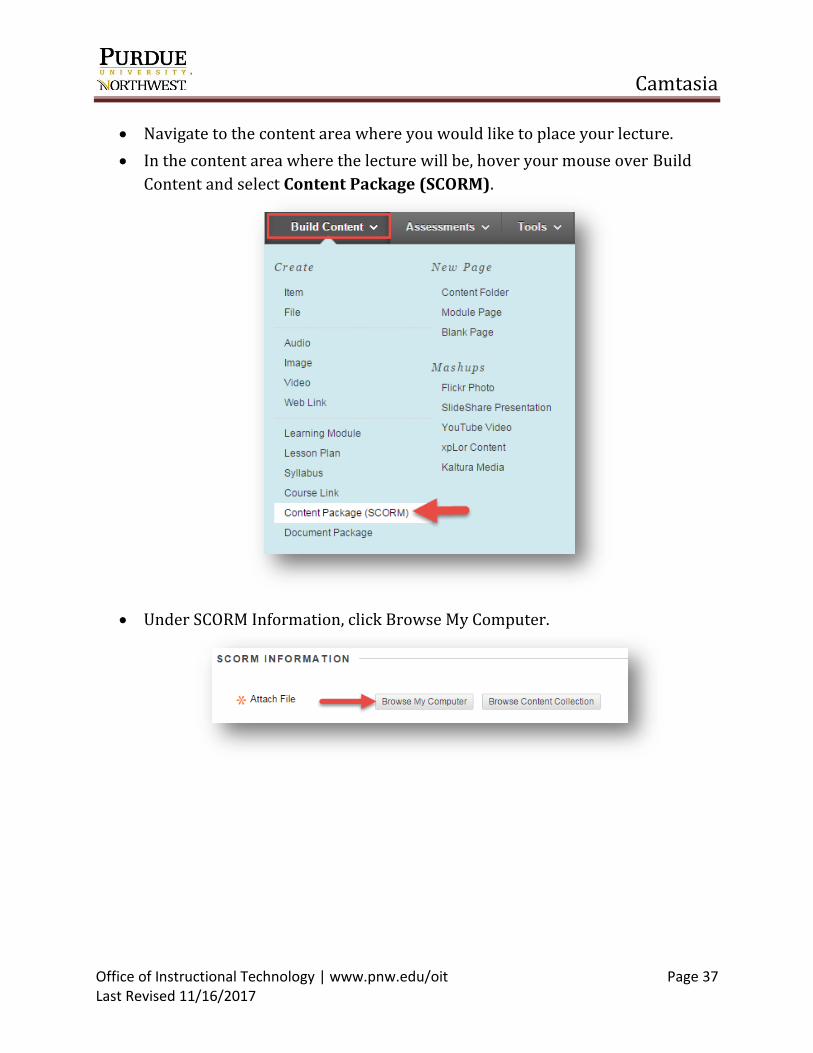
Navigate to the content area where you would like to place your lecture.
In the content area where the lecture will be, hover your mouse over Build
Content and select Content Package (SCORM).
Under SCORM Information, click Browse My Computer.
Camtasia
Office of Instructional Technology | www.pnw.edu/oit Page 38 Last Revised 11/16/2017
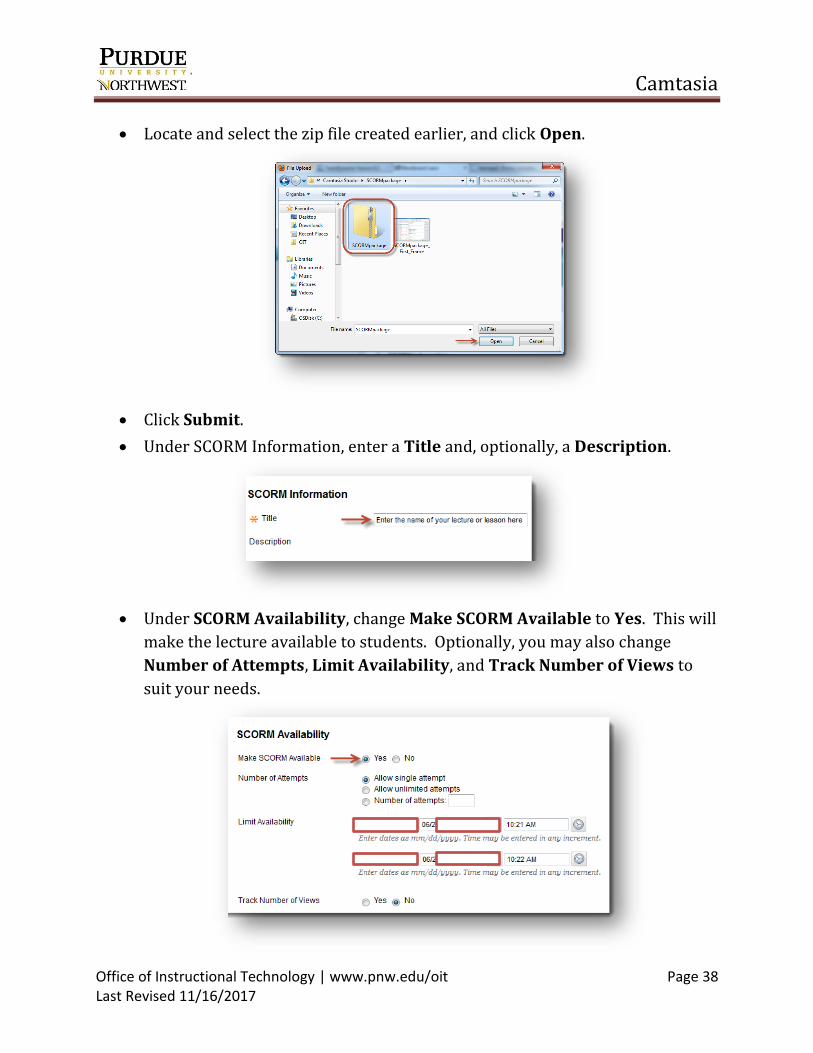
Locate and select the zip file created earlier, and click Open.
Click Submit.
Under SCORM Information, enter a Title and, optionally, a Description.
Under SCORM Availability, change Make SCORM Available to Yes. This will
make the lecture available to students. Optionally, you may also change
Number of Attempts, Limit Availability, and Track Number of Views to
suit your needs.
Camtasia
Office of Instructional Technology | www.pnw.edu/oit Page 39 Last Revised 11/16/2017
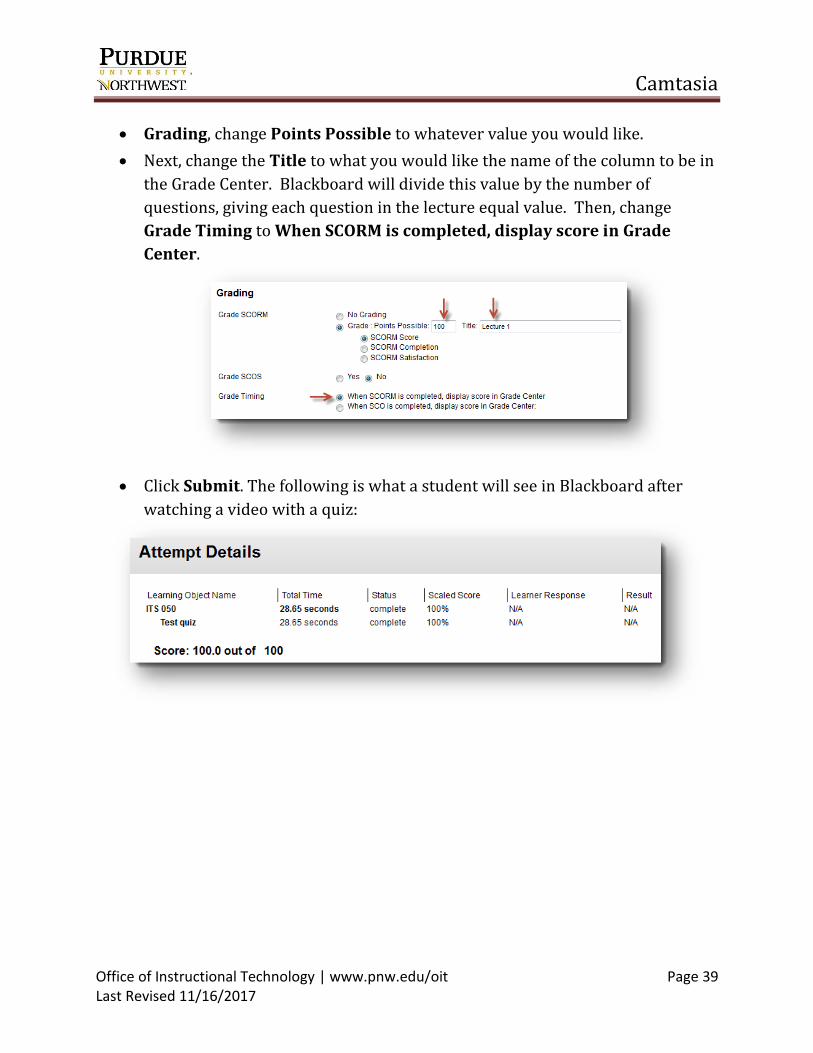
Grading, change Points Possible to whatever value you would like.
Next, change the Title to what you would like the name of the column to be in
the Grade Center. Blackboard will divide this value by the number of
questions, giving each question in the lecture equal value. Then, change
Grade Timing to When SCORM is completed, display score in Grade
Center.
Click Submit. The following is what a student will see in Blackboard after
watching a video with a quiz: