Embed Size (px)
Citation preview
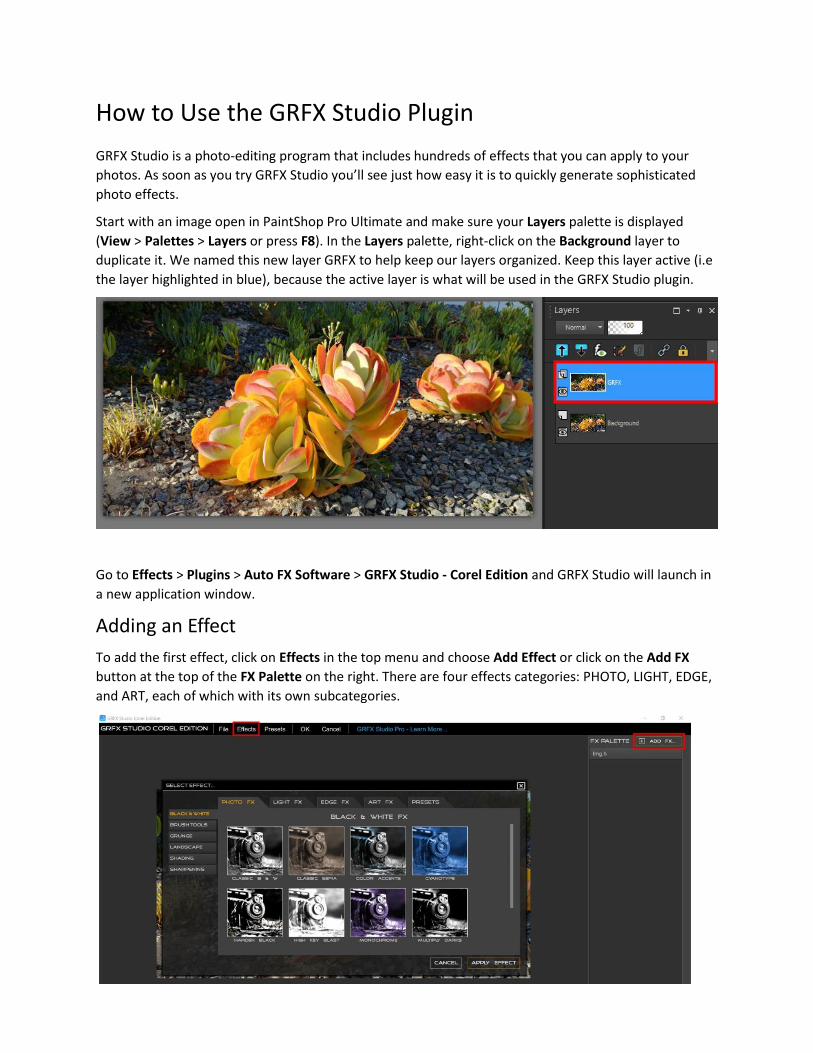
How to Use the GRFX Studio Plugin
GRFX Studio is a photo-editing program that includes hundreds of effects that you can apply to your
photos. As soon as you try GRFX Studio you’ll see just how easy it is to quickly generate sophisticated
photo effects.
Start with an image open in PaintShop Pro Ultimate and make sure your Layers palette is displayed
(View > Palettes > Layers or press F8). In the Layers palette, right-click on the Background layer to
duplicate it. We named this new layer GRFX to help keep our layers organized. Keep this layer active (i.e
the layer highlighted in blue), because the active layer is what will be used in the GRFX Studio plugin.
Go to Effects > Plugins > Auto FX Software > GRFX Studio - Corel Edition and GRFX Studio will launch in
a new application window.
Adding an Effect
To add the first effect, click on Effects in the top menu and choose Add Effect or click on the Add FX
button at the top of the FX Palette on the right. There are four effects categories: PHOTO, LIGHT, EDGE,
and ART, each of which with its own subcategories.

For a simple example, click on the Art FX tab, select Watercolor and click Apply Effect. This adds a
watercolor painting appearance to the photo.
In the FX Palette, you can adjust the strength, darken or lighten, or adjust the intensity of the stroke or
color.

Adjusting an Effect
By default, the effect is applied to the entire image. But the Watercolor Tools toolbar along the top has
options that enable you to control where the effect takes place. For example, click on the Brush tool and
set it to OFF. Then use the brush to paint over a part of the photo where you want to lessen the effect.
The painted area has less of the watercolor effect, meaning that more of the original photo is showing
through. You can brush over the area again to reduce the effect further if you wish.
You can use the Clear Strokes button in the brush tool options to remove all brush strokes.
There are two other options in the Watercolor Tools toolbar that can be used to restrict the effect to
just one area of your image: the Gradient Line tool and the Ellipse tool. Under the Gradient Line tool,
click Add Line and a vertical line will be placed on your image.

The black handle at the top represents the full watercolor effect, and the white handle at the bottom
represents zero watercolor effect. Along the line, the watercolor effect fades from full strength to none.
You can drag the endpoints to change the placement and angle of the gradient line, for example a
horizontal line that applies a gradient effect from right to left.
NOTE: When you hover over the line, an “X” will appear in the center, which you can click to remove the
line and return the full-strength effect to the entire image.
The Ellipse tool works much the same way. Click on Add Ellipse and a target image will be placed on
your image, with four handles (top, bottom, left and right). In the center of the target, the effect is zero
and gradually increases to full strength outside the target, creating a depth of field type of effect. Use
the handles to adjust the shape and size of the target area. Click and drag if you want to move the
ellipse to another area of your image.
NOTE: you can add more than one ellipse or gradient line (or both) on your image.
Combining Multiple Effects
To combine the watercolor effect with another effect, click Add FX at the top of the FX palette. In this
example we chose the Photo FX tab, and selected Cyanotype from the Black and White subcategory.
After adjusting a few settings, you can produce what looks like a watercolor painting of a desert
evening.
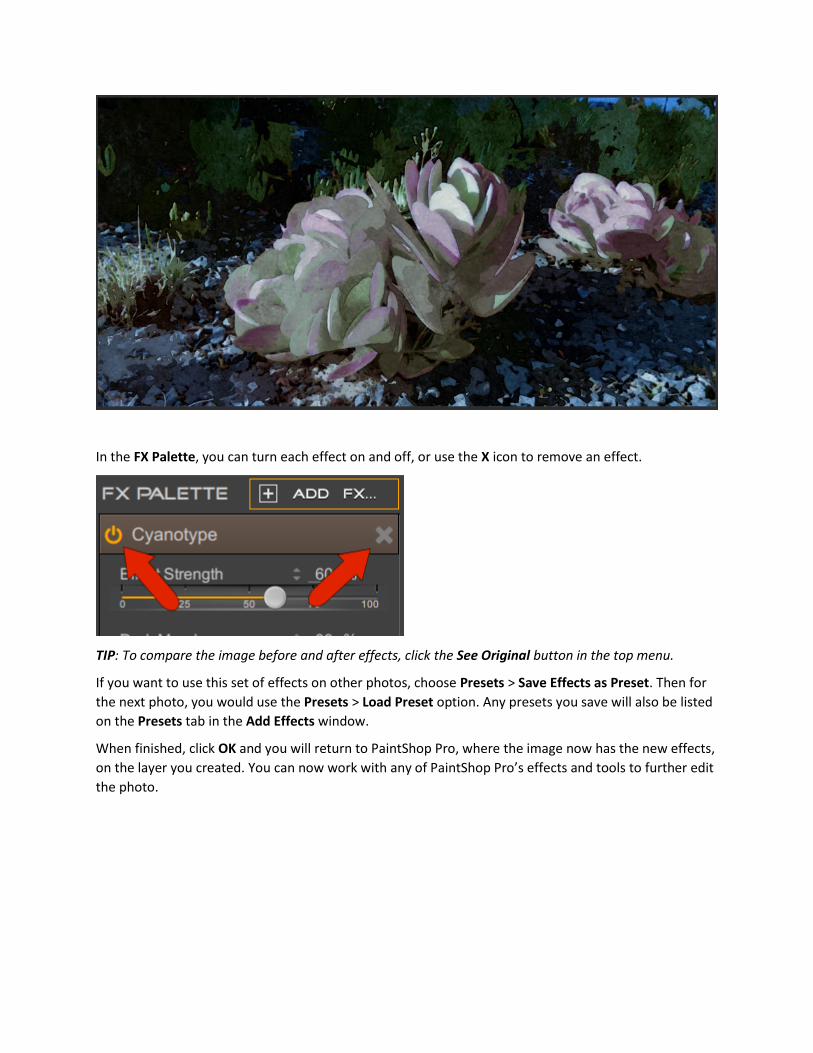
In the FX Palette, you can turn each effect on and off, or use the X icon to remove an effect.
TIP: To compare the image before and after effects, click the See Original button in the top menu.
If you want to use this set of effects on other photos, choose Presets > Save Effects as Preset. Then for
the next photo, you would use the Presets > Load Preset option. Any presets you save will also be listed
on the Presets tab in the Add Effects window.
When finished, click OK and you will return to PaintShop Pro, where the image now has the new effects,
on the layer you created. You can now work with any of PaintShop Pro’s effects and tools to further edit
the photo.

You can use the Visibility (eye) icon to hide the GRFX layer to get the original photo back or delete the
layer if you decide you don’t like the effects. You can also create more duplicate layers for going back to
the GRFX Studio plugin and trying out and comparing different effects.
Get More Effects with GRFX Studio Pro
In this next example we will demonstrate some of the additional effects from the GRFX Studio Pro
version that can be purchased from your product’s Welcome Screen.
To change this from a bright daytime scene to a darker time of day, choose the Shading subcategory on
the Photo FX tab and apply the Shade effect. Click the Brush tool and set the brush to ON. Use the
Brush tool to paint over any areas of your image that you want to apply the effect to. In this example,
we made a first pass with the brush over the entire image, then brushed over just the sky a couple more
times.

After increasing the Strength value, the whole scene becomes darker.
Adding Light Beams
The next effect is in the Light FX tab, in the Light Beams subcategory. Choose the type of beam you want
and click Apply Effect. A T-shaped line will be placed on your image, with handles that can be used to
rotate, move and adjust the length of the lines. In this example we positioned the T-path so that the

light pours down from the closest streetlamp and reduced the Opacity and Spread settings in the FX
Palette. You can also change the light color by clicking Cast Color to open a color picker window. Here
you can choose a color or click Pick Screen Color to sample color from your photo.
Duplicating Effects
To add a fainter light beam to the next streetlamp, you could apply a new beam from scratch and adjust
the settings to your liking. Or you can save the current effects as a preset, which includes both the light
and shading. When you load the preset, both effects are repeated, and you will see them stacked in the
FX Palette.
Click on the X beside Shade to delete the extra shading, then move and adjust the second light beam.

Additional GRFX Studio Pro Effects
As mentioned at the beginning, the Pro version of GRFX Studio has a wider selection of effects than the
free Corel version. Here are some examples.
Use the Weather FX to apply rain (or snow, or lighting, or sunshine).

For another weather effect, choose one of the Dramatic Sky effects, such as this stormy one.
Another fitting effect here would be a rain puddle, also in the Weather FX tab, which by default is
applied to a lower portion of the image.
TIP: You can use the Brush tool to remove the puddles everywhere except the sidewalk.

The Pro version also has some nice focal effects such as Focal Brush, in which the entire imagine is
blurred and you can brush over areas you want in sharper focus.
Or you can try Vintage Color from the Photo FX > Camera subcategory.

Or HDR Color Pop from the Photo FX > Color subcategory.
These are just a few of the over 1200 different effects available in GRFX Studio Pro that can be used on
their own or combined and stacked with other effects for truly unique results every time. And don’t
forget – once you bring your image back into PaintShop Pro you can make further edits with PaintShop
Pro’s effects and tools.


![DataManager Plugin - d36j349d8rqm96.cloudfront.net Plugin - M… · DataManager Plugin 6Version History 6 Version History 6.1Plugin Version Plugin-Version Date [dd.mm.yyyy] Notes](https://img.pdfslide.net/doc/110x75/5f05b5577e708231d4144e44/datamanager-plugin-plugin-m-datamanager-plugin-6version-history-6-version.jpg)