Embed Size (px)
Citation preview
HP LTO Ultrium tape drives technical referencemanual
Volume 5: UNIX, Linux and OpenVMSconfiguration guide
LTO 5 drivesnl
Abstract
This is one of five volumes that document HP LTO Ultrium 5 tape drives (Fibre Channel and SAS). This volumeprovides basic information on configuring the drives with various operating systems. See Chapter 8 on page35 for details of the other guides.
Part Number: EH890–90900 volume 5Third edition: April 2010
Legal and notice information
© Copyright 2010 Hewlett-Packard Development Company, L.P.
The information contained herein is subject to change without notice. The only warranties for HP products and services are setforth in the express warranty statements accompanying such products and services. Nothing herein should be construed asconstituting an additional warranty. HP shall not be liable for technical or editorial errors or omissions contained herein.
Acknowledgements
Windows is a U.S. registered trademarks of Microsoft Corporation.
UNIX is a registered trademark of The Open Group.
Warranty
WARRANTY STATEMENT: To obtain a copy of the warranty for this product, see the warranty information website:
http://www.hp.com/go/storagewarranty
Contents
1 Introduction ....................................................................................... 6Purpose of this manual ................................................................................................................ 6
LTO Ultrium drives in a library ................................................................................................ 6SAS drives ........................................................................................................................... 6
Backup applications .................................................................................................................... 6
2 HP (HP-UX) servers and workstations ..................................................... 7Identifying connected devices ....................................................................................................... 7
For HP-UX 11i v2 and 11i v3 (legacy format) .......................................................................... 7For 11i v3 (Agile I/O tree view) ............................................................................................. 8
Adding stape/estape and eschgr/schgr (media changer driver) to the kernel ..................................... 9For HP-UX 11i v2 ................................................................................................................. 9
For HP-UX 11iv3 (11.31) .............................................................................................. 11Add device files ........................................................................................................................ 12
For HP-UX 11i v2 ............................................................................................................... 12For HP-UX 11i v3 (HP-UX 11.31) .......................................................................................... 13
Using large block sizes .............................................................................................................. 14What next? .............................................................................................................................. 14
3 HP (OpenVMS) servers and workstations ............................................. 15Determining attached devices ..................................................................................................... 15What next? .............................................................................................................................. 15
4 Linux servers and workstations ........................................................... 17Ensure the correct HBA and driver are installed ............................................................................. 17Check the driver modules are loaded in the kernel ........................................................................ 17Determining the attached devices ................................................................................................ 18
Using the seek and tell features of mt .................................................................................... 19What next? .............................................................................................................................. 19
5 IBM (AIX) servers and workstations ..................................................... 21Identifying attached devices ....................................................................................................... 21Configuring the device files ........................................................................................................ 21
If you are using a graphics terminal running X-Windows .......................................................... 21If you are using a non-graphics terminal ................................................................................ 22Device filenames under AIX ................................................................................................. 24
6 Sun (Solaris) servers and workstations ................................................. 25Fibre Channel drives ................................................................................................................. 25
Configuring the device files ................................................................................................. 25SAS drives ............................................................................................................................... 25
Identifying attached devices ................................................................................................. 25
Volume 5: UNIX, Linux and OpenVMS configuration guide 3
Kernel patch levels .................................................................................................................... 26HP-data values ......................................................................................................................... 28
7 Verifying the installation .................................................................... 31Verifying the installation of the drive (UNIX) .................................................................................. 31
To verify the installation: ...................................................................................................... 31Example ..................................................................................................................... 32
8 Support and other resources .............................................................. 35Related documents .................................................................................................................... 35
Documents specific to HP LTO Ultrium drives ........................................................................... 35Documentation map ........................................................................................................... 35
Drives—general ........................................................................................................... 35Installation and configuration ........................................................................................ 35Operation ................................................................................................................... 36Cartridges .................................................................................................................. 36Interface ..................................................................................................................... 36Maintenance and troubleshooting .................................................................................. 37Dealing with errors ...................................................................................................... 37LTO Ultrium features ..................................................................................................... 38
General documents and standardization ............................................................................... 38
Glossary ............................................................................................ 39
Index ................................................................................................. 41
4
Figures
SAM GUI ............................................................................................................... 101
SAM text-based interface ......................................................................................... 102
SMH web-based interface (HP-UX11i v3) ................................................................... 113
Adding estape driver to the kernel ............................................................................. 124
Selecting a tape device to create its device files (Agile View) ........................................ 145
Volume 5: UNIX, Linux and OpenVMS configuration guide 5
1 Introduction
Purpose of this manualThis manual provides basic information on configuring the drives with various operating systems. Seethe top-level release notes that accompany the drive for expected functionality and features.
LTO Ultrium drives are supported on the following platforms:
• HP (HP-UX) servers and workstations, page 7• HP (OpenVMS) servers and workstations, page 15• IBM (AIX) servers and workstations, page 21• Linux servers and workstations, page 17• Sun servers and workstations, page 25
For versions of the operating systems supported, see http://www.hp.com/go/connect.
For platforms not mentioned here, contact HP because there may be new connectivity details availablethat arrived after the release notes were published.
See “Verifying the installation” on page 31 for details of how to verify the installation.
LTO Ultrium drives in a libraryAlthough LTO Ultrium drives may also be used in a library, instructions about installing device driversfor automatic robotics are not included in this manual.
SAS drivesFor supported UNIX, Linux and OVMS versions, go to http://www.hp.com/go/connect.
Backup applicationsFor optimum performance it is important to use a backup application that supports the drive’s featureswithin your system’s configuration.
For details of which backup applications are supported with your tape drive and system, visit the HPTape Compatibility website:
http://www.hp.com/products1/storage/compatibility/tapebackup/index.html.
Follow the “Software compatibility” link then click a tick in the appropriate matrix to drill down intodetailed application support information.
See the Getting Started Guide for more information about usage models.
Introduction6
2 HP (HP-UX) servers and workstations
For supported versions of HP-UX, go to http://www.hp.com/go/connect.
Before you install your tape drive, visit the HP web site, www.hp.com, and search to locate IT ResourceCenter (you may be required to set up a new login). Download the latest hardware enablement (HWE)patch bundle for your operating system. This ensures that you will have the correct device driver foryour tape drive.
System Administration Management (SAM) tools have evolved with ongoing HP-UX version releases.As a result, the procedures for setting up with different HP-UX versions differ. They are describedseparately in this chapter.
HP-UX11i v3 and agile addressing
HP-UX11i v3 introduces agile addressing of devices. Agile addressing uses a different format of thedevice special file (dsf) to represent the tape drive—known as a persistent dsf. However HP-UX11iv3 retains support for the legacy dsf format as used in 11i v2.
For more information about HP-UX releases including HP-UX 11i v3 please refer to www.docs.hp.com.
NOTE:A block size no larger than 256 KB is strongly recommended when working with HP-UX. See “Usinglarge block sizes” on page 14.
Identifying connected devicesScan the system to list the existing devices attached. From a shell window (hpterm/xterm), executeioscan as follows:
For HP-UX 11i v2 and 11i v3 (legacy format)Enter the command:
% /sbin/ioscan -f
The output should look similar to the following (which shows an LTO 5 drive):
Volume 5: UNIX, Linux and OpenVMS configuration guide 7
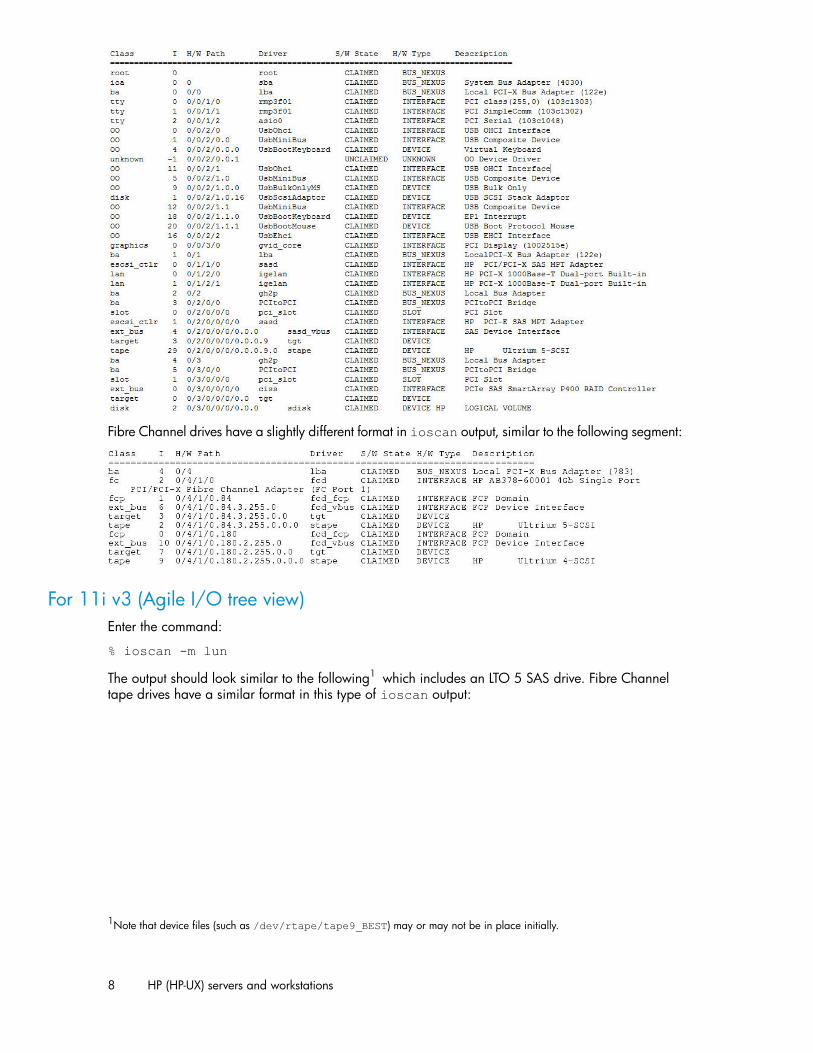
Fibre Channel drives have a slightly different format in ioscan output, similar to the following segment:
For 11i v3 (Agile I/O tree view)Enter the command:
% ioscan -m lun
The output should look similar to the following1 which includes an LTO 5 SAS drive. Fibre Channeltape drives have a similar format in this type of ioscan output:
1Note that device files (such as /dev/rtape/tape9_BEST) may or may not be in place initially.
HP (HP-UX) servers and workstations8
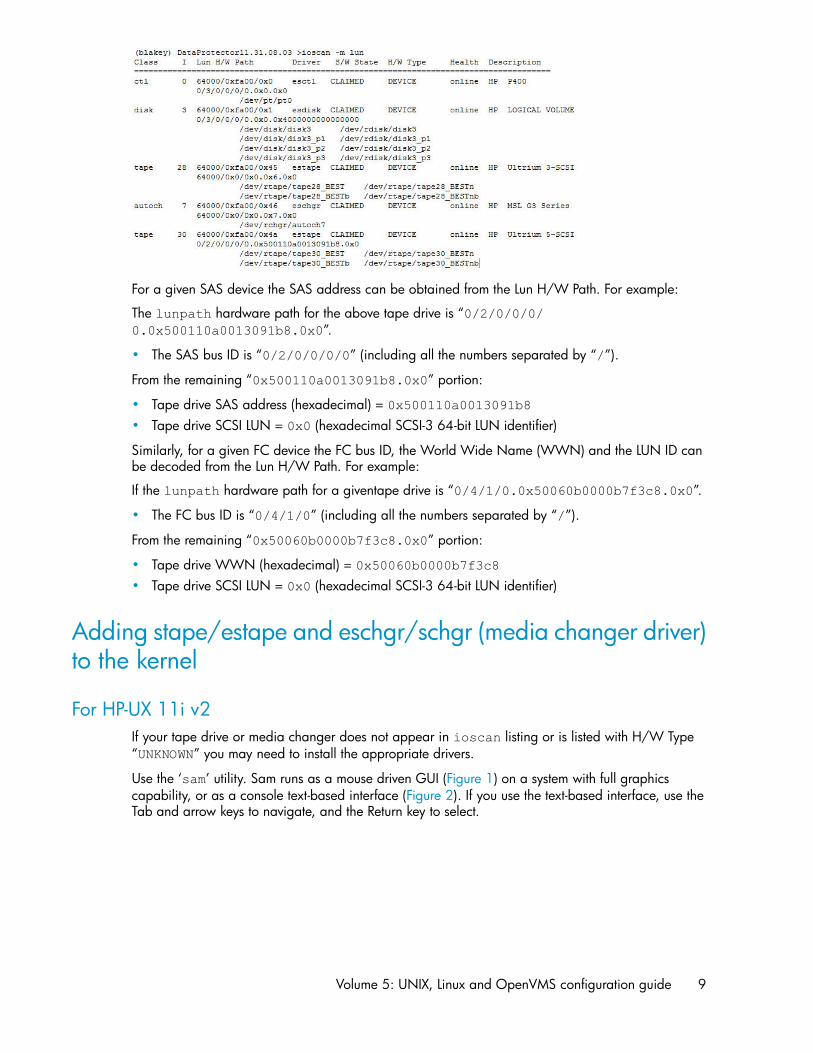
For a given SAS device the SAS address can be obtained from the Lun H/W Path. For example:
The lunpath hardware path for the above tape drive is “0/2/0/0/0/0.0x500110a0013091b8.0x0”.
• The SAS bus ID is “0/2/0/0/0/0” (including all the numbers separated by “/”).
From the remaining “0x500110a0013091b8.0x0” portion:
• Tape drive SAS address (hexadecimal) = 0x500110a0013091b8
• Tape drive SCSI LUN = 0x0 (hexadecimal SCSI-3 64-bit LUN identifier)
Similarly, for a given FC device the FC bus ID, the World Wide Name (WWN) and the LUN ID canbe decoded from the Lun H/W Path. For example:
If the lunpath hardware path for a giventape drive is “0/4/1/0.0x50060b0000b7f3c8.0x0”.
• The FC bus ID is “0/4/1/0” (including all the numbers separated by “/”).
From the remaining “0x50060b0000b7f3c8.0x0” portion:
• Tape drive WWN (hexadecimal) = 0x50060b0000b7f3c8
• Tape drive SCSI LUN = 0x0 (hexadecimal SCSI-3 64-bit LUN identifier)
Adding stape/estape and eschgr/schgr (media changer driver)to the kernel
For HP-UX 11i v2If your tape drive or media changer does not appear in ioscan listing or is listed with H/W Type“UNKNOWN” you may need to install the appropriate drivers.
Use the ‘sam’ utility. Sam runs as a mouse driven GUI (Figure 1) on a system with full graphicscapability, or as a console text-based interface (Figure 2). If you use the text-based interface, use theTab and arrow keys to navigate, and the Return key to select.
Volume 5: UNIX, Linux and OpenVMS configuration guide 9
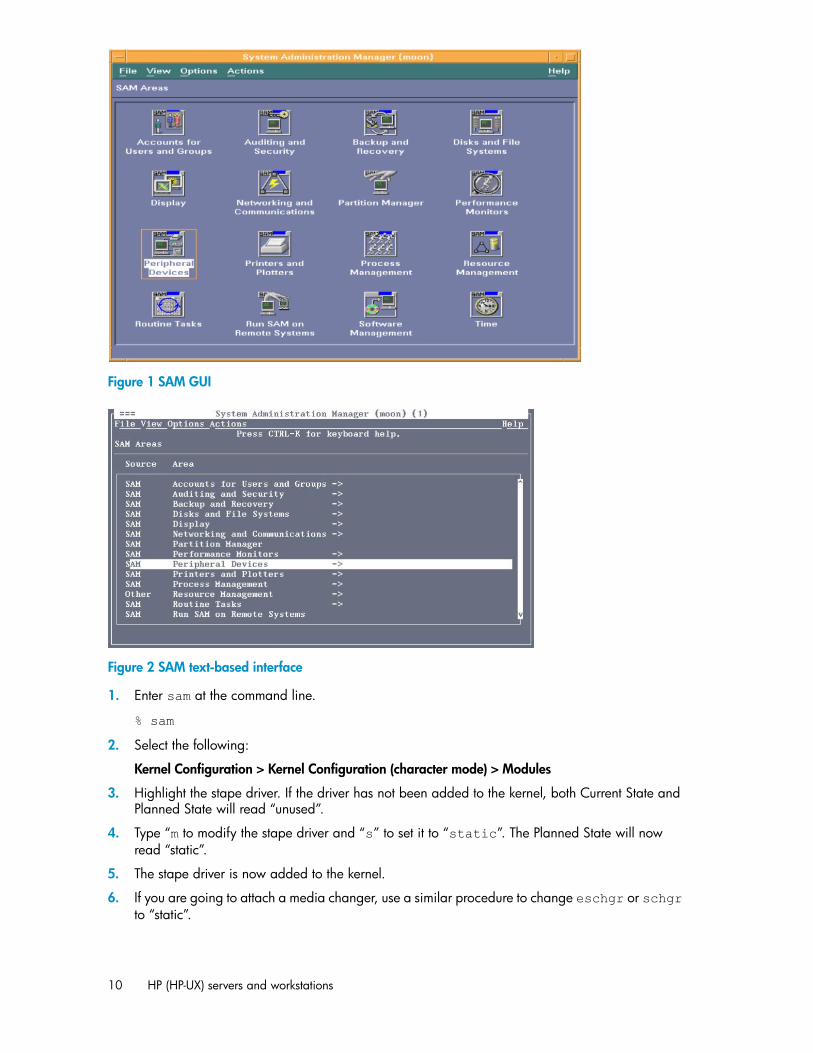
Figure 1 SAM GUI.
Figure 2 SAM text-based interface.
1. Enter sam at the command line.
% sam
2. Select the following:
Kernel Configuration > Kernel Configuration (character mode) > Modules
3. Highlight the stape driver. If the driver has not been added to the kernel, both Current State andPlanned State will read “unused”.
4. Type “m to modify the stape driver and “s” to set it to “static”. The Planned State will nowread “static”.
5. The stape driver is now added to the kernel.
6. If you are going to attach a media changer, use a similar procedure to change eschgr or schgrto “static”.
HP (HP-UX) servers and workstations10
7. Reboot the system.
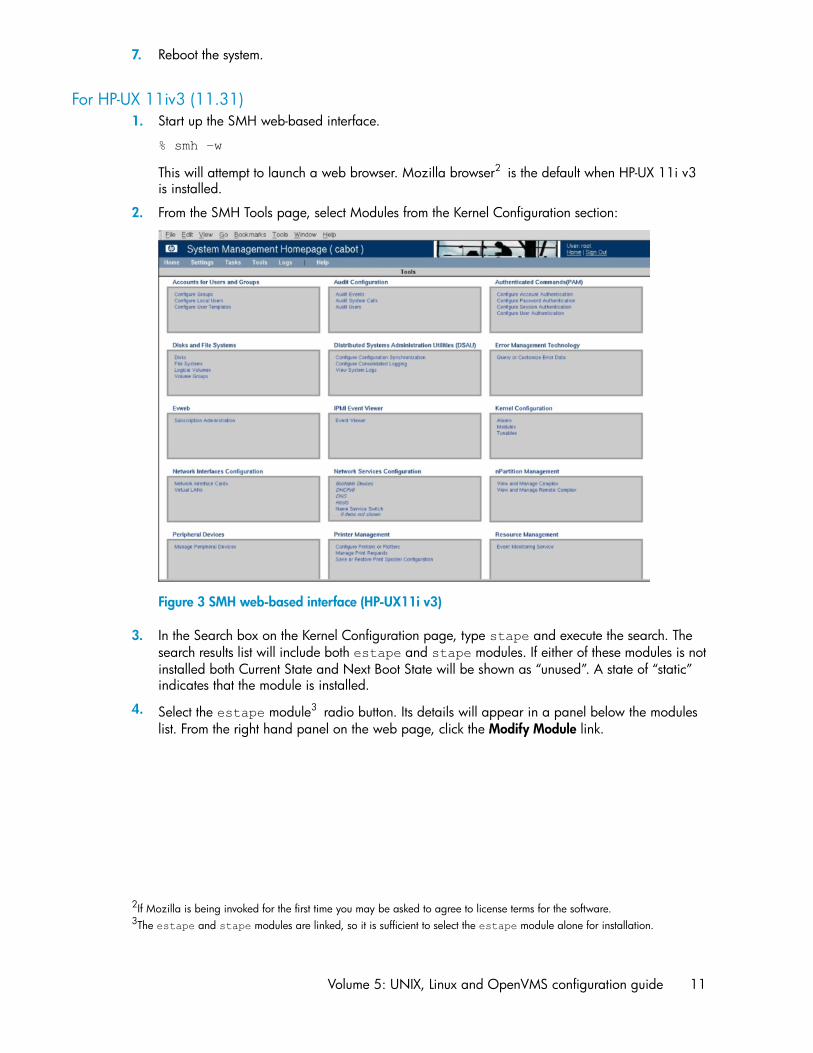
For HP-UX 11iv3 (11.31)1. Start up the SMH web-based interface.
% smh –w
This will attempt to launch a web browser. Mozilla browser2 is the default when HP-UX 11i v3is installed.
2. From the SMH Tools page, select Modules from the Kernel Configuration section:
Figure 3 SMH web-based interface (HP-UX11i v3).
3. In the Search box on the Kernel Configuration page, type stape and execute the search. Thesearch results list will include both estape and stape modules. If either of these modules is notinstalled both Current State and Next Boot State will be shown as “unused”. A state of “static”indicates that the module is installed.
4. Select the estape module3 radio button. Its details will appear in a panel below the moduleslist. From the right hand panel on the web page, click the Modify Module link.
2If Mozilla is being invoked for the first time you may be asked to agree to license terms for the software.3The estape and stape modules are linked, so it is sufficient to select the estape module alone for installation.
Volume 5: UNIX, Linux and OpenVMS configuration guide 11
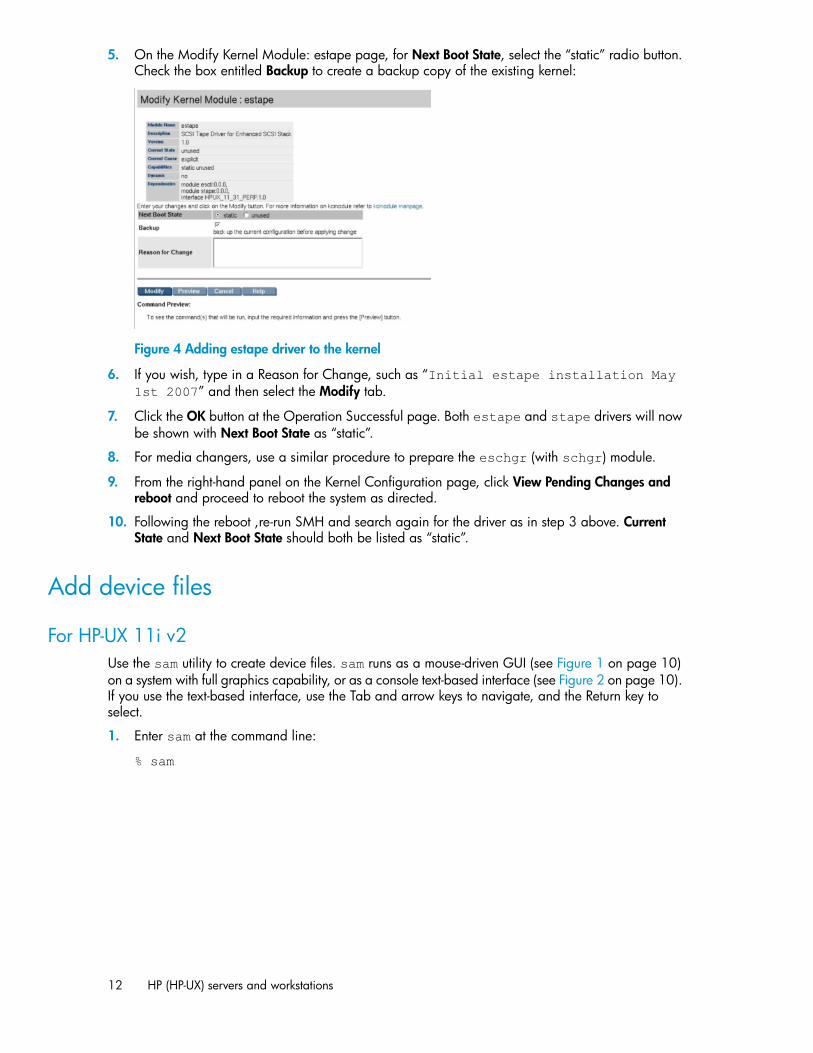
5. On the Modify Kernel Module: estape page, for Next Boot State, select the “static” radio button.Check the box entitled Backup to create a backup copy of the existing kernel:
Figure 4 Adding estape driver to the kernel.
6. If you wish, type in a Reason for Change, such as “Initial estape installation May1st 2007” and then select the Modify tab.
7. Click the OK button at the Operation Successful page. Both estape and stape drivers will nowbe shown with Next Boot State as “static”.
8. For media changers, use a similar procedure to prepare the eschgr (with schgr) module.
9. From the right-hand panel on the Kernel Configuration page, click View Pending Changes andreboot and proceed to reboot the system as directed.
10. Following the reboot ,re-run SMH and search again for the driver as in step 3 above. CurrentState and Next Boot State should both be listed as “static”.
Add device files
For HP-UX 11i v2Use the sam utility to create device files. sam runs as a mouse-driven GUI (see Figure 1 on page 10)on a system with full graphics capability, or as a console text-based interface (see Figure 2 on page 10).If you use the text-based interface, use the Tab and arrow keys to navigate, and the Return key toselect.
1. Enter sam at the command line:
% sam
HP (HP-UX) servers and workstations12
2. Select the following:
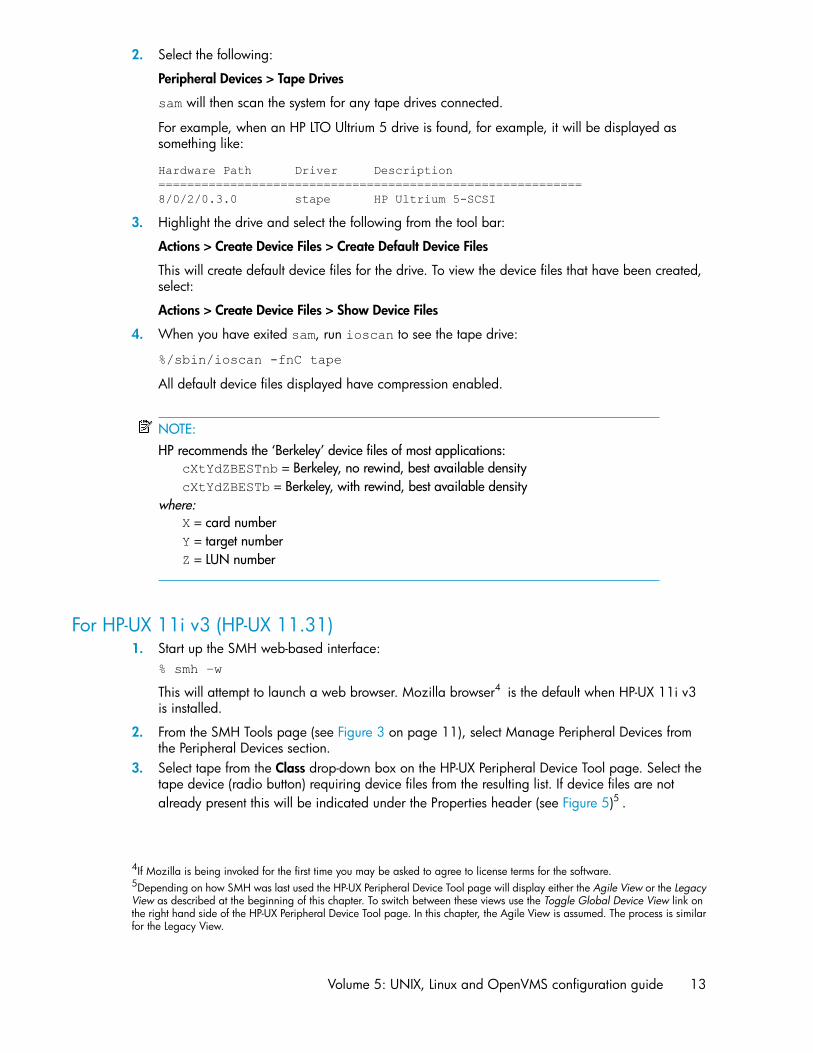
Peripheral Devices > Tape Drives
sam will then scan the system for any tape drives connected.
For example, when an HP LTO Ultrium 5 drive is found, for example, it will be displayed assomething like:
Hardware Path Driver Description===========================================================8/0/2/0.3.0 stape HP Ultrium 5-SCSI
3. Highlight the drive and select the following from the tool bar:
Actions > Create Device Files > Create Default Device Files
This will create default device files for the drive. To view the device files that have been created,select:
Actions > Create Device Files > Show Device Files
4. When you have exited sam, run ioscan to see the tape drive:
%/sbin/ioscan -fnC tape
All default device files displayed have compression enabled.
NOTE:HP recommends the ‘Berkeley’ device files of most applications:nl
cXtYdZBESTnb = Berkeley, no rewind, best available densitynl
cXtYdZBESTb = Berkeley, with rewind, best available densitynl
where:nl
X = card numbernl
Y = target numbernl
Z = LUN number
For HP-UX 11i v3 (HP-UX 11.31)1. Start up the SMH web-based interface:
% smh –w
This will attempt to launch a web browser. Mozilla browser4 is the default when HP-UX 11i v3is installed.
2. From the SMH Tools page (see Figure 3 on page 11), select Manage Peripheral Devices fromthe Peripheral Devices section.
3. Select tape from the Class drop-down box on the HP-UX Peripheral Device Tool page. Select thetape device (radio button) requiring device files from the resulting list. If device files are notalready present this will be indicated under the Properties header (see Figure 5)5 .
4If Mozilla is being invoked for the first time you may be asked to agree to license terms for the software.5Depending on how SMH was last used the HP-UX Peripheral Device Tool page will display either the Agile View or the LegacyView as described at the beginning of this chapter. To switch between these views use the Toggle Global Device View link onthe right hand side of the HP-UX Peripheral Device Tool page. In this chapter, the Agile View is assumed. The process is similarfor the Legacy View.
Volume 5: UNIX, Linux and OpenVMS configuration guide 13
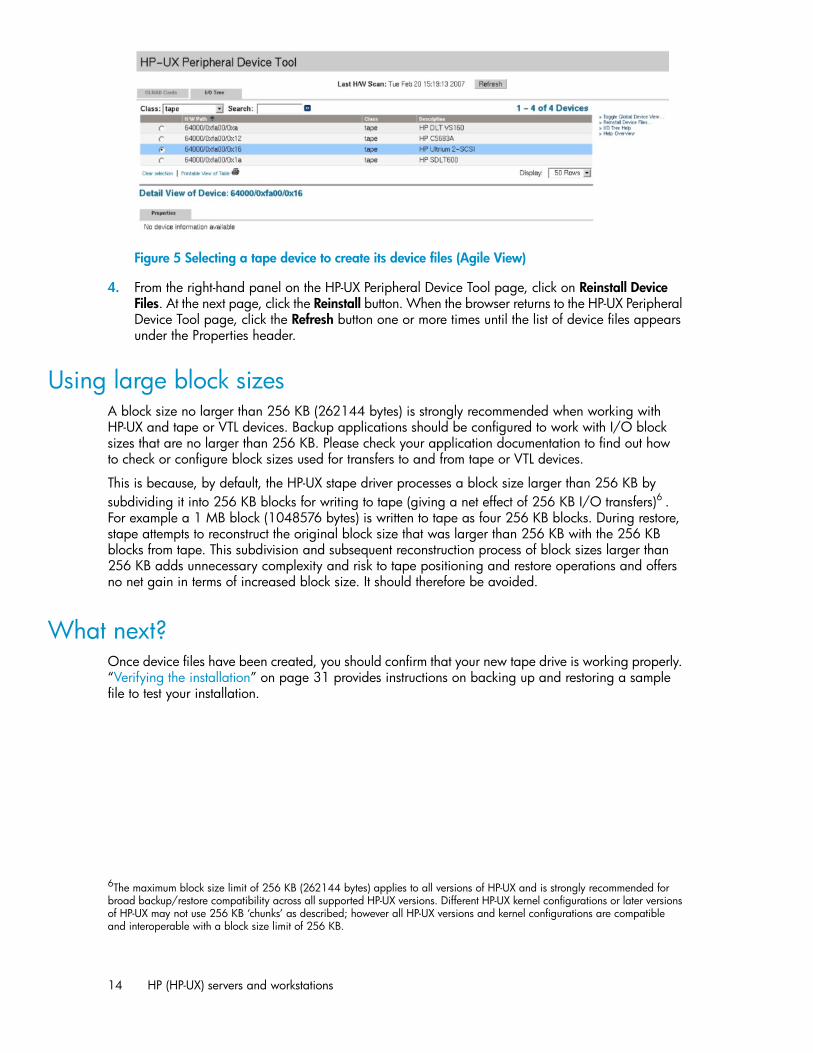
Figure 5 Selecting a tape device to create its device files (Agile View).
4. From the right-hand panel on the HP-UX Peripheral Device Tool page, click on Reinstall DeviceFiles. At the next page, click the Reinstall button. When the browser returns to the HP-UX PeripheralDevice Tool page, click the Refresh button one or more times until the list of device files appearsunder the Properties header.
Using large block sizesA block size no larger than 256 KB (262144 bytes) is strongly recommended when working withHP-UX and tape or VTL devices. Backup applications should be configured to work with I/O blocksizes that are no larger than 256 KB. Please check your application documentation to find out howto check or configure block sizes used for transfers to and from tape or VTL devices.
This is because, by default, the HP-UX stape driver processes a block size larger than 256 KB bysubdividing it into 256 KB blocks for writing to tape (giving a net effect of 256 KB I/O transfers)6 .For example a 1 MB block (1048576 bytes) is written to tape as four 256 KB blocks. During restore,stape attempts to reconstruct the original block size that was larger than 256 KB with the 256 KBblocks from tape. This subdivision and subsequent reconstruction process of block sizes larger than256 KB adds unnecessary complexity and risk to tape positioning and restore operations and offersno net gain in terms of increased block size. It should therefore be avoided.
What next?Once device files have been created, you should confirm that your new tape drive is working properly.“Verifying the installation” on page 31 provides instructions on backing up and restoring a samplefile to test your installation.
6The maximum block size limit of 256 KB (262144 bytes) applies to all versions of HP-UX and is strongly recommended forbroad backup/restore compatibility across all supported HP-UX versions. Different HP-UX kernel configurations or later versionsof HP-UX may not use 256 KB ‘chunks’ as described; however all HP-UX versions and kernel configurations are compatibleand interoperable with a block size limit of 256 KB.
HP (HP-UX) servers and workstations14
3 HP (OpenVMS) servers and workstations
NOTE:SAS drives are not supported on Alpha Server systems.
Determining attached devicesAfter connecting the tape drive to your system, boot OpenVMS and check for the presence of thenew tape device. Execute the following commands.
For FC drives, first:
$mc sysman io find$mc sysman io auto
Then, for all drives:
$mc sysman io find$mc sysman io auto
$ sho dev mk
Device Device Error Volume Free Trans MntName Status Count Label Blocks Count CntMKA400: Online 0
^use this value in the next command line
$ sho dev MKA400/full
Magtape SIT058$MKD300:, device type HP Ultrium 5-SCSI, isonline, file-oriented device, available to cluster, errorlogging is enabled, controller supports compaction (compactiondisabled), device supports fastskip (per_io).
Error count 0 Operations completed 0Owner process "" Owner UIC [SYSTEM]Owner process ID 00000000 Dev Prot S:RWPL,O:RWPL,G:R,WReference count 0 Default buffer size 2048Density default Format Normal-11
Volume status: no-unload on dismount, beginning-of-tape, odd parity.
What next?You are now ready to begin using your tape drive. Please consult your OpenVMS system documentationfor details.
Volume 5: UNIX, Linux and OpenVMS configuration guide 15

HP (OpenVMS) servers and workstations16
4 Linux servers and workstations
TIP:Where convenient, do the original install of the Linux operating system with the tape drive attachedto the SAS port, so that the st driver gets loaded with the kernel during boot up. Otherwise, see theguidelines below for cases where the operating system was already installed without the tape drivebeing available.
Ensure the correct HBA and driver are installedVisit the HP Tape Compatibility website for details of supported Linux OS versions and SAS HBAcontrollers: http://www.hp.com/products1/storage/compatibility/tapebackup/index.html
Download and install the latest controller driver from the manufacturer’s website – for example, foran HP branded HBA, visit www.hp.com to download the latest driver.
Check the driver modules are loaded in the kernelIn order to communicate with a tape device, the operating system needs to have drivers loaded forboth the tape drive and the host bus adaptor. Ensure that both are available as either loadable modules(for example, usable with insmod and visible with lsmod) or are statically built into your kernel.
NOTE:To add drivers to the statically-built kernel you need the Linux source code available on disk andknowledge of how to use the kernel building tools that ship with various Linux distributions. This shouldnot be attempted by novice users.
The following guidelines assume the use of loadable driver modules.
Run the lsmod command to list all driver modules currently loaded in the kernel. Check whether thest driver for tape is listed and also whether the relevant HBA driver is listed.
lsmod
For example, the st driver for tape listing would resemble the entry shown below. Also shown beloware two examples of HBA drivers—cciss driver (for HP SmartArray SAS HBAs) and mptsas driver(for LSI SAS HBA):
Module Size Used byst 38749 0..cciss 68484 3.
Volume 5: UNIX, Linux and OpenVMS configuration guide 17
.mptsas 37321 0
If a particular driver module is not listed as above use the modprobe utility to load it. For exampleif the st driver is missing, execute:
modprobe st
NOTE:Loading of the st driver should happen naturally if your system is rebooted after attaching the drive.
Determining the attached devicesHBAs which use the cciss driver may require an explicit scan procedure to allow the attached tapedrive to be discovered after each reboot; execute the following from the command line (or from ashell script):
for x in /proc/driver*/cciss/c*;do echo engage scsi > $x; done; dmesg
Check the contents of the file /proc/scsi/scsi to determine whether the system discovered thetape drive at module load time:
cat /proc/scsi/scsi
Examine the contents for something like:
Host: SCSI0 Channel: 00 Id:00 Lun:00Vendor: HP Model: Ultrium 5-SCSI Rev: ZxxDType: Sequential-Access ANSI SCSI Revision 06
Look through the output of dmesg to discover which tape drive instance is used (st0 in the examplebelow) and to review the SCSI HBA driver (cciss in the extract below).
NOTE:The exact format and style of the listing may vary with different Linux distributions and versions.
TIP:You may prefer to redirect a lengthy dmesg output to a file for browsing at your convenience:
dmseg > my_boot_messages.txt
or pipe the output of dmesg to a page scrolling utility
dmesg | more
Extract from dmesg output:
.
.scsi3 : ccissVendor: HP Model: Ultrium 5-SCSI Rev: ZxxDType: Sequential-Access ANSI SCSI revision: 06
scsi 3:0:0:0: Attached scsi generic sg0 type 1
Linux servers and workstations18
st: Version 20050830, fixed bufsize 32768, s/g segs 256st 3:0:0:0: Attached scsi tape st0..
The tape drive instance identifies which device files are applicable to the tape drive. For example:
• st0 indicates device files /dev/st0 or /dev/nst0• st1 indicates device files /dev/st1 or /dev/nst1
and so on...
A list of tape device files gets created automatically when the st driver module and the correct HBAdriver have been added. They reside in the /dev/ directory and have the syntax:
/dev/stp or dev/nstp
where:
• p is the instance number of the device file (if only one drive is connected to the system, this willbe 0)
• n Indicates this is a no-rewind driver.
Using the seek and tell features of mtTo use the seek and tell features of mt, the st driver needs to be configured for logical block addressingwith HP Ultrium drives.
With some Linux distributions it is possible to do this using the stsetoptions function with mt utility:
mt -f <devicefile> stsetoptions scsi2logical
where <devicefile> is /dev/stp or /dev/nstp.
Note however that this information is not preserved across reboots, so you need to execute thiscommand each time the system comes up. Some Linux distributions include the stinit utility, whichoffers a convenient way of handling this using the /etc/stinit.def configuration file. Note thatthe file /etc/stinit.def may not exist in a new installation and so may need to be created. Seethe examples of stinit.def entries in /usr/share/doc/mt-st-<version>/stinit.def.examples. If you use this approach, set the manufacturer parameter to HP and themodel to “Ultrium 5-SCSI”.
Where stinit is available, you can also re-initialize the drive to new parameters as entered in /etc/stinit.def without reboot by running:
stinit
What next?Once device files have been created, you should confirm that your new tape drive is working properly.“Verifying the installation” on page 31 provides instructions on backing up and restoring a samplefile to test your installation.
Volume 5: UNIX, Linux and OpenVMS configuration guide 19

Linux servers and workstations20
5 IBM (AIX) servers and workstations
For supported versions of AIX, see http://www.hp.com/go/connect.
Identifying attached devicesFor SAS, to list existing devices, use the following:
% lsdev -C |grep SAS
This produces output similar to:
hdisk0 Available 00-08-00 SAS Disk Drivehdisk1 Available 00-08-00 SAS Disk Drivermt0 Defined 03-08-00 Other SAS Tape Drivesas0 Available 00-08-00 Controller SAS Protocolsas1 Available 03-08-00 Controller SAS Protocolses0 Available 00-08-00 SAS Enclosure Services Deviceses1 Available 00-08-00 SAS Enclosure Services Deviceses2 Available 00-08-00 SAS Enclosure Services Devicesissas0 Available 00-08 PCI-X266 Planar 3Gb SAS Adaptersissas1 Available 03-08 PCI-X266 Ext Dual-x4 3Gb SAS Adapter
Configuring the device filesReboot the server/workstation with the tape drive attached and powered on.
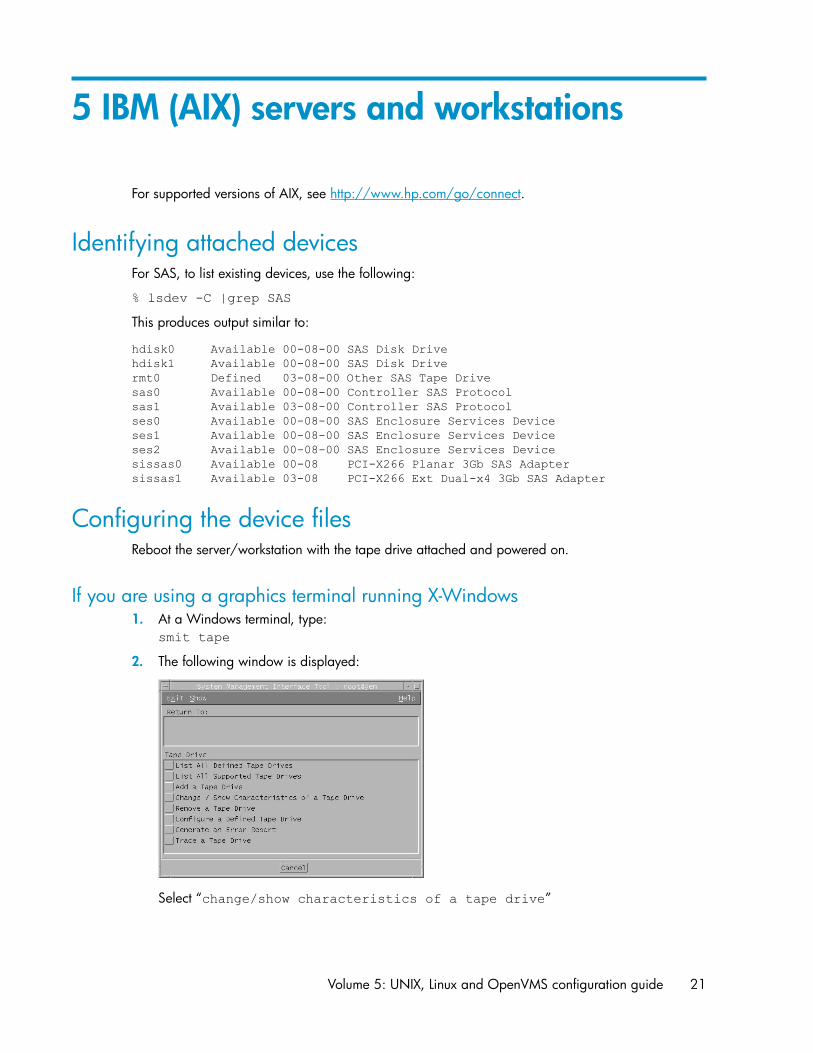
If you are using a graphics terminal running X-Windows1. At a Windows terminal, type:
nl
smit tape
2. The following window is displayed:
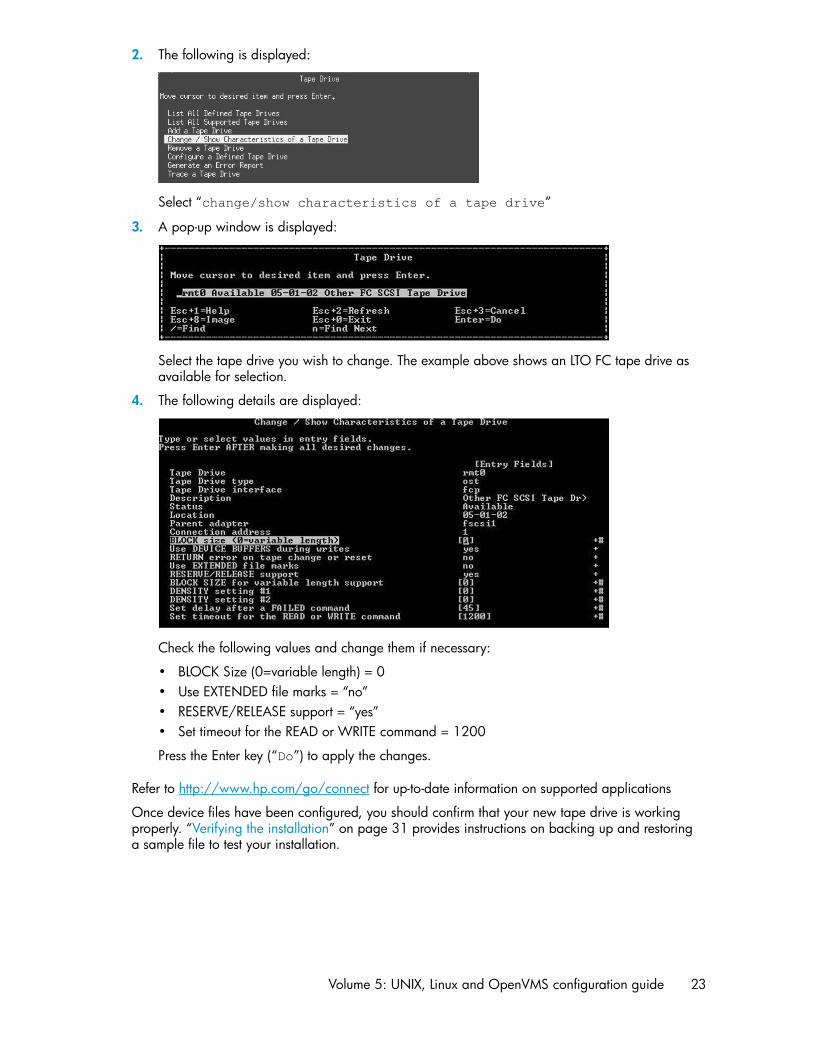
Select “change/show characteristics of a tape drive”
Volume 5: UNIX, Linux and OpenVMS configuration guide 21
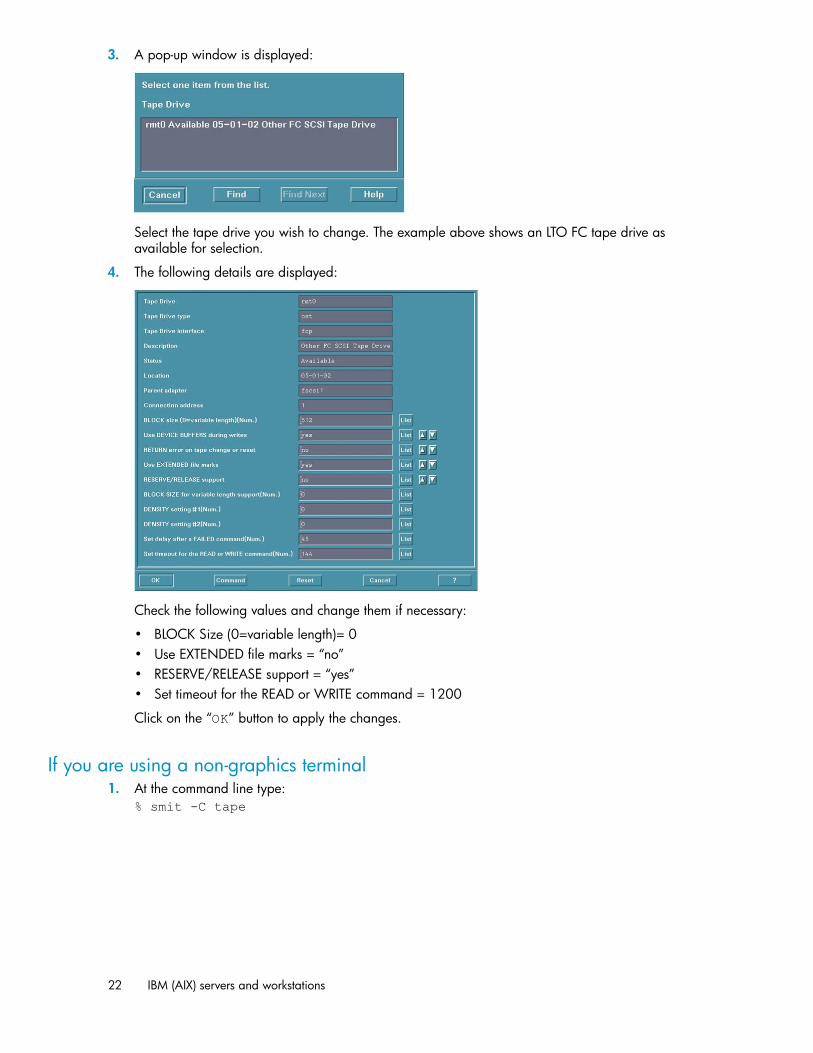
3. A pop-up window is displayed:
Select the tape drive you wish to change. The example above shows an LTO FC tape drive asavailable for selection.
4. The following details are displayed:
Check the following values and change them if necessary:
• BLOCK Size (0=variable length)= 0• Use EXTENDED file marks = “no”• RESERVE/RELEASE support = “yes”• Set timeout for the READ or WRITE command = 1200
Click on the “OK” button to apply the changes.
If you are using a non-graphics terminal1. At the command line type:
nl
% smit -C tape
IBM (AIX) servers and workstations22
2. The following is displayed:
Select “change/show characteristics of a tape drive”
3. A pop-up window is displayed:
Select the tape drive you wish to change. The example above shows an LTO FC tape drive asavailable for selection.
4. The following details are displayed:
Check the following values and change them if necessary:
• BLOCK Size (0=variable length) = 0• Use EXTENDED file marks = “no”• RESERVE/RELEASE support = “yes”• Set timeout for the READ or WRITE command = 1200
Press the Enter key (“Do”) to apply the changes.
Refer to http://www.hp.com/go/connect for up-to-date information on supported applications
Once device files have been configured, you should confirm that your new tape drive is workingproperly. “Verifying the installation” on page 31 provides instructions on backing up and restoringa sample file to test your installation.
Volume 5: UNIX, Linux and OpenVMS configuration guide 23
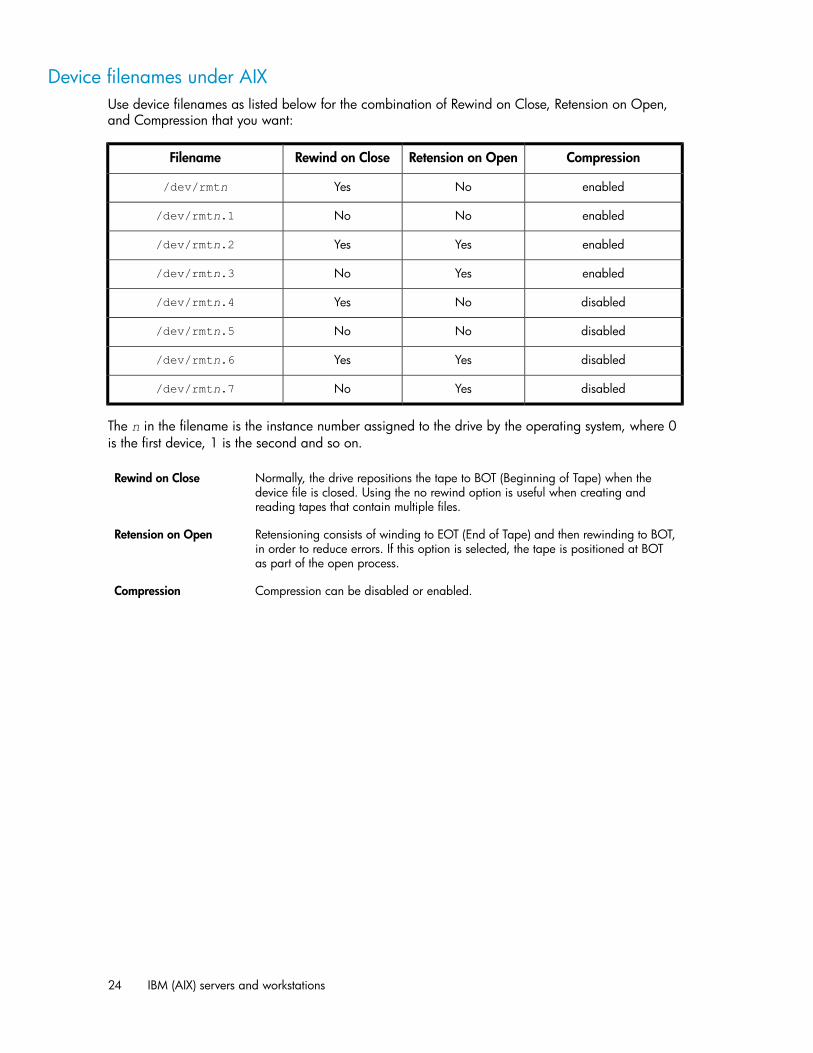
Device filenames under AIXUse device filenames as listed below for the combination of Rewind on Close, Retension on Open,and Compression that you want:
CompressionRetension on OpenRewind on CloseFilename
enabledNoYes/dev/rmtn
enabledNoNo/dev/rmtn.1
enabledYesYes/dev/rmtn.2
enabledYesNo/dev/rmtn.3
disabledNoYes/dev/rmtn.4
disabledNoNo/dev/rmtn.5
disabledYesYes/dev/rmtn.6
disabledYesNo/dev/rmtn.7
The n in the filename is the instance number assigned to the drive by the operating system, where 0is the first device, 1 is the second and so on.
Normally, the drive repositions the tape to BOT (Beginning of Tape) when thedevice file is closed. Using the no rewind option is useful when creating andreading tapes that contain multiple files.
Rewind on Close
Retensioning consists of winding to EOT (End of Tape) and then rewinding to BOT,in order to reduce errors. If this option is selected, the tape is positioned at BOTas part of the open process.
Retension on Open
Compression can be disabled or enabled.Compression
IBM (AIX) servers and workstations24

6 Sun (Solaris) servers and workstations
For supported versions of Solaris, see http://www/hp.com/go/connect.
Fibre Channel drivesBefore configuring your system to support an HP LTO Ultrium drive, ensure that the drive is visible tothe Sun system HBA by correctly zoning the fabric switch (if one is being used).
Configuring the device filesBefore configuring FC-attached drives, ensure the operating system is updated with the latestrecommended patches. On Solaris 9 you also need to install the Sun/StorageTek StorEdge SANFoundation software from www.sun.com/download (select the Storage Management link, thenStorageTek SAN x.x).
When SAN configuration is complete, verify that the drive is visible to the HBA by typing:
% cfgadm -al
This should produce an output similar to:
...c3::50060b000xxxxxxx tape connected configured unknown...
This indicates that the drive is configured and the device files built. In this examplec3::50060b000xxxxxxx is the attachment point identifier with 50060b000xxxxxxx being theWWN of the drive port attached to the SAN and visible to the HBA.
If you do not see anything similar to the example above, recheck the SAN connections and the zoningconfiguration to ensure that the HBA and drive ports are visible to each other.
If the tape device shows as unconfigured, type the following:
% cfgadm -c configure c3::50060b000xxxxxxx
This will build the necessary device file in the /dev/rmt directory.
To verify the particular devices associated with a specific WWN then use the following command:
% ls -al /dev/rmt | grep 50060b000xxxxxxx
Replace 50060b000xxxxxxx with the appropriate WWN for the drive.
SAS drives
Identifying attached devicesUse the cfgadm command to list attached tape devices:
Volume 5: UNIX, Linux and OpenVMS configuration guide 25
% cfgadm -al |grep tape
This produces output lines with a format similar to the following:
c9::rmt/0 tape connected configured unknown
The rmt/K entry indicates the tape device file, where K is the instance number. In the above example,rmt/0 indicates a set of device file options for one tape drive, such as /dev/rmt/0cb, /dev/rmt/0cbn, and so on.7
The cfgadm command may also be used with the –v (verbose) option to list a full path including theSAS controller:
% cfgadm -val |grep tape
An output containing, for example, “/devices/pci@0/pci@0/pci@8/pci@0/pci@1/LSILogic,sas@0:scsi::rmt/1” indicates an SAS tape drive connected via an LSI SAS HBA.
Kernel patch levelsFor optimal performance, ensure that you have the following minimum patch number:
Minimum patch*
The latest version of the st, sd and ssd drivers patch(currently 122300-48, though this version may be superceded)
Solaris 9
The latest version of the kernel patch(05/09 release (update 5) or later)
Solaris 10
Upgrading to the minimum patch level will ensure that the necessary support for officially supporteddrives is included in the driver. You can view your existing patch level using the command “uname-a”. To access Solaris patch upgrades, you need to set up an Online Account with Sun to use http://www.sunsolve/sun/com/.
NOTE:Patch levels are liable to change every 6 months or so, so these “minimum” levels may quickly becomeout-of-date.To obtain the lastest levels, enter the patch names into the search utility “Search the SunSolveKnowledgebase” found on http://www.sunsolve/sun/com/.
If for some reason you cannot upgrade to the minimum patch level, you can make the following filemodifications to enhance performance:
7Device file variants for a given tape device are listed in /dev/rmt with various suffixes—l, m, h, u, c specifying the ‘density’(low, medium, high, ultra, compressed), plus additional options b, ‘Berkeley’ behavior, and n, no rewind behaviour. HPrecommends the ‘Berkeley’ device file option for most applications with compressed density c: /dev/rmt/0cb or /dev/rmt/0cbn
Sun (Solaris) servers and workstations26
1. In the file /kernel/drv/st.conf, after these lines:
########## Copyright 2004 Sun Microsystems, Inc. All rights reserved.# Use is subject to license terms.###pragma ident "@(#)st.conf 1.34 04/06/24 SMI"#
add the following (there are 6 significant spaces between the first occurrences of HP and Ultriumin line 2):
tape-config-list ="HP Ultrium 5","HP Ultrium LTO 5","HP_LTO_GEN_5";HP_LTO_GEN_5 = 2,0x3B,0,0x18659,4,0x00,0x44,0x46,0x58,3,60,1200,600,1200,600,600,18000name="st" class="scsi" target=X lun=0;
where X is the SCSI target address8 of the device you have attached.
See “HP-data values” on page 28 for the values of the parameters in these lines.
2. Instead of rebooting the device, follow these steps.
a. Find the kernel module ID:
# modinfo | grep "st ("96 60dcc000 cdb0 33 1 st (SCSI Sequential Access Driver)
In this example the ID is 96.
b. Unload the kernel module:
# modunload -i 96
c. Load the kernel module back in:
# modload -p drv/st
d. Rebuild the device paths:
devfsadm -Cdevfsadm -i st
For further details, see How do you load st.conf changes without rebooting, SunSolvedocument 18010, on http://sunsolve.sun.com/search/document.do?assetkey=1-9-18010-1&searchclause=18010
This link is valid for registered SunSolve users with a valid Sun Service Plan.
8Typically st.conf already contains a range of target address entries by default, listed after the comments section (# prefixes)in the above format: name="st" class="scsi" target=X lun=0; While SAS drives contain a unique 64-bit SASaddress, they are also allocated a target address value in the operating system. To obtain a particular tape drive’s targetaddress, run the following command to identify it:
% ls -l <tape device file>
This produces a line of output which includes a path which in turn contains an st@X element, where X is the target address.
For example: % ls -l /dev/rmt/0cbn would produce output containing something like the following path:
/dev/rmt/0cbn -> ../../devices/pci@0/pci@0/pci@8/pci@0/pci@8/pci@0/pci1077,14f@1,1/st@3,0:cbn
The element st@3 here indicates target address = 3.
Volume 5: UNIX, Linux and OpenVMS configuration guide 27
3. You should now be able to use the drive.
• Use /dev/rmt/Kcb if you require a compression rewind device file, where K is the relevantdevice file instance.
• Use /dev/rmt/Kcbn when you require a compression non-rewind device.
Once the device files have been created, you should confirm that your new tape drive is workingproperly. “Verifying the installation” on page 31 provides instructions on backing up and restoringa sample file to test your installation.
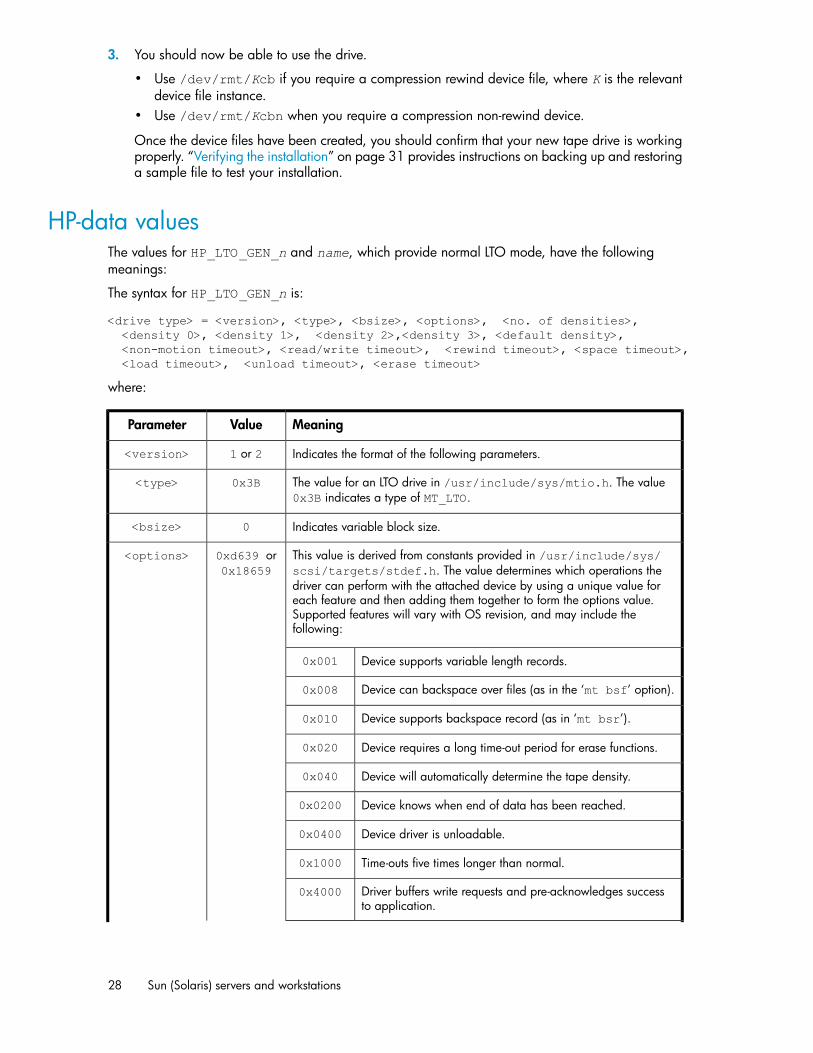
HP-data valuesThe values for HP_LTO_GEN_n and name, which provide normal LTO mode, have the followingmeanings:
The syntax for HP_LTO_GEN_n is:
<drive type> = <version>, <type>, <bsize>, <options>, <no. of densities>,<density 0>, <density 1>, <density 2>,<density 3>, <default density>,<non-motion timeout>, <read/write timeout>, <rewind timeout>, <space timeout>,<load timeout>, <unload timeout>, <erase timeout>
where:
MeaningValueParameter
Indicates the format of the following parameters.1 or 2<version>
The value for an LTO drive in /usr/include/sys/mtio.h. The value0x3B indicates a type of MT_LTO.
0x3B<type>
Indicates variable block size.0<bsize>
This value is derived from constants provided in /usr/include/sys/scsi/targets/stdef.h. The value determines which operations thedriver can perform with the attached device by using a unique value foreach feature and then adding them together to form the options value.Supported features will vary with OS revision, and may include thefollowing:
0xd639 or0x18659
<options>
Device supports variable length records.0x001
Device can backspace over files (as in the ‘mt bsf’ option).0x008
Device supports backspace record (as in ‘mt bsr’).0x010
Device requires a long time-out period for erase functions.0x020
Device will automatically determine the tape density.0x040
Device knows when end of data has been reached.0x0200
Device driver is unloadable.0x0400
Time-outs five times longer than normal.0x1000
Driver buffers write requests and pre-acknowledges successto application.
0x4000
Sun (Solaris) servers and workstations28
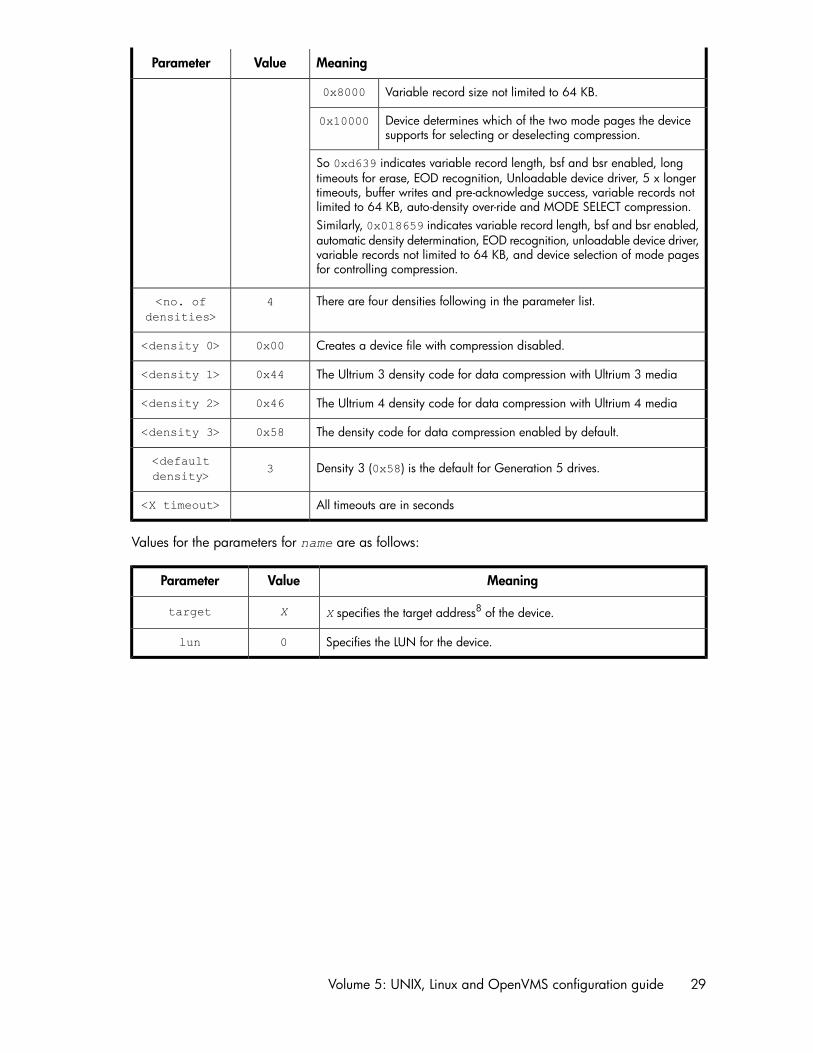
MeaningValueParameter
Variable record size not limited to 64 KB.0x8000
Device determines which of the two mode pages the devicesupports for selecting or deselecting compression.
0x10000
So 0xd639 indicates variable record length, bsf and bsr enabled, longtimeouts for erase, EOD recognition, Unloadable device driver, 5 x longertimeouts, buffer writes and pre-acknowledge success, variable records notlimited to 64 KB, auto-density over-ride and MODE SELECT compression.Similarly, 0x018659 indicates variable record length, bsf and bsr enabled,automatic density determination, EOD recognition, unloadable device driver,variable records not limited to 64 KB, and device selection of mode pagesfor controlling compression.
There are four densities following in the parameter list.4<no. ofdensities>
Creates a device file with compression disabled.0x00<density 0>
The Ultrium 3 density code for data compression with Ultrium 3 media0x44<density 1>
The Ultrium 4 density code for data compression with Ultrium 4 media0x46<density 2>
The density code for data compression enabled by default.0x58<density 3>
Density 3 (0x58) is the default for Generation 5 drives.3<defaultdensity>
All timeouts are in seconds<X timeout>
Values for the parameters for name are as follows:
MeaningValueParameter
X specifies the target address8 of the device.Xtarget
Specifies the LUN for the device.0lun
Volume 5: UNIX, Linux and OpenVMS configuration guide 29

Sun (Solaris) servers and workstations30
7 Verifying the installation
Verifying the installation of the drive (UNIX)As part of the installation process, you will have installed the appropriate device driver for your UNIXsystem, and created device files to communicate with the tape drive.
This section describes how you can verify the installation has been performed correctly.
In outline, the procedure is as follows:
1. Check the tape drive responds to a rewind command.
2. Write test data to a tape.
3. Read the test data from the tape.
4. Compare the data read from the tape with the original data on disk.
To verify the installation:1. Test the SCSI connection to the tape drive by performing a rewind:
a. If there is a tape cartridge already in the drive, remove it.
b. Insert a tape cartridge.
c. Rewind the tape using the command line:nl
% mt -f device file rewind
For example, on HP-UX 11i v2:nl
% mt -f /dev/rmt/c4t3d0BESTnb
For example, on HP-UX 11i v3 (using a persistent device file):nl
% mt -f /dev/rtape/tape0_BESTnb rewind
If the command completes successfully, there will be no feedback. If it fails, you will see anerror message on the console. There may be a reservation by another host, or a zone change,or the hardware installation may be faulty. Check the troubleshooting section of the User’sGuide for help in identifying the problem.
Volume 5: UNIX, Linux and OpenVMS configuration guide 31
2. Write a sample file to tape, using ‘tar’:
% cd /% tar cvf <device_file> <file>
The options to tar have the following meanings:
Create a new archive (backup file) on the device.c
Operate in verbose mode.v
Specify the device file explicitly.f
The arguments follow the cvf options in the command line. Their values depend on the operatingsystem; suggested values are given the appropriate operating system chapter. The argumentsare as follows:
The name of the device file for the drive.nl
Example:/dev/rmt/c4t3d0BESTnb<device file>
The name of the file to archive, prefixed with ‘./’.nl
Example:./stand/vmunix<file>
NOTE:Make sure you prefix the file name with ‘.’ when you back it up to tape. If you do not, therestore operation in step 3 will overwrite the original copy on disk.
3. Read the file back from tape:
% cd /tmp % tar xvf <device file>
The ‘x’ option to tar here means “extract from the archive”.
Use the same value for the <device file> argument as in step 2.
4. Compare the original with this retrieved file:
% cmp <original file> /tmp/<retrieved file>
This compares the files byte by byte. If they are the same, there should be no output, and thisverifies that the installation is correct. The arguments are:
The name of the original file, prefixed with ‘/’.nl
Example:/stand/vmunix<original file>
The name of the file retrieved from the archive.nl
Example:stand/vmunix<retrieved file>
ExampleSuppose you are verifying the installation of an HP LTO Ultrium tape drive on an HP-UX 11.X system.The procedure would be as follows:
Verifying the installation32
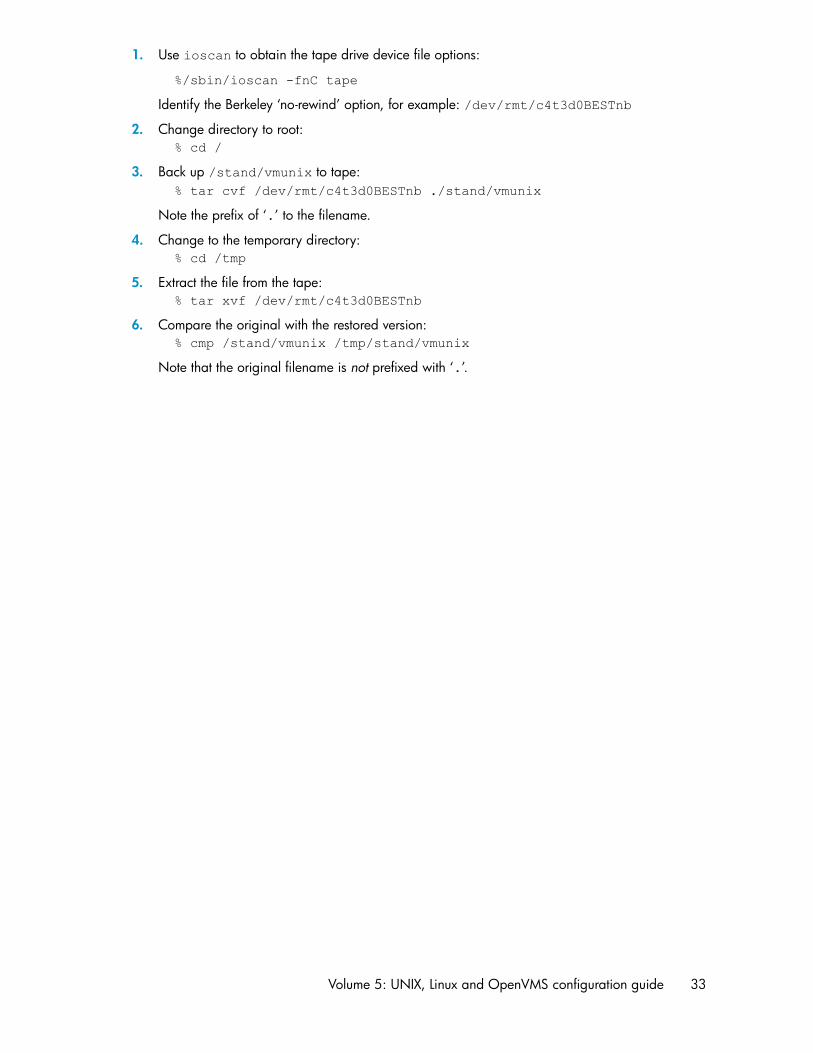
1. Use ioscan to obtain the tape drive device file options:
%/sbin/ioscan -fnC tape
Identify the Berkeley ‘no-rewind’ option, for example: /dev/rmt/c4t3d0BESTnb
2. Change directory to root:nl
% cd /
3. Back up /stand/vmunix to tape:nl
% tar cvf /dev/rmt/c4t3d0BESTnb ./stand/vmunix
Note the prefix of ‘.’ to the filename.
4. Change to the temporary directory:nl
% cd /tmp
5. Extract the file from the tape:nl
% tar xvf /dev/rmt/c4t3d0BESTnb
6. Compare the original with the restored version:nl
% cmp /stand/vmunix /tmp/stand/vmunix
Note that the original filename is not prefixed with ‘.’.
Volume 5: UNIX, Linux and OpenVMS configuration guide 33

Verifying the installation34
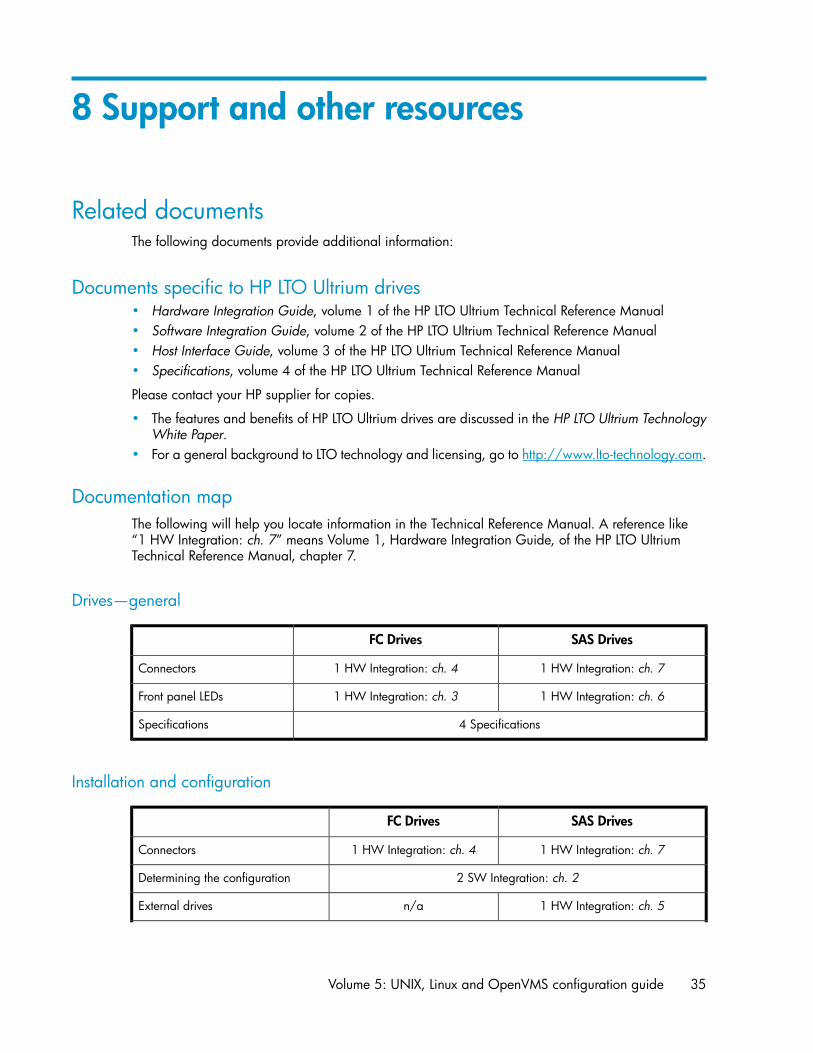
8 Support and other resources
Related documentsThe following documents provide additional information:
Documents specific to HP LTO Ultrium drives• Hardware Integration Guide, volume 1 of the HP LTO Ultrium Technical Reference Manual• Software Integration Guide, volume 2 of the HP LTO Ultrium Technical Reference Manual• Host Interface Guide, volume 3 of the HP LTO Ultrium Technical Reference Manual• Specifications, volume 4 of the HP LTO Ultrium Technical Reference Manual
Please contact your HP supplier for copies.
• The features and benefits of HP LTO Ultrium drives are discussed in the HP LTO Ultrium TechnologyWhite Paper.
• For a general background to LTO technology and licensing, go to http://www.lto-technology.com.
Documentation mapThe following will help you locate information in the Technical Reference Manual. A reference like“1 HW Integration: ch. 7” means Volume 1, Hardware Integration Guide, of the HP LTO UltriumTechnical Reference Manual, chapter 7.
Drives—general
SAS DrivesFC Drives
1 HW Integration: ch. 71 HW Integration: ch. 4Connectors
1 HW Integration: ch. 61 HW Integration: ch. 3Front panel LEDs
4 SpecificationsSpecifications
Installation and configuration
SAS DrivesFC Drives
1 HW Integration: ch. 71 HW Integration: ch. 4Connectors
2 SW Integration: ch. 2Determining the configuration
1 HW Integration: ch. 5n/aExternal drives
Volume 5: UNIX, Linux and OpenVMS configuration guide 35
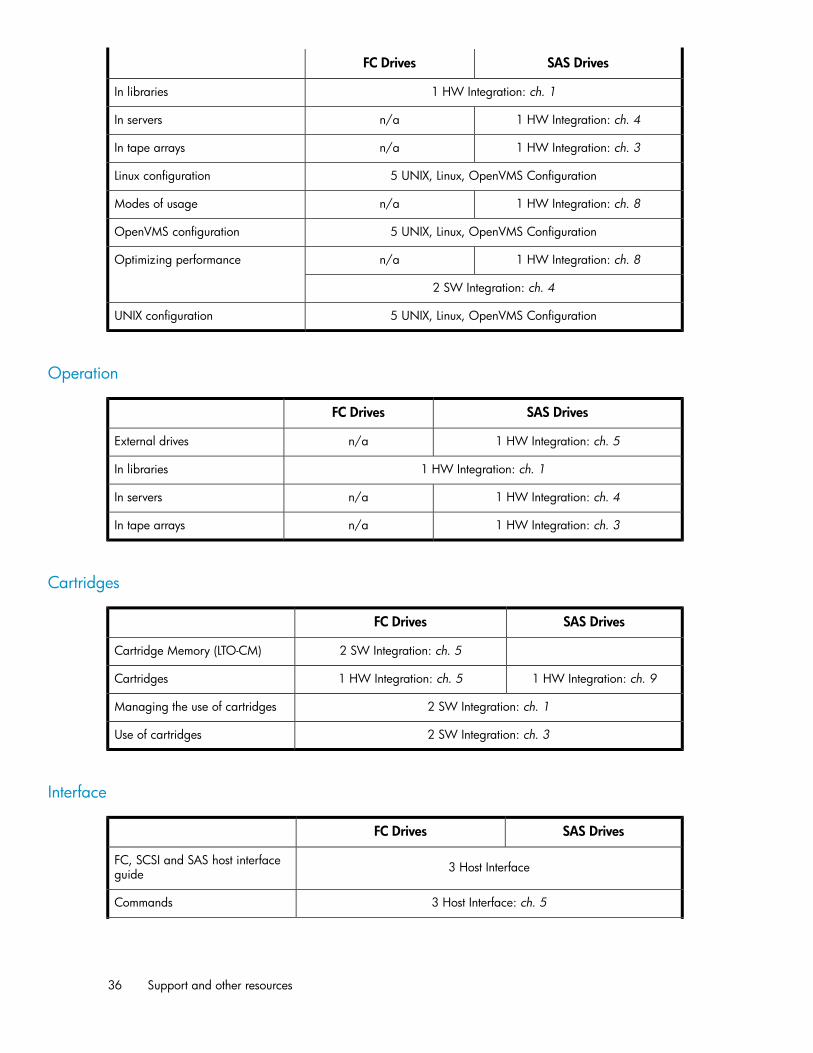
SAS DrivesFC Drives
1 HW Integration: ch. 1In libraries
1 HW Integration: ch. 4n/aIn servers
1 HW Integration: ch. 3n/aIn tape arrays
5 UNIX, Linux, OpenVMS ConfigurationLinux configuration
1 HW Integration: ch. 8n/aModes of usage
5 UNIX, Linux, OpenVMS ConfigurationOpenVMS configuration
1 HW Integration: ch. 8n/aOptimizing performance
2 SW Integration: ch. 4
5 UNIX, Linux, OpenVMS ConfigurationUNIX configuration
Operation
SAS DrivesFC Drives
1 HW Integration: ch. 5n/aExternal drives
1 HW Integration: ch. 1In libraries
1 HW Integration: ch. 4n/aIn servers
1 HW Integration: ch. 3n/aIn tape arrays
Cartridges
SAS DrivesFC Drives
2 SW Integration: ch. 5Cartridge Memory (LTO-CM)
1 HW Integration: ch. 91 HW Integration: ch. 5Cartridges
2 SW Integration: ch. 1Managing the use of cartridges
2 SW Integration: ch. 3Use of cartridges
Interface
SAS DrivesFC Drives
3 Host InterfaceFC, SCSI and SAS host interfaceguide
3 Host Interface: ch. 5Commands
Support and other resources36
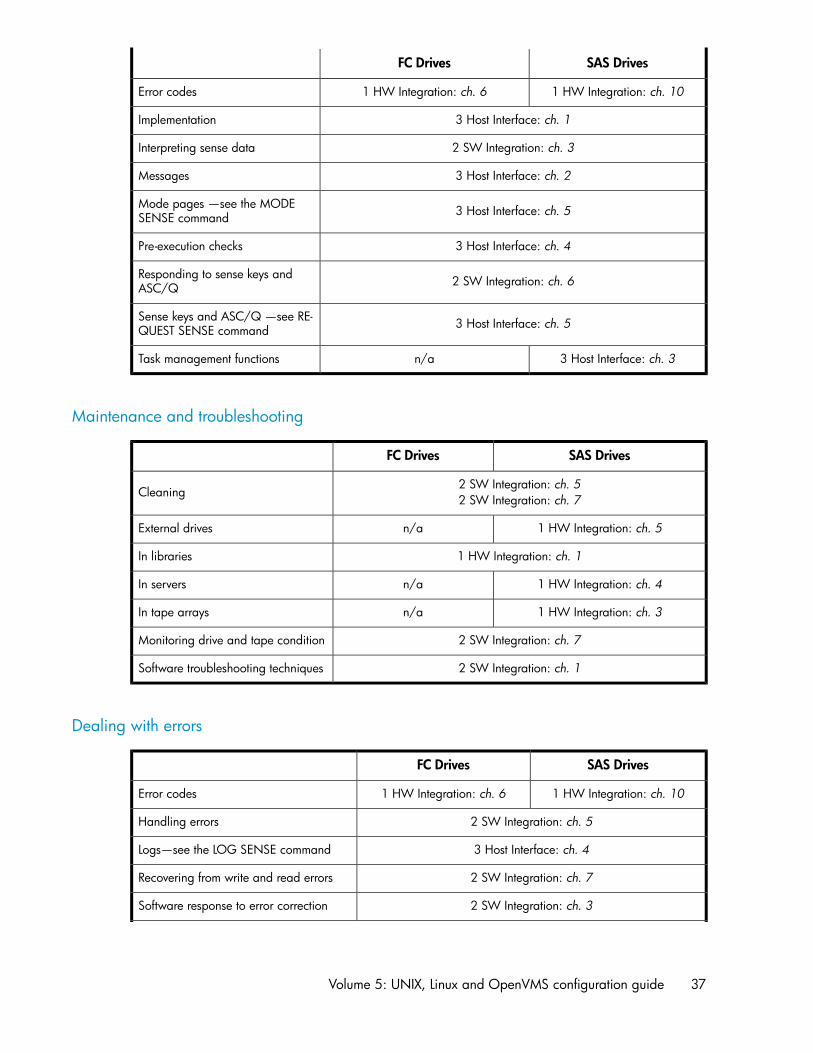
SAS DrivesFC Drives
1 HW Integration: ch. 101 HW Integration: ch. 6Error codes
3 Host Interface: ch. 1Implementation
2 SW Integration: ch. 3Interpreting sense data
3 Host Interface: ch. 2Messages
3 Host Interface: ch. 5Mode pages —see the MODESENSE command
3 Host Interface: ch. 4Pre-execution checks
2 SW Integration: ch. 6Responding to sense keys andASC/Q
3 Host Interface: ch. 5Sense keys and ASC/Q —see RE-QUEST SENSE command
3 Host Interface: ch. 3n/aTask management functions
Maintenance and troubleshooting
SAS DrivesFC Drives
2 SW Integration: ch. 5nl
2 SW Integration: ch. 7Cleaning
1 HW Integration: ch. 5n/aExternal drives
1 HW Integration: ch. 1In libraries
1 HW Integration: ch. 4n/aIn servers
1 HW Integration: ch. 3n/aIn tape arrays
2 SW Integration: ch. 7Monitoring drive and tape condition
2 SW Integration: ch. 1Software troubleshooting techniques
Dealing with errors
SAS DrivesFC Drives
1 HW Integration: ch. 101 HW Integration: ch. 6Error codes
2 SW Integration: ch. 5Handling errors
3 Host Interface: ch. 4Logs—see the LOG SENSE command
2 SW Integration: ch. 7Recovering from write and read errors
2 SW Integration: ch. 3Software response to error correction
Volume 5: UNIX, Linux and OpenVMS configuration guide 37
SAS DrivesFC Drives
2 SW Integration: ch. 3Software response to logs
2 SW Integration: ch. 7TapeAlert log
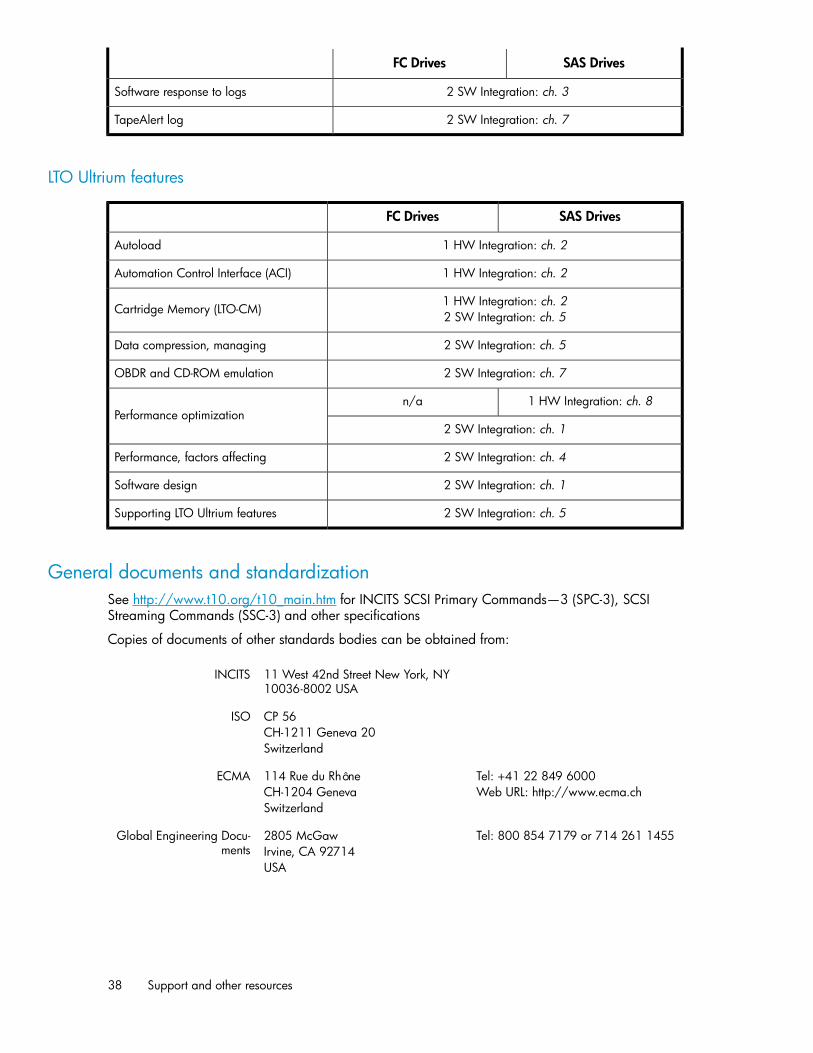
LTO Ultrium features
SAS DrivesFC Drives
1 HW Integration: ch. 2Autoload
1 HW Integration: ch. 2Automation Control Interface (ACI)
1 HW Integration: ch. 2nl
2 SW Integration: ch. 5Cartridge Memory (LTO-CM)
2 SW Integration: ch. 5Data compression, managing
2 SW Integration: ch. 7OBDR and CD-ROM emulation
1 HW Integration: ch. 8n/aPerformance optimization
2 SW Integration: ch. 1
2 SW Integration: ch. 4Performance, factors affecting
2 SW Integration: ch. 1Software design
2 SW Integration: ch. 5Supporting LTO Ultrium features
General documents and standardizationSee http://www.t10.org/t10_main.htm for INCITS SCSI Primary Commands—3 (SPC-3), SCSIStreaming Commands (SSC-3) and other specifications
Copies of documents of other standards bodies can be obtained from:
11 West 42nd Street New York, NY10036-8002 USA
INCITS
CP 56nl
CH-1211 Geneva 20nl
Switzerland
ISO
Tel: +41 22 849 6000nl
Web URL: http://www.ecma.ch114 Rue du Rhônenl
CH-1204 Genevanl
Switzerland
ECMA
Tel: 800 854 7179 or 714 261 14552805 McGawnl
Irvine, CA 92714nl
USA
Global Engineering Docu-ments
Support and other resources38
Glossary
AT&T mode Berkeley and AT&T functional modes differ in “read-only” close functionality. InAT&T mode, a device close operation will cause the tape to be repositioned justafter next filemark on the tape (the start of the next file).
Berkeley mode Berkeley and AT&T functional modes differ in “read-only” close functionality. InBerkeley mode the tape position will remain unchanged by a device closeoperation.
BOT Beginning Of Tape. The first point on the tape that can be accessed by the drive.
buffered mode A mode of data transfer in write operations that facilitates tape streaming. It isselected by setting the Buffered Mode Field to 1 in the SCSI MODE SELECTParameter List header.
compression A procedure in which data is transformed by the removal of redundant informationin order to reduce the number of bits required to represent the data. This isbasically done by representing strings of bytes with codewords.In LTO drives, the data is compressed using the LTO-DC compression formatwhich is based on ALDC (licensed from Stac/IBM) with two enhancements. Onelimits the increase in size of data that cannot be compressed that ALDC produces.The other is the use of embedded codewords.
Fibre Channel Fibre Channel provides an inexpensive yet expendable means of quicklytransferring data between workstations, mainframes, supercomputers, desktopcomputers, storage devices, displays and other peripherals. Although it is calledFibre Channel, its architecture represents neither a channel nor a real networktopology. It allows for an active intelligent interconnection scheme, called afabric, to connect devices. All a Fibre Channel port has to do is to manage asimple point-to-point connection between itself and the fabric.Several common ULPs (Upper Level Protocols) including IP and SCSI can run onFibre Channel, merging high-speed I/O and network functionality in a singleconnectivity technology.
filemark A mark written by the host to the tape that can be searched for, often using thedrive’s fast-search capability. It does not necessarily separate files. It is up to thehost to assign a meaning to the mark.
immediate mode A mode of responding to SCSI commands where the drive or other peripheraldoes not wait until the command has finished before returning status informationback to the host. For writing filemarks, Immediate mode can significantly improvethe performance of systems that do not set the Immediate bit when sending aSCSI WRITE FILEMARKS command. On the other hand, data is not flushed totape in response to a filemark command.
infinite flush By default, the buffer in the drive is flushed every 5 seconds. Infinite flush avoidsfrequent starting and stopping of the mechanism when using a very slowapplication. It also avoids losing capacity through the flushing of partly written
Volume 5: UNIX, Linux and OpenVMS configuration guide 39
groups. On the other hand, infinite flush means that data can remain in the bufferfor very long periods of time, and could be lost in the event of a power failure.
LUN Logical Unit Number, by which different logical units within a particular devicecan be addressed individually. Each logical unit contains a device server. Thedrive provides a SSC device server, typically at LUN 0, and an ADC deviceserver, typically at LUN 7. Both may be reassigned, for example the ADIautomation controller may reassign the ADC LUN by using the ADC DeviceServer configuration mode sub-page. Finally, the drive also provides optionalSMC LUN(s), which may be assigned by an ADI automation controller at thetime of enablement, typically at LUN 1.
SAN Storage Area Network. A dedicated, high-speed network that establishes a directconnection between storage elements and servers. The hardware that connectsworkstations and servers to storage devices in a SAN is referred to as a fabric.The SAN fabric enables any-server-to-any-storage device connectivity throughthe use of Fibre Channel switching technology.
sequential access Sequential access devices store data sequentially in the order in which it isreceived. Tape devices are the most common sequential access devices. Devicessuch as disk drives are direct access devices, where data is stored in blocks, notnecessarily sequentially. Direct access allows speedy retrieval, but is significantlymore costly.
Glossary40
Index
AAIX, 21ANSI, 35, 38AT&T mode, 39
BBerkeley mode, 39BOT, 39buffered mode, 39
Ccompression, 39confirming installation, 31
Ddevice files
AIX, 24IBM (AIX), 21
direct access, 40documents, related, 35
EECMA, 38
Ffibre channel, 39filemarks, 39filenames under AIX, 24
HHP-UX systems, 7
IIBM (AIX), 21
device files, 21immediate mode, 39INCITS, 38infinite flush, 39installation, verifying, 31
ISO, 38
LLinux, 17LUN, 40
Mmode
AT&T, 39Berkeley, 39immediate, 39
OOpenVMS servers, 15OpenVMS servers and workstations
determining attached devices, 15
PPC-based UNIX - Linux, 17
SSAN, 40sequential access, 40servers
OpenVMS, 15Solaris, 25storage area network, 40SUN systems, 25Sun workstations
data values, 28identifying attached devices, 25
systemsHP-UX, 7Linux, 17
Vverifying installation, 31
Volume 5: UNIX, Linux and OpenVMS configuration guide 41

Wworkstations
OpenVMS, 15
42