Embed Size (px)
Citation preview

HP PSC 1400 All-in-One seriesUser Guide
Legal Information
© Copyright 2005 Hewlett-PackardDevelopment Company, L.P.
The information contained herein issubject to change without notice.
Reproduction, adaptation ortranslation without prior writtenpermission is prohibited, except asallowed under copyright laws.
Adobe® and the Acrobat Logo® aretrademarks Adobe SystemsIncorporated.
Portions Copyright © 1989-2004Palomar Software Inc.
The HP PSC 1400 All-in-One seriesincludes printer driver technologylicensed from Palomar Software, Inc.www.palomar.com.
Windows®, Windows NT®, WindowsMe®, Windows XP®, and Windows2000® are U.S. registered trademarksof Microsoft Corporation.
Intel® and Pentium® are registeredtrademarks of Intel Corporation and itssubsidiaries in the United States andother countries.
Energy Star® and Energy Star logo®are US registered marks of the UnitedStates Environmental ProtectionAgency.
First edition: March 2005
NoticeThe only warranties for HP productsand services are set forth in theexpress warranty statementsaccompanying such products andservices. Nothing herein should beconstrued as constituting an additionalwarranty. HP shall not be liable fortechnical or editorial errors oromissions contained herein.
The Hewlett-Packard Company shallnot be liable for incidental orconsequential damages in connectionwith, or arising out of the furnishing,performance, or use of this documentand the program material which itdescribes.
Note: Regulatory information can befound in the technical informationchapter of this guide.
It is not lawful in many places to makecopies of the following items. When indoubt, check with a legalrepresentative first.
● Governmental paper ordocuments:– Passports– Immigration papers– Selective service papers– Identification badges,
cards, or insignias● Governmental stamps:
– Postage stamps– Food stamps
● Checks or drafts drawn onGovernmental agencies
● Paper currency, traveler’schecks, or money orders
● Certificates of deposit● Copyrighted works
Safety information
Warning To prevent fire or shockhazard, do not expose this product torain or any type of moisture.
Always follow basic safety precautionswhen using this product to reduce riskof injury from fire or electric shock.
Warning Potential shock hazard
1. Read and understand allinstructions in the Setup Guide.
2. Use only a grounded electricaloutlet when connecting thedevice to a power source. If youdo not know whether the outletis grounded, check with aqualified electrician.
3. Observe all warnings andinstructions marked on theproduct.
4. Unplug this product from walloutlets before cleaning.
5. Do not install or use this productnear water or when you are wet.
6. Install the product securely on astable surface.
7. Install the product in a protectedlocation where no one can stepon or trip over the power cord,and where the power cord willnot be damaged.
8. If the product does not operatenormally, see the onlineTroubleshooting help.
9. No operator-serviceable partsinside. Refer servicing toqualified service personnel.
10. Use in a well-ventilated area.
Warning This equipment will beinoperable when main power fails.
Publication number: Q7286-90158

HP PSC 1400 All-in-One series
User Guide

Contents
1 HP All-in-One overview........................................................................................3The HP All-in-One at a glance ...............................................................................3Control panel overview ..........................................................................................4Status light overview ..............................................................................................4Use the HP Image Zone to do more with your HP All-in-One ................................6Find more information ............................................................................................6Connection information ..........................................................................................7
2 Load originals and load paper.............................................................................9Load an original .....................................................................................................9Choose papers for printing and copying ................................................................9Load paper ..........................................................................................................10Avoid paper jams .................................................................................................13
3 Use the copy features........................................................................................15Set the copy paper type .......................................................................................15Increase copy speed or quality ............................................................................16Make multiple copies ...........................................................................................16Make a borderless copy of a photo ......................................................................17Resize an original to fit onto letter or A4 paper ....................................................17Stop copying ........................................................................................................18
4 Print from your computer..................................................................................19Print from a software application .........................................................................19Make the HP All-in-One the default printer ..........................................................20Stop a print job ....................................................................................................20
5 Use the scan features......................................................................................... 21Scan from the control panel .................................................................................21Adjust the preview image ..................................................................................... 22Stop scanning ......................................................................................................22
6 Use HP Instant Share.........................................................................................23Overview ..............................................................................................................23Get started ...........................................................................................................23Send images using your computer ......................................................................23
7 Order supplies....................................................................................................27Order paper, transparency film, or other media ...................................................27Order print cartridges ...........................................................................................27Order other supplies ............................................................................................27
8 Maintain your HP All-in-One..............................................................................29Clean the HP All-in-One ......................................................................................29Check the estimated ink levels ............................................................................29Print a self-test report ..........................................................................................30Work with print cartridges ....................................................................................30
9 Troubleshooting information.............................................................................35Before you call HP Support .................................................................................35View the Readme file ...........................................................................................35Setup troubleshooting ..........................................................................................35Operational troubleshooting .................................................................................41
User Guide 1

Device update ......................................................................................................4210 Get HP support ..................................................................................................43
Get support and other information from the Internet ............................................43Warranty support .................................................................................................43HP customer support ...........................................................................................43Access your serial number and service ID ........................................................... 44Contact HP ..........................................................................................................44Call HP Korea customer support .........................................................................45Prepare your HP All-in-One for shipment ............................................................45Hewlett-Packard LIMITED WARRANTY STATEMENT .......................................46
11 Technical information .......................................................................................49System requirements ...........................................................................................49Paper specifications ............................................................................................49Print specifications ...............................................................................................50Copy specifications ..............................................................................................51Scan specifications ..............................................................................................51Physical specifications .........................................................................................52Power specifications ............................................................................................52Environmental specifications ...............................................................................52Additional specifications ......................................................................................52Environmental product stewardship program ......................................................52Regulatory notices ...............................................................................................54
Index...........................................................................................................................57
2 HP PSC 1400 All-in-One series
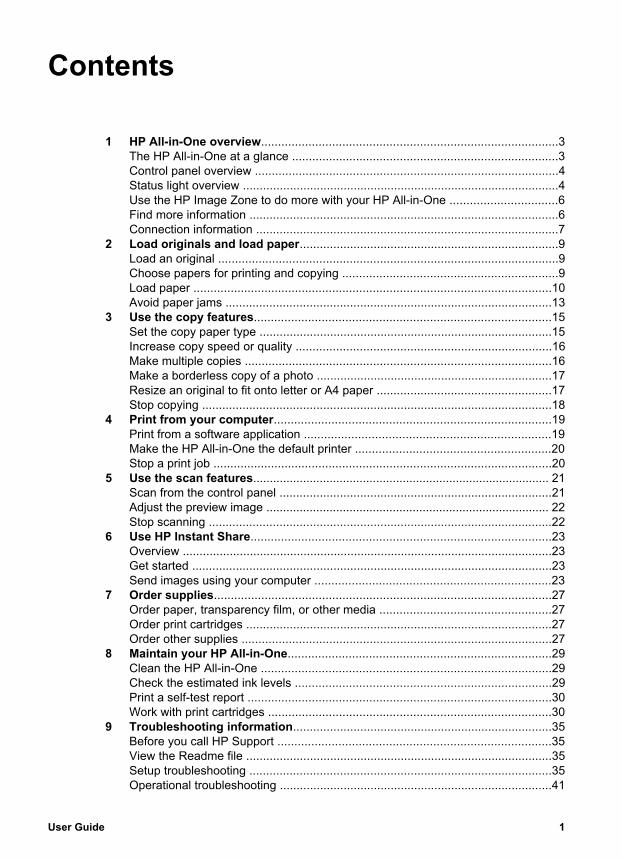
1 HP All-in-One overviewMany HP All-in-One functions can be accessed directly, without turning on yourcomputer. Tasks such as making a copy or printing can be accomplished quickly andeasily from your HP All-in-One.This chapter describes the HP All-in-One hardware features, control-panel functions,and how to access the HP Image Zone software.
Tip You can do more with your HP All-in-One by using the HP Image Zone orHP Solution Center software installed on your computer. The softwareprovides enhanced copy, scan, and photo functionality. For more information,see the onscreen HP Image Zone Help and Use the HP Image Zone to domore with your HP All-in-One.
The HP All-in-One at a glance
1 Control panel2 Paper tray3 Paper tray extender4 Paper-width guide5 Print-carriage access / front clean-out door6 Glass7 Lid
8 Rear clean-out door9 Rear USB port10 Power connection
User Guide 3
HP A
ll-in-One overview
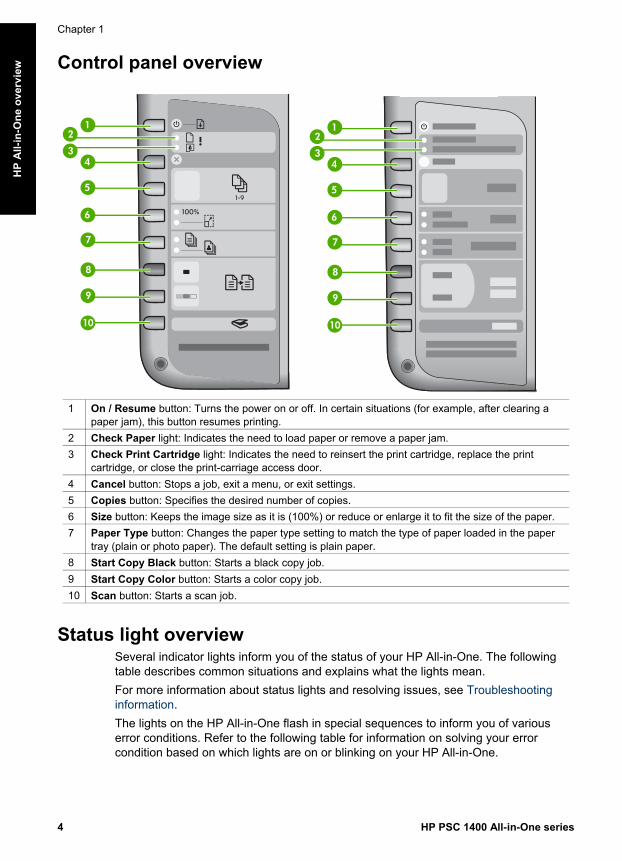
Control panel overview
1 On / Resume button: Turns the power on or off. In certain situations (for example, after clearing apaper jam), this button resumes printing.
2 Check Paper light: Indicates the need to load paper or remove a paper jam.3 Check Print Cartridge light: Indicates the need to reinsert the print cartridge, replace the print
cartridge, or close the print-carriage access door.4 Cancel button: Stops a job, exit a menu, or exit settings.5 Copies button: Specifies the desired number of copies.6 Size button: Keeps the image size as it is (100%) or reduce or enlarge it to fit the size of the paper.7 Paper Type button: Changes the paper type setting to match the type of paper loaded in the paper
tray (plain or photo paper). The default setting is plain paper.8 Start Copy Black button: Starts a black copy job.9 Start Copy Color button: Starts a color copy job.10 Scan button: Starts a scan job.
Status light overview Several indicator lights inform you of the status of your HP All-in-One. The followingtable describes common situations and explains what the lights mean.For more information about status lights and resolving issues, see Troubleshootinginformation.The lights on the HP All-in-One flash in special sequences to inform you of variouserror conditions. Refer to the following table for information on solving your errorcondition based on which lights are on or blinking on your HP All-in-One.
Chapter 1
4 HP PSC 1400 All-in-One series
HP
All-
in-O
ne o
verv
iew
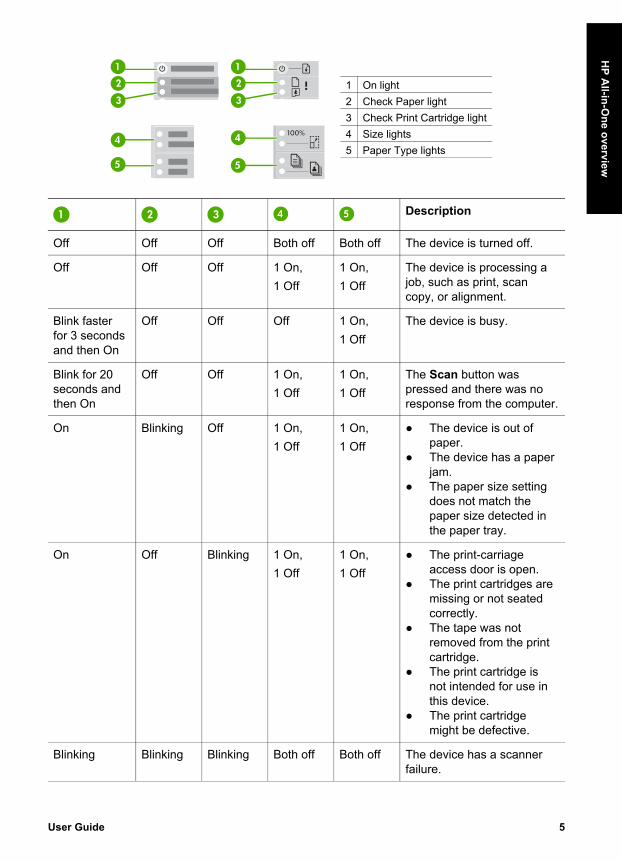
1 On light2 Check Paper light3 Check Print Cartridge light4 Size lights5 Paper Type lights
Description
Off Off Off Both off Both off The device is turned off.
Off Off Off 1 On,1 Off
1 On,1 Off
The device is processing ajob, such as print, scancopy, or alignment.
Blink fasterfor 3 secondsand then On
Off Off Off 1 On,1 Off
The device is busy.
Blink for 20seconds andthen On
Off Off 1 On,1 Off
1 On,1 Off
The Scan button waspressed and there was noresponse from the computer.
On Blinking Off 1 On,1 Off
1 On,1 Off
● The device is out ofpaper.
● The device has a paperjam.
● The paper size settingdoes not match thepaper size detected inthe paper tray.
On Off Blinking 1 On,1 Off
1 On,1 Off
● The print-carriageaccess door is open.
● The print cartridges aremissing or not seatedcorrectly.
● The tape was notremoved from the printcartridge.
● The print cartridge isnot intended for use inthis device.
● The print cartridgemight be defective.
Blinking Blinking Blinking Both off Both off The device has a scannerfailure.
User Guide 5
HP A
ll-in-One overview
Description
Blinking Blinking Blinking Bothblinking
Bothblinking
The device has a fatal error.
Use the HP Image Zone to do more with your HP All-in-One
The HP Image Zone software is installed on your computer when you set up yourHP All-in-One. For further information, see the Setup Guide that came with your device.The entry point for the software varies by operating system (OS). For example, if youhave a PC and are running Windows, the entry point is the HP Solution Center. Ifyou have a Mac OS X v10.2.3 or later, the entry point is the HP Image Zone window.Regardless, the entry point serves as the launching pad for the HP Image Zonesoftware and services.
Note In Windows, you may have the option of installing two versions of thesoftware. If you choose HP Image Zone Express, you will receive a morebasic set of image editing features and some features mentioned may not beavailable.
Access the HP Image Zone software (Windows) Open the HP Solution Center from the desktop icon or the Start menu. TheHP Image Zone software features appear in the HP Solution Center.
Access the HP Image Zone software (Mac) When you install the HP Image Zone software, the HP Image Zone icon is placed inthe Dock. Click the HP Image Zone icon in the Dock. The HP Image Zone windowdisplays only the HP Image Zone features that are appropriate for the selected device.
Note If you install more than one HP All-in-One, an HP Image Zone icon foreach device is displayed in the Dock. For example, if you have an HP scannerand an HP All-in-One installed, two HP Image Zone icons are present in theDock, one for each device. However, if you installed two of the same kind ofdevice (for example, two HP All-in-Ones) only one HP Image Zone icon isdisplayed in the Dock to represent all devices of that type.
➔ Click the HP Image Zone icon in the Dock.The HP Image Zone window appears.The HP Image Zone window displays only the HP Image Zone features that areappropriate for the selected device.
Find more informationA variety of resources, both printed and onscreen, provide information about settingup and using your HP All-in-One.● Setup Guide
The Setup Guide provides instructions for setting up your HP All-in-One andinstalling software. Make sure that you follow the steps in order.
Chapter 1(continued)
6 HP PSC 1400 All-in-One series
HP
All-
in-O
ne o
verv
iew
If you have problems during setup, see Troubleshooting in the last section of theSetup Guide, the Troubleshooting section in the User Guide, or visit www.hp.com/support.
● HP Image Zone HelpThe HP Image Zone Help provides detailed information on using the software foryour HP All-in-One.– The Get step-by-step instructions topic provides information on using the
HP Image Zone software with HP devices.– The Explore what you can do topic provides more information about the
practical and creative things that you can do with the HP Image Zonesoftware and your HP devices.
– If you need further assistance or want to check for HP software updates, seethe Troubleshooting and support topic.
● ReadmeThe Readme file contains the most recent information which might not be foundin other publications. Install the software to access the Readme file.
Connection informationYour HP All-in-One comes with a USB port so you can connect directly to a computerusing a USB cable. You can also share your printer with up to five computers over anexisting Ethernet network using a Windows computer or a Mac as a print server. Thecomputer to which the HP All-in-One is directly connected has access to all of itsfeatures. The other computers can only print.
Connect using a USB cableYou can connect one computer using a USB cable. The USB port is located on therear of the HP All-in-One. Detailed instructions for connecting a computer to yourHP All-in-One with a USB cable are included in the Setup Guide.
Use printer sharing (Windows)If your computer is on a network and another computer on the network has an HP All-in-One connected to it by means of a USB cable, you can use that device as yourprinter using Windows printer sharing. The computer directly connected to the HP All-in-One acts as the host for the printer and can use all the features. Your computer,which is referred to as a client, can only print. All other functions must be performedon the host computer.To enable Windows printer sharing, refer to the user guide that came with yourcomputer or the Windows onscreen Help.
Use printer sharing (Mac OS X)If your computer is on a network and another computer on the network has an HP All-in-One connected to it by means of a USB cable, you can use that device as yourprinter using printer sharing. The computer directly connected to the HP All-in-Oneacts as the host for the printer and can use all the features. Your computer, which is
User Guide 7
HP A
ll-in-One overview
referred to as a client, can only print. All other functions must be performed on thehost computer.1. On the host computer and all computers who want to use the printer, select
System Preferences in the Dock.2. Select Sharing.3. From the Services tab, click the Printer Sharing box.4. From the View menu, select Print & Fax.5. Select the printer model in the Selected printer in Print Dialog menu.6. Click the Share my printers with other computers box.
Chapter 1
8 HP PSC 1400 All-in-One series
HP
All-
in-O
ne o
verv
iew
2 Load originals and load paperThis chapter provides instructions for loading originals on the glass to copy or scan,choosing the best paper type for your job, loading paper in the paper tray, andavoiding paper jams.
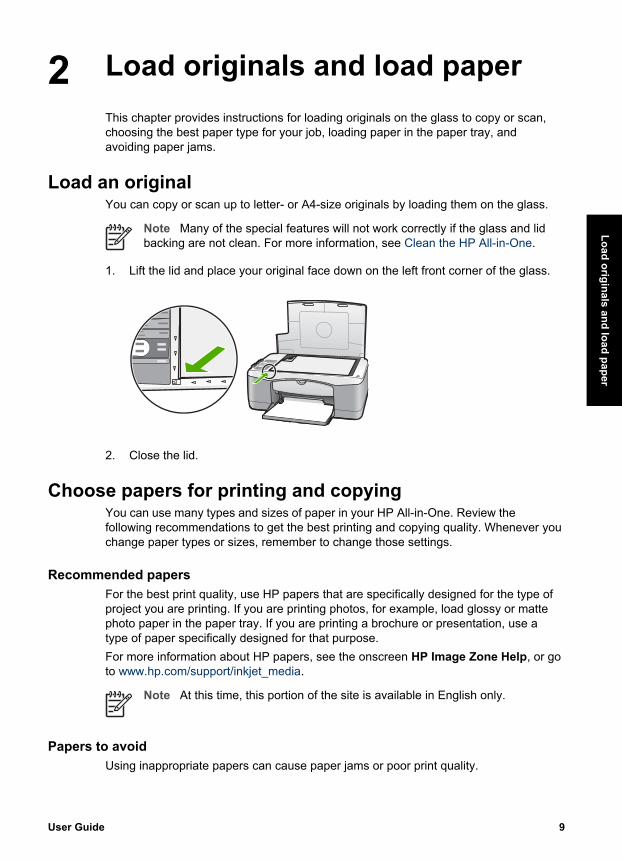
Load an original You can copy or scan up to letter- or A4-size originals by loading them on the glass.
Note Many of the special features will not work correctly if the glass and lidbacking are not clean. For more information, see Clean the HP All-in-One.
1. Lift the lid and place your original face down on the left front corner of the glass.
2. Close the lid.
Choose papers for printing and copyingYou can use many types and sizes of paper in your HP All-in-One. Review thefollowing recommendations to get the best printing and copying quality. Whenever youchange paper types or sizes, remember to change those settings.
Recommended papers For the best print quality, use HP papers that are specifically designed for the type ofproject you are printing. If you are printing photos, for example, load glossy or mattephoto paper in the paper tray. If you are printing a brochure or presentation, use atype of paper specifically designed for that purpose.For more information about HP papers, see the onscreen HP Image Zone Help, or goto www.hp.com/support/inkjet_media.
Note At this time, this portion of the site is available in English only.
Papers to avoid Using inappropriate papers can cause paper jams or poor print quality.
User Guide 9
Load originals and load paper
Avoid these papers in your HP All-in-One● Paper that is too thin, has a slick texture, or that stretches easily● Highly textured stock, such as linen (it might not print evenly, and the ink can
bleed into these papers)● Multi-part forms, such as duplicate and triplicate forms (they can wrinkle or get
stuck and the ink is more likely to smear)● Envelopes with clasps or windows (they can get stuck in the rollers and they can
cause paper jams)● Banner paper
In addition, do not COPY to these papers● Any size paper other than letter, A4, 10 x 15 cm (4 x 6 inch), or Hagaki● Envelopes● Transparency film● Labels
Load paper This section describes the procedure for loading different types and sizes of paperinto your HP All-in-One for your copies or prints.
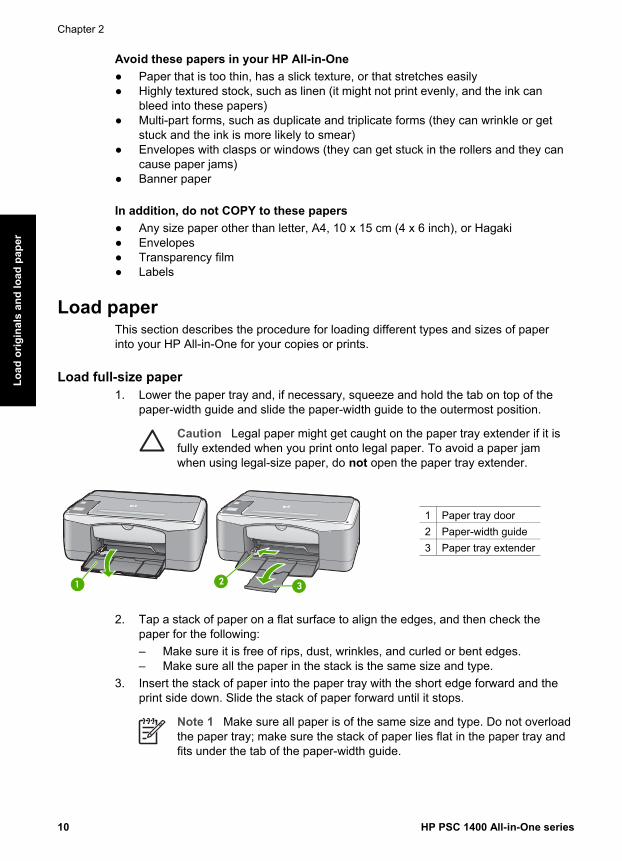
Load full-size paper 1. Lower the paper tray and, if necessary, squeeze and hold the tab on top of the
paper-width guide and slide the paper-width guide to the outermost position.
Caution Legal paper might get caught on the paper tray extender if it isfully extended when you print onto legal paper. To avoid a paper jamwhen using legal-size paper, do not open the paper tray extender.
1 Paper tray door2 Paper-width guide3 Paper tray extender
2. Tap a stack of paper on a flat surface to align the edges, and then check thepaper for the following:– Make sure it is free of rips, dust, wrinkles, and curled or bent edges.– Make sure all the paper in the stack is the same size and type.
3. Insert the stack of paper into the paper tray with the short edge forward and theprint side down. Slide the stack of paper forward until it stops.
Note 1 Make sure all paper is of the same size and type. Do not overloadthe paper tray; make sure the stack of paper lies flat in the paper tray andfits under the tab of the paper-width guide.
Chapter 2
10 HP PSC 1400 All-in-One series
Load
orig
inal
s an
d lo
ad p
aper

Note 2 Do not push the paper in too far. This might cause the HP All-in-One to select several pieces of paper at once.
Tip If you are using letterhead, insert the top of the page first with theprint side down. For more help on loading full-size paper and letterhead,refer to the diagram engraved in the base of the paper tray.
4. Squeeze and hold the tab on the top of the paper-width guide, then slide thepaper-width guide inward until it stops at the edge of the paper.
Load 10 x 15 cm (4 x 6 inch) photo paper You can load 10 x 15 cm (4 x 6 inch) photo paper into the paper tray of your HP All-in-One. For best results, follow these recommendations.● Use a recommended type of 10 x 15 cm (4 x 6 inch) photo paper. For more
information, see the onscreen HP Image Zone Help.
● Set the paper type and paper size before copying or printing. For information onchanging paper settings, see the onscreen HP Image Zone Help.
Tip To help prevent rips, wrinkles, and curled or bent edges, store all paperflat in a resealable bag. If the paper is not stored properly, extreme changes intemperature and humidity might result in curled paper that does not work wellin the HP All-in-One.
1. Remove all paper from the paper tray.2. Insert the stack of photo paper into the far right side of the paper tray with the
short edge forward and the print side down. Slide the stack of photo paperforward until it stops.
3. Squeeze and hold the tab on the top of the paper-width guide, then slide thepaper-width guide inward against the stack of photo paper until it stops.Do not overload the paper tray. Make sure the stack of photo paper lies flat in thepaper tray and fits under the tab of the paper-width guide.
Tip If the photo paper you are using has perforated tabs, load the photopaper so that the tabs are closest to you.
User Guide 11
Load originals and load paper
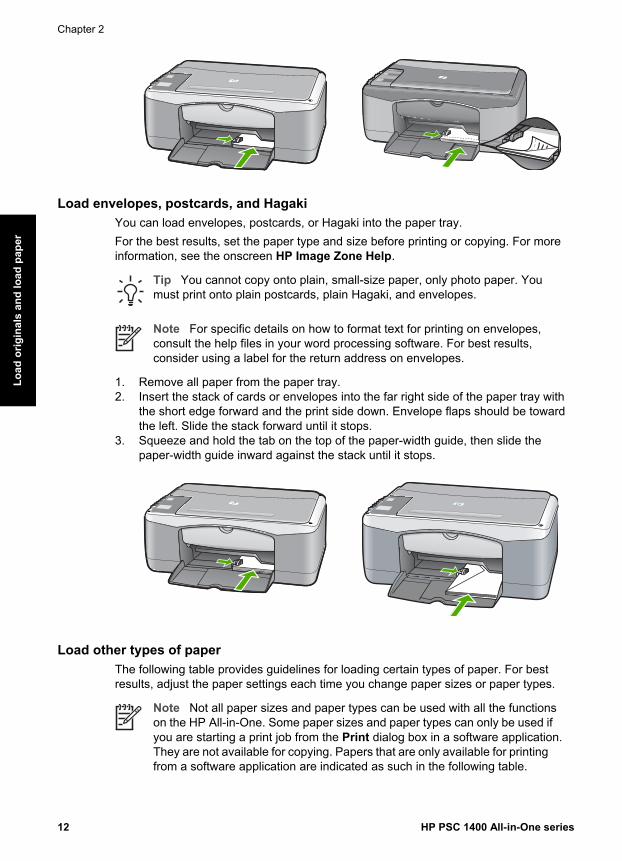
Load envelopes, postcards, and Hagaki You can load envelopes, postcards, or Hagaki into the paper tray.For the best results, set the paper type and size before printing or copying. For moreinformation, see the onscreen HP Image Zone Help.
Tip You cannot copy onto plain, small-size paper, only photo paper. Youmust print onto plain postcards, plain Hagaki, and envelopes.
Note For specific details on how to format text for printing on envelopes,consult the help files in your word processing software. For best results,consider using a label for the return address on envelopes.
1. Remove all paper from the paper tray.2. Insert the stack of cards or envelopes into the far right side of the paper tray with
the short edge forward and the print side down. Envelope flaps should be towardthe left. Slide the stack forward until it stops.
3. Squeeze and hold the tab on the top of the paper-width guide, then slide thepaper-width guide inward against the stack until it stops.
Load other types of paper The following table provides guidelines for loading certain types of paper. For bestresults, adjust the paper settings each time you change paper sizes or paper types.
Note Not all paper sizes and paper types can be used with all the functionson the HP All-in-One. Some paper sizes and paper types can only be used ifyou are starting a print job from the Print dialog box in a software application.They are not available for copying. Papers that are only available for printingfrom a software application are indicated as such in the following table.
Chapter 2
12 HP PSC 1400 All-in-One series
Load
orig
inal
s an
d lo
ad p
aper
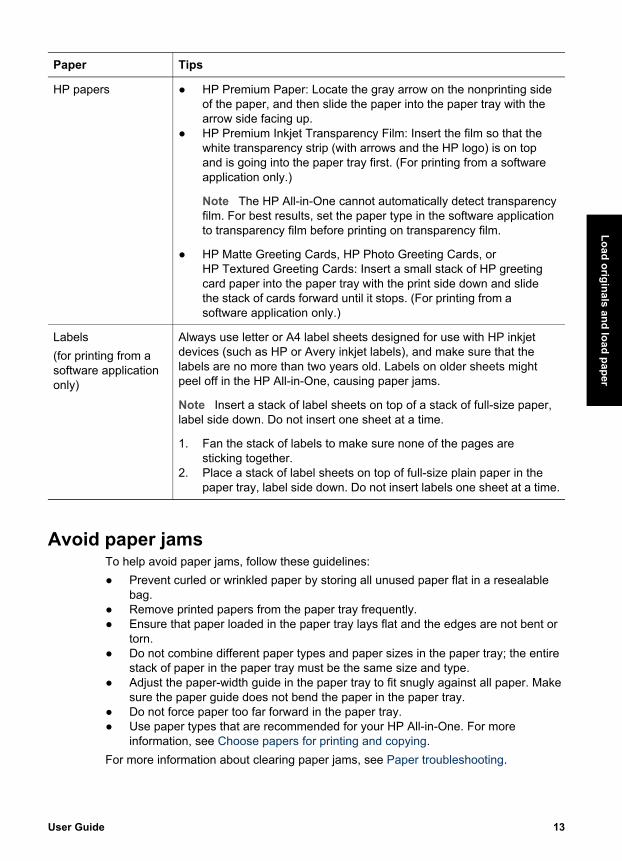
Paper Tips
HP papers ● HP Premium Paper: Locate the gray arrow on the nonprinting sideof the paper, and then slide the paper into the paper tray with thearrow side facing up.
● HP Premium Inkjet Transparency Film: Insert the film so that thewhite transparency strip (with arrows and the HP logo) is on topand is going into the paper tray first. (For printing from a softwareapplication only.)
Note The HP All-in-One cannot automatically detect transparencyfilm. For best results, set the paper type in the software applicationto transparency film before printing on transparency film.
● HP Matte Greeting Cards, HP Photo Greeting Cards, orHP Textured Greeting Cards: Insert a small stack of HP greetingcard paper into the paper tray with the print side down and slidethe stack of cards forward until it stops. (For printing from asoftware application only.)
Labels(for printing from asoftware applicationonly)
Always use letter or A4 label sheets designed for use with HP inkjetdevices (such as HP or Avery inkjet labels), and make sure that thelabels are no more than two years old. Labels on older sheets mightpeel off in the HP All-in-One, causing paper jams.
Note Insert a stack of label sheets on top of a stack of full-size paper,label side down. Do not insert one sheet at a time.
1. Fan the stack of labels to make sure none of the pages aresticking together.
2. Place a stack of label sheets on top of full-size plain paper in thepaper tray, label side down. Do not insert labels one sheet at a time.
Avoid paper jams To help avoid paper jams, follow these guidelines:● Prevent curled or wrinkled paper by storing all unused paper flat in a resealable
bag.● Remove printed papers from the paper tray frequently.● Ensure that paper loaded in the paper tray lays flat and the edges are not bent or
torn.● Do not combine different paper types and paper sizes in the paper tray; the entire
stack of paper in the paper tray must be the same size and type.● Adjust the paper-width guide in the paper tray to fit snugly against all paper. Make
sure the paper guide does not bend the paper in the paper tray.● Do not force paper too far forward in the paper tray.● Use paper types that are recommended for your HP All-in-One. For more
information, see Choose papers for printing and copying.For more information about clearing paper jams, see Paper troubleshooting.
User Guide 13
Load originals and load paper

Chapter 2
14 HP PSC 1400 All-in-One series
Load
orig
inal
s an
d lo
ad p
aper
3 Use the copy featuresThe HP All-in-One allows you to produce high-quality color and black-and-whitecopies on a variety of paper types. You can enlarge or reduce the size of an original tofit a specific paper size, adjust the copy quality, and make high-quality copies ofphotos, including borderless copies.
Tip Copies made from the control panel are automatically made using Bestquality.
Set the copy paper type You can set the paper type for copying to either Plain or Photo.
Plain Photo Start Copy Black Start Copy Color
1. Load your original face down on the left front corner of the glass.2. Press the Paper Type button to select either Plain or Photo.3. Press Start Copy Black or Start Copy Color.Refer to the following table to determine which paper type setting to choose based onthe paper loaded in the paper tray.
Paper type Control panel setting
Copier paper or letterhead Plain
HP Bright White Paper Plain
HP Premium Plus Photo Paper, Glossy Photo
HP Premium Plus Photo Paper, Matte Photo
HP Premium Plus 4 x 6 inch Photo Paper Photo
HP Photo Paper Photo
HP Everyday Photo Paper Photo
HP Everyday Photo Paper, Semi Gloss Photo
Other photo paper Photo
HP Premium Paper Plain
Other inkjet paper Plain
Plain Hagaki Plain
User Guide 15
Use the copy features

Paper type Control panel setting
Glossy Hagaki Photo
Increase copy speed or qualityCopies from the control panel are automatically made using Best quality. For moreoptions on copy speed and quality, use the HP Image Zone software.You can make a Fast copy using the instructions below. Fast copies faster withcomparable quality text, but the graphics quality might be lower. Fast copies use lessink and extend the life of your print cartridges.
Note Fast is not available when the paper type is set to Photo.
Scan Start Copy Black Start Copy Color
1. Load your original face down on the left front corner of the glass.2. Press and hold down the Scan button, and then press either Start Copy Black or
Start Copy Color.
Make multiple copiesYou can set the number of copies from the control panel or from the HP Image Zonesoftware. Use the HP Image Zone software to make more than 9 copies.
Copies Start Copy Black Start Copy Color
1. Load your original face down on the left front corner of the glass.2. Press the Copies button to increase the number of copies up to 9.3. Press Start Copy Black or Start Copy Color.
In this example, the HP All-in-One makes six copies of the original 10 x 15 cm (4x 6 inch) photo.
Chapter 3(continued)
16 HP PSC 1400 All-in-One series
Use
the
copy
feat
ures

Make a borderless copy of a photo For the best quality when copying a photo, load photo paper in the paper tray andthen use the Paper Type button to select Photo.
Tip You can only copy onto full-size or 10 x 15 cm (4 x 6 inch) photo paperusing the control panel. To copy onto other sizes use the HP Image Zonesoftware.
Photo Fit to Page Start Copy Color
1. Load 10 x 15 cm (4 x 6 inch) tabbed photo paper in the paper tray.
Note To make a borderless copy, you must use tabbed photo paper.
2. Load your original photo face down on the left front corner of the glass. Positionthe photo on the glass so the long edge of the photo is along the front edge of theglass.
3. Press the Size button to select Fit to Page.4. Press the Paper Type button to select Photo.
Note When Photo is selected, the HP All-in-One defaults to making aborderless copy with a 10 x 15 cm (4 x 6 inch) original.
5. Press Start Copy Color.The HP All-in-One makes a borderless copy of your original photo, as shownbelow.
Resize an original to fit onto letter or A4 paper If the image or text on your original fills the entire sheet with no margins, use the Fit toPage setting to reduce your original and prevent unwanted cropping of the text orimages at the edges of the sheet.
Tip To copy an original without changing the size of it, use 100%. This settingmakes the copy at the same size as the original.
User Guide 17
Use the copy features
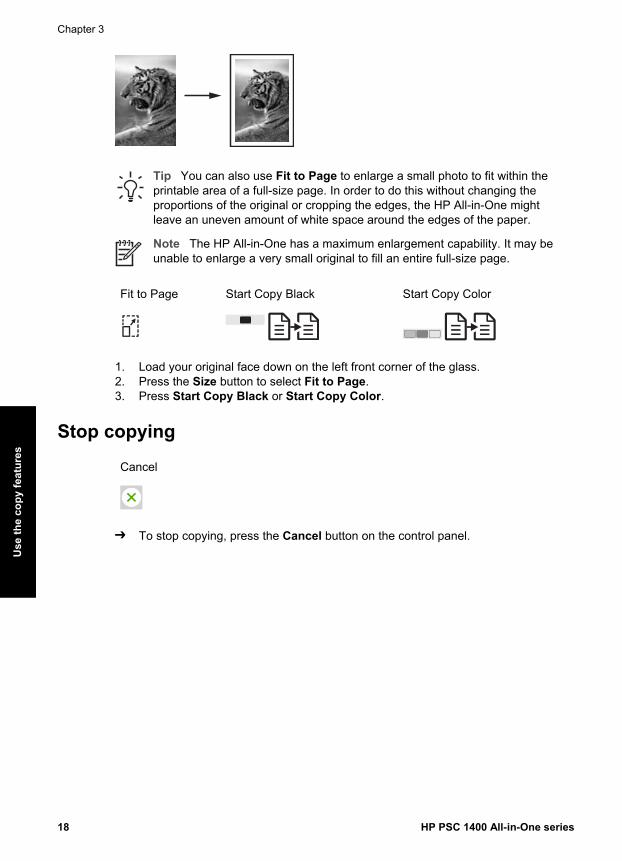
Tip You can also use Fit to Page to enlarge a small photo to fit within theprintable area of a full-size page. In order to do this without changing theproportions of the original or cropping the edges, the HP All-in-One mightleave an uneven amount of white space around the edges of the paper.
Note The HP All-in-One has a maximum enlargement capability. It may beunable to enlarge a very small original to fill an entire full-size page.
Fit to Page Start Copy Black Start Copy Color
1. Load your original face down on the left front corner of the glass.2. Press the Size button to select Fit to Page.3. Press Start Copy Black or Start Copy Color.
Stop copying
Cancel
➔ To stop copying, press the Cancel button on the control panel.
Chapter 3
18 HP PSC 1400 All-in-One series
Use
the
copy
feat
ures
4 Print from your computer The HP All-in-One can be used with any software application that allows printing. Theinstructions vary slightly depending on whether you are printing from a Windows PCor a Mac.In addition to the printing capabilities described in this chapter, you can print specialprint jobs; such as borderless prints and newsletters, as well use scanned images inprinting projects in the HP Image Zone. For more information on performing specialprint jobs or printing images in the HP Image Zone, see the onscreen HP ImageZone Help.
Print from a software application Most print settings are automatically handled by the software application or byHP ColorSmart technology. You need to change the settings manually only when youchange print quality, print on specific types of paper or transparency film, or usespecial features.
To print from the software application (Windows)1. On the File menu in your software application, click Print.2. Select the HP All-in-One as the printer.3. If you need to change settings, click the button that opens the Properties dialog
box.
Note 1 Depending on your software application, this button might becalled Properties, Options, Printer Setup, Printer, or Preferences.
Note 2 When printing a photo, you must select options for the correctpaper type and photo enhancement.
4. Select the appropriate options for your print job by using the features available inthe Paper/Quality, Finishing, Effects, Basics, and Color tabs.
5. Click OK to close the Properties dialog box.6. Click Print or OK to begin printing.
To print from the software application (Mac)1. From the File menu in your software application, choose Page Setup.2. Specify page attributes such as paper size, orientation, and scaling percentage
and click OK.3. From the File menu in your software application, choose Print.4. Change the print settings for each option in the pop-up menu, as appropriate for
your project.5. Click Print to begin printing.
User Guide 19
Print from your com
puter
Make the HP All-in-One the default printerYou can set the HP All-in-One as the default printer to use from any softwareapplication. This means that the HP All-in-One is automatically selected in the printerlist when you select Print from the File menu in a software application.
Windows 9x or 20001. On the Windows taskbar, click Start, point to Settings, and then click Printers.2. Right-click the HP All-in-One icon, and click Set as default printer.
Windows XP1. On the Windows taskbar, click Start, and then click Control Panel.2. Open the Printers and Faxes control panel.3. Right-click the HP All-in-One icon, and click Set as default printer.
Mac1. Open the Print Center (v10.2.3 or later) or Printer Setup Utility (v10.3 or later)
from the Applications:Utilities folder.2. Select the HP All-in-One.3. Click Make Default.
Stop a print job Although you can stop a print job from either the HP All-in-One or the computer, HPrecommends you stop it from the HP All-in-One for best results.
Cancel
➔ Press the Cancel button on the control panel. If the job does not stop printing,press Cancel again.
Chapter 4
20 HP PSC 1400 All-in-One series
Prin
t fro
m y
our c
ompu
ter
5 Use the scan featuresYou can use the scanning features of your HP All-in-One to do the following:● Scan text from an article into your word processor and quote it in a report. Using
OCR software is an art that takes time and practice to master. For moreinformation, see the documentation that came with your OCR software.
● Print business cards and brochures by scanning a logo and using it in yourpublishing software.
● Send photos to friends and relatives by scanning your favorite prints andincluding them in e-mail messages.
● Create a photographic inventory of your house or office, or archive special photosin an electronic scrapbook.
To use the scan features, your HP All-in-One and computer must be connected andturned on. The HP All-in-One software must also be installed and running on yourcomputer prior to scanning. To verify that the HP All-in-One software is running on aWindows PC, look for the HP All-in-One icon in the system tray at the lower right sideof the screen, near the clock. On a Mac, the HP All-in-One software is always running.
Note Closing the HP Windows system tray icon can cause your HP All-in-One to lose some of its scan functionality and result in the No Connectionerror message. If this happens, you can restore full functionality by restartingyour computer or by starting the HP Image Zone software.
For information on how to scan from the computer, and how to adjust, resize, rotate,crop, and sharpen your scans, see the onscreen HP Image Zone Help that came withyour software.
Scan from the control panel You can scan originals placed on the glass directly from the control panel.
Note To use this feature, you must have installed the full software packageand the HP Digital Imaging Monitor must be running.
Scan
1. Load the original face down on the left front corner of the glass.2. Press the Scan button on the control panel.3. Click Done or Finish in the software.
The HP All-in-One sends the scan to the HP Image Zone software, whichautomatically opens and displays the image.
User Guide 21
Scan
The HP Image Zone has many tools that you can use to edit your scanned image.You can improve the overall image quality by adjusting the brightness, sharpness,color tone, or saturation. You can also crop, straighten, rotate, or resize the image.When the scanned image looks just the way you want it, you can open it in anotherapplication, send it through e-mail, save it to a file, or print it. For more information onusing the HP Image Zone, see the onscreen HP Image Zone Help.
Adjust the preview imageYou can use the tools in the HP Scan Pro window to modify a preview image. Anychanges that you make, such as brightness, image type, resolution, and more applyonly to this scan session.You can do the following using the HP Scan Pro software:● Select a portion of the image● Change the image type and quality● Change the resolution● Crop or straighten the image● Adjust the brightness or contrast● Adjust the color or saturation● Sharpen or blur the image● Rotate the image● Resize the imageFor more information, see the HP Scan Pro section of the HP Image Zone Help.You can make additional changes to the scan in the HP Image Zone software. Formore information on the HP Image Zone editing tools, see the HP Image Zone Help.
Stop scanning
Cancel
➔ To stop scanning, press the Cancel button on the control panel, or in theHP Image Zone software, click Cancel.
Chapter 5
22 HP PSC 1400 All-in-One series
Scan
6 Use HP Instant ShareHP Instant Share makes it easy to share photos with family and friends. Using theHP Image Zone software installed on your computer, select one or more photos toshare, select a destination for your photos, and then send the photos. You can evenupload your photos to an online photo album or an online photo finishing service.Availability of services varies by country/region.With HP Instant Share E-mail, family and friends always get photos they can view -no more large downloads or images that are too big to open. An e-mail message withthumbnail images of your photos is sent with a link to a secure web page where familyand friends can easily view, share, print, and save the photos.
Overview Use HP Instant Share to send scanned images or documents from your HP All-in-Oneto a destination of your choice. The destination, for example, can be an e-mailaddress, an online photo album, or an online photo finishing service. Availability ofservices varies by country/region.
Note You can also send images to a friend's or relative's network-connectedHP All-in-One or photo printer. To send to a device, you must have an HPPassport user ID and password. The receiving device must be set up andregistered with HP Instant Share. You will also need to obtain the name therecipient assigned to the receiving device.For more information on scanning an image, see Use the scan features.
Get started You must have the following to use HP Instant Share with your HP All-in-One:● An HP All-in-One connected to a computer● Broadband Internet access through the computer to which the HP All-in-One is
connected● HP Image Zone software installed on your computer. Mac users have an
HP Instant Share client application.
Send images using your computer The HP Image Zone software lets you select and edit one or more images, and thenaccess HP Instant Share to select a service (for example, HP Instant Share E-mail)and send your images. At a minimum, you can share images through the following:● HP Instant Share E-mail (send to an e-mail address)● HP Instant Share E-mail (send to a device)● Online Albums● Online photo finishing (availability varies by country/region)
Note For more information on using Instant Share and the HP Image Zonesoftware or the HP Instant Share client application (Mac), see the onscreenHP Image Zone Help.
User Guide 23
Use H
P Instant Share
Send images using the HP Image Zone software (Windows) 1. Double-click the HP Image Zone icon on your desktop.2. Select one or more images from the folder(s) in which they are stored.
Note Use the HP Image Zone image editing tools to edit your imagesand achieve the results you want. For more information on selectingimages and using the editing tools, see the onscreen HP Image Zone Help.
3. Click the HP Instant Share tab.4. In the Services area of the HP Instant Share tab, click the link or icon of the
service you want to use to send your scanned image.5. From the HP Instant Share E-mail service, you can do any of the following:
– Send an e-mail message with thumbnail images of your photos which can beviewed, printed, and saved over the Internet.
– Open and maintain an e-mail address book. Click Address Book, registerwith HP Instant Share, and create an HP Passport account.
– Send your e-mail message to multiple addresses. Click the related link.– Send a collection of images to a friend's or relative's network-connected
device. Enter the name assigned to the device by the recipient in the E-mailaddress box followed by @send.hp.com. You will be prompted to sign in toHP Instant Share with your HP Passport userid and password.
Note If you have not previously set up HP Instant Share, click I needan HP Passport account on the Sign in with HP Passport screen.
Send images using the HP Instant Share client application software (Mac) 1. Select the HP Image Zone icon from the Dock.
The HP Image Zone opens on your desktop.2. In the HP Image Zone, click the Services button at the top of the window.
A list of applications appears in the lower part of the HP Image Zone.3. Choose HP Instant Share from the list of applications in the lower part of the
HP Image Zone.The HP Instant Share client application software opens on your computer.
4. Use the + button to add an image to the window, or the – button to remove animage.
5. Make sure the images you want to share appear in the HP Instant Share window.6. Click Continue and follow the onscreen instructions.7. From the HP Instant Share services list, select the service you want to use to
send your scanned image and follow the onscreen instructions.8. From the HP Instant Share E-mail service, you can do any of the following:
– Send an e-mail message with thumbnail images of your photos which can beviewed, printed, and saved over the Internet.
– Open and maintain an e-mail address book. Click Address Book, registerwith HP Instant Share, and create an HP Passport account.
– Send your e-mail message to multiple addresses. Click the related link.– Send a collection of images to a friend's or relative's network-connected
device. Enter the name assigned to the device by the recipient in the E-mailaddress box followed by @send.hp.com. You will be prompted to sign in toHP Instant Share with your HP Passport userid and password.
Chapter 6
24 HP PSC 1400 All-in-One series
Use
HP
Inst
ant S
hare

Note If you have not previously set up HP Instant Share, click I need anHP Passport account on the Sign in with HP Passport screen.
User Guide 25
Use H
P Instant Share

Chapter 6
26 HP PSC 1400 All-in-One series
Use
HP
Inst
ant S
hare
7 Order suppliesYou can order recommended types of HP paper and print cartridges online from theHP website.● Order paper, transparency film, or other media● Order print cartridges● Order other supplies
Order paper, transparency film, or other media To order media such as HP Premium Paper, HP Premium Plus Photo Paper, orHP Premium Inkjet Transparency Film go to www.hp.com. If prompted, choose yourcountry/region, follow the prompts to select your product, and then click one of theshopping links on the page.
Order print cartridges Print cartridge reorder numbers vary by country/region. If the reorder numbers listed inthis guide do not match the numbers on the print cartridges currently installed in yourHP All-in-One, order new print cartridges with the same numbers as those youcurrently have installed. Your HP All-in-One supports the following print cartridges.
Print cartridges HP reorder number
HP black print cartridge #21 black print cartridge
HP tri-color print cartridge #22 color print cartridge
Locate the reorder numbers for the print cartridges your device supports by doing thefollowing:● For Windows users: In the HP Solution Center or HP Image Zone, click
Settings, point to Print Settings, and then click Printer Toolbox. Click theEstimated Ink Levels tab, and then click Print Cartridge Ordering Information.
● For Mac users: In the HP Image Zone, choose Settings, choose MaintainPrinter, if prompted, select your HP All-in-One, and then click Utilities. From thepop-up menu, choose Supplies.
Or, you can contact a local HP reseller or go to www.hp.com/support to confirm thecorrect print cartridge reorder numbers for your country/region.
Order other supplies To order other supplies, such as HP All-in-One software, a copy of the User Guide, aSetup Guide, or other customer-replaceable parts, call the appropriate number below:● In the U.S. or Canada, dial 1-800-474-6836 (1-800-HP invent).● In Europe, dial +49 180 5 290220 (Germany) or +44 870 606 9081 (U.K.).To order HP All-in-One software in other countries/regions, call the phone number foryour country/region. The numbers listed below are current as of the publication date ofthis guide. For a list of current ordering numbers, go to www.hp.com. If prompted,
User Guide 27
Order supplies
choose your country/region, and then click Contact HP for information on calling fortechnical support.
Country/Region Number for ordering
Asia Pacific (except for Japan) 65 272 5300
Australia 131047
Europe +49 180 5 290220 (Germany)+44 870 606 9081 (U.K.)
New Zealand 0800 441 147
South Africa +27 (0)11 8061030
U.S. and Canada 1-800-HP-INVENT (1-800-474-6836)
Chapter 7
28 HP PSC 1400 All-in-One series
Ord
er s
uppl
ies
8 Maintain your HP All-in-OneThe HP All-in-One requires little maintenance. Sometimes you might want to clean the glass andlid backing to remove surface dust and ensure that your copies and scans remain clear. You willalso need to replace, align, or clean your print cartridges occasionally. This chapter providesinstructions for keeping your HP All-in-One in top working condition. Perform these simplemaintenance procedures as necessary.
Clean the HP All-in-OneFingerprints, smudges, hair, and other debris on the glass or lid backing slow down performanceand affect the accuracy of special features such as Fit to Page. To ensure that your copies andscans remain clear, you might need to clean the glass and lid backing. You might also want todust the exterior of the HP All-in-One.
Clean the glass 1. Turn off the HP All-in-One, unplug the power cord, and raise the lid.2. Clean the glass with a soft cloth or sponge slightly moistened with a nonabrasive glass
cleaner.
Warning Do not use abrasives, acetone, benzene, or carbon tetrachloride on theglass; they can damage it. Do not place or spray liquid directly on the glass; theliquid might seep under the glass and damage the device.
3. Dry the glass with a chamois or cellulose sponge to prevent spotting.
Clean the lid backing 1. Turn off the HP All-in-One, unplug the power cord, and raise the lid.2. Gently clean the white document backing with a soft cloth or sponge slightly moistened with
a mild soap and warm water. Do not scrub.3. Dry the backing with a chamois or soft cloth.
Caution Do not use paper-based wipes, as these might scratch the backing.
4. If further cleaning is needed, repeat the previous steps using isopropyl (rubbing) alcohol,and wipe the backing thoroughly with a damp cloth to remove any residual alcohol.
Caution Be careful not to spill alcohol on the glass or painted parts of the HP All-in-One, as this might damage the device.
Clean the exterior Use a soft cloth or slightly moistened sponge to wipe dust, smudges, and stains off the case. Theinterior of the HP All-in-One does not require cleaning. Keep fluids away from the control paneland the interior of the HP All-in-One.
Caution To avoid damage to painted parts of the HP All-in-One, do not use alcohol oralcohol-based cleaning products on the control panel, lid, or other painted parts of thedevice.
Check the estimated ink levels You can easily check the ink supply level to determine how soon you might need to replace aprint cartridge. The ink supply level shows an estimate of the amount of ink remaining in the printcartridges.
User Guide 29
Maintain your H
P All-in-O
ne
Tip You can also print a self-test report to see if your print cartridges might need to bereplaced. For more information, see Print a self-test report.
To check the ink levels from the HP Solution Center (Windows)1. In the HP Solution Center, click Settings, point to Print Settings, and then click Printer
Toolbox.2. Click the Estimated Ink Level tab.
The estimated ink levels for the print cartridges appear.
To check the ink levels from the HP Image Zone software (Mac)1. In the HP Image Zone, choose Settings, and then choose Maintain Printer.2. If the Select Printer dialog box appears, select your HP All-in-One, and then click Utilities.3. From the pop-up menu, choose Ink Level.
The estimated ink levels for the print cartridges appear.
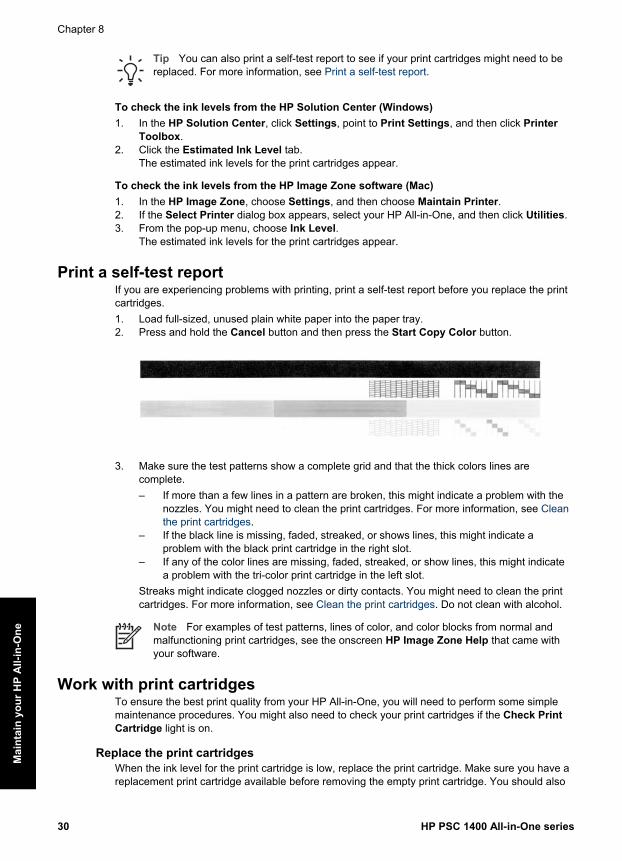
Print a self-test report If you are experiencing problems with printing, print a self-test report before you replace the printcartridges.1. Load full-sized, unused plain white paper into the paper tray.2. Press and hold the Cancel button and then press the Start Copy Color button.
3. Make sure the test patterns show a complete grid and that the thick colors lines arecomplete.– If more than a few lines in a pattern are broken, this might indicate a problem with the
nozzles. You might need to clean the print cartridges. For more information, see Cleanthe print cartridges.
– If the black line is missing, faded, streaked, or shows lines, this might indicate aproblem with the black print cartridge in the right slot.
– If any of the color lines are missing, faded, streaked, or show lines, this might indicatea problem with the tri-color print cartridge in the left slot.
Streaks might indicate clogged nozzles or dirty contacts. You might need to clean the printcartridges. For more information, see Clean the print cartridges. Do not clean with alcohol.
Note For examples of test patterns, lines of color, and color blocks from normal andmalfunctioning print cartridges, see the onscreen HP Image Zone Help that came withyour software.
Work with print cartridges To ensure the best print quality from your HP All-in-One, you will need to perform some simplemaintenance procedures. You might also need to check your print cartridges if the Check PrintCartridge light is on.
Replace the print cartridgesWhen the ink level for the print cartridge is low, replace the print cartridge. Make sure you have areplacement print cartridge available before removing the empty print cartridge. You should also
Chapter 8
30 HP PSC 1400 All-in-One series
Mai
ntai
n yo
ur H
P A
ll-in
-One
replace the print cartridges when you see faded text or if you experience print quality issuesrelated to the print cartridges. For information on checking the ink levels from the HP SolutionCenter or the HP Image Zone, see Check the estimated ink levels.To find out the reorder number for all the print cartridges that your HP All-in-One supports, seeOrder print cartridges. To order print cartridges for your HP All-in-One, go to www.hp.com.
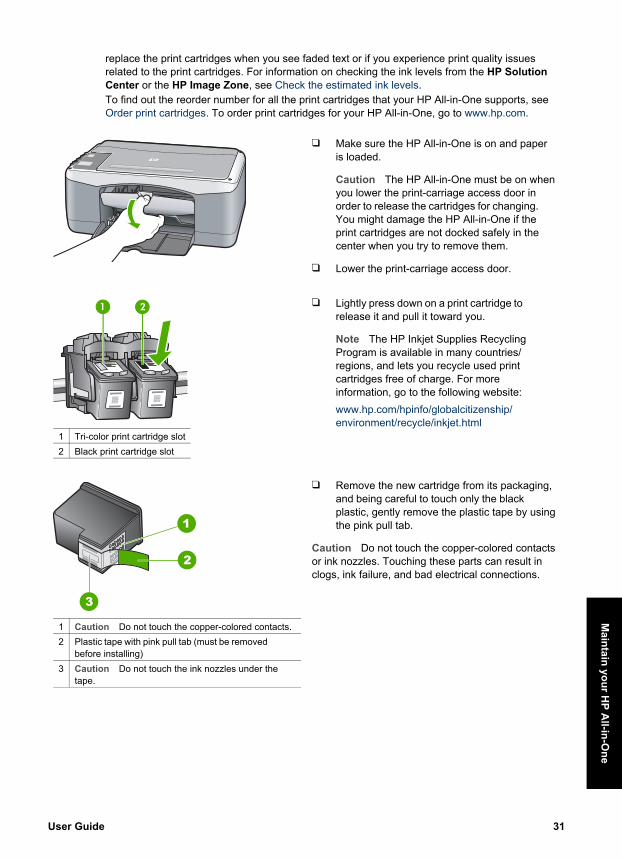
❑ Make sure the HP All-in-One is on and paperis loaded.
Caution The HP All-in-One must be on whenyou lower the print-carriage access door inorder to release the cartridges for changing.You might damage the HP All-in-One if theprint cartridges are not docked safely in thecenter when you try to remove them.
❑ Lower the print-carriage access door.
1 Tri-color print cartridge slot2 Black print cartridge slot
❑ Lightly press down on a print cartridge torelease it and pull it toward you.
Note The HP Inkjet Supplies RecyclingProgram is available in many countries/regions, and lets you recycle used printcartridges free of charge. For moreinformation, go to the following website:www.hp.com/hpinfo/globalcitizenship/environment/recycle/inkjet.html
1 Caution Do not touch the copper-colored contacts.2 Plastic tape with pink pull tab (must be removed
before installing)3 Caution Do not touch the ink nozzles under the
tape.
❑ Remove the new cartridge from its packaging,and being careful to touch only the blackplastic, gently remove the plastic tape by usingthe pink pull tab.
Caution Do not touch the copper-colored contactsor ink nozzles. Touching these parts can result inclogs, ink failure, and bad electrical connections.
User Guide 31
Maintain your H
P All-in-O
ne

❑ Slide the new print cartridge forward at a slightupward angle into the empty slot. Using yourthumb, push the print cartridge forward until itclicks into place.
❑ Close the print-carriage access door.
An alignment sheet will print.❑ Place the alignment sheet on the left front
corner of the glass with the top of the page tothe left and press the Scan button.
Note If you remove and reinstall the same printcartridge, the HP All-in-One will not align the printcartridges.
Align the print cartridges The HP All-in-One aligns the print cartridges every time you install or replace a print cartridge.You can also align the print cartridges at any time from the HP Image Zone software on yourcomputer. Aligning the print cartridges ensures high-quality output.
Note If you remove and reinstall the same print cartridge, the HP All-in-One will notalign the print cartridges. The HP All-in-One remembers the alignment values for thatprint cartridge, so you do not need to realign the print cartridges.If you have colored paper loaded in the paper tray when you align the print cartridges,the alignment will fail. Load unused plain white paper into the paper tray, and then try thealignment again.If the alignment fails again, you might have a defective sensor or print cartridge. ContactHP Support. Go to: www.hp.com/support. If prompted, choose your country/region, andthen click Contact HP for information on calling for technical support.
Scan
1. Make sure you have letter or A4 unused plain white paper loaded in the paper tray.The HP All-in-One prints a print cartridge alignment sheet.
2. Load the print cartridge alignment sheet on the left front corner of the glass with the top ofthe page to the left.
3. Press the Scan button.The HP All-in-One aligns the print cartridges. Recycle or discard the print cartridgealignment sheet.
Chapter 8
32 HP PSC 1400 All-in-One series
Mai
ntai
n yo
ur H
P A
ll-in
-One
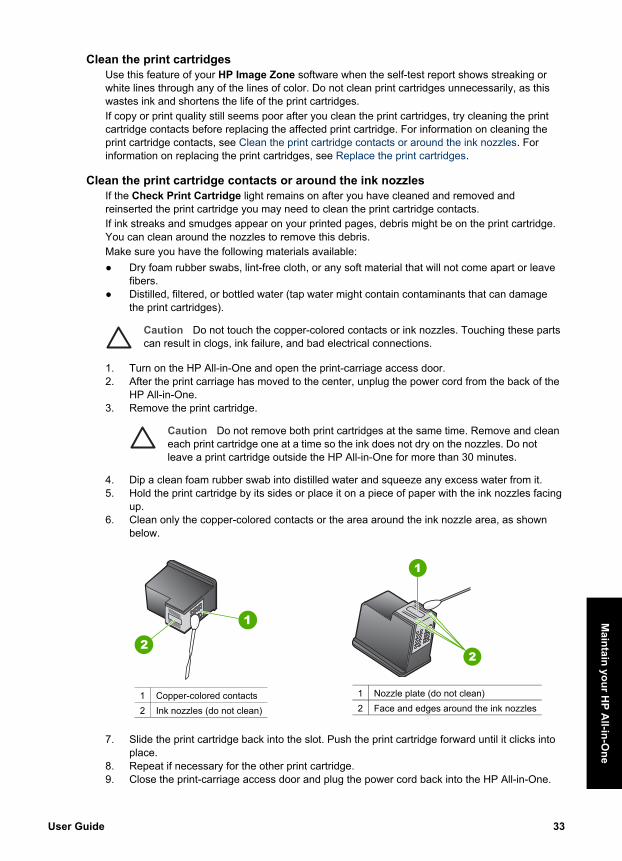
Clean the print cartridges Use this feature of your HP Image Zone software when the self-test report shows streaking orwhite lines through any of the lines of color. Do not clean print cartridges unnecessarily, as thiswastes ink and shortens the life of the print cartridges.If copy or print quality still seems poor after you clean the print cartridges, try cleaning the printcartridge contacts before replacing the affected print cartridge. For information on cleaning theprint cartridge contacts, see Clean the print cartridge contacts or around the ink nozzles. Forinformation on replacing the print cartridges, see Replace the print cartridges.
Clean the print cartridge contacts or around the ink nozzlesIf the Check Print Cartridge light remains on after you have cleaned and removed andreinserted the print cartridge you may need to clean the print cartridge contacts.If ink streaks and smudges appear on your printed pages, debris might be on the print cartridge.You can clean around the nozzles to remove this debris.Make sure you have the following materials available:● Dry foam rubber swabs, lint-free cloth, or any soft material that will not come apart or leave
fibers.● Distilled, filtered, or bottled water (tap water might contain contaminants that can damage
the print cartridges).
Caution Do not touch the copper-colored contacts or ink nozzles. Touching these partscan result in clogs, ink failure, and bad electrical connections.
1. Turn on the HP All-in-One and open the print-carriage access door.2. After the print carriage has moved to the center, unplug the power cord from the back of the
HP All-in-One.3. Remove the print cartridge.
Caution Do not remove both print cartridges at the same time. Remove and cleaneach print cartridge one at a time so the ink does not dry on the nozzles. Do notleave a print cartridge outside the HP All-in-One for more than 30 minutes.
4. Dip a clean foam rubber swab into distilled water and squeeze any excess water from it.5. Hold the print cartridge by its sides or place it on a piece of paper with the ink nozzles facing
up.6. Clean only the copper-colored contacts or the area around the ink nozzle area, as shown
below.
1 Copper-colored contacts2 Ink nozzles (do not clean)
1 Nozzle plate (do not clean)2 Face and edges around the ink nozzles
7. Slide the print cartridge back into the slot. Push the print cartridge forward until it clicks intoplace.
8. Repeat if necessary for the other print cartridge.9. Close the print-carriage access door and plug the power cord back into the HP All-in-One.
User Guide 33
Maintain your H
P All-in-O
ne

Chapter 8
34 HP PSC 1400 All-in-One series
Mai
ntai
n yo
ur H
P A
ll-in
-One

9 Troubleshooting information This chapter contains limited troubleshooting information for the HP All-in-One. For moretroubleshooting information, see the onscreen HP Image Zone Help file that came with yoursoftware.Many issues are caused when the HP All-in-One is connected to the computer using a USBcable before the HP All-in-One software is installed on the computer. To resolve this problem,you must follow these steps:1. Disconnect the USB cable from the computer.2. Uninstall the software (if you have already installed it).3. Restart your computer.4. Turn off the HP All-in-One, wait one minute, then restart it.5. Reinstall the HP All-in-One software. Do not connect the USB cable to the computer until
prompted by the software installation screen.For information about uninstalling and reinstalling the software, see Uninstall and reinstall thesoftware.
Before you call HP Support If you have a problem, follow these steps:1. Check the documentation that came with the HP All-in-One.
– Setup Guide: The Setup Guide explains how to set up the HP All-in-One.– User Guide: The User Guide is the book you are reading.– HP Image Zone Help: The onscreen HP Image Zone Help describes how to use the
HP All-in-One with a computer and contains additional troubleshooting information notcovered in the User Guide.
– Readme file: The Readme file contains information on possible installation problems.For more information, see View the Readme file.
2. If you are unable to solve the problem using the documentation, visit www.hp.com/supportfor the following options (availability varies by product, country/region, and language):– Online support pages– Check for software updates– Send HP an e-mail message for answers to your questions– Connect with an HP technician by using online chat
3. Contact your local point of purchase.4. If you are unable to solve the problem using the onscreen Help or HP websites, contact HP
Support. For more information, see Get HP support.
View the Readme fileYou might want to refer to the Readme file for more information on possible installation problems.● In Windows, click Start, Programs or All Programs, Hewlett-Packard, HP PSC 1400 All-
in-One series, and then View the Readme File.● In Mac OS X, you can access the Readme file by double-clicking the icon located in the top-
level folder of the HP All-in-One software CD-ROM.
Setup troubleshooting This section includes installation and configuration troubleshooting tips for some of the mostcommon issues associated with software installation and hardware setup.
User Guide 35
Troubleshooting information
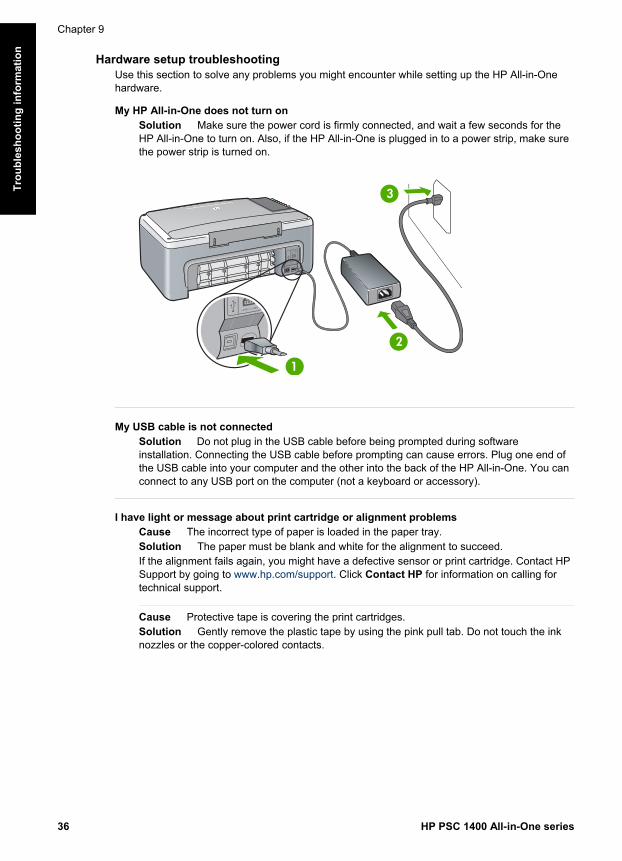
Hardware setup troubleshooting Use this section to solve any problems you might encounter while setting up the HP All-in-Onehardware.
My HP All-in-One does not turn onSolution Make sure the power cord is firmly connected, and wait a few seconds for theHP All-in-One to turn on. Also, if the HP All-in-One is plugged in to a power strip, make surethe power strip is turned on.
My USB cable is not connectedSolution Do not plug in the USB cable before being prompted during softwareinstallation. Connecting the USB cable before prompting can cause errors. Plug one end ofthe USB cable into your computer and the other into the back of the HP All-in-One. You canconnect to any USB port on the computer (not a keyboard or accessory).
I have light or message about print cartridge or alignment problemsCause The incorrect type of paper is loaded in the paper tray.Solution The paper must be blank and white for the alignment to succeed.If the alignment fails again, you might have a defective sensor or print cartridge. Contact HPSupport by going to www.hp.com/support. Click Contact HP for information on calling fortechnical support.
Cause Protective tape is covering the print cartridges.Solution Gently remove the plastic tape by using the pink pull tab. Do not touch the inknozzles or the copper-colored contacts.
Chapter 9
36 HP PSC 1400 All-in-One series
Trou
bles
hoot
ing
info
rmat
ion
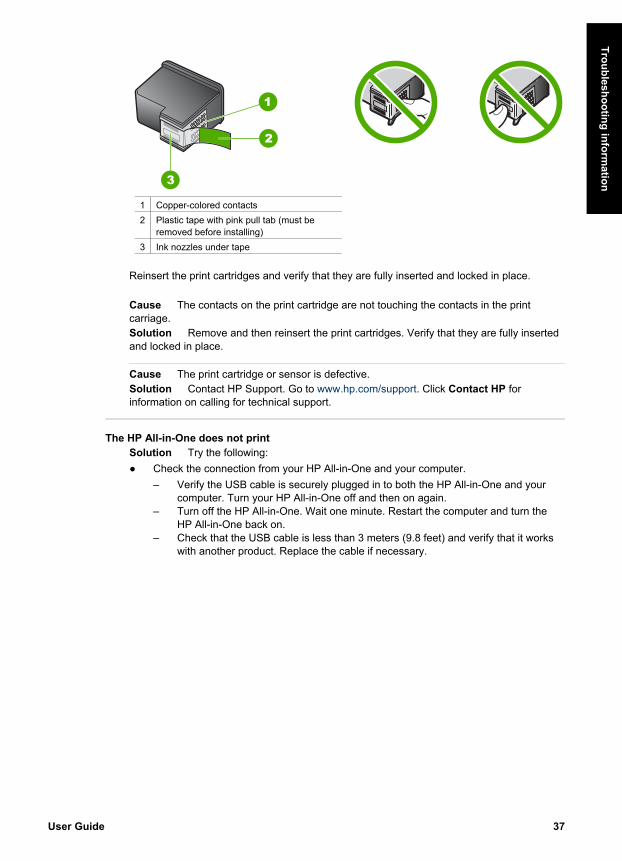
1 Copper-colored contacts2 Plastic tape with pink pull tab (must be
removed before installing)3 Ink nozzles under tape
Reinsert the print cartridges and verify that they are fully inserted and locked in place.
Cause The contacts on the print cartridge are not touching the contacts in the printcarriage.Solution Remove and then reinsert the print cartridges. Verify that they are fully insertedand locked in place.
Cause The print cartridge or sensor is defective.Solution Contact HP Support. Go to www.hp.com/support. Click Contact HP forinformation on calling for technical support.
The HP All-in-One does not printSolution Try the following:● Check the connection from your HP All-in-One and your computer.
– Verify the USB cable is securely plugged in to both the HP All-in-One and yourcomputer. Turn your HP All-in-One off and then on again.
– Turn off the HP All-in-One. Wait one minute. Restart the computer and turn theHP All-in-One back on.
– Check that the USB cable is less than 3 meters (9.8 feet) and verify that it workswith another product. Replace the cable if necessary.
User Guide 37
Troubleshooting information

● Check the print queue (under Start, Settings, then Printers and Faxes) to verify that theprinter does not have an error document or is not offline or paused. Refer to WindowsHelp and Support for more information.
● Check the USB cable. Try connecting it to another product to see if the USB cableworks. If you experience problems, the USB cable might need to be replaced.
● Check other printers or scanners. You might need to disconnect older products fromyour computer.
● If necessary, remove and then install the HP Image Zone software again. For moreinformation on uninstalling the software, see Uninstall and reinstall the software.
For more information on setting up your HP All-in-One and connecting it to your computer,see the Setup Guide that came with your HP All-in-One.
I have an error light or message about a paper jam or a blocked carriageCause If the error lights indicate a paper jam or carriage stall, there might be somepacking material inside the HP All-in-One.Solution Lower the print-carriage access door to expose the print cartridges and removeany packing material, tape, or other foreign objects. Turn off the HP All-in-One, wait oneminute, and then press the On / Resume button to turn the HP All-in-One back on.
Software installation troubleshooting If you encounter a software problem during installation, see the topics below for a possiblesolution. If you encounter a hardware problem during installation, see Hardware setuptroubleshooting.During a normal installation of the HP All-in-One software, the following things occur:● The HP All-in-One CD-ROM runs automatically● The software installs● Files are copied to your hard drive● You are requested to plug in the HP All-in-One● A green OK and check mark appear on an installation wizard screen● You are requested to restart your computer● The registration process runsIf any of these things did not occur, there might be a problem with the installation. To check theinstallation on a Windows computer, verify the following:● Start the HP Solution Center and check to make sure the following icons appear: Scan
Picture, Scan Document, and HP Image Zone. If the icons do not appear immediately,
Chapter 9
38 HP PSC 1400 All-in-One series
Trou
bles
hoot
ing
info
rmat
ion
you might need to wait a few minutes for the HP All-in-One to connect to your computer.Otherwise, see Some of the icons are missing in the HP Solution Center or HP Image Zone.
● Open the Printers dialog box and check to see that the HP All-in-One is listed.● Look in the system tray at the far right of the Windows taskbar for an HP All-in-One icon.
This indicates that the HP All-in-One is ready.
When I insert the CD-ROM into my computer’s CD-ROM drive, nothing happensSolution Double-click My Computer, double-click the CD-ROM icon, and then double-click setup.exe.
The minimum system checks screen appearsSolution Click Details, and then correct the problem before attempting to install thesoftware.
A red X appears on the USB connect promptSolution Normally, a green check appears indicating that the plug and play issuccessful. A red X indicates that the plug and play failed.Do the following:1. Verify that the control panel overlay is firmly attached, and then unplug the HP All-in-
One and then plug it in again.2. Verify that the USB cable and power cord are plugged in.
– Do not attach the USB cable to a keyboard or non-powered hub.– Verify that the USB cable is 3 meters (9.8 feet) or less in length.– If you have several USB devices attached to your computer, you might want to
unplug the other devices during the installation.3. Continue with the installation and restart the computer when prompted.4. Then open HP Solution Center and check for the key components (Scan Picture,
Scan Document, and HP Image Zone).5. If these key components do not appear, remove the software and then reinstall it. For
more information, see Uninstall and reinstall the software.
I received a message that an unknown error has occurredSolution Try to continue with the installation. If that doesn’t work, stop and then restartthe installation and follow the directions on the screen. If an error occurs, you might need touninstall and then reinstall the software. For information, see Uninstall and reinstall thesoftware.
Some of the icons are missing in the HP Solution Center or HP Image Zone If these buttons or icons (Scan Picture, Scan Document, and HP Image Zone) do notappear, your installation might not be complete.Solution If your installation is incomplete, you might need to uninstall and then reinstallthe software. Do not simply delete the HP All-in-One program files from your hard drive.Make sure to remove them properly. For more information, see Uninstall and reinstall thesoftware.
The Digital Imaging Monitor does not appear in the system traySolution If the Digital Imaging Monitor does not appear in the system tray, start theHP Solution Center to check whether or not the key components (Scan Picture, ScanDocument, and HP Image Zone) are there. For more information, see the Use the HPSolution Center section of the HP Image Zone Help that came with your software.
User Guide 39
Troubleshooting information

Uninstall and reinstall the softwareIf your installation is incomplete, or if you connected the USB cable to the computer before beingprompted by the software installation screen, you might need to uninstall and then reinstall thesoftware. Do not simply delete the HP All-in-One program files from your hard drive. Make sureto remove them using these instructions.A reinstall can take from 20 to 40 minutes for both Windows and Mac computers.
To uninstall from a Windows computer, preferred method1. Disconnect your HP All-in-One from your computer. Do not connect the HP All-in-One to
your computer until after you have reinstalled the software.2. Click Start, Start Programs or All Programs (XP), Hewlett-Packard, HP PSC 1400 All-in-
One series, uninstall software and follow the instructions.3. Click No if you are asked to remove shared files.4. Restart your computer.5. To reinstall the software, use the HP All-in-One CD-ROM and follow the instructions
provided in the Setup Guide.6. After the software is installed, connect the HP All-in-One to your computer and press the
On / Resume button. You might have to wait several minutes for all of the Plug and Playevents to complete.
When the software installation is complete, the Status Monitor icon appears in the Windowssystem tray.To verify that the software is properly installed, double-click the HP Solution Center icon on thedesktop. If the HP Solution Center shows the key icons (Scan Picture, Scan Document, andHP Image Zone), the software has been properly installed.
To uninstall from a Windows computer (alternate method)1. Run the HP PSC 1400 All-in-One series software Setup program from the CD-ROM.2. Select Uninstall and follow the onscreen directions.3. Disconnect your HP All-in-One from your computer. It is important that you disconnect your
HP All-in-One before restarting your computer. Do not connect the HP All-in-One to yourcomputer until after you have reinstalled the software.
4. Restart your computer.5. Run the HP PSC 1400 All-in-One series software Setup program again.6. Launch Reinstall.7. Follow the onscreen instructions and the instructions provided in the Setup Guide that came
with your HP All-in-One.
To uninstall from a Mac computer1. Disconnect the HP All-in-One from your Mac.2. Double-click the Applications: HP All-in-One Software folder.3. Double-click HP Uninstaller.
Follow the onscreen instructions.4. After the software is uninstalled, disconnect your HP All-in-One, and then restart your
computer. It is important that you disconnect your HP All-in-One before restarting yourcomputer. Do not connect the HP All-in-One to your computer until after you havereinstalled the software.
5. Insert the HP All-in-One CD-ROM into the CD-ROM drive.6. On the desktop, open the CD-ROM and then double-click HP all-in-one installer.7. Follow the onscreen instructions and the instructions provided in the Setup Guide that came
with your HP All-in-One.
Chapter 9
40 HP PSC 1400 All-in-One series
Trou
bles
hoot
ing
info
rmat
ion
Operational troubleshooting The 1400 series Troubleshooting section in the HP Image Zone Help contains troubleshootingtips for some of the most common issues associated with your HP All-in-One.To access the troubleshooting information from a Windows computer, go to the HP SolutionCenter, click Help, and then choose Troubleshooting and Support. Troubleshooting is alsoavailable through the Help button that appears on some error messages.To access troubleshooting information from Mac OS X, click the HP Image Zone icon in theDock, select Help from the menu bar, choose HP Image Zone Help from the Help menu, andthen choose 1400 series Troubleshooting in the Help Viewer.
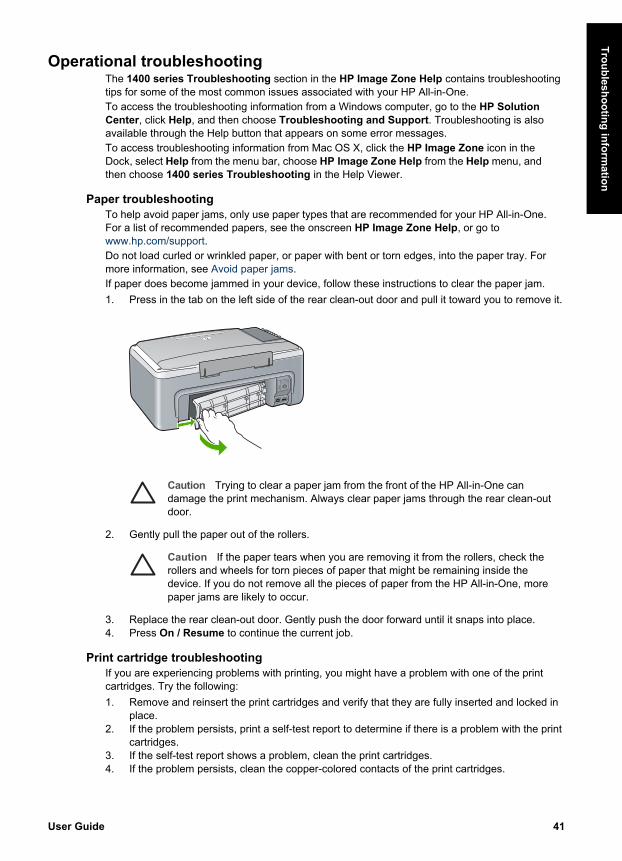
Paper troubleshootingTo help avoid paper jams, only use paper types that are recommended for your HP All-in-One.For a list of recommended papers, see the onscreen HP Image Zone Help, or go towww.hp.com/support.Do not load curled or wrinkled paper, or paper with bent or torn edges, into the paper tray. Formore information, see Avoid paper jams.If paper does become jammed in your device, follow these instructions to clear the paper jam.1. Press in the tab on the left side of the rear clean-out door and pull it toward you to remove it.
Caution Trying to clear a paper jam from the front of the HP All-in-One candamage the print mechanism. Always clear paper jams through the rear clean-outdoor.
2. Gently pull the paper out of the rollers.
Caution If the paper tears when you are removing it from the rollers, check therollers and wheels for torn pieces of paper that might be remaining inside thedevice. If you do not remove all the pieces of paper from the HP All-in-One, morepaper jams are likely to occur.
3. Replace the rear clean-out door. Gently push the door forward until it snaps into place.4. Press On / Resume to continue the current job.
Print cartridge troubleshooting If you are experiencing problems with printing, you might have a problem with one of the printcartridges. Try the following:1. Remove and reinsert the print cartridges and verify that they are fully inserted and locked in
place.2. If the problem persists, print a self-test report to determine if there is a problem with the print
cartridges.3. If the self-test report shows a problem, clean the print cartridges.4. If the problem persists, clean the copper-colored contacts of the print cartridges.
User Guide 41
Troubleshooting information
5. If you are still experiencing problems with printing, determine which print cartridge iscausing the problem and replace it.
For more information on these topics, see Maintain your HP All-in-One.
Device update Several means are provided to update your HP All-in-One. Each involves downloading a file toyour computer to start the Device Update Wizard. For example, based on advice fromHP customer support, you might access the HP support website to retrieve an update for yourdevice.
Device update (Windows) 1. Use one of the following to retrieve an update for your device:
– Use your web browser to download an update for your HP All-in-One fromwww.hp.com/support. The file will be a self-extracting executable with theextension .exe. When you double-click the .exe file, the Device Update Wizard openson your computer.
– Use the Software Update utility, provided with the HP Image Zone software, toautomatically search the HP support website for device updates at predeterminedintervals. For more information on the Software Update utility, see the HP ImageZone Help.
Note If you installed the HP Image Zone Express software, the update utility iscalled Update. The button that opens the Update utility is located in the upper leftcorner of the software window.
2. Do one of the following:– Double-click the update .exe file you downloaded from www.hp.com/support.– When prompted, accept the device update found by the Software Update utility.
3. Follow the onscreen prompts.
Caution Do not disconnect, shut down, or otherwise disturb your device while theupdate is occurring. If you disrupt the update, or an error message indicates the updatefailed, call HP support for assistance.
After your HP All-in-One restarts, the Update Complete screen appears on your computer and atest page prints from your device.
Device update (Mac) The device update installer provides a means to apply updates to your HP All-in-One as follows:1. Use your web browser to download an update for your HP All-in-One from www.hp.com/
support.2. Double-click the downloaded file.
The installer opens on your computer.3. Follow the onscreen prompts to install the update to your HP All-in-One.4. Restart the HP All-in-One to complete the process.
Chapter 9
42 HP PSC 1400 All-in-One series
Trou
bles
hoot
ing
info
rmat
ion

10 Get HP supportHewlett-Packard provides Internet and phone support for your HP All-in-One.This chapter provides information on how to get support from the Internet, contact HP customersupport, access your serial number and service ID, call in North America during warranty, call HPKorea customer support, call elsewhere in the world, call Australia post-warranty, and prepareyour HP All-in-One for shipment.If you are unable to find the answer you need in the printed or onscreen documentation suppliedwith your product, you can contact one of the HP support services listed in the following pages.Some support services are available only in the U.S. and Canada, while others are available inmany countries/regions worldwide. If a support service number is not listed for your country/region, contact your nearest authorized HP dealer for help.
Get support and other information from the Internet If you have Internet access, you can get help from www.hp.com/support. This website offerstechnical support, drivers, supplies, and ordering information.
Warranty supportTo obtain HP repair service, you must first contact an HP service office or an HP CustomerSupport Center for basic troubleshooting. See HP customer support for steps to take beforecalling Customer Support.
Warranty upgrades Depending on your country/region, HP might offer, for an additional fee, a warranty upgradeoption that extends or enhances your standard product warranty. Available options might includepriority phone support, return service, or next business day exchange. Typically, servicecoverage begins on product purchase date and must be purchased within a limited time ofproduct purchase.For more information:● In the U.S., dial 1-866-234-1377 to speak to an HP advisor.● Outside the U.S., please call your local HP Customer Support office. See Contact HP for a
list of international Customer Support numbers.● Outside the U.S., please call your local HP Customer Support office. Refer to your User
Guide for a list of international Customer Support numbers.● Go to the HP website:
www.hp.com/supportIf prompted, choose your country/region, and then find warranty information.
Return your HP All-in-One for serviceBefore returning your HP All-in-One for service, you must contact HP Customer Support. SeeHP customer support for steps to take before calling Customer Support.
HP customer support Software programs from other companies might be included with your HP All-in-One. If youexperience problems with any of those programs, you will receive the best technical assistanceby calling the experts at that company.If you need to contact HP Customer Support, do the following beforehand.1. Make sure that:
a. Your HP All-in-One is plugged in and turned on.b. The specified print cartridges are installed correctly.
User Guide 43
Get H
P support
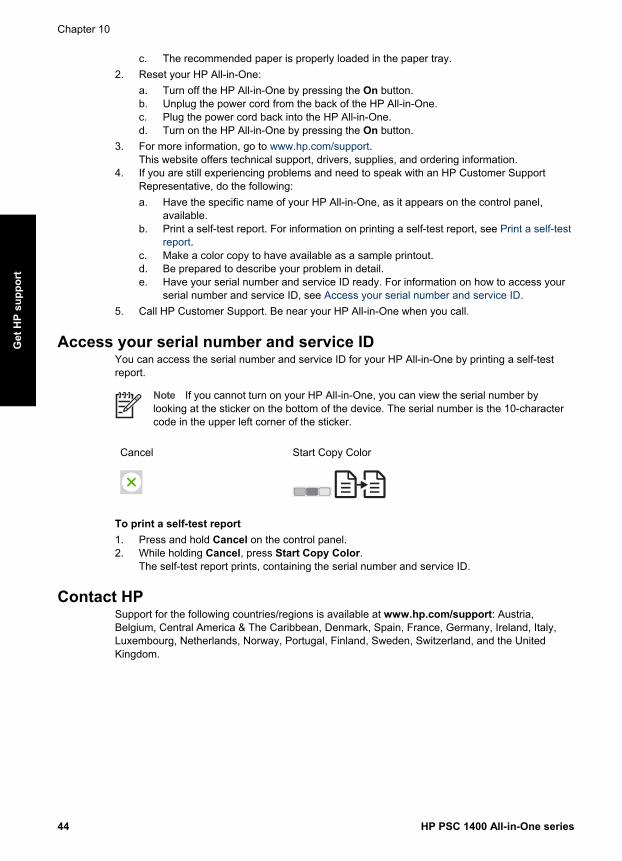
c. The recommended paper is properly loaded in the paper tray.2. Reset your HP All-in-One:
a. Turn off the HP All-in-One by pressing the On button.b. Unplug the power cord from the back of the HP All-in-One.c. Plug the power cord back into the HP All-in-One.d. Turn on the HP All-in-One by pressing the On button.
3. For more information, go to www.hp.com/support.This website offers technical support, drivers, supplies, and ordering information.
4. If you are still experiencing problems and need to speak with an HP Customer SupportRepresentative, do the following:a. Have the specific name of your HP All-in-One, as it appears on the control panel,
available.b. Print a self-test report. For information on printing a self-test report, see Print a self-test
report.c. Make a color copy to have available as a sample printout.d. Be prepared to describe your problem in detail.e. Have your serial number and service ID ready. For information on how to access your
serial number and service ID, see Access your serial number and service ID.5. Call HP Customer Support. Be near your HP All-in-One when you call.
Access your serial number and service ID You can access the serial number and service ID for your HP All-in-One by printing a self-testreport.
Note If you cannot turn on your HP All-in-One, you can view the serial number bylooking at the sticker on the bottom of the device. The serial number is the 10-charactercode in the upper left corner of the sticker.
Cancel Start Copy Color
To print a self-test report1. Press and hold Cancel on the control panel.2. While holding Cancel, press Start Copy Color.
The self-test report prints, containing the serial number and service ID.
Contact HPSupport for the following countries/regions is available at www.hp.com/support: Austria,Belgium, Central America & The Caribbean, Denmark, Spain, France, Germany, Ireland, Italy,Luxembourg, Netherlands, Norway, Portugal, Finland, Sweden, Switzerland, and the UnitedKingdom.
Chapter 10
44 HP PSC 1400 All-in-One series
Get
HP
supp
ort

www.hp.com/support
Belgique
België
Danmark
Suomi
800 171
2 532 5222
www.hp.com/support
Nigeria
Norge
Sverige
España
0 801 800 235
www.hp.com/support
800 897 1444
+ 27 11 2589301
www.hp.com/support
www.hp.com/support
www.hp.com/support
Österreich www.hp.com/support
www.hp.com/support
1 3204 999
(380 44) 4903520
90 212 444 71 71
71 89 12 22
South Africa (RSA) 086 0001030
www.hp.com/support
812 3467997
2 50222444
+ 351 213 17 63
www.hp.com/support
www.hp.com/support
(21) 315 4442
800 4910www.hp.com/support
www.hp.com/support
261 307 310
095 7973520
61 56 45 43
www.hp.com/support
www.hp.com/support
France
Deutschland
+ 30 210 6073603801 11 22 55 47800 9 2649
1 382 1111
(0) 9 830 4848
Italia
Luxembourg
22 404747
Nederland
www.hp.com/support
Portugal
Slovensko
South Africa (international)
Rest of West Africa
www.hp.com/support
Switzerland
United Kingdom
Česká republika
Polska
România
������ (�����)
������ (���- ��������)
Türkiye
�����
Magyarország
Luxemburg www.hp.com/support
Ireland www.hp.com/support
Call HP Korea customer support
Prepare your HP All-in-One for shipment If after contacting HP Customer Support or returning to the point of purchase, you are requestedto send your HP All-in-One in for service, please follow the steps below to avoid further damageto the HP product.1. Turn on the HP All-in-One.
Disregard steps 1 through 6 if your HP All-in-One will not turn on. You will not be able toremove the print cartridges. Proceed to step 8.
2. Open the print-carriage access door.3. Wait until the print carriage is idle and silent, and then remove the print cartridges from their
slots.For information on removing the print cartridges, see Replace the print cartridges.
User Guide 45
Get H
P support
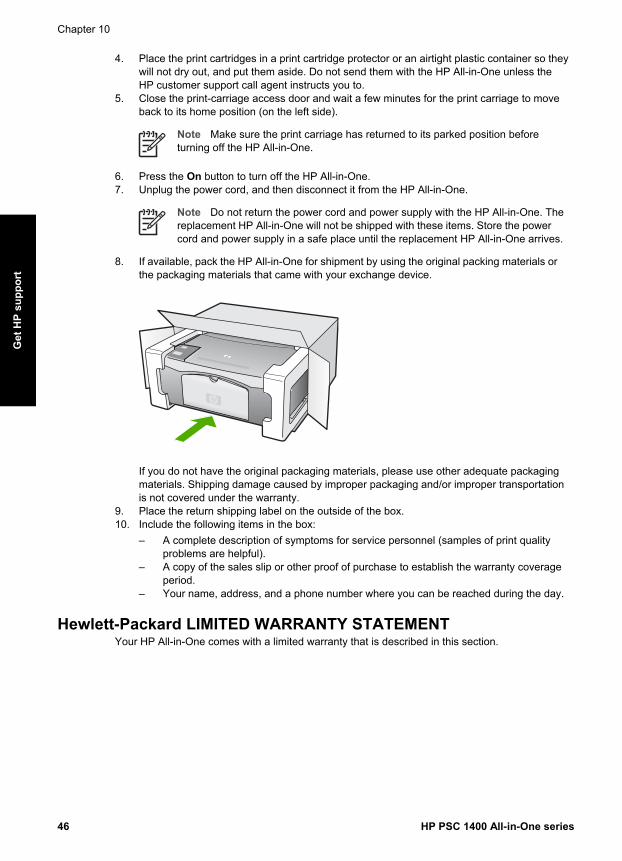
4. Place the print cartridges in a print cartridge protector or an airtight plastic container so theywill not dry out, and put them aside. Do not send them with the HP All-in-One unless theHP customer support call agent instructs you to.
5. Close the print-carriage access door and wait a few minutes for the print carriage to moveback to its home position (on the left side).
Note Make sure the print carriage has returned to its parked position beforeturning off the HP All-in-One.
6. Press the On button to turn off the HP All-in-One.7. Unplug the power cord, and then disconnect it from the HP All-in-One.
Note Do not return the power cord and power supply with the HP All-in-One. Thereplacement HP All-in-One will not be shipped with these items. Store the powercord and power supply in a safe place until the replacement HP All-in-One arrives.
8. If available, pack the HP All-in-One for shipment by using the original packing materials orthe packaging materials that came with your exchange device.
If you do not have the original packaging materials, please use other adequate packagingmaterials. Shipping damage caused by improper packaging and/or improper transportationis not covered under the warranty.
9. Place the return shipping label on the outside of the box.10. Include the following items in the box:
– A complete description of symptoms for service personnel (samples of print qualityproblems are helpful).
– A copy of the sales slip or other proof of purchase to establish the warranty coverageperiod.
– Your name, address, and a phone number where you can be reached during the day.
Hewlett-Packard LIMITED WARRANTY STATEMENT Your HP All-in-One comes with a limited warranty that is described in this section.
Chapter 10
46 HP PSC 1400 All-in-One series
Get
HP
supp
ort

A. Extent of limited warranty 1. Hewlett-Packard (HP) warrants to the end-user customer that the HP products specified above will be free from
defects in materials and workmanship for the duration specified above, which duration begins on the date of purchase by the customer.
2. For software products, HP's limited warranty applies only to a failure to execute programming instructions. HP does not warrant that the operation of any product will be uninterrupted or error free.
3. HP's limited warranty covers only those defects that arise as a result of normal use of the product, and does not cover any other problems, including those that arise as a result of:
a. Improper maintenance or modification; b. Software, media, parts, or supplies not provided or supported by HP; c. Operation outside the product's specifications; d. Unauthorized modification or misuse. 4. For HP printer products, the use of a non-HP ink cartridge or a refilled ink cartridge does not affect either the warranty
to the customer or any HP support contract with the customer. However, if printer failure or damage is attributable to the use of a non-HP or refilled ink cartridge, HP will charge its standard time and materials charges to service the printer for the particular failure or damage.
5. If HP receives, during the applicable warranty period, notice of a defect in any product which is covered by HP's warranty, HP shall either repair or replace the product, at HP's option.
6. If HP is unable to repair or replace, as applicable, a defective product which is covered by HP's warranty, HP shall, within a reasonable time after being notified of the defect, refund the purchase price for the product.
7. HP shall have no obligation to repair, replace, or refund until the customer returns the defective product to HP. 8. Any replacement product may be either new or like-new, provided that it has functionality at least equal to that of the
product being replaced. 9. HP products may contain remanufactured parts, components, or materials equivalent to new in performance. 10. HP's Limited Warranty Statement is valid in any country where the covered HP product is distributed by HP. Contracts
for additional warranty services, such as on-site service, may be available from any authorized HP service facility in countries where the product is distributed by HP or by an authorized importer.
B. Limitations of warrantyTO THE EXTENT ALLOWED BY LOCAL LAW, NEITHER HP NOR ITS THIRD PARTY SUPPLIERS MAKES ANY OTHER WARRANTY OR CONDITION OF ANY KIND, WHETHER EXPRESS OR IMPLIED WARRANTIES OR CONDITIONS OF MERCHANTABILITY, SATISFACTORY QUALITY, AND FITNESS FOR A PARTICULAR PURPOSE.
C. Limitations of liability 1. To the extent allowed by local law, the remedies provided in this Warranty Statement are the customer's sole and
exclusive remedies. 2. TO THE EXTENT ALLOWED BY LOCAL LAW, EXCEPT FOR THE OBLIGATIONS SPECIFICALLY SET FORTH IN
THIS WARRANTY STATEMENT, IN NO EVENT SHALL HP OR ITS THIRD PARTY SUPPLIERS BE LIABLE FOR DIRECT, INDIRECT, SPECIAL, INCIDENTAL, OR CONSEQUENTIAL DAMAGES, WHETHER BASED ON CONTRACT, TORT, OR ANY OTHER LEGAL THEORY AND WHETHER ADVISED OF THE POSSIBILITY OF
SUCH DAMAGES.D. Local law 1. This Warranty Statement gives the customer specific legal rights. The customer may also have other rights which vary
from state to state in the United States, from province to province in Canada, and from country to country elsewhere in the world.
2. To the extent that this Warranty Statement is inconsistent with local law, this Warranty Statement shall be deemed modified to be consistent with such local law. Under such local law, certain disclaimers and limitations of this Warranty Statement may not apply to the customer. For example, some states in the United States, as well as some governments outside the United States (including provinces in Canada), may:
a. Preclude the disclaimers and limitations in this Warranty Statement from limiting the statutory rights of a consumer (e.g., the United Kingdom); b. Otherwise restrict the ability of a manufacturer to enforce such disclaimers or limitations; or c. Grant the customer additional warranty rights, specify the duration of implied warranties which the manufacturer
cannot disclaim, or allow limitations on the duration of implied warranties. 3. THE TERMS IN THIS WARRANTY STATEMENT, EXCEPT TO THE EXTENT LAWFULLY PERMITTED, DO NOT
EXCLUDE, RESTRICT, OR MODIFY, AND ARE IN ADDITION TO, THE MANDATORY STATUTORY RIGHTS APPLICABLE TO THE SALE OF THE HP PRODUCTS TO SUCH CUSTOMERS.
HP Limited WarrantyDear Customer,You will find below the name and address of the HP entity responsible for the performance of the HP Limited Warranty in your country. You may have additional statutory rights against the seller based on your purchase agreement. Those rights are not in any way affected by this HP Limited Warranty.Ireland: Hewlett-Packard Ireland Ltd. 30 Herbert Street IRL-Dublin 2United Kingdom: Hewlett-Packard Ltd, Cain Road, Bracknell, GB-Berks RG12 1HN
HP product Duration of limited warrantySoftware 90 daysPrint cartridges Until the HP ink is depleted or the “end of warranty” date printed on the cartridge has been reached, whichever occurs first. This
warranty does not cover HP ink products that have been refilled, remanufactured, refurbished, misused, or tampered with.
Accessories 1 yearPrinter peripheral hardware (see the following for details) 1 year
User Guide 47
Get H
P support

Chapter 10
48 HP PSC 1400 All-in-One series
Get
HP
supp
ort
11 Technical informationThe technical specifications and international regulatory information for your HP All-in-One areprovided in this section.This chapter provides information on system requirements for Windows and Mac; paper, print,copy, memory card, specifications for scan, physical, power, and environmental concerns;regulatory notices; and the declaration of conformity.
System requirements Software system requirements are located in the Readme file. You can access the Readme fileby double-clicking the icon located in the top-level folder of the HP All-in-One software CD-ROM.If Windows software is already installed, you can access the Readme file from the Start buttonon the taskbar; select Programs, Hewlett-Packard, HP PSC 1400 Series, View the Readme File.
Paper specifications This section provides information on paper-tray capacities, paper sizes, and print marginspecifications.
Paper-tray capacities
Type Paper weight Paper tray1 Output tray2
Plain paper 20 to 24 lb. (75 to 90gsm)
100 (20 lb. paper) 50 (20 lb. paper)
Legal paper 20 to 24 lb. (75 to 90gsm)
100 (20 lb. paper) 50 (20 lb. paper)
Cards 110 lb. index max (200gsm)
20 10
Envelopes 20 to 24 lb. (75 to 90gsm)
10 10
Transparency film N/A 20 15 or fewer
Labels N/A 20 10
4 x 6 inch (10 x 15 cm)Photo Paper
145 lb.(236 gsm)
20 15
8.5 x 11 inch (216 x 279mm) Photo Paper
N/A 20 10
1 Maximum capacity.2 Output tray capacity is affected by the type of paper and the amount of ink you are using.
HP recommends emptying the output tray frequently.
Paper sizes
Type Size
Paper Letter: 216 x 280 mm (8.5 x 11 inches)
User Guide 49
Technical information

Type Size
A4: 210 x 297 mmA5: 148 x 210 mmExecutive: 184.2 x 266.7 mm (7.25 x 10.5 inches)Legal: 216 x 356 mm (8.5 x 14 inches)
Envelopes U.S. #10: 105 x 241 mm (4.125 x 9.5 inches)U.S. #9: 98 x 225 mm (3.9 x 8.9 inches)A2: 111 x 146 mm (4.4 x 5.8 inches)DL: 110 x 220 mm (4.3 x 8.7 inches)C6: 114 x 162 mm (4.5 x 6.4 inches)
Transparency film Letter: 216 x 279 mm (8.5 x 11 inches)A4: 210 x 297 mm
Photo paper 102 x 152 mm (4 x 6 inches)
Cards 76 x 127 mm (3 x 5 inches)Index card: 101 x 152 mm (4 x 6 inches)127 x 178 mm (5 x 7 inches)A6: 105 x 148.5 mmHagaki: 100 x 148 mm (3.94 x 5.83 inches)
Labels Letter: 216 x 279 mm (8.5 x 11 inches)A4: 210 x 297 mm
Custom 76 x 127 mm up to 216 x 356 mm (3 x 5 inches up to 8.5 x 14 inches)
Print margin specifications
Top (leading edge) Bottom (trailing edge)1
Paper or transparency film
U.S. (Letter, Legal, Executive) 1.5 mm (0.06 inches) 12.7 mm (0.5 inches)
ISO (A4, A5) and JIS (B5) 1.8 mm (0.07 inches) 12.7 mm (0.5 inches)
Envelopes
3.2 mm (0.13 inches) 3.2 mm (0.13 inches)
Cards
1.8 mm (0.07 inches) 11.7 mm (0.46 inches)
1 This margin is not compatible; however, the total writing area is compatible. The writingarea is offset from center by 5.4 mm (0.21 inches), which causes asymmetric top andbottom margins.
Print specifications ● 600 x 600 dpi black● 4800 x 1200 optimized dpi color
Chapter 11(continued)
50 HP PSC 1400 All-in-One series
Tech
nica
l inf
orm
atio
n
● Method: drop-on-demand thermal inkjet● Language: LIDIL (lightweight imaging device interface language)● Print speeds vary according to the complexity of the document● Duty cycle: 500 printed pages per month (average)● Duty cycle: 5000 printed pages per month (maximum)
Mode Resolution (dpi) Speed (ppm)
Max DPI Black 4800 x 1200 optimized DPI 0.12
Color 4800 x 1200 optimized DPI1 0.12
Best Black 1200 x 1200 0.92
Color 1200 x 1200 up to 4800 dpi optimized 0.92
Normal Black 600 x 600 7
Color 600 x 600 2.88
Fast Normal Black 600 x 600 7
Color 600 x 600 4.69
Fast Black 300 x 300 18
Color 300 x 300
1 Up to 4800 x 1200 optimized dpi color printing on premium photo papers, 1200 x 1200 inputdpi.
Copy specifications ● Digital image processing● Up to 9 copies from original (varies by model)● Fit to page●● Copy speeds vary according to the complexity of the document
Mode Speed (ppm) Print resolution (dpi) Scan resolution (dpi)1
Best Black up to 0.8 600 x 600 600 x 2400
Color up to 0.8 1200 x 12002 600 x 2400
Fast Black 300 x 1200 600 x 1200
Color 600 x 300 600 x 1200
1 Maximum at 400% scaling.2 On photo paper.
Scan specifications ● Image editor included● Integrated OCR software automatically converts scanned text to editable text● Scan speeds vary according to the complexity of the document● Twain-compliant interface● Resolution: up to 600 x 2400 dpi optical; 19200 dpi enhanced (software)
User Guide 51
Technical information
13
Up to 18 copies per minute black; 13 copies per minute color (varies by model)
up to 18
up to 13
● Color: 36-bit color, 8-bit grayscale (256 levels of gray)● Maximum scan size from glass: 21.6 x 29.7 cm (8.5 x 11.7 inches)
Physical specifications ● Height: 16.97 cm (7.0 inches)● Width: 44 cm (16.8 inches)● Depth: 25.9 cm (10.2 inches)● Weight: 4.5 kg (10 pounds)
Power specifications ● Power consumption: 80 W maximum● Input voltage: AC 100 to 240 V ~ 1 A 50–60 Hz, grounded● Output voltage: DC 32 V===940 mA, 16 V===625mA
Environmental specifications ● Recommended operating temperature range: 15º to 32º C (59º to 90º F)● Allowable operating temperature range: 5º to 40º C (41º to 104º F)● Humidity: 15% to 85% RH non-condensing● Non-operating (Storage) temperature range: –20º to 50º C (–4º to 122º F)● In the presence of high electromagnetic fields it is possible the output from the HP All-in-
One might be slightly distorted● HP recommends using a USB cable less than or equal to 3 m (10 feet) in length to minimize
injected noise due to potential high electromagnetic fields
Additional specificationsIf you have Internet access, you can get acoustic information from the HP website. Go to:www.hp.com/support.
Environmental product stewardship programThis section provides information on protecting the environment; ozone production; energyconsumption; paper use; plastics; material safety data sheets; and recycling programs.
Protecting the environmentHewlett-Packard is committed to providing quality products in an environmentally sound manner.This product has been designed with several attributes to minimize impacts on our environment.For more information, visit HP’s Commitment to the Environment website at:www.hp.com/hpinfo/globalcitizenship/environment/index.html
Ozone productionThis product generates no appreciable ozone gas (O3).
Energy consumptionEnergy usage drops significantly while in ENERGY STAR® mode, which saves naturalresources and saves money without affecting the high performance of this product. This productqualifies for ENERGY STAR, which is a voluntary program established to encourage thedevelopment of energy-efficient office products.
Chapter 11
52 HP PSC 1400 All-in-One series
Tech
nica
l inf
orm
atio
n
ENERGY STAR is a U.S. registered service mark of the U.S. EPA. As an ENERGY STARpartner, HP has determined that this product meets ENERGY STAR guidelines for energyefficiency.For more information on ENERGY STAR guidelines, go to the following website:www.energystar.gov
Paper useThis product is suited for the use of recycled paper according to DIN 19309.
PlasticsPlastic parts over 25 grams are marked according to international standards that enhance theability to identify plastics for recycling purposes at the end of the product’s life.
Material safety data sheetsMaterial safety data sheets (MSDS) can be obtained from the HP website at:www.hp.com/go/msdsCustomers without Internet access should contact their local HP Customer Care Center.
Recycling programHP offers an increasing number of product return and recycling programs in many countries/regions, as well as partnering with some of the largest electronic recycling centers throughout theworld. HP also conserves resources by refurbishing and reselling some of its most popularproducts.This HP product contains the following materials that might require special handling at end-of-life:● Mercury in the fluorescent lamp in the scanner (< 2 mg)● Lead in solder (As of July 1, 2006, all newly-manufactured products will contain lead-free
solder and components according to European Union Directive 2002/95/EC.)
HP inkjet supplies recycling programHP is committed to protecting the environment. The HP Inkjet Supplies Recycling Program isavailable in many countries/regions, and lets you recycle used print cartridges free of charge. Formore information, go to the following website:www.hp.com/hpinfo/globalcitizenship/environment/recycle/inkjet.html
Important recycling information for our customers in the European UnionTo preserve the environment, this product must be recycled after its useful life as required bylaw. The symbol below indicates that this product may not be disposed in the general trash.Please return the product for proper recovery/disposal to the authorized collection locationnearest to you. For more information regarding return and recycling of HP products generally,please visit: http://www.hp.com/hpinfo/globalcitizenship/environment/recycle/index.html.
User Guide 53
Technical information
Regulatory noticesThe HP All-in-One meets product requirements from regulatory agencies in your country/region.This section provides information on the regulatory model identification number for your HP All-in-One; an FCC statement; and separate notices to users in Australia and Korea.
Regulatory model identification number For regulatory identification purposes, your product is assigned a Regulatory Model Number. TheRegulatory Model Number for your product is SDGOB-0401-02. This regulatory number shouldnot be confused with the marketing name (HP PSC 1400 All-in-One series) or product number(Q5786A).
FCC statement The United States Federal Communications Commission (in 47 CFR 15.105) has specified thatthe following notice be brought to the attention of users of this product.Declaration of Conformity: This equipment has been tested and found to comply with the limitsfor a Class B digital device, pursuant to part 15 of the FCC Rules. Operation is subject to thefollowing two conditions: (1) this device may not cause harmful interference, and (2) this devicemust accept any interference received, including interference that may cause undesiredoperation. Class B limits are designed to provide reasonable protection against harmfulinterference in a residential installation. This equipment generates, uses, and can radiate radiofrequency energy, and, if not installed and used in accordance with the instructions, may causeharmful interference to radio communications. However, there is no guarantee that interferencewill not occur in a particular installation. If this equipment does cause harmful interference toradio or television reception, which can be determined by turning the equipment off and on, theuser is encouraged to try to correct the interference by one or more of the following measures:● Reorient the receiving antenna.● Increase the separation between the equipment and the receiver.● Connect the equipment into an outlet on a circuit different from that to which the receiver is
connected.● Consult the dealer or an experienced radio/TV technician for help.For more information, contact the Product Regulations Manager, Hewlett-Packard Company,San Diego, (858) 655-4100.The user may find the following booklet prepared by the Federal Communications Commissionhelpful: How to Identify and Resolve Radio-TV Interference Problems. This booklet is availablefrom the U.S. Government Printing Office, Washington DC, 20402. Stock No. 004-000-00345-4.
Caution Pursuant to Part 15.21 of the FCC Rules, any changes or modifications to thisequipment not expressly approved by the Hewlett-Packard Company may cause harmfulinterference and void the FCC authorization to operate this equipment.
Chapter 11
54 HP PSC 1400 All-in-One series
Tech
nica
l inf
orm
atio
n
Note à l’attention des utilisateurs Canadien/notice to users in Canada Le présent appareil numérique n‘émet pas de bruit radioélectrique dépassant les limitesapplicables aux appareils numériques de la classe B prescrites dans le Règlement sur lebrouillage radioélectrique édicté par le ministère des Communications du Canada.This digital apparatus does not exceed the Class B limits for radio noise emissions from thedigital apparatus set out in the Radio Interference Regulations of the Canadian Department ofCommunications.
Notice to users in Australia
This equipment complies with Australian EMC requirements.
Notice to users in Korea
User Guide 55
Technical information

Chapter 11
56 HP PSC 1400 All-in-One series
Tech
nica
l inf
orm
atio
n

Index
Symbols/Numerics10 x 15 cm photo paper
load 114 x 6 inch photo paper
load 11
AA4 paper
load 10align print cartridges 32
Bborderless copies
10 x 15 cm (4 x 6 inch)photo 17
Ccancel
copy 18print job 20scan 22
cancel button 4cartridges. See print cartridgesclean
exterior 29glass 29lid backing 29print cartridges 33
control paneloverview 4
copycancel 18copy specifications 51paper types,
recommended 15customer support
contact 43Korea 45serial number 44service ID 44website 43
Ddeclaration of conformity
European Economic Area59
United States 59default printer, set as 20device update
Mac 42overview 42Windows 42
EEnvironmental product
stewardship program 52environmental specifications 52
FFCC statement 54fit to page 17
Gglass
clean 29load original 9
greeting cardsload 12
HHagaki
load 12HP All-in-One
overview 3prepare to ship 45
HP Image ZoneHP Instant Share 24Mac 6, 24overview 6Windows 6, 24
HP Instant Shareabout 23e-mail photos from the
HP Image Zone (USB)23
HP Image Zone 23send images from HP
image Zone (USB) 23send to a device 23setup (USB) 23
HP Solution Centermissing icons 39
start (Windows) 6HP Support
before you call 35
Iink cartridges. See print
cartridgesink levels, check 29inkjet supplies recycling 53Instant Share. See HP Instant
Share
Jjams, paper 13
Llabels
load 12legal paper
load 10letter paper
load 10lid backing, clean 29load
10 x 15 cm photo paper 114 x 6 inch photo paper 11A4 paper 10full-size paper 10greeting cards 12Hagaki 12labels 12legal paper 10letter paper 10original 9postcards 12transparencies 12
Mmaintenance
align print cartridges 32check ink levels 29clean exterior 29clean glass 29clean lid backing 29clean print cartridges 33self-test report 30
User Guide 57

media. See paper
Oorder
paper 27print cartridges 27Setup Guide 27software 27User Guide 27
Ppaper
incompatible types 9jams 13load 10order 27paper sizes 49recommended copy types
15recommended types 9
paper specifications 49paper-tray capacities 49phone numbers, customer
support 43photo paper
load 11photos
HP Image Zone 23physical specifications 52postcards
load 12power specifications 52print
cancel job 20from computer 19from software application
19print specifications 50self-test report 30
print cartridgesalign 32check ink levels 29clean 33order 27troubleshoot 41
print margin specifications 50
Rrecycling 53reduce/enlarge copies
resize to fit letter or A4 17regulatory notices
declaration of conformity59
declaration of conformity(European EconomicArea) 59
FCC statement 54note à l’attention des
utilisateurs Canadien 55notice to users in Canada
55notice to users in Korea 55regulatory model
identification number 54reports
self-test 30return your HP All-in-One 45
Sscan
from control panel 21scan specifications 51stop 22
scan button 4scan glass
clean 29load original 9
self-test report 30send to a device
HP Image Zone (Mac) 24HP Image Zone
(Windows) 24serial number 44service 43
see also customer supportservice ID 44software application, print
from 19software update.. See device
updatespecifications. See technical
informationstart black 4start color 4status lights
overview 4stop
copy 18print job 20scan 22
supportbefore you call 35resources 35
system requirements 49
Ttechnical information
copy specifications 51environmental
specifications 52paper sizes 49paper specifications 49paper-tray capacities 49physical specifications 52power specifications 52print margin
specifications 50print specifications 50scan specifications 51system requirements 49weight 52
telephone numbers, customersupport 43
transparenciesload 12
troubleshootcontact HP Support 35hardware installation 36installation overview 35operational 41overview 35software installation 38support resources 35
troubleshoot:jams, paper 13
UUSB cable installation 36
Wwarranty
statement 46upgrades 43
58 HP PSC 1400 All-in-One series

Declaration of conformity (European Economic Area) The Declaration of Conformity in this document complies with ISO/IEC Guide 22 and EN 45014. It identifies the product,manufacturer’s name and address, and applicable specifications recognized in the European community.
Declaration of conformity

© 2005 Hewlett-Packard Development Company, L.P.
www.hp.com
*Q7286-90158**Q7286-90158*Q7286-90158
Electronic Edition