Embed Size (px)
Citation preview

HP SmartStart Scripting Toolkit Linux Edition User Guide
Part Number 415597-006 January 2008 (Sixth Edition)

© Copyright 2005, 2008 Hewlett-Packard Development Company, L.P.
The information contained herein is subject to change without notice. The only warranties for HP products and services are set forth in the express warranty statements accompanying such products and services. Nothing herein should be construed as constituting an additional warranty. HP shall not be liable for technical or editorial errors or omissions contained herein.
Confidential computer software. Valid license from HP required for possession, use or copying. Consistent with FAR 12.211 and 12.212, Commercial Computer Software, Computer Software Documentation, and Technical Data for Commercial Items are licensed to the U.S. Government under vendor’s standard commercial license.
Microsoft and Windows are U.S. registered trademarks of Microsoft Corporation. Intel is a trademark of Intel Corporation in the U.S. and other countries.
Audience assumptions
The Toolkit is designed for IT experts with experience in scripting operating system installations and configuring HP ProLiant server hardware.
Contents 3
Contents
Introduction.................................................................................................................................. 5 SmartStart Scripting Toolkit ......................................................................................................................... 5 Minimum requirements ............................................................................................................................... 5
Deployment using the SmartStart Scripting Toolkit ............................................................................. 6 Deployment overview................................................................................................................................. 6 Sample deployment procedure.................................................................................................................... 6
Creating a network share ................................................................................................................. 7 Preparing the bootable media........................................................................................................... 7 Capturing a reference configuration from the source server................................................................. 10 Configuring the target server........................................................................................................... 11 Installing the operating system......................................................................................................... 11
Advanced topics......................................................................................................................... 12 SYSLINUX .............................................................................................................................................. 12 Booting using PXE ................................................................................................................................... 12
Setting up a TFTP server ................................................................................................................. 13 Populating the TFTP directory share.................................................................................................. 14 Setting up a DHCP server ............................................................................................................... 14
Booting from a USB drive key ................................................................................................................... 15 Performing an unattended operating system installation................................................................................ 16
System hardware configuration ....................................................................................................... 16 Red Hat Linux anaconda-ks.cfg sample file ....................................................................................... 20 Microsoft Windows install_win.sh sample script ................................................................................ 22
Toolkit utilities............................................................................................................................. 23 Syntax conventions .................................................................................................................................. 23 Utility online help .................................................................................................................................... 23 Using system utilities ................................................................................................................................ 24
Using REBOOT ............................................................................................................................. 24 Using SETBOOTORDER.................................................................................................................. 25 Using STATEMGR.......................................................................................................................... 25 Using RBSURESET.......................................................................................................................... 26 Using HPDISCOVERY..................................................................................................................... 27 Using IFHW.................................................................................................................................. 28 Using HWQUERY.......................................................................................................................... 29
Using configuration utilities....................................................................................................................... 31 Using CONREP ............................................................................................................................. 31 Using CPQACUXE......................................................................................................................... 34 Using HPONCFG.......................................................................................................................... 43
Troubleshooting .......................................................................................................................... 48 Troubleshooting table .............................................................................................................................. 48
Technical support........................................................................................................................ 49 Reference documentation ......................................................................................................................... 49 Toolkit support ........................................................................................................................................ 49 HP contact information............................................................................................................................. 49

Contents 4
Acronyms and abbreviations........................................................................................................ 50
Index......................................................................................................................................... 53
Introduction 5
Introduction
SmartStart Scripting Toolkit The SmartStart Scripting Toolkit is a server deployment product that delivers an unattended automated installation for high-volume server deployments. This document describes how to best utilize the Toolkit to configure HP ProLiant servers. It also contains information about the Toolkit utilities and how to use them in an unattended environment. This document does not include information about installing the operating system.
The Toolkit is designed for IT experts with experience in scripting operating system installations and configuring ProLiant server hardware.
CAUTION: Improper use of the Toolkit utilities can result in loss of critical data. Because of the potential data-loss risk, only experienced individuals should use the Toolkit utilities. Before using the Toolkit, all necessary precautions must be taken to ensure that mission-critical systems remain online if a failure occurs.
Minimum requirements Before beginning the deployment process, be sure to have the following items available:
• SmartStart Scripting Toolkit Linux Edition
• HP SmartStart Scripting Toolkit Linux Edition User Guide
• A Linux workstation (any Linux distribution)
Deployment using the SmartStart Scripting Toolkit 6
Deployment using the SmartStart Scripting Toolkit
Deployment overview The SmartStart Scripting Toolkit includes a set of utilities for configuring and deploying servers in a customized, predictable, and unattended manner. These utilities enable you to duplicate the configuration of a source server on target servers with minimum user interaction.
You can perform server deployments in many different ways using the Toolkit, but every deployment must include the following basic steps:
1. Create a network share.
2. Prepare the bootable media (CD/DVD, USB drive key, or PXE).
3. Configure the system and storage hardware on the target server.
4. Perform the operating system installation.
HP also recommends installing the latest version of the PSP. To obtain the most current PSP, see the PSP website (http://www.hp.com/servers/psp).
IMPORTANT: Not all options can be configured using Toolkit utilities. Some options must be configured manually or with other configuration utilities, which are available online, before they can be used with the Toolkit. See the option documentation for more information on configuration.
Sample deployment procedure The following procedure is a case study of a typical deployment. This procedure assumes that you are performing a CD-based installation and that you want to replicate an existing server configuration. The process described in this section can vary depending on your specific requirements.
This section provides a simple overview of a basic deployment, but the flexibility of the SmartStart Scripting Toolkit enables you to do much more. With an understanding of the basic steps and your own deployment environment, you can use the Toolkit to further customize and automate the deployment process. For information on automating deployments, see the "Advanced topics (on page 12)" section of this document.

Deployment using the SmartStart Scripting Toolkit 7
Creating a network share
To create a network share:
1. Download the appropriate SmartStart Scripting Toolkit package from the Toolkit website (http://www.hp.com/servers/sstoolkit).
2. Extract the Toolkit package on a common server that resides on the same network as the servers to be deployed.
3. Use the Linux NFS Server Configuration Tool to share the directory in which you extracted the Toolkit package and to assign read and write permissions for all hosts.
Preparing the bootable media For the Linux edition of the SmartStart Scripting Toolkit, the three main components that are needed to boot any Linux environment are the bootloader, the Linux kernel, and the Linux file system:
• Bootloader—ISOLINUX
In general, you must modify only the bootloader configuration to boot the Toolkit in your environment.
Deployment using the SmartStart Scripting Toolkit 8
• Kernel—vmlinuz, a kernel based on SLES 9
NOTE: The kernel is generally static and cannot be modified easily. HP recommends that you use the kernel that is shipped with the Toolkit because it has been tested on all servers supported by the Toolkit.
• File system—initrd.img, a reduced SLES 9 environment
The bootstrap script in the initrd.img file locates the customized install script in the execution path and executes it, beginning the Toolkit process. Because this script does not reside inside initrd.img, you can modify it as often as necessary without rebuilding the initrd.img file.
The following steps occur during the boot process:
1. The system boots using the CD media.
2. The bootloader (ISOLINUX) loads the Toolkit environment.
3. A startup script executes to finish the environment setup.
The following is a sample syslinux.cfg file: say ============================================================== say HP SmartStart Toolkit Linux Edition 1.50 say Copyright 2001, 2006 Hewlett-Packard Development Company, L.P. say -------------------------------------------------------------- say Instructions for boot: say press <enter> key for normal toolkit boot say type 'bash' and press <enter> key for bash shell default toolkit prompt 1 timeout 300 # # For Networking, add "network=1" to the append line in the toolkit section. # # For USB CDs, change the ssstk_mount option to "/dev/sda" # label toolkit
kernel vmlinuz
append initrd=initrd.img root=/dev/ram0 rw ramdisk_size=89000 quiet=1 ide=nodma ide=noraid pnpbios=off network=1 sstk_mount=/dev/hda sstk_mount_type=iso9660 sstk_script=custom.sh
label bash
kernel vmlinuz
append initrd=initrd.img root=/dev/ram0 rw ramdisk_size=89000 single debug console=ttyS0,115200n8 console=tty0 ide=nodma ide=noraid pnpbios=off
In this example, there are two boot directives: toolkit and bash. If no user input is recorded, then the configuration file instructs the bootloader to prompt the user to pick a boot directive, wait 10 seconds, and then boot the default directive, toolkit.
The toolkit directive instructs the bootloader to use vmlinuz as the kernel. The append line specifies which parameters the bootloader passes to the kernel.
Deployment using the SmartStart Scripting Toolkit 9
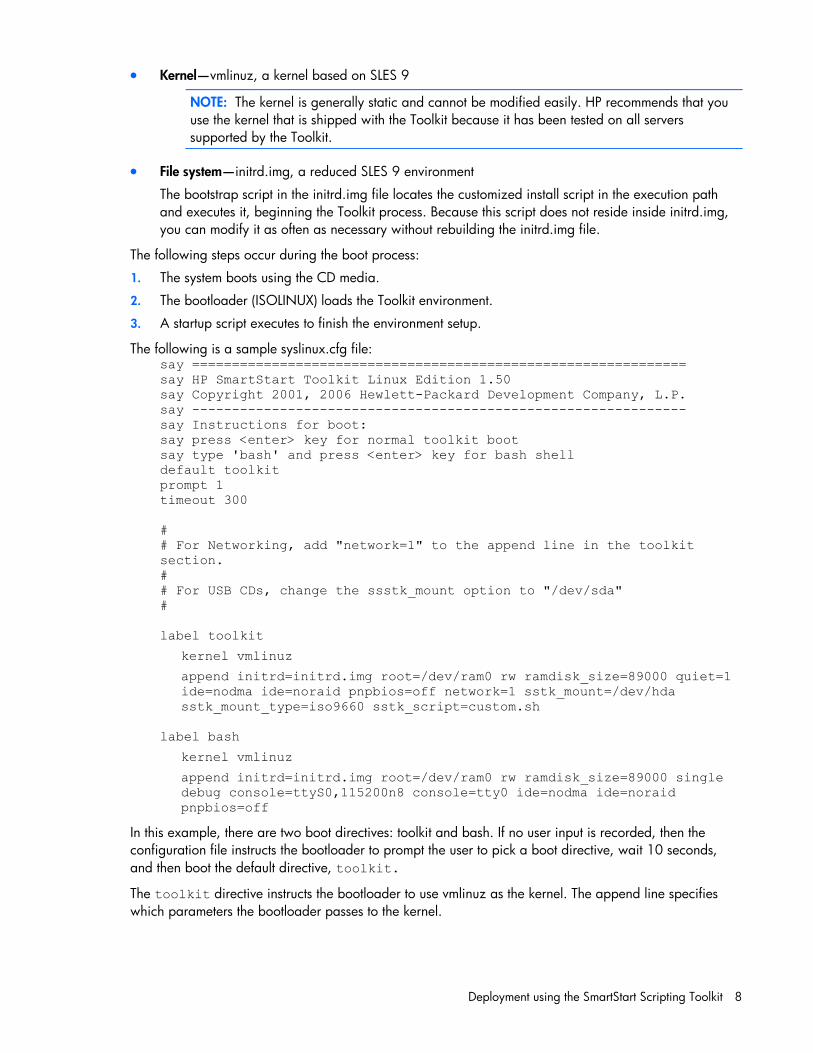
The following figure illustrates a Toolkit CD boot.
Creating a Toolkit bootable CD requires the following general steps:
1. Create a CD build directory.
2. Create an ISO image to be written to CD.
Creating a CD build directory 1. Create a directory on the Linux workstation:
mkdir ./linuxbootCD
2. Create a subdirectory in which to store boot files: mkdir ./linuxbootCD/isolinux
3. Copy the necessary boot files to the ./linuxbootCD/isolinux directory:
o isolinux.bin (the SYSLINUX binary used for ISO media)
o isolinux.cfg (the boot configuration used by isolinux.bin)
o initrd.img (the Linux file system)
o vmlinuz (the Linux kernel)
If needed, copy additional files to ./linuxbootCD. These files might include Toolkit utilities or scripts, configuration files, or third-party tools.
Creating an ISO image to be written to CD The mkisofs command is used to create an ISO image. The following table describes the arguments used with this command.
Argument Description -o linuxbootCD.iso This argument is the output of the mkisofs
command, the ISO file.
Deployment using the SmartStart Scripting Toolkit 10
Argument Description -b isolinux/isolinux.bin This argument sets isolinux.bin as the
bootloader.
-V LinuxBootCD This argument sets the volume label of the CD.
./linuxbootCD This argument specifies the target directory that will be the root of the CD.
To create the ISO image, execute the following command at the shell prompt: mkisofs -J -iso-level 3 -R -L -o linuxbootCD.iso \
-b isolinux/isolinux.bin -c isolinux/boot.cat \
-V LinuxBootCD \
-no-emul-boot -boot-load-size 4 \
-boot-info-table \
./linuxbootCD
Now, the ISO file can be written to a CD.
Capturing a reference configuration from the source server 1. At the source server, boot the CD that contains the custom Linux Toolkit image.
2. At the boot prompt, type bash, and then press Enter. When the process is complete, a command prompt appears.
3. Load the network drivers using the loadnet script: /loadnet.sh
4. Load appropriate storage controller drivers: modprobe -f cciss
5. Load the channel interface driver for iLO: insmod /opt/hp/hp-ilo/bin/`uname -r`/hp_ilo.ko
6. Mount the network share: mkdir /mnt/toolkit_share
mount -t nfs -o rw,nolock <ip of workstation>:/path/to/toolkit /mnt/toolkit_share
7. Capture a hardware discovery report using the HPDISCOVERY utility: cd /mnt/toolkit_share/utilities
./hpdiscovery -f /mnt/toolkit_share/data_files/hpdiscovery.xml
8. Capture the system BIOS configuration using the CONREP utility: cd /mnt/toolkit_share/utilities
./conrep -s -f/mnt/toolkit_share/data_files/conrep.dat
9. Capture the Smart Array configuration using the ACU utility: cd /mnt/toolkit_share/utilities/cpqacuxe
./cpqacuxe -c /mnt/toolkit_share/data_files/cpqacuxe.dat
10. Capture the iLO configuration using the HPONCFG utility: cd /mnt/toolkit_share/utilities
./hponcfg -w /mnt/toolkit_share/data_files/hponcfg.dat
Deployment using the SmartStart Scripting Toolkit 11
11. Edit the iLO configuration report to create an iLO configuration script: vi /mnt/toolkit_share/data_files/hponcfg.dat
Unmount the network share
umount /mnt/toolkit_share
12. Reboot the source server, and then eject the Toolkit CD.
Configuring the target server 1. At the target server, boot the CD that contains the custom Linux Toolkit image.
2. At the boot prompt, type bash and then press Enter. When the process is complete, a command prompt appears.
3. Load the network drivers using the loadnet script: /loadnet.sh
4. Load appropriate storage controller drivers: modprobe -f cciss
5. Load the channel interface driver for iLO: insmod /opt/hp/hp-ilo/bin/`uname -r`/hp_ilo.ko
6. Mount the network share: mkdir /mnt/toolkit_share
mount -t nfs -o rw,nolock <ip of workstation>:/path/to/toolkit /mnt/toolkit_share
7. Apply the system BIOS configuration using the CONREP utility: cd /mnt/toolkit_share/utilities
./conrep -l -f/mnt/toolkit_share/data_files/conrep.dat
8. Apply the Smart Array configuration using the ACU utility: cd /mnt/toolkit_share/utilities/cpqacuxe
./cpqacuxe -c /mnt/toolkit_share/data_files/cpqacuxe.dat
9. Apply the iLO configuration using the HPONCFG utility: cd /mnt/toolkit_share/utilities
./hponcfg -f /mnt/toolkit_share/data_files/hponcfg.dat
10. Unmount the network share: umount /mnt/toolkit_share
11. Insert the operating system CD.
12. Reboot the server to run the operating system installation.
Installing the operating system See the "Advanced topics (on page 12)" section for information on performing an unattended operating system installation. For additional information, see the following resources:
• Operating system documentation
• Kickstart or AutoYAST documentation
Advanced topics 12
Advanced topics
SYSLINUX SYSLINUX is a free third-party bootloader available at the SYSLINUX web page (http://syslinux.zytor.com/index.php).
SYSLINUX is a suite of programs that perform various boot functions. The SmartStart Scripting Toolkit uses the following bootloader programs:
• isolinux.bin—This program enables you to boot from ISO media.
• pxelinux.0—This program enables you to boot using PXE protocol.
• ldlinux.sys—This program enables you to boot from a USB drive key.
The bootloaders each require a configuration file to run:
• isolinux.cfg—This configuration file is used for booting from ISO media.
• default—This configuration file is used for booting using PXE.
• syslinux.cfg—This configuration file is used for booting from a USB drive key.
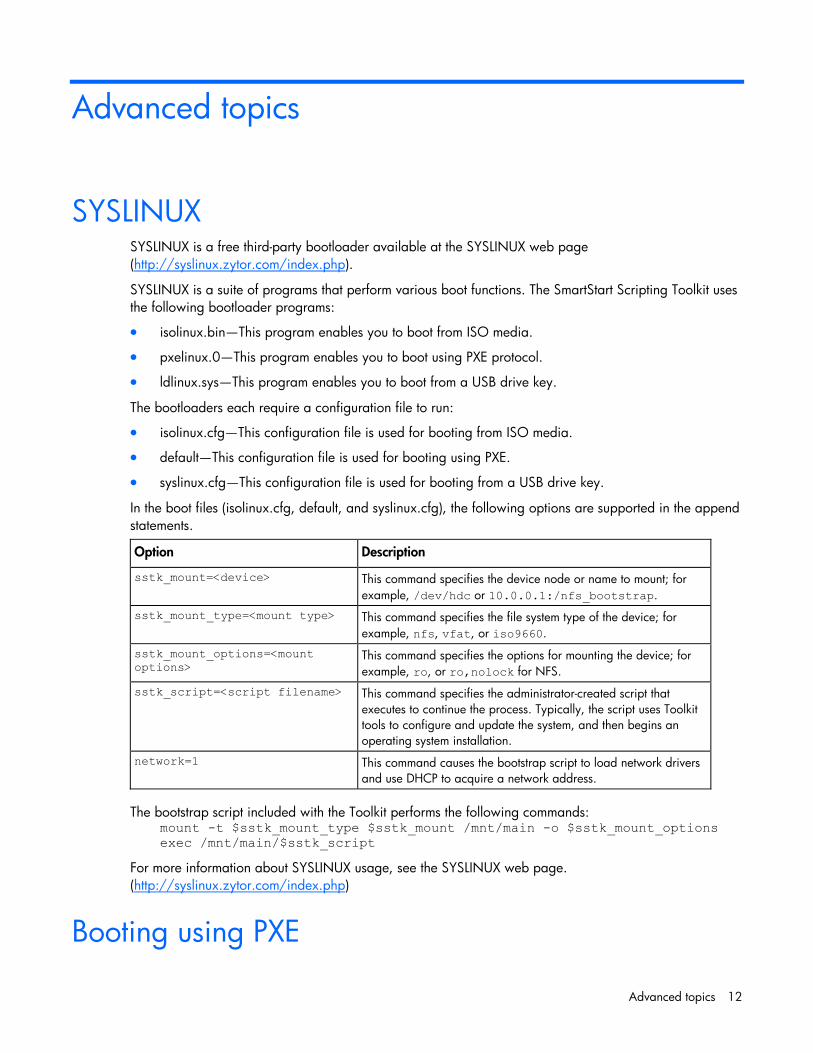
In the boot files (isolinux.cfg, default, and syslinux.cfg), the following options are supported in the append statements.
Option Description
sstk_mount=<device> This command specifies the device node or name to mount; for example, /dev/hdc or 10.0.0.1:/nfs_bootstrap.
sstk_mount_type=<mount type> This command specifies the file system type of the device; for example, nfs, vfat, or iso9660.
sstk_mount_options=<mount options>
This command specifies the options for mounting the device; for example, ro, or ro,nolock for NFS.
sstk_script=<script filename> This command specifies the administrator-created script that executes to continue the process. Typically, the script uses Toolkit tools to configure and update the system, and then begins an operating system installation.
network=1 This command causes the bootstrap script to load network drivers and use DHCP to acquire a network address.
The bootstrap script included with the Toolkit performs the following commands: mount -t $sstk_mount_type $sstk_mount /mnt/main -o $sstk_mount_options exec /mnt/main/$sstk_script
For more information about SYSLINUX usage, see the SYSLINUX web page. (http://syslinux.zytor.com/index.php)
Booting using PXE
Advanced topics 13
IMPORTANT: A basic understanding of DHCP, PXE, and TFTP is required to perform the procedure described in this section.
NOTE: Examples in this section might not be specific to your operating system environment. Refer to the Linux system administrator's guide for more information about your particular environment.
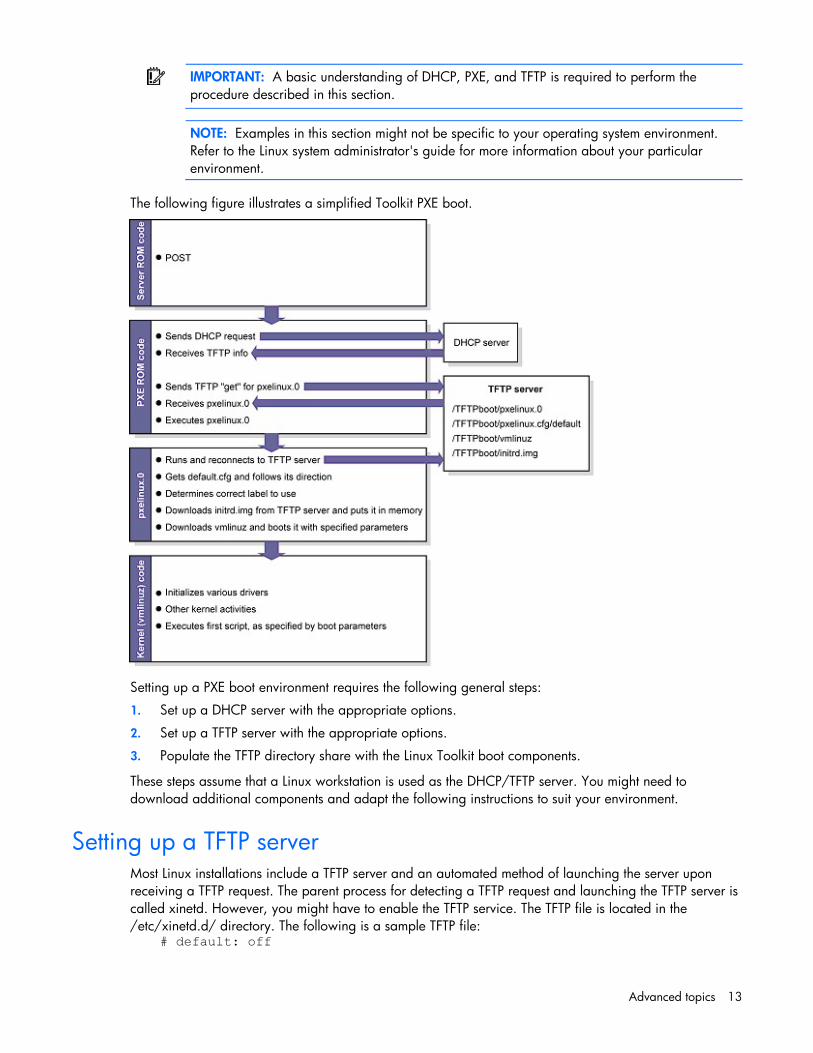
The following figure illustrates a simplified Toolkit PXE boot.
Setting up a PXE boot environment requires the following general steps:
1. Set up a DHCP server with the appropriate options.
2. Set up a TFTP server with the appropriate options.
3. Populate the TFTP directory share with the Linux Toolkit boot components.
These steps assume that a Linux workstation is used as the DHCP/TFTP server. You might need to download additional components and adapt the following instructions to suit your environment.
Setting up a TFTP server Most Linux installations include a TFTP server and an automated method of launching the server upon receiving a TFTP request. The parent process for detecting a TFTP request and launching the TFTP server is called xinetd. However, you might have to enable the TFTP service. The TFTP file is located in the /etc/xinetd.d/ directory. The following is a sample TFTP file:
# default: off
Advanced topics 14
# description: The tftp server serves files using the \ # trivial file transfer protocol. The tftp protocol is \ # often used to boot diskless workstations, download \ # configuration files to network-aware printers and to \ # start the installation process for some operating systems. service tftp {
socket_type = dgram
protocol = udp
wait = yes
user = root
server = /usr/sbin/in.tftpd
server_args = -s /tftpboot
disable = yes
per_source = 11
cps = 100 2 }
In this example, "disabled" is the default setting, and /tftpboot is the root directory for all client access.
To enable the TFTP service on your server, edit the disable line to read: disable = no
Populating the TFTP directory share Use the /tftpboot directory from the "Setting up a TFTP server (on page 13)" section as the directory from which TFTP clients will get their files. To populate the TFTP directory share:
1. Create a /tftpboot directory, if needed.
2. Copy the necessary boot files to the /tftpboot directory:
o pxelinux.0 (the SYSLINUX binary used for PXE boot)
o initrd.img (the Linux file system)
o vmlinuz (the Linux kernel)
3. Create a pxelinux configuration file subdirectory called /tftpboot/pxelinux.cfg.
4. Copy the default file (the boot configuration used by pxelinux.0) into the /tftpboot/pxelinux.cfg/ directory.
The tftpboot directory should now contain the following items: /tftpboot/pxelinux.0 /tftpboot/initrd.img /tftpboot/vmlinuz /tftpboot/pxelinux.cfg/default
Setting up a DHCP server To set up a DHCP server, create and edit a dhcpd.conf file in the /etc directory of your server. The following is a sample dhcpd.conf file:
allow booting; allow bootp; ddns-update-style interim;
Advanced topics 15
[You must customize the file by inserting the appropriate DHCP directives, IP ranges, subnet masks, and so on here.]
next-server IP_ADDRESS_OF_TFTP_SERVER; filename "pxelinux.0";
The next-server command tells the DHCP client where to send the TFTP get request.
The filename command tells the DHCP client which file to get. In this example, the file is pxelinux.0.
When you have finished creating the dhcpd.conf file, restart the DHCP server: /etc/init.d/dhcpd restart
Booting from a USB drive key Some applications require the use of a writable medium. While booting from CD is not suitable for this purpose, a USB drive key provides the ideal medium for this type of activity.
NOTE: Booting from a USB drive key is supported only on certain ProLiant servers. For more information, see the ProLiant USB support website (http://h18004.www1.hp.com/products/servers/platforms/usb-support.html).
To set up a USB drive key to boot the Toolkit environment:
1. Create a FAT file system. In this example, the USB drive key is /dev/sda: cd toolkit/
mkdosfs -I /dev/sda
2. Use SYSLINUX to install the ldlinux.sys bootloader: ./boot_files/syslinux /dev/sda
3. Copy the boot and Toolkit files to the USB drive key: mount /dev/sda /mnt/usbkey/
cp boot_files/syslinux.cfg boot_files/vmlinuz boot_files/initrd.img /mnt/usbkey/
cp -a scripts/ /mnt/usbkey/
cp -a utilities/ /mnt/usbkey/
cp -a linux_unattend/ /mnt/usbkey/
4. Customize the scripts for your environment: vi /mnt/usbkey/linux_unattend/rhel4/syslinux-rh.cfg
In the syslinux-rh.cfg file, be sure to modify the sstk_script boot option parameter to refer to your customized script.
vi /mnt/usbkey/syslinux.cfg
vi /mnt/usbkey/scripts/install_rhel4.sh
Be sure to modify the syslinux.cfg and install_rhel4.sh files to refer to your network server.
5. Copy the bootdisk image from the Red Hat CD: cp RHEL4-i386-AS-disc1.iso/images/diskboot.img /mnt/usbkey/linux_unattend/rhel4/
umount /mnt/usbkey/
6. Test the USB boot process:
Advanced topics 16
a. Insert the USB drive key in the server. If the server already has a C drive, change the IPL order to ensure that the USB drive key boots before the C drive of the primary controller. After the drive key boots, the syslinux information and a Boot: prompt appears.
b. At the Boot: prompt, press the Enter key. A progress bar and the Toolkit boot messages appear. After processing is complete, the /custom.sh script on the USB drive key is executed.
The drive key has been successfully prepared.
Performing an unattended operating system installation
Sample scripts are provided with the Toolkit to simplify the installation process. These scripts are used for:
• System hardware configuration
• Operating system preinstallation configuration
However, these scripts must be modified for your particular environment.
System hardware configuration The sample install_rhel4.sh script performs many hardware configuration tasks, including:
• Copying all toolkit utilities from the network share to the target server
• Running hardware discovery to determine server type
• Obtaining server ID information from the hardware discovery file
• Copying server-specific configuration script and data files from the network share
• Loading drivers for storage controllers and any other devices that must be configured
• Running the CONREP utility
• Running the CPQACUXE utility, if needed (This action is server-specific.)
• Running any other configuration utilities
• Running hardware discovery to determine the boot controller
• Obtaining the device node of the boot controller (This information is required for the disk-carving portion of the operating system setup.)
• Running the operating system-specific setup script
The scripting for these steps must be adapted to your server deployment process. In particular, be sure to change the IP address and path of the NFS server to match your environment. You might also need to make other modifications, such as adding extra configuration steps (for instance, running HPONCFG to configure iLO) or additional servers.
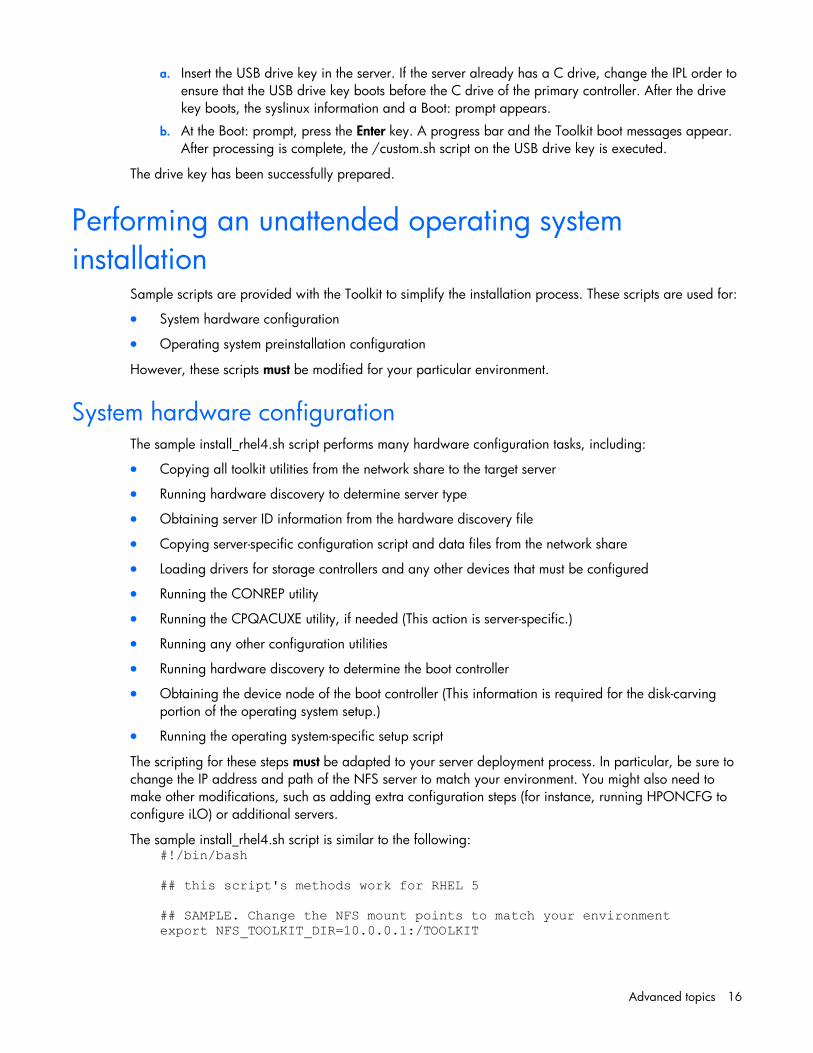
The sample install_rhel4.sh script is similar to the following: #!/bin/bash ## this script's methods work for RHEL 5 ## SAMPLE. Change the NFS mount points to match your environment export NFS_TOOLKIT_DIR=10.0.0.1:/TOOLKIT
Advanced topics 17
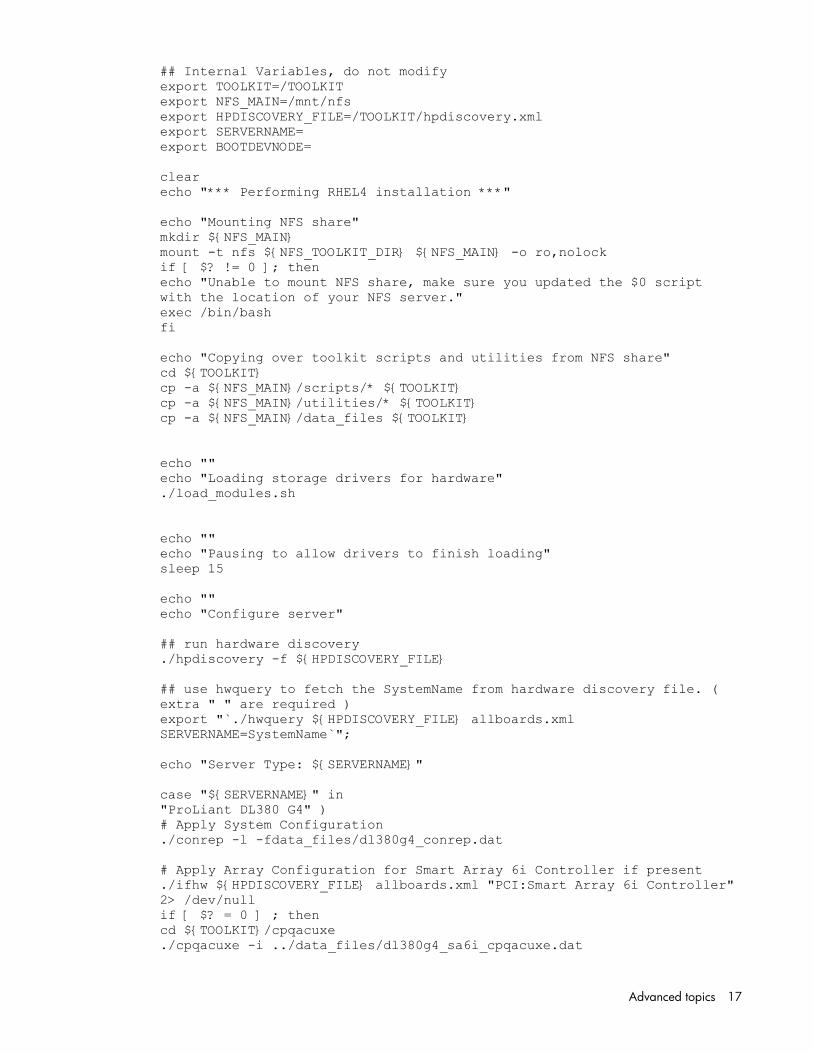
## Internal Variables, do not modify export TOOLKIT=/TOOLKIT export NFS_MAIN=/mnt/nfs export HPDISCOVERY_FILE=/TOOLKIT/hpdiscovery.xml export SERVERNAME= export BOOTDEVNODE= clear echo "*** Performing RHEL4 installation ***" echo "Mounting NFS share" mkdir ${NFS_MAIN} mount -t nfs ${NFS_TOOLKIT_DIR} ${NFS_MAIN} -o ro,nolock if [ $? != 0 ]; then echo "Unable to mount NFS share, make sure you updated the $0 script with the location of your NFS server." exec /bin/bash fi echo "Copying over toolkit scripts and utilities from NFS share" cd ${TOOLKIT} cp -a ${NFS_MAIN}/scripts/* ${TOOLKIT} cp -a ${NFS_MAIN}/utilities/* ${TOOLKIT} cp -a ${NFS_MAIN}/data_files ${TOOLKIT} echo "" echo "Loading storage drivers for hardware" ./load_modules.sh echo "" echo "Pausing to allow drivers to finish loading" sleep 15 echo "" echo "Configure server" ## run hardware discovery ./hpdiscovery -f ${HPDISCOVERY_FILE} ## use hwquery to fetch the SystemName from hardware discovery file. ( extra " " are required ) export "`./hwquery ${HPDISCOVERY_FILE} allboards.xml SERVERNAME=SystemName`"; echo "Server Type: ${SERVERNAME}" case "${SERVERNAME}" in "ProLiant DL380 G4" ) # Apply System Configuration ./conrep -l -fdata_files/dl380g4_conrep.dat # Apply Array Configuration for Smart Array 6i Controller if present ./ifhw ${HPDISCOVERY_FILE} allboards.xml "PCI:Smart Array 6i Controller" 2> /dev/null if [ $? = 0 ] ; then cd ${TOOLKIT}/cpqacuxe ./cpqacuxe -i ../data_files/dl380g4_sa6i_cpqacuxe.dat
Advanced topics 18
fi # Apply Array Configuration for Smart Array P600 Controller if present ./ifhw ${HPDISCOVERY_FILE} allboards.xml "PCI:Smart Array P600 Controller" 2> /dev/null if [ $? = 0 ] ; then cd ${TOOLKIT}/cpqacuxe ./cpqacuxe -i ../data_files/dl380g4_p600_cpqacuxe.dat fi ## ADD EXTRA DL380 G4 Configuration Steps HERE ;; "ProLiant BL45p G1" ) ./conrep -l -fdata_files/bl45pg1_conrep.dat # Apply Array Configuration for Smart Array 6i Controller if present ./ifhw ${HPDISCOVERY_FILE} allboards.xml "PCI:Smart Array 6i Controller" 2> /dev/null if [ $? = 0 ] ; then cd ${TOOLKIT}/cpqacuxe ./cpqacuxe -i ../data_files/bl45pg1_sa6i_cpqacuxe.dat fi ## ADD EXTRA BL45p G1 Configuration Steps HERE ;; "ProLiant ML310 G2" ) ./conrep -l -fdata_files/ml310g2_conrep.dat ./ifhw ${HPDISCOVERY_FILE} allboards.xml "PCI:Intel(R) 6300ESB Ultra ATA Storage/SATA Controller" if [ $? = 0 ] ; then echo "Plain SATA found" # Plain SATA, set BOOTDEVNODE manually since hardware discovery won't find IDE devices export BOOTDEVNODE=/dev/hda fi ## ADD EXTRA ProLiant ML310 G2 Configuration Steps HERE ;; ## ADD MORE SERVERS HERE ProLiant* ) echo "No configuration process defined for this ProLiant server" echo "Update $0 with steps for this ProLiant server" exec /bin/bash ;; * ) echo "Unrecognized Server" exec /bin/bash ;; esac ## CONTINUE COMMON INSTALL PROCESS
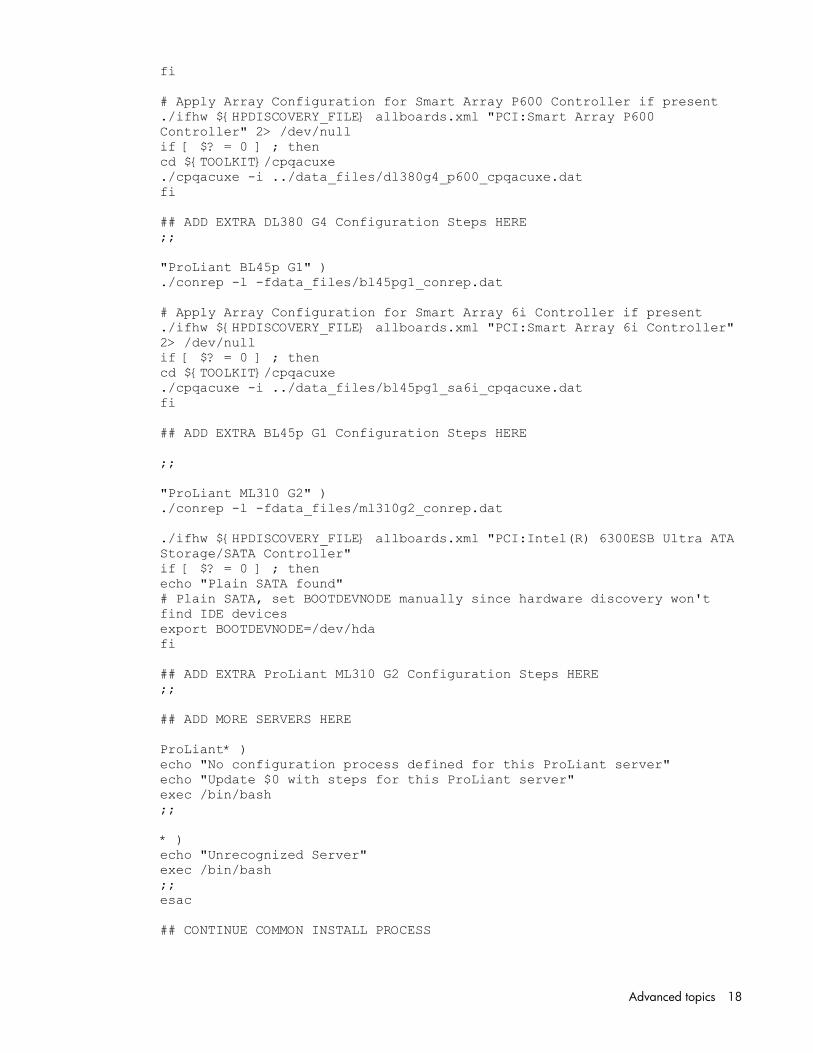
Advanced topics 19
cd ${TOOLKIT} echo "Pausing to allow drivers to catch up" sleep 5 echo "" echo "Rerun hardware discovery to find boot device" ./hpdiscovery -f ${HPDISCOVERY_FILE} ## use hwquery to fetch the boot dev node from hardware discovery file. if [ -z ${BOOTDEVNODE} ]; then export `./hwquery ${HPDISCOVERY_FILE} allboards.xml BOOTDEVNODE=DevNode` fi echo "Boot Device=${BOOTDEVNODE}" if [ -z ${BOOTDEVNODE} ]; then echo "MISSING boot device dev node. Check that the drivers are loaded." exec /bin/bash fi ls -al ${BOOTDEVNODE}* ln -s ${BOOTDEVNODE} /dev/sssd echo "### Linux Unattended Install using Kickstart ###" echo "clearing mbr and a few more sectors" dd if=/dev/zero of=/dev/sssd bs=512 count=32 echo "forcing kernel to re-read partition table" sfdisk --re-read /dev/sssd sleep 5 echo "landing mbr" dd if=${NFS_MAIN}/linux_unattend/generic.mbr of=/dev/sssd bs=512 count=1 echo "create new 256M FAT16 partition using sfdisk" echo "0,256,6,*" | sfdisk -uM -D /dev/sssd echo "forcing kernel to re-read partition table" sfdisk --re-read /dev/sssd sleep 5 ## make symlink for first partition, usually sda1 or c0d0p1 if test -e ${BOOTDEVNODE}1 ; then ln -s ${BOOTDEVNODE}1 /dev/sssd1 elif test -e ${BOOTDEVNODE}p1 ; then ln -s ${BOOTDEVNODE}p1 /dev/sssd1 else echo "Partition 1 missing, check that partition creation succeeded" exec /bin/bash fi ls -al /dev/sssd1 cd ${NFS_MAIN}/linux_unattend/rhel4/ echo "landing diskboot.img from RHEL4-disc1/images/"
Advanced topics 20
dd if=diskboot.img of=/dev/sssd1 ## mount disk echo "mounting to /mnt/dos" mount -t vfat /dev/sssd1 /mnt/dos ##### MAKE SURE YOU MODIFY syslinux-rh.cfg FOR YOUR ENVIRONMENT ####### cp -a syslinux-rh.cfg /mnt/dos/syslinux.cfg cd ${TOOLKIT} ## unmount disk umount /mnt/dos umount ${NFS_MAIN} ## unmount everything else #umount -a #echo "Rebooting" #sleep 5 #/bin/reboot c:
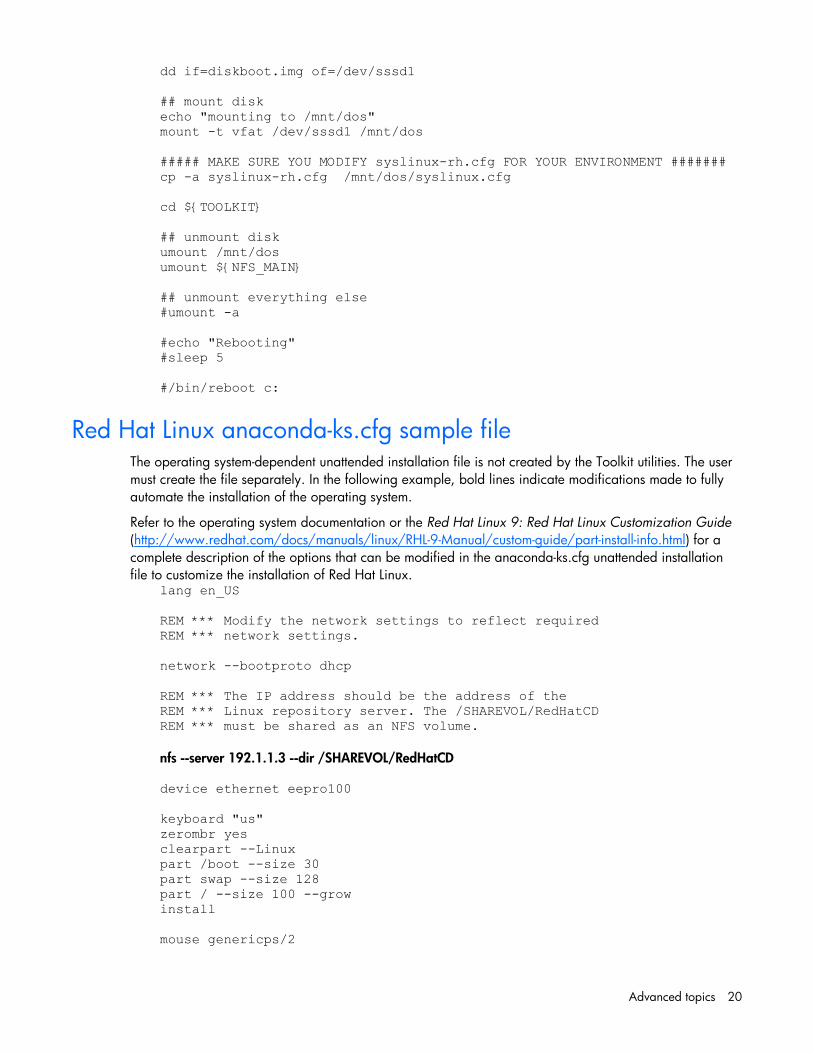
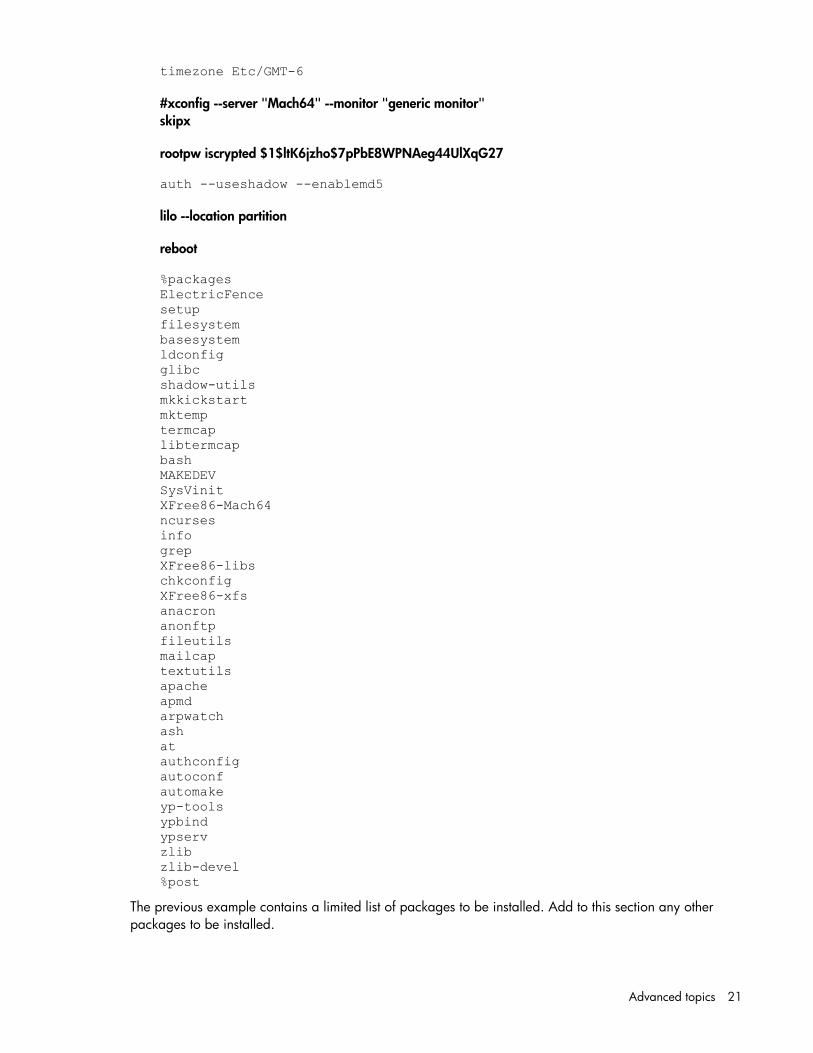
Red Hat Linux anaconda-ks.cfg sample file The operating system-dependent unattended installation file is not created by the Toolkit utilities. The user must create the file separately. In the following example, bold lines indicate modifications made to fully automate the installation of the operating system.
Refer to the operating system documentation or the Red Hat Linux 9: Red Hat Linux Customization Guide (http://www.redhat.com/docs/manuals/linux/RHL-9-Manual/custom-guide/part-install-info.html) for a complete description of the options that can be modified in the anaconda-ks.cfg unattended installation file to customize the installation of Red Hat Linux.
lang en_US REM *** Modify the network settings to reflect required REM *** network settings. network --bootproto dhcp REM *** The IP address should be the address of the REM *** Linux repository server. The /SHAREVOL/RedHatCD REM *** must be shared as an NFS volume. nfs --server 192.1.1.3 --dir /SHAREVOL/RedHatCD device ethernet eepro100 keyboard "us" zerombr yes clearpart --Linux part /boot --size 30 part swap --size 128 part / --size 100 --grow install mouse genericps/2
Advanced topics 21
timezone Etc/GMT-6 #xconfig --server "Mach64" --monitor "generic monitor" skipx rootpw iscrypted $1$ltK6jzho$7pPbE8WPNAeg44UlXqG27 auth --useshadow --enablemd5 lilo --location partition reboot %packages ElectricFence setup filesystem basesystem ldconfig glibc shadow-utils mkkickstart mktemp termcap libtermcap bash MAKEDEV SysVinit XFree86-Mach64 ncurses info grep XFree86-libs chkconfig XFree86-xfs anacron anonftp fileutils mailcap textutils apache apmd arpwatch ash at authconfig autoconf automake yp-tools ypbind ypserv zlib zlib-devel %post
The previous example contains a limited list of packages to be installed. Add to this section any other packages to be installed.
Advanced topics 22
The server deployment configuration and operating system installation process is complete.
Microsoft Windows install_win.sh sample script The install_win.sh sample script performs many of the same hardware configuration tasks described in "Performing an unattended operating system installation (on page 16)."
Additionally, the sample install_win.sh script for Microsoft® Windows® performs preinstallation tasks, including:
• Creating a 2 GiB FAT16 primary partition
• Formatting the partition for the FAT file system
• Creating a boot sector for the partition
• Copying the FreeDOS operating system to the new C drive
• Copying the Windows® installation sources, the $oem$ directory, and unattend.txt files to the C drive
To use the install_win.sh sample script to install Microsoft® Windows®:
1. Create an unattend.txt file by following the instructions in the Microsoft® documentation (http://support.microsoft.com/kb/155197). A sample unattend.txt file is included in the windows_unattend directory.
2. Copy the Windows® source files to the installation source. In this sample script, the installation source is a NFS file share.
3. Adapt the script to perform the correct hardware configuration, and change the NFS server IP address and path to match your environment.
4. Update the syslinux configuration file (pxelinux.cfg, isolinux.cfg, or syslinux.cfg) to reference the install_win.sh sample script.

Toolkit utilities 23
Toolkit utilities
Syntax conventions Syntax refers to the way a command and parameters must be entered. Unless specified otherwise, enter commands, parameters, and switches in all uppercase or all lowercase letters.
Sample syntax line: SAMPLE[/R|-R][PATH]FILENAME[...]
Command element Description SAMPLE Specifies the name of the command.
/ or - Indicates a command line switch for executable files.
PATH Specifies the route the operating system must follow through the directory structure to locate a directory or file. A path and file name must be specified only if the file is not in the current directory.
FILENAME Specifies a file name. This document uses uppercase file names. A device name or a drive letter cannot be specified for a file name.
... Indicates that the previous parameter or switch can be repeated several times in a command. Enter only the information, not the ellipsis (…).
In this document, the length of an example command or syntax might require it to continue on another line. When this happens, the second line (and any additional lines) is indented under the first line.
Placeholder items used in the syntax lines in this chapter include:
• Source—Specifies the location of the data to be transferred to a specified destination or used as input to a command. The source can consist of a drive letter and colon, a directory name, a file name, or a combination of these items.
• Destination—Specifies the destination to which the source transfers the data. The destination can consist of a drive letter and colon, a directory name, a file name, or a combination of these items.
• String—Specifies a group of characters to be treated as a unit. A string can include letters, numbers, spaces, or any other character and is usually enclosed in double quotation marks.
Utility online help Most Toolkit utilities include usage instructions. To obtain help with the syntax, parameters, and switches of a particular Toolkit utility, enter the file name followed by /? in the command line. For example, for usage instructions on the CONREP utility, enter the following command:
CONREP /?
The utility displays information about its command line syntax, argument, and switches.

Toolkit utilities 24
Using system utilities The system utilities control the installation process. System utilities in the Toolkit include:
• REBOOT
• SETBOOTORDER
• STATEMGR
• RBSURESET
• HPDISCOVERY
• IFHW
• HWQUERY
Using REBOOT REBOOT is used from a batch file, in conjunction with other utilities, to control server reboots. This utility enables the user to reboot the server with control over which device is the boot device. If no boot drive argument is passed on to REBOOT, the tool reboots the server using whichever drive is specified as the default drive.
REBOOT command line syntax REBOOT [DRIVE:] [/?]
REBOOT command line arguments
Command line argument Description [DRIVE:] Valid arguments that can be passed to REBOOT are A:, C:, CD, PXE,
RBSU, or no argument. By specifying an argument, the drive indicated is set to boot on the next reboot, and the system is restarted. If no argument is provided, the system is set to boot using the defined boot order.
/? This argument displays help information.
REBOOT return codes There are no return codes for the REBOOT utility.
REBOOT command line examples
Command line argument Description
REBOOT A: This command reboots the system to the A: drive.
REBOOT PXE This command reboots the system by itself to the PXE NIC.
Toolkit utilities 25
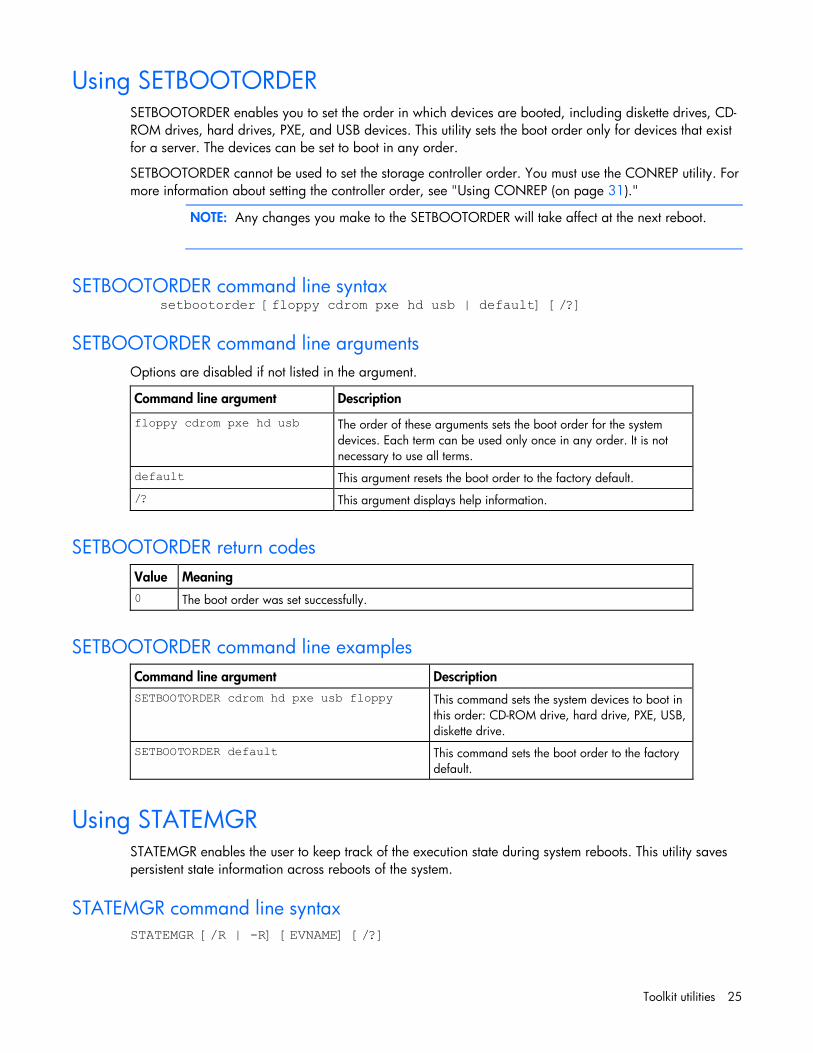
Using SETBOOTORDER SETBOOTORDER enables you to set the order in which devices are booted, including diskette drives, CD-ROM drives, hard drives, PXE, and USB devices. This utility sets the boot order only for devices that exist for a server. The devices can be set to boot in any order.
SETBOOTORDER cannot be used to set the storage controller order. You must use the CONREP utility. For more information about setting the controller order, see "Using CONREP (on page 31)."
NOTE: Any changes you make to the SETBOOTORDER will take affect at the next reboot.
SETBOOTORDER command line syntax setbootorder [floppy cdrom pxe hd usb | default] [/?]
SETBOOTORDER command line arguments Options are disabled if not listed in the argument.
Command line argument Description
floppy cdrom pxe hd usb The order of these arguments sets the boot order for the system devices. Each term can be used only once in any order. It is not necessary to use all terms.
default This argument resets the boot order to the factory default.
/? This argument displays help information.
SETBOOTORDER return codes
Value Meaning 0 The boot order was set successfully.
SETBOOTORDER command line examples
Command line argument Description SETBOOTORDER cdrom hd pxe usb floppy This command sets the system devices to boot in
this order: CD-ROM drive, hard drive, PXE, USB, diskette drive.
SETBOOTORDER default This command sets the boot order to the factory default.
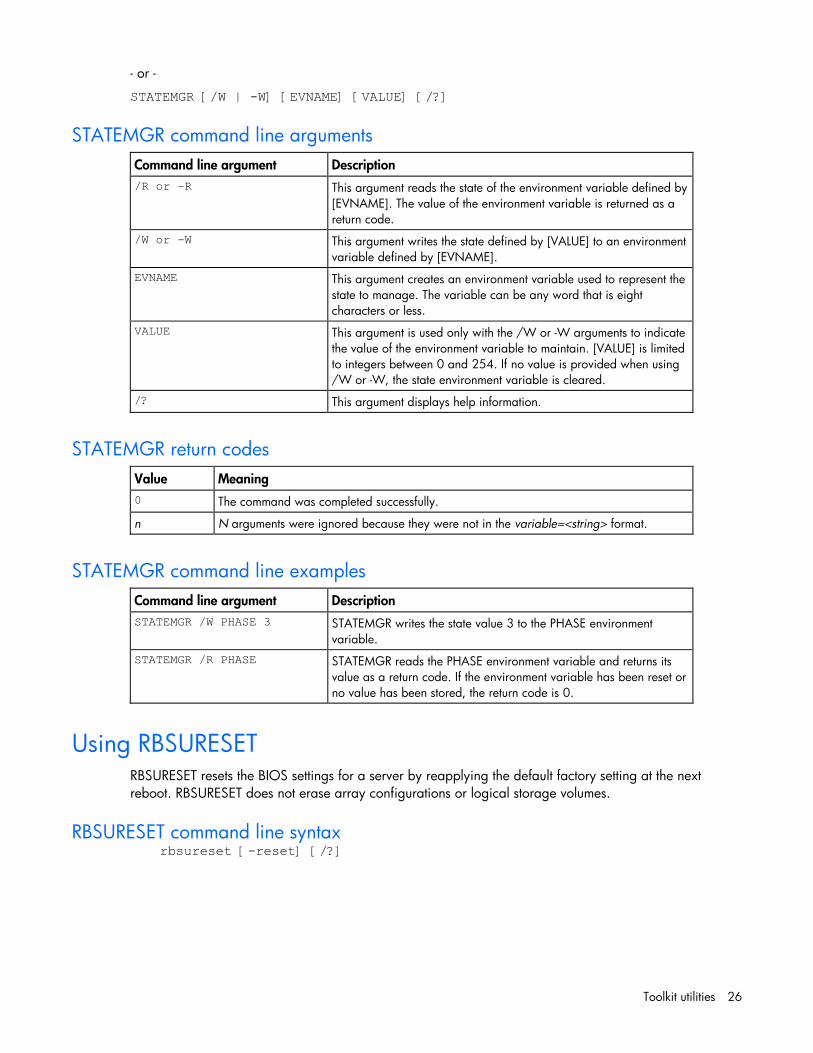
Using STATEMGR STATEMGR enables the user to keep track of the execution state during system reboots. This utility saves persistent state information across reboots of the system.
STATEMGR command line syntax STATEMGR [/R | -R] [EVNAME] [/?]
Toolkit utilities 26
- or -
STATEMGR [/W | -W] [EVNAME] [VALUE] [/?]
STATEMGR command line arguments
Command line argument Description /R or –R This argument reads the state of the environment variable defined by
[EVNAME]. The value of the environment variable is returned as a return code.
/W or -W This argument writes the state defined by [VALUE] to an environment variable defined by [EVNAME].
EVNAME This argument creates an environment variable used to represent the state to manage. The variable can be any word that is eight characters or less.
VALUE This argument is used only with the /W or -W arguments to indicate the value of the environment variable to maintain. [VALUE] is limited to integers between 0 and 254. If no value is provided when using /W or -W, the state environment variable is cleared.
/? This argument displays help information.
STATEMGR return codes
Value Meaning 0 The command was completed successfully.
n N arguments were ignored because they were not in the variable=<string> format.
STATEMGR command line examples
Command line argument Description STATEMGR /W PHASE 3 STATEMGR writes the state value 3 to the PHASE environment
variable.
STATEMGR /R PHASE STATEMGR reads the PHASE environment variable and returns its value as a return code. If the environment variable has been reset or no value has been stored, the return code is 0.
Using RBSURESET RBSURESET resets the BIOS settings for a server by reapplying the default factory setting at the next reboot. RBSURESET does not erase array configurations or logical storage volumes.
RBSURESET command line syntax rbsureset [-reset] [/?]
Toolkit utilities 27
RBSURESET command line arguments
Command line argument Description [-reset] This argument is required. If no argument is provided, the system
displays usage information for the command.
[/?] This argument displays help information.
RBSURESET return codes
Value Meaning 0 The BIOS settings have been successfully reset to the factory default.
1 The BIOS settings have not been reset.
Using HPDISCOVERY HPDISCOVERY provides an inventory of the server being configured and must be run on each server deployed. HPDISCOVERY is executed by the server configuration script and captures the following information:
• System ID
• System name
• ROM information
• Processor information
• Memory information
• PCI devices present in the system
• Storage configuration information
• NIC information
User process decisions can be made based on data that is in the file created by this utility.
HPDISCOVERY command line syntax hpdiscovery [-f filename] [/?]
HPDISCOVERY command line arguments
Command line argument Description -f filename This argument specifies the location and name of the Hardware
Discovery data file.
-? This argument displays help information.
HPDISCOVERY return codes
Value Meaning 0 The command was completed successfully. A usage message might appear.
1 The command contained an invalid parameter.
Toolkit utilities 28
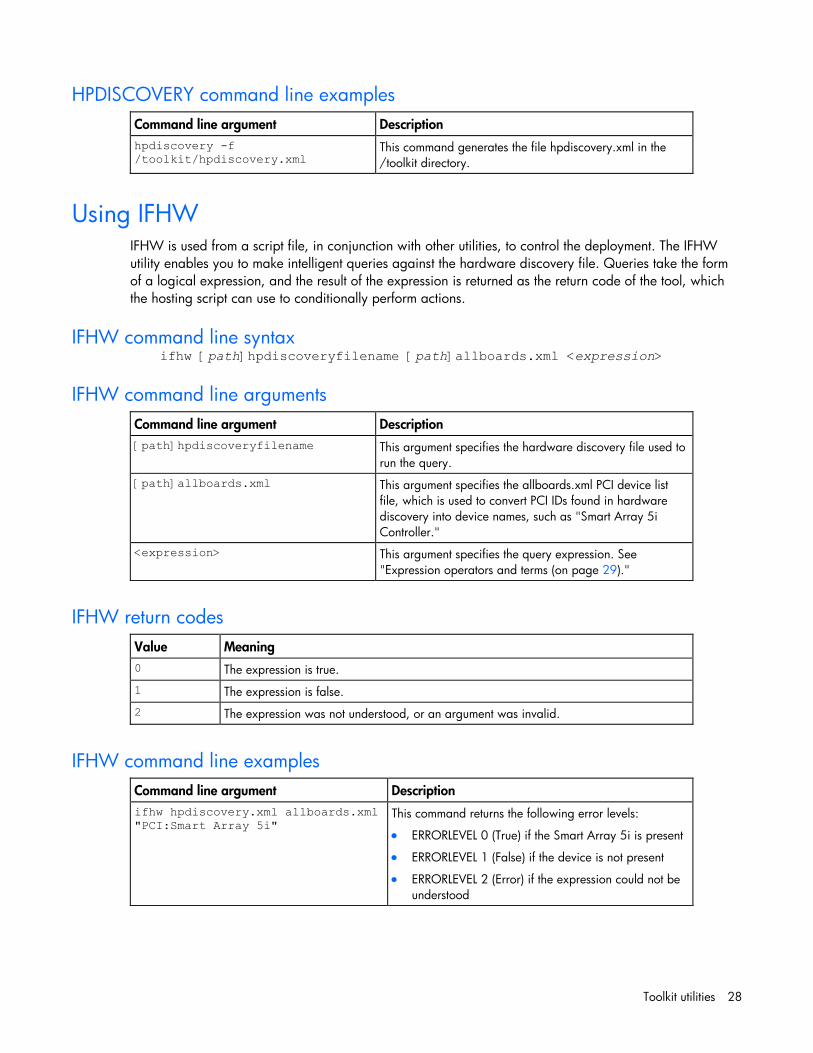
HPDISCOVERY command line examples
Command line argument Description hpdiscovery -f /toolkit/hpdiscovery.xml
This command generates the file hpdiscovery.xml in the /toolkit directory.
Using IFHW IFHW is used from a script file, in conjunction with other utilities, to control the deployment. The IFHW utility enables you to make intelligent queries against the hardware discovery file. Queries take the form of a logical expression, and the result of the expression is returned as the return code of the tool, which the hosting script can use to conditionally perform actions.
IFHW command line syntax ifhw [path]hpdiscoveryfilename [path]allboards.xml <expression>
IFHW command line arguments
Command line argument Description [path]hpdiscoveryfilename This argument specifies the hardware discovery file used to
run the query.
[path]allboards.xml This argument specifies the allboards.xml PCI device list file, which is used to convert PCI IDs found in hardware discovery into device names, such as "Smart Array 5i Controller."
<expression> This argument specifies the query expression. See "Expression operators and terms (on page 29)."
IFHW return codes
Value Meaning 0 The expression is true.
1 The expression is false.
2 The expression was not understood, or an argument was invalid.
IFHW command line examples
Command line argument Description ifhw hpdiscovery.xml allboards.xml "PCI:Smart Array 5i"
This command returns the following error levels:
• ERRORLEVEL 0 (True) if the Smart Array 5i is present
• ERRORLEVEL 1 (False) if the device is not present
• ERRORLEVEL 2 (Error) if the expression could not be understood
Toolkit utilities 29
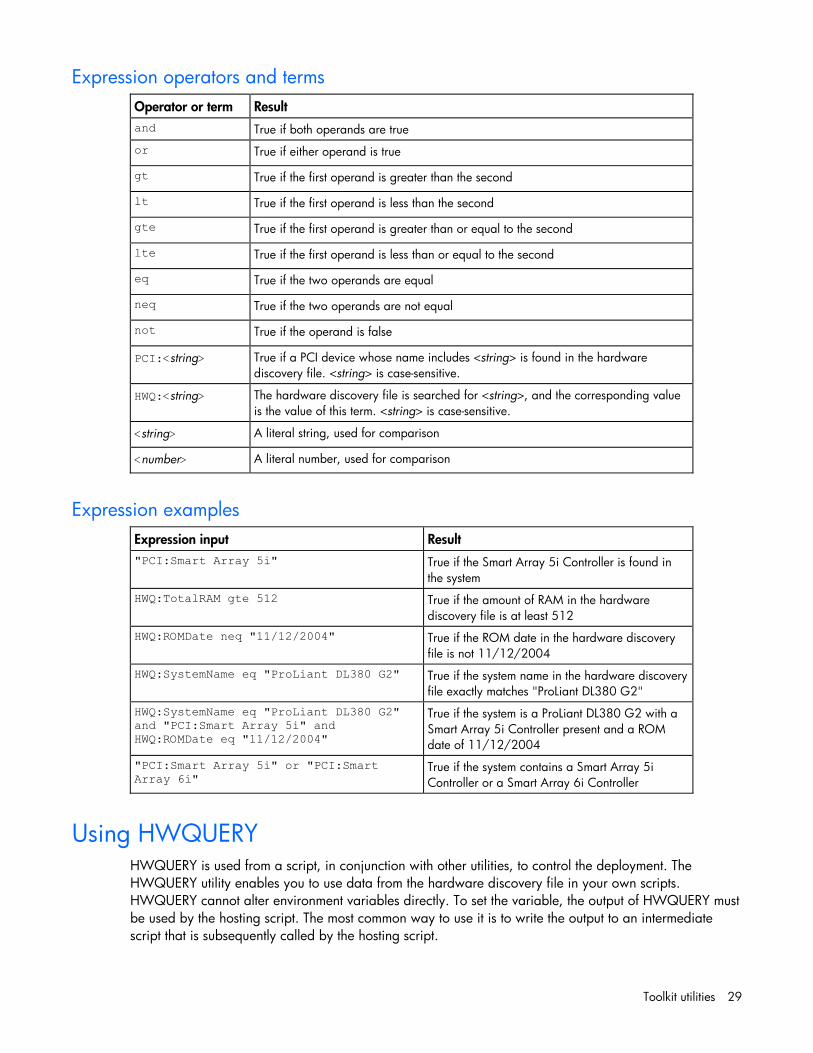
Expression operators and terms
Operator or term Result and True if both operands are true
or True if either operand is true
gt True if the first operand is greater than the second
lt True if the first operand is less than the second
gte True if the first operand is greater than or equal to the second
lte True if the first operand is less than or equal to the second
eq True if the two operands are equal
neq True if the two operands are not equal
not True if the operand is false
PCI:<string> True if a PCI device whose name includes <string> is found in the hardware discovery file. <string> is case-sensitive.
HWQ:<string> The hardware discovery file is searched for <string>, and the corresponding value is the value of this term. <string> is case-sensitive.
<string> A literal string, used for comparison
<number> A literal number, used for comparison
Expression examples
Expression input Result "PCI:Smart Array 5i" True if the Smart Array 5i Controller is found in
the system
HWQ:TotalRAM gte 512 True if the amount of RAM in the hardware discovery file is at least 512
HWQ:ROMDate neq "11/12/2004" True if the ROM date in the hardware discovery file is not 11/12/2004
HWQ:SystemName eq "ProLiant DL380 G2" True if the system name in the hardware discovery file exactly matches "ProLiant DL380 G2"
HWQ:SystemName eq "ProLiant DL380 G2" and "PCI:Smart Array 5i" and HWQ:ROMDate eq "11/12/2004"
True if the system is a ProLiant DL380 G2 with a Smart Array 5i Controller present and a ROM date of 11/12/2004
"PCI:Smart Array 5i" or "PCI:Smart Array 6i"
True if the system contains a Smart Array 5i Controller or a Smart Array 6i Controller
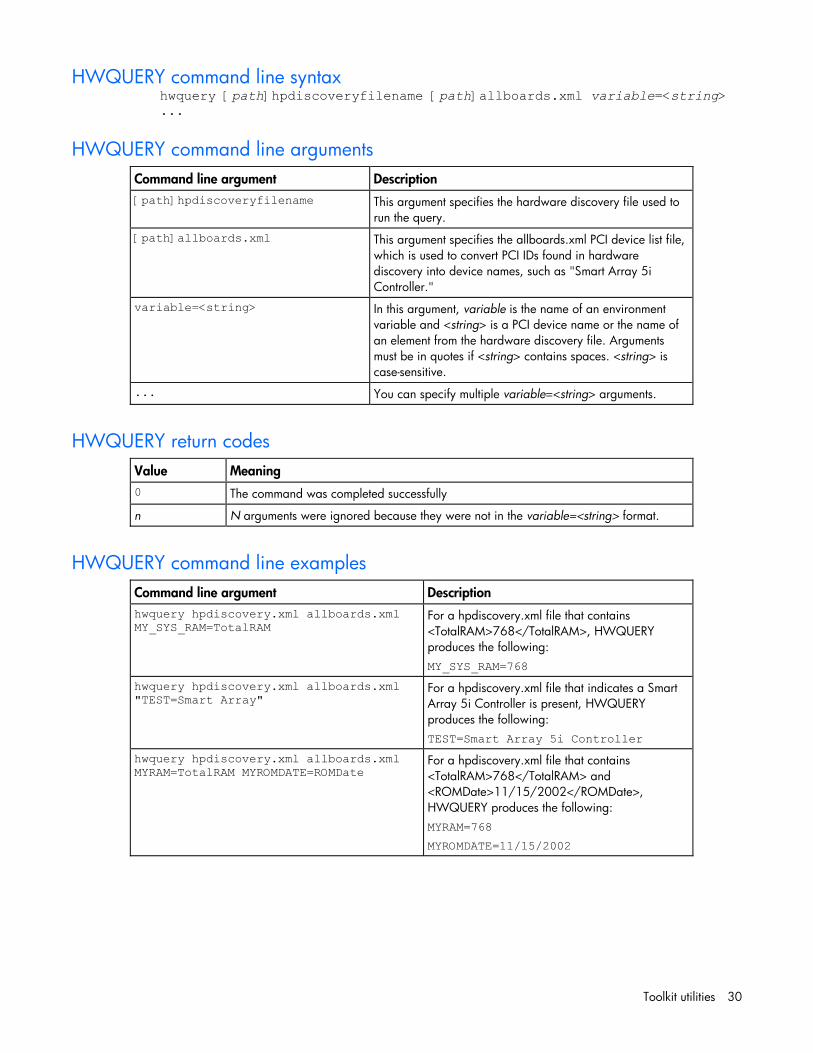
Using HWQUERY HWQUERY is used from a script, in conjunction with other utilities, to control the deployment. The HWQUERY utility enables you to use data from the hardware discovery file in your own scripts. HWQUERY cannot alter environment variables directly. To set the variable, the output of HWQUERY must be used by the hosting script. The most common way to use it is to write the output to an intermediate script that is subsequently called by the hosting script.
Toolkit utilities 30
HWQUERY command line syntax hwquery [path]hpdiscoveryfilename [path]allboards.xml variable=<string> ...
HWQUERY command line arguments
Command line argument Description [path]hpdiscoveryfilename This argument specifies the hardware discovery file used to
run the query.
[path]allboards.xml This argument specifies the allboards.xml PCI device list file, which is used to convert PCI IDs found in hardware discovery into device names, such as "Smart Array 5i Controller."
variable=<string> In this argument, variable is the name of an environment variable and <string> is a PCI device name or the name of an element from the hardware discovery file. Arguments must be in quotes if <string> contains spaces. <string> is case-sensitive.
... You can specify multiple variable=<string> arguments.
HWQUERY return codes
Value Meaning 0 The command was completed successfully
n N arguments were ignored because they were not in the variable=<string> format.
HWQUERY command line examples
Command line argument Description hwquery hpdiscovery.xml allboards.xml MY_SYS_RAM=TotalRAM
For a hpdiscovery.xml file that contains <TotalRAM>768</TotalRAM>, HWQUERY produces the following: MY_SYS_RAM=768
hwquery hpdiscovery.xml allboards.xml "TEST=Smart Array"
For a hpdiscovery.xml file that indicates a Smart Array 5i Controller is present, HWQUERY produces the following: TEST=Smart Array 5i Controller
hwquery hpdiscovery.xml allboards.xml MYRAM=TotalRAM MYROMDATE=ROMDate
For a hpdiscovery.xml file that contains <TotalRAM>768</TotalRAM> and <ROMDate>11/15/2002</ROMDate>, HWQUERY produces the following: MYRAM=768
MYROMDATE=11/15/2002
Toolkit utilities 31
Command line argument Description hwquery hpdiscovery.xml allboards.xml "TEST=smart array 5i"
Although the controller is present, HWQUERY produces the following: TEST=
This behavior is correct. The string is case-sensitive, and the argument uses lowercase lettering instead of the uppercase found in the allboards.xml file.
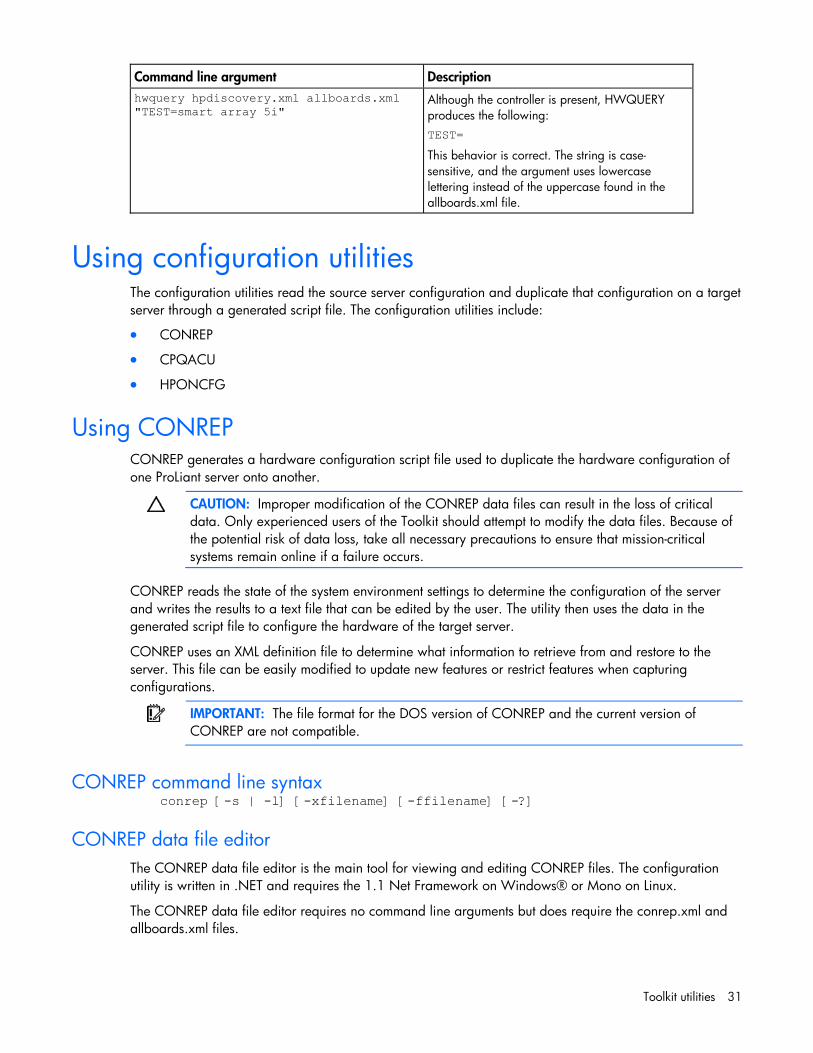
Using configuration utilities The configuration utilities read the source server configuration and duplicate that configuration on a target server through a generated script file. The configuration utilities include:
• CONREP
• CPQACU
• HPONCFG
Using CONREP CONREP generates a hardware configuration script file used to duplicate the hardware configuration of one ProLiant server onto another.
CAUTION: Improper modification of the CONREP data files can result in the loss of critical data. Only experienced users of the Toolkit should attempt to modify the data files. Because of the potential risk of data loss, take all necessary precautions to ensure that mission-critical systems remain online if a failure occurs.
CONREP reads the state of the system environment settings to determine the configuration of the server and writes the results to a text file that can be edited by the user. The utility then uses the data in the generated script file to configure the hardware of the target server.
CONREP uses an XML definition file to determine what information to retrieve from and restore to the server. This file can be easily modified to update new features or restrict features when capturing configurations.
IMPORTANT: The file format for the DOS version of CONREP and the current version of CONREP are not compatible.
CONREP command line syntax conrep [-s | -l] [-xfilename] [-ffilename] [-?]
CONREP data file editor The CONREP data file editor is the main tool for viewing and editing CONREP files. The configuration utility is written in .NET and requires the 1.1 Net Framework on Windows® or Mono on Linux.
The CONREP data file editor requires no command line arguments but does require the conrep.xml and allboards.xml files.
Toolkit utilities 32
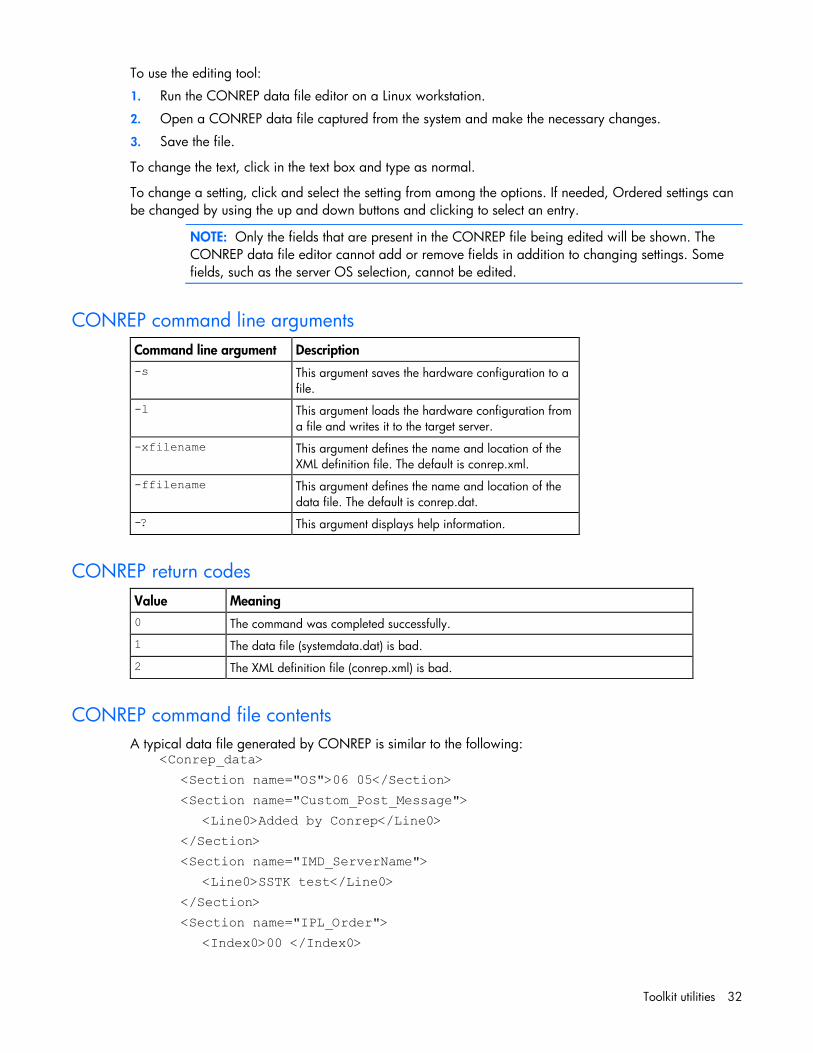
To use the editing tool:
1. Run the CONREP data file editor on a Linux workstation.
2. Open a CONREP data file captured from the system and make the necessary changes.
3. Save the file.
To change the text, click in the text box and type as normal.
To change a setting, click and select the setting from among the options. If needed, Ordered settings can be changed by using the up and down buttons and clicking to select an entry.
NOTE: Only the fields that are present in the CONREP file being edited will be shown. The CONREP data file editor cannot add or remove fields in addition to changing settings. Some fields, such as the server OS selection, cannot be edited.
CONREP command line arguments
Command line argument Description -s This argument saves the hardware configuration to a
file.
-l This argument loads the hardware configuration from a file and writes it to the target server.
-xfilename This argument defines the name and location of the XML definition file. The default is conrep.xml.
-ffilename This argument defines the name and location of the data file. The default is conrep.dat.
-? This argument displays help information.
CONREP return codes
Value Meaning 0 The command was completed successfully.
1 The data file (systemdata.dat) is bad.
2 The XML definition file (conrep.xml) is bad.
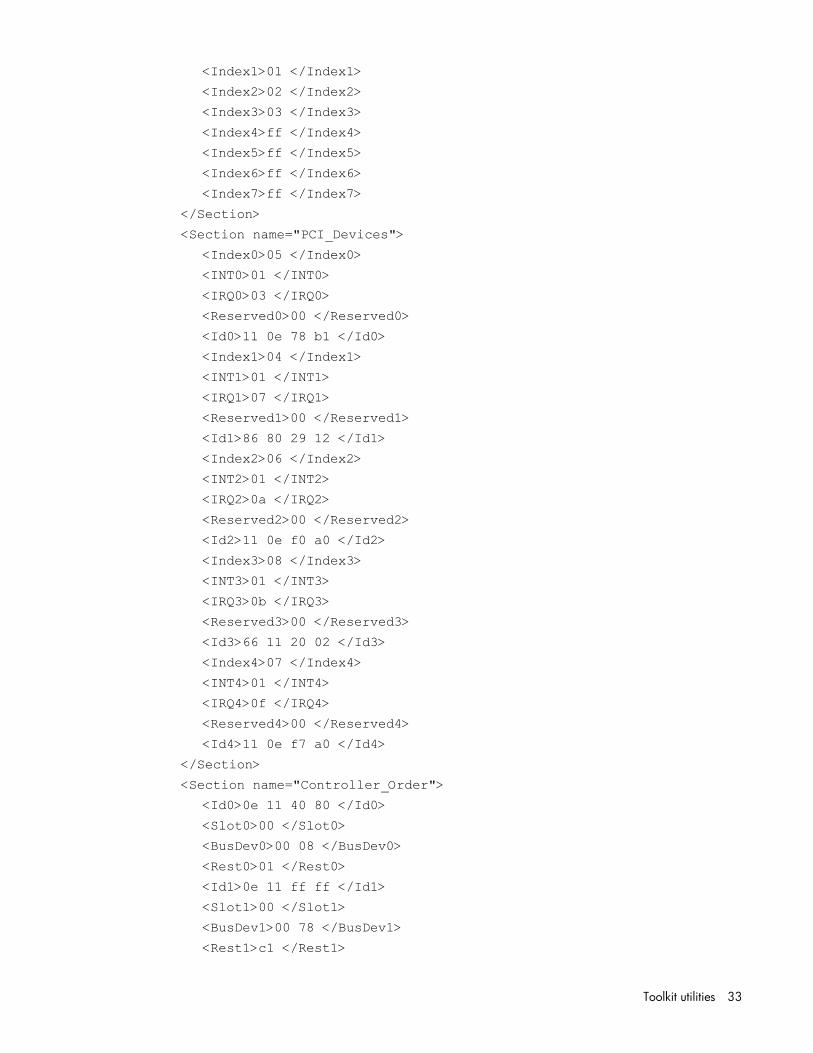
CONREP command file contents A typical data file generated by CONREP is similar to the following:
<Conrep_data>
<Section name="OS">06 05</Section>
<Section name="Custom_Post_Message">
<Line0>Added by Conrep</Line0>
</Section>
<Section name="IMD_ServerName">
<Line0>SSTK test</Line0>
</Section>
<Section name="IPL_Order">
<Index0>00 </Index0>
Toolkit utilities 33
<Index1>01 </Index1>
<Index2>02 </Index2>
<Index3>03 </Index3>
<Index4>ff </Index4>
<Index5>ff </Index5>
<Index6>ff </Index6>
<Index7>ff </Index7>
</Section>
<Section name="PCI_Devices">
<Index0>05 </Index0>
<INT0>01 </INT0>
<IRQ0>03 </IRQ0>
<Reserved0>00 </Reserved0>
<Id0>11 0e 78 b1 </Id0>
<Index1>04 </Index1>
<INT1>01 </INT1>
<IRQ1>07 </IRQ1>
<Reserved1>00 </Reserved1>
<Id1>86 80 29 12 </Id1>
<Index2>06 </Index2>
<INT2>01 </INT2>
<IRQ2>0a </IRQ2>
<Reserved2>00 </Reserved2>
<Id2>11 0e f0 a0 </Id2>
<Index3>08 </Index3>
<INT3>01 </INT3>
<IRQ3>0b </IRQ3>
<Reserved3>00 </Reserved3>
<Id3>66 11 20 02 </Id3>
<Index4>07 </Index4>
<INT4>01 </INT4>
<IRQ4>0f </IRQ4>
<Reserved4>00 </Reserved4>
<Id4>11 0e f7 a0 </Id4>
</Section>
<Section name="Controller_Order">
<Id0>0e 11 40 80 </Id0>
<Slot0>00 </Slot0>
<BusDev0>00 08 </BusDev0>
<Rest0>01 </Rest0>
<Id1>0e 11 ff ff </Id1>
<Slot1>00 </Slot1>
<BusDev1>00 78 </BusDev1>
<Rest1>c1 </Rest1>
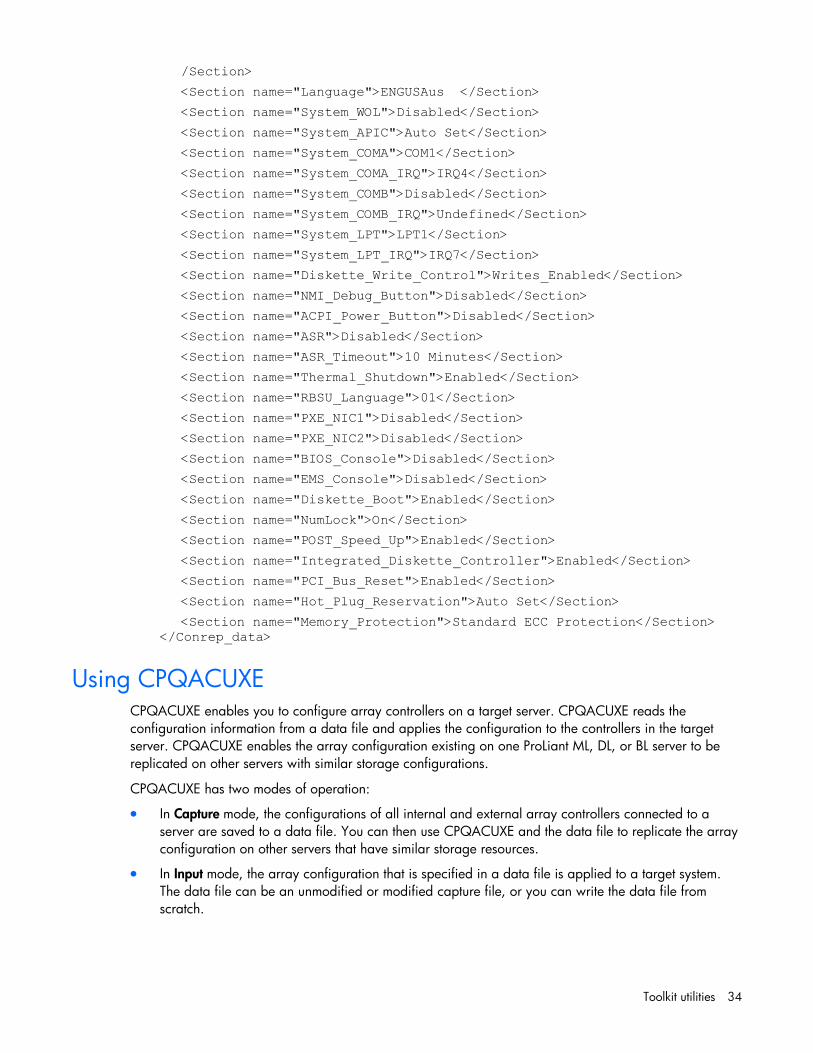
Toolkit utilities 34
/Section>
<Section name="Language">ENGUSAus </Section>
<Section name="System_WOL">Disabled</Section>
<Section name="System_APIC">Auto Set</Section>
<Section name="System_COMA">COM1</Section>
<Section name="System_COMA_IRQ">IRQ4</Section>
<Section name="System_COMB">Disabled</Section>
<Section name="System_COMB_IRQ">Undefined</Section>
<Section name="System_LPT">LPT1</Section>
<Section name="System_LPT_IRQ">IRQ7</Section>
<Section name="Diskette_Write_Control">Writes_Enabled</Section>
<Section name="NMI_Debug_Button">Disabled</Section>
<Section name="ACPI_Power_Button">Disabled</Section>
<Section name="ASR">Disabled</Section>
<Section name="ASR_Timeout">10 Minutes</Section>
<Section name="Thermal_Shutdown">Enabled</Section>
<Section name="RBSU_Language">01</Section>
<Section name="PXE_NIC1">Disabled</Section>
<Section name="PXE_NIC2">Disabled</Section>
<Section name="BIOS_Console">Disabled</Section>
<Section name="EMS_Console">Disabled</Section>
<Section name="Diskette_Boot">Enabled</Section>
<Section name="NumLock">On</Section>
<Section name="POST_Speed_Up">Enabled</Section>
<Section name="Integrated_Diskette_Controller">Enabled</Section>
<Section name="PCI_Bus_Reset">Enabled</Section>
<Section name="Hot_Plug_Reservation">Auto Set</Section>
<Section name="Memory_Protection">Standard ECC Protection</Section> </Conrep_data>
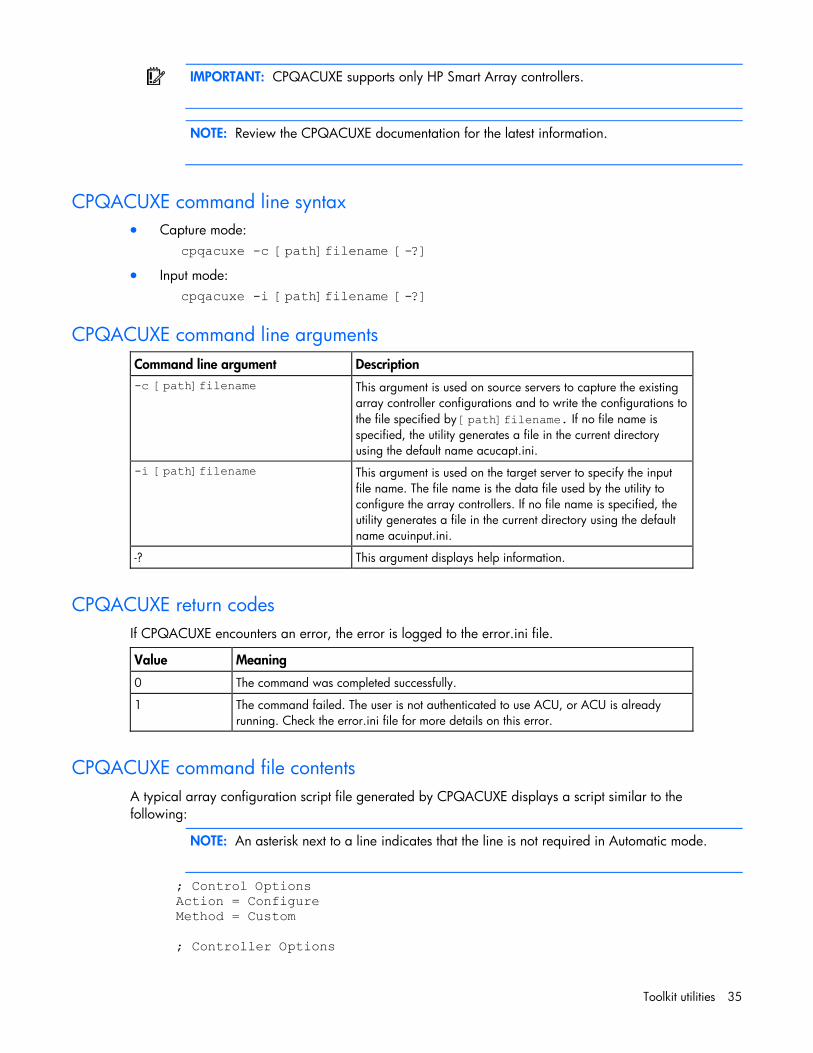
Using CPQACUXE CPQACUXE enables you to configure array controllers on a target server. CPQACUXE reads the configuration information from a data file and applies the configuration to the controllers in the target server. CPQACUXE enables the array configuration existing on one ProLiant ML, DL, or BL server to be replicated on other servers with similar storage configurations.
CPQACUXE has two modes of operation:
• In Capture mode, the configurations of all internal and external array controllers connected to a server are saved to a data file. You can then use CPQACUXE and the data file to replicate the array configuration on other servers that have similar storage resources.
• In Input mode, the array configuration that is specified in a data file is applied to a target system. The data file can be an unmodified or modified capture file, or you can write the data file from scratch.
Toolkit utilities 35
IMPORTANT: CPQACUXE supports only HP Smart Array controllers.
NOTE: Review the CPQACUXE documentation for the latest information.
CPQACUXE command line syntax • Capture mode:
cpqacuxe -c [path]filename [-?]
• Input mode: cpqacuxe -i [path]filename [-?]
CPQACUXE command line arguments
Command line argument Description -c [path]filename This argument is used on source servers to capture the existing
array controller configurations and to write the configurations to the file specified by [path]filename. If no file name is specified, the utility generates a file in the current directory using the default name acucapt.ini.
-i [path]filename This argument is used on the target server to specify the input file name. The file name is the data file used by the utility to configure the array controllers. If no file name is specified, the utility generates a file in the current directory using the default name acuinput.ini.
-? This argument displays help information.
CPQACUXE return codes If CPQACUXE encounters an error, the error is logged to the error.ini file.
Value Meaning
0 The command was completed successfully.
1 The command failed. The user is not authenticated to use ACU, or ACU is already running. Check the error.ini file for more details on this error.
CPQACUXE command file contents A typical array configuration script file generated by CPQACUXE displays a script similar to the following:
NOTE: An asterisk next to a line indicates that the line is not required in Automatic mode.
; Control Options Action = Configure Method = Custom ; Controller Options
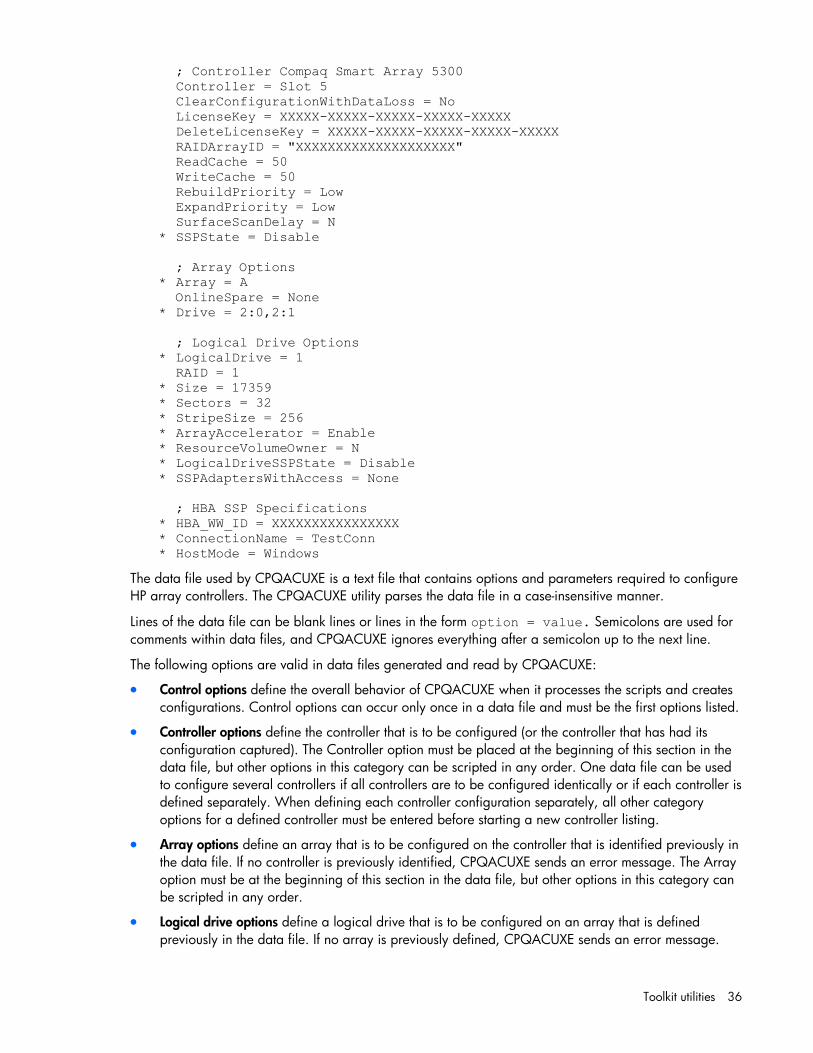
Toolkit utilities 36
; Controller Compaq Smart Array 5300 Controller = Slot 5 ClearConfigurationWithDataLoss = No LicenseKey = XXXXX-XXXXX-XXXXX-XXXXX-XXXXX DeleteLicenseKey = XXXXX-XXXXX-XXXXX-XXXXX-XXXXX RAIDArrayID = "XXXXXXXXXXXXXXXXXXXX" ReadCache = 50 WriteCache = 50 RebuildPriority = Low ExpandPriority = Low SurfaceScanDelay = N * SSPState = Disable ; Array Options * Array = A OnlineSpare = None * Drive = 2:0,2:1 ; Logical Drive Options * LogicalDrive = 1 RAID = 1 * Size = 17359 * Sectors = 32 * StripeSize = 256 * ArrayAccelerator = Enable * ResourceVolumeOwner = N * LogicalDriveSSPState = Disable * SSPAdaptersWithAccess = None ; HBA SSP Specifications * HBA_WW_ID = XXXXXXXXXXXXXXXX * ConnectionName = TestConn * HostMode = Windows
The data file used by CPQACUXE is a text file that contains options and parameters required to configure HP array controllers. The CPQACUXE utility parses the data file in a case-insensitive manner.
Lines of the data file can be blank lines or lines in the form option = value. Semicolons are used for comments within data files, and CPQACUXE ignores everything after a semicolon up to the next line.
The following options are valid in data files generated and read by CPQACUXE:
• Control options define the overall behavior of CPQACUXE when it processes the scripts and creates configurations. Control options can occur only once in a data file and must be the first options listed.
• Controller options define the controller that is to be configured (or the controller that has had its configuration captured). The Controller option must be placed at the beginning of this section in the data file, but other options in this category can be scripted in any order. One data file can be used to configure several controllers if all controllers are to be configured identically or if each controller is defined separately. When defining each controller configuration separately, all other category options for a defined controller must be entered before starting a new controller listing.
• Array options define an array that is to be configured on the controller that is identified previously in the data file. If no controller is previously identified, CPQACUXE sends an error message. The Array option must be at the beginning of this section in the data file, but other options in this category can be scripted in any order.
• Logical drive options define a logical drive that is to be configured on an array that is defined previously in the data file. If no array is previously defined, CPQACUXE sends an error message.
Toolkit utilities 37
The LogicalDrive option must be placed at the beginning of this section in the data file, but other options in this category can be scripted in any order.
• HBA options define an HBA SSP configuration for a logical drive that is previously defined in the data file. If no logical drive is previously defined, CPQACUXE sends an error message. The HBA_WW_ID option must be at the beginning of this section in the data file, but other options in this category can be scripted in any order.
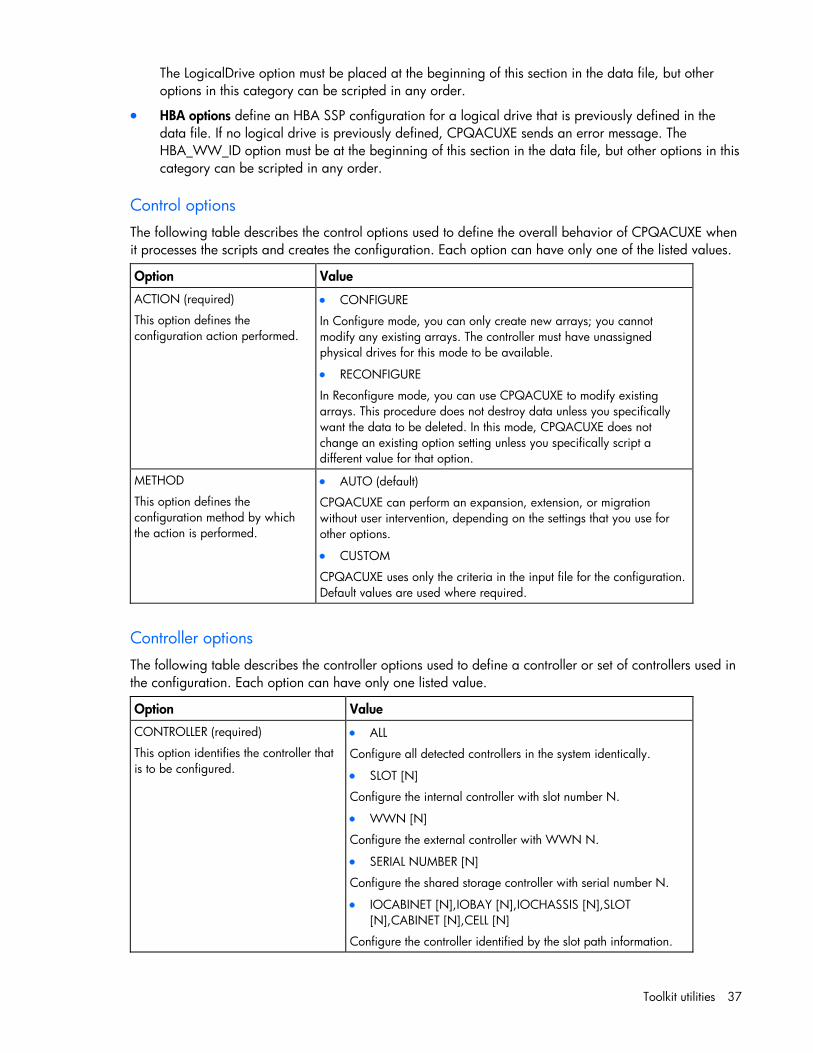
Control options The following table describes the control options used to define the overall behavior of CPQACUXE when it processes the scripts and creates the configuration. Each option can have only one of the listed values.
Option Value
ACTION (required)
This option defines the configuration action performed.
• CONFIGURE
In Configure mode, you can only create new arrays; you cannot modify any existing arrays. The controller must have unassigned physical drives for this mode to be available.
• RECONFIGURE
In Reconfigure mode, you can use CPQACUXE to modify existing arrays. This procedure does not destroy data unless you specifically want the data to be deleted. In this mode, CPQACUXE does not change an existing option setting unless you specifically script a different value for that option.
METHOD
This option defines the configuration method by which the action is performed.
• AUTO (default)
CPQACUXE can perform an expansion, extension, or migration without user intervention, depending on the settings that you use for other options.
• CUSTOM
CPQACUXE uses only the criteria in the input file for the configuration. Default values are used where required.
Controller options The following table describes the controller options used to define a controller or set of controllers used in the configuration. Each option can have only one listed value.
Option Value
CONTROLLER (required)
This option identifies the controller that is to be configured.
• ALL
Configure all detected controllers in the system identically.
• SLOT [N]
Configure the internal controller with slot number N.
• WWN [N]
Configure the external controller with WWN N.
• SERIAL NUMBER [N]
Configure the shared storage controller with serial number N.
• IOCABINET [N],IOBAY [N],IOCHASSIS [N],SLOT [N],CABINET [N],CELL [N]
Configure the controller identified by the slot path information.
Toolkit utilities 38
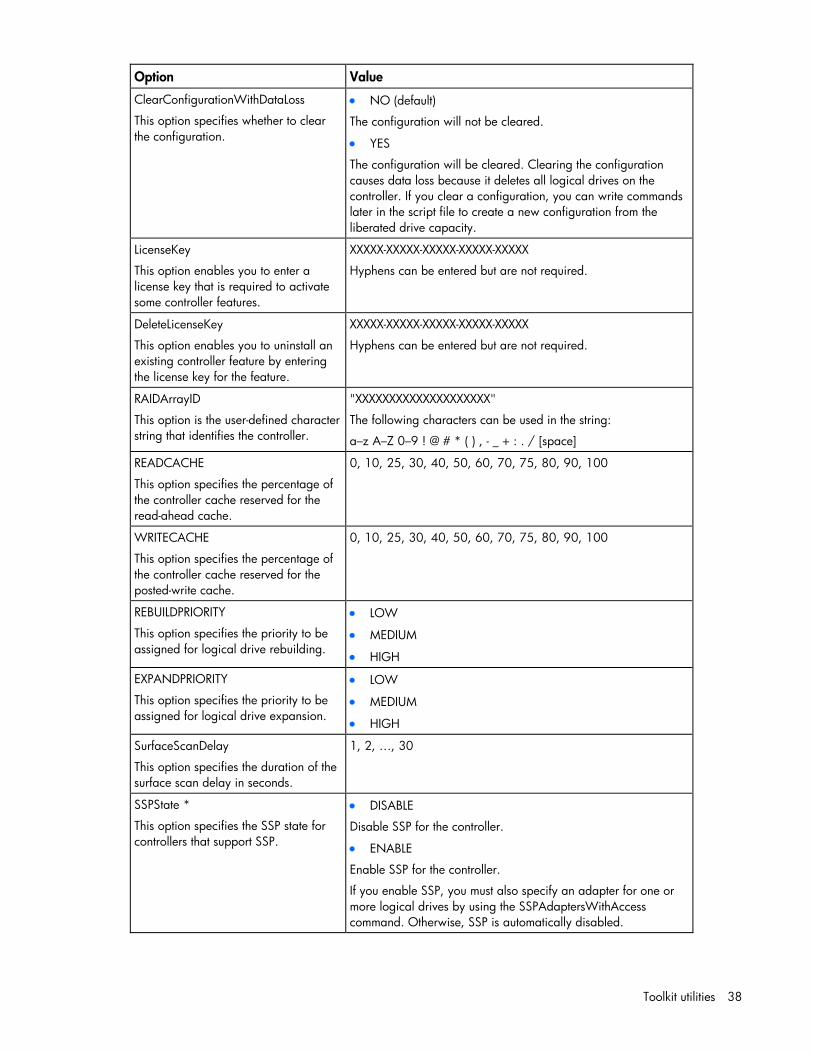
Option Value
ClearConfigurationWithDataLoss
This option specifies whether to clear the configuration.
• NO (default)
The configuration will not be cleared.
• YES
The configuration will be cleared. Clearing the configuration causes data loss because it deletes all logical drives on the controller. If you clear a configuration, you can write commands later in the script file to create a new configuration from the liberated drive capacity.
LicenseKey
This option enables you to enter a license key that is required to activate some controller features.
XXXXX-XXXXX-XXXXX-XXXXX-XXXXX
Hyphens can be entered but are not required.
DeleteLicenseKey
This option enables you to uninstall an existing controller feature by entering the license key for the feature.
XXXXX-XXXXX-XXXXX-XXXXX-XXXXX
Hyphens can be entered but are not required.
RAIDArrayID
This option is the user-defined character string that identifies the controller.
"XXXXXXXXXXXXXXXXXXXX"
The following characters can be used in the string:
a–z A–Z 0–9 ! @ # * ( ) , - _ + : . / [space]
READCACHE
This option specifies the percentage of the controller cache reserved for the read-ahead cache.
0, 10, 25, 30, 40, 50, 60, 70, 75, 80, 90, 100
WRITECACHE
This option specifies the percentage of the controller cache reserved for the posted-write cache.
0, 10, 25, 30, 40, 50, 60, 70, 75, 80, 90, 100
REBUILDPRIORITY
This option specifies the priority to be assigned for logical drive rebuilding.
• LOW
• MEDIUM
• HIGH
EXPANDPRIORITY
This option specifies the priority to be assigned for logical drive expansion.
• LOW
• MEDIUM
• HIGH
SurfaceScanDelay
This option specifies the duration of the surface scan delay in seconds.
1, 2, …, 30
SSPState *
This option specifies the SSP state for controllers that support SSP.
• DISABLE
Disable SSP for the controller.
• ENABLE
Enable SSP for the controller.
If you enable SSP, you must also specify an adapter for one or more logical drives by using the SSPAdaptersWithAccess command. Otherwise, SSP is automatically disabled.
Toolkit utilities 39
* Currently, this option applies only to shared-storage controllers, such as the HP StorageWorks Modular Smart Array 1500 (MSA1500) and Smart Array Cluster Storage. The SSPState option is valid only for controllers that enable SSP on a controller basis. RA4x00 controllers enable SSP on a logical drive basis and use the LogicalDriveSSPState command instead.
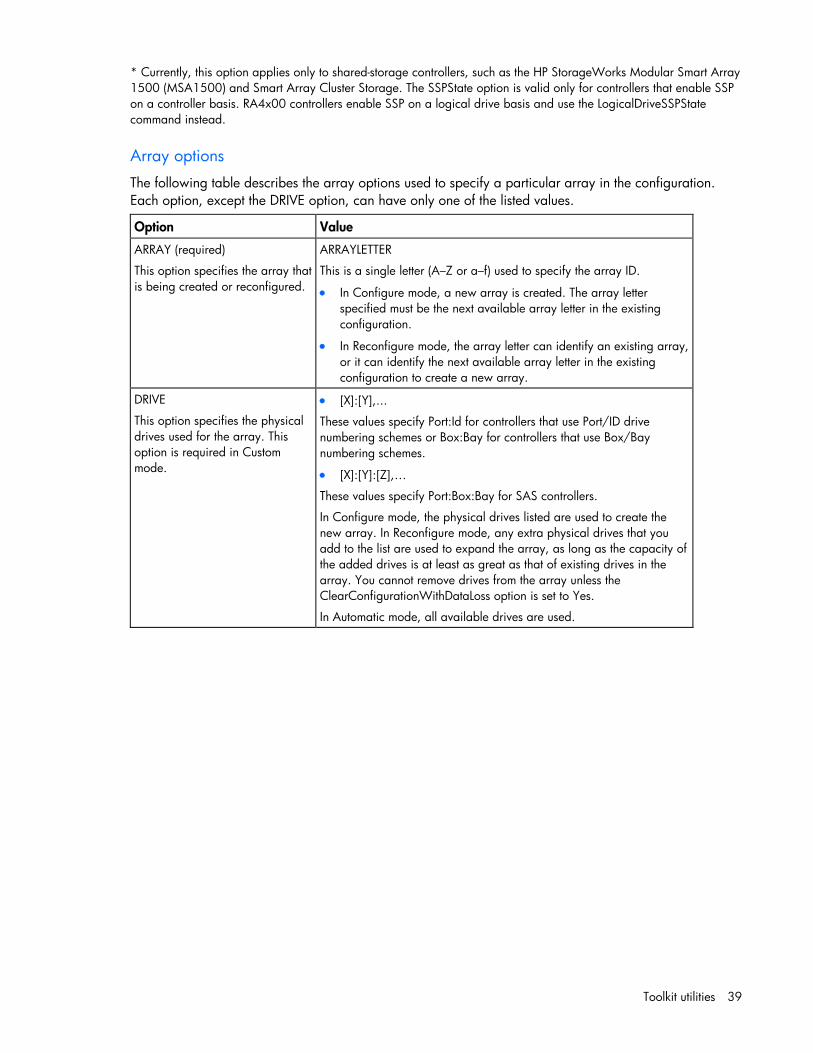
Array options The following table describes the array options used to specify a particular array in the configuration. Each option, except the DRIVE option, can have only one of the listed values.
Option Value
ARRAY (required)
This option specifies the array that is being created or reconfigured.
ARRAYLETTER
This is a single letter (A–Z or a–f) used to specify the array ID.
• In Configure mode, a new array is created. The array letter specified must be the next available array letter in the existing configuration.
• In Reconfigure mode, the array letter can identify an existing array, or it can identify the next available array letter in the existing configuration to create a new array.
DRIVE
This option specifies the physical drives used for the array. This option is required in Custom mode.
• [X]:[Y],...
These values specify Port:Id for controllers that use Port/ID drive numbering schemes or Box:Bay for controllers that use Box/Bay numbering schemes.
• [X]:[Y]:[Z],…
These values specify Port:Box:Bay for SAS controllers.
In Configure mode, the physical drives listed are used to create the new array. In Reconfigure mode, any extra physical drives that you add to the list are used to expand the array, as long as the capacity of the added drives is at least as great as that of existing drives in the array. You cannot remove drives from the array unless the ClearConfigurationWithDataLoss option is set to Yes.
In Automatic mode, all available drives are used.
Toolkit utilities 40
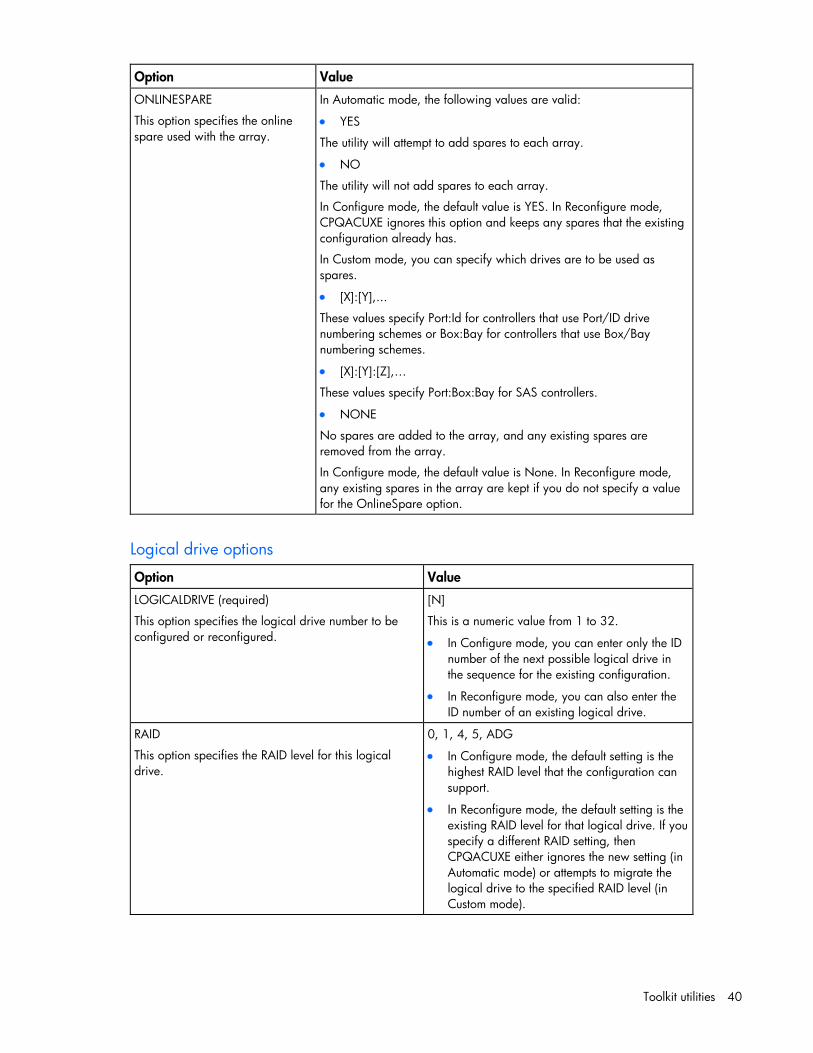
Option Value
ONLINESPARE
This option specifies the online spare used with the array.
In Automatic mode, the following values are valid:
• YES
The utility will attempt to add spares to each array.
• NO
The utility will not add spares to each array.
In Configure mode, the default value is YES. In Reconfigure mode, CPQACUXE ignores this option and keeps any spares that the existing configuration already has.
In Custom mode, you can specify which drives are to be used as spares.
• [X]:[Y],...
These values specify Port:Id for controllers that use Port/ID drive numbering schemes or Box:Bay for controllers that use Box/Bay numbering schemes.
• [X]:[Y]:[Z],…
These values specify Port:Box:Bay for SAS controllers.
• NONE
No spares are added to the array, and any existing spares are removed from the array.
In Configure mode, the default value is None. In Reconfigure mode, any existing spares in the array are kept if you do not specify a value for the OnlineSpare option.
Logical drive options
Option Value
LOGICALDRIVE (required)
This option specifies the logical drive number to be configured or reconfigured.
[N]
This is a numeric value from 1 to 32.
• In Configure mode, you can enter only the ID number of the next possible logical drive in the sequence for the existing configuration.
• In Reconfigure mode, you can also enter the ID number of an existing logical drive.
RAID
This option specifies the RAID level for this logical drive.
0, 1, 4, 5, ADG
• In Configure mode, the default setting is the highest RAID level that the configuration can support.
• In Reconfigure mode, the default setting is the existing RAID level for that logical drive. If you specify a different RAID setting, then CPQACUXE either ignores the new setting (in Automatic mode) or attempts to migrate the logical drive to the specified RAID level (in Custom mode).
Toolkit utilities 41
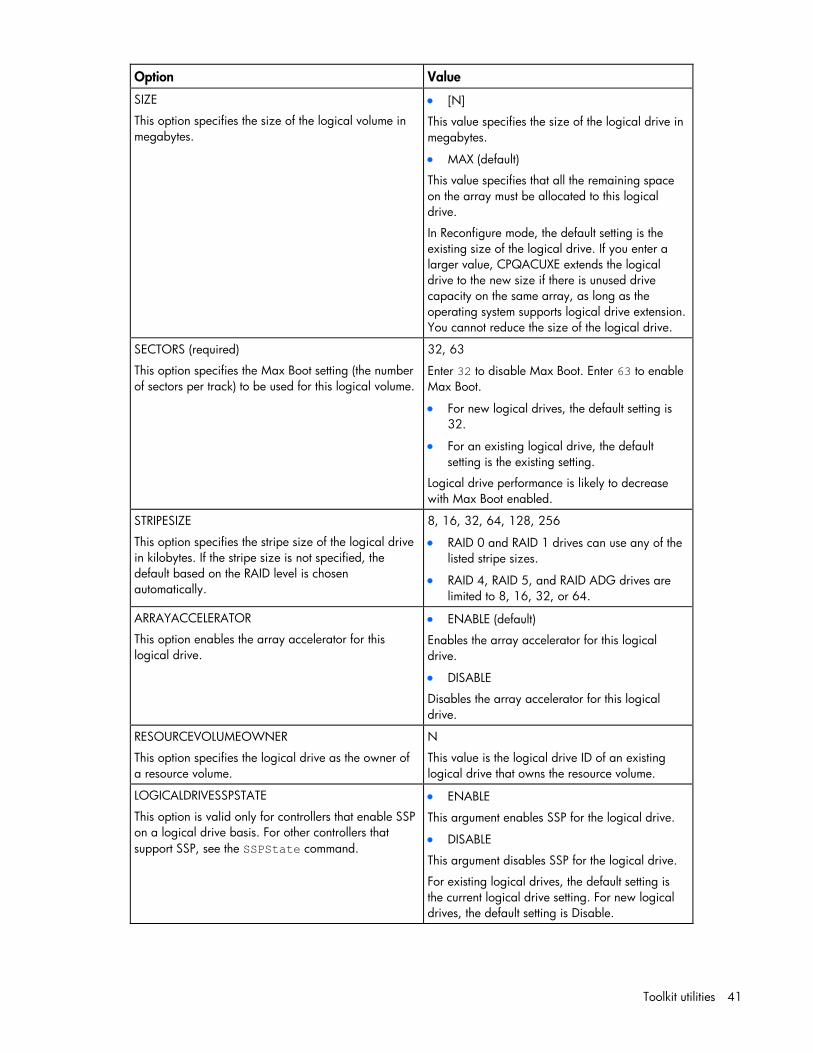
Option Value
SIZE
This option specifies the size of the logical volume in megabytes.
• [N]
This value specifies the size of the logical drive in megabytes.
• MAX (default)
This value specifies that all the remaining space on the array must be allocated to this logical drive.
In Reconfigure mode, the default setting is the existing size of the logical drive. If you enter a larger value, CPQACUXE extends the logical drive to the new size if there is unused drive capacity on the same array, as long as the operating system supports logical drive extension. You cannot reduce the size of the logical drive.
SECTORS (required)
This option specifies the Max Boot setting (the number of sectors per track) to be used for this logical volume.
32, 63
Enter 32 to disable Max Boot. Enter 63 to enable Max Boot.
• For new logical drives, the default setting is 32.
• For an existing logical drive, the default setting is the existing setting.
Logical drive performance is likely to decrease with Max Boot enabled.
STRIPESIZE
This option specifies the stripe size of the logical drive in kilobytes. If the stripe size is not specified, the default based on the RAID level is chosen automatically.
8, 16, 32, 64, 128, 256
• RAID 0 and RAID 1 drives can use any of the listed stripe sizes.
• RAID 4, RAID 5, and RAID ADG drives are limited to 8, 16, 32, or 64.
ARRAYACCELERATOR
This option enables the array accelerator for this logical drive.
• ENABLE (default)
Enables the array accelerator for this logical drive.
• DISABLE
Disables the array accelerator for this logical drive.
RESOURCEVOLUMEOWNER
This option specifies the logical drive as the owner of a resource volume.
N
This value is the logical drive ID of an existing logical drive that owns the resource volume.
LOGICALDRIVESSPSTATE
This option is valid only for controllers that enable SSP on a logical drive basis. For other controllers that support SSP, see the SSPState command.
• ENABLE
This argument enables SSP for the logical drive.
• DISABLE
This argument disables SSP for the logical drive.
For existing logical drives, the default setting is the current logical drive setting. For new logical drives, the default setting is Disable.

Toolkit utilities 42
Option Value
SSPADAPTERSWITHACCESS
This option identifies the SSP adapters that have access to a logical drive.
• [N],[N]...
These values specify a list of SSP adapter IDs that are to be given access to the logical drive.
• NONE
No SSP adapters will have access to the logical drive.
This command is processed only if either SSPState or LogicalDriveSSPState is set to Enable. Otherwise, this command is ignored.
HBA options
Option Value
HBA_WW_ID
This option specifies which HBA to configure.
WWN [N]
Configure the controller with WWN [N].
ConnectionName
This option specifies a user-defined string as the name for the specified controller.
"XXXXXXXXXXXXXXXX"
Any of the following characters can be used in the string:
a–z A–Z 0–9 ! @ # * ( ) , - _ + : . / [space]
HostMode
This option specifies the host mode for the selected HBA.
Setting the host mode optimizes the storage array for the selected operating system. Valid values include:
• Default
• Windows
• Windows (degrade)
• OpenVMS
• Tru64
• Linux
• Solaris
• Netware
• HP
• Windows_SP2
Host modes are device specific. Not all modes are available on all devices and not all HBAs support a host mode.
CPQACUXE overview input file The following text displays an overview input file that describes all of the options for configuring one or more array controllers. The overview provides valid options and their values. Required and default values are in bold type. Options with no default value will not be changed if they are not specified.
;Control Options Action = Configure|Reconfigure Method = Custom|Auto
Toolkit utilities 43
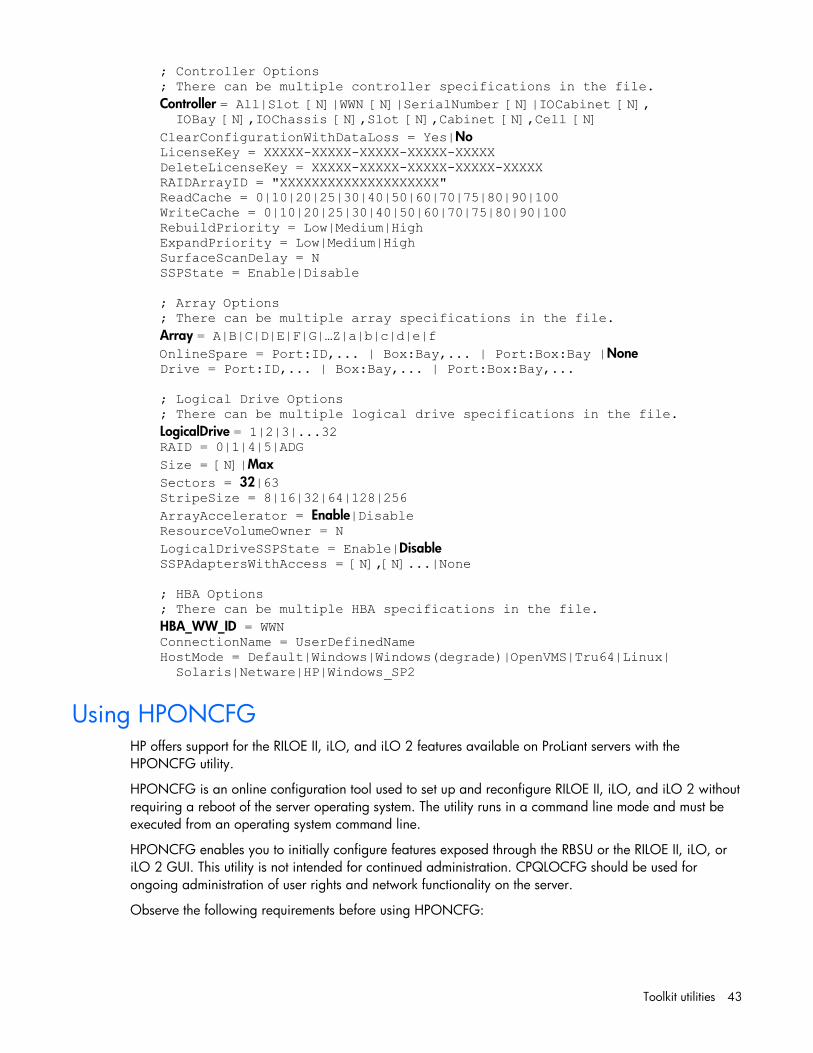
; Controller Options ; There can be multiple controller specifications in the file. Controller = All|Slot [N]|WWN [N]|SerialNumber [N]|IOCabinet [N], IOBay [N],IOChassis [N],Slot [N],Cabinet [N],Cell [N] ClearConfigurationWithDataLoss = Yes|No LicenseKey = XXXXX-XXXXX-XXXXX-XXXXX-XXXXX DeleteLicenseKey = XXXXX-XXXXX-XXXXX-XXXXX-XXXXX RAIDArrayID = "XXXXXXXXXXXXXXXXXXXX" ReadCache = 0|10|20|25|30|40|50|60|70|75|80|90|100 WriteCache = 0|10|20|25|30|40|50|60|70|75|80|90|100 RebuildPriority = Low|Medium|High ExpandPriority = Low|Medium|High SurfaceScanDelay = N SSPState = Enable|Disable ; Array Options ; There can be multiple array specifications in the file. Array = A|B|C|D|E|F|G|…Z|a|b|c|d|e|f OnlineSpare = Port:ID,... | Box:Bay,... | Port:Box:Bay |None Drive = Port:ID,... | Box:Bay,... | Port:Box:Bay,... ; Logical Drive Options ; There can be multiple logical drive specifications in the file. LogicalDrive = 1|2|3|...32 RAID = 0|1|4|5|ADG Size = [N]|Max Sectors = 32|63 StripeSize = 8|16|32|64|128|256 ArrayAccelerator = Enable|Disable ResourceVolumeOwner = N LogicalDriveSSPState = Enable|Disable SSPAdaptersWithAccess = [N],[N]...|None ; HBA Options ; There can be multiple HBA specifications in the file. HBA_WW_ID = WWN ConnectionName = UserDefinedName HostMode = Default|Windows|Windows(degrade)|OpenVMS|Tru64|Linux| Solaris|Netware|HP|Windows_SP2
Using HPONCFG HP offers support for the RILOE II, iLO, and iLO 2 features available on ProLiant servers with the HPONCFG utility.
HPONCFG is an online configuration tool used to set up and reconfigure RILOE II, iLO, and iLO 2 without requiring a reboot of the server operating system. The utility runs in a command line mode and must be executed from an operating system command line.
HPONCFG enables you to initially configure features exposed through the RBSU or the RILOE II, iLO, or iLO 2 GUI. This utility is not intended for continued administration. CPQLOCFG should be used for ongoing administration of user rights and network functionality on the server.
Observe the following requirements before using HPONCFG:
Toolkit utilities 44
• The RILOE II, iLO, or iLO 2 Management Interface Driver must be loaded on the server. HPONCFG displays a warning if the driver is not installed.
• HPONCFG requires minimum RILOE II, iLO, and iLO 2 firmware versions. To determine the minimum firmware version required, see the HP SmartStart Scripting Toolkit Linux and Windows Editions Support Matrix.
For more information, see the Remote Management website (http://www.hp.com/servers/lights-out).
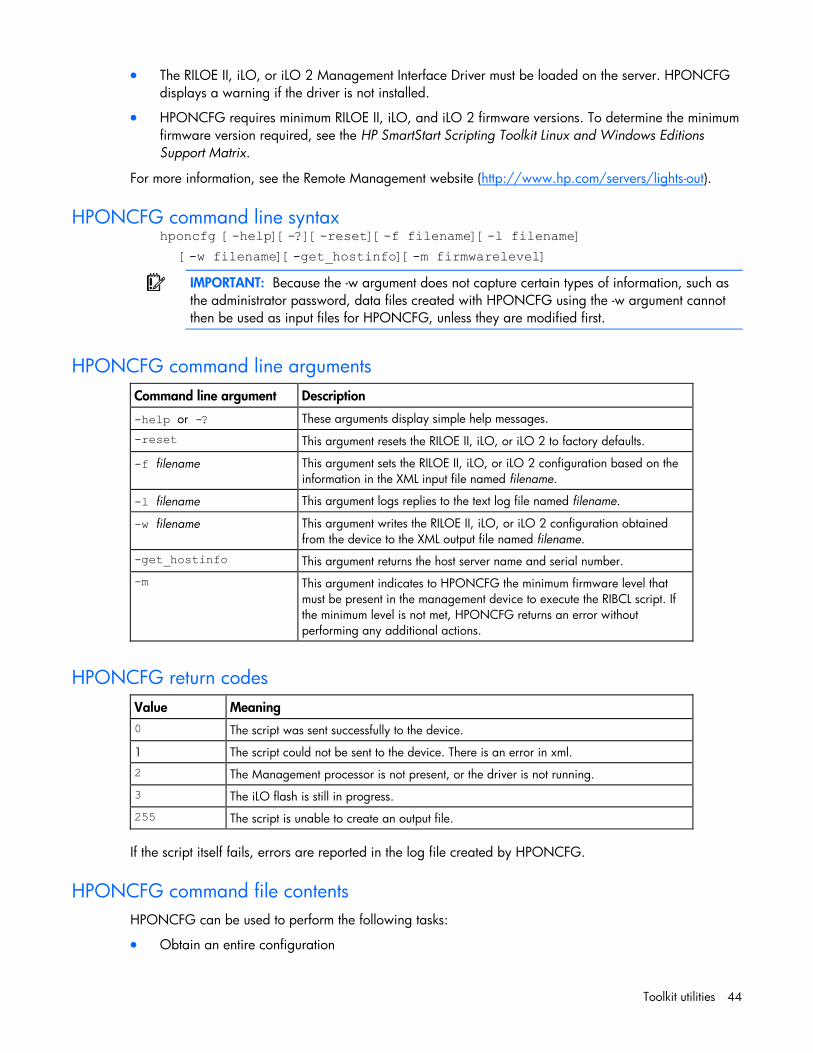
HPONCFG command line syntax hponcfg [-help][-?][-reset][-f filename][-l filename]
[-w filename][-get_hostinfo][-m firmwarelevel]
IMPORTANT: Because the -w argument does not capture certain types of information, such as the administrator password, data files created with HPONCFG using the -w argument cannot then be used as input files for HPONCFG, unless they are modified first.
HPONCFG command line arguments
Command line argument Description
-help or -? These arguments display simple help messages.
-reset This argument resets the RILOE II, iLO, or iLO 2 to factory defaults.
-f filename This argument sets the RILOE II, iLO, or iLO 2 configuration based on the information in the XML input file named filename.
-l filename This argument logs replies to the text log file named filename.
-w filename This argument writes the RILOE II, iLO, or iLO 2 configuration obtained from the device to the XML output file named filename.
-get_hostinfo This argument returns the host server name and serial number.
-m This argument indicates to HPONCFG the minimum firmware level that must be present in the management device to execute the RIBCL script. If the minimum level is not met, HPONCFG returns an error without performing any additional actions.
HPONCFG return codes
Value Meaning 0 The script was sent successfully to the device.
1 The script could not be sent to the device. There is an error in xml.
2 The Management processor is not present, or the driver is not running.
3 The iLO flash is still in progress.
255 The script is unable to create an output file.
If the script itself fails, errors are reported in the log file created by HPONCFG.
HPONCFG command file contents HPONCFG can be used to perform the following tasks:
• Obtain an entire configuration
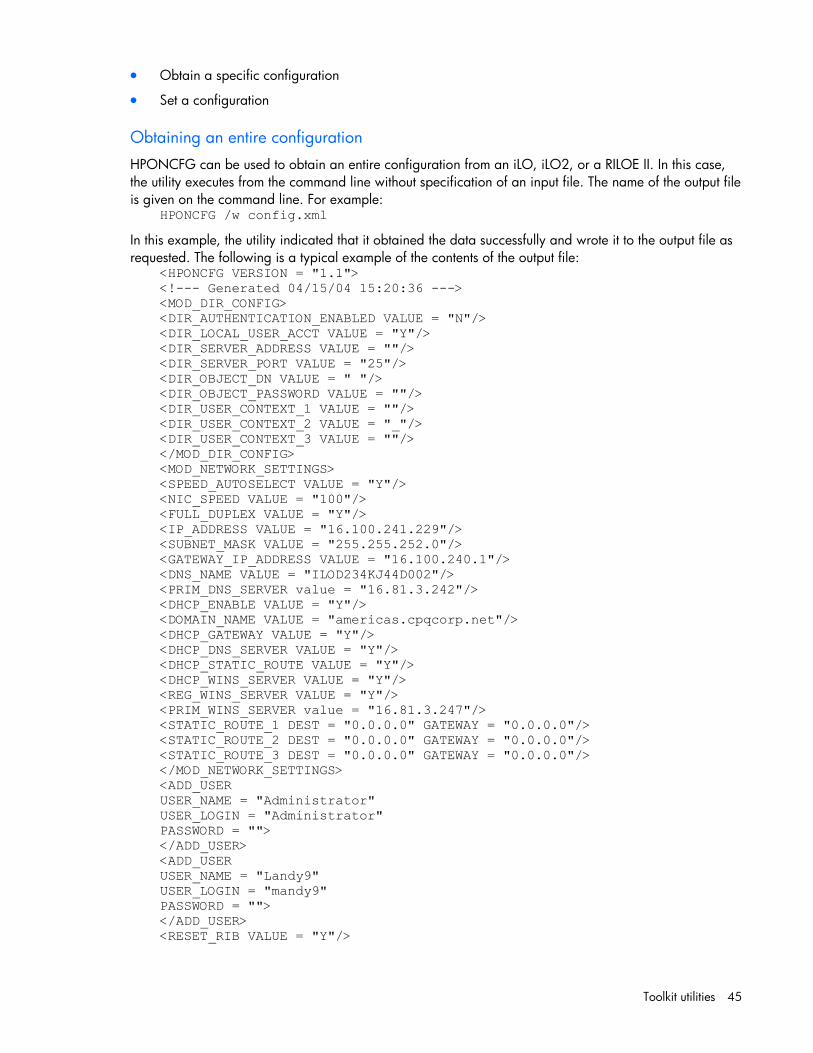
Toolkit utilities 45
• Obtain a specific configuration
• Set a configuration
Obtaining an entire configuration HPONCFG can be used to obtain an entire configuration from an iLO, iLO2, or a RILOE II. In this case, the utility executes from the command line without specification of an input file. The name of the output file is given on the command line. For example:
HPONCFG /w config.xml
In this example, the utility indicated that it obtained the data successfully and wrote it to the output file as requested. The following is a typical example of the contents of the output file:
<HPONCFG VERSION = "1.1"> <!--- Generated 04/15/04 15:20:36 ---> <MOD_DIR_CONFIG> <DIR_AUTHENTICATION_ENABLED VALUE = "N"/> <DIR_LOCAL_USER_ACCT VALUE = "Y"/> <DIR_SERVER_ADDRESS VALUE = ""/> <DIR_SERVER_PORT VALUE = "25"/> <DIR_OBJECT_DN VALUE = " "/> <DIR_OBJECT_PASSWORD VALUE = ""/> <DIR_USER_CONTEXT_1 VALUE = ""/> <DIR_USER_CONTEXT_2 VALUE = "_"/> <DIR_USER_CONTEXT_3 VALUE = ""/> </MOD_DIR_CONFIG> <MOD_NETWORK_SETTINGS> <SPEED_AUTOSELECT VALUE = "Y"/> <NIC_SPEED VALUE = "100"/> <FULL_DUPLEX VALUE = "Y"/> <IP_ADDRESS VALUE = "16.100.241.229"/> <SUBNET_MASK VALUE = "255.255.252.0"/> <GATEWAY_IP_ADDRESS VALUE = "16.100.240.1"/> <DNS_NAME VALUE = "ILOD234KJ44D002"/> <PRIM_DNS_SERVER value = "16.81.3.242"/> <DHCP_ENABLE VALUE = "Y"/> <DOMAIN_NAME VALUE = "americas.cpqcorp.net"/> <DHCP_GATEWAY VALUE = "Y"/> <DHCP_DNS_SERVER VALUE = "Y"/> <DHCP_STATIC_ROUTE VALUE = "Y"/> <DHCP_WINS_SERVER VALUE = "Y"/> <REG_WINS_SERVER VALUE = "Y"/> <PRIM_WINS_SERVER value = "16.81.3.247"/> <STATIC_ROUTE_1 DEST = "0.0.0.0" GATEWAY = "0.0.0.0"/> <STATIC_ROUTE_2 DEST = "0.0.0.0" GATEWAY = "0.0.0.0"/> <STATIC_ROUTE_3 DEST = "0.0.0.0" GATEWAY = "0.0.0.0"/> </MOD_NETWORK_SETTINGS> <ADD_USER USER_NAME = "Administrator" USER_LOGIN = "Administrator" PASSWORD = ""> </ADD_USER> <ADD_USER USER_NAME = "Landy9" USER_LOGIN = "mandy9" PASSWORD = ""> </ADD_USER> <RESET_RIB VALUE = "Y"/>
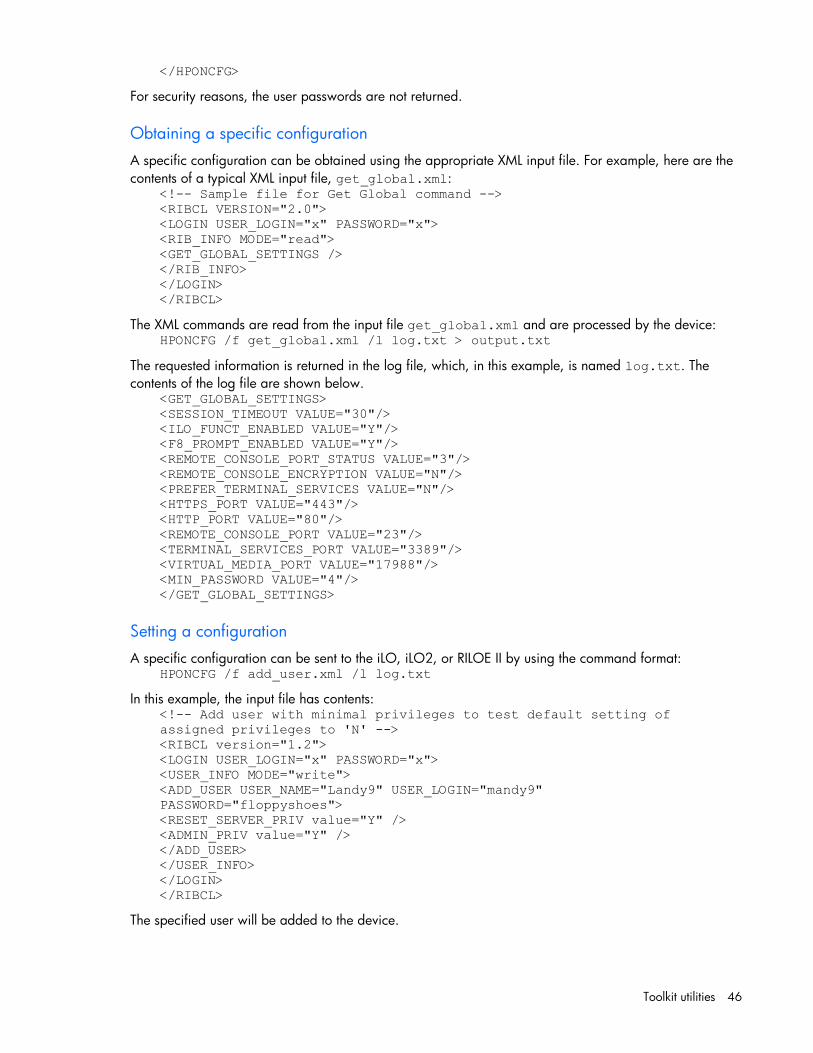
Toolkit utilities 46
</HPONCFG>
For security reasons, the user passwords are not returned.
Obtaining a specific configuration A specific configuration can be obtained using the appropriate XML input file. For example, here are the contents of a typical XML input file, get_global.xml:
<!-- Sample file for Get Global command --> <RIBCL VERSION="2.0"> <LOGIN USER_LOGIN="x" PASSWORD="x"> <RIB_INFO MODE="read"> <GET_GLOBAL_SETTINGS /> </RIB_INFO> </LOGIN> </RIBCL>
The XML commands are read from the input file get_global.xml and are processed by the device: HPONCFG /f get_global.xml /l log.txt > output.txt
The requested information is returned in the log file, which, in this example, is named log.txt. The contents of the log file are shown below.
<GET_GLOBAL_SETTINGS> <SESSION_TIMEOUT VALUE="30"/> <ILO_FUNCT_ENABLED VALUE="Y"/> <F8_PROMPT_ENABLED VALUE="Y"/> <REMOTE_CONSOLE_PORT_STATUS VALUE="3"/> <REMOTE_CONSOLE_ENCRYPTION VALUE="N"/> <PREFER_TERMINAL_SERVICES VALUE="N"/> <HTTPS_PORT VALUE="443"/> <HTTP_PORT VALUE="80"/> <REMOTE_CONSOLE_PORT VALUE="23"/> <TERMINAL_SERVICES_PORT VALUE="3389"/> <VIRTUAL_MEDIA_PORT VALUE="17988"/> <MIN_PASSWORD VALUE="4"/> </GET_GLOBAL_SETTINGS>
Setting a configuration A specific configuration can be sent to the iLO, iLO2, or RILOE II by using the command format:
HPONCFG /f add_user.xml /l log.txt
In this example, the input file has contents: <!-- Add user with minimal privileges to test default setting of assigned privileges to 'N' --> <RIBCL version="1.2"> <LOGIN USER_LOGIN="x" PASSWORD="x"> <USER_INFO MODE="write"> <ADD_USER USER_NAME="Landy9" USER_LOGIN="mandy9" PASSWORD="floppyshoes"> <RESET_SERVER_PRIV value="Y" /> <ADMIN_PRIV value="Y" /> </ADD_USER> </USER_INFO> </LOGIN> </RIBCL>
The specified user will be added to the device.

Toolkit utilities 47
HPONCFG command line examples For HPONCFG command line examples, see the appropriate user guide at the Remote Management website (http://www.hp.com/servers/lights-out).
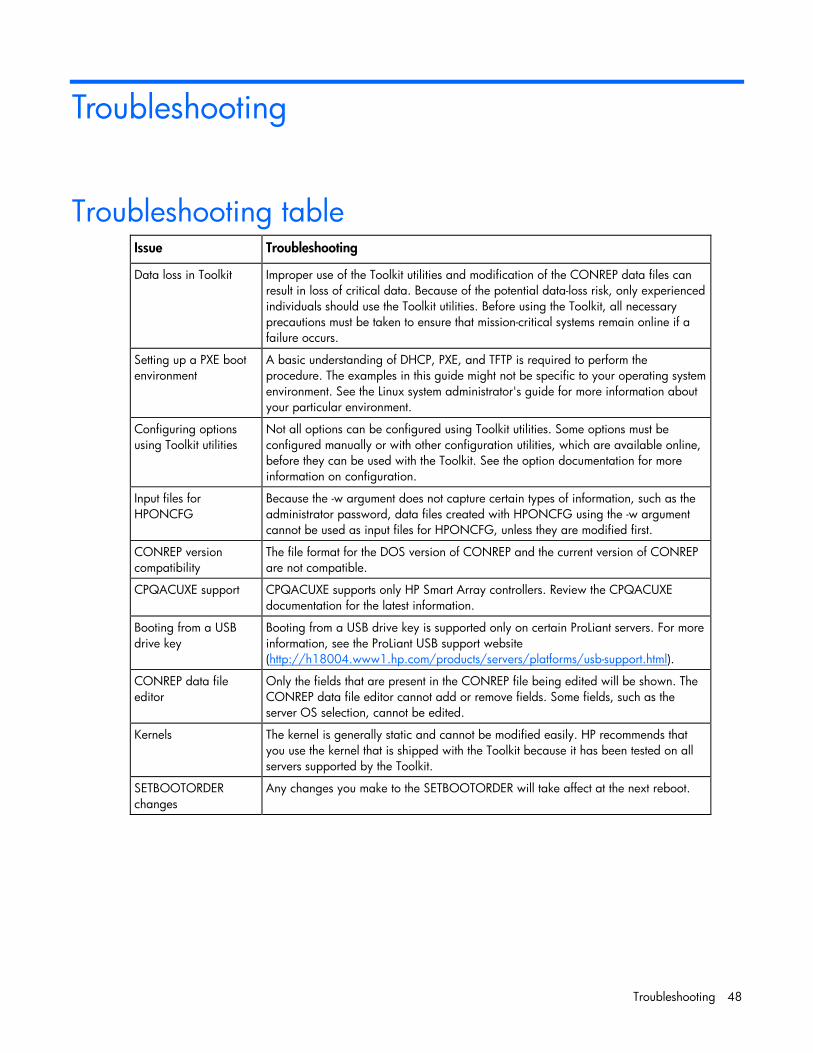
Troubleshooting 48
Troubleshooting
Troubleshooting table
Issue Troubleshooting
Data loss in Toolkit Improper use of the Toolkit utilities and modification of the CONREP data files can result in loss of critical data. Because of the potential data-loss risk, only experienced individuals should use the Toolkit utilities. Before using the Toolkit, all necessary precautions must be taken to ensure that mission-critical systems remain online if a failure occurs.
Setting up a PXE boot environment
A basic understanding of DHCP, PXE, and TFTP is required to perform the procedure. The examples in this guide might not be specific to your operating system environment. See the Linux system administrator's guide for more information about your particular environment.
Configuring options using Toolkit utilities
Not all options can be configured using Toolkit utilities. Some options must be configured manually or with other configuration utilities, which are available online, before they can be used with the Toolkit. See the option documentation for more information on configuration.
Input files for HPONCFG
Because the -w argument does not capture certain types of information, such as the administrator password, data files created with HPONCFG using the -w argument cannot be used as input files for HPONCFG, unless they are modified first.
CONREP version compatibility
The file format for the DOS version of CONREP and the current version of CONREP are not compatible.
CPQACUXE support CPQACUXE supports only HP Smart Array controllers. Review the CPQACUXE documentation for the latest information.
Booting from a USB drive key
Booting from a USB drive key is supported only on certain ProLiant servers. For more information, see the ProLiant USB support website (http://h18004.www1.hp.com/products/servers/platforms/usb-support.html).
CONREP data file editor
Only the fields that are present in the CONREP file being edited will be shown. The CONREP data file editor cannot add or remove fields. Some fields, such as the server OS selection, cannot be edited.
Kernels The kernel is generally static and cannot be modified easily. HP recommends that you use the kernel that is shipped with the Toolkit because it has been tested on all servers supported by the Toolkit.
SETBOOTORDER changes
Any changes you make to the SETBOOTORDER will take affect at the next reboot.
Technical support 49
Technical support
Reference documentation For issues or problems not addressed by this guide, refer to the following resources for more information:
• The SmartStart Scripting Toolkit website (http://www.hp.com/servers/sstoolkit)
• The Red Hat Linux website (http://www.redhat.com)
Toolkit support E-mail support for the SmartStart Scripting Toolkit is available from the HP support website (http://vausnzpro.austin.hp.com/EmailWebForms/email_form.aspx?countrycode=US&langcode=en&sni=437764&lang=en&cc=us).
HP contact information For the name of the nearest HP authorized reseller:
• In the United States, see the HP US service locator webpage (http://www.hp.com/service_locator).
• In other locations, see the Contact HP worldwide (in English) webpage (http://welcome.hp.com/country/us/en/wwcontact.html).
For HP technical support:
• In the United States, for contact options see the Contact HP United States webpage (http://welcome.hp.com/country/us/en/contact_us.html). To contact HP by phone:
o Call 1-800-HP-INVENT (1-800-474-6836). This service is available 24 hours a day, 7 days a week. For continuous quality improvement, calls may be recorded or monitored.
o If you have purchased a Care Pack (service upgrade), call 1-800-633-3600. For more information about Care Packs, refer to the HP website (http://www.hp.com).
• In other locations, see the Contact HP worldwide (in English) webpage (http://welcome.hp.com/country/us/en/wwcontact.html).

Acronyms and abbreviations 50
Acronyms and abbreviations
ACU Array Configuration Utility
CONREP Configuration Replication utility
CPQACUXE Array Configuration Utility XE
CPQLOCFG Lights-Out Configuration Utility
DHCP Dynamic Host Configuration Protocol
FAT file allocation table
GUI
graphical user interface
HBA host bus adapter
HPDISCOVERY HP Discovery Utility
HPONCFG HP Lights-Out Online Configuration utility
HWQUERY
Hardware Query Utility
IFHW IF Hardware Utility
Acronyms and abbreviations 51
iLO Integrated Lights-Out
IP
Internet Protocol
MBR master boot record
NFS network file system
NIC network interface controller
PSP ProLiant Support Pack
PXE Preboot Execution Environment
RAID redundant array of inexpensive (or independent) disks
RAM random access memory
RBSU ROM-Based Setup Utility
RHEL Red Hat Enterprise Linux
RIBCL Remote Insight Board Command Language
RILOE II Remote Insight Lights-Out Edition II
SAS serial attached SCSI
Acronyms and abbreviations 52
SATA serial ATA
SLES
SUSE Linux Enterprise Server
SSP Selective Storage Presentation
STATEMGR State Manager utility
TFTP Trivial File Transfer Protocol
USB universal serial bus
WWN World Wide Name
XML extensible markup language
Index 53
A
ACU (Array Configuration Utility) 10, 11, 34 additional information 49 advanced topics 12 anaconda-ks.cfg 20 arguments 9 arguments, CONREP 32 arguments, CPQACUXE 35 arguments, HPDISCOVERY 27 arguments, HPONCFG 44 arguments, HWQUERY 30 arguments, IFHW 28 arguments, RBSURESET 27 arguments, REBOOT 24 arguments, SETBOOTORDER 25 arguments, STATEMGR 26 Array Configuration Utility (ACU) 10, 11, 34 Array Configuration Utility XE (CPQACUXE) 10, 11,
34 array options 39 authorized reseller 49
B
booting the Linux Toolkit environment from a USB flash device 15
booting the Linux Toolkit environment using PXE 12 bootloader 7 build directory 9
C
capturing configurations 10 caution, data loss 5 CD build directory 9 command file contents 32, 35, 44 command line examples, HPDISCOVERY 28 command line examples, HWQUERY 30 command line examples, IFHW 28 command line examples, REBOOT 24 command line syntax, CONREP 31 command line syntax, CPQACUXE 35 command line syntax, HPDISCOVERY 27 command line syntax, HPONCFG 44
command line syntax, HWQUERY 30 command line syntax, IFHW 28 command line syntax, RBSURESET 26 command line syntax, REBOOT 24 command line syntax, SETBOOTORDER 25 command line syntax, STATEMGR 25 configuration procedures 11, 16, 45, 46 Configuration Replication utility (CONREP) 10, 11,
31 configuration utilities 31 configuration, capturing 10 configuring options 6 CONREP (Configuration Replication utility) 10, 11,
31 control options 37 controller options 37 CPQACUXE (Array Configuration Utility XE) 10, 11,
34 creating a network share 7
D
data file 32 data loss 5 deployment overview 6 DHCP (Dynamic Host Configuration Protocol) 14,
45 DHCP server 14 directory share, TFTP 14 Dynamic Host Configuration Protocol (DHCP) 14,
45
E
e-mail 49 error codes, CONREP 32 error codes, CPQACUXE 35 error codes, HPDISCOVERY 27 error codes, HPONCFG 44 error codes, HWQUERY 30 error codes, IFHW 28 error codes, RBSURESET 27 error codes, REBOOT 24 error codes, SETBOOTORDER 25 error codes, STATEMGR 26
Index
Index 54
examples 24, 25, 26, 28, 30, 42, 47 expression examples 29 expressions 29
F
file contents 32, 35, 44 file system 7
H
hardware configuration 16 Hardware Query Utility (HWQUERY) 29 HBA options 42 help resources 49 HP Discovery Utility (HPDISCOVERY) 27 HP Lights-Out Online Configuration Utility
(HPONCFG) 10, 11, 43, 44 HP ProLiant Support Pack (PSP) 6, 51 HP SmartStart, deployment 6 HPDISCOVERY (HP Discovery Utility) 27 HPONCFG (HP Lights-Out Online
Configuration) 10, 11, 43, 44 HWQUERY (Hardware Query Utility) 29
I
IF Hardware Utility (IFHW) 28 IFHW (IF Hardware Utility) 28 illustrations, boot process 12 iLO (Integrated Lights-Out) 43 iLO 2 (Integrated Lights-Out 2) 43 initrd.img 7 input file, CPQACUXE 42 install_win.sh 22 installing operating system 11, 16 Integrated Lights-Out (iLO) 43 introduction 5 ISO image 9 ISOLINUX 7 isolinux.cfg 7
K
kernel 7
L
Linux Toolkit overview 5 logical drive options 40
M
minimum requirements 5 mkisofs command 9
N
network share 7 NFS Server Configuration Tool 7
O
online help 23 operating system installation 11, 16 operators 29 option configuration 6 overview, Linux Toolkit 5
P
parameters 9 parameters, CONREP 32 parameters, CPQACUXE 35 parameters, HPDISCOVERY 27 parameters, HPONCFG 44 parameters, HWQUERY 30 parameters, IFHW 28 parameters, RBSURESET 27 parameters, REBOOT 24 parameters, SETBOOTORDER 25 parameters, STATEMGR 26 preparing the bootable media 7 ProLiant Support Pack (PSP) 6 PSP (ProLiant Support Pack) 6 PXE boot, illustration 12
R
RBSURESET utility 26 REBOOT (Reboot utility) 24 Reboot utility (REBOOT) 24 references 49 Remote Insight Lights-Out Edition II (RILOE II) 43 requirements, minimum 5 return codes, CONREP 32 return codes, CPQACUXE 35 return codes, HPDISCOVERY 27 return codes, HPONCFG 44 return codes, HWQUERY 30 return codes, IFHW 28 return codes, RBSURESET 27 return codes, REBOOT 24 return codes, SETBOOTORDER 25
Index 55
return codes, STATEMGR 26 RHEL (Red Hat Enterprise Linux) 20 RILOE II (Remote Insight Lights-Out Edition II) 43
S
sample script 20, 22 script files 35, 42, 44 SETBOOTORDER utility 25 setting up a DHCP server 14 setting up a TFTP server 13 source server, capturing configuration from 10 State Manager utility (STATEMGR) 25 STATEMGR (State Manager utility) 25 support 49 syntax conventions 23 syntax, CONREP 31 syntax, CPQACUXE 35 syntax, HPDISCOVERY 27 syntax, HPONCFG 44 syntax, HWQUERY 30 syntax, IFHW 28 syntax, RBSURESET 26 syntax, REBOOT 24 syntax, SETBOOTORDER 25 syntax, STATEMGR 25 SYSLINUX 12 system hardware configuration 16 system utilities 24, 27
T
target server, configuring 11 technical support 49 telephone numbers 49 TFTP directory share 14 TFTP server 13 toolkit utilities 23 troubleshooting 48
U
unattended installation file 20, 22 USB drive key 15
V
variable, State Manager 25 vmlinuz 7
W
website, HP 49