Embed Size (px)
Citation preview

Parts and ControlsSupplied Items
Product Overview
LED Indicator Lights
Getting StartedInstalling Mobile App
Loading Paper
Charging Battery and Powering On/Off
Instant Camera Mode and Printer Mode
Pairing a Mobile Device and the HP Sprocket 2-in-1
Micro-SD Card Functions and Installation
Sound Alerts
Caring for your HP Sprocket 2-in-1
Navigating the AppMenu Navigation
Browse Photo Galleries
Take or Select a Photo
Set up Social Media Sources
Enable Sprocket Printing
Image Preview
Edit a Photo
Create Custom Stickers
Print a Photo
Share a Photo
Sprocket App Features
Safety Information
Specifications
Troubleshooting
Smartphone Printer and Instant Camera—all in one device!
The information contained herein is subject to change without notice. © Copyright 2017 HP Development Company, L.P.
HP Sprocket 2-in-1

1
1
2
4
13
6
7
5 8
11
3
12
14
9
10
15
Supplied ItemsHP Sprocket 2-in-1
Setup Instructions
HP Sprocket Photo Paper (10 sheets)
USB Charging Cable
Wrist Lanyard
Regulatory and Warranty Information
Product Overview1. Power Switch2. Micro-USB Charging Port3. Status Indicator LED Lights4. Charging Indicator LED Light5. Viewfinder6. Shutter Release Button7. Timer Button and Timer LED Light8. Flash LED9. Micro-SD Slot10. Micro-SD Storage LED Light11. Paper Cover12. Paper Output Slot13. Lanyard Notch14. Tripod Mount15. Speaker Output
Parts and Controls

2
LED Indicator LightsCharging Indicator LED LightLED Color/State ConditionOff Fully charged or not connected to a power source
Red, solid Charging; printer can be used while charging
Red, blinking During use, indicates a low battery before turning off. When off, user presses the power switch and the device cannot power ON because of a low battery
Selfie Mirror• Use the reflective surface on the front side
of the Viewfinder as a self-portrait mirror.
Instant Camera Flash Functions• When the device is powered on in
Instant Camera Mode, the camera will automatically trigger the flash if it is necessary for the light conditions.
Using the 10-second Timer Button1. Press and release the Timer Button to toggle between turning the timer on and off. 2. Press the Shutter Release Button to begin the 10 second-countdown. A sound and white Timer LED Light will
alert you the timer is enabled. The timer will automatically disable after each photo is taken.• To cancel the timer while it is counting down, press the Timer Button.• The Timer LED Light will blink slowly for seven seconds and quickly for the final three seconds before taking
the photo.
What if my HP Sprocket 2-in-1 isn’t responding or won’t connect to my mobile device?
If you have trouble connecting or other issues, reset the device. Remove the Paper Cover and locate the pin-hole near the Paper Tray. Insert a straight pin into the hole to press the Reset Button until the printer turns off. Restart the device.
Status Indicator LED Lights LED Color/State ConditionOff The printer is OFF
White, solid The printer is ON
White, fast blinking The printer is booting up; LEDs will turn solid white when ON
White, slow blinking Processing a print job from instant camera or mobile device
Red, solid Printer in error state. Wait for the light to turn white to send a print job
Red, slow blinking Out of paper. Insert more paper to continue printing
Micro-SD Storage LED LightLED Color/State ConditionOff No Micro-SD card installed or card installed with available storage
Red, solid Micro-SD storage is full. Photos cannot be saved, but can be printed
Red, slow blinking Micro-SD card has space for approximately 20 more photos
Reset Button
3
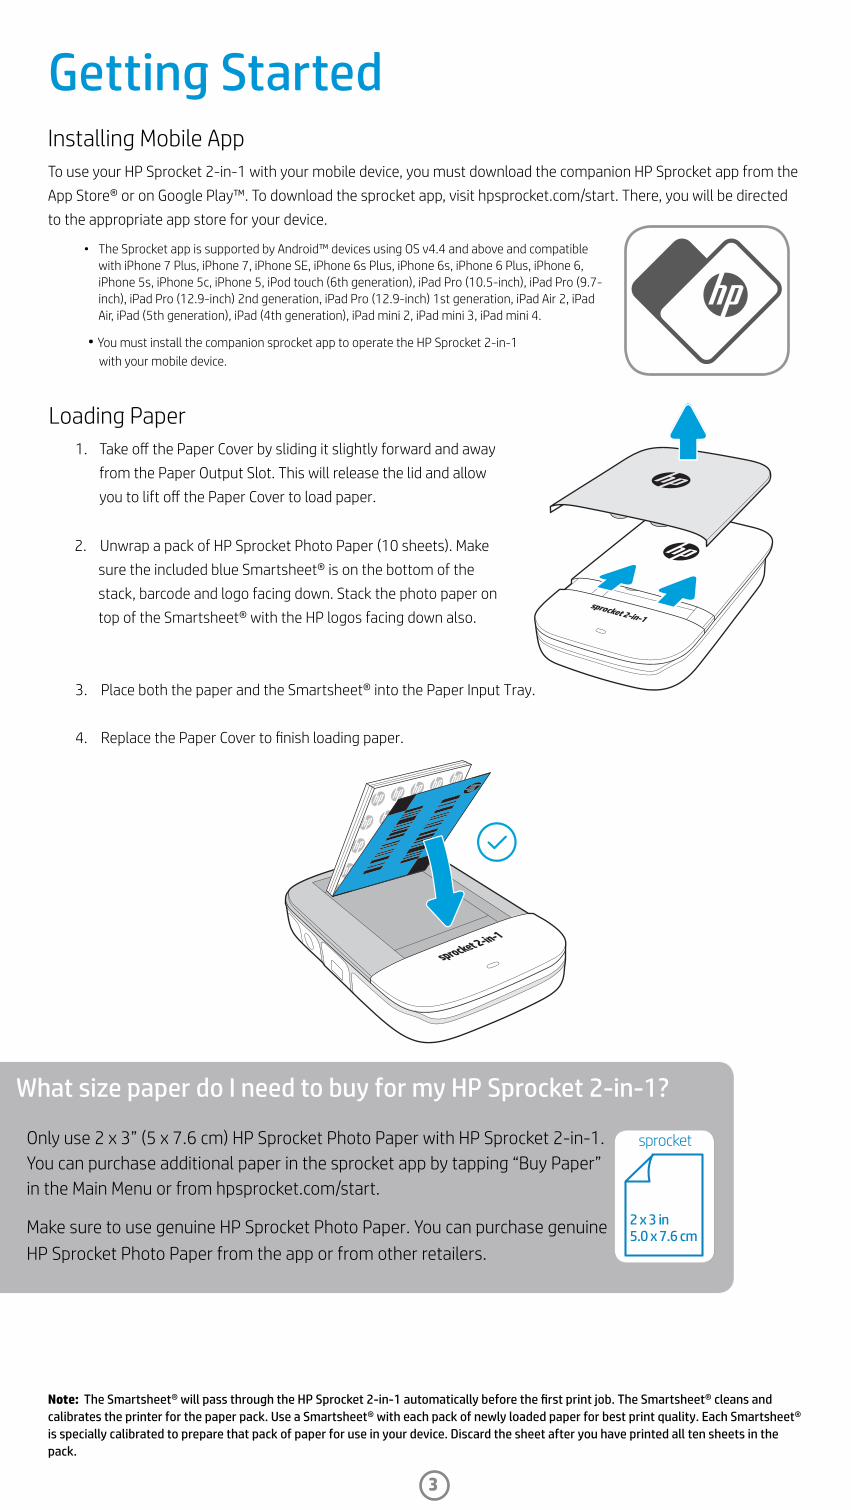
Installing Mobile AppTo use your HP Sprocket 2-in-1 with your mobile device, you must download the companion HP Sprocket app from the App Store® or on Google Play™. To download the sprocket app, visit hpsprocket.com/start. There, you will be directed to the appropriate app store for your device.
• The Sprocket app is supported by Android™ devices using OS v4.4 and above and compatible with iPhone 7 Plus, iPhone 7, iPhone SE, iPhone 6s Plus, iPhone 6s, iPhone 6 Plus, iPhone 6, iPhone 5s, iPhone 5c, iPhone 5, iPod touch (6th generation), iPad Pro (10.5-inch), iPad Pro (9.7-inch), iPad Pro (12.9-inch) 2nd generation, iPad Pro (12.9-inch) 1st generation, iPad Air 2, iPad Air, iPad (5th generation), iPad (4th generation), iPad mini 2, iPad mini 3, iPad mini 4.
• You must install the companion sprocket app to operate the HP Sprocket 2-in-1 with your mobile device.
3. Place both the paper and the Smartsheet® into the Paper Input Tray.
4. Replace the Paper Cover to finish loading paper.
2. Unwrap a pack of HP Sprocket Photo Paper (10 sheets). Make sure the included blue Smartsheet® is on the bottom of the stack, barcode and logo facing down. Stack the photo paper on top of the Smartsheet® with the HP logos facing down also.
Loading Paper1. Take off the Paper Cover by sliding it slightly forward and away
from the Paper Output Slot. This will release the lid and allow you to lift off the Paper Cover to load paper.
What size paper do I need to buy for my HP Sprocket 2-in-1?
Only use 2 x 3” (5 x 7.6 cm) HP Sprocket Photo Paper with HP Sprocket 2-in-1. You can purchase additional paper in the sprocket app by tapping “Buy Paper” in the Main Menu or from hpsprocket.com/start.
Make sure to use genuine HP Sprocket Photo Paper. You can purchase genuine HP Sprocket Photo Paper from the app or from other retailers.
Note: The Smartsheet® will pass through the HP Sprocket 2-in-1 automatically before the first print job. The Smartsheet® cleans and calibrates the printer for the paper pack. Use a Smartsheet® with each pack of newly loaded paper for best print quality. Each Smartsheet® is specially calibrated to prepare that pack of paper for use in your device. Discard the sheet after you have printed all ten sheets in the pack.
Getting Started
4
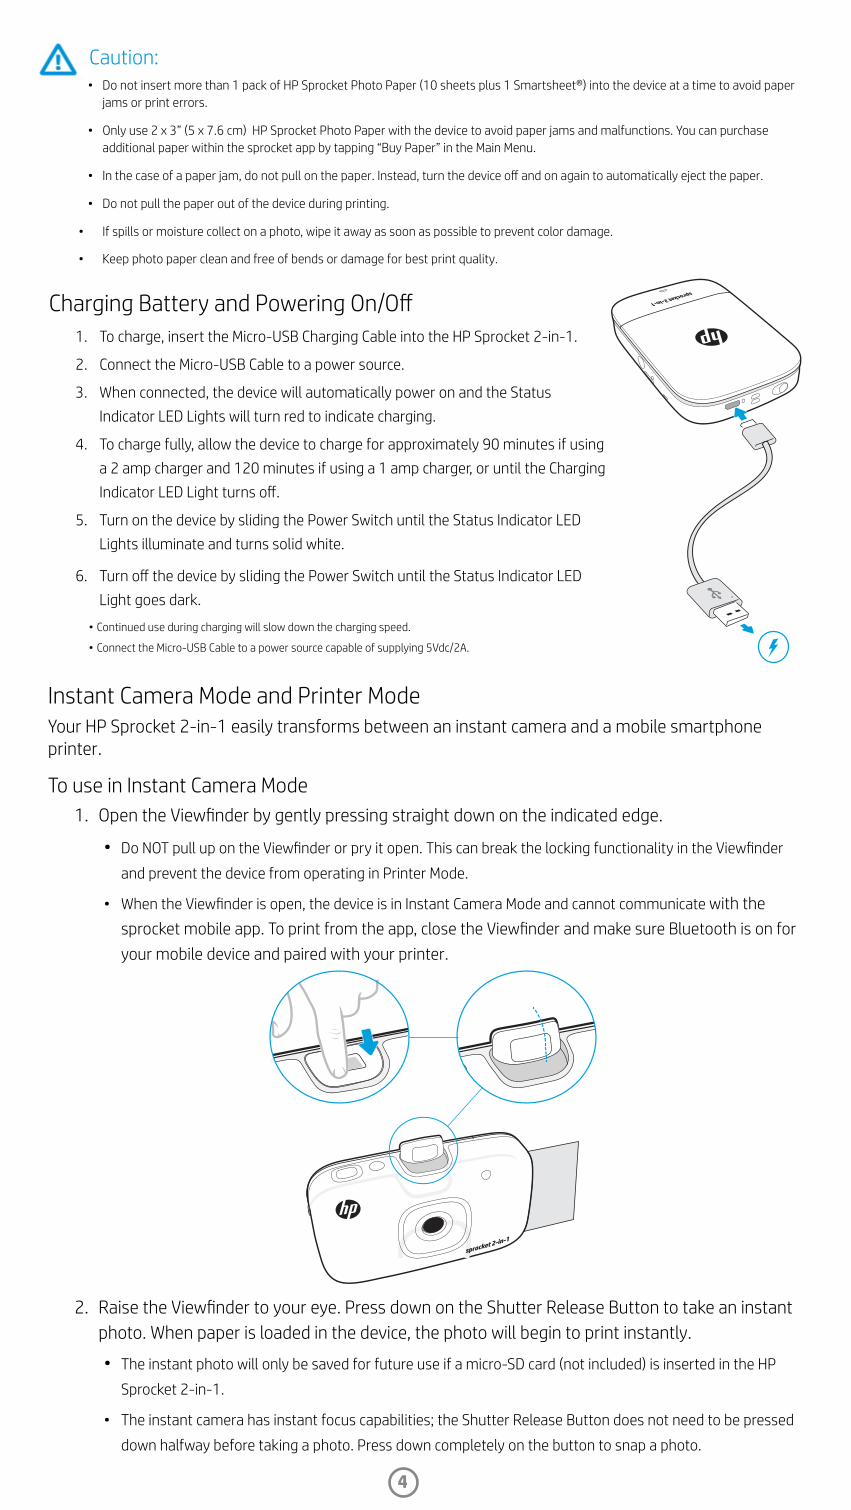
Charging Battery and Powering On/Off1. To charge, insert the Micro-USB Charging Cable into the HP Sprocket 2-in-1.
2. Connect the Micro-USB Cable to a power source.
3. When connected, the device will automatically power on and the Status Indicator LED Lights will turn red to indicate charging.
4. To charge fully, allow the device to charge for approximately 90 minutes if using a 2 amp charger and 120 minutes if using a 1 amp charger, or until the Charging Indicator LED Light turns off.
5. Turn on the device by sliding the Power Switch until the Status Indicator LED Lights illuminate and turns solid white.
6. Turn off the device by sliding the Power Switch until the Status Indicator LED Light goes dark.
• Continued use during charging will slow down the charging speed.
• Connect the Micro-USB Cable to a power source capable of supplying 5Vdc/2A.
Instant Camera Mode and Printer ModeYour HP Sprocket 2-in-1 easily transforms between an instant camera and a mobile smartphone printer.
To use in Instant Camera Mode1. Open the Viewfinder by gently pressing straight down on the indicated edge.
• Do NOT pull up on the Viewfinder or pry it open. This can break the locking functionality in the Viewfinder
and prevent the device from operating in Printer Mode.
• When the Viewfinder is open, the device is in Instant Camera Mode and cannot communicate with the sprocket mobile app. To print from the app, close the Viewfinder and make sure Bluetooth is on for your mobile device and paired with your printer.
2. Raise the Viewfinder to your eye. Press down on the Shutter Release Button to take an instant photo. When paper is loaded in the device, the photo will begin to print instantly.
• The instant photo will only be saved for future use if a micro-SD card (not included) is inserted in the HP
Sprocket 2-in-1.
• The instant camera has instant focus capabilities; the Shutter Release Button does not need to be pressed
down halfway before taking a photo. Press down completely on the button to snap a photo.
Caution:• Do not insert more than 1 pack of HP Sprocket Photo Paper (10 sheets plus 1 Smartsheet®) into the device at a time to avoid paper
jams or print errors.
• Only use 2 x 3” (5 x 7.6 cm) HP Sprocket Photo Paper with the device to avoid paper jams and malfunctions. You can purchase additional paper within the sprocket app by tapping “Buy Paper” in the Main Menu.
• In the case of a paper jam, do not pull on the paper. Instead, turn the device off and on again to automatically eject the paper.
• Do not pull the paper out of the device during printing.
• If spills or moisture collect on a photo, wipe it away as soon as possible to prevent color damage.
• Keep photo paper clean and free of bends or damage for best print quality.

5
Micro-SD Card Functions
Pairing a Mobile Device and the HP Sprocket 2-in-1Pair quickly and easily with your HP Sprocket 2-in-1 using the in-app Setup Instructions. On first launch of the sprocket app, select “Setup”. You can access the Setup Instructions anytime from the Help & How To menu.
For Android™
1. Slide and hold the Power Switch until the Status Indicator LED Lights turn white when fully powered on. 2. Be sure Bluetooth is turned on for your mobile device or tablet and then open the sprocket app. Select the Main
Menu in the upper left-hand corner. 3. Tap sprocket and then Printers to pair your printer with your mobile device or tablet. A pop up message will
direct you to Android™ Settings to pair your printer. Select the printer from the list of available devices.
For iPhone®
1. Slide and hold the Power Switch for 3 seconds to turn on the printer. The Status Indicator LED Lights will turn white once fully powered on.
2. Open iPhone® Settings and select Bluetooth. Turn Bluetooth on and then select the printer from the listed devices.
3. Next, launch the sprocket app.
• A reminder message will appear if you try to print a photo and are not paired with your HP Sprocket 2-in-1.• If your mobile device and printer will not pair, try reseting the printer. • Only one iOS device can pair with the printer at a time. To share the printer, turn off Bluetooth and allow someone else to pair.
To use in Printer Mode1. Close the Viewfinder by pressing it towards the indentation until it latches into place.
• The printer can only communicate with the sprocket app using Bluetooth when the View-finder is closed.
2. Use the sprocket app to decorate and print photos from your mobile camera photo gallery and social sources.
State ResultIf paper is loaded without a micro-SD card
Captures a photo using the instant camera, a shutter sound plays, and one copy of the photo prints
If paper is loaded with a micro-SD card with available storage
Captures a photo using the camera, a shutter sound plays, saves a digital version to micro-SD card, and one copy of the photo prints
If no paper is loaded with a micro-SD card with available storage
Captures a photo using the camera, an error sound plays, and saves a digital version to the micro-SD card (Micro-SD Storage LED blinks red)
If no paper or micro-SD card is loaded An error sound plays (Micro-SD Storage LED blinks red)
Connected to a PC using the USB Charging Cable and a micro-SD card is installed
The device will be in transfer mode and unable to capture or print images
sprocket

6
Sound Alerts
Caring for your HP Sprocket 2-in-1• Remove fingerprints, dust, and dirt from the printer using a dry microfiber cloth.
• Keep the Paper Cover on to prevent dust and debris from entering the paper path.
• Update the printer firmware. Make sure your mobile device is connected to the Internet and then open the HP
Sprocket app. If there is a firmware update available, a firmware update screen displays. Follow the on-screen
prompts to complete the update. Your printer must be charged to 50% or higher before a firmware update.
• Keep your sprocket app updated. If you don’t have your mobile app set to automatically update, go to the
appropriate app store and make sure the latest version is installed.
Apple, the Apple logo, iPhone, iPad, iPod, and iPod touch are trademarks of Apple Inc., registered in the U.S. and other countries.App Store is a service mark of Apple Inc. Android and Google Play are trademarks of Google Inc. Google and Google Logo are registered trademarks of Google Inc.
State Sound ResultPower ON Plays once when the device powers ON
Power OFF Plays once when the device powers OFF (including auto-off)
Shutter Release Button Plays once when the Shutter Release Button is pressed and a photo is taken. When the Timer is running, the sound plays when the photo is taken (end of countdown).
Enable/Disable Timer Plays once per press of the Timer Button
10-second Timer Countdown
Press the Timer Button to start the timer, then press the Shutter Release Button. A sound will play slowly in sync with the Flash LED for the first 7 seconds, then quickly for the last 3 seconds.
Viewfinder open/close Plays once per press of the Viewfinder
Error Plays once per incident (no paper detected, cannot take a photo, etc.)
Install a Micro-SD Card (not included)
• Make sure your HP Sprocket 2-in-1 is powered OFF. Use a fingernail to insert a micro-SD card into your device. The label on the micro-SD card should be facing up towards the Paper Cover.
• The Micro-SD Storage LED will turn red if there is a card error. Remove the micro-SD card, restart the printer, and then reinsert the micro-SD card to clear the error.
• When a micro-SD card is inserted in the device and the device is connected to a computer using the USB Charging Cable, instant camera and printer functionality is unavailable.
• Adjust the sound volume for your HP Sprocket 2-in-1 and other settings through the sprocket app. Access Settings by selecting sprocket in the Main Menu.

7
Menu Navigation
Take a Photo or Scan a Print
Main Menu
View paired printer information
Purchase HP Sprocket Photo Paper
Access help and printer support
Using the Main MenuTap sprocket to view information about your paired printer.
• Check the battery status and change the Auto Off settings for the device.
• View the Mac Address, Firmware Version, and Hardware Version. These will be necessary if contacting HP Sprocket Support.
• This screen will also show Firmware upgrades when available.
Get messages and notifications from the sprocket team
Add and view images to print
Navigating the Sprocket App

8
Browse Photo Galleries1. From the Main Menu, select a social source or the camera photo gallery to view supported photo sources. 2. Once an photo source is selected, swipe left or right on the screen to browse all the galleries.3. For each social media source, a sign in screen will display until you enter your credentials and allow the
sprocket app to access your photos.
• See “Set up Social Media Sources” for information on accessing social media account photos.
User experience navigating the sprocket app might vary based on your operating system. Sytlistic differences provide slight variation in
features and experience. Similarly, available social sources might vary based on region.
Take or Select a Photo1. Launch the HP sprocket app. 2. On the Home Screen, tap the camera icon to take a photo. You can also select a photo from your device or a
social source. 3. If you choose to take a photo, your camera will open. Reverse the camera’s view in the upper left-hand corner.
Tap Exit to return to the gallery.4. Once you’ve taken or selected a photo, you can Edit, Print, or Share your selection.
Set up Social Media Sources1. In the Main Menu, tap Sign In for each of the social media sources listed to allow the sprocket app to gather
photos from your various accounts. 2. You will be redirected to the app login page. Enter your credentials to allow sprocket access to your photo
galleries. 3. Select a photo to edit, print, or share! You will be able to browse your social media photos within the sprocket
app.
Notifications in the sprocket app alert you to updates, tips, and highlights on new features.

9
Image PreviewEdit, print, or share your photo from the image Preview Screen.
• Exit Image Preview by tapping in the upper-left corner.
• Tap Edit to personalize your image.
• Tap the printer icon to print.
• Use a two finger pinching motion on the screen to zoom, rotate, and resize your photo.
• You can also share and save your photo from Image Preview, use Tile Printing, or print multiple copies! To access Print Queue, Tile Printing, and the copies function, swipe up on the light grey bar above the bottom icons to reveal these features.
Enable Sprocket Mobile PrintingYou can enable printing to your HP Sprocket 2-in-1 from most other photo apps too.
For iPhone® or iPad®:
1. From the Preview Screen, tap the Share icon in the lower left corner.
2. Select the More icon—it has three dots. 3. Turn on “Print to sprocket”. You can also drag “Print
to sprocket” to the top of your activity list for easy access.
For Android™: 1. From the Preview Screen, tap the Share icon in the
lower left corner. 2. Select “sprocket” to enable printing.

Edit a Photo
Tap Edit to adjust the photo’s appearance, add text or stickers, and apply filters. Be sure to save your creation when
editing is complete by tapping the checkmark in the upper right corner.
Print a Photo1. Tap the print icon to send your photo to your HP Sprocket 2-in-1.
2. A confirmation message will display, along with a progress bar, to let you know your print job is processing.
3. The Status Indicator LED Light will flash white, the device will make a light humming noise, and the image will begin printing.
4. Now that you’ve printed your photo, use it to decorate as is or remove the back liner from the photo sheet by gently peeling back on a corner. Stick it on a folder, binder, or in a scrapbook!
• If you receive an error message that you are not connected to your printer when you press print, be sure the printer is still powered on and re-pair your mobile device with the printer to try printing again.
• Before printing, make sure no items are blocking the Paper Output Slot.
Share a Photo1. Tap the share icon to post your photo to social
media and send to other apps. 2. After tapping the icon, you can send your photo via
SMS message, email, cloud storage, or to a social media source. When you select your desired sharing source, it will load in the appropriate application for that media outlet.
Note: The available Share options will vary based on the operating system and the applications installed on the mobile device.
10
Autofix
Adjustments
Filters Frames Stickers
Text Crop/Rotate
Brush
Focus
BrightnessContrast Saturation

11
Using the Print Queue Print Queue allows you to save photos to print later and send consecutive prints to your device.
• Queue photos offline for future printing! Send prints to your HP Sprocket 2-in-1 while on the go. When you’re ready to print, access the Print Queue from the Main Menu in the sprocket app and begin printing. The prints in the queue will not automatically print when a connection is re-established.
• Send multiple and consecutive prints to the printer. The prints will appear in the queue in the order they were sent. If the printer is out of paper, images will be added to the queue and will print when paper is loaded.
• Manage the Print Queue from the Main Menu of the sprocket app.
• Access the Print Queue from the Preview Screen. Tap on the light grey bar under your photo to view prints in the queue. Add a print by tapping the print icon.
Create Custom Stickers
1. Create your own drawing or doodle to add to a sprocket print.
2. In the Edit menu, select to enter the Sticker Gallery.
3. In the bottom-left corner, select the plus sign icon.
4. Fill the frame with your drawing and tap the screen.
• Your custom stickers will save to the Custom Sticker Gallery, located next to the plus icon in the Sticker Gallery.
• Long-tap on a sticker to delete it from the Custom Sticker Gallery.
• Long-tap on the Custom Sticker Gallery to delete the entire folder.
Inbox Messages and NotificationsThe sprocket app is continuously adding fun features! Keep up to date on sprocket experiences by reading our sprocket app inbox messages and app notifcations. Enable notifciations in the sprocket app for updates, tips, and highlights on new features.
Sprocket App Features

12
Photobooth Mode
1. Open the sprocket app camera.
2. In the bottom-left corner of the camera screen, tap the rectangle icon.
3. Select Photobooth Mode. When you tap the shutter icon, the camera will then take four photos in a row, with a delay between each. Watch the spinner icon to know how long to hold your pose.
4. Your four captured images will appear tiled in the Preview Screen, on the same print.
• Press the shutter icon again to stop the timed photos while the pictures are being taken.
Relive Memories with Scan ModeMake your sprocket app prints come to life! Scan Mode allows you to use the app camera to scan printed sprocket photos to relive memories through more images and videos from that day or location, augmented reality experiences, and online content.
Scan Mode is only available for photos printed from the mobile sprocket app (not from the Instant Camera). These prints will be automatically tagged to work with Scan Mode.
Scan prints and relive your stories—scanned prints can pull up experiences from a specific location, day, or reveal videos and third party information sources, like websites. Scan Mode also transforms your printed shots into augmented reality experiences.
To Scan:
1. From the sprocket app Photo Gallery, tap on the Camera/Scan icon in the gallery.
2. Center your sprocket print and press and hold the center of the screen to scan and reveal the magic behind the print.
• Make sure the photo is well-lit to avoid a scanning error.
Videos and Scan ModePrint out a video-frame using the sprocket app and rewatch the video when it’s scanned! All videos from any social source or gallery, as well as Apple Live Photos™ will work. Open the video in Image Preview, tap the video-frame selection icon to choose a frame to print, and then tap the print icon.
Magic Frames and Scan ModeAdd a Magic Frame to a photo and watch it reveal hidden treasures when scanned. Select a Magic Frame from the Frame section of the photo Editor. Choose from everyday frames, as well as seasonal and thematic options.
Tile Printing
1. From the Preview Screen, tap the light grey bar under the photo to display a hidden menu.
2. In the Tiles section, select your desired pattern. Tiled photos can print out in 2 x 2 or 3 x 3 prints.
3. Assemble your printed photos to create a large tiled mosaic print!
• From this same collapsed menu you can also add photos to the Print Queue and print multiple copies.
Capture and Scan Mode
Magic Frame Icon
13
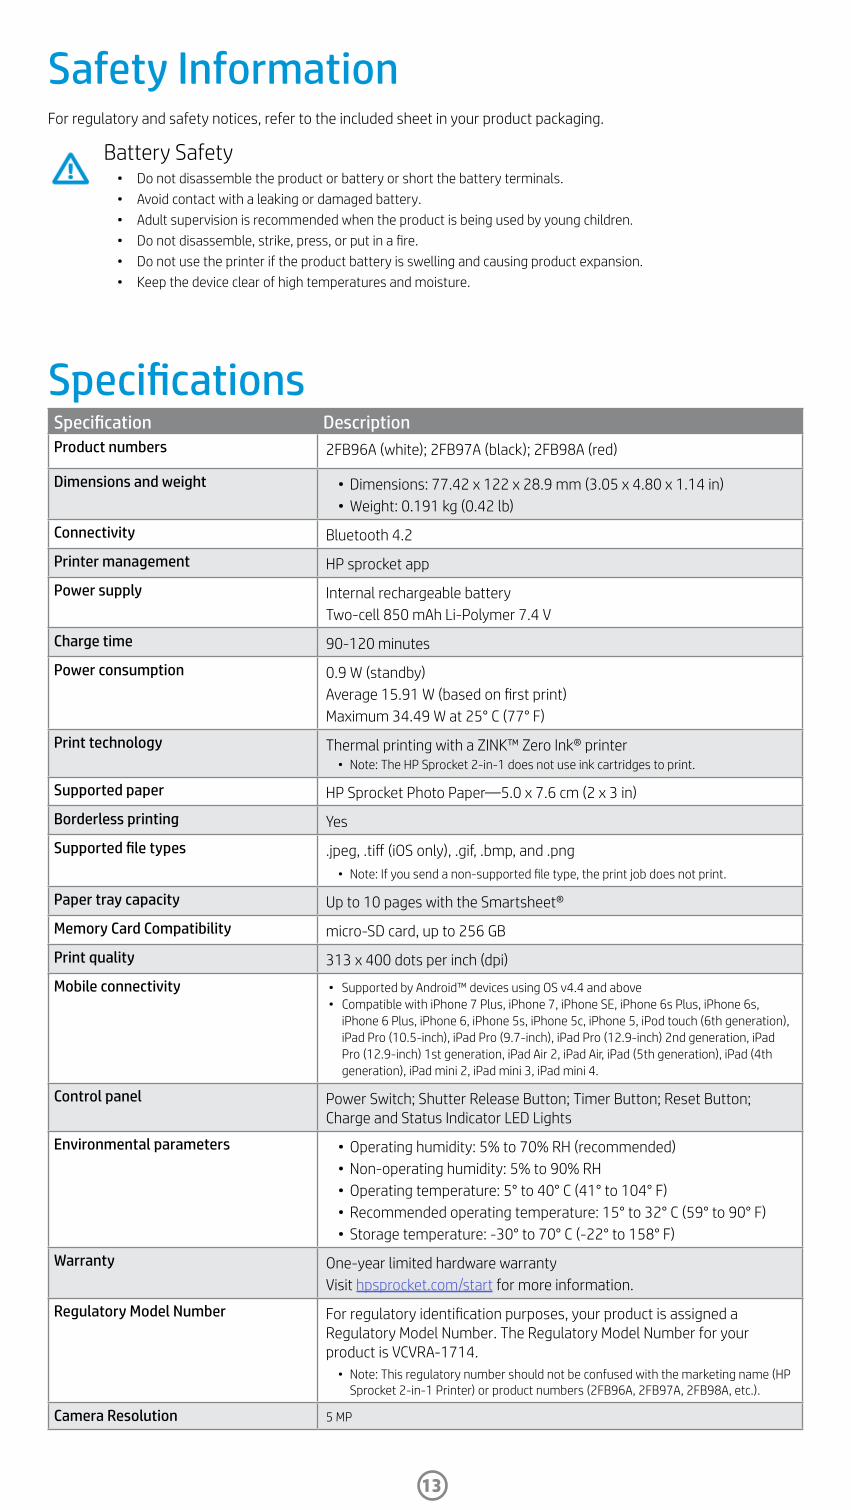
Specification DescriptionProduct numbers 2FB96A (white); 2FB97A (black); 2FB98A (red)
Dimensions and weight • Dimensions: 77.42 x 122 x 28.9 mm (3.05 x 4.80 x 1.14 in)• Weight: 0.191 kg (0.42 lb)
Connectivity Bluetooth 4.2
Printer management HP sprocket app
Power supply Internal rechargeable batteryTwo-cell 850 mAh Li-Polymer 7.4 V
Charge time 90-120 minutes
Power consumption 0.9 W (standby)Average 15.91 W (based on first print)Maximum 34.49 W at 25° C (77° F)
Print technology Thermal printing with a ZINK™ Zero Ink® printer• Note: The HP Sprocket 2-in-1 does not use ink cartridges to print.
Supported paper HP Sprocket Photo Paper—5.0 x 7.6 cm (2 x 3 in)
Borderless printing Yes
Supported file types .jpeg, .tiff (iOS only), .gif, .bmp, and .png• Note: If you send a non-supported file type, the print job does not print.
Paper tray capacity Up to 10 pages with the Smartsheet®
Memory Card Compatibility micro-SD card, up to 256 GB
Print quality 313 x 400 dots per inch (dpi)
Mobile connectivity • Supported by Android™ devices using OS v4.4 and above • Compatible with iPhone 7 Plus, iPhone 7, iPhone SE, iPhone 6s Plus, iPhone 6s,
iPhone 6 Plus, iPhone 6, iPhone 5s, iPhone 5c, iPhone 5, iPod touch (6th generation), iPad Pro (10.5-inch), iPad Pro (9.7-inch), iPad Pro (12.9-inch) 2nd generation, iPad Pro (12.9-inch) 1st generation, iPad Air 2, iPad Air, iPad (5th generation), iPad (4th generation), iPad mini 2, iPad mini 3, iPad mini 4.
Control panel Power Switch; Shutter Release Button; Timer Button; Reset Button; Charge and Status Indicator LED Lights
Environmental parameters • Operating humidity: 5% to 70% RH (recommended)• Non-operating humidity: 5% to 90% RH• Operating temperature: 5° to 40° C (41° to 104° F)• Recommended operating temperature: 15° to 32° C (59° to 90° F)• Storage temperature: -30° to 70° C (-22° to 158° F)
Warranty One-year limited hardware warrantyVisit hpsprocket.com/start for more information.
Regulatory Model Number For regulatory identification purposes, your product is assigned a Regulatory Model Number. The Regulatory Model Number for your product is VCVRA-1714.
• Note: This regulatory number should not be confused with the marketing name (HP Sprocket 2-in-1 Printer) or product numbers (2FB96A, 2FB97A, 2FB98A, etc.).
Camera Resolution 5 MP
For regulatory and safety notices, refer to the included sheet in your product packaging.
Battery Safety• Do not disassemble the product or battery or short the battery terminals. • Avoid contact with a leaking or damaged battery.• Adult supervision is recommended when the product is being used by young children. • Do not disassemble, strike, press, or put in a fire. • Do not use the printer if the product battery is swelling and causing product expansion. • Keep the device clear of high temperatures and moisture.
Safety Information
Specifications

What if the device will not print?• Turn on the printer. By default, the device is set to turn off after 5 minutes. To change when the device automatically turns
off, open the HP sprocket app on your mobile device. Tap , tap sprocket, and then tap Auto Off. Select your desired
timing.
• Charge the printer.
• Confirm Bluetooth is turned on and paired with your printer. If the printer is already paired to your mobile device, turning
Bluetooth off and then on might resolve the issue.
• Make sure the device has photo paper in the input tray. Load up to 10 sheets of HP Sprocket Photo Paper with the blue HP
ZINK™ Smartsheet.
• Move the printer and your mobile device closer together. Bluetooth signals can be weaker at greater distances.
• Update the printer firmware. Make sure your mobile device is connected to the Internet and then open the HP sprocket
app. If there is a firmware update available, a firmware update screen displays. Follow the on-screen prompts to complete
the update. Your printer must be charged to 50% or higher before a firmware update.
• Reset the printer. On the printer, locate the pin-hole under the Paper Cover, insert a straight pin into the hole to press the
reset button until the printer turns off. Restart the printer.
What can I do to improve print quality?Use these recommendations and the sprocket app editing capabilities to improve print quality.
• Use genuine HP Sprocket Photo Paper. ZINK™ makes custom photo paper for a variety of printers, such as Polaroid, LG,
and HP. HP recommends using HP Sprocket Photo Paper for best results. To purchase genuine HP Sprocket Photo Paper, go
to hpsprocket.com/start. You can also purchase genuine HP Sprocket Photo Paper from other retailers.
• Always load the blue HP ZINK™ Smartsheet from the same pack of photo paper currently in the printer. Load the blue HP
ZINK™ Smartsheet into the paper tray with the barcode facing down and the photo paper with the HP logos facing down.
• Allow the printer a few minutes to cool down between print jobs.
• Store the photo paper in a cool, dry place and avoid contact with water. If water spills on a photo, wipe it away as soon as
possible to prevent damaging the photo.
• Update the printer firmware.
How do I clear a paper jam?If the device stops feeding pages, it might be jammed. Clear paper jam and restart the device by sliding and holding the Power Switch.
1. In the sprocket app, press OK to clear the error message.
2. Turn off the printer.
3. Remove the Paper Cover by sliding it away from the Output Slot. Remove any loose photo paper from the input tray.
4. Gently remove the jammed paper from the input tray.
5. Reload the remaining photo paper with the print side facing up.
6. Align the Paper Cover with the tracks on the outside of the printer, and then slide the Paper Cover toward the Output Slot
until it is firmly seated.
8. Turn on the printer.
See page 3 for paper loading illustrations.
14
Troubleshooting and FAQs

15
Can I print to more than one printer?Yes. You can connect and print to more than one printer, but you cannot connect to multiple printers at the same time.
How do I attach a lanyard to my printer?Attach the lanyard to your printer to secure the printer to your wrist, carabiner, etc.
1. With the lanyard in one hand, hold the HP Sprocket 2-in-1 in the other hand, with the camera lens facing upwards.2. Thread the small, narrow end of the lanyard loop through the top hole in the device until it emerges through the bottom
hole. Thread the opposite end of the lanyard through the small end that emerged from the printer.3. Tighten the lanyard by pulling the opposite end.