Embed Size (px)
Citation preview

HRMS User Training Inquiry Only Participant guide Version 1.0 June 2009
Page i of 65

Page ii of 65
HRMS Copyright Information Copyright © 2008 The Australian National University. All rights reserved. Published 2008. Restricted Rights Printed in Australia. The information contained in this document is proprietary and confidential to The Australian National University. The material contained in this document comes from a number of sources including staff and students at the University, and third parties who have given permission for use of their material. No part of this document may be reproduced or transmitted in any form or by any means, electronic or mechanical, including photocopying and recording, for any purpose without the express written permission of The Australian National University. Requests for permission for use of the material should be made to: Pro Vice-Chancellor (Academic Development & Information Services) Second Floor Chancelry - Building 10 East Road Canberra ACT 0200 This document is subject to change without notice, and The Australian National University does not warrant that the material contained in this document is error-free. If you find any errors within this document, please report them to Human Resources Business Solutions. Copyright © 2008 The Australian National University. All rights reserved.

Table of Contents Introduction....................................................................................................4
Support.................................................................................................................... 4 Navigation ............................................................................................................... 5 Common Terminology and Functions ..................................................................... 6
Understanding the HR System .....................................................................7 The Employee Life-Cycle ........................................................................................ 8 The Pay Cycle......................................................................................................... 8 Organisational Relationships .................................................................................. 9
HR Data.........................................................................................................12 How can I look up a person’s address/phone/DOB? ............................................ 12 How do I look up a person’s Emergency Contact Details? ................................... 15 How can I look up a person’s level/pay rate/start date?........................................ 17 How can I look up a person’s Employment-related data?..................................... 23
Payroll and Absence Data...........................................................................27 Daily Pay Processing ............................................................................................ 27 Pay Finalisation..................................................................................................... 28 How can I look up a person’s Hours Pattern?....................................................... 29 How can I look up where a person’s salary is charged to? ................................... 32 How can I look up what additional payments a person is receiving? .................... 34 How do I look up a person’s Absence History?..................................................... 43 How can I look up a person’s Absence Balances or forecast leave balances? .... 46
Where do I find?...........................................................................................49
Page 3 of 65

Introduction Welcome to the Human Resources Management System (HRMS), the University’s HR and payroll system. We use the PeopleSoft Human Resources, version 9 product to administer all our Payroll and Human Resources functions.
Support Support for you in using HRMS in the workplace is provided:
Drop In Centre Wednesday afternoon 2.00 – 4.30pm
HR Help Desk call extension 59622, or
email [email protected], or
log a job at http://hrhelpdesk.anu.edu.au
The HRMS website Located at http://info.anu.edu.au/hr/HR_Systems/HRMS/index.asp
HRMS users email list - You should make sure you are on the
[email protected] email list. These lists are automatically generated twice daily (at lunchtime and overnight) based on information recorded in the ANU's HR Management System, HRMS against Position Data - see the HRMS user guide Adding a Position Category for Administrative Email Lists on the HRMS website.
Page 4 of 65

Navigation
Functions and Pages are accessed through the menu structure that sits on the left hand side of the screen, reflective of many of the University’s web pages. The menu structure is mirrored in the main area of the screen and users can navigate using either the menu or the icons. These are called Default Functional Area Navigation (DFAN) and are used as a navigation short cut.
Also used as a navigation shortcut are Collections-based Functional Area Navigations (CFAN), which are have been configured for certain user groups and act as an access point for commonly used functions and pages. HR Administrators will see an example of a CFAN in Workforce Administration called ANU Hiring and Job Changes. This CFAN contains quick access to most of the pages and functions you will need to access.
Navigation can be traced with the use of Breadcrumbs. Breadcrumbs allow the user to view the navigation path they have taken and to move back at the click of a button.
Page 5 of 65

Users are also able to save their frequently used pages and functions in their “Favourites”. Just like a web browser can save – or bookmark - frequently visited websites, the HRMS can save frequently used functions or pages. Use the “Add to Favourites” function located in the header to save the current page as a favourite.
Then access your favourites list at the top of the left hand side menu bar.
Common Terminology and Functions Understanding some of the Terminology that is used with regard to the system will help you understand the this guide better and navigate through the system quickly. Here are some commonly used terms Page – The name we use to describe the screen displaying data Component – A group of pages i.e. Job Data Element - Earnings, deductions absence entitlements and absence
takes. Element Assignment - A page used to give a payee on -going earnings and
deductions.
Page 6 of 65

Positive Input - A page used to add, update, override or stop an earning or deduction for a payee in a single calendar.
Pay Calendar – A period of time, the pay period, uniquely identified in the
system by an alfa-numeric code. E.g. F20081224PAY Pay Group - Each employee must belong to Pay Group in the HRMS.
The pay group defines many of the benefits and earnings. At ANU we have only one pay group – ANU. Many of the default field values on the Workforce Administration pages are based on the pay group values that you specify on the Pay Group Table component.
Eligibility Group - Determines what earnings, deductions, absence entitlement
and absence takes a payee is eligible for. Person of Interest (POI) A person about whom the organisation maintains
information but who is not part of the workforce. Work schedule - A page used to record a payee’s hours of work that
determines their units for pay and absences. Employment Instance Employment Instance represents an instance of a person
holding a job in PeopleSoft HR. When a person is hired into a position they get an Employment Instance. A person may have one or more Employment Instances.
Effective Date Date on which the associated information takes effect. The
information is in effect until a new entry is made with a more current effective date. We do not have “stop dates” on effective dated data. The Effective Date usually defaults to the system's current date.
Understanding the HR System The HR MS is a web-based system allowing access to the database used to record all employee and person of interest information. Based on your duties and the area of the university you work in you will have an access profile. This profile determines what pages you can access, what functions you can perform and what group of employees you can see. Generally as a HR administrator you will access your functions through three main menus - Workforce Administration- For Job and personal information, to add a relationship instance, give someone a salary increment etc Global Payroll & Absence Management - To access pay information, process a casual or ongoing payment, approve an absence request Organisational Development – To add and maintain position information
Page 7 of 65

The Employee Life-Cycle There are four stages in the life cycle of an employee - Recruit, Hire, Maintain and Terminate.
Hire
Recruit
Maintain
Terminate
While Positions are maintained in the HRMS, recruitment action, such as advertising and applicant management etc is managed through the Recruit@ANU system. Once a successful applicant has accepted the offer, they are then hired in to the HRMS. The Hire stage involves the process of turning the successful applicant into an employee. Once the employee has been hired it will then be necessary to enter all the other data required to ensure all the relevant details about the employee are recorded correctly and they receive all the correct entitlements, banking and tax details, emergency contact information and so on. This information then needs to maintained on an ongoing basis during the employee's period of employment. The Maintain stage includes all actions that occur during a person's employment such as pay rate changes, transfers, reviews, absences and so on. The Terminate stage is when employment ends. Whether the reason for the termination of the employment relationship was resignation, retirement or redundancy it is still referred to as Termination.
The Pay Cycle The ANU runs a fortnightly pay cycle that commences on the Thursday payday and finishes the Wednesday before payday. The pay cycle influences pay processing in the system and as such you will notice that the system will go in to different modes. It is important you are aware of this cycle and what each mode means. Below is an outline.
Page 8 of 65

Day System Mode Thursday Open Access Pay Day Friday Open Access Monday Open Access Tuesday Open Access Wednesday Open Access Pay Cut off – Must have Bank and Tax
details and any other centrally entered data to the Remunerations and Benefits team by COB
Thursday No Hire Mode Not able to Hire new employees Friday No Hire Mode Not able to Hire new employees Monday Inquiry Only Mode Pay Run day. Only central R&B team can
enter data. At 5pm all users are locked out of the System for pay processing Managers can approve absence requests till lunch time
Tuesday Inquiry Only Mode – morning
Pay reconciliation takes place. Depending on the time it takes the system will remain in inquiry only mode. Users should expect Open Access to be granted around mid-morning. Users can still run reports and view data.
Wednesday Open Access
Organisational Relationships Each person recorded in the HRMS is allocated an Organisational Relationship, either an Employee (EMP) or a Person of Interest (POI). A person may have more than one Organisational Relationship and more than one instance of that relationship. An Employee is someone who is employed by University to perform a particular job and be compensated accordingly. Employees have particular benefits and entitlements (including pay) administered through the HRMS. An Employee can hold more than one job and therefore may have multiple Employment Records. A Person of Interest is a person about whom the organisation maintains information but who is not part of the workforce. A Person of Interest (POI) can be:
• Students • Campus Visitors • Academic Visitors • External Trainee/Trainees • ANU Officials • Pre-Employees
Although most of the POI types do not have a Job Record attached to them, there are three that do. These are
• Scholars
Page 9 of 65

Page 10 of 65
• Visiting Fellow with Allowance • Global Payroll Payees (Central use only)
This is so payments can be made to the person using the HRMS. Every person recorded in the HRMS will have a “Person Organisation Summary” which will show all the relationships. You should check the Person Organisation Summary prior to rehiring, adding an employment instance or adding a POI instance.

Page 11 of 65
Main Menu>Workforce Administration>Personal Information>Person Organisation Summary

HR Data The following procedures are designed to help you become familiar with the navigating through system, finding and reviewing data.
How can I look up a person’s address/phone/DOB? Use this process to look up a person’s Personal Data. The Personal Data pages contain information relating to the person, such as name, home address and phone number, gender, date of birth etc.
1. Navigate to the Personal Information component. Main Menu>Workforce Administration>Personal Information>Biographical>Modify a Person
2. The Search Criteria page displays
3. Enter the search information that you have in the relevant field, for example Last Name or EmplID,
then click the Search pushbutton. 4. Where there is an exact match to your search criteria you will be taken directly to Personal Data for
that person. Where there are multiple matches to your search criteria a list will be displayed and you will need to select the correct one.
Page 12 of 65

5. The Personal Data pages now display. The first of these pages is Biographical Details
6. On the Biographical Details page you can see the following details – Name – in the Name group box. Click the View Name link for further name detail. Date of Birth – in the Biographic Information group box Gender – In the Biographical History group box
7. Click the Contact Information tab
Page 13 of 65

8. The Contact Information page displays
9. On the Contact Information page you can see the following details-
Addresses – including home, business and mailing etc Phone Numbers – including mobile, campus, home and emergency mobile Email Addresses – including home, business and campus
10. Click the Regional tab
11. The Regional page displays
12. On the Regional page you can see whether the person identifies as Aboriginal, Torres Strait Islander, both or neither. We do not use the Religion fields at ANU so these will always be blank.
You have successfully reviewed a person’s Personal Data!
Page 14 of 65

How do I look up a person’s Emergency Contact Details? Use this procedure to look up a person’s Emergency Contacts. The Emergency Contact pages contain the contact information for a persons’ Emergency Contact such as name, phone number and address.
1. Navigate to the Emergency Contact component. Main Menu>Workforce Administration>Personal Information>Personal Relationships>Emergency Contact
2. The Search Criteria page displays
3. Enter the search information that you have in the relevant field, for example Last Name or EmplID,
then click the Search pushbutton. 4. Where there is an exact match to your search criteria you will be taken directly to the Emergency
Contact page for that person. Where there are multiple matches to your search criteria a list will be displayed and you will need to select the correct one.
Page 15 of 65

5. The Emergency Contact pages now display. The first of these pages is Contact Address/Phone
6. A person may have more than one emergency contact. All contacts are listed on this page. To see all Contacts, click View All in the group box header, or scroll through the various contacts using the arrow buttons.
First contact – Friend Second contact - Mother
7. Click the Other Phone Numbers tab.
Page 16 of 65

8. The Other Phone Numbers page displays
9. Once again you can scroll through each contact using by clicking View All or using the arrow buttons. This page will display other phone numbers for the respective contact person.
You have successfully reviewed a persons Emergency Contact details!
How can I look up a person’s level/pay rate/start date? Use this procedure to look up a person’s Job-related data. The Job Data pages contain information relevant to the persons’ employment such as hire date, other transaction dates, salary information, compensation rates, HR department and type of appointment.
1. Navigate to the Job Data component Main Menu>Workforce Administration>Job Information>Job Data
Page 17 of 65

2. The Search Criteria page displays
3. Enter the search information that you have in the relevant field, for example Last Name or EmplID,
then click the Search pushbutton. 4. Where there is an exact match to your search criteria you will be taken directly to Job Data for that
person. Where there are multiple matches to your search criteria a list will be displayed and you will need to select the correct one.
Page 18 of 65

5. The Job Data pages now display. The first of these pages is Work Location
6. Job Data consists of multiple pages that hold history, current and future dated data. Each page is effective dated and has a corresponding Action and Reason. These detail the transaction type and the date it takes effect.
We can tell from this effective date that this transaction is due in the future, however there is also a corresponding label
7. Use the arrows or the First and Last hyperlinks to scroll through the various transactions. The first record will always be the most recent transaction, the last record will always be the Hire transaction.
Page 19 of 65

8. Multiple transactions can happen on the same day and in this instance the sequence field will be updated also.
9. There are many transactions that can occur throughout the period of employment, including – • Confirmation of Probation • Change to Standard Hours • Salary Increments • Salary Increases • Temporary or Permanent transfer • And many more
Always check the Effective Date and the Action/Reasons to review the transactions for each employee. Depending on the Action/Reason, other details on Job Data will be updated. For example: a salary increment will mean Salary Step on the Salary Plan page is updated as well as compensation rates on Compensation page. On the Work Location page you can see the following details- Effective Dates Transaction details – Action and Reasons Position details – Position number and Title HR Dept – Department Code and Description
10 Click the Job Information tab
Page 20 of 65

11 The Job Information page displays
12 Always note the Effective Date, Action and Reason in the header section of the page.
Page 21 of 65

13 On the Job Information page you can see the following details- Job details – Job Code and Level in the Job Information group box, Job Classification and Function in the Higher Education group box Supervisor details – Reports to Position Number, the incumbent of that position and their Uni ID Type of Appointment – The Full/Part field in the Job Information group box, and the Type of Appointment in the Higher Education group box Superannuation detail – Superannuation Plan Standard Hours and FTE – in Standard Hours group box Use the Arrows or the First and Last hyperlinks to scroll through the various transactions
14 Click the Payroll tab
15 The Payroll page displays
16 On the Payroll page you can see the following details- Pay Group – will always be ANU Eligibility Group – determines what entitlements the employee is eligible for Holiday Schedule – the State where the employee is working Balance Group – the value in this field increments automatically when the employee is rehired. This field effects payment summary generation so please do not alter values in this field.
17 Click the Salary Plan tab
18 The Salary Plan page displays
Page 22 of 65

19 On the Salary Plan page you can see the following details – Salary Plan details – including Salary Plan type, the Grade and Step, and the dates each of these were entered or take effect.
20 Click the Compensation tab
21 The Compensation page displays
22 On the Compensation page you can see the following details – Effective date Pay rates – Hourly, Fortnightly, Monthly and Annual rates based on salary and standard hours (note: Because this example is using a casual staff member, rates will not default through as there is no standard hours). Pay Components – The hourly rate code, and, if the employee is on Higher Duties the HDA code will also appear here.
You have successfully reviewed a person’s Job Data.
How can I look up a person’s Employment-related data? Use this procedure to look up other Employment related data such as probation date, salary and performance review dates.
1. Navigate to the Job Data component Main Menu>Workforce Administration>Job Information>Job Data
Page 23 of 65

2. The Search Criteria page displays
3. Enter the search information that you have in the relevant field, for example Last Name or EmplID,
then click the Search pushbutton. 4. Where there is an exact match to your search criteria you will be taken directly to Job Data for that
person. Where there are multiple matches to your search criteria a list will be displayed and you will need to select the correct one.
Page 24 of 65
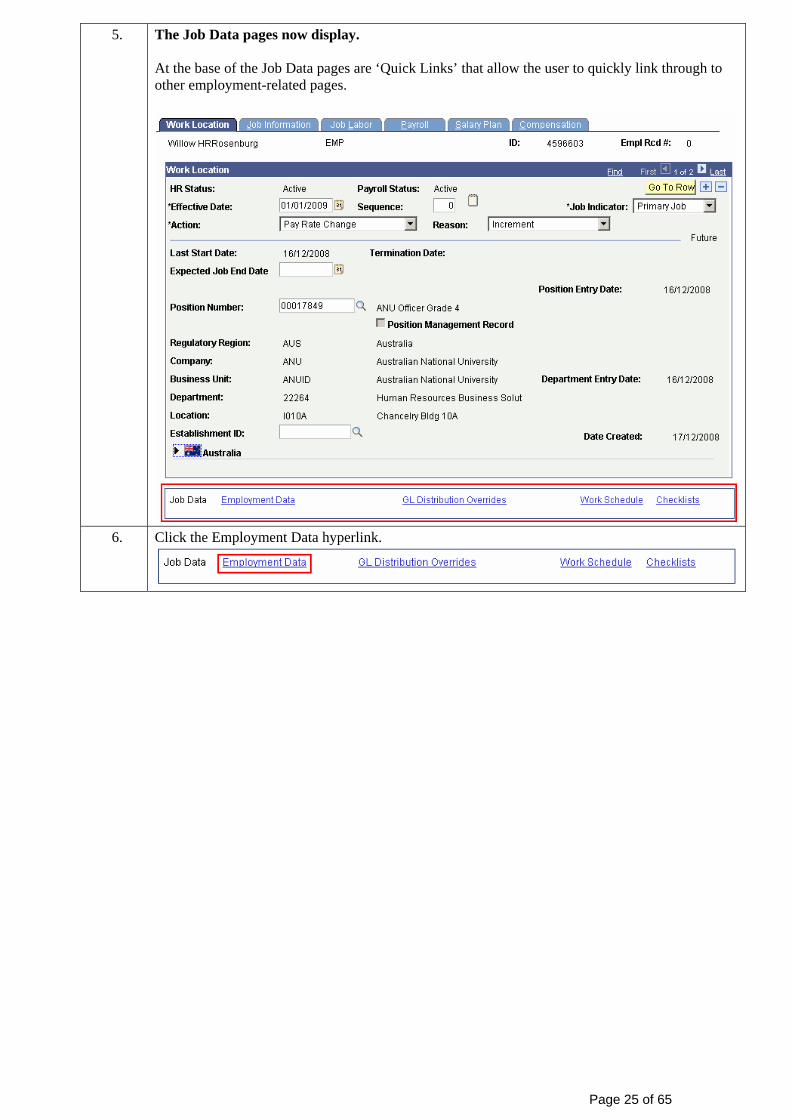
5. The Job Data pages now display. At the base of the Job Data pages are ‘Quick Links’ that allow the user to quickly link through to other employment-related pages.
6. Click the Employment Data hyperlink.
Page 25 of 65

7. The Employment Information page displays.
This page is records important employment-related information. You should note that it is not effective dated. The information stored here is either dynamic (it automatically adjusts based on actions that occur to the employee), or it is overridden as necessary. Dynamic information stored here includes the original start date, the termination date, absence accrual base date and benefit service date. Local HR users should not override any of this information – Central HR should be contacted if any information is incorrect. Probation date, Salary and Performance Review dates are manually entered by users. As this page is not effective dated this information may be overridden. The Salary Increment Due report brings back data from the Salary Review Date field so HR practitioners should always keep this field up-to-date.
8. On the Employment Information page you can see the following details – Organisational Instance information – Original Start Date, Termination Date, Length of Service Other employment information – probation date, salary review date, performance review date, and absence accrual date.
You have successfully reviewed other employment information!
Page 26 of 65

Page 27 of 65
Payroll and Absence Data Payroll and Absence Data is accessed through the Global Payroll and Absence Mgmt menu in the HRMS.
Daily Pay Processing Each day HR Administrators access the system to update Employee information. The information added or changed is reflected in the Pay Results and reviewed prior to the pay finalisation at the end of the fortnight. Twice a day the Pay-Calculation Process is run to refresh the Pay Results with any processing that has happened in the interim.
Results are updated to reflect pay changes processed
This process continues up until the pay is finalised.
Current fortnight’s Calendar opened in HRMS. System is available in normal mode.
Data entered into HRMS
During this loop data is entered and changes are made to various pages throughout the system (New hires, Job Data, Admin PI & EA, Leave etc.). When the next pay calculation is run these changes will be picked up and can be viewed on Administrator Results
Pay Calculation processrun twice daily.

Page 28 of 65
Pay Finalisation The finalising of the pay commences the Monday prior to Pay Day (please check the Pay Cut-Off schedule available online. The pay may be finalised early– usually due to public holidays). The system is in Inquiry Only mode (See The Pay Cycle).
If an employee over payment is identified in the PCA the employees’ net pay can be stopped (rebanked) by contacting Central HR, Remuneration & Benefits before 10am Wednesday.
Rebanks
Thursday - Pay Day! Wednesday – EFT pay file sent to bank
Monday - Pay is finalised Tuesday-Areas should run the Payroll
Costing Analysis Report (PCA) to examine the employee payments for the fortnight.

How can I look up a person’s Hours Pattern? Use this procedure to look up a persons Hours Pattern. The Work Schedule details the persons’ working hours and the hours pattern. The Work Schedule will drive both what the employee gets paid and absences so it is very important that this is correct and kept up to date.
1. Navigate to the Work Schedule. Main Menu>Global Payroll & Absence Mgmt>Payee Data>Create Overrides>Assign Work Schedule This page is also available via the ‘Quick Links’ at the base of the Job Data pages.
2. The Search Criteria page displays
3. Enter the search information that you have in the relevant field, for example Last Name or EmplID,
then click the Search pushbutton. 4. Where there is an exact match to your search criteria you will be taken directly to the Work
Schedule for that person. Where there are multiple matches to your search criteria a list will be displayed and you will need to select the correct one.
Page 29 of 65

5. The Work Schedule page displays.
The Work Schedule is effective dated and some employees may have more than one row here, indicating their hours have changed.
6. Work Schedule for Casual Employee As this is a casual employee the Schedule ID is 0HRW, indicating that there are zero standard hours for this person.
The Description is a brief overview of the working hours and days.
7. View the Schedule detail by clicking the Show Schedule hyperlink.
8. The Schedule Calendar page displays.
As this is a casual employee there are no standard working hours.
9. Users may look at future or previous periods by using the Previous and Next Period pushbuttons. They can also enter a date in the From Date field and click Load Calendar to see the schedule for that date.
Page 30 of 65

10. Work Schedule for Fulltime Employee A Work Schedule for a fulltime employee details the fulltime hours pattern. There are two Schedule Ids that relate to fulltime employees: 38HRW – 38 hours per week 35HRW – 35 hours per week
This description shows that the person works 35 hours per week, Monday to Friday, at 7 hours per day. If the person does not work that particular pattern, but does work 35 hours they will need a Personal Schedule
11. Work Schedule for a Part-time Employee A Work Schedule for a part-time employee details their working days and hours pattern. Each schedule needs to be created personally for the individual.
The Personal Schedule can be identified by two fields.
1. Assignment Method – Create Personal Schedule 2. Schedule ID – Consisting of the employee ID followed by a sequence of zero’s,
ending with the Empl Rec # (0, 1, 2 etc).
12. To view the detail of the schedule, click the Show Schedule link
Page 31 of 65

13. The Schedule Calendar page displays.
The Schedule Calendar group box lists each day and the hours worked that day. From this we can tell the person works Monday – Wednesday, 7 hours per day, each week. If a person worked a fortnightly schedule this would list each day in the fortnight and the hours worked.
14. Users may look at future or previous periods by using the Previous and Next Period pushbuttons. They can also enter a date in the From Date field and click Load Calendar to see the schedule for that date.
You have successfully reviewed a person’s hours pattern.
How can I look up where a person’s salary is charged to? Use this procedure to look upwhere a person’s salary and oncosts are charged to. The GL Overrides will also be the default charging for any additional earnings.
1. Navigate to the GL Distribution Overrides Main Menu>Global Payroll & Absence Mgmt>Payee Data>Create Overrides>GL Distribution overrides This page is also available via the ‘Quick Links’ at the base of the Job Data pages.
Page 32 of 65

2. The Search Criteria page displays
3. Enter the search information that you have in the relevant field, for example Last Name or EmplID,
then click the Search pushbutton. 4. Where there is an exact match to your search criteria you will be taken directly to the Work
Schedule for that person. Where there are multiple matches to your search criteria a list will be displayed and you will need to select the correct one.
5. The GL Distribution Overrides page displays.
This page shows the charging for the persons salary, oncosts and other additional payments. The charge code here is validated against the Finance systems GL.
Page 33 of 65

6. In some instances the GL distribution will be split. This is indicated in the Percent to Allocate field –
And also by the existence of multiple rows at the same effective date –
Use the Arrows or the First and Last hyperlinks to scroll through each charging split.
You have successfully reviewed a person’s GL distribution!
How can I look up what additional payments a person is receiving? Use this procedure to look up what additional payments a person is receiving. There are a few places in the system where additional payments are administered and can be reviewed- Administrator Positive Input – for one off payments such as a performance bonus or casual payment Administrator Earnings Assignment – for ongoing payments such as a loading or allowance. Administrator Results – listing all earnings and deductions for the respective pay calendar.
1. Administrator Positive Input – for one off payments such as a performance bonus or casual payment Main Menu>Global Payroll & Absence Mgmt>Payee Data>Assign Earnings and Deductions>Administrator Positive Input
2. The Search Criteria page displays
3. Click the Find an Existing Value tab.
Page 34 of 65

4. The Search Criteria page displays.
5. Enter the search information that you have in the relevant field, for example EmplID or Name, then click the Search pushbutton. Note: You are only able to look at earnings entered for the current pay calendar. This is indicated in the Calendar ID field. If no results are returned there are no one-time earnings for the pay calendar.
6. The Administrator Positive Input page displays.
This page lists, in grid format, all the additional earnings being paid in the chosen pay calendar. This example shows 14 units of code 103. To view further detail of this payment click the details
icon in the corresponding row.
Page 35 of 65

7. The Positive Input details page displays.
This page displays more detail about the payment. The header contains details of the pay calendar such as the Calendar ID, Begin and End dates. You can also see detail of the payment such as the Code and Name. The name will give you a better understanding of the type of payment. If there is information in the GL Distribution Overrides group box this indicates where the payment is being charged. If it is blank then the charging will be made to the same account as salary and oncosts.
8. Click the OK button to return to the main page. To view when a payment was entered click the source tab in the Earnings group box.
You can see the user that entered the payment and the date and time it was entered.
9. When you have finished viewing payment detail, click the return to search button or home to exit the page.
10. Admin Earnings Assignment – for ongoing payment such as a loading or allowance Main Menu>Global Payroll & Absence Mgmt>Payee Data>Assign Earnings and Deductions>Admin Earnings Assignment
Page 36 of 65

11. The search criteria page displays –
12. Enter the search information that you have in the relevant field, for example EmplID or Name, then
click the Search pushbutton.
13. Where there is an exact match to your search criteria you will be taken directly to the Admin Earnings Assignment for that person. Where there are multiple matches to your search criteria a list will be displayed and you will need to select the correct one.
14. The Admin Earnings Assignment page displays -
This page lists all the on-going earnings an employee currently has or has ever had.
Page 37 of 65

15. There are two group boxes on this page. The first is a search box. Potentially an employee could have quite a number of active and inactive earnings. Use this search box to find the specific earnings you are looking for. The second box lists all the earnings the employee has ever had (within this system). Look at the Active checkbox corresponding to the element to see if it is current or not.
16. Click the Element Name to view details of the earning.
17. The Element Detail page displays –
This page displays more detail about the payment. The header contains details of the payment including the Code and Name. The Name gives you a better understanding of the payment type. You can also see the Begin and End dates (where entered). If there is information in the GL Distribution Overrides group box this indicates where the payment is being charged. If it is blank then the charging will be made to the same account as salary and oncosts. Each Earning is administered differently so accordingly this page will display different information. This particular Earning is administered as a set amount to be paid each fortnight until the end date or a goal amount is reached The Amount Value in the Calculation Information group box specifies the amount to be paid each fortnight. The Goal Limit in the Goal Limit Overrides group box indicates the goal amount. Instead of entering a goal amount, an End Date may be entered in the header section.
18. Click the OK button to return to the Admin Earnings Assignment page. 19. Click on the next Element Name to see details of that Earning.
Page 38 of 65

20. The Element Detail page displays -
This Earning is administered differently to the previous one. The Earning details are shown in the header section and again there is the Code and Name, along with Begin and End Dates. The Calculation Information group box contains the details of how this Earning is calculated. In this case the Percent Value is 5, indicating that 5% of the employees salary will be added as a regular earning until the end date is reached. If then End Date field is blank then the Earning will continue until that Employment Record is Terminated. The Allowance Options allow the user to indicate whether the Allowance is All Purpose, Superannuable or Indexed. If there is information in the GL Distribution Overrides group box this indicates where the payment is being charged. If it is blank then the charging will be made to the same account as salary and oncosts.
21. Click the OK button to return to the Admin Earnings Assignment page. 22. When you are done viewing Earnings click the Return to Search or Home button to exit the page.
Page 39 of 65

23. Administrator Results – to check the payments made to an employee in a particular Pay Calendar. Main Men>Global Payroll & Absence Mgmt>Absence and Payroll Processing>Review Absence/Payroll Info>Administrator Results
24. The search criteria page displays -
25. Enter the search information that you have in the relevant field, for example EmpID or Name, then
click the search pushbutton. Where there are multiple matches to your search criteria a list will be displayed and you will need to select the correct one.
Page 40 of 65

26. The Administrator Results – Summary Page displays.
The Summary page displays a brief description of the pay details for the employee for the selected pay calendar. Details in the Segment Description group box - Pay calendar Begin, End and Payment dates Calculation Status and Time and Date of last status update Details in the Payee Details group box – HR Department Position Number Jobcode – indicating classification stream and level Eligibility Group – indicating employment type and driving the benefits and payments the employee is eligible for Details in the Gross to Net group box – Gross Pay Amount – amount earned in the pay calendar pre-tax Pre and Post-Tax Deductions – total amount withheld pre-tax and post-tax Total Tax for the Period Net Pay Amount – amount paid to employee after tax
Page 41 of 65

27. Click the Earnings and Deductions tab – this page displays details of the Earnings and Deductions for the employee, based on job, for the selected pay calendar.
The Earnings group box contains details of the earnings, deductions and oncosts associated with the employee. Earnings may include
• Salary • Allowances • Loadings • Bonus payments • Overtime and Casual payments
Employer Superannuation deductions are also displayed. Oncosts are costs associated with employing that person. Based on the employment type different oncosts will be payable. A list of oncosts can be found online at http://info.anu.edu.au/hr/Salaries_and_Conditions/HR_Practitioners_at_ANU/Salary_Oncosts. Oncosts may include
• Workers compensation levy • Long service absence levy • Payroll tax
Oncosts can be identified on the Administrator results page by the Element Name, which is always preceded with a ‘Z’.
Page 42 of 65

28. Click the Absences tab – this page displays details of Absences (takes, adjustments and accruals), for the employee, based on job, for the selected pay calendar.
There are three group boxes within this page Absence Data group box – contains details of any absence event that occurred in the selected pay calendar. Generate Positive Input Member List – contains details of any accrual adjustments made by an administrator during the selected pay calendar. It is rare for adjustments to occur and ordinarily this box will be empty. Absence Balances – contains details of the absence accruals for each absence type as at the end of the selected pay calendar.
29. Administrators should always check Administrator Results after a pay calculation when entering payments for an employee to ensure they are resolving.
You have successfully reviewed payments made to an employee!
How do I look up a person’s Absence History? Use this process to look up a persons absence history. The Absence Event page will display details of each event that has been recorded in the system, such as begin and end dates, duration, and type.
1. Navigate to the Absence Event AUS page. Main Menu>Global Payroll & Absence Mgmt>Payee Data>Maintain Absences>Absence Event AUS
Page 43 of 65

2. The Search Criteria page displays –
3. Enter the search information that you have in the relevant field, for example Last Name or EmplID,
then click the Search pushbutton. 4. Where there is an exact match to your search criteria you will be taken directly to the Emergency
Contact page for that person. Where there are multiple matches to your search criteria a list will be displayed and you will need to select the correct one.
5. The Absence Event AUS page displays –
The Absence Event AUS page shows a summary of Absence Events recorded for the employee. By changing the From and Through dates, then clicking the Refresh pushbutton, the view can be updated to display absences that fall within that period.
6. To view details of a particular absence, click the Details hyperlink corresponding to the absence.
Page 44 of 65

7. The Absence Event Input Detail page displays -
The header section contains information about how the absence was entered, approval status and process status.
• Entry Source – Indicates how the absence was entered. Employee indicates it was entered in HORUS by the employee, Admin indicates it was entered by an Administrator.
• Process Status – Indicates whether the absence has been processed or not. An absence will not process until a) it has been approved, and b) the pay has been processed for the pay calendar in which the absence falls.
• Calendar Group ID – Indicates the calendar ID that the absence was processed in. The Absence Begin/End Data group box contains information about the absence dates and hours
• Begin and End Dates – the end date is the last day of the absence • Partial hours – if the employee is taking partial days leave, will display the hours for
that day • Half Day – if the employee is taking half-day leave (will calculate at half-day
according to the hours pattern) • All days – if the employee is taking partial days for all days of leave
User Defined Fields group box contains extra information about the absence. These fields are rarely populated, however administrators will be interested in the Duration field. The duration field will populate when the absence is processed. Absences are processed once they are approved and the pay has run for the calendar in which the absence falls.
Page 45 of 65

8. Click the Comments hyperlink to see details of any comments associated with the absence.
9. Click the OK pushbutton to return to the Detail page. 10 Click the OK pushbutton to return to the Absence Event Entry page.
You have successfully reviewed Absence Event!
How can I look up a person’s Absence Balances or forecast absence balances? Use this process to view an employee’s absence balances.
1. Review Absence Balances Navigate to the Review Absence Balances page. Main Menu>Global Payroll & Absence Mgmt>Payee Data>Maintain Absences>Review Absence Balances
2. The Search Criteria page displays –
3. Enter the search information that you have in the relevant field, for example Last Name or EmplID,
then click the Search pushbutton.
Page 46 of 65

4. Where there is an exact match to your search criteria you will be taken directly to the Emergency Contact page for that person. Where there are multiple matches to your search criteria a list will be displayed and you will need to select the correct one.
5. The Absence Balance page displays –
The initial page displays Current Balances for each Absence Take Element (leave type).
6. Forecast Balance Click the Forecast Balance tab
7. The Forecast Balance Page displays –
Page 47 of 65

8. In the Absence Take Element field, enter the Absence Take you wish to forecast the balance for.
Alternatively, click the magnifying glass to see a list of available Absence Takes, then select from the list.
9 In the As of Date field, enter the date you wish to forecast the balance for.
10. Click the Forecast button to commence forecasting
11. When the forecasting is complete you will see the success message –
12. Click the OK pushbutton 13. The Forecast Results will display -
14. You may forecast other Absence Take Elements by repeating steps 8 – 13 and selecting different Absence Takes and dates.
You have successfully completed absence forecasting!
Page 48 of 65

Where do I find? What Explanation Where Absence Balances
Current Absence Balances can be viewed for absence accruing employees
Main Menu>Global Payroll & Absence Mgmt>Payee Data>Maintain Absences>Review Absence Balances
Absence History
View a list of Absence History and the status of each Absence Event. Drill in to see further details of the Absence.
Main Menu>Global Payroll & Absence Mgmt>Payee Data>Maintain Absences>Absence Event AUS
Page 49 of 65

Allowances and Loadings
Administrator Earnings Assignment – for a list of ongoing earnings. Drill in to see further details of each earning.
Main Menu>Global Payroll & Absence Mgmt>Payee Data>Assign Earnings and Deductions>Administrator Earnings Assignment
Page 50 of 65

Administrator Positive
Input – for a list of one-off payments ever made to an employee. Drill in to see further details of each payment
Main Menu>Global Payroll & Absence Mgmt>Payee Data>Assign Earnings and Deductions>Administrator Positive Input
Administrator Results –
for payments made to an employee in a particular Pay Calendar
Main Men>Global Payroll & Absence Mgmt>Absence and Payroll Processing>Review Absence/Payroll Info>Administrator Results – Earnings and Deductions Tab
Page 51 of 65

Casual Payments
Administrator Positive Input – all casual payments are processed in the Administrator Positive Input page. This page allows you to view all one-off payments made to an employee. Casual payments are made against code 103.
Main Menu>Global Payroll & Absence Mgmt>Payee Data>Assign Earnings and Deductions>Administrator Positive Input
Eligibility Group
Eligibility Group drives the entitlements the employee is eligible for. For example people in the CASUAL Eligibility Group are eligible to receive casual payments, but not accrue absences.
Main Menu>Workforce Administration>Job Information>Job Data – Payroll page
Page 52 of 65

Emergency Contacts
Emergency Contacts are nominated by the employee when they accept their offer of employment. These should be entered when the persons Hire is processed.
Main Menu>Workforce Administration>Personal Information>Personal Relationships>Emergency Contact
Page 53 of 65

Full Time Equivalency (FTE)
FTE can be found in two places – Position Data and Job Data. Job Data more accurately reflects the employees FTE and should be updated with hours changes.
Main Menu>Workforce Administration>Job Information>Job Data – Job Information page
Page 54 of 65

GL Distributions
GL Distributions must be entered for every job a person holds. This tells the system where to charge their salary and associated costs to. GL is linked to the Finance system so if there is an invalid value error here users should contact Finance Business Solutions.
Main Menu>Global Payroll & Absence Mgmt>Payee Data>Create Overrides>GL Distribution overrides
Home Address
Addresses are recorded against each person in the system. It is not mandatory to record an address however it is essential when it comes to Payment Summary distribution and reporting to certain government departments. Administrators are asked to record at least a mailing address for each person.
Main Menu>Workforce Administration>Personal Information>Biographical>Modify a Person – Contact Information page
Page 55 of 65

Home Phone Number
Phone numbers are recorded against each person. Multiple phone numbers may be recorded.
Main Menu>Workforce Administration>Personal Information>Biographical>Modify a Person – Contact Information page
Hours Pattern
A Work Schedule must be recorded for every job a person holds. It is important as this page drives the pay and absence entitlements for the person. Drill in to Show Schedule to see details of the working days and hours.
Main Menu>Global Payroll & Absence Mgmt>Payee Data>Create Overrides>Assign Work Schedule
Page 56 of 65

Increment Due Date
The Salary Review Date field records the date that the person’s next increment is due. This field should be updated after each increment is processed.
Main Menu>Workforce Administration>Job Information>Job Data – Employment Information page (accessed via the Employment Data ‘Quick link’ at the bottom of Job Data).
Page 57 of 65

Job Code
The Job Code indicates the level and type of appointment the person holds and is related to the position.
Main Menu>Workforce Administration>Job Information>Job Data – Job Information page
Page 58 of 65

Pay Group
There is only one Pay Group used at the University and that is ANU. The Pay Group drives a lot of the global rules associated with pay.
Main Menu>Workforce Administration>Job Information>Job Data – Payroll page
Page 59 of 65

Pay rates
The hourly, fortnightly, monthly and annual pay rates for salaried staff are able to be viewed in the Job Data pages. For casual staff only an hourly rate will display.
Main Menu>Workforce Administration>Job Information>Job Data – Compensation page
Page 60 of 65

Performance Review Date
The Performance Review Date field is used to track the due date of the employees’ next performance review. This field should be updated after each review is conducted.
Main Menu>Workforce Administration>Job Information>Job Data – Employment Information page (accessed via the Employment Data ‘Quick link’ at the bottom of Job Data).
Page 61 of 65

Position Number
Every employee holds a position for every job they have at the University. Details from the position flow through to Job Data.
Main Menu>Workforce Administration>Job Information>Job Data – Work Location page
Page 62 of 65

Probation Due Date The Probation Date field
is used to record the employees Probation Date. A Confirmation of Probation row should also be entered in to Job Data.
Main Menu>Workforce Administration>Job Information>Job Data – Employment Information page (accessed via the Employment Data ‘Quick link’ at the bottom of Job Data).
Page 63 of 65

Relationship Instances
The Person Organisational Summary Page gives users an overview of the relationships an individual holds with the University and the status of those relationships. Refer to this page when preparing an offer of employment for an individual.
Main Menu>Workforce Administration>Personal Information>Person Organisation Summary
Page 64 of 65

Supervisor
The Supervisor is recorded against Position Data and flows through to Job Data. The Supervisor indicated here will be the person notified of Absence Requests via system workflow. HR Administrators should ensure all employees have a correct and valid Reports To entered.
Main Menu>Workforce Administration>Job Information>Job Data – Job Information Page
Page 65 of 65