Embed Size (px)
Citation preview

Instructor’sver.1.0
Manual
UTHM Academic Onl ine Resourcesauthor.uthm.edu.my
H MUT
Univ
ersiti Tun Hussein O
nn M
ala
ysi
a

1
Contents
1. INTRODUCTION ..................................................................................................................... 2
2. STEP BY STEP TUTORIAL.................................................................................................... 3
2.1. LOGIN.................................................................................................................................... 3
2.2. SELECTING COURSES ....................................................................................................... 4
2.3. CONTROL PANEL............................................................................................................... 4
2.4. CHANGING COURSE INFORMATION............................................................................ 5
2.5. CREATE COURSES STRUCTURE .................................................................................... 6
2.6 CREATE ASSIGNMENT ..................................................................................................... 7
2.7 CREATE TEST ..................................................................................................................... 9
2.8 COPY FROM ANOTHER COURSE .................................................................................11
2.9 SURVEY...............................................................................................................................12
2.10 GLOSSARY..........................................................................................................................13
2.11 COURSE RULES.................................................................................................................14
2.12 USER STATUS ...................................................................................................................16
2.13 ACTIVATING COMPONENT...........................................................................................16
2.14 FILES ...................................................................................................................................17
2.15 COURSE MATERIAL CONVERTER...............................................................................18
2.16 STUDENT LIST..................................................................................................................19
2.17 EMAIL..................................................................................................................................20
2.18 BLOGS .................................................................................................................................20
2.19 ATTENDANCE LIST .........................................................................................................21
2.19 HELPDESK .........................................................................................................................22
2.20 MARK SHEETS ..................................................................................................................24
2.21 REPORTS............................................................................................................................25
2.22 COMMUNICATE................................................................................................................27
2.23 CALENDAR & ACTIVITIES.............................................................................................30
2.24 VIDEO CONFERENCE ......................................................................................................30
2.25 PERSONAL INFO ..............................................................................................................34
2.26 HOW TO LOGOUT............................................................................................................34
3 SCORM CONTENT.................................................................................................................35

! #!
() *#$+",-.$/"#'
$%&'()*!$+!'(+,!-.!/+'0!1$+/(22,!(--)(3-$1'0!45678!3.9:(-$;2'0!'&'()*$*<!
:2(-=.)9>!!!
-DEF/GH/IEJ?!$%&'()*!@(+!;/$2A!=).9!-B'!+3)(-3B!@$-B!-B'!'*A!/+')!$*!9$*A>!
C./!@$22!=$*A!$-!)(-B')!*(-/)(2!-.!<'-!/+'A!-.!$-+!$*-')=(3'!@B')'!9.+-!.:-$.*+!
()'!+'2=D'E:2(*(-.),>!!
!
?KEIDLLF/DGGMDNGKOJ?!F'!A$A*G-!@(*-!-.!;/$2A!(*.-B')!'&'()*$*<!-..2>!F'!($9!
(-!;/$2A$*<!-B'!9.+-!;'(/-$=/2!'&'()*$*<!-..2>!!
!
%JNPQHLHRKNDLLF/DSODQNJS?!$%&'()*!$+!(*!HI(E!'*(;2'A0!J*$3.A'0!&KHL!(*A!
45678!+/::.)-$*<0!9/2-$2$*</(2!'&'()*$*<!:2(-=.)9>!!
!
.JSDRHRKNDL/NHQNJTGE?!M*-'<)(-'A!-.!$%&'()*!()'!+./*A!:'A(<.<$3(2!
3.*3':-+!-B(-!</$A'!/+')+!(*A!N'':!-B'9!9.-$1(-'A>!!
!
*HUTLJGJ?!$%&'()*!$*32/A'+!(!@$A'!1()$'-,!.=!3.9:.*'*-+!-B(-!B'2:!,./!
3)'(-'!,./)!2'++.*!+-)/3-/)'!(*A!(AA!3.*-'*-0!;/$2A!.*2$*'D-'+-+0!
3.99/*$3(-'!@$-B!.-B')+0!-)(3N!/+')+!B$+-.),!(*A!:).<)'++0!3.*A/3-!+/)1',+0!
(++$<*!:).I'3-+0!(*A!3)'(-'!3')-$=$3(-$.*+>!!!
!

! %!
0) 1$%2'34'1$%2'5-$"+/67'
M*!-B$+!-/-.)$(2!,./!@$22!2'()*?!!!
!
¥ O.@!-.!A'+3)$;'!,./)!2'++.*!PQA/3(-.)!).2'R!!!
!
¥ O.@!-.!3)'(-'!-B'!;(+$3!+-)/3-/)'!.=!,./)!2'++.*!PQA/3(-.)!).2'R!!!
!
¥ O.@!-.!3)'(-'!-'+-+!=.)!,./)!2'++.*!PQA/3(-.)!).2'R!!!
!
¥ O.@!-.!A'3$A'!@B(-!3.9:.*'*-+!-.!(3-$1(-'!=.)!,./)!2'++.*!PQA/3(-.)!
).2'R!!!
!
¥ O.@!-.!3)'(-'!)/2'+!-.!)'+-)$3-!(*A!</$A'!-B'!/+')+!PQA/3(-.)!).2'R!!!
!
¥ O.@!-.!-)(3N!/+')+!:).<)'++!(*A!<$1'!<)(A'+!PQA/3(-.)!).2'R!!!
!
0)() 8"9/#'
S.! /+'! -B'! +,+-'90! <.! -.! B--:?TT29+>/:9>'A/>9,! .*! ,./)! ;).@+')>! Q*-')! -B'!
/+')*(9'!(*A!:(++@.)A>!
!

4
2.2. Selecting Courses
When logging in as an educator, a page will be displayed containing the courses
taught for the semester. To manage any course, simply click on the course name.
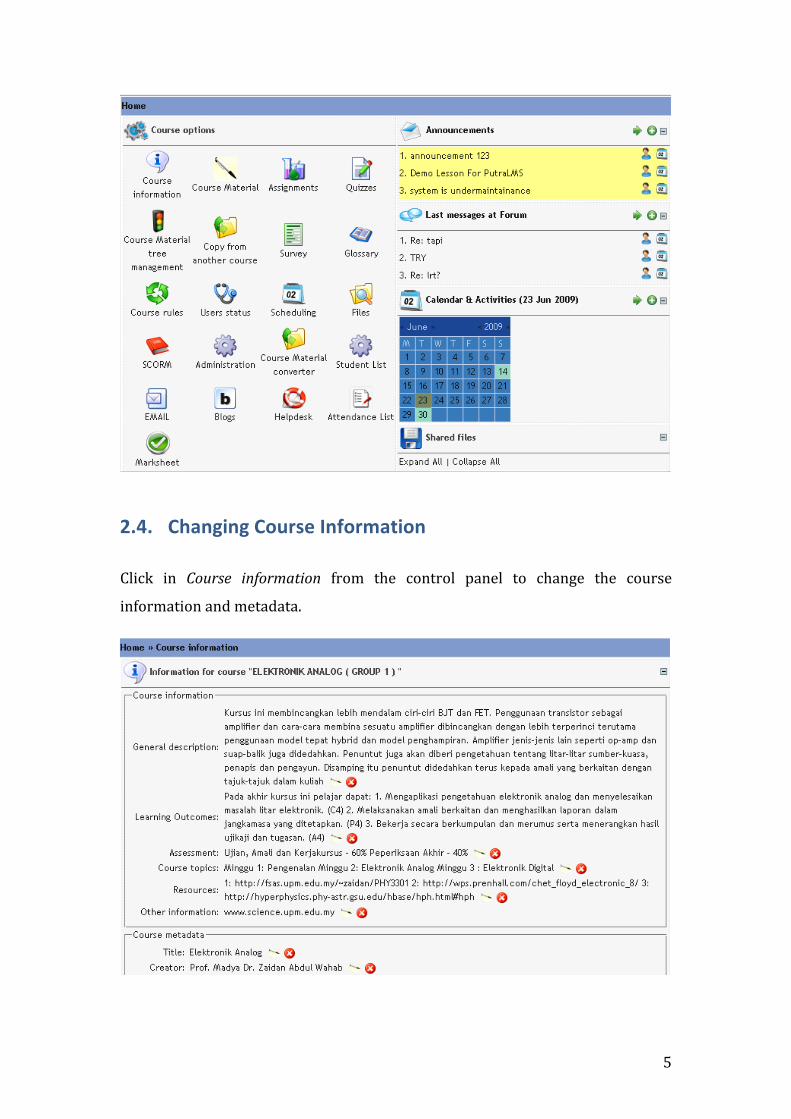
2.3. Control Panel
Below is the control panel for the selected course. Click on the icon to execute a
task or function.
5
2.4. Changing Course Information
Click in Course information from the control panel to change the course
information and metadata.

! X!
0)@) !+%6$%'!"-+&%&'1$+-.$-+%'
F'! )'-/)*! -.! -B'! 9($*! 3./)+'! :(<'! (*A! +'2'3-! .!"#$%&' /,-&$(,0.1! SB'*0! +'2'3-!
2!$&,-&'3)(-41!F'!3(*!/:2.(A!./)!3./)+'!9(-')$(2!;,!+'2'3-$*<!2350",6' *(0&%',)6'
(+,7&%41!SB'*0!@'!3(*!+(1'!-B'!3B(*<'+>!!
!!!
!
!
M=!@'!@(*-!-.!(AA!*'@!9(-')$(2!-.!-B'!3./)+'0!<.!-.!-B'!9($*!3./)+'!:(<'>!4'2'3-!
2!"#$%&'/,-&$(,04!(*A!/+'!-B'!28""0%4!.*!-B'!-.:!.=!-B'!:(<'>!
!
!
!
!
!
!
!

7
Each unit can have a father unit allowing us to build a tree structure for the
content. A flexible visual editor helps speedup the process of adding new
content. To manage your content order, select “Course Material” from the
main page, then selects “Course Material Tree Management” from the “Tools”.
2.6 Create Assignment
For this course, we can create assignment for students in our course. To
create the assignment, go to main control panel and select “Assignments”.
8
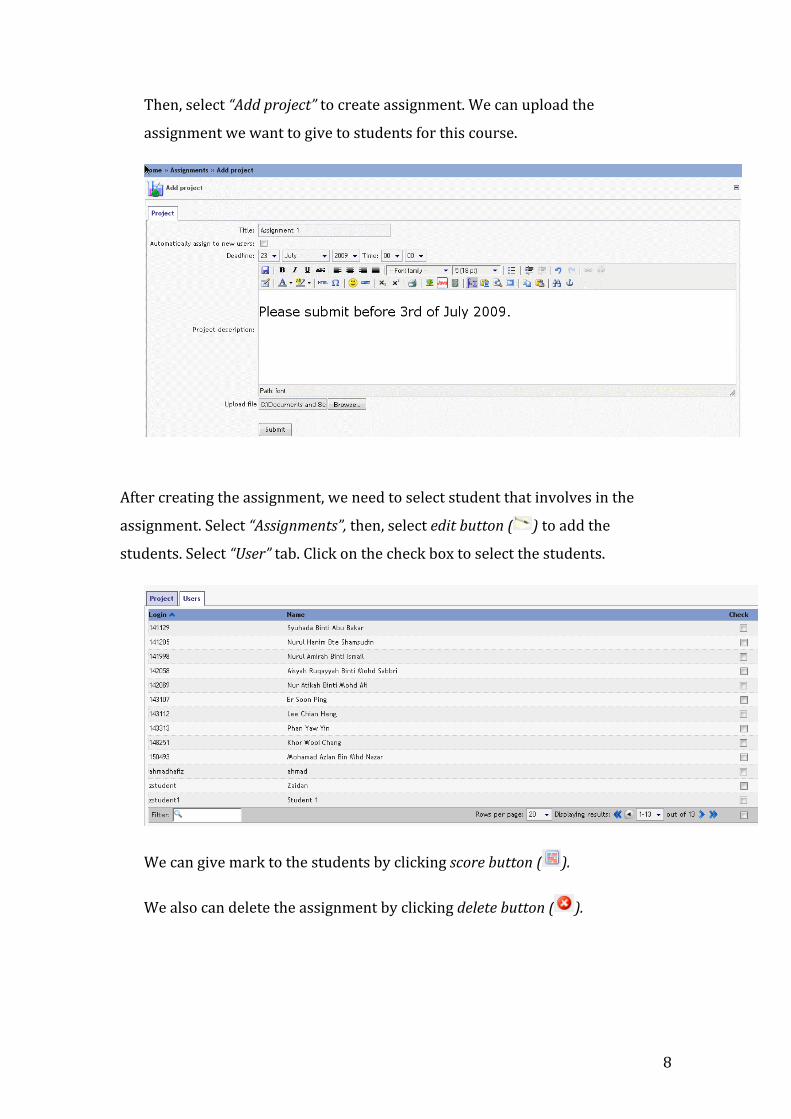
Then, select “Add project” to create assignment. We can upload the
assignment we want to give to students for this course.
After creating the assignment, we need to select student that involves in the
assignment. Select “Assignments”, then, select edit button ( ) to add the
students. Select “User” tab. Click on the check box to select the students.
We can give mark to the students by clicking score button ( ).
We also can delete the assignment by clicking delete button ( ).

9
2.7 Create Test
Now, we will create a test for our course to ensure that students have
understood the lesson.
From the main control panel of educator, select ( ). Then select the
“Question” tab. We can add the type of the question.
For example, we choose an empty spaces type of question. This screen will be
displayed.
Now you can create the questions for the quiz in the “Question text” box.
Click ( ) to key in the answer of the question.
For additional explanation to the answer, click ( ).
Then, click ( ) to save the question or click
( ) to save and create another questions.

10
After creating the question, we need to create the quiz. From the “Quizzes”
tab, select “Add quiz”.
At the bottom of the quiz, select the question for the quiz from the list of the
questions. Then, click ( ) to save the quiz.
We can click ( ) to change the order of the questions.
Click ( ) to delete the quiz.
Click ( ) to edit the quiz.
Click ( ) to print the quiz.
Click ( ) to preview the quiz.

11
2.8 Copy from another Course
Educator is able to copy portions of course content or quizzes from other
courses. Using this tool, educator could duplicate similar courses or quizzes
conducted inside other course.

12
2.9 Survey
Educator is able to conduct survey to gather information from students.
Select ( ) from the main control panel of educator. Then select “Create
Survey”.
After creating the survey, now we need to create the questions for the survey.
Click on the survey that has been created before. Page as below will be displayed.

13
Select the type of the question from the “Add question”. Then we can start to
create the questions for the survey.
After we have finished creating the questions, click ( ) to select the
respondents of the survey.
Click ( ) to edit the survey.
Click ( ) to preview the survey.
Click ( ) to view the survey report.
Click ( ) to edit the survey questions.
Click ( ) to delete the survey.
2.10 Glossary The glossary provides information on the courses glossary use out throughout
the courses.

14
Click “Add definition” to add term to the glossary.
Click ( ) to edit the term in the glossary.
Click ( ) to delete the term in the glossary.
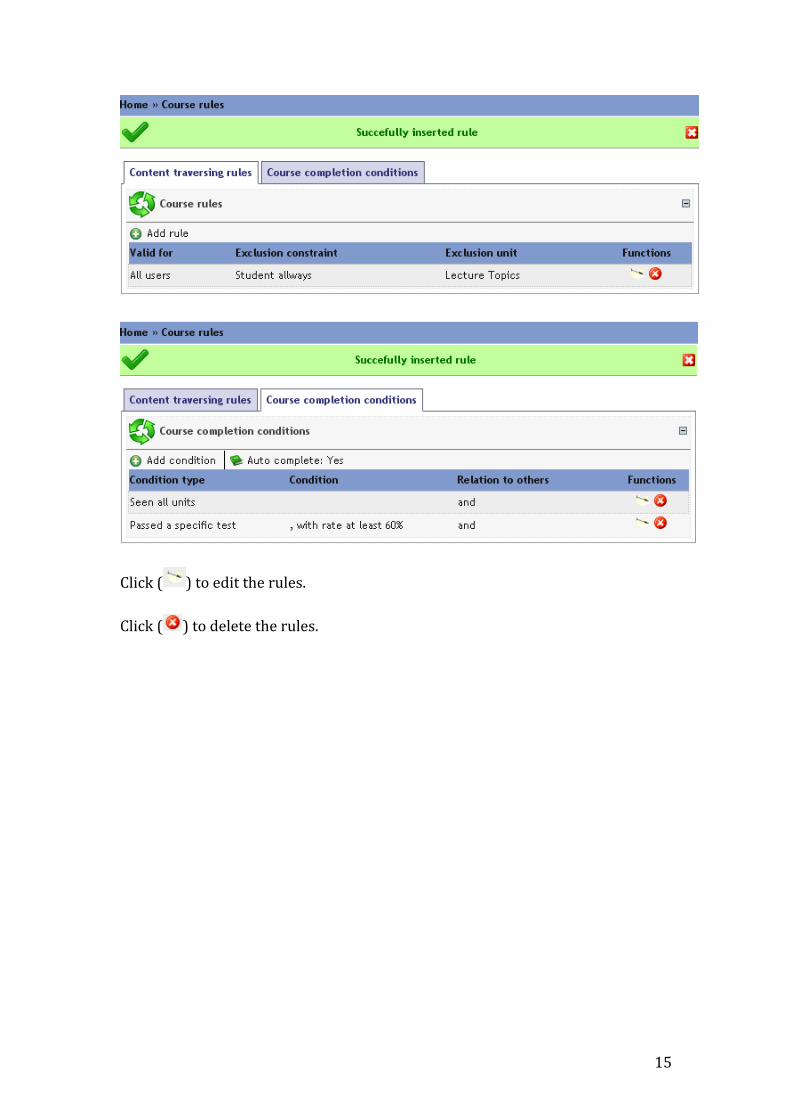
2.11 Course Rules Rules ensure that the user sees the content in a certain manner. For example we
can enforce a linear way of seeing content.
Go to "Course Rules" on the main menu.
There will be two tabs which are "Content Traversing Rules" that define the way
of studying the lesson, and the "Course completion conditions" that define when
the lesson can be considered as completed.
In order to add rule or a course completion condition, define the properties
needed.
15
Click ( ) to edit the rules.
Click ( ) to delete the rules.


![Computer Programming C++ [UTHM]](https://img.pdfslide.net/doc/110x75/55cf981b550346d033959ee7/computer-programming-c-uthm.jpg)

![SolidWork Module [UTHM]](https://img.pdfslide.net/doc/110x75/577ccf271a28ab9e788f0220/solidwork-module-uthm.jpg)