Embed Size (px)
Citation preview
USER GUIDE
Humidity / Temperature Datalogger
Model RHT10
RHT10-EN v4.0 4/14 2
Introduction Congratulations on your purchase of the Relative Humidity and Temperature Datalogger. This datalogger measures and stores up to 16,000 relative humidity and 16,000 temperature readings over 0 to 100%RH and -40 to +70°C (-40 to +158°F) measurement ranges. The user can easily configure the logging rate, high/low alarm and start-mode, and download the stored data by plugging the module into a PC's USB port and running the supplied PC software. Relative Humidity, Temperature and Dew Point data can then be graphed, printed and exported to other applications. GPP (grains per pound) data can be viewed using the optional RHT10-SW software. The data logger is supplied with a long-life lithium battery, which can typically allow logging for one year. This meter is shipped fully tested and calibrated and, with proper use, will provide years of reliable service. Please visit our website (www.extech.com) to check for the latest version of this User Guide, Product Updates, and Customer Support.
Features Memory for 32,000 readings (16,000 temperature and 16,000 humidity readings)
Dew point indication via supplied WindowsTM Software
Grains per pound indication via optional WindowsTM Software (order RHT10-SW)
Selectable data sampling rate: 2s, 5s, 10s, 30s, 1m, 5m, 10m, 30m, 1hr, 2hr, 3hr, 6hr, 12hr, 24hr
Status Indication via Red/Yellow LED and Green LED
USB Interface for Set-up and Data Download
User-Programmable Alarm Thresholds for Relative Humidity and Temperature
Long battery life
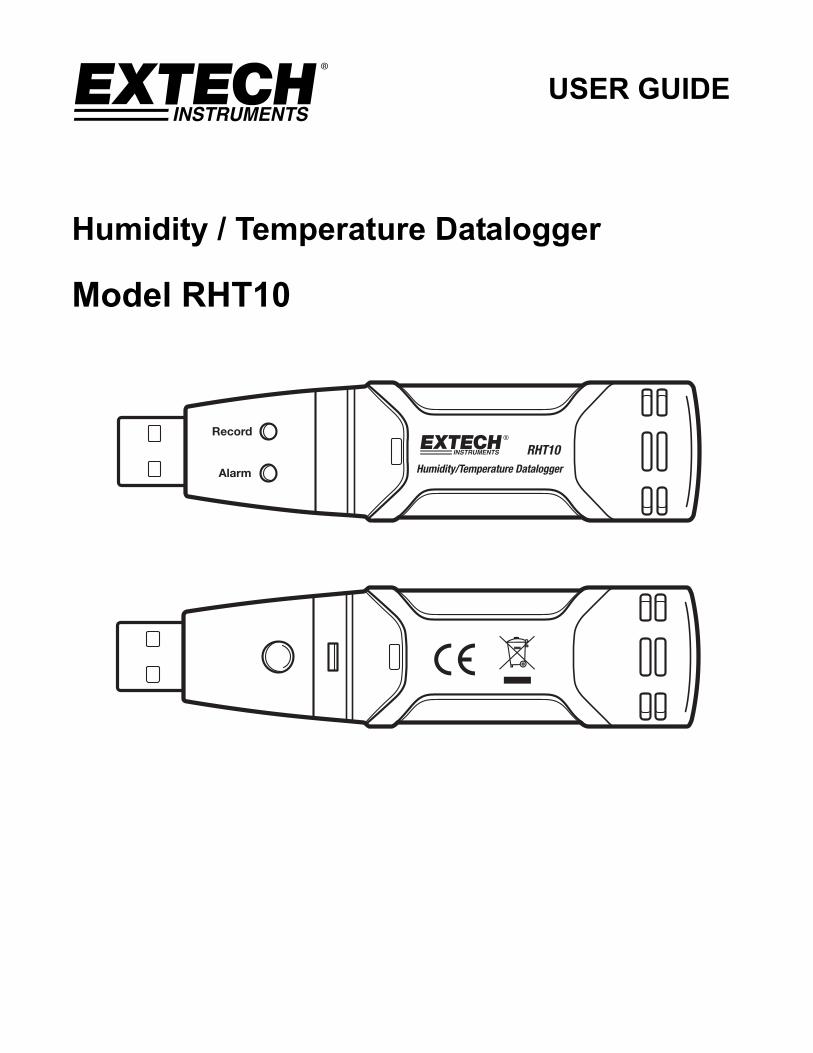
Description 1. Protective cover
2. USB connector to PC port
3. Start button
4. RH and Temperature sensors
5. Alarm LED (red/yellow)
6. Record LED (green)
7. Mounting clip
RHT10-EN v4.0 4/14 3
Operation
INSTALLING THE GRAPHING SOFTWARE Install the supplied Windows PC Datalogger Software by placing the supplied program disk in the PC’s CD-ROM drive. If the installation program does not automatically open and provide on-screen prompts, open and browse the CD-ROM drive, then find and double-click on the SETUP.EXE file included on the program disk. Follow the on-screen prompts to complete the installation. Before running the graphing software, please install the USB Driver software as described in the next section.
INSTALLING THE USB DRIVER The USB driver for the RHT10 must be installed manually.
1. Browse to the RHT10 software CD (or downloaded program).
2. Navigate to the \Driver\DriverUSBXPRESS folder.
3. Double-click on the USBXPressInstaller.exe program.
4. Follow the defaults to load this driver.
5. Once installed, plug the RHT10 unit into the PCs USB port and start the RHT10 software.
Note: When the RHT10 is connected to the USB port, the battery inside the device is discharged at a higher rate than normal. To conserve battery life, do not leave the RHT10 connected to the USB port for a prolonged period of time
RHT10-EN v4.0 4/14 4
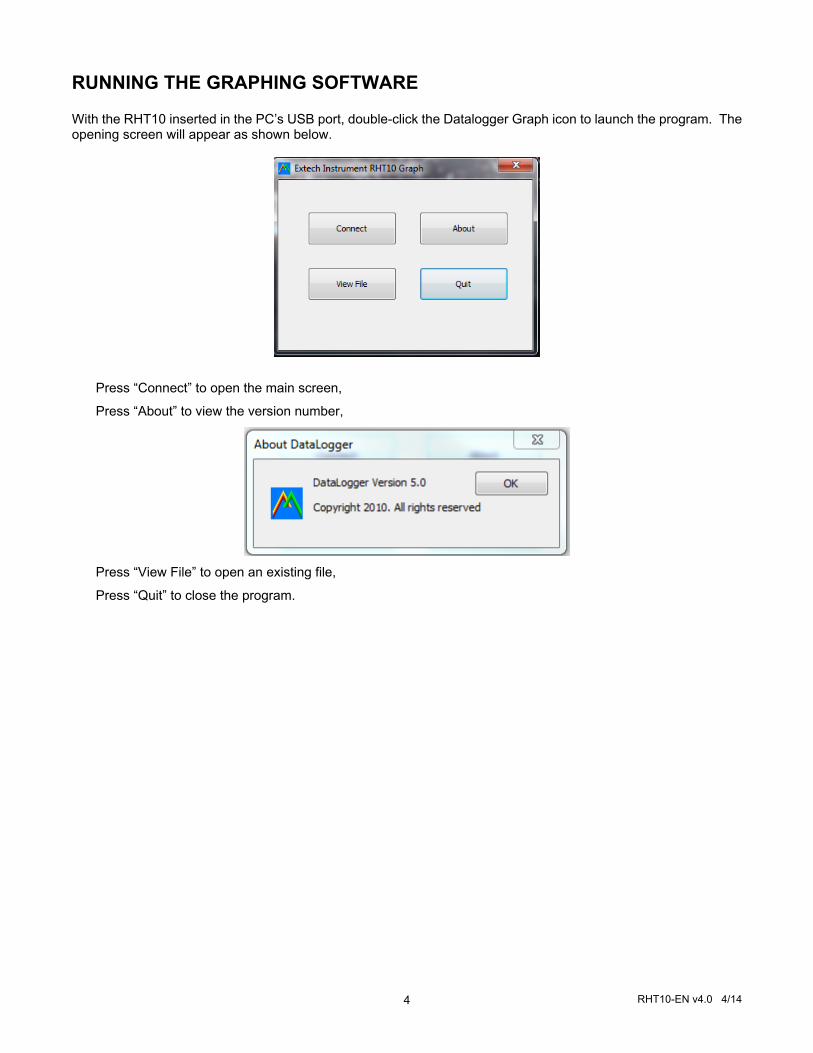
RUNNING THE GRAPHING SOFTWARE With the RHT10 inserted in the PC’s USB port, double-click the Datalogger Graph icon to launch the program. The opening screen will appear as shown below.
Press “Connect” to open the main screen,
Press “About” to view the version number,
Press “View File” to open an existing file,
Press “Quit” to close the program.
RHT10-EN v4.0 4/14 5
MENU BAR DESCRIPTION The main menu for the software appears as follows:
From left to right the MENU BAR icons represent DATA DOWNLOAD, LOGGER SETUP, FILE OPEN, FILE SAVE-AS, FILE PRINT, VIEW ALL, and ZOOM. In addition, the FILE, VIEW, LINK, and HELP pull-down menus are available here. All of these functions are described in the following paragraphs.
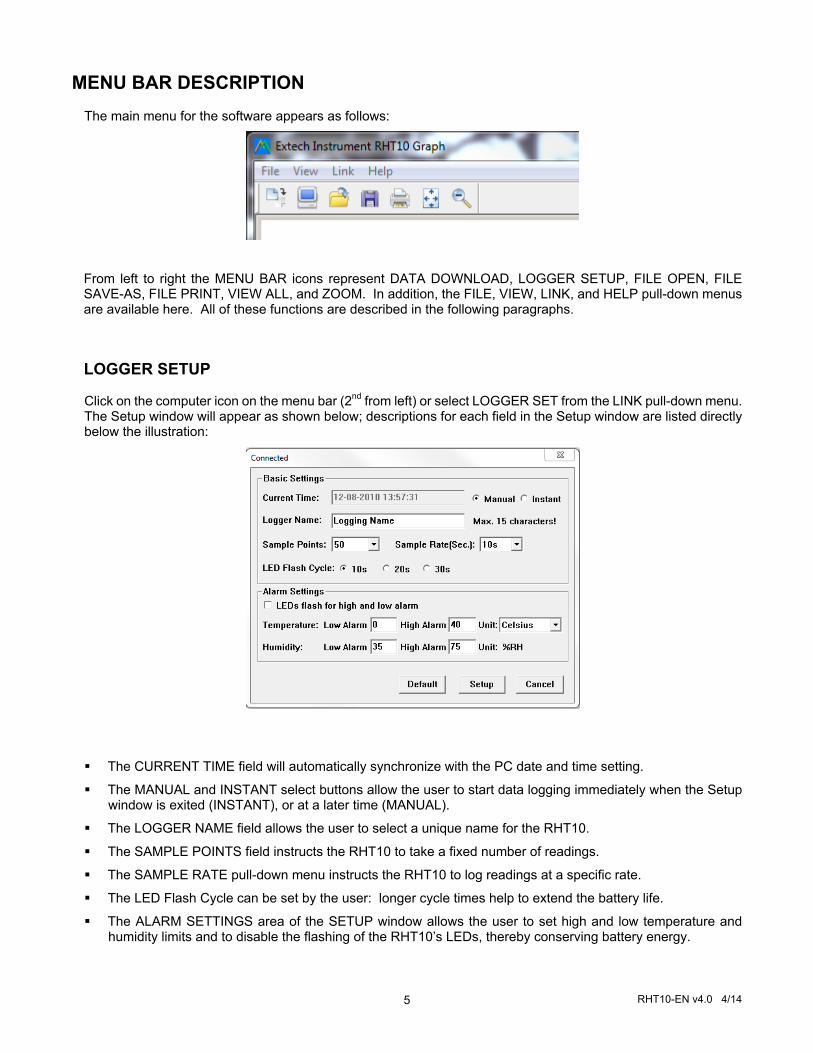
LOGGER SETUP Click on the computer icon on the menu bar (2nd from left) or select LOGGER SET from the LINK pull-down menu. The Setup window will appear as shown below; descriptions for each field in the Setup window are listed directly below the illustration:
The CURRENT TIME field will automatically synchronize with the PC date and time setting.
The MANUAL and INSTANT select buttons allow the user to start data logging immediately when the Setup window is exited (INSTANT), or at a later time (MANUAL).
The LOGGER NAME field allows the user to select a unique name for the RHT10.
The SAMPLE POINTS field instructs the RHT10 to take a fixed number of readings.
The SAMPLE RATE pull-down menu instructs the RHT10 to log readings at a specific rate.
The LED Flash Cycle can be set by the user: longer cycle times help to extend the battery life.
The ALARM SETTINGS area of the SETUP window allows the user to set high and low temperature and humidity limits and to disable the flashing of the RHT10’s LEDs, thereby conserving battery energy.

RHT10-EN v4.0 4/14 6
Once the changes have been made, click on the SETUP button to save them. Press the DEFAULT button to set the RHT10 back to factory default conditions. Press the CANCEL button to abort the setup.
Note: Any stored data will be permanently erased when the user clicks on Setup. To save the data before creating
a new setup, click Cancel and then download the data. Note: The battery may run out before the RHT10 has finished collecting a specified number of sample points.
Always ensure that the remaining charge in the battery is sufficient to last the complete duration of your logging exercise. When in doubt, we recommend that you always install a fresh battery before logging critical data.
If INSTANT was selected in the SETUP window, the RHT10 begins logging at the instant the SETUP button is pressed. If MANUAL was selected, the RHT10 must be manually started by pressing and holding the device’s yellow button for approx. 3 seconds, or until the two LEDs on the RHT10 flash at the same time. Logging will continue at the programmed sample rate until the number of readings (sample points) specified in the Setup window is reached.
The green LED flashes once per sample point and the red or yellow LED flashes when user programmed alarm limits are exceeded. For details, see LED status guide.
DATA DOWNLOAD To transfer the readings stored in the RHT10 to the PC:
1. Connect the RHT10 to the same USB port used when the RHT10 was initialized.
2. Open the graphing software program if it is not still running.
3. Click the Download icon (1st on the left) or select Data Download from the LINK pull-down menu
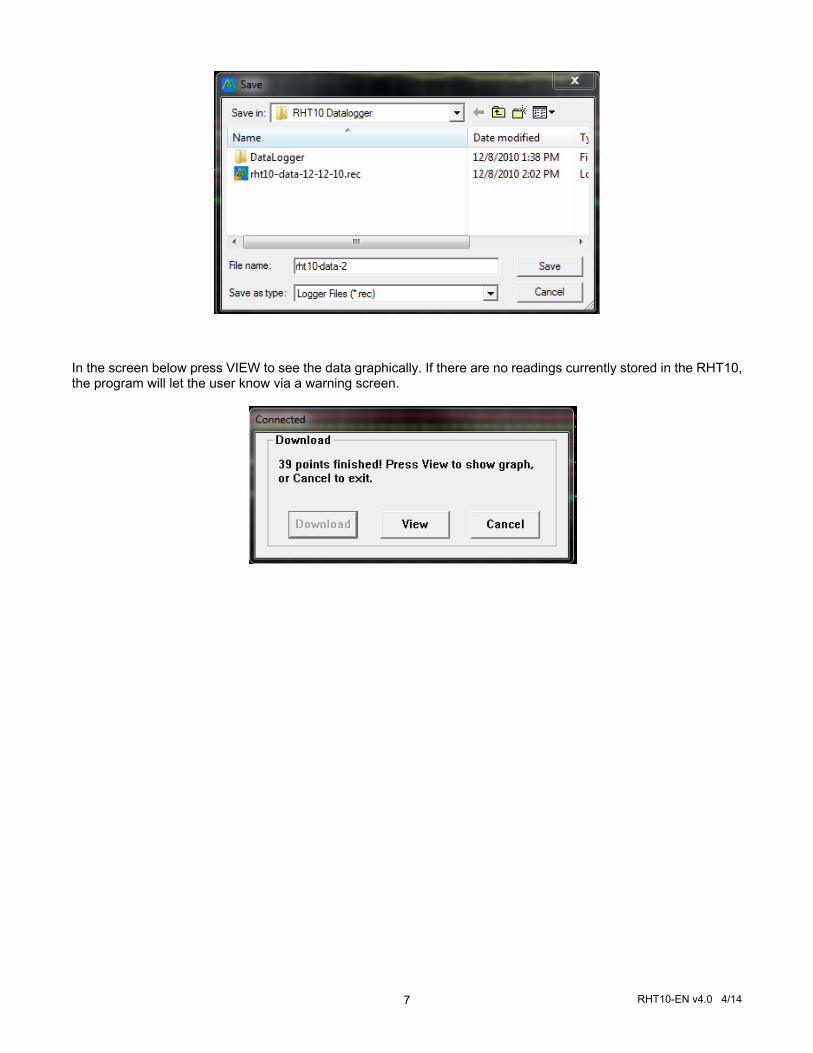
4. The Window shown below will appear. Press DOWNLOAD to begin transferring readings
If the readings are successfully transferred, the VIEW screen and the SAVE screen (both shown below) will appear. In the SAVE screen, name the file and save it to a convenient location. The data is saved as an .rec file for use in this program only. At a later time, the user can select SAVE-AS and save the data as an Excel, Text, or Bitmap file (explained in next section).
RHT10-EN v4.0 4/14 7
In the screen below press VIEW to see the data graphically. If there are no readings currently stored in the RHT10, the program will let the user know via a warning screen.
RHT10-EN v4.0 4/14 8
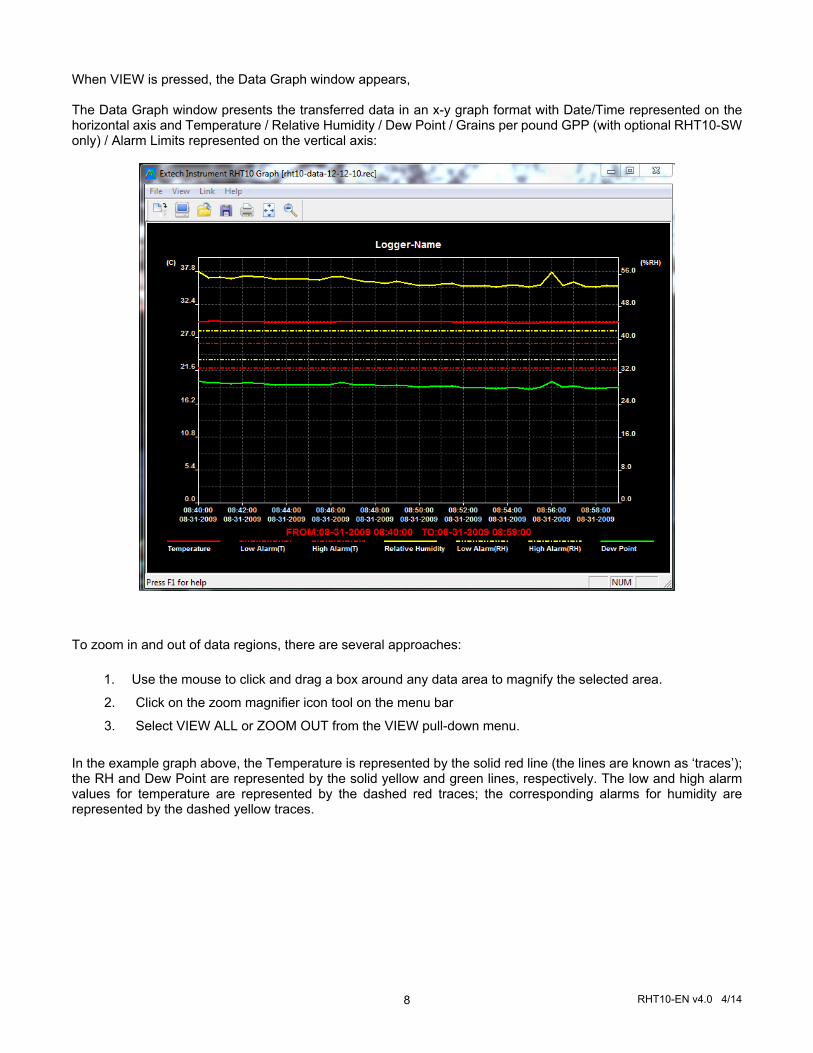
When VIEW is pressed, the Data Graph window appears,
The Data Graph window presents the transferred data in an x-y graph format with Date/Time represented on the horizontal axis and Temperature / Relative Humidity / Dew Point / Grains per pound GPP (with optional RHT10-SW only) / Alarm Limits represented on the vertical axis:
To zoom in and out of data regions, there are several approaches:
1. Use the mouse to click and drag a box around any data area to magnify the selected area.
2. Click on the zoom magnifier icon tool on the menu bar
3. Select VIEW ALL or ZOOM OUT from the VIEW pull-down menu.
In the example graph above, the Temperature is represented by the solid red line (the lines are known as ‘traces’); the RH and Dew Point are represented by the solid yellow and green lines, respectively. The low and high alarm values for temperature are represented by the dashed red traces; the corresponding alarms for humidity are represented by the dashed yellow traces.
RHT10-EN v4.0 4/14 9
To customize the graph window select SHOW TRACES, BACKGROUND, GRID LINES, and MASK POINTS from the VIEW pull-down menu. These options provide the following features:
SHOW TRACES: Allows the user to select which data to view as a trace (Temperature & Alarms).
BACKGROUND: Select background color scheme.
GRID LINES: Add or remove grid lines from x and y axes.
MASK POINTS: Places dots on the traces for the actual data points, breaking up the continuous nature of the trace.
FILE OPEN, FILE SAVE-AS To save the transferred data in a format other than the proprietary .rec format, click the SAVE AS icon from the menu bar (4th from right) or select SAVE AS from the FILE pull-down menu. The data can be saved in the following formats:
TEXT FILE (.txt)
EXCEL FILE (.xls)
BITMAP FILE (.bmp)
To open an existing data file for viewing on the data graph window, click on the FILE OPEN icon on the menu bar (3rd from left), or select FILE OPEN from the FILE pull-down menu. When prompted, select a .rec file saved earlier.
FILE PRINT
To print a data graph window to a line or network printer, click on the printer icon or select PRINT from the FILE pull-down menu. Note that color graph windows can be accurately printed on color printers.
Note: The RHT10 retains data in its internal memory until the user begins a new logging session. Starting a new logging session clears all of the RHT10’s stored readings; be sure to save previous data before starting a new logging session.
GRAINS PER POUND (GPP) The standard software, supplied with the RHT10, does not include the GPP feature. GPP is only available when running the optional RHT10-SW program. The optional software can be purchased through an Extech agent using RHT10-SW as the part number. Note that the standard RHT10 software must be un-installed before the optional RHT10-SW software can be installed. To view GPP data, click on the VIEW menu heading and scroll down to the SHOW TRACES tab. Ensure that the GPP line is checked. If checked, the graph will display GPP data. If unchecked, the graph will not show GPP data.
RHT10-EN v4.0 4/14 10
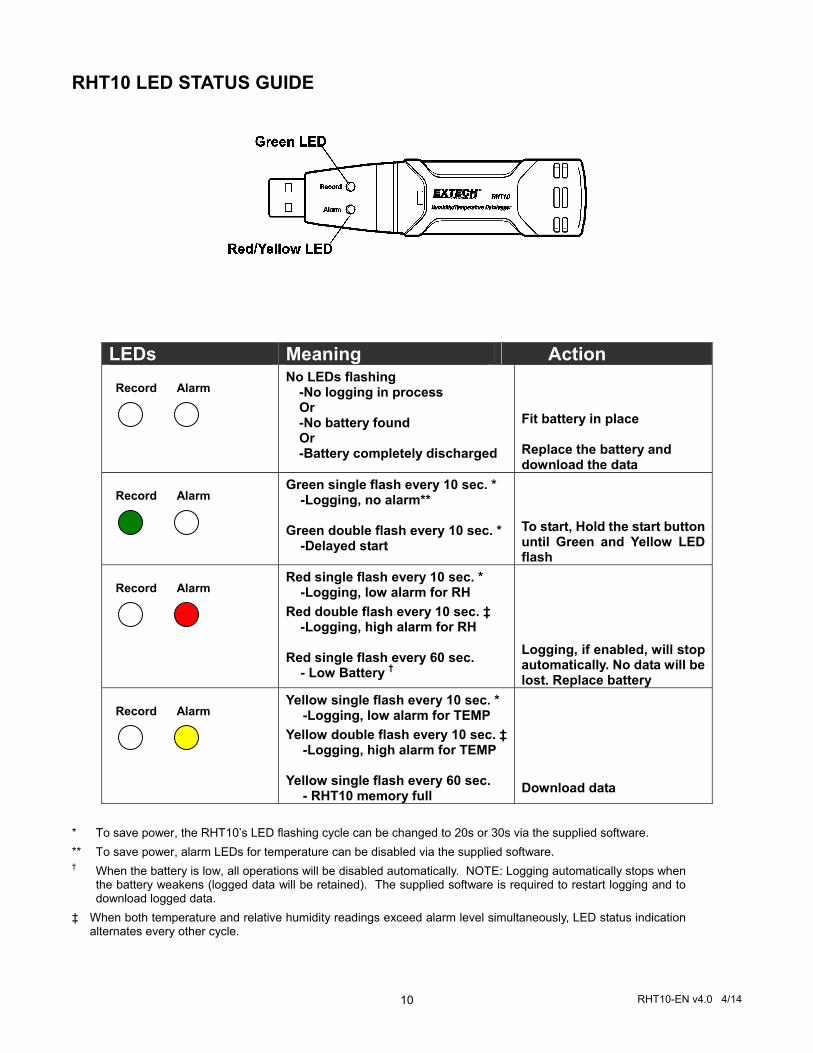
RHT10 LED STATUS GUIDE
LEDs Meaning Action
Record Alarm No LEDs flashing
-No logging in process Or -No battery found Or -Battery completely discharged
Fit battery in place Replace the battery and download the data
Record Alarm
Green single flash every 10 sec. * -Logging, no alarm** Green double flash every 10 sec. * -Delayed start
To start, Hold the start button until Green and Yellow LED flash
Record Alarm
Red single flash every 10 sec. * -Logging, low alarm for RH
Red double flash every 10 sec. ‡ -Logging, high alarm for RH Red single flash every 60 sec. - Low Battery †
Logging, if enabled, will stop automatically. No data will be lost. Replace battery
Record Alarm
Yellow single flash every 10 sec. * -Logging, low alarm for TEMP
Yellow double flash every 10 sec. ‡ -Logging, high alarm for TEMP
Yellow single flash every 60 sec.
- RHT10 memory full
Download data
* To save power, the RHT10’s LED flashing cycle can be changed to 20s or 30s via the supplied software.
** To save power, alarm LEDs for temperature can be disabled via the supplied software. † When the battery is low, all operations will be disabled automatically. NOTE: Logging automatically stops when
the battery weakens (logged data will be retained). The supplied software is required to restart logging and to download logged data.
‡ When both temperature and relative humidity readings exceed alarm level simultaneously, LED status indication alternates every other cycle.
RHT10-EN v4.0 4/14 11
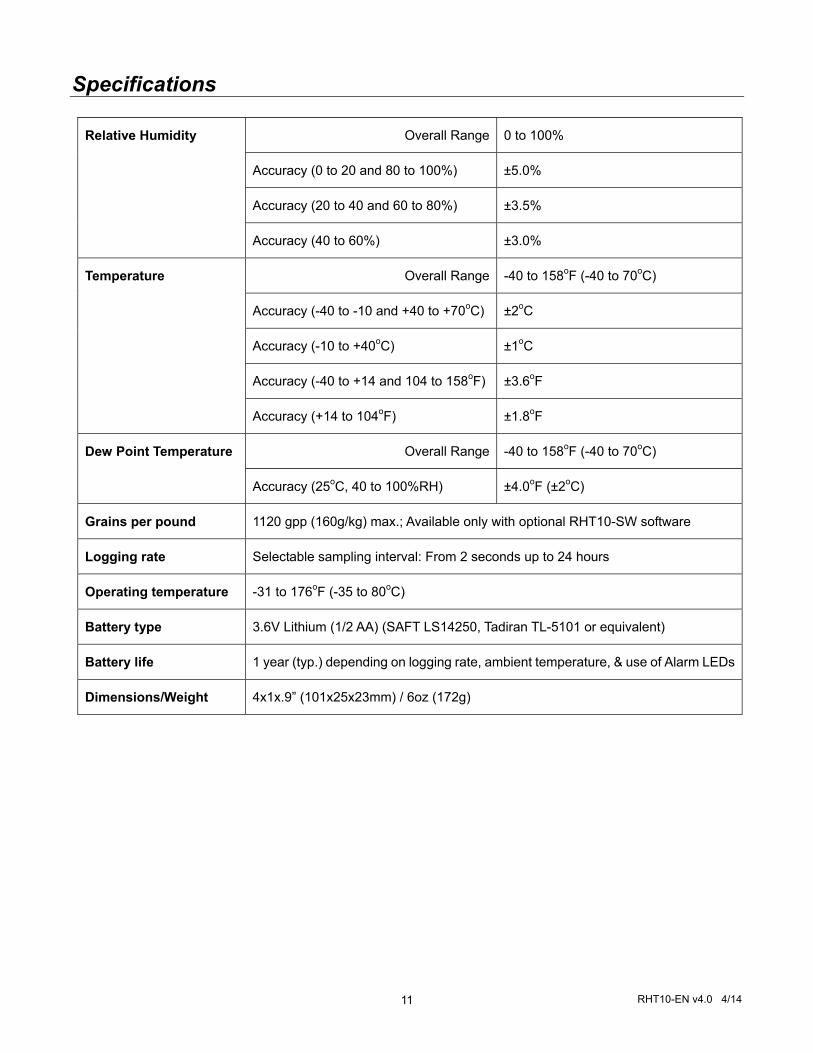
Specifications
Relative Humidity Overall Range 0 to 100%
Accuracy (0 to 20 and 80 to 100%) ±5.0%
Accuracy (20 to 40 and 60 to 80%) ±3.5%
Accuracy (40 to 60%) ±3.0%
Temperature Overall Range -40 to 158oF (-40 to 70oC)
Accuracy (-40 to -10 and +40 to +70oC) ±2oC
Accuracy (-10 to +40oC) ±1oC
Accuracy (-40 to +14 and 104 to 158oF) ±3.6oF
Accuracy (+14 to 104oF) ±1.8oF
Dew Point Temperature Overall Range -40 to 158oF (-40 to 70oC)
Accuracy (25oC, 40 to 100%RH) ±4.0oF (±2oC)
Grains per pound 1120 gpp (160g/kg) max.; Available only with optional RHT10-SW software
Logging rate Selectable sampling interval: From 2 seconds up to 24 hours
Operating temperature -31 to 176oF (-35 to 80oC)
Battery type 3.6V Lithium (1/2 AA) (SAFT LS14250, Tadiran TL-5101 or equivalent)
Battery life 1 year (typ.) depending on logging rate, ambient temperature, & use of Alarm LEDs
Dimensions/Weight 4x1x.9” (101x25x23mm) / 6oz (172g)
RHT10-EN v4.0 4/14 12
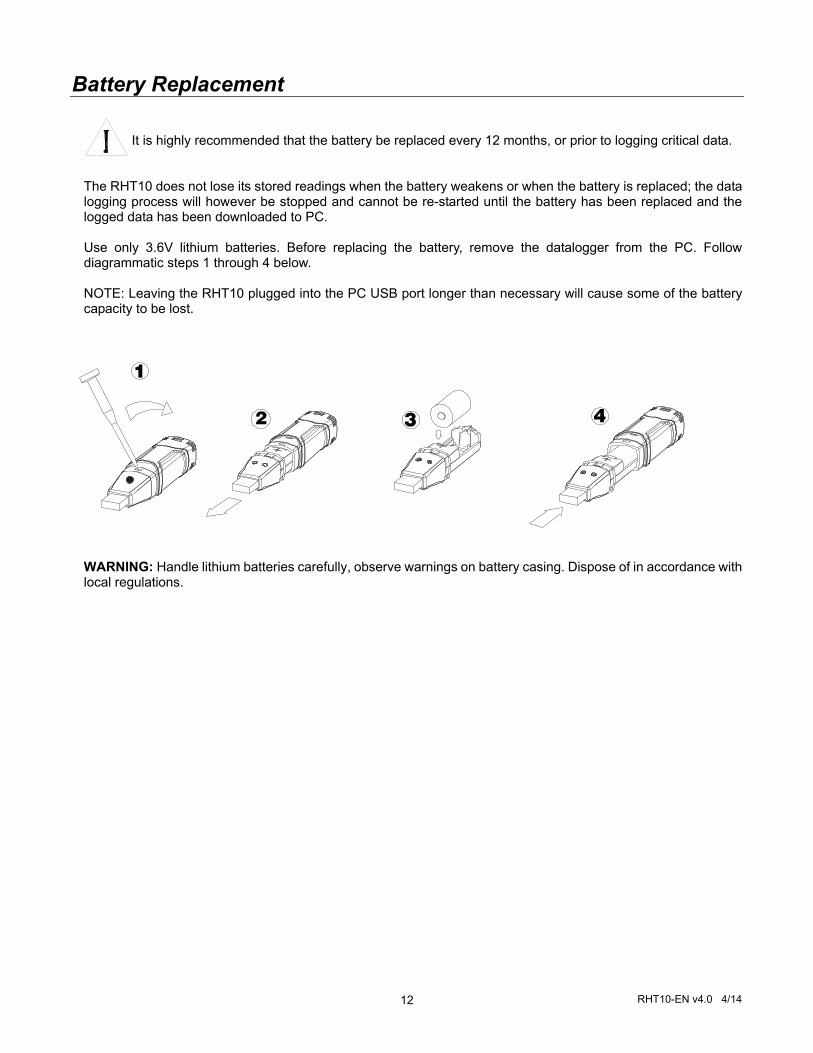
Battery Replacement It is highly recommended that the battery be replaced every 12 months, or prior to logging critical data.
The RHT10 does not lose its stored readings when the battery weakens or when the battery is replaced; the data logging process will however be stopped and cannot be re-started until the battery has been replaced and the logged data has been downloaded to PC. Use only 3.6V lithium batteries. Before replacing the battery, remove the datalogger from the PC. Follow diagrammatic steps 1 through 4 below. NOTE: Leaving the RHT10 plugged into the PC USB port longer than necessary will cause some of the battery capacity to be lost.
WARNING: Handle lithium batteries carefully, observe warnings on battery casing. Dispose of in accordance with local regulations.
RHT10-EN v4.0 4/14 13
Warranty FLIR Systems, Inc. warrants this Extech Instruments brand device to be free of defects in parts and workmanship for three years from date of shipment (a six month limited warranty applies to sensors and cables). If it should become necessary to return the instrument for service during or beyond the warranty period, contact the Customer Service Department for authorization. Visit the website www.extech.com for contact information. A Return Authorization (RA) number must be issued before any product is returned. The sender is responsible for shipping charges, freight, insurance and proper packaging to prevent damage in transit. This warranty does not apply to defects resulting from action of the user such as misuse, improper wiring, operation outside of specification, improper maintenance or repair, or unauthorized modification. FLIR Systems, Inc. specifically disclaims any implied warranties or merchantability or fitness for a specific purpose and will not be liable for any direct, indirect, incidental or consequential damages. FLIR’s total liability is limited to repair or replacement of the product. The warranty set forth above is inclusive and no other warranty, whether written or oral, is expressed or implied.
Calibration, Repair, and Customer Care Services FLIR Systems, Inc. offers repair and calibration services for the Extech Instruments products we sell. NIST certification for most products is also provided. Call the Customer Service Department for information on calibration services available for this product. Annual calibrations should be performed to verify meter performance and accuracy. Technical support and general customer service is also provided, refer to the contact information provided below.
Copyright © 2014 FLIR Systems, Inc.
All rights reserved including the right of reproduction in whole or in part in any form
www.extech.com
Garantie FLIR Systems, Inc. garantit que cet appareil Extech Instruments est exempt de défauts matériaux et de fabrication pendant trois annees à partir de la date d’envoi (une garantie limitée de six mois s’applique aux capteurs et aux câbles). Si le renvoi de l’appareil pour réparation devient nécessaire durant ou après la période de garantie, contactez le service client pour autorisation. Pour obtenir les coordonnées, visitez le site Web suivant : www.extech.com. Un numéro d’autorisation de retour (AR) doit être délivré avant tout retour de produit. L’expéditeur prend à sa charge les frais d’expédition, le fret, l’assurance et l’emballage correct de l’appareil afin de prévenir toute détérioration durant le transport. Cette garantie ne s’applique pas aux dommages imputables à l’utilisateur, tels que l’usage impropre ou abusif, un mauvais câblage, une utilisation non conforme aux spécifications, un entretien ou une réparation incorrecte, ou toute modification non autorisée. FLIR Systems, Inc. déclinera spécifiquement toute garantie ou qualité marchande ou aptitude à l’emploi prévu, et ne sera en aucun cas tenu responsable pour tout dommage conséquent, direct, indirect ou accidentel. La responsabilité totale de FLIR est limitée à la réparation ou au remplacement du produit. La garantie définie ci‐dessus est inclusive et aucune autre garantie, écrite ou orale, n’est exprimée ou implicite.
Calibrage, réparation et services après‐vente FLIR Systems, Inc. offre des services de calibrage et de réparation pour les produits Extech Instruments que nous commercialisons. Nous fournissons également une certification NIST pour la plupart des produits. Contactez notre service client pour toute information sur les services de calibrage disponibles pour ce produit. Un calibrage doit être effectué chaque année pour vérifier les performances et la précision du mètre. Nous offrons également une assistance technique et un service à la clientèle. Veuillez vous reporter aux coordonnées fournies ci‐dessous.
Copyright © 2014 FLIR Systems, Inc.
Tous droits réservés, y compris la reproduction partielle ou totale sous quelque forme que ce soit.
www.extech.com
Support Lines: U.S. (877) 439‐8324; International: +1 (603) 324‐7800 Technical Support: Option 3; E‐mail: [email protected] Repair & Returns: Option 4; E‐mail: [email protected]
Product specifications are subject to change without notice Please visit our website for the most up‐to‐date information
www.extech.com FLIR Commercial Systems, Inc., 9 Townsend West, Nashua, NH 03063 USA
ISO 9001 Certified
Lignes d’assistance: États‐Unis (877) 439‐8324; international: +1 (603) 324‐7800 Service d’assistance technique : Option 3 ; E‐mail : [email protected]
Réparations et retours : Option 4 ; E‐mail : [email protected] Les spécifications produit sont sujettes à modifications sans préavis.
Pour les toutes dernières informations, veuillez visiter notre site Web. www.extech.com
FLIR Commercial Systems, Inc., 9 Townsend West, Nashua, NH 03063 USA Certifié ISO 9001
RHT10-EN v4.0 4/14 14
Garantía FLIR Systems, Inc., garantiza este dispositivo marca Extech Instruments para estar libre de defectos en partes o mano de obra durante tres años a partir de la fecha de embarque (se aplica una garantía limitada de seis meses para cables y sensores). Si fuera necesario regresar el instrumento para servicio durante o después del periodo de garantía, llame al Departamento de Servicio a Clientes para obtener autorización. Visite www.extech.com para Información de contacto. Se debe expedir un número de Autorización de Devolución (AD) antes de regresar cualquier producto. El remitente es responsable de los gastos de embarque, flete, seguro y empaque apropiado para prevenir daños en tránsito. Esta garantía no se aplica a defectos resultantes de las acciones del usuario como el mal uso, alambrado equivocado, operación fuera de las especificaciones, mantenimiento o reparación inadecuada o modificación no autorizada. FLIR Systems, Inc., rechaza específicamente cualesquier garantías implícitas o factibilidad de comercialización o idoneidad para cualquier propósito determinado y no será responsable por cualesquier daños directos, indirectos, incidentales o consecuentes. La responsabilidad total de FLIR está limitada a la reparación o reemplazo del producto. La garantía precedente es inclusiva y no hay otra garantía ya sea escrita u oral, expresa o implícita.
Servicios de calibración, reparación y atención a clientes FLIR Systems, Inc., ofrece servicios de reparación y calibración para los productos que vendemos de Extech Instruments. Además ofrecemos certificación NIST para la mayoría de los productos. Llame al Departamento de Servicio al Cliente para solicitar información de calibración para este producto. Para verificar el funcionamiento y precisión se debe realizar la calibración anual. Además se provee Soporte Técnico y servicios generales al cliente, consulte la información de contacto en seguida.
Líneas de soporte: EE.UU. (877) 439‐8324; Internacional: +1 (603) 324‐7800 Soporte Técnico Opción 3; correo electrónico: [email protected]
Reparación / Devoluciones: Opción 4; correo electrónico: [email protected] Las especificaciones del producto están sujetas a cambios sin aviso
Por favor visite nuestra página en Internet para la información más actualizada www.extech.com
FLIR Commercial Systems, Inc., 9 Townsend West, Nashua, NH 03063 USA Certificado ISO 9001
Copyright © 2014 FLIR Systems, Inc.
Reservados todos los derechos, incluyendo el derecho de reproducción total o parcial en cualquier medio www.extech.com