Embed Size (px)
Citation preview
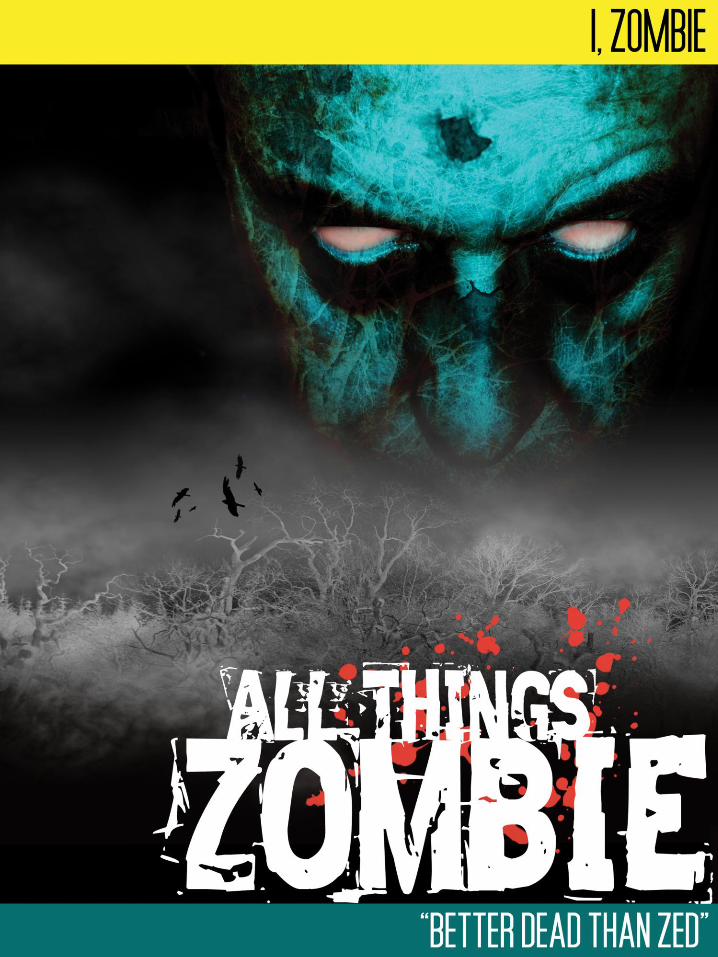


I, ZOMBIE
WRITTEN BY ED TEIXEIRA
© 2010 ED TEIXEIRA – TWO HOUR WARGAMES

I, ZOMBIE
© 2010 ED TEIXEIRA – TWO HOUR WARGAMES
TOC
TABLE OF CONTENTS
Prologue 1
Introduction 1
The 5 "W"s 1 Who 1 What 1 Where 2 When 2 Why 2 What's Inside? 2 Words of Advice 2
Rule Changes 2
Alternative Stars 2 New Fast Move 2 Personalized Reaction Tests 2 Modified In Sight Test 3 Drawing Down 3 No LOS Draw Downs 4 Getting the Drop on the Opponent 4
Received Fire 4
Cover or Concealment 5 Cover In Woods and Buildings 5 Modified Retire 5 Vehicles 5 Characters and Vehicles 5 Movement 5 On The Table Movement 6 Reversing Direction 6 Turning 6 Idling 6 Encumbrance 6 Consequences of Greed 6 Full Pack Jack 6 Vehicle Encumbrance 6 Horse Encumbrance 7 Shopping Cart 7 But Wait, There's More! 7 Other Stuff 7
New Rules 7
Phobias & Quirks 7 Using Phobias & Quirks 7 How Do You Get Them? 8 Phobias & Quirks Table 8 Phobias 8 Social Quirks 10 Personality Quirks 11 Technical Quirks 12 General Quirks 13 Panic Attacks 14
Motivation 15 Fame & Fortune 15 Words 15 Wealth 15 Deeds 15 Using Fame & Fortune Points 16 Zero FFP 16 Buildings Expanded 16 Getting Started 17 Changeable Floor Plan 17 Laying Out the Buildings 17 Choose the Type of Building 17 Layout the Grid 17 Label the Sections 18 Place Exterior Access Points 18 Place Windows 18 Place Interior Access Points 18 Populate the Building 19 Second Stories 19 Smaller & Larger Buildings 20 Joined Sections 20 Figures Inside Buildings 21 Shooting Inside Buildings 21 Moving Inside Buildings 21 Moving Through Access Points 21 Sample Battle in a Building 22 Floor Plans 25 Apartment 25 Bar 25 Diner 25 Gas Station 25 "No-Tell" Motel 26 Store 26 Safe Houses 26 Parting Shot 28 Bicycles 28 Boats 28 Groups 28 Power Boats 28 Types of Boats 29 Defining the Boat 29 Movement 29 Casting Off and Mooring 29 Drifting 29 Starting and Stopping 29 Reversing Direction 29 Turning 30 Getting In And Out Of Boats 30 Boats in Combat 30 Running Over Swimmers 30 Ramming Boats 30 Boat Bashing 31 Shooting and Boats 31 Shooting At Boats 32 Attracting Zombies 32 Swimming 32 Horses 33 Generating Horse Rep 33
I, ZOMBIE
© 2010 ED TEIXEIRA – TWO HOUR WARGAMES
TOC
Movement 33 Fast Move 33 Mounting and Dismounting 33 Loose or Tied 33 Skittish 33 Mounted Tests 34 Are You A Horseman? 34 Damage to Horses 34 Two Riders 34 Mounted Combat 34 Charging 34 Shooting When Mounted 35 Mounted Figures as Targets 35 Feeding the Horse 35 Breakage 35 Lack of Sleep 35 Meet & Greet Table 36 Barter 36
Lazarus Project 36
Side Effects of the Lazarus Agent 36 Ragers 36 Defining Ragers 37 Reputation 37 Weapons 37 How Ragers Appear 37 Placing the Ragers 37 Ragers One Big Family 37 Actions 38 Raging 38 Movement 38 Reactions 39 Shooting 39 Line Of Sight 39 Determining Damage 39 Auto-Kill 39 Melee 39 Hand-To - Hand Weapons 39 How to Melee 39 “Harry, Chill Man!” 40 After The Battle 40 Using Ragers 40 Smart Zombies 41 Defining Smarties 41 Reputation 41 Weapons 41 How Smart Zombies Appear 41 Placing Smart Zombies 41 Shaking the Tree 41 Zombie Feasting 41 Actions 41 Movement 41 Shooting 42 Reloading 42 Hand-To - Hand Weapons 42 How to Melee 42 Damage 42 After The Battle 42
Using Smart Zombies 43 Worms, BA Worms 43 Defining BA Worms 43 Reputation 43 Weapons 43 How BA Worms Appear 43 Placing the BA Worm 44 BA Worm Activation 44 Actions 44 Movement 44 Reactions 45 Shooting 45 Line Of Sight 45 Determining Damage 45 Melee 45 How to Melee 45 BA, BA, Go Away! 46 Outrunning the BA Worm 46 After The Battle 47 Using BA Worms 47 PSY 47 How Prevalent is Psy 47 How Accepted is Psy 47 Wanted Psychics - Dead or Alive? 47 Where Found 47 Playing Psychics 47 Ganger, Survivor, or What? 47 Psy Energy 48 Using Psy-Energy 48 Limits of Psy-Energy 48 The Psy-Gamma Task 48 Performing a Psy Gamma Task 48 Voluntary Targets 48 Empathy 49 Establishing the Connection 49 Probing 49 Block Out 49 Seek 49 Suggestion 49 Closing the Link 49 Psy - Gamma: Putting It All Together 50 The Psy-Kappa Task 50 Performing a Psy Kappa Task 50 Combining Tasks 51 Push Object 51 Manipulate 51 Levitate 51 Fun with Levitated Objects 51 Force Task 51 Spontaneous Combustion 51 Psy Blast 52 Spent Test 52 Performing Psy-Tasks in Reaction 52 Premonition 52 Getting Noticed by Others 52
Encounters 53
The 5 P's 53
I, ZOMBIE
© 2010 ED TEIXEIRA – TWO HOUR WARGAMES
TOC
Setting Up the Encounter 53 Voluntary or Involuntary 53 Types of Encounters 53 Determining the Area 54 Setting Up Terrain 54 Table Size 54 The 3X3 Table 54 The 4x6 Table 54 Dividing the Table 54 Encounter Area and Terrain 55 Placing the Terrain 55 Roads & Streets 56 Determine the Day Part 56 Characters in the Encounter 56 PEFs 56 Generating PEFs 56 Optional PEF Generation 57 PEF Movement 57 Resolving PEFs 57 What Happens Now? 58 Encounter Awareness Test 58 Taking the Encounter Awareness Test 58 How Many NPCs 59 What Are They? 59 Special Instructions 59 Deploying Characters 59 Placing NPCs 59 Placing NPCs Inside Buildings 60 Lacking Sleep 60 Begin the Game 60 Hunting 60 Hunting Limitation 60 Are You A Hunter? 60 What's Out There? 61 Explaining the Available Game 61 Tracking the Prey 61 Unforeseen Circumstances 62 Attracting Zombies 63
The Campaign 63
Character Journal 63 Campaign Area 64 Where Do I Start? 64 Getting Around the Area 64 Random Road Encounters 65 Destination Encounters 69 Buildings - Occupied or Not? 69 Placing Occupants 70 Knock, Knock, Who's There? 70 Looting the Landscape 70 Number of Encounters 71 Involuntary Encounters 71 Lake Havasu City 72 Background: 72 Location & Geography: 72 Size: 72 Land: 72 Sections: 72
Water: 73 Terrain: 73 Climate: 73 Power: 73 People: 73 Population: 73 Language: 73 Government: 73 Legal System: 73 Political Power: 73 Weapons Policy: 73 Papers 73 Holstered Weapon Policy: 74 Economy: 74 Bartering: 74 Communication: 74 Transportation: 74 River Borne: 74 Militia: 74 Patrols: 74 Zombie Threat: 75 Crime and Punishment: 75
NPCs 76
Havasu Area NPCs 76 Governor Newness 76 Police 76 Hanger ons 76 Residents 76 Travelers 77 Cassandra 77 Havasu Area People Table 77 Havasu People Lists 78 Police 78 Residents 78 Travelers 79 NPC Expansion 79 NPC Movement & Actions 79 Why the NPC M&A Table 79 Using the NPC M&A Table 79 Checking By Groups - Before Shooting 80 Checking By Groups - After Shooting 80 Interacting With NPCs 80 When to Interact 80 How to Interact 81 Joining Groups 81 How Much Interaction 81 I Got Your Back 81 Party Favors 81 Types of Party Favors 81 Using Party Favors 81 Consequences of Party Favors 82 Drug Party Favors 82 Extended Example 82

I, ZOMBIE
© 2010 ED TEIXEIRA – TWO HOUR WARGAMES
TOC
Havasu Encounters 86
Coming and Going 86 Chillin' 87 Bartering 87 Recruiting 88 Residency 89 Police 90 Calling the Cops 90 How Many Cops 90 Getting Arrested 91 Police Called In 91 On the Spot 91 To Cooperate or Not 91 Run For It 92 Jail Time 92 Going Before the Judge 92 Disturbing the Peace 92 Brandishing a Weapon 92 Endangerment 92 Stealing 92 Kidnapping 92 Sedition 93 Mayhem 93 Treason 93 Murder 93 Multiple Charges 93 Your Day in Court 93 Sentencing 94 The List 95 Being a Fugitive 95 Attempt to Escape 95 Chase 95 The Show 96 Zombie Wrangling 97 Zombie Wranglers 97 Finding Zombies 97 Capturing Zombies 97 Other Ways to Capture 97 Transferring 98 Capturing Ragers 98 Selling Zombies & Ragers 98 Market Price 99 The Zed Pits 99 Pit Fighting - Zeds and Ragers 99 How to Pit Fight Against Zeds or Ragers 100 Pit Fighting - Humans 101 Zombie Racing 102 Rock Stars of the Apocalypse - Baiters 102 Zombie Racing – How To 102 Setting Up to Play 102 Choosing the Zeds and Baiters 102 Set the Odds 102 Baiter Pay Day 102 The Track 103 At The Start 103 How a Race Is Run 103 Contact! Jammy Dodgers 103 Redirecting a Zed 104
What's On the Schedule Tonight 104 Putting It All Together 105
Final Thoughts 110
After The Horsemen 110
Character Journal 111
Psy Tables 112
All Things Zombie Table 115
Encounter Awareness Table 115
Pit Fighter Table 116
Campaign Turn Sequence 116
NPC Interaction Table 117
Draw Down Table 119
Havasu Barter Table 120
NPC Movement & Action Table 121
Special Thanks To:
Paul Kime for the cover artwork
Rod Campbell for editing
The THW Yahoo group for the great ideas they keep coming up with.
Lil for keeping it real!
I, ZOMBIE
© 2010 ED TEIXEIRA – TWO HOUR WARGAMES
1
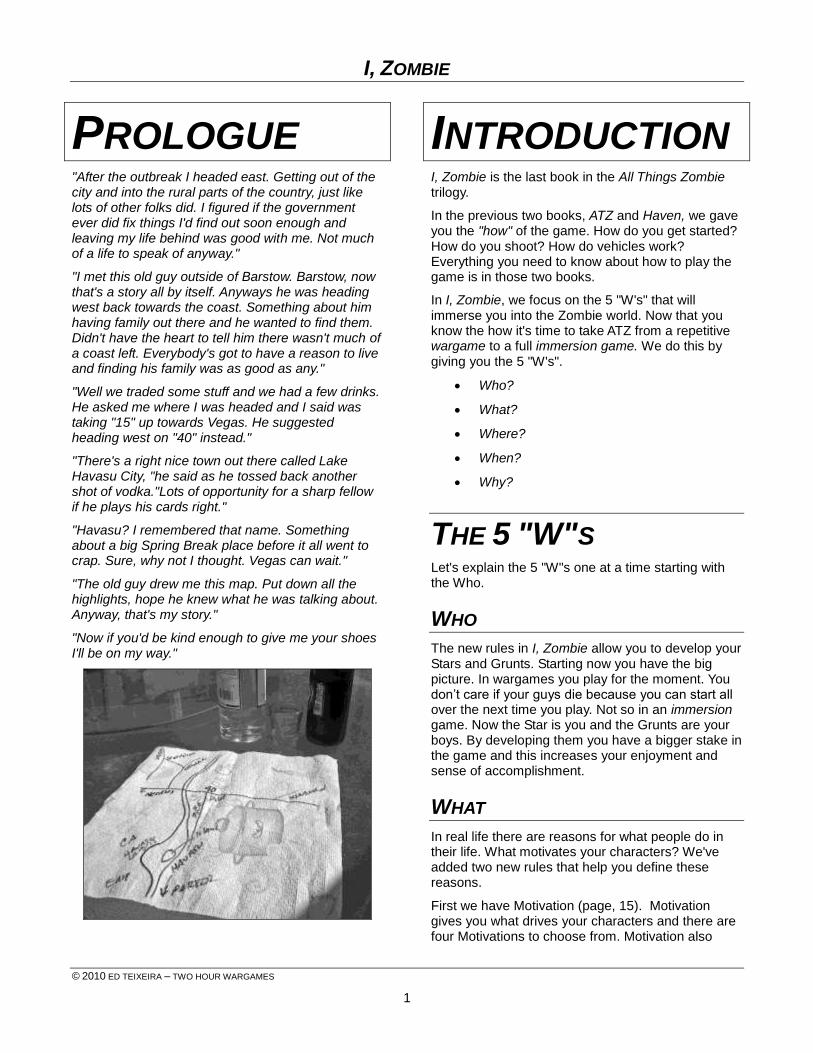
PROLOGUE "After the outbreak I headed east. Getting out of the city and into the rural parts of the country, just like lots of other folks did. I figured if the government ever did fix things I'd find out soon enough and leaving my life behind was good with me. Not much of a life to speak of anyway."
"I met this old guy outside of Barstow. Barstow, now that's a story all by itself. Anyways he was heading west back towards the coast. Something about him having family out there and he wanted to find them. Didn't have the heart to tell him there wasn't much of a coast left. Everybody's got to have a reason to live and finding his family was as good as any."
"Well we traded some stuff and we had a few drinks. He asked me where I was headed and I said was taking "15" up towards Vegas. He suggested heading west on "40" instead."
"There's a right nice town out there called Lake Havasu City, "he said as he tossed back another shot of vodka."Lots of opportunity for a sharp fellow if he plays his cards right."
"Havasu? I remembered that name. Something about a big Spring Break place before it all went to crap. Sure, why not I thought. Vegas can wait."
"The old guy drew me this map. Put down all the highlights, hope he knew what he was talking about. Anyway, that's my story."
"Now if you'd be kind enough to give me your shoes I'll be on my way."
INTRODUCTION I, Zombie is the last book in the All Things Zombie trilogy.
In the previous two books, ATZ and Haven, we gave you the "how" of the game. How do you get started? How do you shoot? How do vehicles work? Everything you need to know about how to play the game is in those two books.
In I, Zombie, we focus on the 5 "W's" that will immerse you into the Zombie world. Now that you know the how it's time to take ATZ from a repetitive wargame to a full immersion game. We do this by giving you the 5 "W's".
Who?
What?
Where?
When?
Why?
THE 5 "W"S Let's explain the 5 "W"s one at a time starting with the Who.
WHO
The new rules in I, Zombie allow you to develop your Stars and Grunts. Starting now you have the big picture. In wargames you play for the moment. You don’t care if your guys die because you can start all over the next time you play. Not so in an immersion game. Now the Star is you and the Grunts are your boys. By developing them you have a bigger stake in the game and this increases your enjoyment and sense of accomplishment.
WHAT
In real life there are reasons for what people do in their life. What motivates your characters? We've added two new rules that help you define these reasons.
First we have Motivation (page, 15). Motivation gives you what drives your characters and there are four Motivations to choose from. Motivation also
I, ZOMBIE
© 2010 ED TEIXEIRA – TWO HOUR WARGAMES
2
provides the reasons why the Non-Player Characters (NPCs) behave the way they do.
We've also added Fame & Fortune (page, 15) rules that reward or penalize your characters for the choices they make. With Fame & Fortune your characters can get better or worse based on what they actually do.
WHERE
At the end of Haven we provided a small Survivor settlement for you to use, Nowhere, Nevada. Now we've provided an area for you to play in, the US Southwest, specifically the area where Nevada, Arizona, and California come together.
This is a desert area and a natural place for anyone trying to escape and rebuild. In I, Zombie we introduce you to Lake Havasu City, a fully developed Post-Apocalyptic town to adventure in and around.
And if you want to know where Nowhere is just take the road north towards Searchlight and hang a left.
WHEN
ATZ and Haven took you from Day One of the Outbreak through the mass exodus of the urban population. I, Zombie begins three years after the anniversary of the Outbreak (ATZ, page, 24). The full effects of the failure of the Lazarus Project have been felt and the Zombies have won. Time in your campaign starts now, August 1st, ZO+3.
WHY
There are two levels of "why" in ATZ.
For the character it's to get better and get its share of the world.
For the player, well, that's up to you. For me it's to have fun and with all the tools we've provided in ATZ, Haven, and now I, Zombie that's a pretty easy thing to do.
WORDS OF ADVICE
In I, Zombie we are adding new rules.
Use as much or as little of the new rules as you like depending upon how immersed you want to be in your game.
When you have questions keep reading as the answers should be along shortly.
RULE
CHANGES In this section we cover existing rules that have changed or expanded.
ALTERNATIVE STARS Instead of starting out as a Rep 5 Star start as a Rep 3 or 4 Star. Everything else remains the same.
NEW FAST MOVE The new Fast Move Test replaces the original one found in ATZ (page, 12) and is much easier to do.
Each character that wishes to Fast Move declares his intent after he had moved its normal move distance.
It then rolls 2d6, adds the result, and may move up to that many additional inches up to a maximum of twice its Rep.
Example - Billy Pink (Rep 5), Sooze (Rep 3) and Chelsea (Rep 4) are in the same group and want to Fast Move. All three move 8" and will now take the test.
Billy rolls a 5 and 2 so moves up to an additional 7 inches.
Sooze rolls a 5 and 3 but can only move up to 6 additional inches.
Chelsea rolls a 2 and 1 so moves up to an additional 3 inches.
PERSONALIZED
REACTION TESTS As anyone that is familiar with THW games knows the centerpiece of the rules are the Reaction Tests (ATZ, page, 12). Currently Reaction Tests are taken
I, ZOMBIE
© 2010 ED TEIXEIRA – TWO HOUR WARGAMES
3
by rolling one set of d6 for the group and applying the results individually.
As ATZ is best played with small numbers of figures we recommend taking Reaction Tests by individual figures instead.
Example - Billy Pink (Rep 5), Char (Rep 4) and Dillon (Rep 3) are all in the same group, within 4" of another group member. They come under fire and must take the Received Fire Test (ATZ, page, 13).
Billy rolls 2d6 plus a Leader Die (ATZ, page, 10). He scores a result of 3 and 5 for his own d6 and a 4 on the Leader Die. Billy passes 2d6 and returns fire.
Char rolls 2d6 and scores a 5 and 6. She is allowed to count Billy's Leader Die so passes 1d6 and Ducks Back.
Dillon rolls 2d6 and scores a 3 and 2. Even without counting Billy's Leader Die he passes 2d6 and returns fire.
MODIFIED IN SIGHT
TEST There will be situations where it is not advisable to have a drawn weapon (Brandishing a Weapon, page, 92). When a character does not have a weapon drawn change the results of their In Sight Test as follows:
Any result of fire becomes a Draw Down instead (page, 119).
Any result of snap fire becomes a Draw Down instead (page, 119) but the character will suffer a -1d6 during the draw.
Example - Billy Pink is in a bar. A hostile NPC enters the bar and Billy takes the Encounter Awareness Test (page, 58). He is allowed to take the In Sight Test and scores a result of fire. He draws his weapon and the two go to a Draw Down (page, 119).
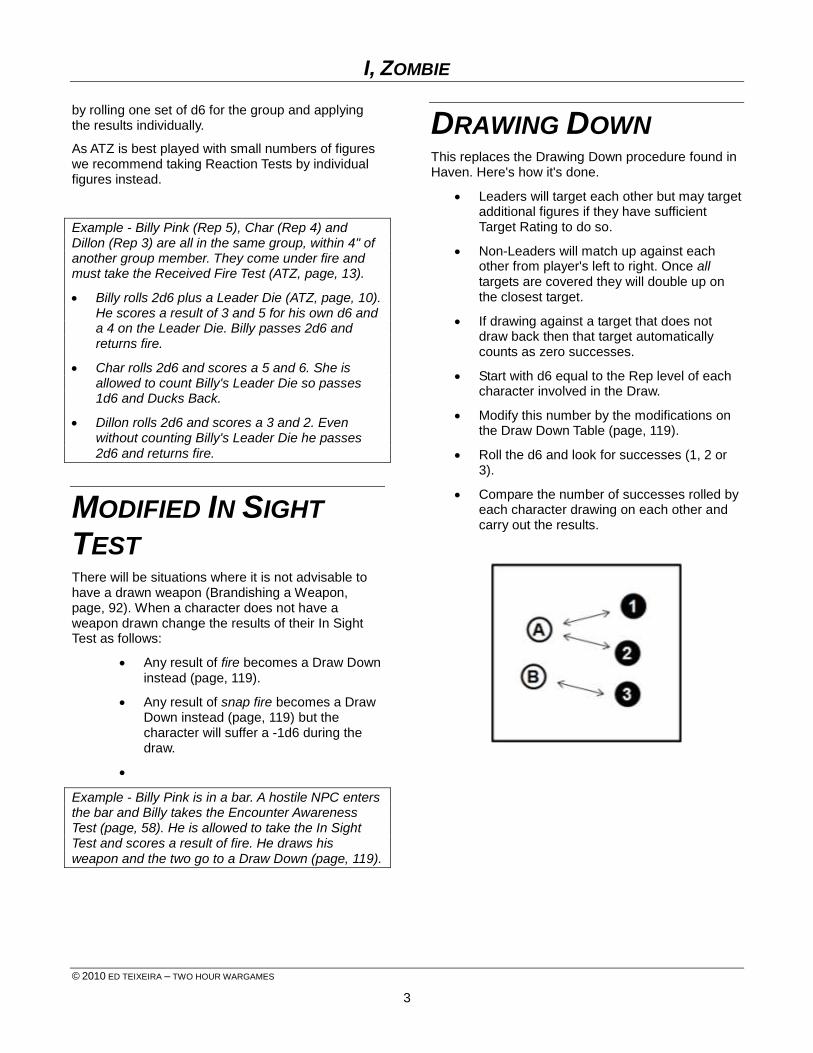
DRAWING DOWN This replaces the Drawing Down procedure found in Haven. Here's how it's done.
Leaders will target each other but may target additional figures if they have sufficient Target Rating to do so.
Non-Leaders will match up against each other from player's left to right. Once all targets are covered they will double up on the closest target.
If drawing against a target that does not draw back then that target automatically counts as zero successes.
Start with d6 equal to the Rep level of each character involved in the Draw.
Modify this number by the modifications on the Draw Down Table (page, 119).
Roll the d6 and look for successes (1, 2 or 3).
Compare the number of successes rolled by each character drawing on each other and carry out the results.
I, ZOMBIE
© 2010 ED TEIXEIRA – TWO HOUR WARGAMES
4
Example - Billy Pink (A) and Sooze (B) are drawing down with three opponents (1, 2, and 3).
Billy (A) and the leader (1) must match up.
Sooze (B) and one of the enemies must match up.
As both Billy and Sooze are targeted the third enemy can now double up on whomever he wants to so he chooses Billy. Billy has the option of drawing back and does. Otherwise he would count as scoring zero successes versus (2).
Billy will roll 5d6 for Rep and a -1d6 for drawing down on an additional target. He rolls 4d6 and scores 2, 3, 3, and 5 for three successes. This is compared to both (1) and (2). If Billy did not draw down on (2) he would have rolled 5d6 but scored zero successes against (2).
Sooze will roll 3d6 for Rep with no modifiers. She scores a 2, 3, and 1 for three successes. This is compared to (3).
NPC (1) rolls 4d6 for Rep with no modifiers. He scores a 2, 3, 3, and 5 for three successes. This is compared to Billy.
NPC (2) rolls 4d6 for Rep but with a -1d6 modifier for being a Dumbass. This means he will roll 3d6. He scores a 2, 4, and 5 for one success. This is compared to Billy.
NPC (3) rolls 3d6 for Rep but with a -1d6 modifier for being Slow to React. This means he will roll 2d6. He scores a 4, and 5 for zero successes. This is compared to Sooze.
Billy scored the same number of successes (3) as NPC (1) so both of them have missed and duck back.
Billy scored two more successes (3 to 1) than NPC (2). This means that NPC (2) was hit and went Out of the Fight. Billy still ducks back from his result with NPC (1).
Sooze scored three more successes (3 to 0) than NPC (3). This means that NPC (3) was hit and is Obviously Dead. Note that Sooze could have chosen to hold fire in hopes that the NPC would surrender.
None of the characters involved in the Draw Down have to take the Received Fire Test but NPC (1) must take the Man Down Test twice for seeing NPC (2) and (3) go down.
After the tests are taken Activation Dice are rolled normally.
NO LOS DRAW DOWNS
There may be a time where a character is being drawn down by another character that they cannot see. Usually this means the opposing character is behind and out of LOS of the character. This happens often when the cops arrive and surround the character. Do the math. It's tough to draw in this situation and it may be better just to give up.
GETTING THE DROP ON THE
OPPONENT
An NPC getting the drop on other will roll 1d6 versus its Rep.
If pass 1d6 it will capture the NPC opponent who surrenders his weapon.
If pass 0d6 the opponent is hit and Obviously Dead.
A player character getting the drop on others can choose whether to capture or kill his opponent.
RECEIVED FIRE This version of the Received Fire Test replaces the one found in ATZ (page, 13).
Whenever a figure has been shot at and not hit it will take this test.
Any friendly figure within 4” and LOS to this figure will also take the test.
Taken when active or inactive.
Example – Billy Pink is shot at. Char and Dez are within 4” and can see Billy. They all take the test.
The difference in the two tests is the distance to the figure has been reduced from 8" to 4".
I, ZOMBIE
© 2010 ED TEIXEIRA – TWO HOUR WARGAMES
5
COVER OR
CONCEALMENT There will be times when a character will hide behind cover or is concealed by terrain.
Concealment hides parts of your body and makes you harder to see and therefore hit.
Cover hides parts of your body, makes you harder to see and therefore hit, and also can stop a bullet.
COVER IN WOODS AND
BUILDINGS To determine what type of cover is available to characters in woods and buildings we use the follow rules.
Stationary characters in woods that are fired on are in cover.
Stationary characters inside a building are in cover.
Moving characters in woods or buildings are concealed and not in cover.
MODIFIED RETIRE Retire is a Reaction result in ATZ (page, 12). It is now modified as follows:
Characters inside of a building that score a result of Retire will now count it as Duck Back.
Characters outside a building that score a result of Retire will now move directly off the table at the fastest speed possible. This may require them to take the Fast Move Test (ATZ, page, 12).
VEHICLES In this section we provide new vehicle rules in some cases replace the existing rules already found in ATZ (page, 24). Feel free to use or not use these rules as desired. It's up to you!
CHARACTERS AND VEHICLES
A character may do one of the following when active.
Move and enter a vehicle at a cost of 2" from their movement.
Start up the vehicle.
Drive the vehicle.
Fire from the vehicle. Note that the driver may also fire and drive the vehicle but will count as snap firing while doing so.
Exit the vehicle at a cost of 2" from their movement and continue to move.
Turning off the vehicle may be done at anytime and may be combined with any of the above actions.
You may not combine vehicle and character movement in the same turn.
MOVEMENT
Vehicles may only move when Active. Vehicle movement is done as follows.
If the vehicle starts off the table-
Nominate the spot where the vehicle will enter the table.
Decide if the vehicle will stop on the table or exit the table on a table edge.
o If stopping on the table, nominate the spot where the vehicle will stop.
o If exiting the table nominate the spot it will exit the table.
If the vehicle starts on the table-
Decide if the vehicle will move and stop on the table or exit the table.
o If stopping on the table, nominate the spot where the vehicle will stop.
o If exiting the table nominate the spot it will exit the table.
I, ZOMBIE
© 2010 ED TEIXEIRA – TWO HOUR WARGAMES
6
ON THE TABLE MOVEMENT
If the vehicle is entering and exiting the table on the same turn it is considered to be Fast Moving.
If the vehicle is starting or stopping on the table it is not considered to be Fast Moving.
REVERSING DIRECTION
Anytime a vehicle wishes to move in reverse it may do so at up to at a maximum of 8". The vehicle must have been stopped prior to moving in reverse.
TURNING
Vehicles may voluntarily make as many turns, changes of direction limited by the model's physical turning radius, whenever desired during their movement.
IDLING
If desired the Driver may stop his move on the table but leave the engine running or idling. When the vehicle is idling, the Driver may be required, or choose, to move the vehicle due to a Vehicle Reaction Test (ATZ, page, QRS).
When taking the In Sight Test and passing 2d6 the Driver may move the vehicle up to 12". Otherwise it remains in place.
When taking the Received Fire Test and passing 2d6 the Driver may choose to charge with the vehicle in lieu of firing a weapon and will take the Vehicle Charge Test (ATZ, page, QRS)
ENCUMBRANCE In ATZ (page, 49) we explained how much your character could carry. We've decided to change it up just a bit. Here it is.
Remember those great role-playing games where you would spend hours figuring out how much stuff your character could lug around? Some games called it encumbrance or something similar. And how much did a repeating crossbow with 24 bolts actually weigh? How much stuff could my guy carry around?
Well, in ATZ it’s all about the game. So we’ve made it real easy. Ready?
First off we’ll assign all items an Encumbrance Value (EV). This replaces the Cargo Value Table found in ATZ.
If you would normally use the item with one hand it has an EV of 1.
If you would normally use the item with two hands it has an EV of 2.
CONSEQUENCES OF GREED
With nothing to stop you but your conscience a player can take and take and take as much stuff as he can get his hands on. But keep in mind that Greed is one of the Seven Deadly Sins and trying to carry too much can be dangerous. What's too much?
A character may carry twice his Rep in EV without any penalties.
A character may carry up to three times his Rep but cannot try to Fast Move.
A character carrying more than three times his Rep is restricted to half normal movement.
That’s it, short and sweet.
Example - Jim Bob Joe has a shotgun (2 EV), a knife (EV 1), pistol (EV 1), two Resource Units (EV 2), and a gas mask (EV 1). He is carrying 7 EV and as he is a Rep 4 he has no movement penalties.
FULL PACK JACK
Smart players will carry up to twice their Rep in EV on their body. This could be a second weapon slung over the back, etc.
The rest of the extra EV can be shoved into a back pack or similar device. When using a back pack the player may declare that he is dropping it and can immediately increase his movement as outlined above.
When using a back pack the player must list exactly what is inside the pack. See the Character Journal (page, 111).
VEHICLE ENCUMBRANCE
Vehicles can carry EV equal to the number of seats they have x 12.
Example – A Sedan (ATZ, page, 25) could carry 6 x 12 or 72 EV.
I, ZOMBIE
© 2010 ED TEIXEIRA – TWO HOUR WARGAMES
7
HORSE ENCUMBRANCE
Horses can carry EV equal to their Rep x 10. Note that a rider counts as 20 EV by himself.
Example – A Rep 4 horse could carry a rider and 20 additional points of EV.
SHOPPING CART
You're kidding, right? Nope. Everyone is familiar with shopping carts and they can be found at many stores (1-3). Shopping carts are used in the following way:
May carry up to 24 EV.
If moving over concrete or asphalt may move up to 6".
If over grass or similar surface 4".
Over anything else 2".
You can Fast Move with a cart. Take the test as normal with a result of:
Pass 2d6 = Cart can move double movement.
Pass 1d6 = Cart can move up to one and a half times movement.
Pass 0d6 = Cart can move up to normal movement.
Any roll of doubles while Fast Moving results in the cart being flipped, all contents tossed onto the ground, and the character falling prone. Carts can be reloaded at 6 EV per turn of Activation.
BUT WAIT, THERE'S MORE!
Wait, wait, and wait some more! According to these rules if I am a Rep 5 guy I could carry an assault rifle (EV 2), three shotguns (EV 6) and two pistols (EV 2) and not take any movement penalty? Isn’t that a bit crazy? I’m already thinking of real whacko combinations to abuse this obvious oversight on your part. What do you say to that?
“Obviously Dead".
OTHER STUFF
What about little stuff? You know, like wallets, watches, etc. If it’s non-lethal and normal every day stuff that you’d leave your house with then there’s 0 EV to it.
How about other stuff? Hey look, we don’t want to make this too extreme and excessive and if you really have to cheese it and abuse the rules that’s fine. We’re just giving you some easy guidelines to follow. Actual mileage may vary.
Start with the one hand (EV 1) or two hand (EV 2) test.
Is it bulky? +2 EV
Heavy? +2 EV
Light? +1 EV
When not specified by the scenario we trust you to use your best judgment to decide on the proper EV.
Dude, it's just a game, have fun!
NEW RULES In this section we introduce new rules. Some are totally new and some may replace others that you may have used in All Things Zombie.
PHOBIAS & QUIRKS It's a tough Post-Apocalyptic world out there. There's always something working on the humans that are tough enough to survive. All these pressures sometimes cause irrational fears and odd behaviors to come to the surface. These Phobias and Quirks can be used to really breathe life into your Stars and Grunts.
USING PHOBIAS & QUIRKS
Phobias and Quirks are the responsibility of the player. You need to know what its effects are and when to use them.
I, ZOMBIE
© 2010 ED TEIXEIRA – TWO HOUR WARGAMES
8
HOW DO YOU GET THEM?
Characters get Phobias & Quirks in two ways:
When your Star is created or when a Grunt is recruited.
Every time the character's Rep goes up or down
Here's how it's done:
Roll 2d6 and add the scores together.
To this total add the Rep of the character.
Next consult the Phobias & Quirks Table (page, 8) to see if the character has gained any Phobias or Quirks.
Next roll 1d6 to see what Phobia or Quirk you have gained. This may require an additional d6 roll.
Example -I start as a Rep 4 Star. I roll 2d6 and score a 7 for a total of 11. Looking on the Phobias & Quirks Table I have gained one Social Quirk. I roll 1d6 and score a 5 so will use Table 3. I now roll 1d6 and score a 4. Looking on Table 3 I see that I have gained the Wishy Washy Quirk.
HOW DO YOU GET RID OF THEM?
You don't. Live with it.
2 Phobias & Quirks Table (Adding the scores to Rep)
Total Result
1 - 6 It's all good. No Quirks or Phobias for you today.
7 - 9 Maybe a little bit of self-doubt creeping in? Roll on Phobias Table.
10 - 12 When did you become a people person? Roll on the Social Quirks Table. (If the character already has 2 Social Quirks, roll on the General Quirks Table instead)
13-16 You're becoming a bit eccentric bud. Roll on the Personality Quirks Table. (If the character already has 2 Personality Quirks, roll on the General Quirks Table instead)
17-20 You're either getting more focused or more distant. Roll on the Technical Quirks table.
21-23 You're good with your individuality. Roll on the General Quirks Table. (If the character already has 2 General Quirks then no Quirks or Phobias for you today.
24+ "You know who you are, and you know what you like." Roll on the Table of your choice.
PHOBIAS (Re-roll any score of 5 or 6) 1 Table 1 2 Table 2 3 Table 3 4 Table 4
1 Being Alone 1 Darkness 1 Opposite Sex 1 Snakes
2 Being Robbed 2 Dogs 2 Pain 2 Speaking in Public
3 Cats 3 Firearms 3 Rivers and Water 3 Thunder and Lightning
4 Clowns 4 Flying 4 Rodents 4 Travel
5 Confined Spaces 5 Heights 5 Sleeping 5 Wild Animals
6 Crowds 6 Horses 6 Re-Roll 6 Re-Roll
Being Alone - This person is deathly afraid to be alone. If left alone (without friends within 6" and in line of sight), this person is subject to Panic Attacks (page, 14).
Being Robbed - This person has a fear of being robbed. If in a city or town at night and approached by an unknown character or characters will immediately move to avoid them. If they move to within 3" of this person he is subject to Panic Attacks (page, 14) with a result of pass 1d6 meaning the
character will Draw Down (page, 119) on the character or characters.
Cats - This person has an irrational fear of cats. If approached by a cat will move to avoid it. If come within 6" and LOS to the cat this person is subject to Panic Attacks (page, 14) with a result of pass 1d6 meaning the character will draw its weapon and fire at the cat.
Clowns - Really? Really. This person is deathly afraid of clowns. If come within 12" and LOS this person is subject to Panic Attacks (page, 14).
I, ZOMBIE
© 2010 ED TEIXEIRA – TWO HOUR WARGAMES
9
Confined Spaces - This person fears closed in areas and confined spaces. If called upon to enter one, such as a tunnel, the person will desert the party and head for home. If they find themselves in a confined space they are subject to Panic Attacks (page, 14) but may only use 1d6 instead of 2d6.
Crowds - This person fears crowds. Whenever there are five or more characters within 6" and LOS to the character he is subject to Panic Attacks (page, 14). If pass 0d6 the character will run away in the opposite direction leaving the Encounter. If this is not possible he will draw a weapon and fire into the air in hopes of scaring the crowd away.
Darkness - This person fears the night and dark places. They will not go out at night, will sleep with a light on, and if forced into the dark they are subject to Panic Attacks (page, 14) but may only use 1d6 instead of 2d6.
Dogs - This person is deathly afraid of dogs. If approached by a dog will move to avoid it. If come within 6" and LOS to the dog this person is subject to Panic Attacks (page, 14) with a result of pass 1d6 meaning the character will draw its weapon and fire at the dog.
Firearms - This person has a fear of firearms and when in LOS and 6" of one pointed at them they must take a Panic Attack Test (page, 14). In addition when threatened will acquiesce to the gunman's directions.
Flying - This person fears flying and will not enter an aircraft. If they find themselves in a aircraft they are subject to Panic Attacks (page, 14) counting a result of pass 0d6 as charging towards the pilot with the intent of wresting the controls from him and landing the plane themselves. This is represented by fighting a round of melee with the pilot counting -3d6.
Heights - This person fears any type of heights from cliffs to stairs. If confronted with having to climb he is subject to Panic Attacks (page, 14). If they find themselves perched on a height, even the top of stairs, they are subject to Panic Attacks (page, 14) but may only use 1d6 instead of 2d6.
Horses - This person is deathly afraid of horses. If approached by a horse they will move to avoid it. If come within 6" and LOS to the horse this person is subject to Panic Attacks (page, 14) with a result of pass 0d6 meaning the character will run away in the opposite direction.
Opposite Sex - This person fears interacting with members of the opposite sex. When interacting with members of the opposite sex, this person will count
a -2d6 when using the NPC Interaction Table (page, 117).
If they score more successes than the member of the opposite sex they will roll on the NPC Negative Reaction Table (page, 118).
If the member of the opposite sex scores equal or more successes than the character the character will immediately walk away.
Pain - This person has a fear of pain and when confronted with the threat of it within LOS and 6" they must take a Panic Attack Test (page, 14). In addition when threatened will acquiesce to the perpetrator's directions.
Rivers and Water - This person fears rivers and other bodies of water and will not enter a watercraft or the body of water. If confronted with the choice of entering the water or watercraft the person will desert the party and head for home. If they find themselves in a watercraft they are subject to Panic Attacks (page, 14) but may only use 1d6 instead of 2d6.
Rodents - This person is deathly afraid of rodents. If approached by a rodent will move to avoid it. If come within 6" and LOS to the rodent this person is subject to Panic Attacks (page, 14) with a result of pass 1d6 meaning the character will draw its weapon and fire at the rodent. For each rodent confronting this person, subtract one from its Rep down to zero if need be.
Sleeping - This person isn’t really afraid of sleeping but actually afraid of never waking up. Consequently he will never sleep for more than four hours at a time and must take the Lack of Sleep Test (page, 35) for every Encounter they are involved in.
Snakes - This person is deathly afraid of snakes. If approached by a snake will move to avoid it. If come within 2" and LOS to the snake this person is subject to Panic Attacks (page, 14) with a result of pass 0d6 meaning the character will run away from the snake.
Speaking in Public - This person is afraid to speak to groups or in public. When interacting with a group of three or more characters he will be subject to a Panic Attack (page, 14) before going to the NPC Interaction Table (page, 117).
Pass 2d6 means he will interact normally.
Pass 1d6 means he will interact but at +2d6.
Pass 0d6 means he will break off the Encounter and try to leave.
I, ZOMBIE
© 2010 ED TEIXEIRA – TWO HOUR WARGAMES
10
Thunder and Lightning - This person fears thunder and lightning and if caught in a storm is subject to Panic Attacks (page, 14).
Travel - This person fears travel and will not enter a vehicle or leave their home. Anyone trying to Recruit this person (page, 88) will do so at -3. If the person is recruited he will desert the party and head home if left alone.
Wild Animals - This person is deathly afraid of any wild animal. If approached by a wild animal will move to avoid it. If come within 6" and LOS to the wild animal this person is subject to Panic Attacks (page, 14) with a result of pass 0d6 meaning the character will run away from the animal, which could trigger an attack (1-2).
SOCIAL QUIRKS 1 - 2 Table 1 3 - 4 Table 2 5 -6 Table 3
1 Charismatic 1 Friendly 1 Stinky
2 Chatterbox 2 Frugal 2 Strong Silent Type
3 Child at Heart 3 Gothic 3 Terrifying
4 Cult of Personality 4 Haggle 4 Wishy Washy
5 Flirty 5 Schmoozer 5 Re-Roll
6 Re-Roll 6 Re-Roll 6 Re-Roll
Charismatic - This character is highly effective at interacting with people and receives a +2d6 when using the NPC Interaction Table (page, 117). He also receives +2d6 when using the Keeping It Together Table (ATZ, page, 60).
Chatterbox - This character loves to talk and talk and talk. Due to its incessant chatter it will count a -1 to Rep on the Under Arrest Table (page, 91), the Justice Is Served Table (page, 94) and a +1d6 on the NPC Interaction Table (page, 117).
Child at Heart - This character can interact well with children and receives a +2d6 on the NPC Interaction Table (page, 117) when doing so. In addition it will always come to the aid of a child.
Cult of Personality - This character is something of a Cult figure. When interacting with others he will count a +1d6 on the NPC Interaction Table (page, 117) for each NPC it is interacting with. So if interacting with 3 NPCs he will do so at a +3d6. Unfortunately he inspires hatred as well. So anyone that scores more successes during interaction will go to the Draw Down Table (page, 119) with the Personality counting -2d6.
Flirty - A natural born flirt this character counts a +1d6 when interacting with members of the opposite sex.
Friendly - Nice person that will treat a result of score one more success than opponent on the NPC Interaction Table (page, 117) as if a result of score same number of successes instead.
Frugal - Will never spend more than normal value for resources when bartering and does not keep Luxury Resources.
Gothic - These people are so Gothic that if they are within LOS of a human and that human has not seen them move they may (1-2) mistake them for a Zombie and will fire at them.
Haggle - This person is good at bartering and will do so at +2d6 on the Barter Table (page, 120).
Schmoozer - This person is a real smooth a$$ kisser. Schmoozers can buy Party Favors (page, 81) at half price when using them on the NPC Interaction Table (page, 117). However, if they try and schmooze someone but are unsuccessful (the person scores more successes than the schmoozer) he will be discovered for what he is and cannot interact with that person again.
Stinky - The person has a strong aversion to personal hygiene. This results in no human standing closer than 3" to the stinker unless forced to. In addition the Stinker will interact at a +2d6 on the NPC Interaction Table (page, 117).
Strong Silent Type - This person doesn't say much and will never act as the leader of a group when interacting with others.
Terrifying - Causes fear in any character with a lower Rep than his. When a character fears an opponent it will:
Melee at -1d6.
I, ZOMBIE
© 2010 ED TEIXEIRA – TWO HOUR WARGAMES
11
Interact at -2d6 on the NPC Interaction Table (page, 117).
Always counts as if Fast Moving when shooting at the terrifying character.
Take the Wanting to Charge and Being Charged Reaction Tests with 1d6 instead of 2d6 and does not count Leader Die.
Wishy Washy - The Wishy Washy character cannot make up his mind and when interacting with another character will treat all results of score one more success as score same number of successes.
PERSONALITY QUIRKS 1 - 2 Personality Quirk 3 - 4 Personality Quirk 5 - 6 Personality Quirk
1 Animal Friendly 1 Hates the Outdoors 1 Mooch
2 Brave 2 Hot-Headed 2 Psycho
3 Couch Potato 3 Kleptomaniac 3 Reckless
4 Coward 4 Loner 4 Size Matters
5 Dislikes Children 5 Loves the Outdoors 5 Smoking Hot
6 Empathy 6 Mental Block 6 Thrifty
Animal Friendly - These people receive a +2d6 bonus when interacting with domestic animals and a +1d6 bonus with wild animals.
Brave - Counts first Retire result as Duck Back.
Couch Potato - Likes to hang out indoors and anyone trying to Recruit (page, 88) this person does so at -3. Will rarely (1) go on a Chillin' Encounter outside his house.
Coward - Counts any result of Duck Back as run away from the Encounter.
Dislikes Children - Not good with kids and can never score better than score same number of successes when interacting with them.
Empathy - This person feels for everyone and will receive a +2d6 when interacting but cannot score higher than score one success more.
Hates the Outdoors - This person hates going outside of their house and anyone trying to recruit them will do so at -2. In addition they will never leave the city unless forced to.
Hot-Headed - Suffers a -3d6 when interacting with others.
Kleptomaniac - Always stealing without giving it a thought. When go into a store take a Challenge Test (ATZ, page, 52).
Pass 2d6 - Successfully shoplift 1 random Resource Unit.
Pass 1d6 - Immediately re-take the test counting a result of pass 1d6 as if pass 0d6.
Pass 0d6 - He has been caught and the Police will be called (1-5) or the store owner will Draw Down (page, 119) on him.
Loner - Doesn’t work well with groups. If hired by others will never count Leader Die in Reaction but always rolls 3d6 instead of 2d6 for the following tests:
Received Fire.
Wanting to Charge.
Being Charged.
Man Down.
Rally.
This person never has to take the Leader Lost Reaction Test.
Loves the Outdoors - Will never be a resident of a city or town.
Mental Block - Is not Psy but rolls 3d6 on all Psy Tasks (page, 48).
Mooch - If this person is in your group on an Encounter you will lose 1 Random Resource Unit.
Psycho - Must Fast Move towards the enemy firing at full Target Rating until he makes contact. Never takes the Wanting to Charge Test as he always can charge. If pass 2d6 on the Being Charged Test the Psycho will countercharge into contact. Counts a +2 when scoring a NPC Negative Reaction.
Reckless - Always out in front whenever possible and suffers a -1d6 when taking In Sight Tests. Never

I, ZOMBIE
© 2010 ED TEIXEIRA – TWO HOUR WARGAMES
12
actively seeks cover. Counts a +1 when scoring a NPC Negative Reaction.
Size Matters - This person always has to have the biggest weapon of its type available. Will barter at twice the cost if need be to get a bigger weapon.
Smoking Hot - This female is just that, smoking hot. She interacts with men at +3d6.
Thrifty - The character will keep everything and will only barter for food if absolutely necessary.
TECHNICAL QUIRKS 1 - 2 Table 1 3 - 4 Table 2 5 - 6 Table 3
1 Demolition Expert 1 Green Thumb 1 Moonshiner
2 Explorer 2 Gun Nut 2 Natural Cook
3 Genius 3 Lock Pick 3 Night Person
4 Grease Monkey 4 Medic 4 Pit Fighter
5 Grease Monkey 5 Mr. Fixit 5 Re-Roll
6 Re-Roll 6 Re-Roll 6 Re-Roll
Demolition Expert - Can recognize explosives, make bombs, and will roll 3d6 instead of 2d6 when taking a Challenge Test (ATZ, page, 52) involving explosives.
Explorer - Will always be in front when in the outdoors. Always wants to see what lies ahead and not afraid to take risks.
Genius - The genius is able to use 3d6 instead of 2d6 when attempting mental Challenges (ATZ, page, 51).
Grease Monkey - This person will roll 3d6 instead of 2d6 on the Repair Table (page, 35) when attempting to repair a vehicle or power boat.
Green Thumb - This person is an expert at growing plants and if spending a full month at home can grow 1+1/2d6 Food Resources. Matt the Gardner in Haven (page, 53) is an example of someone with a green thumb and an entrepreneurial spirit.
Gun Nut - This person will roll 3d6 instead of 2d6 on the Repair Table (page, 35) when attempting to repair a gun.
Lock Pick - The lock pick quirk allows the character to treat locked doors as if they were unlocked.
Medic - Those with the Medic quirk are treated like a nurse when a character is taking a Recovery Test (ATZ, pages, 22-23).
Mr. Fixit - This person will roll 3d6 instead of 2d6 on the Repair Table (page, 35) when attempting to
repair anything except for vehicles, power boats, or guns.
Moonshiner - The moonshiner is like the guy with the Green Thumb Technical Quirk but with distilled liquor. A moonshiner spending time at his still cooking hooch can make 2 + 1/2d6 Party Favors per month. Moonshiners are prized in large communities and rival moonshiners have been known to trigger violence.
Natural Cook - This person is a great cook and can whip up a meal from almost anything. This has led to a good reputation which allows them a +2d6 when using the Havasu Barter Table (page, 120) if bartering for food. If successfully barter for food they will bring back a meal for the person that they bartered with gaining one FFP (page, 15).
Night Person - The Night Person will roll 3d6 instead of 2d6 on their In Sight test at Night Time. He often sleeps late so is rarely (1) encountered during the Daytime.
Pit Fighter - This person is allowed to re-roll one failure each time they roll d6 when Pit Fighting (page, 99). Due to its reputation he always counts as one Rep higher when setting the odds (page, 99).
I, ZOMBIE
© 2010 ED TEIXEIRA – TWO HOUR WARGAMES
13
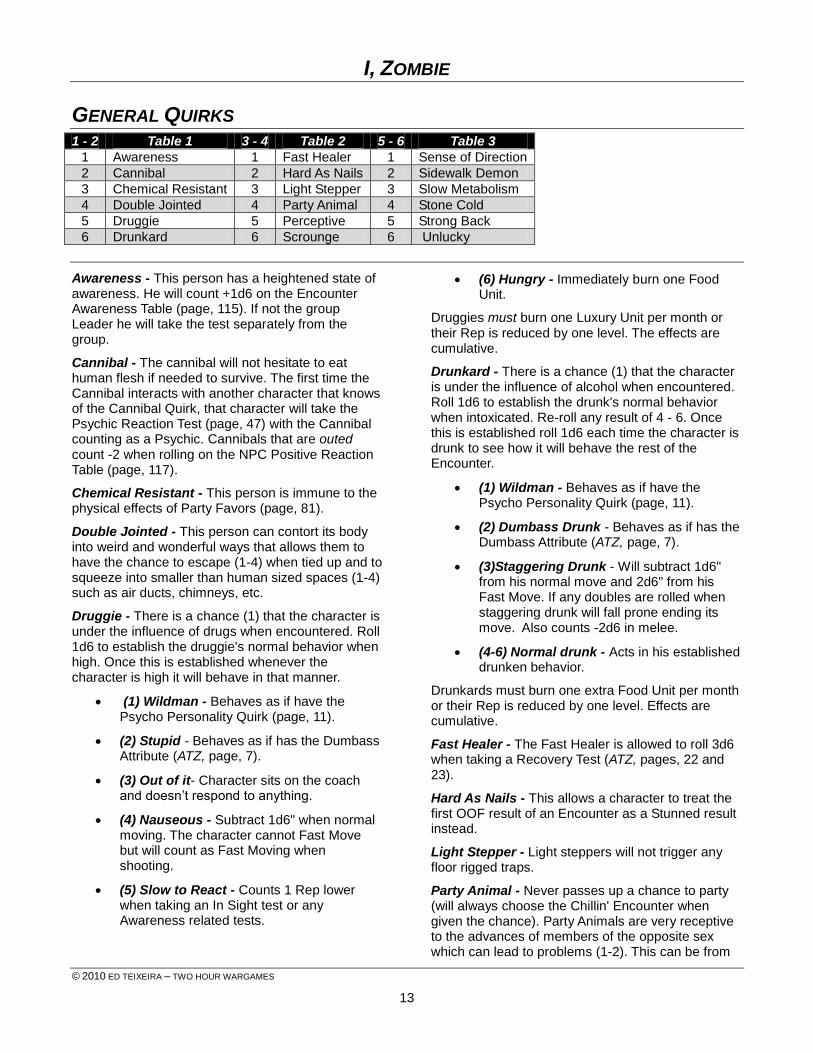
GENERAL QUIRKS 1 - 2 Table 1 3 - 4 Table 2 5 - 6 Table 3
1 Awareness 1 Fast Healer 1 Sense of Direction
2 Cannibal 2 Hard As Nails 2 Sidewalk Demon
3 Chemical Resistant 3 Light Stepper 3 Slow Metabolism
4 Double Jointed 4 Party Animal 4 Stone Cold
5 Druggie 5 Perceptive 5 Strong Back
6 Drunkard 6 Scrounge 6 Unlucky
Awareness - This person has a heightened state of awareness. He will count +1d6 on the Encounter Awareness Table (page, 115). If not the group Leader he will take the test separately from the group.
Cannibal - The cannibal will not hesitate to eat human flesh if needed to survive. The first time the Cannibal interacts with another character that knows of the Cannibal Quirk, that character will take the Psychic Reaction Test (page, 47) with the Cannibal counting as a Psychic. Cannibals that are outed count -2 when rolling on the NPC Positive Reaction Table (page, 117).
Chemical Resistant - This person is immune to the physical effects of Party Favors (page, 81).
Double Jointed - This person can contort its body into weird and wonderful ways that allows them to have the chance to escape (1-4) when tied up and to squeeze into smaller than human sized spaces (1-4) such as air ducts, chimneys, etc.
Druggie - There is a chance (1) that the character is under the influence of drugs when encountered. Roll 1d6 to establish the druggie's normal behavior when high. Once this is established whenever the character is high it will behave in that manner.
(1) Wildman - Behaves as if have the Psycho Personality Quirk (page, 11).
(2) Stupid - Behaves as if has the Dumbass Attribute (ATZ, page, 7).
(3) Out of it- Character sits on the coach and doesn’t respond to anything.
(4) Nauseous - Subtract 1d6" when normal moving. The character cannot Fast Move but will count as Fast Moving when shooting.
(5) Slow to React - Counts 1 Rep lower when taking an In Sight test or any Awareness related tests.
(6) Hungry - Immediately burn one Food Unit.
Druggies must burn one Luxury Unit per month or their Rep is reduced by one level. The effects are cumulative.
Drunkard - There is a chance (1) that the character is under the influence of alcohol when encountered. Roll 1d6 to establish the drunk's normal behavior when intoxicated. Re-roll any result of 4 - 6. Once this is established roll 1d6 each time the character is drunk to see how it will behave the rest of the Encounter.
(1) Wildman - Behaves as if have the Psycho Personality Quirk (page, 11).
(2) Dumbass Drunk - Behaves as if has the Dumbass Attribute (ATZ, page, 7).
(3)Staggering Drunk - Will subtract 1d6" from his normal move and 2d6" from his Fast Move. If any doubles are rolled when staggering drunk will fall prone ending its move. Also counts -2d6 in melee.
(4-6) Normal drunk - Acts in his established drunken behavior.
Drunkards must burn one extra Food Unit per month or their Rep is reduced by one level. Effects are cumulative.
Fast Healer - The Fast Healer is allowed to roll 3d6 when taking a Recovery Test (ATZ, pages, 22 and 23).
Hard As Nails - This allows a character to treat the first OOF result of an Encounter as a Stunned result instead.
Light Stepper - Light steppers will not trigger any floor rigged traps.
Party Animal - Never passes up a chance to party (will always choose the Chillin' Encounter when given the chance). Party Animals are very receptive to the advances of members of the opposite sex which can lead to problems (1-2). This can be from
I, ZOMBIE
© 2010 ED TEIXEIRA – TWO HOUR WARGAMES
14
the involved person (1-2) (can you say stalker) or their jilted paramour (3-6). Party Animals burn one extra Party Favor per month.
Perceptive - The perceptive character will and additional +1d6 when using the NPC Interaction Table (page, 117).
Scrounge - This person has an innate ability to find items that others may overlook. When this person searches for Resources they are always allowed one additional roll.
Sense of Direction - This person has a natural sense of direction and always knows which way they are going. A group with this person will never get lost or take the wrong turn.
Sidewalk Demon - The Sidewalk Demon can double the spread of their weapon when firing, not the Target Rating, and does not divide their melee dice when fighting more than one opponent.
Slow Metabolism - This allows a character to survive on 1/2 Food Unit per month without any penalties to its Rep.
Stone Cold - Character rolls 3d6 for all Reaction Tests except for In Sight and Recover From Knock Down.
Strong Back - The character with a strong back can carry a bit more EV (page, 6) than normal characters.
This character may carry three times his Rep in EV without any penalties.
This character may carry up to four times his Rep but cannot try to Fast Move.
This character carrying more than four times his Rep is restricted to half normal movement.
Unlucky - Anytime anyone with 3" of the unlucky character is hit by ranged weapons fire roll 1d6. On a score of "1" the unlucky character is hit instead whether or not the shooter had LOS.
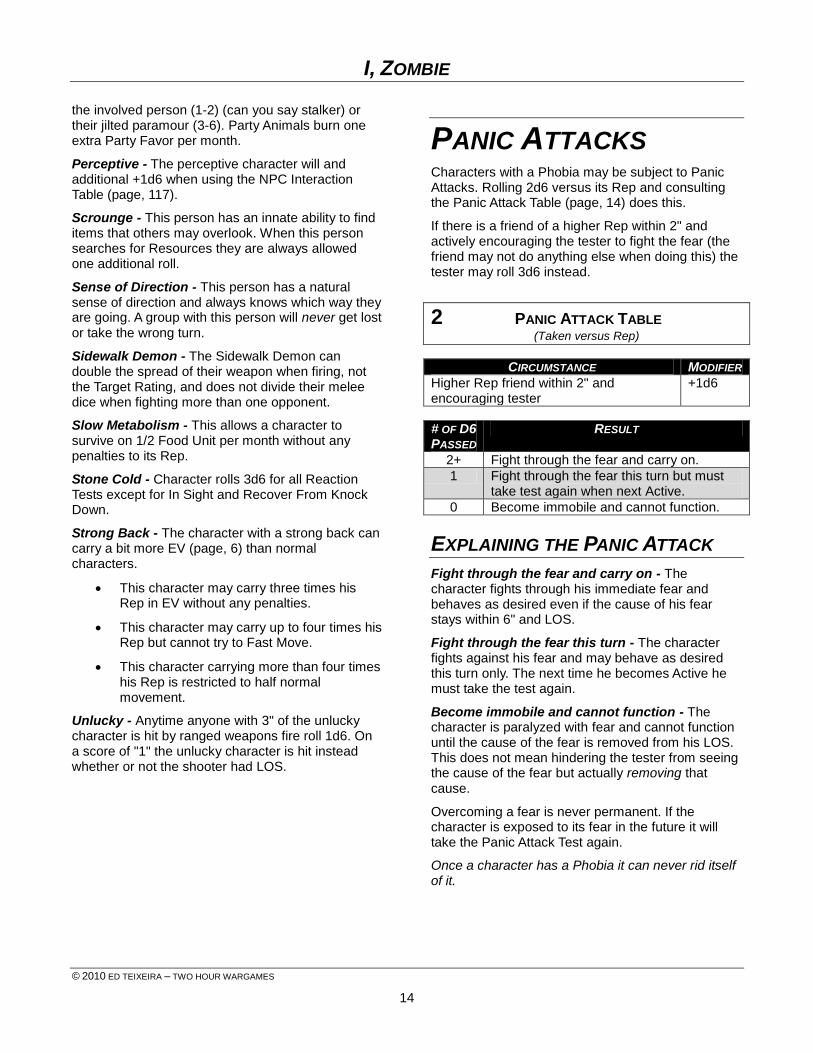
PANIC ATTACKS Characters with a Phobia may be subject to Panic Attacks. Rolling 2d6 versus its Rep and consulting the Panic Attack Table (page, 14) does this.
If there is a friend of a higher Rep within 2" and actively encouraging the tester to fight the fear (the friend may not do anything else when doing this) the tester may roll 3d6 instead.
2 PANIC ATTACK TABLE (Taken versus Rep)
CIRCUMSTANCE MODIFIER
Higher Rep friend within 2" and encouraging tester
+1d6
# OF D6 PASSED
RESULT
2+ Fight through the fear and carry on.
1 Fight through the fear this turn but must take test again when next Active.
0 Become immobile and cannot function.
EXPLAINING THE PANIC ATTACK
Fight through the fear and carry on - The character fights through his immediate fear and behaves as desired even if the cause of his fear stays within 6" and LOS.
Fight through the fear this turn - The character fights against his fear and may behave as desired this turn only. The next time he becomes Active he must take the test again.
Become immobile and cannot function - The character is paralyzed with fear and cannot function until the cause of the fear is removed from his LOS. This does not mean hindering the tester from seeing the cause of the fear but actually removing that cause.
Overcoming a fear is never permanent. If the character is exposed to its fear in the future it will take the Panic Attack Test again.
Once a character has a Phobia it can never rid itself of it.
I, ZOMBIE
© 2010 ED TEIXEIRA – TWO HOUR WARGAMES
15
MOTIVATION Everyone has reasons for what they do in the ATZ world and those reasons aren’t always noble. These reasons are called the character's Motivation. The character's Motivation is usually based on its Character Class (ATZ, page, 5) but can be personalized. See the People's List for more info (page, 78).
Motivation is broken down into four types.
Duty - The character has a sense of duty to the greater good and a sense of fair play. Duty motivated characters want to do the "right thing" and will often champion the less fortunate.
Gain - The character is concerned about getting ahead and will do so at the expense of others. Won't go out of their way to screw someone but will not hesitate to do so.
Profit - It's all about material gain. They try to accumulate as many Resources as they can at as little cost as they possible. Generally not bad people but it's all about profit.
Survival- Live and let live is their motto. As long as you let them do their thing they'll let you do yours. Fiercely independent people that band together if it's mutually beneficial to everyone involved.
The motivation of a character will affect how it interacts with others. This is reflected in the various tables found in I, Zombie.
Once chosen or determined, the Motivation of a character will not change.
FAME & FORTUNE We've added another dimension to the ATZ world by using Fame & Fortune. Fame & Fortune represents accumulated wealth or items, personal favors that can be called in when needed, and fame acquired by your words and deeds. Here's how your character accumulates Fame & Fortune points (FFP).
WORDS
It's possible to gain (and lose) Fame & Fortune points by interacting with NPCs when using the NPC Interaction Table (page, 117).
For each success more you score than your opponent you gain 1 FFP.
For each success less you score than your opponent you will lose 1 FFP.
WEALTH
While adventuring you may accumulate wealth which can translate into FFP. Wealth represents weapons, food, and other Resource Units.
For each Resource Unit you gain during an Encounter you receive 1 FFP.
DEEDS
A character is defined by what he does and the more you do the higher your Fame & Fortune. Here's what to do to gain FFP.
You do not get credit for killing Zombies or Ragers.
Winning A Melee - For each character you kill or knock Out of the Fight you receive FFP equal to the difference in Rep between your Rep and their Rep, but never less than 1 FFP. So if you beat up on low Rep characters you will still gain 1 FFP.
Ranged Weapon Damage - For each character you kill or OOF with ranged weapons fire you score 1 FFP.
Capturing An Enemy - For every enemy character you capture and take off the table you receive FFP equal to their Rep. If it is a Star then you receive three times their Rep!
Retrieving the Wounded. If you retrieve an Out of the Fight party member and take them off the table to safety you gain 3 FFP.
Burying the Dead. If you bury an Obviously Dead party member you gain 3 FFP. It takes one character ten turn of uninterrupted Activation to bury a party member. More characters shoveling will decrease the number of turns proportionately but only the character that initiated the burial will gain the FFP. To gain the points another party member must see it being done.
I, ZOMBIE
© 2010 ED TEIXEIRA – TWO HOUR WARGAMES
16
Just as you can gain FFP you can lose them by what you do or fail to do. Here's what not to do.
Out of the Fight. You will lose 3 + 1/2d6 FFP when going Out of the Fight.
Larger Than Life. If you use the rule (ATZ, Page, 5) you immediately lose half, rounded down, of your current FFP
Cheating Death. If you use the rule (ATZ, Page, 5) you immediately lose all of your current FFP
Cowardice. You will lose 6 + 1d6 FFP if you runaway.
Abandoning. You will lose 1/2d6 FFP for each live group member you leave behind in enemy hands or alone.
Fatalities. You will lose 5 FFP for each member of your group that is killed while you are leading them.
Charged with a Crime. You will lose 2 FFP per Class of crime you go to trial for.
Convicted of a Crime. You will lose 5 FFP per Class of crime you are convicted of.
USING FAME & FORTUNE POINTS
So how do you use FFP? As you gain and lose FFP keep a running total for your Star and other members of your group as you like.
Whenever you have accumulated five times your current Rep you can spend it to increase your Improving Rep (ATZ, page, 61) die score by 1 point with the following restrictions.
It can only be used immediately after a successful Encounter (ATZ, page, 61) and cannot be used when you have failed in an Encounter.
Regardless of the number of FFP you use you cannot increase your Rep by more than 1 point at a time
Example - Billy Pink is currently a Rep 5. He has just had a successful Encounter and it's time to take his Improving Rep die roll. Billy has 33 FFP. He decides to spend 25 to influence his die roll by 1. He rolls a 5 which becomes a 6 when modified by the spent FFP. Billy is now a Rep 6.
Note that FFP are not transferable between characters nor can it be gifted or gambled away. They can be saved and used as you desire.
ZERO FFP
Yes it is possible (probable) that you will be reduced to zero FFP. No biggie. At least you can’t go into the negative side!
BUILDINGS EXPANDED Buildings can be a pretty integral part of your game when playing ATZ or other miniatures games. Building models are laid on the table like any other piece of terrain and their presence enhances the visual appearance of the table. But in reality they are sorely underutilized. Why is this?
Because when you game with buildings you usually have only two ways to use them.
The first way is when the figures "enter" the building you remove the roof from the model and squeeze your figures inside. If you are lucky the building may have more than one area which can be considered to be separate from each other. More often than not this is not the case. Rarely are there more than two areas inside the building as the model isn't large enough or the cost of buying such a model is prohibitive. Not to mention large buildings take up too much space on the table and can pose a real life storage problem. Moving from room to room as in a real building is out of the question.
The second and most common way that buildings are used is when figures enter the building they are actually placed on top of the model. Figures are then determined to be inside the building and in cover while those outside are not. In this way you definitely cannot move from room to room. In effect the building is actually a one area box.
This is how we did it in ATZ (page, 23).
That is, until now. In I, Zombie we're going to expand the current rules you learned in ATZ. By using these rules you will be able to move inside buildings and from room to room in a realistic manner and at little, if any, additional cost.
I, ZOMBIE
© 2010 ED TEIXEIRA – TWO HOUR WARGAMES
17
These rules replace any movement through building rules found in ATZ or Haven.
GETTING STARTED
What we do first is map out the floor plans* of the buildings that we will be using and then set up a building board on the side of the table. When using a 2x2, 3x3, or even a 4x4 table there will usually be space nearby or on the table that is not utilized. That is where we place our changeable floor plan.
*We've included free floor plans to be used in your games (page, 25).
CHANGEABLE FLOOR PLAN
Just as we divided our table into nine sections we also divide our changeable floor plan into nine sections.
You will need nine equal sized flat squares. These can be drawn on cardstock and cut to size or you can go to the store and buy small inexpensive ceramic or vinyl tiles. Heck you can even get them as free samples from the larger box stores.
If playing with 15mm figures 3" x 3" squares will work while for 28mm figures 4" x 4" squares are recommended. I personally use nine 4 1/2" x 4 1/2" ceramic tiles that I purchased for sixteen cents each and use with both 15mm and 28mm figures.
These tiles, when placed in a grid, form your changeable floor plan. They will represent the interior of the buildings that are on the gaming table.
Once you have your terrain placed and the changeable floor plan set up you are ready to start laying out your buildings.
Note that if desired you can choose to draw the changeable floor plan on a sheet of paper instead of actually using one. It will work just as well but your game will lose some of the visual appeal.
LAYING OUT THE BUILDINGS
There's an order to laying out buildings. For each building we follow the same procedure.
1. Choose the type of building.
2. Layout the interior sections.
3. Label the sections.
4. Place exterior access points.
5. Place windows.
6. Place interior access points.
CHOOSE THE TYPE OF BUILDING
The first thing to do is decide what type of building you are playing in. The types that you can use are limitless. In fact, there are examples of many buildings where you live from small houses to the large box stores. Once you learn how to layout your first building you can layout any building. To get you started we've included some pre-made buildings elsewhere in the book (page, 25).
LAYOUT THE GRID
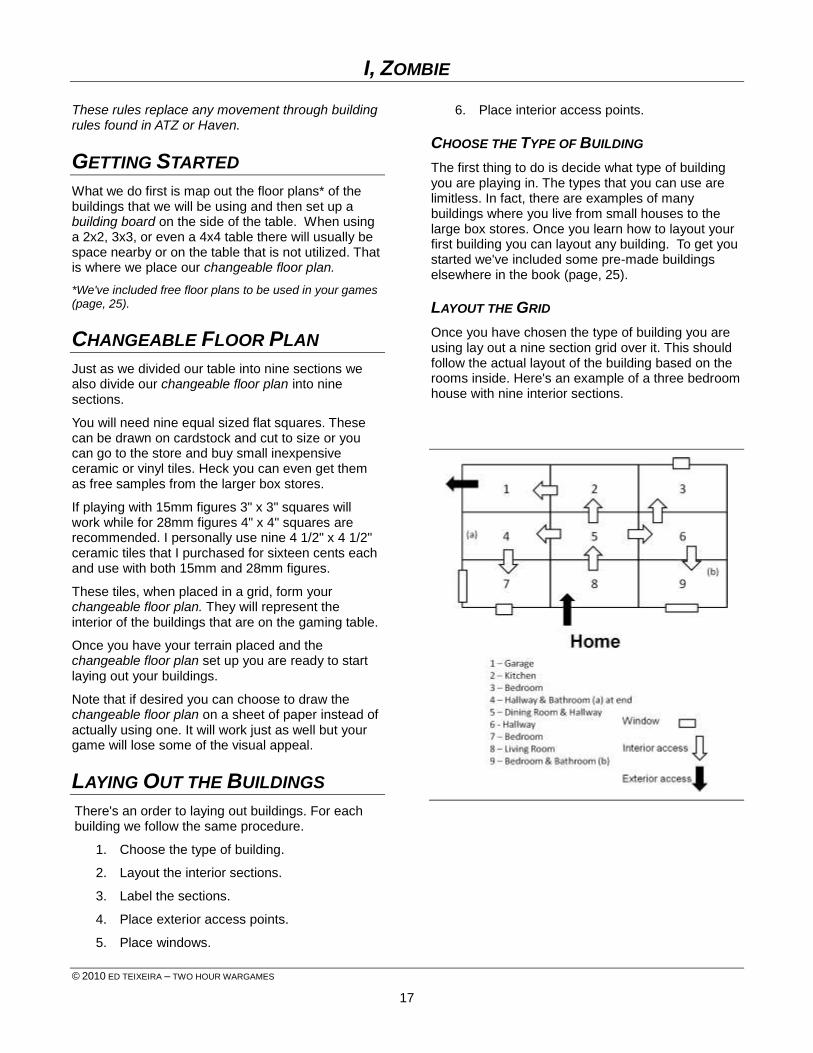
Once you have chosen the type of building you are using lay out a nine section grid over it. This should follow the actual layout of the building based on the rooms inside. Here's an example of a three bedroom house with nine interior sections.
I, ZOMBIE
© 2010 ED TEIXEIRA – TWO HOUR WARGAMES
18
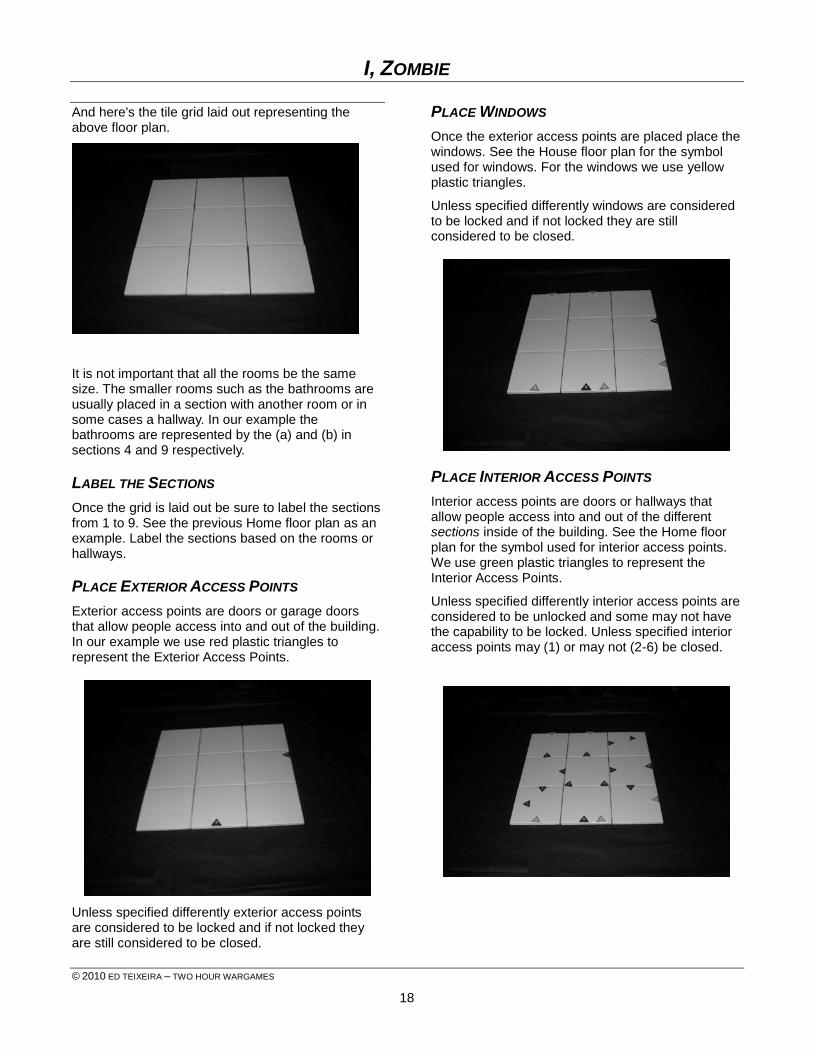
And here's the tile grid laid out representing the above floor plan.
It is not important that all the rooms be the same size. The smaller rooms such as the bathrooms are usually placed in a section with another room or in some cases a hallway. In our example the bathrooms are represented by the (a) and (b) in sections 4 and 9 respectively.
LABEL THE SECTIONS
Once the grid is laid out be sure to label the sections from 1 to 9. See the previous Home floor plan as an example. Label the sections based on the rooms or hallways.
PLACE EXTERIOR ACCESS POINTS
Exterior access points are doors or garage doors that allow people access into and out of the building. In our example we use red plastic triangles to represent the Exterior Access Points.
Unless specified differently exterior access points are considered to be locked and if not locked they are still considered to be closed.
PLACE WINDOWS
Once the exterior access points are placed place the windows. See the House floor plan for the symbol used for windows. For the windows we use yellow plastic triangles.
Unless specified differently windows are considered to be locked and if not locked they are still considered to be closed.
PLACE INTERIOR ACCESS POINTS
Interior access points are doors or hallways that allow people access into and out of the different sections inside of the building. See the Home floor plan for the symbol used for interior access points. We use green plastic triangles to represent the Interior Access Points.
Unless specified differently interior access points are considered to be unlocked and some may not have the capability to be locked. Unless specified interior access points may (1) or may not (2-6) be closed.
I, ZOMBIE
© 2010 ED TEIXEIRA – TWO HOUR WARGAMES
19
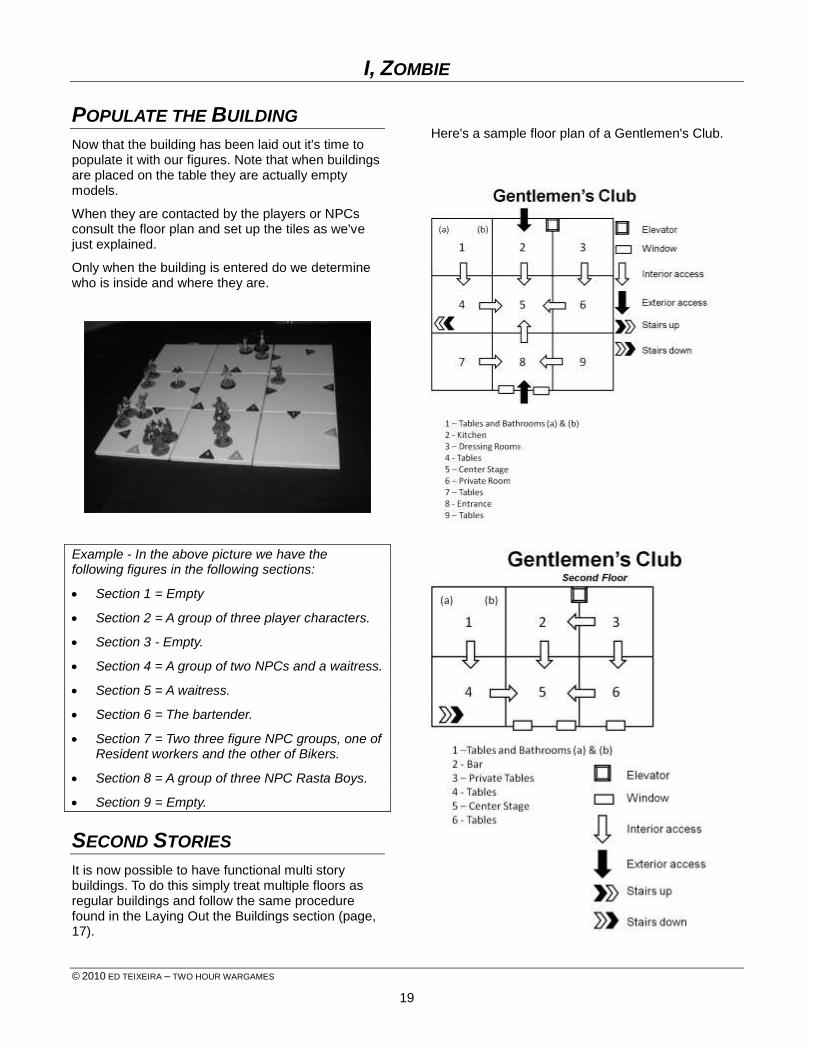
POPULATE THE BUILDING
Now that the building has been laid out it's time to populate it with our figures. Note that when buildings are placed on the table they are actually empty models.
When they are contacted by the players or NPCs consult the floor plan and set up the tiles as we've just explained.
Only when the building is entered do we determine who is inside and where they are.
Example - In the above picture we have the following figures in the following sections:
Section 1 = Empty
Section 2 = A group of three player characters.
Section 3 - Empty.
Section 4 = A group of two NPCs and a waitress.
Section 5 = A waitress.
Section 6 = The bartender.
Section 7 = Two three figure NPC groups, one of Resident workers and the other of Bikers.
Section 8 = A group of three NPC Rasta Boys.
Section 9 = Empty.
SECOND STORIES
It is now possible to have functional multi story buildings. To do this simply treat multiple floors as regular buildings and follow the same procedure found in the Laying Out the Buildings section (page, 17).
Here's a sample floor plan of a Gentlemen's Club.
I, ZOMBIE
© 2010 ED TEIXEIRA – TWO HOUR WARGAMES
20
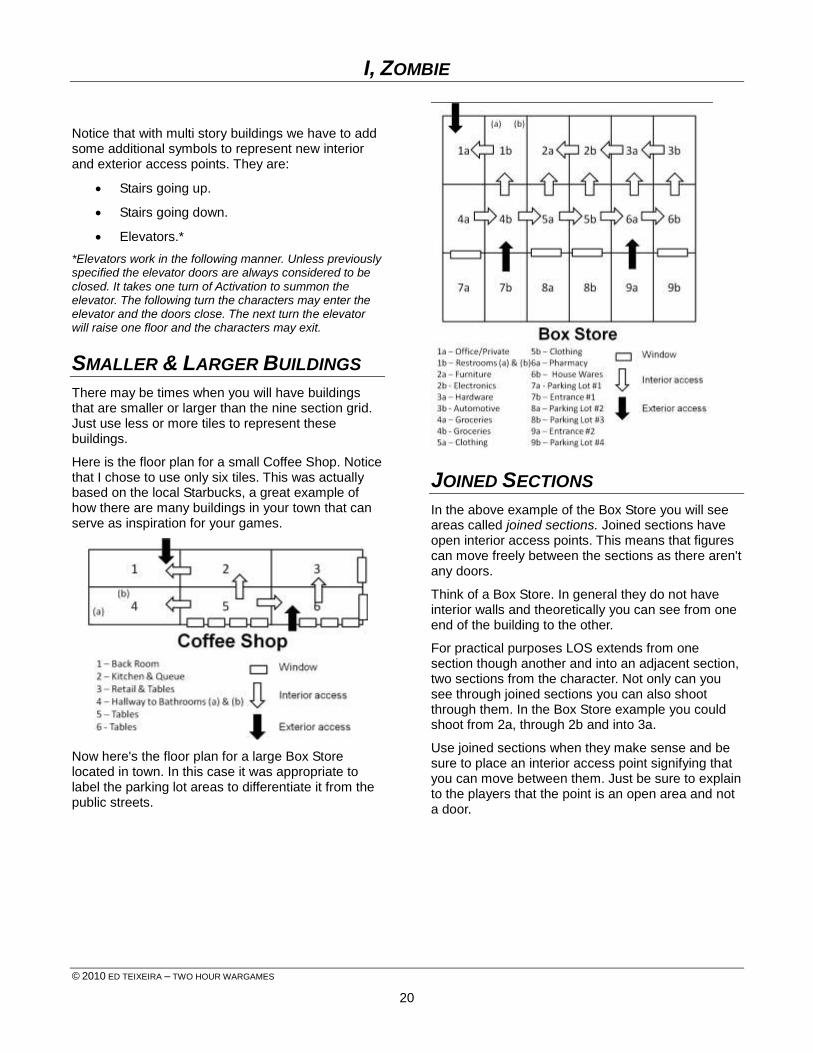
Notice that with multi story buildings we have to add some additional symbols to represent new interior and exterior access points. They are:
Stairs going up.
Stairs going down.
Elevators.*
*Elevators work in the following manner. Unless previously specified the elevator doors are always considered to be closed. It takes one turn of Activation to summon the elevator. The following turn the characters may enter the elevator and the doors close. The next turn the elevator will raise one floor and the characters may exit.
SMALLER & LARGER BUILDINGS
There may be times when you will have buildings that are smaller or larger than the nine section grid. Just use less or more tiles to represent these buildings.
Here is the floor plan for a small Coffee Shop. Notice that I chose to use only six tiles. This was actually based on the local Starbucks, a great example of how there are many buildings in your town that can serve as inspiration for your games.
Now here's the floor plan for a large Box Store located in town. In this case it was appropriate to label the parking lot areas to differentiate it from the public streets.
JOINED SECTIONS
In the above example of the Box Store you will see areas called joined sections. Joined sections have open interior access points. This means that figures can move freely between the sections as there aren't any doors.
Think of a Box Store. In general they do not have interior walls and theoretically you can see from one end of the building to the other.
For practical purposes LOS extends from one section though another and into an adjacent section, two sections from the character. Not only can you see through joined sections you can also shoot through them. In the Box Store example you could shoot from 2a, through 2b and into 3a.
Use joined sections when they make sense and be sure to place an interior access point signifying that you can move between them. Just be sure to explain to the players that the point is an open area and not a door.
I, ZOMBIE
© 2010 ED TEIXEIRA – TWO HOUR WARGAMES
21
FIGURES INSIDE BUILDINGS
Figures inside the buildings are handled as follows:
Figures that are not next to a door or window are placed in the center of the section.
Those at a door or window are placed in contact with the interior or exterior access point or window. Only two characters may be in contact with an interior or exterior access point or window at the same time.
SHOOTING INSIDE BUILDINGS
Shooting in buildings is a bit different than on the table top.
Figures inside the same section can shoot at each other.
Figures in contact with interior or exterior access points or windows can shoot through them into the adjacent section or outside of the building.
Figures in joined sections (page, 20) can shoot through one section into an adjacent one or two sections from the shooter if LOS permits.
Stationary figures inside a section always count as cover.
Moving figures inside a section always count as concealed.
MOVING INSIDE BUILDINGS
With the changeable floor plan moving from room to room in a realistic manner is now possible in your games. Here are some guidelines and tricks to help you understand how it works.
You cannot move from one interior section to another unless there is an interior access arrow placed between sections. Looking back at the Home floor plan you can see that characters can move from the Living Room (# 8) to the Dining Room (#5). They cannot move directly from the Living Room (#8) to the Bedroom (#7) on the left. To reach it they would have to move into the Dining Room (#5), then to the Hallway (#4), and finally to the Bedroom (#7).
Lines separating sections that do not have interior access points are considered to be interior walls.
Normal character movement inside buildings is from one section to another per turn of Activation. In the case of the Home floor plan a character could move from the Living Room (#8) to the Dining Room (#5) in one turn.
Characters may Fast Move from one section through another and into a third only if they score a result of 6 or more on their Fast Move Test (page, 2). In cases where more than one character Fast Moves through the same section, the one with the higher score is assumed to be in the front and will always enter the section first.
Figures forced to Retire will leave the section they are in and move to an adjacent section away from the enemy only if there is an interior or exterior access point or a window that they can jump out of. If none are available the figure will surrender.
Figures exiting a second floor window are subject to possibly falling to the ground and taking damage and must take a Challenge Test (ATZ, page, 52).
MOVING THROUGH ACCESS POINTS
Access points may stop or slow movement through them in the following ways:
Only two figures may move through a doorway at the same time.
Movement through a doorway does not reduce the movement rate of the figure.
Characters may not move through locked doors. Contacting a locked door ends the figure's movement.
Characters may unlock a door and then move through it at normal movement rate.
Only one figure may move through a window at a time and up to two characters during the same turn of activation.
Movement through a window costs half of the figures movement rate.
For information on how to breach a barricaded window or access point see the
I, ZOMBIE
© 2010 ED TEIXEIRA – TWO HOUR WARGAMES
22
section called Barricading Doors and Windows (ATZ, page, 23).
SAMPLE BATTLE IN A BUILDING
Now we'll do a sample battle inside a building to demonstrate how it's done.
We have set up the tiles for a small single wide mobile home. The layout is as follows:
Section 1 (top left) = Hallway.
Section 2 (top center) = Kitchen with the back door and opens to the hallway.
Section 3 (top right) = Hallway with a bathroom at the end.
Section 4 (bottom left) = Bedroom.
Section 5 (bottom center) = Living room with the front door. Note that this section opens up to section 2 (Joined Sections, page, 20).
Section 6 (bottom right) = Master bedroom.
As mentioned previously the areas of the building represented by the tiles do not have to be the same size.
SET UP
The Encounter is a Raid. Two bounty hunters are looking for a Fugitive (page, 95) and have been alerted to his whereabouts, a single wide mobile home.
I played Artie and Benny was my Grunt NPC. Both Fugitives were NPCs.
NPCs would be run by the NPC Movement & Action Table (page, 121). Note that before the shooting starts NPCs work off the left column. When the shooting starts they work off of the right column. Refer to the NPC M&A Table if desired.
Bounty Hunters -
Artie (Rep 5) Shotgun - Outside the back door.
Benny (Rep 4) Shotgun - Outside the front door.
Fugitives
Carl (Rep 4) BAP - In living room.
Debbie (Rep 3) Shotgun - In bath room.
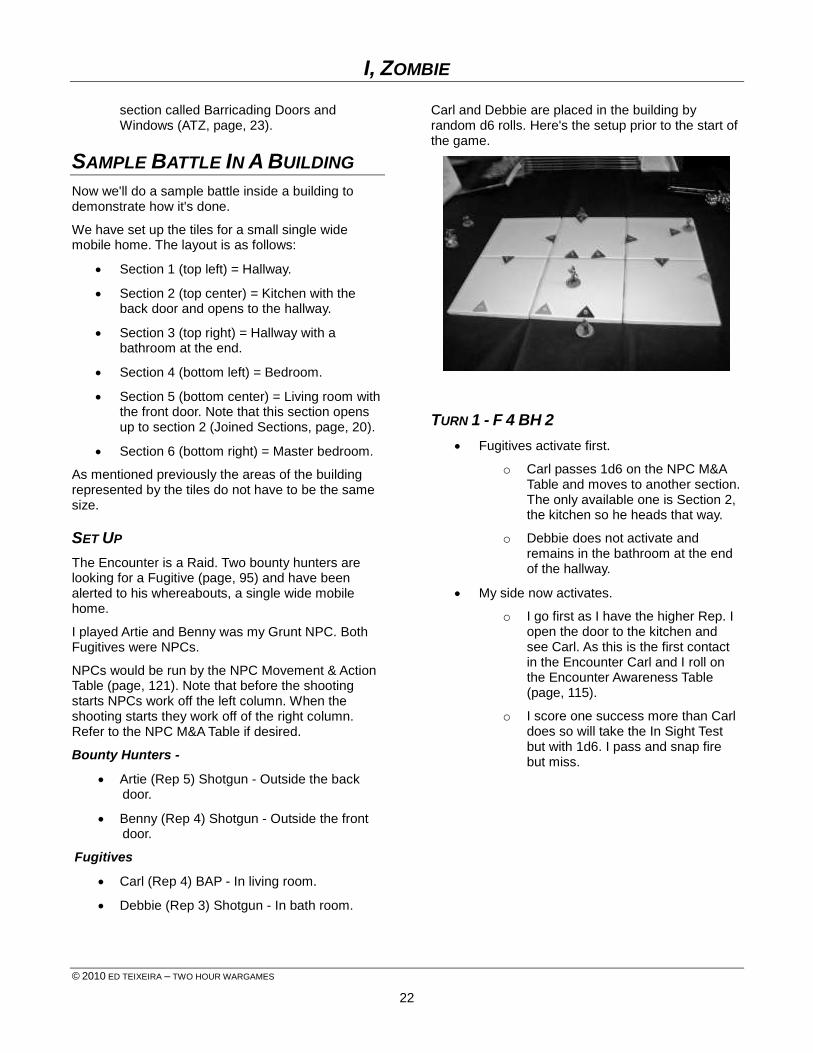
Carl and Debbie are placed in the building by random d6 rolls. Here's the setup prior to the start of the game.
TURN 1 - F 4 BH 2
Fugitives activate first.
o Carl passes 1d6 on the NPC M&A Table and moves to another section. The only available one is Section 2, the kitchen so he heads that way.
o Debbie does not activate and remains in the bathroom at the end of the hallway.
My side now activates.
o I go first as I have the higher Rep. I open the door to the kitchen and see Carl. As this is the first contact in the Encounter Carl and I roll on the Encounter Awareness Table (page, 115).
o I score one success more than Carl does so will take the In Sight Test but with 1d6. I pass and snap fire but miss.

I, ZOMBIE
© 2010 ED TEIXEIRA – TWO HOUR WARGAMES
23
o Carl takes the Received Fire Test and passes 2d6. But because his weapon isn't drawn he cannot return fire but instead Ducks Back down the hallway and out of my sight.
o As I am active I follow up into the kitchen. This allows Carl to take an in Sight Test. He scores a result of fire. Because his weapon isn't drawn this is converted into a Draw Down result (page, 119).
o We both roll on the Draw Down Table and I fire and knock Carl Out of the Fight.
o As I am Fast Moving I can move two sections so end up in Section 1 with Carl.
Here's what happened in real life. Carl was chillin' in the living room then headed for the kitchen to get a beer. I kicked open the door and fired at Carl who ran down the hall. I chased after him and he turned and drew his weapon but before he could fire I shot him in the chest taking him out of the fight.
Benny activates and must roll on the NPC M&A Table. He passes 2d6 so enters the building. He moves into the living room.
TURN 2 - F 3 BH 1
Fugitives activate first.
o Debbie rolls on the NPC M&A Table and passes 0d6. She must now try and leave the building. She moves to the
master bedroom (Section 6) as it has a window.
My side now activates.
o I activate next and cuff Carl.
o Benny activates next and rolls on the NPC M&A Table. He passes 2d6. As there aren’t any targets in sight he can go looking for them. He goes down the hallway and checks the bathroom first.
Here's what happened in real life. Debbie heard the shots and decided she hadn’t signed up for this kind of stuff. She ran to the master bedroom to climb out the window. I ran over to Carl and cuffed him while Benny took a peek down the hallway then checked out the bathroom.
I, ZOMBIE
© 2010 ED TEIXEIRA – TWO HOUR WARGAMES
24
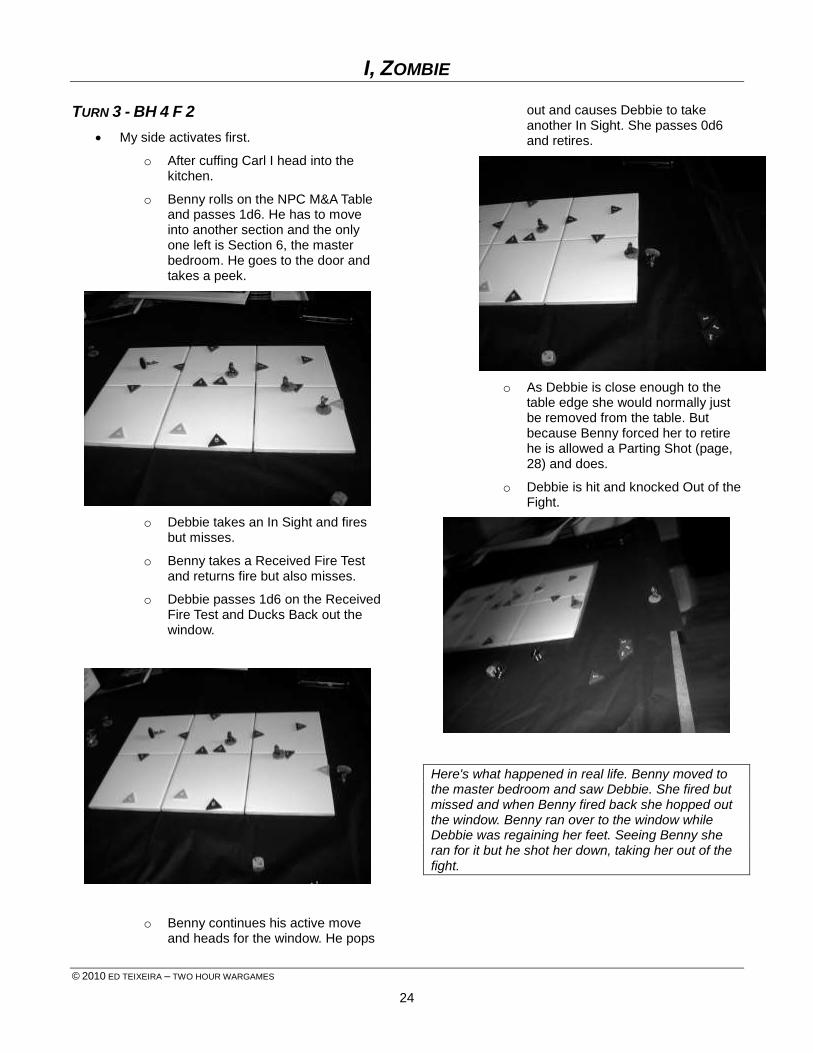
TURN 3 - BH 4 F 2
My side activates first.
o After cuffing Carl I head into the kitchen.
o Benny rolls on the NPC M&A Table and passes 1d6. He has to move into another section and the only one left is Section 6, the master bedroom. He goes to the door and takes a peek.
o Debbie takes an In Sight and fires but misses.
o Benny takes a Received Fire Test and returns fire but also misses.
o Debbie passes 1d6 on the Received Fire Test and Ducks Back out the window.
o Benny continues his active move and heads for the window. He pops
out and causes Debbie to take another In Sight. She passes 0d6 and retires.
o As Debbie is close enough to the table edge she would normally just be removed from the table. But because Benny forced her to retire he is allowed a Parting Shot (page, 28) and does.
o Debbie is hit and knocked Out of the Fight.
Here's what happened in real life. Benny moved to the master bedroom and saw Debbie. She fired but missed and when Benny fired back she hopped out the window. Benny ran over to the window while Debbie was regaining her feet. Seeing Benny she ran for it but he shot her down, taking her out of the fight.
I, ZOMBIE
© 2010 ED TEIXEIRA – TWO HOUR WARGAMES
25
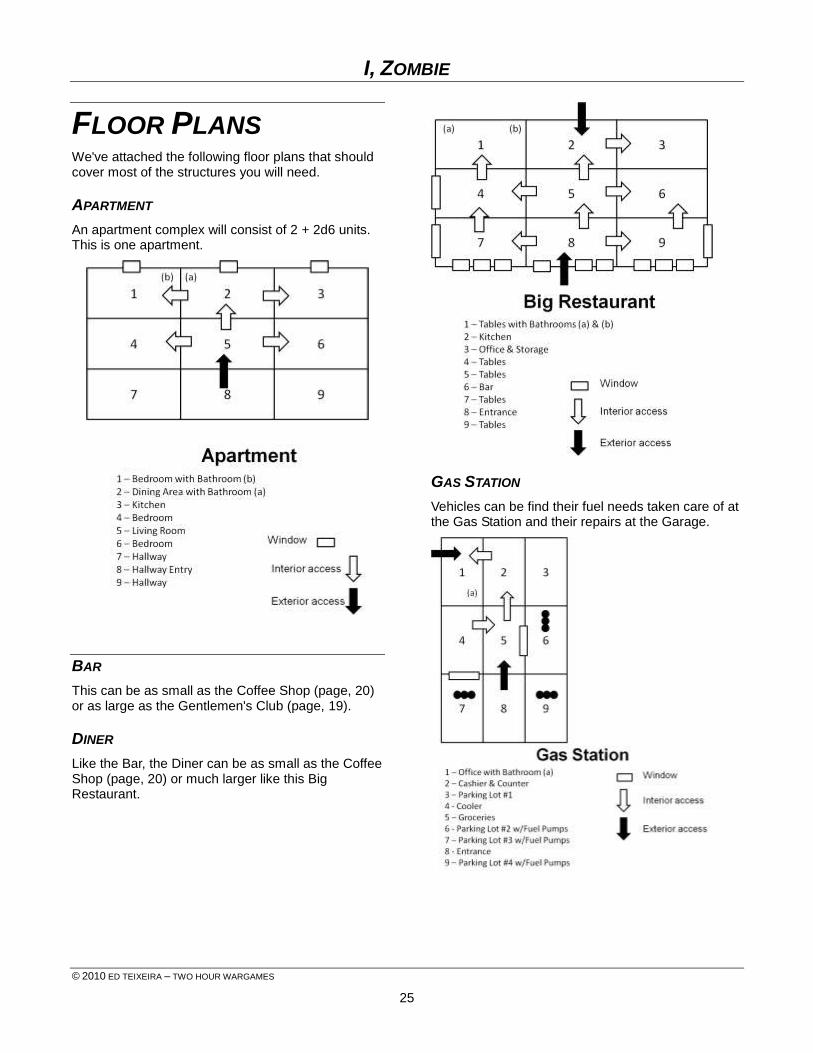
FLOOR PLANS We've attached the following floor plans that should cover most of the structures you will need.
APARTMENT
An apartment complex will consist of 2 + 2d6 units. This is one apartment.
BAR
This can be as small as the Coffee Shop (page, 20) or as large as the Gentlemen's Club (page, 19).
DINER
Like the Bar, the Diner can be as small as the Coffee Shop (page, 20) or much larger like this Big Restaurant.
GAS STATION
Vehicles can be find their fuel needs taken care of at the Gas Station and their repairs at the Garage.
I, ZOMBIE
© 2010 ED TEIXEIRA – TWO HOUR WARGAMES
26
"NO-TELL" MOTEL
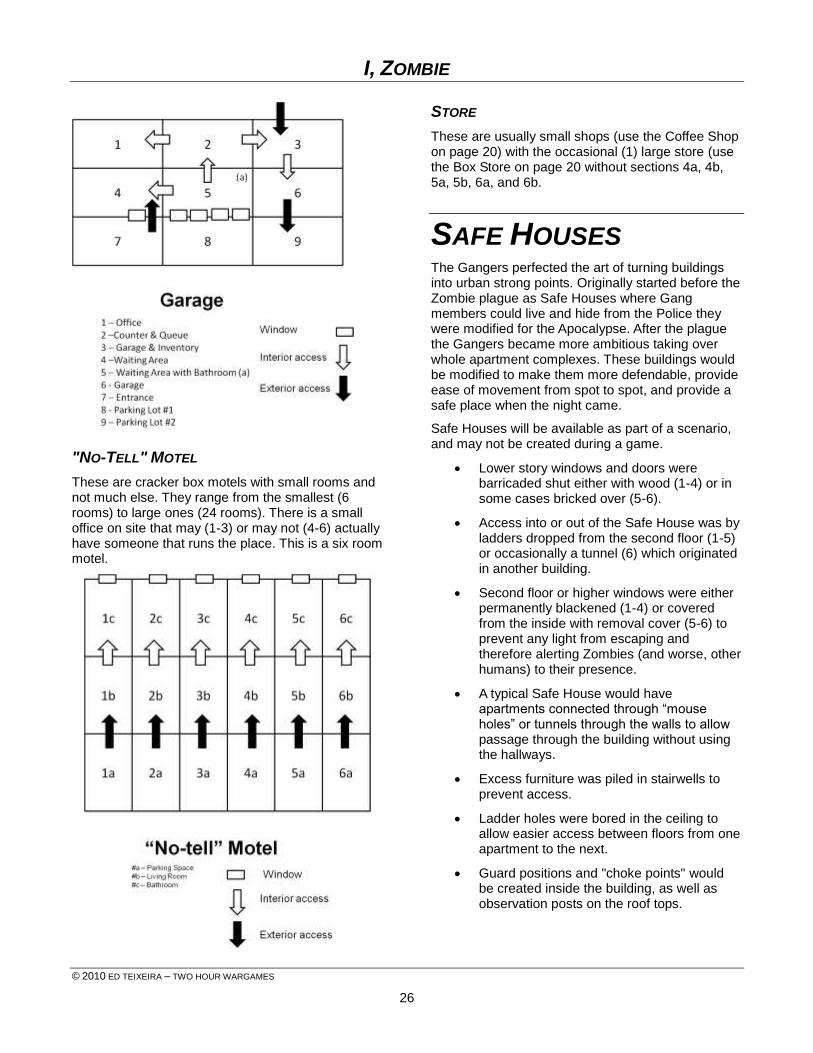
These are cracker box motels with small rooms and not much else. They range from the smallest (6 rooms) to large ones (24 rooms). There is a small office on site that may (1-3) or may not (4-6) actually have someone that runs the place. This is a six room motel.
STORE
These are usually small shops (use the Coffee Shop on page 20) with the occasional (1) large store (use the Box Store on page 20 without sections 4a, 4b, 5a, 5b, 6a, and 6b.
SAFE HOUSES The Gangers perfected the art of turning buildings into urban strong points. Originally started before the Zombie plague as Safe Houses where Gang members could live and hide from the Police they were modified for the Apocalypse. After the plague the Gangers became more ambitious taking over whole apartment complexes. These buildings would be modified to make them more defendable, provide ease of movement from spot to spot, and provide a safe place when the night came.
Safe Houses will be available as part of a scenario, and may not be created during a game.
Lower story windows and doors were barricaded shut either with wood (1-4) or in some cases bricked over (5-6).
Access into or out of the Safe House was by ladders dropped from the second floor (1-5) or occasionally a tunnel (6) which originated in another building.
Second floor or higher windows were either permanently blackened (1-4) or covered from the inside with removal cover (5-6) to prevent any light from escaping and therefore alerting Zombies (and worse, other humans) to their presence.
A typical Safe House would have apartments connected through “mouse holes” or tunnels through the walls to allow passage through the building without using the hallways.
Excess furniture was piled in stairwells to prevent access.
Ladder holes were bored in the ceiling to allow easier access between floors from one apartment to the next.
Guard positions and "choke points" would be created inside the building, as well as observation posts on the roof tops.
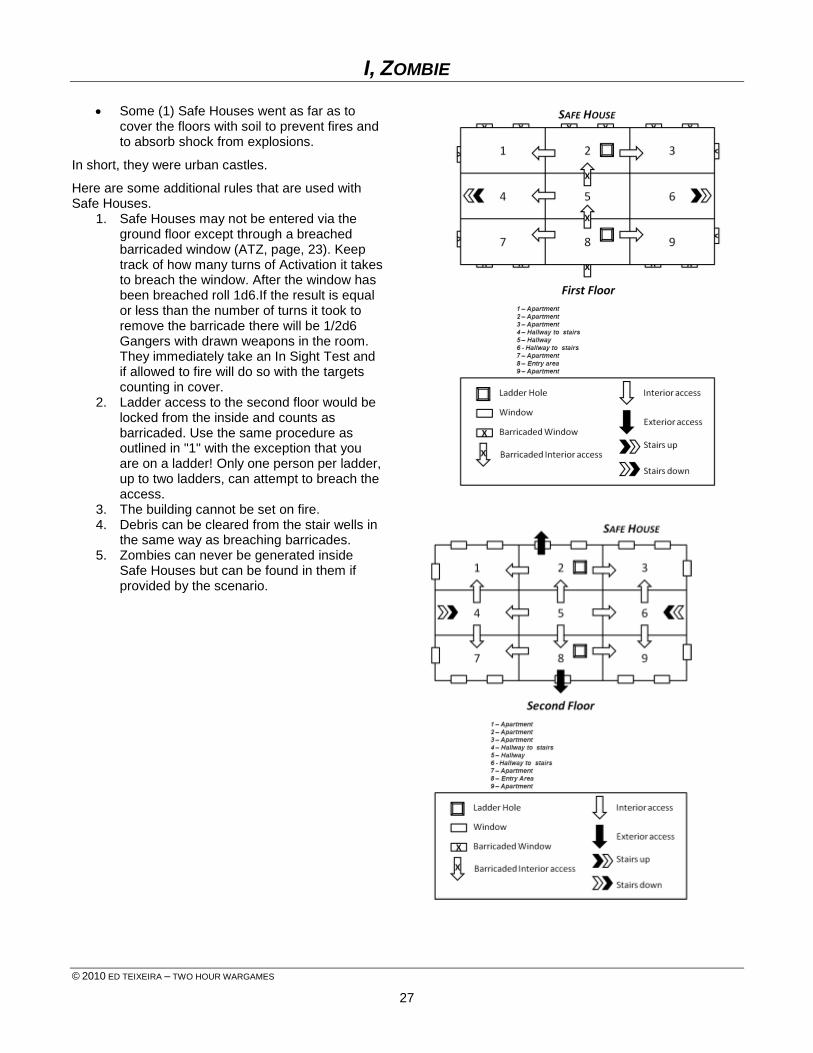
I, ZOMBIE
© 2010 ED TEIXEIRA – TWO HOUR WARGAMES
27
Some (1) Safe Houses went as far as to cover the floors with soil to prevent fires and to absorb shock from explosions.
In short, they were urban castles.
Here are some additional rules that are used with Safe Houses.
1. Safe Houses may not be entered via the ground floor except through a breached barricaded window (ATZ, page, 23). Keep track of how many turns of Activation it takes to breach the window. After the window has been breached roll 1d6.If the result is equal or less than the number of turns it took to remove the barricade there will be 1/2d6 Gangers with drawn weapons in the room. They immediately take an In Sight Test and if allowed to fire will do so with the targets counting in cover.
2. Ladder access to the second floor would be locked from the inside and counts as barricaded. Use the same procedure as outlined in "1" with the exception that you are on a ladder! Only one person per ladder, up to two ladders, can attempt to breach the access.
3. The building cannot be set on fire. 4. Debris can be cleared from the stair wells in
the same way as breaching barricades. 5. Zombies can never be generated inside
Safe Houses but can be found in them if provided by the scenario.
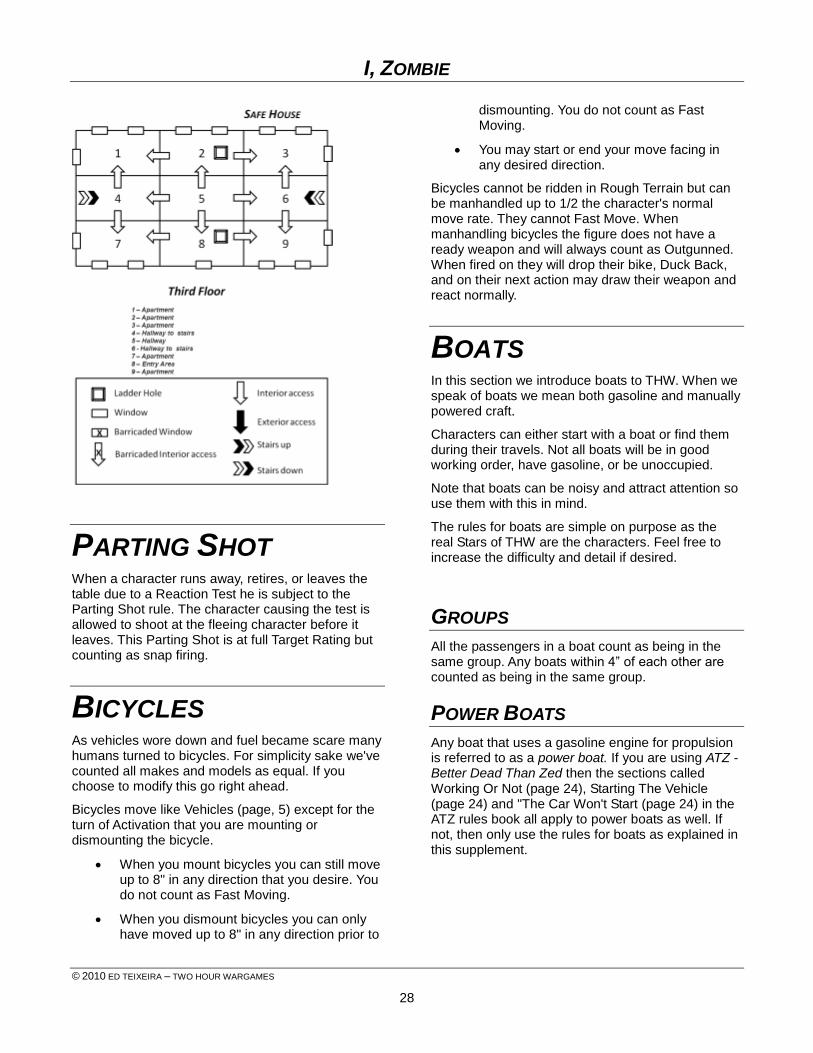
I, ZOMBIE
© 2010 ED TEIXEIRA – TWO HOUR WARGAMES
28
PARTING SHOT When a character runs away, retires, or leaves the table due to a Reaction Test he is subject to the Parting Shot rule. The character causing the test is allowed to shoot at the fleeing character before it leaves. This Parting Shot is at full Target Rating but counting as snap firing.
BICYCLES As vehicles wore down and fuel became scare many humans turned to bicycles. For simplicity sake we've counted all makes and models as equal. If you choose to modify this go right ahead.
Bicycles move like Vehicles (page, 5) except for the turn of Activation that you are mounting or dismounting the bicycle.
When you mount bicycles you can still move up to 8" in any direction that you desire. You do not count as Fast Moving.
When you dismount bicycles you can only have moved up to 8" in any direction prior to
dismounting. You do not count as Fast Moving.
You may start or end your move facing in any desired direction.
Bicycles cannot be ridden in Rough Terrain but can be manhandled up to 1/2 the character's normal move rate. They cannot Fast Move. When manhandling bicycles the figure does not have a ready weapon and will always count as Outgunned. When fired on they will drop their bike, Duck Back, and on their next action may draw their weapon and react normally.
BOATS In this section we introduce boats to THW. When we speak of boats we mean both gasoline and manually powered craft.
Characters can either start with a boat or find them during their travels. Not all boats will be in good working order, have gasoline, or be unoccupied.
Note that boats can be noisy and attract attention so use them with this in mind.
The rules for boats are simple on purpose as the real Stars of THW are the characters. Feel free to increase the difficulty and detail if desired.
GROUPS
All the passengers in a boat count as being in the same group. Any boats within 4” of each other are counted as being in the same group.
POWER BOATS
Any boat that uses a gasoline engine for propulsion is referred to as a power boat. If you are using ATZ - Better Dead Than Zed then the sections called Working Or Not (page 24), Starting The Vehicle (page 24) and "The Car Won't Start (page 24) in the ATZ rules book all apply to power boats as well. If not, then only use the rules for boats as explained in this supplement.

I, ZOMBIE
© 2010 ED TEIXEIRA – TWO HOUR WARGAMES
29
TYPES OF BOATS
Here’s a list of boats available for use.
X BOAT LIST
TYPE SPEED TURNS SEATS BASH
Two-man raft - manually powered.
8/4 1 2 0
Small manually powered boat
12/6 1 4 1
Small power boat. 16 2 4 3
Medium power boat. 16 2 10 4
Cigarette Boat 32 2 (1) 5 6
Two-man raft – Small, two-man inflatable raft, manually powered by paddles.
Small manually powered boat – Small four-man rowboat manually powered by oars.
Small power boat – Small four-man boat with an outboard motor.
Medium power boat – Medium sized ten-man boat with twin outboard motors.
Cigarette boat – "Miami Vice" type boat favored by drug smugglers and the wealthy.
DEFINING THE BOAT
All boats are defined by the following characteristics. They are:
TYPE – The type of boat it is.
SPEED – The normal speed, in inches, that the boat
may move each turn of activation. When two numbers occur the second is the speed going against the current.
TURNS – This column tells you how many times a
boat can make up to a 90-degree change of direction when they are active. Power boats must move at least half their current speed before making a second turn in the same activation. When a (1) appears in the Turns column, the boat may only make one turn if moving over 16 inches.
SEATS– How many people or equivalent the boat
can safely carry. If desired you may overload the boat by up to half. This reduces speed by 25% and Bash Value by half, rounding down.
BASH VALUE – The relative size and Impact a boat
will make when bashed against objects such as other boats or swimmers.
MOVEMENT
A boat may move up to its normal speed as specified on the Boat List when active.
Boats are always assumed to be moving unless specified otherwise. Boats may enter the table at any speed.
CASTING OFF AND MOORING
Boats can be tied to a dock or similar structure, drug ashore, or anchored in place offshore. It will take the following amount of time to cast off or to moor a boat.
Tied - One turn of uninterrupted activation.
Drug ashore - Only available to small boats, it takes one person two turns of activation to beach or launch a boat or one turn of activation if two or more characters are doing the task.
Anchored - It takes 1/2d6 turns of activation to pull an anchor up and make ready to move and one turn of activation to drop anchor.
DRIFTING
Boats will drift in two ways.
If anchored - It will drift 3" downriver the first turn after dropping anchor.
If not anchored and not under power - It will drift 3" down river each turn of activation whether active or not.
STARTING AND STOPPING
When the boat is stopped it may accelerate to half of its normal speed.
When active a powered boat may reduce its speed by half its current speed.
When active a manually powered boat may reduce its speed by 4".
REVERSING DIRECTION
Boats may not move backward.
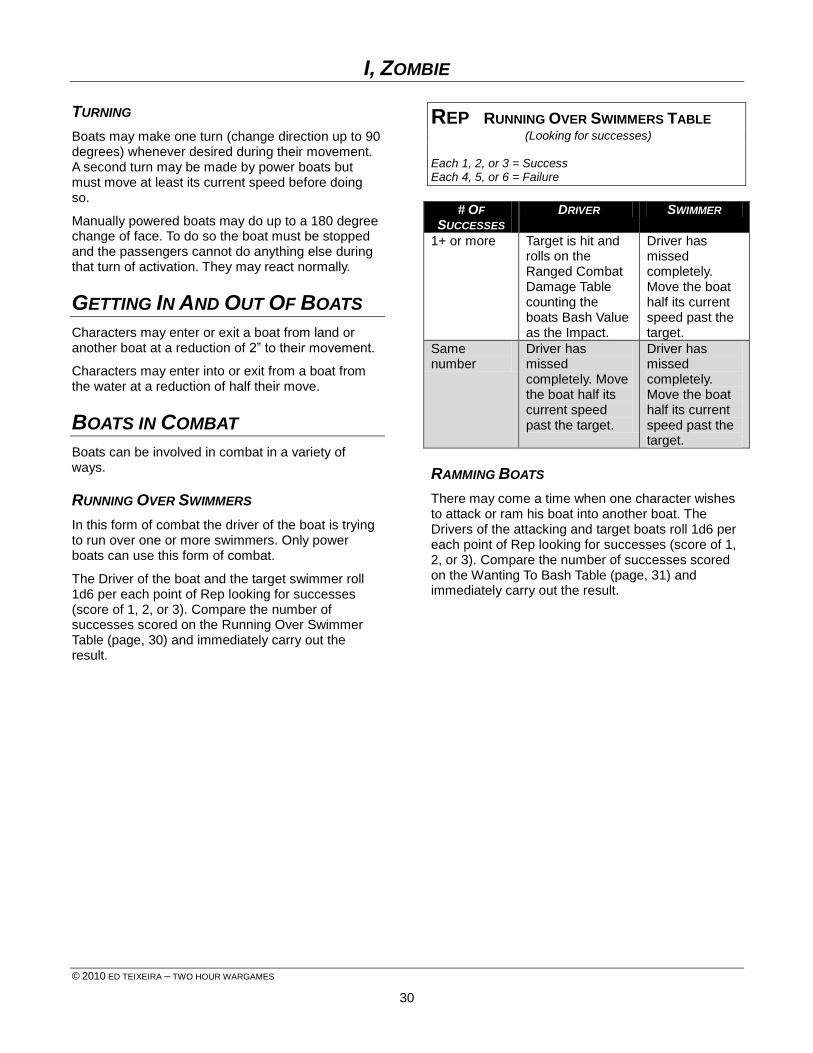
I, ZOMBIE
© 2010 ED TEIXEIRA – TWO HOUR WARGAMES
30
TURNING
Boats may make one turn (change direction up to 90 degrees) whenever desired during their movement. A second turn may be made by power boats but must move at least its current speed before doing so.
Manually powered boats may do up to a 180 degree change of face. To do so the boat must be stopped and the passengers cannot do anything else during that turn of activation. They may react normally.
GETTING IN AND OUT OF BOATS
Characters may enter or exit a boat from land or another boat at a reduction of 2” to their movement.
Characters may enter into or exit from a boat from the water at a reduction of half their move.
BOATS IN COMBAT
Boats can be involved in combat in a variety of ways.
RUNNING OVER SWIMMERS
In this form of combat the driver of the boat is trying to run over one or more swimmers. Only power boats can use this form of combat.
The Driver of the boat and the target swimmer roll 1d6 per each point of Rep looking for successes (score of 1, 2, or 3). Compare the number of successes scored on the Running Over Swimmer Table (page, 30) and immediately carry out the result.
REP RUNNING OVER SWIMMERS TABLE (Looking for successes)
Each 1, 2, or 3 = Success Each 4, 5, or 6 = Failure
# OF
SUCCESSES DRIVER SWIMMER
1+ or more Target is hit and rolls on the Ranged Combat Damage Table counting the boats Bash Value as the Impact.
Driver has missed completely. Move the boat half its current speed past the target.
Same number
Driver has missed completely. Move the boat half its current speed past the target.
Driver has missed completely. Move the boat half its current speed past the target.
RAMMING BOATS
There may come a time when one character wishes to attack or ram his boat into another boat. The Drivers of the attacking and target boats roll 1d6 per each point of Rep looking for successes (score of 1, 2, or 3). Compare the number of successes scored on the Wanting To Bash Table (page, 31) and immediately carry out the result.
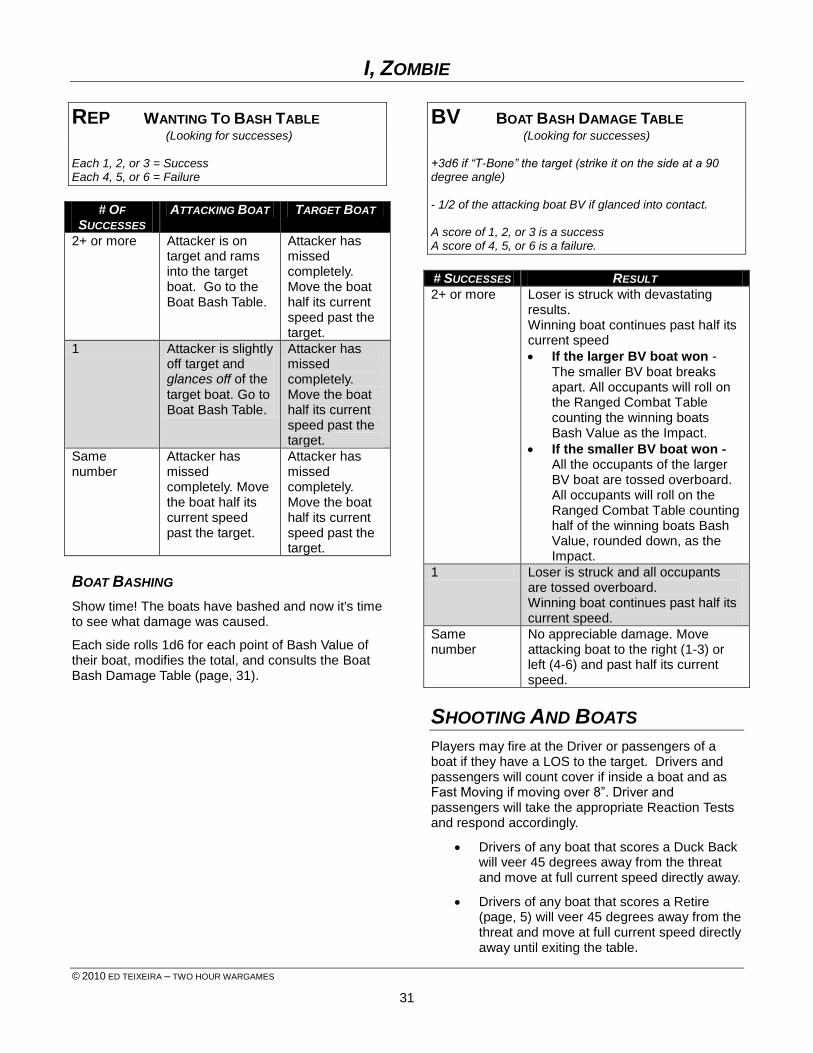
I, ZOMBIE
© 2010 ED TEIXEIRA – TWO HOUR WARGAMES
31
REP WANTING TO BASH TABLE (Looking for successes)
Each 1, 2, or 3 = Success Each 4, 5, or 6 = Failure
# OF
SUCCESSES ATTACKING BOAT TARGET BOAT
2+ or more Attacker is on target and rams into the target boat. Go to the Boat Bash Table.
Attacker has missed completely. Move the boat half its current speed past the target.
1 Attacker is slightly off target and glances off of the target boat. Go to Boat Bash Table.
Attacker has missed completely. Move the boat half its current speed past the target.
Same number
Attacker has missed completely. Move the boat half its current speed past the target.
Attacker has missed completely. Move the boat half its current speed past the target.
BOAT BASHING
Show time! The boats have bashed and now it's time to see what damage was caused.
Each side rolls 1d6 for each point of Bash Value of their boat, modifies the total, and consults the Boat Bash Damage Table (page, 31).
BV BOAT BASH DAMAGE TABLE (Looking for successes)
+3d6 if “T-Bone” the target (strike it on the side at a 90 degree angle) - 1/2 of the attacking boat BV if glanced into contact. A score of 1, 2, or 3 is a success A score of 4, 5, or 6 is a failure.
# SUCCESSES RESULT
2+ or more Loser is struck with devastating results. Winning boat continues past half its current speed
If the larger BV boat won - The smaller BV boat breaks apart. All occupants will roll on the Ranged Combat Table counting the winning boats Bash Value as the Impact.
If the smaller BV boat won - All the occupants of the larger BV boat are tossed overboard. All occupants will roll on the Ranged Combat Table counting half of the winning boats Bash Value, rounded down, as the Impact.
1 Loser is struck and all occupants are tossed overboard. Winning boat continues past half its current speed.
Same number
No appreciable damage. Move attacking boat to the right (1-3) or left (4-6) and past half its current speed.
SHOOTING AND BOATS
Players may fire at the Driver or passengers of a boat if they have a LOS to the target. Drivers and passengers will count cover if inside a boat and as Fast Moving if moving over 8”. Driver and passengers will take the appropriate Reaction Tests and respond accordingly.
Drivers of any boat that scores a Duck Back will veer 45 degrees away from the threat and move at full current speed directly away.
Drivers of any boat that scores a Retire (page, 5) will veer 45 degrees away from the threat and move at full current speed directly away until exiting the table.
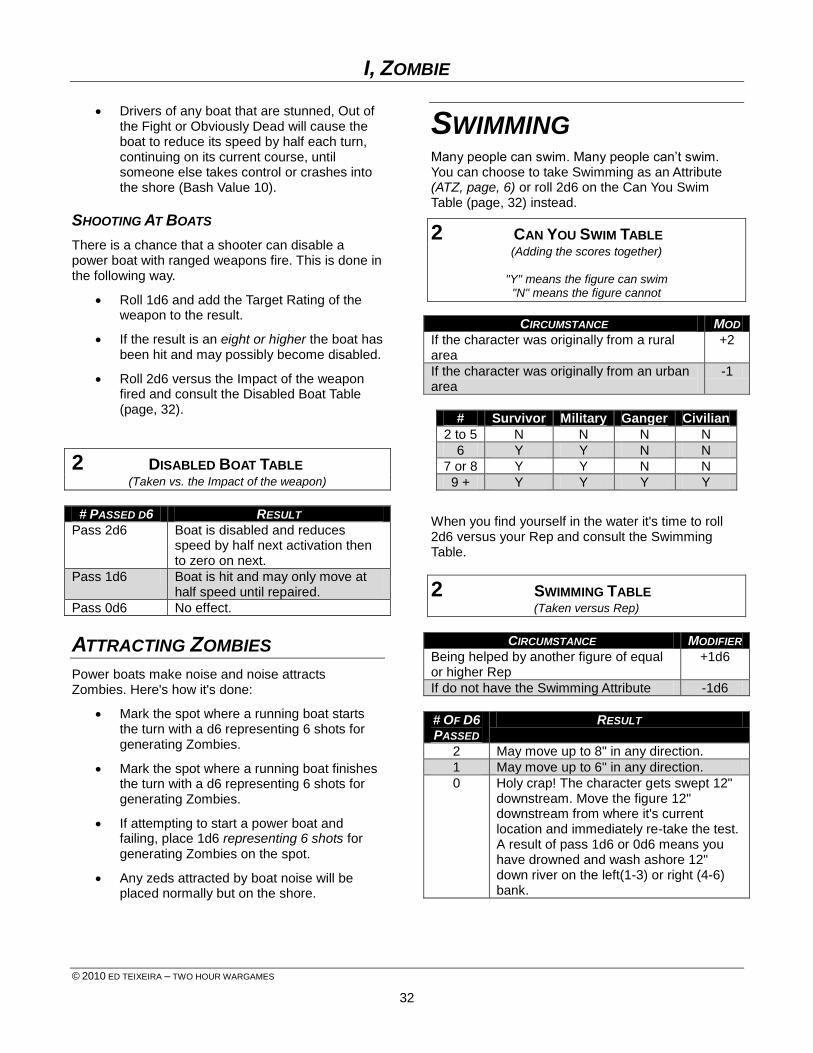
I, ZOMBIE
© 2010 ED TEIXEIRA – TWO HOUR WARGAMES
32
Drivers of any boat that are stunned, Out of the Fight or Obviously Dead will cause the boat to reduce its speed by half each turn, continuing on its current course, until someone else takes control or crashes into the shore (Bash Value 10).
SHOOTING AT BOATS
There is a chance that a shooter can disable a power boat with ranged weapons fire. This is done in the following way.
Roll 1d6 and add the Target Rating of the weapon to the result.
If the result is an eight or higher the boat has been hit and may possibly become disabled.
Roll 2d6 versus the Impact of the weapon fired and consult the Disabled Boat Table (page, 32).
2 DISABLED BOAT TABLE (Taken vs. the Impact of the weapon)
# PASSED D6 RESULT
Pass 2d6 Boat is disabled and reduces speed by half next activation then to zero on next.
Pass 1d6 Boat is hit and may only move at half speed until repaired.
Pass 0d6 No effect.
ATTRACTING ZOMBIES
Power boats make noise and noise attracts Zombies. Here's how it's done:
Mark the spot where a running boat starts the turn with a d6 representing 6 shots for generating Zombies.
Mark the spot where a running boat finishes the turn with a d6 representing 6 shots for generating Zombies.
If attempting to start a power boat and failing, place 1d6 representing 6 shots for generating Zombies on the spot.
Any zeds attracted by boat noise will be placed normally but on the shore.
SWIMMING Many people can swim. Many people can’t swim. You can choose to take Swimming as an Attribute (ATZ, page, 6) or roll 2d6 on the Can You Swim Table (page, 32) instead.
2 CAN YOU SWIM TABLE (Adding the scores together)
"Y" means the figure can swim "N" means the figure cannot
CIRCUMSTANCE MOD
If the character was originally from a rural area
+2
If the character was originally from an urban area
-1
# Survivor Military Ganger Civilian
2 to 5 N N N N
6 Y Y N N
7 or 8 Y Y N N
9 + Y Y Y Y
When you find yourself in the water it's time to roll 2d6 versus your Rep and consult the Swimming Table.
2 SWIMMING TABLE (Taken versus Rep)
CIRCUMSTANCE MODIFIER
Being helped by another figure of equal or higher Rep
+1d6
If do not have the Swimming Attribute -1d6
# OF D6
PASSED RESULT
2 May move up to 8" in any direction.
1 May move up to 6" in any direction.
0 Holy crap! The character gets swept 12" downstream. Move the figure 12" downstream from where it's current location and immediately re-take the test. A result of pass 1d6 or 0d6 means you have drowned and wash ashore 12" down river on the left(1-3) or right (4-6) bank.
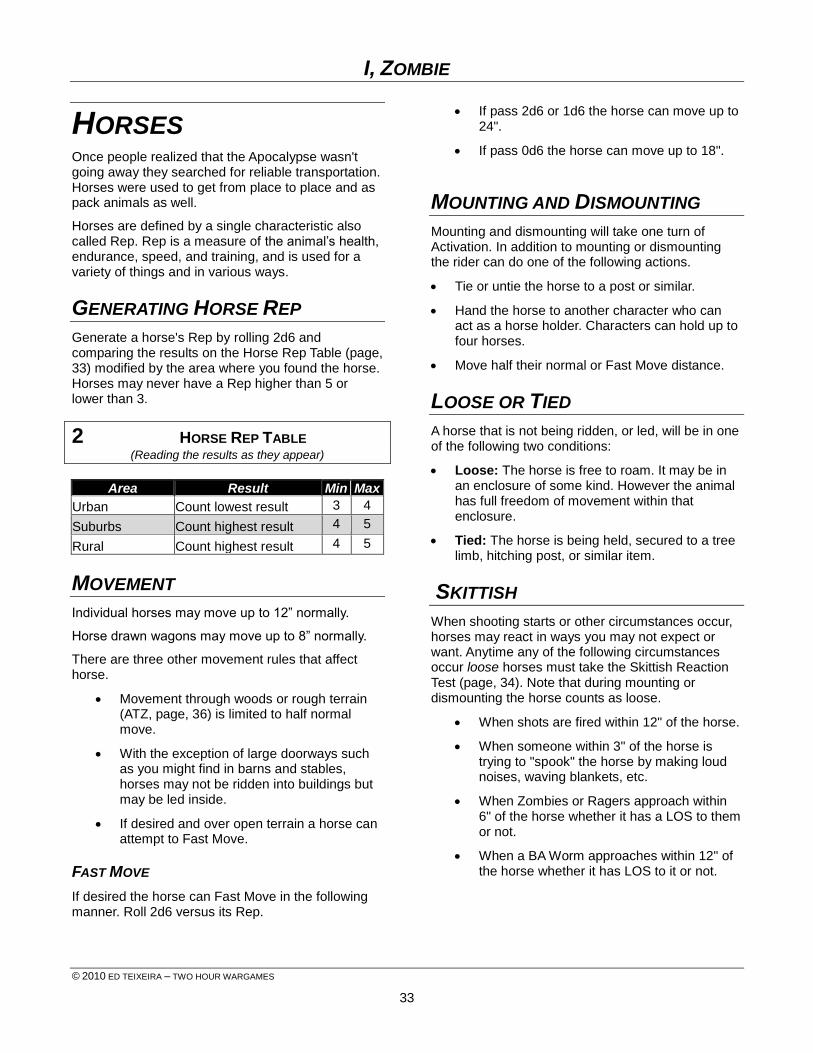
I, ZOMBIE
© 2010 ED TEIXEIRA – TWO HOUR WARGAMES
33
HORSES Once people realized that the Apocalypse wasn't going away they searched for reliable transportation. Horses were used to get from place to place and as pack animals as well.
Horses are defined by a single characteristic also called Rep. Rep is a measure of the animal’s health, endurance, speed, and training, and is used for a variety of things and in various ways.
GENERATING HORSE REP
Generate a horse's Rep by rolling 2d6 and comparing the results on the Horse Rep Table (page, 33) modified by the area where you found the horse. Horses may never have a Rep higher than 5 or lower than 3.
2 HORSE REP TABLE (Reading the results as they appear)
Area Result Min Max
Urban Count lowest result 3 4
Suburbs Count highest result 4 5
Rural Count highest result 4 5
MOVEMENT
Individual horses may move up to 12” normally.
Horse drawn wagons may move up to 8” normally.
There are three other movement rules that affect horse.
Movement through woods or rough terrain (ATZ, page, 36) is limited to half normal move.
With the exception of large doorways such as you might find in barns and stables, horses may not be ridden into buildings but may be led inside.
If desired and over open terrain a horse can attempt to Fast Move.
FAST MOVE
If desired the horse can Fast Move in the following manner. Roll 2d6 versus its Rep.
If pass 2d6 or 1d6 the horse can move up to 24".
If pass 0d6 the horse can move up to 18".
MOUNTING AND DISMOUNTING
Mounting and dismounting will take one turn of Activation. In addition to mounting or dismounting the rider can do one of the following actions.
Tie or untie the horse to a post or similar.
Hand the horse to another character who can act as a horse holder. Characters can hold up to four horses.
Move half their normal or Fast Move distance.
LOOSE OR TIED
A horse that is not being ridden, or led, will be in one of the following two conditions:
Loose: The horse is free to roam. It may be in an enclosure of some kind. However the animal has full freedom of movement within that enclosure.
Tied: The horse is being held, secured to a tree limb, hitching post, or similar item.
SKITTISH
When shooting starts or other circumstances occur, horses may react in ways you may not expect or want. Anytime any of the following circumstances occur loose horses must take the Skittish Reaction Test (page, 34). Note that during mounting or dismounting the horse counts as loose.
When shots are fired within 12" of the horse.
When someone within 3" of the horse is trying to "spook" the horse by making loud noises, waving blankets, etc.
When Zombies or Ragers approach within 6" of the horse whether it has a LOS to them or not.
When a BA Worm approaches within 12" of the horse whether it has LOS to it or not.

I, ZOMBIE
© 2010 ED TEIXEIRA – TWO HOUR WARGAMES
34
2 SKITTISH REACTION TEST (Taken versus the Rep of the horse)
# OF D6
PASSED RESULT
2 Horse remains in place.
1 Horse moves 12" directly away from the cause of the test.
0 Horse bolts and runs at Fast Move speed directly away from the cause of the test. If a rider is mounting or dismounting he his thrown and must take the recover From Knock Down Test (ATZ, page, 13) with 3d6 instead of 2d6.
MOUNTED TESTS
Just like humans a horse may be forced by its rider to take a Challenge Test (ATZ, page, 52) for unusual circumstances. Two examples would be jumping a fence or swimming across a river. Rolling 2d6 versus the Rep of the horse and consulting the Mounted Challenge Test (page, 34) does this.
When taking the Mounted Challenge Test, a separate d6 is rolled against the Rep of the rider, and applied like Leader Die (ATZ, page, 10).
2 LDR MOUNTED CHALLENGE TEST (Taken versus the Rep of the horse)
# OF D6
PASSED RESULT
2 Horse successfully completes the challenge.
1 If passing 1d6 for the first time the challenger may choose to not attempt the challenge or immediately try it again. If the challenger attempts the challenge again count a result of pass 1d6 as pass 0d6.
0 Horse fails the challenge and suffers the consequences. *
* The consequences will always be the horse balking at the challenge and tossing the rider causing him to take a Recover From Knock Down Test (ATZ, page, 13) with 3d6 instead of 2d6.
ARE YOU A HORSEMAN?
You can choose to take Horsemanship as an Attribute (ATZ, page, 6) or roll 2d6 on the Are You A Horseman Table (page, 34) instead.
2 Are You A Horsemanship Table (Adding the scores together)
"Y" means the figure has Horsemanship
"N" means the figure does not have Horsemanship
CIRCUMSTANCE MOD
If the character was originally from a rural area
+2
If the character was originally from an urban area
-2
# Survivor Military Ganger Civilian
2 to 6 N N N N
7 Y N N N
8 Y Y N N
9 + Y Y Y Y
DAMAGE TO HORSES
If a horse has been hit by a ranged weapon it must test for damage. Rolling 2d6 versus the Rep of the horse does this.
If pass 2d6 or 1d6 the horse is unhurt.
If pass 0d6 the horse is OOF and the rider, if any, must take the Recover From Knock Down Test (ATZ, page, 13).
TWO RIDERS
Horses can carry a second rider but at a minus one to their Rep.
MOUNTED COMBAT
Horses and their riders can be involved in combat in the following ways.
CHARGING
Mounted figures may charge dismounted figures by using the Running Down Pedestrians section in ATZ (page, 27) counting the horse as having a Bash Value of 6 and the human sized target a BV of 1.
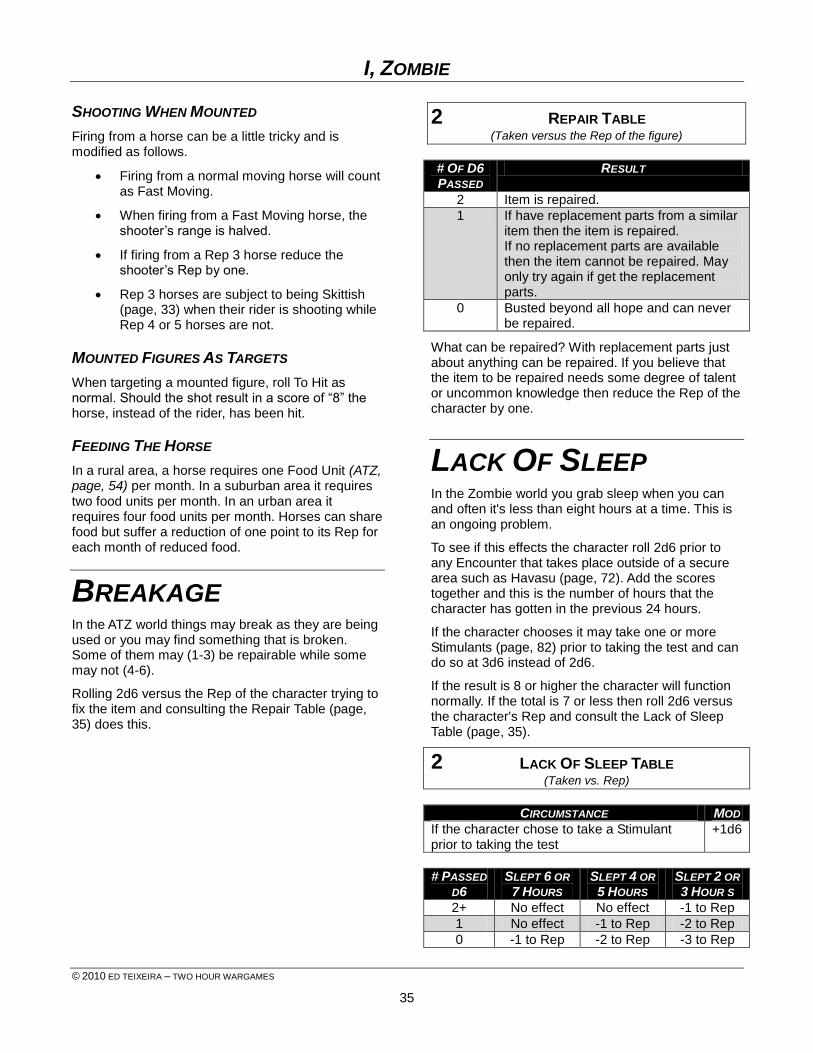
I, ZOMBIE
© 2010 ED TEIXEIRA – TWO HOUR WARGAMES
35
SHOOTING WHEN MOUNTED
Firing from a horse can be a little tricky and is modified as follows.
Firing from a normal moving horse will count as Fast Moving.
When firing from a Fast Moving horse, the shooter’s range is halved.
If firing from a Rep 3 horse reduce the shooter’s Rep by one.
Rep 3 horses are subject to being Skittish (page, 33) when their rider is shooting while Rep 4 or 5 horses are not.
MOUNTED FIGURES AS TARGETS
When targeting a mounted figure, roll To Hit as normal. Should the shot result in a score of “8” the horse, instead of the rider, has been hit.
FEEDING THE HORSE
In a rural area, a horse requires one Food Unit (ATZ, page, 54) per month. In a suburban area it requires two food units per month. In an urban area it requires four food units per month. Horses can share food but suffer a reduction of one point to its Rep for each month of reduced food.
BREAKAGE In the ATZ world things may break as they are being used or you may find something that is broken. Some of them may (1-3) be repairable while some may not (4-6).
Rolling 2d6 versus the Rep of the character trying to fix the item and consulting the Repair Table (page, 35) does this.
2 REPAIR TABLE (Taken versus the Rep of the figure)
# OF D6
PASSED RESULT
2 Item is repaired.
1 If have replacement parts from a similar item then the item is repaired. If no replacement parts are available then the item cannot be repaired. May only try again if get the replacement parts.
0 Busted beyond all hope and can never be repaired.
What can be repaired? With replacement parts just about anything can be repaired. If you believe that the item to be repaired needs some degree of talent or uncommon knowledge then reduce the Rep of the character by one.
LACK OF SLEEP In the Zombie world you grab sleep when you can and often it's less than eight hours at a time. This is an ongoing problem.
To see if this effects the character roll 2d6 prior to any Encounter that takes place outside of a secure area such as Havasu (page, 72). Add the scores together and this is the number of hours that the character has gotten in the previous 24 hours.
If the character chooses it may take one or more Stimulants (page, 82) prior to taking the test and can do so at 3d6 instead of 2d6.
If the result is 8 or higher the character will function normally. If the total is 7 or less then roll 2d6 versus the character's Rep and consult the Lack of Sleep Table (page, 35).
2 LACK OF SLEEP TABLE (Taken vs. Rep)
CIRCUMSTANCE MOD
If the character chose to take a Stimulant prior to taking the test
+1d6
# PASSED
D6 SLEPT 6 OR
7 HOURS SLEPT 4 OR
5 HOURS SLEPT 2 OR
3 HOUR S
2+ No effect No effect -1 to Rep
1 No effect -1 to Rep -2 to Rep
0 -1 to Rep -2 to Rep -3 to Rep
I, ZOMBIE
© 2010 ED TEIXEIRA – TWO HOUR WARGAMES
36
Note that the reduction in Rep will last the entire Encounter.
MEET & GREET TABLE The Meet & Greet Table in ATZ has been replaced with the NPC Interaction Table (page, 117).
BARTER The Bartering Table in ATZ has been replaced with the Havasu Bartering Table on page 120.
LAZARUS
PROJECT They thought they could save the world
They were wrong.
The government began testing for ways to reverse the effects of the Zombie outbreak almost immediately. Initial tests were failures but on Day 13 a breakthrough was achieved.
With hope, work on the project was increased to round the clock testing. It soon became apparent that those exposed to the antidote within 24 hours of infection appeared to fully recover. It was a miracle or so it seemed.
Production was increased and development of a mass delivery system became of the utmost importance. By Day 21, enough of the Lazarus Agent had been produced to begin and the delivery system was ready to go. The plan was to fly over the major urban areas, now claimed by the Zombies, and spray the inhabitants with the Lazarus Agent. Zombies would die while the newly infected would recover. That was the plan.
On Day 22 the planes took off and discharged their payload. Now it was time to wait.
Almost immediately the effects of the Lazarus Agent became evident. Bio-hazard teams were sent into the urban areas to provide help and assistance to those that recovered while finishing off those that didn't.
However, disturbing news emerged from the test facilities. Those that had shown reversal of the Zombie virus had begun exhibiting signs of anger and rage. Instead of eliminating the infection the Lazarus Agent had mutated it. The results were devastating. Ragers, as they became known, now ran amok through the very cities that the government had hoped to reclaim.
What could be worse?
How about “smart” Zombies?
Ragers attacked everyone in sight and that included Zombies. When the Rage virus blended with the Zombie virus it acted like adrenaline to the Zombies. It began to rebuild damaged nerves and organs.
The result? Memories of being alive flooded the Zombies as their motor skills increased. The Zombies recovered simple desires and wants, formulated rudimentary thought, and soon they wanted their share of the world. It’s not all about brains anymore, it’s about survival. Their survival.
SIDE EFFECTS OF THE
LAZARUS AGENT The most obvious side effect of the Lazarus Agent were the Ragers (page, 36). The Ragers were the result of the agent being introduced into humans that had been exposed to the Zombie virus. The effects on normal humans, the mutation of these people, didn’t become visible until much later.
One of the more dramatic side effects is Psy (page, 47).
RAGERS Oh great. It’s not bad enough that you’ve got Zombies and looters to worry about. Now there’s Ragers?
Well, here’s the lowdown.
First off, Ragers look pretty much like humans. But they move fast, very fast. And they scream while running. Oh yeah, they are usually covered in blood. Get the idea?
Ragers have only one purpose and that’s to tear humans into shreds. Nothing personal, it’s just what they do.
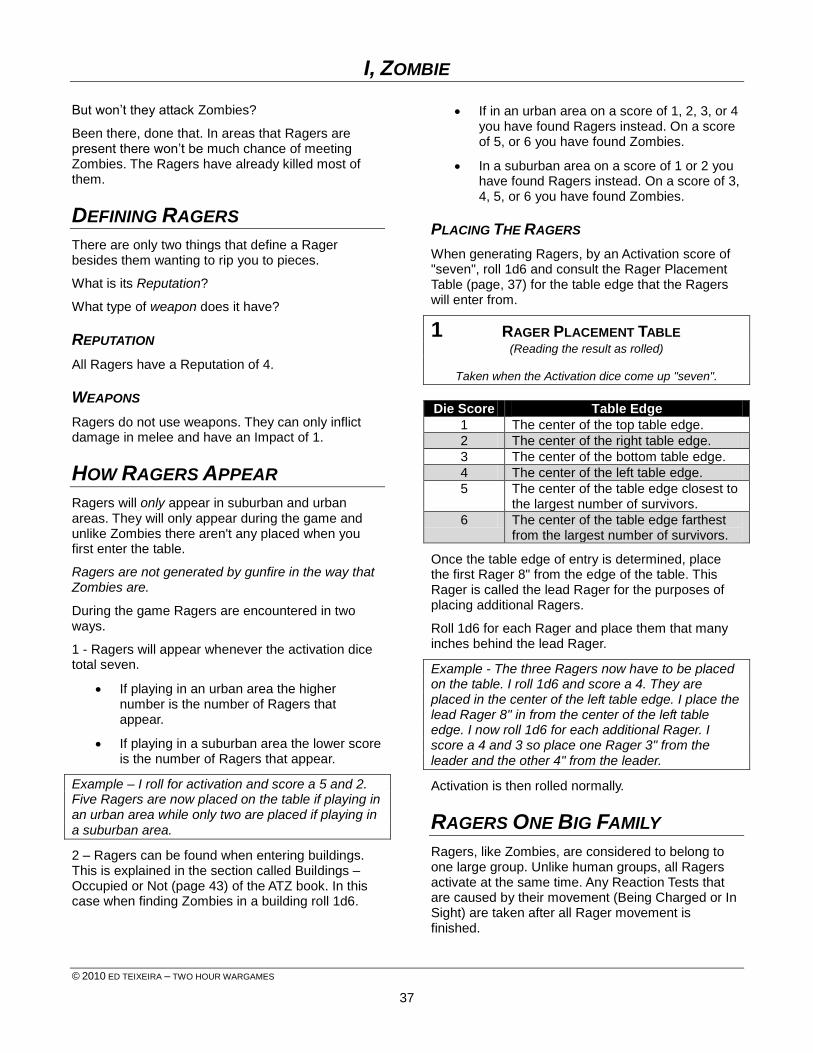
I, ZOMBIE
© 2010 ED TEIXEIRA – TWO HOUR WARGAMES
37
But won’t they attack Zombies?
Been there, done that. In areas that Ragers are present there won’t be much chance of meeting Zombies. The Ragers have already killed most of them.
DEFINING RAGERS
There are only two things that define a Rager besides them wanting to rip you to pieces.
What is its Reputation?
What type of weapon does it have?
REPUTATION
All Ragers have a Reputation of 4.
WEAPONS
Ragers do not use weapons. They can only inflict damage in melee and have an Impact of 1.
HOW RAGERS APPEAR
Ragers will only appear in suburban and urban areas. They will only appear during the game and unlike Zombies there aren't any placed when you first enter the table.
Ragers are not generated by gunfire in the way that Zombies are.
During the game Ragers are encountered in two ways.
1 - Ragers will appear whenever the activation dice total seven.
If playing in an urban area the higher number is the number of Ragers that appear.
If playing in a suburban area the lower score is the number of Ragers that appear.
Example – I roll for activation and score a 5 and 2. Five Ragers are now placed on the table if playing in an urban area while only two are placed if playing in a suburban area.
2 – Ragers can be found when entering buildings. This is explained in the section called Buildings – Occupied or Not (page 43) of the ATZ book. In this case when finding Zombies in a building roll 1d6.
If in an urban area on a score of 1, 2, 3, or 4 you have found Ragers instead. On a score of 5, or 6 you have found Zombies.
In a suburban area on a score of 1 or 2 you have found Ragers instead. On a score of 3, 4, 5, or 6 you have found Zombies.
PLACING THE RAGERS
When generating Ragers, by an Activation score of "seven", roll 1d6 and consult the Rager Placement Table (page, 37) for the table edge that the Ragers will enter from.
1 RAGER PLACEMENT TABLE (Reading the result as rolled)
Taken when the Activation dice come up "seven".
Die Score Table Edge
1 The center of the top table edge.
2 The center of the right table edge.
3 The center of the bottom table edge.
4 The center of the left table edge.
5 The center of the table edge closest to the largest number of survivors.
6 The center of the table edge farthest from the largest number of survivors.
Once the table edge of entry is determined, place the first Rager 8" from the edge of the table. This Rager is called the lead Rager for the purposes of placing additional Ragers.
Roll 1d6 for each Rager and place them that many inches behind the lead Rager.
Example - The three Ragers now have to be placed on the table. I roll 1d6 and score a 4. They are placed in the center of the left table edge. I place the lead Rager 8" in from the center of the left table edge. I now roll 1d6 for each additional Rager. I score a 4 and 3 so place one Rager 3" from the leader and the other 4" from the leader.
Activation is then rolled normally.
RAGERS ONE BIG FAMILY
Ragers, like Zombies, are considered to belong to one large group. Unlike human groups, all Ragers activate at the same time. Any Reaction Tests that are caused by their movement (Being Charged or In Sight) are taken after all Rager movement is finished.
I, ZOMBIE
© 2010 ED TEIXEIRA – TWO HOUR WARGAMES
38
Example - Billy Pink is currently in melee with a Rager (A). Char is nearby and currently not in melee but has two Ragers (B & C) close by and in sight.
The Ragers activate.
Rager B moves its full move forward towards Char and ends its move 6 inches away.
Rager C charges Char and is stopped 4” from her.
All the Ragers have finished their movement.
Char now takes a Being Charged test, passes, and fires but misses. Rager C now is placed next to Char and into melee.
Ragers A and C conduct their melees
ACTIONS
When a Rager is active it will perform the following actions in this order of priority. Go down the list and do the first Action that applies.
1 - If it has a LOS to a human or Zombie it will move 12” towards it.
2 - If it had a LOS to a human or Zombie when last active but does not now it will move 12” towards the spot it last saw the human.
3 – It will move 12” in the direction of the most gunfire or loudest noise, such as a vehicle, anywhere on the table.
4 – If none of the above applies it will remain in place, milling around, waiting until one of the above stimulants occur.
Example – Billy Pink is active and ducks around the corner out of sight of two Ragers.
The Ragers now activate. They do not have a LOS to any human but they had one the last time they were active so move 12” towards where they last saw Billy. They turn the corner but do not see Billy. The next time they activate they will remain in place.
RAGING
Here’s another action that the Ragers will do. It’s called Raging and is only done when a Rager is in contact with a human that they have stunned, caused to go Out of the Fight, or caused to go Obviously Dead.
When Raging the Rager rips and rends the human until their Rage subsides. Rolling 1d6 will determine the number of turns the Rager spends Raging. Once the last turn has been completed the Rager will
move on. Unlike Zombies other Ragers do not join in on a Rage. Instead they will look for their own prey.
Seeing a Rage does not cause a human to take any special Reaction Test such as the Sanity Test for seeing a Zombie Feast.
MOVEMENT
Ragers have a normal move of up to 12”. They do not Fast Move.
However they are subject to the following movement restrictions-
Knocked Down – Ragers that are knocked down will regain their feet on their next activation. Unlike Zombies, once they regain their feet they can still move 6".
Climbing Stairs and Ladders - Ragers can climb stairs and ladders like humans can.
Entering and Exiting Doors – Ragers may enter or exit a door at a reduction of 2”.
Ragers encountering unlocked but closed doors will spend one turn of activation at the door before moving through it.
Those encountering locked or barricaded doors will fight the door in melee counting the door as Rep 3. When a result of out of the fight or worse is scored on the door it has been cleared to enter. Any result of Out of Fight or worse on the Rager is ignored. There is no limit to the number of Ragers that can try and break down the door.
Entering and Exiting Windows – Ragers may break through and enter any size windows.
When a Rager reaches a closed window it will fight the window in melee counting the window as Rep 2. When a result of Out of the Fight or worse is scored on the window it has been busted out and the Rager may pass through it when next active.
Entering or exiting a window ends the Ragers movement.
Moving In Buildings – When moving in a building, Ragers will move normally.
Impassable Rock Formations - Movement not allowed and treated as a dead end.
Wooded Area Or Rough Terrain - Movement reduced to 8” through these areas. Visibility penalties inside these terrain features apply to
I, ZOMBIE
© 2010 ED TEIXEIRA – TWO HOUR WARGAMES
39
Ragers. Those at the edge of these terrain features count as in concealment and can see and be seen. Those 1” or farther inside from the edge cannot.
Definite Road - Move on roads normally.
Hills - Move on hills normally.
River And Other Bodies Of Water - Ragers cannot swim. They will move up to 3” into a body of water then will return to land. Ragers in a pool are able to pull themselves out, ending their movement.
REACTIONS
Ragers do not take Reaction Tests but they can affect those taken by humans in the following ways.
IN SIGHT – Humans may not take an In Sight test
on any Rager that they have LOS to when it is first placed on the table due to the activation roll.
If the Rager moves into sight, when either side is active, the human will take the In Sight test.
Example – Two Ragers are generated when "7" comes up for Activation. They are placed 8" and 6" in from the center of the table edge.
Billy has a LOS to them but cannot take an In Sight test against the Ragers.
Later another group of Ragers are placed behind a building and Billy does not have an LOS to it. They activate and move around the corner of the building and come into sight. Billy now takes the In Sight test.
RALLY – Humans cannot take this test if within 6” of
a Rager that is standing up whether it is facing the human or not.
SHOOTING
Ragers cannot use ranged weapons of any type. However, ranged weapons can affect them in the following ways.
LINE OF SIGHT
You still need to see the Rager to hit it. But the good news is that Ragers don’t care about getting shot so do not use cover. So this means they never count cover when being fired at on the Ranged Combat Table.
But they do count concealment.
Example - Billy Pink sees a Rager standing in the woods. Although the Rager isn’t concerned enough to get behind a tree he still is concealed and harder to hit. Billy fires with his BA pistol and scores a net result of 8 (miss due to concealment) and 9 (hit as the Rager cannot count cover).
DETERMINING DAMAGE
Once you’ve scored a hit on the Rager you have to see what kind of damage you inflicted. Ragers are similar to humans so that most rules for damage will apply to them as well. The exception is when a result of knocked down is scored with an Impact 1 weapon they will ignore it and carry on. This means if it is inactive it will remain standing and if it is active it will continue its movement.
AUTO-KILL
If an active human comes into physical contact with an Out of the Fight Rager he may dispatch or capture it.
Example – Billy Pink activates and runs up to the Out of the Fight Rager and dispatches him.
MELEE
When Ragers come into contact with a human they enter into melee or hand-to-hand combat.
HAND-TO - HAND WEAPONS
Ragers do not use any type of weapon in melee. This includes improvised weapons as well. They prefer to melee by punching, biting and ripping their opponents to pieces.
HOW TO MELEE
Rangers are handled a bit differently in melee.
They roll 3d6 when in melee.
Ragers have an Impact of 1.
They do count the –2d6 for being prone or attacked from the rear.
I, ZOMBIE
© 2010 ED TEIXEIRA – TWO HOUR WARGAMES
40
Example – Billy Pink (Rep 5) and two Ragers (A & B) are in melee.
Billy starts with 5d6 for his Rep. He is using a pipe as an Improvised weapon with an Impact of 1. This offsets the Ragers natural Impact of 1 when in melee. No modifiers apply so he rolls 5d6. However he must divide them between the two Ragers. He decides to use 3d6 versus Rager A and 2d6 versus Rager B.
Both Ragers are allowed to roll 3d6.
Billy rolls 3d6 against Rager A and scores 1, 4 and 5 for one success.
Rager A rolls 3d6 and scores a 4, 5 and a 5 for zero successes.
Billy has scored 1 more success than Rager A so knocks it out of the fight.
Billy rolls 2d6 against Rager B and scores a 5 and 6 for zero successes.
Rager B rolls 3d6 and scores a 4, 4 and a 6 for zero successes.
Billy and Rager B have scored zero successes so are evenly matched. They remain in melee.
If Billy activates first he can break off or continue the melee using all of his 5d6. If the Rager activates first it will continue the melee.
“HARRY, CHILL MAN!”
Meleeing with Ragers is a dicey thing to do. Not only can they rip you to pieces if they win they could infect you with the Rage virus if they lose.
If a Rager scores a result of stunned or Out of the Fight on a human and the human escapes from the Rager there is a chance that the human will become infected.
The next time a result of "7" occurs on the Activation dice the human will roll1d6.
Add the score to the Rep of the human.
If the score is 9 or more the human is fine.
If the score is 8 or less the human has become infected and is now a Rager, Activating with other Ragers.
If a human scores a result of Out of the Fight or Obviously Dead on a Rager when in melee there is a chance that the human will become infected.
The next time a result of "7" occurs on the Activation dice the human will roll1d6.
Add the score to the Rep of the human.
If the score is 8 or more the human is fine.
If the score is 7 or less the human has become infected and is now a Rager, Activating with other Ragers.
This means that a human that has meleed with a Rager is a potential time bomb that could off at any time.
What if the game ends before the next Activation score of "7" occurs? The human immediately takes the test before leaving the table.
AFTER THE BATTLE
Ragers may roll for recovery if they have been captured. Otherwise don’t bother as there are an endless number of them
USING RAGERS
Like we said earlier, using Ragers is optional. Here's a few ways that they can be used.
Use them in your ATZ games instead of Zombies.
Use them in your ATZ games with Zombies.
Use them instead of humans in a Take Back Encounter (ATZ, page 43). The only humans in the scenario would be those found in buildings and must be destroyed.
Use them as occupants of a laboratory in a Discover Encounter (ATZ, page, 41).
Try and capture them to use in the Pits in Havasu (page, 72).
Let your imagination run wild. Just realize that Ragers can be difficult opponents.
I, ZOMBIE
© 2010 ED TEIXEIRA – TWO HOUR WARGAMES
41
SMART ZOMBIES In this section we cover Smart Zombies or smarties for short.
It wasn't long after the Lazarus Agent created Ragers that the Smart Zombies were spawned. Memories of another live before zombification was a powerful force. They want their share, a return to the glory days.
But they still share some characteristics with their not so smart undead brethren. No one is going to mistake a Smart Zombie for a human. But that's a good thing as Smart Zombies get along just fine with normal Zombies. Smart Zombies still have the pale look of a zed as well as the Zombie hop. You know. That twitchy "hip hop" walk that you see in the movies.
And this means you can use Smart Zombies as non-player creatures or even play as Smart Zombies.
DEFINING SMARTIES
There are two things that define a Smart Zombie and here they are.
What is its Reputation?
What type of weapon does it have?
REPUTATION
All Smart Zombies have a Reputation of 4.
WEAPONS
Smart Zombies have an Impact of 0.
Smart Zombies may or may not be armed with ranged or melee weapons. When armed with ranged weapons this allows them to shoot. When armed with melee weapons this will increase their Impact.
HOW SMART ZOMBIES APPEAR
Smart Zombies can appear in any area type. They will appear exactly like Zombies do in ATZ (page, 29) with the following difference.
Anytime a Zombie is generated roll 1d6. If the result is a "1" then it is a Smart Zombie. Roll another d6 and consult the Smart Zombie Weapons Table (page, 41).
1 SMART ZOMBIE WEAPONS TABLE (Reading the result as rolled)
Die Score Weapon
1 Unarmed
2 Armed with Impact 1 Improvised Weapon
3 Armed with Impact 2 One Handed Weapon
4 Armed with a BAP
5 Armed with a Shotgun
6 Armed with Assault Rifle
PLACING SMART ZOMBIES
Smart Zombies are placed like other Zombies (ATZ, page, 30).
SHAKING THE TREE
Smart Zombies will follow the same rules as normal Zombies (ATZ, pages 29 to 35) unless otherwise specified.
ZOMBIE FEASTING
Smart Zombies are not subject to Zombie Feasting (ATZ, page, 31).
ACTIONS
Smart Zombies behave just like regular Zombies as outline in ATZ on page, .
MOVEMENT
Smart Zombies have a normal move of up to 6”. They do not Fast Move.
However they are subject to the following movement restrictions-
Knocked Down – Smart Zombies that are knocked down will regain their feet on their next activation and can still move 3".
Climbing Stairs and Ladders - Smart Zombies can climb stairs and ladders like humans can.
Entering and Exiting Doors – Smart Zombies may enter or exit a door at a reduction of 2”.
Smart Zombies encountering unlocked but closed doors will spend one turn of activation at the door before moving through it.
I, ZOMBIE
© 2010 ED TEIXEIRA – TWO HOUR WARGAMES
42
Those encountering locked or barricaded doors will fight the door in melee counting the door as Rep 3. When a result of out of the fight or worse is scored on the door it has been cleared to enter. Any result of Out of Fight or worse on the Smart Zombie is ignored. There is no limit to the number of Smart Zombies that can try and break down the door and they can try with regular Zombies as well.
Entering and Exiting Windows – Smart Zombies may break through and enter any size windows.
When a Smart Zombie reaches a closed window it will fight the window in melee counting the window as Rep 2. When a result of Out of the Fight or worse is scored on the window it has been busted out and the Smart Zombie may pass through it when next active.
Entering or exiting a window ends the Smart Zombies movement.
Moving In Buildings – When moving in a building, Smart Zombies will move normally.
Impassable Rock Formations - Movement not allowed and treated as a dead end.
Wooded Area Or Rough Terrain - Movement reduced to 8” through these areas. Visibility penalties inside these terrain features apply to Smart Zombies. Those at the edge of these terrain features count as in concealment and can see and be seen. Those 1” or farther inside from the edge cannot.
Definite Road - Move on roads normally.
Hills - Move on hills normally.
River And Other Bodies Of Water - Smart Zombies cannot swim. They will simply treat the water as land and continue their movement, until they reach dry land, but at half of their normal speed.
SHOOTING
Smart Zombies are not great shots. In fact, if you get shot by a Smart Zombie it was probably an accident. Smart Zombies do not use the Ranged Combat Table and are Pitiful Shots (ATZ, page, 19). Here's how they shoot.
Whenever they have a LOS to the target they will fire. They do not have to be in range of the target, just in LOS.
Roll 1d6 for each Target Rating of the weapon they are using.
If the score is a 1, 2, 3, 4, or 5 they have missed and the target doesn’t have to take a Received Fire Test.
If the score is a 6 then they will roll another d6.
o If the score is a 1, 2, or 3 they have scored a hit and damage is resolved normally.
o If they score a 4, 5 or 6 they have missed and the target must take the Received Fire Test.
RELOADING
When a Smart Zombie runs out of ammo it will drop the weapon when next active. Whenever it sees a weapon on the ground it will move directly towards it and pick it up.
MELEE
When Smart Zombies come into contact with you they enter into melee or hand-to-hand combat.
HAND-TO - HAND WEAPONS
Smart Zombies may use any type of weapon in melee. This includes improvised weapons as well.
HOW TO MELEE
Smart Zombies are handled a bit differently in melee.
They roll 2d6 when in melee instead of 1d6 like normal Zombies.
Unarmed Smart Zombies have an Impact of 0.
DAMAGE
Smart Zombies are damaged just like normal Zombies (ATZ, page 34).
AFTER THE BATTLE
Smart Zombies use the Recovery Test (ATZ, pages, 22 and 23) when used as a player.
I, ZOMBIE
© 2010 ED TEIXEIRA – TWO HOUR WARGAMES
43
USING SMART ZOMBIES
Using Smart Zombies is optional. Here are a few ways that they can be used.
Use them in your ATZ games with Ragers.
Use them instead of humans in a Take Back Encounter (ATZ, page 43). The only humans in the scenario would be those found in buildings and must be destroyed.
Use them like humans in a Discover Encounter (ATZ, page 41).
Use them instead of humans in a Raid Encounter (ATZ, page 41). The only humans in the scenario would be those found in buildings and must be destroyed.
Try and capture them to use in the Pits in Havasu (page, 72).
Let your imagination run wild. Just realize that Smart Zombies will bring their own brand of uniqueness to your games.
WORMS, BA WORMS "Area 51?" I asked. "That's over 400 miles from here."
"Actually more like 350" the dancer replied as she swayed to the music. "As the crow flies or worm tunnels in this case."
I had to smile. Here I was sitting in a private room at a, uh, Gentlemen's Club listening to a very attractive lady tell me about worms or as she called them Big Ass Worms.
"How big are they?" I asked with a half-grin of doubt.
"At least as big as the ones in that movie. Know which one I'm talking about?" she replied concentrating on her gyrations as she spoke.
"Yep, I know which one. And you say you've seen them?"
Rita, that was her name, just smiled."If I had seen one I wouldn’t be here. All I'm saying is just be careful out there, sweetie." She blew me a kiss and continued."Not all my customers are as nice as you."
BA worms? Really?
Yep, really. Blame it on Area 51 or the Lazarus Agent or whatever you want. Who knows the how or the why it's a fact of life out here in the ATZ world.
Here's the lowdown.
DEFINING BA WORMS
There are only two things that define BA Worms.
What is its Reputation?
What type of weapon does it have?
REPUTATION
All BA Worms have a Reputation of 6. Yes, Rep 6. This is not a misprint.
WEAPONS
BA Worms do not use weapons unless you consider their 12" teeth to be weapons. They can inflict damage in two ways:
Against human sized target they will melee them counting a +3d6 for size with an Impact of 5.
Against vehicles or buildings they will Bash attack (ATZ, page, 27) with a Bash Value of 8.
HOW BA WORMS APPEAR
BA Worms will only appear in the following areas during a Random Road or Discover Encounter:
Destination Circles 1, 2, and 3 (page, 69).
The black lines between Destination Circles:
o 1 and 2.
o 2 and 3.
o 2 and 5 but NOT including Destination Circle 5.
o 2 and 6 but NOT including Destination Circle 6.
During the game BA Worms are encountered in only one way. BA Worms will appear the first time the activation dice total seven. There can only be one BA Worm in the Encounter.
Example – I roll for activation and score a 5 and 2. One BA Worm enters the Encounter. Later I roll a 6 and 1 for activation but as one BA Worm has already been put into play there cannot be any more.
I, ZOMBIE
© 2010 ED TEIXEIRA – TWO HOUR WARGAMES
44
PLACING THE BA WORM
When the BA Worm is generated it is always placed in the center of the table edge closest to the most movement that occurred during the previous turn. The most movement is defined as the following. Go down the list and the first circumstance that occurs is defined as the most movement.
1. Any vehicle that moved. When more than one vehicle was moving then the vehicle with the highest Bash Value (ATZ, page, 25) counts as the most movement.
2. The largest group of characters that moved outside of a building whether player or non-player characters.
3. The largest group of characters that moved inside of a building whether player or non-player characters.
4. At the center of a table edge rolled at random.
The BA Worm does not activate on the same turn that it is placed and always starts underground and not in sight.
Example - During Turn Three a sedan of Gangers enter the table and stop in front of a deserted house. At the same time six Zombies move towards them. Inside the house three other Gangers move to the windows and start to fire.
Dice are rolled of Turn Four and come up 5 and 2. This is the first seven that has been rolled so the BA Worm is placed on the table in the center of the table edge closest to the stopped vehicle (most movement).
BA WORM ACTIVATION
BA Worms will always roll their own activation dice. Their die score is not used to see if they will double up with one or more of the other Activation Dice. If they do double up they will usually move first as Activation is based on Rep.
Note that the BA Worm will always activate.
Example - Turn Five Activation dice are rolled.
Players 4.
BA Worm 3.
Zombies 3.
The Players will go first. The Zombies and BA Worm doubled up but the BA Worm will go first because it has the highest Rep (6).
ACTIONS
When a BA Worm is active it will perform the following actions in this order of priority. Go down the list and do the first Action that applies.
1 - If underground they will move 16" directly towards the most movement that happened during the same or previous turn. It's important to track all movement on the table when the BA Worm is about. A good way to do this is to place a marker on the current most movement and pass the marker as the most movement changes.
2 - If reach within 6" of the most movement it will come up from underground (called breaching) causing all the characters in sight of the BA Worm to take the Encounter Awareness Test (page, 58).
3 - When outside of 6" from the most movement the BA Worm will return to under the ground.
4 - If there has not been any movement during the previous or current turn the BA Worm will not move.
MOVEMENT
BA Worms have a normal move of up to 16” whether under or above ground. They do not Fast Move.
However they are subject to the following movement restrictions-
Rock - BA Worms cannot move through rocky areas. That's a good place to hide. Rocky areas must be clearly defined.
Under Buildings - When moving underground the BA Worm will ignore buildings unless they are built on rocky areas in which case they may not pass under.
Through Buildings - BA Worms can move through buildings at 1/2 speed if they are of wood construction. If concrete they will burst into the building which will stop their move. They can continue next activation at 1/2 speed.
Impassable Rock Formations - Movement not allowed and treated as a dead end.
Wooded Area Or Rough Terrain - Movement reduced to 1/2 speed if moving through but normal if moving underneath.
I, ZOMBIE
© 2010 ED TEIXEIRA – TWO HOUR WARGAMES
45
Definite Road - If come up from underground on a road the road will have a hole where the BA Worm exited or re-entered.
Hills - Move on hills normally.
Rivers and Other Bodies Of Water - BA Worms will move across rivers at 1/2 speed if needed but will normally go under it.
REACTIONS
BA Worms do not take Reaction Tests but they can affect those taken by humans in the following ways.
IN SIGHT – Once a BA Worm comes above ground
all characters with LOS can take the In Sight Test. If the character is part of the most movement it must take the Encounter Awareness Test (page, 58) instead.
Example – The BA Worm Activates and moves towards the group that qualifies as the "most movement". It reaches 6" from that group and comes above ground into sight. The most movement takes the Encounter Awareness Test (page, 58) while the other characters with LOS take the In Sight Test.
ENCOUNTER AWARENESS TEST - BA Worms that
win the test will move into melee, if against human sized target, or Bash Attack (ATZ, page, 27).
SHOOTING
BA Worms cannot use ranged weapons of any type. However, ranged weapons can affect them in the following ways.
LINE OF SIGHT
You still need to see the BA Worm to hit it. But the good news is that BA Worms don’t care about getting shot so they do not use cover or even count concealment.
Example - Billy Pink sees a BA Worm breaching inside a patch of woods and takes an In Sight Test. He passes 2d6 and can fire. Although the BA Worm is moving through the woods it does not count cover or concealment. Billy fires with his BA pistol and scores a net result of 7 (miss) and 9 (hit) as the BA Worm cannot count cover.
DETERMINING DAMAGE
Once you’ve scored a hit on the BA Worm you have to see what kind of damage you inflicted. Whenever a hit is scored on a BA Worm, roll 2d6. If double sixes (boxcars) are not scored the Worm ignores the damage and carries on.
If you did score double sixes then you have hit the Worm and can now roll 1d6 versus the Impact of the weapon for damage.
o If you score a result of OD you have hit a vital spot and the beast is OD.
o If you score a result of OOF the BA Worm has been hit in a vital spot and it hurts. The BA Worm will immediately go back underground and head off the table. It will not return this Encounter.
o If you score a result of Knocked Down it ignores the damage and carries on.
MELEE
When BA Worms come into contact with a human sized target they enter into melee or hand-to-hand combat.
HOW TO MELEE
BA Worms are handled as follows.
They roll a total of 9d6 when in melee.
BA Worms do divide their melee d6 when attacking more than one target. if they score multiple results of move past the target they will always move the farthest distance.
BA Worms have an Impact of 5.
They do not count any other modifiers.
In melees involving BA Worms only roll the d6 once. Do not re-roll successes!
Compare the number of successes rolled on the BA Worm Melee Results Table (page, 46).
I, ZOMBIE
© 2010 ED TEIXEIRA – TWO HOUR WARGAMES
46
REP BA WORM MELEE RESULTS TABLE (Looking for successes)
BA Worm will always roll 9d6
A score of 1, 2, or 3 is a success A score of 4, 5, or 6 is a failure. Do not re-roll successes!
# OF
SUCCESSES
SCORED
BA WORM CHARACTER
2+ or more Gulp! Target is swallowed up and OD and worm continues on 6" forward.
Target dodges to left (1-3) or right (4-6) and worm continues on 12" past target.
1 Smack! Target is struck by the worm. Roll for damage versus an Impact 5 weapon.
Target dodges to left (1-3) or right (4-6) and worm continues on 6" past target.
Same number
BA Worm knocks down target. Immediately take Recover From Knock Down Test.
BA Worm knocks down target. Immediately take Recover From Knock Down Test.
Example – Billy Pink (Rep 5), Sooze (Rep 3), and Cherrie (Rep 3) moved last turn so are the most movement target for a BA Worm.
The worm activates and enters melee with the three characters. The worm must divide its d6 so will roll 3d6 versus all three characters.
Billy rolls 5d6 and scores 3 successes.
The worm rolls 3d6 and scores 2 successes so Billy scores 1 success more. Billy dodges out of the path of the worm who continues on another 6".
Sooze rolls 3d6 and scores 3 successes.
The worm rolls 3d6 and scores 1 success so Sooze scores 2 successes more. Sooze dodges out of the path of the worm who continues on another 12".
Cherrie rolls 3d6 and scores 0 successes.
The worm rolls 3d6 and scores 2 successes so the worm scores 2 successes more. The worm gulps Cherri down and continues on 6".
As the farthest result for the worm continue was 12" it has gulped Cherri down and continued 12" past Sooze.
BA Worms always return to any stunned, OOF, or OD characters and will gulp them down if given the chance.
BA, BA, GO AWAY!
Okay so we know that if you can:
Score a hit on the BA Worm.
Then roll "boxcars".
Then roll Impact or less on 1d6 but not a "1" the BA Worm will leave the table.
So what else can we do for it to go away? Not a thing.
OUTRUNNING THE BA WORM
What about outrunning the BA Worm? Sure, here's how it's done. You cannot outrun the worm by simply leaving the table. Instead you must first exit the table then each character rolls 2d6, adds the scores together, modify this total as per circumstances, and consult the Bye, Bye Worm Table (page, 46).
The Driver of the vehicle will roll only once while the passengers that remain inside do not.
2 BYE, BYE WORM TABLE (2d6 added together)
CIRCUMSTANCE MOD
If left table in a vehicle that can exceed 16" of movement
+3
If left table over a rocky area +2
If left table on a horse +1
# STARS 6 or less
BA Worm overtakes closest character and will melee or Bash as needed. Other characters will escape.
7 or more Character escapes.
I, ZOMBIE
© 2010 ED TEIXEIRA – TWO HOUR WARGAMES
47
AFTER THE BATTLE
As BA Worms can only be killed or forced to leave the table they never have to roll for recovery.
USING BA WORMS
Using BA Worms is optional just like using Ragers. BA Worms are very, very tough enemies and should be feared.
PSY Remember when we mentioned that the Lazarus Agent mutated humans (page, 36). Well here's the low down on one of the mutations that it caused.
Psy, short for Psionics, is the ability to tap into the power of the mind to perform extraordinary feats. Before we get into more detail let's give you a quick overview of Psy.
HOW PREVALENT IS PSY
Everyone has experienced Psy in one form or another. The most common is of course Déjà vu or the feeling of having experienced something previously.
But real practitioners of Psy (called Psychics or worse) are very rare. Whether that's because Psy isn't prevalent in the world or because Psychics trust no one so often do not reveal their powers, you will rarely, if ever, meet a real Psychic.
HOW ACCEPTED IS PSY
Humans naturally have a fear and dislike for Psychics. This often manifests itself in aggressive behavior towards the Psychic and almost never empathy or help. Players can choose their reaction to Psychics while NPCs will use the Psychic Reaction Test (page, 47).
WANTED PSYCHICS - DEAD OR ALIVE?
There is a rumor amongst Psychics that the remnants of various Governments have a vested interest in Psychics and are actively searching for them. As to the reasons behind this one can only speculate.
WHERE FOUND
Psychics can be found in one of two ways.
You can meet a player character Psychic.
You can meet a NPC Psychic in a programmed encounter. Cassandra (page, 77) is an example of a NPC Psychic.
PLAYING PSYCHICS
Yes, you can play as a Psychic. However, whenever any Psychic uses their powers all NPCs that saw this happen roll 1d6, add it to their Rep, and consult the Psychic Reaction Table (page, 47).
1 Psychic Reaction Table (1d6 added to Rep)
# Reaction
2 or 3 Negative reaction. Will behave violently. Go to Draw Down (page, 119).
4 or 5 Negative reaction. Will behave violently. Go to Draw Down (page, 119) but only for a fistfight.
6 or 7 Negative reaction. Will shun Psychic and tell it to leave. If Psychics does not leave go to Draw Down (page, 119).
8 Negative reaction. Will shun Psychic and leave the encounter.
9
Positive reaction. Will tolerate Psychic but not interact with them.
10+ Positive reaction. Will interact with Psychic.
Once a NPC has taken the Psychic Reaction Test it will behave this way in the future when encountering any Psychic.
GANGER, SURVIVOR, OR WHAT?
Rep 3 or lower Psychics will use the Civilian QRS found in ATZ.
Rep 4 or higher Psychics will use the Survivor QRS found in ATZ.
I, ZOMBIE
© 2010 ED TEIXEIRA – TWO HOUR WARGAMES
48
PSY ENERGY Psy-Energy is divided into two types, Psy-Gamma (PG) and Psy-Kappa (PK).
Psy-Gamma deals with perception.
Psy-Kappa deals with action.
Psychics will use both types depending upon the Psychic Task it wishes to perform.
For ease of play all Psy-Tasks have been grouped together in the back of the book.
USING PSY-ENERGY
Using Psy-Energy requires the Psychic to completely focus on the Task at hand. Therefore, when attempting to use their power the Psychic may not do anything else. This includes moving, firing a weapon or anything not directly related to the Task. If the Psychic is forced to break off its concentration due to external circumstances, such as being shot, or meleed, it will count as if passed 0d6 on the Closing the Link Test (page, 49) if performing a Psy-Gamma Task (page, 48).
Any Psy-Kappa Task (page, 50) immediately fails.
LIMITS OF PSY-ENERGY
Using Psy-Energy is not an exact science and there are limitations and dangers in its use.
Each Psychic has a Psy-Energy Pool or Pool for short. The Pool is equal to twice the Rep of the Psychic.
Each time a Psychic performs the Close the Link Task (page, 49) or any Psy-Kappa Energy Task (page, 50) he reduces his Pool by one.
If the Psy-Energy Pool reaches zero or less the Psychic's Rep is reduced by one and the Psychic must immediately take the Spent Test (page, 52) and carry out the results.
All Psy-Energy losses cannot be recovered during the Encounter but are recovered at the end of each Encounter instead.
THE PSY-GAMMA TASK
Psy-Gamma is direct mind-to-mind contact as opposed to Psy-Kappa which causes a physical reaction. To use Psy-Gamma there must be a Psychic and a subject, also referred to as the target. There are five different Psy- Gamma Tasks that the Psychic can perform. They are:
Empathy
Probing
Seek
Suggestion
Closing
Psy-Gamma psionics involves the Psychic and the target rolling a number of d6 versus their Rep. Success or failure is measured by how many more d6 the Psychic passes* compared to the number of d6 the target passes.
*Passing is a score equal or less than the testers Rep.
PERFORMING A PSY GAMMA TASK
To perform a Psy Gamma Task the Psychic must be Active and within twice it's Rep in inches to the target but not necessarily in LOS. Once this is achieved the Psychic can begin.
First determine if the target has any Psy ability. If the target is not a Psychic it still may have Psy ability but does not know it. To find out roll 3d6. If the results are triple sixes the target has Psy ability and it is now aware of this!
If the target has Psy ability the Psychic will roll 2d6 versus its Rep as will the target.
If the target does not have Psy ability the Psychic will roll 3d6 versus its Rep and the target will roll 2d6 versus half of its Rep rounded up.
Compare the number of passing* d6 and consult the Psy-Gamma Tasks Table (page, 112) and immediately carry out the results.
*Passing is a score equal or less than the testers Rep.
VOLUNTARY TARGETS
Targets can fully cooperate if they so desire. Targets may choose to pass 0d6 for any Task at any time and can choose to pass 0d6 on some but not others which would cause them to roll on the appropriate table.
I, ZOMBIE
© 2010 ED TEIXEIRA – TWO HOUR WARGAMES
49
Example - Billy Pink allows Cassie (page, 77) to establish a connection with him by choosing to pass 0d6. Cassie still rolls 3d6, as Billy does not have any Psy ability, and passes 2d6. As she has passed more than Billy she has established the connection and can proceed.
Cassie now wants to ask Billy a question she attempts the Probe Task. Cassie rolls 3d6 and passes 2d6 while Billy chooses to pass 0d6.
Cassie may now ask Billie questions that he must answer truthfully.
EMPATHY
Empathy is the ability to know someone else’s emotions psychically during normal conversation or even silently at a distance. Empathy is limited telepathy and the most common of all Psy abilities. Most people feel a form of empathy when conversing with friends. However, a Psychic can do much more than this. A Psychic can establish a powerful Emphatic Connection (page, 49) with his target.
Once the connection is made emotions will flow in both directions with both the Psy and the target feeling some emotions from each other.
ESTABLISHING THE CONNECTION
It all starts with the Psychic and the target establishing an Emphatic Connection. Before any other Task can be attempted the connection must be made. To do this the Psychic performs the Empathy Task (page, 112).
If the target is willing the connection is automatic and the Psychic can move on to the next Task.
If the target is not willing the Psychic must establish a connection with the target by rolling d6 as outlined in the previous sections.
PROBING
Once a connection is established the Psychic may begin to probe the mind of the target by attempting a Probe Task (page, 112). If the Probe is successful, the Psychic can ask the target a number of questions equal to the Psychics Rep during the one turn of Activation.
If the Probe is successful the Psychic can ask questions to visualize through the target’s mind what the target has seen or places it may have been.
Example - Can you show me what Cassandra looks like? If the target has seen Cassandra it will transfer that image to the Psychic.
BLOCK OUT
When being probed it is possible for the target to try and shield or block his thoughts and to even go as far as try to push the Psychic out of its mind. If the Psychic encounters a result of Block Out it will immediately take Block Out Test (page, 112).
SEEK
The Seek Task (page, 112) is performed when the Psychic is attempting to determine the location of a target. This can only be done if the Psychic and target have previously had an Emphatic Connection.
While a successful Seek will tell you the location of the target there is no guarantee that the target will be located someplace accessible from your current Encounter location.
Example - The Psychic is in the US but the target is in the Middle East.
SUGGESTION
The Psychic may try to compel the target to undertake some action by planting a suggestion into the mind of the target. This is usually a simple task such as “unlock the door” or “bring me the stick”.
If the Psychic wants to try to get the target to do a physically difficult or dangerous suggestion then it will be harder to get the target to do it.
If the Psychic tries to plant a “morally inconsistent suggestion” that is contrary to what the target would normally be willing to do then there will be greater resistance to doing it.
To plant a suggestion the Psychic attempts the Suggestion Task (page, 112).
Once a suggestion has been refused it cannot be attempted again.
CLOSING THE LINK
When the Psychic is ready to break the connection between the Psychic and the target the Closing the Link (page, 112) is used. This can pose a danger to the target and Psychic if not done correctly. The link can be closed gently by the psychic, or violently due to resistance on the part of the target.
I, ZOMBIE
© 2010 ED TEIXEIRA – TWO HOUR WARGAMES
50
If an Empathic Connection has been closed gently the Psychic is allowed to use an additional 1d6 when trying future connections with that target up to a total of 4d6 if the target does not have any Psy ability.
PSY - GAMMA: PUTTING IT ALL
TOGETHER
Here's a detailed example of how Psy-Gamma works.
Char is a Rep 4 Psy with a Psy-Energy Pool of 4 (page, 48). She is sitting across from Digger a Rep 3 Ganger. Digger is a suspect in a crime and tied to the chair so he really isn’t going anywhere. Char has been brought in to get some info.
Char must start by establishing an Emphatic Connection (page, 49) to Digger and starts with an Empathy Task (page, 112).
Char will be using 2d6. She will count her full Rep of 4.
Digger does not know if he has any Psy-ability so we must roll 3d6. If the result is triple sixes, unbeknownst to Digger, he has Psy-ability. The dice come up 4, 5 and 3 confirming that Digger does not have Psy-ability.
Because Digger does not have Psy-ability he will roll 2d6 and count half of his Rep rounded down. This means he will count as if he had a Rep of 2.
Char rolls 3d6 and scores a 1, 4, and 6 to pass 2d6.
Digger rolls a 1 and a 6 to pass 1d6.
Looking on the Empathy Table with Char passing more d6 she establishes a link and can attempt another Task.
Char now tries to Probe (page, 112) and rolls a 2, 6 and 6 passing 1d6.
Digger rolls a 1 and 1 and passes 2d6.
On the target passes more portion of the Probe table Digger now tries to Block Out Char (page, 112).
Char and Digger now go to the Block Out Table and roll dice.
Rolling dice results in Char passing more d6 and this takes the duo back to the Probe Table.
Char and Digger immediately roll d6 and Char passes more d6. She immediately asks Digger for the information she needs.
After getting the info she tries to Close the Link (page, 112).
Char rolls results in a pass more d6 than Digger and the link is successfully broken.
Char has her Psy-Energy Pool reduced by one.
THE PSY-KAPPA TASK
As mentioned previously Psy-Kappa is the psionics of action. While Gamma is between minds Kappa is mind over matter. There are six different Psy-Kappa Tasks that the Psychic can perform. They are:
Push Object
Manipulate
Levitate
Force
Spontaneous Combustion
Psy Blast
PERFORMING A PSY KAPPA TASK
To perform a Psy Kappa Task the Psychic must be Active and within twice it's Rep in inches to the target and in LOS. Once this is achieved the Psychic can begin.
The Psychic must declare the Task it would like to try and the size of the target object. Note that objects can also be living creatures.
Small sized objects are defined as items that are roughly the size of a can of spray paint and weigh up to one pound.
Medium sized objects are roughly the size of a back pack and weigh up to twenty pounds.
Large objects are roughly the size of a six foot tall human and weigh up to two hundred pounds.
Once the Task has been declared and the target object defined the Psychic may attempt the Task in the following way:
The Psychic will roll 2d6 versus its Rep.
This is modified up or down by the size of the target object.
Determine the number of passing* d6 and consult the appropriate Task Table. The results are carried out immediately.
I, ZOMBIE
© 2010 ED TEIXEIRA – TWO HOUR WARGAMES
51
*Passing is a score equal or less than the testers Rep.
COMBINING TASKS
A Psychic may continue doing Psy-Kappa Task until he has failed at one.
Example – Hallern spies a fork on the table across from his cell. He “manipulates” it to fit the lock on the cell door. He then “levitates” it into the air. Finally he “forces” it while in midair to the lock and inserts the fork. He can now take a Challenge Test (ATZ, page, 52) and try to unlock the door.
PUSH OBJECT
When successfully performed the Psychic pushes the selected object along a flat surface at a steady rate. This can be a floor or perhaps a tabletop. The Psychic must maintain a LOS to the object he is pushing at all times. Failure to do this causes the object to stop.
Those hit by a pushed object do not suffer any damage.
The Push Object Task is on page 114.
MANIPULATE
One of the oldest recorded uses of psionics, manipulating means to literally bend an object. This power can also be used to manipulate small objects, for example turning a key that is already in a lock. This is limited to small items no larger than 12” long and 1” thick. The Psychic must maintain a LOS to the object he wishes to manipulate.
The Manipulate Task is on page 114.
LEVITATE
Another old use of psionics often referred to as a magic trick, levitating means to literally lift an object, even the Psychic, off the ground up to a height of 2” above the tabletop. The Psychic must maintain a LOS to the object he wishes to levitate. Note that the levitation is straight up and no horizontal movement occurs. That would be possible by using the Psy Force Task after Levitation.
The Levitate Task is found on page 114.
FUN WITH LEVITATED OBJECTS
There may come a time where you are in close proximity to something or someone that’s floating in the air at the whim of a Psychic.
If you want them down, just move to them and pull them down. Or if you just want to move them, just push them up to 1" per your level of Rep.
For added fun your Psychic can Force them even though a different Psy was levitating them in the first place…see the following.
FORCE TASK
The Force Task is used to push medium and large levitated objects along at a safe speed up to the Rep of the Psychic each turn of Activation.
In addition it also allows for levitated small objects to be fired up to two times the Rep of the Psychic in inches as if firing a BAP. Once the Task is successful roll on the Ranged Combat Table (ATZ, page, 18) to see it if hit the target. Damage is carried out as if a BAP.
The Force Task is on page 114.
SPONTANEOUS COMBUSTION
Now this one is a real show stopper!
The Spontaneous Combustion Task allows the Psychic to ignite flammable items that will burst into flames. To do so there must be combustible material within twice the Rep in inches of the Psy. This cannot be a living being but could be an item that it may be wearing.
The fire will start as a 1" circle and expands by 1" each turn of Activation if there are combustible items adjacent to it. It will continue to grow as long as it is allowed to burn. Those faced by fire must move away from it or choose to fight it.
Figures must be Active to fight a fire.
One figure fighting the fire will reduce it by two inches if using water and by four inches if using a fire extinguisher.
If not completely put out fire will grow as outlined above.
The Spontaneous Combustion Task is on page 114.
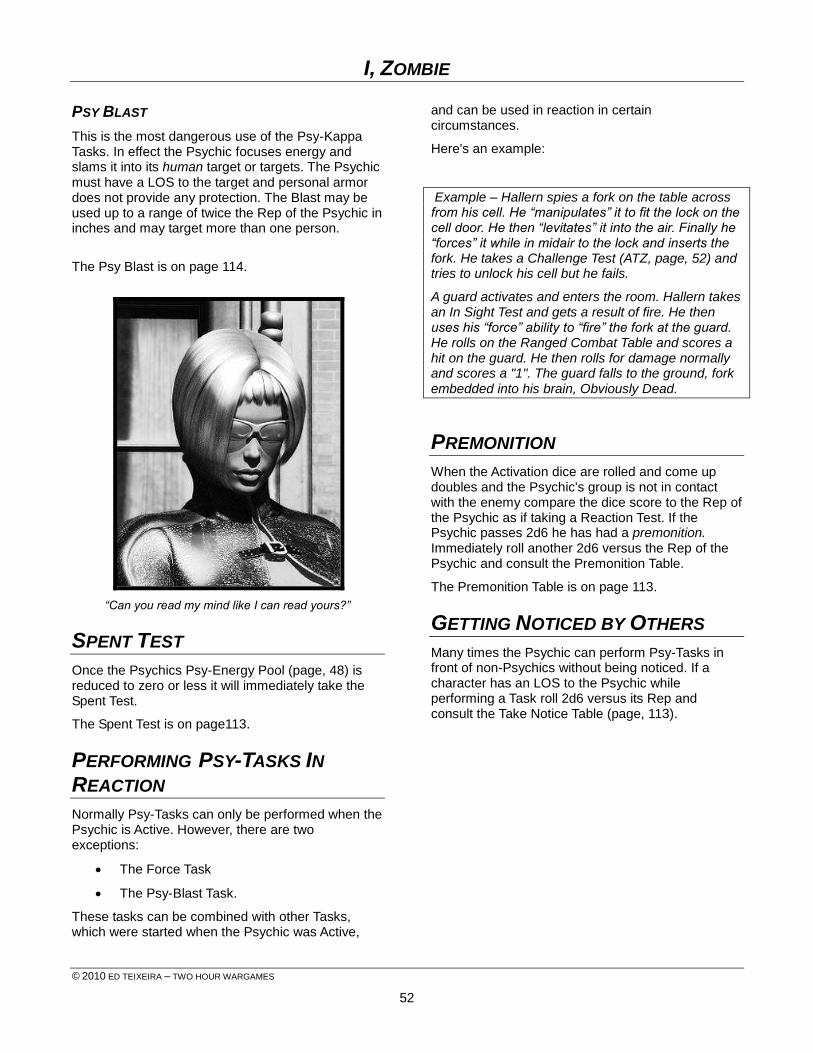
I, ZOMBIE
© 2010 ED TEIXEIRA – TWO HOUR WARGAMES
52
PSY BLAST
This is the most dangerous use of the Psy-Kappa Tasks. In effect the Psychic focuses energy and slams it into its human target or targets. The Psychic must have a LOS to the target and personal armor does not provide any protection. The Blast may be used up to a range of twice the Rep of the Psychic in inches and may target more than one person.
The Psy Blast is on page 114.
“Can you read my mind like I can read yours?”
SPENT TEST
Once the Psychics Psy-Energy Pool (page, 48) is reduced to zero or less it will immediately take the Spent Test.
The Spent Test is on page113.
PERFORMING PSY-TASKS IN
REACTION
Normally Psy-Tasks can only be performed when the Psychic is Active. However, there are two exceptions:
The Force Task
The Psy-Blast Task.
These tasks can be combined with other Tasks, which were started when the Psychic was Active,
and can be used in reaction in certain circumstances.
Here's an example:
Example – Hallern spies a fork on the table across from his cell. He “manipulates” it to fit the lock on the cell door. He then “levitates” it into the air. Finally he “forces” it while in midair to the lock and inserts the fork. He takes a Challenge Test (ATZ, page, 52) and tries to unlock his cell but he fails.
A guard activates and enters the room. Hallern takes an In Sight Test and gets a result of fire. He then uses his “force” ability to “fire” the fork at the guard. He rolls on the Ranged Combat Table and scores a hit on the guard. He then rolls for damage normally and scores a "1". The guard falls to the ground, fork embedded into his brain, Obviously Dead.
PREMONITION
When the Activation dice are rolled and come up doubles and the Psychic's group is not in contact with the enemy compare the dice score to the Rep of the Psychic as if taking a Reaction Test. If the Psychic passes 2d6 he has had a premonition. Immediately roll another 2d6 versus the Rep of the Psychic and consult the Premonition Table.
The Premonition Table is on page 113.
GETTING NOTICED BY OTHERS
Many times the Psychic can perform Psy-Tasks in front of non-Psychics without being noticed. If a character has an LOS to the Psychic while performing a Task roll 2d6 versus its Rep and consult the Take Notice Table (page, 113).
I, ZOMBIE
© 2010 ED TEIXEIRA – TWO HOUR WARGAMES
53
ENCOUNTERS In this section we give provide more Encounters and upgrade ones you may already be familiar with.
THE 5 P'S Proper planning prevents poor performance. Before you decide to play a game it's easier to do some groundwork ahead of time instead of on the fly especially if you want to play the game with other people. Here are some shortcuts that can be done ahead of time, even days before.
1. Decide what type of Encounter you will be playing, the area it will be in, and what Day Part it is.
2. Set up or sketch out the terrain.
3. Map out the buildings.
4. Roll up 1 to 6 NPC enemies so you have them ready to go when needed. This saves you from rolling on the People's Lists during the game.
If you do these four easy things before the game starts it will make your game easier to play and more enjoyable.
SETTING UP THE
ENCOUNTER Set up the Encounters by using the following procedure.
1 - Determine if it is a voluntary or involuntary Encounter (page, 53).
2 - Determine what the Encounter (page, 53) is.
3 - Determine the area where the Encounter takes place (urban, the suburbs, or a rural area).
4 - Set up the table and terrain (page, 54).
5 - Determine what Day Part (ATZ, page, 43) it is.
6 - Determine what characters are involved on both sides (page, 56).
7 - Determine the number of PEFs there are (page, 56).
8- Determine what Special Instructions are in effect. Special Instructions explain the particulars of the Encounter.
9 - Determine how the characters are deployed (page, 59).
10 - Check each character for a Lack of Sleep (page, 35) if needed.
11 - Begin the game.
Players of ATZ will recognize that this procedure resembles the Encounter set up used before.
Now let's cover each of these steps in more detail.
VOLUNTARY OR
INVOLUNTARY In I, Zombie we have expanded how Encounters (ATZ, page, 40) are handled.
There are two types of Encounters. They are:
Voluntary - Where the player chooses the Encounter.
Involuntary - Where the player is thrust into an Encounter.
Encounters can be voluntary, involuntary, or both.
TYPES OF
ENCOUNTERS In the ATZ world we have the following Encounters.
Voluntary Encounters
Discover - See ATZ, page, 41.
Raid - See ATZ, page, 41.
Take Back - See ATZ, page, 43.
Hunting - See page, 60.
Coming and Going - See page, 86.
Chillin' - See page, 87.
Bartering - See page 87.
Residency - See page, 89.
Police - See page, 90.

I, ZOMBIE
© 2010 ED TEIXEIRA – TWO HOUR WARGAMES
54
Selling Zombies/Ragers - See page, 98.
Involuntary Encounters
Raid - If the player is being raided. See ATZ, page, 41.
Random Road Encounter - See page, 65.
Chillin' - See page, 87.
Police - See page, 90.
Players should note that some of these Encounters are introduced in I, Zombie but can be used in other settings as well.
DETERMINING THE
AREA The area where the encounter will take place can be chosen by the player or will be determined by the campaign. In I, Zombie the campaign area is rural.
SETTING UP TERRAIN Here's how we set up terrain in the ATZ world. You may have been exposed to this in Haven or more than likely in Chain Reaction 3.0 our free introduction rules set that you can download at our website. This system replaces the one found in ATZ (page, 36).
TABLE SIZE
In the ATZ world we tailor the table size to the Encounter you are playing. By using the correct board size you save time and perhaps money by not having to gather terrain that really doesn’t figure into the game.
Here are the recommended table sizes for each type of Encounter available in the ATZ world. If desired you can use larger or smaller tables.
X Recommended Table Sizes
Encounter Table Size
Bartering 3x3 (1)
Chillin' 3x3
Coming and Going 3x3
Discover 4x6
Hunting 3x3
Police 3x3
Raid 4x6
Random Road Encounter 3x3
Residency 4x6
Selling Zombies/Ragers 3x3
Take Back 4x6
(1) If desired a 2x2 table can be substituted for 3x3 at any time.
Basically we are recommending two table sizes.
THE 3X3 TABLE
Use a 3x3 table for Encounters that are interaction based. These are Encounters where one or two buildings may be used and the goal is to interact with NPCs to obtain items or info. Bartering is a good example of when to use a 3x3 or even a 2x2 table where the primary action is centered on the building. In these situations I prefer to set up the buildings in the center of the table with a small area of outdoors surrounding the buildings. Once a character leaves a building he has one turn outside then can easily leave the Encounter.
THE 4X6 TABLE
The 4x6 table comes into play when there are multiple objectives and the players will have the opportunity to encounter many NPCs and Zombies. The Discover or Take Back Encounters are good examples of where the 4x6 table is used.
DIVIDING THE TABLE
Here's how we divide the table regardless of the table size you choose to use.
1 - Divide the table into nine equal sections.
2 - Number each section as illustrated. The upper left hand section will always be "1" and the lower right hand section will always be "9".
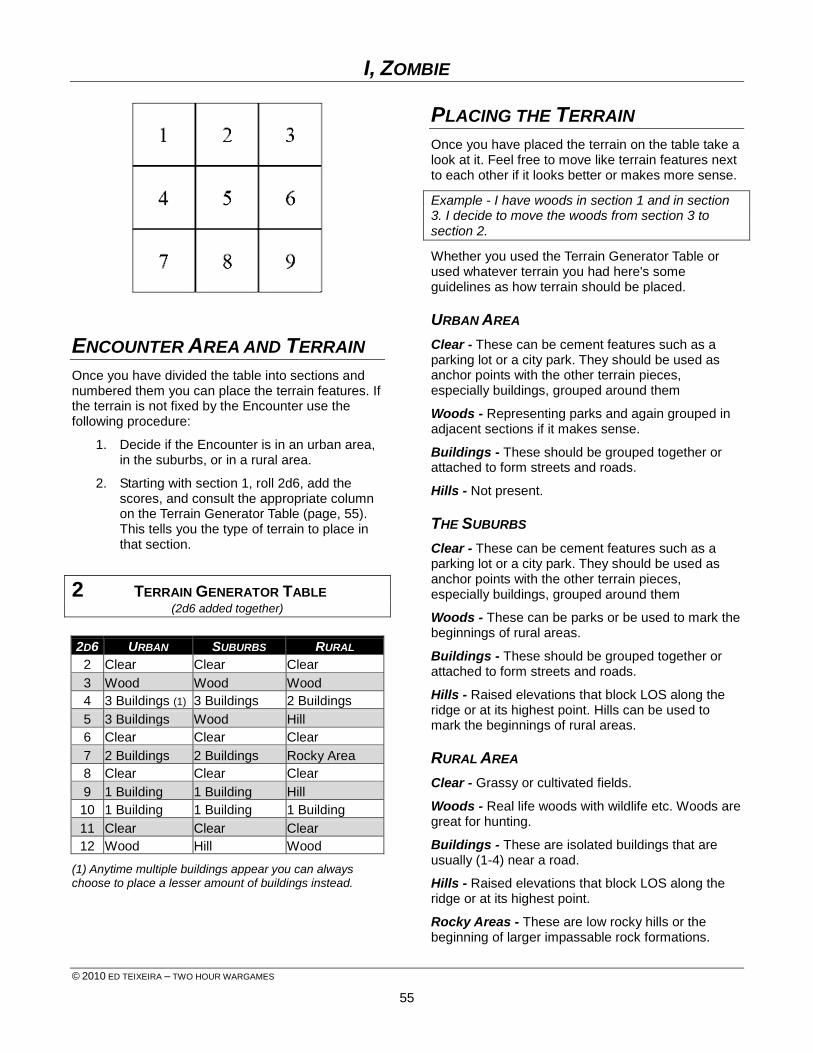
I, ZOMBIE
© 2010 ED TEIXEIRA – TWO HOUR WARGAMES
55
ENCOUNTER AREA AND TERRAIN
Once you have divided the table into sections and numbered them you can place the terrain features. If the terrain is not fixed by the Encounter use the following procedure:
1. Decide if the Encounter is in an urban area, in the suburbs, or in a rural area.
2. Starting with section 1, roll 2d6, add the scores, and consult the appropriate column on the Terrain Generator Table (page, 55). This tells you the type of terrain to place in that section.
2 TERRAIN GENERATOR TABLE (2d6 added together)
2D6 URBAN SUBURBS RURAL
2 Clear Clear Clear
3 Wood Wood Wood
4 3 Buildings (1) 3 Buildings 2 Buildings
5 3 Buildings Wood Hill
6 Clear Clear Clear
7 2 Buildings 2 Buildings Rocky Area
8 Clear Clear Clear
9 1 Building 1 Building Hill
10 1 Building 1 Building 1 Building
11 Clear Clear Clear
12 Wood Hill Wood
(1) Anytime multiple buildings appear you can always choose to place a lesser amount of buildings instead.
PLACING THE TERRAIN
Once you have placed the terrain on the table take a look at it. Feel free to move like terrain features next to each other if it looks better or makes more sense.
Example - I have woods in section 1 and in section 3. I decide to move the woods from section 3 to section 2.
Whether you used the Terrain Generator Table or used whatever terrain you had here's some guidelines as how terrain should be placed.
URBAN AREA
Clear - These can be cement features such as a parking lot or a city park. They should be used as anchor points with the other terrain pieces, especially buildings, grouped around them
Woods - Representing parks and again grouped in adjacent sections if it makes sense.
Buildings - These should be grouped together or attached to form streets and roads.
Hills - Not present.
THE SUBURBS
Clear - These can be cement features such as a parking lot or a city park. They should be used as anchor points with the other terrain pieces, especially buildings, grouped around them
Woods - These can be parks or be used to mark the beginnings of rural areas.
Buildings - These should be grouped together or attached to form streets and roads.
Hills - Raised elevations that block LOS along the ridge or at its highest point. Hills can be used to mark the beginnings of rural areas.
RURAL AREA
Clear - Grassy or cultivated fields.
Woods - Real life woods with wildlife etc. Woods are great for hunting.
Buildings - These are isolated buildings that are usually (1-4) near a road.
Hills - Raised elevations that block LOS along the ridge or at its highest point.
Rocky Areas - These are low rocky hills or the beginning of larger impassable rock formations.
I, ZOMBIE
© 2010 ED TEIXEIRA – TWO HOUR WARGAMES
56
ROADS & STREETS
Roads and streets are not on the Terrain Generator Table. Instead they are laid out based on the number of buildings that you are using. Basically more buildings will mean more roads.
Urban areas and the Suburbs have streets. Rural areas have roads or highways.
Streets - Two lanes in the residential and older sections of town and four lanes downtown or through the center of the city. Streets are dotted with intersections.
Roads - Two lane dirt or asphalt roads crossed by the rare intersection (1). The two lane roads are often the older business routes prior to modern highways.
Highways - Four and six lane asphalt roads with off ramps instead of intersections.
Depending upon the number of buildings, which are grouped around the streets and roads, there will usually be one or two streets or roads on each table. Lay them on the table so they enter one table edge and exit the opposite table edge. In some cases like when playing a Hunting (page, 60) Encounter there will not be any roads on the table.
DETERMINE THE DAY
PART See the section called What Time of the Day (ATZ, page, 43) for more about when the Encounter can take place.
CHARACTERS IN THE
ENCOUNTER Each Encounter should list the following characters:
What the players can use. This can be one or more of their group.
What the enemy characters will be. This can be any combination of Gangers, Ragers, Zombies, Survivors, Residents, etc. This can be divided into primary and secondary enemies.
What NPCs are used.
More info about this can be found in the People Lists found in ATZ, Haven, and here in I, Zombie (page, 78).
PEFS In earlier THW games we introduced a measure of uncertainty into our games with PEFs or Possible Enemy Forces.
In short, a PEF was a marker on the table that would move randomly until it contacted or was contacted by player characters.
When that occurred the PEF was resolved and it could be anything from a bad case of nerves to a large enemy force. We've decided to take it one step farther. Here's how we use PEFs.
GENERATING PEFS
After terrain is placed on the sectioned table we must generate PEFs before the game can begin.
1. Roll 1d6. This score indicates which numbered section of the table will contain a PEF. Refer to the illustration at the end of this section (page, 57).
2. Place a marker or figure of any type in this section of the table to represent the PEF. If there is a terrain feature in the section that can block LOS from the PEF to sections 7, 8 or 9, place the PEF behind that feature. If no such feature is present then place the PEF in the center of that section.
3. Repeat this process until you have three PEFs placed on the board. It is possible to have more than one PEF in the same section.
4. Now generate the Rep of each PEF. Roll 2d6 for each PEF and take the lowest score as the Rep. Once the PEF is resolved and characters are placed on the table the characters will use their actual Rep.
Example - I roll a 2 and a 5. The Rep for that PEF would be 2. Later the PEF is resolved to be 3 NPC Gangers. I remove the PEF marker and place the three gangers on the table. They have Reps of 4, 4 and 3.
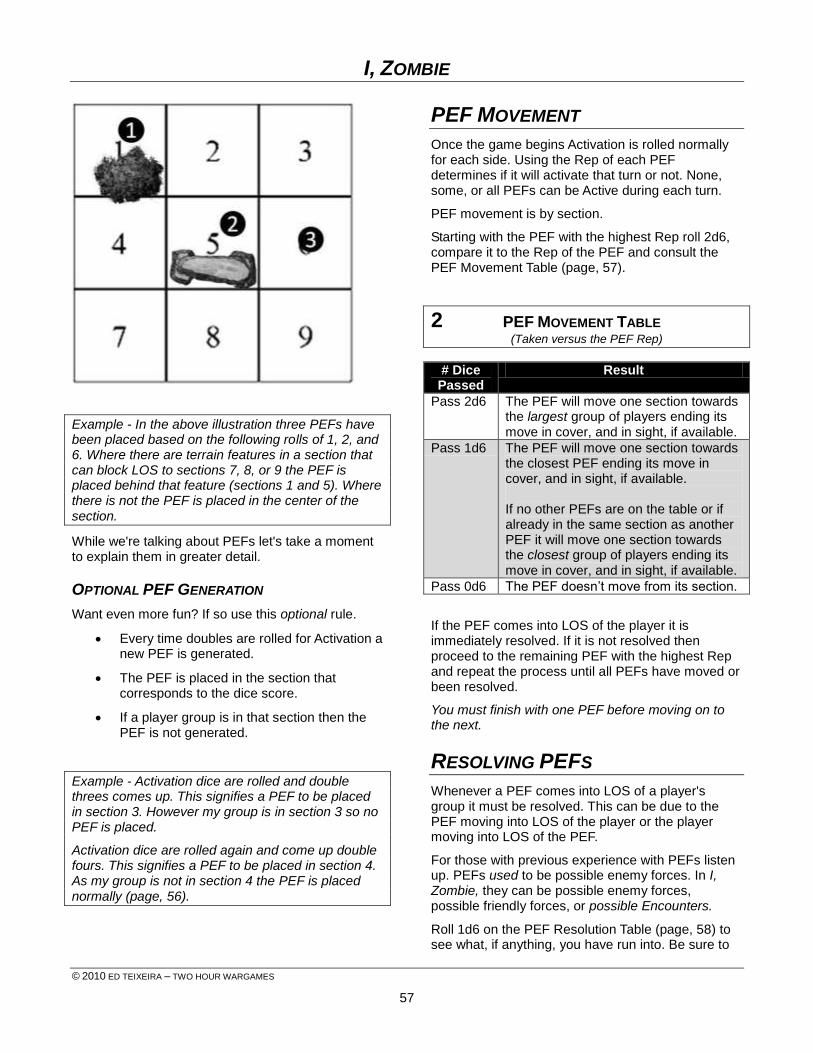
I, ZOMBIE
© 2010 ED TEIXEIRA – TWO HOUR WARGAMES
57
Example - In the above illustration three PEFs have been placed based on the following rolls of 1, 2, and 6. Where there are terrain features in a section that can block LOS to sections 7, 8, or 9 the PEF is placed behind that feature (sections 1 and 5). Where there is not the PEF is placed in the center of the section.
While we're talking about PEFs let's take a moment to explain them in greater detail.
OPTIONAL PEF GENERATION
Want even more fun? If so use this optional rule.
Every time doubles are rolled for Activation a new PEF is generated.
The PEF is placed in the section that corresponds to the dice score.
If a player group is in that section then the PEF is not generated.
Example - Activation dice are rolled and double threes comes up. This signifies a PEF to be placed in section 3. However my group is in section 3 so no PEF is placed.
Activation dice are rolled again and come up double fours. This signifies a PEF to be placed in section 4. As my group is not in section 4 the PEF is placed normally (page, 56).
PEF MOVEMENT
Once the game begins Activation is rolled normally for each side. Using the Rep of each PEF determines if it will activate that turn or not. None, some, or all PEFs can be Active during each turn.
PEF movement is by section.
Starting with the PEF with the highest Rep roll 2d6, compare it to the Rep of the PEF and consult the PEF Movement Table (page, 57).
2 PEF MOVEMENT TABLE (Taken versus the PEF Rep)
# Dice Passed
Result
Pass 2d6 The PEF will move one section towards the largest group of players ending its move in cover, and in sight, if available.
Pass 1d6 The PEF will move one section towards the closest PEF ending its move in cover, and in sight, if available. If no other PEFs are on the table or if already in the same section as another PEF it will move one section towards the closest group of players ending its move in cover, and in sight, if available.
Pass 0d6 The PEF doesn’t move from its section.
If the PEF comes into LOS of the player it is immediately resolved. If it is not resolved then proceed to the remaining PEF with the highest Rep and repeat the process until all PEFs have moved or been resolved.
You must finish with one PEF before moving on to the next.
RESOLVING PEFS
Whenever a PEF comes into LOS of a player's group it must be resolved. This can be due to the PEF moving into LOS of the player or the player moving into LOS of the PEF.
For those with previous experience with PEFs listen up. PEFs used to be possible enemy forces. In I, Zombie, they can be possible enemy forces, possible friendly forces, or possible Encounters.
Roll 1d6 on the PEF Resolution Table (page, 58) to see what, if anything, you have run into. Be sure to
I, ZOMBIE
© 2010 ED TEIXEIRA – TWO HOUR WARGAMES
58
note how many PEFS have previously been resolved and use the corresponding row.
Example – I enter section 5 and have a LOS to a PEF. It is time to resolve the PEF. How many PEFS have I resolved previously? None, so I will use the “0 PEF” row. I roll 1d6 and score a 5. The result is “C”.
1 PEF RESOLUTION TABLE
(Reading the result as it appears)
# of Previously Resolved PEFs:
1 2 3 4 5 6
0 PEF A A B B C D
1 PEF A B C C D D
2 or more PEFS A B C D D D
A: Encounter - You have stumbled into an involuntary Encounter (page, 53).
B: NPC Interaction - You have run into NPCs. Interact with them by using the NPC Interaction Table (page, 117). Note that if you run into Zeds or Ragers they are considered hostile and treat this as a C PEF resolution.
C: Hostile NPCs - You have run into obviously hostile NPCs.
D: False alarm. It was only noise and nothing more.
Once a PEF is resolved it is removed from play.
WHAT HAPPENS NOW?
What happens next depends upon the PEF resolution.
Encounter - If the result was an Encounter go to the Involuntary Encounter Table (page, 71) if in Havasu or another city, and determine what type it is. If this result was rolled, and you are not in Havasu or another city, roll a Random Road Encounter (page, 65).
NPC Interaction - Move the figures normally towards each other when they are Active until they reach 6" and LOS from each other. Both sides roll on the NPC Interaction Table (page, 117). If the NPC group does not join the player group or go hostile it will move to leave the table and will no longer take the NPC Movement & Action Test (page, 121).
Hostile NPCs - When hostile NPCs are contacted the Leaders of each side must take the Encounter Awareness Test (page, 115).
ENCOUNTER AWARENESS TEST
This procedure is only used each time Hostile NPCs are encountered for the first time and does not replace the normal In Sight Test.
Example - I come around a corner and see a group of Hostile NPCs for the first time during the Encounter. We use the Encounter Awareness Test. After an exchange of gunfire I Duck back out of sight.
The NPCs activate and move into my LOS. I now take the In Sight Test.
Later in the Encounter a PEF comes into sight and is resolved as a Hostile NPC group. We take the Encounter Awareness Test. They Duck Back. Later I activate and move into their LOS. They take the In Sight Test.
TAKING THE ENCOUNTER AWARENESS TEST
Here's how you take the test.
The leader of each side starts with 1d6 per point of Rep.
Modify the number of d6 rolled by the circumstances on the Encounter Awareness Test (page, 115).
Each side rolls their d6 and looks for successes.
Compare the number of successes scored, consult the Encounter Awareness Test, and carry out the results.
It should be noted that with this new procedure it is possible that Active as well as Inactive figures will be taking the In Sight Test.
I, ZOMBIE
© 2010 ED TEIXEIRA – TWO HOUR WARGAMES
59
HOW MANY NPCS
You've run into NPCs but now you need to see how many of them there are. Roll 2d6, add the two results and consult the PEF How Many NPCs Table (page, 59).
2 PEF How Many NPCs Table (2d6 added together)
# # NPCs
2 1/2 as many as you
3 - 4 One less than you
5 - 6 Equal number to you
7 - 8 One more than you
9 - 10 1/2 as many more than you
11 Twice as many as you
12 Three times as many as you
WHAT ARE THEY?
What the NPCs are will depend upon where you have met them and what type of Encounter you are in. Random Road Encounters (page, 65) will have your NPC already generated. For other Encounter's we use the NPC Type Table (page, 59) and will require you to roll 1d6.
1 NPC TYPE TABLE
(Reading the result as it appears)
Where You Are 1 2 3 4 5 6
In an urban city G G G R R Z
In a suburban town G G S R Z Z
In a rural town S T T RS RS Z
In an urban area G S R R Z Z
In a suburban area G G S S Z Z
In a rural area G S RS T T Z
G = Gangers (ATZ, page, 9).
R = Ragers (page, 36).
RS = Resident (page, 78).
S = Survivors (ATZ, page, 8).
T = Traveler (page, 79)
Z = Zeds (ATZ, page, 29).
ARE THEY WALKING OR RIDING?
Refer to the section on Walking or Riding (page, 65) to see if the NPCs are on foot or in vehicles.
SPECIAL
INSTRUCTIONS The section on Special Instructions should cover anything that the player needs to know to play the Encounter besides what is already listed. This could be but is not limited to the following info:
The location of enemy forces.
Changes to Zombie generation.
Descriptions of special terrain and their effects on movement.
Time restraints for the Encounter.
How to perform unusual tasks.
What to read or not to read before the Encounter.
Unusual circumstances.
DEPLOYING
CHARACTERS One side will start off the table while the other side will occupy the table either as NPCs or PEFs. We've already shown you how to place the PEFs now let's show you how to place NPCs.
PLACING NPCS
There can be times when NPCs are already determined for the game and must be placed on the table such as in a Raid Encounter. This procedure replaces the one found in ATZ (page, 41). In these cases NPC's are placed as follows:
Roll 1d6 for each NPC and place it in the corresponding numbered section (page, 54).
If the section contains cover, vehicles or buildings roll another 1d6 for each NPC. If the Encounter is taking place in the Daytime add 1 to each result.
I, ZOMBIE
© 2010 ED TEIXEIRA – TWO HOUR WARGAMES
60
o On a score of 1-3 the NPC is inside the cover, vehicle, or building. When there is more than one possible location determine which one to use randomly.
o On a score of 4-6 the NPC is outdoors.
PLACING NPCS INSIDE BUILDINGS
If NPC's are occupying the building they are placed as follows:
Roll 1d6 for each NPC. The score is the section of the building that the NPC is in.
LACKING SLEEP The last step before starting the game is rolling for the player characters to determine if they are lacking in sleep. NPCs are assumed to already have taken this test and their Reps have been adjusted appropriately.
BEGIN THE GAME Now it's time to begin the game. The side that starts off the table enters the table by moving into sections 7, 8, or 9. They can enter into one or more of these sections as desired. This is a free move and happens before any Activation rolls occur.
If this move causes an LOS to one or more PEFs these PEFs must be immediately resolved (page, 58). This could result in more than one PEF being resolved at the same time! If this occurs then the PEF with the higher Rep is resolved first. After this occurs the next PEF is resolved. This could occur with the LOS that caused it no longer existing.
Example - I enter section 7 and have LOS to two PEFs. The higher Rep PEF is resolved first. It is a hostile Rep 5 Ganger. We immediately take the Encounter Awareness Test (page, 115). He fires first and this causes me to Duck Back behind a building. I no longer have an LOS to the unresolved PEF but it still must be resolved. It is resolved and it is two more hostile Gangers.
In reality I stepped into view and saw three Gangers. One fired at me first and caused be to Duck back before the other two could react.
Once the free move is finished and all necessary PEF resolution, reactions, and Zombies generation are done the game can begin.
Now that you have how to set up your Encounters let's introduce you to a new one.
HUNTING Here's a new Encounter to add to your ATZ games. It's called Hunting.
One of the benefits of playing in a rural area is the possibility of unlimited food supplies being available. It's called Hunting. Food acquired in this manner does not reduce the quantities available in the area where the Encounters takes place (ATZ, pages, 53 & 54). Here's how to hunt.
HUNTING LIMITATION
Characters count each Hunting Encounter as a Voluntary Encounter and against their monthly Encounter total. But there is a way around this. Just have your hunters go out alone.
ARE YOU A HUNTER?
Is your character an experienced hunter? You can choose to take Hunting as an Attribute (ATZ, page, 6) or roll 2d6 on the Hunter Table instead. Note that the Hunting Attribute is more about tracking and stalking and less about shooting.
2 HUNTER TABLE (Adding the scores together)
"Y" means the figure is a Hunter "N" means the figure is not a Hunter
CIRCUMSTANCE MOD
If the character was originally from a rural area
+2
If the character was originally from an urban area
-2
# Survivor Military Ganger Civilian
2 to 7 N N N N
8 Y Y N N
9 Y Y N N
10 Y Y N Y
11+ Y Y Y Y
I, ZOMBIE
© 2010 ED TEIXEIRA – TWO HOUR WARGAMES
61
WHAT'S OUT THERE
It would be impossible to tailor hunting to every area of the world and to every possibility. So instead we've Hunting very generic and allow you to fill in the blanks.
To see what's available to hunt simple roll 2d6, add the results together, and check the Available Game Table (page, 61). This may result in there being more than one type available. Players may choose which type to track.
2 AVAILABLE GAME TABLE (Adding the scores together)
A result of "Y" means that type of game available
A result of "N" means that type of game is not available
CIRCUMSTANCE MOD
If hunting in the mountains +2
If hunting in the woods +1
# Small Feeder
Large Feeder
Medium Ferocious
Large Ferocious
2 N N N N
3 N N N N
4 N N N N
5 Y N N N
6 Y N N N
7 Y N N N
8 Y Y N N
9 Y Y Y N
10 Y Y Y N
11 N Y Y Y
12+ N N Y Y
EXPLAINING THE AVAILABLE GAME
Here's a description of each type of game. If needed Feeder animals will use the Civilian QRS (ATZ) Reaction Tests while Ferocious will use the Military QRS (ATZ).
Small Feeder - This represents small timid animals such as rabbits, birds, etc. Small Feeders are Rep 2. Each four Small Feeders will count as one Food Unit (ATZ, page, 54).
Large Feeder - This represents herd animals such as deer. Large Feeders are Rep 3. Each Large Feeder animal counts as four Food Units (ATZ, page, 54).
Medium Ferocious - This represents aggressive animals such as wolves, javelinas, cougars, etc.
Medium Ferocious are Rep 4. Each Medium Ferocious animal counts as two Food Units (ATZ, page, 54).
Large Ferocious - This represents an aggressive animal such as a bear. Large Ferocious are Rep 6. Each Large Ferocious animal counts as six Food units (ATZ, page, 54).
Note that the number of Food units isn’t based totally upon the size of the animal and takes into account the difficulty of keeping the meat from spoiling.
TRACKING THE PREY
Once you have determined what game is available it's time to actually hunt it. Here's how it's done:
The leader of the Hunting party starts with 1d6 per point of Rep.
The prey starts with 1d6 per point of Rep.
Modify the number of d6 rolled by the modifiers on the Tracking Table (page, 62).
Each side rolls their d6 and looks for successes (a score of 1, 2, or 3).
Compare the number of successes scored, consult the Tracking Table, and carry out the results.
I, ZOMBIE
© 2010 ED TEIXEIRA – TWO HOUR WARGAMES
62
REP TRACKING TABLE (Looking for successes)
A score of 1, 2, or 3 is a success A score of 4, 5, or 6 is a failure.
CIRCUMSTANCE MOD
If the character has the Hunting Attribute +1
# OF
SUCCESSES
SCORED
HUNTER PREY
2+ or more Hunter has closed to 12" of the prey. Take In Sight Test (ATZ, page, 12).
Ferocious prey has ambushed the hunter. Go to Animal Ambush Table (page, 62). Feeder prey has disappeared. No game shot on this Encounter.
1 more Hunter has closed to 12" of the prey. Prey sees hunter and attempts to flee. Hunter takes In Sight Test (ATZ, page, 12) using only 1d6. If cannot shoot the prey escapes. No game shot on this Encounter.
Hunter has lost the trail. No game shot on this Encounter.
Same number
Hunter finds tracks of prey and can follow. Roll on Tracking Table again.
Hunter finds tracks of prey and can follow. Roll on Tracking Table again.
REP ANIMAL AMBUSH TABLE (Looking for successes)
A score of 1, 2, or 3 is a success A score of 4, 5, or 6 is a failure. If more than one hunter the target is determined randomly.
# OF
SUCCESSES
SCORED
HUNTER PREY
1+ or more Prey has closed to 6" of the hunter and charges. Hunter takes Being Charged Test (ATZ, page, 13). If fight a melee the prey counts a +1d6 for higher Impact weapon and +2d6 for being ferocious.
Prey charges into hunter with neither side taking any Reaction Tests. Immediately fight melee with the prey counting a +1d6 for higher Impact weapon and +2d6 for being ferocious.
Same number
Prey has closed to 6" of the hunter and charges. Hunter takes Being Charged Test (ATZ, page, 13) using 1d6. If fight a melee the prey counts a +1d6 for higher Impact weapon and +2d6 for being ferocious.
Prey has closed to 6" of the hunter and charges. Hunter takes Being Charged Test (ATZ, page, 13) using 1d6. If fight a melee the prey counts a +1d6 for higher Impact weapon and +2d6 for being ferocious.
UNFORESEEN CIRCUMSTANCES
When you choose a Hunting Encounter there is a chance of unforeseen circumstances occurring. To simulate this at the start of the Encounter roll 2d6 and if double sixes or "box cars" come up you have had a Random Event.
Next roll 2d6, add the results together, and consult the Hunting Random Events Table
I, ZOMBIE
© 2010 ED TEIXEIRA – TWO HOUR WARGAMES
63
2 HUNTING RANDOM EVENTS TABLE (2d6 added together)
# STARS GRUNTS 2
Hunt failed. No game shot on this Encounter.
Never heard from again.
3
Hunt failed. No game shot on this Encounter.
Hunt failed. No game shot on this Encounter.
4
Random Road Encounter (page, 65).
Hunt failed. No game shot on this Encounter.
5
Random Road Encounter (page, 65).
Captured by Residents from Havasu (page, 78) or other humans if not using Havasu.
6
Medium (1-4) or Large Ferocious (5-6) ambushes you on the trail! Go to Animal Ambush Table (page, 62).
Injured on the trail. Come back to camp without a weapon and Rep reduced by 1 level.
7
Random Road Encounter (page, 65).
Never heard from again.
8
Random Road Encounter (page, 54).
Hunt failed. No game shot on this Encounter.
9
Find remains of another human. Roll 1/2d6 times on the Resource List (page, 71) and continue to hunt.
Hunt failed. No game shot on this Encounter.
10
Find a back pack filled with Resources. Roll 3 + 1/2d6 times the on Resource List (page, 71) and continue to hunt.
Hunt failed. No game shot on this Encounter.
11
Injured on the trail. Stumble back into camp and pass out OOF. Must take Recovery Test (ATZ, page, 23).
Hunt failed. No game shot on this Encounter.
12
Injured on the trail. Stumble back into camp and pass out OOF. Must take Recovery Test (ATZ, page, 23).
Hunt failed. No game shot on this Encounter.
ATTRACTING ZOMBIES
When hunting, remember that shooting can still attract Zombies.
THE CAMPAIGN In this section we provide you with a full blown Campaign complete with an area to play and populated with NPCs and creatures.
CHARACTER JOURNAL We've provided you with an easy to use Character Journal to track the progress of your Star and his group. On it you'll find places to note all the specifics of your Star and space to write down your adventures. You'll find the Character Journal on page, 111.
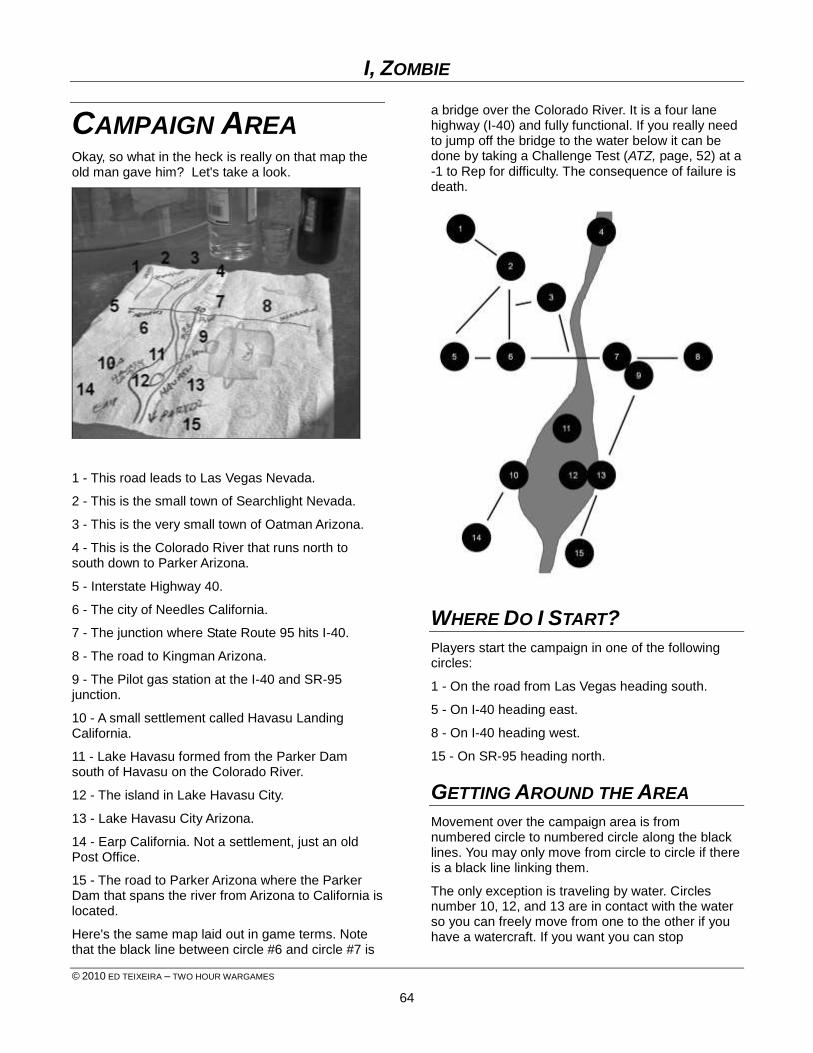
I, ZOMBIE
© 2010 ED TEIXEIRA – TWO HOUR WARGAMES
64
CAMPAIGN AREA Okay, so what in the heck is really on that map the old man gave him? Let's take a look.
1 - This road leads to Las Vegas Nevada.
2 - This is the small town of Searchlight Nevada.
3 - This is the very small town of Oatman Arizona.
4 - This is the Colorado River that runs north to south down to Parker Arizona.
5 - Interstate Highway 40.
6 - The city of Needles California.
7 - The junction where State Route 95 hits I-40.
8 - The road to Kingman Arizona.
9 - The Pilot gas station at the I-40 and SR-95 junction.
10 - A small settlement called Havasu Landing California.
11 - Lake Havasu formed from the Parker Dam south of Havasu on the Colorado River.
12 - The island in Lake Havasu City.
13 - Lake Havasu City Arizona.
14 - Earp California. Not a settlement, just an old Post Office.
15 - The road to Parker Arizona where the Parker Dam that spans the river from Arizona to California is located.
Here's the same map laid out in game terms. Note that the black line between circle #6 and circle #7 is
a bridge over the Colorado River. It is a four lane highway (I-40) and fully functional. If you really need to jump off the bridge to the water below it can be done by taking a Challenge Test (ATZ, page, 52) at a -1 to Rep for difficulty. The consequence of failure is death.
WHERE DO I START?
Players start the campaign in one of the following circles:
1 - On the road from Las Vegas heading south.
5 - On I-40 heading east.
8 - On I-40 heading west.
15 - On SR-95 heading north.
GETTING AROUND THE AREA
Movement over the campaign area is from numbered circle to numbered circle along the black lines. You may only move from circle to circle if there is a black line linking them.
The only exception is traveling by water. Circles number 10, 12, and 13 are in contact with the water so you can freely move from one to the other if you have a watercraft. If you want you can stop
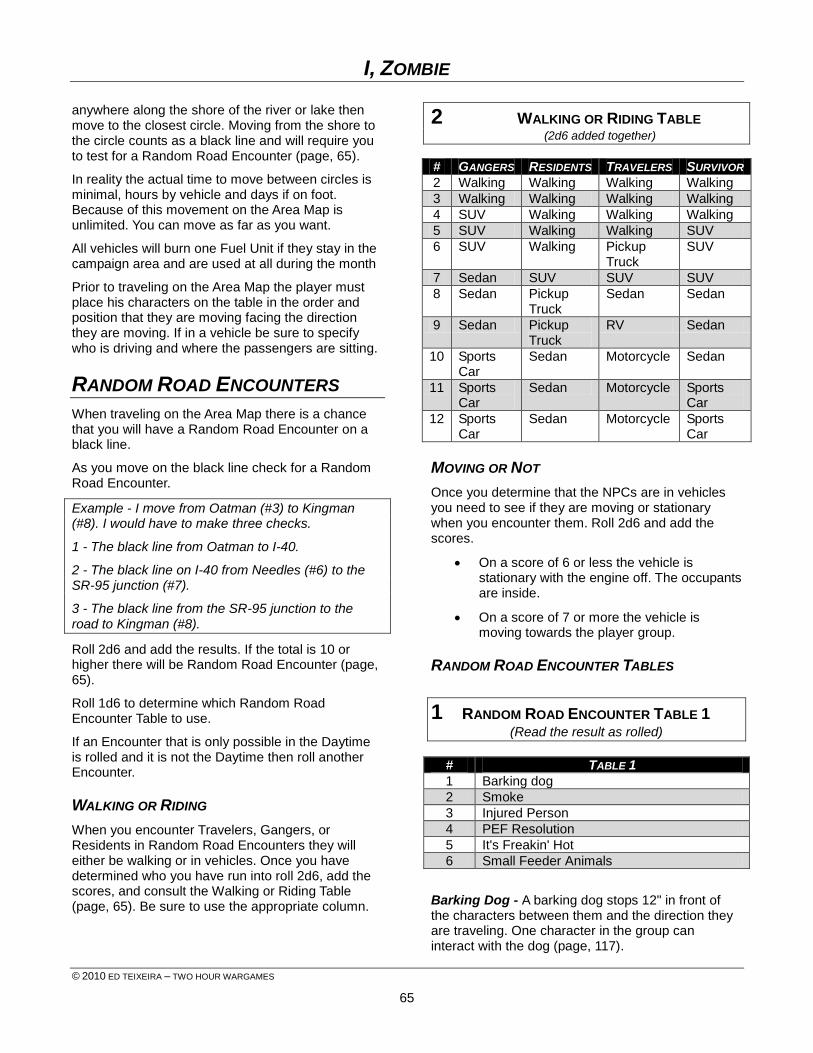
I, ZOMBIE
© 2010 ED TEIXEIRA – TWO HOUR WARGAMES
65
anywhere along the shore of the river or lake then move to the closest circle. Moving from the shore to the circle counts as a black line and will require you to test for a Random Road Encounter (page, 65).
In reality the actual time to move between circles is minimal, hours by vehicle and days if on foot. Because of this movement on the Area Map is unlimited. You can move as far as you want.
All vehicles will burn one Fuel Unit if they stay in the campaign area and are used at all during the month
Prior to traveling on the Area Map the player must place his characters on the table in the order and position that they are moving facing the direction they are moving. If in a vehicle be sure to specify who is driving and where the passengers are sitting.
RANDOM ROAD ENCOUNTERS
When traveling on the Area Map there is a chance that you will have a Random Road Encounter on a black line.
As you move on the black line check for a Random Road Encounter.
Example - I move from Oatman (#3) to Kingman (#8). I would have to make three checks.
1 - The black line from Oatman to I-40.
2 - The black line on I-40 from Needles (#6) to the SR-95 junction (#7).
3 - The black line from the SR-95 junction to the road to Kingman (#8).
Roll 2d6 and add the results. If the total is 10 or higher there will be Random Road Encounter (page, 65).
Roll 1d6 to determine which Random Road Encounter Table to use.
If an Encounter that is only possible in the Daytime is rolled and it is not the Daytime then roll another Encounter.
WALKING OR RIDING
When you encounter Travelers, Gangers, or Residents in Random Road Encounters they will either be walking or in vehicles. Once you have determined who you have run into roll 2d6, add the scores, and consult the Walking or Riding Table (page, 65). Be sure to use the appropriate column.
2 WALKING OR RIDING TABLE (2d6 added together)
# GANGERS RESIDENTS TRAVELERS SURVIVOR
2 Walking Walking Walking Walking
3 Walking Walking Walking Walking
4 SUV Walking Walking Walking
5 SUV Walking Walking SUV
6 SUV Walking Pickup Truck
SUV
7 Sedan SUV SUV SUV
8 Sedan Pickup Truck
Sedan Sedan
9 Sedan Pickup Truck
RV Sedan
10 Sports Car
Sedan Motorcycle Sedan
11 Sports Car
Sedan Motorcycle Sports Car
12 Sports Car
Sedan Motorcycle Sports Car
MOVING OR NOT
Once you determine that the NPCs are in vehicles you need to see if they are moving or stationary when you encounter them. Roll 2d6 and add the scores.
On a score of 6 or less the vehicle is stationary with the engine off. The occupants are inside.
On a score of 7 or more the vehicle is moving towards the player group.
RANDOM ROAD ENCOUNTER TABLES
1 RANDOM ROAD ENCOUNTER TABLE 1 (Read the result as rolled)
# TABLE 1
1 Barking dog
2 Smoke
3 Injured Person
4 PEF Resolution
5 It's Freakin' Hot
6 Small Feeder Animals
Barking Dog - A barking dog stops 12" in front of the characters between them and the direction they are traveling. One character in the group can interact with the dog (page, 117).
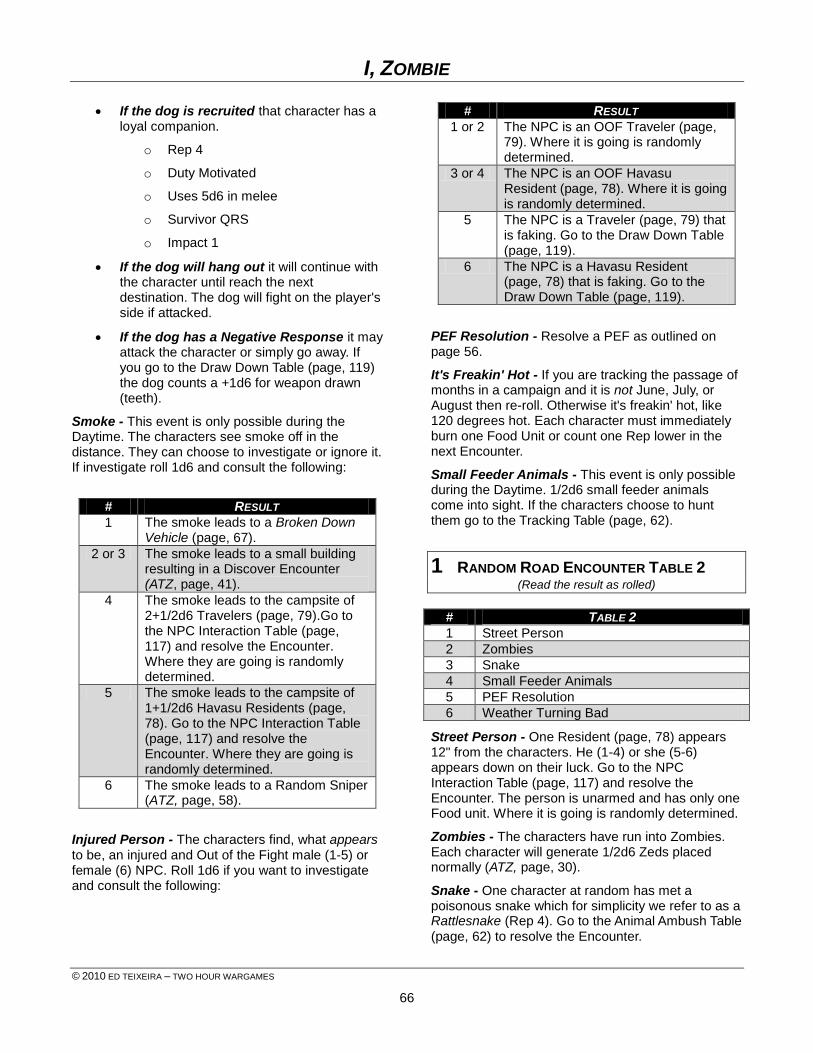
I, ZOMBIE
© 2010 ED TEIXEIRA – TWO HOUR WARGAMES
66
If the dog is recruited that character has a loyal companion.
o Rep 4
o Duty Motivated
o Uses 5d6 in melee
o Survivor QRS
o Impact 1
If the dog will hang out it will continue with the character until reach the next destination. The dog will fight on the player's side if attacked.
If the dog has a Negative Response it may attack the character or simply go away. If you go to the Draw Down Table (page, 119) the dog counts a +1d6 for weapon drawn (teeth).
Smoke - This event is only possible during the Daytime. The characters see smoke off in the distance. They can choose to investigate or ignore it. If investigate roll 1d6 and consult the following:
# RESULT
1 The smoke leads to a Broken Down Vehicle (page, 67).
2 or 3 The smoke leads to a small building resulting in a Discover Encounter (ATZ, page, 41).
4 The smoke leads to the campsite of 2+1/2d6 Travelers (page, 79).Go to the NPC Interaction Table (page, 117) and resolve the Encounter. Where they are going is randomly determined.
5 The smoke leads to the campsite of 1+1/2d6 Havasu Residents (page, 78). Go to the NPC Interaction Table (page, 117) and resolve the Encounter. Where they are going is randomly determined.
6 The smoke leads to a Random Sniper (ATZ, page, 58).
Injured Person - The characters find, what appears to be, an injured and Out of the Fight male (1-5) or female (6) NPC. Roll 1d6 if you want to investigate and consult the following:
# RESULT
1 or 2 The NPC is an OOF Traveler (page, 79). Where it is going is randomly determined.
3 or 4 The NPC is an OOF Havasu Resident (page, 78). Where it is going is randomly determined.
5 The NPC is a Traveler (page, 79) that is faking. Go to the Draw Down Table (page, 119).
6 The NPC is a Havasu Resident (page, 78) that is faking. Go to the Draw Down Table (page, 119).
PEF Resolution - Resolve a PEF as outlined on page 56.
It's Freakin' Hot - If you are tracking the passage of months in a campaign and it is not June, July, or August then re-roll. Otherwise it's freakin' hot, like 120 degrees hot. Each character must immediately burn one Food Unit or count one Rep lower in the next Encounter.
Small Feeder Animals - This event is only possible during the Daytime. 1/2d6 small feeder animals come into sight. If the characters choose to hunt them go to the Tracking Table (page, 62).
1 RANDOM ROAD ENCOUNTER TABLE 2 (Read the result as rolled)
# TABLE 2
1 Street Person
2 Zombies
3 Snake
4 Small Feeder Animals
5 PEF Resolution
6 Weather Turning Bad
Street Person - One Resident (page, 78) appears 12" from the characters. He (1-4) or she (5-6) appears down on their luck. Go to the NPC Interaction Table (page, 117) and resolve the Encounter. The person is unarmed and has only one Food unit. Where it is going is randomly determined.
Zombies - The characters have run into Zombies. Each character will generate 1/2d6 Zeds placed normally (ATZ, page, 30).
Snake - One character at random has met a poisonous snake which for simplicity we refer to as a Rattlesnake (Rep 4). Go to the Animal Ambush Table (page, 62) to resolve the Encounter.

I, ZOMBIE
© 2010 ED TEIXEIRA – TWO HOUR WARGAMES
67
If a character is bitten immediately take the Recover From Knocked Down Test. If it scores a result of stunned then it has either self-applied or someone else has applied enough first aid for the character to recover.
If it scores an Out of Fight result then the character must take the Recovery Test (ATZ, page, 23).
Small Feeder Animals - This event is only possible during the Daytime. 1/2d6 small feeder animals come into sight. If the characters choose to hunt them go to the Tracking Table (page, 62).
PEF Resolution - Resolve a PEF as outlined on page 57.
Weather Turning Bad - The weather is turning bad. A sudden storm rolls in resulting in a heavy downpour reducing visibility to 12” during the day and 6” in the night. There is a chance of thunder and lightning (1-4). All fires are extinguished. Immediately roll another Random Road Encounter and resolve it during the storm.
1 RANDOM ROAD ENCOUNTER TABLE 3 (Read the result as rolled)
# TABLE 3
1 Lost Children
2 Broken Down Vehicle
3 PEF Resolution
4 Vultures
5 Residents
6 Javelina
Lost Children - The characters have run into 1/2d6 children. They are of varying ages and Reps that may (1-4) or may not (5-6) be siblings. If siblings they will scream if they are ever separated by a distance of 2” or more or if they cannot see each other. Their screaming counts as if 3 shots for attracting Zombies.
Lost Children
# TYPE REP
2 or 3 Big kid 3
4 to 6 Littler one 3
7 to 12 Small child 2
Big kids functions like a normal Survivor.
Littler ones will move 2” slower than normal. Will scream if see Zombies within 12” counting as if 3 shots for attracting more until Rallied (ATZ, page, 13).
Small children will move 3” slower than normal. Will scream if see Zombies within 12” counting as if 3 shots for attracting more. Continues screaming until cannot see any Zombies that are still alive.
Broken Down Vehicle - The characters have found a broken down vehicle that may (1-2) or may not be repaired (3-6). See Looting the Landscape (page, 70) and Breakage (page, 35).
PEF Resolution - Resolve a PEF as outlined on page 57.
Vultures - This event is only possible during the Daytime. The characters see vulture circling off in the distance. They can choose to investigate or ignore it. If investigate roll 1d6 and consult the following:
# RESULT
1 or 2 The vultures lead to an Injured Person (page, 66).
3 The vultures lead to a Broken Vehicle with 1/2d6 occupants treated like Injured People (page, 66).
4 The vultures lead to a Javelina (page, 67).
5 The vultures lead to a gutted Javelina being munched on by a pack of Feral Dogs (page, 69).
6 The smoke leads to an injured Street Person (page, 66).
Residents - 2+1/2d6 Residents (page, 78) appear 12" from the characters. Go to the NPC Interaction Table (page, 117) and resolve the Encounter. Where they are going is randomly determined.
Javelina - The javelina is a large (40-80 pounds) boar-like beast found in the US southwest. It is not usually aggressive but will be if contacted by the player. Luckily this is a dead Javelina. There are two puncture wounds on its throat and there is no blood visible anywhere nor is there any sign of struggle.
1 RANDOM ROAD ENCOUNTER TABLE 4 (Read the result as rolled)
# TABLE 4
1 Broken Weapon
2 It's Worm. A BA Worm!
3 Out of Gas
4 Horse
5 Car Trouble
6 Black Chopper
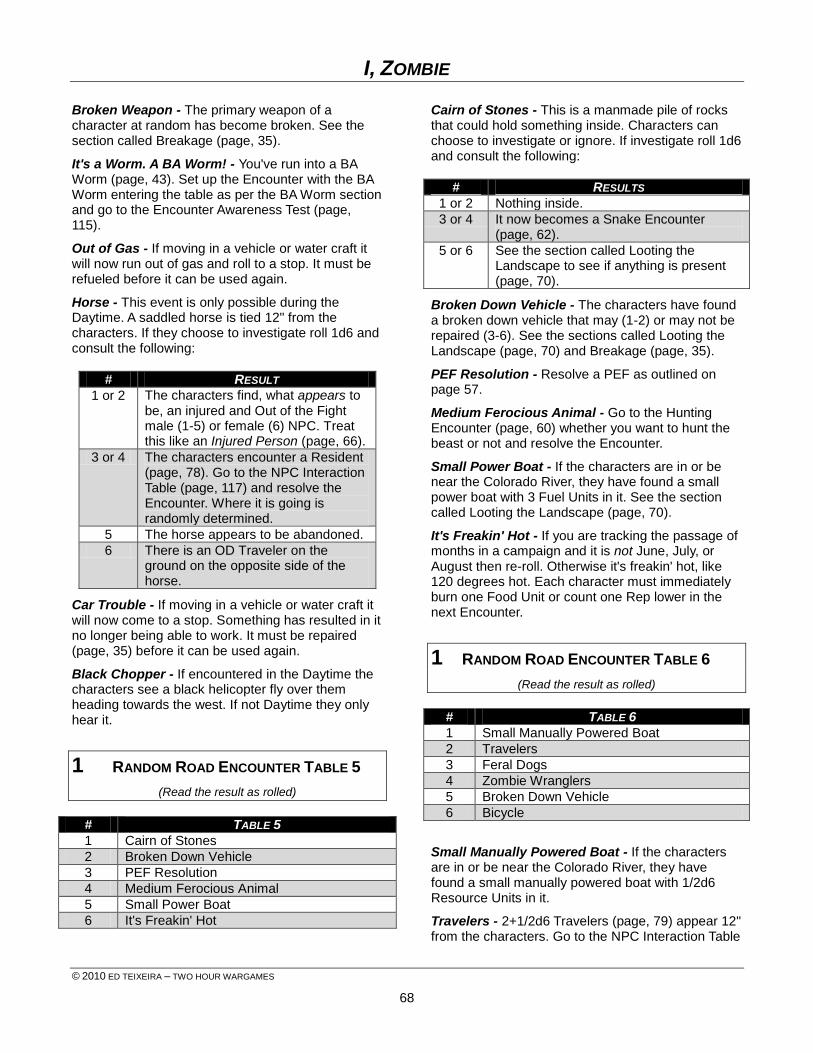
I, ZOMBIE
© 2010 ED TEIXEIRA – TWO HOUR WARGAMES
68
Broken Weapon - The primary weapon of a character at random has become broken. See the section called Breakage (page, 35).
It's a Worm. A BA Worm! - You've run into a BA Worm (page, 43). Set up the Encounter with the BA Worm entering the table as per the BA Worm section and go to the Encounter Awareness Test (page, 115).
Out of Gas - If moving in a vehicle or water craft it will now run out of gas and roll to a stop. It must be refueled before it can be used again.
Horse - This event is only possible during the Daytime. A saddled horse is tied 12" from the characters. If they choose to investigate roll 1d6 and consult the following:
# RESULT
1 or 2 The characters find, what appears to be, an injured and Out of the Fight male (1-5) or female (6) NPC. Treat this like an Injured Person (page, 66).
3 or 4 The characters encounter a Resident (page, 78). Go to the NPC Interaction Table (page, 117) and resolve the Encounter. Where it is going is randomly determined.
5 The horse appears to be abandoned.
6 There is an OD Traveler on the ground on the opposite side of the horse.
Car Trouble - If moving in a vehicle or water craft it will now come to a stop. Something has resulted in it no longer being able to work. It must be repaired (page, 35) before it can be used again.
Black Chopper - If encountered in the Daytime the characters see a black helicopter fly over them heading towards the west. If not Daytime they only hear it.
1 RANDOM ROAD ENCOUNTER TABLE 5
(Read the result as rolled)
# TABLE 5
1 Cairn of Stones
2 Broken Down Vehicle
3 PEF Resolution
4 Medium Ferocious Animal
5 Small Power Boat
6 It's Freakin' Hot
Cairn of Stones - This is a manmade pile of rocks that could hold something inside. Characters can choose to investigate or ignore. If investigate roll 1d6 and consult the following:
# RESULTS
1 or 2 Nothing inside.
3 or 4 It now becomes a Snake Encounter (page, 62).
5 or 6 See the section called Looting the Landscape to see if anything is present (page, 70).
Broken Down Vehicle - The characters have found a broken down vehicle that may (1-2) or may not be repaired (3-6). See the sections called Looting the Landscape (page, 70) and Breakage (page, 35).
PEF Resolution - Resolve a PEF as outlined on page 57.
Medium Ferocious Animal - Go to the Hunting Encounter (page, 60) whether you want to hunt the beast or not and resolve the Encounter.
Small Power Boat - If the characters are in or be near the Colorado River, they have found a small power boat with 3 Fuel Units in it. See the section called Looting the Landscape (page, 70).
It's Freakin' Hot - If you are tracking the passage of months in a campaign and it is not June, July, or August then re-roll. Otherwise it's freakin' hot, like 120 degrees hot. Each character must immediately burn one Food Unit or count one Rep lower in the next Encounter.
1 RANDOM ROAD ENCOUNTER TABLE 6
(Read the result as rolled)
# TABLE 6
1 Small Manually Powered Boat
2 Travelers
3 Feral Dogs
4 Zombie Wranglers
5 Broken Down Vehicle
6 Bicycle
Small Manually Powered Boat - If the characters are in or be near the Colorado River, they have found a small manually powered boat with 1/2d6 Resource Units in it.
Travelers - 2+1/2d6 Travelers (page, 79) appear 12" from the characters. Go to the NPC Interaction Table
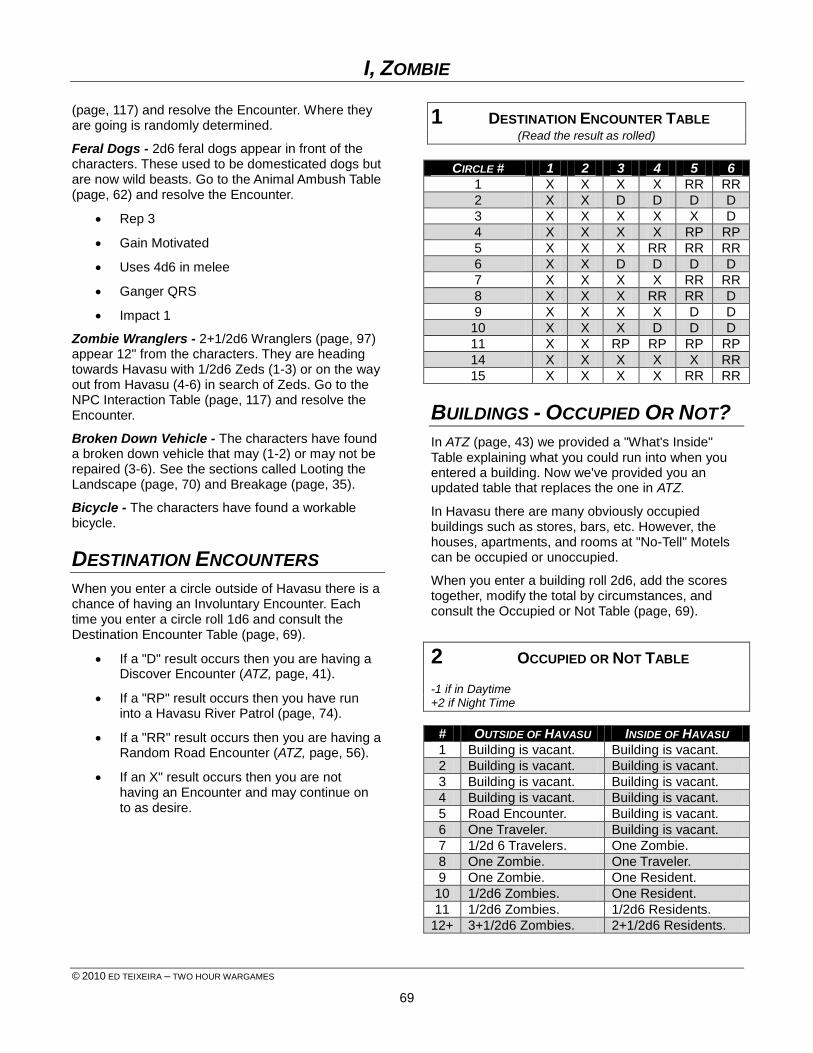
I, ZOMBIE
© 2010 ED TEIXEIRA – TWO HOUR WARGAMES
69
(page, 117) and resolve the Encounter. Where they are going is randomly determined.
Feral Dogs - 2d6 feral dogs appear in front of the characters. These used to be domesticated dogs but are now wild beasts. Go to the Animal Ambush Table (page, 62) and resolve the Encounter.
Rep 3
Gain Motivated
Uses 4d6 in melee
Ganger QRS
Impact 1
Zombie Wranglers - 2+1/2d6 Wranglers (page, 97) appear 12" from the characters. They are heading towards Havasu with 1/2d6 Zeds (1-3) or on the way out from Havasu (4-6) in search of Zeds. Go to the NPC Interaction Table (page, 117) and resolve the Encounter.
Broken Down Vehicle - The characters have found a broken down vehicle that may (1-2) or may not be repaired (3-6). See the sections called Looting the Landscape (page, 70) and Breakage (page, 35).
Bicycle - The characters have found a workable bicycle.
DESTINATION ENCOUNTERS
When you enter a circle outside of Havasu there is a chance of having an Involuntary Encounter. Each time you enter a circle roll 1d6 and consult the Destination Encounter Table (page, 69).
If a "D" result occurs then you are having a Discover Encounter (ATZ, page, 41).
If a "RP" result occurs then you have run into a Havasu River Patrol (page, 74).
If a "RR" result occurs then you are having a Random Road Encounter (ATZ, page, 56).
If an X" result occurs then you are not having an Encounter and may continue on to as desire.
1 DESTINATION ENCOUNTER TABLE (Read the result as rolled)
CIRCLE # 1 2 3 4 5 6
1 X X X X RR RR
2 X X D D D D
3 X X X X X D
4 X X X X RP RP
5 X X X RR RR RR
6 X X D D D D
7 X X X X RR RR
8 X X X RR RR D
9 X X X X D D
10 X X X D D D
11 X X RP RP RP RP
14 X X X X X RR
15 X X X X RR RR
BUILDINGS - OCCUPIED OR NOT?
In ATZ (page, 43) we provided a "What's Inside" Table explaining what you could run into when you entered a building. Now we've provided you an updated table that replaces the one in ATZ.
In Havasu there are many obviously occupied buildings such as stores, bars, etc. However, the houses, apartments, and rooms at "No-Tell" Motels can be occupied or unoccupied.
When you enter a building roll 2d6, add the scores together, modify the total by circumstances, and consult the Occupied or Not Table (page, 69).
2 OCCUPIED OR NOT TABLE -1 if in Daytime +2 if Night Time
# OUTSIDE OF HAVASU INSIDE OF HAVASU
1 Building is vacant. Building is vacant.
2 Building is vacant. Building is vacant.
3 Building is vacant. Building is vacant.
4 Building is vacant. Building is vacant.
5 Road Encounter. Building is vacant.
6 One Traveler. Building is vacant.
7 1/2d 6 Travelers. One Zombie.
8 One Zombie. One Traveler.
9 One Zombie. One Resident.
10 1/2d6 Zombies. One Resident.
11 1/2d6 Zombies. 1/2d6 Residents.
12+ 3+1/2d6 Zombies. 2+1/2d6 Residents.
I, ZOMBIE
© 2010 ED TEIXEIRA – TWO HOUR WARGAMES
70
Building is vacant – The building is unoccupied. There may be resources that you can search for on your next turn of activation. Roll once on the Resource List (page, 71).
Road Encounter - Before entering the building you have a Random Road Encounter (page, 65). You can still enter the building before or after the Random Road Encounter is resolved.
One Traveler – You have run into one Traveler (page, 79).
1/2d6 Travelers - You have run into 1/2d6 Travelers (page, 79).
One Resident - You have run into one Resident (page, 78).
1/2d6 Residents - You have run into 1/2d6 Residents (page, 78).
2+1/2d6 Residents - You have run into 2 + 1/2d6 Residents (page, 78).
One Zombie - You have run into one Zombie. Take the Surprise Test (ATZ, page, 44). There may be resources that you can search for on the activation turn after you dispatch the Zed. Roll once on the Resource List (page, 71).
1/2d6 Zombies - You have run into 1/2d6 Zombies. Take the Surprise Test (ATZ, page, 44). There may be resources that you can search for on the activation turn after you dispatch the Zed. Roll once on the Resource List (page, 71) for each Zed you found.
3 + 1/2d6 Zombies - You have run into 3 + 1/2d6 Zombies. Take the Surprise Test (ATZ, page, 44). There may be resources that you can search for on the activation turn after you dispatch the Zed. Roll once on the Resource List (page, 71) for each Zed you found.
PLACING OCCUPANTS
Once you have determined that the building is occupied and who the occupants are place them as outlined in the section Placing NPCs in Buildings (page, 19).
If you choose to knock on the door (page, 70) there will always be at least one NPC in the section containing the appropriate door.
KNOCK, KNOCK, WHO'S THERE?
Before entering a building you can knock or not.
If you knock before entering any occupants will answer the door and let you know that they live there. Go to the NPC Interaction Table (page, 117) to see what happens next.
If you don’t knock before entering any occupants will probably shoot you to let you know that they live there. To represent this the first time you enter the same section as an occupant roll on the Encounter Awareness Table (page, 115).
LOOTING THE LANDSCAPE
There may come a time when you have an opportunity to find Resource Units from an unexpected source, other humans. Here's how to determine if that person had any items that can be recovered from them. Use the same Resource List (page, 71) when determining if you found items lying by the roadside or not similarly connected to humans.
You can always take whatever you have seen the character use.
You can take any visible weapons the character has.
Next roll 1d6, add it to the Rep of the character that you are recovering items from or "3" if the Rep cannot be determined such as in a building, and consult the Recovered Items Table (page, 70).
1 RECOVERED ITEMS TABLE (Add the score to Rep or "3" if a building)
# RESULT
6 or less No additional resources
7 - 8 Roll once on Resource List
9 Roll twice on Resource List
10 Roll three times on Resource List
11 or more Roll four times on Resource List
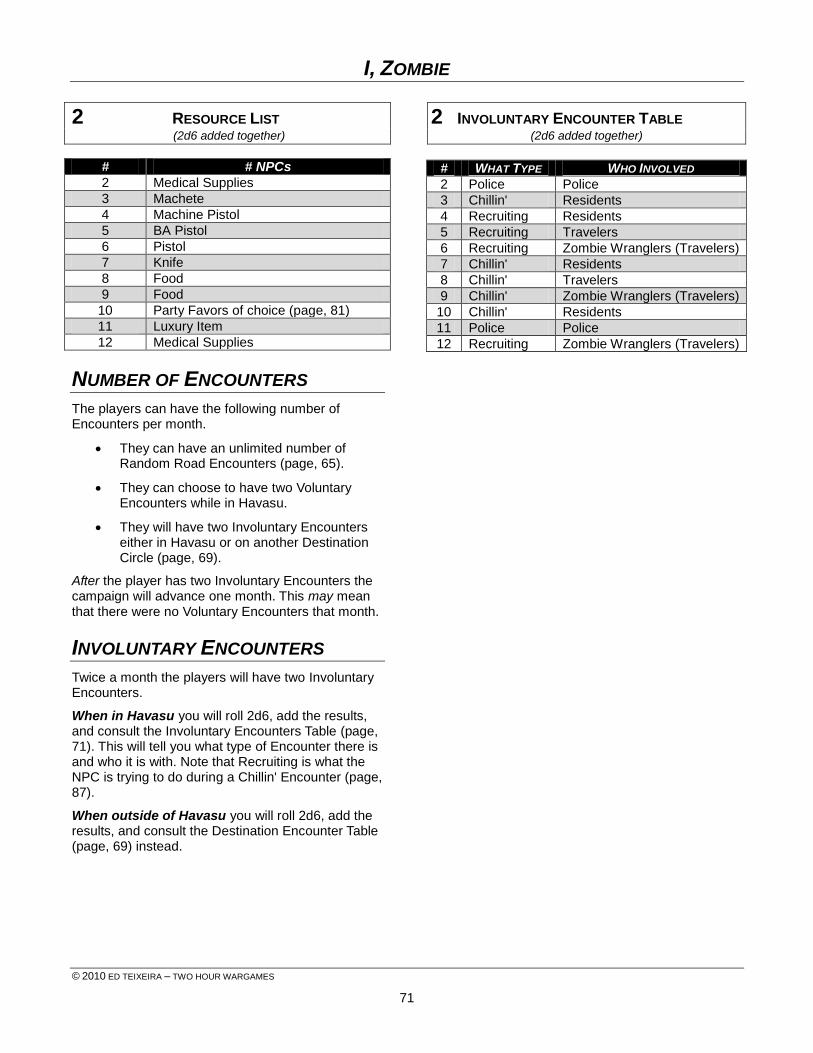
I, ZOMBIE
© 2010 ED TEIXEIRA – TWO HOUR WARGAMES
71
2 RESOURCE LIST (2d6 added together)
# # NPCs
2 Medical Supplies
3 Machete
4 Machine Pistol
5 BA Pistol
6 Pistol
7 Knife
8 Food
9 Food
10 Party Favors of choice (page, 81)
11 Luxury Item
12 Medical Supplies
NUMBER OF ENCOUNTERS
The players can have the following number of Encounters per month.
They can have an unlimited number of Random Road Encounters (page, 65).
They can choose to have two Voluntary Encounters while in Havasu.
They will have two Involuntary Encounters either in Havasu or on another Destination Circle (page, 69).
After the player has two Involuntary Encounters the campaign will advance one month. This may mean that there were no Voluntary Encounters that month.
INVOLUNTARY ENCOUNTERS
Twice a month the players will have two Involuntary Encounters.
When in Havasu you will roll 2d6, add the results, and consult the Involuntary Encounters Table (page, 71). This will tell you what type of Encounter there is and who it is with. Note that Recruiting is what the NPC is trying to do during a Chillin' Encounter (page, 87).
When outside of Havasu you will roll 2d6, add the results, and consult the Destination Encounter Table (page, 69) instead.
2 INVOLUNTARY ENCOUNTER TABLE (2d6 added together)
# WHAT TYPE WHO INVOLVED
2 Police Police
3 Chillin' Residents
4 Recruiting Residents
5 Recruiting Travelers
6 Recruiting Zombie Wranglers (Travelers)
7 Chillin' Residents
8 Chillin' Travelers
9 Chillin' Zombie Wranglers (Travelers)
10 Chillin' Residents
11 Police Police
12 Recruiting Zombie Wranglers (Travelers)

I, ZOMBIE
© 2010 ED TEIXEIRA – TWO HOUR WARGAMES
72
LAKE HAVASU CITY It may be a Zombie world but you can still find groups of humanity clustered together trying to rebuild their lives. Most of these settlements are in the rural areas and some have gotten quite big. Here's one such settlement for you to adventure in. What follows is a short introduction to Lake Havasu City.
BACKGROUND:
Located in the desert in Arizona Lake Havasu City, or Havasu as referred to by the locals, was a planned community springing up in the 60's. The city grew around an old mining town that was established much earlier. Isolated from other cities, LHC was always an independent community on its own.
LOCATION & GEOGRAPHY:
LHC is located along the Colorado River in western Arizona. The only access to Lake Havasu City by road is via Arizona State Route (SR) 95 which meets with Interstate 40 to the north and Interstate 10 to the south.
SIZE:
LHC is roughly 40 square miles.
LAND:
LHC is covered in roads with no apparent pattern bordered by Lake Havasu and the Colorado River to the west and desert to the north, east, and south.
SECTIONS:
For ease of play we've divided LHC into nine sections. In the following diagram section # 2 would define North, #4 West, #6 East, and #8 South.
Each section is identified as follows:
Northgate (Section 1) - The northern entry into Havasu on SR 95. Access from the north is through rough hilly terrain with the highway acting as a natural funnel for Zombie activity.
The Airstrip (Section 2) - A small functional airstrip that could accommodate small aircraft before the outbreak.
Desert (Section 3) - Empty desert.
West End (Section 4) - The north end of the actual lake. Water flows down from the Colorado River and forms a large lake that acts as the western border of Havasu. Across the lake to the west lies California. The West End is where Zombie Racing (page, 102) and Pit Fighting (page, 99) take place. This area is called the Arena. Outside of the Arena area the West End is filled with residences, mostly small houses (1-3), "No-Tell" motels (4-5), and the occasional apartment complex (6).
Central (Section 5) - The Central area is the most populous area of Havasu and filled with residences, small houses (1-4) "No-Tell" motels (5), and the occasional apartment complex (6).
The Heights (Section 6) - An extension of the low hills in section 1, these small mountains, along with the hills in section 9 form a natural barrier on three sides of the town. Zombie activity through this section is extremely rare. The Heights are filled with residences, small houses (1-3) and apartment complexes (4-6).
The Island (Section 7) - Separated by a small channel of water the island has only one access, the London Bridge. The island
I, ZOMBIE
© 2010 ED TEIXEIRA – TWO HOUR WARGAMES
73
is the center of the city government and off limits to the average citizen.
Downtown (Section 8) - This is where folks come to barter for things and recruit people. If you can’t find it here you probably can’t find it anywhere. The Downtown area is populated with bars (1-2), stores (3), diners (4), gas stations/repair shops (5), and "No-Tell" motels (6).
Southgate (Section 9) - The southern entry into Havasu on SR 95. Access from the south is through rough hilly terrain with the highway acting as a natural funnel for Zombie activity. This is also the southern end of the lake.
WATER:
Water is abundant in LHC as it has its own underground wells.
TERRAIN:
LHC is surrounded by low hilly and mountainous terrain located in a flat desert with concealing scrub and gullies. The lake shore is sandy at places and mostly flat while the town consists of xeriscape landscaped concrete areas.
CLIMATE:
Arid desert climate with lows in the 80's in the winter months. Triple digit temperature from April to September, peaking around 120 degrees in June, July, and August.
POWER:
Havasu has a limited power grid up and running that provides electrical power within the city limits.
PEOPLE:
LHC is rumored to have the largest concentration of people in the area.
POPULATION:
Rumors put the population from 500 to 5,000 people with a constant flow of survivors going in and out.
LANGUAGE:
English and Spanish are common in LHC as it is in the US southwest.
GOVERNMENT:
LHC is ruled by one man, Governor Newness.
LEGAL SYSTEM:
Governor Newness has the final say in all matters.
POLITICAL POWER:
Political power lies in the hands of Governor Newness and his cronies. Power is based on acts of kindness and horror interspersed with free food and entertainment to the inhabitants.
WEAPONS POLICY:
Governor Newness has declared that residents and visitors to LHC cannot possess the following weapons within the city limits.*
*The city limits is defined as the area inside Northgate to Southgate and the Lake to the Heights. See the map on (page, 72).
Assault Rifle
Bolt Action Rifle
Flash Bang Grenade
Machine Pistol
Semi-Automatic Rifle
Shotgun
Squad Automatic Weapon
Submachine Gun
Upon entry to the city you must check these weapons and then receive your papers (page, 73). When you leave the city they will return them to you. What? You just want to pass through LHC, enter through Northgate and exit through Southgate? No problem. Just let the Police know what you intend and they will move your weapon for you but it will cost you one Resource Unit to do it.
PAPERS
Anyone entering LHC must immediately pay one Resource Unit of their choice. When this is done you receive papers acknowledging that you have paid. The local authorities (Governor Newness' appointed Police Officers) can ask people for their papers at any time they encounter them (1-2) . If they are not in order they will be arrested and taken to court.
I, ZOMBIE
© 2010 ED TEIXEIRA – TWO HOUR WARGAMES
74
Your papers are valid only as long as you remain in LHC. Each time you enter LHC you must get new papers and pay one Resource Unit.
HOLSTERED WEAPON POLICY:
In LHC there is a holstered weapon policy. What this means is that it is against the law to draw your weapon while inside LHC. Draw your weapon and you may face charges of Endangerment (page, 92).
Note that anytime a character with a holstered weapon scores a result of fire or snap fire on an In Sight Reaction Test it will draw its weapon instead.
ECONOMY:
There is a thriving free enterprise system in place regulated by a strong tax for the greater good.
Residents are required to pay one Resource Unit of their choice at the start of each month.
Travelers that spend one month in LHC are subject to the Resident tax as well.
Store owners are required to pay 10% of whatever they have earned that month with a minimum of two Resources of their choice.
Taxes are payable at the Northgate Police Station and anyone not paying the tax becomes a Fugitive (page, 95).
BARTERING:
Resources of all types are plentiful in LHC and bartering is active in the town.
COMMUNICATION:
Cell phone communication is possible but limited to the area around LHC. It is reserved for authorized use only and anyone tapping into the system is subject to arrest and trial.
TRANSPORTATION:
Walking is the norm (1-4) within LHC but there is occasional vehicle usage (5) and usually it's by the Police. In addition many of the residents travel on horseback (6) (page, 33).
RIVER BORNE:
Watercraft entering the Lake is subject to search and seizure by LHC Police. The police maintain multiple boats to enforce the law. Anyone entering the lake must check in at either Northgate or Southgate for inspection and to get papers. If entering from the west, California, they must still check in.
MILITIA:
In times of crisis LHC has an informal militia compose of residents and visitors. They are expected to defend the area from Zombie incursions as they arrive. All Zombie incursions must be reported to the Police to insure proper disposal of the Zeds.
PATROLS:
Havasu maintains both mounted and waterborne patrols outside the town itself. Each patrol consists of 3 + 1/2d6 Police determined by using the People Table - Police (page, 78). All officers will have a shotgun (1-3) or assault rifle (4-6) in addition to a sidearm even if it does not appear on the list.
There is a chance that a mounted patrol can be encountered in the following situations:
When playing a Coming & Going Encounter you can meet a patrol coming into town (1-3) or leaving town (4-6).
When moving in section 2, (the Airstrip), section 3 (Desert), or in the mountains of section 6 (the Heights).
You will not meet a mounted patrol inside the town.
If you are in any of the above areas and doubles are rolled for Activation there is a chance that you have encountered a mounted patrol. Roll 2d6, add the results, and consult the Mounted Patrol Table to see what area the patrol is in. Be sure to use the column appropriate for the Day Part.
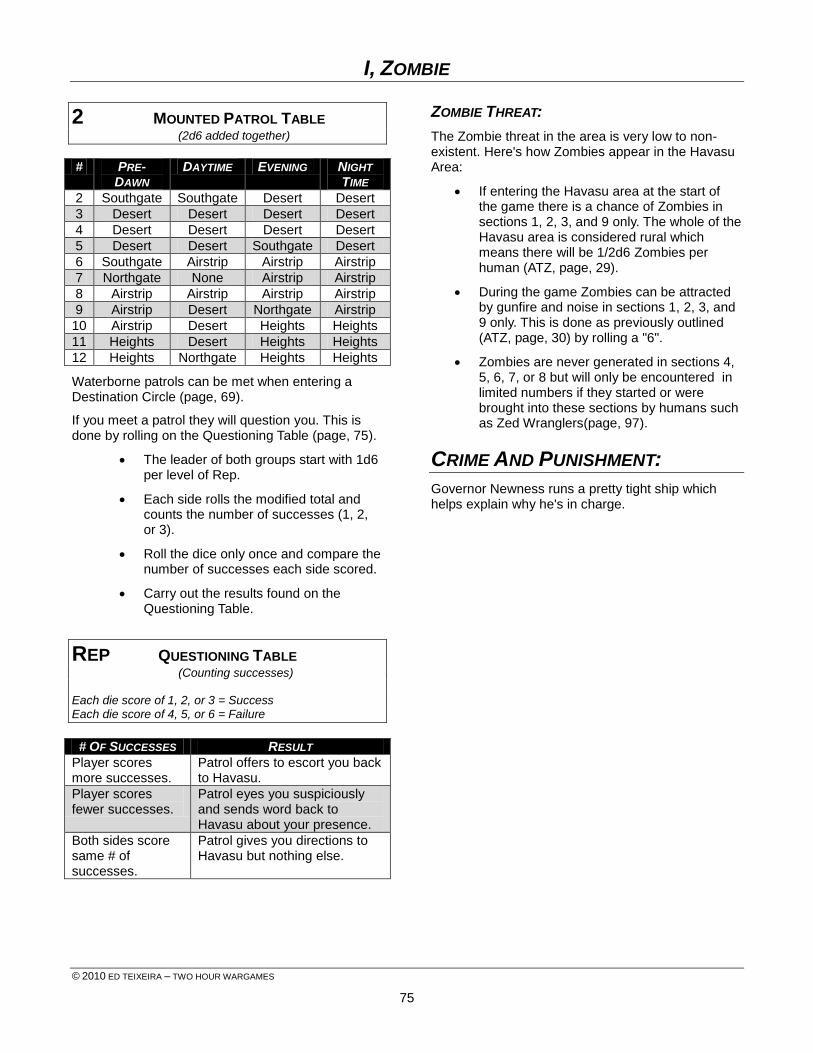
I, ZOMBIE
© 2010 ED TEIXEIRA – TWO HOUR WARGAMES
75
2 MOUNTED PATROL TABLE (2d6 added together)
# PRE-DAWN
DAYTIME EVENING NIGHT
TIME
2 Southgate Southgate Desert Desert
3 Desert Desert Desert Desert
4 Desert Desert Desert Desert
5 Desert Desert Southgate Desert
6 Southgate Airstrip Airstrip Airstrip
7 Northgate None Airstrip Airstrip
8 Airstrip Airstrip Airstrip Airstrip
9 Airstrip Desert Northgate Airstrip
10 Airstrip Desert Heights Heights
11 Heights Desert Heights Heights
12 Heights Northgate Heights Heights
Waterborne patrols can be met when entering a Destination Circle (page, 69).
If you meet a patrol they will question you. This is done by rolling on the Questioning Table (page, 75).
The leader of both groups start with 1d6 per level of Rep.
Each side rolls the modified total and counts the number of successes (1, 2, or 3).
Roll the dice only once and compare the number of successes each side scored.
Carry out the results found on the Questioning Table.
REP QUESTIONING TABLE (Counting successes)
Each die score of 1, 2, or 3 = Success Each die score of 4, 5, or 6 = Failure
# OF SUCCESSES RESULT
Player scores more successes.
Patrol offers to escort you back to Havasu.
Player scores fewer successes.
Patrol eyes you suspiciously and sends word back to Havasu about your presence.
Both sides score same # of successes.
Patrol gives you directions to Havasu but nothing else.
ZOMBIE THREAT:
The Zombie threat in the area is very low to non-existent. Here's how Zombies appear in the Havasu Area:
If entering the Havasu area at the start of the game there is a chance of Zombies in sections 1, 2, 3, and 9 only. The whole of the Havasu area is considered rural which means there will be 1/2d6 Zombies per human (ATZ, page, 29).
During the game Zombies can be attracted by gunfire and noise in sections 1, 2, 3, and 9 only. This is done as previously outlined (ATZ, page, 30) by rolling a "6".
Zombies are never generated in sections 4, 5, 6, 7, or 8 but will only be encountered in limited numbers if they started or were brought into these sections by humans such as Zed Wranglers(page, 97).
CRIME AND PUNISHMENT:
Governor Newness runs a pretty tight ship which helps explain why he's in charge.
I, ZOMBIE
© 2010 ED TEIXEIRA – TWO HOUR WARGAMES
76
NPCS In this section we expand on the Non-Player Characters or NPCs used in the ATZ world.
HAVASU AREA NPCS This section gives more details about the NPCs in and around the Havasu Area.
GOVERNOR NEWNESS
Governor Newness uses the Ganger QRS
Name: CJ Newness but goes by Governor
Occupation: Governor of Lake Havasu City
Rep: 6
Motivation: Gain
Quirks: Cult of Personality, Flirty
Phobia: Unknown
Weapons: Governor Newness will always carry a BA Machine Pistol and Machete when on the streets of Havasu. If need be he has access to any and all weapons from the ATZ Weapons List (page, 16).
WEAPON TYPE RANGE TARGETS IMP
BA Machine Pistol 12 3 2
Machete (+2d6 in melee)
x na 2
Notes: Fair. Generous. Compassionate. These and many more similar words cannot be used when describing Governor Newness.
Newness and his followers came into Havasu about three years ago and muscled their way to the top of the heap. The best thing that can be said about Newness is he's brought a semblance of order and sense of security to the town.
The Governor has the Born Leader Attribute (ATZ, page, 7). He is very organized and surrounds himself with very loyal people.
At least that's the rumor.
POLICE
Police use the Ganger QRS
Name: Each "officer" has its own name. The Chief of Police is Earl, yep, just Earl.
Occupation: The Police are responsible for enforcing the law and protecting the Governor and the citizens of Havasu.
Rep: 2 to 5.
Motivation: Varied based on the officer.
Weapons: Vary from BAP to Assault Rifles. In case of emergencies they have total access to all the weapons on the ATZ Weapons List (page, 16).
Notes: To protect and serve? No. The LHC Police is a gang exercising its muscle to keep control of the town. Don’t like it? Leave.
Earl is Rep 5, has the Brawler Attribute and carries a BAP and Shotgun at all times.
HANGER ONS
Hanger ons use the Ganger QRS
Name: Each hanger on has its own name.
Occupation: Hanger ons have a variety of jobs but are usually unemployed.
Rep: 2 or 3
Motivation: Gain or Profit.
Weapons: Usually a knife, pistol or an occasional BAP
Notes: Hanger ons are snitches, toadies, and suck ups to the Governor and Police. They will go out of their way to harass and intimidate unsuspecting Travelers in hopes of getting them jailed or worse and then be able to claim a reward. When times get tough the hanger ons get going.
RESIDENTS
Residents use the Survivors QRS
Name: Residents have their own names.
Occupation: Varies.
Rep: 2 to 5
Motivation: Any and all.
Weapons: Limited to certain weapon types while in town (page, 73). When outside of town have access to most of the weapons on the ATZ Weapons List (page, 16).
Notes: The actual number of Havasu residents is unknown. Estimates are from 500 to 5,000 at any given time. To be a Resident you must have papers and stake out a place. That can be from a room in a "No-Tell" motel up to a large house. The only rule is
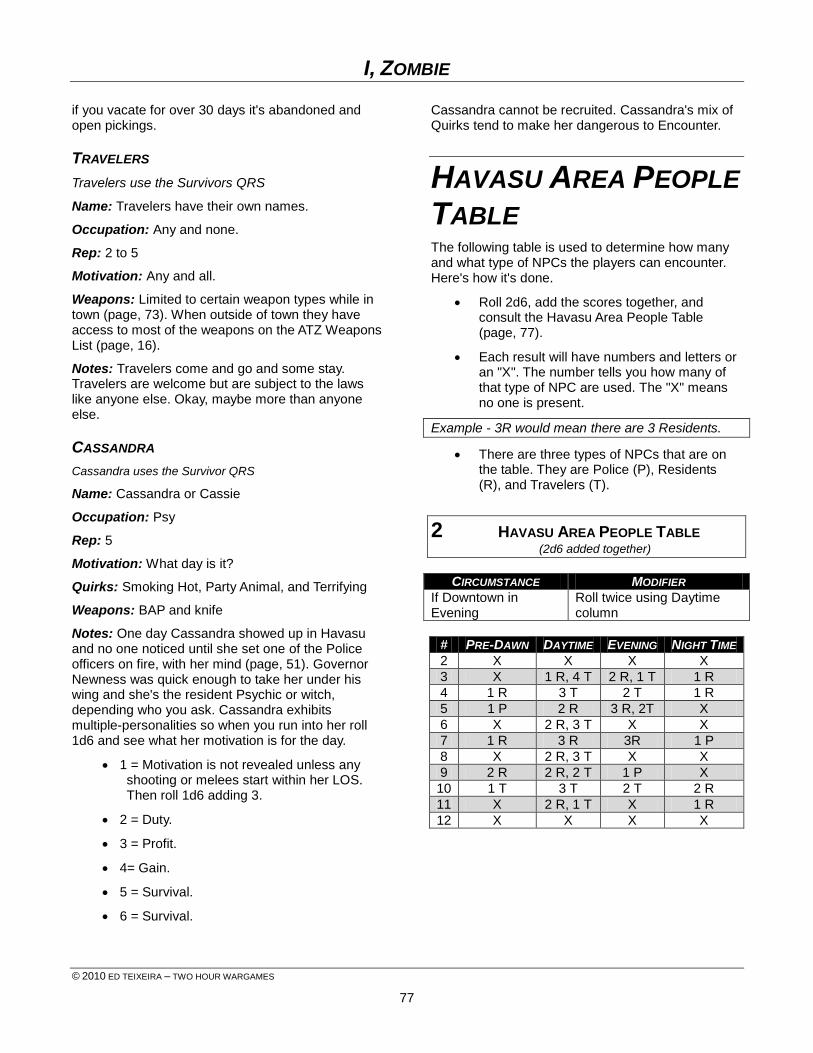
I, ZOMBIE
© 2010 ED TEIXEIRA – TWO HOUR WARGAMES
77
if you vacate for over 30 days it's abandoned and open pickings.
TRAVELERS
Travelers use the Survivors QRS
Name: Travelers have their own names.
Occupation: Any and none.
Rep: 2 to 5
Motivation: Any and all.
Weapons: Limited to certain weapon types while in town (page, 73). When outside of town they have access to most of the weapons on the ATZ Weapons List (page, 16).
Notes: Travelers come and go and some stay. Travelers are welcome but are subject to the laws like anyone else. Okay, maybe more than anyone else.
CASSANDRA
Cassandra uses the Survivor QRS
Name: Cassandra or Cassie
Occupation: Psy
Rep: 5
Motivation: What day is it?
Quirks: Smoking Hot, Party Animal, and Terrifying
Weapons: BAP and knife
Notes: One day Cassandra showed up in Havasu and no one noticed until she set one of the Police officers on fire, with her mind (page, 51). Governor Newness was quick enough to take her under his wing and she's the resident Psychic or witch, depending who you ask. Cassandra exhibits multiple-personalities so when you run into her roll 1d6 and see what her motivation is for the day.
1 = Motivation is not revealed unless any shooting or melees start within her LOS. Then roll 1d6 adding 3.
2 = Duty.
3 = Profit.
4= Gain.
5 = Survival.
6 = Survival.
Cassandra cannot be recruited. Cassandra's mix of Quirks tend to make her dangerous to Encounter.
HAVASU AREA PEOPLE
TABLE The following table is used to determine how many and what type of NPCs the players can encounter. Here's how it's done.
Roll 2d6, add the scores together, and consult the Havasu Area People Table (page, 77).
Each result will have numbers and letters or an "X". The number tells you how many of that type of NPC are used. The "X" means no one is present.
Example - 3R would mean there are 3 Residents.
There are three types of NPCs that are on the table. They are Police (P), Residents (R), and Travelers (T).
2 HAVASU AREA PEOPLE TABLE (2d6 added together)
CIRCUMSTANCE MODIFIER
If Downtown in Evening
Roll twice using Daytime column
# PRE-DAWN DAYTIME EVENING NIGHT TIME
2 X X X X
3 X 1 R, 4 T 2 R, 1 T 1 R
4 1 R 3 T 2 T 1 R
5 1 P 2 R 3 R, 2T X
6 X 2 R, 3 T X X
7 1 R 3 R 3R 1 P
8 X 2 R, 3 T X X
9 2 R 2 R, 2 T 1 P X
10 1 T 3 T 2 T 2 R
11 X 2 R, 1 T X 1 R
12 X X X X
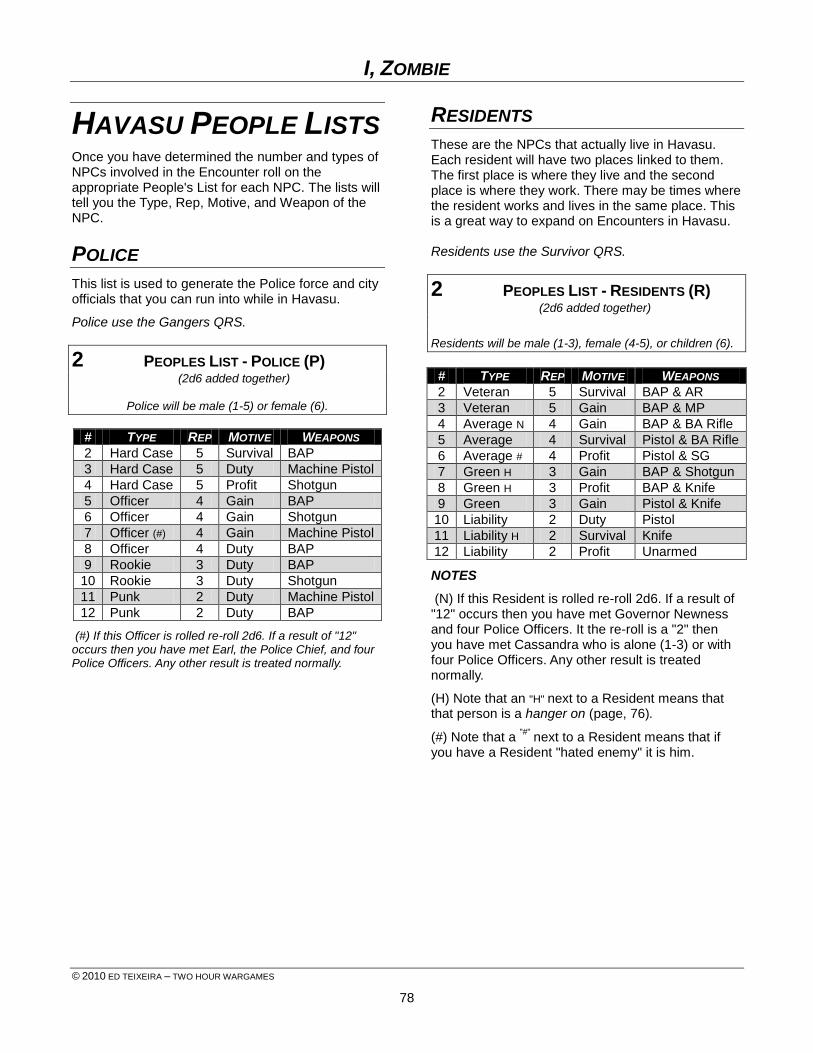
I, ZOMBIE
© 2010 ED TEIXEIRA – TWO HOUR WARGAMES
78
HAVASU PEOPLE LISTS Once you have determined the number and types of NPCs involved in the Encounter roll on the appropriate People's List for each NPC. The lists will tell you the Type, Rep, Motive, and Weapon of the NPC.
POLICE
This list is used to generate the Police force and city officials that you can run into while in Havasu.
Police use the Gangers QRS.
2 PEOPLES LIST - POLICE (P) (2d6 added together)
Police will be male (1-5) or female (6).
# TYPE REP MOTIVE WEAPONS
2 Hard Case 5 Survival BAP
3 Hard Case 5 Duty Machine Pistol
4 Hard Case 5 Profit Shotgun
5 Officer 4 Gain BAP
6 Officer 4 Gain Shotgun
7 Officer (#) 4 Gain Machine Pistol
8 Officer 4 Duty BAP
9 Rookie 3 Duty BAP
10 Rookie 3 Duty Shotgun
11 Punk 2 Duty Machine Pistol
12 Punk 2 Duty BAP
(#) If this Officer is rolled re-roll 2d6. If a result of "12" occurs then you have met Earl, the Police Chief, and four Police Officers. Any other result is treated normally.
RESIDENTS
These are the NPCs that actually live in Havasu. Each resident will have two places linked to them. The first place is where they live and the second place is where they work. There may be times where the resident works and lives in the same place. This is a great way to expand on Encounters in Havasu. Residents use the Survivor QRS.
2 PEOPLES LIST - RESIDENTS (R) (2d6 added together)
Residents will be male (1-3), female (4-5), or children (6).
# TYPE REP MOTIVE WEAPONS
2 Veteran 5 Survival BAP & AR
3 Veteran 5 Gain BAP & MP
4 Average N 4 Gain BAP & BA Rifle
5 Average 4 Survival Pistol & BA Rifle
6 Average # 4 Profit Pistol & SG
7 Green H 3 Gain BAP & Shotgun
8 Green H 3 Profit BAP & Knife
9 Green 3 Gain Pistol & Knife
10 Liability 2 Duty Pistol
11 Liability H 2 Survival Knife
12 Liability 2 Profit Unarmed
NOTES
(N) If this Resident is rolled re-roll 2d6. If a result of "12" occurs then you have met Governor Newness and four Police Officers. It the re-roll is a "2" then you have met Cassandra who is alone (1-3) or with four Police Officers. Any other result is treated normally.
(H) Note that an "H" next to a Resident means that that person is a hanger on (page, 76).
(#) Note that a "#"
next to a Resident means that if you have a Resident "hated enemy" it is him.
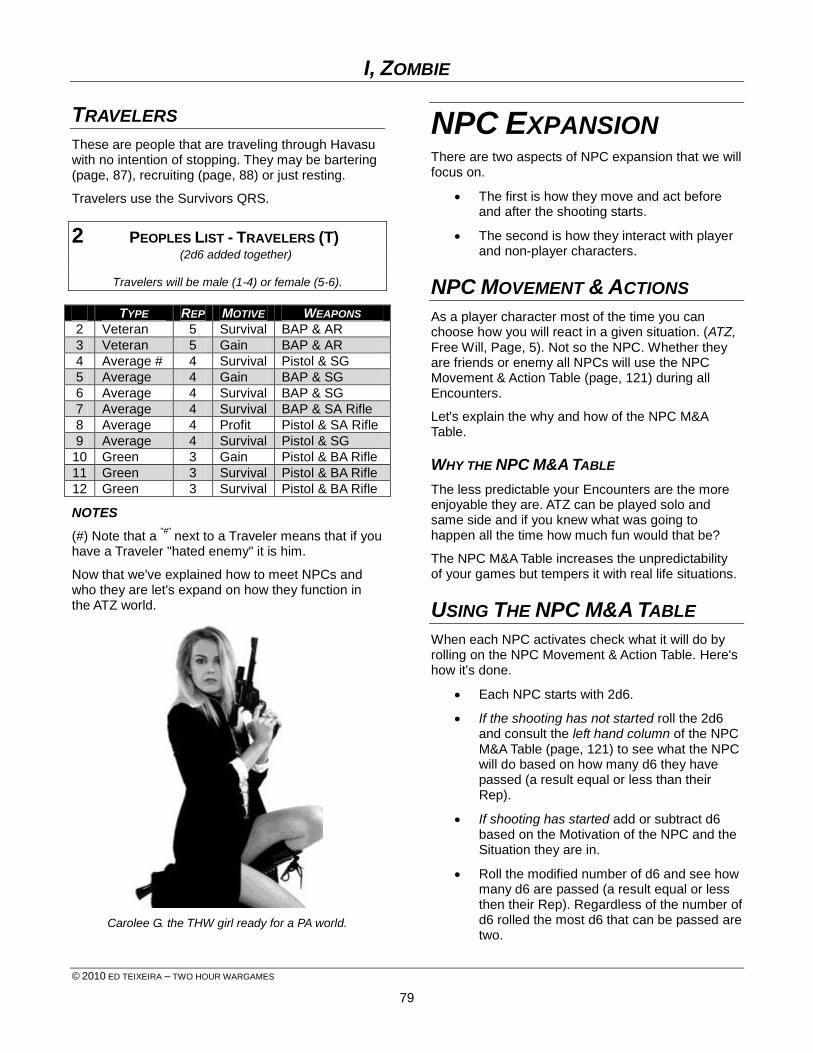
I, ZOMBIE
© 2010 ED TEIXEIRA – TWO HOUR WARGAMES
79
TRAVELERS
These are people that are traveling through Havasu with no intention of stopping. They may be bartering (page, 87), recruiting (page, 88) or just resting.
Travelers use the Survivors QRS.
2 PEOPLES LIST - TRAVELERS (T) (2d6 added together)
Travelers will be male (1-4) or female (5-6).
TYPE REP MOTIVE WEAPONS
2 Veteran 5 Survival BAP & AR
3 Veteran 5 Gain BAP & AR
4 Average # 4 Survival Pistol & SG
5 Average 4 Gain BAP & SG
6 Average 4 Survival BAP & SG
7 Average 4 Survival BAP & SA Rifle
8 Average 4 Profit Pistol & SA Rifle
9 Average 4 Survival Pistol & SG
10 Green 3 Gain Pistol & BA Rifle
11 Green 3 Survival Pistol & BA Rifle
12 Green 3 Survival Pistol & BA Rifle
NOTES
(#) Note that a "#"
next to a Traveler means that if you have a Traveler "hated enemy" it is him.
Now that we've explained how to meet NPCs and who they are let's expand on how they function in the ATZ world.
Carolee G. the THW girl ready for a PA world.
NPC EXPANSION There are two aspects of NPC expansion that we will focus on.
The first is how they move and act before and after the shooting starts.
The second is how they interact with player and non-player characters.
NPC MOVEMENT & ACTIONS
As a player character most of the time you can choose how you will react in a given situation. (ATZ, Free Will, Page, 5). Not so the NPC. Whether they are friends or enemy all NPCs will use the NPC Movement & Action Table (page, 121) during all Encounters.
Let's explain the why and how of the NPC M&A Table.
WHY THE NPC M&A TABLE
The less predictable your Encounters are the more enjoyable they are. ATZ can be played solo and same side and if you knew what was going to happen all the time how much fun would that be?
The NPC M&A Table increases the unpredictability of your games but tempers it with real life situations.
USING THE NPC M&A TABLE
When each NPC activates check what it will do by rolling on the NPC Movement & Action Table. Here's how it's done.
Each NPC starts with 2d6.
If the shooting has not started roll the 2d6 and consult the left hand column of the NPC M&A Table (page, 121) to see what the NPC will do based on how many d6 they have passed (a result equal or less than their Rep).
If shooting has started add or subtract d6 based on the Motivation of the NPC and the Situation they are in.
Roll the modified number of d6 and see how many d6 are passed (a result equal or less then their Rep). Regardless of the number of d6 rolled the most d6 that can be passed are two.
I, ZOMBIE
© 2010 ED TEIXEIRA – TWO HOUR WARGAMES
80
Consult the right hand column of the NPC M&A table and immediately carry out the results.
CHECKING BY GROUPS - BEFORE SHOOTING
Prior to the when the shooting starts the NPC M&A Test is taken by the group. The test is taken based on the Rep of the group leader. Be sure to use the left hand column when testing.
When doing so there are a few rules that must be followed:
Player and NPC groups:
Many times a group will be composed of player and NPC characters. In these cases the player still must roll on the NPC M&A Table to see what their NPCs will do. This test is taken against the Rep of the player.
Passing 1d6:
If the testing group is intact then some of the group will move to another section of the table or building. Roll 1/2d6 to determine how many of them will move into this new section. A minimum of one of the characters will remain in the original section.
The characters moving from the original group now form a separate group.
If characters have previously moved away from the original group some or all of them may return or continue on to another section based on a 1d6 roll. Roll 1/2d6 to determine how many of them will return to the original group or move to another section if called upon to do so.
Passing 0d6:
The original group will be leaving the building or the table. If the original group is together they will move normally.
If one or more members of the original group are in a different section the original group will move to gather them up. If any character from the original group has joined another group then they must be interacted with to see if they rejoin.
CHECKING BY GROUPS - AFTER SHOOTING
Once the shooting starts all NPC M&A Tests are taken individually when the NPC activates. This includes player NPC Grunts as well as normal NPCs.
Be sure to use the right hand column of the NPC M&A Table immediately once the shooting starts.
Once the shooting has stopped the NPCs will revert back to group testing.
INTERACTING WITH
NPCS The second way we breathe life into NPCs is by using the NPC Interaction Table (page, 117). The NPC Interaction Table is used when NPCs encounter player and non-player characters.
WHEN TO INTERACT
There are some easy rules to determine when you can interact with NPCs.
At the start of the Encounter when you are in the same section with a group or groups of NPCs.
o If there is more than one NPC group you can choose to interact with them as desired.
o When you are finished choosing whom to interact with the remaining NPC groups will interact with you.
Anytime you enter a new section or an NPC group enters the section that you are in you must interact with them.
Players can choose to interact directly with one member of the NPC group instead of the Leader.
If a character or characters that split off from a group without the leader will interact on their own.
Example - A group of three bikers enter a roadhouse and come into a section where Bill Pink and his group are sitting. The leaders of the two groups now interact and get a result of exchange small talk. Later Sooze splits off from the group and enters another section of the roadhouse and meets one of the bikers that had split from his group. The two interact and the result is the biker has a "run in" with Sooze.
I, ZOMBIE
© 2010 ED TEIXEIRA – TWO HOUR WARGAMES
81
HOW TO INTERACT
You will interact with NPCs either on the table or inside buildings.
If on the table simply move each group when active until they have reached 6" from each other.
If in a building you must be in the same section.
Here's how NPC interaction takes place:
The player* and the NPC to be interacted with will each roll 1d6 per level of Rep.
Modify the number of d6 by any applicable circumstances.
Both sides roll their modified number of d6 looking for successes (a score of 1, 2, or 3).
Compare the number of successes rolled on the NPC Interaction Table (page, 117).
Carry out the result.
* When NPCs interact with NPCs one side will use the player circumstances.
JOINING GROUPS
In this section we show you how NPCs can interact and join an existing group.
Look on the NPC Movement & Action Table (page, 121). It is divided into two columns. Joining a group can only occur when using the left hand column.
When a NPC enters another section of the table or building it must interact with all groups in that section.
The NPC could join the new group due to a NPC Positive Result. When this happens it will no longer be counted with the original group but instead has joined the new group.
If one or more NPCs of the original group enter the section they will immediately interact directly with the old group member.
If the old group member does not rejoin the original group 1d6 is immediately rolled.
o If the characters are of the opposite sex add 2 to the score.
o On a total of 6 or more the old group has a NPC Negative Reaction to the character and its new group.
o Roll 1d6 on the NPC Negative Reaction Table to determine the reaction.
HOW MUCH INTERACTION
Players may choose to continue to interact with an NPC if they have scored a NPC Positive Result. Once a NPC Negative Result is scored the players cannot continue to interact with that NPC.
They can interact with them in future Encounters.
I GOT YOUR BACK
When a character goes into another section of a building or table and gets into a confrontation with another character its current group will immediately move to join it. This will be all the groups of characters involved.
If a melee breaks out, or if shooting starts, all NPCs in both groups will roll on the right hand column of the NPC Movement & Action Table.
PARTY FAVORS
Note that the section on Party Favors is presented to bring an element of realism into the ATZ immersion game and in no way should it be considered an endorsement of their actual use or abuse.
"Party Favors" is the catch all term for the vices that humans can fall prey to. Drugs, alcohol, etc. all these fall under Party Favors. We are including this in the section on NPC Interaction to show you how they can be used when interacting with the NPC Interaction Table (page, 117).
TYPES OF PARTY FAVORS
Party Favors are broken down into two types, alcohol and drugs. You can "buy" Party Favors for NPCs to influence their response to your interaction with them. However, you must use the correct Party favor to get this bonus.
Food Units are used to represent Alcohol Party Favors.
Luxury Units are used to represent Drug Party Favors.
USING PARTY FAVORS
For each Party Favor a character spends on another character he gains 1d6 on the NPC Interaction Table (page, 117) when interacting with that character.
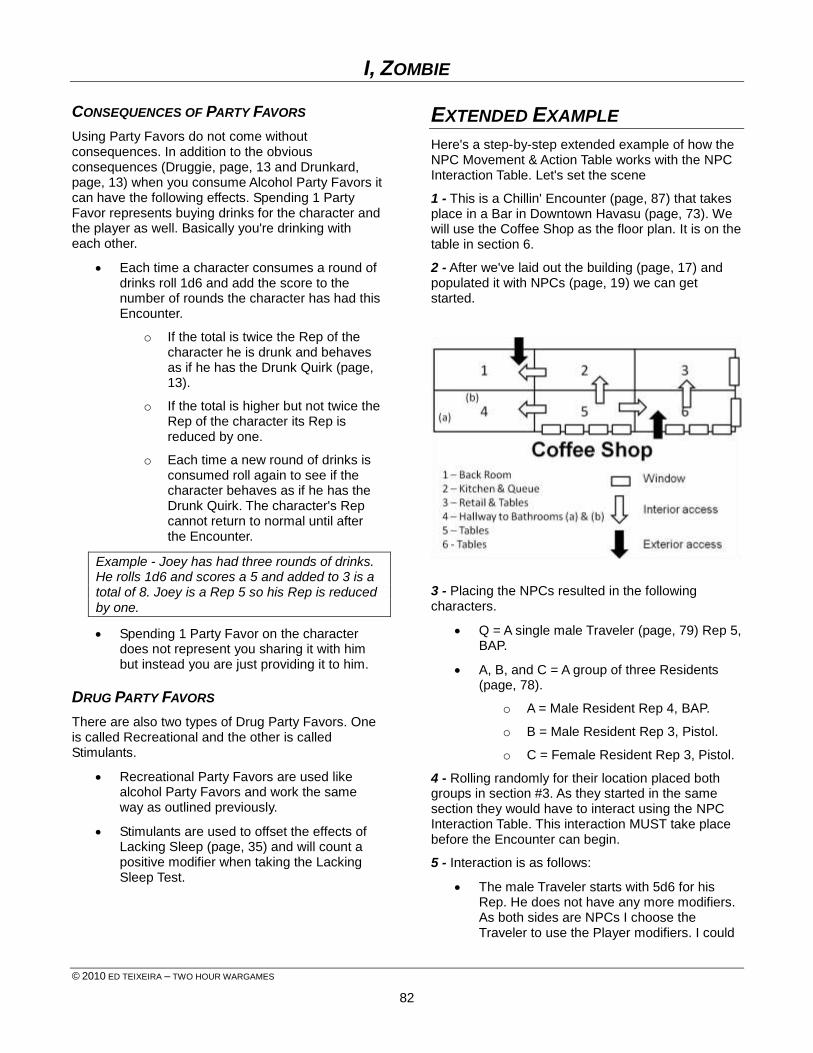
I, ZOMBIE
© 2010 ED TEIXEIRA – TWO HOUR WARGAMES
82
CONSEQUENCES OF PARTY FAVORS
Using Party Favors do not come without consequences. In addition to the obvious consequences (Druggie, page, 13 and Drunkard, page, 13) when you consume Alcohol Party Favors it can have the following effects. Spending 1 Party Favor represents buying drinks for the character and the player as well. Basically you're drinking with each other.
Each time a character consumes a round of drinks roll 1d6 and add the score to the number of rounds the character has had this Encounter.
o If the total is twice the Rep of the character he is drunk and behaves as if he has the Drunk Quirk (page, 13).
o If the total is higher but not twice the Rep of the character its Rep is reduced by one.
o Each time a new round of drinks is consumed roll again to see if the character behaves as if he has the Drunk Quirk. The character's Rep cannot return to normal until after the Encounter.
Example - Joey has had three rounds of drinks. He rolls 1d6 and scores a 5 and added to 3 is a total of 8. Joey is a Rep 5 so his Rep is reduced by one.
Spending 1 Party Favor on the character does not represent you sharing it with him but instead you are just providing it to him.
DRUG PARTY FAVORS
There are also two types of Drug Party Favors. One is called Recreational and the other is called Stimulants.
Recreational Party Favors are used like alcohol Party Favors and work the same way as outlined previously.
Stimulants are used to offset the effects of Lacking Sleep (page, 35) and will count a positive modifier when taking the Lacking Sleep Test.
EXTENDED EXAMPLE
Here's a step-by-step extended example of how the NPC Movement & Action Table works with the NPC Interaction Table. Let's set the scene
1 - This is a Chillin' Encounter (page, 87) that takes place in a Bar in Downtown Havasu (page, 73). We will use the Coffee Shop as the floor plan. It is on the table in section 6.
2 - After we've laid out the building (page, 17) and populated it with NPCs (page, 19) we can get started.
3 - Placing the NPCs resulted in the following characters.
Q = A single male Traveler (page, 79) Rep 5, BAP.
A, B, and C = A group of three Residents (page, 78).
o A = Male Resident Rep 4, BAP.
o B = Male Resident Rep 3, Pistol.
o C = Female Resident Rep 3, Pistol.
4 - Rolling randomly for their location placed both groups in section #3. As they started in the same section they would have to interact using the NPC Interaction Table. This interaction MUST take place before the Encounter can begin.
5 - Interaction is as follows:
The male Traveler starts with 5d6 for his Rep. He does not have any more modifiers. As both sides are NPCs I choose the Traveler to use the Player modifiers. I could
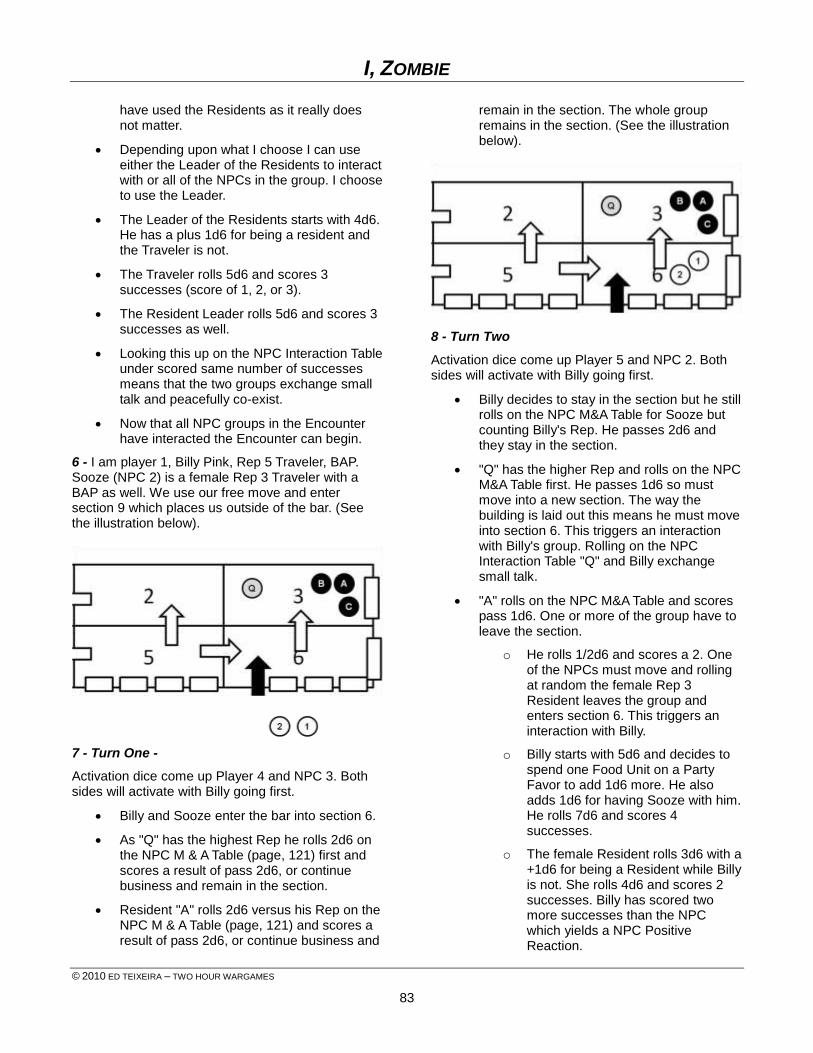
I, ZOMBIE
© 2010 ED TEIXEIRA – TWO HOUR WARGAMES
83
have used the Residents as it really does not matter.
Depending upon what I choose I can use either the Leader of the Residents to interact with or all of the NPCs in the group. I choose to use the Leader.
The Leader of the Residents starts with 4d6. He has a plus 1d6 for being a resident and the Traveler is not.
The Traveler rolls 5d6 and scores 3 successes (score of 1, 2, or 3).
The Resident Leader rolls 5d6 and scores 3 successes as well.
Looking this up on the NPC Interaction Table under scored same number of successes means that the two groups exchange small talk and peacefully co-exist.
Now that all NPC groups in the Encounter have interacted the Encounter can begin.
6 - I am player 1, Billy Pink, Rep 5 Traveler, BAP. Sooze (NPC 2) is a female Rep 3 Traveler with a BAP as well. We use our free move and enter section 9 which places us outside of the bar. (See the illustration below).
7 - Turn One -
Activation dice come up Player 4 and NPC 3. Both sides will activate with Billy going first.
Billy and Sooze enter the bar into section 6.
As "Q" has the highest Rep he rolls 2d6 on the NPC M & A Table (page, 121) first and scores a result of pass 2d6, or continue business and remain in the section.
Resident "A" rolls 2d6 versus his Rep on the NPC M & A Table (page, 121) and scores a result of pass 2d6, or continue business and
remain in the section. The whole group remains in the section. (See the illustration below).
8 - Turn Two
Activation dice come up Player 5 and NPC 2. Both sides will activate with Billy going first.
Billy decides to stay in the section but he still rolls on the NPC M&A Table for Sooze but counting Billy's Rep. He passes 2d6 and they stay in the section.
"Q" has the higher Rep and rolls on the NPC M&A Table first. He passes 1d6 so must move into a new section. The way the building is laid out this means he must move into section 6. This triggers an interaction with Billy's group. Rolling on the NPC Interaction Table "Q" and Billy exchange small talk.
"A" rolls on the NPC M&A Table and scores pass 1d6. One or more of the group have to leave the section.
o He rolls 1/2d6 and scores a 2. One of the NPCs must move and rolling at random the female Rep 3 Resident leaves the group and enters section 6. This triggers an interaction with Billy.
o Billy starts with 5d6 and decides to spend one Food Unit on a Party Favor to add 1d6 more. He also adds 1d6 for having Sooze with him. He rolls 7d6 and scores 4 successes.
o The female Resident rolls 3d6 with a +1d6 for being a Resident while Billy is not. She rolls 4d6 and scores 2 successes. Billy has scored two more successes than the NPC which yields a NPC Positive Reaction.
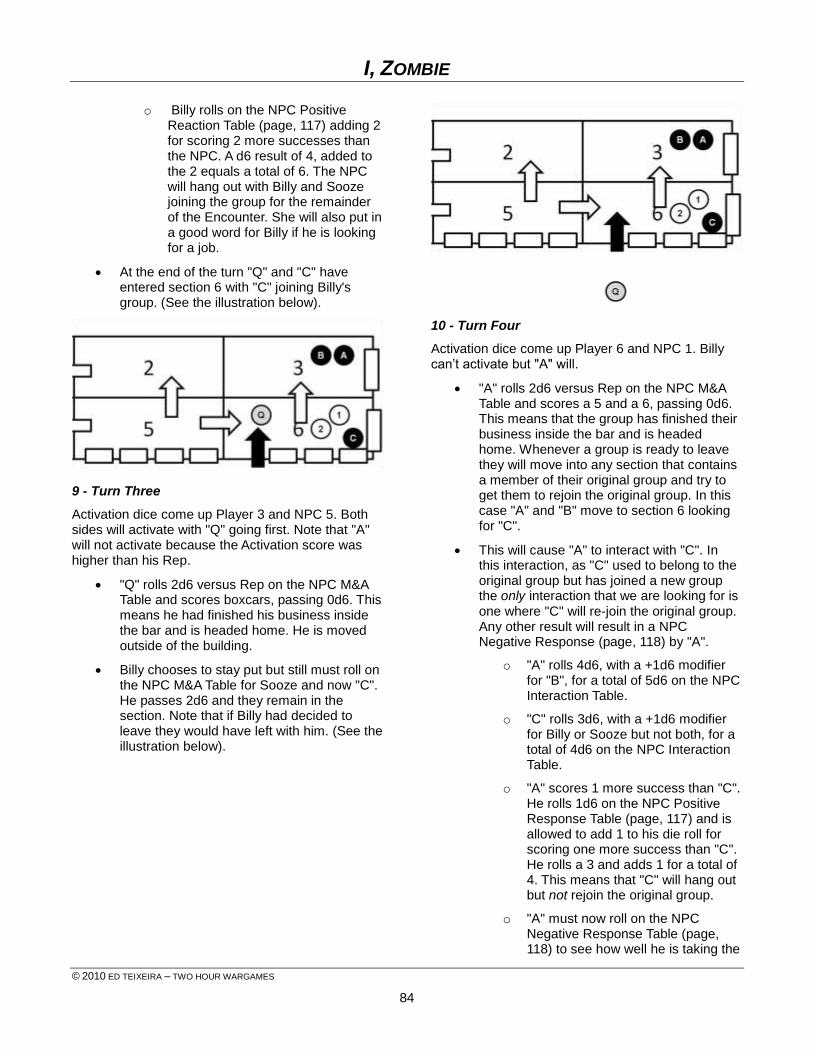
I, ZOMBIE
© 2010 ED TEIXEIRA – TWO HOUR WARGAMES
84
o Billy rolls on the NPC Positive Reaction Table (page, 117) adding 2 for scoring 2 more successes than the NPC. A d6 result of 4, added to the 2 equals a total of 6. The NPC will hang out with Billy and Sooze joining the group for the remainder of the Encounter. She will also put in a good word for Billy if he is looking for a job.
At the end of the turn "Q" and "C" have entered section 6 with "C" joining Billy's group. (See the illustration below).
9 - Turn Three
Activation dice come up Player 3 and NPC 5. Both sides will activate with "Q" going first. Note that "A" will not activate because the Activation score was higher than his Rep.
"Q" rolls 2d6 versus Rep on the NPC M&A Table and scores boxcars, passing 0d6. This means he had finished his business inside the bar and is headed home. He is moved outside of the building.
Billy chooses to stay put but still must roll on the NPC M&A Table for Sooze and now "C". He passes 2d6 and they remain in the section. Note that if Billy had decided to leave they would have left with him. (See the illustration below).
10 - Turn Four
Activation dice come up Player 6 and NPC 1. Billy can’t activate but "A" will.
"A" rolls 2d6 versus Rep on the NPC M&A Table and scores a 5 and a 6, passing 0d6. This means that the group has finished their business inside the bar and is headed home. Whenever a group is ready to leave they will move into any section that contains a member of their original group and try to get them to rejoin the original group. In this case "A" and "B" move to section 6 looking for "C".
This will cause "A" to interact with "C". In this interaction, as "C" used to belong to the original group but has joined a new group the only interaction that we are looking for is one where "C" will re-join the original group. Any other result will result in a NPC Negative Response (page, 118) by "A".
o "A" rolls 4d6, with a +1d6 modifier for "B", for a total of 5d6 on the NPC Interaction Table.
o "C" rolls 3d6, with a +1d6 modifier for Billy or Sooze but not both, for a total of 4d6 on the NPC Interaction Table.
o "A" scores 1 more success than "C". He rolls 1d6 on the NPC Positive Response Table (page, 117) and is allowed to add 1 to his die roll for scoring one more success than "C". He rolls a 3 and adds 1 for a total of 4. This means that "C" will hang out but not rejoin the original group.
o "A" must now roll on the NPC Negative Response Table (page, 118) to see how well he is taking the
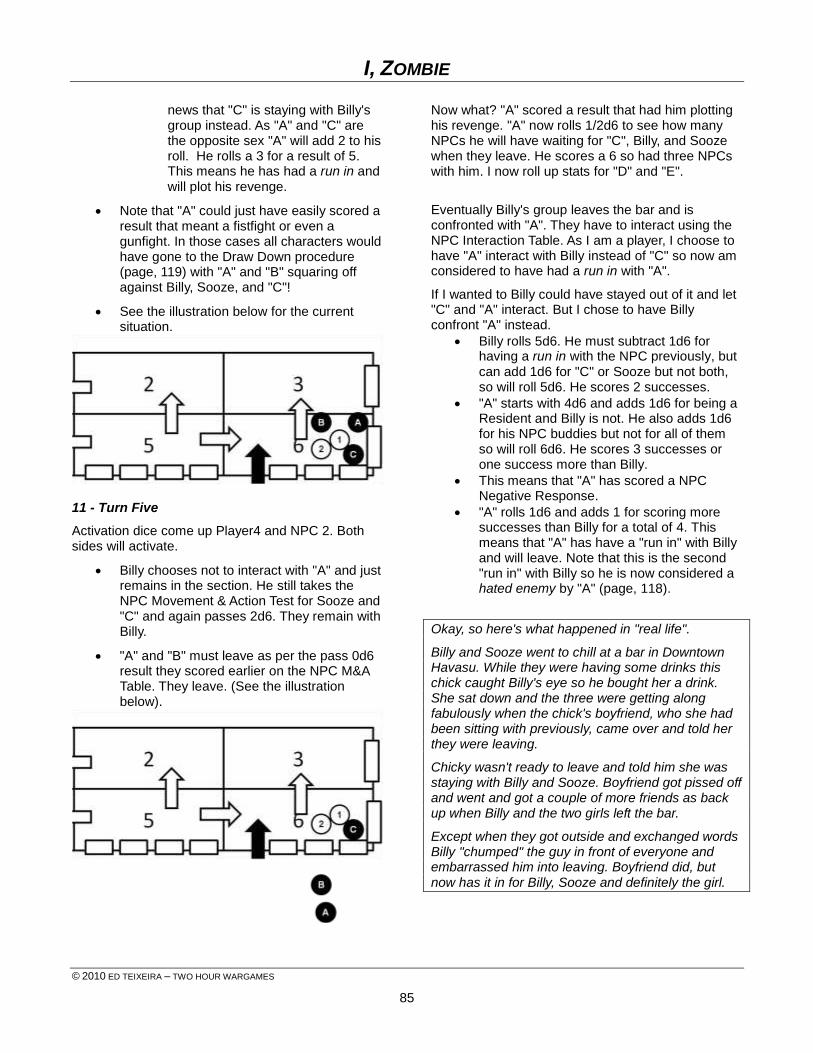
I, ZOMBIE
© 2010 ED TEIXEIRA – TWO HOUR WARGAMES
85
news that "C" is staying with Billy's group instead. As "A" and "C" are the opposite sex "A" will add 2 to his roll. He rolls a 3 for a result of 5. This means he has had a run in and will plot his revenge.
Note that "A" could just have easily scored a result that meant a fistfight or even a gunfight. In those cases all characters would have gone to the Draw Down procedure (page, 119) with "A" and "B" squaring off against Billy, Sooze, and "C"!
See the illustration below for the current situation.
11 - Turn Five
Activation dice come up Player4 and NPC 2. Both sides will activate.
Billy chooses not to interact with "A" and just remains in the section. He still takes the NPC Movement & Action Test for Sooze and "C" and again passes 2d6. They remain with Billy.
"A" and "B" must leave as per the pass 0d6 result they scored earlier on the NPC M&A Table. They leave. (See the illustration below).
Now what? "A" scored a result that had him plotting his revenge. "A" now rolls 1/2d6 to see how many NPCs he will have waiting for "C", Billy, and Sooze when they leave. He scores a 6 so had three NPCs with him. I now roll up stats for "D" and "E".
Eventually Billy's group leaves the bar and is confronted with "A". They have to interact using the NPC Interaction Table. As I am a player, I choose to have "A" interact with Billy instead of "C" so now am considered to have had a run in with "A".
If I wanted to Billy could have stayed out of it and let "C" and "A" interact. But I chose to have Billy confront "A" instead.
Billy rolls 5d6. He must subtract 1d6 for having a run in with the NPC previously, but can add 1d6 for "C" or Sooze but not both, so will roll 5d6. He scores 2 successes.
"A" starts with 4d6 and adds 1d6 for being a Resident and Billy is not. He also adds 1d6 for his NPC buddies but not for all of them so will roll 6d6. He scores 3 successes or one success more than Billy.
This means that "A" has scored a NPC Negative Response.
"A" rolls 1d6 and adds 1 for scoring more successes than Billy for a total of 4. This means that "A" has have a "run in" with Billy and will leave. Note that this is the second "run in" with Billy so he is now considered a hated enemy by "A" (page, 118).
Okay, so here's what happened in "real life".
Billy and Sooze went to chill at a bar in Downtown Havasu. While they were having some drinks this chick caught Billy's eye so he bought her a drink. She sat down and the three were getting along fabulously when the chick's boyfriend, who she had been sitting with previously, came over and told her they were leaving.
Chicky wasn't ready to leave and told him she was staying with Billy and Sooze. Boyfriend got pissed off and went and got a couple of more friends as back up when Billy and the two girls left the bar.
Except when they got outside and exchanged words Billy "chumped" the guy in front of everyone and embarrassed him into leaving. Boyfriend did, but now has it in for Billy, Sooze and definitely the girl.
I, ZOMBIE
© 2010 ED TEIXEIRA – TWO HOUR WARGAMES
86
HAVASU
ENCOUNTERS In this section we introduce new Encounters that are specific to the Havasu Campaign Area but can be used in other locations as well.
COMING AND GOING Use this Encounter whenever characters enter or leave via SR 95, which is the only approved way to enter Havasu. As mentioned previously when you enter Havasu you will receive papers and surrender weapons as per the Weapons Policy (page, 73). Do not be confused, failure to surrender your weapons will result in the Police shooting first and asking questions later.
AREA
This encounter takes place at Northgate (Section 1) or Southgate (Section 9). The board should have a two lane highway running north and south with 1/2d6 buildings on both sides. Sections 7, 8 and 9 are empty of terrain, except for the highway, with the buildings in sections 4, 5 or 6. One of these buildings will be the Police Station where visitors are expected to check in.
The area is well lit during all night Day Parts with LOS handled normally (ATZ, page, 17).
Across the roadway is placed a six inch wide barrier of spike strips that will disable any vehicle that moves over it. Humans on foot will spend one turn of Activation walking through the area and cannot Fast Move.
FORCES
You can use a part of or your entire group.
Your primary enemies will be Zombies.
DEPLOYMENT
You will enter the board into section 7, 8, or 9.
Zombies are generated normally but must be placed randomly in sections 7, 8, or 9.
On each side of the barrier will be 1/2d6 Police officers with shotguns (1-3) or Assault Rifles (4-6) and BAPs. Each officer counts as protected (ATZ, page, 6). Determine their Rep by rolling on the Police List (page, 78).
There are always 2 +1/2d6 Police officers in the Police Station.
Place the NPCs on the table as outlined in the Placing NPCs section (page, 59).
SPECIAL INSTRUCTIONS
Players can choose in which Day Part the Encounter is taking place.
Before starting the Encounter roll on the Havasu Area People Table (page, 77) to determine what NPCs are used.
Note that some characters may have weapons that are restricted in Havasu.
o Those that start outside the barrier are entering town and will have them. They will head for the Police Station and will not have them when they exit. They will then head towards town and exit off sections 1, 2, or 3.
o Those that start inside the barrier will not have them but can retrieve them in the Police Station. Once they are done they will head out of town and exit off sections 7, 8, or 9.
As soon as you enter the table you will be expected to go to the Police Station, obtain papers and surrender the appropriate weapons (page, 73). If you choose not to do so you are identified and become a Fugitive (page, 95).
If Zombies are generated only the Police at the barrier will engage them. Player characters may or may not engage the Zombies as they choose.
I, ZOMBIE
© 2010 ED TEIXEIRA – TWO HOUR WARGAMES
87
CHILLIN' Man is a social animal. Even in a Zombie ravaged world man has the desire to seek company and socialize.
In this Encounter the player is relaxing, shooting the breeze, and just chillin' with other folks. How the player interacts (page, 117) with these people is what Chillin' is all about.
Chillin' is used for bartering Resource Units, recruiting more NPCs, and gaining Fame and Fortune Points (page, 15).
AREA
The Encounter can happen in the Central (1), West End (2), the Heights (3), or in the Downtown section (4-6) of Havasu.
FORCES
You can use a part of or your entire group.
Place the NPCs on the table as outlined in the Placing NPCs section (page, 59).
SPECIAL INSTRUCTIONS
The player must decide in which Day Part and which section of Havasu he is Chillin'. This determines the number of NPCs he may encounter.
When you contact an NPC but before you interact with them roll on the appropriate People's List for their stats.
The NPC Movement & Action Table (page, 121) and the NPC Interaction Table (page, 117) are used to move the Encounter.
BARTERING Use this Encounter whenever characters want to barter. Bartering is done as described in ATZ (page, 54) but the Havasu Barter Table (page, 120) is used instead of the original one found there. Bartering will occur in one of two ways.
The player chooses to go Downtown to a store and barter for Resources.
The player runs into an NPC while on a Chillin' Encounter (page, 87) and has a chance to barter through successful Interaction (page, 117).
AREA
This encounter takes place in the Downtown area (Section 8) or anywhere the player meets NPCs that want to barter. The board should be 2x2 or 3x3 with a street running from one table edge to the opposite with an optional second street forming a four way intersection. There should be 6+1/2d6 buildings on the table clustered around the streets.
The Downtown area is well lit during all night Day Parts with LOS handled normally (ATZ, page, 17).
FORCES
You can use a part of or your entire group.
There aren't any enemies but you may encounter the Police, Residents, and Travelers.
DEPLOYMENT
You can enter the board from any end of the street.
Place the NPCs on the table as outlined in the Placing NPCs section (page, 59).
SPECIAL INSTRUCTIONS
Players can choose in which Day Part the Encounter is taking place.
Before starting the Encounter roll on the Havasu Area People Table (page, 77) to determine what NPCs are used.
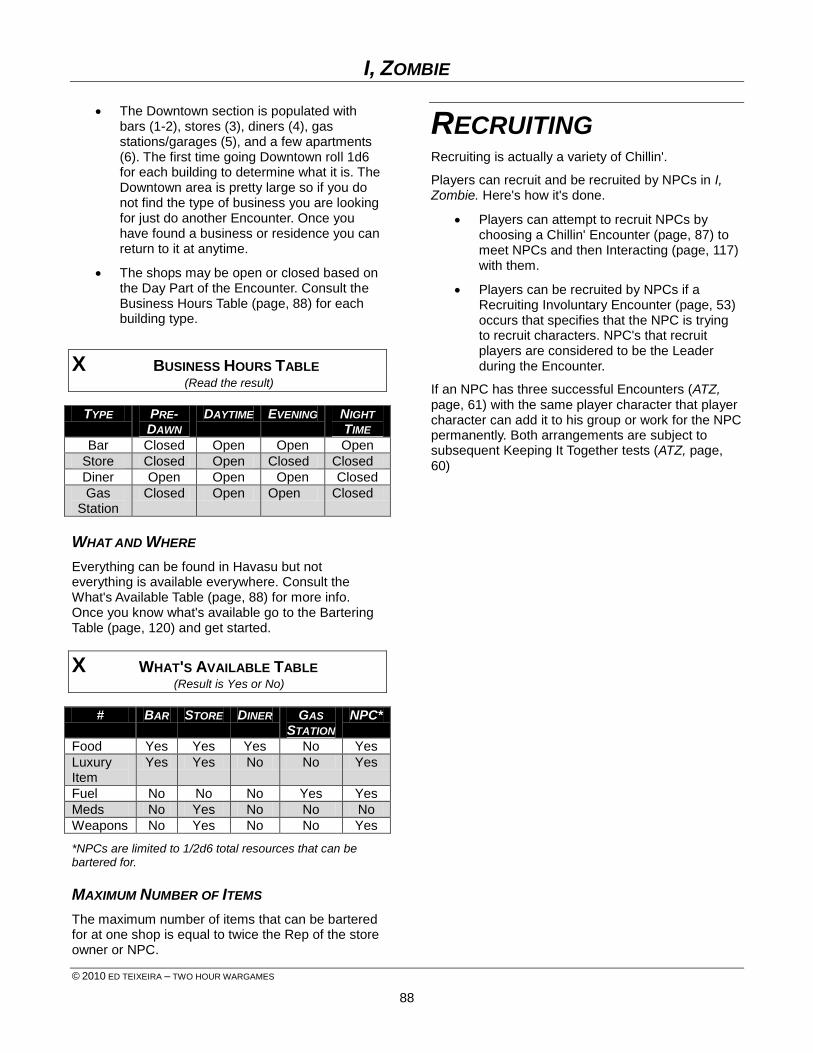
I, ZOMBIE
© 2010 ED TEIXEIRA – TWO HOUR WARGAMES
88
The Downtown section is populated with bars (1-2), stores (3), diners (4), gas stations/garages (5), and a few apartments (6). The first time going Downtown roll 1d6 for each building to determine what it is. The Downtown area is pretty large so if you do not find the type of business you are looking for just do another Encounter. Once you have found a business or residence you can return to it at anytime.
The shops may be open or closed based on the Day Part of the Encounter. Consult the Business Hours Table (page, 88) for each building type.
X BUSINESS HOURS TABLE (Read the result)
TYPE PRE-DAWN
DAYTIME EVENING NIGHT
TIME
Bar Closed Open Open Open
Store Closed Open Closed Closed
Diner Open Open Open Closed
Gas Station
Closed Open Open Closed
WHAT AND WHERE
Everything can be found in Havasu but not everything is available everywhere. Consult the What's Available Table (page, 88) for more info. Once you know what's available go to the Bartering Table (page, 120) and get started.
X WHAT'S AVAILABLE TABLE (Result is Yes or No)
# BAR STORE DINER GAS STATION
NPC*
Food Yes Yes Yes No Yes
Luxury Item
Yes Yes No No Yes
Fuel No No No Yes Yes
Meds No Yes No No No
Weapons No Yes No No Yes
*NPCs are limited to 1/2d6 total resources that can be bartered for.
MAXIMUM NUMBER OF ITEMS
The maximum number of items that can be bartered for at one shop is equal to twice the Rep of the store owner or NPC.
RECRUITING Recruiting is actually a variety of Chillin'.
Players can recruit and be recruited by NPCs in I, Zombie. Here's how it's done.
Players can attempt to recruit NPCs by choosing a Chillin' Encounter (page, 87) to meet NPCs and then Interacting (page, 117) with them.
Players can be recruited by NPCs if a Recruiting Involuntary Encounter (page, 53) occurs that specifies that the NPC is trying to recruit characters. NPC's that recruit players are considered to be the Leader during the Encounter.
If an NPC has three successful Encounters (ATZ, page, 61) with the same player character that player character can add it to his group or work for the NPC permanently. Both arrangements are subject to subsequent Keeping It Together tests (ATZ, page, 60)
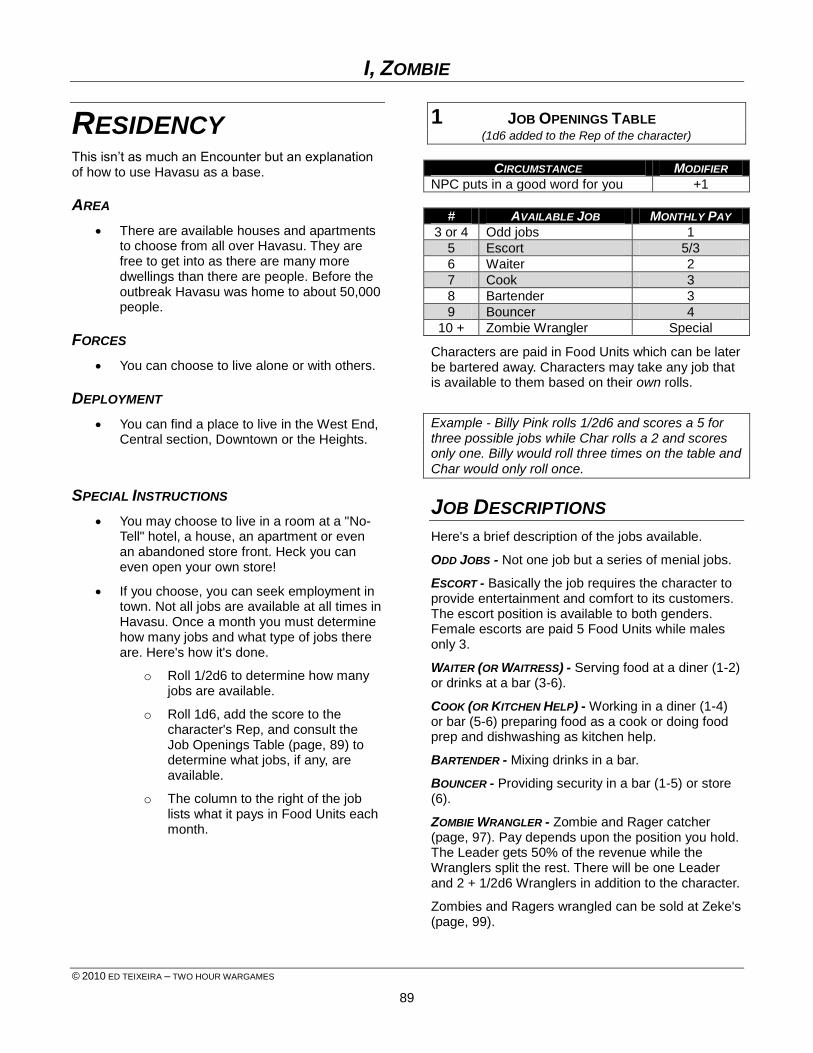
I, ZOMBIE
© 2010 ED TEIXEIRA – TWO HOUR WARGAMES
89
RESIDENCY This isn’t as much an Encounter but an explanation of how to use Havasu as a base.
AREA
There are available houses and apartments to choose from all over Havasu. They are free to get into as there are many more dwellings than there are people. Before the outbreak Havasu was home to about 50,000 people.
FORCES
You can choose to live alone or with others.
DEPLOYMENT
You can find a place to live in the West End, Central section, Downtown or the Heights.
SPECIAL INSTRUCTIONS
You may choose to live in a room at a "No-Tell" hotel, a house, an apartment or even an abandoned store front. Heck you can even open your own store!
If you choose, you can seek employment in town. Not all jobs are available at all times in Havasu. Once a month you must determine how many jobs and what type of jobs there are. Here's how it's done.
o Roll 1/2d6 to determine how many jobs are available.
o Roll 1d6, add the score to the character's Rep, and consult the Job Openings Table (page, 89) to determine what jobs, if any, are available.
o The column to the right of the job lists what it pays in Food Units each month.
1 JOB OPENINGS TABLE (1d6 added to the Rep of the character)
CIRCUMSTANCE MODIFIER
NPC puts in a good word for you +1
# AVAILABLE JOB MONTHLY PAY
3 or 4 Odd jobs 1
5 Escort 5/3
6 Waiter 2
7 Cook 3
8 Bartender 3
9 Bouncer 4
10 + Zombie Wrangler Special
Characters are paid in Food Units which can be later be bartered away. Characters may take any job that is available to them based on their own rolls.
Example - Billy Pink rolls 1/2d6 and scores a 5 for three possible jobs while Char rolls a 2 and scores only one. Billy would roll three times on the table and Char would only roll once.
JOB DESCRIPTIONS
Here's a brief description of the jobs available.
ODD JOBS - Not one job but a series of menial jobs.
ESCORT - Basically the job requires the character to provide entertainment and comfort to its customers. The escort position is available to both genders. Female escorts are paid 5 Food Units while males only 3.
WAITER (OR WAITRESS) - Serving food at a diner (1-2) or drinks at a bar (3-6).
COOK (OR KITCHEN HELP) - Working in a diner (1-4) or bar (5-6) preparing food as a cook or doing food prep and dishwashing as kitchen help.
BARTENDER - Mixing drinks in a bar.
BOUNCER - Providing security in a bar (1-5) or store (6).
ZOMBIE WRANGLER - Zombie and Rager catcher (page, 97). Pay depends upon the position you hold. The Leader gets 50% of the revenue while the Wranglers split the rest. There will be one Leader and 2 + 1/2d6 Wranglers in addition to the character.
Zombies and Ragers wrangled can be sold at Zeke's (page, 99).
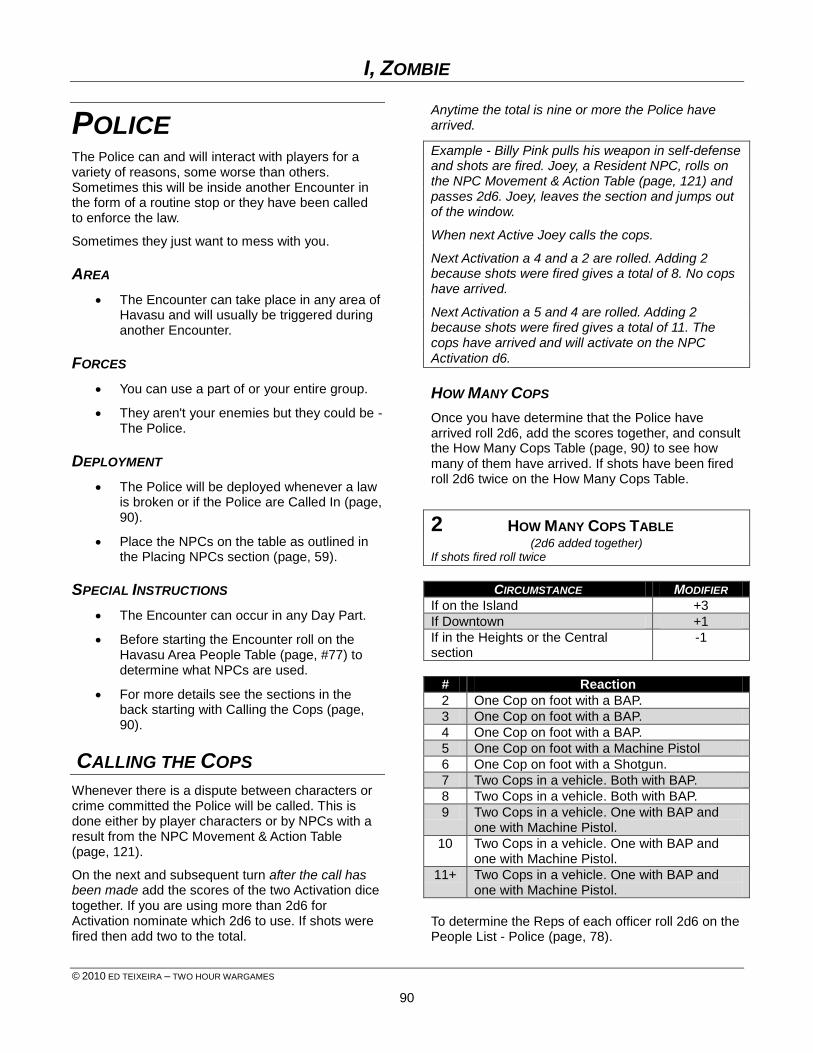
I, ZOMBIE
© 2010 ED TEIXEIRA – TWO HOUR WARGAMES
90
POLICE The Police can and will interact with players for a variety of reasons, some worse than others. Sometimes this will be inside another Encounter in the form of a routine stop or they have been called to enforce the law.
Sometimes they just want to mess with you.
AREA
The Encounter can take place in any area of Havasu and will usually be triggered during another Encounter.
FORCES
You can use a part of or your entire group.
They aren't your enemies but they could be - The Police.
DEPLOYMENT
The Police will be deployed whenever a law is broken or if the Police are Called In (page, 90).
Place the NPCs on the table as outlined in the Placing NPCs section (page, 59).
SPECIAL INSTRUCTIONS
The Encounter can occur in any Day Part.
Before starting the Encounter roll on the Havasu Area People Table (page, #77) to determine what NPCs are used.
For more details see the sections in the back starting with Calling the Cops (page, 90).
CALLING THE COPS
Whenever there is a dispute between characters or crime committed the Police will be called. This is done either by player characters or by NPCs with a result from the NPC Movement & Action Table (page, 121).
On the next and subsequent turn after the call has been made add the scores of the two Activation dice together. If you are using more than 2d6 for Activation nominate which 2d6 to use. If shots were fired then add two to the total.
Anytime the total is nine or more the Police have arrived.
Example - Billy Pink pulls his weapon in self-defense and shots are fired. Joey, a Resident NPC, rolls on the NPC Movement & Action Table (page, 121) and passes 2d6. Joey, leaves the section and jumps out of the window.
When next Active Joey calls the cops.
Next Activation a 4 and a 2 are rolled. Adding 2 because shots were fired gives a total of 8. No cops have arrived.
Next Activation a 5 and 4 are rolled. Adding 2 because shots were fired gives a total of 11. The cops have arrived and will activate on the NPC Activation d6.
HOW MANY COPS
Once you have determine that the Police have arrived roll 2d6, add the scores together, and consult the How Many Cops Table (page, 90) to see how many of them have arrived. If shots have been fired roll 2d6 twice on the How Many Cops Table.
2 HOW MANY COPS TABLE (2d6 added together)
If shots fired roll twice
CIRCUMSTANCE MODIFIER
If on the Island +3
If Downtown +1
If in the Heights or the Central section
-1
# Reaction
2 One Cop on foot with a BAP.
3 One Cop on foot with a BAP.
4 One Cop on foot with a BAP.
5 One Cop on foot with a Machine Pistol
6 One Cop on foot with a Shotgun.
7 Two Cops in a vehicle. Both with BAP.
8 Two Cops in a vehicle. Both with BAP.
9 Two Cops in a vehicle. One with BAP and one with Machine Pistol.
10 Two Cops in a vehicle. One with BAP and one with Machine Pistol.
11+ Two Cops in a vehicle. One with BAP and one with Machine Pistol.
To determine the Reps of each officer roll 2d6 on the People List - Police (page, 78).
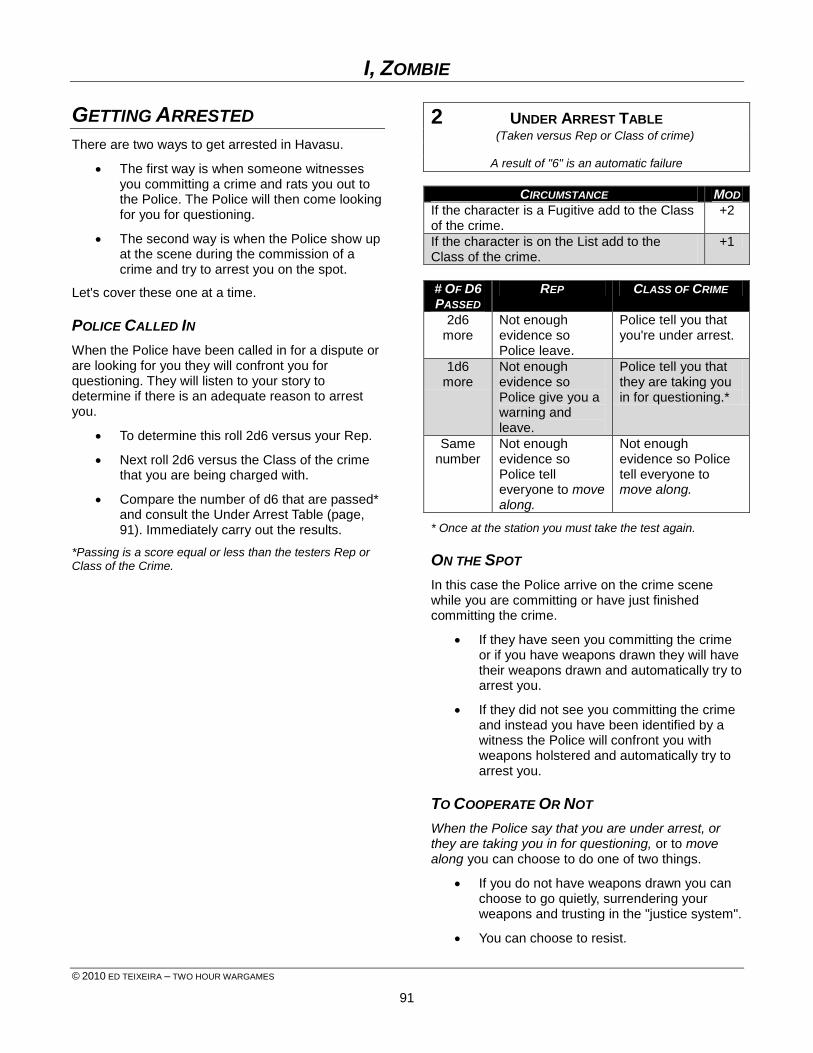
I, ZOMBIE
© 2010 ED TEIXEIRA – TWO HOUR WARGAMES
91
GETTING ARRESTED
There are two ways to get arrested in Havasu.
The first way is when someone witnesses you committing a crime and rats you out to the Police. The Police will then come looking for you for questioning.
The second way is when the Police show up at the scene during the commission of a crime and try to arrest you on the spot.
Let's cover these one at a time.
POLICE CALLED IN
When the Police have been called in for a dispute or are looking for you they will confront you for questioning. They will listen to your story to determine if there is an adequate reason to arrest you.
To determine this roll 2d6 versus your Rep.
Next roll 2d6 versus the Class of the crime that you are being charged with.
Compare the number of d6 that are passed* and consult the Under Arrest Table (page, 91). Immediately carry out the results.
*Passing is a score equal or less than the testers Rep or Class of the Crime.
2 UNDER ARREST TABLE (Taken versus Rep or Class of crime)
A result of "6" is an automatic failure
CIRCUMSTANCE MOD
If the character is a Fugitive add to the Class of the crime.
+2
If the character is on the List add to the Class of the crime.
+1
# OF D6
PASSED REP CLASS OF CRIME
2d6 more
Not enough evidence so Police leave.
Police tell you that you're under arrest.
1d6 more
Not enough evidence so Police give you a warning and leave.
Police tell you that they are taking you in for questioning.*
Same number
Not enough evidence so Police tell everyone to move along.
Not enough evidence so Police tell everyone to move along.
* Once at the station you must take the test again.
ON THE SPOT
In this case the Police arrive on the crime scene while you are committing or have just finished committing the crime.
If they have seen you committing the crime or if you have weapons drawn they will have their weapons drawn and automatically try to arrest you.
If they did not see you committing the crime and instead you have been identified by a witness the Police will confront you with weapons holstered and automatically try to arrest you.
TO COOPERATE OR NOT
When the Police say that you are under arrest, or they are taking you in for questioning, or to move along you can choose to do one of two things.
If you do not have weapons drawn you can choose to go quietly, surrendering your weapons and trusting in the "justice system".
You can choose to resist.
I, ZOMBIE
© 2010 ED TEIXEIRA – TWO HOUR WARGAMES
92
There are three ways to resist arrest.
You can try and Run For It (page, 92).
You can charge into melee with the target taking a Being Charged Test.
You can choose to draw your weapon. If you do then all involved will take the Draw Down Test (page, 119).
RUN FOR IT
If the player chooses to run for it then each figure rolls 1d6 and adds it to their Rep.
Any player with a total higher than all Police sees their chance and can leave the table. The Encounter is over but you are now on the List (page, 95) and considered to be a Fugitive (page, 95).
Any player with a total equal to or less than any Police total fails in their attempt to run for it and must either go quietly, charge into melee or Draw Down (page, 119) but only against those officers. Any officer with a lower total than the player is not involved. If the player defeats those with an equal or higher total he can escape. The Encounter is over but you are now on the List (page, 95) and considered to be a Fugitive (page, 95).
JAIL TIME
Once you are arrested you will be hauled to the jail located in the West End (page, 72) of town near the Arena. From there you have two choices:
Going before a judge (page, 92).
Attempt to escape (page, 95).
GOING BEFORE THE JUDGE
If you are arrested you will go before the judge and he will hear your case. Each crime is tried separately.
If the crime is Class 2 or lower a regular judge will be provided.
In Class 3 or higher crimes Governor Newness will preside over the trial. That's usually not good.
The trial counts as an Involuntary Encounter.
Here's list of punishable offenses in and around Havasu.
DISTURBING THE PEACE
Disturbing the Peace has a very broad definition but includes general rowdiness or whatever the responding Police think it is. It's kind of a catch all crime.
Disturbing the Peace is a Class 1 crime.
BRANDISHING A WEAPON
Brandishing a Weapon is defined as drawing or waving a weapon in public. See the Holstered Weapon Policy on page, 74. This can be a knife as well as a gun. Usually piggy-backed with Endangerment and will cause the perpetrator to stand trial twice for essentially the same crime.
Brandishing a Weapon is a Class 2 crime.
ENDANGERMENT
Pointing a weapon while in LHC can result in you being charged with Endangerment. This is different than using it. Usually piggy-backed with Brandishing a Weapon and will cause the perpetrator to stand trial twice for essentially the same crime.
Endangerment is a Class 2 crime.
STEALING
This one is pretty self-explanatory. Take something that doesn’t belong to you and it's considered to be stealing.
Stealing is a Class 2 crime.
KIDNAPPING
Kidnapping includes illegal captivity as well. Snatch someone and hold them against their will and you'll
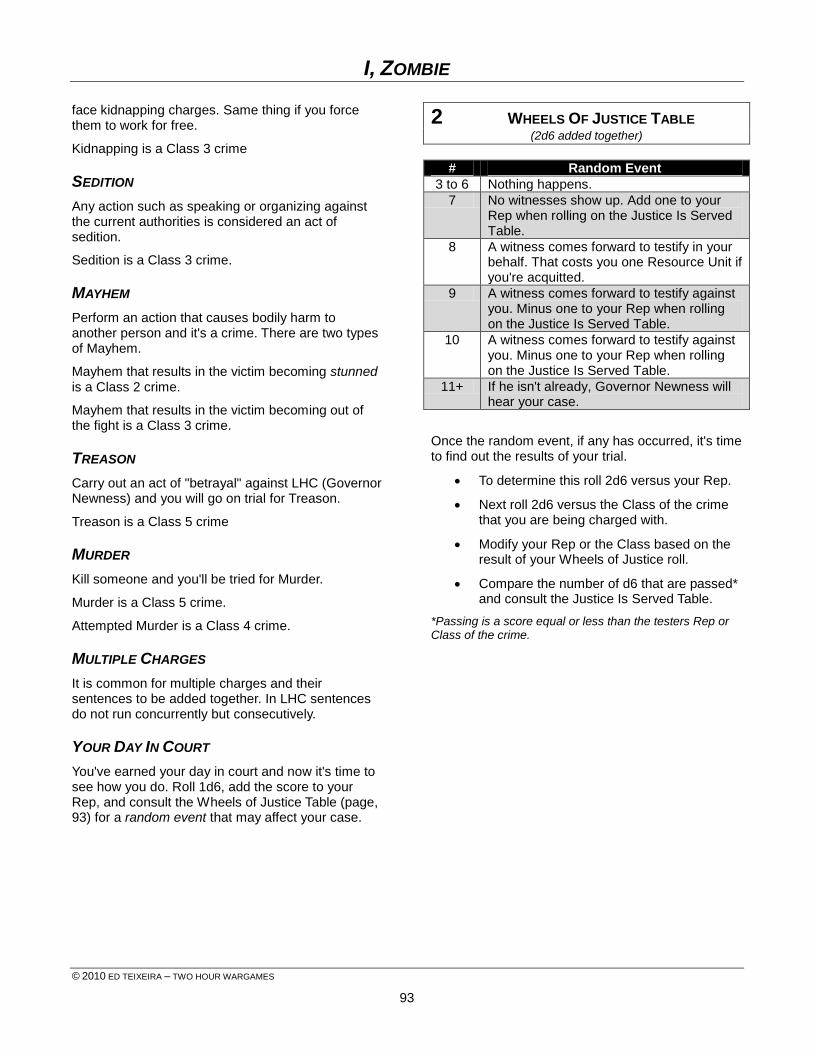
I, ZOMBIE
© 2010 ED TEIXEIRA – TWO HOUR WARGAMES
93
face kidnapping charges. Same thing if you force them to work for free.
Kidnapping is a Class 3 crime
SEDITION
Any action such as speaking or organizing against the current authorities is considered an act of sedition.
Sedition is a Class 3 crime.
MAYHEM
Perform an action that causes bodily harm to another person and it's a crime. There are two types of Mayhem.
Mayhem that results in the victim becoming stunned is a Class 2 crime.
Mayhem that results in the victim becoming out of the fight is a Class 3 crime.
TREASON
Carry out an act of "betrayal" against LHC (Governor Newness) and you will go on trial for Treason.
Treason is a Class 5 crime
MURDER
Kill someone and you'll be tried for Murder.
Murder is a Class 5 crime.
Attempted Murder is a Class 4 crime.
MULTIPLE CHARGES
It is common for multiple charges and their sentences to be added together. In LHC sentences do not run concurrently but consecutively.
YOUR DAY IN COURT
You've earned your day in court and now it's time to see how you do. Roll 1d6, add the score to your Rep, and consult the Wheels of Justice Table (page, 93) for a random event that may affect your case.
2 WHEELS OF JUSTICE TABLE (2d6 added together)
# Random Event
3 to 6 Nothing happens.
7 No witnesses show up. Add one to your Rep when rolling on the Justice Is Served Table.
8 A witness comes forward to testify in your behalf. That costs you one Resource Unit if you're acquitted.
9 A witness comes forward to testify against you. Minus one to your Rep when rolling on the Justice Is Served Table.
10 A witness comes forward to testify against you. Minus one to your Rep when rolling on the Justice Is Served Table.
11+ If he isn't already, Governor Newness will hear your case.
Once the random event, if any has occurred, it's time to find out the results of your trial.
To determine this roll 2d6 versus your Rep.
Next roll 2d6 versus the Class of the crime that you are being charged with.
Modify your Rep or the Class based on the result of your Wheels of Justice roll.
Compare the number of d6 that are passed* and consult the Justice Is Served Table.
*Passing is a score equal or less than the testers Rep or Class of the crime.
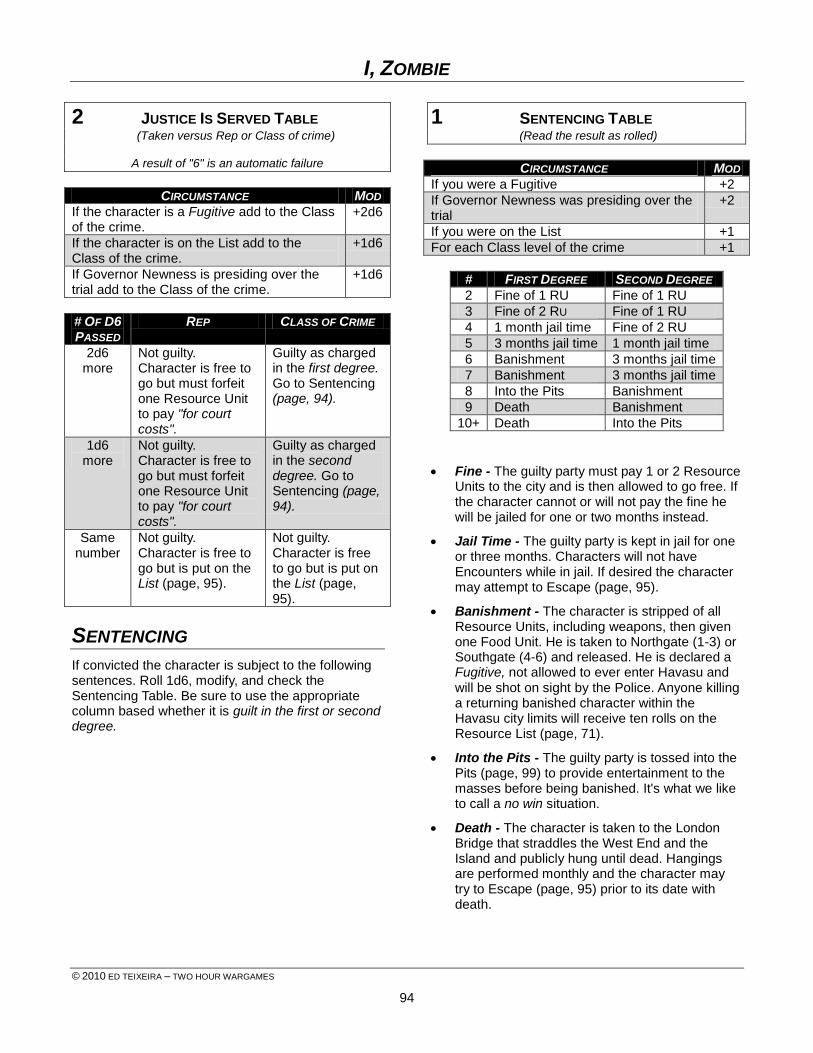
I, ZOMBIE
© 2010 ED TEIXEIRA – TWO HOUR WARGAMES
94
2 JUSTICE IS SERVED TABLE (Taken versus Rep or Class of crime)
A result of "6" is an automatic failure
CIRCUMSTANCE MOD
If the character is a Fugitive add to the Class of the crime.
+2d6
If the character is on the List add to the Class of the crime.
+1d6
If Governor Newness is presiding over the trial add to the Class of the crime.
+1d6
# OF D6
PASSED REP CLASS OF CRIME
2d6 more
Not guilty. Character is free to go but must forfeit one Resource Unit to pay "for court costs".
Guilty as charged in the first degree. Go to Sentencing (page, 94).
1d6 more
Not guilty. Character is free to go but must forfeit one Resource Unit to pay "for court costs".
Guilty as charged in the second degree. Go to Sentencing (page, 94).
Same number
Not guilty. Character is free to go but is put on the List (page, 95).
Not guilty. Character is free to go but is put on the List (page, 95).
SENTENCING
If convicted the character is subject to the following sentences. Roll 1d6, modify, and check the Sentencing Table. Be sure to use the appropriate column based whether it is guilt in the first or second degree.
1 SENTENCING TABLE (Read the result as rolled)
CIRCUMSTANCE MOD
If you were a Fugitive +2
If Governor Newness was presiding over the trial
+2
If you were on the List +1
For each Class level of the crime +1
# FIRST DEGREE SECOND DEGREE
2 Fine of 1 RU Fine of 1 RU
3 Fine of 2 RU Fine of 1 RU
4 1 month jail time Fine of 2 RU
5 3 months jail time 1 month jail time
6 Banishment 3 months jail time
7 Banishment 3 months jail time
8 Into the Pits Banishment
9 Death Banishment
10+ Death Into the Pits
Fine - The guilty party must pay 1 or 2 Resource Units to the city and is then allowed to go free. If the character cannot or will not pay the fine he will be jailed for one or two months instead.
Jail Time - The guilty party is kept in jail for one or three months. Characters will not have Encounters while in jail. If desired the character may attempt to Escape (page, 95).
Banishment - The character is stripped of all Resource Units, including weapons, then given one Food Unit. He is taken to Northgate (1-3) or Southgate (4-6) and released. He is declared a Fugitive, not allowed to ever enter Havasu and will be shot on sight by the Police. Anyone killing a returning banished character within the Havasu city limits will receive ten rolls on the Resource List (page, 71).
Into the Pits - The guilty party is tossed into the Pits (page, 99) to provide entertainment to the masses before being banished. It's what we like to call a no win situation.
Death - The character is taken to the London Bridge that straddles the West End and the Island and publicly hung until dead. Hangings are performed monthly and the character may try to Escape (page, 95) prior to its date with death.
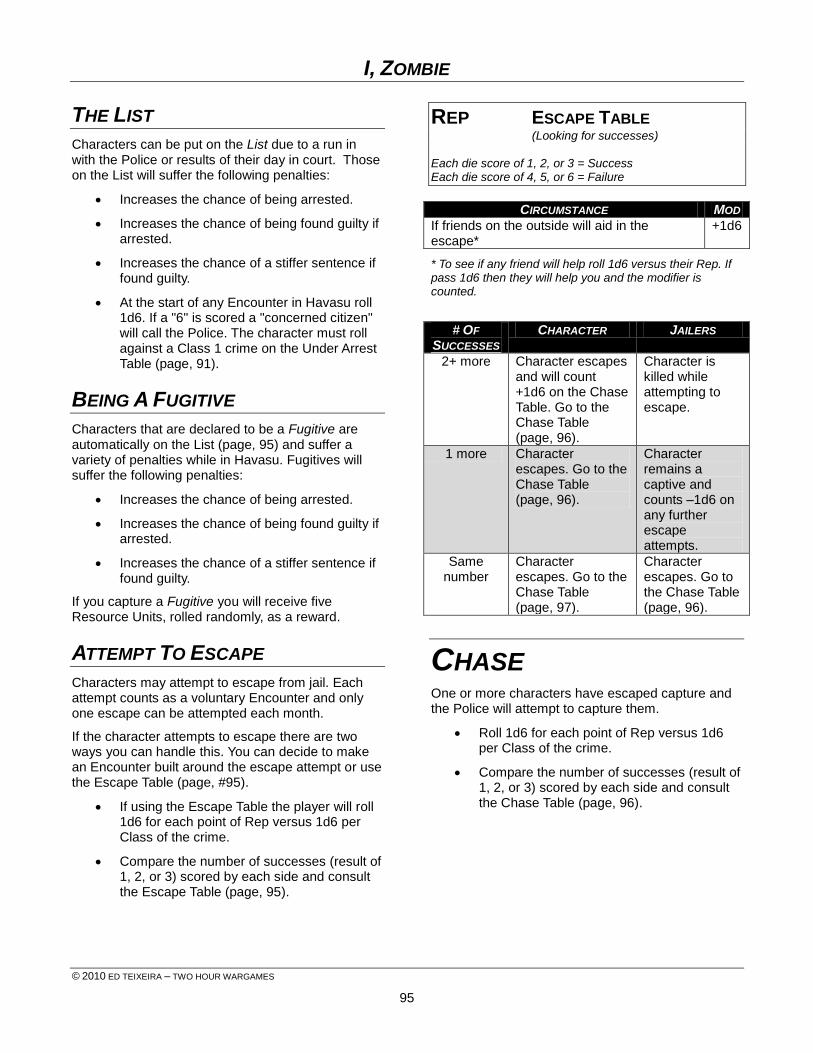
I, ZOMBIE
© 2010 ED TEIXEIRA – TWO HOUR WARGAMES
95
THE LIST
Characters can be put on the List due to a run in with the Police or results of their day in court. Those on the List will suffer the following penalties:
Increases the chance of being arrested.
Increases the chance of being found guilty if arrested.
Increases the chance of a stiffer sentence if found guilty.
At the start of any Encounter in Havasu roll 1d6. If a "6" is scored a "concerned citizen" will call the Police. The character must roll against a Class 1 crime on the Under Arrest Table (page, 91).
BEING A FUGITIVE
Characters that are declared to be a Fugitive are automatically on the List (page, 95) and suffer a variety of penalties while in Havasu. Fugitives will suffer the following penalties:
Increases the chance of being arrested.
Increases the chance of being found guilty if arrested.
Increases the chance of a stiffer sentence if found guilty.
If you capture a Fugitive you will receive five Resource Units, rolled randomly, as a reward.
ATTEMPT TO ESCAPE
Characters may attempt to escape from jail. Each attempt counts as a voluntary Encounter and only one escape can be attempted each month.
If the character attempts to escape there are two ways you can handle this. You can decide to make an Encounter built around the escape attempt or use the Escape Table (page, #95).
If using the Escape Table the player will roll 1d6 for each point of Rep versus 1d6 per Class of the crime.
Compare the number of successes (result of 1, 2, or 3) scored by each side and consult the Escape Table (page, 95).
REP ESCAPE TABLE (Looking for successes)
Each die score of 1, 2, or 3 = Success Each die score of 4, 5, or 6 = Failure
CIRCUMSTANCE MOD
If friends on the outside will aid in the escape*
+1d6
* To see if any friend will help roll 1d6 versus their Rep. If pass 1d6 then they will help you and the modifier is counted.
# OF
SUCCESSES CHARACTER JAILERS
2+ more Character escapes and will count +1d6 on the Chase Table. Go to the Chase Table (page, 96).
Character is killed while attempting to escape.
1 more Character escapes. Go to the Chase Table (page, 96).
Character remains a captive and counts –1d6 on any further escape attempts.
Same number
Character escapes. Go to the Chase Table (page, 97).
Character escapes. Go to the Chase Table (page, 96).
CHASE One or more characters have escaped capture and the Police will attempt to capture them.
Roll 1d6 for each point of Rep versus 1d6 per Class of the crime.
Compare the number of successes (result of 1, 2, or 3) scored by each side and consult the Chase Table (page, 96).
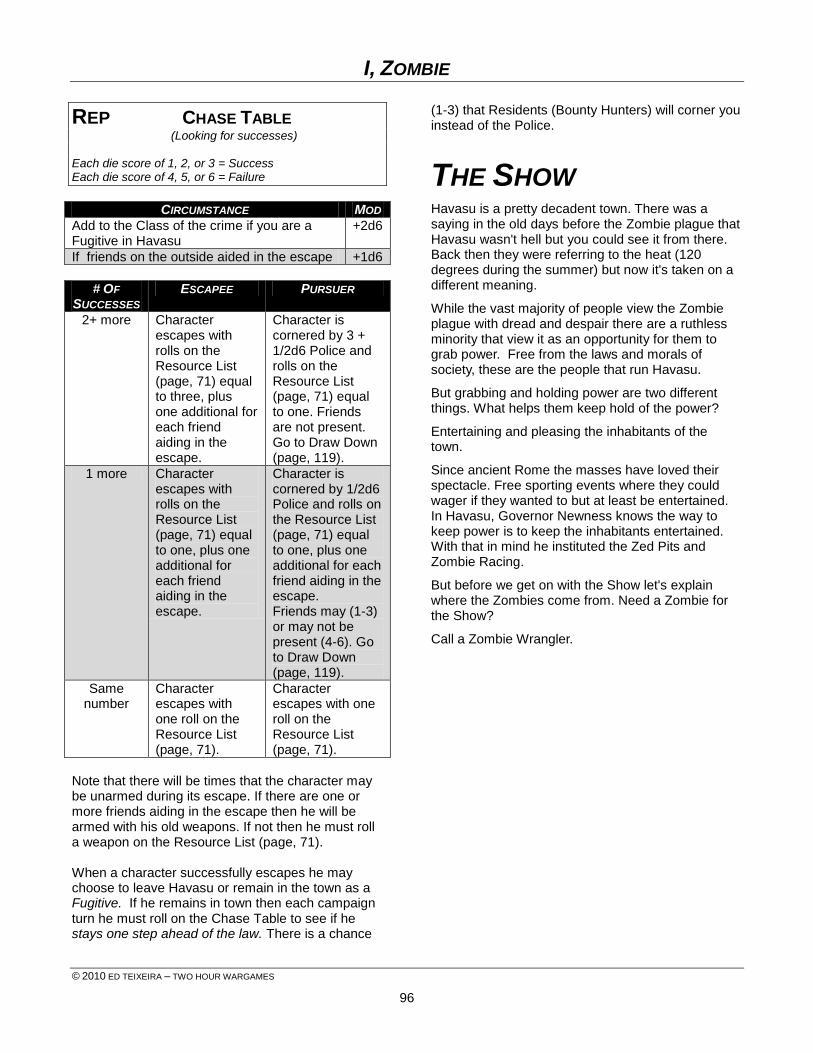
I, ZOMBIE
© 2010 ED TEIXEIRA – TWO HOUR WARGAMES
96
REP CHASE TABLE (Looking for successes)
Each die score of 1, 2, or 3 = Success Each die score of 4, 5, or 6 = Failure
CIRCUMSTANCE MOD
Add to the Class of the crime if you are a Fugitive in Havasu
+2d6
If friends on the outside aided in the escape +1d6
# OF
SUCCESSES ESCAPEE PURSUER
2+ more Character escapes with rolls on the Resource List (page, 71) equal to three, plus one additional for each friend aiding in the escape.
Character is cornered by 3 + 1/2d6 Police and rolls on the Resource List (page, 71) equal to one. Friends are not present. Go to Draw Down (page, 119).
1 more Character escapes with rolls on the Resource List (page, 71) equal to one, plus one additional for each friend aiding in the escape.
Character is cornered by 1/2d6 Police and rolls on the Resource List (page, 71) equal to one, plus one additional for each friend aiding in the escape. Friends may (1-3) or may not be present (4-6). Go to Draw Down (page, 119).
Same number
Character escapes with one roll on the Resource List (page, 71).
Character escapes with one roll on the Resource List (page, 71).
Note that there will be times that the character may be unarmed during its escape. If there are one or more friends aiding in the escape then he will be armed with his old weapons. If not then he must roll a weapon on the Resource List (page, 71). When a character successfully escapes he may choose to leave Havasu or remain in the town as a Fugitive. If he remains in town then each campaign turn he must roll on the Chase Table to see if he stays one step ahead of the law. There is a chance
(1-3) that Residents (Bounty Hunters) will corner you instead of the Police.
THE SHOW Havasu is a pretty decadent town. There was a saying in the old days before the Zombie plague that Havasu wasn't hell but you could see it from there. Back then they were referring to the heat (120 degrees during the summer) but now it's taken on a different meaning.
While the vast majority of people view the Zombie plague with dread and despair there are a ruthless minority that view it as an opportunity for them to grab power. Free from the laws and morals of society, these are the people that run Havasu.
But grabbing and holding power are two different things. What helps them keep hold of the power?
Entertaining and pleasing the inhabitants of the town.
Since ancient Rome the masses have loved their spectacle. Free sporting events where they could wager if they wanted to but at least be entertained. In Havasu, Governor Newness knows the way to keep power is to keep the inhabitants entertained. With that in mind he instituted the Zed Pits and Zombie Racing.
But before we get on with the Show let's explain where the Zombies come from. Need a Zombie for the Show?
Call a Zombie Wrangler.
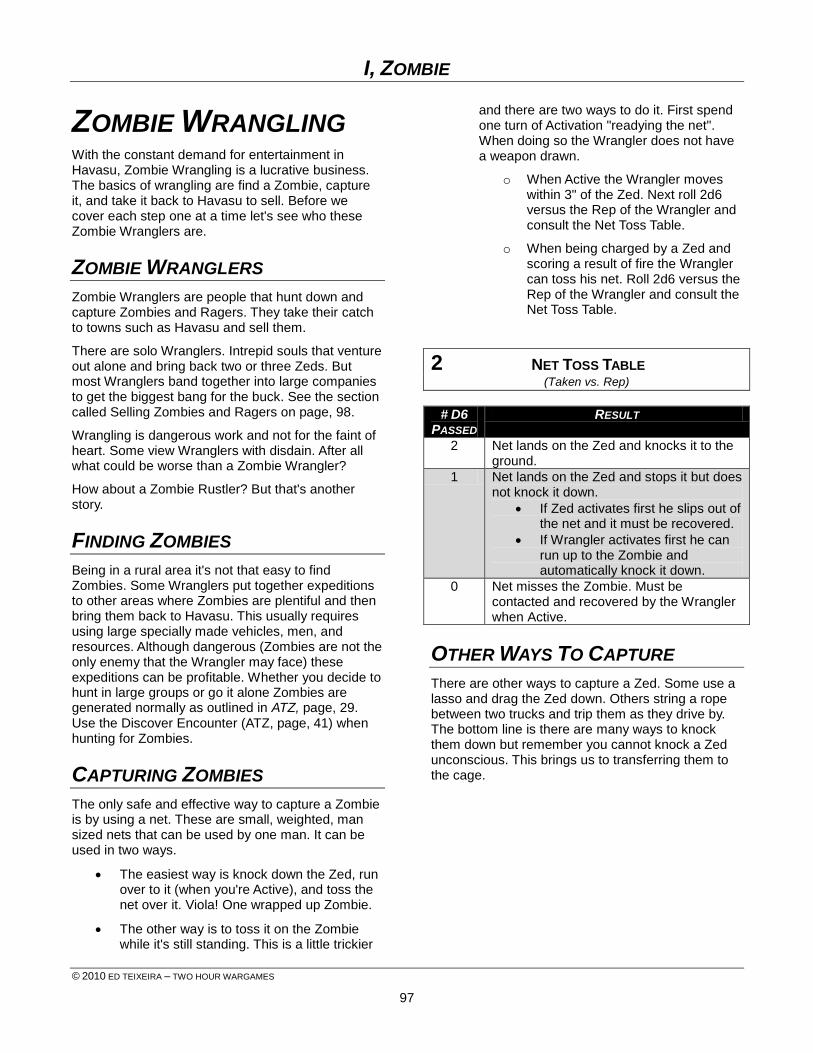
I, ZOMBIE
© 2010 ED TEIXEIRA – TWO HOUR WARGAMES
97
ZOMBIE WRANGLING With the constant demand for entertainment in Havasu, Zombie Wrangling is a lucrative business. The basics of wrangling are find a Zombie, capture it, and take it back to Havasu to sell. Before we cover each step one at a time let's see who these Zombie Wranglers are.
ZOMBIE WRANGLERS
Zombie Wranglers are people that hunt down and capture Zombies and Ragers. They take their catch to towns such as Havasu and sell them.
There are solo Wranglers. Intrepid souls that venture out alone and bring back two or three Zeds. But most Wranglers band together into large companies to get the biggest bang for the buck. See the section called Selling Zombies and Ragers on page, 98.
Wrangling is dangerous work and not for the faint of heart. Some view Wranglers with disdain. After all what could be worse than a Zombie Wrangler?
How about a Zombie Rustler? But that's another story.
FINDING ZOMBIES
Being in a rural area it's not that easy to find Zombies. Some Wranglers put together expeditions to other areas where Zombies are plentiful and then bring them back to Havasu. This usually requires using large specially made vehicles, men, and resources. Although dangerous (Zombies are not the only enemy that the Wrangler may face) these expeditions can be profitable. Whether you decide to hunt in large groups or go it alone Zombies are generated normally as outlined in ATZ, page, 29. Use the Discover Encounter (ATZ, page, 41) when hunting for Zombies.
CAPTURING ZOMBIES
The only safe and effective way to capture a Zombie is by using a net. These are small, weighted, man sized nets that can be used by one man. It can be used in two ways.
The easiest way is knock down the Zed, run over to it (when you're Active), and toss the net over it. Viola! One wrapped up Zombie.
The other way is to toss it on the Zombie while it's still standing. This is a little trickier
and there are two ways to do it. First spend one turn of Activation "readying the net". When doing so the Wrangler does not have a weapon drawn.
o When Active the Wrangler moves within 3" of the Zed. Next roll 2d6 versus the Rep of the Wrangler and consult the Net Toss Table.
o When being charged by a Zed and scoring a result of fire the Wrangler can toss his net. Roll 2d6 versus the Rep of the Wrangler and consult the Net Toss Table.
2 NET TOSS TABLE (Taken vs. Rep)
# D6
PASSED RESULT
2 Net lands on the Zed and knocks it to the ground.
1 Net lands on the Zed and stops it but does not knock it down.
If Zed activates first he slips out of the net and it must be recovered.
If Wrangler activates first he can run up to the Zombie and automatically knock it down.
0 Net misses the Zombie. Must be contacted and recovered by the Wrangler when Active.
OTHER WAYS TO CAPTURE
There are other ways to capture a Zed. Some use a lasso and drag the Zed down. Others string a rope between two trucks and trip them as they drive by. The bottom line is there are many ways to knock them down but remember you cannot knock a Zed unconscious. This brings us to transferring them to the cage.
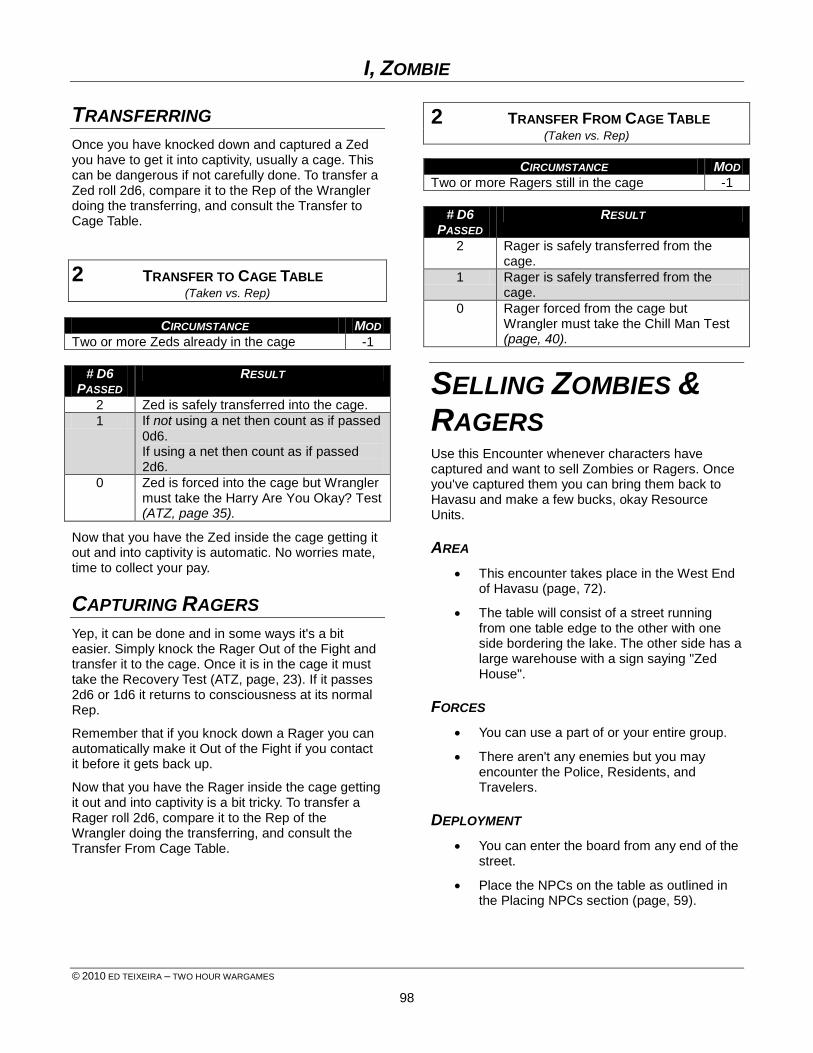
I, ZOMBIE
© 2010 ED TEIXEIRA – TWO HOUR WARGAMES
98
TRANSFERRING
Once you have knocked down and captured a Zed you have to get it into captivity, usually a cage. This can be dangerous if not carefully done. To transfer a Zed roll 2d6, compare it to the Rep of the Wrangler doing the transferring, and consult the Transfer to Cage Table.
2 TRANSFER TO CAGE TABLE (Taken vs. Rep)
CIRCUMSTANCE MOD
Two or more Zeds already in the cage -1
# D6
PASSED RESULT
2 Zed is safely transferred into the cage.
1 If not using a net then count as if passed 0d6. If using a net then count as if passed 2d6.
0 Zed is forced into the cage but Wrangler must take the Harry Are You Okay? Test (ATZ, page 35).
Now that you have the Zed inside the cage getting it out and into captivity is automatic. No worries mate, time to collect your pay.
CAPTURING RAGERS
Yep, it can be done and in some ways it's a bit easier. Simply knock the Rager Out of the Fight and transfer it to the cage. Once it is in the cage it must take the Recovery Test (ATZ, page, 23). If it passes 2d6 or 1d6 it returns to consciousness at its normal Rep.
Remember that if you knock down a Rager you can automatically make it Out of the Fight if you contact it before it gets back up.
Now that you have the Rager inside the cage getting it out and into captivity is a bit tricky. To transfer a Rager roll 2d6, compare it to the Rep of the Wrangler doing the transferring, and consult the Transfer From Cage Table.
2 TRANSFER FROM CAGE TABLE (Taken vs. Rep)
CIRCUMSTANCE MOD
Two or more Ragers still in the cage -1
# D6
PASSED RESULT
2 Rager is safely transferred from the cage.
1 Rager is safely transferred from the cage.
0 Rager forced from the cage but Wrangler must take the Chill Man Test (page, 40).
SELLING ZOMBIES &
RAGERS Use this Encounter whenever characters have captured and want to sell Zombies or Ragers. Once you've captured them you can bring them back to Havasu and make a few bucks, okay Resource Units.
AREA
This encounter takes place in the West End of Havasu (page, 72).
The table will consist of a street running from one table edge to the other with one side bordering the lake. The other side has a large warehouse with a sign saying "Zed House".
FORCES
You can use a part of or your entire group.
There aren't any enemies but you may encounter the Police, Residents, and Travelers.
DEPLOYMENT
You can enter the board from any end of the street.
Place the NPCs on the table as outlined in the Placing NPCs section (page, 59).
I, ZOMBIE
© 2010 ED TEIXEIRA – TWO HOUR WARGAMES
99
SPECIAL INSTRUCTIONS
The Zed House only buys Zombies and Ragers in the Daytime.
Before starting the Encounter roll on the Havasu Area People Table (page, 77) to determine what NPCs are used.
Inside the Zed House there will be 2 + 1/2d6 off duty Police officers with shotguns (1-3) or Assault Rifles (4-6) and BAP. Each officer counts as protected (ATZ, page, 6). Determine their Rep by rolling on the Police List (page, 95).
SELLING THE ZOMBIES OR RAGERS
Once you have entered the Zed House (leave your Zeds out back) you will negotiate price with Zeke (Rep 3 BAP) who runs the place. Zeke will buy all the Zeds or Ragers you have. Once you have agreed on the price you must unload your Zeds and Ragers (page, 98). Once finished go back inside and Zeke will pay you the agreed price.
MARKET PRICE
When you bring in a Zed or Rager you will be compensated for your work.
To see what the market price is roll 2d6.
Count the lower result for a Zombie and the higher result for a Rager.
You will receive this many Resource Units per captive. What type you ask?
Roll 2d6 for each Resource Unit Zeke pays you, add the scores, and consult the Wages of Sin Table (page, 99).
2 Wages of Sin Table (2d6 added together)
If desired may substitute a Food Unit for any other
# Type of Resource
2 to 7 Food
8 BA Pistol
9 Shotgun
10 Assault Rifle
11 Fuel
12 Fuel
THE ZED PITS The Zed Pits are small enclosures either dug into the ground or caged in where humans are pitted against Zombies in hand-to-hand combat. Either the human kills the Zed or the Zed kills the human. Bets are taken as to who will win.
It's real simple. One human enters the pit where a Zombie waits. The Zombie is chained to one end in a way that limits his range to half of the pit. Behind him is a machete. The human has to get past the Zombie, grab the machete, and then finish off the Zombie.
Now the question I'm sure you're asking yourself is what human in his right mind would enter the Pit. There are two types. The first are down on their luck humans who need to make some Resources really fast. The second and most common type are criminals or more accurately those that have been found guilty by Governor Newness.
PIT FIGHTING - ZEDS AND RAGERS
Here's how the Pit Fights are done. We've included a sample Pit for your use (page, 99).
SETTING UP THE FIGHT
Here's how to set up a Pit Fight.
Roll 1d6. If the score is a 1 or 2 then the Zed Rep is reduced to 3. Any other result means the Zed has the normal Rep of 4.
Next roll 2d6 and take the lower score. This is the Rep of the human opponent but it can never be lower than 2.
Consult the Betting Tables (page, 100) to establish the odds.
Next players can bet on the Zed, Rager, or human. Pit Fighters may bet on themselves if desired. All bets are made with Food Units.
Once the bets are placed roll 1d6. On a result of "1" the Zombie is actually a Smarty.
SET THE ODDS
Once you have chosen the participants for the fight it's time to Set the Betting Odds.
If fighting a Zed or Rager refer to the Zed Pits Betting Tables (page, 100).
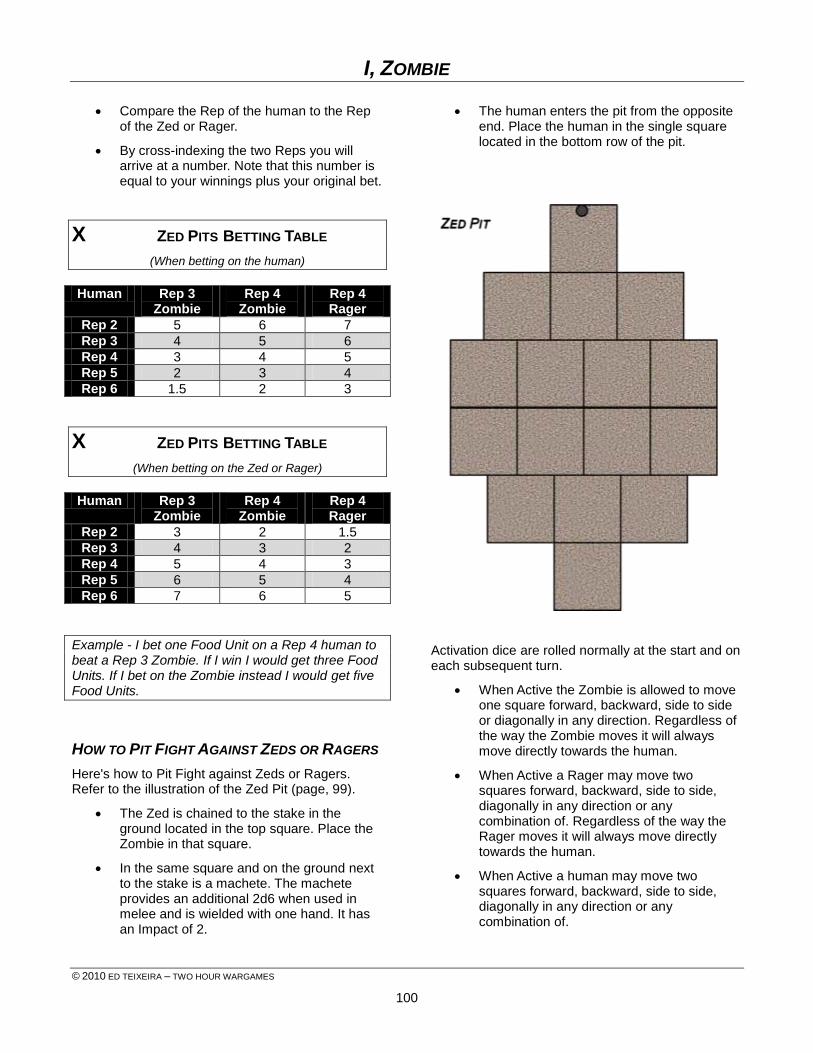
I, ZOMBIE
© 2010 ED TEIXEIRA – TWO HOUR WARGAMES
100
Compare the Rep of the human to the Rep of the Zed or Rager.
By cross-indexing the two Reps you will arrive at a number. Note that this number is equal to your winnings plus your original bet.
X ZED PITS BETTING TABLE
(When betting on the human)
Human Rep 3 Zombie
Rep 4 Zombie
Rep 4 Rager
Rep 2 5 6 7
Rep 3 4 5 6
Rep 4 3 4 5
Rep 5 2 3 4
Rep 6 1.5 2 3
X ZED PITS BETTING TABLE
(When betting on the Zed or Rager)
Human Rep 3 Zombie
Rep 4 Zombie
Rep 4 Rager
Rep 2 3 2 1.5
Rep 3 4 3 2
Rep 4 5 4 3
Rep 5 6 5 4
Rep 6 7 6 5
Example - I bet one Food Unit on a Rep 4 human to beat a Rep 3 Zombie. If I win I would get three Food Units. If I bet on the Zombie instead I would get five Food Units.
HOW TO PIT FIGHT AGAINST ZEDS OR RAGERS
Here's how to Pit Fight against Zeds or Ragers. Refer to the illustration of the Zed Pit (page, 99).
The Zed is chained to the stake in the ground located in the top square. Place the Zombie in that square.
In the same square and on the ground next to the stake is a machete. The machete provides an additional 2d6 when used in melee and is wielded with one hand. It has an Impact of 2.
The human enters the pit from the opposite end. Place the human in the single square located in the bottom row of the pit.
Activation dice are rolled normally at the start and on each subsequent turn.
When Active the Zombie is allowed to move one square forward, backward, side to side or diagonally in any direction. Regardless of the way the Zombie moves it will always move directly towards the human.
When Active a Rager may move two squares forward, backward, side to side, diagonally in any direction or any combination of. Regardless of the way the Rager moves it will always move directly towards the human.
When Active a human may move two squares forward, backward, side to side, diagonally in any direction or any combination of.
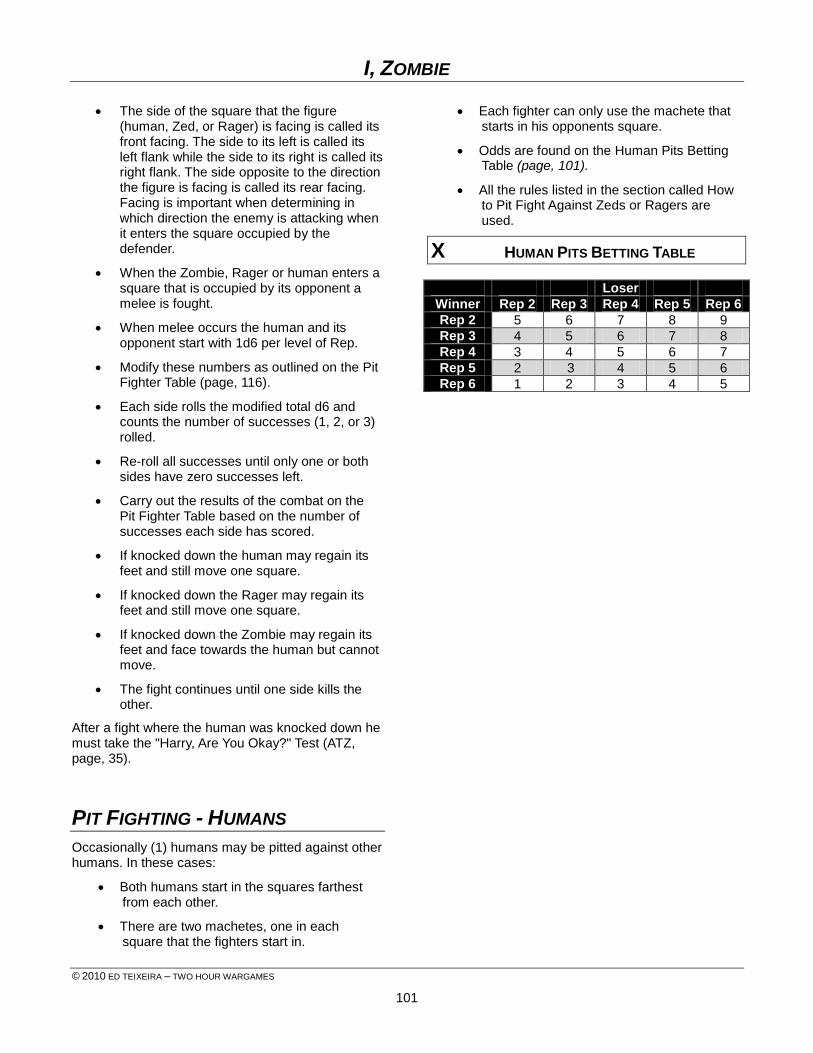
I, ZOMBIE
© 2010 ED TEIXEIRA – TWO HOUR WARGAMES
101
The side of the square that the figure (human, Zed, or Rager) is facing is called its front facing. The side to its left is called its left flank while the side to its right is called its right flank. The side opposite to the direction the figure is facing is called its rear facing. Facing is important when determining in which direction the enemy is attacking when it enters the square occupied by the defender.
When the Zombie, Rager or human enters a square that is occupied by its opponent a melee is fought.
When melee occurs the human and its opponent start with 1d6 per level of Rep.
Modify these numbers as outlined on the Pit Fighter Table (page, 116).
Each side rolls the modified total d6 and counts the number of successes (1, 2, or 3) rolled.
Re-roll all successes until only one or both sides have zero successes left.
Carry out the results of the combat on the Pit Fighter Table based on the number of successes each side has scored.
If knocked down the human may regain its feet and still move one square.
If knocked down the Rager may regain its feet and still move one square.
If knocked down the Zombie may regain its feet and face towards the human but cannot move.
The fight continues until one side kills the other.
After a fight where the human was knocked down he must take the "Harry, Are You Okay?" Test (ATZ, page, 35).
PIT FIGHTING - HUMANS
Occasionally (1) humans may be pitted against other humans. In these cases:
Both humans start in the squares farthest from each other.
There are two machetes, one in each square that the fighters start in.
Each fighter can only use the machete that starts in his opponents square.
Odds are found on the Human Pits Betting Table (page, 101).
All the rules listed in the section called How to Pit Fight Against Zeds or Ragers are used.
X HUMAN PITS BETTING TABLE
Loser
Winner Rep 2 Rep 3 Rep 4 Rep 5 Rep 6
Rep 2 5 6 7 8 9
Rep 3 4 5 6 7 8
Rep 4 3 4 5 6 7
Rep 5 2 3 4 5 6
Rep 6 1 2 3 4 5
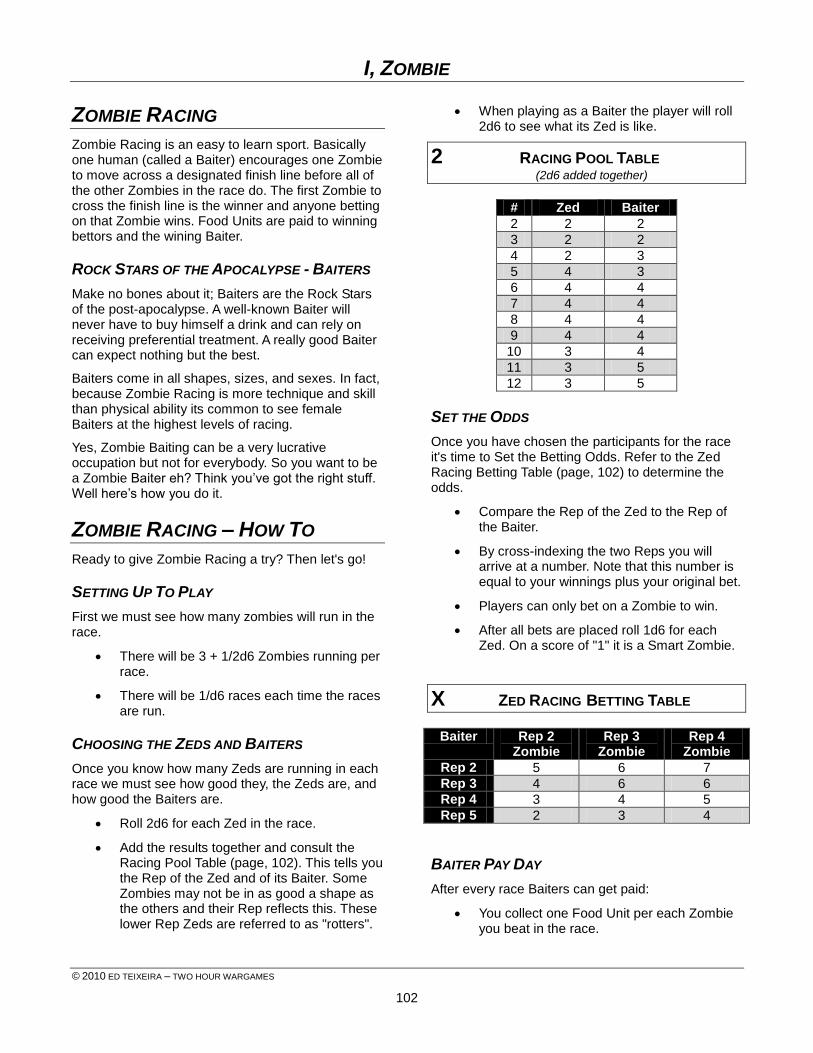
I, ZOMBIE
© 2010 ED TEIXEIRA – TWO HOUR WARGAMES
102
ZOMBIE RACING
Zombie Racing is an easy to learn sport. Basically one human (called a Baiter) encourages one Zombie to move across a designated finish line before all of the other Zombies in the race do. The first Zombie to cross the finish line is the winner and anyone betting on that Zombie wins. Food Units are paid to winning bettors and the wining Baiter.
ROCK STARS OF THE APOCALYPSE - BAITERS
Make no bones about it; Baiters are the Rock Stars of the post-apocalypse. A well-known Baiter will never have to buy himself a drink and can rely on receiving preferential treatment. A really good Baiter can expect nothing but the best.
Baiters come in all shapes, sizes, and sexes. In fact, because Zombie Racing is more technique and skill than physical ability its common to see female Baiters at the highest levels of racing.
Yes, Zombie Baiting can be a very lucrative occupation but not for everybody. So you want to be a Zombie Baiter eh? Think you’ve got the right stuff. Well here’s how you do it.
ZOMBIE RACING – HOW TO
Ready to give Zombie Racing a try? Then let's go!
SETTING UP TO PLAY
First we must see how many zombies will run in the race.
There will be 3 + 1/2d6 Zombies running per race.
There will be 1/d6 races each time the races are run.
CHOOSING THE ZEDS AND BAITERS
Once you know how many Zeds are running in each race we must see how good they, the Zeds are, and how good the Baiters are.
Roll 2d6 for each Zed in the race.
Add the results together and consult the Racing Pool Table (page, 102). This tells you the Rep of the Zed and of its Baiter. Some Zombies may not be in as good a shape as the others and their Rep reflects this. These lower Rep Zeds are referred to as "rotters".
When playing as a Baiter the player will roll 2d6 to see what its Zed is like.
2 RACING POOL TABLE (2d6 added together)
# Zed Baiter
2 2 2
3 2 2
4 2 3
5 4 3
6 4 4
7 4 4
8 4 4
9 4 4
10 3 4
11 3 5
12 3 5
SET THE ODDS
Once you have chosen the participants for the race it's time to Set the Betting Odds. Refer to the Zed Racing Betting Table (page, 102) to determine the odds.
Compare the Rep of the Zed to the Rep of the Baiter.
By cross-indexing the two Reps you will arrive at a number. Note that this number is equal to your winnings plus your original bet.
Players can only bet on a Zombie to win.
After all bets are placed roll 1d6 for each Zed. On a score of "1" it is a Smart Zombie.
X ZED RACING BETTING TABLE
Baiter Rep 2 Zombie
Rep 3 Zombie
Rep 4 Zombie
Rep 2 5 6 7
Rep 3 4 6 6
Rep 4 3 4 5
Rep 5 2 3 4
BAITER PAY DAY
After every race Baiters can get paid:
You collect one Food Unit per each Zombie you beat in the race.
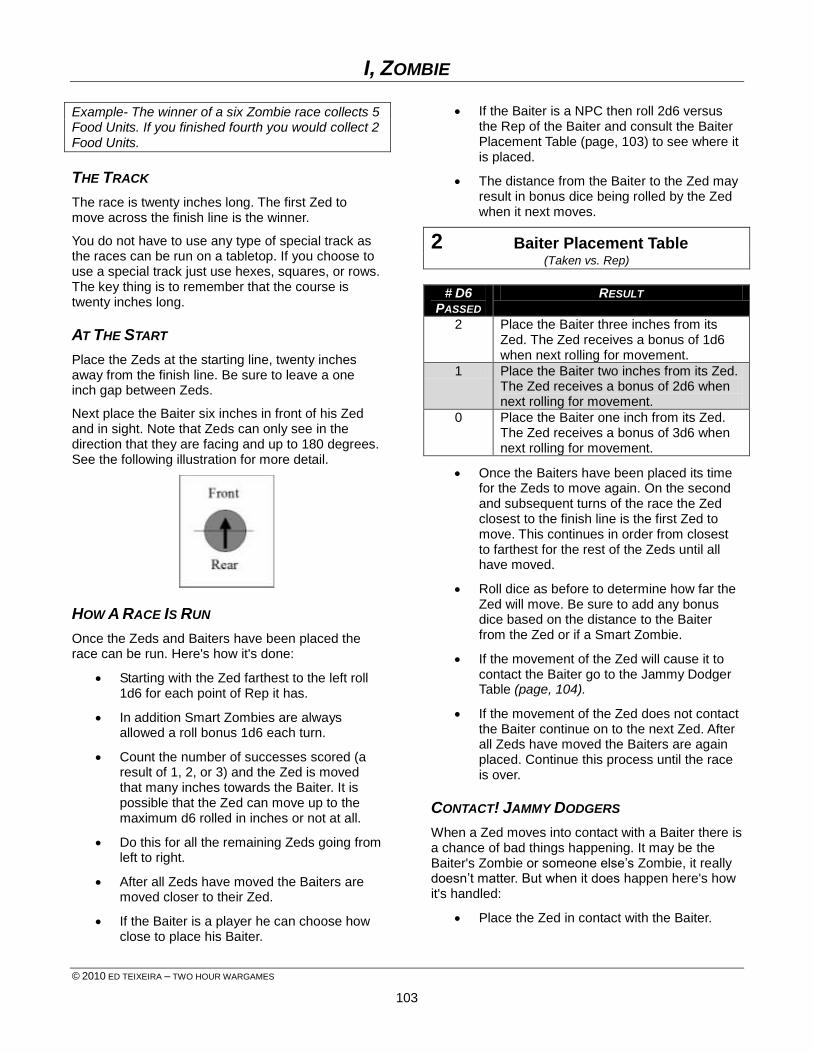
I, ZOMBIE
© 2010 ED TEIXEIRA – TWO HOUR WARGAMES
103
Example- The winner of a six Zombie race collects 5 Food Units. If you finished fourth you would collect 2 Food Units.
THE TRACK
The race is twenty inches long. The first Zed to move across the finish line is the winner.
You do not have to use any type of special track as the races can be run on a tabletop. If you choose to use a special track just use hexes, squares, or rows. The key thing is to remember that the course is twenty inches long.
AT THE START
Place the Zeds at the starting line, twenty inches away from the finish line. Be sure to leave a one inch gap between Zeds.
Next place the Baiter six inches in front of his Zed and in sight. Note that Zeds can only see in the direction that they are facing and up to 180 degrees. See the following illustration for more detail.
HOW A RACE IS RUN
Once the Zeds and Baiters have been placed the race can be run. Here's how it's done:
Starting with the Zed farthest to the left roll 1d6 for each point of Rep it has.
In addition Smart Zombies are always allowed a roll bonus 1d6 each turn.
Count the number of successes scored (a result of 1, 2, or 3) and the Zed is moved that many inches towards the Baiter. It is possible that the Zed can move up to the maximum d6 rolled in inches or not at all.
Do this for all the remaining Zeds going from left to right.
After all Zeds have moved the Baiters are moved closer to their Zed.
If the Baiter is a player he can choose how close to place his Baiter.
If the Baiter is a NPC then roll 2d6 versus the Rep of the Baiter and consult the Baiter Placement Table (page, 103) to see where it is placed.
The distance from the Baiter to the Zed may result in bonus dice being rolled by the Zed when it next moves.
2 Baiter Placement Table (Taken vs. Rep)
# D6
PASSED RESULT
2 Place the Baiter three inches from its Zed. The Zed receives a bonus of 1d6 when next rolling for movement.
1 Place the Baiter two inches from its Zed. The Zed receives a bonus of 2d6 when next rolling for movement.
0 Place the Baiter one inch from its Zed. The Zed receives a bonus of 3d6 when next rolling for movement.
Once the Baiters have been placed its time for the Zeds to move again. On the second and subsequent turns of the race the Zed closest to the finish line is the first Zed to move. This continues in order from closest to farthest for the rest of the Zeds until all have moved.
Roll dice as before to determine how far the Zed will move. Be sure to add any bonus dice based on the distance to the Baiter from the Zed or if a Smart Zombie.
If the movement of the Zed will cause it to contact the Baiter go to the Jammy Dodger Table (page, 104).
If the movement of the Zed does not contact the Baiter continue on to the next Zed. After all Zeds have moved the Baiters are again placed. Continue this process until the race is over.
CONTACT! JAMMY DODGERS
When a Zed moves into contact with a Baiter there is a chance of bad things happening. It may be the Baiter's Zombie or someone else’s Zombie, it really doesn’t matter. But when it does happen here's how it's handled:
Place the Zed in contact with the Baiter.
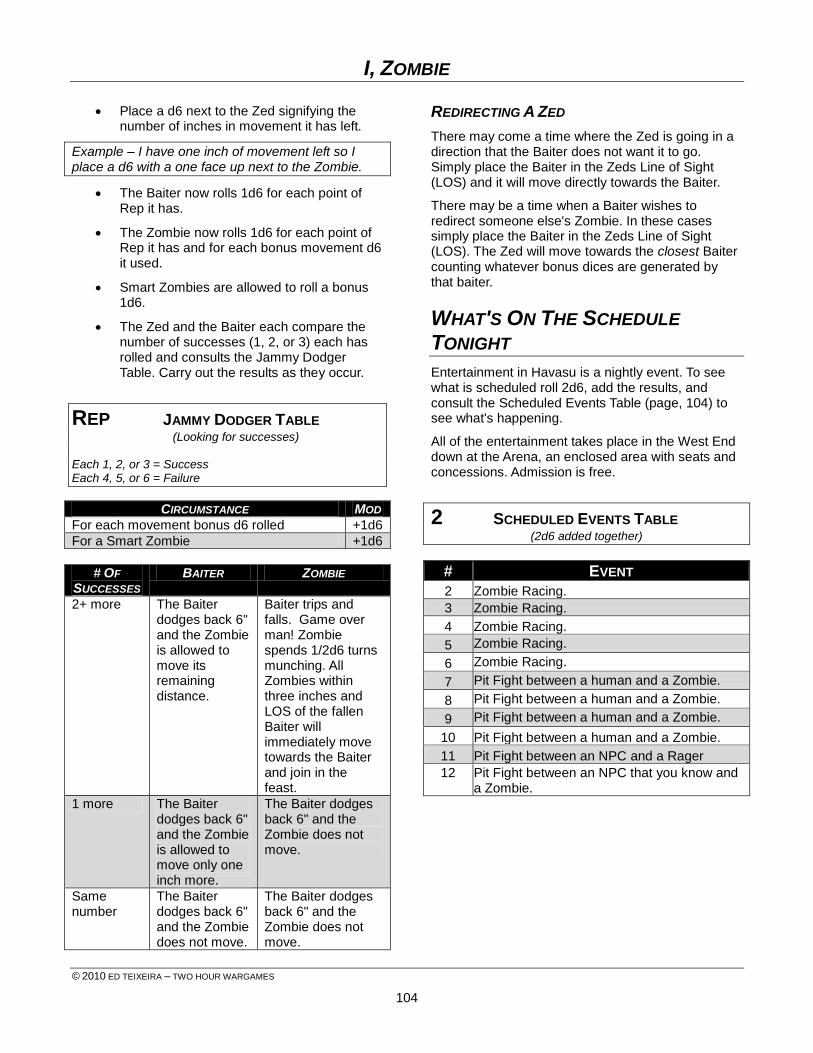
I, ZOMBIE
© 2010 ED TEIXEIRA – TWO HOUR WARGAMES
104
Place a d6 next to the Zed signifying the number of inches in movement it has left.
Example – I have one inch of movement left so I place a d6 with a one face up next to the Zombie.
The Baiter now rolls 1d6 for each point of Rep it has.
The Zombie now rolls 1d6 for each point of Rep it has and for each bonus movement d6 it used.
Smart Zombies are allowed to roll a bonus 1d6.
The Zed and the Baiter each compare the number of successes (1, 2, or 3) each has rolled and consults the Jammy Dodger Table. Carry out the results as they occur.
REP JAMMY DODGER TABLE (Looking for successes)
Each 1, 2, or 3 = Success Each 4, 5, or 6 = Failure
CIRCUMSTANCE MOD
For each movement bonus d6 rolled +1d6
For a Smart Zombie +1d6
# OF
SUCCESSES BAITER ZOMBIE
2+ more The Baiter dodges back 6" and the Zombie is allowed to move its remaining distance.
Baiter trips and falls. Game over man! Zombie spends 1/2d6 turns munching. All Zombies within three inches and LOS of the fallen Baiter will immediately move towards the Baiter and join in the feast.
1 more The Baiter dodges back 6" and the Zombie is allowed to move only one inch more.
The Baiter dodges back 6" and the Zombie does not move.
Same number
The Baiter dodges back 6" and the Zombie does not move.
The Baiter dodges back 6" and the Zombie does not move.
REDIRECTING A ZED
There may come a time where the Zed is going in a direction that the Baiter does not want it to go. Simply place the Baiter in the Zeds Line of Sight (LOS) and it will move directly towards the Baiter.
There may be a time when a Baiter wishes to redirect someone else's Zombie. In these cases simply place the Baiter in the Zeds Line of Sight (LOS). The Zed will move towards the closest Baiter counting whatever bonus dices are generated by that baiter.
WHAT'S ON THE SCHEDULE
TONIGHT
Entertainment in Havasu is a nightly event. To see what is scheduled roll 2d6, add the results, and consult the Scheduled Events Table (page, 104) to see what's happening.
All of the entertainment takes place in the West End down at the Arena, an enclosed area with seats and concessions. Admission is free.
2 SCHEDULED EVENTS TABLE (2d6 added together)
# EVENT
2 Zombie Racing.
3 Zombie Racing.
4 Zombie Racing.
5 Zombie Racing.
6 Zombie Racing.
7 Pit Fight between a human and a Zombie.
8 Pit Fight between a human and a Zombie.
9 Pit Fight between a human and a Zombie.
10 Pit Fight between a human and a Zombie.
11 Pit Fight between an NPC and a Rager
12
Pit Fight between an NPC that you know and a Zombie.
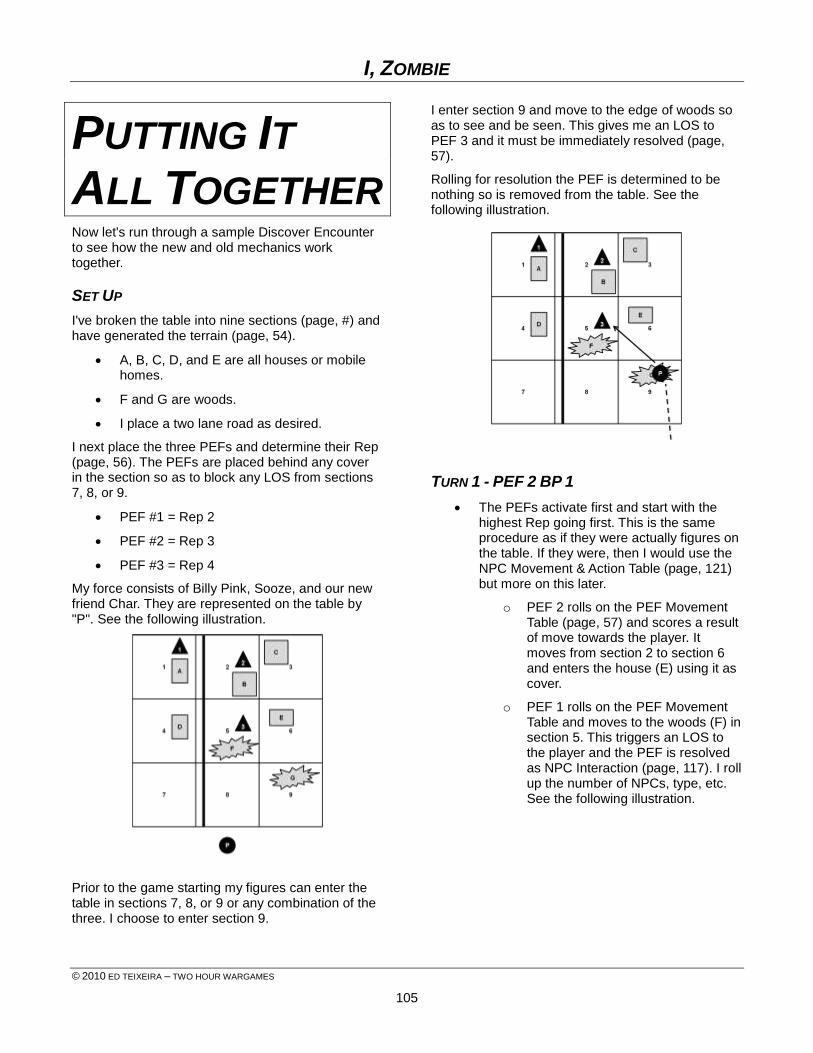
I, ZOMBIE
© 2010 ED TEIXEIRA – TWO HOUR WARGAMES
105
PUTTING IT
ALL TOGETHER Now let's run through a sample Discover Encounter to see how the new and old mechanics work together.
SET UP
I've broken the table into nine sections (page, #) and have generated the terrain (page, 54).
A, B, C, D, and E are all houses or mobile homes.
F and G are woods.
I place a two lane road as desired.
I next place the three PEFs and determine their Rep (page, 56). The PEFs are placed behind any cover in the section so as to block any LOS from sections 7, 8, or 9.
PEF #1 = Rep 2
PEF #2 = Rep 3
PEF #3 = Rep 4
My force consists of Billy Pink, Sooze, and our new friend Char. They are represented on the table by "P". See the following illustration.
Prior to the game starting my figures can enter the table in sections 7, 8, or 9 or any combination of the three. I choose to enter section 9.
I enter section 9 and move to the edge of woods so as to see and be seen. This gives me an LOS to PEF 3 and it must be immediately resolved (page, 57).
Rolling for resolution the PEF is determined to be nothing so is removed from the table. See the following illustration.
TURN 1 - PEF 2 BP 1
The PEFs activate first and start with the highest Rep going first. This is the same procedure as if they were actually figures on the table. If they were, then I would use the NPC Movement & Action Table (page, 121) but more on this later.
o PEF 2 rolls on the PEF Movement Table (page, 57) and scores a result of move towards the player. It moves from section 2 to section 6 and enters the house (E) using it as cover.
o PEF 1 rolls on the PEF Movement Table and moves to the woods (F) in section 5. This triggers an LOS to the player and the PEF is resolved as NPC Interaction (page, 117). I roll up the number of NPCs, type, etc. See the following illustration.
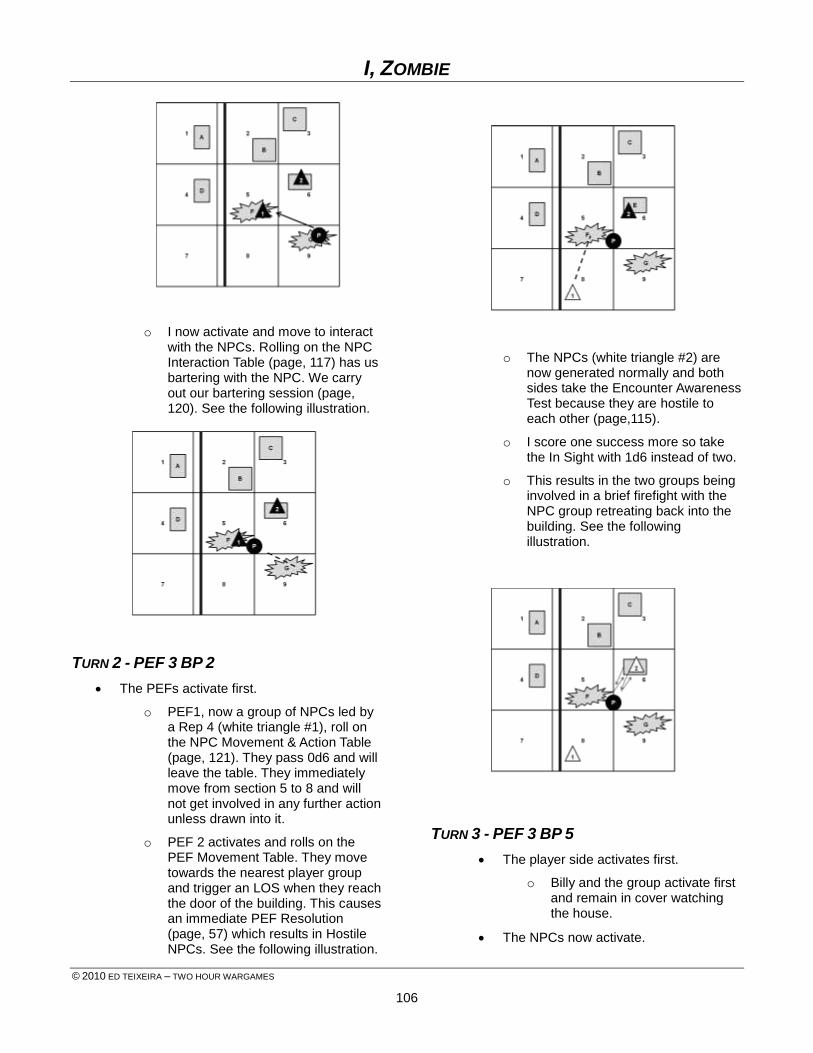
I, ZOMBIE
© 2010 ED TEIXEIRA – TWO HOUR WARGAMES
106
o I now activate and move to interact with the NPCs. Rolling on the NPC Interaction Table (page, 117) has us bartering with the NPC. We carry out our bartering session (page, 120). See the following illustration.
TURN 2 - PEF 3 BP 2
The PEFs activate first.
o PEF1, now a group of NPCs led by a Rep 4 (white triangle #1), roll on the NPC Movement & Action Table (page, 121). They pass 0d6 and will leave the table. They immediately move from section 5 to 8 and will not get involved in any further action unless drawn into it.
o PEF 2 activates and rolls on the PEF Movement Table. They move towards the nearest player group and trigger an LOS when they reach the door of the building. This causes an immediate PEF Resolution (page, 57) which results in Hostile NPCs. See the following illustration.
o The NPCs (white triangle #2) are now generated normally and both sides take the Encounter Awareness Test because they are hostile to each other (page,115).
o I score one success more so take the In Sight with 1d6 instead of two.
o This results in the two groups being involved in a brief firefight with the NPC group retreating back into the building. See the following illustration.
TURN 3 - PEF 3 BP 5
The player side activates first.
o Billy and the group activate first and remain in cover watching the house.
The NPCs now activate.
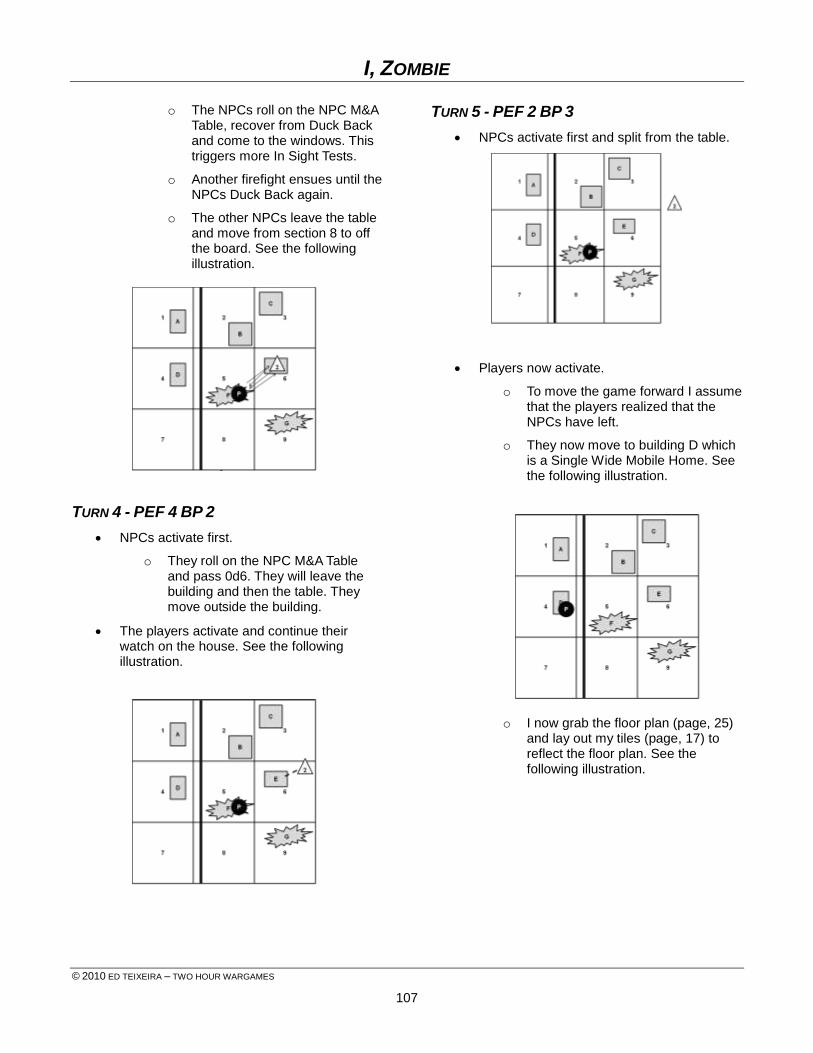
I, ZOMBIE
© 2010 ED TEIXEIRA – TWO HOUR WARGAMES
107
o The NPCs roll on the NPC M&A Table, recover from Duck Back and come to the windows. This triggers more In Sight Tests.
o Another firefight ensues until the NPCs Duck Back again.
o The other NPCs leave the table and move from section 8 to off the board. See the following illustration.
TURN 4 - PEF 4 BP 2
NPCs activate first.
o They roll on the NPC M&A Table and pass 0d6. They will leave the building and then the table. They move outside the building.
The players activate and continue their watch on the house. See the following illustration.
TURN 5 - PEF 2 BP 3
NPCs activate first and split from the table.
Players now activate.
o To move the game forward I assume that the players realized that the NPCs have left.
o They now move to building D which is a Single Wide Mobile Home. See the following illustration.
o I now grab the floor plan (page, 25) and lay out my tiles (page, 17) to reflect the floor plan. See the following illustration.
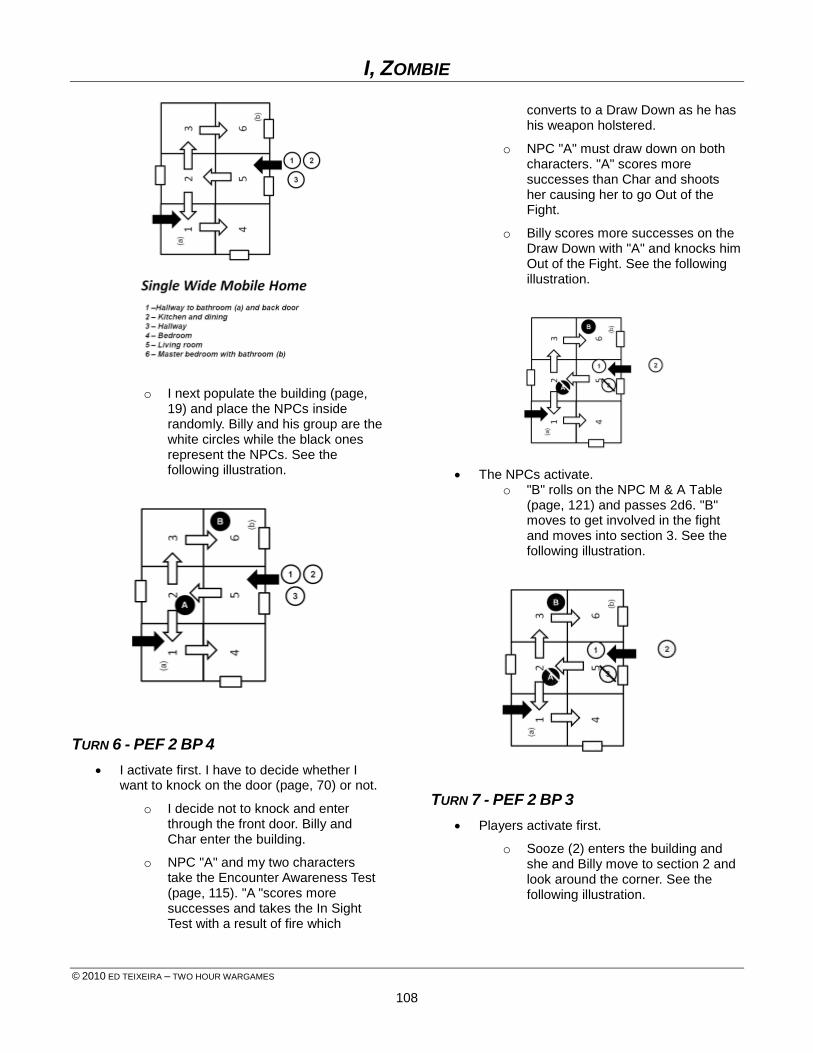
I, ZOMBIE
© 2010 ED TEIXEIRA – TWO HOUR WARGAMES
108
o I next populate the building (page, 19) and place the NPCs inside randomly. Billy and his group are the white circles while the black ones represent the NPCs. See the following illustration.
TURN 6 - PEF 2 BP 4
I activate first. I have to decide whether I want to knock on the door (page, 70) or not.
o I decide not to knock and enter through the front door. Billy and Char enter the building.
o NPC "A" and my two characters take the Encounter Awareness Test (page, 115). "A "scores more successes and takes the In Sight Test with a result of fire which
converts to a Draw Down as he has his weapon holstered.
o NPC "A" must draw down on both characters. "A" scores more successes than Char and shoots her causing her to go Out of the Fight.
o Billy scores more successes on the Draw Down with "A" and knocks him Out of the Fight. See the following illustration.
The NPCs activate. o "B" rolls on the NPC M & A Table
(page, 121) and passes 2d6. "B" moves to get involved in the fight and moves into section 3. See the following illustration.
TURN 7 - PEF 2 BP 3
Players activate first.
o Sooze (2) enters the building and she and Billy move to section 2 and look around the corner. See the following illustration.
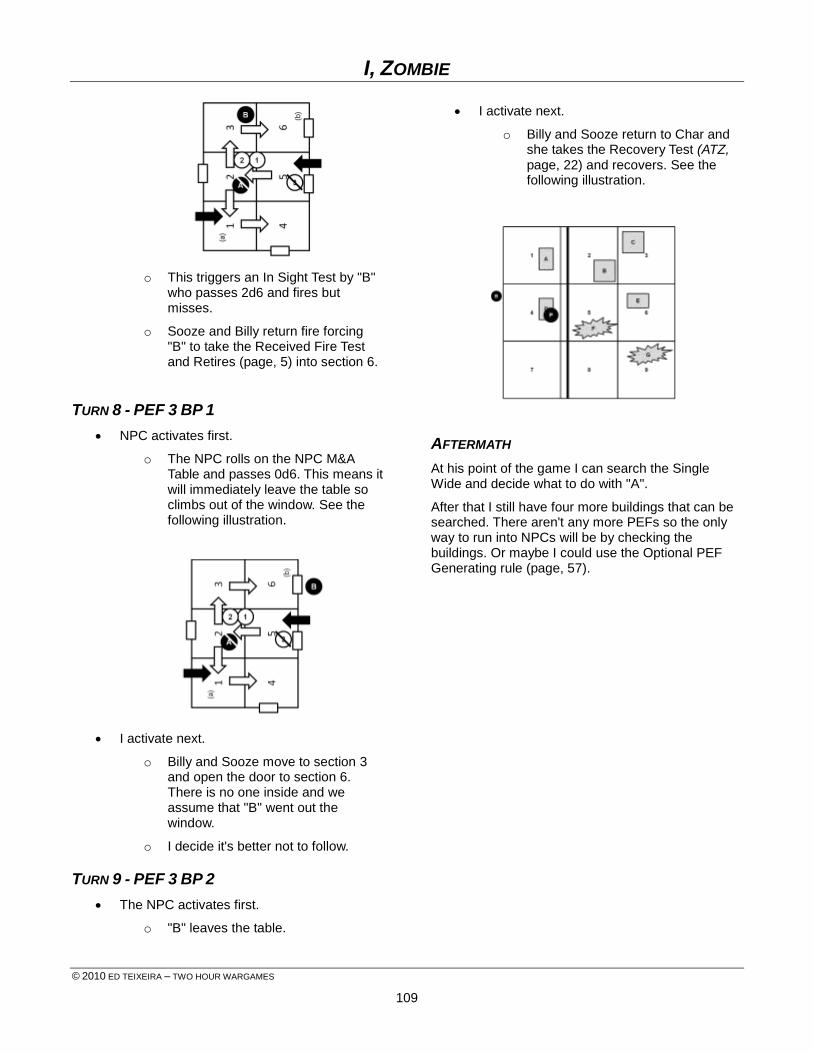
I, ZOMBIE
© 2010 ED TEIXEIRA – TWO HOUR WARGAMES
109
o This triggers an In Sight Test by "B" who passes 2d6 and fires but misses.
o Sooze and Billy return fire forcing "B" to take the Received Fire Test and Retires (page, 5) into section 6.
TURN 8 - PEF 3 BP 1
NPC activates first.
o The NPC rolls on the NPC M&A Table and passes 0d6. This means it will immediately leave the table so climbs out of the window. See the following illustration.
I activate next.
o Billy and Sooze move to section 3 and open the door to section 6. There is no one inside and we assume that "B" went out the window.
o I decide it's better not to follow.
TURN 9 - PEF 3 BP 2
The NPC activates first.
o "B" leaves the table.
I activate next.
o Billy and Sooze return to Char and she takes the Recovery Test (ATZ, page, 22) and recovers. See the following illustration.
AFTERMATH
At his point of the game I can search the Single Wide and decide what to do with "A".
After that I still have four more buildings that can be searched. There aren't any more PEFs so the only way to run into NPCs will be by checking the buildings. Or maybe I could use the Optional PEF Generating rule (page, 57).
I, ZOMBIE
© 2010 ED TEIXEIRA – TWO HOUR WARGAMES
110
FINAL
THOUGHTS This completes the All Things Zombie Trilogy. What started out as a Zombie game has evolved into a post-apocalyptic game with Zombies in it. And after playing I, Zombie you'll realize there's a difference.
The ATZ world will give you hours of fun at any level you want. Remember, it's your game so use as much or as little of the rules as you feel like. And yes, there will be more ATZ scenarios to come in the near future.
For those of you that still have questions about what happens to the world after the Zombies we'll be providing After the Horsemen. Here's a little preview.
AFTER THE HORSEMEN "Brothers and sisters the world is over! The Four Horsemen of the Apocalypse have come and mankind is dead!"
The little robed man gestured wildly into the air in front of the small crowd of twenty. Many had come lured by the hope provided by the campfire only to find the self-styled Prophet offering his words and little else.
"The dead walk the Earth. Our children and friends have died or worse been turned into these vile creatures! Who amongst you has not suffered at the hands of this evil?"
The faces reflected by the fire only confirmed the murmurs of quiet despair in the camp. Two robed men opened large jugs that were set upon a hastily set up table and began filling paper cups with a dark liquid. The Prophet continued to preach.
"Just as has been prophesized the Four Horsemen have arrived. Mankind suffers Pestilence, War, Famine, and Death! What is there left to do than to move on to a better place? What is there to do than to forsake this hell of our own making?"
When the two men had finished filling and arranging the cups in neat rows on the table the Prophet continued. With sincerity he looked out into the crowd and quietly continued.
"How do we get there you ask? Where is the path to salvation and final peace? Forsake the hardship of life and embrace the freedom of the soul. Escape from your prison of flesh and rise above it. Follow me to a better place," he said assuredly."Come drink from the cup of salvation. Come drink with us."
Slowly a woman rose up from the crowd and walked to the table, a small child in tow. One of the men handed each a cup and smiled.
"Come forward and drink," the Prophet said. "Let us begin our journey to peace."
Boom!
A large hole appeared on the Prophet's forehead. In silence he fell to the ground.
"I swore I'd kill you some day," the Stranger said matter of factly as he stepped from the dark and into the light. The two robed men ran off as he continued to speak.
"Don't drink it. It's poison," the Stranger continued."He wanted all of you to drink the poison so he could take your stuff. He's done it before. I know because it happened to people I knew."
The crowd began to talk amongst themselves unsure of exactly what they had witnessed and realizing what they had escaped. One man shouted out, "But what about the Horsemen?"
The Stranger smiled. "That's not the question. The real question is; what happens after the Horsemen and that's up to you."
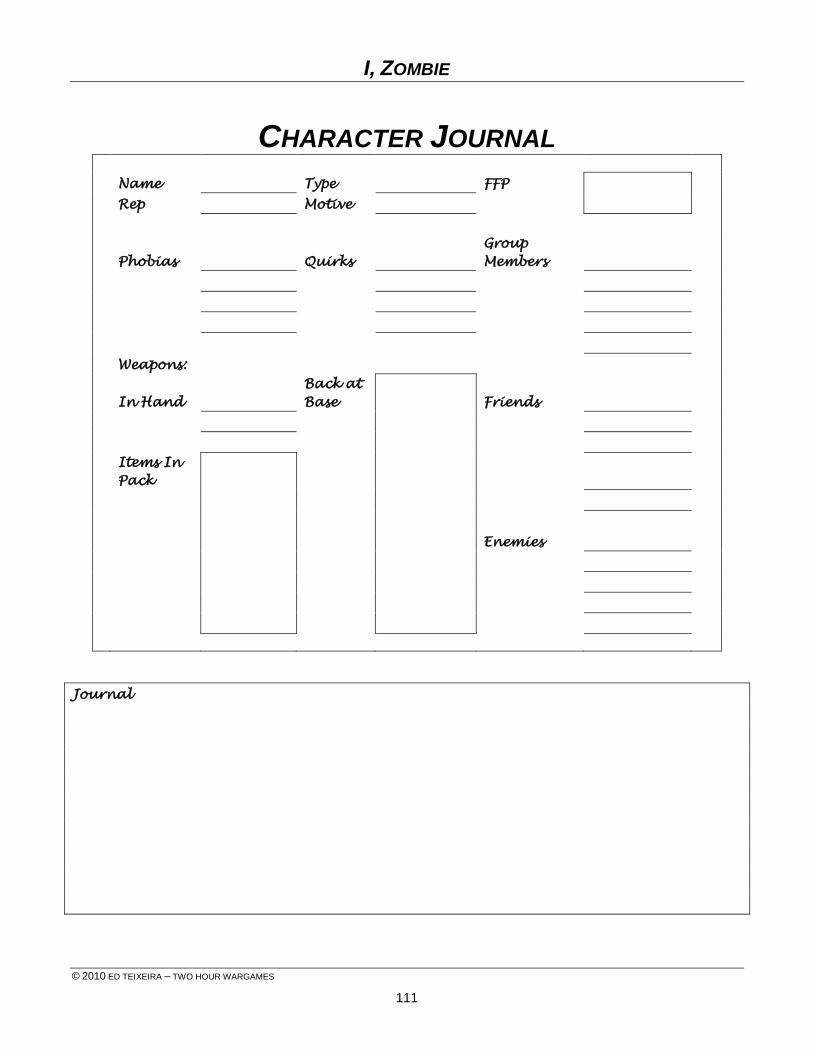
I, ZOMBIE
© 2010 ED TEIXEIRA – TWO HOUR WARGAMES
111
CHARACTER JOURNAL
Name Type FFP
Rep Motive
Phobias Quirks
Group
Members
Weapons:
In Hand
Back at
Base Friends
Items In
Pack
Enemies
Journal
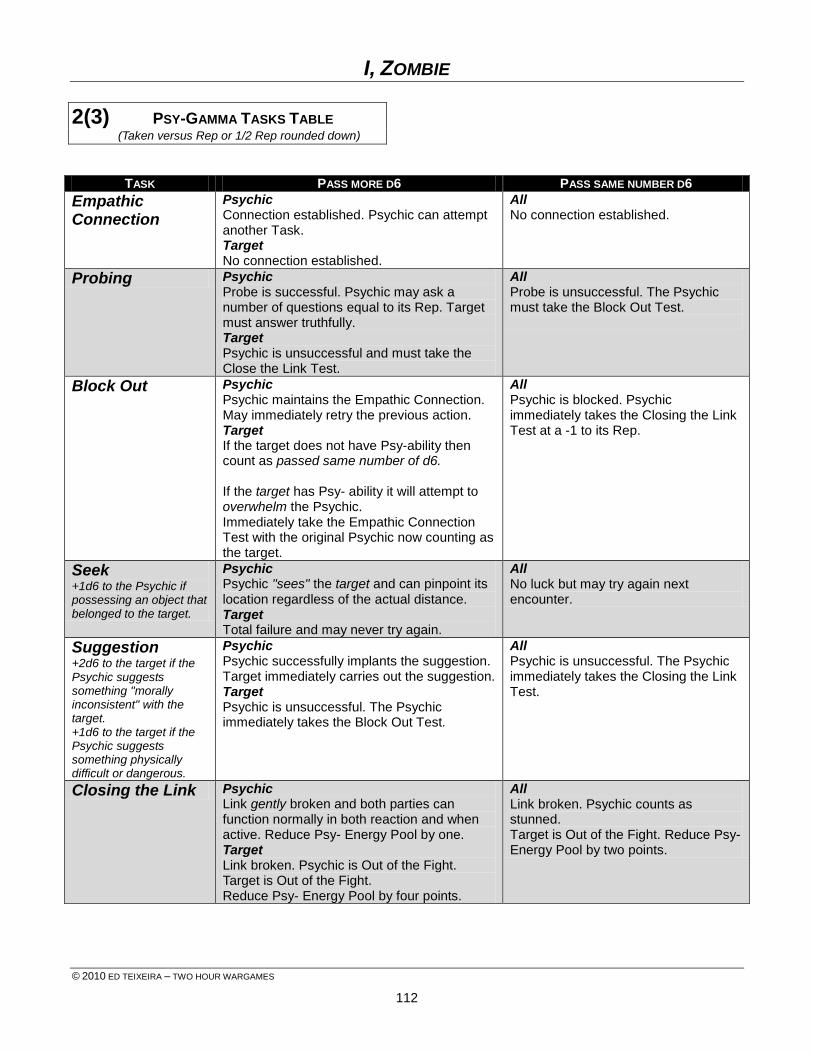
I, ZOMBIE
© 2010 ED TEIXEIRA – TWO HOUR WARGAMES
112
2(3) PSY-GAMMA TASKS TABLE (Taken versus Rep or 1/2 Rep rounded down)
TASK PASS MORE D6 PASS SAME NUMBER D6
Empathic Connection
Psychic Connection established. Psychic can attempt another Task. Target No connection established.
All No connection established.
Probing Psychic Probe is successful. Psychic may ask a number of questions equal to its Rep. Target must answer truthfully. Target Psychic is unsuccessful and must take the Close the Link Test.
All Probe is unsuccessful. The Psychic must take the Block Out Test.
Block Out Psychic Psychic maintains the Empathic Connection. May immediately retry the previous action. Target If the target does not have Psy-ability then count as passed same number of d6. If the target has Psy- ability it will attempt to overwhelm the Psychic. Immediately take the Empathic Connection Test with the original Psychic now counting as the target.
All Psychic is blocked. Psychic immediately takes the Closing the Link Test at a -1 to its Rep.
Seek +1d6 to the Psychic if possessing an object that belonged to the target.
Psychic Psychic "sees" the target and can pinpoint its location regardless of the actual distance. Target Total failure and may never try again.
All No luck but may try again next encounter.
Suggestion +2d6 to the target if the Psychic suggests something "morally inconsistent" with the target. +1d6 to the target if the Psychic suggests something physically difficult or dangerous.
Psychic Psychic successfully implants the suggestion. Target immediately carries out the suggestion. Target Psychic is unsuccessful. The Psychic immediately takes the Block Out Test.
All Psychic is unsuccessful. The Psychic immediately takes the Closing the Link Test.
Closing the Link Psychic Link gently broken and both parties can function normally in both reaction and when active. Reduce Psy- Energy Pool by one. Target Link broken. Psychic is Out of the Fight. Target is Out of the Fight. Reduce Psy- Energy Pool by four points.
All Link broken. Psychic counts as stunned. Target is Out of the Fight. Reduce Psy- Energy Pool by two points.
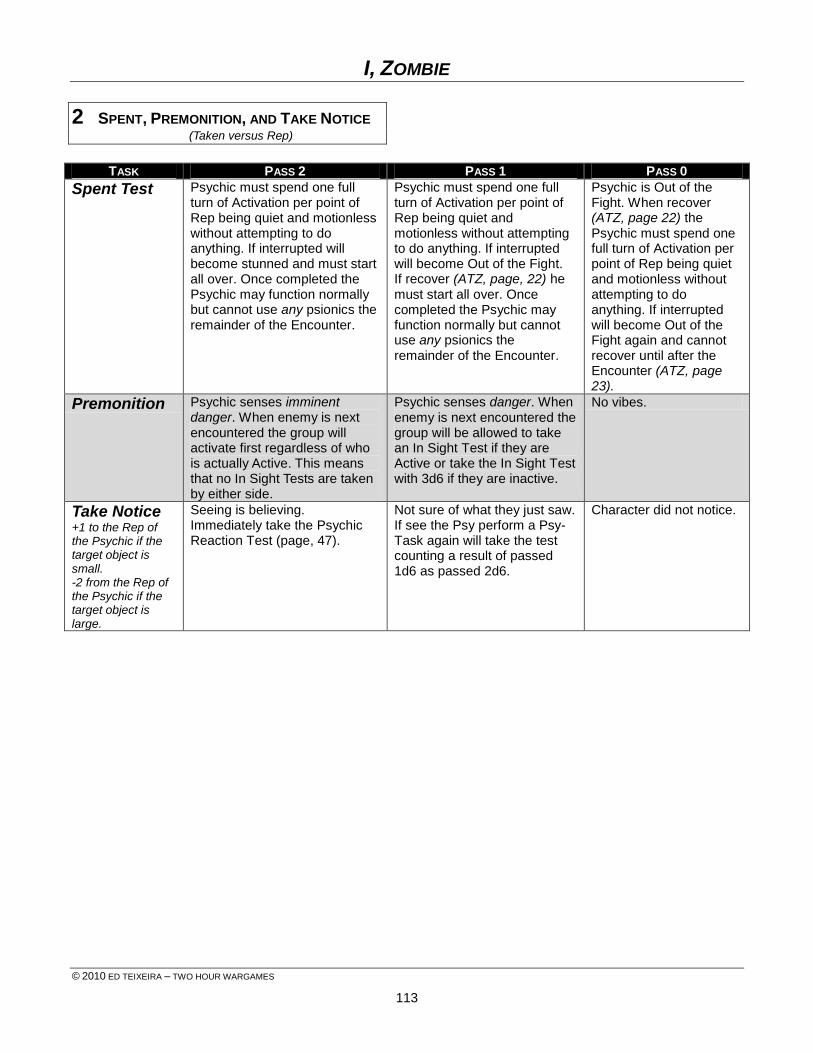
I, ZOMBIE
© 2010 ED TEIXEIRA – TWO HOUR WARGAMES
113
2 SPENT, PREMONITION, AND TAKE NOTICE (Taken versus Rep)
TASK PASS 2 PASS 1 PASS 0
Spent Test Psychic must spend one full turn of Activation per point of Rep being quiet and motionless without attempting to do anything. If interrupted will become stunned and must start all over. Once completed the Psychic may function normally but cannot use any psionics the remainder of the Encounter.
Psychic must spend one full turn of Activation per point of Rep being quiet and motionless without attempting to do anything. If interrupted will become Out of the Fight. If recover (ATZ, page, 22) he must start all over. Once completed the Psychic may function normally but cannot use any psionics the remainder of the Encounter.
Psychic is Out of the Fight. When recover (ATZ, page 22) the Psychic must spend one full turn of Activation per point of Rep being quiet and motionless without attempting to do anything. If interrupted will become Out of the Fight again and cannot recover until after the Encounter (ATZ, page 23).
Premonition Psychic senses imminent danger. When enemy is next encountered the group will activate first regardless of who is actually Active. This means that no In Sight Tests are taken by either side.
Psychic senses danger. When enemy is next encountered the group will be allowed to take an In Sight Test if they are Active or take the In Sight Test with 3d6 if they are inactive.
No vibes.
Take Notice +1 to the Rep of the Psychic if the target object is small. -2 from the Rep of the Psychic if the target object is large.
Seeing is believing. Immediately take the Psychic Reaction Test (page, 47).
Not sure of what they just saw. If see the Psy perform a Psy-Task again will take the test counting a result of passed 1d6 as passed 2d6.
Character did not notice.
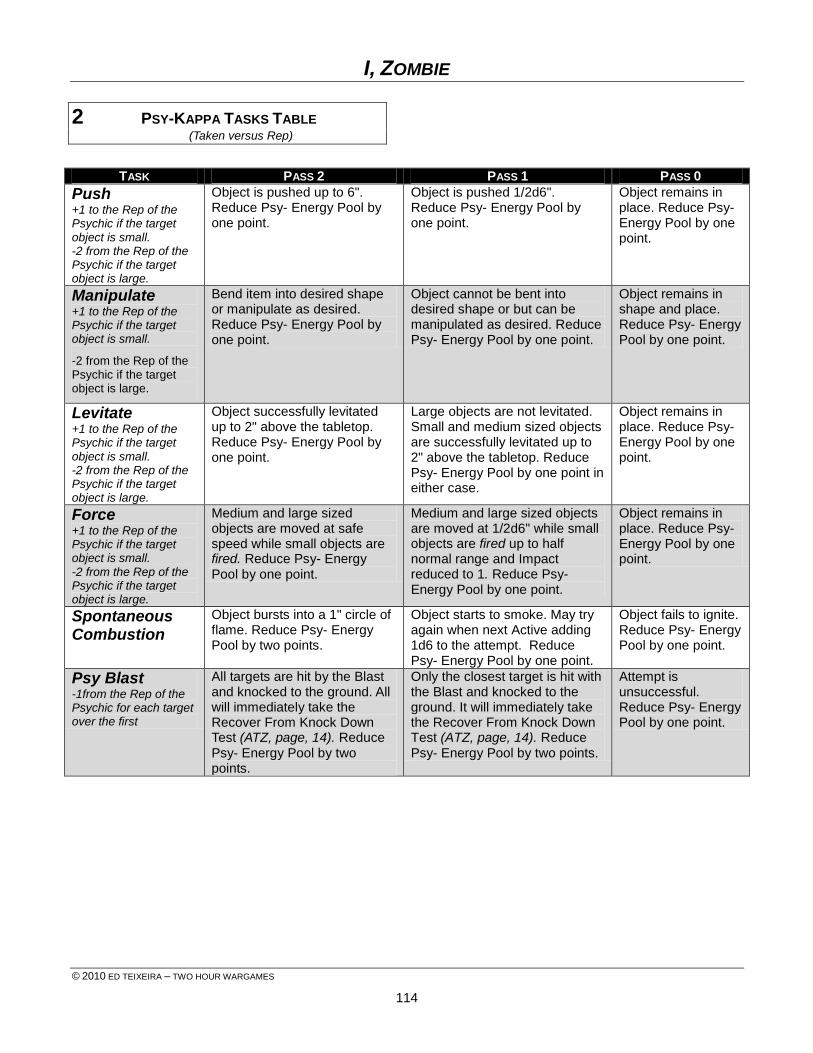
I, ZOMBIE
© 2010 ED TEIXEIRA – TWO HOUR WARGAMES
114
2 PSY-KAPPA TASKS TABLE (Taken versus Rep)
TASK PASS 2 PASS 1 PASS 0
Push +1 to the Rep of the Psychic if the target object is small. -2 from the Rep of the Psychic if the target object is large.
Object is pushed up to 6". Reduce Psy- Energy Pool by one point.
Object is pushed 1/2d6". Reduce Psy- Energy Pool by one point.
Object remains in place. Reduce Psy- Energy Pool by one point.
Manipulate +1 to the Rep of the Psychic if the target object is small.
-2 from the Rep of the Psychic if the target object is large.
Bend item into desired shape or manipulate as desired. Reduce Psy- Energy Pool by one point.
Object cannot be bent into desired shape or but can be manipulated as desired. Reduce Psy- Energy Pool by one point.
Object remains in shape and place. Reduce Psy- Energy Pool by one point.
Levitate +1 to the Rep of the Psychic if the target object is small. -2 from the Rep of the Psychic if the target object is large.
Object successfully levitated up to 2" above the tabletop. Reduce Psy- Energy Pool by one point.
Large objects are not levitated. Small and medium sized objects are successfully levitated up to 2" above the tabletop. Reduce Psy- Energy Pool by one point in either case.
Object remains in place. Reduce Psy- Energy Pool by one point.
Force +1 to the Rep of the Psychic if the target object is small. -2 from the Rep of the Psychic if the target object is large.
Medium and large sized objects are moved at safe speed while small objects are fired. Reduce Psy- Energy Pool by one point.
Medium and large sized objects are moved at 1/2d6" while small objects are fired up to half normal range and Impact reduced to 1. Reduce Psy- Energy Pool by one point.
Object remains in place. Reduce Psy- Energy Pool by one point.
Spontaneous Combustion
Object bursts into a 1" circle of flame. Reduce Psy- Energy Pool by two points.
Object starts to smoke. May try again when next Active adding 1d6 to the attempt. Reduce Psy- Energy Pool by one point.
Object fails to ignite. Reduce Psy- Energy Pool by one point.
Psy Blast -1from the Rep of the Psychic for each target over the first
All targets are hit by the Blast and knocked to the ground. All will immediately take the Recover From Knock Down Test (ATZ, page, 14). Reduce Psy- Energy Pool by two points.
Only the closest target is hit with the Blast and knocked to the ground. It will immediately take the Recover From Knock Down Test (ATZ, page, 14). Reduce Psy- Energy Pool by two points.
Attempt is unsuccessful. Reduce Psy- Energy Pool by one point.
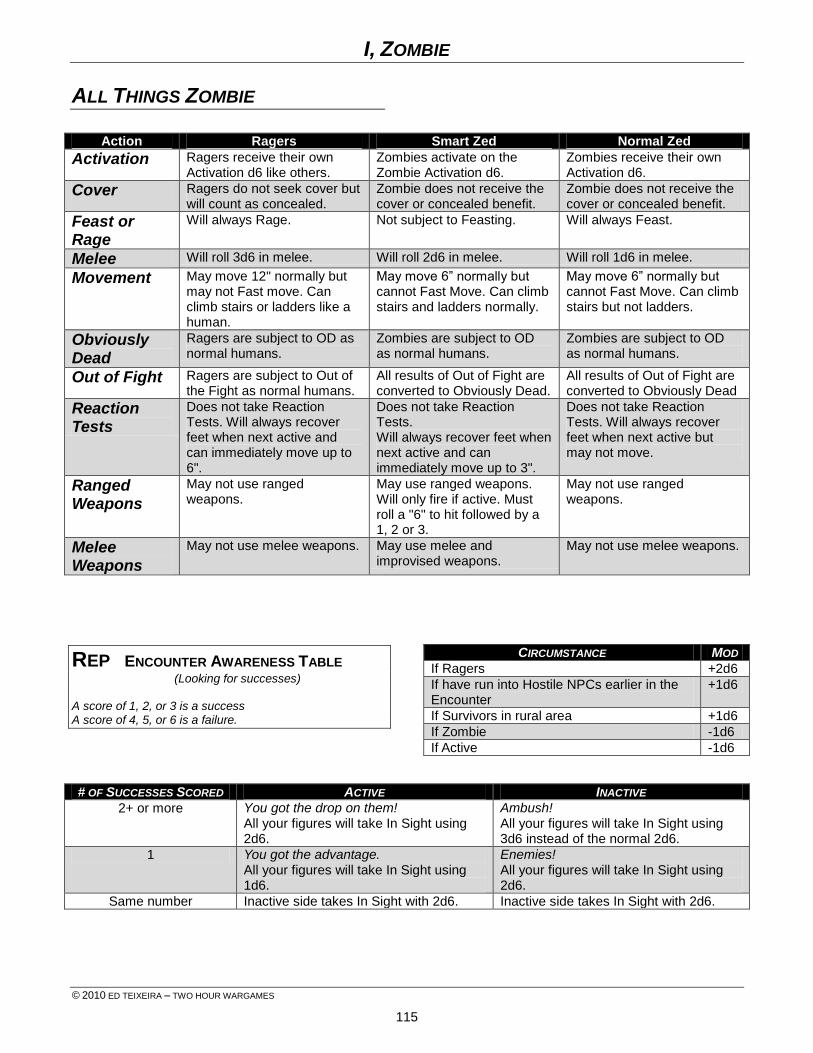
I, ZOMBIE
© 2010 ED TEIXEIRA – TWO HOUR WARGAMES
115
ALL THINGS ZOMBIE
Action Ragers Smart Zed Normal Zed
Activation Ragers receive their own Activation d6 like others.
Zombies activate on the Zombie Activation d6.
Zombies receive their own Activation d6.
Cover Ragers do not seek cover but will count as concealed.
Zombie does not receive the cover or concealed benefit.
Zombie does not receive the cover or concealed benefit.
Feast or Rage
Will always Rage. Not subject to Feasting. Will always Feast.
Melee Will roll 3d6 in melee. Will roll 2d6 in melee. Will roll 1d6 in melee.
Movement May move 12" normally but may not Fast move. Can climb stairs or ladders like a human.
May move 6” normally but cannot Fast Move. Can climb stairs and ladders normally.
May move 6” normally but cannot Fast Move. Can climb stairs but not ladders.
Obviously Dead
Ragers are subject to OD as normal humans.
Zombies are subject to OD as normal humans.
Zombies are subject to OD as normal humans.
Out of Fight Ragers are subject to Out of the Fight as normal humans.
All results of Out of Fight are converted to Obviously Dead.
All results of Out of Fight are converted to Obviously Dead
Reaction Tests
Does not take Reaction Tests. Will always recover feet when next active and can immediately move up to 6".
Does not take Reaction Tests. Will always recover feet when next active and can immediately move up to 3".
Does not take Reaction Tests. Will always recover feet when next active but may not move.
Ranged Weapons
May not use ranged weapons.
May use ranged weapons. Will only fire if active. Must roll a "6" to hit followed by a 1, 2 or 3.
May not use ranged weapons.
Melee Weapons
May not use melee weapons. May use melee and improvised weapons.
May not use melee weapons.
REP ENCOUNTER AWARENESS TABLE (Looking for successes)
A score of 1, 2, or 3 is a success A score of 4, 5, or 6 is a failure.
CIRCUMSTANCE MOD
If Ragers +2d6
If have run into Hostile NPCs earlier in the Encounter
+1d6
If Survivors in rural area +1d6
If Zombie -1d6
If Active -1d6
# OF SUCCESSES SCORED ACTIVE INACTIVE
2+ or more You got the drop on them! All your figures will take In Sight using 2d6.
Ambush! All your figures will take In Sight using 3d6 instead of the normal 2d6.
1 You got the advantage. All your figures will take In Sight using 1d6.
Enemies! All your figures will take In Sight using 2d6.
Same number Inactive side takes In Sight with 2d6. Inactive side takes In Sight with 2d6.
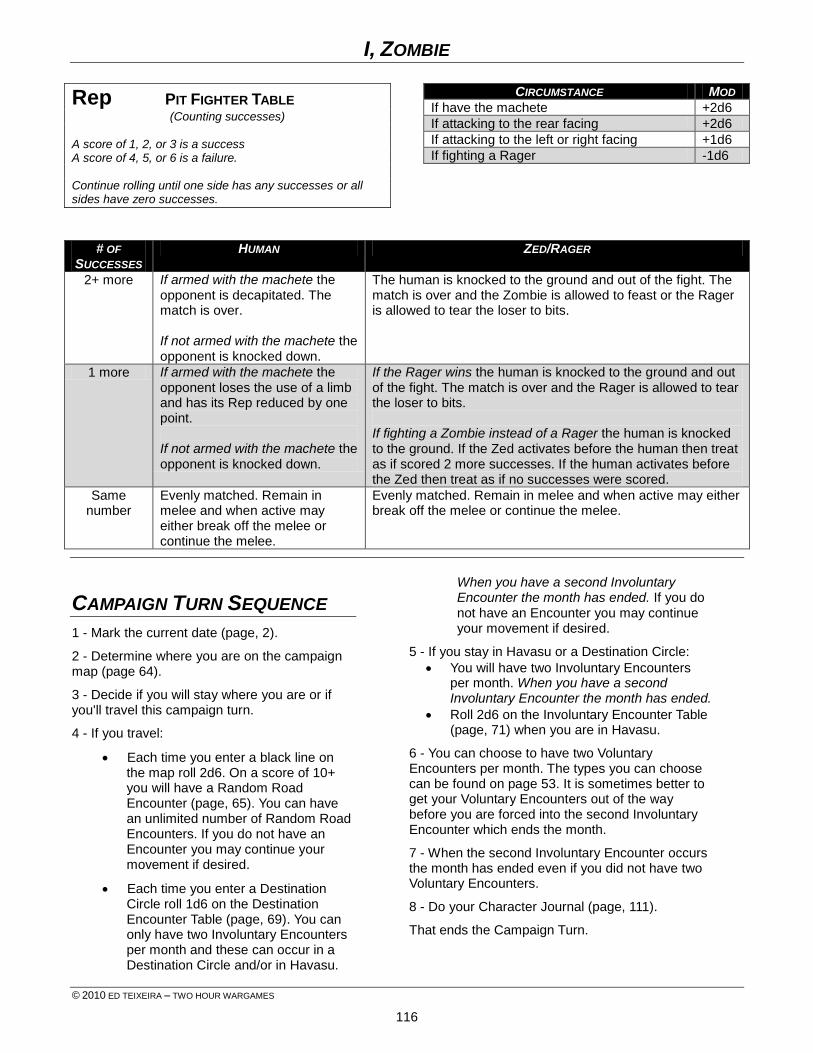
I, ZOMBIE
© 2010 ED TEIXEIRA – TWO HOUR WARGAMES
116
Rep PIT FIGHTER TABLE (Counting successes)
A score of 1, 2, or 3 is a success A score of 4, 5, or 6 is a failure. Continue rolling until one side has any successes or all sides have zero successes.
CIRCUMSTANCE MOD
If have the machete +2d6
If attacking to the rear facing +2d6
If attacking to the left or right facing +1d6
If fighting a Rager -1d6
# OF
SUCCESSES HUMAN ZED/RAGER
2+ more If armed with the machete the opponent is decapitated. The match is over. If not armed with the machete the opponent is knocked down.
The human is knocked to the ground and out of the fight. The match is over and the Zombie is allowed to feast or the Rager is allowed to tear the loser to bits.
1 more If armed with the machete the opponent loses the use of a limb and has its Rep reduced by one point. If not armed with the machete the opponent is knocked down.
If the Rager wins the human is knocked to the ground and out of the fight. The match is over and the Rager is allowed to tear the loser to bits. If fighting a Zombie instead of a Rager the human is knocked to the ground. If the Zed activates before the human then treat as if scored 2 more successes. If the human activates before the Zed then treat as if no successes were scored.
Same number
Evenly matched. Remain in melee and when active may either break off the melee or continue the melee.
Evenly matched. Remain in melee and when active may either break off the melee or continue the melee.
CAMPAIGN TURN SEQUENCE
1 - Mark the current date (page, 2).
2 - Determine where you are on the campaign map (page 64).
3 - Decide if you will stay where you are or if you'll travel this campaign turn.
4 - If you travel:
Each time you enter a black line on the map roll 2d6. On a score of 10+ you will have a Random Road Encounter (page, 65). You can have an unlimited number of Random Road Encounters. If you do not have an Encounter you may continue your movement if desired.
Each time you enter a Destination Circle roll 1d6 on the Destination Encounter Table (page, 69). You can only have two Involuntary Encounters per month and these can occur in a Destination Circle and/or in Havasu.
When you have a second Involuntary Encounter the month has ended. If you do not have an Encounter you may continue your movement if desired.
5 - If you stay in Havasu or a Destination Circle:
You will have two Involuntary Encounters per month. When you have a second Involuntary Encounter the month has ended.
Roll 2d6 on the Involuntary Encounter Table (page, 71) when you are in Havasu.
6 - You can choose to have two Voluntary Encounters per month. The types you can choose can be found on page 53. It is sometimes better to get your Voluntary Encounters out of the way before you are forced into the second Involuntary Encounter which ends the month.
7 - When the second Involuntary Encounter occurs the month has ended even if you did not have two Voluntary Encounters.
8 - Do your Character Journal (page, 111).
That ends the Campaign Turn.
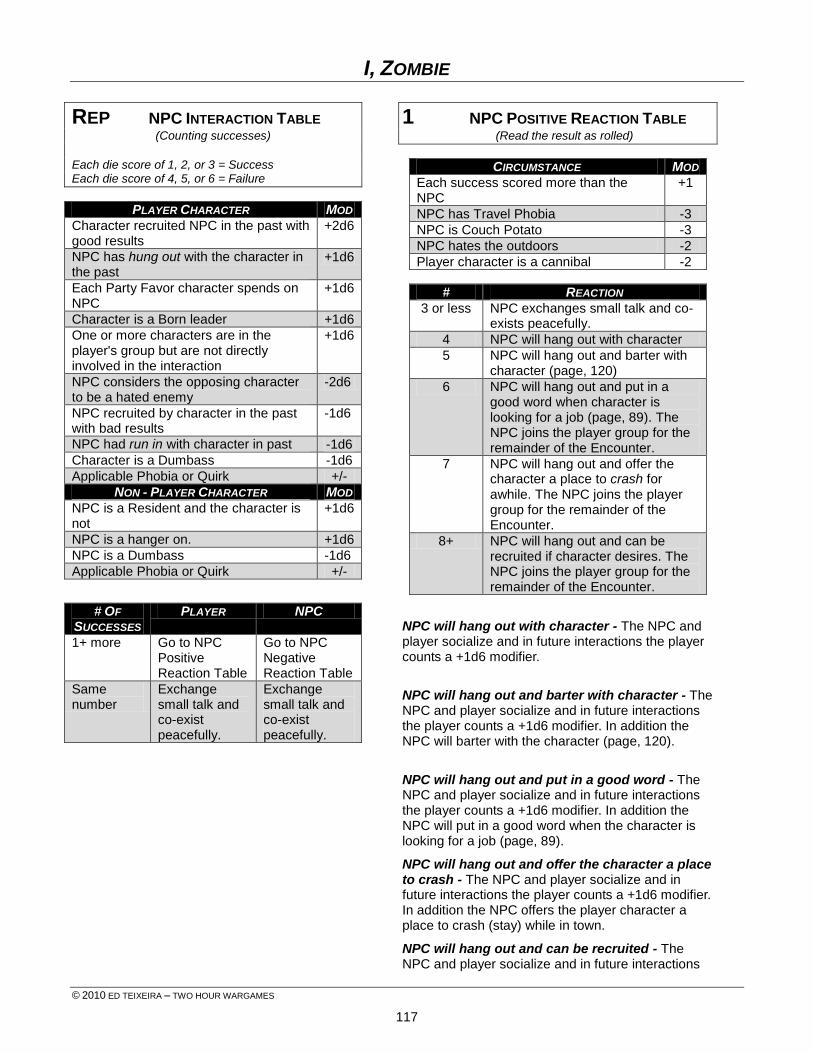
I, ZOMBIE
© 2010 ED TEIXEIRA – TWO HOUR WARGAMES
117
REP NPC INTERACTION TABLE (Counting successes)
Each die score of 1, 2, or 3 = Success Each die score of 4, 5, or 6 = Failure
PLAYER CHARACTER MOD
Character recruited NPC in the past with good results
+2d6
NPC has hung out with the character in the past
+1d6
Each Party Favor character spends on NPC
+1d6
Character is a Born leader +1d6
One or more characters are in the player's group but are not directly involved in the interaction
+1d6
NPC considers the opposing character to be a hated enemy
-2d6
NPC recruited by character in the past with bad results
-1d6
NPC had run in with character in past -1d6
Character is a Dumbass -1d6
Applicable Phobia or Quirk +/-
NON - PLAYER CHARACTER MOD
NPC is a Resident and the character is not
+1d6
NPC is a hanger on. +1d6
NPC is a Dumbass -1d6
Applicable Phobia or Quirk +/-
# OF
SUCCESSES PLAYER NPC
1+ more Go to NPC Positive Reaction Table
Go to NPC Negative Reaction Table
Same number
Exchange small talk and co-exist peacefully.
Exchange small talk and co-exist peacefully.
1 NPC POSITIVE REACTION TABLE (Read the result as rolled)
CIRCUMSTANCE MOD
Each success scored more than the NPC
+1
NPC has Travel Phobia -3
NPC is Couch Potato -3
NPC hates the outdoors -2
Player character is a cannibal -2
# REACTION
3 or less NPC exchanges small talk and co-exists peacefully.
4 NPC will hang out with character
5 NPC will hang out and barter with character (page, 120)
6 NPC will hang out and put in a good word when character is looking for a job (page, 89). The NPC joins the player group for the remainder of the Encounter.
7 NPC will hang out and offer the character a place to crash for awhile. The NPC joins the player group for the remainder of the Encounter.
8+ NPC will hang out and can be recruited if character desires. The NPC joins the player group for the remainder of the Encounter.
NPC will hang out with character - The NPC and player socialize and in future interactions the player counts a +1d6 modifier.
NPC will hang out and barter with character - The NPC and player socialize and in future interactions the player counts a +1d6 modifier. In addition the NPC will barter with the character (page, 120).
NPC will hang out and put in a good word - The NPC and player socialize and in future interactions the player counts a +1d6 modifier. In addition the NPC will put in a good word when the character is looking for a job (page, 89).
NPC will hang out and offer the character a place to crash - The NPC and player socialize and in future interactions the player counts a +1d6 modifier. In addition the NPC offers the player character a place to crash (stay) while in town.
NPC will hang out and can be recruited - The NPC and player socialize and in future interactions

I, ZOMBIE
© 2010 ED TEIXEIRA – TWO HOUR WARGAMES
118
the player counts a +1d6 modifier. In addition the NPC can be recruited if the player so desires.
1 NPC NEGATIVE REACTION TABLE (Read the result as rolled)
CIRCUMSTANCE MOD
Each success the NPC scored more player
+1
NPC is Psycho +2
NPC is Reckless +1
# REACTION
3 or less
NPC leaves in a civil manner.
4 NPC has "run in" with character.
5 NPC has "run in" with character and plots revenge
6 NPC becomes angry
7 NPC gets angry and plots revenge
8+ NPC becomes furious. Go to Draw Down Table (page, 119)
NPC leaves in a civil manner - The NPC gets up and leaves.
NPC has "run in" with character - The NPC and player have words with each other causing the NPC to leave. In future interactions the NPC counts a +1d6 modifier. Note that if you have more than one "run in" with the same NPC you have graduated to "hated enemy" status.
NPC has "run in" with character and plots revenge - In addition to the above the character will wait for you outside with 1/2d6 friends. Interact again with the NPC who counts +1d6 on the NPC Interaction Table and NPC Negative Reaction Table for each friend he has with him waiting outside.
NPC becomes angry - The NPC becomes angry with the player and they get into a fistfight. Go to the Draw Down Table (page, 119). Characters will melee but not draw weapons. In future interactions the NPC counts a +2d6 modifier as the character is now a hated enemy.
NPC gets angry and plots revenge - In addition to the above the character will wait for you outside with 1/2d6 friends. The NPC takes the NPC Negative Reaction Test again counting a +1d6 for each friend he has with him waiting outside.
NPC becomes furious - The NPC becomes furious with the player and they get into a gunfight. Go to the Draw Down Table (page, 119). In future interactions the NPC counts a +2d6 modifier as the character is now a hated enemy.
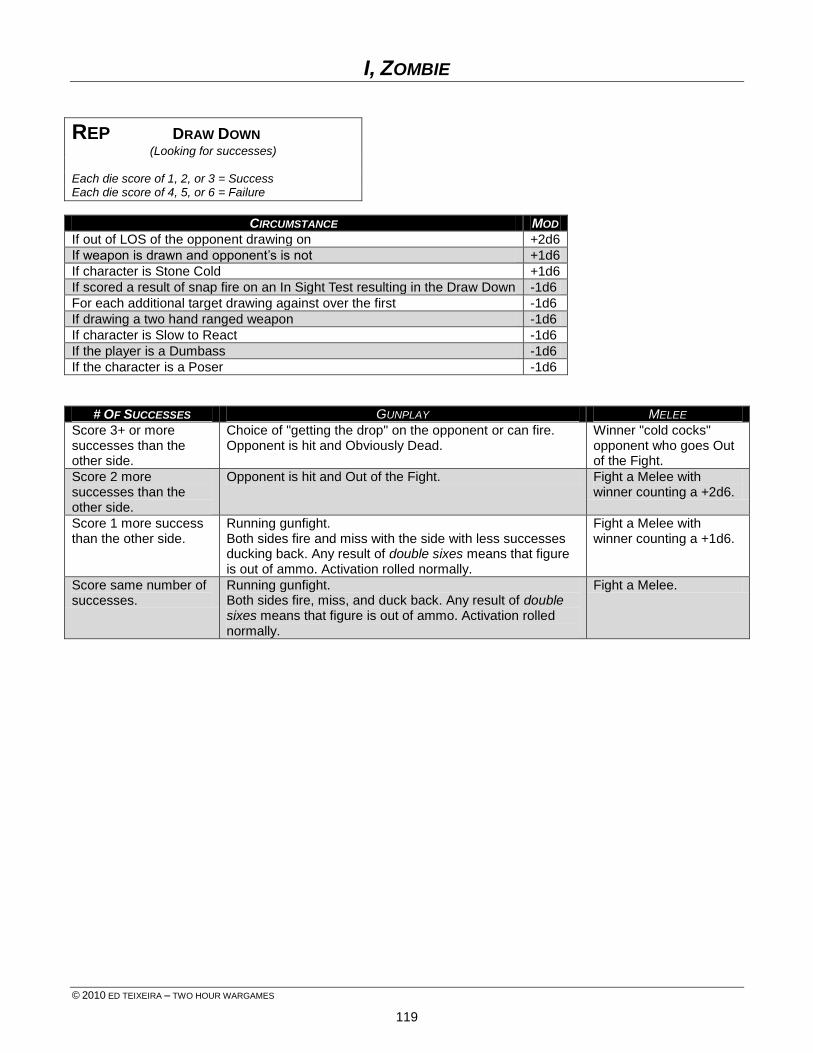
I, ZOMBIE
© 2010 ED TEIXEIRA – TWO HOUR WARGAMES
119
REP DRAW DOWN (Looking for successes)
Each die score of 1, 2, or 3 = Success Each die score of 4, 5, or 6 = Failure
CIRCUMSTANCE MOD
If out of LOS of the opponent drawing on +2d6
If weapon is drawn and opponent’s is not +1d6
If character is Stone Cold +1d6
If scored a result of snap fire on an In Sight Test resulting in the Draw Down -1d6
For each additional target drawing against over the first -1d6
If drawing a two hand ranged weapon -1d6
If character is Slow to React -1d6
If the player is a Dumbass -1d6
If the character is a Poser -1d6
# OF SUCCESSES GUNPLAY MELEE
Score 3+ or more successes than the other side.
Choice of "getting the drop" on the opponent or can fire. Opponent is hit and Obviously Dead.
Winner "cold cocks" opponent who goes Out of the Fight.
Score 2 more successes than the other side.
Opponent is hit and Out of the Fight. Fight a Melee with winner counting a +2d6.
Score 1 more success than the other side.
Running gunfight. Both sides fire and miss with the side with less successes ducking back. Any result of double sixes means that figure is out of ammo. Activation rolled normally.
Fight a Melee with winner counting a +1d6.
Score same number of successes.
Running gunfight. Both sides fire, miss, and duck back. Any result of double sixes means that figure is out of ammo. Activation rolled normally.
Fight a Melee.
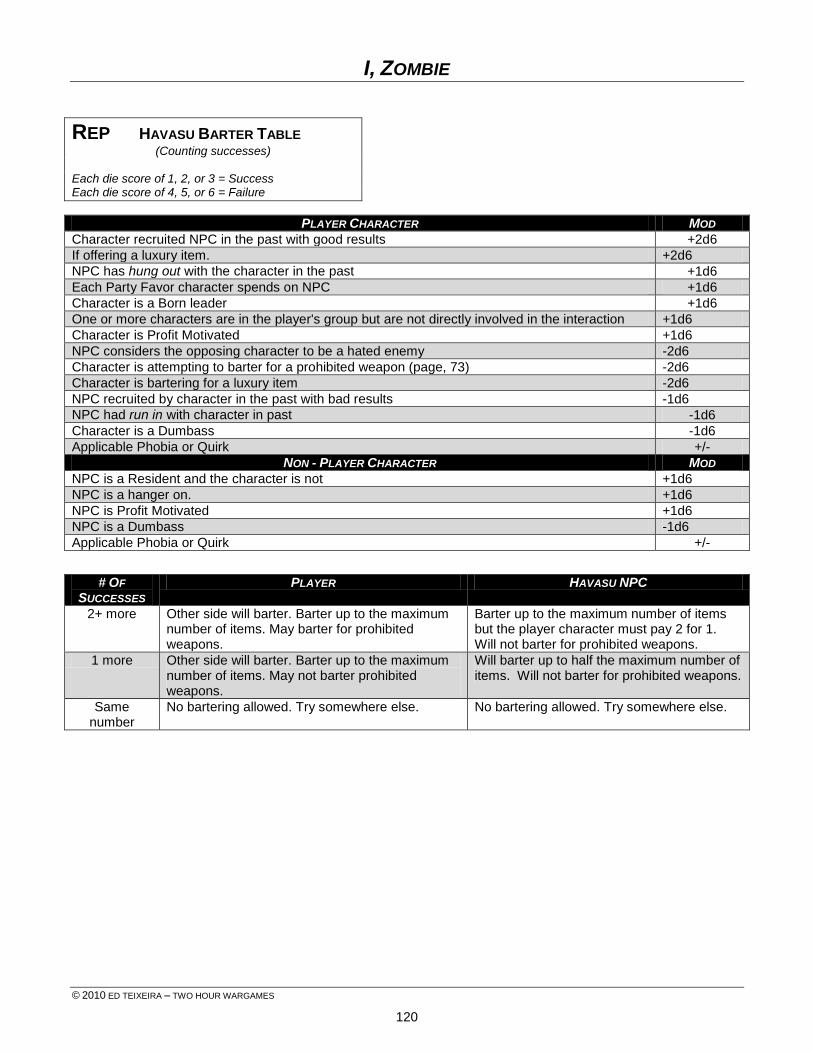
I, ZOMBIE
© 2010 ED TEIXEIRA – TWO HOUR WARGAMES
120
REP HAVASU BARTER TABLE (Counting successes)
Each die score of 1, 2, or 3 = Success Each die score of 4, 5, or 6 = Failure
PLAYER CHARACTER MOD
Character recruited NPC in the past with good results +2d6
If offering a luxury item. +2d6
NPC has hung out with the character in the past +1d6
Each Party Favor character spends on NPC +1d6
Character is a Born leader +1d6
One or more characters are in the player's group but are not directly involved in the interaction +1d6
Character is Profit Motivated +1d6
NPC considers the opposing character to be a hated enemy -2d6
Character is attempting to barter for a prohibited weapon (page, 73) -2d6
Character is bartering for a luxury item -2d6
NPC recruited by character in the past with bad results -1d6
NPC had run in with character in past -1d6
Character is a Dumbass -1d6
Applicable Phobia or Quirk +/-
NON - PLAYER CHARACTER MOD
NPC is a Resident and the character is not +1d6
NPC is a hanger on. +1d6
NPC is Profit Motivated +1d6
NPC is a Dumbass -1d6
Applicable Phobia or Quirk +/-
# OF
SUCCESSES PLAYER HAVASU NPC
2+ more Other side will barter. Barter up to the maximum number of items. May barter for prohibited weapons.
Barter up to the maximum number of items but the player character must pay 2 for 1. Will not barter for prohibited weapons.
1 more Other side will barter. Barter up to the maximum number of items. May not barter prohibited weapons.
Will barter up to half the maximum number of items. Will not barter for prohibited weapons.
Same number
No bartering allowed. Try somewhere else. No bartering allowed. Try somewhere else.
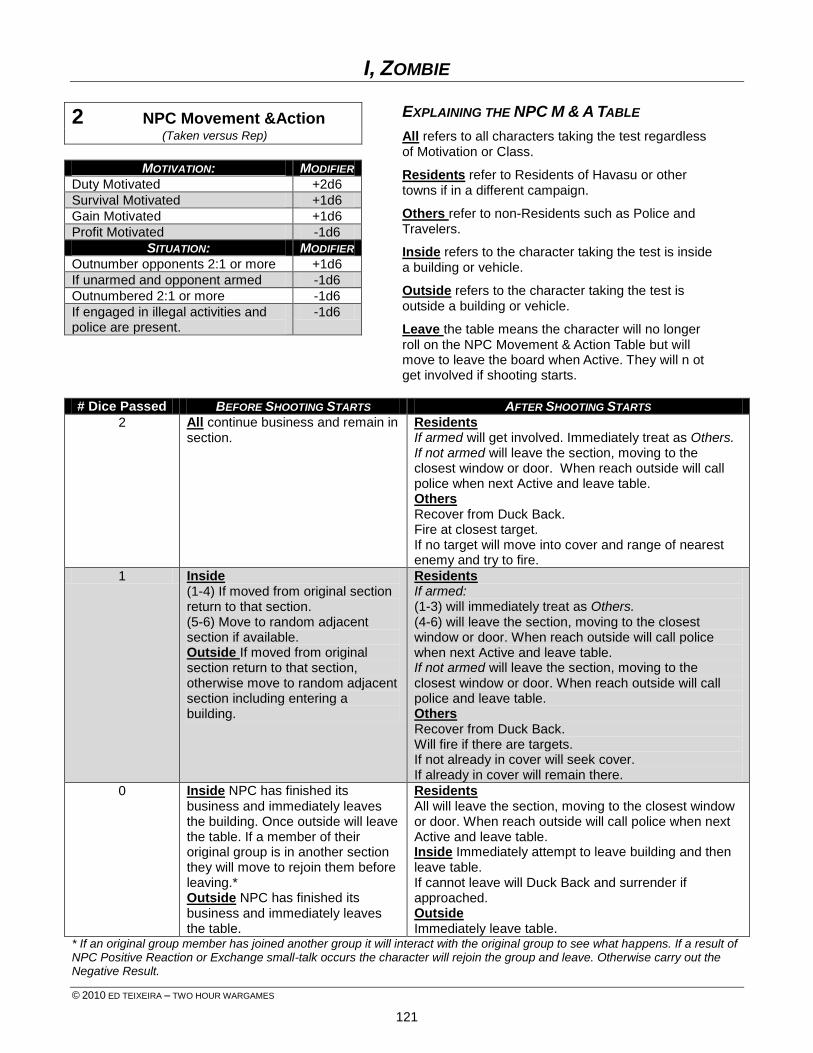
I, ZOMBIE
© 2010 ED TEIXEIRA – TWO HOUR WARGAMES
121
2 NPC Movement &Action (Taken versus Rep)
MOTIVATION: MODIFIER
Duty Motivated +2d6
Survival Motivated +1d6
Gain Motivated +1d6
Profit Motivated -1d6
SITUATION: MODIFIER
Outnumber opponents 2:1 or more +1d6
If unarmed and opponent armed -1d6
Outnumbered 2:1 or more -1d6
If engaged in illegal activities and police are present.
-1d6
EXPLAINING THE NPC M & A TABLE
All refers to all characters taking the test regardless of Motivation or Class.
Residents refer to Residents of Havasu or other towns if in a different campaign.
Others refer to non-Residents such as Police and Travelers.
Inside refers to the character taking the test is inside a building or vehicle.
Outside refers to the character taking the test is outside a building or vehicle.
Leave the table means the character will no longer roll on the NPC Movement & Action Table but will move to leave the board when Active. They will n ot get involved if shooting starts.
# Dice Passed BEFORE SHOOTING STARTS AFTER SHOOTING STARTS
2 All continue business and remain in section.
Residents If armed will get involved. Immediately treat as Others. If not armed will leave the section, moving to the closest window or door. When reach outside will call police when next Active and leave table. Others Recover from Duck Back. Fire at closest target. If no target will move into cover and range of nearest enemy and try to fire.
1 Inside (1-4) If moved from original section return to that section. (5-6) Move to random adjacent section if available. Outside If moved from original section return to that section, otherwise move to random adjacent section including entering a building.
Residents If armed: (1-3) will immediately treat as Others. (4-6) will leave the section, moving to the closest window or door. When reach outside will call police when next Active and leave table. If not armed will leave the section, moving to the closest window or door. When reach outside will call police and leave table. Others Recover from Duck Back. Will fire if there are targets. If not already in cover will seek cover. If already in cover will remain there.
0 Inside NPC has finished its business and immediately leaves the building. Once outside will leave the table. If a member of their original group is in another section they will move to rejoin them before leaving.* Outside NPC has finished its business and immediately leaves the table.
Residents All will leave the section, moving to the closest window or door. When reach outside will call police when next Active and leave table. Inside Immediately attempt to leave building and then leave table. If cannot leave will Duck Back and surrender if approached. Outside Immediately leave table.
* If an original group member has joined another group it will interact with the original group to see what happens. If a result of NPC Positive Reaction or Exchange small-talk occurs the character will rejoin the group and leave. Otherwise carry out the Negative Result.
I, ZOMBIE
© 2010 ED TEIXEIRA – TWO HOUR WARGAMES
122
I, ZOMBIE
© 2010 ED TEIXEIRA – TWO HOUR WARGAMES
INDEX
INDEX 5 P's 53 5 W" 1 After The Horsemen 110 Apartment 25 Back Pack 6 Bar 25 Barter 36 Bicycles 28 Boats in Combat 30 Boats 28 Breakage 35 Buildings - Occupied or Not? 69 Buildings Expanded 16 Calling the Cops 90 Campaign Area 64 Campaign 63 Casting Off and Mooring 29 Changeable Floor Plan 17 Character Journal 63 Characters in the Encounter 56 Chase 95 Cover In Woods and Buildings 5 Cover or Concealment 5 Day Part 56 Destination Encounters 69 Determining the Area 54 Diner 25 Drawing Down 3 Encounter Awareness Test 58 Encounters - Involuntary 71 Encounters - Number of 71 Encumbrance 6 Escape 95 Exterior Access Points 18 Fame & Fortune Points - Using 16 Fame & Fortune 15 Fast Move - New 2 Floor Plans 25 Fugitive 95 Gas Station 25 Getting Arrested 91 Going Before the Judge 92 Havasu Area People Table 77 Havasu Encounters - Bartering 87 Havasu Encounters - Chillin' 87 Havasu Encounters - Coming and Going 86 Havasu Encounters - Police 90 Havasu Encounters - Recruiting 88 Havasu Encounters - Residency 89 Havasu Encounters - Selling Zombies & Ragers 98 Havasu People Lists 78 Holstered Weapon Policy 74 Horses 33 Hunting 60 In Sight Test - Modified 3 Inside Buildings - Moving 21
Inside Buildings - Shooting 21 Inside Buildings 21 Interacting With NPCs 80 Interior Access Points 18 Jail Time 92 Joined Sections 20 Knock, Knock, Who's There? 70 Lack of Sleep 35 Lake Havasu City - Background 72 Lake Havasu City - Crime and Punishment 75 Lake Havasu City - Economy 74 Lake Havasu City - Government 73 Lake Havasu City - Location & Geography 72 Lake Havasu City - Militia 74 Lake Havasu City - Patrols 74 Lake Havasu City - People 73 Lake Havasu City - Zombie Threat 75 Lake Havasu City 72 Laws - Brandishing a Weapon 92 Laws - Disturbing the Peace 92 Laws - Endangerment 92 Laws - Kidnapping 92 Laws - Mayhem 93 Laws - Multiple Charges 93 Laws - Murder 93 Laws - Sedition 93 Laws - Stealing 92 Laws - Treason 93 Laying Out the Buildings 17 List 95 Looting the Landscape 70 Meet & Greet Table 36 Motel - "No-Tell" 26 Motivation 15 NPC Movement & Action 79 NPCs - Cassandra 77 NPCs - Governor Newness 76 NPCs - Hanger ons 76 NPCs - Havasu Area 76 NPCs - Placing Inside Buildings 60 NPCs - Placing 59 NPCs - Police 76 NPCs - Residents 76 NPCs - Travelers 77 NPCs 59 NPCs 76 Panic Attacks 14 Papers 73 Parting Shot 28 Party Favors 81 PEF - Generating 56 PEF - Movement 57 PEF - Optional Generation 57 PEF - Resolving 57 PEF 56 Phobias & Quirks Table 8 Phobias 7 Phobias 8
I, ZOMBIE
© 2010 ED TEIXEIRA – TWO HOUR WARGAMES
INDEX
Pit Fighting 99 Populate the Building 19 Power Boats 28 PSY 47 Quirks - General 13 Quirks - Personality 11 Quirks - Social 10 Quirks - Technical 12 Ragers 36 Random Road Encounters 65 Reaction Tests - Personalized 2 Retire - Modified 5 Safe Houses 26 Second Stories 19 Sentencing 94 Setting Up the Encounter 53 Shopping Cart 7 Smaller & Larger Buildings 20 Smart Zombies 41 Stars - Alternative 2 Store 26 Swimming 32 Terrain - Dividing the Table 54 Terrain - Encounter Area and Terrain 55 Terrain - Placing Terrain 55 Terrain - Roads & Streets 56 Terrain - Setting Up 54 Types of Boats 29 Types of Encounters 53 Vehicle Movement 5 Vehicles 5 Weapons Policy 73 Windows 18 Worms, BA Worms 43 Zombie Racing 102 Zombie Wrangling 97
INDEX OF TABLE BY PURPOSE BA Worm - Escape From 46 BA Worm - Melee Results 46 Barter 120 Boat - Bash 31 Boat - Bash Damage 31 Boat - Disabled Boat 32 Boat - Running Over Swimmers 30 Boat List 29 Buildings Occupied 69 Business Hours 88 Draw Down 119 Encounter Awareness 115 Encounters - Destination 69 Encounters - Involuntary 71 Encounters - Random Road 65 Escape From Jail - Chase 95 Escape From Jail 95 Havasu Events 104 Horsemanship 34
Horses - Mounted Challenge 34 Horses - Rep 33 Horses - Skittish 34 Hunting - Animal Ambush 62 Hunting - Available Game 61 Hunting - Hunting Skill 60 Hunting - Random Events 63 Hunting - Tracking 62 Jobs - Openings 89 NPC - Havasu Area People 77 NPC - Police 78 NPC - Residents 78 NPC - Travelers 79 NPC - Type 59 NPC - Walk or Ride 65 NPC Interaction 117 NPC Movement & Action 121 Panic Attack 14 Patrol 75 PEF - How Many NPCs 59 PEF - Movement Table 57 PEF - Resolution 58 Phobias & Quirks 8 Phobias 8 Pit Fighting - Betting Tables 100 Pit Fighting 116 Police - How Many Cops 90 Police - Under Arrest 91 Psy - Spent, Premonition, Take Notice 113 Psy- Kappa Tasks 114 Psychic Reaction 47 Psy-Gamma Tasks 112 Questioning 75 Quirks - General 13 Quirks - Personality 11 Quirks - Social 10 Quirks - Technical 12 Rager - Placement 37 Repairing 35 Resource - Recovered Items 70 Resource - What's Available? 88 Resource List 71 Sleep - Lack of 35 Smart Zombie - Weapons 41 Swim - Can You? 32 Swimming 32 Table Size 54 Terrain Generator 55 Trial - Result 94 Trial - Sentencing 94 Trial - Witnesses 93 Zombie Racing - Betting Table 102 Zombie Racing - Dodging 104 Zombie Racing - Placing Baiters 103 Zombie Racing - Racing Pool 102 Zombie Wrangling - Net Toss 97 Zombie Wrangling - Selling Zombies 97 Zombie Wrangling - Transferring to Cage 97