Embed Size (px)
Citation preview
IBM InformixVersion 11.50
IBM Informix Dynamic ServerInstallation Guidefor Windows
GC27-3612-00
����

IBM InformixVersion 11.50
IBM Informix Dynamic ServerInstallation Guidefor Windows
GC27-3612-00
����

NoteBefore using this information and the product it supports, read the information in “Notices” on page B-1.
This document contains proprietary information of IBM. It is provided under a license agreement and is protectedby copyright law. The information contained in this publication does not include any product warranties, and anystatements provided in this manual should not be interpreted as such.
When you send information to IBM, you grant IBM a nonexclusive right to use or distribute the information in anyway it believes appropriate without incurring any obligation to you.
© Copyright IBM Corporation 1996, 2010.US Government Users Restricted Rights – Use, duplication or disclosure restricted by GSA ADP Schedule Contractwith IBM Corp.
Contents
Introduction . . . . . . . . . . . . . . . . . . . . . . . . . . . . . . . . . . vIBM Informix Dynamic Server editions . . . . . . . . . . . . . . . . . . . . . . . . . . vAbout this publication . . . . . . . . . . . . . . . . . . . . . . . . . . . . . . . . v
Types of users . . . . . . . . . . . . . . . . . . . . . . . . . . . . . . . . . . vWhat's new in IBM Informix Dynamic Server installation, Version 11.50 . . . . . . . . . . . . . . . viDocumentation conventions . . . . . . . . . . . . . . . . . . . . . . . . . . . . . viii
Technical changes . . . . . . . . . . . . . . . . . . . . . . . . . . . . . . . . viiiFeature, product, and platform markup. . . . . . . . . . . . . . . . . . . . . . . . . viiiExample code conventions . . . . . . . . . . . . . . . . . . . . . . . . . . . . . ix
Additional documentation . . . . . . . . . . . . . . . . . . . . . . . . . . . . . . ixCompliance with Industry Standards . . . . . . . . . . . . . . . . . . . . . . . . . . . xSyntax Diagrams . . . . . . . . . . . . . . . . . . . . . . . . . . . . . . . . . . x
How to read a command-line syntax diagram . . . . . . . . . . . . . . . . . . . . . . . xiKeywords and punctuation . . . . . . . . . . . . . . . . . . . . . . . . . . . . . xiiIdentifiers and names . . . . . . . . . . . . . . . . . . . . . . . . . . . . . . . xii
How to Provide Documentation Feedback . . . . . . . . . . . . . . . . . . . . . . . . . xiii
Chapter 1. Preparing to install IDS and client products on Windows . . . . . . . . . 1-1Online notes . . . . . . . . . . . . . . . . . . . . . . . . . . . . . . . . . . . 1-1Verify system requirements . . . . . . . . . . . . . . . . . . . . . . . . . . . . . . 1-1Verify Administrators group membership . . . . . . . . . . . . . . . . . . . . . . . . . 1-1Multiple copies of IDS on one computer . . . . . . . . . . . . . . . . . . . . . . . . . 1-1Choose your installation setup . . . . . . . . . . . . . . . . . . . . . . . . . . . . . 1-2Installable features of IDS . . . . . . . . . . . . . . . . . . . . . . . . . . . . . . 1-4Demonstration database server . . . . . . . . . . . . . . . . . . . . . . . . . . . . 1-6Instance Configuration Wizard. . . . . . . . . . . . . . . . . . . . . . . . . . . . . 1-7Plan role separation . . . . . . . . . . . . . . . . . . . . . . . . . . . . . . . . 1-8Installation directory . . . . . . . . . . . . . . . . . . . . . . . . . . . . . . . . 1-9Choose between local and domain installations . . . . . . . . . . . . . . . . . . . . . . . 1-9User informix . . . . . . . . . . . . . . . . . . . . . . . . . . . . . . . . . . 1-10Upgrade the database server . . . . . . . . . . . . . . . . . . . . . . . . . . . . . 1-10
Chapter 2. Installing IDS on Windows . . . . . . . . . . . . . . . . . . . . . . 2-1Installing IBM Informix products . . . . . . . . . . . . . . . . . . . . . . . . . . . . 2-1Installing with the GUI typical setup. . . . . . . . . . . . . . . . . . . . . . . . . . . 2-1Installing with the GUI custom setup . . . . . . . . . . . . . . . . . . . . . . . . . . 2-2Installing a copy of IDS on a computer . . . . . . . . . . . . . . . . . . . . . . . . . . 2-4Performing a silent installation. . . . . . . . . . . . . . . . . . . . . . . . . . . . . 2-5
Using a customized server.ini file for silent installation . . . . . . . . . . . . . . . . . . . 2-5Using a response file for silent installation . . . . . . . . . . . . . . . . . . . . . . . . 2-6
Silent installation response codes . . . . . . . . . . . . . . . . . . . . . . . . . . . . 2-8Setting up cluster installations . . . . . . . . . . . . . . . . . . . . . . . . . . . . . 2-8
Cluster installations . . . . . . . . . . . . . . . . . . . . . . . . . . . . . . . 2-8Upgrade of IDS by overwriting an existing installation . . . . . . . . . . . . . . . . . . . . 2-11
Overwriting an existing IDS installation . . . . . . . . . . . . . . . . . . . . . . . . 2-12Multiple residency . . . . . . . . . . . . . . . . . . . . . . . . . . . . . . . . 2-12
Plan for multiple residency . . . . . . . . . . . . . . . . . . . . . . . . . . . . 2-12Creating a new database server instance . . . . . . . . . . . . . . . . . . . . . . . . 2-13Server Instance Manager command-line options . . . . . . . . . . . . . . . . . . . . . 2-13
Troubleshooting installation problems . . . . . . . . . . . . . . . . . . . . . . . . . . 2-14
Chapter 3. Post-installation tasks on Windows . . . . . . . . . . . . . . . . . . 3-1Working with the installation . . . . . . . . . . . . . . . . . . . . . . . . . . . . . 3-1Setup performed by the installation application . . . . . . . . . . . . . . . . . . . . . . . 3-1IDS program group . . . . . . . . . . . . . . . . . . . . . . . . . . . . . . . . 3-2
© Copyright IBM Corp. 1996, 2010 iii
Initializing and starting the database server . . . . . . . . . . . . . . . . . . . . . . . . 3-3Stopping the database server . . . . . . . . . . . . . . . . . . . . . . . . . . . . 3-4
Database server configuration after installation . . . . . . . . . . . . . . . . . . . . . . . 3-4Database server number . . . . . . . . . . . . . . . . . . . . . . . . . . . . . . 3-4Database server name. . . . . . . . . . . . . . . . . . . . . . . . . . . . . . . 3-5Service name and port number . . . . . . . . . . . . . . . . . . . . . . . . . . . 3-5Dbspace name, location, and size . . . . . . . . . . . . . . . . . . . . . . . . . . . 3-5Default sbspace name, location, size, and page size . . . . . . . . . . . . . . . . . . . . . 3-5Configuring IDS manually . . . . . . . . . . . . . . . . . . . . . . . . . . . . . 3-6
Chapter 4. Removing or modifying IDS and client products on Windows . . . . . . . 4-1Altering IDS features . . . . . . . . . . . . . . . . . . . . . . . . . . . . . . . . 4-1Uninstalling IDS . . . . . . . . . . . . . . . . . . . . . . . . . . . . . . . . . 4-1Reinstalling the database server . . . . . . . . . . . . . . . . . . . . . . . . . . . . 4-2Performing silent uninstallations of IDS. . . . . . . . . . . . . . . . . . . . . . . . . . 4-2
Chapter 5. Deploying IDS . . . . . . . . . . . . . . . . . . . . . . . . . . . 5-1The deployment utility . . . . . . . . . . . . . . . . . . . . . . . . . . . . . . . 5-1Rapid IDS embeddability with the deployment utility . . . . . . . . . . . . . . . . . . . . . 5-2Creating a snapshot for deployment . . . . . . . . . . . . . . . . . . . . . . . . . . . 5-4Deploying a snapshot with the deployment utility . . . . . . . . . . . . . . . . . . . . . . 5-4The ifxdeploy command: The deployment utility . . . . . . . . . . . . . . . . . . . . . . 5-5The ifxdeploy.conf file: The deployment utility configuration file . . . . . . . . . . . . . . . . . 5-10
The ifxdeploy.conf file template . . . . . . . . . . . . . . . . . . . . . . . . . . . 5-13Removing a snapshot with the deployment utility . . . . . . . . . . . . . . . . . . . . . . 5-15
Appendix. Accessibility . . . . . . . . . . . . . . . . . . . . . . . . . . . . A-1Accessibility features for IBM Informix products . . . . . . . . . . . . . . . . . . . . . . A-1
Accessibility features . . . . . . . . . . . . . . . . . . . . . . . . . . . . . . . A-1Keyboard navigation . . . . . . . . . . . . . . . . . . . . . . . . . . . . . . . A-1Related accessibility information . . . . . . . . . . . . . . . . . . . . . . . . . . . A-1IBM and accessibility. . . . . . . . . . . . . . . . . . . . . . . . . . . . . . . A-1
Dotted decimal syntax diagrams . . . . . . . . . . . . . . . . . . . . . . . . . . . . A-1
Notices . . . . . . . . . . . . . . . . . . . . . . . . . . . . . . . . . . . B-1Trademarks . . . . . . . . . . . . . . . . . . . . . . . . . . . . . . . . . . . B-3
Index . . . . . . . . . . . . . . . . . . . . . . . . . . . . . . . . . . . . X-1
iv IBM Informix Dynamic Server Installation Guide for Windows
||
||||||
Introduction
This introduction provides an overview of IBM® Informix® products and of thispublication as well as the conventions that it uses.
IBM Informix Dynamic Server editionsIBM Informix Dynamic Server is available in different editions to fit differentbusiness needs.
Some of the functionality described in IBM Informix documentation might not beavailable for Workgroup Edition. For details on the differences between editions,see the following Web site: http://www.ibm.com/software/data/informix/ids/ids-ed-choice/
The license agreement has the specific restrictions for each edition. To view alicense for a particular edition, search for "Informix Dynamic Server" on thefollowing Web site: http://www.ibm.com/software/sla/sladb.nsf
About this publicationThis guide explains how to install, configure, and initialize IBM Informix DynamicServer on a computer running a Windows® operating system.
The following additional products can be installed from the installation media forIDS:v IBM Informix BladeManagerv IBM Informix DataBlade® Developers Kit (DBDK)v IBM Informix ClusterITv The IBM Informix JDBC Driver is available on the installation media and needs
to be separately installed. For information on installing IBM Informix JDBCDriver, see the IBM Informix JDBC Driver Programmer's Guide.
v IBM Informix Client Software Development Kit (Client SDK) or IBM InformixConnect. Client SDK provides software tools that lets you develop and run clientapplications. Informix Connect provides runtime support for client programs.See the IBM Informix Client Products Installation Guide for more information.
IBM Informix Server Administrator (ISA) is available for download at:http://www.ibm.com/software/data/informix/downloads.html
OpenAdmin Tool for IDS is a PHP-based Web browser administration tool that canadminister multiple database server instances using a single installation on a Webserver. OpenAdmin Tool is available for download at: http://www.openadmintool.com
For a description of client and other related products for IDS, see IBM InformixDynamic Server Getting Started Guide.
Types of usersThis publication is for database administrators (DBAs) who install IBM Informixproducts. This guide assumes that you are familiar with the operating procedures
© Copyright IBM Corp. 1996, 2010 v
of your computer and with your operating system. For information about youroperating system, see your Microsoft® Windows documentation.
What's new in IBM Informix Dynamic Server installation, Version 11.50This publication includes information about new features and changes in existingfunctionality.
The following changes and enhancements are relevant to this publication. For acomprehensive list of all new features for this release, see the IBM InformixDynamic Server Getting Started Guide.
Table 1. What's new in Version 11.50.xC6
Overview Reference
Simplified Deployment of an IDS Instance (Windows)
You can set configuration parameters, essentialenvironment variables, and SQLHOST connectivityinformation in a deployment utility configuration file(ifxdeploy.conf). You can reuse the file to deployinstances with the deployment utility. When you plan toembed a snapshot of the same instance in multiplelocations, you can use the customized configuration fileto centralize the installation setup work and ensure thatthe deployed instances are consistent.
If you do not specify certain environment variables whenyou run the ifxdeploy command, or set them in anifxdeploy.conf file, the deployment utility sets valuesbased on the process environment.
See “The ifxdeploy.conf file: The deployment utilityconfiguration file” on page 5-10.
Dynamic dbspace Relocation when Deploying Snapshots(Windows)
You can dynamically reconfigure the chunk paths of asnapshot by using the -relocate option of the deploymentutility. The -relocate option initializes the dbspacesrequired for deploying the template instance without aseparate step for disk space initialization.
See “Rapid IDS embeddability with the deploymentutility” on page 5-2.
Table 2. What's new in Version 11.50.xC5
Overview Reference
Deploying IDS with the Deployment Utility (Windows)
This command-line utility facilitates faster deployment ofa configured IDS instance. This utility is currentlyavailable on Windows. The utility can be calledprogrammatically or from a script as part of anapplication installation, and therefore supports completelysilent IDS deployment.
See Chapter 5, “Deploying IDS,” on page 5-1.
Upgrading to IDS v11.50.xC5 in Silent Mode (Windows)
You can upgrade from IDS v11.50.xC4 or earlier to IDSv11.50.xC5 in silent mode. You will need to record aresponse file for IDS v11.50.xC5. You cannot use aresponse file that was recorded when IDS v11.50.xC4 orearlier versions were installed.
See “Using a response file for silent installation” on page2-6.
vi IBM Informix Dynamic Server Installation Guide for Windows
||
||
|
|||||||||
||||
||
||
|||||
||
|
Table 3. What's new in Version 11.50.xC4
Overview Reference
Upgrade IDS by Overwriting the Existing Installation
When you are upgrading IDS from one fix pack level toanother in the same product version, you can install theproduct in the running database server installationdirectory. You also can overwrite an existing installationfor training or specialized technical needs. Take allnecessary backup precautions before upgrading with thismethod. It is recommended that most users follow theIBM Informix Migration Guide for version-to-versionupgrades and migrations.
“Upgrade of IDS by overwriting an existing installation”on page 2-11
Table 4. What's new in Version 11.50.xC2
Overview Reference
Multiple Copies of IDS on the Same Windows Computer
In version 11.10, you could not install and run multiplecopies of the same version of IDS on the same Windowscomputer. Now you can do so by using the graphicaluser interface or by supplying installation parameters in afile to perform a silent, non-interactive installation.
If the installation application detects that the sameversion of IDS is already installed, you can choose toinstall a new copy in another directory or you can chooseto modify the existing installation.
“Multiple copies of IDS on one computer” on page 1-1
Table 5. What's new in Version 11.50.xC1
Overview Reference
Enhanced Configuration Options During Installation
You can use the new Instance Configuration Wizard toautomatically create the database server configuration file(onconfig) during a custom installation in GUI mode.
Provide the information for the instance that you areinstalling, such as the number of CPUs, memory, diskspace, and estimates of online transactions and queryclients. The wizard ensures that your settings are valid,and it calculates values for other server configurationparameters based on your settings. Your customconfiguration information is stored in the onconfig file sothat when you start the instance after the product isinstalled, the instance runs with your settings.
See “Instance Configuration Wizard” on page 1-7.
Introduction vii
Table 5. What's new in Version 11.50.xC1 (continued)
Overview Reference
DRDA® Protocol Configuration During Installation
It's easier now than in past releases to set up an instanceto use a variety of database clients. When you install IDSVersion 11.50 the installer enables you to configure adatabase server alias and a port for clients that use theDistributed Relational Database Architecture™ (DRDA)protocol. By default, those items are configured for youunless you deselect DRDA support. DRDA is for opendevelopment of applications that allow access ofdistributed data. DRDA is interoperable with IBM DataServer clients.
If you disable DRDA support in the installationapplication, you can still modify the instance to functionwith the DRDA protocol after installation by using theinstmgr.exe utility (see "Server Instance ManagerCommand-Line Options").
See “Installing with the GUI custom setup” on page 2-2.
Install as the Local System Account Support
In past releases, the IDS Windows Service was allowed tolog on only as user informix. Starting with version 11.50,you can install IDS on Windows as the local systemaccount.
Select the Local System User option in the installationapplication. That option provides the same privileges asthe informix user account; however, it uses an internalaccount that does not require a password. The localsystem account is used by the operating system andservices running under Windows during the installationof IDS.
You can choose not to create an informix user account atall, but if you do so, you will not be able to useEnterprise Replication between IDS on UNIX® and IDS onWindows operating systems.
See “Installing with the GUI custom setup” on page 2-2.
Documentation conventionsSpecial conventions are used in the IBM Informix product documentation.
Technical changesTechnical changes to the text are indicated by special characters depending on theformat of the documentation.
HTML documentationNew or changed information is surrounded by blue @ and ! characters.
PDF documentationA plus sign (+) is shown to the left of the current changes. A vertical bar(│) is shown to the left of changes made in earlier shipments.
Feature, product, and platform markupFeature, product, and platform markup identifies paragraphs that containfeature-specific, product-specific, or platform-specific information.
viii IBM Informix Dynamic Server Installation Guide for Windows
Some examples of this markup follow:
Dynamic Server only: Identifies information that is specific to IBM InformixDynamic Server
Windows only: Identifies information that is specific to the Windows operatingsystem
This markup can apply to one or more paragraphs within a section. When anentire section applies to a particular product or platform, this is noted as part ofthe heading text, for example:
Table Sorting (Windows)
Example code conventionsExamples of SQL code occur throughout this publication. Except as noted, the codeis not specific to any single IBM Informix application development tool.
If only SQL statements are listed in the example, they are not delimited bysemicolons. For instance, you might see the code in the following example:CONNECT TO stores_demo...
DELETE FROM customerWHERE customer_num = 121
...
COMMIT WORKDISCONNECT CURRENT
To use this SQL code for a specific product, you must apply the syntax rules forthat product. For example, if you are using an SQL API, you must use EXEC SQLat the start of each statement and a semicolon (or other appropriate delimiter) atthe end of the statement. If you are using DB–Access, you must delimit multiplestatements with semicolons.
Tip: Ellipsis points in a code example indicate that more code would be added ina full application, but it is not necessary to show it to describe the concept beingdiscussed.
For detailed directions on using SQL statements for a particular applicationdevelopment tool or SQL API, see the documentation for your product.
Additional documentationDocumentation about IBM Informix products is available in various formats.
You can view, search, and print all of the product documentation from theinformation center on the Web at http://publib.boulder.ibm.com/infocenter/idshelp/v115/index.jsp.
For additional documentation about IBM Informix products, including releasenotes, machine notes, and documentation notes, go to the online product librarypage at http://www.ibm.com/software/data/informix/techdocs.html.Alternatively, you can access or install the product documentation from the QuickStart CD that is shipped with the product.
Introduction ix
Compliance with Industry StandardsIBM Informix products are compliant with various standards.
IBM Informix SQL-based products are fully compliant with SQL-92 Entry Level(published as ANSI X3.135-1992), which is identical to ISO 9075:1992. In addition,many features of IBM Informix database servers comply with the SQL-92Intermediate and Full Level and X/Open SQL Common Applications Environment(CAE) standards.
The IBM Informix Geodetic DataBlade Module supports a subset of the data typesfrom the Spatial Data Transfer Standard (SDTS)—Federal Information ProcessingStandard 173, as referenced by the document Content Standard for GeospatialMetadata, Federal Geographic Data Committee, June 8, 1994 (FGDC MetadataStandard).
IBM Informix Dynamic Server (IDS) Enterprise Edition, Version 11.50 is certifiedunder the Common Criteria. For more information, refer to Common CriteriaCertification: Requirements for IBM Informix Dynamic Server, which is available athttp://www.ibm.com/support/docview.wss?uid=swg27015363.
Syntax DiagramsSyntax diagrams use special components to describe the syntax for statements andcommands.
Table 6. Syntax Diagram Components
Component represented in PDF Component represented in HTML Meaning
>>---------------------- Statement begins.
-----------------------> Statement continues on nextline.
>----------------------- Statement continues fromprevious line.
----------------------->< Statement ends.
--------SELECT---------- Required item.
--+-----------------+---'------LOCAL------'
Optional item.
---+-----ALL-------+---+--DISTINCT-----+'---UNIQUE------'
Required item with choice.One and only one item mustbe present.
---+------------------+---+--FOR UPDATE-----+'--FOR READ ONLY--'
Optional items with choiceare shown below the mainline, one of which you mightspecify.
x IBM Informix Dynamic Server Installation Guide for Windows
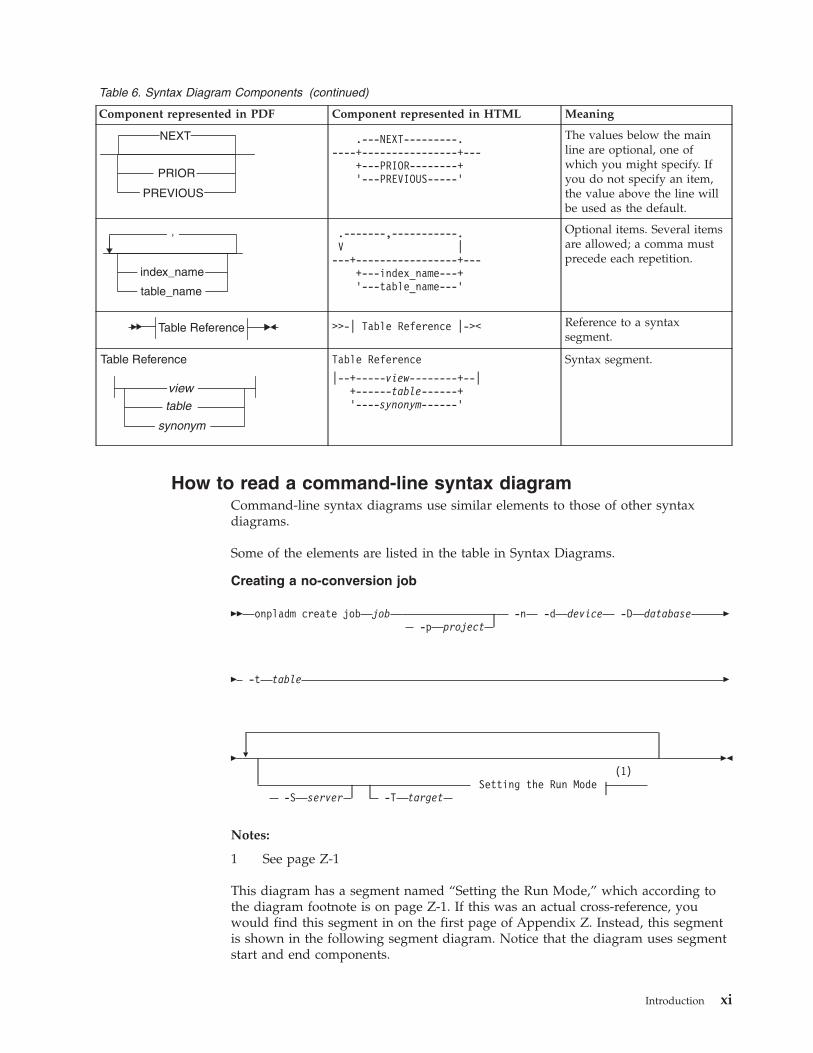
Table 6. Syntax Diagram Components (continued)
Component represented in PDF Component represented in HTML Meaning
.---NEXT---------.----+----------------+---
+---PRIOR--------+'---PREVIOUS-----'
The values below the mainline are optional, one ofwhich you might specify. Ifyou do not specify an item,the value above the line willbe used as the default.
.-------,-----------.V |---+-----------------+---
+---index_name---+'---table_name---'
Optional items. Several itemsare allowed; a comma mustprecede each repetition.
>>-| Table Reference |->< Reference to a syntaxsegment.
Table Reference
|--+-----view--------+--|+------table------+'----synonym------'
Syntax segment.
How to read a command-line syntax diagramCommand-line syntax diagrams use similar elements to those of other syntaxdiagrams.
Some of the elements are listed in the table in Syntax Diagrams.
Creating a no-conversion job
�� onpladm create job job-p project
-n -d device -D database �
� -t table �
� �(1)
Setting the Run Mode-S server -T target
��
Notes:
1 See page Z-1
This diagram has a segment named “Setting the Run Mode,” which according tothe diagram footnote is on page Z-1. If this was an actual cross-reference, youwould find this segment in on the first page of Appendix Z. Instead, this segmentis shown in the following segment diagram. Notice that the diagram uses segmentstart and end components.
Introduction xi

Setting the run mode:
-fdpa
lc
u n N
To see how to construct a command correctly, start at the top left of the maindiagram. Follow the diagram to the right, including the elements that you want.The elements in this diagram are case sensitive because they illustrate utilitysyntax. Other types of syntax, such as SQL, are not case sensitive.
The Creating a No-Conversion Job diagram illustrates the following steps:1. Type onpladm create job and then the name of the job.2. Optionally, type -p and then the name of the project.3. Type the following required elements:v -n
v -d and the name of the devicev -D and the name of the databasev -t and the name of the table
4. Optionally, you can choose one or more of the following elements and repeatthem an arbitrary number of times:v -S and the server namev -T and the target server namev The run mode. To set the run mode, follow the Setting the Run Mode
segment diagram to type -f, optionally type d, p, or a, and then optionallytype l or u.
5. Follow the diagram to the terminator.
Keywords and punctuationKeywords are words reserved for statements and all commands exceptsystem-level commands.
When a keyword appears in a syntax diagram, it is shown in uppercase letters.When you use a keyword in a command, you can write it in uppercase orlowercase letters, but you must spell the keyword exactly as it appears in thesyntax diagram.
You must also use any punctuation in your statements and commands exactly asshown in the syntax diagrams.
Identifiers and namesVariables serve as placeholders for identifiers and names in the syntax diagramsand examples.
You can replace a variable with an arbitrary name, identifier, or literal, dependingon the context. Variables are also used to represent complex syntax elements thatare expanded in additional syntax diagrams. When a variable appears in a syntaxdiagram, an example, or text, it is shown in lowercase italic.
xii IBM Informix Dynamic Server Installation Guide for Windows
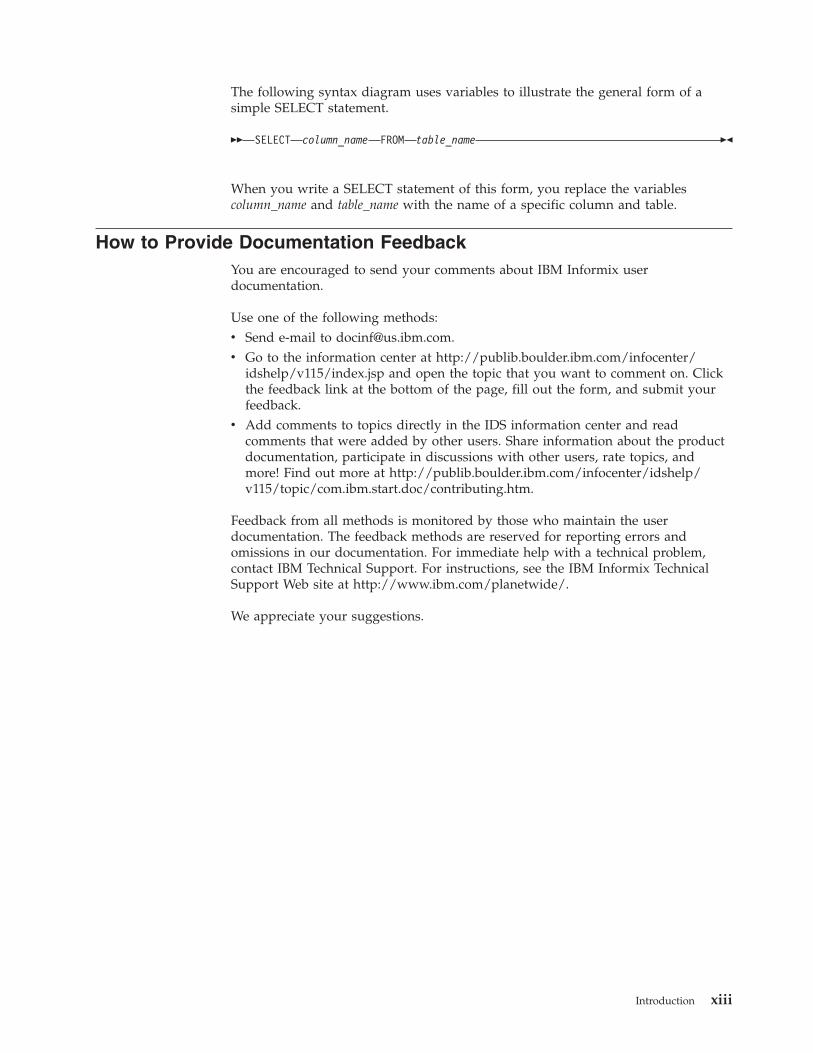
The following syntax diagram uses variables to illustrate the general form of asimple SELECT statement.
�� SELECT column_name FROM table_name ��
When you write a SELECT statement of this form, you replace the variablescolumn_name and table_name with the name of a specific column and table.
How to Provide Documentation FeedbackYou are encouraged to send your comments about IBM Informix userdocumentation.
Use one of the following methods:v Send e-mail to [email protected] Go to the information center at http://publib.boulder.ibm.com/infocenter/
idshelp/v115/index.jsp and open the topic that you want to comment on. Clickthe feedback link at the bottom of the page, fill out the form, and submit yourfeedback.
v Add comments to topics directly in the IDS information center and readcomments that were added by other users. Share information about the productdocumentation, participate in discussions with other users, rate topics, andmore! Find out more at http://publib.boulder.ibm.com/infocenter/idshelp/v115/topic/com.ibm.start.doc/contributing.htm.
Feedback from all methods is monitored by those who maintain the userdocumentation. The feedback methods are reserved for reporting errors andomissions in our documentation. For immediate help with a technical problem,contact IBM Technical Support. For instructions, see the IBM Informix TechnicalSupport Web site at http://www.ibm.com/planetwide/.
We appreciate your suggestions.
Introduction xiii

xiv IBM Informix Dynamic Server Installation Guide for Windows
Chapter 1. Preparing to install IDS and client products onWindows
Read the following information and complete the tasks appropriate for yourinstallation environment.
Online notes
Read the online notes that are located in the IIF/doc directory or athttp://publib.boulder.ibm.com/infocenter/idshelp/v115/topic/com.ibm.relnotes.doc/relnotes.htm.
Verify system requirements
Refer to the IBM Informix Dynamic Server machine notes for specific, supportedWindows operating systems.
Verify that your computer meets the minimum installation requirements:v 256 MB of RAM.v Sum of RAM and paging file must be at least 512 megabytes. (Some installation
choices require additional disk space. The installation application informs you ofthe total disk space required by your setup before you copy the binary files toyour host computer.)
v Total of 350 MB of free disk space for installation of the product and all featuresof a working system.
v Destination drive with a Windows file system (NTFS).
The installation program determines, at run time, the amount of disk spacerequired.
Verify Administrators group membershipVerify that you are logged in as a member of the Windows Administrators group.
For information on how to create groups and add users to groups, see yourWindows documentation.
Multiple copies of IDS on one computerMultiple copies of IBM Informix Dynamic Server can run on the same computer.The copies can be the same version or different versions of the product.
Multiple copies of different versions
If your computer hosts more than one installation of IDS, each instance has acorresponding IDS program group on the Start → Programs menu.
Do not install a newer version of IDS in the same location where an earlier versionof the product exists to avoid conflicts between directories, .dll files, registry
© Copyright IBM Corp. 1996, 2010 1-1
entries, and other IBM Informix-related services. If you want to run differentversions of IDS on the same host machine, keep the installations in different paths.
To uninstall versions of IBM Informix products released before 11.50, refer to theuninstallation documentation for that version.
To uninstall version 11.50 IDS and any of its components, refer to Chapter 4,“Removing or modifying IDS and client products on Windows,” on page 4-1.
Multiple copies of the same version
You can install multiple copies of the same version of IDS on one Windowsoperating system. A copy refers to an installation in a different location on thesame computer. The benefits of doing this include:v The ability to test new features before using them in a production databasev The ability to have both 32-bit and 64-bit versions on the same computer
To identify which installed copy you want to modify, use the unique location ofthe installation or the installation number that was generated automatically whenthe copy was installed.
The first copy that you install on a computer is, by default, installation number 1.The subsequent copies that you install have installation numbers that increase by 1.For example, the installation number of the second copy is 2 and the installationnumber of the next copy is 3.
If you uninstall copies, and then install additional copies, the installation numberwill increase by 1 based on the highest installation number on that computer. Forexample, if you have three copies on the computer and you delete installationnumber 2, when you install another copy of the same version, the new copy isinstallation number 4.Related tasks
“Installing a copy of IDS on a computer” on page 2-4
Choose your installation setupUsing the installation application, you can choose a typical or custom setup forloading IBM Informix Dynamic Server and other products to your system. Typicalsetup installs the full IDS product, while custom setup lets you exclude productfeatures in order to minimize the installation footprint (disk size).
Installation application setup types
The installation application has two setup options:
Typical installationA typical installation requires the most disk space and memory. It is therecommended installation for most database servers. The typical setupinstalls IDS (the base server) and all associated feature sets (components),as well as a configured demonstration database server.
Custom installationA custom installation allows you to perform advanced installation stepsand configuration of the database server. The main customization tool ofthis setup option is the deployment wizard, which lets you omit
1-2 IBM Informix Dynamic Server Installation Guide for Windows
components and features that you do not need to reduce the disk spacerequired by the installation (footprint).
You can run the installation application on Windows in either of the followingmodes:v Graphical user interface (GUI).v Silent installation. You can perform a silent installation, an installation method
that requires no user interaction with the installation application after you startit. Silent installation is useful when you plan to install IDS or related productson multiple computers or in multiple directories. You must have a completeresponse file, which indicates how you want the installation to be configured,before you can perform a silent installation. See “Performing a silentinstallation” on page 2-5 for details.
Which setup type you choose depends on your system architecture, your technicalexpertise, and the needs of your implementation. There are some IDS installationoptions for which you must choose a particular setup or installation mode:
Instance Configuration WizardThis wizard is only available with a custom setup in GUI mode.
Silent installationCustom setup is recommended, but not required, for silent installation. Ifyou expect to replicate your installation configuration with silentinstallation, read “Performing a silent installation” on page 2-5 first. In theGUI installation application, you can generate a response file forconfiguring other instances' installations in silent mode, but not when youuse the Instance Configuration Wizard. Parameters affected by the InstanceConfiguration Wizard are not available for silent installation.
Automatic startup of cluster utility after installationYou must select a custom IBM Informix Dynamic Server installation andselect the cluster utility check box if you want the IBM Informix ClusterITUtility to start running automatically after you have completed installation.This option is only available if you have the IDS installation media that isbundled with other IBM Informix products and if the installationapplication detects the Microsoft Cluster Server on the host computer. Read“Cluster installations” on page 2-8 for more information.
DRDA protocol supportTo include support for Distributed Relational Database Architecture(DRDA) connections in your IDS instance, you must select a custominstallation and complete the configuration setup accordingly. DRDA isdesigned for interoperability among different IBM Data Server clients. Ifyou disable DRDA support in the installation application, you can stillmodify the instance to function with the DRDA protocol after installationby using the instmgr.exe utility (see “Server Instance Managercommand-line options” on page 2-13).
Installing database server to run as local system userTo install IDS as a local system account on Windows, you must select acustom installation and complete the configuration setup accordingly. Thislets the IDS log in as a Windows service, instead of user informix.
Read “Installing with the GUI custom setup” on page 2-2 for more informationabout DRDA support and IDS as local system user.
Chapter 1. Preparing to install IDS and client products (Windows) 1-3
Installable features of IDSYou can install the following features with the base server: Database ServerExtensions, Global Language Support, Backup and Restore, Demos, Data-LoadingUtilities, and Administrative Utilities.
Base server
The base server refers to the core database server for basic DBA operations withoutoptional extensions, libraries, or utilities. The minimum size of the base serverinstallation is 180 megabytes (MB). Every IBM Informix Dynamic Serverinstallation includes the components of the base server, regardless of whether youchoose a typical or custom installation.
The base server no longer contains the XML Publishing feature and must beincluded in your Deployment Wizard selections if you want to install it. XMLPublishing is in the Database Server Extensions component.
Support for the Distributed Relational Database Architecture (DRDA) protocol isincluded in the base server. To use the DRDA support functionality with IBM DataServer .NET Provider or IBM Data Server JDBC Driver, you must obtain and installthe .NET Provider or JDBC Driver separately.
The IBM Global Security Kit (GSKit) is included as a component of the IDSinstallation.
Features
The following list describes all features available in an IBM Informix DynamicServer installation. A typical installation setup installs all of these features. If youchoose custom installation setup, you can omit features that you do not want toinstall. You can view the size of each component and feature on your systembefore you actually proceed with installation when you select the component orfeature in the GUI setup.
Database Server ExtensionsDatabase administration tools and programming extensions
J/FoundationFor writing user-defined routines in the Java™ programminglanguage
Built-in DataBlade ModulesFor providing large object location management, MQ transactionsupport, binary user-defined types, the hierarchical node data type,basic text search, and Web Feature Services for spatial data
Conversion and Reversion SupportFramework required for migrating to and from other versions ofthe database server
XML PublishingSet of functions to publish SQL queries as XML
Global Language SupportThe feature files to support languages, cultural conventions, and code sets.These files are not required if your default locale uses American English,which is the default language in IDS when no GLS feature is installed.
1-4 IBM Informix Dynamic Server Installation Guide for Windows
West European and AmericasDanish, Dutch, English, Finnish, French, German, Icelandic, Italian,Norwegian, Portuguese, Spanish, and Swedish locales
East European and CyrillicCzech, Polish, Russian, and Slovak locales
ChineseTraditional Chinese and simplified Chinese locales
KoreanKorean locales
JapaneseJapanese locales
Other Thai locales
Backup and RestoreFeature utilities for backing up and restoring database server data
ON-Bar utilitiesThe onbar utility is a batch file (onbar.bat) that starts theonbar-driver. Use this batch file to customize backup and restoreoperations and check the storage-manager version.
Informix Interface for Tivoli® Storage ManagerFor implementing XBSA functions that use Tivoli Storage Managerwith ON-Bar
IBM Informix Storage ManagerFor managing external storage devices and media that containbackups
The archecker utilityFor verifying backups and restoring portions of a database, a table,a portion of a table, or a set of tables
DemosDemonstration databases and examples
Data-loading utilitiesFor efficient loading and unloading of data in certain configurations
The onunload and onload utilitiesFor moving data quickly from one operating system or databaseserver to another without changing the database schema. Use theonunload utility to unload data from the specified database ortable onto a tape or a file on disk in disk-page-sized units. Use theonload utility to re-create the database or the table from the tapeor file that was created by the onload utility.
The dbload utilityFor loading data into databases or tables that IBM Informixproducts created. Use the dbload utility to transfer data from oneor more text files into one or more existing tables.
High-Performance Loader (HPL)For loading or unloading large quantities of data efficiently to orfrom a database. Use HPL to exchange data with tapes, data files,and programs, and convert data from these sources into a format
Chapter 1. Preparing to install IDS and client products (Windows) 1-5
compatible with IBM Informix databases. Also use HPL tomanipulate and filter the data as you perform load and unloadoperations.
Enterprise ReplicationFor replicating data between IDS database servers
Administrative utilitiesAdditional administrative utility feature sets
Miscellaneous monitoring utilitiesFor displaying the logical log by using the onlog utility ormanaging the database server with SNMP by using the onsnmputility.
Auditing utilitiesFor administering audit masks, trails, and other auditinginformation on the database server by using the onaudit andonshowaudit utilities.
Database import and export utilitiesFor unloading a database into text files, creating and populating adatabase from those text files, or unloading a database schema intoa text file
Demonstration database serverThe installation application can create and configure a ready-to-use databaseserver, which you can use as a production or testing instance.
The IDS configuration file
To access the installed database server, a configuration file must exist inINFORMIXDIR and must contain valid settings for your system. Setting up ademonstration database server during installation establishes a basic, validconfiguration file, which can help users who are new to IBM Informix DynamicServer. The installation setup you choose determines how the demonstrationdatabase server can be configured:
Typical installationSetup of the demonstration database server is automatic and requires nouser input during installation. The installation application scans yoursystem and records necessary information to the configuration file shippedwith the installation media. The database server will be initialized afterinstallation is complete.
Custom installationCustom installation lets you decide whether to configure a database serveror not, and if you do, gives you more options about the settings. There aretwo ways in which you can utilize the default configuration file duringinstallation
Basic demonstration database serverSelect the Initialize Server check box in the installation applicationand ensure that the settings for the server name, service name,port, and server number are accurate.
Instance Configuration WizardA more customized database server can be created with theInstance Configuration Wizard. Select the Initialize Server and
1-6 IBM Informix Dynamic Server Installation Guide for Windows
Enable the default configuration file check boxes to use thisfeature. Read “Instance Configuration Wizard” for moreinformation.
Important: If you check the box by Initialize Server, the database serverinitializes automatically after installation and deletes any existing data onthe host computer.
Alternatively, you can skip server configuration and configure the databaseserver manually after installation is complete using the Server InstanceManager (instmgr.exe) utility.
Demonstration database server on your system
The following information about the demonstration database server can help youdecide what installation setup and settings to choose:v The demonstration database server should have on your system a server number
between 0 and 255 that is not shared with another instance. If all the validserver numbers are used by other instances and you want to install thedemonstration server, it is recommended that you make one of the servernumbers available only for the IDS demonstration instance before launching theinstallation.
v The installation application automatically searches for and assigns a unique,unused server number for your demonstration database server. You can alsospecify a server number between 0 and 255. If you enter a server number that isused by another instance, the installation application does not accept it and doesone of the following:– If a server number between 0 and 255 is unused on your system, the
demonstration database server is assigned this number.– If the installation application is unable to find another unused server number,
then the number that you provided will be used.v If you select the shipped configuration file, the name assigned to the
demonstration database server depends on what installation setup is being used:
Typical setupThe installation application dynamically creates a database server name,and the information about it is displayed in a message.
Custom setupYou provide the database server name.
The ONCONFIG environment variable is set to the sample configuration filelocated at %INFORMIXDIR%\etc\onconfig.demo_server_name. Details about this aredisplayed before the installation application copies files. The information is alsostored in %INFORMIXDIR%\logs\IDS_install_date_time.log.
v When the installation application initializes the demonstration database server,the following databases are built automatically: sysmaster, sysuser, sysutils, andsysadmin.
v The message log regarding installation of the demonstration database server islocated in %INFORMIXDIR%\demo_server_name.log.
Instance Configuration WizardThe Instance Configuration Wizard is an installation option that automaticallycreates a database server configuration file customized to your systemenvironment.
Chapter 1. Preparing to install IDS and client products (Windows) 1-7
You can use the Instance Configuration Wizard on a Windows computer when youinstall using a custom setup in GUI mode. In the installation application, the checkboxes for Initialize Server and for enabling a custom configuration file must beselected to invoke the wizard.
Important: When the Initialize Server check box is selected, the installation willdelete any existing IBM Informix Dynamic Server data on the host computer.
The wizard is a utility that ensures your settings are valid, and it calculates valuesfor other server configuration parameters based on your settings. The configurationinformation is stored in the configuration file so that when you start the instanceafter the product is installed, the instance runs with settings appropriate for yourenvironment.
If you use this configuration utility, the installation's settings cannot be recorded ina response file for silent installation.
The Instance Configuration Wizard prompts for the following configurationsettings and system information:v server namev server numberv rootsize: the size of the root dbspace (in megabytes)v number of central processing units (CPUs): a CPU is equivalent to a single
execution unitv memory: system RAM dedicated to the server instance being created (in
megabytes)v number of online transaction clients (applications used for modifying the state of
databases)v number of query clients (applications used for returning result sets for decision
support; typically require more overhead than clients used for transactionprocessing)
The number of configuration file parameters set by this wizard varies, dependingon your hardware and database system needs.
If the Instance Configuration Wizard encounters a problem while checking theentered settings, the configuration file is created with standard, workableconfiguration parameters and a message about this is displayed.
Plan role separation
You must choose custom installation setup to enable role separation.
Role separation provides increased database security because the database serversplits administrative tasks into mutually exclusive roles. If you do not enable roleseparation, the Informix-Admin group performs all administrative tasks. Fordetailed information about the role separation feature, see the IBM Informix SecurityGuide.
You cannot turn off role separation after you enable it. To remove role separationfrom your system, you must use the uninstaller to remove all database instancesand related files. and then reinstall the database server without role separation.
1-8 IBM Informix Dynamic Server Installation Guide for Windows
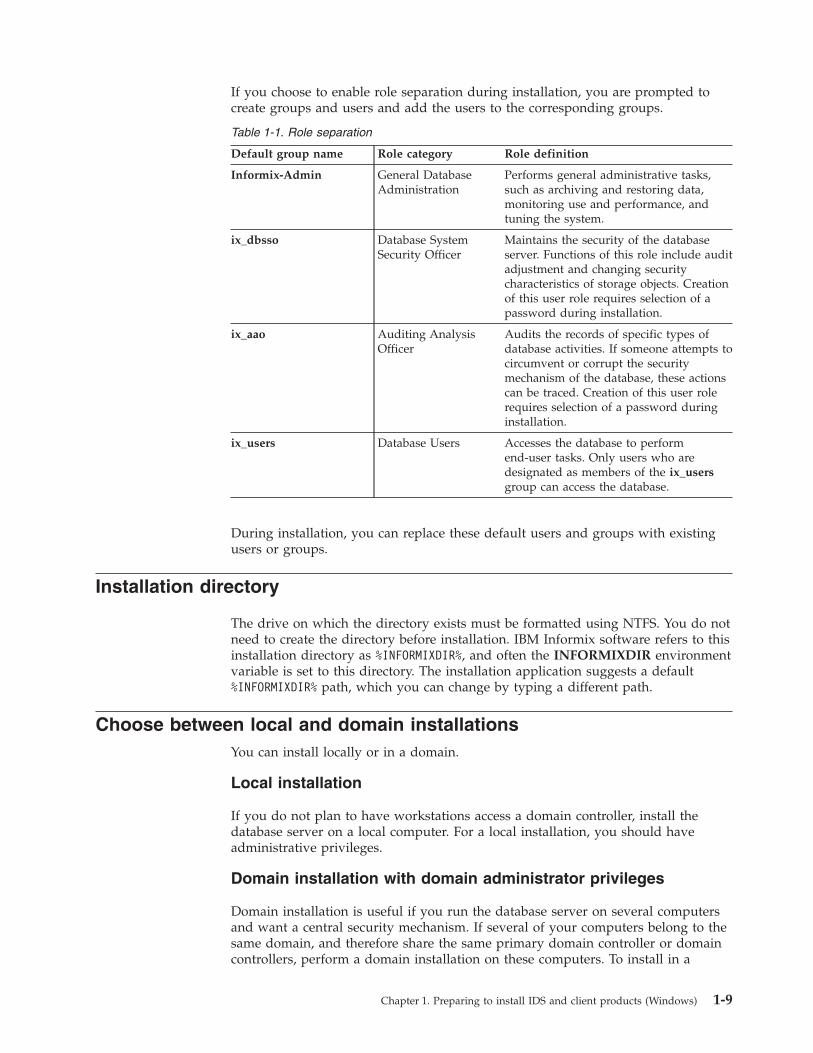
If you choose to enable role separation during installation, you are prompted tocreate groups and users and add the users to the corresponding groups.
Table 1-1. Role separation
Default group name Role category Role definition
Informix-Admin General DatabaseAdministration
Performs general administrative tasks,such as archiving and restoring data,monitoring use and performance, andtuning the system.
ix_dbsso Database SystemSecurity Officer
Maintains the security of the databaseserver. Functions of this role include auditadjustment and changing securitycharacteristics of storage objects. Creationof this user role requires selection of apassword during installation.
ix_aao Auditing AnalysisOfficer
Audits the records of specific types ofdatabase activities. If someone attempts tocircumvent or corrupt the securitymechanism of the database, these actionscan be traced. Creation of this user rolerequires selection of a password duringinstallation.
ix_users Database Users Accesses the database to performend-user tasks. Only users who aredesignated as members of the ix_usersgroup can access the database.
During installation, you can replace these default users and groups with existingusers or groups.
Installation directory
The drive on which the directory exists must be formatted using NTFS. You do notneed to create the directory before installation. IBM Informix software refers to thisinstallation directory as %INFORMIXDIR%, and often the INFORMIXDIR environmentvariable is set to this directory. The installation application suggests a default%INFORMIXDIR% path, which you can change by typing a different path.
Choose between local and domain installationsYou can install locally or in a domain.
Local installation
If you do not plan to have workstations access a domain controller, install thedatabase server on a local computer. For a local installation, you should haveadministrative privileges.
Domain installation with domain administrator privileges
Domain installation is useful if you run the database server on several computersand want a central security mechanism. If several of your computers belong to thesame domain, and therefore share the same primary domain controller or domaincontrollers, perform a domain installation on these computers. To install in a
Chapter 1. Preparing to install IDS and client products (Windows) 1-9
domain, you must have administrative privileges and your computer must alreadybelong to a domain. Run the installation program and choose the Install in Domainoption when the installation wizard prompts you.
User informixUser informix is a user account with main authority over an IBM InformixDynamic Server instance.
User informix is required for most installations because it has the unique useridentifier (UID) to manage and maintain IDS instances and databases on the hostserver. The only exception to this requirement is when you install IDS 11.50 aslocal system user.
The password for this user account must be protected. Only let trusted databaseand security administrators log in as user informix.
If you are installing IDS for the first time on your system and have not selected thelocal system user option, the installation program prompts you to create theinformix user by providing a password. If user informix already exists on yoursystem, the installation program prompts you to confirm the password.
Important: The database server will not start if password standards for eitheruser informix or end users do not conform to local security standards.
Upgrade the database serverFor information on migrating your database server from a previous version of IBMInformix Dynamic Server to Version 11.50, and for information on migrating yourdata, see the IBM Informix Migration Guide, Version 11.50.
See also “Upgrade of IDS by overwriting an existing installation” on page 2-11 toreplace the earlier product.
1-10 IBM Informix Dynamic Server Installation Guide for Windows
Chapter 2. Installing IDS on Windows
The following topics explain your IBM Informix Dynamic Server and IBM Informixproducts installation choices.
Installing IBM Informix products
IBM Informix Dynamic Server for Windows includes a Windows launchpad, whichis a graphical interface with the options to view this publication, the release notesor the Information Center, start the installation, or browse the installation media.The launchpad will start automatically when the CD is inserted. To access thelaunchpad from a downloaded product, from the main directory, select Launch.exe.
If the Launch.exe file does not appear in the directory that first opens, clicksetup.exe.
The IBM Informix JDBC Driver is available on the installation media and needs tobe separately installed. For information on installing IBM Informix JDBC Driver,see the IBM Informix JDBC Driver Programmer's Guide.
Installing with the GUI typical setupLaunch the GUI installation application to complete a typical installation setup ofIBM Informix products, which will load IBM Informix Dynamic Server with all itscomponents and features.
Typical setup automates the installation by providing default settings for thefollowing:v server namev server numberv portv user account (informix)v general administrative group (Informix-Admin)
To install IBM Informix Dynamic Server using GUI Typical Setup:1. Prepare the installation media.v Downloaded installation media: You must extract the files maintaining the
folder structure delivered in the media.v Disk installation: Launch the disk device.
The Launchpad opens.2. Select Install Products from the Launchpad and click Next.3. Select the products that you want to install.4. Read the license agreement. You must accept it to proceed.5. Select the Typical option.6. Enter user account information. You will need to enter your system's user
informix password for these GUI windows. If no user informix exists yet, theinstallation wizard creates one and will require you to create a password for it.Enter a password and record it in a secure location.
© Copyright IBM Corp. 1996, 2010 2-1
7. Specify the installation directory if you do not want to accept the defaultdestination path that the GUI displays.The destination drive must be formatted with a Windows file system (NTFS).
8. Review your installation settings. When the GUI displays a summary of yourinstallation settings, you have the opportunity to change the settings (Backbutton) or to cancel the installation (Cancel button). Otherwise, if you aresatisfied with the settings, select Next to begin installation.
Completing the installation program loads a configured database server with atypical setup. For information on changing the configuration or configuring adatabase server manually, see “Database server configuration after installation” onpage 3-4 and “Configuring IDS manually” on page 3-6.
The informix user account, under which the database server runs, is assigned tothe Informix-Admin group.
Installing with the GUI custom setupCustom installation in GUI mode lets you exclude some IBM Informix DynamicServer features and offers you other ways to configure installation variables for theneeds of your system.
Use the GUI custom setup if you want to generate a response file for replicatingthe installation setup on other instances in silent mode. The silent installationprocess will function in this way if you choose to install IBM Informix DynamicServer only (that is, you cannot choose any other IBM Informix products availableon the installation media). Read the topics “Performing a silent installation” onpage 2-5 and “Using a response file for silent installation” on page 2-6 before youstart the installation application if you want to generate a response file.
To install IDS using GUI custom setup:1. Prepare the installation media.v Downloaded installation media: You must extract the files maintaining the
folder structure delivered in the media.v Disk installation: Launch the disk device.
The Launchpad opens.2. Select Install Products from the Launchpad and click Next.3. Select the products that you want to install.4. Read the license agreement. You must accept it to proceed.5. Select Custom installation setup.6. Specify the installation directory if you do not want to accept the default
destination path that the GUI displays.The destination drive must be formatted with a Windows file system (NTFS).
7. Select the features you want to install. Components are at the top level of thetree-nesting hierarchy.a. Click the + character by component feature sets–features grouped together
by similar functionality–to view individual features. The componentswithout + characters next to them do not have individual features.
b. Clear components and features that you do not want to install. The wizardenforces dependencies among features and all components. If you cannotconfigure the selected/deselected features exactly as you want, it isprobably an unsupported installation configuration for your site.
2-2 IBM Informix Dynamic Server Installation Guide for Windows

Notice that a brief description of a selected component or feature appearson the right side of the GUI window.See the disk-size information about your selected component and featureconfiguration, as well as the amount of free space on your drive, under theGUI feature tree.
8. Enter applicable user account information and, optionally, enable roleseparation. If the user informix account does not exist on your computer yet,the installation application creates one and requires you to create a passwordfor it.a. Enter the user informix password for your Windows computer, unless you
want to install IDS so that it runs as a local system user account withoutcreating user informix. If no user informix exists on your computer yet,the installation application creates one but you are responsible forproviding the password and storing it in a secure location.
b. Optional: Click the first check box to install in a particular domain andspecify the domain controller administrator. You must have administratorprivileges for the domain to do this.
c. Optional: Click the Local System User check box if you want the IDSinstance to run as an internal Windows account, instead of logging in as aWindows service.
d. Optional: Click the check box for Do not Create User informix if you aresure that this does not interfere with your implementation goals.
e. Optional: Click the Enable Role Separation box if you want to activatethis configuration option. If you do not enable role separation, click Nextand go to step 10.
9. Specify role-based groups for IDS administration.a. Select the name of the group to access the database server for general
administration tasks.b. Select the name of the security administrator group and the password
twice for confirmation.c. Select the name of the auditing administrator group and the password
twice for confirmation.d. Select the name of the database end user group.
10. Enter the server name for the installation.11. Optional: Select the Create Server option if you want to create the database
server but not initialize it.12. Optional: Create the database server instance and set basic configuration
parameters in the GUI application.
Important: Installing with the Initialize Server check box selected deletes allexisting IDS data, if any, on your host computer as part of the installationprocess. However, to set basic configuration parameters in the installationGUI, the Initialize Server check box must be selected. While using theconfiguration features in the installation application are potentially veryuseful, be sure to know your installation environment and proceed withcaution.a. Clear the Initialize Server check box if you do not want to overwrite
existing IDS data on your host computer by setting the configurationparameters below. Regardless of whether this check box is selected or not,the GUI program will provide a summary of your installation choicesbefore copying files to your computer.
Chapter 2. Installing IDS (Windows) 2-3
b. Optional: Select the Enable a custom configuration file to suit your needsand hardware check box if you want to activate the Instance ConfigurationWizard. You need to enter settings for the socket protocol fields, but youwill provide more detailed hardware and usage parameters in the GUIwindow that appears directly afterwards. (See “Instance ConfigurationWizard” on page 1-7 for more information about this option.)
c. Optional: Select the Enable DRDA Support check box if you want theinstance to have a server alias and port for Distributed Relational DatabaseArchitecture (DRDA) connections. DRDA is designed for interoperabilitywith IBM Data Server clients. If you install IDS without this option, youcan still add DRDA connectivity to the instance later without reinstalling.
13. Optional: Select the Start the ClusterIT Utility check box if you want the IBMInformix ClusterIT Utility to start up after installation. You will need tocomplete the tasks outlined in “Setting up a cluster installation” on page 2-9.When the check box is disabled, the installation application does not detect asupported cluster environment in the host computer or you are not using theIDS installation media that is bundled with other IBM Informix products.
14. If you chose to install other IBM Informix products bundled with IDS, verifythe GUI window for products selection reflects what you want to install.
15. Specify a domain installation type, if applicable.16. Review your installation settings and select whether to begin copying the IBM
Informix files to your computer. When the GUI displays a summary of yourinstallation settings, you have the opportunity to change the settings (Backbutton) or to cancel the installation (Cancel button). Otherwise, if you aresatisfied with the settings, select Next.
The installation program configures the database server with a custom setup. Forinformation on changing the configuration or configuring a database servermanually, see “Database server configuration after installation” on page 3-4 and“Configuring IDS manually” on page 3-6
Installing a copy of IDS on a computerYou can install a copy of IBM Informix Dynamic Server in a different directory ifthe same version of the product is already installed on the computer.
The following steps require IBM Informix Dynamic Server Version 11.50.xC2 orlater. They describe how to use a graphical user interface (GUI) to install a copy ofthe product. If you prefer to install a copy without directly interacting with theGUI, you can perform a silent installation instead.
To install a copy of IDS on a computer where the same version is already installed:1. Prepare the installation media.v Downloaded installation media: You must extract the files maintaining the
folder structure delivered in the media. Select Launch.exe.v Disk installation: Launch the disk device.
The Launchpad opens.2. Select Install Products from the Launchpad and click Next.3. Select to install IBM Informix Dynamic Server and click Next.4. Select the option to install a new instance when the installation application lists
existing IDS instances and click Next.
2-4 IBM Informix Dynamic Server Installation Guide for Windows
5. Select the option to install in a different directory and click Next. Complete theprompts in the server installation application for a typical or custom setup.
Related concepts
“Multiple copies of IDS on one computer” on page 1-1Related tasks
“Altering IDS features” on page 4-1
Performing a silent installationYou can perform a silent installation, an installation method requiring no userinteraction with the setup program, to install IBM Informix Dynamic Server andrelated client products separately. Silent installation is performed in thecommand-line environment.
Before you can do a silent installation, you must provide IDS installation setupinformation an .ini file. Then to complete silent installation, you invoke this .inifile to repeat the same installation setup on a different computer or in a differentlocation on the same computer.
Choose one of the following methods to prepare the .ini file and to complete asilent installation:v Use the server.ini file provided on the installation media as a template for
entering your silent-installation settings. Specify your customized .ini file in thesilent installation command.
v While installing IDS with the GUI custom setup program, record yourinstallation settings in a response file. Use this response file for replicating thecustom installation in silent mode.
For information on how to silently install other IBM Informix products, see theirproduct documentation.Related tasks
“Performing silent uninstallations of IDS” on page 4-2
Using a customized server.ini file for silent installationCopy the server.ini file in the IBM Informix Dynamic Server installation media,customize it with a different file name, and run the silent installation command.
You must have Windows administrator privileges to perform the silent installation.
To perform a silent installation using the server.ini file on the installation media:1. Create a copy of the server.ini file in the top directory of the database server
product folder (IIF by default), and keep your .ini file in the IIF folder.
Important: Do not overwrite the existing server.ini file, and do not move thecopy that you make from the IIF folder.
2. Customize the copy of the server.ini file.3. Run the following command in the IIF directory to start the silent installation
and generate a log file.setup.exe -s -f1"path\your_filename.ini" -f2"path\your_filename.log"
Where path\your_filename is the full path and file name for your customized.ini file in the -f1 flag and for the log file in the -f2 flag
Chapter 2. Installing IDS (Windows) 2-5

The file specified by -f2 captures details about the silent installation. Because thesilent installation does not display error messages, it uses the log file as aninstallation log. If the silent installation fails for any reason, the failure is recordedin this log file.
For example, if you have not changed the default database server product foldername and its contents and you customize the .ini settings in a file namednew_server.ini, you would enter the following command to start the silentinstallation of the database server:setup.exe -s -f1"C:\IIF\new_server.ini" -f2"C:\IIF\new_server.log"
Using a response file for silent installationRecord IBM Informix Dynamic Server installation settings in a response file, andspecify this file when you run the silent installation command.
You must have Windows administrator privileges to perform the silent installation.
If you plan to perform silent installation by replicating the settings of a completedIDS installation done with the GUI custom setup program, use the followingmethod to start the installation application.
Restriction: The response file option does not function if you use the InstanceConfiguration Wizard during the installation.
To perform a silent installation by using a response file:1. Start the installation application by running the following command:
setup.exe -r -f1"path\response_filename.ini"
Where path\response_filename is the full path and file name of your response fileThe f1 argument is optional. If you do not specify the location and name of theresponse file with the f1 argument, by default the installation sequence is savedin %WINDIR%\setup.iss.
2. Complete the GUI custom installation of the product.3. Copy your .ini file to the directory where you want to use silent installation to
replicate the IDS installation setup that you just created.4. Run the following command in the IIF directory.
setup.exe -s -f1"path\response_filename.ini" -f2"path\response_filename.log"
Where path\response_filename is the full path and file name for your responsefile in the -f1 flag and for the log file in the -f2 flag.If the target computer already hosts one or more IDS installations, see “Silentinstallation on a host with multiple installations” on page 2-7.
The file specified by -f2 captures details about the silent installation. Because thesilent installation does not display error messages, it uses the .log file as aninstallation log. If the silent installation fails for any reason, the failure is recordedin this log file.
For example, you want to complete an IDS installation and record the setup so thatyou can replicate the installation in silent mode afterwards. First, you need torecord the installation setup in a response file. You run the following command:setup.exe -r -f1"C:\temp\silent.ini"
Where:
2-6 IBM Informix Dynamic Server Installation Guide for Windows
v C:\temp\ is the path to the location where you want the response file to begenerated. This is not necessarily the same path as where you install IDSbecause you indicate the path for the product installation in the GUI programthat launches after you run this command.
v silent is your response file name, to which you must append the .ini extension
After you have completed the installation, copy silent.ini to the directory whereyou want to use silent installation to replicate the installation setup. For thisexample, the following are conditions of the silent installation host environment:v You are completing the silent installation on a different computer from where
you created the response file.v The target computer does not already have another IDS installation.v You want to install the product in an existing path named C:\AppDev.
Run the following command in the IIF directory:setup.exe -s -f1"C:\AppDev\silent.ini" -f2"C:\AppDev\silent.log"
After silent installation completes, you can view the generated silent.log file fortroubleshooting in the path that you indicated in the -f2 option.
Silent installation on a host with multiple installationsUse a response file to direct the action of the silent installation on a computer thatalready hosts an IBM Informix Dynamic Server installation. A command-lineoption lets you specify location when maintaining or uninstalling an existinginstallation.
Specify an installation to modify
If the IDS version that you want to install matches the version on the targetcomputer, the information recorded in your response file determines whether thesilent installation adds a new copy of the database server or modifies the existinginstallation. Therefore, if your response file recorded a new installation, you do notneed to include the -multiple option in the silent installation command. Similarly,if you ran the setup.exe -r command to start the installation application inmaintenance mode, the response file records your intention to modify features,repair binaries, or complete uninstallation of an existing database serverinstallation.
On a computer that hosts more than one installation of the database server, youcan direct which installation to modify by using the -path option in the silentinstallation command.
If you do not specify a location with the -path option, the silent installationrandomly selects one of the existing installations on the target computer andproceeds in maintenance mode.
The following is an example of how to include the -path option in the silentinstallation command:setup.exe -s –path C:\tmp\informix –f1”C:\tmp\install.ini” –f2”C\tmp\log.txt”
where -path C:\tmp\informix indicates the location of the installation to modify.
Chapter 2. Installing IDS (Windows) 2-7
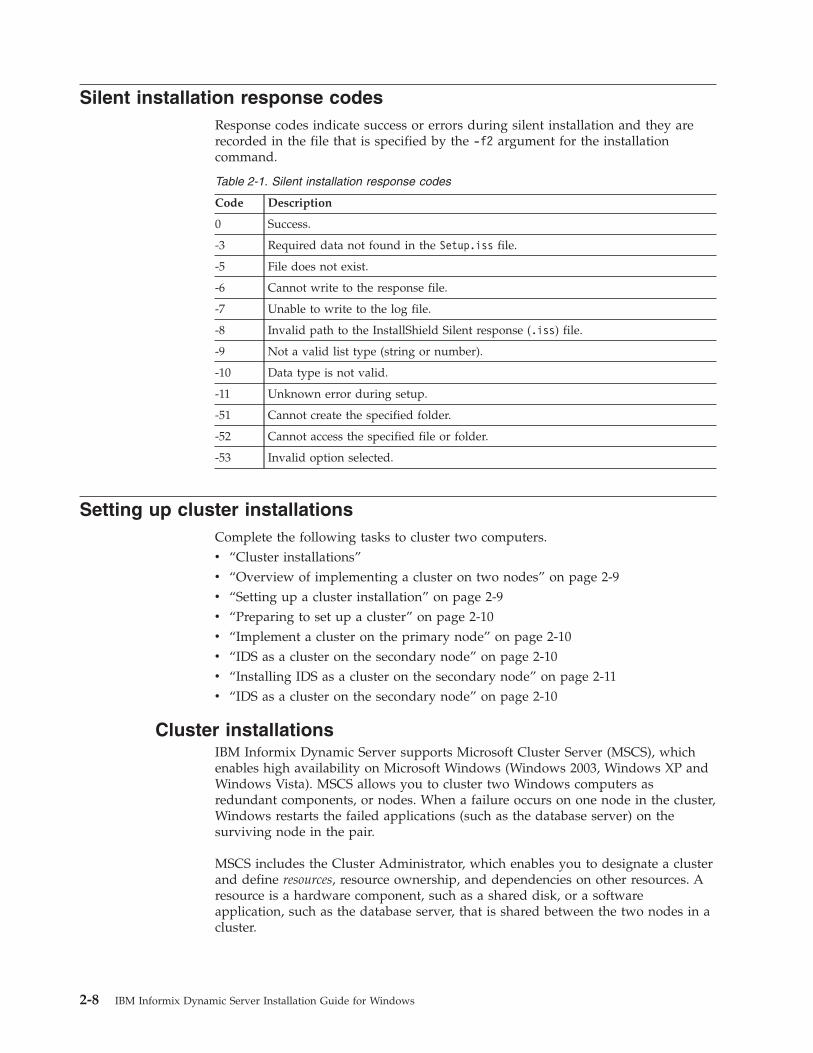
Silent installation response codesResponse codes indicate success or errors during silent installation and they arerecorded in the file that is specified by the -f2 argument for the installationcommand.
Table 2-1. Silent installation response codes
Code Description
0 Success.
-3 Required data not found in the Setup.iss file.
-5 File does not exist.
-6 Cannot write to the response file.
-7 Unable to write to the log file.
-8 Invalid path to the InstallShield Silent response (.iss) file.
-9 Not a valid list type (string or number).
-10 Data type is not valid.
-11 Unknown error during setup.
-51 Cannot create the specified folder.
-52 Cannot access the specified file or folder.
-53 Invalid option selected.
Setting up cluster installationsComplete the following tasks to cluster two computers.v “Cluster installations”v “Overview of implementing a cluster on two nodes” on page 2-9v “Setting up a cluster installation” on page 2-9v “Preparing to set up a cluster” on page 2-10v “Implement a cluster on the primary node” on page 2-10v “IDS as a cluster on the secondary node” on page 2-10v “Installing IDS as a cluster on the secondary node” on page 2-11v “IDS as a cluster on the secondary node” on page 2-10
Cluster installationsIBM Informix Dynamic Server supports Microsoft Cluster Server (MSCS), whichenables high availability on Microsoft Windows (Windows 2003, Windows XP andWindows Vista). MSCS allows you to cluster two Windows computers asredundant components, or nodes. When a failure occurs on one node in the cluster,Windows restarts the failed applications (such as the database server) on thesurviving node in the pair.
MSCS includes the Cluster Administrator, which enables you to designate a clusterand define resources, resource ownership, and dependencies on other resources. Aresource is a hardware component, such as a shared disk, or a softwareapplication, such as the database server, that is shared between the two nodes in acluster.
2-8 IBM Informix Dynamic Server Installation Guide for Windows
The Cluster Administrator also enables you to define groups that specify resourcedependencies, so that the Microsoft Resource Manager can move groups ofdependent resources to the surviving node in the event of failover. The MicrosoftResource Manager is a program that invokes specific start, restart, stop, andmonitoring functions for a resource.
You can install IDS either on one node of a cluster or on both nodes (in a fail-safemode). Installation on one node of a cluster is the same as regular installation on astand-alone computer. For more information about installing IDS, see “InstallingIBM Informix products” on page 2-1.
Important: Stop IDS before shutting down the operating system during MSCSsetup to avoid any data loss.
Overview of implementing a cluster on two nodes
After you complete cluster-implementation preparation tasks, you implement IBMInformix Dynamic Server in a cluster environment in three steps:1. Install IBM Informix Dynamic Server on the primary node.2. Install the ClusterIT utility.3. Convert the database servers to a cluster configuration. This step is
implemented with the ClusterIT utilities:v Use the clusterIT_a utility to configure IDS on the primary node for use in a
cluster.v Use the clusterIT_b utility to install IDS and configure it for use in a cluster
on the secondary node.
Setting up a cluster installation
To set up a cluster on the primary node:1. Run the following command on the primary node: clusterIT_a.
The Informix ClusterIT - primary Node window appears.2. Fill out the information about networking environment, machine names, and
configuration for installing IBM Informix Dynamic Server:a. In the DBSERVERNAME to be clustered text box, enter the name of your
unclustered IDS instance.b. In the DBSERVERNAME final (when clustered) text box, enter a name for
your IDS instance after it has been converted into a cluster configuration.c. In the Physical hostname primary node text box, enter the physical host
name of the primary node.d. In the Informix password text box, enter your password.e. Fill in the Full path to the IDS directory on the Informix RDBMS CD
field.f. Enter the location of the installation (the value of %INFORMIXDIR% must be
located on a local disk and must be identical for both nodes).g. In the New virtual host name for the database host text box, enter the new
virtual host name.h. In the virtual IP address for the database host text box, enter the IP
address for the new virtual host.i. In the Subnetmask text box, enter the value of the Subnetmask for the new
virtual host.
Chapter 2. Installing IDS (Windows) 2-9
j. Choose the network you want to use for the IP address from the Networkmenu.
k. Choose the Number of shared disks where you have chunks located.l. Enter the name of the shared disks you use as chunk locations for IDS from
the Shared disks for database text box. These disks are moved to theInformix group that will be created by the ClusterIT utility. In the event offailure, the disks you specify here will move over to the other node.
3. Click Convert to Cluster. After the ClusterIT utility completes, an IDS comesback online, but it is now controlled by the Microsoft Cluster Service. Theresource group Informix has been created.
You can check the state of your IDS by running the onstat- command.
Preparing to set up a cluster
To prepare to set up a cluster:1. Install IBM Informix Dynamic Server on the primary node without
initialization.2. Edit the onconfig file. For more information on the onconfig file, see the IBM
Informix Dynamic Server Administrator's Reference.3. Put the root dbspace on a shared disk.4. Move all shared disks to the primary node.5. Initialize the database server. For more information, see “Database server
configuration after installation” on page 3-4.6. Create additional dbspaces, if needed. For more information, see “Dbspace
name, location, and size” on page 3-5. Additional dbspaces must be located onshared disks.
7. Uninstall any previous IDS installations on the secondary node.
Implement a cluster on the primary nodeWhen you run the clusterIT_a utility on the primary node, ClusterIT performs thefollowing tasks:v Extracts the resource .dll (ifxdb920.dll) to the WINDOWS\Cluster directoryv Creates an IBM Informix resource groupv Moves all physical disks on which chunks are located to the IBM Informix groupv Creates a virtual IP address and a virtual host namev Registers the resource type IFXDB920v Creates the IDS cluster resourcev Sets dependenciesv Sets the IDS cluster resource to online
To use ClusterIT to implement a cluster, the INFORMIXDIR directory must be locatedon a local disk, the INFORMIXDIR directory must be on an identical local path foreach node, and any chunks must be on shared disks. It must be possible to movethe disks from one node to another.
IDS as a cluster on the secondary node
When you run the clusterIT_b utility on the secondary node, the clusterIT_butility performs the following tasks:v Installs IBM Informix Dynamic Server on the secondary node (silent installation)v Copies registry entries from the primary node
2-10 IBM Informix Dynamic Server Installation Guide for Windows
v Copies the configuration file from the primary nodev Makes the resource .dll (ifxdb920.dll) available on the secondary node
Installing IDS as a cluster on the secondary node
To install IBM Informix Dynamic Server in a cluster configuration on the secondarynode:1. Run the following command on the secondary node: clusterIT_b The IBM
Informix ClusterIT - secondary node window appears.2. Fill in the text boxes:
a. In the Physical hostname primary node field, enter the physical host nameof the primary node.
b. Fill in the Full path to the IDS directory on the Informix RDBMS CDfield.
c. Enter the Instance number that you choose for IDS on the secondary node.This number is the same as that of IDS on the first node.
d. Enter the location of the installation (the value of %INFORMIXDIR% must belocated on a local disk and must be identical for both nodes).
e. Enter your Informix password.f. In the DBSERVERNAME final (when clustered) text box, enter the name of
the IDS instance in the cluster configuration. On this secondary node, IDSwill be installed directly with this name.
g. Check whether or not to enable Role separation. For more information, see“Plan role separation” on page 1-8.
3. Click Convert to Cluster. After the ClusterIT utility completes, IDS starts on thesecondary node.
After implementing a cluster environment on multiple nodes, you can find arecord of the ClusterIT utility activities in the clusterIT.log files, one forclusterIT_a in the primary node directory, and one for clusterIT_b in thesecondary node directory where the ClusterIT executables were installed.
Upgrade of IDS by overwriting an existing installationUse the installation application to overwrite an existing IBM Informix DynamicServer installation only when you are upgrading from a previous fix pack of thesame version number or for specialized technical environments.
When you place the IDS installation media on a Windows computer that hosts anearlier version of the server, you will be prompted as to whether you want toinstall in a different directory or upgrade by installing in the same directory wherethe older version of the product already exists.
For upgrading or migrating a production database server, choose to install in adifferent directory as documented in the IBM Informix Migration Guide unless youhave specific goals or system constraints that require you to overwrite the olderinstallation completely. The following are some examples of when you mightupgrade by installing directly to the directory where an earlier version or fix packlevel are located:v Upgrade an existing IDS installation that has the same version number as the
new product, but is an earlier fix pack. For example, if the host computer hasIDS 11.50.xC1 and you want to install IDS 11.50.xC4, then complete the upgradeby installing in the same location.
Chapter 2. Installing IDS (Windows) 2-11
v Capture the installation settings in a response file so that you can upgrade otherolder IDS instances with silent installation.
v You have a computer hosting an older version of IDS that does not havesufficient free space to hold two installations of the product.
v You plan to use a symbolic link to migrate the data to the new version.
Overwriting an existing IDS installationEnsure that you complete the prerequisites before you do an upgrade that installsthe product in a directory that already has an earlier version.
Important: Ensure that you have the installation media for the IBM InformixDynamic Server version that you are replacing, back up your databases, andcomplete other preparation steps before you upgrade using the following method.See the IBM Informix Migration Guide for details about supported upgrade pathsand data migration.
When you install using the procedure below, the old version or fix pack of theproduct is uninstalled.1. Open the IDS installation application of the version or fix pack level that you
want to install.2. Select the option to install a new instance when the installation application lists
existing IDS instances and click Next.3. Select the option to upgrade by replacing the product and click Next. Complete
the prompts in the server installation application for a typical or custom setup.
While the database server engine is upgraded by this task, the preceding steps donot change your databases.
To start the IDS instance, you must initialize the server manually.
Multiple residencyYou can set up multiple independent database server environments on the samecomputer.
Complete the following tasks to set up multiple residency.
Plan for multiple residencyWhen you plan for multiple residency on a computer, consider the followingfactors:v Storage space
Each database server must have its own unique storage space. You cannot usethe same disk space for more than one instance of a database server. When youprepare an additional database server, you need to repeat some of the planningthat you did to install the first database server. For example, you need toconsider these questions:– Will you use mirroring? Where will the mirrors reside?– Where will the message log reside?– Can you dedicate a tape drive to this database server for its logical logs?– What kind of backups will you perform?
v Memory
2-12 IBM Informix Dynamic Server Installation Guide for Windows
Each database server has its own memory. Can your computer handle thememory usage that an additional database server requires?
Creating a new database server instance
Before you set up multiple residency, you must install one database server asdescribed in Chapter 2, “Installing IDS on Windows,” on page 2-1. It is notnecessary to install more than one copy of the database server binary files. Allinstances of the same version of the database server on one computer can share thesame executable files.
To set up multiple residency, use the Server Instance Manager. To use the ServerInstance Manager program, you must have administrative privileges on thedatabase server. However, local administrator privileges are sufficient, even if thedatabase server was installed for domain use.
Before you use the Server Instance Manager, verify that you are a member of theInformix-Admin group. For more information, see “Verify Administrators groupmembership” on page 1-1.
The following steps are for using the Server Instance Manager GUI. See “ServerInstance Manager command-line options” for other ways you can use this utility.
To create a new database server instance:1. Choose Start → Programs → IBM Informix Dynamic Server → Server Instance
Manager.2. Select the Installation Method, and click Create New to create a new instance
of the database server.3. Follow the prompts.
After you enter the required information, the Server Instance Manager installsservices, records environment variables, updates the registry, and creates anonconfig file for the new database server instance.
Server Instance Manager command-line optionsThe instmgr.exe utility extends the ability to configure an IBM Informix DynamicServer instance with command-line options.
Purpose
The instmgr.exe utility is a command-line version of the Server Instance Manager.
You must have administrative privileges on the database server. However, localadministrator privileges are sufficient, even if the database server was installed fordomain use.
The following table describes the instmgr.exe utility options.
Chapter 2. Installing IDS (Windows) 2-13
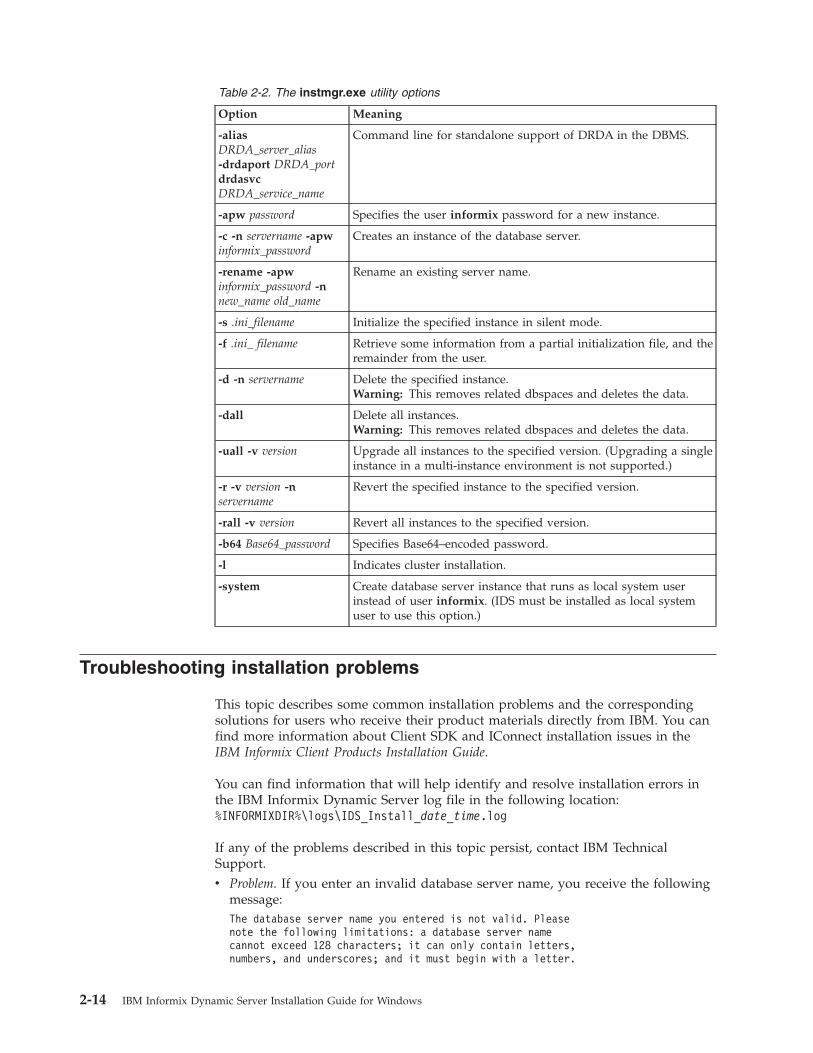
Table 2-2. The instmgr.exe utility options
Option Meaning
-aliasDRDA_server_alias-drdaport DRDA_portdrdasvcDRDA_service_name
Command line for standalone support of DRDA in the DBMS.
-apw password Specifies the user informix password for a new instance.
-c -n servername -apwinformix_password
Creates an instance of the database server.
-rename -apwinformix_password -nnew_name old_name
Rename an existing server name.
-s .ini_filename Initialize the specified instance in silent mode.
-f .ini_ filename Retrieve some information from a partial initialization file, and theremainder from the user.
-d -n servername Delete the specified instance.Warning: This removes related dbspaces and deletes the data.
-dall Delete all instances.Warning: This removes related dbspaces and deletes the data.
-uall -v version Upgrade all instances to the specified version. (Upgrading a singleinstance in a multi-instance environment is not supported.)
-r -v version -nservername
Revert the specified instance to the specified version.
-rall -v version Revert all instances to the specified version.
-b64 Base64_password Specifies Base64–encoded password.
-l Indicates cluster installation.
-system Create database server instance that runs as local system userinstead of user informix. (IDS must be installed as local systemuser to use this option.)
Troubleshooting installation problems
This topic describes some common installation problems and the correspondingsolutions for users who receive their product materials directly from IBM. You canfind more information about Client SDK and IConnect installation issues in theIBM Informix Client Products Installation Guide.
You can find information that will help identify and resolve installation errors inthe IBM Informix Dynamic Server log file in the following location:%INFORMIXDIR%\logs\IDS_Install_date_time.log
If any of the problems described in this topic persist, contact IBM TechnicalSupport.v Problem. If you enter an invalid database server name, you receive the following
message:The database server name you entered is not valid. Pleasenote the following limitations: a database server namecannot exceed 128 characters; it can only contain letters,numbers, and underscores; and it must begin with a letter.
2-14 IBM Informix Dynamic Server Installation Guide for Windows

Solution. Enter a different name and note the limitations stated in the message.v Problem. If you have insufficient virtual memory for the installation, you receive
the following message:This installation of Dynamic Server requires number MB offree page file space. After you install this product,increase your page file size to properly use your virtualmemory with this product.
Solution. For information about how to increase the size of your page file, referto your Windows documentation.
v Problem. If you do not have the correct privileges to run the install program, youreceive the following messageYou do not appear to be an administrator. In order to runthis program, you must belong to the Administrators groupon local computer.
Solution. Use the administrator account to log on or contact your systemadministrator to add your user account to the Administrators group.
Chapter 2. Installing IDS (Windows) 2-15

2-16 IBM Informix Dynamic Server Installation Guide for Windows
Chapter 3. Post-installation tasks on Windows
Review the following information after installing IBM Informix Dynamic Server.
Working with the installationAfter installing IBM Informix Dynamic Server, determine how much of thedatabase server setup the installation application has completed and what actionsyou must do before putting the server in production.
The installation sets up a database server that is ready to use and can run on yoursystem automatically. But you may still want to perform some basic enhancementsbefore you put the server in production. These tasks show you ways to control theway IDS runs on your system.
If you have completed a more advanced installation of IDS, these post-installationtasks might be required in order to work with the database server.
Tip: When you initialize a server, a shortcut is added to the Start menu. To runcommands for an initialized server, click Start → All Programs → IBM InformixDynamic Server → server_name.
The following tasks are covered in the next topics of the documentation:v Starting the database server manually.v Setting up the database server to start whenever Windows is launched.v Stopping the database server.
Two IDS features that require post-installation configuration are the following:
Global Language Support (GLS)A feature that enables you to configure the database server to use alocale other than the default locale, which is U.S. English. For moreinformation on how to create databases that use the diacritics, collatingsequence, and monetary and time conventions of a different language,see the IBM Informix GLS User's Guide.
IBM Informix Storage Manager (ISM)A feature that can be used for ON-Bar backup-and-restores. See the IBMInformix Storage Manager Administrator's Guide for more information.
Setup performed by the installation applicationBefore you begin manual post-installation tasks, it is helpful to know some of themajor tasks the installation application has done.
A typical installation (and possibly a custom installation, depending on yourchoices during setup) performs the following actions to make the database serverready to run on Windows:v Configured and installed the database server as a Windows service.v Created an informix user account and an Informix-Admin administrative group.
For custom installations, if you enabled role separation when you installed thedatabase server, you could have changed the name of the Informix-Admingroup.
© Copyright IBM Corp. 1996, 2010 3-1
v Automatically assigned the informix user account, under which the databaseserver runs, to the Informix-Admin group and to the Windows Administratorsgroup.
v Granted the following advanced privileges to the informix user account:– Logon as service– Act as part of the operating system– Increase quotas– Replace a process level token– Debug programs– Manage auditing and security log
IDS program groupAn IBM Informix Dynamic Server program group is on the Windows Start menuafter installation completes.
To access the following items on the database server program group, click Start →Programs → IBM Informix Dynamic Server. The following table describes theprogram group menu.
Table 3-1. IBM Informix Dynamic Server program group
Menu item Description
Documentation Contains shortcuts to product documentation:
Information CenterA Web-based, powerful online interfacecontaining the technical information about theIBM Informix products. Requires a connectionto the Internet. If you do not have a connectionto the Internet, you can find the productdocumentation on the installation media.
Release NotesDescribes new features of IBM Informixproducts. This file also contains informationabout any changes to function from previousreleases, as well as any known problems andtheir workarounds. Read this file before youuse the database server.
Error Messages Provides a complete list of all of the error messages andtheir corrective actions.
Modify Installation Opens a wizard for modifying the installation:
ModifyAlter IDS components and features.
Repair Fix any corrupt or missing binaries for installedfeatures.
RemoveRemove all features of a working installationand, optionally, remove related group and userIDs. This selection launches the uninstallationapplication.
Server Instance Manager Creates and configures new server instances andremoves configured server instances.
3-2 IBM Informix Dynamic Server Installation Guide for Windows
Table 3-1. IBM Informix Dynamic Server program group (continued)
Menu item Description
server-name Opens a Command Prompt window for an initializeddatabase server instance. You can use that window torun DB-Access and certain command-line utilities suchas onstat, oncheck, and onspaces. (The oninit utility isdesigned to be started by a service rather than from thiswindow.) If you have more than one database serverinstance, there is a shortcut menu for each of them.
Initializing and starting the database serverAfter the database server is initialized once, you can start it manually or set it tostart automatically when Windows starts.
You can initialize and start the server from the Control Panel interface or from thecommand line. If the server was initialized during installation, you do not need toinitialize it again.
Important: To complete these tasks from the Control Panel, you must be a memberof the Windows Administrators group. To complete them from the command line,you must be a member of the Informix-Admin group. Do not use the oninit utilityto start the database server. For detailed information about how to start thedatabase server, see the IBM Informix Dynamic Server Administrator's Guide.
To start the database server by using the Control Panel:1. Choose one of the following options:v Start → Control Panel → Administrative Tools
v Control Panel → Administrative Tools → Component Services → ConsoleRoot → Services (Local) (for a Domain Controller)
2. Double-click Services.3. Double-click Informix IDS - server_name from the list and specify the
appropriate start options or accept the default ones. Verify the options on theGeneral page of the dialog box:v If you want database server to start automatically when Windows starts,
make sure that Startup type is set to Automatic. The database server is set tostart automatically if you installed with a custom setup, or if you initializedthe database server during a typical setup.
v If the server is not initialized yet, type -iy in the Start Parameters field. Thisoption creates and initializes the root dbspace. You do not need to do this ifyou chose to initialize the server during installation. The server needs to beinitialized only once before you can start it.
Warning: If you run the -iy switch on a database server that has IDSdatabases, the data is deleted.
v Click OK to save your options.4. Click Start.
Chapter 3. Post-installation tasks (Windows) 3-3
Stopping the database server
To stop the database server from the Control Panel, you must be a member of theWindows Administrators group. To stop the database server from the commandline, you must be a member of the Informix-Admin group.
To stop the database server:v From the Control Panel:
1. Choose Start → Control Panel → Administrative Tools.2. Double-click Services.3. Select Informix IDS -server_name from the Service list box.4. Click Stop.
v From the Command Prompt window:1. Click Start → Programs → IBM Informix Dynamic Server to display the
program group for the database server.2. Click the database server instance (server_name) to display the Command
Prompt window.3. In the Command Prompt window, type: onmode -ky.
Database server configuration after installationIf you need to create an IBM Informix Dynamic Server instance after installationcompletes, you can use the Server Instance Manager or use the standardconfiguration file (onconfig.std) as a basis for a new configuration file.
The genoncfg utility is an alternative configuration method if you are comfortableworking in a command-line environment. With this utility, you set a short list ofparameters in an input file, from which the utility then generates an IDSconfiguration file that is optimized for both your anticipated usage and your hostenvironment. You cannot use this utility to change a working configuration file.The genoncfg utility is documented in the IBM Informix Dynamic ServerAdministrator's Reference.
The following information is provided for advanced users who must manuallystart or change configuration of a database server instance.
Database server numberThe database server number uniquely identifies a database server if more than oneinstance of the database server is installed.
If only one instance of the database server is installed, set this number to 0. Thedatabase server number that you specify is the value for the SERVERNUMconfiguration parameter.
The database server uses configuration parameters, set in the onconfig file, duringinitialization. For more information about configuration parameters and theonconfig file, see the “Configuration parameters” topic of the IBM InformixDynamic Server Administrator's Reference.
To determine how many instances of the database server are installed, run theServer Instance Manager program. To run the Server Instance Manager program,choose Start → Programs → IBM Informix Dynamic Server → Server InstanceManager.
3-4 IBM Informix Dynamic Server Installation Guide for Windows
Database server nameThe database server name identifies the database server to client applications.
In most cases, you can choose the default database server name. The databaseserver name that you specify is the value for the DBSERVERNAME configurationparameter.
Database server names must begin with a letter and can contain only letters,numbers, and the underscore character.
Service name and port numberThe service name specifies the service name entry and the port number specifiesthe port entry for the database server in the sqlhosts registry.
Specify the service name and port number for the TCP/IP network protocol.
If only one database server instance exists on the computer, the installationprogram provides default values. It is recommended that you use these defaultvalues. For subsequent database server instances, you must provide unique values.
Dbspace name, location, and sizeA dbspace is a logical collection of chunks to which databases and tables areassigned.
During installation, the root dbspace is created automatically. You can configure anadditional data dbspace, mirror location, or smart blob drive.
Specify the location and disk-space size for the dbspace:
Primary data locationBy default, the primary data location is the current drive. The installationprogram displays the amount of available disk space; the default dbspacesize is 200 megabytes.
Smart blob driveA default smart blobspace can be configured optionally. The default size is200 megabytes.
Mirror locationThe mirrored location serves as the backup area if the primary storagedevice fails. The mirrored location should be the same size as the primarylocation and should be in a different drive. The data dbspace and thesmart blob can be mirrored on the same drive.
This mirrored location is also the value of the MIRRORPATH configurationparameter.
Default sbspace name, location, size, and page sizeAn sbspace is a logical storage area that the database server uses to store smartlarge objects (CLOB and BLOB data).
The default sbspace is the location in which the database server stores a smartlarge object if you do not specify an sbspace name when you create the smart largeobject. The database server also uses the default sbspace to store user-definedstatistics.
Chapter 3. Post-installation tasks (Windows) 3-5
Specify the primary and mirror data-storage location for the default sbspace:
Primary Data LocationBy default, the Primary Data Location of the sbspace is the current driveand must have a minimum of 200 megabytes. The installation programdisplays the amount of available disk space. This location also specifies thevalue of the SBSPACENAME configuration parameter.
Mirror locationThe mirrored location serves as the backup area if the primary storagedevice fails. The mirrored location should be the same size as the primarylocation and should be in a different drive.
Size The size of the sbspace should be at least 200 megabytes.
Page sizeThe size of the sbpage should approximate the size of the most frequentlyoccurring smart large object that the sbspace holds. The default is onepage.
For more information about sbspaces, see the IBM Informix Dynamic ServerAdministrator's Guide.
Shared server definition computerThe shared server definition computer is the machine hosting the database serverinstance with which client computers connect if you are deploying IBM InformixDynamic Server in a networked Windows environment.
Specify where you want the sqlhosts registry information for the shared serverdefinition to be stored. You can choose either the local host machine or anothercomputer that hosts a central, shared repository of sqlhosts settings for multipledatabase servers in the network.
If you specify another computer on the network, you must set theINFORMIXSQLHOSTS environment variable on your local computer to the nameof the computer that stores the sqlhosts information.
Configuring IDS manuallyUse the Server Instance Manager if you want to configure the database servermanually after installation of the product.
To configure the installed database server:1. Open the Server Instance Manager utility and specify the following:v database server numberv database server namev service name and port number for the TCP/IP network protocol
2. If you selected custom installation setup:a. Specify a name for the root dbspace.b. Specify the primary and mirror storage location and disk-space size for the
root dbspace.c. Specify the name of the default sbspace.d. Specify the primary and mirror storage location and disk-space size for the
default sbspace.3. Specify the computer to use for shared server definition for your database
server and administrative tools.
3-6 IBM Informix Dynamic Server Installation Guide for Windows

The installation program installs services on the computer and configures thedatabase server.
4. If you configured a new instance of the database server, you are prompted toinitialize the database server:v Click Yes to initialize the database server and the root dbspace.v Click No to skip initialization.If you skip initialization, you must manually start the database server andspecify the root dbspace size later. For more information on manualinitialization, see “Initializing and starting the database server” on page 3-3.Database server initialization might take several minutes.A message indicates that the database server was successfully installed.
5. If you selected other products to install, the installation prompts you toconfigure these products.
6. To update the members of the Informix-Admin group, log out and log back in.This step enables you to run the IBM Informix administration tools.
7. Restart your computer, if prompted.
For more information about configuring the database server manually, see the IBMInformix Dynamic Server Administrator's Guide.
Chapter 3. Post-installation tasks (Windows) 3-7

3-8 IBM Informix Dynamic Server Installation Guide for Windows
Chapter 4. Removing or modifying IDS and client products onWindows
The uninstallation application facilitates uninstallation and reinstallation of IBMInformix Dynamic Server, as well as modification of installed features of a databaseserver instance.
Review the following information to uninstall or modify IDS.
Altering IDS featuresYou can modify, repair, or remove installed features. To alter the features andcomponents of your installation, IBM Informix Dynamic Server provides adynamic GUI that detects what features are on your server.
This part of the uninstall application not only lets you select and clear features, butalso repairs any flawed binaries among installed features.
To alter the features of your IDS installation:1. Select Start → Programs → IBM Informix Dynamic Server 11.50 → Modify
Installation or launch the GUI maintenance wizard by opening the Add orRemove Programs feature of the Control Panel.
2. Select the Modify button to alter IDS components and features.The wizard for modifying IDS features and components enforces certaindependencies. For example, if you select a feature for removal but do not selectother components that rely on this feature, the wizard does not let you performthis.
3. Select the Repair button to fix any corrupt or missing binaries for installedfeatures.
4. Select the Remove button to remove all features, including all requiredcomponents for a working installation. This selection launches the uninstallprogram.
Related tasks
“Installing a copy of IDS on a computer” on page 2-4
Uninstalling IDS
Back up your IBM Informix Dynamic Server system before you uninstall.
Important: Any groups and user accounts that you used for this installation willbe removed in both local and domain installations, except when there are otherinstances on the disk. The uninstallation application cannot remove groups anduser accounts if there are other IDS instances on the host computer.
To uninstall the database server:1. Select Start → Programs → IBM Informix Dynamic Server → Modify Installation
→ Remove
2. Choose one of the following options:v Retains all databases, but removes all server binaries
© Copyright IBM Corp. 1996, 2010 4-1
This option is typically used when you upgrade the product because itfacilitates removing server binaries while preserving dbspace.
v Removes server binaries and all databases associated with themThis option removes all installed binaries and dbspaces. Use this option withcaution.
Reinstalling the database serverIf an earlier version of the database server is already installed at a specific instance,the installer provides options either to upgrade or to complete a fresh installationat a different location. See “Multiple copies of IDS on one computer” on page 1-1.
Performing silent uninstallations of IDSYou can remove IBM Informix Dynamic Server without interactively providingoptions. To do so, you must generate a response file for the uninstallationapplication. Ensure that you have access to the original media files for this task.
To perform a silent uninstallation:1. To uninstall an existing installation and record a response file, use this
command:setup.exe -r -f1"X:path\uninstall.ini"
The command records the uninstallation options as you perform them andstores them in a response file. If you do not specify the location of the responsefile, by default the uninstallation sequence is saved in %WINDIR%\setup.iss.
2. To perform the silent uninstallation on another system, or to uninstall from thesame system at a later time, specify the appropriate response file with thiscommand:setup.exe -s -f1"X:path\uninstall.ini"
3. To uninstall an existing installation when there are multiple copies of a versioninstalled on the same computer, specify the appropriate response file with oneof the following commands:v setup.exe -s -path installation path -f1"X:path\uninstall.ini"
v setup.exe -s -instnum installation number -f1"X:path\uninstall.ini"
Where:v installation path is the full or relative path to the location of the IDS
installation that you want to alter.v installation number is the unique number that identifies each copy; this
number was automatically generated when the copy was installed.v X:path\uninstall.ini is your drive, path, and file name for the recorded file
that contains the uninstallation options.Related reference
“Performing a silent installation” on page 2-5
4-2 IBM Informix Dynamic Server Installation Guide for Windows

Chapter 5. Deploying IDS
Use the command-line deployment utility to deploy a snapshot of IBM InformixDynamic Server and create a new instance as a quick alternative to traditionalinstallation, especially for deployments to many computers.
You can configure the snapshot so that the instance is ready to run for your needsimmediately after deployment.
The deployment utilityThe IBM Informix deployment utility can deploy snapshots of pre-configured IBMInformix Dynamic Server instances (with or without data) on one or morecomputers.
A snapshot is an image that includes the IDS installation directory, configurationsettings, and any data spaces associated with the instance. To take a snapshot, youmust have installed IDS. The installation can be a working instance, or simply aninstallation that you set up as a template from which to deploy the instance onother computers.
Deploying a snapshot is different from installing IDS with the silent installationoption. It is much quicker because you are simply recreating the installed instancefrom a snapshot, you are not installing the product all over again. Similarly, if youdeployed a snapshot on a computer, you can replace the snapshot or remove it byusing the deployment utility.
The following list describes some scenarios for which the deployment utility can beuseful:v You want to deploy a particular database server configuration on multiple
computers. You can tune only one instance as the template instance, and thenuse the utility to deploy it on to other computers in silent mode.
v You want to clone an instance on the same computer or set up multipleinstances quickly.
v You want to upgrade multiple instances to a different fix pack or version level totake advantage of newer product enhancements but this requires tuning certainconfiguration parameters or environment variables. You can tune the templateinstance, and then use the utility to upgrade other instances rapidly.
v You are embedding an IDS application on multiple computers and want toreduce application installation and setup time. You can specify the installationlocation and a single path for all application files including the database serverfiles during deployment to avoid waiting for data loading and database serverinitialization.
Most deployment utility functionality can be invoked by using eithercommand-line options or setting options in a text-based template configuration(.conf) file to accommodate your working preference. The .conf file also facilitateseasier reuse of an instance setup because you can save your settings in a copy ofthe file.
To operate the deployment utility, run the ifxdeploy executable from a commandline or from a script as part of an application installation. (The full file name of the
© Copyright IBM Corp. 1996, 2010 5-1
||
|||||
|||||
|
executable is ifxdeploy.exe in the Windows version of IDS, but it will be referredto as simply ifxdeploy throughout the documentation.) The utility can be runwithout user interaction, in silent mode.
Rapid IDS embeddability with the deployment utilityA snapshot of an instance can be reconfigured and initialized by running thedeployment utility with a combination of command line options or by settingvalues in the ifxdeploy.conf file.
You can preinitialize the instance by indicating the location of the IBM InformixDynamic Server chunk paths on the target computer.
The ifxdeploy.conf file allows for more dynamic customization than thecommand-line options because in the file you can specify any configurationparameter values, set key environment variables, and create multiple databaseserver aliases.
To apply configuration settings of the ifxdeploy.conf file to an instance you aredeploying, enter the file name as an argument to the -config option when you runthe ifxdeploy command.
If you set different values for the same instance in the ifxdeploy.conf file and asan option to the ifxdeploy command option, the deployment utility uses the valuespecified on the command line. For example, if you specify -p mypassword1 on thecommand line but set the INFORMIXPASSWORD parameter to mypassword2 in theifxdeploy.conf file, the deployed instance requires mypassword1 for authentication.
Initialized dbspaces
If you create a snapshot with initialized dbspaces, you can deploy the snapshot asan initialized instance without having to wait for disk space initialization on thetarget system.
To deploy the dbspaces to different locations from where they were when thesnapshot was taken, use the -relocate option. In the -relocate option you specifyone or more parent directories for the chunks of the deployed instance.
If you want to relocate the chunk parent directories, verify the following beforeyou run the utility:v The chunk files on the target computer exist in path locations that correspond
with your chunk parent directory relocation settings.v Each chunk file has an ownership and permissions setting that allows you to
modify it.v You know the ROOTPATH (and MIRRORPATH, if applicable) for the deployed
instance, and provide the path information in a configuration parameter settingor by using the -rootpath option.
Database server configuration
You can set essential configuration parameters in the command-line options of theifxdeploy command, instead of setting the values in the onconfig file.
In the ifxdeploy.conf file, you can provide server configuration parameters in thefollowing ways:
5-2 IBM Informix Dynamic Server Installation Guide for Windows
||
|
|||
||
||||
|||
|||||
|
|||
|||
||
||
||
|||
|
||
||
v Edit essential configuration parameter settings for your instance; the parameteroptions that appear in the file mirror those that are available as command-lineoptions.
v If you do not edit a configuration parameter setting listed in the file, accept thedefault value.
v Indicate a pre-existing onconfig file for the instance to use.v Customize configuration parameter settings in the ONCONFIG part of the
ifxdeploy.conf file, which overrides any onconfig file settings. This isparticularly useful if you have brought your snapshot to the target computer,analyzed the environment, and know that there are a few specific parametersthat are easier to adjust through the deployment utility instead of manuallyediting the onconfig file.
Attention: The values of any options that you pass on the ifxdeploy commandline supersede the corresponding settings of the ifxdeploy.conf file.
An onconfig file is generated from onconfig.std if you do not specify one and theONCONFIG environment variable is not set.
Environment variables
You can specify INFORMIXDIR, INFORMIXSERVER, INFORMIXSQLHOSTS,and ONCONFIG environment variables in the ifxdeploy.conf file.
The deployment utility can read the following environment variables from theprocess environment and use them to configure the deployed instance:v INFORMIXDIR
v INFORMIXSERVER
v CLIENT_LOCALE
v DB_LOCALE
v DBLANG
v GL_USEGLU
v SERVER_LOCALE
If the INFORMIXDIR and INFORMIXSERVER environment variables are not seton the target computer, you must enter them in the configuration file or whenprompted by the deployment utility. No default values are provided for these twoenvironment variables.
On Windows, the INFORMIXSQLHOSTS environment variable is used only ifyou want to capture the connectivity settings stored in the registry of anothercomputer.
If the ONCONFIG environment variable is not set, the utility creates one from acombination of whatever parameter settings you provide in the configuration fileand onconfig.std. The file name format of the autogenerated onconfig file isonconfig.server_name.
Database server aliases
With the ifxdeploy.conf file, you can set up multiple database server aliases thatare equivalent to setting the DBSERVERALIASES configuration parameter in theonconfig file. The "ALIAS" section of the file consists of fields in which you can
Chapter 5. Deploying IDS 5-3
|||
||
|
||||||
||
||
|
||
||
|
|
|
|
|
|
|
||||
|||
||||
|
|||
provide the SQLHOSTS connection information for each alias. The "ALIAS" settingcan expedite your deployment if you plan to use database server aliases becauseyou enter the connection information as part of the configuration file setup and donot need to configure SQLHOSTS information separately.
Creating a snapshot for deploymentCreate a snapshot of IBM Informix Dynamic Server that you can use with thedeployment utility to place pre-configured instances on multiple computers.
Before you create a snapshot, you must meet the following prerequisites:v Windows administrator privileges on the computer.v Sufficient disk space to save the snapshot in a file. If space is limited, you might
want to store the snapshot in a compressed file.
To create a snapshot, complete the following steps on the computer where youinstalled the IDS instance:1. Shut down the instance in a consistent state with onmode -kuy.2. Create a snapshot of the following items:v IDS installation directory
Tip: Ensure you include the IDSFILES.txt file, which is in the installationdirectory. That file is required if you want to use the deployment utility toremove the snapshot from the target computer after you deploy it.
v Configuration settingsv Optional: Data spaces associated with the instance
Tip: Store the components of the snapshot in a compressed file if you wantto save space. If you compress the snapshot with Gzip tar on UNIX orLinux® or into a zip file on Windows, the utility can be automaticallydecompressed by the deployment utility.
3. Optional: After you create the snapshot, you can restart the instance.
Deploying a snapshot with the deployment utilityDeploy a snapshot of an instance by using the ifxdeploy command on the targetcomputer.
Before you deploy a snapshot, you must meet the following prerequisites:v Windows administrator privileges on the target computer.v If you plan to include data with the deployed instance without using the
-relocate option in the ifxdeploy command to specify one or more parentdirectories for the chunks, note the absolute path of the instance on the templatecomputer. You must remember to set the root dbspace on the target computer tothe same absolute path of the instance on the template computer.
v The target computer has sufficient disk space for the snapshot.
Tip: You need the same amount of space as was used on the template computer.The space required depends on what you included in the snapshot, such as data,extra files, or other applications.
To deploy the snapshot on the target computer:1. Save a copy of the snapshot.
5-4 IBM Informix Dynamic Server Installation Guide for Windows
||||
|
|
||||
|
||
||
|
|
|||||
|
|||
|
|
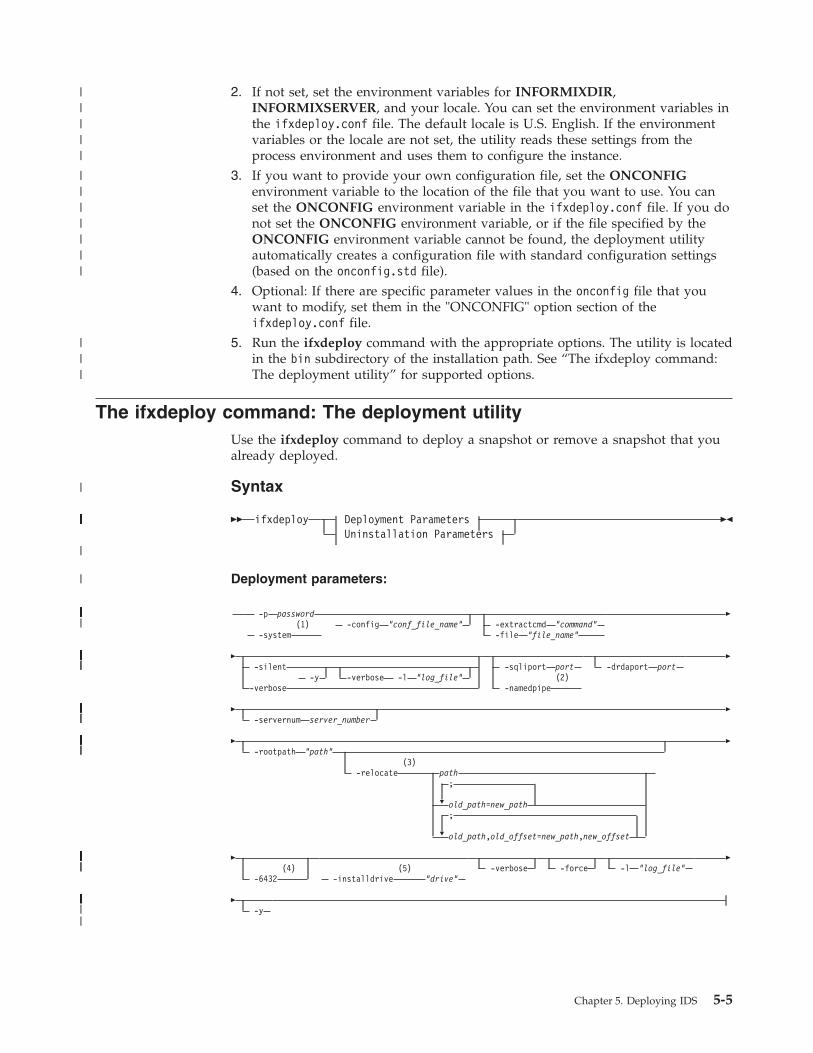
2. If not set, set the environment variables for INFORMIXDIR,INFORMIXSERVER, and your locale. You can set the environment variables inthe ifxdeploy.conf file. The default locale is U.S. English. If the environmentvariables or the locale are not set, the utility reads these settings from theprocess environment and uses them to configure the instance.
3. If you want to provide your own configuration file, set the ONCONFIGenvironment variable to the location of the file that you want to use. You canset the ONCONFIG environment variable in the ifxdeploy.conf file. If you donot set the ONCONFIG environment variable, or if the file specified by theONCONFIG environment variable cannot be found, the deployment utilityautomatically creates a configuration file with standard configuration settings(based on the onconfig.std file).
4. Optional: If there are specific parameter values in the onconfig file that youwant to modify, set them in the "ONCONFIG" option section of theifxdeploy.conf file.
5. Run the ifxdeploy command with the appropriate options. The utility is locatedin the bin subdirectory of the installation path. See “The ifxdeploy command:The deployment utility” for supported options.
The ifxdeploy command: The deployment utilityUse the ifxdeploy command to deploy a snapshot or remove a snapshot that youalready deployed.
Syntax
�� ifxdeploy Deployment ParametersUninstallation Parameters
��
Deployment parameters:
-p password(1) -config "conf_file_name" -extractcmd "command"
-system -file "file_name"
�
�-silent
-y -verbose -l "log_file"-verbose
-sqliport port(2)
-namedpipe
-drdaport port�
�-servernum server_number
�
�
�
�
-rootpath "path"(3)
-relocate path;
old_path=new_path;
old_path,old_offset=new_path,new_offset
�
�(4)
-6432(5)
-installdrive "drive"-verbose -force -l "log_file"
�
�-y
Chapter 5. Deploying IDS 5-5
|||||
|||||||
|||
|
|||||||||||||||||||||
|
|
|||||||||||||||||||||||||||||||||||||
|||||||||||||||||||||||||||||||||||||||||||||||||||
||||||||||||||
||||||||||||||||||||||||||||||||||||||||||
||||||||||||||||||||||||||||||||||||||||||||||
|||||||||||||
|
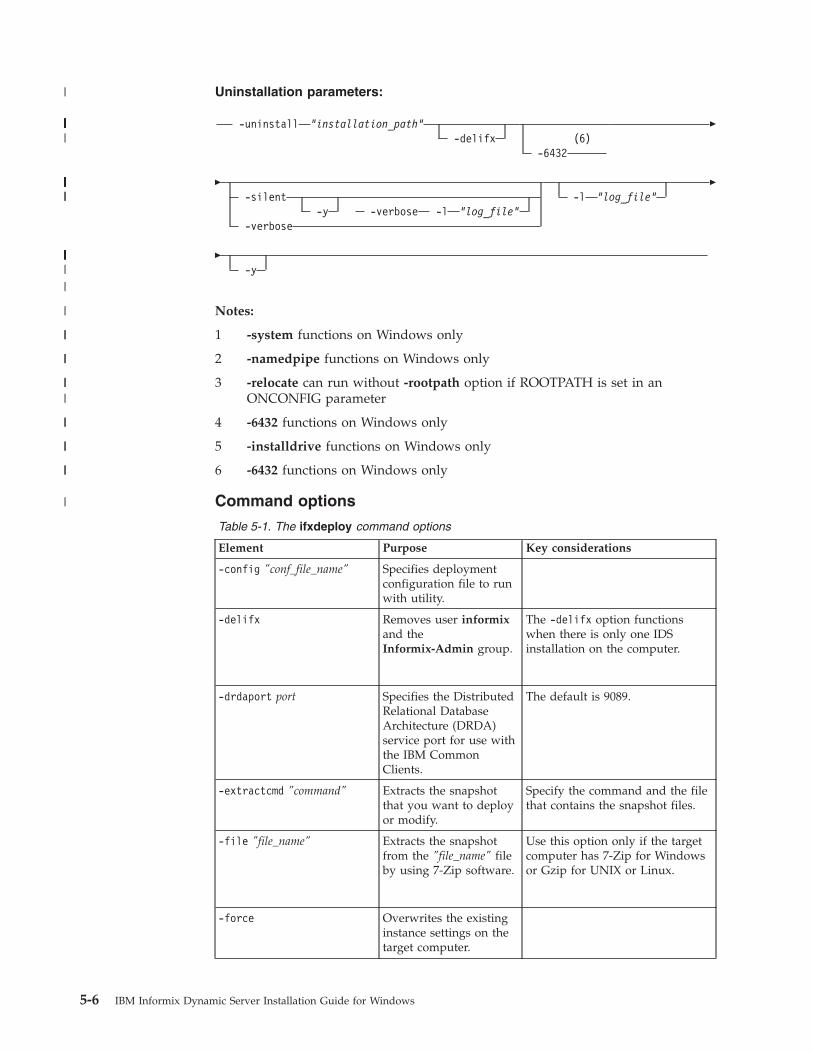
Uninstallation parameters:
-uninstall "installation_path"-delifx (6)
-6432
�
�-silent
-y -verbose -l "log_file"-verbose
-l "log_file"�
�-y
Notes:
1 -system functions on Windows only
2 -namedpipe functions on Windows only
3 -relocate can run without -rootpath option if ROOTPATH is set in anONCONFIG parameter
4 -6432 functions on Windows only
5 -installdrive functions on Windows only
6 -6432 functions on Windows only
Command options
Table 5-1. The ifxdeploy command options
Element Purpose Key considerations
-config "conf_file_name" Specifies deploymentconfiguration file to runwith utility.
-delifx Removes user informixand theInformix-Admin group.
The -delifx option functionswhen there is only one IDSinstallation on the computer.
-drdaport port Specifies the DistributedRelational DatabaseArchitecture (DRDA)service port for use withthe IBM CommonClients.
The default is 9089.
-extractcmd "command" Extracts the snapshotthat you want to deployor modify.
Specify the command and the filethat contains the snapshot files.
-file "file_name" Extracts the snapshotfrom the "file_name" fileby using 7-Zip software.
Use this option only if the targetcomputer has 7-Zip for Windowsor Gzip for UNIX or Linux.
-force Overwrites the existinginstance settings on thetarget computer.
5-6 IBM Informix Dynamic Server Installation Guide for Windows
|
|||||||||||||||||||||||||
||||||||||||||||||||||||||||||||||||||
|||||||||||||
|
|
||
||
|||
||
||
||
|
Table 5-1. The ifxdeploy command options (continued)
Element Purpose Key considerations
-installdrive "drive" This option is forWindows only.
Specifies the drive forthe directory containingdata spaces (typically,this is the IFMXDATAdirectory).
The default drive is C:. You musthave enough space for the IDSinstallation and databases.
-l "file_path" Sends status messages toa text file.
Indicate the full path and filename for the log file that youwant to use. If the file does notexist, it will be created for you.
-namedpipe This option is forWindows only. Sets thedefault database servernetwork protocol to anamed pipe connection.
If you specify both -namedpipeand -sqliport, the deploymentutility uses only one of them.
-p password Specifies the userinformix password usedto create the IDS service.
Specify the password for userinformix on the target computer.If you specify a password and theuser informix does not exist onthe target computer, the user willbe created and will have thespecified password.
-relocate path Specifies new parentdirectory of chunks inthe deployed instance.
You can specify a single newparent directory or map multipleseparate chunk paths to differentlocations. In addition, you cansubstitute offsets of the old pathswith new values if you areindicating multiple new parentdirectories.
Windows: If the parent directorieshave spaces in the paths, place thestring of paths after the -relocateoption in double-quotation marks.Example:
ifxdeploy -relocate"C:\Program Files\IBM\IBMDynamic Server\11.50\tmp=D:\IFMXDATA\myserver"
Linux: If multiple parentdirectories are specified and havespaces in the paths, place thestring of paths after the -relocateoption in single-quotation marks.Example:
ifxdeploy -relocate'/opt/IBM/informix1150/tmp=/local/data/myserver;/opt/IBM/informix1150/dbspace=/local2/data/myserver'
-rootpath "path" Indicates the location ofthe root dbspace.
default path:drive:\ifmxdata\server_name\rootdbs_dat.000
Chapter 5. Deploying IDS 5-7
Table 5-1. The ifxdeploy command options (continued)
Element Purpose Key considerations
-servernum server_number Specifies the servernumber of the instance.
The number must be an integerfrom 0 to 255. The default is 0.
-silent Directs the utility to runin silent mode.
When you use this option,messages do not display on thescreen but are written in a log file.If you use the -silent option and-verbose option together, youmust also include the -largument.
-sqliport port Specifies the SQLHOSTSservice port for theserver instance.
The default port is 9088.
If you specify both -namedpipeand -sqliport, the deploymentutility uses only one of them.
-system This option is forWindows only.
Creates an IDS servicethat logs in to theoperating system assystem user.
-uninstall installation_path Removes a snapshot thatwas originally deployedby the deploymentutility.
-verbose Runs the command inverbose mode.
-y Runs the commandwithout prompting forconfirmation.
-6432 This option is forWindows only.
Redirects registry accessto 32-bit registry view.
Use this option if you aredeploying a 32-bit IDS instance ona 64-bit computer.
Usage
Before you use this command, create a snapshot and copy it to the computerwhere you want to deploy the snapshot. See “Creating a snapshot for deployment”on page 5-4 for more information.
Run this command, with options, on the computer where you want to deploy thesnapshot. When you specify a value for a parameter, if the value contains a space,enclose the value in double quotation marks. You must run the command either asan Administrator user or as the root user.
If you placed the snapshot in a compressed file, you must extract it. Use the-extractcmd option to decompress a snapshot with a customized command orscript. Alternatively, if you have 7-zip software for Windows or Gzip for UNIX orLinux installed, you can use the -file option to decompress the snapshot.
5-8 IBM Informix Dynamic Server Installation Guide for Windows
||||
Use the -force parameter to deploy a snapshot to multiple computers andoverride the database server instance settings on the target computer.
Examples of deployment utility usage on Windows
Deploying an IDS instance in silent mode
In this example, the user informix is created on the target server and has thepassword mypassw0rd. The command will run in silent mode, without promptingfor confirmation. The snapshot is decompressed from the my_archive.zip file by7-zip software if it is installed on the operating system.ifxdeploy.exe -p mypassw0rd -y -silent -file C:\IBM\informix\my_archive.zip
Deploying an IDS instance as local system user where you specify an extractionmethod
In this example, the snapshot is extracted from the C:\my_archive.tar file on thetarget computer:ifxdeploy.exe -system -extractcmd tar -xf C:\my_archive.tar c:\informix
The extract command is enclosed in double quotation marks because it containsspaces.
Creating a new server instance
In this example, the SQLHOSTS port number is 9090, the server number for theinstance is 2, and a full path is specified for the log file.ifxdeploy.exe -silent -y -sqliport 9090 -servernum 2 -l C:\my_log.txt
Creating an instance as local system user with DRDA enabled
In this example, the SQLHOSTS port is 9090, the DRDA port is 9096, and thecommand will run in verbose mode. The snapshot used here is not in acompressed file format, so neither the -file option nor the -extractcmd option isneeded.ifxdeploy.exe -system -y -sqliport 9090 -drdaport 9096 -verbose
Dynamic relocation of chunks to single parent directory
In this example, the chunks are relocated to a single parent directory and indicatelocation of the root dbspace:ifxdeploy -rootpath D:\IFMX\ex1\rootdbs.001 -relocate D:\IFMX\ex2
Chunk relocation to multiple paths
In this example, the location of the root dbspace has been specified with theROOTPATH configuration parameter, so the command does not need to be runwith the -rootpath option. Each mapping between the old path and the new pathis separated by a semicolon.ifxdeploy -relocate C:\IFMXDATA=D:\IFMXDATA;C:\IFMXLOGSPACE=E:\IFMXLOGSPACE
Chunk relocation to multiple paths with new offsets
In this example, the location of the root dbspace has been specified with theROOTPATH configuration parameter, so the command does not need to be run
Chapter 5. Deploying IDS 5-9
with the -rootpath option. The mapping of the old paths and the new pathsincludes offset values (in kilobytes), which are indicated after the commas.ifxdeploy -relocate C:\IFMXDATA,0=D:\IFMXDATA,4;C:\IFMXDATAB,3=D:\IFMXDATAB,5
The ifxdeploy.conf file: The deployment utility configuration fileThe ifxdeploy.conf file is a text-file template in which you can configure aninstance snapshot prior to deploying it with the ifxdeploy command.
Purpose
The ifxdeploy.conf file is in $INFORMIXDIR/etc/ on Linux and %INFORMIXDIR%\etcon Windows.
By using the ifxdeploy.conf file, you can run the deployment utility with fewercommand-line options to configure the instance. You can save and reuse the file todeploy instances to other locations. The file supports the same functionality as theifxdeploy command options, but also additional functionality that is useful forembedding IBM Informix Dynamic Server when you are deploying a snapshot inmultiple locations that require minimal or no modification in instance setup. See“Rapid IDS embeddability with the deployment utility” on page 5-2 for adescription of the major embeddability features of the ifxdeploy.conf file.
Parameters
The ifxdeploy.conf file is value pair based. If there is a parameter with a defaultvalue that you want to change, provide the value in an uncommented line.
Attention: The values of parameters that are set on the ifxdeploy command lineoverwrite the values of the same parameters in the ifxdeploy.conf file.
The following table explains the parameters in the same order that they appear inthe configuration template file.
Table 5-2. The ifxdeploy.conf file parameters
Parameter DescriptionExample of value setting(uncommented line)
INFORMIXSERVER Primary database servername. Must be set eitherhere or as environmentvariable before deployment(no default value isprovided).
INFORMIXSERVER deploy3
PROTOCOL1 Primary network protocol.
Windows: This is equivalentto the PROTOCOL field ofthe SQLHOSTS registry.
PROTOCOL1 olscoctcp
PORT1 Number of the primarylistening port. No valuerequired for the onipcnmpprotocol. The range ofpermissible values is from 1to 32767.
PORT1 9094
5-10 IBM Informix Dynamic Server Installation Guide for Windows
|
||
|
||
||||||||
|
||
||
||
||
||||
|||||||
|
||
|||
|
|||||||
|
Table 5-2. The ifxdeploy.conf file parameters (continued)
Parameter DescriptionExample of value setting(uncommented line)
SERVERNUM The server number.Corresponds to theSERVERNUM configurationparameter. The range ofpermissible values is from 0to 255.
SERVERNUM 100
INFORMIXSQLHOSTSWindows: Pointer to remotecomputer containingSQLHOSTS registry settingsthat the deployed instance isto use.
BEGIN ALIAS . . . ENDALIAS
Specifies new databaseserver aliases and relatedSQLHOSTS connectivitysettings for the deployedinstance. The optionalOPTIONS line sets aSQLHOSTS parametervalue. In the example,b=32767 sets buffers.
BEGIN ALIASSERVERNAME alias1PROTOCOL drsoctcpPORT 9091OPTIONS b=32767END ALIAS
INFORMIXDIR Path for the deployedinstance. Must be set here oras environment variable (nodefault path is provided).
Windows: C:\tmp\informix
ONCONFIG The onconfig file name. Ifnone is specified here andno ONCONFIGenvironment variable is set,a new file is created fromonconfig.std.
onconfig.sample
SNAPSHOT Note: This parameter canonly be used if you aredeploying an instance froma snapshot compressed as a.tgz file on UNIX or Linuxor a .zip file on Windows.
Indicates the location of asupported, compressedarchive type containing thesnapshot. This parameter isequivalent to the -filecommand-line option.
Chapter 5. Deploying IDS 5-11
|
||||
|||||||
|
||||||
|
|||||||||||
||||||
|||||
|
|
|||||||
|
|||||||
||||||
|
Table 5-2. The ifxdeploy.conf file parameters (continued)
Parameter DescriptionExample of value setting(uncommented line)
RELOCATE Set chunk paths for thedeployed instance. You canindicate a parent directoryfor all chunk path names ormap them individually toseparate parent directories.You can also deploy thechunks with specific offsetvalues. Offset values are inkilobytes.
Example 1: Relocate all chunk paths toone directory:
Windows: C:\example1
Example 2: Select individual chunkpaths and specify the directories wherethe paths are relocated:
Windows: C:\ex2=C:\ex3;C:\ex4=C:\ex5
Example 3: Change multiple chunkpaths and offsets:
Windows: C:\ex6,10=C:\ex7,100;C:\ex8,20=C:\ex9,200
INFORMIXPASSWORD Password for user informixon the target computer. Setspassword to what you enteras a value if no userinformix exists on thecomputer.
INFORMIXPASSWORD password
SYSTEM
This parameter is forWindows only.
Sets whether the deployedinstance will log on toWindows as local systemaccount. The default value is0 (IDS logs on as userinformix).
SYSTEM 1 (this directs instance tolog on as local system account butuser informix is created) SYSTEM 2(this deploys instance withoutcreation of user informix)
LOGFILE Sets the full path name forthe log file of thedeployment utility's errorsand messages.
Windows: LOGFILE c:\my_log.txt
LOGLEVEL Sets amount of informationto write to log. Refer to theifxdeploy.conf file forpermissible values.
LOGLEVEL 5
SILENT Sets whether or not theutility displays consoleoutput while it is running.
SILENT 1 (no console output)
SILENT 0 (displays console output)
FORCE Overwrites existingenvironment variable andonconfig file settings of thetarget computer.
FORCE 0 (Does not overwrite)
FORCE 1 (Overwrites existingsettings)
INSTALLDRIVE
This parameter is forWindows only.
Specifies the directory inwhich the deployedinstance's dbspaces will becreated on Windows.
INSTALLDRIVE C
ROOTPATH Sets the location of the rootdbspace.
Windows default path:drive:\ifmxdata\server_name\rootdbs_dat.000
5-12 IBM Informix Dynamic Server Installation Guide for Windows
|
||||
|||||||||||
||
|
|||
||
||
||
|||||||
|
|
||
||||||
|||||
|||||
|
|
|||||
|
||||
|
|
|||||
|
||
|
||
||||
|
||||||
Table 5-2. The ifxdeploy.conf file parameters (continued)
Parameter DescriptionExample of value setting(uncommented line)
WIN6432
This parameter is forWindows only.
Set this to 1 if installing32-bit IDS on 64-bitWindows.
WIN6432 1
BEGIN ONCONFIG . . .END ONCONFIG
Specify values for anyconfiguration fileparameters. Enter eachparameter and value exactlyas they would be entered inthe onconfig file.
Can be used to overwritespecific onconfig fileparameter values or insteadof providing an onconfigfile.
BEGIN ONCONFIGLOCKS 10000END ONCONFIG
The ifxdeploy.conf file templateThe following shows the contents of the ifxdeploy.conf file.# Licensed Material - Property Of IBM## "Restricted Materials of IBM"## IBM Informix Dynamic Server# Copyright IBM Corporation 2009 All rights reserved.## Title: ifxdeploy.conf# Description: Configuration file for the IDS Deployment Utility## Uncomment any values that you want to change from the default values.## Note that any parameters set on the command line will override these values.
# Primary server values# - These values define the primary server name, protocol, and port.# - Use the BEGIN ALIAS section to define additional sever names and# protocols (such as DRDA).
# INFORMIXSERVER - Set the primary server name, or set it as an environment# variable or command line parameter.#INFORMIXSERVER
# PROTOCOL1 - Set the primary protocol (the sqlhosts NETTYPE field) for the# primary server.# - Values: onsoctcp, onipcnmp#PROTOCOL1 onsoctcp
# PORT1 - Set the primary listening port for the primary server (not needed for# onipcnmp).# - Range: 1-32767#PORT1 9088
# SERVERNUM - Set the primary server number (the value for the SERVERNUM# configuration parameter).# - Range: 0-255#SERVERNUM
# INFORMIXSQLHOSTS - Set a value for the INFORMIXSQLHOSTS environment
Chapter 5. Deploying IDS 5-13
|
||||
|
||
|||
|
||||||||
|||||
|||
|
|
|
|||||||||||||||||||||||||||||||||||||||
# variable. On UNIX this value specifies the sqlhosts file# (default is $INFORMIXDIR/etc/sqlhosts). On Windows, this# value is generally not used but can be used to point to a# remote machine (for example, \\machinename) whose registry# contains SQLHOSTS information.#INFORMIXSQLHOSTS
# Define additional server names and listeners with the BEGIN/END ALIAS# statements.# Each ALIAS results in a new SQLHOSTS entry and a new value for the# DBSERVERALIASES configuration parameter in the onconfig file.# For example:#BEGIN ALIAS#SERVERNAME alias1#PROTOCOL drsoctcp#PORT 9091#OPTIONS # optional SQLHOSTS parameters (for example, b=32767 to set buffers)#END ALIAS
# INFORMIXDIR - Set the location of the installation directory.# - Alternatively, set the INFORMIXDIR environment variable.#INFORMIXDIR
# ONCONFIG - Set the onconfig file.# - If not specified and the ONCONFIG environment variable is not set,# a new onconfig file is created based on the onconfig.std file.#ONCONFIG
# SNAPSHOT - Set the location of the compressed archive. This parameter is the# equivalent to the -file command line option. The archive must be a# .tgz file on UNIX or Linux and a .zip file on Windows. Only set# this value if you are supplying a compressed snapshot of an IDS# instance.#SNAPSHOT
# RELOCATE - Set to the new location of dbspace chunks.# Use one of these methods or a combination of methods 2 and 3:# - Method 1: new_path (relocates all chunks to the specified path)# - Method 2: old_path=new_path (relocates only chunks# created in the old path to the new path)# - Method 3: old_path,old_offset=new_path,new_offset;# (relocates chunks and moves offsets)# You can specify multiple paths with methods 2 and 3 by# separating old and new path sets with a semicolon (;).##RELOCATE
# Authentication values# INFORMIXPASSWORD - Set the password for the informix user.# - If not set, can be supplied on command line or# interactively.# - Not required if the SYSTEM parameter is set to 2.#INFORMIXPASSWORD
# SYSTEM - Windows only - Set the IDS service to log on as the Windows# Local System user.# - Values:# 0 - IDS service logs on as the informix user.# 1 - IDS service logs on as the Local System user but creates the# informix user.# 2 - Do not create the informix user.#SYSTEM 0
# Logging parameters# LOGFILE - Set the file for Deployment Utility errors and messages.#LOGFILE
5-14 IBM Informix Dynamic Server Installation Guide for Windows
|||||||||||||||||||||||||||||||||||||||||||||||||||||||||||||||||||
# LOGLEVEL - Set the amount of information to write to the log.## 1 - FATAL - only print fatal errors.# 3 - WARNING - print warnings and fatal errors.# 5 - INFO - print informational messages, warnings, and fatal errors.# 10 - DEBUG - print debugging information and all other messages.##LOGLEVEL 5
# SILENT - Set to 1 to prevent console output sot that errors and# messages only appear in the log file.# - Range: 0,1#SILENT 1
# FORCE - Set to 1 to overwrite existing settings# - Range: 0,1#FORCE 0
# INSTALLDRIVE - Windows only - Set to the drive where data spaces will be# created# - Range: C-Z#INSTALLDRIVE C
# ROOTPATH - Set to the path for the root dbspace# - Default is \ifmxdata\$INFORMIXSERVER\rootdbs_dat.000#ROOTPATH
# WIN6432 - Windows only - Set this to 1 if installing a 32-bit version of IDS# on a 64-bit Windows operating system.# - Range: 0,1#WIN6432 0
# Onconfig customization# Use the BEGIN ONCONFIG and END ONCONFIG statements to add or override# configuration parameters values in the onconfig file.# Use instead of providing an onconfig file.# Example:#BEGIN ONCONFIG#LOCKS 10000#END ONCONFIG
Removing a snapshot with the deployment utilityUse the deployment utility to remove a snapshot that was originally deployed bythe deployment utility. In addition, you can use this utility to remove userinformix and the Informix-Admin group from the operating system.
You must have Windows administrator privileges to remove the snapshot orremove the user and group objects.
You must have the IDSFILES.txt file in the etc subdirectory of the installationpath.
To remove a snapshot:
Run the ifxdeploy command with the uninstallation options on the computerwhere the snapshot is deployed. See “The ifxdeploy command: The deploymentutility” on page 5-5 for details about the command syntax.
The following command is an example of how to use the deployment utility toremove a snapshot and to display runtime status messages:ifxdeploy.exe -u C:\tmp\informix -verbose
Chapter 5. Deploying IDS 5-15
||||||||||||||||||||||||||||||||||||||||
||
|||
||
||
|
|||
||
|

The following is an example of how to uninstall a snapshot and to remove userinformix and the administrative group:ifxdeploy.exe -u C:\tmp\informix -verbose -delifx
5-16 IBM Informix Dynamic Server Installation Guide for Windows
||
|
|
Appendix. Accessibility
IBM strives to provide products with usable access for everyone, regardless of ageor ability.
Accessibility features for IBM Informix productsAccessibility features help a user who has a physical disability, such as restrictedmobility or limited vision, to use information technology products successfully.
Accessibility featuresThe following list includes the major accessibility features in IBM Informixproducts. These features support:v Keyboard-only operation.v Interfaces that are commonly used by screen readers.v The attachment of alternative input and output devices.
Tip: The information center and its related publications are accessibility-enabledfor the IBM Home Page Reader. You can operate all features using the keyboardinstead of the mouse.
Keyboard navigationThis product uses standard Microsoft Windows navigation keys.
Related accessibility informationIBM is committed to making our documentation accessible to persons withdisabilities. Our publications are available in HTML format so that they can beaccessed with assistive technology such as screen reader software.
You can view the publications in Adobe® Portable Document Format (PDF) usingthe Adobe Acrobat Reader.
IBM and accessibilitySee the IBM Accessibility Center at http://www.ibm.com/able for more informationabout the commitment that IBM has to accessibility.
Dotted decimal syntax diagramsThe syntax diagrams in our publications are available in dotted decimal format,which is an accessible format that is available only if you are using a screen reader.
In dotted decimal format, each syntax element is written on a separate line. If twoor more syntax elements are always present together (or always absent together),the elements can appear on the same line, because they can be considered as asingle compound syntax element.
Each line starts with a dotted decimal number; for example, 3 or 3.1 or 3.1.1. Tohear these numbers correctly, make sure that your screen reader is set to readpunctuation. All syntax elements that have the same dotted decimal number (forexample, all syntax elements that have the number 3.1) are mutually exclusive
© Copyright IBM Corp. 1996, 2010 A-1

alternatives. If you hear the lines 3.1 USERID and 3.1 SYSTEMID, your syntax caninclude either USERID or SYSTEMID, but not both.
The dotted decimal numbering level denotes the level of nesting. For example, if asyntax element with dotted decimal number 3 is followed by a series of syntaxelements with dotted decimal number 3.1, all the syntax elements numbered 3.1are subordinate to the syntax element numbered 3.
Certain words and symbols are used next to the dotted decimal numbers to addinformation about the syntax elements. Occasionally, these words and symbolsmight occur at the beginning of the element itself. For ease of identification, if theword or symbol is a part of the syntax element, the word or symbol is preceded bythe backslash (\) character. The * symbol can be used next to a dotted decimalnumber to indicate that the syntax element repeats. For example, syntax element*FILE with dotted decimal number 3 is read as 3 \* FILE. Format 3* FILEindicates that syntax element FILE repeats. Format 3* \* FILE indicates thatsyntax element * FILE repeats.
Characters such as commas, which are used to separate a string of syntaxelements, are shown in the syntax just before the items they separate. Thesecharacters can appear on the same line as each item, or on a separate line with thesame dotted decimal number as the relevant items. The line can also show anothersymbol that provides information about the syntax elements. For example, the lines5.1*, 5.1 LASTRUN, and 5.1 DELETE mean that if you use more than one of theLASTRUN and DELETE syntax elements, the elements must be separated by a comma.If no separator is given, assume that you use a blank to separate each syntaxelement.
If a syntax element is preceded by the % symbol, that element is defined elsewhere.The string following the % symbol is the name of a syntax fragment rather than aliteral. For example, the line 2.1 %OP1 means that you should refer to a separatesyntax fragment OP1.
The following words and symbols are used next to the dotted decimal numbers:
? Specifies an optional syntax element. A dotted decimal number followedby the ? symbol indicates that all the syntax elements with acorresponding dotted decimal number, and any subordinate syntaxelements, are optional. If there is only one syntax element with a dotteddecimal number, the ? symbol is displayed on the same line as the syntaxelement (for example, 5? NOTIFY). If there is more than one syntax elementwith a dotted decimal number, the ? symbol is displayed on a line byitself, followed by the syntax elements that are optional. For example, ifyou hear the lines 5 ?, 5 NOTIFY, and 5 UPDATE, you know that syntaxelements NOTIFY and UPDATE are optional; that is, you can choose one ornone of them. The ? symbol is equivalent to a bypass line in a railroaddiagram.
! Specifies a default syntax element. A dotted decimal number followed bythe ! symbol and a syntax element indicates that the syntax element is thedefault option for all syntax elements that share the same dotted decimalnumber. Only one of the syntax elements that share the same dotteddecimal number can specify a ! symbol. For example, if you hear the lines2? FILE, 2.1! (KEEP), and 2.1 (DELETE), you know that (KEEP) is thedefault option for the FILE keyword. In this example, if you include theFILE keyword but do not specify an option, default option KEEP is applied.A default option also applies to the next higher dotted decimal number. In
A-2 IBM Informix Dynamic Server Installation Guide for Windows

this example, if the FILE keyword is omitted, default FILE(KEEP) is used.However, if you hear the lines 2? FILE, 2.1, 2.1.1! (KEEP), and 2.1.1(DELETE), the default option KEEP only applies to the next higher dotteddecimal number, 2.1 (which does not have an associated keyword), anddoes not apply to 2? FILE. Nothing is used if the keyword FILE is omitted.
* Specifies a syntax element that can be repeated zero or more times. Adotted decimal number followed by the * symbol indicates that this syntaxelement can be used zero or more times; that is, it is optional and can berepeated. For example, if you hear the line 5.1* data-area, you know thatyou can include more than one data area or you can include none. If youhear the lines 3*, 3 HOST, and 3 STATE, you know that you can includeHOST, STATE, both together, or nothing.
Notes:
1. If a dotted decimal number has an asterisk (*) next to it and there isonly one item with that dotted decimal number, you can repeat thatsame item more than once.
2. If a dotted decimal number has an asterisk next to it and several itemshave that dotted decimal number, you can use more than one itemfrom the list, but you cannot use the items more than once each. In theprevious example, you could write HOST STATE, but you could not writeHOST HOST.
3. The * symbol is equivalent to a loop-back line in a railroad syntaxdiagram.
+ Specifies a syntax element that must be included one or more times. Adotted decimal number followed by the + symbol indicates that this syntaxelement must be included one or more times. For example, if you hear theline 6.1+ data-area, you must include at least one data area. If you hearthe lines 2+, 2 HOST, and 2 STATE, you know that you must include HOST,STATE, or both. As for the * symbol, you can only repeat a particular item ifit is the only item with that dotted decimal number. The + symbol, like the* symbol, is equivalent to a loop-back line in a railroad syntax diagram.
Appendix. Accessibility A-3

A-4 IBM Informix Dynamic Server Installation Guide for Windows
Notices
This information was developed for products and services offered in the U.S.A.
IBM may not offer the products, services, or features discussed in this document inother countries. Consult your local IBM representative for information on theproducts and services currently available in your area. Any reference to an IBMproduct, program, or service is not intended to state or imply that only that IBMproduct, program, or service may be used. Any functionally equivalent product,program, or service that does not infringe any IBM intellectual property right maybe used instead. However, it is the user's responsibility to evaluate and verify theoperation of any non-IBM product, program, or service.
IBM may have patents or pending patent applications covering subject matterdescribed in this document. The furnishing of this document does not grant youany license to these patents. You can send license inquiries, in writing, to:
IBM Director of LicensingIBM CorporationNorth Castle DriveArmonk, NY 10504-1785U.S.A.
For license inquiries regarding double-byte (DBCS) information, contact the IBMIntellectual Property Department in your country or send inquiries, in writing, to:
Intellectual Property LicensingLegal and Intellectual Property LawIBM Japan Ltd.1623-14, Shimotsuruma, Yamato-shiKanagawa 242-8502 Japan
The following paragraph does not apply to the United Kingdom or any othercountry where such provisions are inconsistent with local law: INTERNATIONALBUSINESS MACHINES CORPORATION PROVIDES THIS PUBLICATION "AS IS"WITHOUT WARRANTY OF ANY KIND, EITHER EXPRESS OR IMPLIED,INCLUDING, BUT NOT LIMITED TO, THE IMPLIED WARRANTIES OFNON-INFRINGEMENT, MERCHANTABILITY OR FITNESS FOR A PARTICULARPURPOSE. Some states do not allow disclaimer of express or implied warranties incertain transactions, therefore, this statement may not apply to you.
This information could include technical inaccuracies or typographical errors.Changes are periodically made to the information herein; these changes will beincorporated in new editions of the publication. IBM may make improvementsand/or changes in the product(s) and/or the program(s) described in thispublication at any time without notice.
Any references in this information to non-IBM Web sites are provided forconvenience only and do not in any manner serve as an endorsement of those Websites. The materials at those Web sites are not part of the materials for this IBMproduct and use of those Web sites is at your own risk.
© Copyright IBM Corp. 1996, 2010 B-1

IBM may use or distribute any of the information you supply in any way itbelieves appropriate without incurring any obligation to you.
Licensees of this program who wish to have information about it for the purposeof enabling: (i) the exchange of information between independently createdprograms and other programs (including this one) and (ii) the mutual use of theinformation which has been exchanged, should contact:
IBM CorporationJ46A/G4555 Bailey AvenueSan Jose, CA 95141-1003U.S.A.
Such information may be available, subject to appropriate terms and conditions,including in some cases, payment of a fee.
The licensed program described in this document and all licensed materialavailable for it are provided by IBM under terms of the IBM Customer Agreement,IBM International Program License Agreement or any equivalent agreementbetween us.
Any performance data contained herein was determined in a controlledenvironment. Therefore, the results obtained in other operating environments mayvary significantly. Some measurements may have been made on development-levelsystems and there is no guarantee that these measurements will be the same ongenerally available systems. Furthermore, some measurements may have beenestimated through extrapolation. Actual results may vary. Users of this documentshould verify the applicable data for their specific environment.
Information concerning non-IBM products was obtained from the suppliers ofthose products, their published announcements or other publicly available sources.IBM has not tested those products and cannot confirm the accuracy ofperformance, compatibility or any other claims related to non-IBM products.Questions on the capabilities of non-IBM products should be addressed to thesuppliers of those products.
All statements regarding IBM's future direction or intent are subject to change orwithdrawal without notice, and represent goals and objectives only.
All IBM prices shown are IBM's suggested retail prices, are current and are subjectto change without notice. Dealer prices may vary.
This information is for planning purposes only. The information herein is subject tochange before the products described become available.
This information contains examples of data and reports used in daily businessoperations. To illustrate them as completely as possible, the examples include thenames of individuals, companies, brands, and products. All of these names arefictitious and any similarity to the names and addresses used by an actual businessenterprise is entirely coincidental.
COPYRIGHT LICENSE:
This information contains sample application programs in source language, whichillustrate programming techniques on various operating platforms. You may copy,
B-2 IBM Informix Dynamic Server Installation Guide for Windows
modify, and distribute these sample programs in any form without payment toIBM, for the purposes of developing, using, marketing or distributing applicationprograms conforming to the application programming interface for the operatingplatform for which the sample programs are written. These examples have notbeen thoroughly tested under all conditions. IBM, therefore, cannot guarantee orimply reliability, serviceability, or function of these programs. The sampleprograms are provided "AS IS", without warranty of any kind. IBM shall not beliable for any damages arising out of your use of the sample programs.
Each copy or any portion of these sample programs or any derivative work, mustinclude a copyright notice as follows:
© (your company name) (year). Portions of this code are derived from IBM Corp.Sample Programs.
© Copyright IBM Corp. _enter the year or years_. All rights reserved.
If you are viewing this information softcopy, the photographs and colorillustrations may not appear.
TrademarksIBM, the IBM logo, and ibm.com® are trademarks or registered trademarks ofInternational Business Machines Corp., registered in many jurisdictions worldwide.Other product and service names might be trademarks of IBM or other companies.A current list of IBM trademarks is available on the Web at “Copyright andtrademark information” at http://www.ibm.com/legal/copytrade.shtml.
Adobe, the Adobe logo, and PostScript® are either registered trademarks ortrademarks of Adobe Systems Incorporated in the United States, and/or othercountries.
Intel®, Itanium®, and Pentium® are trademarks or registered trademarks of IntelCorporation or its subsidiaries in the United States and other countries.
Java and all Java-based trademarks are trademarks of Sun Microsystems, Inc. in theUnited States, other countries, or both.
Linux is a registered trademark of Linus Torvalds in the United States, othercountries, or both.
Microsoft, Windows, and Windows NT® are trademarks of Microsoft Corporationin the United States, other countries, or both.
UNIX is a registered trademark of The Open Group in the United States and othercountries.
Other company, product, or service names may be trademarks or service marks ofothers.
Notices B-3

B-4 IBM Informix Dynamic Server Installation Guide for Windows

Index
Special characters-relocate option 5-2%INFORMIXDIR%
environment variable 1-9
AAccessibility A-1
dotted decimal format of syntax diagrams A-1keyboard A-1shortcut keys A-1syntax diagrams, reading in a screen reader A-1
Accessing database server program group 3-1Accounts
informix user 3-1Administrative
groupsadding members to 1-1
privileges, Server Instance Manager 2-13Administrative Utilities 1-4Administrator
privileges, incorrect 2-14Administrators group
adding members 1-1incorrect privileges 2-14requirements for installing 1-1
Advanced privileges, granted to informix user 3-1
BBackup and Restore 1-4Backups
and multiple residency 2-12configuring storage manager 3-1
base server 1-2, 1-4BladeManager 1-4BLOB data 3-5
Cchunks
location 5-2relocating parent directories 5-2
CLOB data 3-5clone 5-1Cluster
installationon multiple nodes 1-2, 2-2, 2-9
Cluster Administrator 2-8ClusterIT, installing in a Microsoft cluster environment 1-2,
2-2, 2-9Command line
deploying IDS snapshot 5-5initializing database server 3-3starting database server 3-3stopping database server 3-4
compliance with standards xcomponents 1-2, 1-4
configuration fileand deployment utility 5-2creating during installation 1-8, 2-2for demonstration database server 1-6response file 1-8
Configuration parametersDBSERVERNAME 3-5MIRRORPATH 3-5SBSPACENAME 3-5SERVERNUM 3-4
Control Panelinitializing database server 3-3starting database server 3-3stopping database server 3-4
Conversion and Reversion SupportDistributed Relational Database Architecture (DRDA) 1-4XML Publishing 1-4
Creatingdatabase server instances 2-13
custom installation 1-2, 2-2
DData-Loading Utilities 1-4database server
aliases 5-2Database server name
description of 3-5error message 2-14fixing invalid 2-14limitations 2-14specifying 3-6
Database server numberdescription of 3-4specifying 3-6
Database serverscreating new instances 2-13fresh installation 4-2initializing 3-6installing
multiple instances 1-9on multiple nodes 2-9
program groupaccessing 3-1
reinstalling 4-2silent uninstallation 4-2stopping 3-4uninstalling 4-1, 4-2
DataBlade modules 1-4DBSERVERNAME configuration parameter 3-5dbspace
specifying 3-5dbspaces 3-5
initializing 5-2root 3-6
Default sbspacedefinition of 3-5specifying 3-6
demonstration database server 1-6Demos 1-4deploying to multiple computers 5-1
© Copyright IBM Corp. 1996, 2010 X-1

deployment utility 5-1removing a snapshot 5-15syntax and options 5-5using with ifxdeploy.conf file 5-10
Disabilities, visualreading syntax diagrams A-1
Disability A-1Disk space, installation requirements 1-1Dotted decimal format of syntax diagrams A-1DRDA (Distributed Relational Database Architecture) 1-2, 2-2
Eembeddability
database server 5-2Enterprise Replication 1-4Environment variable
%INFORMIXDIR% 1-9Environment variables
INFORMIXSQLHOSTS 3-6Error log 2-14Error messages 2-14
installation 2-14
Ffeatures 1-2, 1-4
modifying 4-1removing 4-1repairing 4-1
features installed with IDS 1-4First-time installation
INFORMIXDIR directory 1-9fix the installation 3-2Fresh installation
database server 4-2
GGlobal Language Support (GLS) 1-4, 3-1GLS (Global Language Support) 1-4Group names 1-8
IIDS extensions 1-4ifxdeploy command
syntax and usage 5-5ifxdeploy.conf file 5-10Incorrect privileges error message 2-14industry standards xinformation center 3-2Informix Storage Manager (ISM) 3-1informix user 1-10
advanced privileges 3-1creation of 3-1
Informix-Admin accountcreation of 3-1
Informix-Admin group 1-8updating members 3-6using Server Instance Manager 2-13
INFORMIXDIR directoryfirst-time installation 1-9multiple installation 1-9upgrade 1-9
INFORMIXSQLHOSTSenvironment variable 3-6
Initializing database server 3-3, 3-6installation 2-1
of selective features 1-4prerequisites 1-1
Installationcustom 1-9custom with GUI 2-2domain 1-9error messages 2-14first-time 1-9local 1-9problems, troubleshooting 2-14typical 1-9typical with GUI 2-1
installation number 1-1Installations
specialized 2-8installing
multiple copies on 1 computer 1-1Installing
database servercustom with GUI 2-2multiple instances 1-9on multiple nodes 2-9typical with GUI 2-1
Instance Configuration Wizard 1-2, 1-6, 1-8, 2-2Instance Manager utility 1-6instmgr.exe 1-6instnum option 1-1Insufficient virtual memory error message 2-14Invalid database server name 2-14
LLarge objects (LOBs), smart 3-5Limitations, database server name 2-14local system user
installing product as 1-2, 2-2
MMemory requirements, and multiple residency 2-12Memory, virtual 2-14Message log, for multiple residency 2-12Migrating 1-10Mirror location 3-5
root dbspace 3-6Mirroring, and multiple residency 2-12MIRRORPATH configuration parameter 3-5modify installation 3-2Modifying
Dynamic Server 4-1modifying a copy of Dynamic Server 4-1modifying installed features 4-1multiple copies on a computer 1-1Multiple installations
INFORMIXDIR directory 1-9using silent installation 2-7
Multiple nodes, installing on 2-9Multiple nodes, installing with ClusterIT utility 2-9Multiple residency 2-12
and backups 2-12and mirroring 2-12and multiple binaries, warning 2-13
X-2 IBM Informix Dynamic Server Installation Guide for Windows

Multiple residency (continued)memory requirements 2-12message log for 2-12ONCONFIG file 2-13planning for 2-12storage-space requirements 2-12tape drive 2-12
NNetwork protocol
TCP/IP 3-5
OON-Bar utility
configuring storage manager 3-1onconfig file 1-6
and deployment utility 5-2ONCONFIG file, and multiple residency 2-13onmode utility 3-4
PPage size
default sbspace 3-5error message 2-14
Paging file, installation requirements 1-1Parameters
DBSERVERNAME 3-5MIRRORPATH 3-5SBSPACENAME 3-5SERVERNUM 3-4
Port numbersdefined 3-5specifying 3-6
Post-Installation tasks 3-1Primary storage location, root dbspace 3-6Privileges
administrator 2-14advanced 3-1local 2-13Server Instance Manager 2-13
Problems, installation 2-14program group 3-2Program, database server group 3-1
RRAM, installation requirements 1-1reinstall the installation 3-2Reinstalling
database server 4-2INFORMIXDIR directory 1-9
release notes 3-2remove features or products 3-2removing a copy of Dynamic Server 4-1removing installed features 4-1repair the installation 3-2repairing a copy of Dynamic Server 4-1repairing installed features 4-1response codes 2-8response file 1-2, 2-5, 2-6, 2-7Restore
configuring storage manager 3-1
return codes 2-8Role separation 1-8Root dbspace
disk space requirements 1-1primary and mirror storage locations 3-6specifying name 3-6
Ssbpage, size 3-5SBSPACENAME configuration parameter 3-5sbspaces
defaultspecifying location 3-5specifying name 3-6specifying storage location 3-6
defined 3-5, 3-6size 3-5
Screen readerreading syntax diagrams A-1
servermodifying 4-1removing a copy 4-1repairing 4-1
Server Instance Manager 3-2command-line options 2-13DRDA (Distributed Relational Database Architecture) 2-13Informix-Admin Group 2-13privileges 2-13starting 2-13
Server name 3-6Server number 3-6SERVERNUM configuration parameter 3-4Service name
defined 3-5specifying 3-6
Shared serverspecifying 3-6
Shortcut keyskeyboard A-1
shortcut menus 3-2silent installation 1-2, 2-5
definition of 2-5response codes 2-8response file 2-6, 2-7server.ini file 2-5
Sizedefault sbspace 3-5sbpage 3-5
Smart blob drive 3-5Smart large objects 3-5snapshot 5-1
creating for deployment 5-4deploying 5-4removing 5-15
Specialized installations 2-8Specifying
database server name 3-6database server number 3-6default sbspace 3-6root dbspace name 3-6service name 3-6
sqlhosts registryport entry 3-5servicename entry 3-5shared server definition computer 3-6
standards x
Index X-3

Start menu 3-2Starting
database server automatically 3-3starts utility 3-3Storage locations, specifying 3-6Storage-space requirements, and multiple residency 2-12Syntax diagrams
reading in a screen reader A-1
TTape drives, for multiple residency 2-12TCP/IP
port number 3-5service name 3-5specifying port number 3-6specifying service name 3-6
Troubleshooting, installation problems 2-14typical installation 1-2, 2-1
UUninstalling 4-1
database server 4-1, 4-2Updating Informix-Admin group 3-6Upgrading 1-10
INFORMIXDIR directory 1-9User accounts
informixcreating 3-1
User informix 1-10utilities 1-4Utilities
onmode 3-4starts 3-3
VVirtual memory, insufficient 2-14Visual disabilities
reading syntax diagrams A-1
WWindows Administrators group 1-1Windows file system, installation requirements 1-1wizard
see installation application, GUI mode 1-2
X-4 IBM Informix Dynamic Server Installation Guide for Windows


����
Printed in USA
GC27-3612-00