Embed Size (px)
Citation preview

111
IBM Rational Rapid Developer Software: IntroductionIntroduction
Version 5.01 – May, 2003© 2003 Rational Software Corp. All rights reserved.

2
Course Daily AgendaCourse Daily Agenda
Daily agenda and subject list:Day one:
Project configuration and setupClass modelingSite and style modelingPage modeling and method writing
Day two:Integration – Messaging, Web Services, ComponentsProject enhancements (application maintenance)Application Internationalization/LocalizationIndependent Study Workshop
The Rational Associates:Jon Sayles, Manager, Rapid Developer Product Education. (203) 402-2070 - [email protected] your instructor's name and contact information here, if you are taking this class in stand-up learning mode: _____________________________________________________________________________
Additional Rational Contacts:Subhash Gupta, Project Manager. (203) 402-2083 – [email protected]

3
Introduction to IBM Rational Rapid Developer Introduction to IBM Rational Rapid Developer -- Course SpecificationsCourse Specifications
Course Length: ~2 daysCourse Format: Workshop/DiscussionDelivery Mode: Classroom Instruction – and Notes Pages for self-paced educationIntended Audience:
• Technical developers• Web designers and graphic artists• Project managers and Business analysts• Application architects
Assumes a background in Internet technology, application software and MS-Windows development
Required Artifacts: • Hardware (see course notes on minimum requirements)• Version 5 (or later) of Rapid Developer• A supported J2EE Application Server (or MTS/COM – if using Microsoft DNA development)• MS-Access or other supported relational database• \RDEV\ folder

4
Provides a broad overview of Rapid Developer product features and facilities, as well as demonstrating many of the key value proposition points, hands-on
Duration and Hands-on2 days, 90% hands-on
Designed ForAnalysts, project managers, DBA’s, Graphic Artists and Java DevelopersSales Engineers and Technical Support Technical Evaluators May be taken in audit mode
Pre-Requisite CoursesNone
Useful Prior ExpertiseMS-Windows Product UsageApplication DevelopmentInternet and RDBMS technologiesObject Oriented Design and Programming
Related Recommended CoursesDevelopers should proceed to the IBM Rational Rapid Developer Software: Development Techniques – an in-depth extension of this course for anyone expecting to begin production-level work with the tool.You may also consider taking specific advanced topic courses based on your need
Introduction and OverviewRapid Developer Overview
Rapid Developer Development ProcessValue Proposition
Rapid Developer Project MethodologyCourse Project
The Business ProblemRequirements, Analysis, DesignRapid Developer Development Steps
Installation and SetupRapid Developer InstallationDBMS
Install DBMS, Set up ODBCSet up in Rapid Developer
Application ServerInstall App ServerSet up in Rapid Developer
Start ApplicationSetup FoldersCreate Application
Rapid Developer Walk-through
Business Object ModelingClass Modeling OverviewImport Rose ModelUse Class ArchitectDefine AttributesDatabase Modeling and Construction
User Interface DesignSite Modeling OverviewDesign Site ModelPage DesignPage Architect Overview
List pagesindex pagesUpdate pagesData-Entry pagesSearch pagesNested Grid pages
List Page LogicList pages Selection and SortingPage ParametersPage ExpressionsError Messages
Update Page LogicLogic Editor OverviewCode PatternsUpdate, Insert, Delete methodsSetNextPage
Message and IntegrationXML Message
Design an Output messageWeb Services
Web Services OverviewPublish Web ServicesUse Web Services
Component Based DevelopmentInclude and Use Component
InternationalizationLocalized pagesJava Formatting options
Construction, Testing and Maintenance
J2EE Construction and TestingMicrosoft DNA Construction and Testing
Course OutlineCourse Description
555
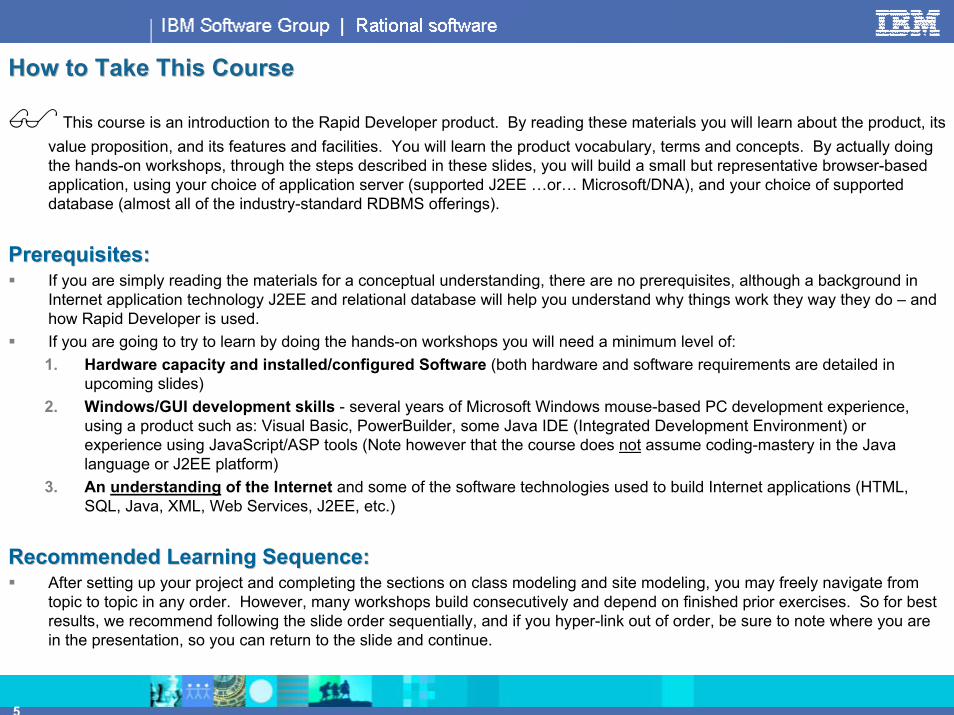
How to Take This CourseHow to Take This Course
This course is an introduction to the Rapid Developer product. By reading these materials you will learn about the product, its value proposition, and its features and facilities. You will learn the product vocabulary, terms and concepts. By actually doing the hands-on workshops, through the steps described in these slides, you will build a small but representative browser-based application, using your choice of application server (supported J2EE …or… Microsoft/DNA), and your choice of supported database (almost all of the industry-standard RDBMS offerings).
Prerequisites:Prerequisites:If you are simply reading the materials for a conceptual understanding, there are no prerequisites, although a background in Internet application technology J2EE and relational database will help you understand why things work they way they do – and how Rapid Developer is used.If you are going to try to learn by doing the hands-on workshops you will need a minimum level of:1. Hardware capacity and installed/configured Software (both hardware and software requirements are detailed in
upcoming slides)2. Windows/GUI development skills - several years of Microsoft Windows mouse-based PC development experience,
using a product such as: Visual Basic, PowerBuilder, some Java IDE (Integrated Development Environment) or experience using JavaScript/ASP tools (Note however that the course does not assume coding-mastery in the Java language or J2EE platform)
3. An understanding of the Internet and some of the software technologies used to build Internet applications (HTML, SQL, Java, XML, Web Services, J2EE, etc.)
Recommended Learning Sequence:Recommended Learning Sequence:After setting up your project and completing the sections on class modeling and site modeling, you may freely navigate from topic to topic in any order. However, many workshops build consecutively and depend on finished prior exercises. So for best results, we recommend following the slide order sequentially, and if you hyper-link out of order, be sure to note where you are in the presentation, so you can return to the slide and continue.

666
Before You Take This CourseBefore You Take This Course
This course is designed to be taken either in the classroom, or standalone – as self-study. If you are learning in the classroom your instructor will assist you with setup, product and desktop configuration and other pre-requisites to successful training. If you are taking the course as self-study, you will need to ensure that the following is complete before you begin:
1. Hardware – You will need to use a reasonably state-of-the-art machine, as you will be building and testing a moderately-sized J2EE application. This means at least a Pentium III/500 MHZ processor, with 256 (preferably 512) Megs of RAM, and at least 500 Meg free disk space (which will be used to accommodate your J2EE server, DBMS, Rapid Developer product and the training artifacts required by this course.
2. Development Operating System – You can use Windows NT, Windows 2000 or Windows XP to develop. Run-time deployment is only limited to the supporting J2EE application servers.
3. Application Server – You will need to install and configure one of the Application Servers supported by Rapid Developer, including: Tomcat 4.0, Oracle9iAS, WebSphere 3.5 or later, or WebLogic (5.0 or later). You are responsible to ensure that your server is correctly configured. Note that you may need to re-specify the HTTP Port settings (if using a pre-configured Server), and also note that you should not install the Application Server as a Windows Service. You will also need the Sun/Java JDK and Compiler (version 1.3 or later, installed on your PC).
4. IBM Rational Rapid Developer – You will need to install Rapid Developer version 5 or later, and its License Key.
5. DBMS – You may use any supported Relational DBMS for persisting your business objects. However, note that this course documentation assumes the use of MS-Access/2000. You are responsible to be able to create an ODBC driver to your DBMS. The course notes will assist, if you are using MS-Access.
6. Education Artifacts - Finally, you will need the \\RDEVRDEV\\ folder – which contains various models, graphics, samples, code templates, etc. used in the course. This folder is located in \Rapid Developer\Samples.

777
Courseware ArtifactsCourseware Artifacts
ViewletsViewlets – when you click this icon, you will see a short recorded animation of a visual development technique. The MacroMedia Flash player must be installed on your computer to view the interactive media. If you have an internet connection, you can download the Flash plug-in from http://www.macromedia.com.
Notes PaneNotes Pane – the Notes pane at the bottom of the screen provides additional information or course instruction (if you are using the PowerPoint slides, pull down the VViewiew menu, and select Notes Notes PPageage to display notes pages in full screen mode)
Acrobat formatAcrobat format – for printed copies. If you are taking this course in self-paced training mode, you will most likely want to print the workshops (which make up the overwhelming percentage of the materials). Do so by printing the Adobe Acrobat file, that installs with Rapid Developer.

888
Course Icons and Heading LegendCourse Icons and Heading Legend
Icon metaphorsIcon metaphors: The following icons are occasionally used on the slides to represent:
Read this This bullet, section or slide is conceptual, and is to be read and understood
Do this This bullet is a step in a visual development technique, it denotes some action to be taken by you, typically using the product
Page Headers:Page Headers: In some instances, all of a slide is to be read – or a slide contains bullets of "things to be done" using Rapid Developer. Such slides will have the following consistent topic headers:
Concepts – Topic – slide material is to be read. This slide is not an exercise
Steps – Topic – slide material is also to read. Steps slides contain a high-level conceptual view of the workflow process for some visual development technique
Workshop – Topic – slide bullets are to be done/accomplished – typically using Rapid Developer
Optional WorkshopOptional Workshop – Topic – slide bullets are to be done using Rapid Developer – if time permits in class – or in Self-Paced mode, if you are interested in the topic.

999
Section A Section A –– Rapid Developer Overview Rapid Developer Overview - ConceptsConceptsSection A – IBM Rational Rapid Developer and RAD IBM Rational Rapid Developer and RAD
ConceptsConcepts
After you finish this section, you will be able to:After you finish this section, you will be able to:Define the use of Rapid Developer as Rapid Application Development technologyDescribe the characteristic of RAD work with Rapid Developer, and how it differs from traditional IDE-based manual codingDescribe the inputs to Rapid Developer's code-construction and the overall process of application generation.
NoteNote::This first section is entirely conceptual. There are no workshops or exercises associated with any of the learning topics.

10
What is Rapid Developer?What is Rapid Developer?RADRAD (Rapid Application Development) software used for creating architected, n-tier J2EE browser-based applications
Characteristics:Characteristics:Model-centric … You create models. You refine models. You do some traditional method writing. And you integrate your models with existing application functionality (components, packages, etc.)
Visual Development … High level of abstraction – easy to create new and maintain existing applications
Constructed Code … Engineered for high-performance, scalability, maintain-ability
End-to-end Development Lifecycle Integration … Development artifacts and business semantics captured and organized in visual models. Universally applied during project development.
Enforced Object-Orientation … Development process driven by the Business (Class) Model
Extensible … Ubiquitous integration points with: XML, Web Services, Java/EJB components, DHTML
Maintain Rapid Developer Applications using Rational Rapid Developer …or… traditional IDE tools
11
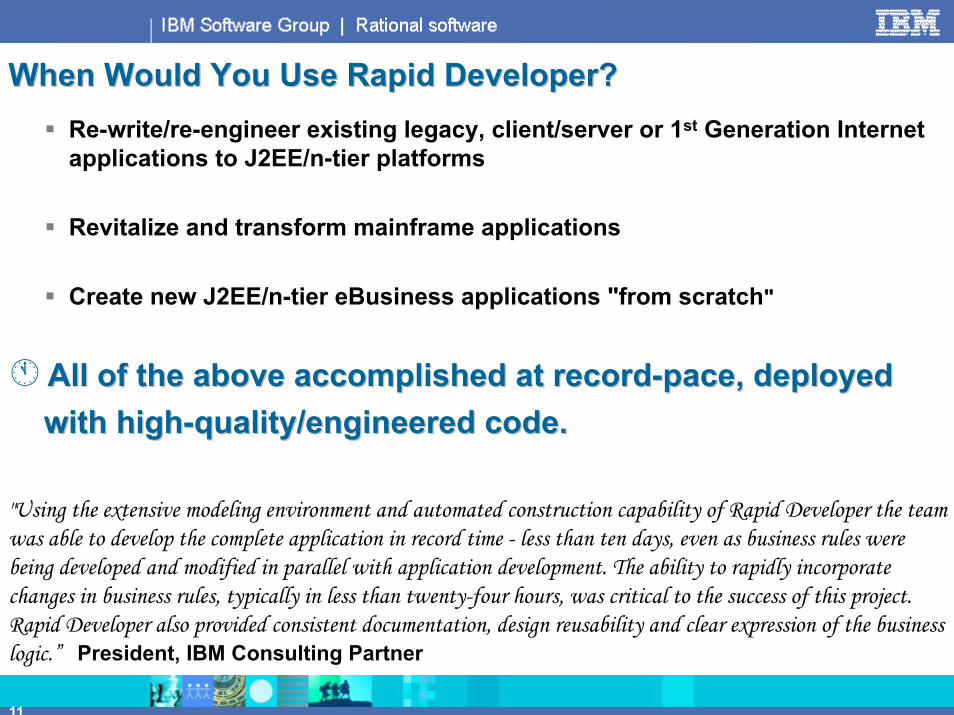
When Would You Use Rapid Developer?When Would You Use Rapid Developer?Re-write/re-engineer existing legacy, client/server or 1st Generation Internet applications to J2EE/n-tier platforms
Revitalize and transform mainframe applications
Create new J2EE/n-tier eBusiness applications "from scratch"
All of the above accomplished at recordAll of the above accomplished at record--pace, deployed pace, deployed with highwith high--quality/engineered code.quality/engineered code.
"Using the extensive modeling environment and automated construction capability of Rapid Developer the team was able to develop the complete application in record time - less than ten days, even as business rules were being developed and modified in parallel with application development. The ability to rapidly incorporate changes in business rules, typically in less than twenty-four hours, was critical to the success of this project. Rapid Developer also provided consistent documentation, design reusability and clear expression of the business logic.” President, IBM Consulting Partner

12
How Do Developers Use Rapid Developer?How Do Developers Use Rapid Developer?
Using integrated, visual tools, you: Using integrated, visual tools, you:
CreateCreate models – abstractions of your application semantics
…and…
RefineRefine models – set properties, specify expressions, code business methods
Create models Create models
Refine modelsRefine models
All Models IntegrateAll Models IntegrateDevelopers leverage the model semantics
during every phase of the development process.

13
Capturing and Refining Business SemanticsCapturing and Refining Business Semantics
Rapid Developer projectRapid Developer projectspecifications and specifications and
propertiesproperties(Visual Development)(Visual Development)
TechnologySite ModelPartition ModelIntegration Model
Page Model
ImportedAssets
(Create Models)(Create Models)
UML Class ModelUML Class ModelDBMS SchemaDBMS Schema
COBOL SchemaCOBOL SchemaComponentsComponents
Java PackagesJava PackagesC/S JavaScriptC/S JavaScript
CapturePhase
RefinePhase
IntegratedIntegratedModel RepositoryModel RepositoryRapid Developer ApplicationRapid Developer Application

14
Visual Development … vs … Hand CodingVisual Development … vs … Hand Coding
CodeCodeComponentComponentRepositoryRepository
ConstructionConstruction
"The larger and more complex the application, the more benefit we realized from this approach."I/T Vice President, eCommerce company
Business Logic… Page Development… Messaging… Web Services… Components… Internationalization …
IntegratedIntegratedModel RepositoryModel Repository
Captured Business SemanticsCaptured Business Semantics
Visual Development Techniques … Leverage Shared Integrated ModelVisual Development Techniques … Leverage Shared Integrated Models … s … MinimizeMinimize Java hand codingJava hand coding

15
The Big Picture The Big Picture –– Steps in Building Your First ProjectSteps in Building Your First Project
1. Software Installation and Configuration 1. Software Installation and Configuration
2. Single User Project Setup2. Single User Project Setup
3. Import and Refine Class Model3. Import and Refine Class Model
4. User Interface and Site Modeling4. User Interface and Site Modeling
5. Page and Logic Modeling5. Page and Logic Modeling
6. Application Integration6. Application Integration
7. Application Maintenance and Enhancement7. Application Maintenance and Enhancement

16
Summary – Section A Section A –– Rapid Developer Overview Rapid Developer Overview - Review
In this section you have learned the following:In this section you have learned the following:Rapid Developer is a RAD, model-driven alternative to traditional application development using IDEs and hand-codingIn the process of using Rapid Developer, developers create and refine modelsRapid Developer projects can import models from a variety of sourcesThese models are refined and elaborated using integrated visual tools – the models become the project's "production source"Each project's unique model set (including technology selections) is input with a rules engine which constructs standard J2EE/Java codeThis standard code is deployed into an application server
In the next section In the next section –– Rapid Developer Installation and Project Setup Rapid Developer Installation and Project Setup -- you will learn how to:you will learn how to:Install Rapid DeveloperDefine a blank MS-Access databaseConfigure an ODBC Data Source for an MS-Access databaseUnderstand what other software packages may be needed for development

171717
Section B Section B –– Installation and Project SetupInstallation and Project SetupSection B – Software Installation and ConfigurationSoftware Installation and Configuration
After you finish this section, you will be able to:After you finish this section, you will be able to:Install Rational Rapid Developer – in standard (not custom) installation modeDefine the Windows folders you need for this course on your PCCreate a new blank, Microsoft Access database for this course – for object persistenceCreate a new System-Level DSN (ODBC Data Source) to connect the application to the database
Viewlet of complete setup stepsViewlet of complete setup steps

18
The Big Picture The Big Picture -- StepsSteps
1. Software Installation and Configuration 1. Software Installation and Configuration
2. Single User Project Setup
3. Import and Refine Class Model
4. User Interface and Site Modeling
5. Page and Logic Modeling
6. Application Integration
7. Application Maintenance and Enhancement

19
Steps Steps –– Installation and Setup Installation and Setup –– Single User Desktop ProjectSingle User Desktop Project
2. Install Software/Configure Development Environment 2. Install Software/Configure Development Environment Install Rapid Developer Install Rapid Developer Install infrastructure technologyInstall infrastructure technologyInstall development technology software Install development technology software
Create your project folders and directories Create your project folders and directories Create a new blank MSCreate a new blank MS--Access database Access database Create a System DSN, ODBC driver for your new database Create a System DSN, ODBC driver for your new database
1. Analyze Hardware/Software Requirements1. Analyze Hardware/Software RequirementsCPU speed, Memory, Disk, Network bandwidth, etc.CPU speed, Memory, Disk, Network bandwidth, etc.
3. Verify Installation 3. Verify Installation (Optional Step)(Optional Step)Open NeuCommerce ProjectOpen NeuCommerce ProjectConstruct PersistenceConstruct PersistenceStart Application Server and PreviewStart Application Server and Preview

20
Concepts Concepts –– 1. Analyze Hardware/Software Requirements1. Analyze Hardware/Software Requirements
Hardware Requirements:Hardware Requirements:A high-performance IBM PC or compatible. Minimum configuration is as follows:
Pentium III micro-processor (minimum 500 MHZ )256 Megabytes of RAM (512M recommended, especially for J2EE development)500 Megabytes of free disk space available on your hard-drive – for Rapid Developer itself, the Training artifacts, and your constructed applicationsA high-resolution display monitor (minimum 1024X768) CD-ROMMouse
Software Requirements:Software Requirements:Operating System support:
Windows NTMicrosoft Windows NT operating system Service Pack 5 Admin rights on your NT operating system.
Windows 2000Windows XP
Will also need the following on your machine:Rapid Developer – Version 5 or later[Supported] Application Server – installed and configured correctly (see next slide for list)
If you are planning to use Microsoft/COM/MTS) You will need to install the Microsoft SDK 4.0.[Supported] DBMS (see next slide for list)

21
Concepts Concepts –– Project Setup Project Setup -- Other Software That You May Need to InstallOther Software That You May Need to Install
Required Software that you need to InstallRequired Software that you need to InstallApplication Server
J2EE Application Servers:IBM WebSphere, BEA WebLogic, Tomcat 4, Oracle 9iAS (versions 1 and 2), other
Microsoft: MTS/COM + Internet Information Server, Personal Web Server
DBMS: Oracle, SQL Server, Sybase, DB2, MS-AccessWeb Browser: Internet Explorer 4.0+, Netscape 3.0+Sun Java SDK/Javac.exe – version 1.3 or later
Optional Software Optional Software (if your application requires, you will need the following):Messaging : MQSeries, MSMQ, TIBCO, …LDAP ServerMainframe Connection – IBM's DB2Connect, etc.Wireless Emulator (for development), or wireless devicesIDE for Source-Level Debugging
Rapid Developer supports certain compatible Java debuggers including WSAD, and eclipse.

22
Steps Steps –– 2. Install IBM Rational Rapid Developer2. Install IBM Rational Rapid Developer
1.1. Make sure that you have uninstalled any previous version of RapiMake sure that you have uninstalled any previous version of Rapid Developer.d Developer.
2.2. From your Installation disk, click on: From your Installation disk, click on: Setup.exeSetup.exe
3.3. Accept the initial dialog boxes, and accept the license agreemenAccept the initial dialog boxes, and accept the license agreement.t.
4.4. Select whether you want to install Rapid Developer only, or alsoSelect whether you want to install Rapid Developer only, or also the companion the companion utilitiesutilities
5.5. Select the directory where you want to install Rapid DeveloperSelect the directory where you want to install Rapid Developer
6.6. Rapid Developer will ask you whether you want to install sample Rapid Developer will ask you whether you want to install sample applications applications (recommended)
7.7. You will need a License file to use the product You will need a License file to use the product –– obtain from the Developer Center, or obtain from the Developer Center, or directly from your Rational Account representative.directly from your Rational Account representative.
8.8. Rapid Developer will ask whether you want to install Web ServiceRapid Developer will ask whether you want to install Web Services Components. You s Components. You should specify: should specify: YESYES..
9.9. After installation, Rapid Developer will display the Getting StaAfter installation, Rapid Developer will display the Getting Started Guide.rted Guide.

23
WorkshopWorkshop – Setup FoldersSetup Folders
Using Windows Explorer, or MyComputer, Create the following Project Folder(s)X:X:\\ApplicationsApplications\\ProjectsProjects\\QuickStartQuickStart\\X:X: The drive you want to use for your project.
Spell the directories exactly as shownOn this slide:
\Applications --- capital A\Projects --- capital P\QuickStart --- capital Q and capital S

24
WorkshopWorkshop – If Taking Course As Self-Paced Study – Copy Folder to Desktop
If you are taking this workshop independently without an instructor, you might want to copy the \\RDevRDev\\ directory located in the x:\\RapidDeveloperRapidDeveloper\\SamplesSamples\\ installation directory to your desktop (for convenient access during the class)
Browse to the: x:x:\\RapidDeveloperRapidDeveloper\\SamplesSamples\\RDevRDev\\ directory.
Right-click on: \\RDevRDev\\
Select CopyCopy from the dropdown
Navigate to your desktop, right-click anywhere and select PastePaste onto your Windows desktop.

25
Steps Steps –– Database SetupDatabase Setup
You will need to create a blank empty database – then an ODBC connection to access the Database.
The steps to set up a database are different for each type of DBMS. However, they all involve the following:
1. Create a blank (empty) database in your DBMS2. Create an ODBC connection to your database

26
WorkshopWorkshop – Create a blank MSCreate a blank MS--Access DatabaseAccess Database
Launch Microsoft Access:Launch Microsoft Access:
Create a new Blank Access database:
Name the database QuickStartQuickStart
Browse through and: Save in your \\QuickStartQuickStart\\ directory
Click Click CreateCreate to save the Database
Close MSClose MS--AccessAccess -- before continuing
Using Windows Explorer, or MyComputer:Using Windows Explorer, or MyComputer:

27
Workshop – Create a System ODBC DSNCreate a System ODBC DSN
Create an ODBC Connection to your database:1. Launch the ODBC Data Source Administrator
2. Click the System DSNSystem DSN tab, and click Add…Add…
3. Select Microsoft Access Driver (*.mdb) Select Microsoft Access Driver (*.mdb) and click FinishFinish

28
Workshop – continued – Create a System ODBC DSNCreate a System ODBC DSN
4. Enter Data Source Name and optional description then click Select Select
5. From the Select Database tab:Browse to and select your QuickStart
MS-Access database:Click OK and eOK and exit the ODBC Data Source Administrator

29
Summary – Section B Section B –– Software Installation and Configuration Software Installation and Configuration – Review of Steps
Install SoftwareInstall Software
Create Project Root Create Project Root Directory FolderDirectory Folder
Create Blank DatabaseCreate Blank Database
Create SystemCreate SystemODBC DSNODBC DSN
Install Rapid DeveloperInstall Rapid Developer

30
Summary – Section B Section B –– Software Installation and Configuration Software Installation and Configuration - Review
In this section you have learned:What you will need in the way of hardware and software to develop applications using Rapid DeveloperHow to install Rapid DeveloperHow to define a blank MS-Access databaseHow to configure an ODBC Data Source for an MS-Access databaseWhat other software packages you will need to, or may want to install
In the next section – Rapid Developer Project Setup - you will:Create your 1st Rapid Developer standalone project and applicationSpecify initial/default Application technology properties for your 1st applicationUnderstand what application components you will build using Rapid Developer

313131
Section C –– SingleSingle--User Project SetupUser Project Setup
After you finish this section, you will be able to:After you finish this section, you will be able to:Launch Rapid Developer, and create a new application for this courseFor the application, specify your development defaults, selecting:
Which presentation defaults to chooseWhich application server you will be developing with (and constructing to)Which database your application will connect to – through an ODBC DSN
You will also be able to set the appropriate properties for presentation construction, application server and database access
Viewlet of complete project default specificationsViewlet of complete project default specifications

32
The Big Picture The Big Picture -- StepsSteps
1. Software Installation and Configuration
2. Single User Project Setup 2. Single User Project Setup
3. Import and Refine Class Model
4. User Interface and Site Modeling
5. Page and Logic Modeling
6. Application Integration
7. Application Maintenance and Enhancement

33
Steps Steps -- SingleSingle--User Project SetupUser Project Setup
2. Specify Development Technologies 2. Specify Development Technologies andand DefaultsDefaultsPresentation DefaultsPresentation DefaultsApplication ServerApplication Server
Application Server Installation directoryApplication Server Installation directoryJDK and Java compilerJDK and Java compiler
Specify Message Transport(s)Specify Message Transport(s)Select Data Source for object persistenceSelect Data Source for object persistence
1. Create New Project1. Create New ProjectName project Name project Save in project folderSave in project folderSelect Application Style (Presentation U.I. Defaults) Select Application Style (Presentation U.I. Defaults) Describe project (document)Describe project (document)

34
Concepts Concepts -- Introduction to the Sample Project Introduction to the Sample Project (Background)
The QuickStartQuickStart Project:
Subset of NeuCommerce, which is a complete, fully-functional B-2-B/eCommerce application framework that ships with Rapid Developer
In building the QuickStart project, you will get a chance to work with the following models and Rapid Developer product features:
Class ModelImport UML file, and extend with custom class modeling
Site ModelDesign the application navigation and create the initial pages
Page ModelCreate Master/Detail pages, List pages, Search pages, Update pages, Data Entry pages
IntegrationCreate an XML messageCreate an EJB componentSubscribe to (Load and Discover) several Web Service components
Internationalization/Localization
Electronically-generated Project Documentation

35
Workshop Workshop –– Create New ApplicationCreate New ApplicationFrom the Windows Desktop, Launch Rapid Developer
From the Rapid Developer entry tab, select: Create new application Create new application and click: OKOK

36
Workshop Workshop –– New Application WizardNew Application Wizard
From the Application Wizard:Application Wizard:1. Name the application: QuickStartQuickStart
2. Application Directory: Browse to x:x:\\ApplicationsApplications\\ProjectsProjects\\QuickStartQuickStart\\
3. Application Style: x:…x:…\\RDEVRDEV\\StyleRepositoryStyleRepository\\StyleStyle\\BasicStyle1BasicStyle1\\BasicStyle1.OMDBasicStyle1.OMD
4. Click FinishFinish – and answer YesYes – to the "do you want to proceed" prompt.
View Notes Page View Notes Page – to learn what gets constructed from this wizard

37
Workshop Workshop –– New Application New Application –– Application Architect ViewApplication Architect View
Application Architect View of new applicationApplication Architect View of new applicationNote the following:
Menu bar – Context independentToolbar – Context sensitiveTabs – Context sensitiveNav bar (Project Navigation bar) – expandable icons – also context sensitive
Menu barMenu barToolbarToolbar
Nav bar
TabsTabs
38
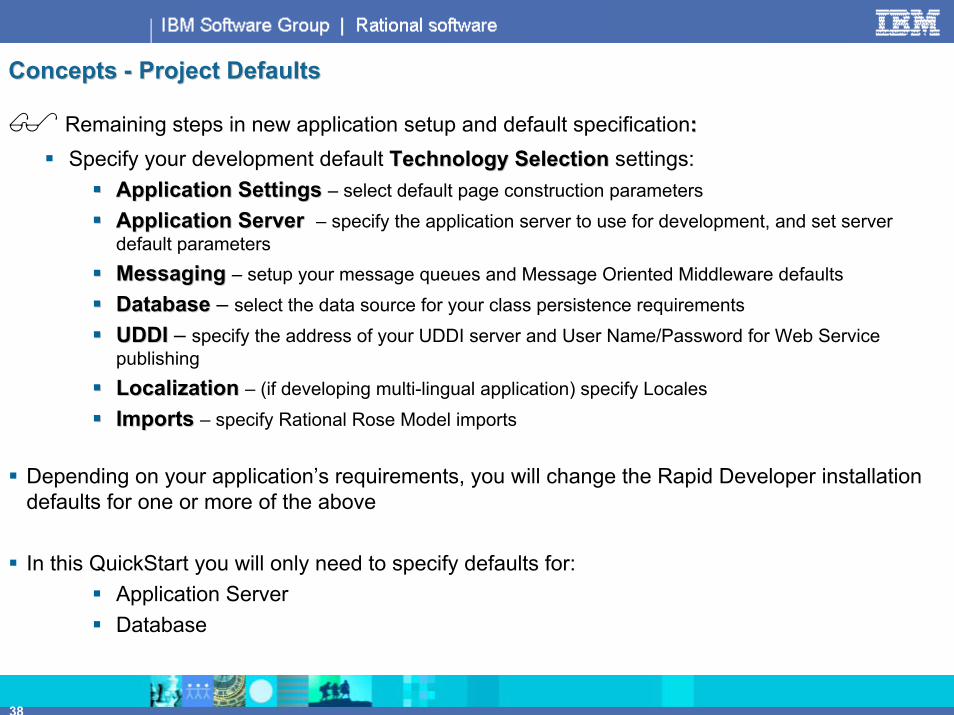
Concepts Concepts -- Project DefaultsProject Defaults
Remaining steps in new application setup and default specification::Specify your development default Technology SelectionTechnology Selection settings:
Application Settings Application Settings – select default page construction parameters
Application Server Application Server – specify the application server to use for development, and set server default parameters
MessagingMessaging – setup your message queues and Message Oriented Middleware defaults
DatabaseDatabase – select the data source for your class persistence requirements
UDDIUDDI – specify the address of your UDDI server and User Name/Password for Web Service publishing
LocalizationLocalization – (if developing multi-lingual application) specify Locales
ImportsImports – specify Rational Rose Model imports
Depending on your application’s requirements, you will change the Rapid Developer installation defaults for one or more of the above
In this QuickStart you will only need to specify defaults for:Application ServerDatabase

39
Workshop Workshop – Specify/Verify Project Defaults – Application Settings tabApplication Settings tabFrom Application Architect, pull down the: Application Application menu and select Selections…Selections…
On the Application SettingsApplication Settings tab, you may over-ride product installation defaults for:
Deprecated APIs Deprecated APIs – for backward compatibility with existing applications being migratedConstruct style sheetConstruct style sheet – Construct a cascading stylesheetEncode Unicode Encode Unicode – Encode strings for JSPs – applies to certain application servers (Oracle9 V.1)
For QuickStart: Verify that: NS4 and up compatible - is selected

40
Concepts Concepts –– Partition Models Partition Models –– Introduction
Rapid Developer allows system architects to customize the constructed Java architecture for a given application. You may create different models, of two types:
Simple – typically used for your initial development (your Local Model). This model's construction pattern(s) are often 2-tier applications (Servlet-only).
Advanced – your integration, Q.A. or production deployment architecture and their customized construction patterns. You can learn more about the Advanced options in the Development Techniques course – which is available from IBM Rational Software Group Education Services.
Note: Leave LocalModel as Simple - for this QuickStart application

41
Concepts Concepts -- Application ServersApplication Servers
Rapid Developer works with many application servers, including: Apache TomcatApache TomcatOracle9iasOracle9iasWebSphereWebSphereBEA WebLogicBEA WebLogicMicrosoft DNAMicrosoft DNAOthersOthers……
In the next section we describe how to set up each application server.
You will most likely only need to set up one of the supported servers, after which you may jump ahead to setup your database.
To expedite your work with the course, setup one Application Server (as described on the next slide(s) then specify the properties for your project database.

42
Workshop Workshop - Application Server Properties – TomcatTomcat
Select Technology Settings, in the Nav Bar. From the Application Server tab you will specify defaults for the construction to the application server you are using to develop the project.
NoteNote: Be sure to check the default Properties…Properties… for Tomcat – and don't forget to specify the Tomcat installation directory, your Java JDK and compiler. Leave Enterprise JavaBeans (EJB) with servlets – checked, as the default.

43
Workshop Workshop - Application Server Properties – Tomcat DetailsTomcat Details
Select the Application Server tab. From this tab you will specify defaults for the construction to the application server you are using to develop the project.
To construct pages that run under the Apache Tomcat server1. Click: Enterprise JavaBeans (EJB) with servletsEnterprise JavaBeans (EJB) with servlets2. From the dropdown list box, select: Tomcat 4.0Tomcat 4.03. Click: PropertiesProperties……
Ensure that the details of your Tomcat server are correct:Install default Http server Port: 8080
4. Within Compile and deployment settings, specify your: App server installation directoryJava JDK home directoryJava compiler
Note that it is important to NOT install yourTomcat Server as a Windows Service –as this may conflict with the Rapid DeveloperConstruction/Deployment scripts.
Note: Once you have specified Tomcat as your Application Server, you may skip ahead in this course
to the slide titled: Database Setup Database Setup -- MSMS--AccessAccess
Note: Be sure to select the proper App server
Installation Drive – ( D: - C: … ) as well as theproper drive/directories for the Java JDK and compiler

44
Workshop Workshop - Application Server Properties – Oracle9iASOracle9iAS
To construct pages that run under the EJB Server Oracle9iASOracle9iAS:1. Click: Enterprise JavaBeans (EJB) with servletsEnterprise JavaBeans (EJB) with servlets2. From the dropdown list box, select: Oracle9iAS 1.0.2.2 Oracle9iAS 1.0.2.2 (or Oracle9i AS 9.0.2.00)3. Click: PropertiesProperties……
Ensure that the details of your Oracle9ias server are correct:
Install default Http server Port: 88884. Within Compile and deployment settings, specify your:
App server installation directoryJava JDK home directoryJava compiler
Note: Be sure to select the
proper App server installationDrive – ( D: - C: … ) as well as theproper directories.
Note: Once you have specified Oracle9iAS as your Application Server,
you may skip ahead in this course to the slide titled: Database Setup Database Setup -- MSMS--AccessAccess

45
Workshop Workshop - Application Server Properties – WebSphereWebSphere
WebSphere:To construct pages that run under IBM WebSphereIBM WebSphere:
1. Click: Enterprise JavaBeans (EJB) with servletsEnterprise JavaBeans (EJB) with servlets2. From the dropdown list box, select: IBM WebSphere 4.0, 3.5, or 5.0 IBM WebSphere 4.0, 3.5, or 5.0 (View Notes Page)3. Click: PropertiesProperties……
Ensure that the details of your WebSphere server are correct:
Install default Http server Port: 908090804. Within Compile and deployment settings, specify your:
App server installation directoryJava JDK home directory
Note: Be sure to select the
proper App server installationDrive – ( D: - C: … ) as well as the
proper directories.
Note: Once you have specified WebSphere as your Application Server,
you may skip ahead in this course to the slide titled: Database Setup Database Setup -- MSMS--AccessAccessJava compiler

46
Workshop Workshop - Application Server Properties – BEA WebLogic BEA WebLogic –– Version 6.1Version 6.1
To construct pages that run under BEA WebLogicBEA WebLogic:1. Click: Enterprise JavaBeans (EJB) with servletsEnterprise JavaBeans (EJB) with servlets2. From the dropdown list box, select: BEA WebLogicBEA WebLogic3. Click: PropertiesProperties……
Ensure that the details of your WebLogic server are correct:Install default Http server Port: 70017001
4. Within Compile and deployment settings, specify your: App server installation directoryJava JDK home directoryJava compiler
Note: Be sure to select the
proper App server installationDrive – ( D: - C: … ) as well as the
proper directories.
Notes: Once you have specified WebLogic as your
Application Server, you may skip ahead in this course to the slide titled: Database Database
Setup Setup -- MSMS--AccessAccess

47
Workshop Workshop - Application Server Properties – BEA WebLogic BEA WebLogic –– Version 7.0Version 7.0
To construct pages that run under BEA WebLogicBEA WebLogic:1. Click: Enterprise JavaBeans (EJB) with servletsEnterprise JavaBeans (EJB) with servlets2. From the dropdown list box, select: BEA WebLogicBEA WebLogic3. Click: PropertiesProperties……
Ensure that the details of your WebLogic server are correct:Install default Http server Port: 7001 and 8 character Password7001 and 8 character Password
4. Within Compile and deployment settings, specify your: App server installation directoryJava JDK home directoryJava compiler
Notes: View Notes Page…View Notes Page…
Once you have specified WebLogic as your Application Server, you may skip ahead in
this course to the slide titled: Database Database Setup Setup -- MSMS--AccessAccess

48
Workshop Workshop - Application Server Properties – Microsoft DNAMicrosoft DNA
Select the Application Server tab. From this tab you will specify defaults for the construction to the application server you are using to develop the project.
Microsoft DNA, Java COMTo construct pages that run under the Java/MTS/COM environment:
Click: Microsoft DNA, Java ComMicrosoft DNA, Java ComClick: DebugDebug
Note: Once you have specified Microsoft DNA as your Application Server, you may skip
ahead in this course to the slide titled: Database Setup Database Setup -- MSMS--AccessAccess

49
Workshop Workshop - Database Properties – MSMS--AccessAccessSteps…
1. Open 1. Open thethe Database typeDatabase type dropdown listbox, and select your DBMS select your DBMS (defaults to Microsoft Access)
2. Specify the ODBC data source name2. Specify the ODBC data source name configured for your data access, and any other properties (these settings are database and JDBC connection-dependent)
Click Test Persistence Connection to verify your settings
Save your Application
Specifications to select a single MS-Access Database for object
persistence
Note Do notnot modify the Descriptor Name(View Notes Page for details)

50
Summary – Section C Section C –– Single User Project Defaults Single User Project Defaults – Review of Steps
Create New ProjectCreate New Project
Specify TechnologySpecify TechnologyDefaultsDefaults
Application ServerApplication ServerDatabaseDatabase
(Select DSN)
Name and Save ProjectName and Save ProjectSelect Style ApplicationSelect Style Application
Application DefaultsApplication DefaultsNS4
Other defaults…Other defaults…(Messaging, etc.)

51
Summary – Single-User Project Setup - Review
In this section you have learned:About the NeuCommerce application and what you will be creating as part of this QuickStart projectAbout the Rapid Developer development process, steps and the order in which they proceedHow to setup a standalone application folder-setHow to specify Application defaultsHow to select different application server and database technologies for your projects
In the next section – Business Object Modeling - you will:Create your first Rapid Developer Class ModelImport a UML extract fileCreate a custom ClassIntegrate the UML model with your custom ClassConstruct Database Persistence
The next slide (Business Object Modeling column) describes the Rapid Developer facilities we will be covering in the next section

52
Summary - Rapid Developer Software Rapid Developer Software -- Development StepsDevelopment Steps-- ConceptsConcepts
Import (UML, DBMS)
Construct DBMS
Class Architect
Sample Data
Page Architect
Site Architect
Construction
Message Architect
Technology
Object Space
Business Object Modeling Messaging and IntegrationUser Interface Modeling
Web Services
Technology and Construction
Business Logic

535353
Section D – Import and the Refine Class ModelImport and the Refine Class Model
After you finish this section, you will be able to:After you finish this section, you will be able to:Describe the steps and options for model importImport an XMI-exported model from a UML Class Diagram, created using Rational RoseRefine (elaborate) the imported model:
Add a new Class and specify its:- Name- Attributes- Sample data generation properties and values – to populate the attributes with
imported and generated sample rows in the databaseDraw an aggregate relationship from one class to another
For each class in your model:Construct the persistence for the Class ModelConstruct the sample data rows, for application unit testingView these rows in the Data Entry tab

54
ConceptsConcepts - Create the Business Object Model
Business Object Modeling is an iterative process that consists of analysis, design, construction andvalidation – eventually producing an application that meets user requirements and service level agreements
There are many levels of depth across many different models, in the creation of a complete Business Model for your application.
We cannot cover the depth and breadth of all Rapid Developer Business Object Modeling in this QuickStart. Other courses are available from NeuUniversity that do.
At this point, you should understand that the Business Model is composed minimally of:
1. Class modelYour business objects, their properties and relationships
2. Database modelThe construction of a Class model to database tables, primary/foreign keys and indices
3. Site modelThe layout or design of each individual web-site required by your application (pages and page navigation)
4. Page modelThe actual pages themselves
5. Logic modelThe methods, Messages, Components and Web Services that realize the business application's functionality
Now that you have setup your project and specified its custom development properties we will proceed to creating the Class model. To do this, you will import an XMI export file, and then extend the model by creating a Class from scratch and integrating with the imported classes.

55
Concepts Concepts -- Creating Class Models Creating Class Models – Options
You can create a Class by Importing a model into your Rapid Developer application. There are four different types of Business Model imports that are supported:
1.1. Rational Rose Class ModelsRational Rose Class Models – modelname.mdlmodelname.mdl
Which you can Import and synchronize
2.2. Create classes “from scratch”Create classes “from scratch”Rapid Developer contains a powerful and yet relatively simple GUI for creating class models, and elaborating their details.
3.3. Other UML Class ModelsOther UML Class Models using XMI files (Erwin, Rose, etc.)In this QuickStart, we have exported a Rational Rose UML model to an XMI file. You will import the XMI file into your project.
4. Existing (legacy) file and database models Existing (legacy) file and database models -- including- Client/Server Databases (Oracle, Sybase, Informix, MS-Access, etc.)- Mainframe relational and non-relational databases and files:
- DB2. - IMS/DB. - VSAM/QSAM- Using Information Builders iWayiWay software to import from over 200+ data source types
No matter which import source you use, the process is the same:From within Rapid Developer - use the ImportImport facility to transfer the model metadata to your Application. The external metadata is transformed into valid Class model(s) – which you can view, customize and extend in the Class Architect, according to the requirements of your application

56
The Big Picture The Big Picture -- StepsSteps
1. Software Installation and Configuration
2. Single User Project Setup
3. Import and Refine the Class Model 3. Import and Refine the Class Model
4. User Interface and Site Modeling
5. Page and Logic Modeling
6. Application Integration
7. Application Maintenance and Enhancement

57
Steps Steps -- Business Object ModelingBusiness Object Modeling
2. Elaborate Class Model2. Elaborate Class ModelEnhance/Refine attribute definitionsEnhance/Refine attribute definitionsSpecify Sample DataSpecify Sample Data
1. Import Business Objects1. Import Business ObjectsRose Model, Legacy DBMS Tables, Rose Model, Legacy DBMS Tables, … or create classes “from scratch”… or create classes “from scratch”
3. Construct Object Persistence3. Construct Object PersistenceResolve schema conflictsResolve schema conflictsConstruct tables Construct tables Construct Sample DataConstruct Sample DataReview and refine Sample DataReview and refine Sample Data

58
Workshop Workshop -- Import an XML ModelImport an XML Model
1. Open the ToolsTools menumenu, and select:Import UML ClassModel(XMI)…Import UML ClassModel(XMI)…
2. Browse to the file QuickStart.xml QuickStart.xml found in the folder:
…\RDEV\Models\QuickStart\
3. Click: OpenOpen
4. This will import the model. Click OKOK to complete this process.
Viewlet of model import and default settingsViewlet of model import and default settings
59
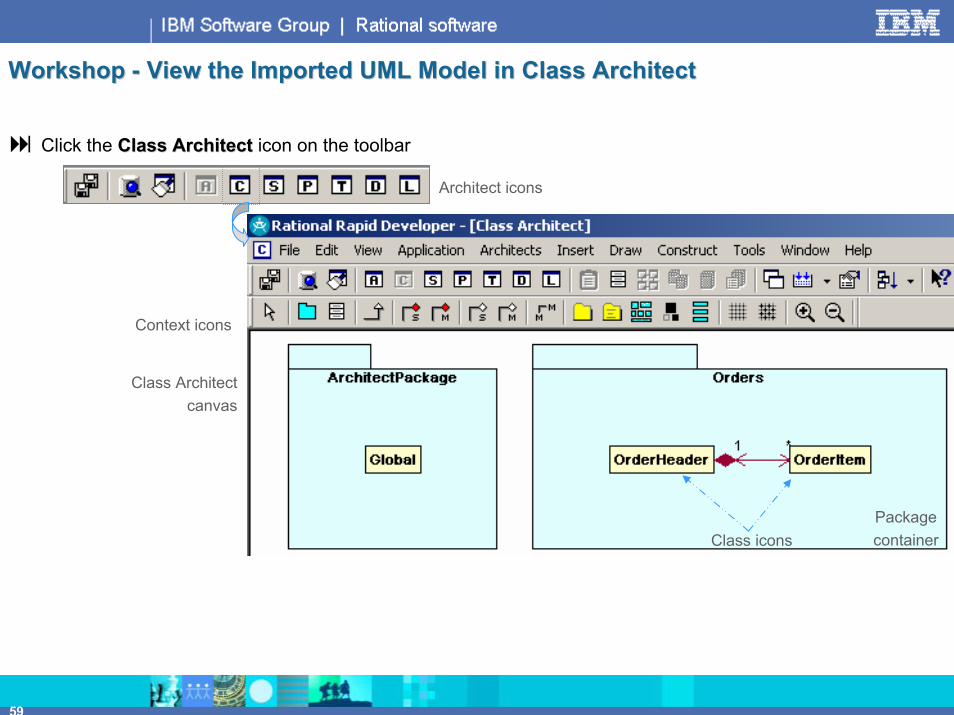
Workshop Workshop -- View the Imported UML Model in Class ArchitectView the Imported UML Model in Class Architect
Click the Class ArchitectClass Architect icon on the toolbar
PackagecontainerClass icons
Architect icons
Context icons
Class Architectcanvas
60
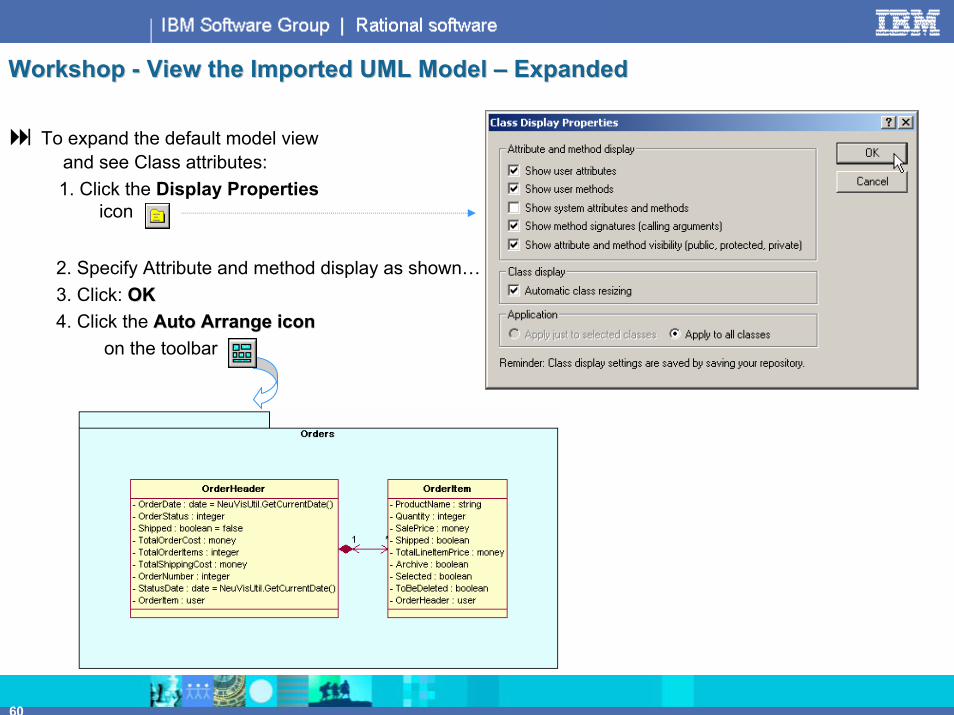
Workshop Workshop -- View the Imported UML Model View the Imported UML Model –– ExpandedExpanded
To expand the default model view and see Class attributes:1. Click the Display Properties
icon
2. Specify Attribute and method display as shown…3. Click: OKOK4. Click the Auto Arrange icon Auto Arrange icon
on the toolbar

61
To view or change the details of your Class definitions:
1.1. DoubleDouble--Click theClick the OrderHeaderOrderHeader class iconclass icon- View the Class tab details- Specify Number of sample rows: 8888
-- Click CloseClick Closeand return to the Class Architect
2.2. DoubleDouble--Click theClick the OrderItemOrderItem class iconclass icon- From the Class tab, specify Number of sample rows: 444444- Click Close and return to the Class Architect
Workshop Workshop -- View and Set Class PropertiesView and Set Class Properties

62
Workshop Workshop -- Create a New ClassCreate a New Class
There are many aspects to Class Modeling that you can learn about in follow-on courses. In this QuickStart, you will: 1. Create a new class, 2. Add attributes and customize the class’s properties and, 3. Draw a Relationship between your new class and the Imported classes.
To create a new class:1. Click the1. Click the Insert ClassInsert Class icon on the toolbar
2. Click anywhere in the Orders package2. Click anywhere in the Orders package container- This will create a new class in the Orders Package
3.3. Double-Clickover the new class to access and customize its properties
Viewlet of create new class and set add attributesViewlet of create new class and set add attributes

63
Workshop Workshop -- Customize the Class Properties and SettingsCustomize the Class Properties and Settings
By Double-Clicking the new class icon (previous slide) you should see the Class PropertiesClass Properties tab – where you can change the Class’s default properties.
1.1. Name your new class: BuyerBuyer(upper-case B)
2.2. Specify the Number of sample rows: 1212

64
Steps Steps -- Add Class AttributesAdd Class Attributes
Click the AttributesAttributes tab
To add a new attribute:Click NewNewSpecify: Attribute nameAttribute nameSpecify: Attribute’s
-- DatatypeDatatype-- SizeSize

65
Save your Project…Workshop Workshop -- Add Class AttributesAdd Class Attributes
Finished Buyer attribute list
Add the following attributes:Name: BuyerNameBuyerNameDatatype: Text /Text / 3333 characterscharacters
Name: DescriptionDescriptionDatatype: Text /Text / 144144 characterscharacters
Name: AddressAddressDatatype: Text /Text / 2222 characterscharacters
Name: CityCityDatatype: Text /Text / 2222 characterscharacters
Name: StateStateDatatype: Text /Text / 22 characterscharacters
Name: ZipZip(upper-case ZZ, lower-case ipip)Datatype: Text /Text / 55 characterscharacters
Note: Spelling (including capitalization) counts

66
1. In the Attribute list, select the attribute, then click the Sample Data sub-tab2. UnUncheck Append numeric suffixes to values3. Click Edit value set 4. Click Import5. Select the Sample Data file you wish to use6. Answer NONO to the prompt: "Do you want to append the imported data to the current value set"?
StepsSteps -- Import Sample Data Text ValuesImport Sample Data Text Values
View Notes Page…

67
WorkshopWorkshop -- Import Sample Data Values for Text AttributesImport Sample Data Values for Text Attributes
1.1. Using the six steps described in the previous slide, customize the BuyerBuyer class’s sample data:Attribute: BuyerNameBuyerName
Import file: CorpNames.csv
Attribute: DescriptionDescriptionImport file: CorpDescription.csv
Attribute: AddressAddressImport file: Address.csv
Attribute: CityCityImport file: City.csv
Attribute: StateStateImport file: USStates.csv
Attribute: ZipZipImport file: Zips.csv
2.2. Close the Buyer class,and then customize the OrderItemOrderItem class’s sample data:Attribute: ProductNameProductName
Import file: ProductNames.csv
Note: (for each attribute) don't forget to:
UnUncheck Append numeric suffixes to values
When you are finished importing both
classes' sample data Save your Project

68
Workshop Workshop -- Customize Numeric/Date Sample DataCustomize Numeric/Date Sample Data
Besides adding explicit values for text attributes, you may specify Sample Data ranges for numeric and Date/DateTime data types, over-riding the product defaults.
(From Class Architect) DoubleDouble--Click Click the OrderHeader Class Class icon. ClickClick the AttributesAttributes tab and the Sample DataSample Data sub-tab. Specify the following custom Sample Data ranges and values for OrderHeader:
Attribute: OrderDateOrderDateStart: 01/01/200301/01/2003End: 01/01/200401/01/2004
Attribute: OrderStatusOrderStatusStart: 11End: 44
Attribute: TotalOrderCostTotalOrderCostStart: 10001000End: 1000010000
Attribute: TotalShippingCostTotalShippingCostStart: 1010End: 100100
Attribute: OrderNumberOrderNumberStart: 11End: 8888
Sequentially choose from value set/rangeWhen you are finished specifying the OrderHeader sample data, click Close to return to the Class Architect

69
Workshop Workshop -- Add a Class RelationshipAdd a Class Relationship
In our business model, one BuyerBuyer can make many purchases (recorded as OrderHeadersOrderHeaders and associated OrderItemsOrderItems). We need to specify this as a Multi-Own relationship in the Class model.
Steps…1.1. Click Click the MultiMulti--Own relationshipOwn relationship icon on the toolbar
2.2. LeftLeft--clickclick from the middle of the Buyer class and drag the relationship arrow into the middle of the drag the relationship arrow into the middle of the OrderHeader Class icon … releaseOrderHeader Class icon … release
Save your Project…
Viewlet of create relationship/construct persistenceViewlet of create relationship/construct persistence
70
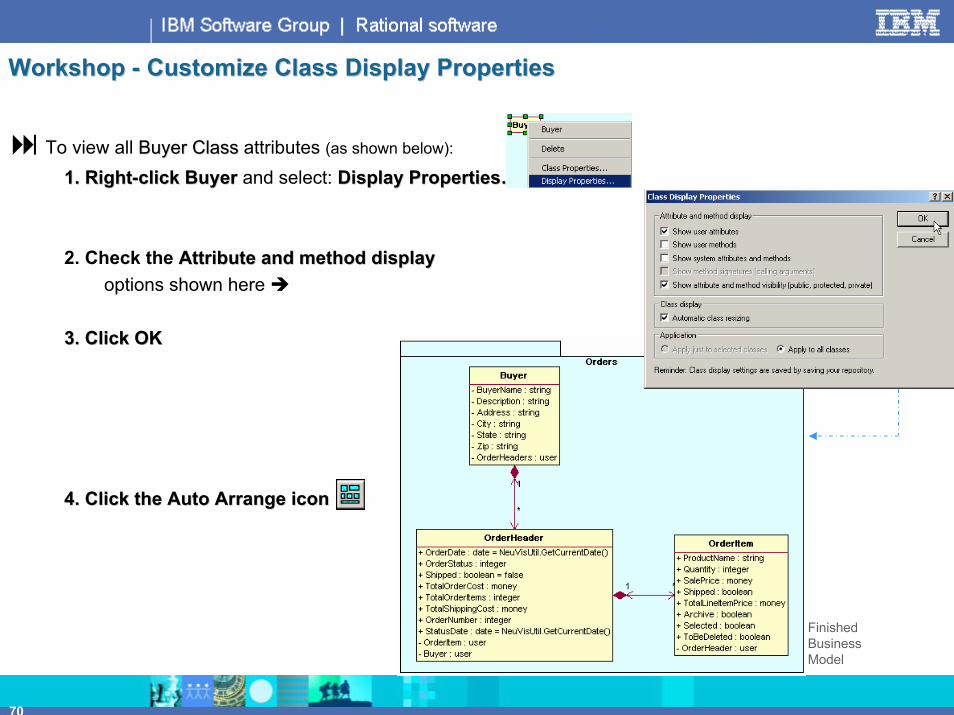
Workshop Workshop -- Customize Class Display PropertiesCustomize Class Display Properties
To view all Buyer ClassBuyer Class attributes (as shown below):
1. Right1. Right--click Buyerclick Buyer and select: Display Properties…Display Properties…
2. Check the Attribute and method display Attribute and method display options shown here
3. Click OK3. Click OK
4. Click the Auto Arrange icon4. Click the Auto Arrange icon
Finished Business Model
71
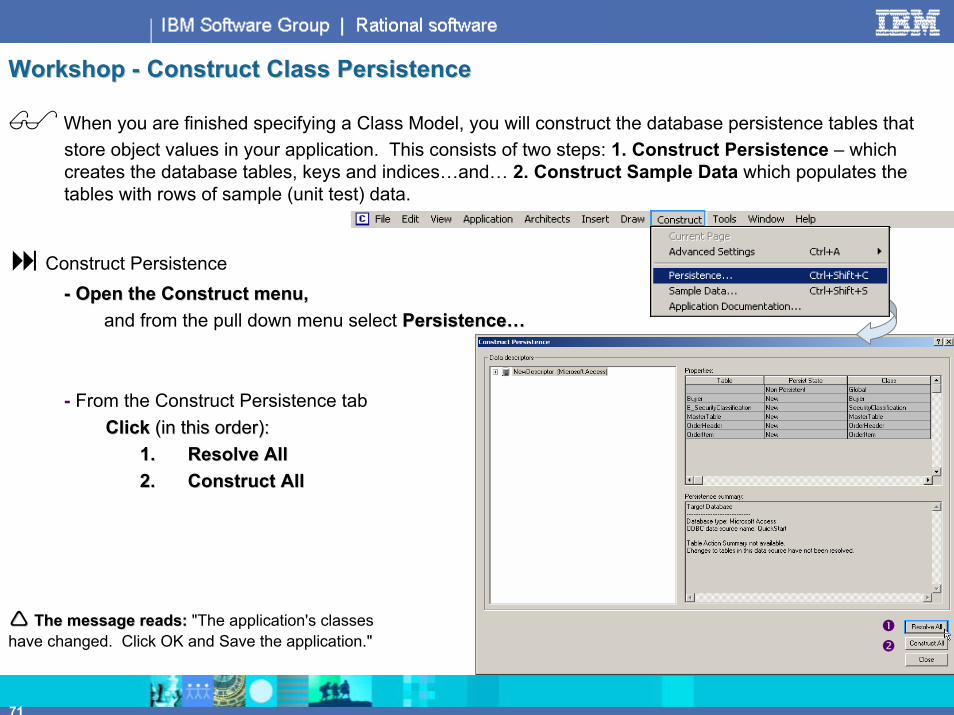
Workshop Workshop -- Construct Class PersistenceConstruct Class Persistence
When you are finished specifying a Class Model, you will construct the database persistence tables that store object values in your application. This consists of two steps: 1. Construct Persistence – which creates the database tables, keys and indices…and… 2. Construct Sample Data which populates the tables with rows of sample (unit test) data.
Construct Persistence-- Open the Construct menu,Open the Construct menu,
and from the pull down menu select Persistence…Persistence…
- From the Construct Persistence tabClick Click (in this order):(in this order):
1.1. Resolve AllResolve All2.2. Construct AllConstruct All
The message reads: The message reads: "The application's classes have changed. Click OK and Save the application."

72
Workshop Workshop -- Construct Sample DataConstruct Sample Data
Construct Persistence creates empty database tables, primary/foreign keys and default indices based on the specification of your Class model. In order to test your pages, you will want live data in the tables. Use Sample Data to generate table rows and values:
Construct Sample DataConstruct Sample Data1. Open 1. Open the Construct menu,Construct menu,
and from the pull down menu select Sample Data…Sample Data…
2. 2. From the Construct Sample Data tab- Click Construct
Save your Project…View Notes Page – to learn what is constructed for database persistence

73
Workshop Workshop –– View and/or Modify Test Data View and/or Modify Test Data (Data Entry tab)
Constructing Sample Data will populate your database tables with unit test data – according to the Sample Data specifications for your Attributes. To view this data, and/or refine individual test data rows use the Data EntryData Entry tab:
Return to Application Architect Application Architect and navigate to the Data Entry tab, by:Data Entry tab, by:1. Expand Orders, and select (click) the BuyerBuyer Class iconClass icon in the Class Navigation bar2.2. ClickClick the Data EntryData Entry tab
From the Data Entry tab, you may:- Modify row values- Delete rows- Insert rows- View parent/child row aggregates
by selecting different rows in the top pane
ClassNavigation Bar

74
Summary – Section D Section D –– Import and Refine Class ModelImport and Refine Class Model– Review of Steps – 1 of 2
Construct PersistenceConstruct Persistence
Create New Class…Create New Class…(next slide)
Elaborate Class ModelElaborate Class Model
Construct Construct Sample DataSample Data
Specify Number ofSpecify Number ofSample Data RowsSample Data Rows
Import Class ModelImport Class Model
CustomizeCustomizeSample Data ValuesSample Data Values

75
Summary – Section D Section D –– Import and Refine Class ModelImport and Refine Class Model– Review of Steps – 2 of 2
Create New ClassCreate New Class
SpecifySpecifyAttributesAttributes
Specify Number ofSpecify Number ofSample Data RowsSample Data Rows
Specify ClassSpecify ClassRelationshipRelationship
AttributeAttributeName & TypeName & Type
CustomizeCustomizeSample Data ValuesSample Data Values

76
Import and Refine Class ModelImport and Refine Class Model– Feature Summary - ReviewReview
In this section you have learned:About Class Modeling – to a small extent. Much more on this topic is covered in subsequent Rational Rapid Developer learning contentHow to Import an XMI fileHow to create a new ClassHow to modify Class propertiesHow to add Attributes, and customize their:
DatatypeSizeSample Data defaults
How to construct Persistence and Sample Data for your classes
In the next section – User Interface Modeling - you will:Import a Style Model – to customize an application's G.U.I. defaultsCreate a Site Model – to storyboard the application
The next slide (User Interface Modeling column) describes the Rapid Developer facilities we will be covering in the next section

77
Summary - Rapid Developer Software – Development Steps
Import (UML, DBMS)
Construct DBMS
Class Architect
Sample Data
Page Architect
Site Architect
Construction
Message Architect
Technology
Object Space
Business Object Modeling Messaging and IntegrationUser Interface Modeling
Web Services
Technology and Construction
Business Logic

787878
Section E – User Interface and Site ModelingUser Interface and Site ModelingAfter you finish this section, you will be able to:After you finish this section, you will be able to:
Import a Style Repository for your application, which contains predefined:Colors and font selections (Themes)Controls and different control stylesTemplate page styles
Define a Site Model for your application – which is a storyboard of the user's page-navigation experience and contains:
Pages – to be designed in detail later on the projectPage links – which show expected page navigation
Define specific page properties, including:NamePrimary classData accessPage style (select a page template)

79
The Big Picture The Big Picture -- StepsSteps
1. Software Installation and Configuration
2. Single User Project Setup
3. Import and Refine Class Model
4. User Interface and Site Modeling 4. User Interface and Site Modeling
5. Page and Logic Modeling
6. Application Integration
7. Application Maintenance and Enhancement

80
Steps Steps -- User Interface and Site ModelingUser Interface and Site Modeling
1. Create or Select a Custom Style Application 1. Create or Select a Custom Style Application Specify graphical "Themes"Specify graphical "Themes"Specify initial control definitions and propertiesSpecify initial control definitions and propertiesCreate Template pagesCreate Template pages
Note that for QuickStart Note that for QuickStart –– we have already imported an existing Style Applicationwe have already imported an existing Style Application
2. Create the Site Model2. Create the Site ModelDesign the SiteDesign the SiteCreate new pagesCreate new pagesSpecify initial Page PropertiesSpecify initial Page PropertiesStoryboard the SiteStoryboard the Site

81
Workshop Workshop -- Site Architect Site Architect –– Create New PageCreate New Page
Application-level Site Design is accomplished using the Site Architect, which allows you to: View the entire site and user navigation, Create new pages, Customize Page Properties, Design Page Links, Print/Document your Site and Preview pages once they have been constructed.
Navigate to the Site Architect:Click the Site Architect icon on the toolbarClick the Site Architect icon on the toolbar
From the Site Architect, create a new Page:1. Click 1. Click the Create New Page Create New Page icon2. Place the page 2. Place the page (click) in the canvasin the canvas
Site Architect
82
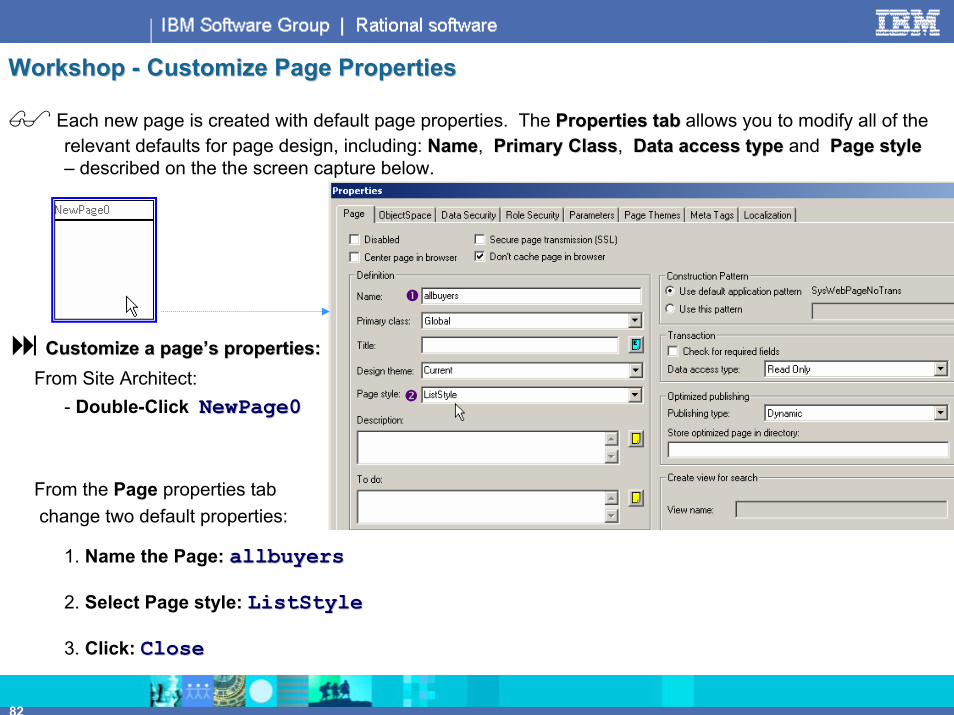
Workshop Workshop -- Customize Page PropertiesCustomize Page Properties
Each new page is created with default page properties. The Properties tabProperties tab allows you to modify all of the relevant defaults for page design, including: NameName, Primary ClassPrimary Class, Data access typeData access type and Page stylePage style– described on the the screen capture below.
Customize a page’s properties:Customize a page’s properties:From Site Architect:
- Double-Click NewPage0NewPage0
From the Page properties tabchange two default properties:
1. Name the Page: allbuyersallbuyers
2. Select Page style: ListStyleListStyle
3. Click: CloseClose

83
Workshop 1 of 2 Workshop 1 of 2 -- Create Site Model Create Site Model - Layout
Using the Screen Capture and Page specifications on the next slide create the following Site Map for your application:
Site Architect Site ModelNew pages added
See next slide for detailedPage Specifications
NoteNote::Thumbnail Sketches will
appear after you complete the Site Model and Save
the Application.
View Notes PageView Notes Page –To learn what is
constructed upon Save of your Site Model

84
Workshop 2 of 2 Workshop 2 of 2 -- Create Site Model Create Site Model – Detailed Page Specifications
Use the screen capture on the previous page, and the page specifications below as requirements to create the following Site Model for your application. StepsSteps (From the Site Architect):
1.1. Add each Page to the Site ModelAdd each Page to the Site Model2.2. DoubleDouble--Click each PageClick each Page3. From the Properties tab, specify: NameName, Primary ClassPrimary Class, Data access typeData access type and Page StylePage Style
Page Name Primary Class Data access type Page Styleindex Global No Data AccessNo Data Access DetailStyleallbuyers Global Read Only ListStyleallorders Global Read Only ListStyleordersearchresults Global Read Only ListStyle
buyerdetail Buyer Read Only DetailStylebuyerupdate Buyer Full DetailStylenewbuyer Buyer Enter Only DetailStyle
orderdetail OrderHeader Read Only DetailStyleneworder OrderHeader Enter Only DetailStyleordersearch OrderHeader SearchSearch DetailStyleorderupdate OrderHeader Full DetailStyle
orderitemdetail OrderItem Read Only DetailStyleorderitemupdate OrderItem Full DetailStyle
Note: When you change a Primary class a message box displays.
Click OK

85
Workshop Workshop -- Site Model Site Model –– Linking pagesLinking pagesThe Site Architect allows you to design Page Links that help you follow the User’s navigation within your site:
- There are many different types of Page Links available.
- For the purposes of the QuickStart, you will use two types of links:
-- Menu LinksMenu Links – which designate that a link will be created using a Page menu item specification
-- Process LinksProcess Links – which designate that a page is to be linked to using either a:- Method redirect- Direct Page Link from a field value (dynamically constructed URL with page parameters)
- To create a page link:
1.1. Select the Page linkSelect the Page link typetype from the Site Architect toolbar
2.2. Click in the middle of the Click in the middle of the LinkedLinked--from Pagefrom Page
3.3. Drag the link arrow to the middle of the Drag the link arrow to the middle of the LinkLink--to Pageto Page and releaserelease
Workshop:Workshop: On the next slide you will see the completed SiteMap with all pages and Page Links. Connect the index page to its child pages with Menu linksMenu links. Connect the remaining pages with Process linksProcess links as shown.
Menu and Process links
Save your Project…

86
Connect the index page to its child pages with Menu linksMenu links. Connect the remaining pages with Process linksProcess links.
The "thumbnail images" shown above will display once you've completed your work, and saved your project Save your Project…
Note: To "bend" a Note: To "bend" a link, select its green link, select its green focus box and drag focus box and drag with your mouse.with your mouse.
Site Model Site Model –– CompleteCompleteWhen you are finished your Site Model should look (approximately) like this

87
Optional WorkshopOptional Workshop -- Site Model Site Model –– Additional FeaturesAdditional FeaturesIf time remains during this workshop, feel free to experiment with the following Site Model features:
1.1. Save your Site Image as a 24-bit .JPG filein the QuickStart directory
After you've saved it, open it
2. Select two or more images and experimentwith the Align options.
3. Zoom in…Zoom out
Optional: Optional: Save Site Image at different zoom levels. Open the saved files to see how they differ.

88
Summary – Section E Section E –– User Interface Modeling User Interface Modeling – Review of Steps
Create DesignCreate Design--TimeTimePage LinksPage Links
Create Site MapCreate Site Map
Specify InitialSpecify InitialPage PropertiesPage Properties
Create Create New PagesNew Pages

89
User Interface and Site Modeling – Feature Summary - ReviewReview
In this section you have learned:About User Interface (Style) Modeling – to a small extent – and Web Site Modeling (storyboarding an application). Much more on these topics is covered in subsequent Rational Rapid Developer learning contentHow to import a Style RepositoryHow to create a SiteMapHow to create new pages from a SiteMap, and customize their:
NamePrimary ClassData Access typePage Style (template)
How to design Page Links that storyboard your web-site, and describe the user's navigational experience
In the next section – User Interface Modeling - you will:Create pages – of virtually every "type" and styleCreate business logic called from pagesUnderstand the Rapid Developer ObjectSpace concept

909090
Section C – Page ModelingSection F – Page and Logic ModelingPage and Logic Modeling
After you finish this section, you will be able to:After you finish this section, you will be able to:Access Page Architect and using the features and facilities of Page Architect, design, construct and preview the following common page styles:
List pageDetail pageUpdate formInsert formIndex pageSearch pagePages with nested (embedded) controlsPages that call custom business methods and perform database update operations
Add hyper-links among pagesCreate pages using either pre-defined style templates or custom controlsUse the Method editor and Code Templates to create simple business methods in a parameter-driven processAdd Business Rules to attributes for over-riding initial values and providing consistent server-side validations

91
The Big Picture The Big Picture -- StepsSteps
1. Software Installation and Configuration
2. Single User Project Setup
3. Import and Refine Class Model
4. User Interface and Site Modeling
5. Page and Logic Modeling5. Page and Logic Modeling
6. Application Integration
7. Application Maintenance and Enhancement

92
Workshop Workshop –– From Site Architect …to… Page ArchitectFrom Site Architect …to… Page Architect
The Site Architect is used to design the overall Web Site and Page navigation. To design, create and test individual pages, you will use the Page Architect.
Page Architect is a sophisticated Rapid Developer facility, that has hundreds of options, giving you both broad and deep coverage of your application requirements.
In the QuickStart you will build the pages designed in your Site Model, which will cover around, 30% of the functionality of Page Architect. Subsequent classes cover Page Architect in much greater depth.
To access the Page Architect from Site ArchitectRightRight-Click Click over allbuyersallbuyers and select EditEdit
Right-Click (context) menu…Select EditEdit
93
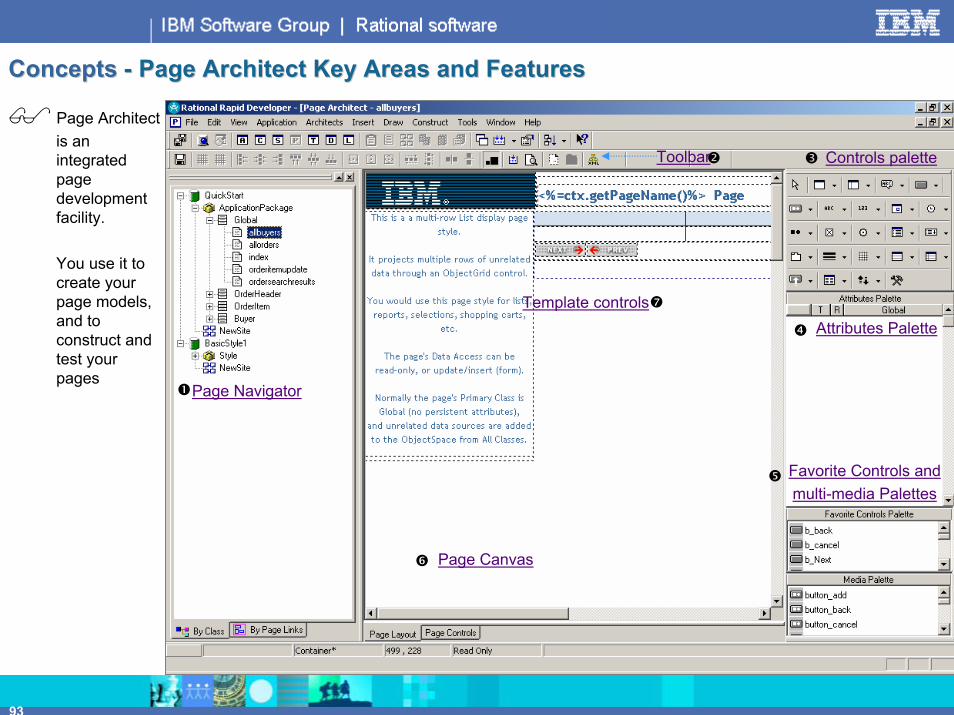
ConceptsConcepts -- Page ArchitectPage Architect Key Areas and FeaturesKey Areas and Features
Page Navigator
Toolbar Controls palette
Attributes Palette
Favorite Controls and multi-media Palettes
Page Canvas
Template controls
Page Architect is an integrated page development facility.
You use it to create your page models, and to construct and test your pages

94
Workshop Workshop - Page Architect – Set Page Development Option Set Page Development Option (Snap to Parent)
Before beginning your first page, you may wish to modify the installation defaults for Page Architect
From within Page Architect, inside the top menu, pull down: Tools, Page Options…
Check: Check: Snap to parent – then click OK OK to return to Page Architect

95
ConceptsConcepts -- Your First Page Your First Page – Display All BuyersFor your first page, you will create the read/only list page shown below – that is used to display all Buyer data. There are a number of controls on this page. Can you find them? (View Notes Page for answer)
allbuyers PageRunning under Tomcat
Create allbuyers Viewlet (complete)Create allbuyers Viewlet (complete)

96
Steps Steps -- Page Modeling Process for a List Page Built Using a Page Style Page Modeling Process for a List Page Built Using a Page Style TemplateTemplate
1. Specify Page Properties 1. Specify Page Properties Customize the Page’s “ObjectSpace”Customize the Page’s “ObjectSpace”
2. Specify Pre2. Specify Pre--Placed Control PropertiesPlaced Control PropertiesBind an ObjectGrid control to an ObjectSetBind an ObjectGrid control to an ObjectSet
3. Add Attributes to the Data Aware Controls3. Add Attributes to the Data Aware ControlsClick attributes into the ObjectGrid controlClick attributes into the ObjectGrid controlCustomize attribute and control GUI presentationCustomize attribute and control GUI presentation
4. Construct and Preview4. Construct and PreviewTest and verify your Page ModelingTest and verify your Page Modeling

97
Workshop Workshop -- 1. Specify Page Properties1. Specify Page PropertiesEach Page’s data content is managed through a Rapid Developer facility called "ObjectSpaceObjectSpace" – part of Page Properties. The ObjectSpace defines the Page’s content (classes, attributes, methods and messages constructed for the page). Some pages can use their default ObjectSpace. For other pages you will need to explicitly specify ObjectSpace attributes. In the allbuyers page, you will need to add the Buyer Class to the ObjectSpace from All classes
Customize the allbuyers Page’s ObjectSpace Customize the allbuyers Page’s ObjectSpace –– add the Buyer Class:add the Buyer Class:1. From Page Architect – open to the allbuyersallbuyers page::
-- Click Click the Page Properties icon Page Properties icon on the toolbar
2. Click the ObjectSpaceObjectSpace tab
From the ObjectSpace tab:ObjectSpace tab:
3.3. From All classes All classes -- Select Select (click) BuyerBuyer-- Click Click the(lower) Add >> Add >> button … or …
Double-Click Buyer
4. Click Close 4. Click Close to return
Page Properties icon

98
ConceptsConcepts –– What is an ObjectSpace?What is an ObjectSpace?
ObjectSpace for allbuyersObjectSpace for allbuyers(complete)(complete)
The ObjectSpace is used by Rapid Developer to customize the codegenerated for each of your pages.
Creates and compiles the Java classes (deployed code)
Class ModelClass ModelAttribute and MethodAttribute and Method
PropertiesProperties
ConstructionConstructionEngineEngineContains element definitions Specifies which elements are used in a given page

99
ConceptsConcepts - allbuyersallbuyers - Page Design and LayoutPage Design and Layout
When you use templates pages (Page Styles) - as we will for the first part of this course - your project's GUI designers will create pages that contain pre-placed controls, and within those controls, pre-set properties and specifications. Later in this class, you will learn how to place and customize controls yourself. Controls pre-set from the ListStyle template page:
Static TextInside of aContainer
ObjectGrid (data-aware) control – one of twocontrols that allow you to project ObjectSets (multiple rows) of user data.
You will need to specify this control's ObjectSet properties
A Page Header (static) label control inside a Container control -that dynamically determines its name (label value) at run-time
Static Image

100
Workshop Workshop –– 2. Specify ObjectGrid Control Properties2. Specify ObjectGrid Control PropertiesEach ObjectGrid control must be bound (assigned) to an ObjectSet – as its data source. This is accomplished using the ObjectSet tab, which is one of the properties of an ObjectGrid control.
Bind the ObjectGrid control to an ObjectSetBind the ObjectGrid control to an ObjectSetFrom Page Architect:
1. Select (Hold down the CtrlCtrl key and Left-Click over) the ObjectGrid control2. Click the Control Properties icon on the toolbar: 3. Click the Object Set tab
On the Object Set tab – bindbind the ObjectGrid control to an Object Set:4. Open the Select object set/attributes: Select object set/attributes: listbox, and select: ObjectSpace.BuyerObjectSpace.Buyer
5. Click OK 5. Click OK to return to Page Architect
Access a selected control's properties

101
Workshop Workshop -- 3. Click Fields Into ObjectGrid3. Click Fields Into ObjectGrid
After an ObjectGrid Control has been assigned to an ObjectSet, the attributes of the ObjectSet’s Class will appear in the Attributes Palette (assuming the control has focus on the Page Architect canvas). Add fields to the ObjectGrid control by clicking the Attribute Palette’s R column checkbox
Add Attributes to the ObjectGrid ControlAdd Attributes to the ObjectGrid ControlWith the ObjectGrid control in focus (Press the Ctrl key, and Left-Click over the control):
Add four of the Buyer fields to the control by clicking the attribute'sclicking the attribute's R column checkboxR column checkbox in the in the Attributes PaletteAttributes Palette
NoteNote: The control that has focus will show a blue lineblue line around its border. It will also show a single green diamond in the middle of the control (used for moving the control in the Page Architect canvas) – and green sizing boxes around the control's edges.

102
Workshop Workshop -- 4. Construct the Page4. Construct the Page
When you are finished modeling your Page, you can ConstructConstruct then PreviewPreview. Construct compiles the Java classes and supporting run-time artifacts for the page.
Construct allbuyersConstruct allbuyers1. 1. From the Page Architect toolbar, click the Construct Page icon
The construct dialog will open up, and your Page will be compiled and deployed to the Application Server specified in Technology Selections::
2. Click CloseClose to return to Page Architect
… Also close the Application Validationmessages window.
View Notes PageView Notes Page, to learn what getsconstructed…
Construct the Page you are working on

103
Workshop Workshop -- 4. Start the Application Server, Preview the Page4. Start the Application Server, Preview the Page
After your Page successfully Constructs: If you are using J2EE technology, start your application server and then Preview the Page. If you are using Microsoft/COM technology, just Preview the Page.
Preview allbuyers, usingPreview allbuyers, using TomcatTomcat1. From the top toolbar in Page Architect, click the Start Server icon:
When Tomcat is running, 2. click (set focus back to) Page Architect
When the Application Server has started 3. click the Web Page Preview icon on the toolbar:
Wait for this message in the Tomcat window:HttpConnector[port#] Starting background thread
Preview the Page in the Browser

104
Concepts Concepts -- What Could Go Wrong?What Could Go Wrong?
If you did not successfully construct and preview the page, here are a few things to look for:
Page not found:If you constructed successfully, but were not able to see your page when you clicked Preview, return to
Application Architect by clicking Next Window on the toolbar, then clicking the Application icon in the Application Architect. Check your Physical directory and/or J2EE Web server settings (esp. Port#)
Compiler not found – or Application Home directory not correctly specified:If Rapid Developer could not Construct your page, ensure that you have successfully downloaded, installed and
configured the Java Compiler/Java JDK and App Server home directory. This will appear as a Validation error.
Cannot find server or DNS error:When you Preview your page, Rapid Developer tries to launch it in the browser. If you are using a J2EE
application server you must start the server before you preview the page, or you will get this error.
Error Row Message:When you Preview your page, if all you see is a red error message stating that there are no records found in the
database, retrace your steps doing Sample Data Construction…or…add some rows to the Policy table through the Data Entry tab.
Other errors:If some other error arises, and you need additional assistance, do not hesitate to access either the Rational Rapid Developer support line: (877) 474-9910, or the Rapid Developer section of RDN (Rational Developer Network).

105
Workshop Workshop -- Customize Validation Error MessagesCustomize Validation Error Messages
To avoid having to close the Application Validation window for low-level problems, from the product menu:
1. Pull-down ToolsTools … then… Workstation SettingsWorkstation Settings
2. From the ValidationValidation tabSpecify: Show errors at level: ErrorError

106
Summary – Section F Section F –– Page Modeling/Create List Page Page Modeling/Create List Page – Review of Steps
Add "data class" toAdd "data class" toPage's ObjectSpacePage's ObjectSpace Click in andClick in and
size attributessize attributes
Bind ObjectGridBind ObjectGridcontrol to Datacontrol to Data
Edit Page FromEdit Page FromPage ArchitectPage Architect
ConstructConstructPagePage
StartStartApplication ServerApplication ServerIf not running…
PreviewPreviewPagePage

107
WorkshopWorkshop - Create Another List Page Create Another List Page – allordersNow that you have completed your first List Page, it is a good time to reinforce the concepts by creating another List Page using a different class (OrderHeader). By following the instructions on the next slide you will create this page, which displays all Orders.
allordersRunning under Tomcat
Create allorders Viewlet (complete) Create allorders Viewlet (complete)

108
Page Navigator
WorkshopWorkshop - allordersallordersFrom Page Architect: From the Page NavigatorPage Navigator, select allordersallorders
1. Add the OrderHeader data class to allorders' ObjectSpace- Click the Page Properties iconPage Properties icon on the Toolbar- From Page properties, click the ObjectSpace tabObjectSpace tab- From the ObjectSpace tab:
- Select OrderHeader OrderHeader in All classesAll classes- Click Add >>Add >>- Click CloseClose
2. Bind the ObjectGrid control to the OrderHeader ObjectSetHold down the Ctrl key, Ctrl key, and LeftLeft--ClickClick over the ObjectGrid control – then click the Control Properties Control Properties icon
- Click the Object Set tabObject Set tab-- Open the Select ObjectSet/Attributes: Select ObjectSet/Attributes: listbox, and select: ObjectSpace.OrderHeaderObjectSpace.OrderHeader-- In the Sort Sort area, type: OrderStatusOrderStatus-- Click OK Click OK to return to Page Architect
3. Add OrderHeader attributes to the ObjectGrid ControlWith the ObjectGrid selected, click all of the OrderHeader attributes into
the control except for the relational attribute: RR Buyer

109
Workshop Workshop -- Sizing Columns in an ObjectGridSizing Columns in an ObjectGridYou will often have to customize the size of individual controls, rows or columns. To size individual (simple) controls, selectthe controls and use the small green box handles. To size the column widths of an ObjectGrid control:
1. Select the ENTIREENTIRE ObjectGrid control (Hold down the Ctrl key, and Left-Click over one of the control's borders)2. Move your mouse over the columns until the cursor changes to a Left-Right pointer:
Use this pointer to size the column width
Workshop:Workshop: Shrink Shrink eacheach of the column widths in the ObjectGrid of the column widths in the ObjectGrid (size the columns smaller)

110
Workshop Workshop -- allorders Finishedallorders Finished
4. Construct4. Construct and PreviewPreview allordersallorders. Note to J2EE developers, if your Application Server supports “hot deploy” (like Tomcat, Oracle9iAS, WebLogic, WebSphere 5.0 etc.) and it is still running, you will notnot have to restart the server before previewing your page.
Optional Workshop:Optional Workshop: Using the ObjectGrid control's ObjectSet tab:1. Sort by OrderDate, OrderStatusOrderDate, OrderStatus2. Select only the rows with an OrderStatus > 2OrderStatus > 2
allordersRunning under Tomcat
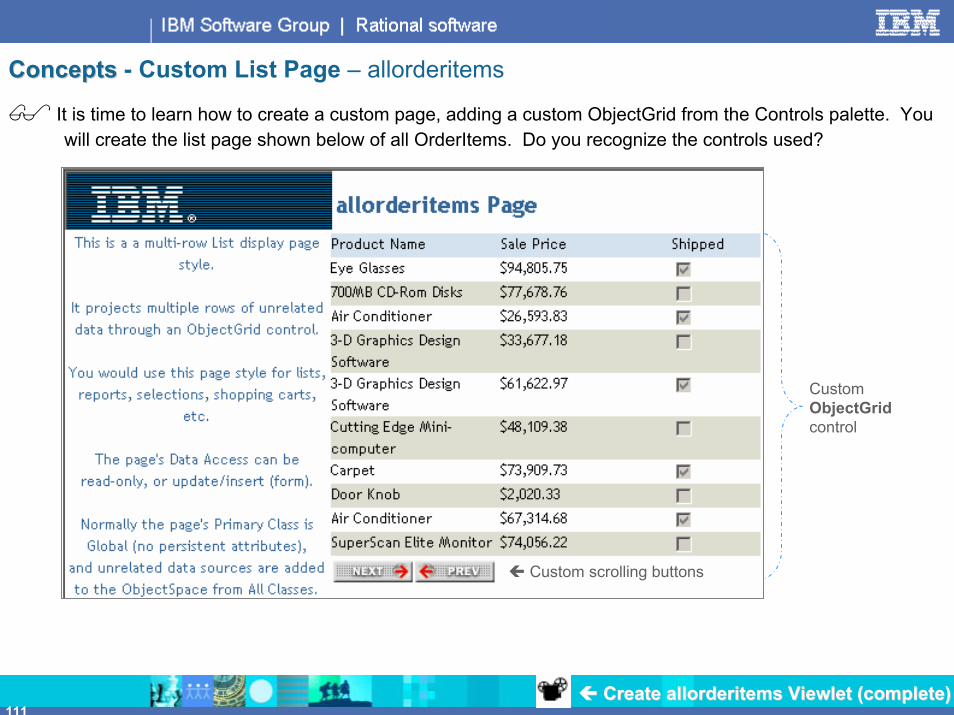
111
ConceptsConcepts - Custom List Page – allorderitems
It is time to learn how to create a custom page, adding a custom ObjectGrid from the Controls palette. You will create the list page shown below of all OrderItems. Do you recognize the controls used?
Custom scrolling buttons
CustomObjectGridcontrol
Create allorderitems Viewlet (complete) Create allorderitems Viewlet (complete)
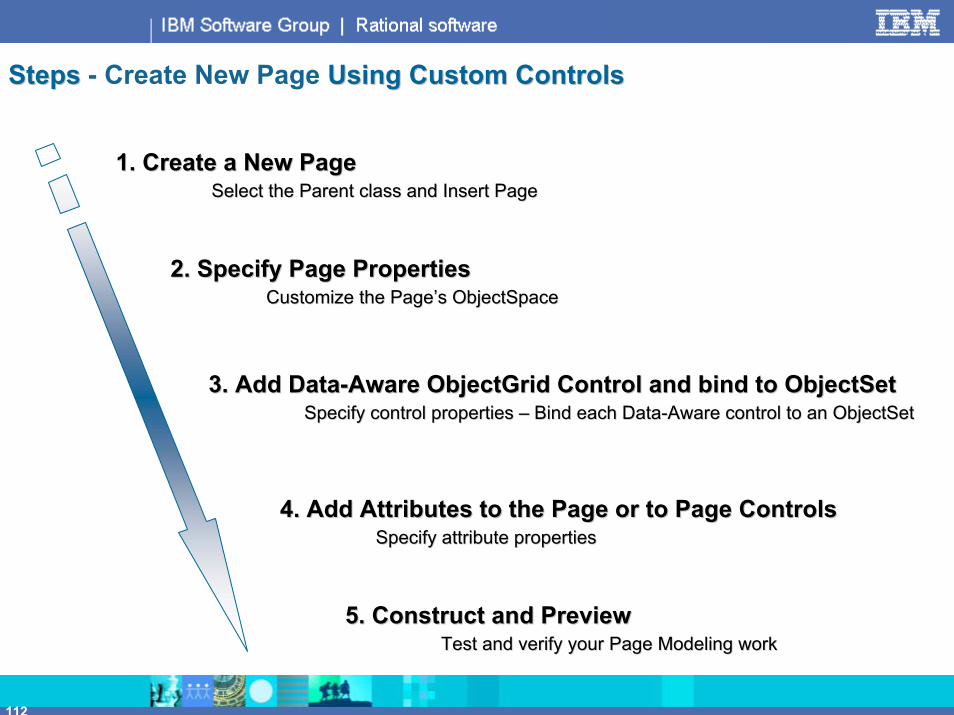
112
StepsSteps - Create New Page Using Custom ControlsUsing Custom Controls
1. Create a New Page 1. Create a New Page Select the Parent class and Insert PageSelect the Parent class and Insert Page
2. Specify Page Properties 2. Specify Page Properties Customize the Page’s ObjectSpaceCustomize the Page’s ObjectSpace
3. Add Data3. Add Data--Aware ObjectGrid Control and bind to ObjectSetAware ObjectGrid Control and bind to ObjectSetSpecify control properties Specify control properties –– Bind each DataBind each Data--Aware control to an ObjectSetAware control to an ObjectSet
4. Add Attributes to the Page or to Page Controls4. Add Attributes to the Page or to Page ControlsSpecify attribute propertiesSpecify attribute properties
5. Construct and Preview5. Construct and PreviewTest and verify your Page Modeling work Test and verify your Page Modeling work

113
Workshop Workshop -- Page Design and LayoutPage Design and Layout
1.1. Create a new Page in the Global classCreate a new Page in the Global classFrom Page Architect:
- Select the GlobalGlobal Class icon in the Navigator bar- Right-Click and select: Insert PageInsert Page
2. Specify page properties2. Specify page properties- Click the Page Properties icon, on the toolbar- From the Page Properties tab, specify the following:
Name: allorderitemsPage style: ListStyle
3. Modify allorderitems' ObjectSpaceModify allorderitems' ObjectSpaceFrom the ObjectSpace tab:
- Select OrderItemOrderItem in All classesAll classes- Click Add >>Add >>- Click Close
Right-ClickContext menu
allorderitems' ObjectSpace after adding the Data Class (OrderItem)
Close

114
Workshop Workshop -- 3. Add an ObjectGrid Control3. Add an ObjectGrid Control
When a Page’s ObjectSpace defined, you then add data-aware controls to the Page. Because you will be creating a new custom control, you should start by deleting the existing ObjectGrid control that was part of the ListStyle page.
4. Delete and add an Object Grid Control to the Page4. Delete and add an Object Grid Control to the PageFrom Page Architect
- Hold down CtrlCtrl and LeftLeft--Click over the ObjectGridClick over the ObjectGrid control. Then press the DeleteDelete key
- Single Click Click the Object Grid control Object Grid control icon on the Controls palette
-- Move your cursor into the Page Move your cursor into the Page (move without holding down either mouse button)
-- LeftLeft--ClickClick – to place the controlin the page, withits top-left cornerpositioned at themouse pointer.

115
Workshop Workshop -- 3. Bind ObjectGrid control to ObjectSet3. Bind ObjectGrid control to ObjectSetEach ObjectGrid control must be assigned to an ObjectSet (set of persisted objects - data rows). This is accomplished using the ObjectSet tab, which is one of the properties of an ObjectGrid control.
Workshop: Specify the ObjectGrid control’s ObjectSetWorkshop: Specify the ObjectGrid control’s ObjectSet1.1. When you have placed the control – with the control in focus…
Click the Control Properties icon on the toolbar
2.2. Access the ObjectSet tab, and from the ObjectSet tab – Bind the ObjectGrid control to an Object Set:- Open the Select ObjectSet/Attributes: listbox, - Select: ObjectSpace.OrderItem
3.3. From Display, Settings, Check: Check: Footer area (for Next, Prev buttons, etc…)
4. Click OK 4. Click OK to return to Page Architect
Selected ObjectGrid control

116
Workshop Workshop -- 4. Click Fields Into the ObjectGrid Control4. Click Fields Into the ObjectGrid Control
After an ObjectGrid Control has been assigned to an ObjectSet, the attributes of the ObjectSet’s Class will appear in the Attributes Palette (providing that the control has focus on the Page Architect canvas).
You can add fields to the ObjectGrid control by clicking the Attribute Palette’s R column checkbox
Workshop: Add Attributes to the ObjectGrid ControlWorkshop: Add Attributes to the ObjectGrid ControlWith the ObjectGrid control in focus (I.e. green boxes border the control):
Add three of the OrderItem fields to the control by clicking clicking the attribute's R column checkboxthe attribute's R column checkbox in the in the Attributes PaletteAttributes Palette
Add attributesCheckbox
Selected control (blue line)

117
Workshop Workshop -- Add Prev/Next Scrolling ButtonsAdd Prev/Next Scrolling ButtonsMost data-aware List Pages require automatic scrolling, for purposes of aesthetics, navigation and usability. You can enable scrolling by adding Object set navigation buttons to the Footer area of a set-level data-aware control.
Workshop: Add Next and Prev scrolling buttonsWorkshop: Add Next and Prev scrolling buttons1. 1. From Favorite Controls Palette, find and select (click and turn inverse video): b_Nextb_Next
2.2. Position your mouse pointer inside the in the Footer area of the ObjectGrid control and Single-Click
3.3. Double-Click b_Next and enable Next Hide scrolling by clicking: Object set navigation
Repeat the above and add b_Prev to the Footer area. Enable b_Prevb_Prev for Prev Hide
Footer Area
Instance Area
b_Next - Control properties tab

118
Workshop Workshop -- 5.5. Construct and PreviewConstruct and Preview
After you have clicked the attributes into the ObjectGrid control you might want to resize the column widths. Then click the Construct Page and Web Page Preview icons to construct and test your work.
First Construct, then Preview the Page
Save your Project…
Optional: Sort by SalePrice Desc
Test out your paging buttons

119
Concepts Concepts – Detail Style Page – Design ViewDesign View
In this QuickStart application we have minimized the number of object attributes, in the interests of saving time. However, it is not unusual for a production-scale business object (even one that is heavily normalized) to contain 20, 30 and in many class designs, more attributes. Projecting this many attributes in a horizontal table control (like an ObjectGrid) is visually un-appealing, and unwieldy to navigate. And because a large percentage of most Web applications’ pages consist of presenting extensive details about a single business object we will need a vertical presentation layout.
In this exercise, we’ll use a:- GridGrid control for Buyer details- ObjectGridObjectGrid to show Orders for this Buyer
Identify each of the five control types in thisScreen capture(For answer, look at the Notes Page View of this slide)
Also, note the layout of this Pagefor the upcoming Workshop…
Create buyerdetail Viewlet (complete) Create buyerdetail Viewlet (complete)

120
Workshop Workshop -- Create buyerdetail Create buyerdetail –– 1 of 21 of 2Design buyerdetail Design buyerdetail –– which lists information for a specific Buyerwhich lists information for a specific BuyerFrom Page Architect:
1. From the Page NavigatorPage Navigator, open the BuyerBuyer class and select: buyerdetailbuyerdetail
2. Set focus to the Grid control (hold down Ctrl and Left-Click over the control)
3. “click in” all of the Buyer attributes
4. Modify the BuyerName Display – make it BasicLargerBoldBasicLargerBold1. Double-Click directly over the BuyerName field – in the Grid control
2. From the Display tab, open the Font Theme DropDown listbox andselect BasicLargerBold
Page Navigator

121
Workshop Workshop -- Create buyerdetail Create buyerdetail –– 2 of 22 of 2
Add ObjectGrid to Display Buyer OrdersAdd ObjectGrid to Display Buyer OrdersFrom Page Architect:
5. Add an ObjectGridObjectGrid control to the page. Place it directly under theGrid control (see Design View – two slides back - for placement)
6. With focus on the ObjectGrid, Click Click the Control Properties Control Properties icon– this will display the ObjectGrid's Properties
7. From the Object SetObject Set tab – pull down the Specify ObjectSet/Attributes listbox and select: OrderHeadersOrderHeaders
8. With the ObjectGrid control in focusin focus on the canvas, “click in” three OrderHeader attributes:
9. ConstructConstruct and PreviewPreview buyerdetailbuyerdetail
- OrderDate- OrderStatus
- Shipped
Save your Project…
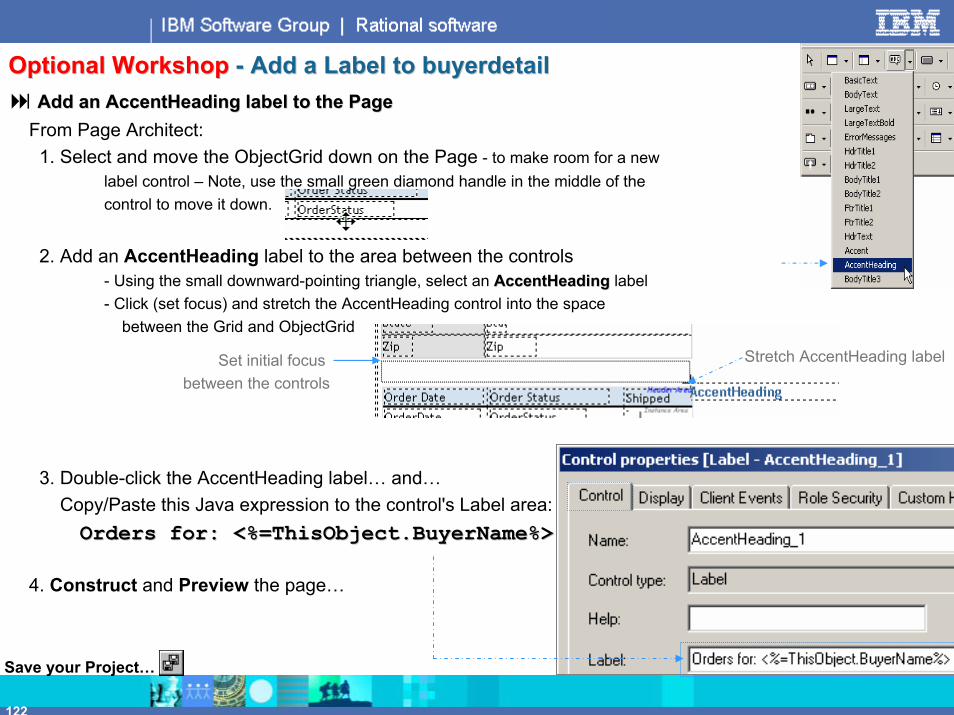
122
Add an AccentHeading label to the PageAdd an AccentHeading label to the PageFrom Page Architect:1. Select and move the ObjectGrid down on the Page - to make room for a new
label control – Note, use the small green diamond handle in the middle of the control to move it down.
2. Add an AccentHeading label to the area between the controls- Using the small downward-pointing triangle, select an AccentHeadingAccentHeading label- Click (set focus) and stretch the AccentHeading control into the space
between the Grid and ObjectGrid
3. Double-click the AccentHeading label… and…Copy/Paste this Java expression to the control's Label area:Orders for: <%=ThisObject.BuyerName%>Orders for: <%=ThisObject.BuyerName%>
4. Construct and Preview the page…
Set initial focus between the controls
Stretch AccentHeading label
Save your Project…
Optional WorkshopOptional Workshop -- Add a Label to buyerdetailAdd a Label to buyerdetail

123
Optional WorkshopOptional Workshop –– buyerdetail buyerdetail –– FinishedFinishedBrowser rendering of buyerdetailBrowser rendering of buyerdetail
Optional:Optional:Change the color of the BuyerNameBuyerName valueSort the OrderItems by: OrderDate DescOrderDate DescChange the column color of the Grid control (you may need to ask your instructor for help on this one)
Center the OrderStatus value within its column

124
ConceptsConcepts – Visual Development Techniques - Adding Controls and Attributes
Three ways to add/place controls and attributes to a Page::
1. Click and 1. Click and PlacePlace- Left-Click – to select the control or attribute- Position your cursor in the Page (do not drag the control … release the left-mouse button and point to where you want
the control to be placed)- Left-Click again - to place- Top-left corner (0,0) of the control will be placed where the mouse-pointer cross-hairs are focused- Control retains Style Repository defaults for dimensions (height/width)
2. Click and 2. Click and SizeSize- Left-Click – to select the control or attribute- Position your cursor in the Page- Left-Click and drag (size) the control to its dimensions- This allows you to over-ride the Style defaults, and re-size/re-shape the control’s height/width
3. 3. (Attributes-only) Click inClick intoto -- Grid, ObjectGrid, ObjectTable controlsGrid, ObjectGrid, ObjectTable controls- Left-Click (Select) the Grid, ObjectGrid or ObjectTable control – green focus boxes appear on the control’s border- Click the RR checkbox next to the attribute you wish to add to the control- Attributes are added top-to-bottom, in Grid and ObjectTable controls, and right-to-left in ObjectGrid controls
Note:Note: This slide and the two that follow represent optionaloptional workshops – aimed primarily at increasing thevisual development skill of graphic page designers and developers using Page Architect facilities.

125
Optional WorkshopOptional Workshop – Visual Development Techniques - Adding Controls and Attributes
Experiment with these techniques:1. From Page Architect, create a new page in the OrderHeader class
- Select the OrderHeader class icon in the Page Navigator bar. - Right-click, and select: Insert Page- Name the page whatever you like – leave all the other page properties at their defaults
2. Add a number of the followings to the page – Note, use mouse-over to find the controls in the palette:- Controls and categories:
Set Controls:ObjectGrid … ObjectTable … DropDown control
Single-object data-aware controls:Grid … EditText … EditNumber … CheckBox … EditImage control
Static text and static graphic controls:Label … ImageDefault … CustomControl control
3. Select a Grid control, and click-in several OrderHeader attributes
4. Add OrderHeader attributes to the page directly from the Attributes palette
5. Double-Click any of single-object data-aware controls that show a red question mark (which signifies an unassigned data-aware control) and from its Projection tab, Double-Click in an attribute
6. Resize and move either single or multiple controls.

126
Optional WorkshopOptional Workshop – Visual Development Placement and Alignment TechniquesAfter a control is placed you may make its placement precise After a control is placed you may make its placement precise (to the pixel) using the Positioning properties:Positioning properties:
1. Select a control and access its PropertiesProperties tab2. Specify a Left/Top positioning - in pixels3. Notes:
- Positioning is relative to the control’s “parent container”- Containers may be nested- The page canvas is considered the ultimate ancestor container – of the page
Page Architect can provide a simulated Browser view – without having to Preview a page:
Experiment with this technique (using the buyerdetail Page):
- Select Tools, Page Options… and Un-check: Show outline- Click OKOK – and note the difference in the Page Architect display- Return to Editor Options and Check: Show outline

127
ConceptsConcepts - Page Design 3 – HyperHyper--LinksLinksWhen you Previewed the buyerdetail Page in the previous exercise, you may have noticed that it always presented the very first Buyer row in the database. What the users want to be able to do, is to select a Buyer and see a specific Buyer’s details. When finished with this exercise, your Web pages will look like this (note the dynamic URL construction and paging button):
allbuyers PageWith scrolling and Data-Aware
Hyper-Links
buyerdetail Page
Create hyperCreate hyper--links Viewlet (complete) links Viewlet (complete)

128
Workshop Workshop - Create Dynamic Hyper-Links from BuyerName to BuyerDetail PageSteps…Steps…
1. From Page Navigator, select: allbuyersallbuyers
2. Double2. Double--Click Click over the ObjectGrid’s BuyerName BuyerName field::
3. From Control properties, click Page Linkclick Page Link
4. From Link PropertiesLink Properties- Click NewNew
From Select page:Select page:- DoubleDouble--Click: Click: buyerdetailbuyerdetail- Click OK OK twice, to return to Page Architect
5. Construct/Preview and check out the data-awarepage links (note the URL produced for each row)
Page NavigatorNote:Double-Click in the middle of the BuyerNamefield – in the ObjectGrid
Save your Project…

129
Optional WorkshopOptional Workshop - Page Design 3a – Add Hyper-Links to allorders
To reinforce concepts learned from the last two examples, design the orderdetailorderdetail page and then modify allordersallorders, so that users can select an Order and see its details. ("how to" directions follow…)
allorders Page
orderdetail Page

130
Summary – Section F Section F –– Page Modeling/Create Detail Page Page Modeling/Create Detail Page – Review of Steps
Explicitly Project Explicitly Project RRelationship Attributeelationship Attribute
Click attributesClick attributesinto Grid controlinto Grid control
Add CustomAdd CustomObjectGrid controlObjectGrid control
Edit orderdetailEdit orderdetail
ConstructConstructPagePage
StartStartApplication ServerApplication Server
If not running…
Bind ObjectGridBind ObjectGridcontrol to Datacontrol to Data
PreviewPreviewPagePageClick inClick in
attributesattributes

131
Summary – Section F Section F –– Page Modeling/HyperPage Modeling/Hyper--Link from ListPage Link from ListPage – Review of Steps
Access OrderNumberAccess OrderNumberfield propertyfield property
Edit allordersEdit allorders
ConstructConstructPagePage
Add NewAdd NewPage Link to…Page Link to…
PreviewPreviewallordersallorders
Select PageSelect Page(orderdetail)(orderdetail) HyperHyper--LinkLink
To orderdetailTo orderdetail

132
Optional Workshop Optional Workshop –– 1 of 21 of 2 -- Create orderdetail PageCreate orderdetail Page
Steps…Steps…1. From Page Navigator, select: orderdetailorderdetail
2. Set focus to Set focus to (Hold down Ctrl and Left-Click) the Grid control the Grid control and click in click in ALLALL OrderHeader attributes OrderHeader attributes ––including Buyer including Buyer -- which is added to the Grid control as a DropDown listbox
3. Double-Click the Buyer DropDown listbox –
3a. And from the Projection tab- Expand Buyer - in Class attribute- Double-Click BuyerNameBuyerName
3b. (Optionally) From the Display tab, select BasicLargerBold text for BuyerNameBuyerName
Double-Click BuyerName

133
Optional Workshop Optional Workshop –– 2 of 22 of 2 -- Create orderdetail PageCreate orderdetail Page
Steps, continued…Steps, continued…
4. Add an ObjectGrid control to the page. Place it below the Grid control (see screen-shot below)
5. Access the ObjectGrid control’s propertiesAccess the ObjectGrid control’s properties, and from the ObjectSet tabObjectSet tab, select OrderItemOrderItem from the Select ObjectSet/AttributesSelect ObjectSet/Attributes list box
6. ClickClick ProductName, QuantityProductName, Quantity and SalePriceSalePrice into the ObjectGrid control
7. ConstructConstruct and PreviewPreview orderdetailorderdetail
Save your Project…

134
Optional WorkshopOptional Workshop -- Modify allorders Page – Add Hyper-Links to orderdetailSteps…Steps…
1. From Page Navigator, open the GlobalGlobal class and select: allordersallorders
2. Double2. Double--Click Click the OrderNumber OrderNumber field to access its Properties
3. From the Control properties tab, click Page LinkPage Link, and add a NewNew Page Link to: orderdetailorderdetail
4. ConstructConstruct and PreviewPreview allorders allorders – test your scrolling and Page Link to orderdetail

135
Optional Exercises Optional Exercises – Various Page Development Techniques
Opt. Ex. 1.Opt. Ex. 1. - Add an AccentHeadingAccentHeading label between the Grid and ObjectGrid that contains the following Label text: OrderItems for OrderNumber: <%=ThisObject.OrderNumber%>OrderItems for OrderNumber: <%=ThisObject.OrderNumber%>
Opt. Exercise 2 Opt. Exercise 2 -- CreateCreate orderitemdetailorderitemdetail –– using the screen design as shown below1. Delete and add a custom Grid control2. Project OrderNumber from OrderHeader
in the DropDown control3. Customize Display font size and color:
- ProductName- OrderHeader.OrderNumber
4. Customize the default column label forOrderHeader
5. Create a Page Link from allorderitemsto orderitemdetail (ProductName)
Save your Project…

136
ConceptsConcepts - Page Design 4 – HTML Forms HTML Forms -- Business LogicBusiness LogicMost eBusiness and eCommerce applications are transactional, in that they provide functionality that processes requests and updates databases online. Update functionality is provided through business logic. Business logic is supported through Java methods and Java expressions, which are in turn, called by Submit Buttons from pages. In this next workshop you will create an Update page, that allows users to change Buyer information online. buyerdetail will link to the Update page.
buyerupdate pageNote: changed values
buyerdetail page
allbuyers page

137
Steps Steps -- Create Java MethodsCreate Java Methods
1. Define the Method1. Define the MethodSelect the Method’s Primary Class and create a new MethodSelect the Method’s Primary Class and create a new Method
2. Specify the Method’s Signature2. Specify the Method’s SignatureSpecify input/return parameters Specify input/return parameters – as needed
3. Select Java Imports3. Select Java ImportsSpecify any includes required by the method Specify any includes required by the method – as needed
4. Code the Method's Java Statements4. Code the Method's Java StatementsUse Code Templates whenever possibleUse Code Templates whenever possible
Import (firstImport (first--time only)time only)Select Code templateSelect Code templateRespond to parameter promptRespond to parameter prompt
Customize the Code Template Java …or…Customize the Code Template Java …or…Code the method from scratchCode the method from scratch

138
Workshop Workshop –– Create a Java Method Create a Java Method – 1 of 4
NavigationBar
Create a new Java method that updates the databaseCreate a new Java method that updates the databaseReturn to the Application Architect – by clicking the Application Architect icon on the toolbar:
From the Application Architect:From the Navigation Bar:
1. Expand the OrdersOrders package
2. Select the BuyerBuyer Class
3. Click the MethodsMethods tab
In the Methods tab:4. Click NewNew
5. Enter the method name:
buyerUpdateProcbuyerUpdateProc
6. Click the MM icon
7. Click: Logic ArchitectLogic Architect
Create method Viewlet (complete) Create method Viewlet (complete)

139
Workshop Workshop –– Import Code Templates Import Code Templates – 2 of 4Steps…Steps…
From within the Logic Editor:1. Select the Insert template icon2. Right-click and select Import
3. From the Windows browse, find the following Code Template:\\RDEVRDEV\\Code TemplatesCode Templates\\
- Training Courses.xml- Click Open to Import
Close the Templates window to continue with this workshop…
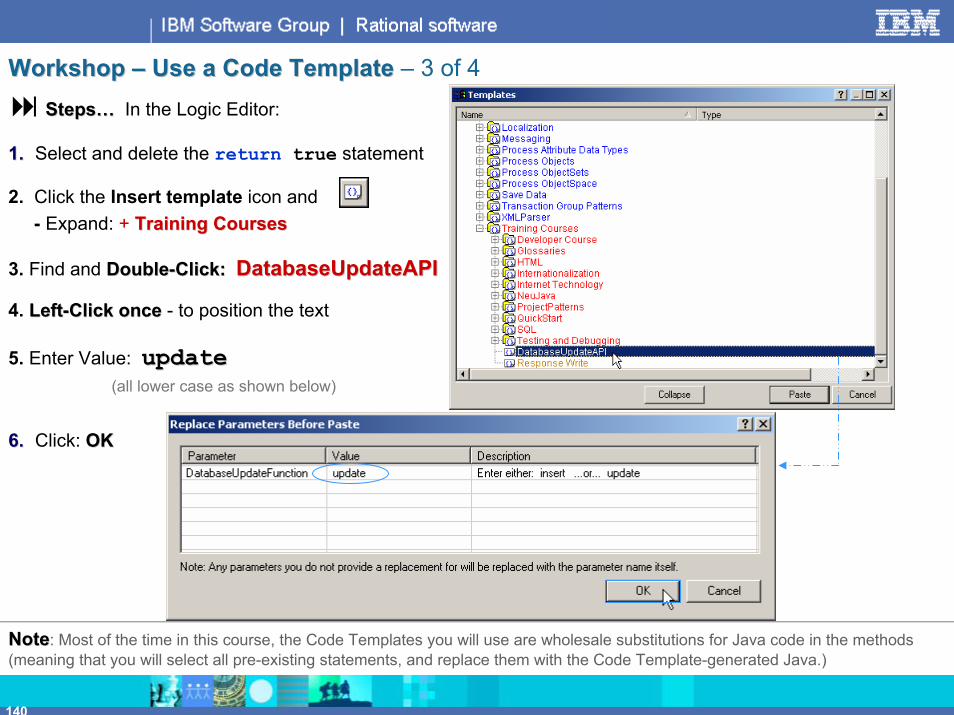
140
Workshop Workshop –– Use a Code Template Use a Code Template – 3 of 4
Steps… Steps… In the Logic Editor:
1.1. Select and delete the return true statement
2. Click the Insert template icon and- Expand: + Training CoursesTraining Courses
3. Find and DoubleDouble--Click:Click: DatabaseUpdateAPIDatabaseUpdateAPI
4. LeftLeft--Click onceClick once - to position the text
5. Enter Value: updateupdate(all lower case as shown below)
6.6. Click: OKOK
NoteNote: Most of the time in this course, the Code Templates you will use are wholesale substitutions for Java code in the methods (meaning that you will select all pre-existing statements, and replace them with the Code Template-generated Java.)

141
Workshop Workshop –– Create a Java Method Create a Java Method –– 4 of 44 of 4Feel free to look over the code that is created (see below).
SaveSave your method editing work, and close the Logic Editor
On the Rapid Developer toolbar - Click Next Window Next Window – to return to Page Architect
buyerUpdateProc– created from parameterized
Code Template

142
Workshop Workshop - Design an Update Page for Buyer DataSteps…Steps…
From Page Architect:
1. From the Page NavigatorPage Navigator, - in the Buyer class, select buyerupdatebuyerupdate
2. Select (set focus to) the Grid control andClick in all of the Buyer attributesClick in all of the Buyer attributes
From Favorite Controls PaletteFavorite Controls Palette3. Select sb_updatesb_update. Drag and drop it on the Page
4. DoubleDouble--Click sb_updateClick sb_update and click its Submit tabSubmit tabFrom the SubmitSubmit tab:
5. Open the Method to callMethod to call listboxSelect: buyerUpdateProcbuyerUpdateProc
6. Click Redirect to this page when return is TRUERedirect to this page when return is TRUESpecify a NewNew Page LinkPage Link to: allbuyersallbuyers
Create update form Viewlet (complete) Create update form Viewlet (complete)
Note:Note: Do not constructthis page yet…

143
Workshop Workshop – Modify buyerdetail – Add a HyperAdd a Hyper--Link Button to buyerupdateLink Button to buyerupdate
Steps…Steps…
From the Page Navigator: Select buyerdetailbuyerdetail
From the Favorite Controls Palette:1. Select an AccentHeading label, and place it on the Page (below the ObjectGrid)
2. DoubleDouble--Click the labelClick the labelFrom the Control properties tab:
3a. Type this text in the label: Go to update…Go to update…
3b. Click: Page LinkPage Link- Specify a New Page LinkNew Page Link to: buyerupdatebuyerupdate
Label with Page Link(Browser View)

144
Workshop Workshop – Construct Multiple Pages and Test Construct Multiple Pages and Test Steps Steps …
1. From the Toolbar, click Advanced SettingsToolbar, click Advanced Settings
2. 2. Click BrowseBrowse
3. 3. From Select page(s) for code constructionSelect page(s) for code constructionCheck buyerupdatebuyerupdate and buyerdetailbuyerdetail
Click OKOK
4. 4. From Advanced SettingsAdvanced SettingsClick ConstructConstruct
5. Preview 5. Preview allbuyersallbuyers and test your work, by updating some Buyer value(s).
Save your Project…

145
Optional WorkshopOptional Workshop -- Update OrdersUpdate Orders
To reinforce concepts learned from the last two examples, design the orderupdateorderupdate page, and then modify orderdetailorderdetail, so that users can update an Order online.
orderdetail Page
allorders Page
orderupdate Page

146
Summary – Section F Section F –– Create Update Method and Form Create Update Method and Form – Review of Steps
Use Code TemplateUse Code Templateto create statementsto create statements
Create newCreate newJava methodJava method
in a classin a class
Click attributesClick attributesinto Grid controlinto Grid control
Create orderupdate Create orderupdate
ConstructConstructorderupdateorderupdate
Select JavaSelect Javamethodmethod
Add SubmitButtonAdd SubmitButtoncontrol to pagecontrol to page
From Page Architect…
Specify pageSpecify pageredirectredirect
From Application Architect…

147
Summary – Section F Section F –– Page Modeling/Modify Detail Page Page Modeling/Modify Detail Page – Review of Steps
Add buttonAdd buttonto pageto page
Edit orderdetailEdit orderdetail
ConstructConstructorderdetailorderdetail
PreviewPrevieworderdetailorderdetail
Add Page Link to…Add Page Link to…orderupdateorderupdate
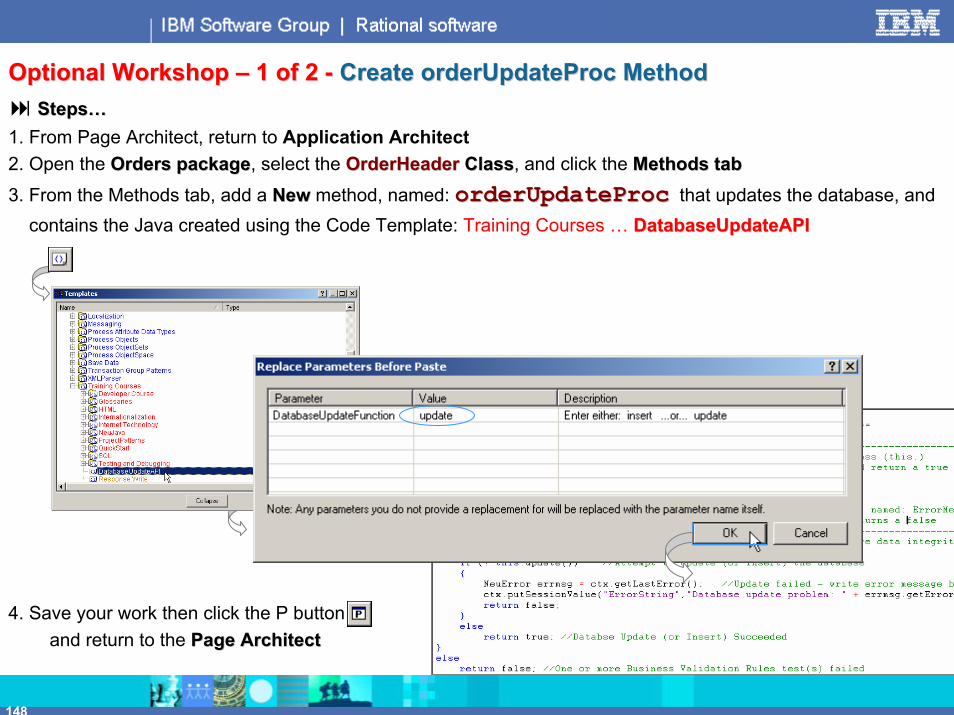
148
Optional Workshop Optional Workshop –– 1 of 2 1 of 2 -- Create orderUpdateProc MethodCreate orderUpdateProc MethodSteps…Steps…
1. From Page Architect, return to Application Architect2. Open the Orders packageOrders package, select the OrderHeaderOrderHeader ClassClass, and click the Methods tabMethods tab3. From the Methods tab, add a NewNew method, named: orderUpdateProcorderUpdateProc that updates the database, and
contains the Java created using the Code Template: Training Courses … DatabaseUpdateAPIDatabaseUpdateAPI
4. Save your work then click the P buttonand return to the Page ArchitectPage Architect

149
Optional Workshop Optional Workshop –– 2 of 2 2 of 2 -- Design orderupdate and Page Link to itDesign orderupdate and Page Link to itSteps…Steps…
5. From the Page Architect/Page NavigatorPage Navigator, select: orderupdateorderupdate
6. Select (set focus on) the Grid control, and click in all fields click in all fields
7. Double-Click the Buyer DropDown control- From its Projection tab, Open the Buyer Class attribute- Double-Click BuyerName into the Expression area
8. From Favorite Controls Palette, drag and drop sb_update sb_update on the Page
9. Double9. Double--Click sb_updateClick sb_update, and in its SubmitSubmit tab, specify:- Method to call: orderUpdateProcorderUpdateProc- Page redirection… Create a new Page LinkPage Link to: allordersallorders
10. From Page Navigator, Page Navigator, select the orderdetailorderdetail page
11. From Favorite Controls Palette, add a label, and specify its properties to Page Link Page Link orderupdateorderupdate
12. Construct both pages 12. Construct both pages and Preview Preview (test) your work your work – starting from orderdetailorderdetail
Double-Click dropdownProject to: Buyer.BuyerName
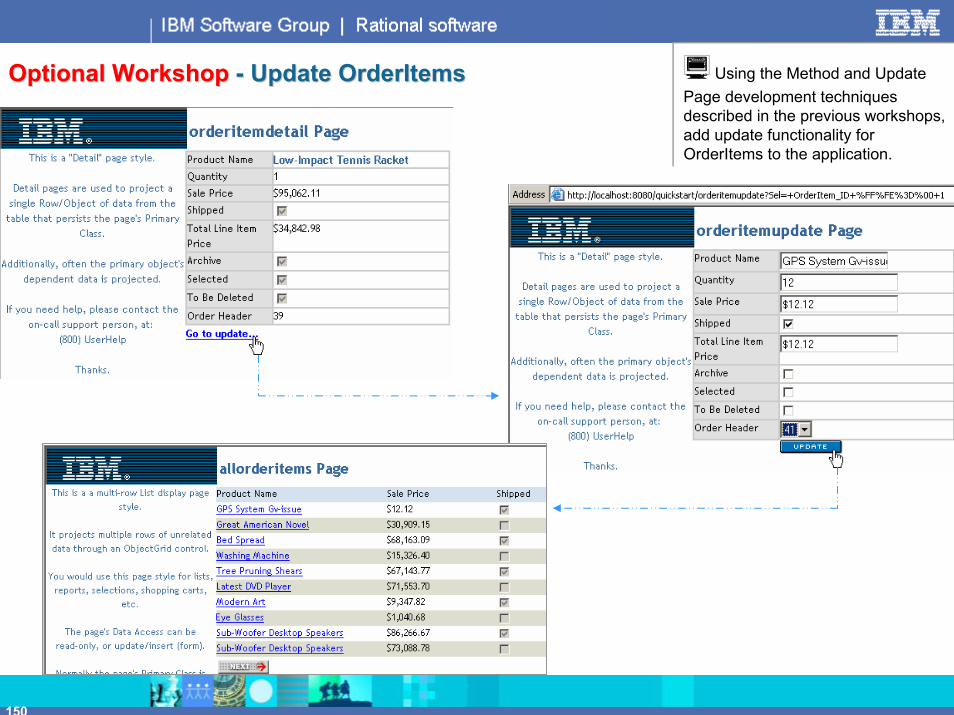
150
Optional WorkshopOptional Workshop -- Update OrderItemsUpdate OrderItems Using the Method and Update Page development techniques described in the previous workshops, add update functionality for OrderItems to the application.
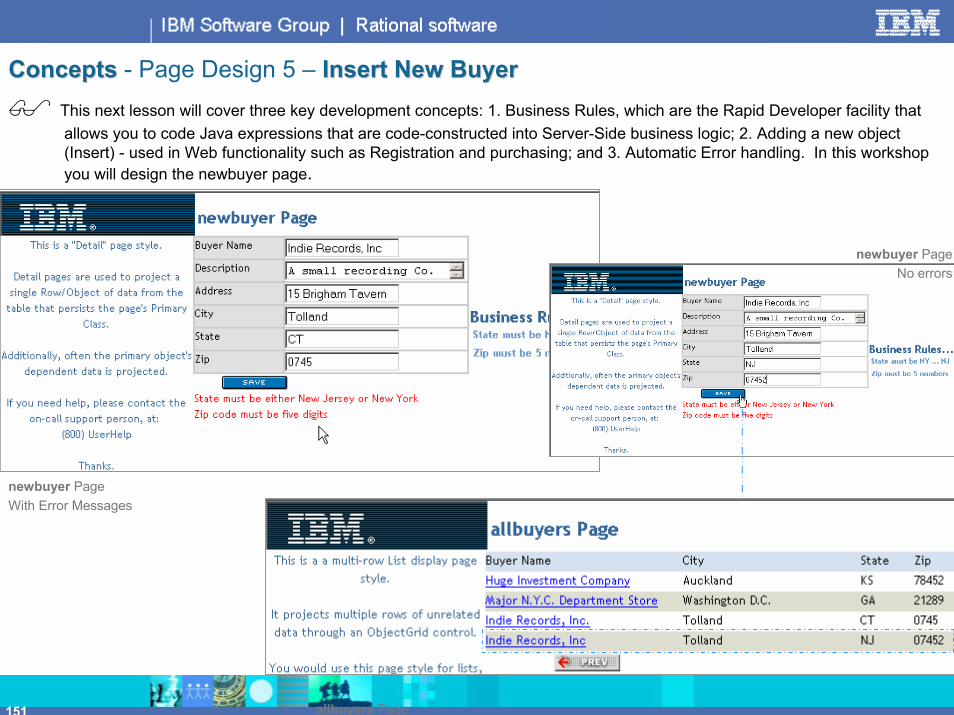
151
Concepts Concepts - Page Design 5 – Insert New BuyerInsert New BuyerThis next lesson will cover three key development concepts: 1. Business Rules, which are the Rapid Developer facility that allows you to code Java expressions that are code-constructed into Server-Side business logic; 2. Adding a new object (Insert) - used in Web functionality such as Registration and purchasing; and 3. Automatic Error handling. In this workshop you will design the newbuyer page.
newbuyer PageWith Error Messages
newbuyer PageNo errors
allbuyers Page

152
Rapid Developer Business Rules are Java expressions, assigned to attributes that get code-constructed into Java methods in your application’s Server-Side Java classes. View the Notes Page for additional details…
1.1. Initial Value:Initial Value:- A Java expression (a partial Java statement) that assigns a specific value to the attribute when:
- A “new” object is constructed- An Enter Only Page is displayed in the browser
- Always invoked- Code a literal or built-in Rapid Developer function whose return value conforms to the attribute’s datatype and size
- Three Initial Value examples: “My Company”, NeuVisUtil.GetCurrentDate(), -12.2. Derivation Rule:Derivation Rule:
- A Java expression that calculates (returns) a value – usually based on other values in the object. - Always invoked- The Derivation Rule is always invoked to return the attribute value. Its result must conform to the attribute’s datatype
and size.- Two Derivation Rule examples:
this.SalePrice.multiply(new java.math.BigDecimal(this.Quantity))new java.math.BigDecimal(this.GetTotalOrderCost())
3.3. Validation Rule:Validation Rule:- Returns a boolean result based on a simple if-test. Generally used for data entry and update processing- Validation Rules are only invoked if requested – through a call to: this.validate()- A Message can be specified that allows you to provide automated error handling. All Validation Rule Messages are concatenated and automatically assigned to a reserved label (usually on the sending page) named: ErrorMessages
- Two Validation Rule examples:(this.TotalOrderCost.compareTo(new BigDecimal("0.0"))==1)NeuVisUtil.isNumber(this.Zip)
Concepts Concepts -- Business RulesBusiness Rules

153
Steps Steps -- Create Rapid Developer Business RulesCreate Rapid Developer Business Rules
1. Select the Attribute1. Select the AttributeFirst select the First select the ClassClass, its , its AttributesAttributes tab and the tab and the AttributeAttribute
2. Select the Business Rule2. Select the Business RuleFrom the From the Business RulesBusiness Rules subsub--tab: Set focus to the Business Rule tab: Set focus to the Business Rule
3. Code the Business Rule3. Code the Business RuleUse Code TemplatesUse Code TemplatesCustomize the Code Template expression …or…Customize the Code Template expression …or…Create Business Rule expression from scratchCreate Business Rule expression from scratch(If coding a ValidationValidation Rule)
Code the Message to be returned upon user errorCode the Message to be returned upon user error(Optionally)(Optionally) Code a description for the Business RuleCode a description for the Business Rule

154
Steps Steps -- To CreateTo Create Business RulesBusiness RulesFrom Application ArchitectApplication Architect:1. Select the ClassClass you wish to specify Business Rules for, and click its Attributes tabAttributes tab2. From the Attributes listAttributes list
- Select the AttributeAttribute … Click the Business RulesBusiness Rules sub-tab
3. Click the Rule to enter:- Initial Value- Derivation- Validation
4. For each Rule, enter:JavaJava expressionexpression
DescriptionDescription (optional)
5. If Validation rule, enter:Message Message text
Create business rules Viewlet (complete) Create business rules Viewlet (complete)

155
Concepts Concepts – Business Rules Workshop – How ToHow To
Using the the QuickStart…Business Rules WorkshopQuickStart…Business Rules Workshop Code Templates create these Business Rules.
Note that the Code Template Descriptions are to be used for the Validation rule Message text
Steps:Steps:1. From Application Architect – Click the Logic Architect button on the toolbar:
2. (From the Classes tab) Select a class
3. From View, turn on (check) Context bar
4. Expand the selected class to expose: Rules 4a. Select the Attribute
6. In the Context bar – select TemplatesTemplates
7a. Set your mouse-pointer focus (single-click) into the Business Rule area7b. Locate and Double-Click the appropriate Code Template
8a. Set your mouse-pointer focus (single-click) into the Business Rule Messages area8b. Locate and Double-Click the appropriate Code Template for the Validation Message
9. (Without leaving Logic Architect) – repeat step 4: Select different attributes and/or different classes

156
Concepts Concepts – Business Rules Workshop – Big PictureBig Picture
Code Templates use for Business Rule development…

157
Workshop Workshop –– Business Rules Business Rules –– 1 of 21 of 2 Business Rules – Templates
Business Rules for Class: Business Rules for Class: BuyerBuyer
Attribute: StateStateValidation Rule: this.State.equals("this.State.equals("NJNJ") ") |||| thisthis.State.equals(".State.equals("NYNY")")
Message: State must be either New Jersey or New York<BR>
Attribute: ZipZipInitial Value: ""9999999999""Validation Rule: NeuVisUtil.isNumber(NeuVisUtil.isNumber(thisthis.Zip) .Zip) &&&& this.Zip.length() == 5this.Zip.length() == 5
Message: Zip code must be five digits<BR>
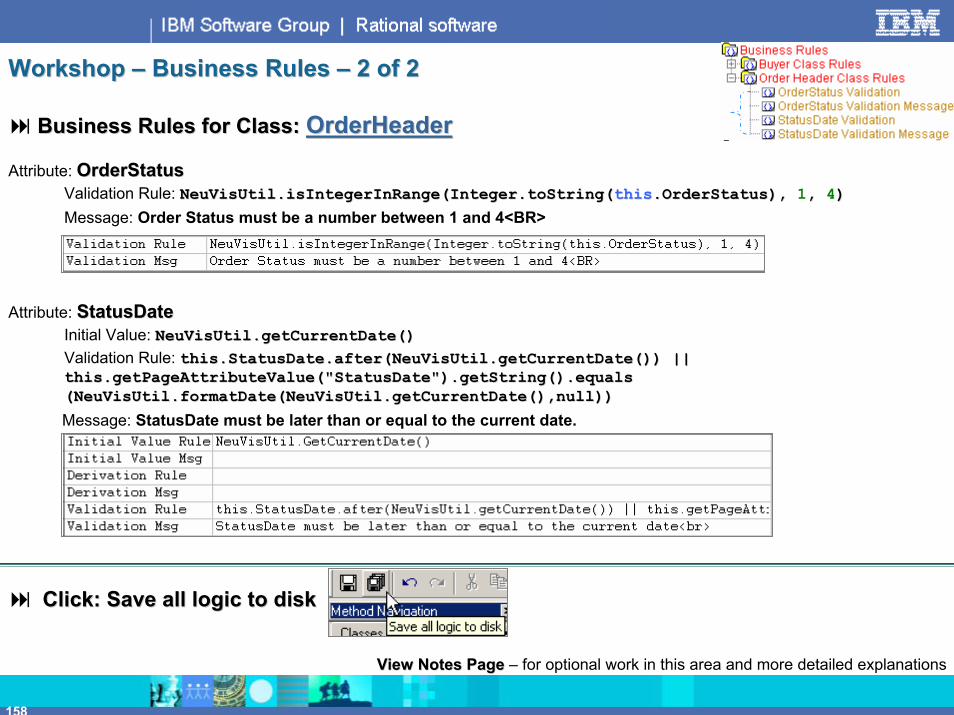
158
Workshop Workshop –– Business Rules Business Rules –– 2 of 22 of 2
Business Rules for Class: Business Rules for Class: OrderHeaderOrderHeader
Attribute: OrderStatusOrderStatusValidation Rule: NeuVisUtil.isIntegerInRange(Integer.toString(NeuVisUtil.isIntegerInRange(Integer.toString(thisthis.OrderStatus), .OrderStatus), 1, , 4))
Message: Order Status must be a number between 1 and 4<BR>
Attribute: StatusDateStatusDateInitial Value: NeuVisUtil.getCurrentDate()NeuVisUtil.getCurrentDate()Validation Rule: this.StatusDate.after(NeuVisUtil.getCurrentDate()) || this.StatusDate.after(NeuVisUtil.getCurrentDate()) || this.getPageAttributeValue("StatusDate").getString().equals this.getPageAttributeValue("StatusDate").getString().equals (NeuVisUtil.formatDate(NeuVisUtil.getCurrentDate(),null))(NeuVisUtil.formatDate(NeuVisUtil.getCurrentDate(),null))
Message: StatusDate must be later than or equal to the current date.
Click: Save all logic to diskClick: Save all logic to disk
View Notes PageView Notes Page – for optional work in this area and more detailed explanations

159
Workshop Workshop -- Create a Conditional Database Insert MethodCreate a Conditional Database Insert MethodSteps…Steps…
1. From Application ArchitectApplication Architect, open the Orders packageOrders package, select Buyer ClassBuyer Class, and click its Methods tabMethods tab
2. From the MethodsMethods tab add a NewNew method named: buyerInsertProcbuyerInsertProc. Click the Method editor icon Use Logic Architect to create the insertinsert method using the Java Code Template: DatabaseUpdateAPIDatabaseUpdateAPI
Save your Project…
Templates
Create insert method and form Viewlet (complete) Create insert method and form Viewlet (complete)

160
Steps…Steps…
1.1. From the Page ArchitectPage Architect/Page Navigator, select: newbuyernewbuyer
2.2. From the Controls palette:Select (set focus to) the GridGrid control
and click in all Buyer attributes click in all Buyer attributes
3.3. From the Favorite Controls Palette:Add sb_save sb_save …position as shown…
4. Double4. Double--Click sb_saveClick sb_save, and specify:Control propertiesControl properties tab:SubmitSubmit tab:
Method to call: buyerInsertProcbuyerInsertProcPage redirection … Create a new Page LinkPage Link to: allbuyersallbuyers
5.5. From the Favorite Controls PaletteAdd ErrorMessages ErrorMessages (as shown)
6. Construct newbuyer 6. Construct newbuyer and Preview Preview Test your work by adding a new Buyer – with both bad/good data (State that is notnot NJ or NY … Zip that is notnot 5 digit numeric)
PageNavigator
Optional…Optional…Add these 3 labels
to remind you of whatyou should be testing for.
Workshop Workshop - Create newbuyer – a Data Entry Pagea Data Entry Page

161
Optional WorkshopOptional Workshop -- Insert a New OrderInsert a New OrderTo reinforce concepts learned from the last exercise,and to extend your knowledge of certain development techniques, design the neworderneworder page, so that users can enter new orders online.
buyerdetail Page
neworder Page

162
Summary – Section F Section F –– Create Insert Method and Data Entry Form Create Insert Method and Data Entry Form – Steps
From Page Architect…From Application Architect…
Use Code TemplateUse Code Templateto create statementsto create statements
Create newCreate newJava methodJava method
Click attributesClick attributesinto Grid controlinto Grid control
Create neworder Create neworder
ConstructConstructand Previewand Preview
neworderneworder
Select JavaSelect Javamethodmethod
Add SubmitButtonAdd SubmitButtoncontrol to pagecontrol to page
Specify pageSpecify pageredirectredirect
Explicitly ProjectExplicitly ProjectRReference attributeeference attribute

163
Optional WorkshopOptional Workshop - Create orderInsertProc – a conditional database insert method
Steps…Steps…1. From Application ArchitectApplication Architect, expand the Orders packageOrders package, select the OrderHeader OrderHeader class, and click its
Methods Methods tab2. From the MethodsMethods tab, add a NewNew method, named: orderInsertProc. orderInsertProc. Using Logic Architect
add the Java code in the OrderInsertProcOrderInsertProc Code Template
3. Save your method
4. Click the Next WindowNext Window icon on the toolbar, to open or return to Page Architect
if (this.validate()){
if (! this.insert()){
NeuError errmsg = ctx.getLastError(); ctx.putSessionValue("ErrorString",errmsg.getErrorMessage()); return false;
}else{
String NextDoc = "buyerdetail?Sel=Buyer_ID="+this.Buyer_ID;ctx.getResponse().setNextDoc(NextDoc);return true;
}}else
return false;

164
Optional WorkshopOptional Workshop - Create neworder – Add fields and project a Relationship attribute
From the Page Architect/Page NavigatorPage Navigator, select: neworderneworder
From the Controls palette:1.1. Select (set focus to the GridGrid control) and
click in all fields click in all fields (INCLUDING R R Buyer)
2. Double2. Double--click the Buyerclick the Buyer DropDown controlFrom the Projection tab:
3.3. Expand Buyer (Buyer) under Class Attribute:4.4. Double-Click BuyerName into Expression
Buyer DropDown control
Double-Click BuyerName

165
Optional WorkshopOptional Workshop - neworder – Add a Submit Button and ErrorMessages label
Steps…Steps…
1.1. From the Controls palette:Add sb_savesb_save – from Favorite Controls Palette
2. Double2. Double--Click sb_saveClick sb_save, and in its SubmitSubmit tab, specify:SubmitSubmit tab:
- Method to call: orderInsertProcorderInsertProc-- Page redirection Page redirection - If method returns true
Redirect to page specified in the method’s call to setNextPage()
3.3. From the Favorite Controls PaletteFavorite Controls PaletteAdd ErrorMessages ErrorMessages (as shown)
4.4. From the toolbar: Construct neworder Construct neworder and Preview Preview (test) your workyour work
Save your Project…

166
Concepts Concepts - Page Design 6 – Embedded (nested) ControlsEmbedded (nested) ControlsSome types of online data presentation require you to display information from two or more related business objects. To do this, you can embed or nest ObjectGrid controls. By visually embedding one data-aware control inside another, and selecting the relationship attribute in the ObjectSet tab, Rapid Developer automatically generates the proper foreign key selection to "join" the objects correctly.
Nested ObjectGrid
orderdetail Page
Modified allbuyers Page with Orders ObjectGrid embedded within the Buyers ObjectGrid
Embedded control Viewlet (complete) Embedded control Viewlet (complete)

167
Steps Steps -- Embedding ControlsEmbedding Controls
3. Size the New Column3. Size the New ColumnEnlarge the column to make room for the embedded controlEnlarge the column to make room for the embedded control
1. Select and Resize the Outer Control1. Select and Resize the Outer ControlEnlarge the outer control's Instance row, to make room for an emEnlarge the outer control's Instance row, to make room for an embedded controlbedded control
2. Add an "Element" to the Outer Control2. Add an "Element" to the Outer ControlRightRight--Click and select "Add Element" (adds a new column)Click and select "Add Element" (adds a new column)
4. Position/Drop the Embedded Control in the New Column4. Position/Drop the Embedded Control in the New ColumnSelect the ObjectGrid control in the Control PaletteSelect the ObjectGrid control in the Control PalettePosition the leftPosition the left--hand corner in the middle of the new white Element and Click hand corner in the middle of the new white Element and Click

168
Workshop Workshop – allbuyers – Add a nested ObjectGrid that displays each Buyer's Orders
Steps… Steps… Step 1. Select and resize the outer control
From the Page Navigator: Open the GlobalGlobal Class and select: allbuyersallbuyers
-- Select the ObjectGrid ControlSelect the ObjectGrid Control (by dragging your mouse from thewhite canvas area to any one the control’s edges)
- Using your mouse:Set focus to the ObjectGrid controlResize the Instance area height Resize the Instance area height –– Stretch/Pull the bottom edge down
Note the blue line denoting that the entire ObjectGrid control has focus in the canvas
InstanceArea
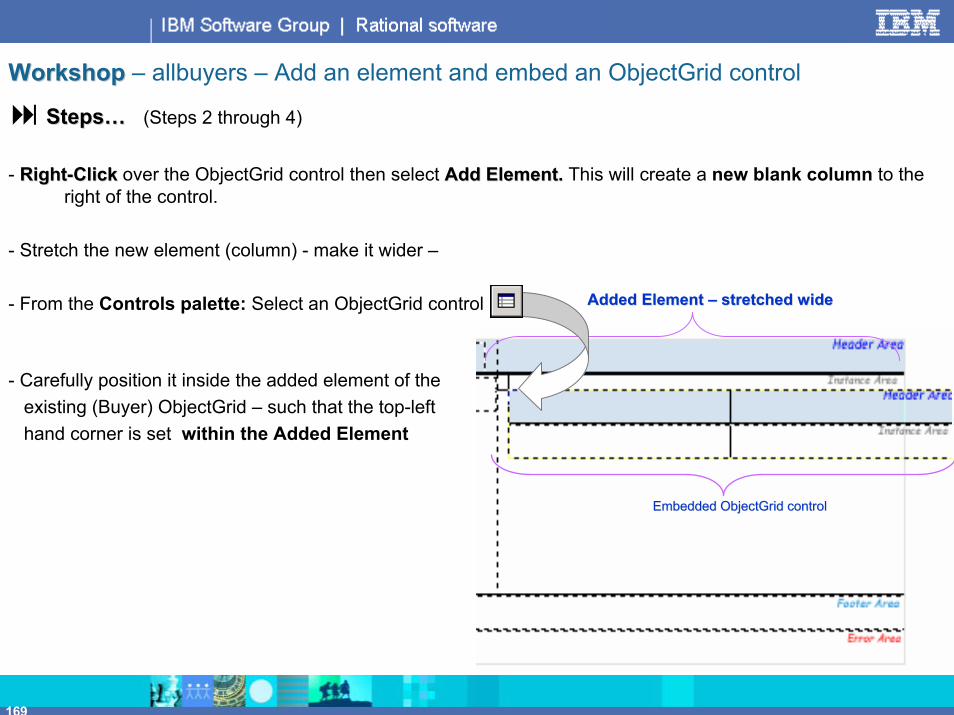
169
Workshop Workshop – allbuyers – Add an element and embed an ObjectGrid control
Steps… Steps… (Steps 2 through 4)
- RightRight--ClickClick over the ObjectGrid control then select Add Element. Add Element. This will create a new blank column to the right of the control.
- Stretch the new element (column) - make it wider –
- From the Controls palette: Select an ObjectGrid control
- Carefully position it inside the added element of the existing (Buyer) ObjectGrid – such that the top-lefthand corner is set within the Added Element
Added Element Added Element –– stretched widestretched wide
Embedded ObjectGridEmbedded ObjectGrid controlcontrol

170
Workshop Workshop – Bind the nested ObjectGrid to an ObjectSet and add attributes
Steps… Steps…
1. With the embedded ObjectGrid in focus:- RightRight--ClickClick and select PropertiesProperties
2. Click the ObjectSet tab:ObjectSet tab:- Open Select Object Set/Attributes Select Object Set/Attributes - Select: OrderHeadersOrderHeaders-- Click OKOK
3. From the Attributes Palette:Attributes Palette:- Click in the following OrderHeader Attributes:
OrderDate, OrderStatus, OrderNumberOrderDate, OrderStatus, OrderNumber-- Size the column widths in the embedded ObjectGrid

171
Workshop Workshop –– Add a Page Link from the Nested ObjectGridAdd a Page Link from the Nested ObjectGrid
Steps…Steps…From the Page Architect
1.1. DoubleDouble--Click directly over the OrderNumber fieldClick directly over the OrderNumber field in the embedded ObjectGrid2.2. From its Control properties:
- Create a new Page Link Create a new Page Link to orderdetailorderdetail
From the toolbar:3. Construct 3. Construct allbuyersallbuyers and Preview Preview your work
Save your Project…

172
Optional Workshop Optional Workshop -- Embedded OrderItem DataEmbedded OrderItem DataTo reinforce concepts learned from the last exercise, embed OrderItems in the allorders page and allow users to change OrderItem information online.
Modified allordersallorders Page
orderitemupdateorderitemupdate Page

173
Summary – Section F Section F –– Create Embedded Controls Create Embedded Controls – Review of Steps
Modify the outer controlModify the outer control(Make room for the nested control)(Make room for the nested control)
Click in and sizeClick in and sizeNested control attributesNested control attributes
Bind nested ObjectGridBind nested ObjectGridcontrol to Datacontrol to Data
Add a nested ObjectGridAdd a nested ObjectGridcontrol inside the instance areacontrol inside the instance area
of the added elementof the added element
ConstructConstructPagePage
Add a new elementAdd a new elementto the outer controlto the outer control
PreviewPreviewPagePage

174
Optional Workshop Optional Workshop – Modify allorders – Embed an ObjectGrid that displays OrderItemsSteps…Steps…
1. From Page Architect/Page NavigatorPage Navigator, open the GlobalGlobal class, and select: allordersallorders
2. In order to make room for the embedded control, enlarge the size of the Page by Double-Clicking the white page canvas, and specifying: Width: 14441444
3.3. Select the ObjectGrid controlSelect the ObjectGrid control, and resize the column widthsresize the column widths (make them smaller – see prev. slide)
4. Re-Select Select the ObjectGridObjectGrid. RightRight--Click Click and select Add ElementAdd Element
5.5. Stretch the Added Element out to the rightStretch the Added Element out to the right (to accommodate an embedded ObjectGrid)
6. From the Controls palette, select an ObjectGridObjectGrid control and embed it in the added element - Be sure that the top-left corner is positioned within the white Instance Area
7.7. DoubleDouble--Click the Embedded ObjectGridClick the Embedded ObjectGrid, and in its ObjectSetObjectSet tab open the Select Object Set/Attributes Select Object Set/Attributes dropdown list and select: OrderItemOrderItem
8. 8. Click in the following OrderItem Attributes: ProductName, Quantity, SalePriceProductName, Quantity, SalePrice
Size the column widths in the embedded ObjectGrid (make them fit in the added element space)
DoubleDouble--Click Click directly over the ProductNameProductName field in the embedded ObjectGrid, and from its Control properties create a Page Link to: orderitemupdate orderitemupdate (created in an Optional Workshop earlier in the course)
Construct Construct and Preview Preview your work
Make the canvas wider
Save your Project…

175
Concepts Concepts - Page Design 7 – Index PageIndex PageIndex …AKA… "Home" pages are required for almost all web sites. They typically contain text, dynamic image files and menus. You will create the following index page for the QuickStart application.
Look this new design over carefully, and note how theDefault controls havebeen moved andresized…Before continuingwith this workshop…What new controlshave been added?(check the NotesPage to find out)
Create index page Part I Viewlet Create index page Part I Viewlet

176
Steps…Steps…From Page Navigator, open the Global class and select: index1. Select and delete the existing Grid control – from the default Style2. Move the existing text container down and shrink the text label/container
Note: To select the text container, Left-Click in the palette just outside the container. Holdingthe Left-Mouse button down, drag your mouse pointer until it touches the control border
3. Add a Menu control to the top of the page. - use Tab_Top_L2 style
4. Double-Click the Menu control5. Select the Menu tab, and add the following entries – for each entry specify the Page Link shown…
Menu Entry Page Link to…- All Buyers allbuyers- New Buyer newbuyer- All Orders allorders- New Order neworder- Order Items allorderitems- Search ordersearch- Home Page index
6. Click OKOK to return to Page Architect andlengthen the menu control's width/height
7. Construct and Preview – Test your links
Workshop Workshop -- Create index Page menuCreate index Page menu
View Notes PageView Notes Page for additionalinformation on Menus …
and optional exercises.

177
Steps…Steps…
1.1. Add an Image Button control to the top of the page, to the right of the Page Header control
2. Double2. Double--Click Click the Image ButtonImage Button, and from its Display tab:Display tab:
- Click the Select button for Back imageBack image.
- Select the file: ……\\QuickStartQuickStart\\StyleStyle\\BasicStyle1BasicStyle1\\SiteImagesSiteImages\\Pic1.gifPic1.gif
3.3. Add a rollover graphic to the Image Button:From the Display tab:Display tab:
Check Mouse Effects, Check Mouse Effects, and select: MouseOverMouseOver- Check: SpecifySpecify
- Click the Select button for Back imageBack image. Select the file: ……\\SiteImagesSiteImages\\Pic2.gifPic2.gif
Create index page Part II Viewlet Create index page Part II Viewlet
Workshop Create index Page Workshop Create index Page –– Add Rollover GraphicsAdd Rollover Graphics
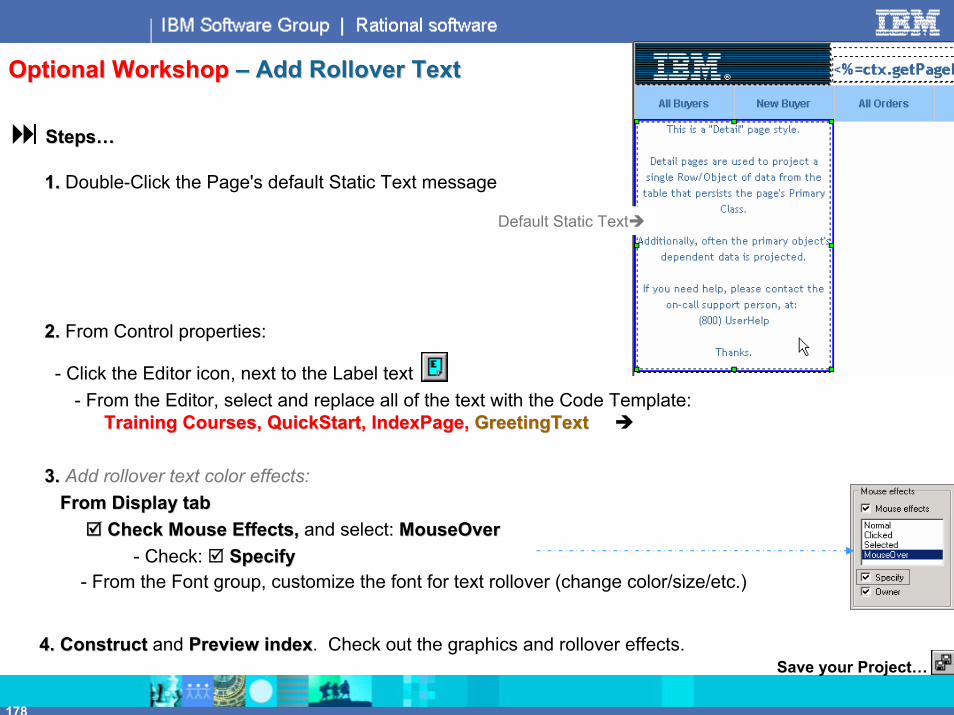
178
Steps…Steps…
1.1. Double-Click the Page's default Static Text message
2.2. From Control properties:
- Click the Editor icon, next to the Label text- From the Editor, select and replace all of the text with the Code Template:
Training Courses, QuickStart, IndexPage, Training Courses, QuickStart, IndexPage, GreetingTextGreetingText
3.3. Add rollover text color effects:From Display tabFrom Display tab
Check Mouse Effects, Check Mouse Effects, and select: MouseOverMouseOver- Check: SpecifySpecify
- From the Font group, customize the font for text rollover (change color/size/etc.)
4. Construct4. Construct and Preview indexPreview index. Check out the graphics and rollover effects.
Optional WorkshopOptional Workshop –– Add Rollover TextAdd Rollover Text
Default Static Text
Save your Project…
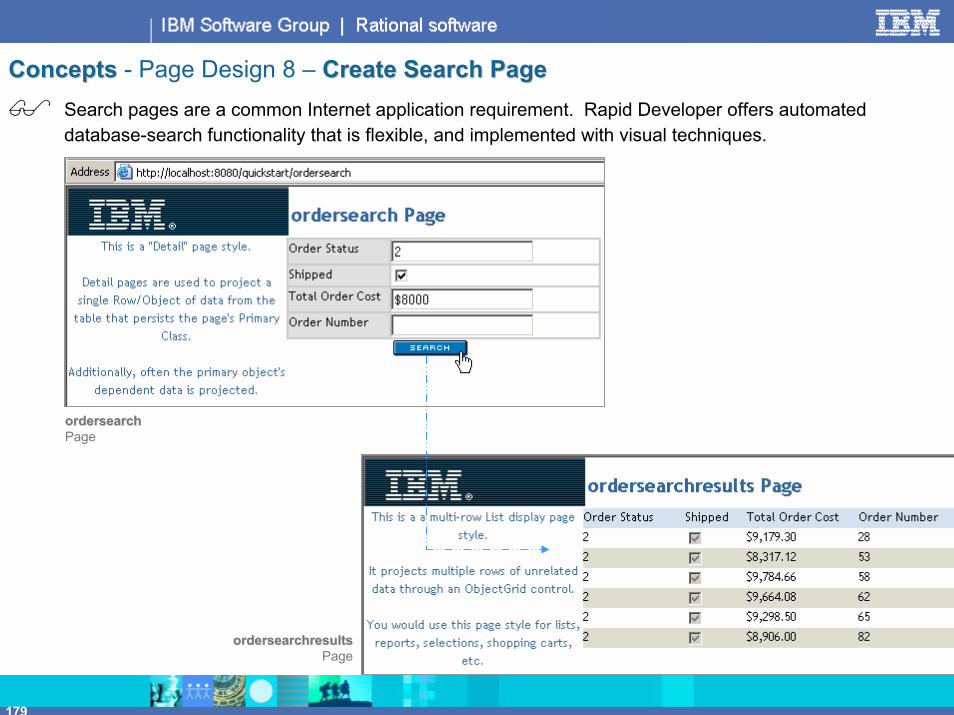
179
Concepts Concepts - Page Design 8 – Create Search PageCreate Search PageSearch pages are a common Internet application requirement. Rapid Developer offers automated database-search functionality that is flexible, and implemented with visual techniques.
ordersearch ordersearch Page
ordersearchresults ordersearchresults Page

180
Steps Steps –– Search PagesSearch Pages
2. Create the Search Results Page2. Create the Search Results PageSearch Results page properties:Search Results page properties:
"List Page" "List Page" -- Primary Class = Primary Class = GlobalGlobalObject Space Object Space –– add Dataadd Data--sourcesource--class from All classesclass from All classes
Add ObjectGrid controlAdd ObjectGrid controlFrom ObjectSet tab: select ObjectSpace.Data Source … and specifyFrom ObjectSet tab: select ObjectSpace.Data Source … and specify Search API …Search API ……and add Footer and Error Area …and add Footer and Error Area
1. Create the Search Page1. Create the Search PageSearch page properties:Search page properties:
Data Access Type = Data Access Type = SearchSearchPrimary Class = DataPrimary Class = Data--sourcesource--classclass***
Add controls and attributesAdd controls and attributesFor each attribute, from For each attribute, from ProjectionProjection tab tab –– specify Search field (Where Clause) propertyspecify Search field (Where Clause) propertySubmitButtonSubmitButton –– Page link to Search Results pagePage link to Search Results page
*** Data-source-class = class that contains the attributes you intend to base the search on.

181
Steps…Steps…From Page NavigatorPage Navigator, open the OrderHeaderOrderHeader class and select: ordersearchordersearch
1. Select 1. Select (set focus to) the Grid controlthe Grid control- Click in the following attributes:
-- OrderStatusOrderStatus-- ShippedShipped-- TotalOrderCostTotalOrderCost-- OrderNumberOrderNumber
2. For each attribute:For each attribute: Double-Click the Attribute inside the Grid
From the ProjectionProjection tab select a Search field type
3.3. From Favorite Controls Palette, add an sb_search button to the Page- From the SubmitSubmit tab, Page LinkPage Link to ordersearchresultsordersearchresults
4. Construct4. Construct but do not Preview ordersearchordersearch
Workshop Workshop -- Create Search PageCreate Search Page
Attribute Name Search field typeOrderStatus Range toShipped Boolean Yes, NoTotalOrderCost Range FromOrderNumber Typed Search Value
Create search page ViewletCreate search page Viewlet

182
Workshop Workshop -- Create Search/Results Page Create Search/Results Page –– 1 of 21 of 2Steps…Steps…
From Page NavigatorPage Navigator1. Expand the GlobalGlobal class2. Select: ordersearchresultsordersearchresults
Modify the Page’s ObjectSpace3. From the toolbar, click the Page PropertiesPage Properties icon
4. Click the Object SpaceObject Space tab
- From the Object Space tab:5. Select OrderHeaderOrderHeader from All classesAll classes
Click Add >>Add >>
6. With the OrderHeaderOrderHeader Object set selected:(with OrderHeader selected in the Object Space)add the following Selection expression:
%ctx.getSearchSelectClause()%%ctx.getSearchSelectClause()%
Create search results page ViewletCreate search results page Viewlet
OrderHeaderselected

183
Steps…Steps…1. Set focus to ObjectGrid and access its propertiesSet focus to ObjectGrid and access its properties
From the ObjectSetObjectSet tab:2. Select ObjectSet/Attributes: ObjectSpace.OrderHeaderObjectSpace.OrderHeader
3. Click the four OrderHeader attributes Click the four OrderHeader attributes shown below, into the ObjectGrid control
4. Add an Accent LabelAccent Label to the Error AreaError Area of the ObjectGrid control5. Type in an appropriate Label text message for a Not-Found error condition (the user's select criteria
returned no rows). Example: No Soup For You!! ☺ … or maybe, "No orders match your search criteria. Please try again."
Workshop Workshop -- Create Search/Results Page Create Search/Results Page –– 2 of 2 2 of 2 –– Customize the ObjectGridCustomize the ObjectGrid
Place the controlinside the Error Area

184
Workshop Workshop -- Create Search/Results Page Create Search/Results Page –– Construct and TestConstruct and Test
(Optional Exercise)(Optional Exercise) Add a new Page Link Add a new Page Link – from OrderNumberOrderNumber to orderupateorderupate-- ConstructConstruct ordersearchresults, ordersearchresults, then from Page Navigator Page Navigator select ordersearch. Preview ordersearch. Preview and test your
search functionality. Notes on testing your page:- You must enter the TotalOrderCost search value formatted with $ signs: $8,000- The boolean Shipped checkbox will return True/False results. To search on True results and all
rows (irrespective of Shipped value) change the Search field type to: Boolean Yes, Don't care
VView Notes Pageiew Notes Page on this slide – for additional search page information and technical discussion.

185
Optional WorkshopOptional Workshop -- Search PagesSearch PagesWhat SQL is being constructed?What SQL is being constructed?
To determine what SQL is being generated by the Search page, for the SearchResults page, do the following:
1. From Page Architect, click the Debug Options icon on the toolbar 2. Check SQL calls and Click OK3. Preview your Search page and test4. Note that on the SearchResults page, you will now see the constructed SQL – inside the bright red box.
Try different combinations of field search values5. When finished, return to Debug Options and uncheck SQL Calls - click OK
Note: The automated search data access logically "ANDsANDs" all constructed Where clause conditions. For more sophisticated and complex searches, use Enter onlyEnter only pages + custom methods. See: Custom SearchCustom Search example - in the Rapid Developer Software: Development Techniques course

186
Optional WorkshopOptional Workshop -- Search PagesSearch Pages
Enhance ordersearchEnhance ordersearch
Add:
Label search indicators – to show the users what each field search does
TotalOrderItems – then Copy/Paste the TotalOrderItems field inside the row and add Label text
It will be helpful to select and resize the TotalOrderItems row (create space for graphic development techniques)
In the ordersearchresultsordersearchresults page, add:
SortingSorting
A Page Link to orderupdateorderupdate

187
Page Design Feature Summary Page Design Feature Summary -- ReviewReviewIn this section you have learned:
How to use Page Architect to create:List pagesDetail pagesSearch pagesIndex pagesDatabase Update and Insert pages – with Business Logic (methods and Business Rule expressions)Pages with embedded (nested) controls
In the next section – Messaging and Integration - you will:Create an XML Output messageModify a method to invoke the MessageView the output XML formed by the MessageCreate a Java Session bean componentInclude the component and call it from a methodAccess a published Web ServiceDiscover a Web Services
The next slide (D. Business Messaging and Integration column) describes the Rapid Developer facilities we will be covering in the next section
Save your Project…

188
Summary - Rapid Developer Software Rapid Developer Software –– Development Steps for this CourseDevelopment Steps for this Course
Construction
Import (UML, DBMS)
Construct DBMS
Class Architect
Sample Data
Page Architect
Site Architect Message Architect
Technology
Object Space
Business Object Modeling Messaging and IntegrationUser Interface Modeling
Web Services
Technology and Construction
Business Logic

189189189
Section G – Application IntegrationApplication Integration
After you finish this section, you will be able to:After you finish this section, you will be able to:Describe the methods and facilities to integrate a Rapid Developer application with other (external) applications through:
XML MessagingWeb ServicesCreation and use of external Java Packages and Components
Create an XML Output message, and call the one of the message's built-in methods to create an XML data stream with the data from a formCreate a Web Service and write a method that calls the Web Service passing it parametersCreate and use a Page local variableCreate a standalone EJB Session Bean componentInclude and call the EJB Session Bean component from a method

190
The Big Picture The Big Picture -- StepsSteps
1. Software Installation and Configuration
2. Single User Project Setup
3. Import and Refine Class Model
4. User Interface and Site Modeling
5. Page and Logic Modeling
6. Application Integration 6. Application Integration
7. Application Maintenance and Enhancement

191
Concepts Concepts -- Application IntegrationApplication IntegrationFew of your applications will consist of completely Rapid Developer-generated and deployed functionality. More likely there
will be considerable interaction with existing business logic frameworks, with Web Services, with Java packages and J2EE components and through XML messaging.
ClassClass……orderInsertProc()orderInsertProc()
validate() datavalidate() datainsert() new rowinsert() new rowCall OrderMsg GET methodCall OrderMsg GET methodto format XML messageto format XML message
Write XML to file…Write XML to file…
redirect redirect ……
……
DatabaseDatabase
Send XMLMessage
Create and useJ2EE components andexisting Java Packages
Publish anduse a
Web Service
Publish andPublish anduse ause a
Web ServiceWeb Service
Receive XMLMessage
Rapid Developer Application – and various application integration options

192
Concepts Concepts -- MessagingMessagingXML Messaging as a means of integrating applications and creating standardized component/data-based functionality is
becoming a standard requirement for Internet application development.
Manually creating XML messages and Java methods that send and receive the XML messages is time-consuming, difficult, and it requires extensive technical knowledge of proprietary APIs in different Messaging products (MQSeries, Tibco, MSMQ, JMS, etc.).
Rapid Developer makes developing Messaging applications much easier than manual coding, and fully supports Message construction across a number of different transport protocols – ensuring technology independent investment protection in your applications. View Notes PageView Notes Page for more information on the topic of XML per se'.
What is the Business Problem?What is the Business Problem?
Many businesses integrate cross-platform applications (desktop-to-middle-tier…middle-tier-to-mainframe, etc.) using XML.
In our case, when a new Buyer is added to the database, requirements dictate that we send an Output message to a mainframe system consisting of all the Buyer attributes and values.
DatabaseDatabasezSerieszSeries
900900
CustomMethod
Output XML Message – Transport to…

193
Workshop Workshop -- MessagingMessaging
Workshop Preliminary Step:Workshop Preliminary Step: Select a Messaging Transport. You must select at least one messaging transport, in order to continue with this workshop:
* Pull down the Window menu and select: QuickStart.OMDQuickStart.OMD – to access Application Architect
1.1. Expand LocalModel … LocalModel … then select: Technology SettingsTechnology Settings …then the Messaging Messaging tab2.2. Click New, Click New, to create a Transport Descriptor Name 3. Choose any Transport type (it doesn't matter what Transport type you choose, just so long as you
select at least one)

194
Steps Steps -- Creating Rapid Developer Output MessageCreating Rapid Developer Output Message
3. Specify 3. Specify thethe Message’s Message’s Artifact's ObjectSpaceObjectSpaceAdd classes and attributes to the MessageAdd classes and attributes to the Message
1. Define 1. Define thethe Message Message "Artifact"Select the Message’s Primary Class and name the new MessageSelect the Message’s Primary Class and name the new Message
2. Specify 2. Specify thethe Message’s Message’s Artifact's PropertiesPropertiesSelect message type, transport queue properties, data access, enSelect message type, transport queue properties, data access, encryption, etc.cryption, etc.
4. Import/Map 4. Import/Map … or …… or … Create a DTD Create a DTD for thefor the MessageMessageCreate default DTD, Import an Existing DTD, or create and customCreate default DTD, Import an Existing DTD, or create and customize a DTDize a DTDMap the DTD to the ObjectSpace Map the DTD to the ObjectSpace –– Automap … or … Drag/Drop attributesAutomap … or … Drag/Drop attributes
5. Construct 5. Construct thethe Message ClassesMessage ClassesConstruct the Message (constructs and deploys the Java classes)Construct the Message (constructs and deploys the Java classes)

195
Workshop Workshop –– Define an XML Output Message Define an XML Output Message – 1 of 2From Application Architect… Application Architect… (Steps 1 and 2 from the previous slide)
-- Select the Buyer Buyer Class …then… click the Messages tab, and define a New XML output message
1. Name the Message: BuyerMsgBuyerMsg
2. In the Message details/Direction group, click: OutOut
3. Click: ObjectSpace & DTD Mapping…
NoteNote: Because we will be using copy/paste code, spelling and capitalization are very important – even on the artifacts such as the Message Name (BuyerMsgBuyerMsg)
ObjectSpace & DTD Mapping…
Messaging Viewlet Messaging Viewlet –– 1 of 21 of 2

196
From Message ObjectSpaceMessage ObjectSpace (Steps 3 - 5 in the process)1. Right-Click over Buyer in the ObjectSpace2. 2. Select: Add all the basic attributes for this elementAdd all the basic attributes for this element
2. Click Create XML DTD…Create XML DTD…3. Name the file: BuyerMsg.DTDBuyerMsg.DTD and click ExportExport4. Click YesYes to Automap ObjectSpace to DTD? ((Optionally Edit the DTDEdit the DTD produced))5. Click CloseClose, then OKOK – to return to the Messages tab
6.6. From the MessagesMessages tab
- Click ConstructClick Construct
XMLXML MessageMessage –Auto-mapped to the
ObjectSpace
Workshop Workshop –– Define an XML Output Message Define an XML Output Message – 2 of 2

197
From the Buyer Buyer Class’s Methods Methods tab:
1. 1. Select (click) buyerInsertProcbuyerInsertProc and click the Logic Editor icon:
2.2. And from Logic Architect, select and delete all existing Java statements
3. 3. Replace it with Training Courses, QuickStart, Messaging Methods, Training Courses, QuickStart, Messaging Methods, BuyerMsgBuyerMsg
The above GetBuyerMsg(…)GetBuyerMsg(…) Rapid Developer Java/API creates the String equivalent of an XML message, whose data is derived from the Inserted ObjectSpace values.
The java.io.PrintWriter(…) statement prints the String to a file on your C: drive> c:c:\\BuyerMsg.xmlBuyerMsg.xml
4.4. Access Page Architect. (click the button on the toolbar)
Workshop Workshop -- Create the Method that Calls the MessageCreate the Method that Calls the Message
Messaging Viewlet Messaging Viewlet –– 2 of 22 of 2

198
Workshop Workshop – Enhance newbuyer - page that calls the method (that calls the message)
From Page Architect/Page Navigator, select: newbuyernewbuyer
1. Click the Page Properties icon and access the newbuyer Page’s ObjectSpaceObjectSpace tab2. From the ObjectSpace tab:
Select BuyerMsgBuyerMsg from Current base classCurrent base classAdd >>Add >> BuyerMsgBuyerMsg to the Object Space
Click CloseClose to return to Page Architect
3. Change the SubmitButton'sSubmitButton's Page Link (Submit tab)to: file:///C:/BuyerMsg.xmlfile:///C:/BuyerMsg.xml
4. From Page Architect:ConstructConstruct and PreviewPreview newbuyernewbuyer.-- Enter dataEnter data in all of the fields and press SAVESAVE
Save your Project…

199
Optional WorkshopOptional Workshop – Order Output MessageOrder Output Message
Reinforce concepts learned from the last example, add an XML message for new Orders. Call the message from the current Method that inserts a new Order.
neworder Page
Order Order -- ClassClass……orderInsertProc()orderInsertProc()
validate() datavalidate() datainsert() new rowinsert() new rowCall OrderMsg GET methodCall OrderMsg GET methodWrite XML to file…Write XML to file…redirect to buyerdetailredirect to buyerdetail
……Output XML for new Order
Invoke Servlet, which invokes…
buyerdetail Page
Claims.Claims.mdbmdb
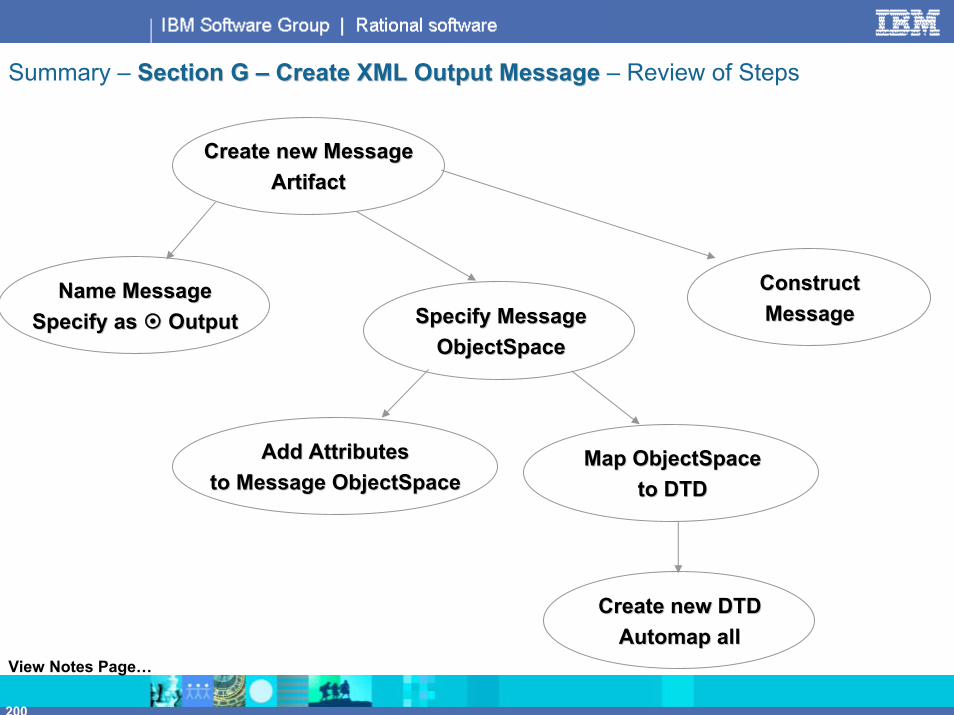
200
Summary – Section G Section G –– Create XML Output Message Create XML Output Message – Review of Steps
Name MessageName MessageSpecify as Specify as OutputOutput
Add AttributesAdd Attributesto Message ObjectSpaceto Message ObjectSpace
Specify MessageSpecify MessageObjectSpaceObjectSpace
Create new MessageCreate new MessageArtifactArtifact
ConstructConstructMessageMessage
Map ObjectSpaceMap ObjectSpaceto DTDto DTD
Create new DTDCreate new DTDAutomap allAutomap all
View Notes Page…

201
Optional WorkshopOptional Workshop – Order Output Message and Method Order Output Message and Method –– 1 of 41 of 4From Application ArchitectApplication Architect
1. Select Select the OrderHeaderOrderHeader Class …then… click click the MessagesMessages tab.. Define a New XML output message…
2. Name the Message: OrderMsgOrderMsg3. In the Message details/Direction group, click: OutOut4. Click: ObjectSpace & DTD Mapping…ObjectSpace & DTD Mapping…
From Message ObjectSpaceMessage ObjectSpace:5. Select OrderHeader. Right5. Select OrderHeader. Right--Click Click and Add all the basic attributes for this element.Add all the basic attributes for this element.6. 6. With OrderHeader selected in the ObjectSpace, DoubleDouble--Click Click RR Buyer Buyer in Current base class: OrderHeaderCurrent base class: OrderHeader
7. 7. With RR Buyer Buyer selected in the ObjectSpace, Double-Click BuyerName in Current base class: BuyerCurrent base class: Buyer

202
Optional WorkshopOptional Workshop – Order Output Message and Method Order Output Message and Method –– 2 of 42 of 4Complete ObjectSpace
From Message tab Message tab -- ObjectSpaceObjectSpace
8. Click Create XML DTD…Create XML DTD…9. Name the file: OrderMsg.DTDOrderMsg.DTD and click ExportExport10. Click YesYes to Automap ObjectSpace to DTD?11. Click Close Close … then… OKOK – to return to the Messages tab
12. From the MessagesMessages tab click ConstructConstruct

203
Optional WorkshopOptional Workshop – Order Output Message and Method Order Output Message and Method –– 3 of 43 of 4From Application Architect …
1. From the From the MethodsMethods tab. Selecttab. Select (click) orderInsertProcorderInsertProc and click the Logic Editor icon:
2.2. And from Logic Architect, select and delete all existing Java statements
3.3. Replace the existing method with:Training Courses, QuickStart, Messaging Methods,Training Courses, QuickStart, Messaging Methods, OrderMsgOrderMsg
4. Click Save: 4. Click Save:
orderInsertProc – new Java statements

204
Click the Next Window icon to access Page Architect.
From Page Architect:1.1. From Page Navigator, select the neworderneworder Page2.2. Click the Page Properties icon and access the ObjectSpaceObjectSpace tab
- From the ObjectSpace tab:3. Select OrderMsg from Current Base ClassCurrent Base Class4. Add >>4. Add >> it to the Object Space5. Click CloseClose to return to Page Architect
6.6. Change the SubmitButton'sSubmitButton's Page Link (Submit tab) redirection to: file:///C:/OrderMsg.xmlfile:///C:/OrderMsg.xml
From Page Architect:7. Construct7. Construct and PreviewPreview neworder.8. Enter data8. Enter data in all of the fields and press SAVE SAVE – verify results (new database row, and XML file produced)
Save your Project…
Optional WorkshopOptional Workshop – Order Output Message Page Order Output Message Page –– 4 of 44 of 4

205
Concepts Concepts -- Web Services Web Services –– BackgroundBackground
Web services (sometimes called application services) are literally services (usually including some combination of programming and data, but possibly including human resources as well) that are made available from a business's Web server for Web users or other Web-connected programs.
Web services range from such major functionality as storage management and customer relationship management (CRM) down to much more limited services such as the furnishing of a stock quote and the checking of bids for an auction item – the rough equivalent of a Remote Procedure Call (RPC) using theInternet.
The accelerating creation and availability of Web Services is a major I/T trend.
For those interested in background reading, general research/Q&A on Web Services, we recommend:
http://www-106.ibm.com/developerworks/webservices/ - IBM’s free tutorialshttp://www.sys-con.com/webservices/ - an online subscription Web Services journalhttp://www.xml.com/pub/a/2001/04/04/webservices/ - an excellent one-stop tutorialhttp://www.xmethods.net/ - a site where published web services existhttp://msdn.microsoft.com/msdnmag/issues/0900/WebPlatform/WebPlatform.asp
Rapid Developer can help you construct an application that provides Web Services, is a Web Service consumer, and/or publishes Web Services to a private or industry UDDI registry.
In either case, the development workflow is visual and is accomplished at the same high level of abstraction as the rest of the work you've been doing.

206
Concepts Concepts -- Web Services Web Services -- Web Services Web Services –– RequirementsRequirements
There are two modes of Web Services access and utilization:
1.1. ConsumeConsume (call to) a Web Service:Load the WSDL Location and call the Web ServiceDiscover + Load the WSDL Location using a UDDI server and the service’s Business Name
2.2. PublishPublish a Web Service- Create a Component- Expose the Component as a Web Service …and…- Register the Component to a UDDI Server
Pre-Requirements for Rapid Developer Web Services development:Web Services functionality is available only using J2EE application servers - not applications using Microsoft/DNA.Web Services access (calling a Web Service through either UDDI Discovery of Business Names, or Loading a Web Service WSDL) is available using all of the Rapid Developer supported J2EE application serversRapid Developer 5.0 supports Web Services publishing only under WebSphere, WebLogic and Oracle9iAS (version 9)Your machine must be connected (live) to the Internet, in order to access remote Web Services functionality You must have installed Rapid Developer with the SOAP Components option. If you did not do this, your Rapid Developer CD has a Soap Components install option (as does the \RDEV\Zips\ folder.Complex types (I.e. Web Services with <types> tags in the WSDL files) are not supported in the current release.

207
Steps Steps -- Creating Rapid Developer Web ServicesCreating Rapid Developer Web Services
2. Code a Method that uses the Web Service Artifact to 2. Code a Method that uses the Web Service Artifact to Call a Web ServiceCall a Web Service
Select the Method’s Class and create a new MethodSelect the Method’s Class and create a new MethodUsing the Logic Editor, code the Java statements required beforeUsing the Logic Editor, code the Java statements required before the Web Servicethe Web ServiceOpen the Web Services entries and DoubleOpen the Web Services entries and Double--Click the Web Service methodClick the Web Service methodModify the return and (optionally) sending parameters of the WebModify the return and (optionally) sending parameters of the Web ServiceServiceCode the Java statements required after the Web ServiceCode the Java statements required after the Web Service
1. Define the Web Service 1. Define the Web Service ArtifactCreate a new Web ServiceCreate a new Web ServiceLoadLoad (code manually) or (code manually) or DiscoverDiscover the Web Service’s the Web Service’s WSDLWSDLClick the Web Service method to understand the input/output paraClick the Web Service method to understand the input/output parametersmeters
3. Create a Page that calls the Method 3. Create a Page that calls the Method … … that calls the Web Servicethat calls the Web Service

208
Workshop Workshop –– 1. Create a New Web Service Artifact1. Create a New Web Service Artifact
From Application Architect, select the Application Package Application Package icon…then… click click the Web Services Web Services tab,
Define a NewNew Web Service
Name: GetTempWSGetTempWS
Click: LoadLoad
Copy/Paste this WSDL Locationand click: LoadLoad
Click: getTemp to exposeits Method parametersMethod parameters
http://www.xmethods.net/sd/2001/TemperatureService.wsdl
Note: The above WSDL location text is available under the Web Services Code Templates: GetTempWS
Web Services ViewletWeb Services Viewlet

209
Workshop Workshop –– 2. Create a Method that Calls the Web Service2. Create a Method that Calls the Web Service
Click the BuyerBuyer Class icon, and its MethodsMethods tab…
- Define a NewNew Method named: getTempWSProcgetTempWSProc- Click the Logic Editor icon: -- and enter the Logic Architect
From Logic ArchitectLogic Architect do the following to create a method that calls your Web Service:Code (or copy/paste) this statement as the first line: float tempf == 0.0f;
Enter a new line Enter a new line and click the Component API on the toolbar: Expand GetTempWS, and Double-Click: float getTemp(zipcode)float getTemp(zipcode)
Under the [Web Services Method] pre-processor line, change: return …to… tempf
Click in the following statement found in the QuickStart, Web ServicesQuickStart, Web Services Templates ctx.getResponse().Write("Current temp for: " + zipcode + " is: " + tempf);
return true; // should be the last line of the method.
SaveSave your method editing work, and close the Logic Editor

210
Click the Next Window icon to access Page ArchitectPage Architect.
From the Navigator bar:From the Navigator bar:1. Click (select) the BuyerBuyer class icon2. RightRight--ClickClick and select: Insert PageInsert Page3. Click the Page PropertiesPage Properties icon
From Page Properties:4. Name the Page: get_temp_ws_page5. Change its Data access type: to Full6. Click the ObjectSpaceObjectSpace tab
From the Object SpaceFrom the Object Space7. Click the Buyer Class, RightRight--clickclick and select: Add local variableAdd local variable8. Name the local variable: zipcode its Datatype should be TextText
8a. Optionally enter an initial value in double-quotes: "07452""07452"
9. Click OKOK and CloseClose to return to Page Architect
Workshop Workshop –– 3. Create a Page that Calls the Method 3. Create a Page that Calls the Method -- that Calls the Web Servicethat Calls the Web Service
View Notes Page…

211
Workshop Workshop -- Create a Page that Calls the Method Create a Page that Calls the Method -- that Calls the Web Servicethat Calls the Web Service
Steps… continued
From the Controls paletteFrom the Controls palette1. Add two Label controls, a Submit Button (use sb_search) and an EditNumber control control - as shown in
this screen shot below…
2. DoubleDouble--Click the EditNumber Click the EditNumber control3. From the Projection Projection tab, , DoubleDouble--Click: Click: zipcode
4. DoubleDouble--Click the Submit Button Click the Submit Button control- From the Submit tab:Submit tab:
4a. Check: DefaultDefault4b. Specify Method to call: getTempWSProc4c. Check: Redisplay the current page with the same dataRedisplay the current page with the same data
Label Controls

212
Workshop Workshop -- Web Services Web Services –– Construct and Page PreviewConstruct and Page Preview
From Page Architect:
ConstructConstruct and Preview:Preview: get_temp_ws_pageget_temp_ws_pageEnter a valid U.S. zipcode in zipcode field and press: SearchSearch
Preview NotePreview Note: Your performance and response time will be dependent on your Internet connection speed for the Web Service workshops.
Save your Project…

213
Workshop Workshop -- Discover Web Services Using UDDI Registry Business NameDiscover Web Services Using UDDI Registry Business Name
As you develop with Web Services, it may be the case that you do not have the WSDL location to load. Or you may simply be searching for a particular Web Service by Business. To discover the WSDL Location of a UDDI-registered Web Service:
From the Web Services tab, 1.1. Define a new Web ServiceDefine a new Web Service
2.2. ClickClick: DiscoverDiscover
3. In Business Name:Business Name: type wsuserwsuser and clickclick DiscoverDiscover
4. When the Resulting rows return:-- SelectSelect (click) (click) TemperatureTemperature (Service)(Service)- Click: OKOK
Alternatively, you may enter a partial name in the Business Name:(the beginning letters of the Business name)
From here forward, the process is the same as the previous Web Services work-flow examples.

214
Summary – Section G Section G –– Create Web Service Create Web Service – Review of Steps
Load WSDLLoad WSDLfrom locationfrom location
Select UDDISelect UDDIRegistryRegistry
Discover WSDLDiscover WSDL
Create new Web ServiceCreate new Web ServiceArtifactArtifact
Enter Business NameEnter Business Name
Call Web ServiceCall Web Servicefrom Java Methodfrom Java Method
Code preCode pre--WebWebService statementsService statements
DoubleDouble--ClickClickWeb ServiceWeb Service
Customize WebCustomize WebService parametersService parameters

215
Optional WorkshopOptional Workshop –– Web Service Load Example Web Service Load Example -- ConceptsConcepts
To reinforce concepts learned from the last example, create a new Web Service artifact that calls a Domain Name Checker program:
domain_name PageIn the Browser
domain_name PageAfter call to Web Service

216
From Application Architect, define a new Web Service artifact:Application Architect, define a new Web Service artifact:1. Select Select the Application Package Application Package icon …then… click click the Web Services Web Services tab:
2. Define a NewNew Web Service, named: TestDomainTestDomain3. Click: LoadLoad4. Copy/Paste this WSDL: http://services.xmethods.net/soap/urn:xmethods-DomainChecker.wsdl
and click: LoadLoad
5. Click the checkDomaincheckDomain method to expose its Method ParametersMethod Parameters
OptionalOptional WorkshopWorkshop –– Web Service Load Example Web Service Load Example –– 1 of 41 of 4

217
OptionalOptional WorkshopWorkshop –– Web Service Load Example Web Service Load Example –– 2 of 42 of 4
Steps… continued - Define a method that calls the Web Service:
1. Select 1. Select the Global Class Global Class icon …then… click click the Methods Methods tab, and define a NewNew Method, named: domainNameProcdomainNameProc
2. Click the Logic Editor icon and from Logic Architect, create a method that calls your Web Service:2a. Enter a new line, above: return true;
2b. Use the Templates to Double-Click the TestDomainTestDomain Web Service lines into your method. Modify the method as shown below…
2c. Type, or Copy/Paste in the following ctx.PutSessionValue(…)ctx.PutSessionValue(…) statement – as shown below:ctx.putSessionValue("ctx.putSessionValue("ErrorStringErrorString", Result);", Result);
Save: and navigate to Page Architect.

218
Optional WorkshopOptional Workshop –– Web Service Load Example Web Service Load Example –– 3 of 43 of 4Steps… continued
From Page ArchitectFrom Page ArchitectFrom the Navigator bar::
1. Click (select) the GlobalGlobal class icon2. RightRight--ClickClick and select: Insert PageInsert Page3. Click the Page PropertiesPage Properties icon
From Page Properties:4. Name the Page: domain_namedomain_name
5. Change its Data access type: to FullFull6. Click the ObjectSpaceObjectSpace tab
From the Object Space7. Click the Global Class, RightRight--clickclick and select: Add local variableAdd local variable
8. Create a TextText local variable named: symbolsymbol8a. Optionally: specify an initial value: "IBM.COM""IBM.COM"
9. Click OKOK to return to Page Architect

219
Optional WorkshopOptional Workshop –– Web Service Load Example Web Service Load Example –– 4 of 44 of 4Steps… continued
From the Controls palette1. Add two Label controls, sb_search and an Edit Text control2. Also add an ErrorMessageErrorMessage label (from Favorite Controls)
3. DoubleDouble--Click Click the Edit TextEdit Text control4. From the Projection tab, DoubleProjection tab, Double--Click: Click: symbolsymbol
5. DoubleDouble--Click sb_search Click sb_search control- From the Submit tab:Submit tab:
5a. Check: DefaultDefault5b. Method to call: domainNameProcdomainNameProc
5c. Redisplay the current page with the same data
6. Construct Construct and Preview Preview the Page.
Test with domain names:no http// … no www – ex.
IBM.comIBM.comIBM4U.com
Code Template thatcontains this text
IBM4U.com
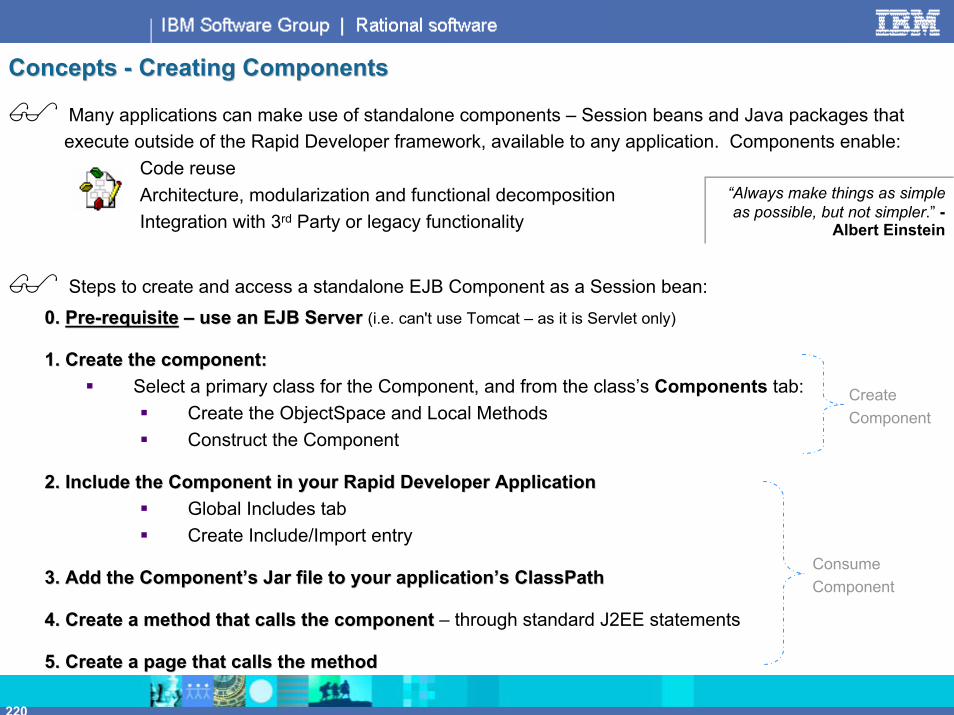
220
Many applications can make use of standalone components – Session beans and Java packages that execute outside of the Rapid Developer framework, available to any application. Components enable:
Code reuseArchitecture, modularization and functional decompositionIntegration with 3rd Party or legacy functionality
Steps to create and access a standalone EJB Component as a Session bean:
0. 0. PrePre--requisiterequisite –– use an EJB Server use an EJB Server (i.e. can't use Tomcat – as it is Servlet only)
1. Create the component:1. Create the component:Select a primary class for the Component, and from the class’s Components tab:
Create the ObjectSpace and Local MethodsConstruct the Component
2. Include the Component in your Rapid Developer Application2. Include the Component in your Rapid Developer ApplicationGlobal Includes tabCreate Include/Import entry
3. Add the Component’s Jar file to your application’s ClassPath3. Add the Component’s Jar file to your application’s ClassPath
4. Create a method that calls the component 4. Create a method that calls the component – through standard J2EE statements
5. Create a page that calls the method5. Create a page that calls the method
Concepts Concepts -- Creating ComponentsCreating Components
ConsumeComponent
CreateComponent
“Always make things as simple as possible, but not simpler.” -
Albert Einstein

221
Because EJB components require you to construct and deploy EJB Session (or Entity) beans, you will not be able to continue using Tomcat (which is a Servlet-only application server) at this point. You may use WebSphere, WebLogic, Oracle9iAS or any other supported EJB application server. Note that it Note that it isis possible to use Tomcat to create components as possible to use Tomcat to create components as Java Java PackagesPackages. . The Rapid Developer Development Rapid Developer Development –– Techniques CourseTechniques Course contains detailed instructions on how to do this.
If you are using Tomcat, return to the Application Architect – Technology Selections tab, and change Application Servers now, before beginning this section. The screen capture below, describes settings for using Oracle9iAS, version 1.0. Note the Http server properties – as well as the JNDI properties which are erased (blanked out) as per the app server install req's.
Workshop Workshop -- EJB Components EJB Components –– Change Application ServerChange Application Server
Components Viewlet Components Viewlet –– 1 of 21 of 2
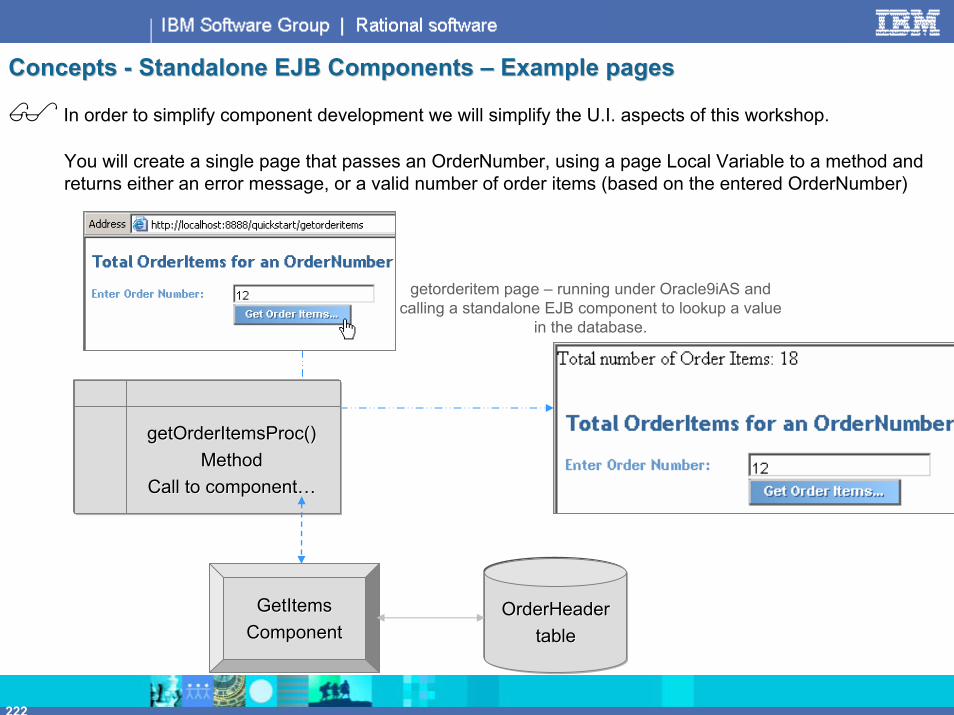
222
Concepts Concepts -- Standalone EJB Components Standalone EJB Components –– Example pagesExample pages
In order to simplify component development we will simplify the U.I. aspects of this workshop.
You will create a single page that passes an OrderNumber, using a page Local Variable to a method and returns either an error message, or a valid number of order items (based on the entered OrderNumber)
getorderitem page – running under Oracle9iAS and calling a standalone EJB component to lookup a value
in the database.
getOrderItemsProc()getOrderItemsProc()MethodMethod
Call to component…Call to component…
GetItemsGetItemsComponentComponent
OrderHeaderOrderHeadertabletable

223
Steps Steps -- Create and Consume ComponentsCreate and Consume Components
3. Code the Component’s 3. Code the Component’s Private (Local) Methods(Local) MethodsCode the component’s Java methods and specify their Definitions (input/return parameter signature)Specify at least one method as an Interface to the component
4. Construct the Component4. Construct the ComponentConstruct the Component (constructs and deploys the Java classes)
1. Define the Component 1. Define the Component artifactSelect the Component’s Primary Class and name the new Component
2. Specify the Component’s ObjectSpace2. Specify the Component’s ObjectSpaceAdd classes and attributes to the Component’s ObjectSpace
5. Code a Method that calls the Component5. Code a Method that calls the ComponentSelect the Method’s class and create a new MethodUsing the Logic Editor/Code Templates, Code the EJB statements to invoke the Component
6. Create a Page that calls the Method … that calls the Componen6. Create a Page that calls the Method … that calls the Componentt

224
Workshop Workshop -- Define a New EJB Component Define a New EJB Component – 1 of 3
From Application ArchitectApplication Architect select the OrderHeaderOrderHeader class class icon …then… click click the ComponentsComponents tab:- Define a NewNew Component
- Name the component: GetItemsGetItems and click ObjectSpaceObjectSpace
- From the ObjectSpace tab:1. Add TotalOrderItemsTotalOrderItems from Current Base Class to the Object Space2. RightRight--ClickClick on OrderHeader, and select Add Local MethodAdd Local Method
- From the Local Method dialog window:Name: getItemsProcLMgetItemsProcLM
- Click the Method editor iconand invoke Logic ArchitectLogic Architect
View Notes Page…View Notes Page…

225
Delete: Delete: The return true statement
Definition: Definition: Change: booleanboolean ……to… intint … … Add an input parameter: ((String OrdNoString OrdNo))
Add the Template: Add the Template: QuickStart, Components, QuickStart, Components, LocalMethodLocalMethod
Workshop Workshop -- Define a New EJB Component Define a New EJB Component – 2 of 3
LocalMethodTemplate
code
ModifiedDefinition

226
(In the Method Navigation bar) RightRight--click over getItemsProcLM() and…click over getItemsProcLM() and…
1. Select ObjectSpace1. Select ObjectSpace- Check Interface (public method)- Click OK to return
2. 2. Right-click over getItemsProcLM() again and select: Construct in GetItemsConstruct in GetItems
Save: and navigate to Application Architect
Workshop Workshop -- Define a New EJB Component Define a New EJB Component – 3 of 3

227
Constructing a component creates a standalone Session Bean. To include this Session Bean in your application so that you can call it from a method …
Click the ApplicationPackage ApplicationPackage icon …then from the Global Includes Global Includes tab:
1. Specify a Java Package Import by entering the Java Package Name: com.quickstart.cmp.GetItems.*com.quickstart.cmp.GetItems.*2. Add the component Jar file to the Class Path by browsing to the requisite \build\ directory. View Notes Page for location
Workshop Workshop -- Include a Component in the ApplicationInclude a Component in the Application
Hint:Hint:To learn more about the Package Name import…and/or…Add to Class Path includeView the Notes Page

228
From the Application NavigatorApplication Navigator select the OrderHeaderOrderHeader class icon …then… click click the Methods Methods tab:
Define a NewNew Method1. Name the method: getItemsProcgetItemsProc2. Open the dropdown and check the include for: GetItems.*GetItems.*
3. Click the Logic Editor Logic Editor icon and using the Logic Architect, add the Java statements shown in the screen capture below ––and in the Code Templates: and in the Code Templates: Training Courses, QuickStart, Components,Training Courses, QuickStart, Components, GetItemsProcGetItemsProc
As before – Save your work - and navigate to Page Architect
Workshop Workshop -- Create a Method that Calls the Component’s Local MethodCreate a Method that Calls the Component’s Local Method
Components Viewlet Components Viewlet –– 2 of 22 of 2
getItemsProc()Java code

229
Workshop Workshop - Add a Page that Calls the Component Method – Define ObjectSpaceDefine ObjectSpaceFrom the Page ArchitectFrom the Page Architect
From the From the Navigator bar:Navigator bar:1. Click (select) the OrderHeaderOrderHeader class icon2. RightRight--ClickClick and select: Insert PageInsert Page3. Click the Page PropertiesPage Properties icon
From From Page Properties:Page Properties:4. Name the Page: getorderitemsgetorderitems5. Change its Data access type: to FullFull6. Click the ObjectSpaceObjectSpace tab
From the From the Object Space Object Space tab:7. Click the OrderHeader Class, RightRight--clickclick and select: Add local variableAdd local variable8. Name the local variable: OrdNoOrdNo – make it a type of TextText9. Click OK OK and CloseClose to return to Page Architect

230
From the From the Controls palette, Controls palette, add two Label controls, a Submit Button and an EditNumber control
1. DoubleDouble--Click Click the Edit NumberEdit Number control2. From its Projection tab, DoubleProjection tab, Double--Click: Click: OrdNoOrdNo
3. DoubleDouble--Click the Submit Button Click the Submit Button control- From the Submit tab:Submit tab:
3a. Method to call: getItemsProcgetItemsProc3b. Check: DefaultDefault3c. Redisplay the current page with same dataRedisplay the current page with same data
From the Favorite Controls Palette4. Add ErrorMessages to the Page
Workshop Workshop - Add a Page that Calls the Component Method – Finish DesignFinish Design
Save your Project…

231
ConstructConstruct, Preview Preview and test by entering a valid OrderNumber (don't forget to start your App Server):
Workshop Workshop -- Component Component –– Test pagesTest pages
getorderitemAfter call to Component
getorderitem
Hint: If you get compilation
errors, be sure that you check
the include of the GetItems
component.

232
Summary – Section G Section G –– Create Reusable Component Create Reusable Component – Review of Steps
Add Attributes andAdd Attributes andMethods to ObjectSpaceMethods to ObjectSpace
Code LocalCode LocalMethod JavaMethod Java
Add Local MethodAdd Local Method
Create new ComponentCreate new Component
Construct ComponentConstruct Component
Designate certainDesignate certainMethods as PublicMethods as Public
InterfacesInterfaces

233
Summary – Section G Section G –– Include and Call Component Include and Call Component – Review of Steps
Call componentCall componentfrom Java Methodfrom Java Method
Add name to Import areaAdd name to Import areaGlobal IncludesGlobal Includes Add jar file to ClasspathAdd jar file to Classpath
Include ComponentInclude Component
PrePre--componentcomponentstatementsstatements
Code JNDICode JNDIstatementsstatements
Call componentCall componentLocal methodLocal method
Browse to slide 318 for a text-summary slide about component definition…

234234234
Section H – Application Maintenance and Enhancement Application Maintenance and Enhancement
After you finish this section, you will be able to:After you finish this section, you will be able to:Construct comprehensive Project Documentation in HTML formVerify the Site Map links you designed, and also add new ("existing") pages to the Site MapPerform maintenance on the application:
Change the User Interface (modify the menu style)Internationalize a PageAdd an attributeAdd a Derived Field and Derivation RuleModify a field’s datatype (add an Enum)Add a dropdown list of all BuyersChange the development server
Rebuild and re-test your application using different Technologies

235
The Big Picture The Big Picture -- StepsSteps
1. Software Installation and Configuration
2. Single User Project Setup
3. Import and Refine Class Model
4. User Interface and Site Modeling
5. Page and Logic Modeling
6. Application Integration
7. Application Maintenance and Enhancement 7. Application Maintenance and Enhancement
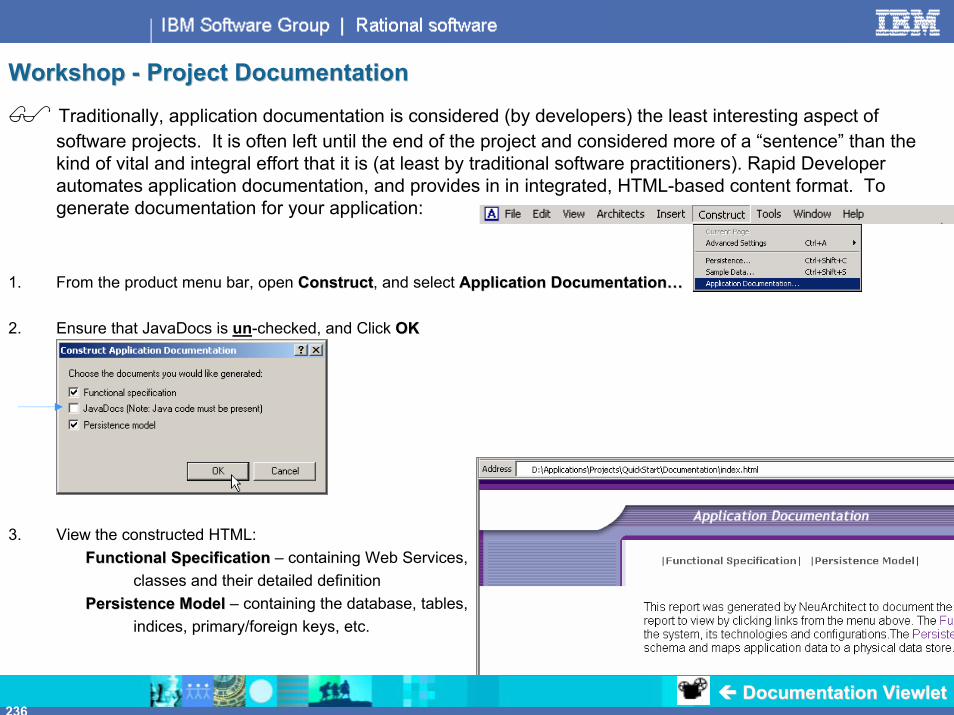
236
Traditionally, application documentation is considered (by developers) the least interesting aspect of software projects. It is often left until the end of the project and considered more of a “sentence” than the kind of vital and integral effort that it is (at least by traditional software practitioners). Rapid Developer automates application documentation, and provides in in integrated, HTML-based content format. To generate documentation for your application:
1. From the product menu bar, open ConstructConstruct, and select Application Documentation…Application Documentation…
2. Ensure that JavaDocs is un-checked, and Click OKOK
3. View the constructed HTML:Functional SpecificationFunctional Specification – containing Web Services,
classes and their detailed definitionPersistence ModelPersistence Model – containing the database, tables,
indices, primary/foreign keys, etc.
Workshop Workshop -- Project DocumentationProject Documentation
Documentation ViewletDocumentation Viewlet

237
Scroll through the generated documentation, and note the following: Different categories of documentation. Hyper-links among classes. Comprehensive Documentation: Web Services, Messages, Components, etc. Check out the Persistence Model (DBA documentation)
Workshop Workshop -- Project DocumentationProject Documentation

238
Workshop Workshop -- Site Map Discover LinksSite Map Discover Links
In addition to the high-quality documentation produced by Construct Application Documentation… you may recall that you have added numerous pages to your application. Let’s update the SiteMap and see what we’ve created in this QuickStart…
From the product menu bar, click the Site Architect icon:
From the Site Architect:1. Click the Select Available Pages Select Available Pages icon2. Check the QuickStart QuickStart checkbox, , and click OKOK3. From the Edit Edit menu, select Discover Links within Site From, All PagesDiscover Links within Site From, All Pages
NotesNotes:
Existing “design-time” links will change colors:
Blue links are “new” links, discovered by the Site Architect.
Green links are implemented links, that is, they are design-time links that have been implemented as intended by the SiteMap.
Red links are un-implemented design-time links. They represent work remaining.

239
Concept Concept -- Change the User InterfaceChange the User InterfaceIt is not one bit unusual for users to decide – once they've seen the application, or its pages – that it needs to be changed. In our case users want a radical change – to a framed design view (see below).
Index page maintenanceIndex page maintenance

240
Workshop Workshop –– Modifications to the index pageModifications to the index pageSteps…1 .Select the rollover graphic and move it down underneath the Text (container) control.2. Select the Menu control, and move it over (to the right)3. Select the Text (container) control, shrink its width, and move it up directly underneath the graphic
Rollover graphic, moved…
Menu, moved…
TextContainerControl
Recommendation: From the View menu, turn off the Navigation Bar display – in order to give yourself more visual real estate to view and work within, on the canvas.

241
Workshop Workshop -- Modify the Menu StyleModify the Menu StyleDouble-Click the menu, and modify its Display tab properties as shown below:1. Style: TabImage_Top_L2TabImage_Top_L2
2. Back image: Auto size the control to wrap around the back image. Note that you may have to select Tile … then … Center - in order to enable Auto size
2.
1.

242
Add a large Custom Control below the menu, and to the right of the Text container – Specify Properties:- Width: 900 … Height: 700- Custom Control HTML – in the Presentation tier: add the following Code Template: Training Courses, Training Courses,
QuickStart, ClientSide JavaScript,QuickStart, ClientSide JavaScript, iFrameiFrame
Workshop Workshop -- Add Client/Side JavaScript Custom ControlAdd Client/Side JavaScript Custom Control
Properties…
Custom Control – stretched large

243
Workshop Workshop -- Modify Menu Page Links Modify Menu Page Links –– Construct and TestConstruct and Test
Double-Click the Menu control, and from its Menu tab… for all existing Menu links:- Click: Page Link
- Specify Target frame: frame1frame1
Repeat the above, for all menu itemsRepeat the above, for all menu items – except Home
Construct and Preview the index pageConstruct and Preview the index page – NoteNote - If you've changed your Application Server from Tomcat, you should change back before you Construct/Preview. And if you change your Application Server, you will have to start the server before Preview.

244
What to do about the redundant Page Header/Graphics (options):Delete the graphics and Page Header container - from all of the pagesCreate new "iFrame-Version" pages - to be loaded into the iFrame index PageUse Visibility Expressions - see Rapid Developer Software: Development Techniques course for additional information
Optional WorkshopOptional Workshop -- iFrame'd Index PageiFrame'd Index Page
NoteNote:
In this example we have modified allordersallorders, and
taken out the (redundant) graphics and Page Header.

245
New Requirements! Your company has just picked up two new partners in Spain and Germany. Management now expects your pages to be localized to the browser languages of the users in these two countries. View the Notes Page for details on traditional ways to solve Internationalization.
Steps (we'll add one language at a time):From Application Architect: Create Locales … specify:
NameLanguage/CountryDynamic Callback method
From Page Architect: Internationalize a PageCreate the Page in English – Construct/PreviewToggle to the new language localeProvide translations for your labelsConstruct/PreviewFrom the browser, add a new language preference to your browser, and move it to the top of the list (making it the default)Refresh your browser
NoteNote: Before beginning this exercise: Stop (close) your Application Server
Concepts Concepts -- ApplicationApplication InternationalizationInternationalization
Have you heard or seen the acronym: I18N …or… L10N?
To find out what they mean, check out this slide's Notes Page
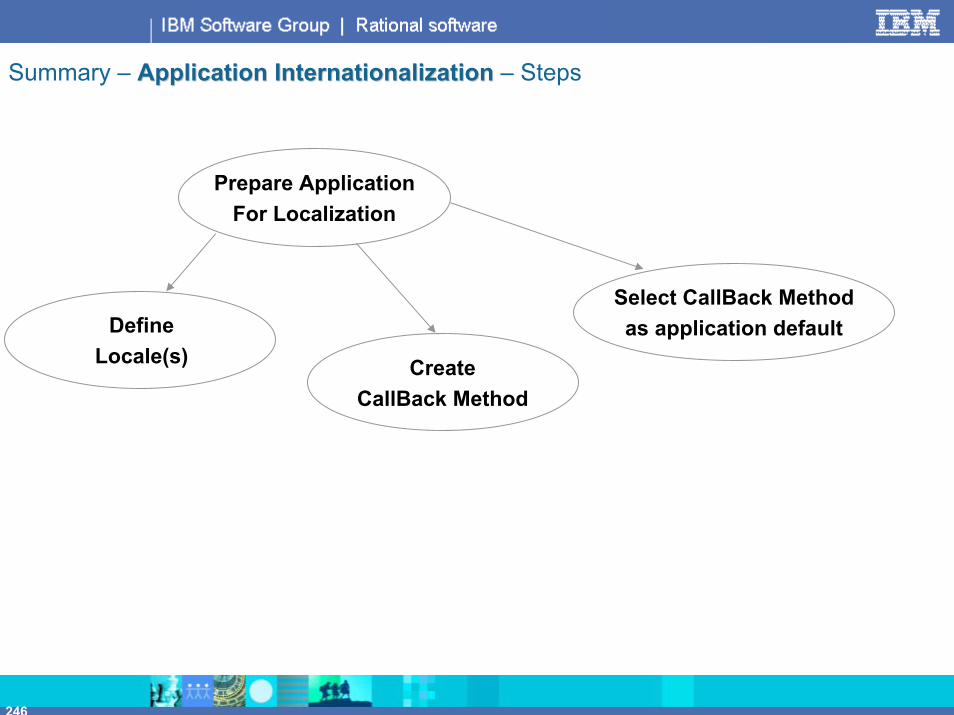
246
Summary – Application Internationalization Application Internationalization – Steps
DefineLocale(s)
Select CallBack Methodas application default
CreateCallBack Method
Prepare ApplicationFor Localization
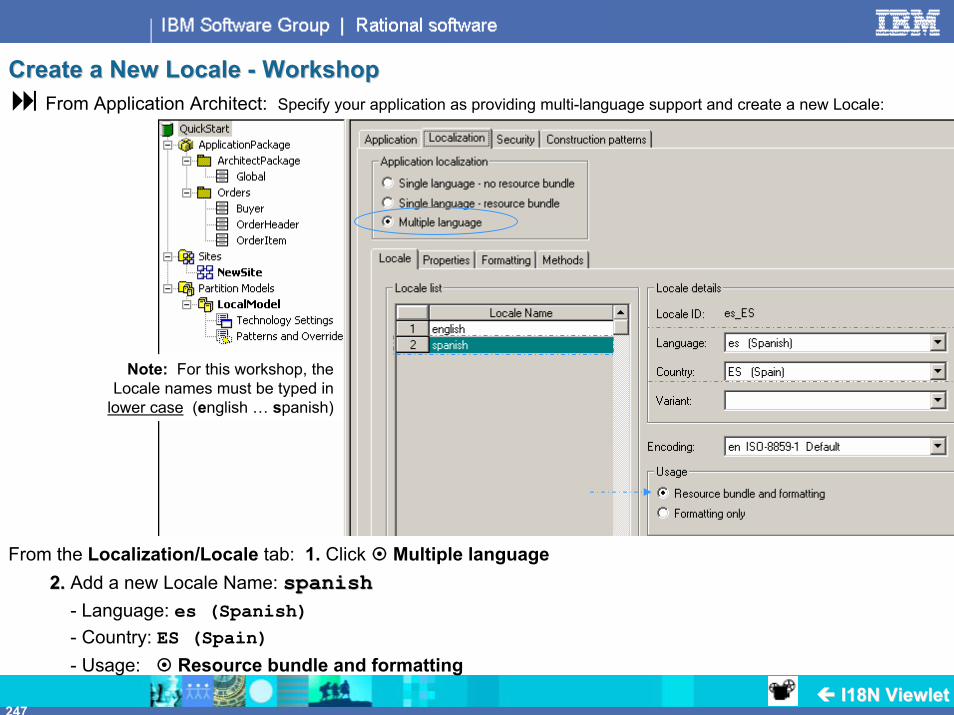
247
From Application Architect: Specify your application as providing multi-language support and create a new Locale:
From the Localization/Locale tab: 1. Click Multiple language 2.2. Add a new Locale Name: spanishspanish
- Language: es (Spanish)- Country: ES (Spain)- Usage: Resource bundle and formatting
Create a New Locale Create a New Locale -- WorkshopWorkshop
Note: For this workshop, the Locale names must be typed in
lower case (english … spanish)
I18N ViewletI18N Viewlet

248
Workshop Workshop -- Create a Dynamic Callback MethodCreate a Dynamic Callback Method3. From the Localization/Methods sub-tab
- Add a newnew method named: languageCallBack languageCallBack Create it using Code TemplateCode Template: GetLanguageGetLanguage
Code Template

249
Workshop Workshop -- Specify the CallBack Method in the Properties tabSpecify the CallBack Method in the Properties tab
4. From the Localization/PropertiesProperties sub-tab
- Click Specify application locale dynamically, and pull down: languageCallBacklanguageCallBack

250
Workshop Workshop -- Create a New Page Create a New Page (English-Only Version)
From Page Architect – create a new Read/Only, DocStyle Page in the GlobalGlobal class as follows:From Page Properties:
1. Name: I18NPageI18NPage
2. Object Space: Add BuyerBuyer from All classes to the ObjectSpace
3. Add an ObjectGrid control to the Page. From its properties/ObjectSet tab
4. Bind the control with ObjectSpace.Buyer5. Check: Footer area
6. Click all of the Buyer attributes into the ObjectGrid
7. Add a Page Header (HdrTitle1 label control) as shown below
8. Add two basic text labels in the ObjectGrid's Footer area, for next and previous scrolling:
Label: Next…- ObjectSet navigation: Next Hide
Label Previous…- ObjectSet navigation: Prev Hide
HdrTitle1 label
Controls Palette
Footer area…
Note: ObjectSet navigation is on the Control tab

251
Workshop Workshop -- I18NPage I18NPage –– in Englishin EnglishConstruct
Start your application server:
Preview
Page will be rendered in English in the browser…

252
Summary – Section H Section H –– Application Localization/Page Translation Application Localization/Page Translation – Steps
Test LocalizedPages
LocalizePage
Toggle Locales
Change Labelcontrols to Keys
Translate literalsto other languages
Add newLanguage Preference
Make new languageBrowser default
Refresh Browser

253
Workshop Workshop –– Change the labels to keysChange the labels to keys
Steps…
1. From Page Architect – click the Toggle Locales icon on the toolbar:should be selected as the current Locale for the page:
2. For each and every ObjectGrid column labeleach and every ObjectGrid column label, the HdrTitle1 Label and Next, the HdrTitle1 Label and Next……PrevPrev…… labelslabels:
- Right-click over the control, and select: Change to keyChange to key
Note: Change the ObjectGrid column header labels to keys, not thNote: Change the ObjectGrid column header labels to keys, not the Instancee Instance--area data fieldsarea data fields
ObjectGridColumnLabels

254
Steps… From Windows, open the file: \RDEV\Translations\QuickStart.txtQuickStart.txt
-- ForFor each and every ObjectGrid column label and HdrTitle1 Labeleach and every ObjectGrid column label and HdrTitle1 Label: Double-Click the control (Control properties), and copy/paste the associated Spanish translation (found in QuickStart.txt) into the Label area:
Workshop Workshop -- Translate the Labels Into SpanishTranslate the Labels Into Spanish
When you have finished translating all labels and the Page Heading into Spanish: Construct and Preview
Double-ClickEach column header

255
Workshop Workshop -- Add a New Language PreferenceAdd a New Language Preference
From your Browser:1. Select ToolsTools, Internet OptionsInternet Options
2. Click:
Languages
Add
and select Spanish (International Sort) [es] from the list
3. From Language Preference- Select Spanish- Click Move Up
Click OKand return to the browser
4. Refresh your browser

256
Optional WorkshopOptional Workshop -- PPáágina Espagina Españñola ola (Spanish Page!)
Optional exercise:Optional exercise:
- Add German language capabilities to your page, by repeating the steps on the previous slides.
Browser Language Selection, Locales and Callback Method:Browser Language Selection, Locales and Callback Method:**Recommendation****Recommendation** When you are finished testing with different languages, change your browser back to your default language (if in the U.S. – English). View Notes Page for details.

257
Optional WorkshopOptional Workshop -- Construct to Different Technology SelectionsConstruct to Different Technology Selections
By "Technical Agility" we refer to the process of constructing and deploying the finished application to different database, GUI and application server platforms with potentially zero manual effort. In fact, unless you have included or referenced technology-dependent 3rd-Party software solutions in your application, you should be able to simply click and go. We encourage you to take your QuickStart application and do the following:
1. Change the application server1. Change the application server. From Technology SelectionsTechnology Selections / Application ServerApplication Server- If you have been using Microsoft DNA – at this point, specify an EJB server (provided you have one on available to you)- If you have been using Servlet only construction, specify EJBs JSP pages (if using a J2EE server)- Ensure that your Compile, deployment and Property settings are correct- From the product menu, pull down ConstructConstruct and select Advanced Settings…Advanced Settings… PagePage, and All- Test your pages for equivalent functionality and design
2. Change the database2. Change the database. If you have access to a different RDBMS- Create a new blank database with a different RDBMS- Create an ODBC driver to the database- From the Technology Selections / Database tab: Change the database specification. Construct PersistencePersistence and Sample DataSample Data
- Optionally, if your new database supports Stored Procedures, you may wish to test using Stored Procedures instead of dynamic SQL statements by rebuilding all pages to use Stored Procedures
3. Change the Composite Theme3. Change the Composite Theme. From the Theme Architect, click Use Editable Local Theme List. Select a new Theme (you can see the various color combinations from the Color tab). Make your new theme current – and rebuild (Construct) all – or selected – pages and Preview to see the effect of dynamic themes.

258
Optional WorkshopOptional Workshop - Business Agility – Add an AttributeAdd an Attribute
Let’s see what’s in involved in adding an attribute to a Class, and then subsequently to pages against the class:
From Application ArchitectApplication Architect1. Select the BuyerBuyer Class … and then its AttributesAttributes tab2. Click: NewNew3. Name the attribute: eMaileMail
The datatype default will suffice for this exercise (Text/50Text/50)
4. From the top menu, open the ConstructConstruct menu, and select PersistencePersistence
5. Click Resolve AllResolve All – Note that the NewDescriptor displays a red warning icon. This signifies your current Class Model does not agree with the DB meta-data. In order to force Construct All to modify your tables:
Expand NewDescriptorNewDescriptorCheck: BuyerBuyerClick: Construct AllConstruct All
You have now AlteredAltered the database, and added an eMaileMail attribute to BuyerBuyer
View Notes Page View Notes Page – for a note on continuing these workshops in multiple-language mode.Save your Project…
Application maintenance ViewletApplication maintenance Viewlet
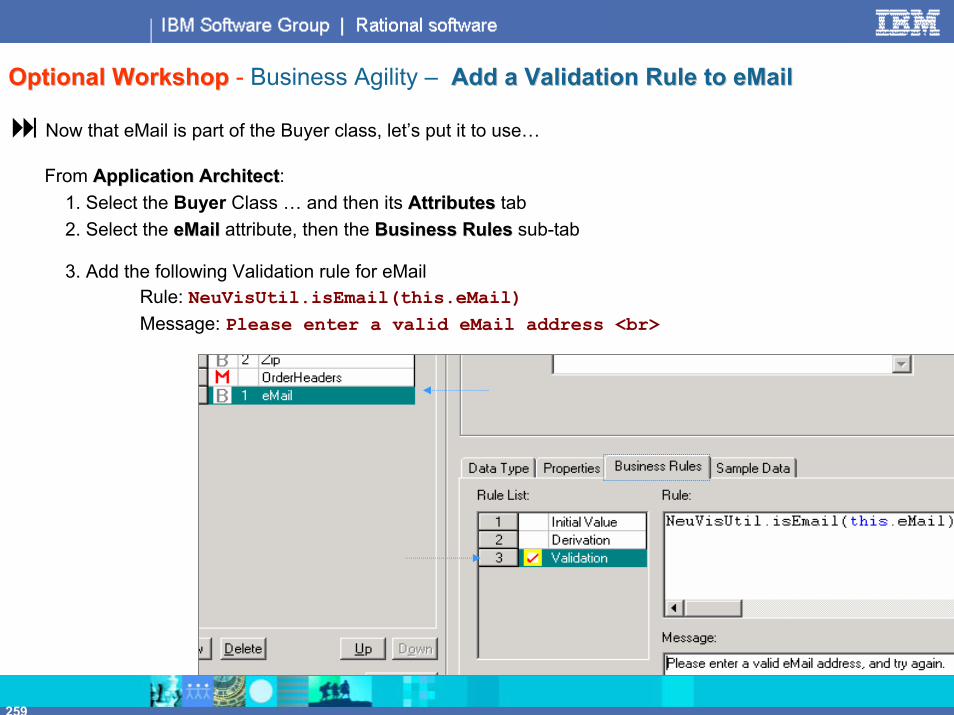
259
Optional Workshop Optional Workshop - Business Agility – Add a Validation Rule to eMailAdd a Validation Rule to eMail
Now that eMail is part of the Buyer class, let’s put it to use…
From Application ArchitectApplication Architect:1. Select the Buyer Class … and then its AttributesAttributes tab2. Select the eMaileMail attribute, then the Business RulesBusiness Rules sub-tab
3. Add the following Validation rule for eMailRule: NeuVisUtil.isEmail(this.eMail)Message: Please enter a valid eMail address <br>

260
Optional Workshop Optional Workshop - Business Agility – Use the new eMail Attribute on a PageUse the new eMail Attribute on a Page
Let's enhance newbuyer to use the new attribute…
- From the Pages Pages tab, PagePage list, select: newbuyer, and click Page Architect
- Select (set focus to) the GridGrid control, and from the Buyer Attributes Palette, click click in the eMail attribute
-- ConstructConstruct and PreviewPreview newbuyerTest with a bad eMail addressTest with a valid eMail address
Page Modeling Design Note – You will probably have to move sb_save and ErrorMessages down in the canvas, to make room for the new Grid row containing the eMail attribute
Screen capture of bottom portion of newbuyer afterThe user has entered an invalid eMail address

261
Optional Workshop Optional Workshop - Business Agility – Add a Derived FieldAdd a Derived Field
You may need to add an attribute to your Rapid Developer classes that does not get persisted to the Database:
From Application ArchitectApplication Architect1. Select the BuyerBuyer Class … and then its AttributesAttributes tab2. Click: NewNew3. Name the attribute: fullAddressfullAddress
From the Data Type sub-tab, specify Text: 8888From the PropertiesProperties sub-tab, Check: NonNon--persistentpersistent
4. Add the following Derivation Business Rule for fullAddressTemplates, QuickStart, Business Rules, Buyer Class Rules, Templates, QuickStart, Business Rules, Buyer Class Rules, Full AddressFull Address
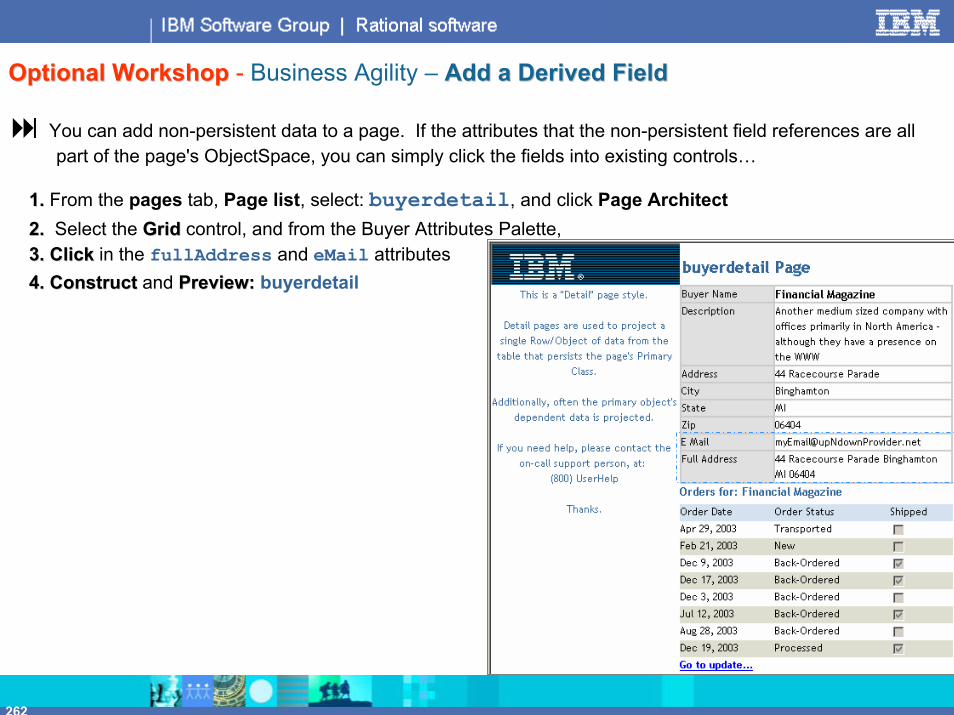
262
Optional Workshop Optional Workshop - Business Agility – Add a Derived FieldAdd a Derived Field
You can add non-persistent data to a page. If the attributes that the non-persistent field references are all part of the page's ObjectSpace, you can simply click the fields into existing controls…
1.1. From the pages tab, Page list, select: buyerdetail, and click Page Architect2.2. Select the GridGrid control, and from the Buyer Attributes Palette, 3.3. Click Click in the fullAddress and eMail attributes4. Construct4. Construct and Preview:Preview: buyerdetail

263
Optional Workshop Optional Workshop - Business Agility – Create an Enum Attribute Create an Enum Attribute –– 1 of 31 of 3
You may need to modify an attribute’s datatype. Example, change OrderStatusOrderStatus to an Enum:
From Application ArchitectApplication Architect1. Select the OrderHeaderOrderHeader Class …
…its AttributesAttributes tab, then click OrderStatusOrderStatus2. In the Data Type tab, click: EnumEnum3. From the Attribute Change Impact tab, select: Fix AllFix All
4. Click OKOK
5. Click Create New Enumeration
6. Add the status values as shown
ViewView the Notes PageNotes Page on Fix AllFix All

264
Optional Workshop Optional Workshop - Business Agility – Create an Enum Attribute Create an Enum Attribute –– 2 of 32 of 3
From the MenusMenus pulldown: Construct PersistenceConstruct Persistence1.1. Click Resolve All Resolve All - A red warning flag will appear, signifying that you need to explicitly enable the
modification to the database – and over-ride the warnings for all classes affected by the change2.2. Open the Data descriptors by checking the box3.3. Check the boxes for OrderHeader and OrderItem4.4. Click Construct AllConstruct All
Construct Sample Data…5.5. Pull down the menu again, and
Construct sample data
View your new data…6. 6. Select the OrderHeaderOrderHeader class,
and using the Data Entry tabData Entry tab, view the Sample Data
VView Notes Pageiew Notes Page For an understanding of what's going on behind the scenes.

265
Optional Workshop Optional Workshop - Business Agility – Create an Enum Attribute Create an Enum Attribute –– 3 of 33 of 3
From Page Architect, OrderHeader class, select: neworderneworder1. Select the existing grid control (so that the green focus boxes surround it)
- From the Attributes palette:2. De-select OrderStatus … Re-Select OrderStatus - Optionally move the OrderStatus grid row (currently at the bottom) upwards in the control:
3. With the grid control selected move your mouse to the leftuntil your cursor turns into a right-pointing arrow
4. Left-Click to select the row5. Use your PC keyboard up/down arrows to move the row
6. Construct and Preview the page
SelectedRow

266
Optional WorkshopOptional Workshop - Internationalization –– Translate an Enum Into Spanish Translate an Enum Into Spanish –– 1 of 21 of 2
From Application Architect – Select ApplicationPackageApplicationPackage, then the EnumerationsEnumerations tab. In the Enumerations tab, select the OrderStatus Enum, and check: Localize. Open the DropDown list, and select spanish
1. From Windows, open the file: \RDEV\Translations\ open the file: QuickStart.txtQuickStart.txt
2. For each and everyeach and every Enum item:- copy/paste the associated Spanish translation into the appropriate Value (spanish) field:
3.3. Construct PersistenceConstruct Persistence (Note: this is necessary in order to add the Spanish translations to your E_OrderStatusE_OrderStatus table in the database). Don't forget to: Resolve All … then … Construct All.

267
Optional WorkshopOptional Workshop - Internationalization –– Translate an Enum Into Spanish Translate an Enum Into Spanish –– 2 of 22 of 2
Construct and Preview: neworderneworder (Note … you may need to reset your browser's default language to Spanish)

268268268
Section I – Independent Workshop Independent Workshop
After you finish this section, you will be able to:After you finish this section, you will be able to:Create the environment for a standalone project on your PCCreate a new application and specify the necessary Technology SelectionsImport a UML business model (in the form of an XMI file)Elaborate and extend (refine) business model using Class ArchitectGenerate the persistence engine for your application and some sample data for testingCreate the following types of common pages:
List pageDetail pageIndex pageSearch pageUpdate formEntry form
Create methods for the update and entry forms that modify database valuesCreate an XML output messagesCreate an Internationalized version of a pageGenerate application documentation

269
The Big Picture The Big Picture –– Steps Steps –– 10,000 Foot View10,000 Foot View
1. Software Installation and Configuration 1. Software Installation and Configuration
2. Single User Project Setup2. Single User Project Setup
3. Import and Refine Class Model3. Import and Refine Class Model
4. User Interface and Site Modeling4. User Interface and Site Modeling
5. Page and Logic Modeling5. Page and Logic Modeling
6. Application Integration6. Application Integration
7. Application Maintenance and Enhancement7. Application Maintenance and Enhancement

270
Independent Study Workshop Independent Study Workshop –– "Big Picture" "Big Picture" –– 500 Foot View500 Foot View
4. Define the U.I. Model and Create Pages4. Define the U.I. Model and Create PagesCreate pages Create pages –– from the Class pages tabfrom the Class pages tabCreate a number of different page types and functionalityCreate a number of different page types and functionality
1. Create a New Project1. Create a New ProjectName the Project, create a directory for it, create a blank dataName the Project, create a directory for it, create a blank database and an ODBC driverbase and an ODBC driver
2. Specify Project Defaults2. Specify Project DefaultsPresentation, App Server, Messaging and Data Source defaultsPresentation, App Server, Messaging and Data Source defaults
3. Import and Elaborate the Business Model3. Import and Elaborate the Business ModelImport a Rose Model (XMI export file)Import a Rose Model (XMI export file)Add enumerations and refine the imported Class attribute data tyAdd enumerations and refine the imported Class attribute data types, specify Sample Data, etc.pes, specify Sample Data, etc.Construct Persistence and Sample DataConstruct Persistence and Sample Data
5. Add Business Rules and Methods Called by the Pages5. Add Business Rules and Methods Called by the PagesSelect the Method’s class and create new Methods for database peSelect the Method’s class and create new Methods for database persistencersistence
6. Add Messaging, Localization, Components and Web Services to t6. Add Messaging, Localization, Components and Web Services to the Projecthe ProjectAdd interfaces to the Project to external applications through XAdd interfaces to the Project to external applications through XML messaging and Web ServicesML messaging and Web Services
7. Document the Project7. Document the Project

271
Summary – Installation and Project Setup Installation and Project Setup – Steps
Install SoftwareInstall Software
Create Project Root Create Project Root Directory FolderDirectory Folder
Create Blank DatabaseCreate Blank Database
Create SystemCreate SystemODBC DSNODBC DSN
Install Rapid DeveloperInstall Rapid Developer
So, start here…
Already done on your machine…
Note: If you need additional or detailed assistance, please see previous Section B – Software Installation and ConfigurationSoftware Installation and Configuration

272
Create an Insurance/Claims ApplicationCreate an Insurance/Claims Application
StepsSteps ……
1.1. Create a new project Create a new project (Project Setup)
1a. Create a new directory: \\ClaimsClaims\\ ……under… \Applications\Projects\
1b. Create a new blank MS-Access Database, named: Claims. Claims. Save it in the \Claims\ directory
1c. Create a new – SystemSystem – Microsoft Access *.mdb ODBC driver Microsoft Access *.mdb ODBC driver -- for the Claims database
Important NoteImportant Note: If you are using Tomcat, Stop/Re-start ("bump") the server before you Construct and Preview your first Page

273
Summary – Single User Project Defaults Single User Project Defaults – Steps
Create New ProjectCreate New Project
Specify TechnologySpecify TechnologyDefaultsDefaults
Application ServerApplication Server
DatabaseDatabase(Select DSN)(Select DSN)
Name and Save ProjectName and Save Project
HTML GenerationHTML GenerationServletServlet--onlyonly

274
Create an Insurance/Claims ApplicationCreate an Insurance/Claims Application
WorkshopWorkshop… … 2. Specify Project Defaults2. Specify Project Defaults
Start Rapid Developer, and from the Wizard
- Create a new Application
- Name it: ClaimsClaims
- Save it in the \ClaimsClaims\ directory
- Use the same Application Style as QuickStart:x:…x:…\\RDEVRDEV\\StyleRepositoryStyleRepository\\StyleStyle\\BasicStyle1BasicStyle1\\BasicStyle1.OMDBasicStyle1.OMD
Note: If you need additional or detailed assistance, please see previous Section C – Single User Project SetupSingle User Project Setup

275
WorkshopWorkshop… … 2. Specify Project Defaults 2. Specify Project Defaults - continued
From Application Architect, specify (or verify) your default development technologies:Application/Settings… menu::
NS4 and up compatible NS4 and up compatible
Expand the Partition Models/Local Model. Partition Models/Local Model. Select Technology Settings Technology Settings (see below) and specify:1. Application Server 1. Application Server tab:
Enterprise JavaBeans (EJB) with servlets Enterprise JavaBeans (EJB) with servlets Tomcat 4.x Tomcat 4.x (or your installed App Server).Specify the App server App server installationinstallation directory and Java JDK/Compiler locationsdirectory and Java JDK/Compiler locations
2. Messaging 2. Messaging tab: Define at least one new Messaging Descriptor name
3. Database 3. Database tab: Pulldown the ODBC data source name dropdown. Select the Claims ODBC driver
Save your application
Application ServerLocalModel defaults
Tomcat selected

276
Summary – Business Object Modeling Business Object Modeling – Steps
Construct PersistenceConstruct Persistence
Create New Class…Create New Class…
Elaborate Class ModelElaborate Class Model
Construct Construct Sample DataSample Data
Specify Number ofSpecify Number ofSample Data RowsSample Data Rows
Import Class ModelImport Class Model
Note: If you need additional or detailed assistance, please see previous Section D – Import and Refine Class ModelImport and Refine Class Model

277
3a. Create the Class Model 3a. Create the Class Model -- WorkshopWorkshopFrom the Tools, Import UML Class Model (XMI) menu, import the file: Claims.xmlClaims.xml. You will find this file in the \\RDEVRDEV\\ModelsModels\\ClaimsClaims\\ folder. After import, refine the Class Model using Class Architect as follows…
Policy Policy Class-- Number of Sample Rows: Number of Sample Rows: 2222- Attribute elaboration:
insuredName:insuredName: Text/22Text/22Import: Import: FullNames.csvFullNames.csv sample data file
policyType:policyType: EnumEnumLife InsuranceHealth InsuranceProperty Casualty Insurance
Claim Claim Class-- Number of Sample Rows: Number of Sample Rows: 6666- Attribute elaboration:
claimID:claimID: Text/11Text/11claimType:claimType: EnumEnum
LiabilityWorker’s CompProperty
Payment Payment Class-- Number of Sample Rows: Number of Sample Rows: 111
Reminders: 1. uncheck Append numeric suffixes…
for your sample data import2. Feel free to customize other attribute
Sample Data values
Policy/Claim/Payment Classes in Class Architect
111

278
3b. Construct the Class Model 3b. Construct the Class Model -- WorkshopWorkshop
1.1. Pull down the Construct menu, and Construct Persistence Construct Persistence (Resolve All … Construct All)
2.2. Pull down the Construct menu again, and Construct Sample Data Construct Sample Data … Save your work Save your work

279
Concepts – User Interface ModelingUser Interface Modeling
Create Design-TimePage Links
Create Site Map
Specify InitialPage Properties
Create New Pages
You will You will NOTNOT create a SiteMap in thiscreate a SiteMap in thisWorkshop. After creating individual pages you willWorkshop. After creating individual pages you will
build a SiteMap by discovering existing pages.build a SiteMap by discovering existing pages.

280
Concepts– Page Modeling/Create List PagePage Modeling/Create List Page
PreviewPreviewPagePage
Customize PageCustomize PagePropertiesProperties Click in andClick in and
size attributessize attributes
Bind ObjectGridBind ObjectGridcontrol to Datacontrol to Data
Create Page FromCreate Page FromPage ArchitectPage Architect
ConstructConstructPagePage
StartStartApplication ServerApplication Server
If not running…
Page NamePage Name
Data AccessData Access
Primary ClassPrimary Class
StyleStyle
ObjectSpaceObjectSpace Note: If you need additional or detailed assistance, please see previous Section F – Page and Logic ModelingPage and Logic Modeling

281
4. 4. Define the U.I. Model – Create List pages Using a Page Style Create List pages Using a Page Style -- WorkshopWorkshopCreate pages…Create pages…
allpoliciesallpolicies – Policy listPrimary Class: GlobalGlobalData Access: Read OnlyRead OnlyPage Style: ListStyleListStyleObjectSpace: Add Policy Policy from All classesAll classes
Specify control properties as needed to:- Bind the ObjectGrid control to the Policy ObjectSet- Sort: policyLimit Desc policyLimit Desc (add this sort expression to the ObjectGrid's Sort specification in the ObjectSet tab)
allclaimsallclaims – Claim list sorted by: claimType, lossDate Desc, claimAmountclaimType, lossDate Desc, claimAmount

282
4. Create List Page From Scratch 4. Create List Page From Scratch (DocStyle) – Workshop Workshop –– 1 of 21 of 2Page Modeling Page Modeling - Create a custom page, without a prea custom page, without a pre--defined Styledefined Style
allpaymentsallpayments – a List page – without a Style PagePrimary Class: GlobalGlobalData Access: Read OnlyRead OnlyPage Style: DocStyleDocStyleObjectSpace: Add Payment Payment from All classesAll classesSpecify control properties as needed to:1. Bind the ObjectGrid control to the Payment ObjectSet2. Specify custom Selection/Sort as shown 3. Check Footer areaFooter area
HdrTitle2 Label control
Accent Label control
b_Next, b_Prev controlsplaced in Footer Area
From Control Properties – select Next Hide and Prev Hide
for scrolling
See the next slide …or …See the next slide …or …View Notes PageView Notes Pageof the PowerPoint slides of the PowerPoint slides for assistance with how to project the insuredName Attribute into this ObjectGrid
ObjectGrid control

283
4. Create List Page From Scratch 4. Create List Page From Scratch (DocStyle) – Workshop Workshop –– 2 of 22 of 2Page Modeling Page Modeling – Project a "grand-parent" ancestor/related value
1. Double-Click the control…
2. From the Projection tab:- Expand Claim (Claim)
- Expand Policy (Policy)- Double-Click insuredName

284
4. Create List pages With Embedded Set Controls 4. Create List pages With Embedded Set Controls -- WorkshopWorkshopPage Modeling Page Modeling –– Create a Policy detail page, with Claims and related Payment information
policydetail policydetail – a Detail pagePrimary Class: PolicyPolicyData Access: Read OnlyRead OnlyPage Style: DetailStyleDetailStyleAdd controls
In the Claim ObjectGrid1. Add an Error row and appropriate
No claims found condition message2. (Add a BasicBasic Text label to the
Error area of the Object Grid control)
3. In the Object Grid tab, enable (check):Row separator … Column separator
4. In the Display tab, specify a Plain borderDepth 1, Color "Shine" (select from color palette)
5. Add an element to the ObjectGridEmbed an ObjectGrid control in the element that displays Payments for that Claim – if there are any. Display a no payments message in the Error row (for not found conditions) using a Basic Text label – View Notes Page
Label with Java Expression******
EmbeddedPayment ObjectGrid
View Notes Page
*** *** Label text: Claims for Policyholder: <%=ThisObject.insuredName%>
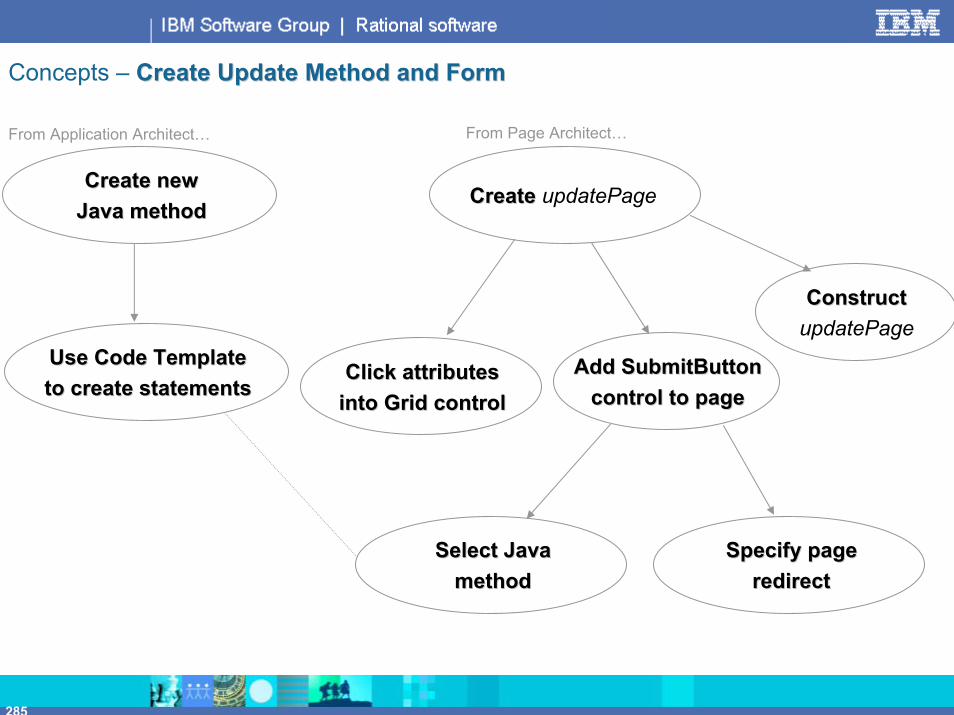
285
Concepts – Create Update Method and FormCreate Update Method and Form
From Page Architect…From Application Architect…
Use Code TemplateUse Code Templateto create statementsto create statements
Create newCreate newJava methodJava method
Click attributesClick attributesinto Grid controlinto Grid control
Create Create updatePage
ConstructConstructupdatePage
Select JavaSelect Javamethodmethod
Add SubmitButtonAdd SubmitButtoncontrol to pagecontrol to page
Specify pageSpecify pageredirectredirect

286
5. Create Update Methods 5. Create Update Methods -- WorkshopWorkshop
Business Logic Modeling Business Logic Modeling –– From the Logic Architect, create the following three Java Methods that update the database For each method use the DatabaseUpdateAPIDatabaseUpdateAPI Code Template (shown below)
Parent ClassParent Class Method NameMethod NamePolicyPolicy policyUpdateProcpolicyUpdateProcClaimClaim claimUpdateProcclaimUpdateProcPaymentPayment paymentUpdateProcpaymentUpdateProc
Note: don’t forget to select the pre-existing return true statement – and over-write it, with the contents of the Code TemplateSave your work Save your work

287
4. Create Database Update pages 4. Create Database Update pages –– Workshop Workshop – 1 of 2
Page Modeling Page Modeling –– Create the following additional pages. Create the following additional pages. Each Page's submit button (sb_updatesb_update) should invoke the associated update method (previous slide) – and redirect to the associated "all<class>" page in Global (ex. policyupdate should redirect to allpolicies, etc.). Don't forget to add an ErrorMessages labelErrorMessages label on all of these pages (found in Favorite Controls Palette).
claimupdate claimupdate – a DetailStyle pagePrimary Class: ClaimClaimData Access: FullFull
policyupdate policyupdate – a DetailStyle pagePrimary Class: PolicyPolicyData Access: FullFull

288
4. Create Database Update pages 4. Create Database Update pages –– Workshop Workshop – 2 of 2 – paymentupdate Pagepaymentupdate Page
Create a detailed page without using a Grid control.Create a detailed page without using a Grid control. Many graphic artists eschew the rigid formatting of Grid controls in favor of free-form placement on a page, according to some creative design. Rendering free-form attributes and label text is very simple with RRD. Follow these steps to create to see an example…
1. Create a new, DocStyle, Full data access page in Payment, named: paymentupdatepaymentupdate2. (In order to have RRD generate column labels) Add a Grid control to the page, and click in all four fields (see below)3. Select each column label from the left column of the grid control, and Copy/Paste it on to the page4. Delete the grid control5. From the Attributes Palette, click the Attribute name (not checkbox) and drag the attribute on to the canvas6. Double-click the heading labels.
- Modify their Label text as shown- From the Display tab, customize the fonts and align
7. Using the alignment/sizing icons – customize the controls (see below)8. Add additional controls
- Page header label- sb_update- ErrorMessages
7. Alignment/Sizing icons – mouse-over to discover available options…
Construct/Preview Page 7. Page Architect – Align and size controls
5. Select an attribute – drag it onto the canvasColumnLabels

289
4. Create Hyper Links From the List pages 4. Create Hyper Links From the List pages -- WorkshopWorkshop
Page Modeling Page Modeling – Modify the following List pages – add Hyper-Links to related Detail/Update pages…
allpoliciesallpoliciesPage link:from: insuredNameto: policydetailpolicydetail
allclaimsallclaimsPage link:
from: claimID to: claimupdateclaimupdate

290
4. Add More Hyper Links 4. Add More Hyper Links -- WorkshopWorkshop
Page Modeling Page Modeling – Add the following Page links to: policydetailpolicydetail
insuredName policyupdatepolicyupdate
claimID claimupdateclaimupdate
checkNo paymentupdatepaymentupdate
Pages related by Primary class owner will generate default selection parameters for the Page Link

291
4. Create Search Result Page 4. Create Search Result Page -- WorkshopWorkshopPage Modeling Page Modeling – Add search functionality. Start by creating the search results page. Why?
policysearchresultspolicysearchresults – a ListStyle pagePrimary Class: GlobalGlobalData Access: Read OnlyRead OnlyObjectSpace: Add Policy Policy from All classesAll classes
Select and delete the text/Container control (part of the default ListStyle)
From the ObjectGrid’s ObjectSet tab, add the following:Selection: Selection: %ctx.getSearchSelectClause()%%ctx.getSearchSelectClause()%Error area: Error area: … add a Basic or Accent label to the Error area describing no rows found (View Notes PageView Notes Page
for an interesting example of a combined text/Java expression error message)
policysearchresultsObjectGrid in Page ArchitectPage in the Browser

292
Create Search Page Create Search Page –– WorkshopWorkshop
Steps to create Search pageSteps to create Search page
policysearchpolicysearch – a searchsearch Data access pagePrimary Class: PolicyPolicyPage Style: DocStyleDocStyleData Access: SearchSearchAdd the three controls shown here
Click the three attributes shown here into the Grid control
In each field’s Projection tab, specify search type:1. PolicyType: Search field type: Select one value2. PolicyLimit: Search field type: Range to3. InsuredName: Search field type: Typed like value
(From Favorite Controls Palette) Add sb_searchAdd sb_search. From its Submit tab, redirect to: policysearchresults
Note: Optional Page Link to policyupdate.

293
5. Insert Method 5. Insert Method –– Customize a Code Template's Java Customize a Code Template's Java –– WorkshopWorkshop
Create a database insert method – starting with a code template and customizing the Java statements that the Code Template produces to fit the requirements of this application (different class name).
1. Create a new Method in PolicyName: policyInsertProcpolicyInsertProc
2. Use the code in the Code Template: QuickStart, New Order, OrderInsertProcQuickStart, New Order, OrderInsertProc
3. Modify as shown below: policydetail?Sel=Policy_ID="+this.Policy_IDpolicydetail?Sel=Policy_ID="+this.Policy_ID
Note – copy/paste code: "policydetail?Sel=Policy_ID="+this.Policy_ID;
VView Reminder on Notes Page

294
4. Data Entry pages 4. Data Entry pages –– WorkshopWorkshop
Create policyinsertpolicyinsert as an Enter Only, Detail page – see Page Architect design view belowPrimary Class: PolicyPolicyData Access: Enter OnlyEnter Only
SubmitButton control: SubmitButton control: sb_savesb_saveMethod: policyInsertProcpolicyInsertProc Redirect to page specified in method’s call to SetNextPage
From Favorite Controls PaletteFavorite Controls Palette, add: ErrorMessagesErrorMessages

295
4. index Page 4. index Page –– Concepts and Design view Concepts and Design view (what you're about to create)
allclaims page loaded into iframe control by clicking List Claims menu item
Initial (default) greeting page, loaded into iframe control

296
4. index Page 4. index Page –– Create Initial iframe Page Create Initial iframe Page –– WorkshopWorkshopPage Modeling Page Modeling – Add a the initial index frame page: indexdefaultindexdefault
Primary Class: Global, Global, Data Access: No data access, Page Style DocStyleNo data access, Page Style DocStyle
Add a single (large) AccentHeadingAccentHeading label control, with a MultiMulti--LineLine text, …inserted from Code Template: Claims Index PageClaims Index Page
Extra CreditExtra Credit…… explain (do you know) what's up with the tags and Scriptlets here?
NoteNote: Your index page (next slide) needs this page created before you preview Index. It is loaded by default into an iframe control

297
4. Create index Page 4. Create index Page –– WorkshopWorkshop
Custom Control
TabImage_Top_L2
Custom Control HTML Custom Control HTML – Presentation tier –add the following from Code Templates, Code Templates, Client Side JavaScriptClient Side JavaScript, Claims Index iFrameClaims Index iFrame
PropertiesProperties
<iframe name="frame1frame1" src="indexdefaultindexdefault" width="1100" height="600"></iframe>
Add an indexindex pagePrimary Class: Global, Global, Data Access: No data access, No data access, Page Style Detail Detail (delete the Text/Container and Grid controls)
Menu control Menu control -- TabImage_Top_L2TabImage_Top_L2 –– Menu items as shown below (One item per/page as previously implemented).Each Menu item should Page Link the appropriate Page into Target frame: frame1frame1

298
5. Business Rules 5. Business Rules –– (Copy and Paste from the PowerPoint electronic slides) - WorkshopWorkshop
Business Logic Modeling Business Logic Modeling – Add a few Business Rules to the Policy class’s Attributes. Recommendations: 1.1. Copy/Paste these rules from the slide text. 2.2. For Validation Rules, be sure to add the Message text. 3.3. Add as many rules as time permits (it is not necessary to add all of the shown below),4.4. Test by previewing the policyinsertpolicyinsert page – enter values that break these rules and click the Save button
insuredName:insuredName:Initial Value: "name"Validation:
Rule: this.insuredName.length() > 2Message: Name must be longer than two characters <br>
policyType:policyType:Validation:
Rule: this.policyType > 0Message: Please select a Policy Type<br>
effectiveDate:effectiveDate:Initial Value: NeuVisUtil.GetCurrentDate()Validation:
Rule: this.effectiveDate.after(NeuVisUtil.GetCurrentDate())Message: Must be later than the current date <br>
policyLimit:policyLimit:Initial Value: new BigDecimal(100.00)Validation:
Rule: (policyLimit.compareTo(new BigDecimal("10000"))==1)Message: Policy Limit must be > $10,000 <br>
Validation Rule errorsdisplayed in ErrorMessages control

299
Concepts – Create XML Output Message Create XML Output Message – Steps
Name MessageName MessageSpecify as Specify as OutputOutput
Add MessageAdd MessageAttributesAttributes
Specify MessageSpecify MessageObjectSpaceObjectSpace
Create new MessageCreate new Message
ConstructConstructMessageMessage
Map ObjectSpaceMap ObjectSpaceTo DTDTo DTD
Create new DTDCreate new DTDAutomap allAutomap allNote: If you need additional or detailed assistance, please see
previous Section G – Application IntegrationApplication Integration

300
6. Create an XML Output Message 6. Create an XML Output Message –– WorkshopWorkshop
Add an XML Message that is created whenever a Policy Update occurs. Steps…
From the Policy Class's Message tab, define a new MessageMessage Name: PolicyMsgPolicyMsgDirection: OutOutCreate the ObjectSpace shown here Steps…1. Select Policy in the ObjectSpace.
2. Right-Click and: Add all Basic attributes… from Policy3. Add M M Claim (from Current base class)
4. Select Claim in the ObjectSpace.5. Right-Click and: Add all Basic attributes… from Claim
6. Re-Select Claim in the ObjectSpace (set focus to MM Claim)7. Add M M Payment (from Current base class)
8. Select Payment in the ObjectSpace.9. Right-Click and: Add all Basic attributes… from Payment
Click: Create XML DTD…Export … Automap ObjectSpace
Return to the Messages tab, and…Construct the Message
PolicyMsg ObjectSpace
Note: Nested Claim and Payment objects and attributes. The nesting implies dependent data.
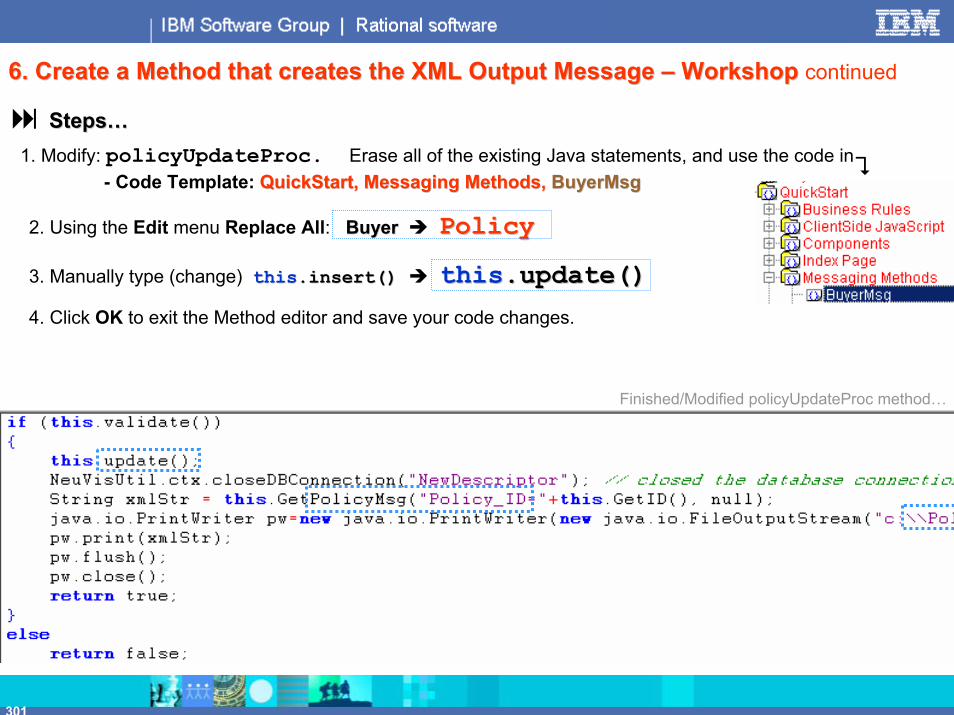
301
6. Create a Method that creates the XML Output Message 6. Create a Method that creates the XML Output Message –– Workshop Workshop continued
Steps…Steps…1. Modify: policyUpdateProc. Erase all of the existing Java statements, and use the code in
- Code Template: QuickStart, Messaging Methods, QuickStart, Messaging Methods, BuyerMsgBuyerMsg
2. Using the Edit menu Replace All: BuyerBuyer PolicyPolicy
3. Manually type (change) thisthis.insert().insert() thisthis.update().update()
4. Click OK to exit the Method editor and save your code changes.
Finished/Modified policyUpdateProc method…

302
6. Workshop 6. Workshop – Enhance policyupdate page – add PolicyMsg to ObjectSpaceadd PolicyMsg to ObjectSpace
Modify the policyupdate page model – from Page Properties/ObjectSpace add PolicyMsg
- Access ObjectSpace: Add PolicyMsgPolicyMsg – from Current base class
- Construct the Page
- Try to test (Preview) with a Policy that has several Claims and Claim Payments:
1. From the index page – select allpolicies2. From allpolicies – select an Insured w/many claims3. From policydetail – click the insuredName link to policyupdatepolicyupdate4. From policyupdate. Change one or more values and update
5. View: x:\PolicyMsg.xml

303
Concepts – Section H Section H –– Application Localization Application Localization – Steps
DefineDefineLocale(s)Locale(s)
Select CallBack MethodSelect CallBack Methodas application defaultas application default
CreateCreateCallBack MethodCallBack Method
Prepare ApplicationPrepare ApplicationFor LocalizationFor Localization
Note: If you need additional or detailed assistance, please see previous Application Internationalization Application Internationalization slides in Section H

304
6. Workshop 6. Workshop -- Application Internationalization Application Internationalization –– Project prep Project prep –– 1 of 21 of 2
It's time to take Policy/Claims international – and create multi-lingual page(s). Return in the course to the section on Internationalization, and set up your application for multiple languages - follow these steps (note return in this courseware to the detailed slides if you want additional assistance):
From Application ArchitectFrom Application Architect
1. Specify that the Claims application is enabled for Multiple languages and create a new Locales (lower-case: spanish) -- both Locales should specify: Resource bundle and formattingResource bundle and formatting

305
6. Workshop 6. Workshop -- Application Internationalization Application Internationalization –– Project prep Project prep –– 2 of 22 of 2
Remaining steps…. Using a Template in Logic Architect, create a dynamic callback methodnamed: callbackLanguagecallbackLanguage
4. Specify (select) the callback method in the Localization PropertiesProperties tab
Code Templates

306
Workshop Workshop -- Create an English Language PageCreate an English Language Page
It's time to take Policy/Claims international – and create multi-lingual page(s)
Create a new, Read/Only ListStyle Page in Global, named: policyI18NpolicyI18N as shown below – including a custom HdrTitle2 label for the Page Header: Internationalized List of All Policyholders
HdrTitle2 label
Note: Don't forget to "bump""bump"(stop and restart) your application serverText/Container label

307
Concepts Concepts –– Spanish Translated Labels Spanish Translated Labels –– completed view of page in Page Architect
See next slide for Steps…
TextContainerlabel

308
Concepts – Application Internationalization - Page Translation Page Translation – Steps
Test LocalizedTest LocalizedPagesPages
LocalizeLocalizePagePage
Toggle LocalesToggle Locales
Change LabelChange Labelcontrols to Keyscontrols to Keys
Translate literalsTranslate literalsto other languagesto other languages
Add newAdd newLanguage PreferenceLanguage Preference
Make new languageMake new languageBrowser defaultBrowser default
Refresh BrowserRefresh Browser

309
From Page Architect – click the Toggle Locales icon on the toolbar:should be selected as the current Locale for the page:
From Windows, open the file: \RDEV\Translations\ open the file: Claims.txtClaims.txt
For eacheach ObjectGrid column label and the HdrTitle2 Page Heading label:1. Right-click over the column label, and select: Change to key2. Double-click the column label, and copy/paste the associated
Spanish translation into it:
Double-click the Text/Container label (long blue text control on the left-hand side of the Page). From the Editor, select all existing text, and copy the associated translated Spanish text into it, from Claims.txtClaims.txtYou will probably have to resize the control – making it longer for the lengthier Spanish translation.
Workshop Workshop -- Translate the Labels Into SpanishTranslate the Labels Into Spanish

310
Workshop Workshop -- Internationalized pages Internationalized pages -- ResultsResults
ConstructConstruct the Page, and PreviewPreview.
From your Browser, change your default language to Spanish (Tools, Internet Options…, Languages, move Spanish up in the list) and Refresh your Browser
OptionalOptional--Optional WorkshopOptional WorkshopStellen Sie diese Seite auf Deutsch her!
(Re-Create this page in German!)

311
7. Workshop 7. Workshop -- Generate Site MapGenerate Site Map
Navigate to Site Architect • Click the Select Available Pages icon on the toolbar
• Check Available pages in Claims:
• Click OK• Spread the pages out on the canvas (see below)
• Pull down the menu: Edit, Discover Links Within site From, All Pages
OptionallyOptionally –Save the Site Map as
a .JPG file

312
7. Workshop 7. Workshop -- Project Documentation Project Documentation –– WorkshopWorkshop
Generate project documentation Pull down the menu: Construct, Application Documentation, Uncheck JavaDocs

313
OptionalOptional - Application IntegrationApplication Integration Workshops Workshops –– 1 of 21 of 2
Using your knowledge of the Rapid Developer product and the detailed instructions on the slides in this course, try the following:
1. Create a new Web Service in the Claims application – View Notes PageView Notes Page
2. Create a component that displays the Maximum claim amount for a given policy (note Java (note Java expertsexperts only)only)
- Define the Component in the Claim class - name: GetClaimsGetClaims- Use the following Code Template: OptionalWorkshop MaxClaimsOptionalWorkshop MaxClaims
…don’t forget to check Interface- Name the local method: GetClaimAmountGetClaimAmount- Add claimAmountclaimAmount to the ObjectSpace
Carefully follow all instructions in theCarefully follow all instructions in theCode Template DescriptionCode Template Description

314
OptionalOptional - Application IntegrationApplication Integration Workshops Workshops –– 2 of 22 of 2
Steps continued - Include the component and Add to Class Path (Global Includes tab)
- For the method that calls the Component:- Define the method in the Global class… - Use the Code Template OptionalWorkshop ClaimsMethodOptionalWorkshop ClaimsMethod
- Create a new Full page, ObjectSpace – create an Integer local variable named: PolIDPolIDControls:
- Assign PolID to an EditNumber control- Add an ErrorMessages control – from Favorite Controls
Note: Don't forget to "bump" "bump" (stop and restart) your application server

315
OptionalOptional WorkshopsWorkshops ContinuedContinued – Create a row-at-a-time update page
3. Change policysearchresultspolicysearchresults … make it a Full page.
From the ObjectGrid control's ObjectSet tab, select FullDouble-click each field (white attribute control).
- From the Project tab – uncheck: Read only. - From the Display tab, select an Edit (not db) control style. - For the PolicyType Enum, you may have to go to the DropDown tab, and select: Attribute Enum.
Add an element and embed a SubmitButton in the element to allow the user to update a row in the Search Results
SaveButton
Added element

316
OptionalOptional WorkshopsWorkshops ContinuedContinued – Alternate Policy Detail Page – 1 of 2Change policydetailpolicydetail using the controls described below.
ObjectTableObjectTableControlControl
ContainerContainerControlControl
Label (Accent)Label (Accent)
Label BasicText)Label BasicText)<HR><HR>
See next slide for steps… See next slide for steps…

317
OptionalOptional WorkshopsWorkshops ContinuedContinued – Alternate Policy Detail Page – 2 of 2Steps:
1. Delete the existing ObjectGrid controls (both outer and nested)2. Add an ObjectTable control to the page – from ObjectSet, bind this control to the Claim class3. Select this control, and make lengthen the Instance area (make it longer and wider)4. Click in the three Claim attributes shown below.5. Select and cut all three of the Claim attributes (and their associated field headers) – Ctrl/X6. Add a Container control inside the Instance area to the left. Stretch it wide enough to hold the controls7. With the container control selected, paste (Ctrl/V) the Claim attributes inside8. Add an ObjectGrid control inside the ObjectTable's instance area (to the right)9. Bind this control with Payment and click in the fields as shown10. Add an Accent label control (outside the ObjectTable) as shown11. Add a BasicText label to the Instance area (label text: <HR>) – stretch it all the way across as shown12. You will undoubtedly have to move/size and align the controls
Optionally add to the set controls (ObjectGrid/ObjectTable):Error row – for data not foundFooter – for paging

318318318
AppendicesAppendices
• Application Development Lifecycle – Big Picture (Summary of Steps)• Review - Model Hierarchy – Concepts• Working With IBM Rational Software Group – Product Support, Mentoring and
Consulting Services• In-Message Flow – Concepts• Out-Message Flow – Concepts• Code Construction Architecture:
• Generated Code Folders• Generated Classes
• Run-Time Code Architecture• Servlet Only Form• Servlet Only Detail Page
Note:Note: All of these topics and slides are Conceptual. There are All of these topics and slides are Conceptual. There are nono workshops or workshops or exercises associated with them.exercises associated with them.

319
Application Development Lifecycle Application Development Lifecycle –– Big Picture Big Picture (Summary of Steps)
1. Import Business Objects1. Import Business Objects –– Import Rose Model, Legacy DBMS Tables, or create “from scratch”Import Rose Model, Legacy DBMS Tables, or create “from scratch”
Rapid DeveloperRapid DeveloperApplicationApplication
ProjectConfiguration
Design/Development
Construction
Integration
Documentation
Testing
Deployment
Enhancements
3. Create U.I. 3. Create U.I. -- Style RepositoryStyle Repository –– Specify colors, fonts, images, template page defaultsSpecify colors, fonts, images, template page defaults
4. Create SiteModel4. Create SiteModel –– Storyboard the webStoryboard the web--site. Create pages site. Create pages –– bind to classes and templatesbind to classes and templates
6. Develop Java Methods6. Develop Java Methods –– Use Code Templates, or write custom Java logic. Integrate w/PUse Code Templates, or write custom Java logic. Integrate w/Pages ages
2. Elaborate Model2. Elaborate Model –– Enhance attribute definitions, Specify Business Rules, ConstrucEnhance attribute definitions, Specify Business Rules, Constructt
5. Model Pages5. Model Pages –– Customize properties, Add Controls and Attributes, Construct anCustomize properties, Add Controls and Attributes, Construct and Previewd Preview
7. Specify External Interfaces7. Specify External Interfaces –– Input/Output XML messages, Web Services, Java Package callsInput/Output XML messages, Web Services, Java Package calls
8. Generate Application Documentation8. Generate Application Documentation –– Create HTML functional specificationCreate HTML functional specification
9. Integration Test9. Integration Test –– Partition the Application to Q.A. Deployment Environment Partition the Application to Q.A. Deployment Environment –– ReRe--constructconstruct
10. Deploy to Production10. Deploy to Production –– Partition the Application to Production Deployment EnvironmentPartition the Application to Production Deployment Environment
11. Enhance Application 11. Enhance Application –– Business Objects, Methods, pages, etc.Business Objects, Methods, pages, etc.
Note that some of these steps will occur in parallel. And that the entire process is iterative and prototyping

320
Project Model and Artifact HierarchyProject Model and Artifact HierarchyApplication (RepositoryName.OMD/.NDX) – database of your project's development models (Application Architect)
Uses Style Repository for default GUI properties. Specify Internationalization (Locale) properties
ApplicationPackage – Project-scope application artifacts and properties (Packages, Enumerations,
Web Services, External Package Import definitions, Global (Session) variables, etc. (Application Architect)
Package – organizing container for related classes (no code generation) (Application Architect)
Class – Business Object Model (Class Architect/Design, Application Architect)
AttributesBasic
Size/Datatype
Extended properties
Business Rules
Sample Data
Pages (Page Architect)
Methods (Logic Editor)
Messages
Components
…
Site – organized view of related Web pages - BuyerSite, SellerSite, etc. (Site Architect)
321
Working With IBM Rational Software GroupIBM Rational Software Group –Product Support, Mentoring and Consulting Services
Other courses in the curriculum:Business Programming in JavaBusiness Programming in Java – a course for non-Java (I.e. Client/Server, COBOL/Legacy developers) who are responsible for writing or maintaining Java methods or other Java artifacts. 3 daysIBM Rational Rapid Developer Software: Development TechniquesIBM Rational Rapid Developer Software: Development Techniques – an intensive 4 day course in using Rapid Developer to create medium-complexity applications
Mentoring:Following training, mentoring and/or on-site consulting services ("blended teams") are strongly recommended for initial projectinitial project:
Scope of Training Knowledge Transfer - not typically able to anticipate unique and idiosyncratic production application requirements (I.e. every project is unique and generally requires a certain percentage of development techniques not covered in the course material set)Often there is a skills gap in critical background areas of project team:
Object Modeling, Application Architecture, web/GUI designJ2EE Method Writing - esp. if interfacing with 3rd Party codeApplication/SQL performance and tuning
Developers understanding application and retention of content different - and may require follow-on mentoring and/or supportImportant to establish an in-house Rapid Developer "help-desk" and support infrastructure for immediate (real time) assistance with areas of difficulty
Consultant becomes initial "primary support" person for any additional needs
Additional Knowledge Transfer deliverables available from the Rapid Developer "Developer Center"
Product Support:Direct support line: (877) 474-9910Subhash Gupta ([email protected]), Manager of Product support: (203) 402(203) 402--20832083

322
InIn--Message FlowMessage Flow
WebSphereWebSphereOS 390OS 390
MessageMessageQueueQueue
<?xml version="1.0" encoding="ISO-8859"?><ObjectSpace> <Policy><Policy_ID>1</Policy_ID><sysMark>false</sysMark><insuredName>Diana………………………………………………
XML Stream XML Stream – sent via Transport Technology
XML Messaging flow and components –upon receipt of an incoming XML message… NeuSwitchBoardNeuSwitchBoard
Interface withMQSeries
Application ClassApplication Class
In-Method(…)……
this.LastName…this.LastName…this.OrderNumber…this.OrderNumber… References to ObjectSpace variables
Custom Message.classCustom Message.class1. Create ObjectSpace fromXML Stream using DTD
2. Call your In-Method
MessageObjectSpace

323
XML Messaging flow and components – sending an outgoing XML message…
OutOut--Message FlowMessage FlowApplication ClassApplication Class
Custom_Method(…)……
this.LastName…this.LastName…this.OrderNumber…this.OrderNumber…SendMessageName(parms)SendMessageName(parms)
…… DatabaseDatabase
OS 390OS 390
NeuSwitchBoardNeuSwitchBoard
MessageMessageQueueQueue
Message ObjectSpaceCustom Message.classCustom Message.class1. Create XML Stream using DTD
and ObjectSpace populated from Database
2. Place Message on Queue
Interface withMQSeries
<Policy><Policy_ID>1</Policy_ID><sysMark>false</sysMark><?xml version="1.0" encoding="ISO-8859"?><ObjectSpace>
<insuredName>Diana………………………………………………
XML Stream XML Stream – sent via Transport Technology

324
Application Root Directory
Common – Shared Jar and Include files
OSDtd - Generated Message DTD files
Form – folder that contains the Servlet files. Pages organized in sub-folders named by Page
Global – contains GlobalObject.java, all attributes and methods defined on the Session tabs
Source – folder set for all page definitions (.NAF) and Methods (.MTD). Organized by owning (Primary Class) Business class sub-folder
Jsp – folder that contains all JSP files (no sub-folders)
Jbuilder – debugging Project (.jpr) files generated if Jbuilder installed
Msg – All messaging class files
SiteImages – default folder for static graphic images. Esp. those copied from SampleStyle
Global – folder for the Session/Global object
Css - Cascading Style Sheet for Application
Cmp – Custom components - generated class and java files
Database - Generated SQL/DDL and Sample Data files for Persistence tablesDataImages - Folder for all images to be rendered dynamically as graphics
GenSrc - Generated Source sub-directoriesbuild – Generated Class files – prior to deploying to EJB ServerBusinesstier - Folder for all generated Java files
Form – All Pages. Organized by sub=folders named the same as the Pages
Webtier – folder for all generated Servlet files
Code Construction ArchitectureCode Construction Architecture
Project Directory StructureProject Directory Structure

325
Code Construction Architecture Code Construction Architecture –– Generated ClassesGenerated Classes
Webtier (Servlets) - Servlet or JSP "Helper Class" contains Response Writes for HTML rendering. Page Architect java expressions (except for SQL) go here
Jsp (Jsp Pages) - JSP EJB Form Home and Remote Interfaces. Page Architect specifications go here.
ObjectSpace.Java – Loads data into the Page's ObjectSpace – single objects and multi-row ObjectSets. Page Architect ObjectSet SQL goes here, as well as ObjectSpace Local Methods
Entity (Class Instance) java files. Contains all Attributes found in ObjectSpace (including Page Local Variables)Contains all custom methods defined in the ObjectSpace.Contains all constructed methods - based on the Pages Data access typeContains class constructor methodDoes marshal/de-Marshal from Request Object through tokensContains all Business Rules implemented as custom methods:
Validate()Initialize – in class constructor Derive()
Contains a constructed get<ParentClass>() method

326
Run-Time Code Architecture – Servlet Only FormServlet Only Form
FormInternetInternet
WebSphere WebSphere ServerServer
Http:String…
PageNameServlet…doPost()
PageNameFormClass…generate()
ObjectSpace…Construct()
Buyer…Business_Method()
PageNameServlet…PageNameServlet…doPost()
PageNameFormClass…PageNameFormClass…generate()
ObjectSpace…ObjectSpace…Construct()
Buyer…Buyer…
PackagePackage…\com\quickstart\form\PageName\
Get session, request objects from AppServer … call generate(session, request)
Start Trxn … Call ObjectSpace.Construct() … Call Post(Buyer.method) … End Trxn
Construct the ObjectSpace from the form variables in the request object …
Business_Method() Method() : Do application-specific logic …

327
Run-Time Code Architecture – Servlet Only Detail PageServlet Only Detail Page
PagePage
PageNameServlet……fall-thru…
PageNameFormClass…generate()
ObjectSpace…Construct()
Buyer…HelperMethods()
PageNameServlet…PageNameServlet……fall-thru…
PageNameFormClass…PageNameFormClass…generate()
ObjectSpace…ObjectSpace…Construct()
Buyer…Buyer…
WebSphere WebSphere ServerServer
InternetInternet Http:String… HTML<..>……………………………
PackagePackage…\com\quickstart\form\PageName\
Get session, request objects from AppServer … call generate(session, request)
Call ObjectSpace.Construct()
Construct the ObjectSpace from the database – use the Buyer classes helper methods
HelperMethods() Buyer class/attribute manipulation…

328
Component Feature Summary Component Feature Summary -- ReviewReview
In this section you have learned:- Create a Component artifact
1. Change technology (App Server) from Tomcat to Oracle9iAS (or some other EJB server)2. Choose the primary class – the class where the data resides, or in the case of a multi-
class message, the highest class in the Class Model hierarchy3. Specify the Component’s ObjectSpace – the data content of the component4. Create a local method for the component.
Method nameMethod Java code (from Code Template)Method signature (in our parlance: “Definition”)Check Interface
5. Construct the component6. Create a custom method that invokes the local method of the Component artifact 7. Create a page that invokes the custom method that invokes the local method of the
Component artifact
Save your Project…