Embed Size (px)
Citation preview
ICDL WORD PROCESSING
Syllabus 6.0
Learning Material (MS Word 2016)
Provided by:
«Name»
Page ii ICDL Word Processing 2016 S6.0 V1 010817 © 2017
European Computer Driving Licence, ECDL, International Computer Driving Licence, ICDL, e-Citizen and related logos are all registered Trade Marks of The European Computer Driving Licence Foundation Limited (“ICDL Foundation”). This courseware may be used to assist candidates to prepare for the ICDL Foundation Certification Programme as titled on the
courseware. ICDL Foundation does not warrant that the use of this courseware publication will ensure passing of the tests for that ICDL
Foundation Certification Programme.
The material contained in this courseware does not guarantee that candidates will pass the test for the ICDL Foundation Certification
Programme. Any and all assessment items and / or performance-based exercises contained in this courseware relate solely to this
publication and do not constitute or imply certification by ICDL Foundation in respect of the ICDL Foundation Certification Programme or
any other ICDL Foundation test. This material does not constitute certification and does not lead to certification through any other process
than official ICDL Foundation certification testing.
Candidates using this courseware must be registered with the National Operator before undertaking a test for an ICDL Foundation
Certification Programme. Without a valid registration, the test(s) cannot be undertaken and no certificate, nor any other form of
recognition, can be given to a candidate. Registration should be undertaken at an Approved Test Centre.
Screen shots used with permission from Microsoft.

© 2017 «PageFooterText» Page iii
ICDL Word Processing
Word Processing applications continue to play a prominent role in people’s professional
and personal lives. This ICDL Word Processing module provides you with the practical
components to begin working with word processers. Having the skills to create, format and
finish word processing documents will improve your productivity and will allow you to
produce a professional, polished document.
On completion of this module you will be able to:
• Work with documents and save them in different file formats, locally or in the cloud.
• Use available help resources, shortcuts and the go to tool to enhance productivity.
• Create and edit word processing documents that will be ready to share and
distribute.
• Apply different formats and styles to enhance documents and recognise good
practice in choosing the appropriate formatting options.
• Insert tables, pictures and drawn objects into documents.
• Prepare documents for mail merge operations.
• Adjust document page settings and check and correct spelling before printing.
What are the benefits of this module?
This module gives you the skills to operate word processing software, including the most
common commercial and open-source offerings. Despite technological advances in recent
years, word processing remains a core computer skill that can be used to improve
efficiency and capability in the workplace. Once you have developed the skills and
knowledge set out in this book, you will be in a position to become certified in
an international standard in this area - ICDL Word Processing.
How to use this book
This book covers the entirety of the ICDL Word Processing course. It introduces important
concepts and sets out the specific steps associated with using different features of the
application. You will also have the opportunity to practice some of these activities yourself
using sample files provided in the Student Folder. It is recommended that you do not save
your changes to sample files, as you may want to practice an activity more than once.
For details of the specific areas of the ICDL Word Processing syllabus covered in each
section of this book, refer to the ICDL Word Processing syllabus map at the end of this
book.


© 2017 «PageFooterText» Page v
Page vi «PageFooterText» © 2017
ICDL WORD PROCESSING
LESSON 1 - EXPLORING MICROSOFT WORD 2016 .............................................................. 1
1.1 Starting Word 2016 ............................................................................................................. 2
1.2 The User Interface .............................................................................................................. 2
1.3 The Backstage View ........................................................................................................... 4
1.4 Converting Documents ........................................................................................................ 5
1.5 Setting Word Options .......................................................................................................... 6
1.6 Setting the Default Folders .................................................................................................. 6
1.7 The Quick Access Toolbar .................................................................................................. 8
1.8 Using the Ribbon and Tabs ............................................................................................... 11
1.9 Using the Mini Toolbar ...................................................................................................... 12
1.10 Using Dialog Box Launchers ........................................................................................... 13
1.11 Using Contextual Tabs .................................................................................................... 14
1.12 Using Help ...................................................................................................................... 15
1.13 Exiting Word ................................................................................................................... 16
1.14 Review Exercise ............................................................................................................. 18
LESSON 2 - WORKING WITH DOCUMENTS ......................................................................... 19
2.1 Creating a New Blank Document ...................................................................................... 20
2.2 Creating a New Document using Templates ..................................................................... 20
2.3 Searching for Templates ................................................................................................... 21
2.4 Entering Text .................................................................................................................... 22
2.5 Inserting Symbols ............................................................................................................. 23
2.6 Saving a Document ........................................................................................................... 25
2.7 Using Save As .................................................................................................................. 28
2.8 Save a Document as a Template ...................................................................................... 29
2.9 Save a Document in Alternative File Formats ................................................................... 30
2.10 Closing a Document ........................................................................................................ 31
2.11 Opening an Existing Document ....................................................................................... 31

© 2017 «PageFooterText» Page vii
2.12 Selecting Text ................................................................................................................. 32
2.13 Navigating a Document ................................................................................................... 33
2.14 Review Exercise ............................................................................................................. 36
LESSON 3 - DOCUMENT VIEWS............................................................................................ 37
3.1 Changing the View ............................................................................................................ 38
3.2 Zooming In/Out ................................................................................................................. 39
3.3 Display/Hide the Ruler ......................................................... Error! Bookmark not defined.
3.4 Formatting (Paragraph Marks) ............................................. Error! Bookmark not defined.
3.5 Soft Carriage Returns .......................................................... Error! Bookmark not defined.
3.6 Opening Multiple Documents ............................................... Error! Bookmark not defined.
3.7 Switching Between Documents ............................................ Error! Bookmark not defined.
3.8 Review Exercise .................................................................. Error! Bookmark not defined.
LESSON 4 - EDITING TEXT ........................................... ERROR! BOOKMARK NOT DEFINED.
4.1 Editing Text in a Document .................................................. Error! Bookmark not defined.
4.2 Deleting Text ........................................................................ Error! Bookmark not defined.
4.3 Replacing Selected Text ...................................................... Error! Bookmark not defined.
4.4 Copying, Moving/Pasting Text .............................................. Error! Bookmark not defined.
4.5 Using Undo, Redo and Repeat ............................................ Error! Bookmark not defined.
4.6 Review Exercise .................................................................. Error! Bookmark not defined.
LESSON 5 - FORMATTING TEXT .................................. ERROR! BOOKMARK NOT DEFINED.
5.1 Formatting Text .................................................................... Error! Bookmark not defined.
5.2 Changing Fonts.................................................................... Error! Bookmark not defined.
5.3 Changing Font Size ............................................................. Error! Bookmark not defined.
5.4 Applying Bold/Italics Formats ............................................... Error! Bookmark not defined.
5.5 Underlining ........................................................................... Error! Bookmark not defined.
5.6 Changing Font Colour .......................................................... Error! Bookmark not defined.
5.7 Applying Subscript/Superscript ............................................ Error! Bookmark not defined.
5.8 Using Format Painter ........................................................... Error! Bookmark not defined.
5.9 Changing Case .................................................................... Error! Bookmark not defined.
Page viii «PageFooterText» © 2017
5.10 Working with Hyperlinks ..................................................... Error! Bookmark not defined.
5.11 Clearing Formats ............................................................... Error! Bookmark not defined.
5.12 Review Exercise ................................................................ Error! Bookmark not defined.
LESSON 6 - FORMATTING PARAGRAPHS .................. ERROR! BOOKMARK NOT DEFINED.
6.1 Creating and Merging Paragraphs ....................................... Error! Bookmark not defined.
6.2 Aligning Paragraphs ............................................................. Error! Bookmark not defined.
6.3 Aligning Text with Click and Type ........................................ Error! Bookmark not defined.
6.4 Paragraph Spacing .............................................................. Error! Bookmark not defined.
6.5 Line Spacing ........................................................................ Error! Bookmark not defined.
6.6 Applying Border/Shading to Paragraph/Text ........................ Error! Bookmark not defined.
6.7 Copying Paragraph Formats ................................................ Error! Bookmark not defined.
6.8 Review Exercise .................................................................. Error! Bookmark not defined.
LESSON 7 - INDENTING PARAGRAPHS ...................... ERROR! BOOKMARK NOT DEFINED.
7.1 Changing the Left Indent ...................................................... Error! Bookmark not defined.
7.2 Indenting the First Line......................................................... Error! Bookmark not defined.
7.3 Creating a Right Indent ........................................................ Error! Bookmark not defined.
7.4 Creating a Hanging Indent ................................................... Error! Bookmark not defined.
7.5 Review Exercise .................................................................. Error! Bookmark not defined.
LESSON 8 - CHARACTER AND PARAGRAPH STYLE ERROR! BOOKMARK NOT DEFINED.
8.1 Applying a Character Style ................................................... Error! Bookmark not defined.
8.2 Applying a Paragraph Style .................................................. Error! Bookmark not defined.
LESSON 9 - BULLETS AND NUMBERINGS ................. ERROR! BOOKMARK NOT DEFINED.
9.1 Typing a Numbered or Bulleted List ..................................... Error! Bookmark not defined.
9.2 Applying Numbers or Bullets to Text .................................... Error! Bookmark not defined.
9.3 Adding a Numbered or Bulleted Item ................................... Error! Bookmark not defined.
9.4 Removing Numbers or Bullets from text ............................... Error! Bookmark not defined.
9.5 Changing a Bullet or Number Style ...................................... Error! Bookmark not defined.
9.6 Review Exercise .................................................................. Error! Bookmark not defined.
LESSON 10 - CHECKING SPELLING AND GRAMMAR ERROR! BOOKMARK NOT DEFINED.
© 2017 «PageFooterText» Page ix
10.1 Checking Spelling/Grammar as You Type .......................... Error! Bookmark not defined.
10.2 Automatic Hyphenation ...................................................... Error! Bookmark not defined.
10.3 Running the Spelling and Grammar Checker ..................... Error! Bookmark not defined.
10.4 Adding Words to the Custom Dictionary ............................. Error! Bookmark not defined.
10.5 Review Exercise ................................................................ Error! Bookmark not defined.
LESSON 11 - USING FIND AND REPLACE .................. ERROR! BOOKMARK NOT DEFINED.
11.1 Using Find .......................................................................... Error! Bookmark not defined.
11.2 Using Replace.................................................................... Error! Bookmark not defined.
11.3 Review Exercise ................................................................ Error! Bookmark not defined.
LESSON 12 - HEADERS AND FOOTERS ..................... ERROR! BOOKMARK NOT DEFINED.
12.1 Creating Headers/Footers using the Galleries .................... Error! Bookmark not defined.
12.2 Inserting Page Numbers using the Galleries ...................... Error! Bookmark not defined.
12.3 Inserting the Current Date .................................................. Error! Bookmark not defined.
12.4 Inserting the File Name ...................................................... Error! Bookmark not defined.
12.5 Inserting Fields into a Header / Footer ............................... Error! Bookmark not defined.
12.6 Deleting a Header / Footer ................................................. Error! Bookmark not defined.
12.7 Review Exercise ................................................................ Error! Bookmark not defined.
LESSON 13 - WORKING WITH TABS AND TABLES .... ERROR! BOOKMARK NOT DEFINED.
13.1 Using Tab Stops ................................................................ Error! Bookmark not defined.
13.2 Setting Tab Stops .............................................................. Error! Bookmark not defined.
13.3 Deleting Tab Stops ............................................................ Error! Bookmark not defined.
13.4 Clearing All Tabs ................................................................ Error! Bookmark not defined.
13.5 Inserting a Table ................................................................ Error! Bookmark not defined.
13.6 Navigating a Table ............................................................. Error! Bookmark not defined.
13.7 Selecting the Table ............................................................ Error! Bookmark not defined.
13.8 Inserting Rows and Columns into a Table .......................... Error! Bookmark not defined.
13.9 Adding Text to a Table ....................................................... Error! Bookmark not defined.
13.10 Hiding and Showing Gridlines .......................................... Error! Bookmark not defined.
13.11 Inserting Rows and Columns into a Table ........................ Error! Bookmark not defined.

Page x «PageFooterText» © 2017
13.12 Changing Column Width and Row Height ........................ Error! Bookmark not defined.
13.13 Adding a Border to a Table .............................................. Error! Bookmark not defined.
13.14 Removing a Border from a Table ..................................... Error! Bookmark not defined.
13.15 Adding and Removing Shading ........................................ Error! Bookmark not defined.
13.16 Deleting a Table ............................................................... Error! Bookmark not defined.
13.17 Review Exercise .............................................................. Error! Bookmark not defined.
LESSON 14 - INSERTING GRAPHICS .......................... ERROR! BOOKMARK NOT DEFINED.
14.1 Inserting Online Pictures .................................................... Error! Bookmark not defined.
14.2 Inserting a Picture .............................................................. Error! Bookmark not defined.
14.3 Inserting a Drawn Object .................................................... Error! Bookmark not defined.
14.4 Inserting a Chart ................................................................ Error! Bookmark not defined.
14.5 Copying/Moving Objects within Same Document ............... Error! Bookmark not defined.
14.6 Copying/Moving Objects between Open Documents ......... Error! Bookmark not defined.
14.7 Review Exercise ................................................................ Error! Bookmark not defined.
LESSON 15 - MAIL MERGE ............................................. ERROR! BOOKMARK NOT DEFINED.
15.1 Using Mail Merge ............................................................... Error! Bookmark not defined.
15.2 Printing Mail Merge Outputs ............................................... Error! Bookmark not defined.
15.3 Creating Mailing Labels ...................................................... Error! Bookmark not defined.
15.4 Selecting Label Options ..................................................... Error! Bookmark not defined.
15.5 Attaching a Data Source .................................................... Error! Bookmark not defined.
15.6 Inserting Label Merge Fields .............................................. Error! Bookmark not defined.
15.7 Merging Labels to a New Document .................................. Error! Bookmark not defined.
15.8 Review Exercise ................................................................ Error! Bookmark not defined.
LESSON 16 - USING DOCUMENT FORMATTING ........ ERROR! BOOKMARK NOT DEFINED.
16.1 Inserting a Manual Page Break .......................................... Error! Bookmark not defined.
16.2 Removing a Manual Page Break ........................................ Error! Bookmark not defined.
16.3 Page Orientation ................................................................ Error! Bookmark not defined.
16.4 Setting the Document Margins ........................................... Error! Bookmark not defined.
16.5 Changing the Paper Size ................................................... Error! Bookmark not defined.

© 2017 «PageFooterText» Page xi
16.6 Print Preview ...................................................................... Error! Bookmark not defined.
16.7 Printing the Current Page or Specific Pages ...................... Error! Bookmark not defined.
16.8 Printing Multiple Copies ..................................................... Error! Bookmark not defined.
16.9 Print Specific Text .............................................................. Error! Bookmark not defined.
16.10 Review Exercise .............................................................. Error! Bookmark not defined.
ICDL SYLLABUS .............................................................. ERROR! BOOKMARK NOT DEFINED.


LESSON 1 -
EXPLORING MICROSOFT WORD 2016
In this section, you will learn about:
• Starting Word 2016
• The user interface
• The backstage view
• Converting documents
• Setting Word options
• Setting the default folders
• The Quick Access Toolbar
• Using ribbons and tabs
• Using the Mini Toolbar
• Using dialog box launchers
• Using contextual tabs
• Using Help
• Exiting Word

Lesson 1 – Exploring Microsoft Word 2016 ICDL Word Processing
Page 2 «PageFooterText» © 2017
1.1 STARTING WORD 2016
Concepts
Microsoft Word 2016, which is part of the Microsoft Office Suite, is a word processing application used to create, edit, and print a wide range of documents.
Steps
To start Microsoft Word:
1. Select the Start button on the taskbar.
The Start menu appears. Click
2. Point to the programs list.
The scroll menu appears.
Click the scroll bar and scroll
to Word 2016.
3. Scroll to and select Word 2016.
Microsoft Word 2016 opens. Click
1.2 THE USER INTERFACE
Concepts
The Microsoft Word 2016 user interface uses ribbons and tabs, just like its predecessor, Microsoft Office 2013.

ICDL Word Processing Lesson 1 – Exploring Microsoft Word 2016
© 2017 «PageFooterText» Page 3
File tab and Backstage View: When you click the File tab, you see the backstage view. This view shows all the information about a document in one location.
Quick Access Toolbar: This is a customisable toolbar placed by default above the Ribbon - you can add icons for frequently used commands to this toolbar. It can also be placed below the Ribbon.
Quick Access Toolbar (QAT)
Ribbon: The Ribbon displays commands used to work with your document. Commands related to each other are arranged in named groups. Buttons next to the group names launch dialog boxes which allow you to access more commands and options. These buttons can be referred to as dialog box launchers.
Ribbon
Status Bar: Located at the bottom of the screen, this provides information about the total number of pages, total number of words, and different layouts, including zoom options.
Status Bar
Lesson 1 – Exploring Microsoft Word 2016 ICDL Word Processing
Page 4 «PageFooterText» © 2017
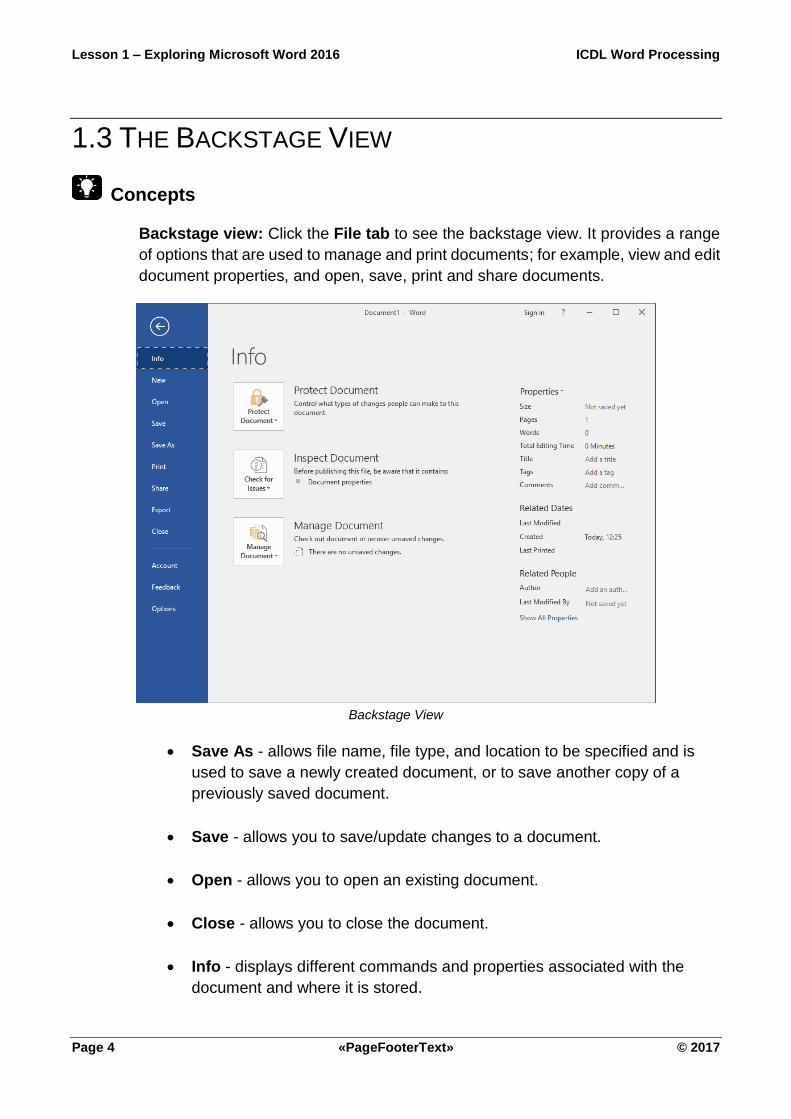
1.3 THE BACKSTAGE VIEW
Concepts
Backstage view: Click the File tab to see the backstage view. It provides a range
of options that are used to manage and print documents; for example, view and edit
document properties, and open, save, print and share documents.
Backstage View
• Save As - allows file name, file type, and location to be specified and is
used to save a newly created document, or to save another copy of a
previously saved document.
• Save - allows you to save/update changes to a document.
• Open - allows you to open an existing document.
• Close - allows you to close the document.
• Info - displays different commands and properties associated with the
document and where it is stored.

ICDL Word Processing Lesson 1 – Exploring Microsoft Word 2016
© 2017 «PageFooterText» Page 5
1.4 CONVERTING DOCUMENTS
Concepts
Word 2016 uses Compatibility Mode to open documents that were created in earlier
versions of Word. To save a document that has been opened and modified in
compatibility mode, it may be necessary to convert it to the latest Word format
because not all the latest features of Word 2016 are compatible with earlier versions
of Word.
Convert Feature
Steps
To convert a document.
Open FSS.docx from the Student Folder. Do this by going to the drive that the
Student Folder is located in, double-clicking the Student Folder and then double-
clicking FSS.docx.
1. Select the File tab.
The Backstage View is displayed. Click
2. Select the Convert button from the Info
option.
A Microsoft Word message box is displayed.
Click
3. Select OK to convert the document.
The document is converted. Click
Do not save or close the document FSS.docx.
Lesson 1 – Exploring Microsoft Word 2016 ICDL Word Processing
Page 6 «PageFooterText» © 2017
1.5 SETTING WORD OPTIONS
Concepts
Word Options are used to set various preferences in Word, such as the default
name to be used as the author for documents, and the default folder in which to
open and save documents.
Steps
To use Word Options:
1. Click the File tab.
The Backstage View is displayed. Click
2. Click the Options button.
The Word Options dialog box is displayed. Click
3. Select User Name under Personalize your copy of
Microsoft Office.
The User Name is entered in the text box.
Click the User Name box and
type your name
4. Select Initials and specify the initials of your name.
The Initials are entered in the text box.
Click the Initials box and type
your initials
5. Click OK to accept the changes.
The settings are applied to the document. Click
1.6 SETTING THE DEFAULT FOLDERS
Concepts
The Documents folder is the default working folder for all of the files created in your
Microsoft Office programs. It is the default folder location that appears when
opening and saving Word documents. You can choose a different default working
folder.
Steps
Set the default open folder:
1. Click the File tab.
The Backstage View is displayed. Click
ICDL Word Processing Lesson 1 – Exploring Microsoft Word 2016
© 2017 «PageFooterText» Page 7
2. Click the Options button.
The Word Options dialog box is displayed.
Click
3. Select Advanced.
The Advanced options are displayed.
Click Advanced
4. Click the File Locations button under General.
The File Locations dialog box is displayed with
Documents selected under File types.
Scroll down and click File
Locations under the General
section.
5. Click the Modify button.
The Modify Location dialog box is displayed.
Click Modify
6. Select the default folder to open documents.
The folder is selected.
Click Desktop
7. Click OK.
The default folder location is updated. Click
8. Click OK.
The File Locations dialog box closes. Click
9. Click OK to accept the changes.
The settings are applied. Click
Set the default save folder:
1. Click the File tab.
The Backstage View is displayed. Click
2. Click the Options button.
The Word Options dialog box is displayed.
Click
3. Select Save.
The Save options are displayed.
Click Save
4. Type in the path in the Default local file location or
select the Browse button and select the default folder.
The path is displayed in file location textbox. We have
set the default to be in the desktop in this example.
Type ..\Desktop\
5. Click OK to accept the changes.
The settings are applied to the document. Click
Lesson 1 – Exploring Microsoft Word 2016 ICDL Word Processing
Page 8 «PageFooterText» © 2017
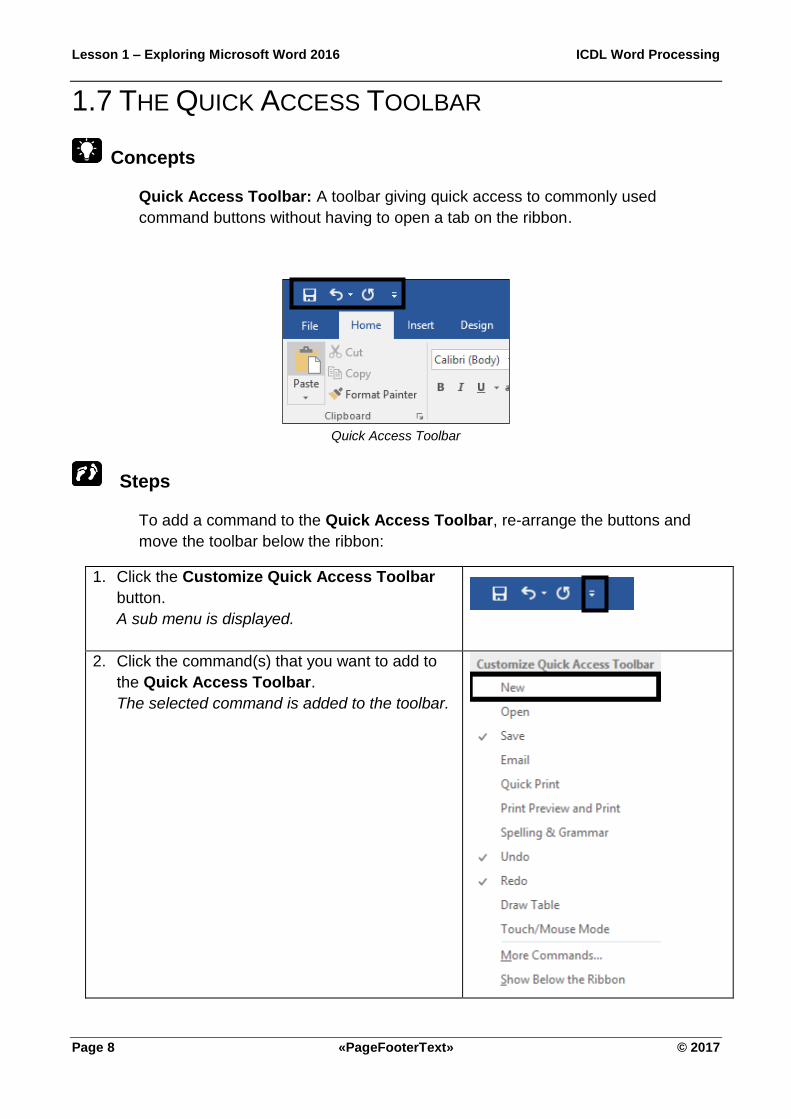
1.7 THE QUICK ACCESS TOOLBAR
Concepts
Quick Access Toolbar: A toolbar giving quick access to commonly used
command buttons without having to open a tab on the ribbon.
Quick Access Toolbar
Steps
To add a command to the Quick Access Toolbar, re-arrange the buttons and
move the toolbar below the ribbon:
1. Click the Customize Quick Access Toolbar
button.
A sub menu is displayed.
2. Click the command(s) that you want to add to
the Quick Access Toolbar.
The selected command is added to the toolbar.
ICDL Word Processing Lesson 1 – Exploring Microsoft Word 2016
© 2017 «PageFooterText» Page 9
3. Click the Customize Quick Access Toolbar
button.
A sub menu is displayed. Note the New button
has been added to the Quick Access Toolbar.
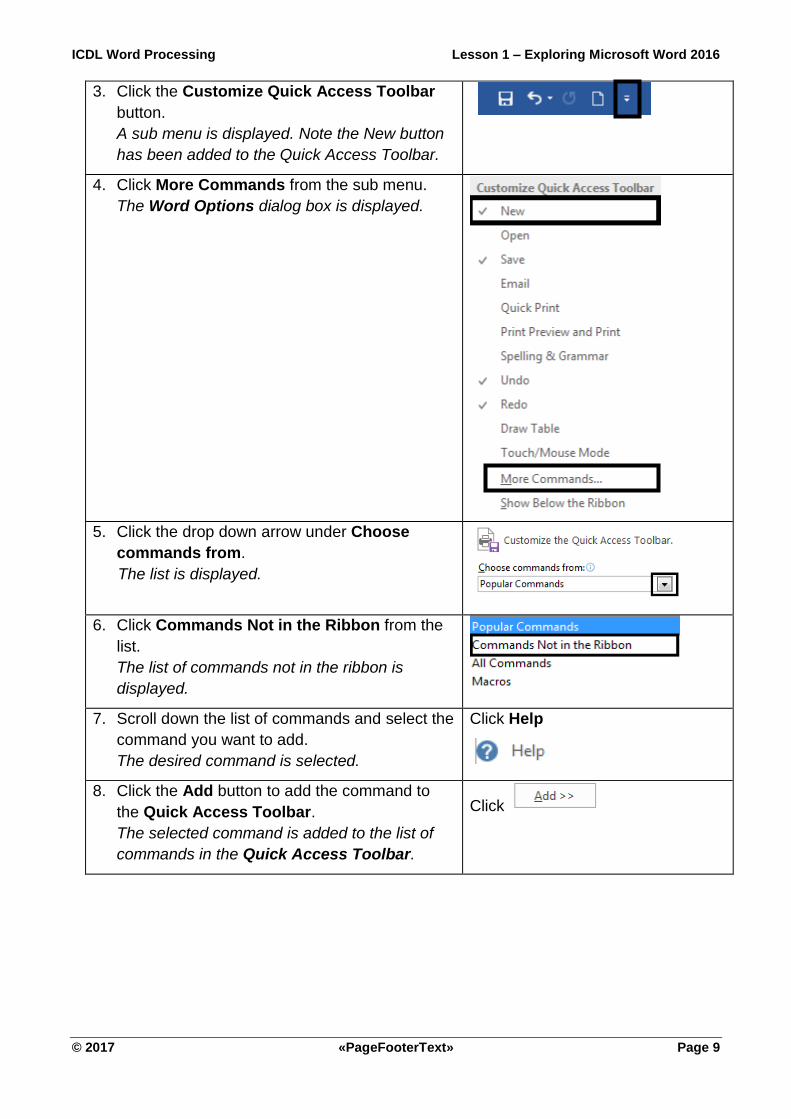
4. Click More Commands from the sub menu.
The Word Options dialog box is displayed.
5. Click the drop down arrow under Choose
commands from.
The list is displayed.
6. Click Commands Not in the Ribbon from the
list.
The list of commands not in the ribbon is
displayed.
7. Scroll down the list of commands and select the
command you want to add.
The desired command is selected.
Click Help
8. Click the Add button to add the command to
the Quick Access Toolbar.
The selected command is added to the list of
commands in the Quick Access Toolbar.
Click
Lesson 1 – Exploring Microsoft Word 2016 ICDL Word Processing
Page 10 «PageFooterText» © 2017
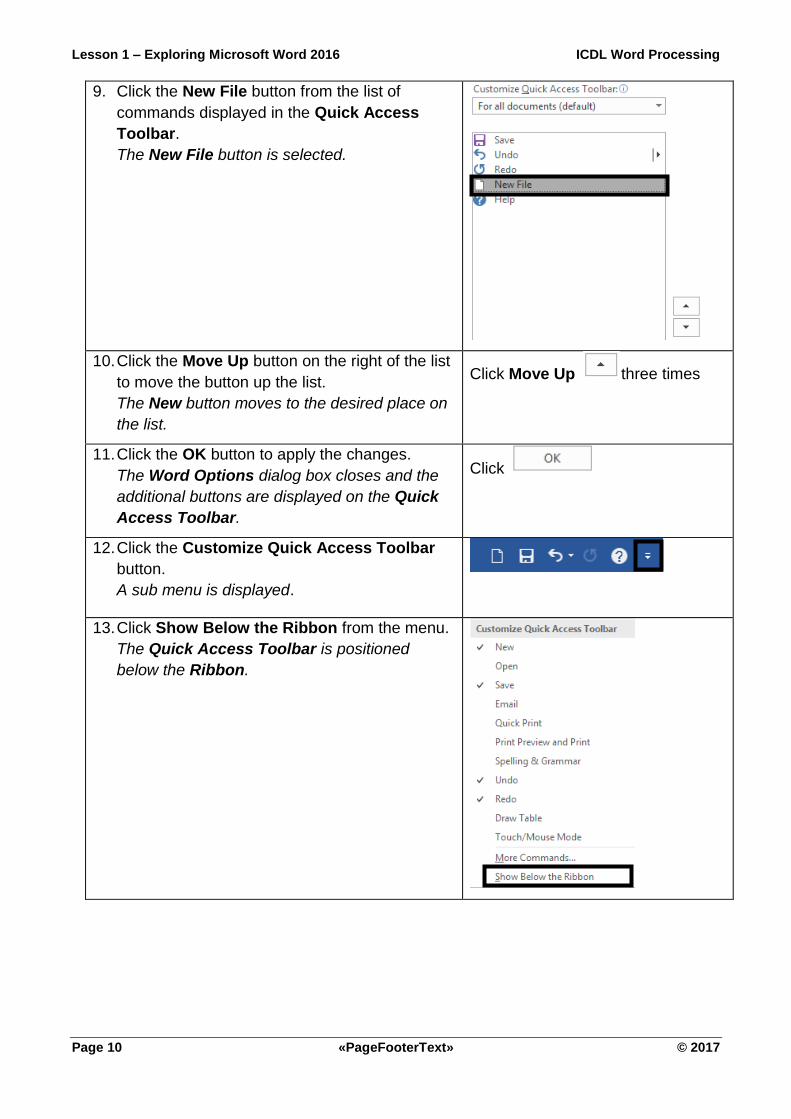
9. Click the New File button from the list of
commands displayed in the Quick Access
Toolbar.
The New File button is selected.
10. Click the Move Up button on the right of the list
to move the button up the list.
The New button moves to the desired place on
the list.
Click Move Up three times
11. Click the OK button to apply the changes.
The Word Options dialog box closes and the
additional buttons are displayed on the Quick
Access Toolbar.
Click
12. Click the Customize Quick Access Toolbar
button.
A sub menu is displayed.
13. Click Show Below the Ribbon from the menu.
The Quick Access Toolbar is positioned
below the Ribbon.
ICDL Word Processing Lesson 1 – Exploring Microsoft Word 2016
© 2017 «PageFooterText» Page 11
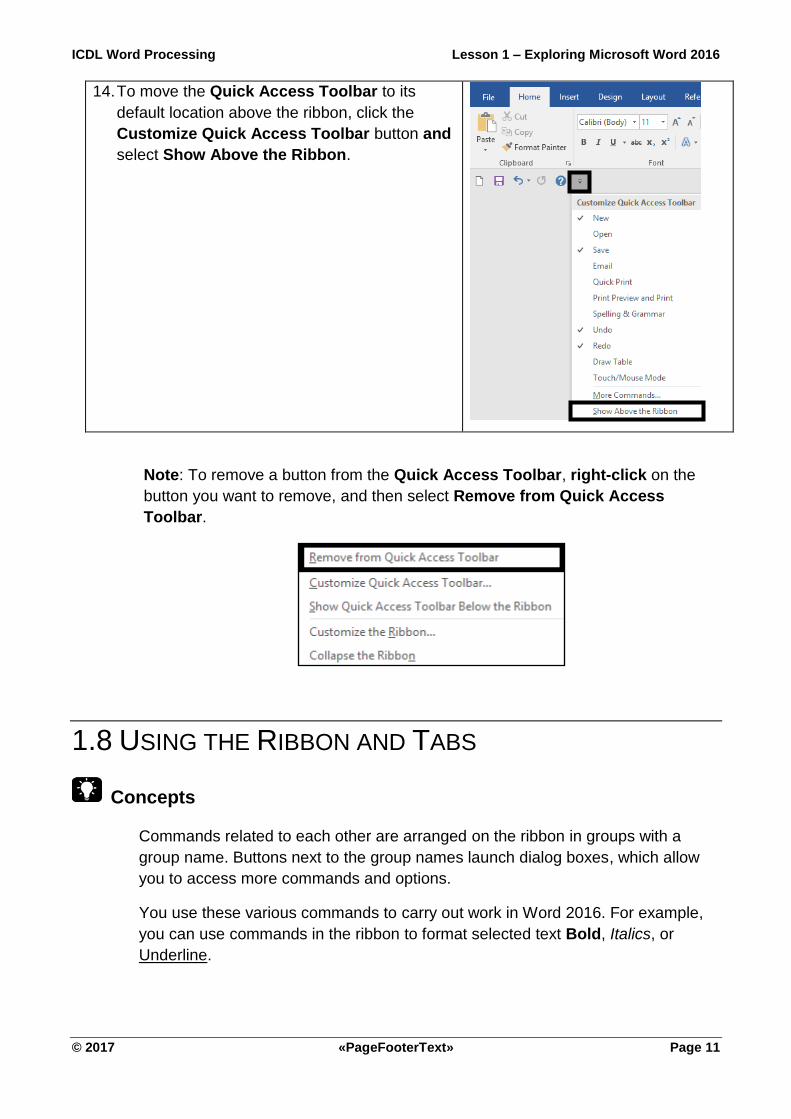
14. To move the Quick Access Toolbar to its
default location above the ribbon, click the
Customize Quick Access Toolbar button and
select Show Above the Ribbon.
Note: To remove a button from the Quick Access Toolbar, right-click on the
button you want to remove, and then select Remove from Quick Access
Toolbar.
1.8 USING THE RIBBON AND TABS
Concepts
Commands related to each other are arranged on the ribbon in groups with a
group name. Buttons next to the group names launch dialog boxes, which allow
you to access more commands and options.
You use these various commands to carry out work in Word 2016. For example,
you can use commands in the ribbon to format selected text Bold, Italics, or
Underline.
Lesson 1 – Exploring Microsoft Word 2016 ICDL Word Processing
Page 12 «PageFooterText» © 2017
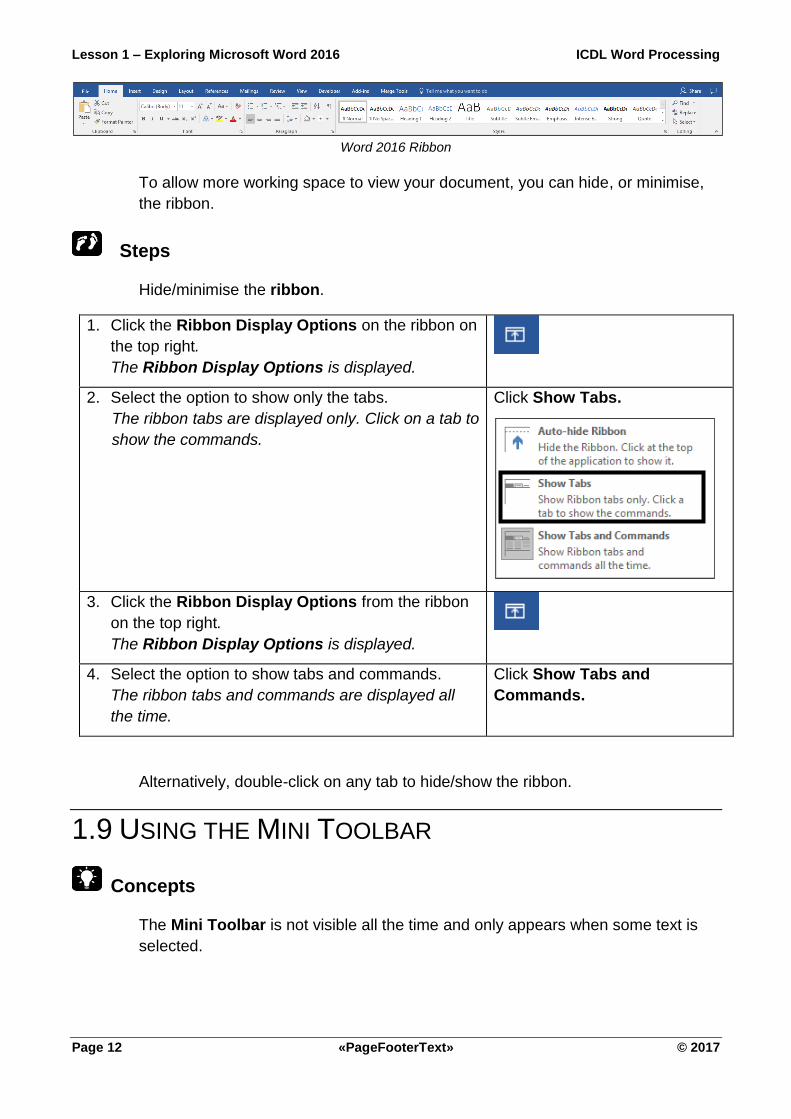
Word 2016 Ribbon
To allow more working space to view your document, you can hide, or minimise,
the ribbon.
Steps
Hide/minimise the ribbon.
1. Click the Ribbon Display Options on the ribbon on
the top right.
The Ribbon Display Options is displayed.
2. Select the option to show only the tabs.
The ribbon tabs are displayed only. Click on a tab to
show the commands.
Click Show Tabs.
3. Click the Ribbon Display Options from the ribbon
on the top right.
The Ribbon Display Options is displayed.
4. Select the option to show tabs and commands.
The ribbon tabs and commands are displayed all
the time.
Click Show Tabs and
Commands.
Alternatively, double-click on any tab to hide/show the ribbon.
1.9 USING THE MINI TOOLBAR
Concepts
The Mini Toolbar is not visible all the time and only appears when some text is
selected.

ICDL Word Processing Lesson 1 – Exploring Microsoft Word 2016
© 2017 «PageFooterText» Page 13
Word 2016 Mini Toolbar
This toolbar has commonly used commands, such as those associated with
changing font appearance or alignment.
1.10 USING DIALOG BOX LAUNCHERS
Concepts
Dialog Box Launchers are small buttons displaying downward pointing arrows
that appear at the bottom right of some tab groups. When you point to a Dialog
Box Launcher, a small image of the dialog box along with a short description is
shown.
The Font Dialog Box Launcher

Lesson 1 – Exploring Microsoft Word 2016 ICDL Word Processing
Page 14 «PageFooterText» © 2017
1.11 USING CONTEXTUAL TABS
Concepts
Contextual Tabs only appear when certain objects are selected and display
functionality related to these objects.
SmartArt Tools Contextual Tab
Steps
Display contextual tabs for a SmartArt graphic.
Navigate to the end of the document.
1. Select the Insert tab on the Ribbon.
The Insert tab is displayed.
Click the Insert tab
2. Select the SmartArt button in the Illustrations group.
The Choose a SmartArt Graphic dialog box opens. Click
3. Select the desired SmartArt diagram from the left
pane.
Various options under the selected SmartArt
diagram are displayed in the right pane.
Click
ICDL Word Processing Lesson 1 – Exploring Microsoft Word 2016
© 2017 «PageFooterText» Page 15
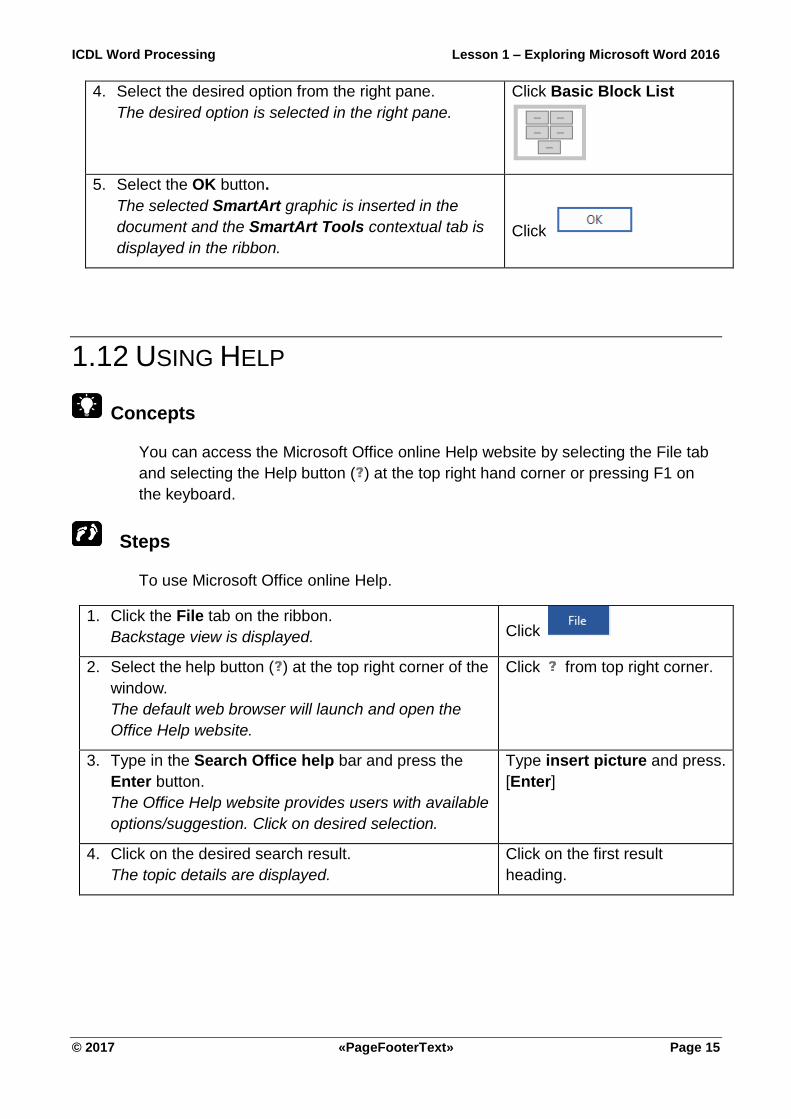
4. Select the desired option from the right pane.
The desired option is selected in the right pane.
Click Basic Block List
5. Select the OK button.
The selected SmartArt graphic is inserted in the
document and the SmartArt Tools contextual tab is
displayed in the ribbon.
Click
1.12 USING HELP
Concepts
You can access the Microsoft Office online Help website by selecting the File tab
and selecting the Help button ( ) at the top right hand corner or pressing F1 on
the keyboard.
Steps
To use Microsoft Office online Help.
1. Click the File tab on the ribbon.
Backstage view is displayed. Click
2. Select the help button ( ) at the top right corner of the
window.
The default web browser will launch and open the
Office Help website.
Click from top right corner.
3. Type in the Search Office help bar and press the
Enter button.
The Office Help website provides users with available
options/suggestion. Click on desired selection.
Type insert picture and press.
[Enter]
4. Click on the desired search result.
The topic details are displayed.
Click on the first result
heading.
Lesson 1 – Exploring Microsoft Word 2016 ICDL Word Processing
Page 16 «PageFooterText» © 2017
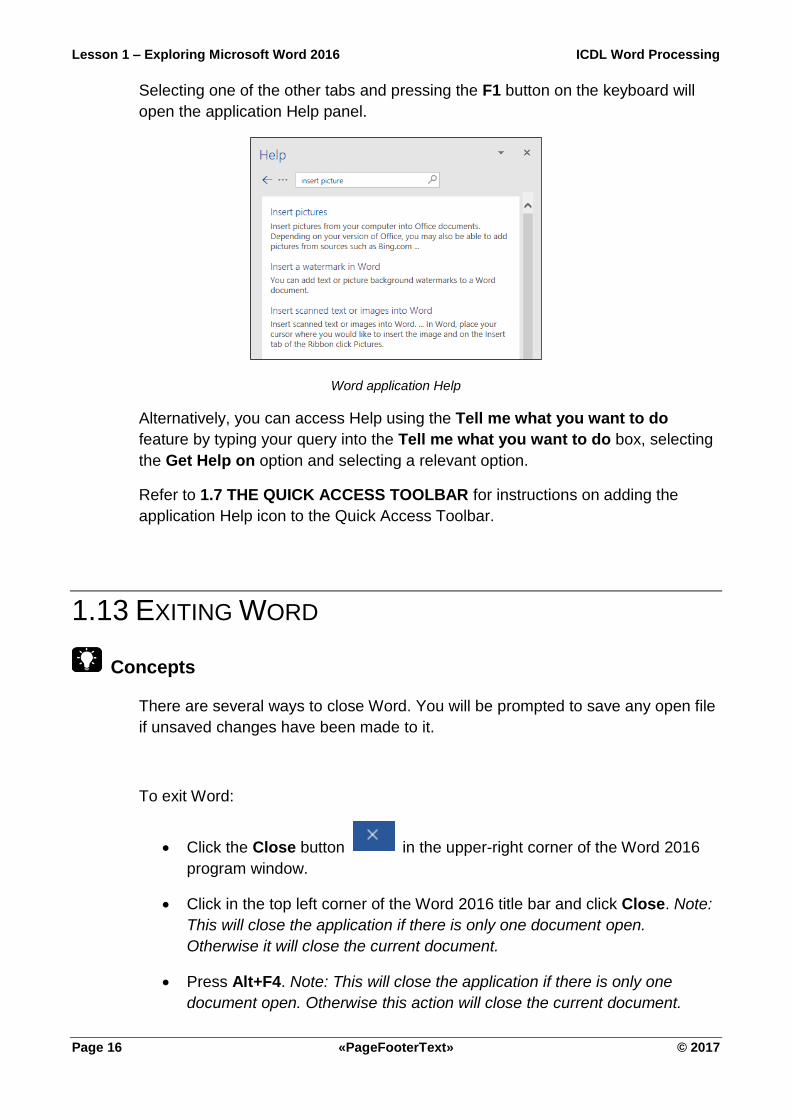
Selecting one of the other tabs and pressing the F1 button on the keyboard will
open the application Help panel.
Word application Help
Alternatively, you can access Help using the Tell me what you want to do
feature by typing your query into the Tell me what you want to do box, selecting
the Get Help on option and selecting a relevant option.
Refer to 1.7 THE QUICK ACCESS TOOLBAR for instructions on adding the
application Help icon to the Quick Access Toolbar.
1.13 EXITING WORD
Concepts
There are several ways to close Word. You will be prompted to save any open file
if unsaved changes have been made to it.
To exit Word:
• Click the Close button in the upper-right corner of the Word 2016
program window.
• Click in the top left corner of the Word 2016 title bar and click Close. Note:
This will close the application if there is only one document open.
Otherwise it will close the current document.
• Press Alt+F4. Note: This will close the application if there is only one
document open. Otherwise this action will close the current document.

ICDL Word Processing Lesson 1 – Exploring Microsoft Word 2016
© 2017 «PageFooterText» Page 17
Steps
1. Navigate your cursor to the upper-left
hand corner on the left of the Quick
Access Toolbar and click on the blank
space.
The popup menu opens.
2. Select the Close command.
Word closes.
Click
Select Don’t Save if you are prompted to save changes to FSS.docx.
Lesson 1 – Exploring Microsoft Word 2016 ICDL Word Processing
Page 18 «PageFooterText» © 2017
1.14 REVIEW EXERCISE
Exploring Word 2016
1. Customise the Quick Access Toolbar by adding the Draw Table and Spelling &
Grammar button.
2. Personalise your copy of Microsoft Office by adding the following details:
User Name: Your name
Initials: Your initials
3. Open a new blank document. Type the following information in the document
Welcome GoldSmith Ltd. - Proposal and Marketing Plan
4. Save the document as WGSPlan.docx in your current working folder (the default
folder location that appears when opening and saving word documents).
5. Close Microsoft Word.
LESSON 2 -
WORKING WITH DOCUMENTS
In this section you, will learn about:
• Creating a new blank document
• Creating a new document using templates
• Searching for templates
• Entering text
• Inserting symbol
• Saving a document to a local or online drive
• Using save as
• Saving a document as a template
• Saving a document in alternative file formats
• Closing a document
• Opening an existing document
• Selecting text
• Using the Go To feature
Lesson 2 – Working with Documents ICDL Word Processing
Page 20 «PageFooterText» © 2017
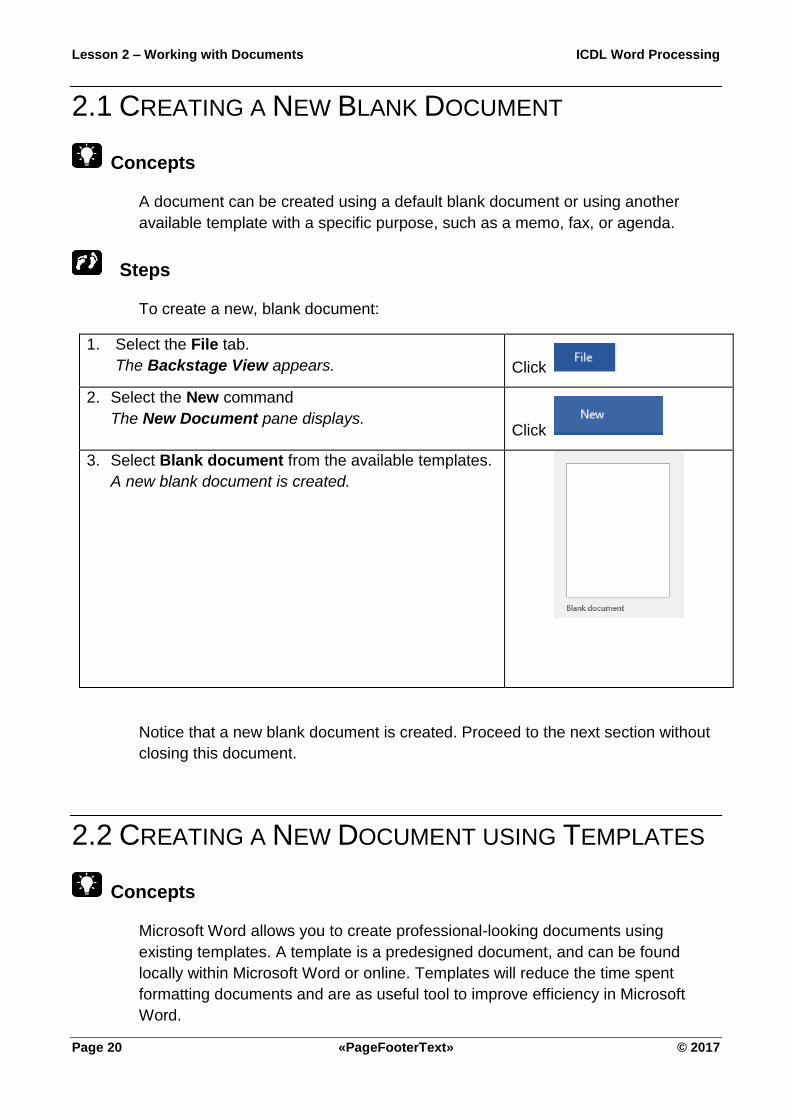
2.1 CREATING A NEW BLANK DOCUMENT
Concepts
A document can be created using a default blank document or using another
available template with a specific purpose, such as a memo, fax, or agenda.
Steps
To create a new, blank document:
1. Select the File tab.
The Backstage View appears. Click
2. Select the New command
The New Document pane displays. Click
3. Select Blank document from the available templates.
A new blank document is created.
Notice that a new blank document is created. Proceed to the next section without
closing this document.
2.2 CREATING A NEW DOCUMENT USING TEMPLATES
Concepts
Microsoft Word allows you to create professional-looking documents using
existing templates. A template is a predesigned document, and can be found
locally within Microsoft Word or online. Templates will reduce the time spent
formatting documents and are as useful tool to improve efficiency in Microsoft
Word.
ICDL Word Processing Lesson 2 – Working with Documents
© 2017 «PageFooterText» Page 21
Steps
To create a new resume using a template:
1. Select the File tab.
The Backstage View appears. Click
2. Select the New command.
The New Document pane appears and displays
Word’s own templates, as well as some online
templates.
3. Click on a desired template to start a new document.
Scroll down the list to search for more options. Scroll down (if necessary) and
click Resume (color)
4. Click Create to download the template.
The new resume template is downloaded, ready for
editing.
Click Create
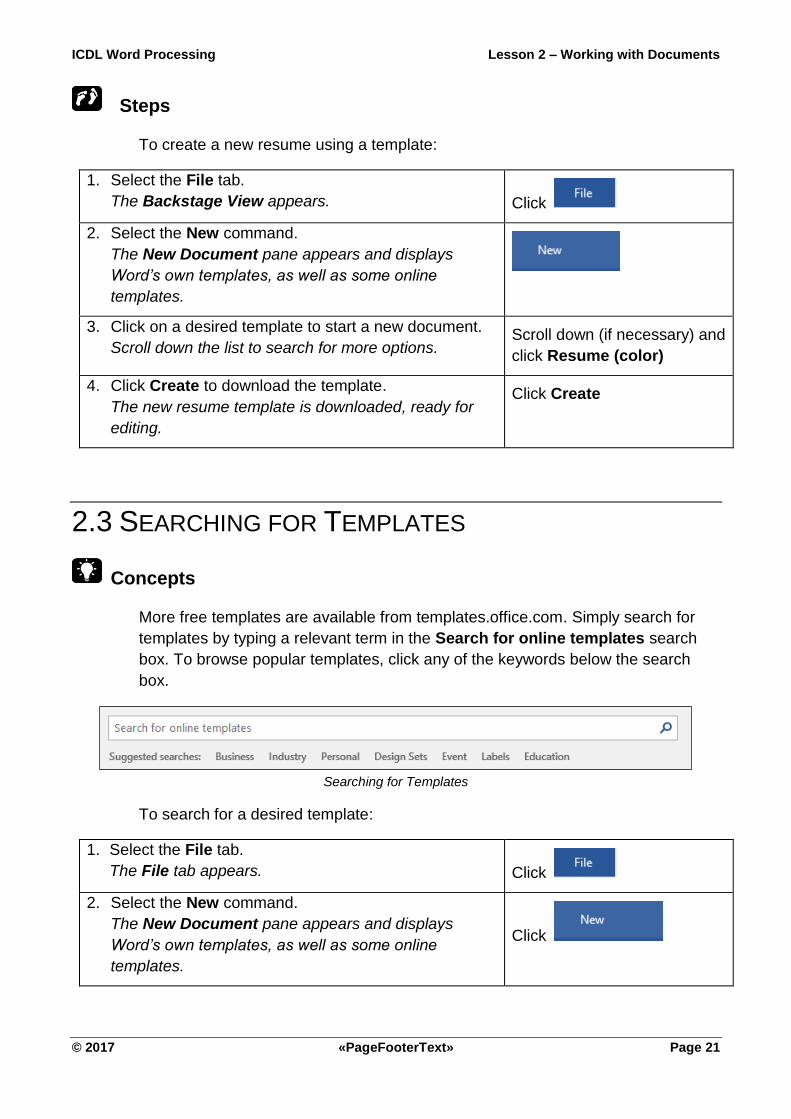
2.3 SEARCHING FOR TEMPLATES
Concepts
More free templates are available from templates.office.com. Simply search for
templates by typing a relevant term in the Search for online templates search
box. To browse popular templates, click any of the keywords below the search
box.
Searching for Templates
To search for a desired template:
1. Select the File tab.
The File tab appears. Click
2. Select the New command.
The New Document pane appears and displays
Word’s own templates, as well as some online
templates.
Click
Lesson 2 – Working with Documents ICDL Word Processing
Page 22 «PageFooterText» © 2017
3. Click in the Search for online templates textbox
area.
The cursor is displayed on the search area.
Click on
4. Type in the keywords and press Enter.
Examples of keywords include fax, memo, agenda,
letter etc. The online template will display all available
Letters template.
Type Letter and press Enter
5. Click on a desired template to start a new document.
Scroll down the list to search for more options. Click Cover letter (blue)
6. Click Create to download the template.
The letter document is downloaded ready for editing. Click Create
2.4 ENTERING TEXT
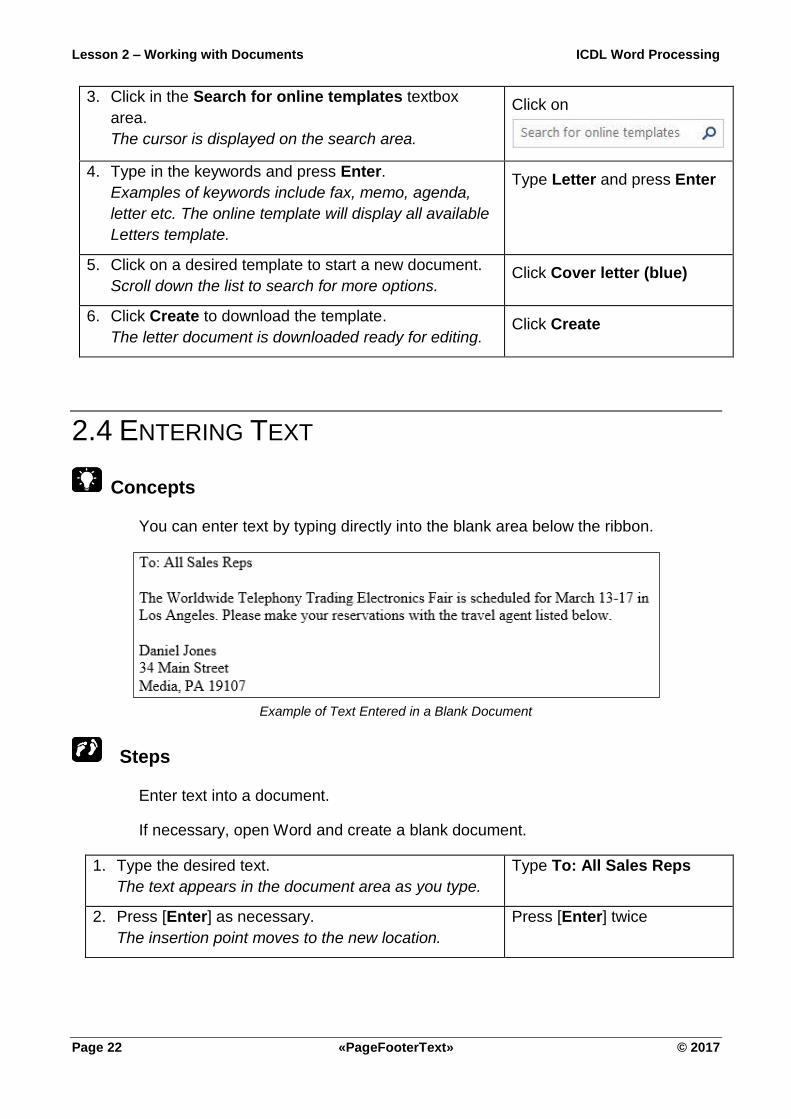
Concepts
You can enter text by typing directly into the blank area below the ribbon.
Example of Text Entered in a Blank Document
Steps
Enter text into a document.
If necessary, open Word and create a blank document.
1. Type the desired text.
The text appears in the document area as you type.
Type To: All Sales Reps
2. Press [Enter] as necessary.
The insertion point moves to the new location.
Press [Enter] twice
ICDL Word Processing Lesson 2 – Working with Documents
© 2017 «PageFooterText» Page 23
3. Type additional text as necessary.
The text appears in the document area as you type
and, as the text fills a line, Word automatically moves
to the beginning of the next line.
Type The Worldwide
Telephony Trading
Electronics Fair is
scheduled for March 13-17
in Los Angeles. Please
make your reservations
with the travel agent listed
below.
4. Press [Enter] Press [Enter]
Practice the Concept: Type the following text, pressing [Enter] after each line:
Daniel Jones
34 Main Street
Media, PA 19107
2.5 INSERTING SYMBOLS
Concepts
Word provides many symbols for use in documents. You can use the Symbol
dialog box to insert symbols, such as © for Copyright, ® for Registered, ™ for
Trademark, or special characters, such as a dash (—) or ellipsis (…).
Steps
To insert a symbol in selected text:
1. Place the cursor at the required area.
The cursor appears in the document area as you
type.
Click at the end of the text
Telephony
2. Select the Insert tab.
The Insert tab is displayed.
Click Insert
Lesson 2 – Working with Documents ICDL Word Processing
Page 24 «PageFooterText» © 2017
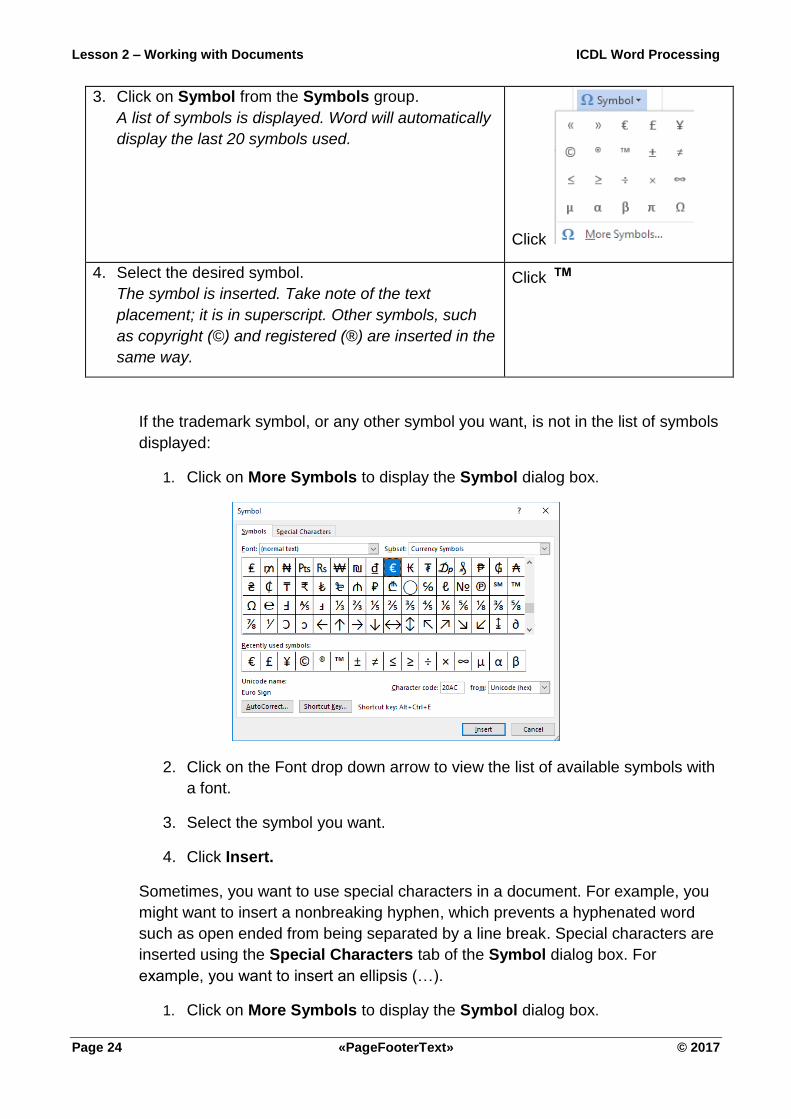
3. Click on Symbol from the Symbols group.
A list of symbols is displayed. Word will automatically
display the last 20 symbols used.
Click
4. Select the desired symbol.
The symbol is inserted. Take note of the text
placement; it is in superscript. Other symbols, such
as copyright (©) and registered (®) are inserted in the
same way.
Click ™
If the trademark symbol, or any other symbol you want, is not in the list of symbols
displayed:
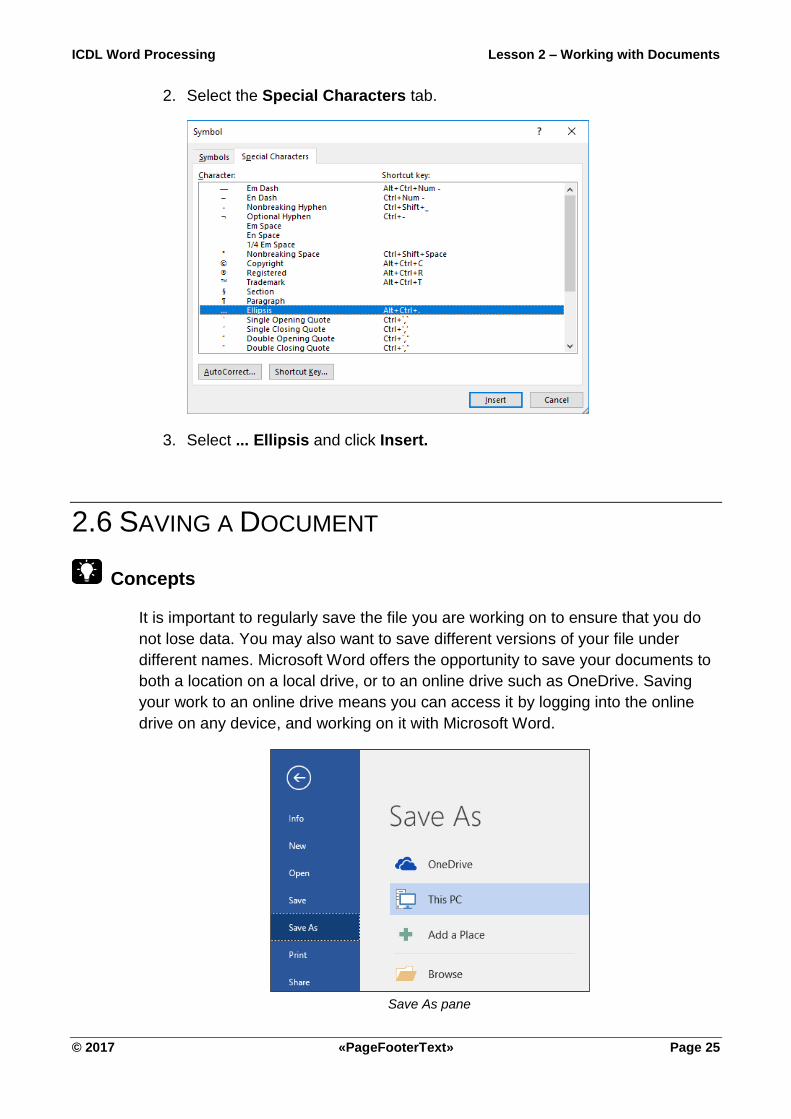
1. Click on More Symbols to display the Symbol dialog box.
2. Click on the Font drop down arrow to view the list of available symbols with
a font.
3. Select the symbol you want.
4. Click Insert.
Sometimes, you want to use special characters in a document. For example, you
might want to insert a nonbreaking hyphen, which prevents a hyphenated word
such as open ended from being separated by a line break. Special characters are
inserted using the Special Characters tab of the Symbol dialog box. For
example, you want to insert an ellipsis (…).
1. Click on More Symbols to display the Symbol dialog box.
ICDL Word Processing Lesson 2 – Working with Documents
© 2017 «PageFooterText» Page 25
2. Select the Special Characters tab.
3. Select ... Ellipsis and click Insert.
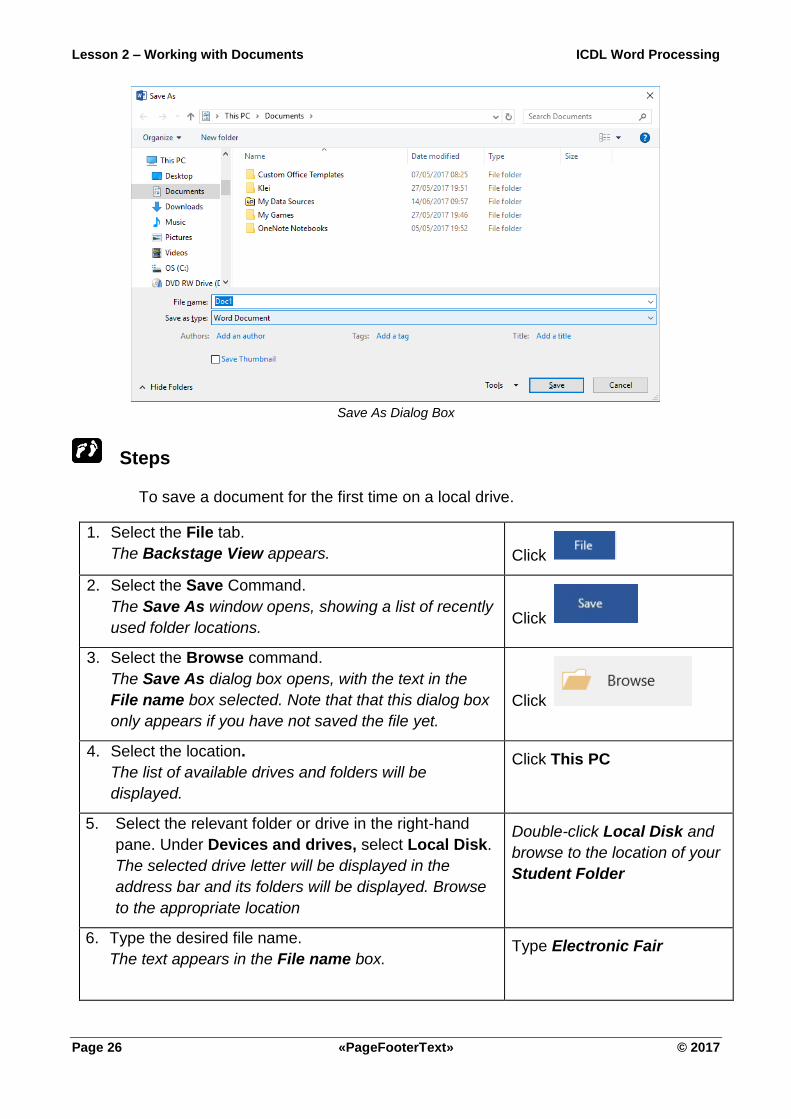
2.6 SAVING A DOCUMENT
Concepts
It is important to regularly save the file you are working on to ensure that you do
not lose data. You may also want to save different versions of your file under
different names. Microsoft Word offers the opportunity to save your documents to
both a location on a local drive, or to an online drive such as OneDrive. Saving
your work to an online drive means you can access it by logging into the online
drive on any device, and working on it with Microsoft Word.
Save As pane
Lesson 2 – Working with Documents ICDL Word Processing
Page 26 «PageFooterText» © 2017
Save As Dialog Box
Steps
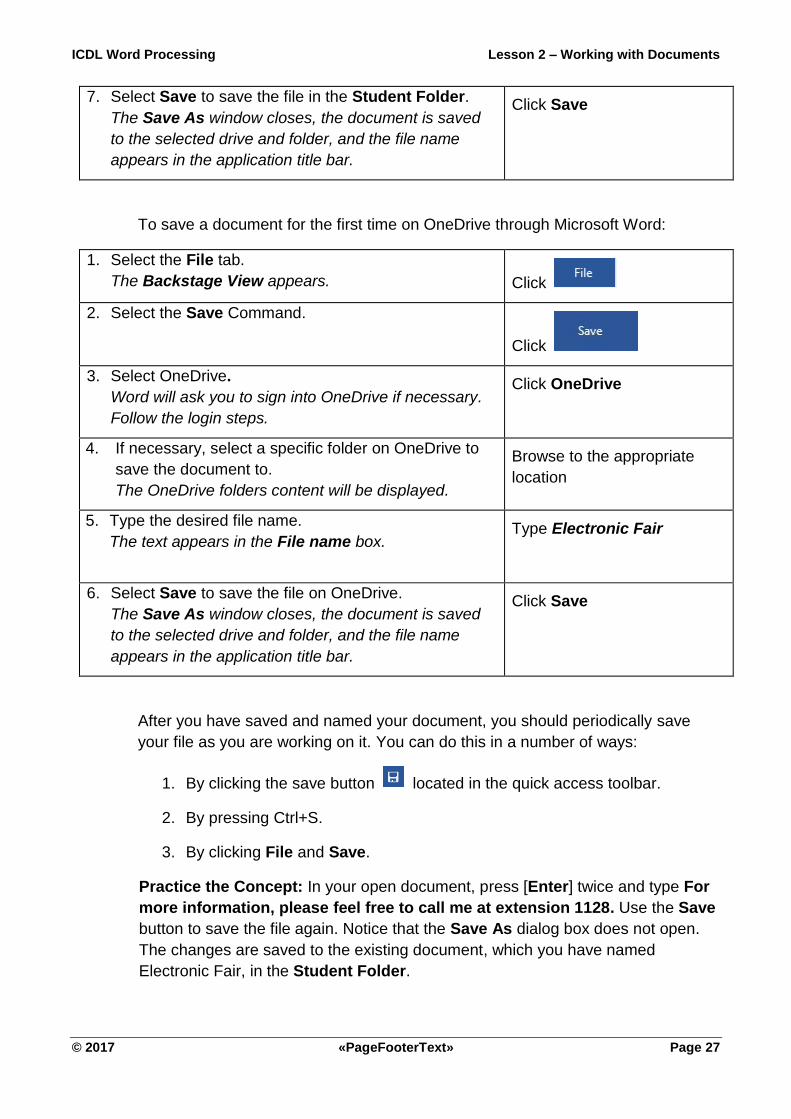
To save a document for the first time on a local drive.
1. Select the File tab.
The Backstage View appears. Click
2. Select the Save Command.
The Save As window opens, showing a list of recently
used folder locations. Click
3. Select the Browse command.
The Save As dialog box opens, with the text in the
File name box selected. Note that that this dialog box
only appears if you have not saved the file yet.
Click
4. Select the location.
The list of available drives and folders will be
displayed.
Click This PC
5. Select the relevant folder or drive in the right-hand
pane. Under Devices and drives, select Local Disk.
The selected drive letter will be displayed in the
address bar and its folders will be displayed. Browse
to the appropriate location
Double-click Local Disk and
browse to the location of your
Student Folder
6. Type the desired file name.
The text appears in the File name box. Type Electronic Fair
ICDL Word Processing Lesson 2 – Working with Documents
© 2017 «PageFooterText» Page 27
7. Select Save to save the file in the Student Folder.
The Save As window closes, the document is saved
to the selected drive and folder, and the file name
appears in the application title bar.
Click Save
To save a document for the first time on OneDrive through Microsoft Word:
1. Select the File tab.
The Backstage View appears. Click
2. Select the Save Command.
Click
3. Select OneDrive.
Word will ask you to sign into OneDrive if necessary.
Follow the login steps.
Click OneDrive
4. If necessary, select a specific folder on OneDrive to
save the document to.
The OneDrive folders content will be displayed.
Browse to the appropriate
location
5. Type the desired file name.
The text appears in the File name box. Type Electronic Fair
6. Select Save to save the file on OneDrive.
The Save As window closes, the document is saved
to the selected drive and folder, and the file name
appears in the application title bar.
Click Save
After you have saved and named your document, you should periodically save
your file as you are working on it. You can do this in a number of ways:
1. By clicking the save button located in the quick access toolbar.
2. By pressing Ctrl+S.
3. By clicking File and Save.
Practice the Concept: In your open document, press [Enter] twice and type For
more information, please feel free to call me at extension 1128. Use the Save
button to save the file again. Notice that the Save As dialog box does not open.
The changes are saved to the existing document, which you have named
Electronic Fair, in the Student Folder.
Lesson 2 – Working with Documents ICDL Word Processing
Page 28 «PageFooterText» © 2017
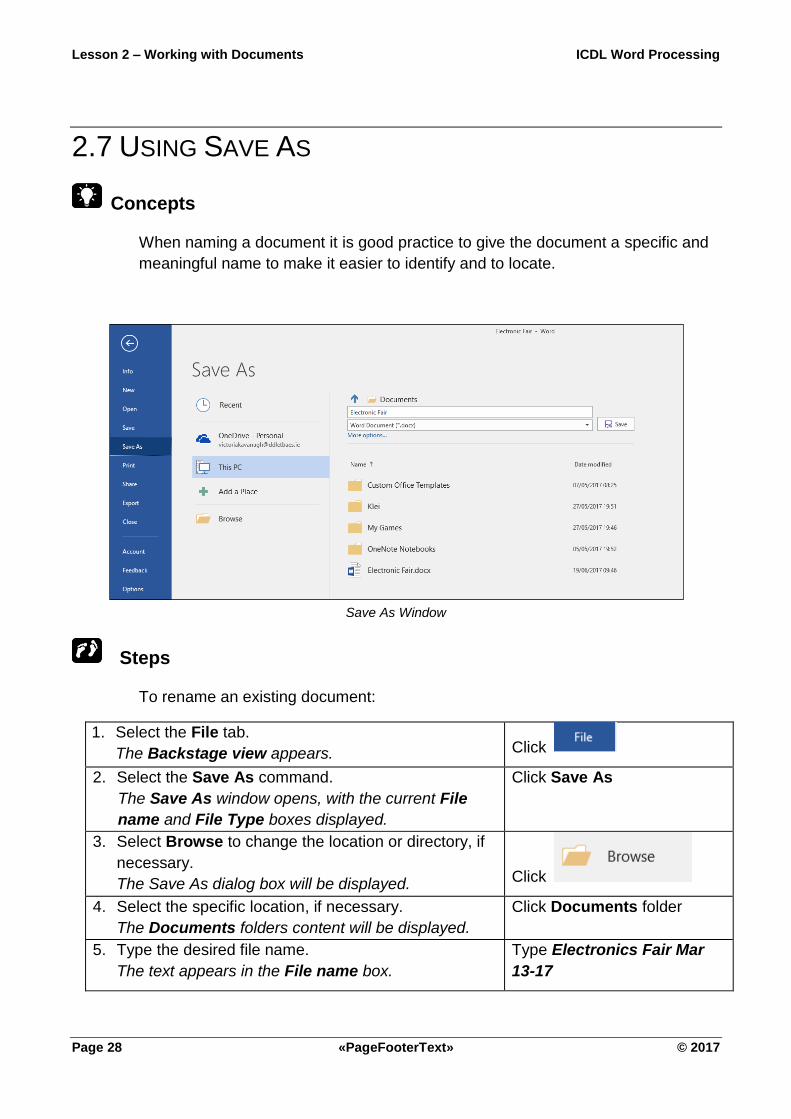
2.7 USING SAVE AS
Concepts
When naming a document it is good practice to give the document a specific and
meaningful name to make it easier to identify and to locate.
Save As Window
Steps
To rename an existing document:
1. Select the File tab.
The Backstage view appears. Click
2. Select the Save As command.
The Save As window opens, with the current File
name and File Type boxes displayed.
Click Save As
3. Select Browse to change the location or directory, if
necessary.
The Save As dialog box will be displayed. Click
4. Select the specific location, if necessary.
The Documents folders content will be displayed.
Click Documents folder
5. Type the desired file name.
The text appears in the File name box.
Type Electronics Fair Mar
13-17
ICDL Word Processing Lesson 2 – Working with Documents
© 2017 «PageFooterText» Page 29
6. Select Save to save the file in the Current Folder.
The Save As window closes, the document is saved
with a different name, and the new file name appears
in the application title bar.
Click Save
2.8 SAVE A DOCUMENT AS A TEMPLATE
Concepts
If you frequently create a certain type of document, such as a monthly report with
a company logo and specific formatting, you should save it as a template so you
can use that as your starting point, instead of building the file from scratch each
time you need it.
Steps
To save a document as a template:
1. Select the File tab.
The Backstage view appears. Click
2. Select the Save As command.
The Save As window opens, with the File name and
File Type boxes displayed.
Click Save As
3. Select the location or directory if necessary.
The Documents folders content will be displayed. Click
4. Type the desired file name.
The text appears in the File name box.
Type Electronics Fair
5. To change the file type, select the drop down arrow
beside the current file type.
A list of available file types appears. Click
6. Select the template file type.
The file type is selected and automatically goes to the
Custom Office Templates folder.
Select Word Template
(*.dotx)
7. Select Save to save the file.
The Save As window closes, the document is saved
to the selected folder, and the file name appears in
the application title bar.
Click

Lesson 2 – Working with Documents ICDL Word Processing
Page 30 «PageFooterText» © 2017
2.9 SAVE A DOCUMENT IN ALTERNATIVE FILE
FORMATS
Concepts
You may want to make your document readable or editable by someone who
does not have Microsoft Word. You can do this by using formats such as plain text
(.txt), Portable Document Format (.pdf), Rich Text Format (.rtf), or other software
specific file extensions.
Steps
To save an existing document using a different file type:
1. Select the File tab.
The Backstage view appears. Click
2. Select the Save As command.
The Save As window opens.
Click Save As
3. Select the location or directory if necessary.
The Documents folders content will be displayed. Click
4. Type the desired file name.
The text appears in the File name box.
Type Electronics Fair
5. To change the file type, select the drop down arrow
beside the current file type.
A list of available file types appears. Click
6. Select the desired File type. (E.g. Rich Text Format
(*.rtf), Plain Text (*.txt), PDF (*.pdf)).
The file type is selected.
Select Rich Text Format
(*.rtf)
7. Select Save to save the file in the Student Folder.
The Save As window closes, the document is saved
to the selected drive and folder, and the file name
appears in the application title bar.
Click

ICDL Word Processing Lesson 2 – Working with Documents
© 2017 «PageFooterText» Page 31
2.10 CLOSING A DOCUMENT
Concepts
You can close your Word document by clicking the File tab and then selecting the
Close option. Word will prompt to save the file if it has not been saved before.
Steps
To close a document.
1. Select the File tab.
The Backstage view is displayed. Click
2. Select the Close command.
The document closes. A message box may open
asking if you want to save changes. Select Save if
you want to save changes; Don’t Save if you do not
want to save changes.
Click Close
Tip: You can also close an open document by pressing Ctrl+W.
2.11 OPENING AN EXISTING DOCUMENT
Steps
To open an existing document from a specific drive and folder location.
1. Select the File tab.
The Backstage view appears. Click
2. Select the Open command.
Click
3. Select the Browse command.
The Open dialog box opens. Click
4. Select the drive where the document you want to
open is located.
Click the drive containing the
Student Folder.
Lesson 2 – Working with Documents ICDL Word Processing
Page 32 «PageFooterText» © 2017
5. Open the folder in which the document you want to
open is located.
The contents of the folder appear.
Double-click to open the
Student Folder.
6. Select the file name of the document you want to
open.
The file name is selected.
Scroll if necessary and click
BasDoc.docx
7. Click the Open button.
The Open dialog box closes, and the document
opens.
Click
Tip: You can also open an existing document by pressing Ctrl+O, and browsing to
the document you want to open.
Close BasDoc.docx without saving it.
2.12 SELECTING TEXT
Concepts
You need to select text in order to carry out a range of actions, including
formatting and alignment. In Word 2016, you can select text, or other objects in a
document, by using the mouse or the keyboard.
Steps
To select text using multiple methods:
From the Student Folder, open BasDoc.docx.
1. To select a word, double-click it.
The word is selected.
Scroll as necessary and
double-click the word
Systems in the first sentence
of the body of the letter.
2. Click anywhere in the document to deselect selected
text.
The text is deselected.
Click anywhere in the
document.
3. To select a sentence, hold [Ctrl] and click anywhere
in the sentence you want to select.
The sentence is selected.
Hold [Ctrl] and click in the
sentence beginning MaxWide
is proud...
ICDL Word Processing Lesson 2 – Working with Documents
© 2017 «PageFooterText» Page 33
4. To select a paragraph, triple-click anywhere in the
paragraph you want to select.
The paragraph is selected.
Alternatively, point to the blank area to the left of any
line in the paragraph and double-click.
Triple-click in the paragraph
beginning Thank you...
5. To select a text block using the mouse, drag across
the text from the first character you want to select to
the right of the last character you want to select.
The text is selected.
Drag from the left of the letter
T in the text The enclosed at
the beginning of the second
paragraph to the right of the
letter g in the word catalog
6. To select multiple text blocks, select a text block
using the mouse, then hold [Ctrl] and select
additional text blocks as desired.
Multiple, non-continuous text blocks are selected.
At the end of the first
paragraph, select United
States using the mouse. Hold
[Ctrl] and select Canada.
7. To select the entire document, press [Ctrl+A].
The entire document is selected.
Alternatively, point to the blank area to the left of any
line in the document and triple-click.
Press [Ctrl+A]
8. Click anywhere in the document to deselect selected
text.
The text is deselected.
Click anywhere in the
document.
Click anywhere in the document to deselect the text. Close BasDoc.docx without
saving it.
2.13 NAVIGATING A DOCUMENT
Concepts
Microsoft Word offers a number of features that improves efficiency and
consistency when working on documents. You can navigate to specific pages,
sections, tables and other parts within the document by using the Go To tool,
which allows you to search for and jump to a page in the document.
Lesson 2 – Working with Documents ICDL Word Processing
Page 34 «PageFooterText» © 2017
Steps
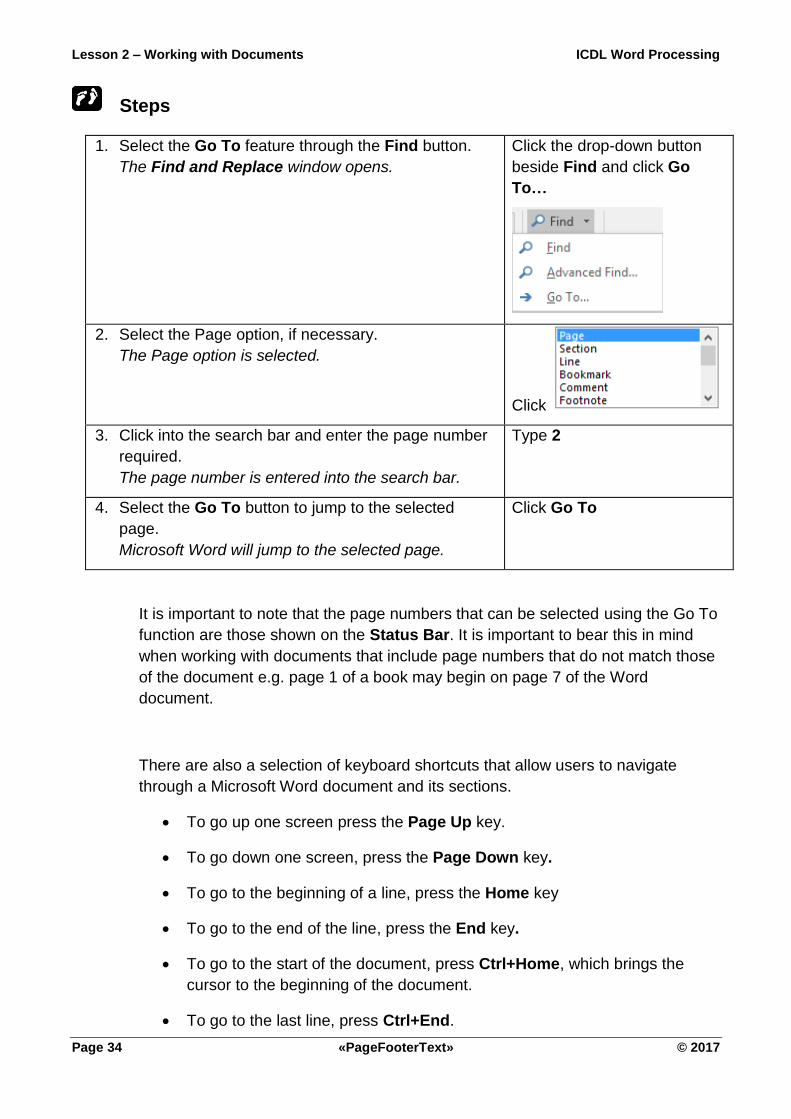
1. Select the Go To feature through the Find button.
The Find and Replace window opens.
Click the drop-down button
beside Find and click Go
To…
2. Select the Page option, if necessary.
The Page option is selected.
Click
3. Click into the search bar and enter the page number
required.
The page number is entered into the search bar.
Type 2
4. Select the Go To button to jump to the selected
page.
Microsoft Word will jump to the selected page.
Click Go To
It is important to note that the page numbers that can be selected using the Go To
function are those shown on the Status Bar. It is important to bear this in mind
when working with documents that include page numbers that do not match those
of the document e.g. page 1 of a book may begin on page 7 of the Word
document.
There are also a selection of keyboard shortcuts that allow users to navigate
through a Microsoft Word document and its sections.
• To go up one screen press the Page Up key.
• To go down one screen, press the Page Down key.
• To go to the beginning of a line, press the Home key
• To go to the end of the line, press the End key.
• To go to the start of the document, press Ctrl+Home, which brings the
cursor to the beginning of the document.
• To go to the last line, press Ctrl+End.

ICDL Word Processing Lesson 2 – Working with Documents
© 2017 «PageFooterText» Page 35
Lesson 2 – Working with Documents ICDL Word Processing
Page 36 «PageFooterText» © 2017
2.14 REVIEW EXERCISE
Use basic document skills
1. Create a new document.
2. Type the following information in the document:
Breakfast 9:30 - 10:30
Keynote Speaker 10:30 - 11:00
Exhibitions 11:00 - 1:30
Lunch 1:30 - 2:30
Workshops 2:30 - 4:30
3. Save the document to the Student Folder with the name Agenda.
4. Close the document.

LESSON 3 -
DOCUMENT VIEWS
In this section, you will learn about:
• Changing the view
• Zooming in/out
• Displaying/hiding the ruler
• Formatting (paragraph) marks
• Soft carriage returns
• Opening multiple documents
• Switching between documents

Lesson 2 – Working with Documents ICDL Word Processing
Page 38 «PageFooterText» © 2017
3.1 CHANGING THE VIEW
Concepts
Views Group
You can easily switch between different document views, changing the way your
document appears in the Word window.
Read Mode
This displays the document as a digital magazine. It removes all the features from
the interface.
Print Layout
The document appears on the screen as it would appear in a printed document.
The layout is more complete and accurate than in the other layout options.
Web Layout
The document appears as a web page, with the text wrapping as it would in a web
browser. Backgrounds and formatting will appear as they would in a web browser.
Outline
This layout shows the headings and subheadings in your document. It allows you
to reorganise portions of your document and delete them if necessary.
Draft
The document appears with a dotted line separating the pages and showing
document sections.
Steps
To view the document in different views:
Open an existing document from a specific drive and folder location.
1. Click the View tab.
The View tab appears. Click

ICDL Word Processing Lesson 2 – Working with Documents
© 2017 «PageFooterText» Page 39
2. Click the Read Mode command.
The document is displayed in Read Mode view.
Click
3. Click the Web Layout command.
The document is displayed in Web Layout view.
Click
4. Click the Outline command.
The document is displayed in Outline view.
Click
5. Click the Draft command.
The document is displayed in Draft view.
Click
3.2 ZOOMING IN/OUT
Concepts
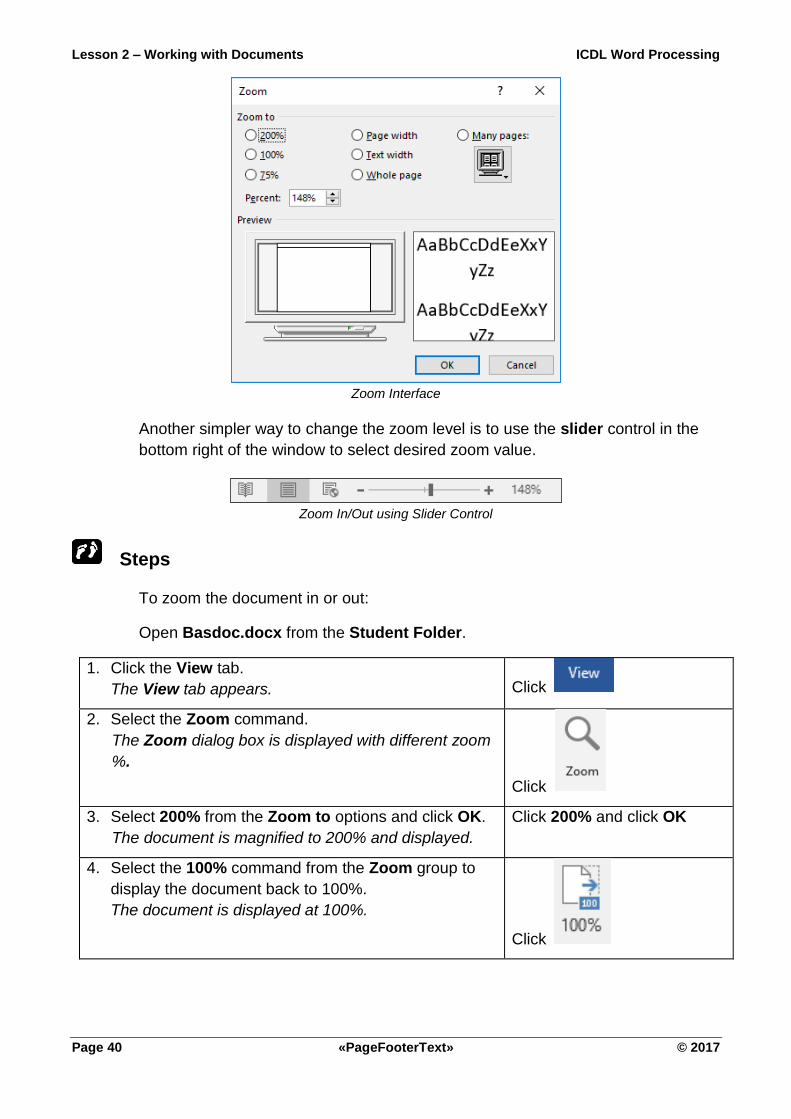
The zoom level in Word 2016 can be changed in different ways. You can use the
View tab and select the Zoom command to display the Zoom window. Select the
preferred zoom level and click OK to confirm the changes.
Ribbon Showing the Zoom Group
Lesson 2 – Working with Documents ICDL Word Processing
Page 40 «PageFooterText» © 2017
Zoom Interface
Another simpler way to change the zoom level is to use the slider control in the
bottom right of the window to select desired zoom value.
Zoom In/Out using Slider Control
Steps
To zoom the document in or out:
Open Basdoc.docx from the Student Folder.
1. Click the View tab.
The View tab appears. Click
2. Select the Zoom command.
The Zoom dialog box is displayed with different zoom
%.
Click
3. Select 200% from the Zoom to options and click OK.
The document is magnified to 200% and displayed.
Click 200% and click OK
4. Select the 100% command from the Zoom group to
display the document back to 100%.
The document is displayed at 100%.
Click