Embed Size (px)
Citation preview

REF 2100291-0003/2016.12 © Bien-Air Dental
Rx Only
ICHIROPRO,ICHIROPRO SURGERYENG INSTRUCTIONS FOR USE.
0120
REF 2100291-0003/2016.12 © Bien-Air Dental
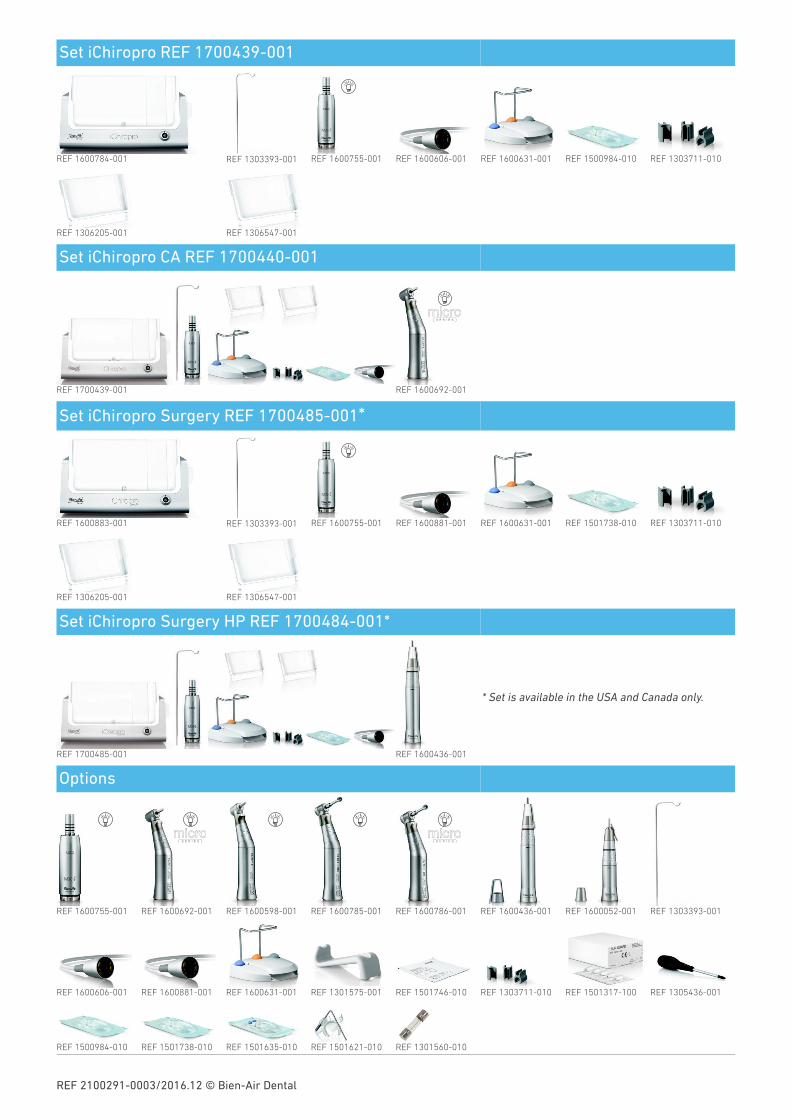
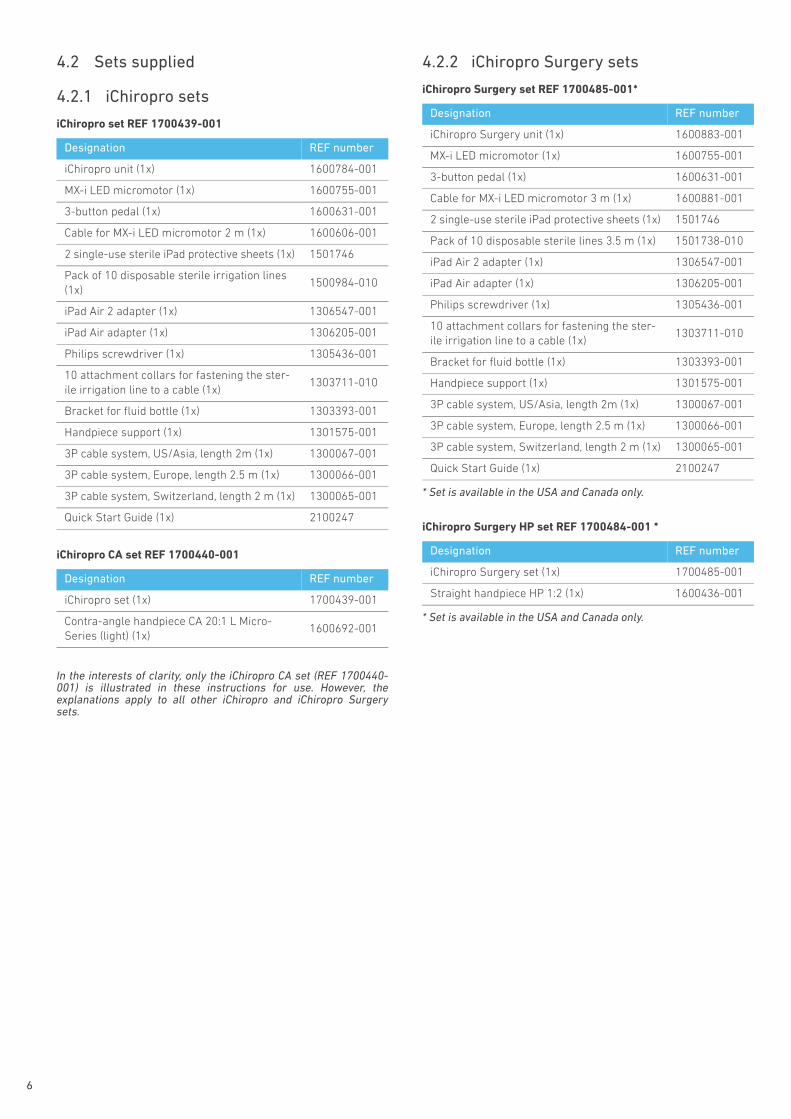
Set iChiropro REF 1700439-001
REF 1600784-001 REF 1303393-001 REF 1600755-001 REF 1600606-001 REF 1600631-001 REF 1500984-010 REF 1303711-010
REF 1306205-001 REF 1306547-001
Set iChiropro CA REF 1700440-001
REF 1700439-001 REF 1600692-001
Set iChiropro Surgery REF 1700485-001*
REF 1600883-001 REF 1303393-001 REF 1600755-001 REF 1600881-001 REF 1600631-001 REF 1501738-010 REF 1303711-010
REF 1306205-001 REF 1306547-001
Set iChiropro Surgery HP REF 1700484-001*
REF 1700485-001 REF 1600436-001
* Set is available in the USA and Canada only.
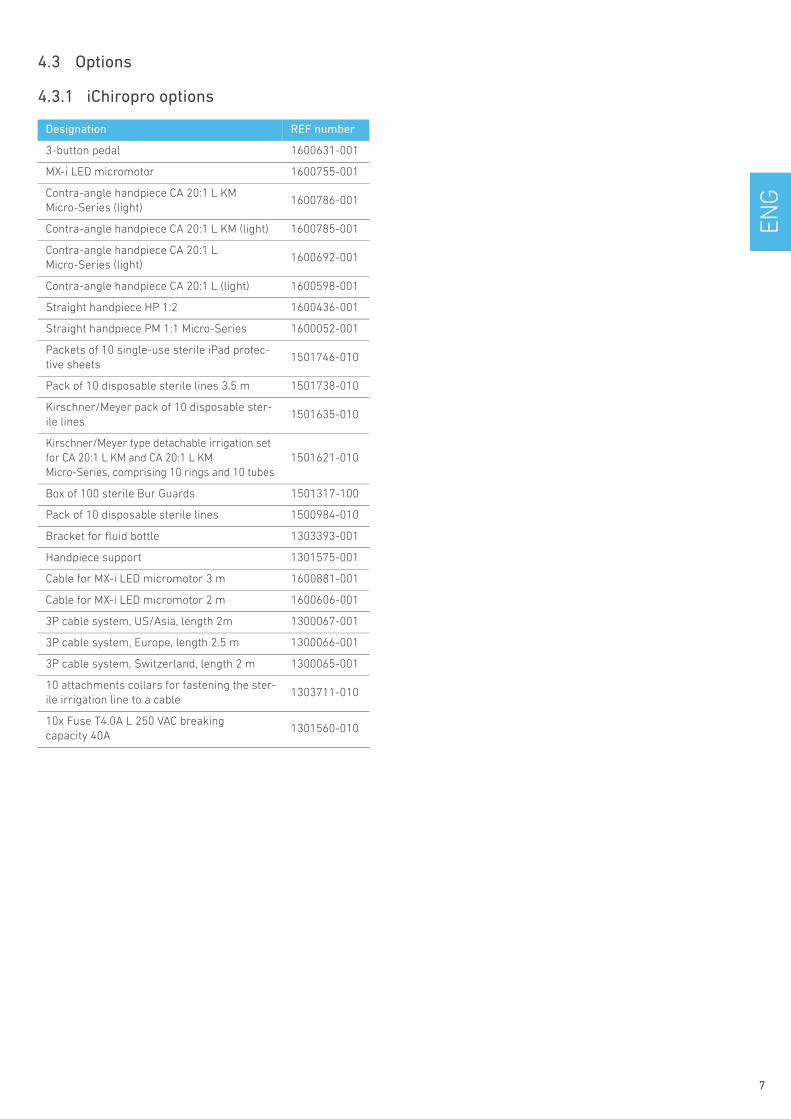
Options
REF 1600755-001 REF 1600692-001 REF 1600598-001 REF 1600785-001 REF 1600786-001 REF 1600436-001 REF 1600052-001 REF 1303393-001
REF 1600606-001 REF 1600881-001 REF 1600631-001 REF 1301575-001 REF 1501746-010 REF 1303711-010 REF 1501317-100 REF 1305436-001
REF 1500984-010 REF 1501738-010 REF 1501635-010 REF 1501621-010 REF 1301560-010
EN
G
1
1 Symbols............................................................. 21.1 Description of symbols for iChiropro and
iChiropro Surgery units .....................................................................21.2 Description of symbols for iChiropro and
iChiropro Surgery accessories .......................................................2
2 Identification, Intended use and Notation ... 32.1 Identification ..........................................................................................32.2 Intended use ..........................................................................................32.3 Notation and chapter links................................................................3
3 Warnings & Precautions of Use .................... 4
4 Description........................................................ 54.1 iChiropro system overview ..............................................................54.2 Sets supplied.........................................................................................6
4.2.1 iChiropro sets..........................................................................64.2.2 iChiropro Surgery sets.........................................................6
4.3 Options ....................................................................................................74.3.1 iChiropro options ...................................................................7
4.4 Technical data .......................................................................................84.5 Environmental protection and information for disposal ..........84.6 Limitation of liability............................................................................94.7 Electromagnetic compatibility (technical description) .............9
5 Installation ..................................................... 125.1 Install the iChiropro app.................................................................. 135.2 Install the iChiropro system........................................................... 135.3 Installation of the iPad on the iChiropro..................................... 135.4 On/off procedure............................................................................... 13
6 Interface overview......................................... 146.1 iChiropro application ........................................................................ 14
6.1.1 Compatibility ........................................................................ 146.1.2 Notation ................................................................................. 14
6.2 Sound alerts ....................................................................................... 146.3 iPad and iChiropro connection / disconnection
conditions ............................................................................................ 146.3.1 Disconnection ...................................................................... 146.3.2 Connection............................................................................ 146.3.3 iChiropro unit switched ON.............................................. 14
7 Getting started ............................................... 157.1 Back up data....................................................................................... 157.2 Launch iChiropro app....................................................................... 157.3 Welcome screen and disclaimer .................................................. 157.4 Home page screen............................................................................ 167.5 User page screen .............................................................................. 167.6 Create user profile ............................................................................ 167.7 Edit or remove user profile ............................................................ 177.8 Patients ................................................................................................ 18
7.8.1 Add or edit patient.............................................................. 187.8.2 Remove patient ................................................................... 187.8.3 Consult patients history.................................................... 187.8.4 Merge patients..................................................................... 19
7.9 Operations history ............................................................................ 207.9.1 Search operations history ............................................... 207.9.2 Operation data ..................................................................... 217.9.3 Export report........................................................................ 227.9.4 Export all operations reports .......................................... 22
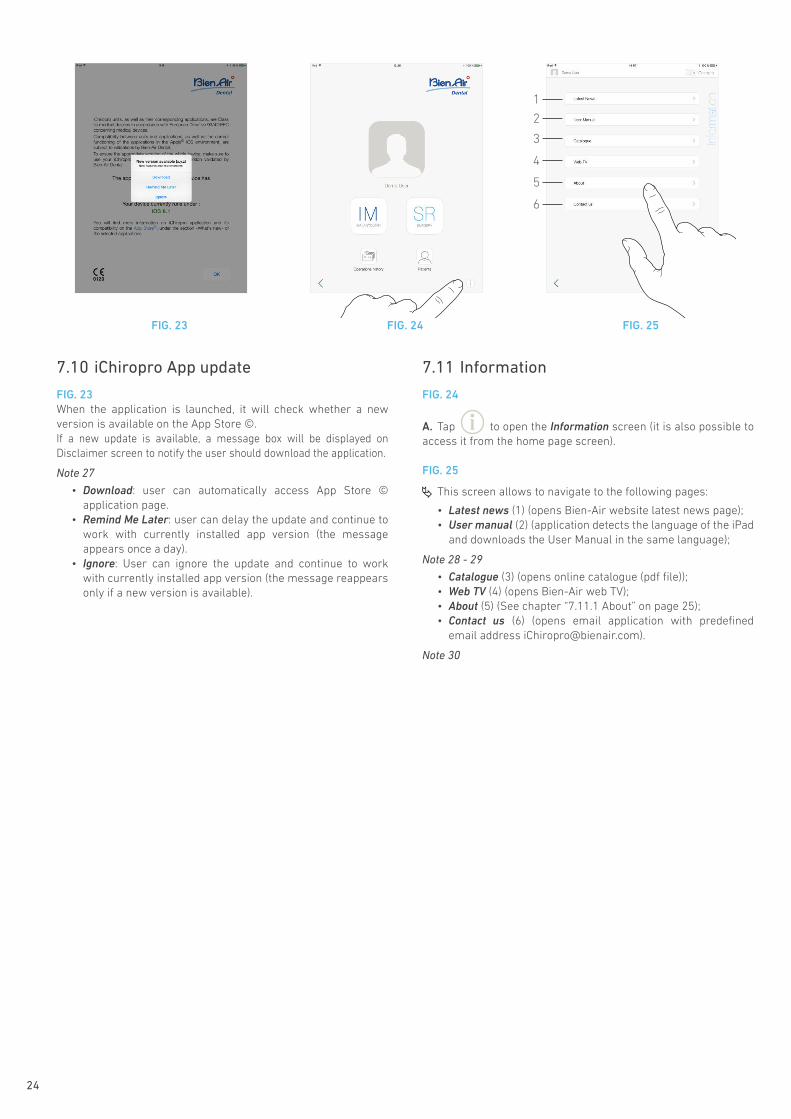
7.10 iChiropro App update ....................................................................... 247.11 Information ......................................................................................... 24
7.11.1 About ...................................................................................... 257.12 ISQ values readings.......................................................................... 25
8 Operation - Implantology mode.................. 268.1 Enter implantology mode ............................................................... 268.2 Setup screen description................................................................ 268.3 Plan an operation.............................................................................. 268.4 Import an operation.......................................................................... 288.5 Remove an operation....................................................................... 308.6 Start or resume a planned operation ......................................... 308.7 Start a direct operation ................................................................... 328.8 Operative parameters...................................................................... 34
8.8.1 MX-i micromotor Speed & Torque ................................. 348.8.2 MX-i micromotor rotation direction............................... 348.8.3 Irrigation Level .................................................................... 358.8.4 Handpiece ratio ................................................................... 358.8.5 Light intensity ...................................................................... 35
8.9 Tool visualization in cassette......................................................... 368.10 Add, edit or remove implants ........................................................ 36
8.10.1 Add implant .......................................................................... 368.10.2 Edit (user-defined) implant.............................................. 388.10.3 Remove (user-defined) implant ..................................... 38
8.11 Bookmark or remove brands ........................................................ 38
9 Operation - Surgery mode ........................... 409.1 Enter surgery mode ......................................................................... 409.2 Setup screen description................................................................ 409.3 Plan an operation.............................................................................. 409.4 Remove an operation....................................................................... 429.5 Start or resume an operation........................................................ 429.6 Start a direct operation ................................................................... 449.7 Operative parameters...................................................................... 46
9.7.1 MX-i micromotor Speed & Torque ................................. 469.7.2 MX-i micromotor rotation direction............................... 469.7.3 Irrigation Level .................................................................... 479.7.4 Handpiece ratio ................................................................... 479.7.5 Light intensity ...................................................................... 47
9.8 Add, edit or remove procedures ................................................... 489.8.1 Add procedure ..................................................................... 489.8.2 Edit (user-defined) procedure......................................... 489.8.3 Remove (user-defined) procedure ................................ 49
10 List of errors & Troubleshooting ............... 5010.1 Safety warning (operating)............................................................. 5010.2 Device operating error..................................................................... 5110.3 iOS compatibility errors (disclaimer screen)............................ 51
11 Maintenance .................................................. 5211.1 Servicing.............................................................................................. 5211.2 Information ......................................................................................... 5211.3 Cleaning-disinfection ....................................................................... 5211.4 Important............................................................................................. 5211.5 iPad adapter change ........................................................................ 5211.6 Fuses replacement........................................................................... 53
12 General information and guarantee ......... 5412.1 General information ......................................................................... 5412.2 Terms of guarantee .......................................................................... 54
Table of contents
2
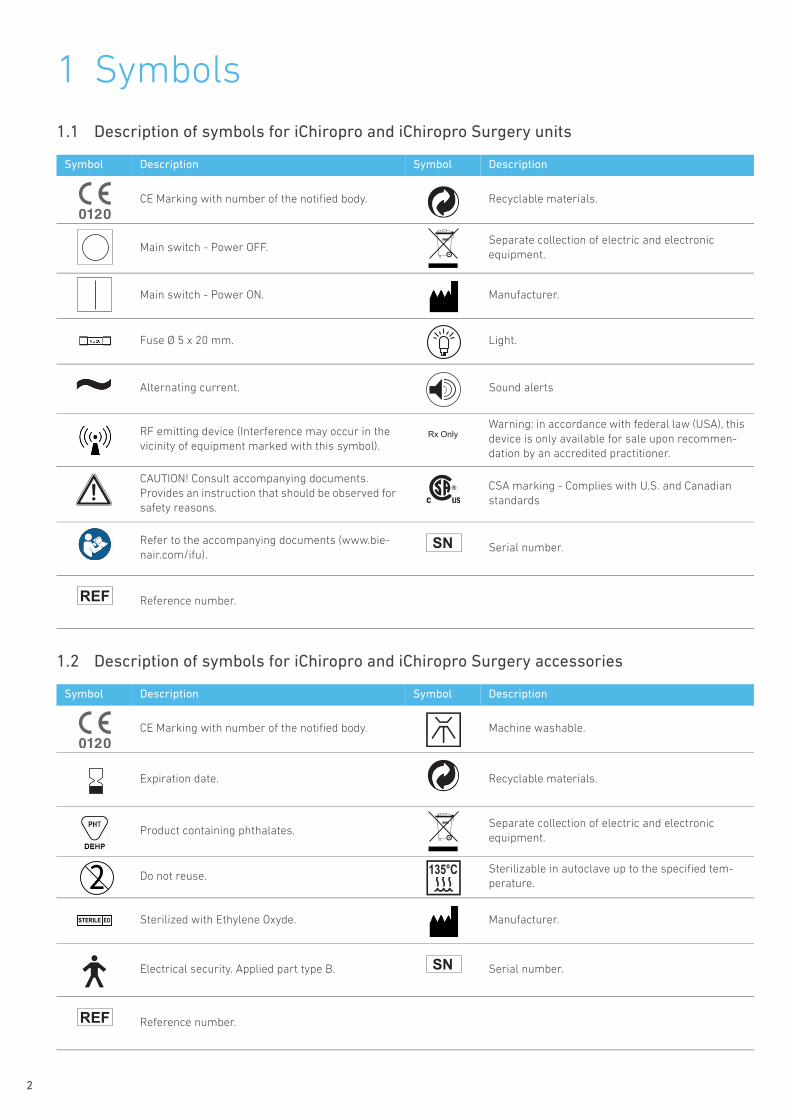
1 Symbols
1.1 Description of symbols for iChiropro and iChiropro Surgery units1.2 Description of symbols for iChiropro and iChiropro Surgery accessories
Symbol Description Symbol Description
CE Marking with number of the notified body. Recyclable materials.
Main switch - Power OFF.Separate collection of electric and electronic equipment.
Main switch - Power ON. Manufacturer.
Fuse Ø 5 x 20 mm. Light.
Alternating current. Sound alerts
RF emitting device (Interference may occur in the vicinity of equipment marked with this symbol).
Warning: in accordance with federal law (USA), this device is only available for sale upon recommen-dation by an accredited practitioner.
CAUTION! Consult accompanying documents. Provides an instruction that should be observed for safety reasons.
CSA marking - Complies with U.S. and Canadian standards
Refer to the accompanying documents (www.bie-nair.com/ifu).
Serial number.
Reference number.
Symbol Description Symbol Description
CE Marking with number of the notified body. Machine washable.
Expiration date. Recyclable materials.
Product containing phthalates.Separate collection of electric and electronic equipment.
Do not reuse.Sterilizable in autoclave up to the specified tem-perature.
Sterilized with Ethylene Oxyde. Manufacturer.
Electrical security. Applied part type B. Serial number.
Reference number.
Rx Only
SN
REF
135°C
STERILE EO
SN
REF
EN
G
3
2 Identification, Intended use and Notation
2.1 Identification
Electronically controlled tabletop device for dentistry allowing operation of a dental handpiece via an MX-i micromotor with variable speed control by a pedal.A peristaltic pump conveys the physiological liquid via a disposable irrigation line without being contaminated.It is essential to connect a compatible iPad to the device using the connector provided for this purpose.
See section “6.1.1 Compatibility” on page 14 for details.
The implant fitting parameters are defined before the operation using the iChiropro application installed on the iPad.
CAUTION
The pre-recorded settings of Implant Brands are informative only and must be updated according to the Instructions for use from Implant Brands.
2.2 Intended use
The system is to be used by dentists and surgeons in dental offices and hospitals. The system is designed to control a dental MX-i micromotor which can drive a dental hand-piece fitted with appropriate tools to cut hard and soft tissues in the mouth and to screw dental implants.The system is intended for use in dentistry for implantology and dental surgery.Any use other than that for which this product is intended is unauthorized and may be dangerous.The system meets all the current legal requirements for medicaldevices.
iChiropro and iChiropro Surgery dental units are intended for use in dental implantology and dental surgery.
Two applications are available to control these systems:• The iChiropro application, deployed on the App Store ©
worldwide except United States and Canada; • The iChiropro US application, deployed on the App Store © in
United States and Canada only.
The iChiropro US application allows both implantology and surgery procedures only when the iPad is connected to an iChiropro Surgery unit. When the iPad is connected to an iChiropro unit, only implantology procedures may be accessed by the user.
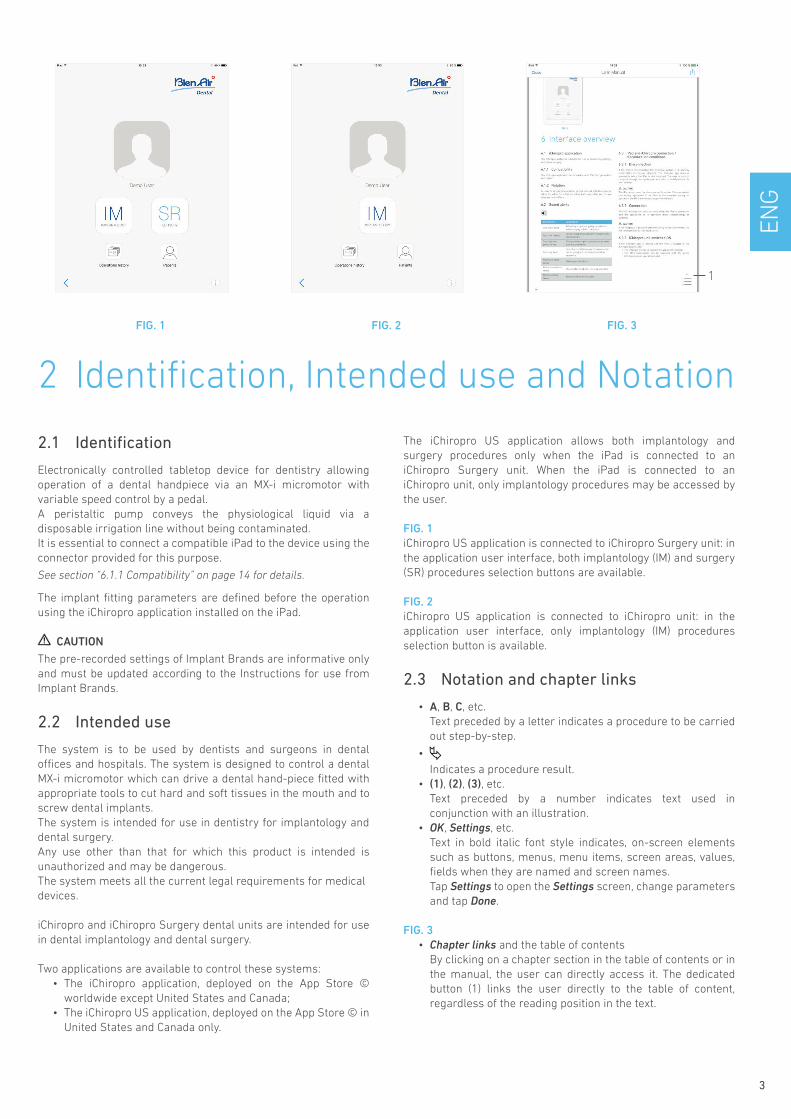
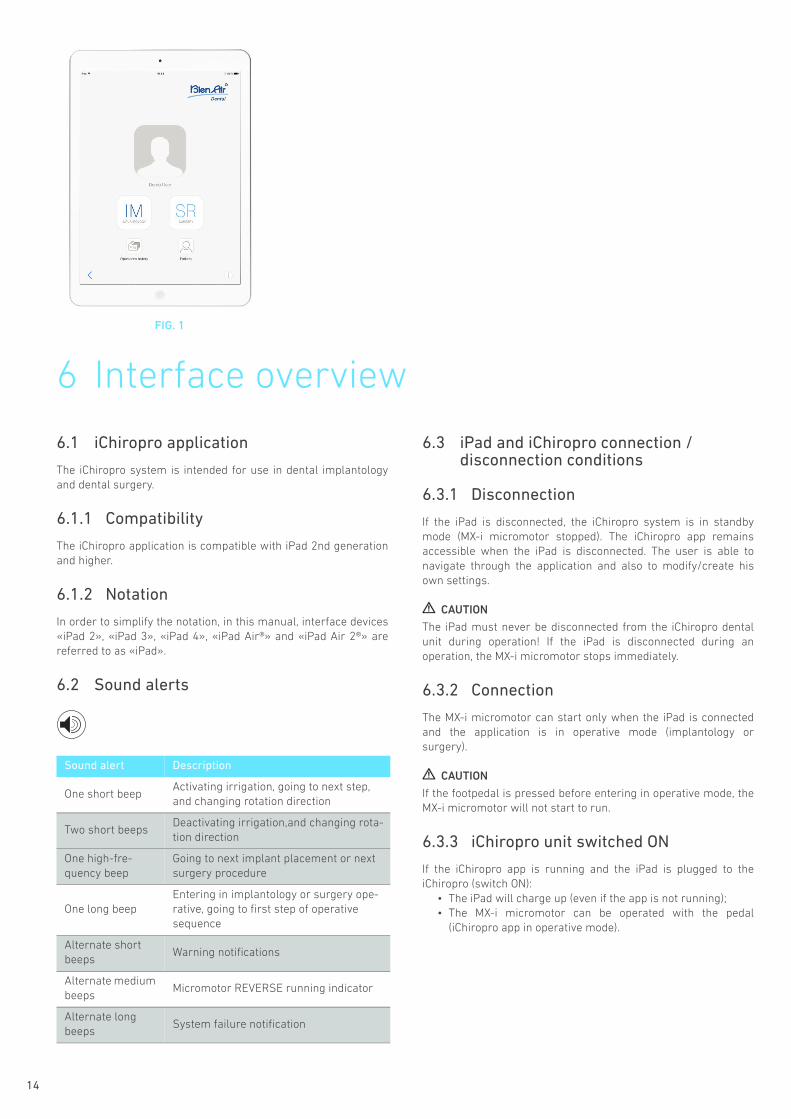
FIG. 1iChiropro US application is connected to iChiropro Surgery unit: in the application user interface, both implantology (IM) and surgery (SR) procedures selection buttons are available.
FIG. 2iChiropro US application is connected to iChiropro unit: in the application user interface, only implantology (IM) procedures selection button is available.
2.3 Notation and chapter links
• A, B, C, etc. Text preceded by a letter indicates a procedure to be carried out step-by-step.
• Indicates a procedure result.
• (1), (2), (3), etc. Text preceded by a number indicates text used in conjunction with an illustration.
• OK, Settings, etc. Text in bold italic font style indicates, on-screen elements such as buttons, menus, menu items, screen areas, values, fields when they are named and screen names. Tap Settings to open the Settings screen, change parameters and tap Done.
FIG. 3• Chapter links and the table of contents
By clicking on a chapter section in the table of contents or in the manual, the user can directly access it. The dedicated button (1) links the user directly to the table of content, regardless of the reading position in the text.
FIG. 1 FIG. 2 FIG. 3
1
4
3 Warnings & Precautions of Use CAUTION
To prevent any risk of electric shock, this device must be connected only to a power supply network provided with protective earth.
CAUTION
The power plug is the device used for disconnection in case of problems, it must be easily accessible at all times.
CAUTION
Never connect a handpiece on a running MX-i micromotor.
CAUTION
The iPad must never be disconnected from the iChiropro dental unit during operation.
CAUTION
Any modification of the medical device is strictly forbidden.
CAUTION
The device is not designed for use in an explosive atmosphere (anaesthetic gas).
CAUTION
Do not attempt to open the device when it is connected to the electric mains.Risk of electrocution.
CAUTION
The parameters contained in the dental procedures are given as information ONLY. Bien-Air Dental SA cannot be held liable for them.
Note 1
NOTES
1 The predefined parameters may be subject to modification without notice.
ENG
4 Description
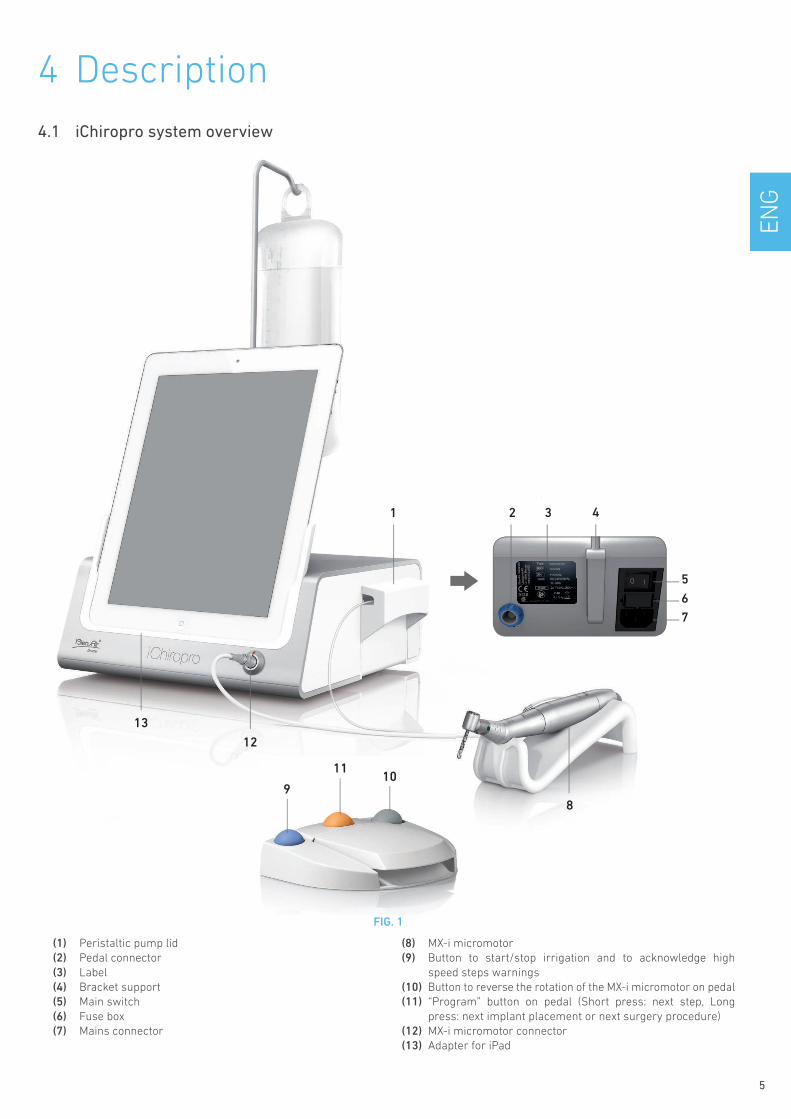
4.1 iChiropro system overviewFIG. 1
(1) Peristaltic pump lid(2) Pedal connector(3) Label(4) Bracket support(5) Main switch(6) Fuse box(7) Mains connector
(8) MX-i micromotor(9) Button to start/stop irrigation and to acknowledge high
speed steps warnings(10) Button to reverse the rotation of the MX-i micromotor on pedal(11) “Program” button on pedal (Short press: next step, Long
press: next implant placement or next surgery procedure)(12) MX-i micromotor connector(13) Adapter for iPad
12
13
1
9
1110
8
3 42
5
67
5
6
4.2 Sets supplied
4.2.1 iChiropro sets
iChiropro set REF 1700439-001
iChiropro CA set REF 1700440-001
In the interests of clarity, only the iChiropro CA set (REF 1700440-001) is illustrated in these instructions for use. However, the explanations apply to all other iChiropro and iChiropro Surgery sets.
4.2.2 iChiropro Surgery sets
iChiropro Surgery set REF 1700485-001*
* Set is available in the USA and Canada only.
iChiropro Surgery HP set REF 1700484-001 *
* Set is available in the USA and Canada only.
Designation REF number
iChiropro unit (1x) 1600784-001
MX-i LED micromotor (1x) 1600755-001
3-button pedal (1x) 1600631-001
Cable for MX-i LED micromotor 2 m (1x) 1600606-001
2 single-use sterile iPad protective sheets (1x) 1501746
Pack of 10 disposable sterile irrigation lines (1x)
1500984-010
iPad Air 2 adapter (1x) 1306547-001
iPad Air adapter (1x) 1306205-001
Philips screwdriver (1x) 1305436-001
10 attachment collars for fastening the ster-ile irrigation line to a cable (1x)
1303711-010
Bracket for fluid bottle (1x) 1303393-001
Handpiece support (1x) 1301575-001
3P cable system, US/Asia, length 2m (1x) 1300067-001
3P cable system, Europe, length 2.5 m (1x) 1300066-001
3P cable system, Switzerland, length 2 m (1x) 1300065-001
Quick Start Guide (1x) 2100247
Designation REF number
iChiropro set (1x) 1700439-001
Contra-angle handpiece CA 20:1 L Micro-Series (light) (1x)
1600692-001
Designation REF number
iChiropro Surgery unit (1x) 1600883-001
MX-i LED micromotor (1x) 1600755-001
3-button pedal (1x) 1600631-001
Cable for MX-i LED micromotor 3 m (1x) 1600881-001
2 single-use sterile iPad protective sheets (1x) 1501746
Pack of 10 disposable sterile lines 3.5 m (1x) 1501738-010
iPad Air 2 adapter (1x) 1306547-001
iPad Air adapter (1x) 1306205-001
Philips screwdriver (1x) 1305436-001
10 attachment collars for fastening the ster-ile irrigation line to a cable (1x)
1303711-010
Bracket for fluid bottle (1x) 1303393-001
Handpiece support (1x) 1301575-001
3P cable system, US/Asia, length 2m (1x) 1300067-001
3P cable system, Europe, length 2.5 m (1x) 1300066-001
3P cable system, Switzerland, length 2 m (1x) 1300065-001
Quick Start Guide (1x) 2100247
Designation REF number
iChiropro Surgery set (1x) 1700485-001
Straight handpiece HP 1:2 (1x) 1600436-001
EN
G
4.3 Options
4.3.1 iChiropro options
Designation REF number
3-button pedal 1600631-001
MX-i LED micromotor 1600755-001
Contra-angle handpiece CA 20:1 L KM Micro-Series (light)
1600786-001
Contra-angle handpiece CA 20:1 L KM (light) 1600785-001
Contra-angle handpiece CA 20:1 L Micro-Series (light)
1600692-001
Contra-angle handpiece CA 20:1 L (light) 1600598-001
Straight handpiece HP 1:2 1600436-001
Straight handpiece PM 1:1 Micro-Series 1600052-001
Packets of 10 single-use sterile iPad protec-tive sheets
1501746-010
Pack of 10 disposable sterile lines 3.5 m 1501738-010
Kirschner/Meyer pack of 10 disposable ster-ile lines
1501635-010
Kirschner/Meyer type detachable irrigation set for CA 20:1 L KM and CA 20:1 L KM Micro-Series, comprising 10 rings and 10 tubes
1501621-010
Box of 100 sterile Bur Guards 1501317-100
Pack of 10 disposable sterile lines 1500984-010
Bracket for fluid bottle 1303393-001
Handpiece support 1301575-001
Cable for MX-i LED micromotor 3 m 1600881-001
Cable for MX-i LED micromotor 2 m 1600606-001
3P cable system, US/Asia, length 2m 1300067-001
3P cable system, Europe, length 2.5 m 1300066-001
3P cable system, Switzerland, length 2 m 1300065-001
10 attachments collars for fastening the ster-ile irrigation line to a cable
1303711-010
10x Fuse T4.0A L 250 VAC breaking capacity 40A
1301560-010
7
8
4.4 Technical data
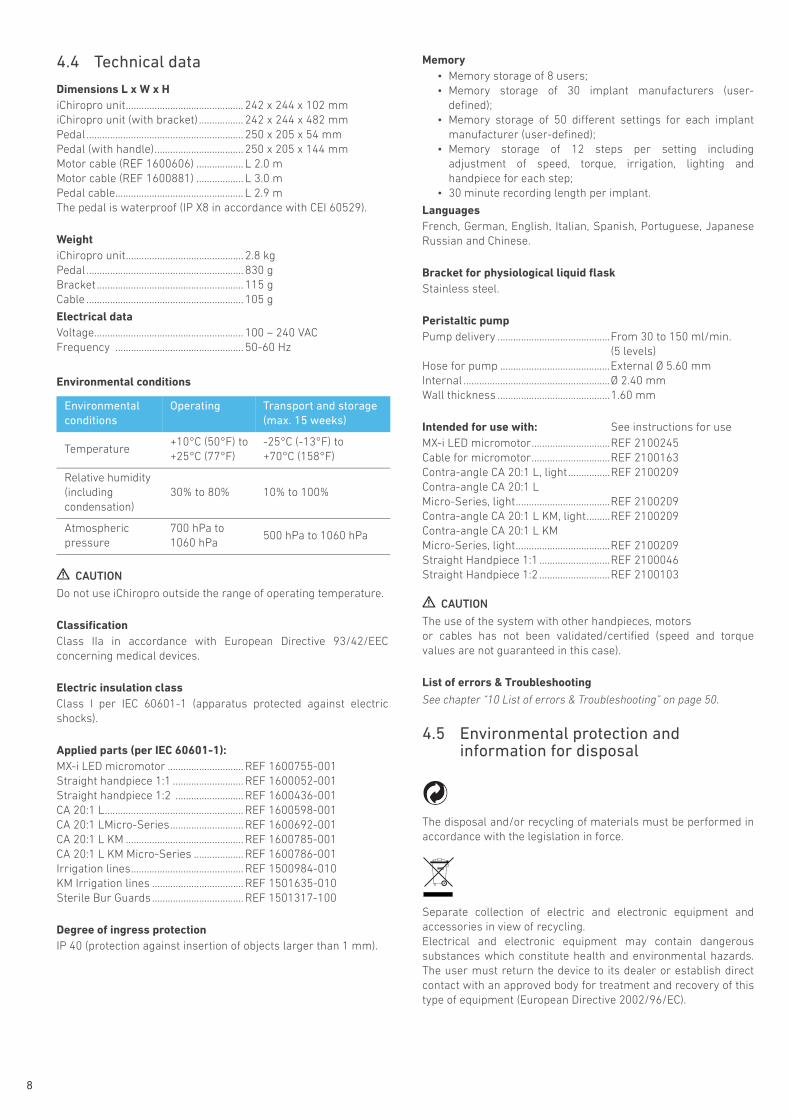
Dimensions L x W x HiChiropro unit............................................. 242 x 244 x 102 mm iChiropro unit (with bracket) ................. 242 x 244 x 482 mm Pedal ............................................................ 250 x 205 x 54 mmPedal (with handle).................................. 250 x 205 x 144 mmMotor cable (REF 1600606) .................. L 2.0 mMotor cable (REF 1600881) .................. L 3.0 mPedal cable................................................. L 2.9 m The pedal is waterproof (IP X8 in accordance with CEI 60529).
WeightiChiropro unit............................................. 2.8 kg Pedal ............................................................ 830 gBracket ........................................................ 115 gCable ............................................................ 105 g
Electrical dataVoltage......................................................... 100 – 240 VACFrequency ................................................. 50-60 Hz
Environmental conditions
CAUTION
Do not use iChiropro outside the range of operating temperature.
ClassificationClass IIa in accordance with European Directive 93/42/EEC concerning medical devices.
Electric insulation classClass I per IEC 60601-1 (apparatus protected against electric shocks).
Applied parts (per IEC 60601-1):MX-i LED micromotor ............................. REF 1600755-001Straight handpiece 1:1 ........................... REF 1600052-001Straight handpiece 1:2 .......................... REF 1600436-001CA 20:1 L..................................................... REF 1600598-001CA 20:1 LMicro-Series............................ REF 1600692-001CA 20:1 L KM ............................................. REF 1600785-001CA 20:1 L KM Micro-Series ................... REF 1600786-001Irrigation lines........................................... REF 1500984-010KM Irrigation lines ................................... REF 1501635-010Sterile Bur Guards................................... REF 1501317-100
Degree of ingress protectionIP 40 (protection against insertion of objects larger than 1 mm).
Memory• Memory storage of 8 users;• Memory storage of 30 implant manufacturers (user-
defined);• Memory storage of 50 different settings for each implant
manufacturer (user-defined);• Memory storage of 12 steps per setting including
adjustment of speed, torque, irrigation, lighting and handpiece for each step;
• 30 minute recording length per implant.
LanguagesFrench, German, English, Italian, Spanish, Portuguese, Japanese Russian and Chinese.
Bracket for physiological liquid flaskStainless steel.
Peristaltic pumpPump delivery ...........................................From 30 to 150 ml/min.
(5 levels)Hose for pump ..........................................External Ø 5.60 mmInternal ........................................................Ø 2.40 mmWall thickness ...........................................1.60 mm
Intended for use with: See instructions for useMX-i LED micromotor..............................REF 2100245Cable for micromotor..............................REF 2100163Contra-angle CA 20:1 L, light................REF 2100209Contra-angle CA 20:1 L Micro-Series, light....................................REF 2100209Contra-angle CA 20:1 L KM, light.........REF 2100209Contra-angle CA 20:1 L KM Micro-Series, light....................................REF 2100209Straight Handpiece 1:1 ...........................REF 2100046Straight Handpiece 1:2 ...........................REF 2100103
CAUTION
The use of the system with other handpieces, motorsor cables has not been validated/certified (speed and torque values are not guaranteed in this case).
List of errors & TroubleshootingSee chapter “10 List of errors & Troubleshooting” on page 50.
4.5 Environmental protection and information for disposal
The disposal and/or recycling of materials must be performed in accordance with the legislation in force.
Separate collection of electric and electronic equipment and accessories in view of recycling.Electrical and electronic equipment may contain dangerous substances which constitute health and environmental hazards. The user must return the device to its dealer or establish direct contact with an approved body for treatment and recovery of this type of equipment (European Directive 2002/96/EC).
Environmental conditions
Operating Transport and storage (max. 15 weeks)
Temperature+10°C (50°F) to +25°C (77°F)
-25°C (-13°F) to +70°C (158°F)
Relative humidity (including condensation)
30% to 80% 10% to 100%
Atmospheric pressure
700 hPa to 1060 hPa
500 hPa to 1060 hPa
EN
G
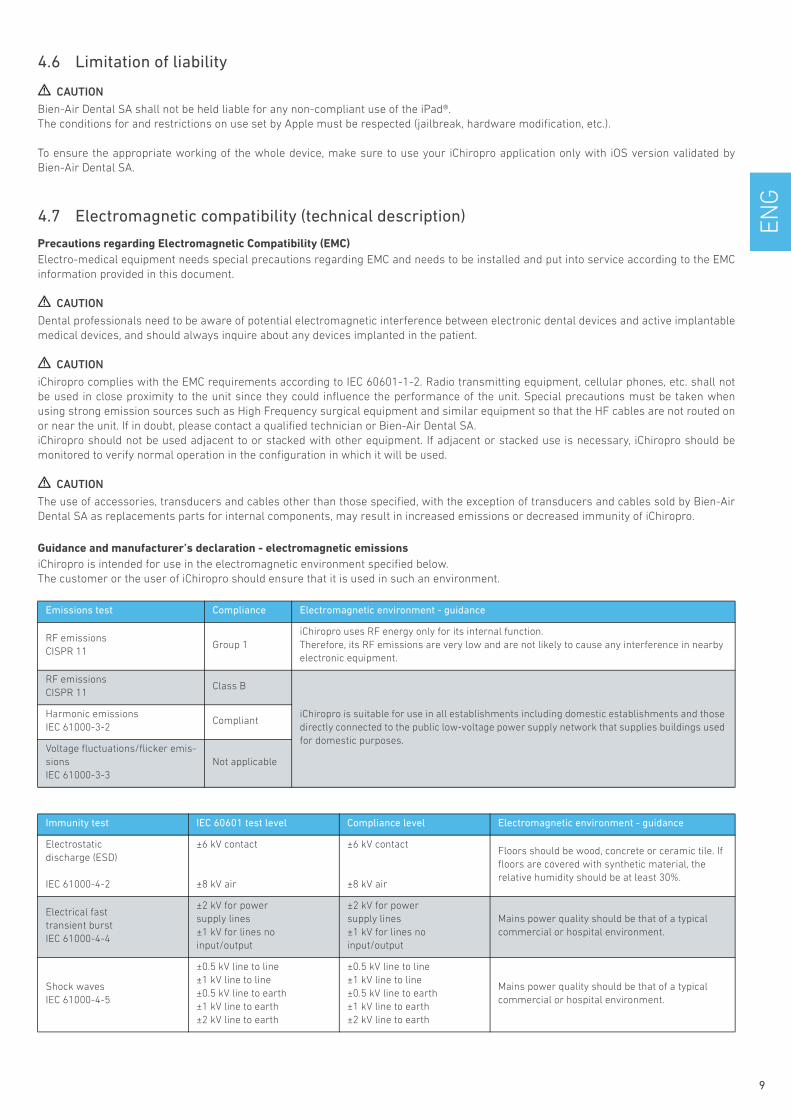
4.6 Limitation of liability
CAUTION
Bien-Air Dental SA shall not be held liable for any non-compliant use of the iPad®.The conditions for and restrictions on use set by Apple must be respected (jailbreak, hardware modification, etc.).
To ensure the appropriate working of the whole device, make sure to use your iChiropro application only with iOS version validated by Bien-Air Dental SA.
4.7 Electromagnetic compatibility (technical description)
Precautions regarding Electromagnetic Compatibility (EMC)Electro-medical equipment needs special precautions regarding EMC and needs to be installed and put into service according to the EMC information provided in this document.
CAUTION
Dental professionals need to be aware of potential electromagnetic interference between electronic dental devices and active implantablemedical devices, and should always inquire about any devices implanted in the patient.
CAUTION
iChiropro complies with the EMC requirements according to IEC 60601-1-2. Radio transmitting equipment, cellular phones, etc. shall not be used in close proximity to the unit since they could influence the performance of the unit. Special precautions must be taken when using strong emission sources such as High Frequency surgical equipment and similar equipment so that the HF cables are not routed on or near the unit. If in doubt, please contact a qualified technician or Bien-Air Dental SA. iChiropro should not be used adjacent to or stacked with other equipment. If adjacent or stacked use is necessary, iChiropro should be monitored to verify normal operation in the configuration in which it will be used.
CAUTION
The use of accessories, transducers and cables other than those specified, with the exception of transducers and cables sold by Bien-Air Dental SA as replacements parts for internal components, may result in increased emissions or decreased immunity of iChiropro.
Guidance and manufacturer’s declaration - electromagnetic emissionsiChiropro is intended for use in the electromagnetic environment specified below. The customer or the user of iChiropro should ensure that it is used in such an environment.
Emissions test Compliance Electromagnetic environment - guidance
RF emissions CISPR 11
Group 1iChiropro uses RF energy only for its internal function.Therefore, its RF emissions are very low and are not likely to cause any interference in nearby electronic equipment.
RF emissionsCISPR 11
Class B
iChiropro is suitable for use in all establishments including domestic establishments and those directly connected to the public low-voltage power supply network that supplies buildings used for domestic purposes.
Harmonic emissions IEC 61000-3-2
Compliant
Voltage fluctuations/flicker emis-sions IEC 61000-3-3
Not applicable
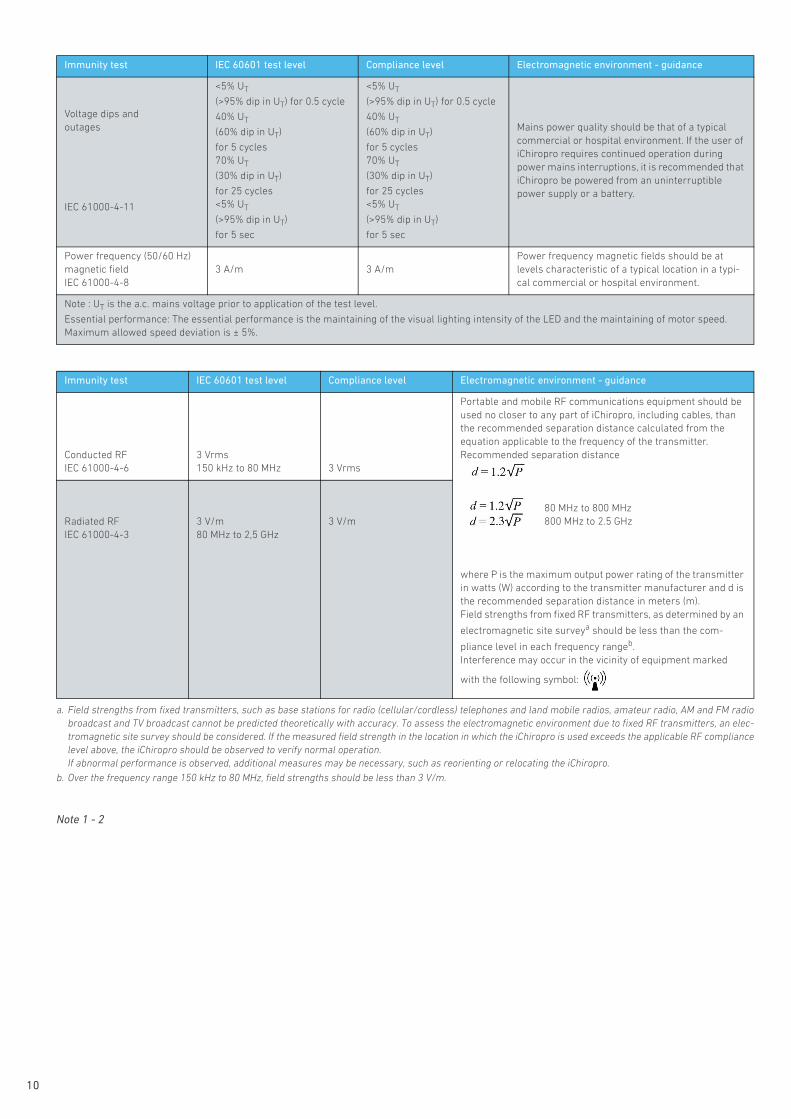
Immunity test IEC 60601 test level Compliance level Electromagnetic environment - guidance
Electrostatic discharge (ESD)
IEC 61000-4-2
±6 kV contact
±8 kV air
±6 kV contact
±8 kV air
Floors should be wood, concrete or ceramic tile. If floors are covered with synthetic material, the relative humidity should be at least 30%.
Electrical fasttransient burstIEC 61000-4-4
±2 kV for powersupply lines±1 kV for lines noinput/output
±2 kV for powersupply lines±1 kV for lines noinput/output
Mains power quality should be that of a typical commercial or hospital environment.
Shock wavesIEC 61000-4-5
±0.5 kV line to line±1 kV line to line±0.5 kV line to earth±1 kV line to earth±2 kV line to earth
±0.5 kV line to line±1 kV line to line±0.5 kV line to earth±1 kV line to earth±2 kV line to earth
Mains power quality should be that of a typical commercial or hospital environment.
9
10
Note 1 - 2
Voltage dips and outages
IEC 61000-4-11
<5% UT
(>95% dip in UT) for 0.5 cycle
40% UT
(60% dip in UT) for 5 cycles70% UT (30% dip in UT) for 25 cycles<5% UT
(>95% dip in UT)
for 5 sec
<5% UT
(>95% dip in UT) for 0.5 cycle
40% UT
(60% dip in UT) for 5 cycles70% UT (30% dip in UT) for 25 cycles<5% UT
(>95% dip in UT)
for 5 sec
Mains power quality should be that of a typical commercial or hospital environment. If the user of iChiropro requires continued operation during power mains interruptions, it is recommended that iChiropro be powered from an uninterruptible power supply or a battery.
Power frequency (50/60 Hz) magnetic fieldIEC 61000-4-8
3 A/m 3 A/mPower frequency magnetic fields should be at levels characteristic of a typical location in a typi-cal commercial or hospital environment.
Note : UT is the a.c. mains voltage prior to application of the test level.
Essential performance: The essential performance is the maintaining of the visual lighting intensity of the LED and the maintaining of motor speed. Maximum allowed speed deviation is ± 5%.
Immunity test IEC 60601 test level Compliance level Electromagnetic environment - guidance
Conducted RFIEC 61000-4-6
3 Vrms150 kHz to 80 MHz 3 Vrms
Portable and mobile RF communications equipment should be used no closer to any part of iChiropro, including cables, than the recommended separation distance calculated from the equation applicable to the frequency of the transmitter.Recommended separation distance
80 MHz to 800 MHz800 MHz to 2.5 GHz
where P is the maximum output power rating of the transmitter in watts (W) according to the transmitter manufacturer and d is the recommended separation distance in meters (m).Field strengths from fixed RF transmitters, as determined by an
electromagnetic site surveya should be less than the com-
pliance level in each frequency rangeb.Interference may occur in the vicinity of equipment marked
with the following symbol:
Radiated RFIEC 61000-4-3
3 V/m80 MHz to 2,5 GHz
3 V/m
a. Field strengths from fixed transmitters, such as base stations for radio (cellular/cordless) telephones and land mobile radios, amateur radio, AM and FM radio broadcast and TV broadcast cannot be predicted theoretically with accuracy. To assess the electromagnetic environment due to fixed RF transmitters, an elec-tromagnetic site survey should be considered. If the measured field strength in the location in which the iChiropro is used exceeds the applicable RF compliance level above, the iChiropro should be observed to verify normal operation. If abnormal performance is observed, additional measures may be necessary, such as reorienting or relocating the iChiropro.
b. Over the frequency range 150 kHz to 80 MHz, field strengths should be less than 3 V/m.
Immunity test IEC 60601 test level Compliance level Electromagnetic environment - guidance
EN
G
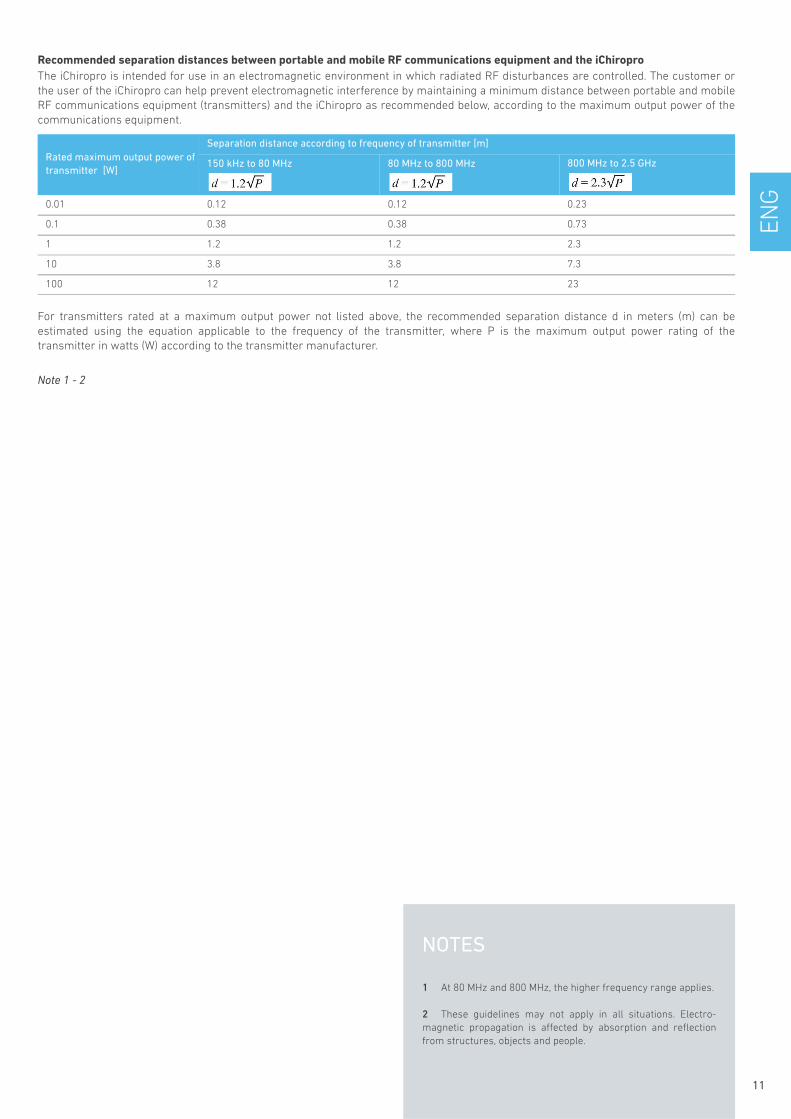
Recommended separation distances between portable and mobile RF communications equipment and the iChiroproThe iChiropro is intended for use in an electromagnetic environment in which radiated RF disturbances are controlled. The customer or the user of the iChiropro can help prevent electromagnetic interference by maintaining a minimum distance between portable and mobile RF communications equipment (transmitters) and the iChiropro as recommended below, according to the maximum output power of the communications equipment.
For transmitters rated at a maximum output power not listed above, the recommended separation distance d in meters (m) can be estimated using the equation applicable to the frequency of the transmitter, where P is the maximum output power rating of the transmitter in watts (W) according to the transmitter manufacturer.
Note 1 - 2
Rated maximum output power of transmitter [W]
Separation distance according to frequency of transmitter [m]
150 kHz to 80 MHz 80 MHz to 800 MHz 800 MHz to 2.5 GHz
0.01 0.12 0.12 0.23
0.1 0.38 0.38 0.73
1 1.2 1.2 2.3
10 3.8 3.8 7.3
100 12 12 23
NOTES
1 At 80 MHz and 800 MHz, the higher frequency range applies.
2 These guidelines may not apply in all situations. Electro-magnetic propagation is affected by absorption and reflection from structures, objects and people.
11
12
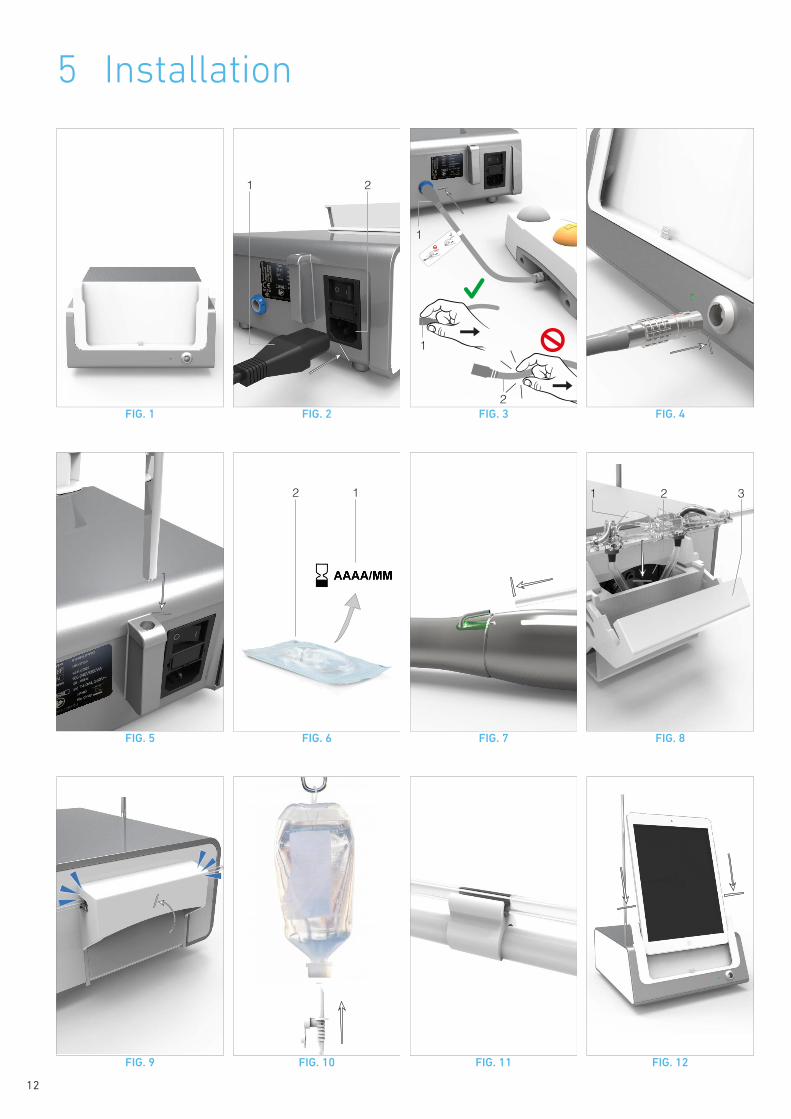
5 Installation
FIG. 1 FIG. 2 FIG. 3 FIG. 4
1 2
1
1
2
FIG. 5 FIG. 6 FIG. 7 FIG. 8
12 1 2 3
FIG. 9 FIG. 10 FIG. 11 FIG. 12
EN
G
NOTES
1 The iPad must be correctly connected to the Internet before the App Store © is opened; refer to Apple's user guide for appro-priate use of the iPad.
2 The equipment is powered by the mains power supply (100 - 240 Vac).
5.1 Install the iChiropro app
A. Open theApp Store ©, tap the corresponding icon on the iPad.
B. Tap Search to find the iChiropro application.
C. Install the iChiropro application designed by Bien-Air Dental.
Note 1
5.2 Install the iChiropro system
A. If necessary, use the Phillips screwdriver to change the adapter for the iPad model being used (see chapter “11.5 iPad adapter change” on page 52).
FIG. 1
B. Place the iChiropro on a flat surface capable of bearing its weight.
CAUTION
It may be positioned on a table, on a trolley or any other surface but in no circumstances on the floor.
FIG. 2
C. The fuse box may be opened with a screwdriver. 100 - 240 Vac = fuse T-4.0 A L 250 VAC REF 1301560-010.
To replace a fuse, see chapter“11.6 Fuses replacement” on page 53.
D. Connect the power cable (1) to the connector (2).
Note 2
CAUTION
The power plug is the device used for disconnection in case of problems, it must be easily accessible at all times.
FIG. 3
E. Connect the pedal cable to the output provided on the rear panel, guiding the connector and plug by means of the index pin on the connector.
CAUTION
Do not lift the pedal holding the connection cable. To disconnect the pedal cable pull the cable socket connector (1). Do not pull the cable (2) without disconnecting the cable socket before.
FIG. 4
F. Connect the MX-i micromotor cable to the motor output, guiding the connector and plug by means of the index pin on the connector.
FIG. 5
G. Align and attach the bracket to the housing provided on the rear of the console and suspend the flask or bottle.
FIG. 6
H. Check the packaging integrity, as well as the expiry date of the irrigation line on the label (1).
CAUTION
The medical device must be used only with lines supplied by Bien-Air Dental to ensure trouble-free operation. These lines are sterile and for single use. Re-use may result in microbiological contamination of the patient.
I. Remove the single-use sterile irrigation line (2) from its pouch.
FIG. 7
J. Connect the flexible hose of the irrigation line to the spray tube of the handpiece or contra-angle.FIG. 8
K. Install the peristaltic cassette (1) in the peristaltic pump (2).Check that the cassette is clipped correctly.FIG. 9
L. Close the pump lid (3). If there is resistance to closing, open the lid again and check the correct positioning of the cassette. When the lid is correctly closed, the user should hear a click sound.
CAUTION
Do not run the pump while the lid is open.
CAUTION
Risk of pinching!
FIG. 10
M. Perforate the cap of the physiological liquid flask with the pointed end of the irrigation line after removing the protective cap.
FIG. 11
N. Attach the irrigation line on the motor cable using the attachment collars (1) REF 1303711-010.
5.3 Installation of the iPad on the iChiropro
O. Remove the single-use sterile protection sheet for iPad from its pouch and stick it on the screen. Refer to the instructions on the back of the pouch.
FIG. 12
P. Connect the iPad to the iChiropro by sliding it carefully along theadapter.
5.4 On/off procedure
The device can be switched on and off in complete safety using the main switch on the iPad and iChiropro.
13
14
6 Interface overview
FIG. 1
6.1 iChiropro application
The iChiropro system is intended for use in dental implantology and dental surgery.
6.1.1 Compatibility
The iChiropro application is compatible with iPad 2nd generation and higher.
6.1.2 Notation
In order to simplify the notation, in this manual, interface devices «iPad 2», «iPad 3», «iPad 4», «iPad Air®» and «iPad Air 2®» are referred to as «iPad».
6.2 Sound alerts
6.3 iPad and iChiropro connection / disconnection conditions
6.3.1 Disconnection
If the iPad is disconnected, the iChiropro system is in standby mode (MX-i micromotor stopped). The iChiropro app remains accessible when the iPad is disconnected. The user is able to navigate through the application and also to modify/create his own settings.
CAUTION
The iPad must never be disconnected from the iChiropro dental unit during operation! If the iPad is disconnected during an operation, the MX-i micromotor stops immediately.
6.3.2 Connection
The MX-i micromotor can start only when the iPad is connected and the application is in operative mode (implantology or surgery).
CAUTION
If the footpedal is pressed before entering in operative mode, the MX-i micromotor will not start to run.
6.3.3 iChiropro unit switched ON
If the iChiropro app is running and the iPad is plugged to the iChiropro (switch ON):
• The iPad will charge up (even if the app is not running);• The MX-i micromotor can be operated with the pedal
(iChiropro app in operative mode).
Sound alert Description
One short beepActivating irrigation, going to next step, and changing rotation direction
Two short beepsDeactivating irrigation,and changing rota-tion direction
One high-fre-quency beep
Going to next implant placement or next surgery procedure
One long beepEntering in implantology or surgery ope-rative, going to first step of operative sequence
Alternate short beeps
Warning notifications
Alternate medium beeps
Micromotor REVERSE running indicator
Alternate long beeps
System failure notification

EN
G
FIG. 1 FIG. 2 FIG. 3
3
2
4
1
5
1
2
3
4
7 Getting started
7.1 Back up data
Use iTunes or iCloud to automatically back up your iChiropro application user-defined settings (user profiles, implant brands, implant parameters and all operations data). Refer to Apple's user guide for appropriate use of the iPad, iTunes or iCloud.
7.2 Launch iChiropro app
FIG. 1
A. Make sure that the sound volume on your iPad is ON and set to an appropriate level according to the ambient noise of the room:
• Volume down (3) and up (2).
B. Close all other applications in order not to disrupt the operation:• Double-click the home button (4) to show the multitasking
display and drag the app up to close.• Click the home button again to return to the main screen.
C. Deactivate Auto-lock and all alerts. Refer to Apple's user guide for appropriate use of the iPad.
D. Ensure that the latest application updates have been installed (see chapter “7.10 iChiropro App update” on page 24).
E. Tap the app icon (5) to launch the iChiropro application.
CAUTION
If not using your iPad, press the Sleep/Wake button (1) to lock it.
7.3 Welcome screen and disclaimer
A. To ensure the appropriate working of the iChiropro Dental unit, make sure to only use your iChiropro application with the iOS version validated by Bien-Air Dental.FIG. 2
Refer to the current iOS version of your device (1).
CAUTION
Do not update iOS unless it is recommended by Bien-Air.
See also chapter “10.1 Safety warning (operating)” on page 50.
For more information go to the App Store © under «what’s new» of the selected application.
B. Tap OK (2) to acknowledge disclaimer message and access the disclaimer message second screen (3).
FIG. 3
C. Make sure to have set all steps of disclaimer (3) and tap OK (4).
The Home page screen is displayed.
See chapter “7.4 Home page screen” on page 16.
15
16
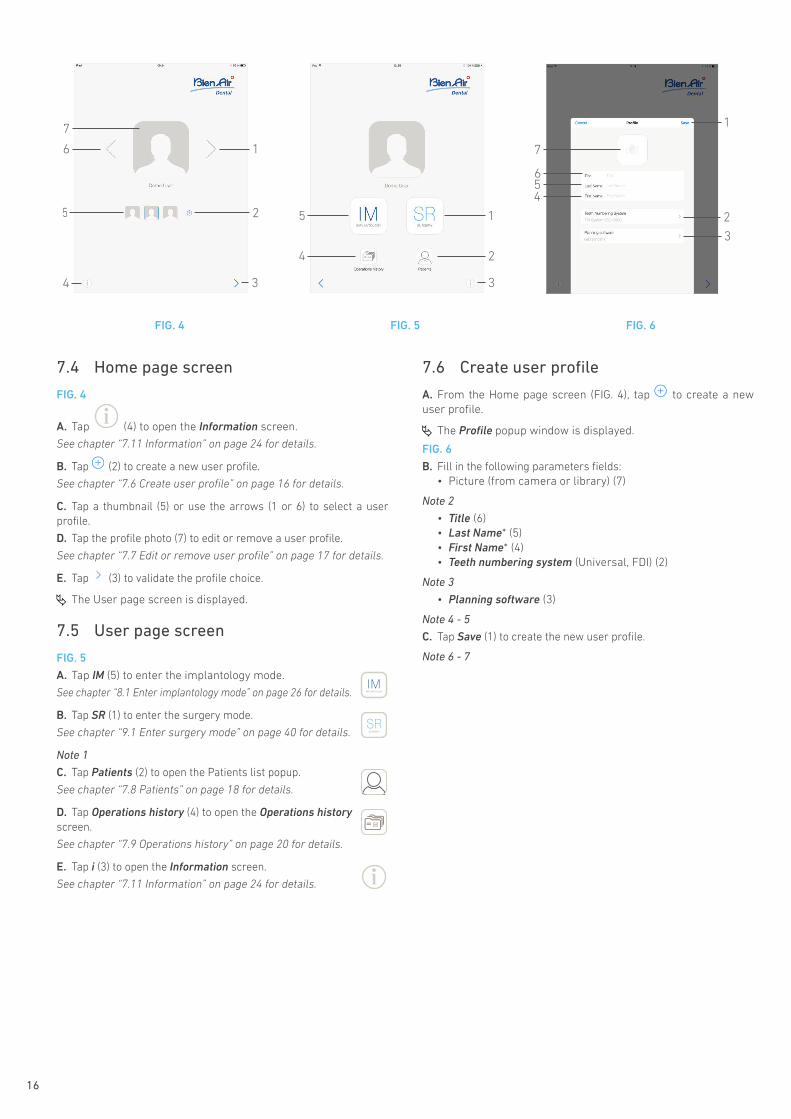
7.4 Home page screen
FIG. 4
A. Tap (4) to open the Information screen.
See chapter “7.11 Information” on page 24 for details.
B. Tap (2) to create a new user profile.
See chapter “7.6 Create user profile” on page 16 for details.
C. Tap a thumbnail (5) or use the arrows (1 or 6) to select a user profile.
D. Tap the profile photo (7) to edit or remove a user profile.
See chapter “7.7 Edit or remove user profile” on page 17 for details.
E. Tap (3) to validate the profile choice.
The User page screen is displayed.
7.5 User page screen
FIG. 5
A. Tap IM (5) to enter the implantology mode.
See chapter “8.1 Enter implantology mode” on page 26 for details.
B. Tap SR (1) to enter the surgery mode.
See chapter “9.1 Enter surgery mode” on page 40 for details.
Note 1
C. Tap Patients (2) to open the Patients list popup.
See chapter “7.8 Patients” on page 18 for details.
D. Tap Operations history (4) to open the Operations historyscreen.
See chapter “7.9 Operations history” on page 20 for details.
E. Tap i (3) to open the Information screen.
See chapter “7.11 Information” on page 24 for details.
7.6 Create user profile
A. From the Home page screen (FIG. 4), tap to create a new user profile.
The Profile popup window is displayed.
FIG. 6
B. Fill in the following parameters fields:• Picture (from camera or library) (7)
Note 2
• Title (6)• Last Name* (5)• First Name* (4)• Teeth numbering system (Universal, FDI) (2)
Note 3
• Planning software (3)
Note 4 - 5
C. Tap Save (1) to create the new user profile.
Note 6 - 7
FIG. 4 FIG. 5 FIG. 6
16
5
3
2
4
7
15
3
4 2
2
7
654
1
3
EN
G
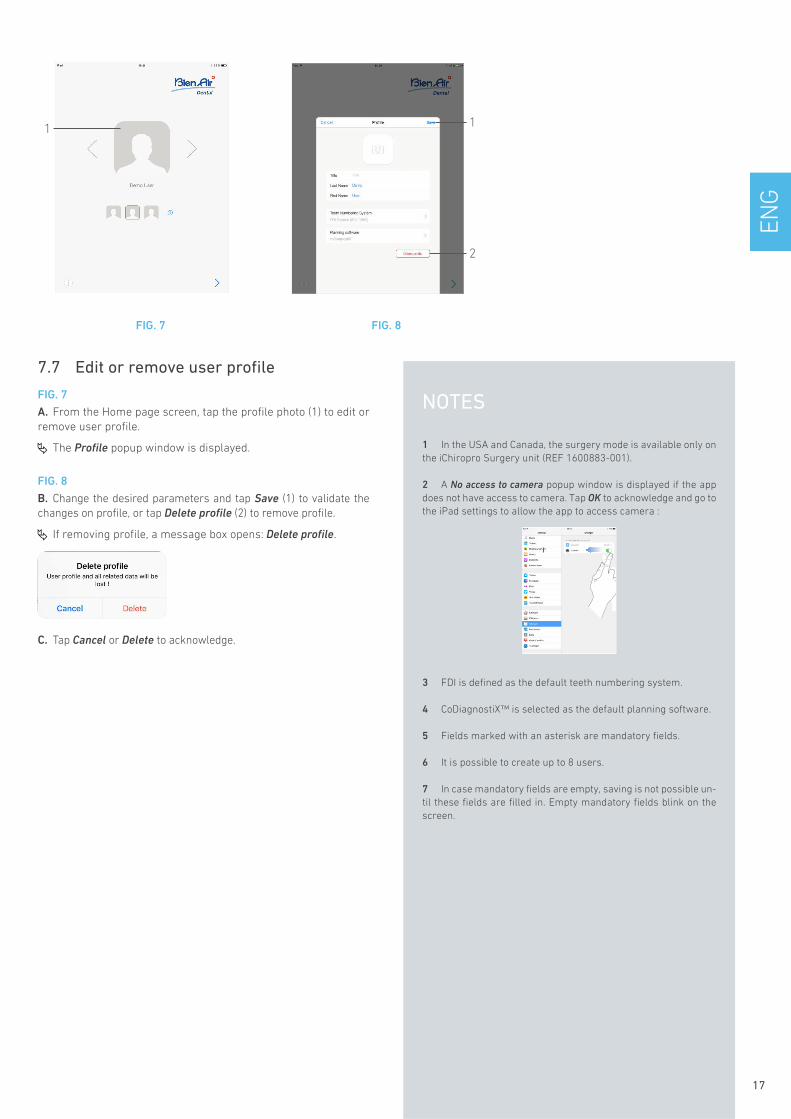
7.7 Edit or remove user profile
FIG. 7
A. From the Home page screen, tap the profile photo (1) to edit or remove user profile.
The Profile popup window is displayed.
FIG. 8
B. Change the desired parameters and tap Save (1) to validate the changes on profile, or tap Delete profile (2) to remove profile.
If removing profile, a message box opens: Delete profile.
C. Tap Cancel or Delete to acknowledge.
FIG. 7 FIG. 8
1
2
1
17
NOTES
1 In the USA and Canada, the surgery mode is available only on the iChiropro Surgery unit (REF 1600883-001).
2 A No access to camera popup window is displayed if the app does not have access to camera. Tap OK to acknowledge and go to the iPad settings to allow the app to access camera :
3 FDI is defined as the default teeth numbering system.
4 CoDiagnostiX™ is selected as the default planning software.
5 Fields marked with an asterisk are mandatory fields.
6 It is possible to create up to 8 users.
7 In case mandatory fields are empty, saving is not possible un-til these fields are filled in. Empty mandatory fields blink on the screen.
18
7.8 Patients
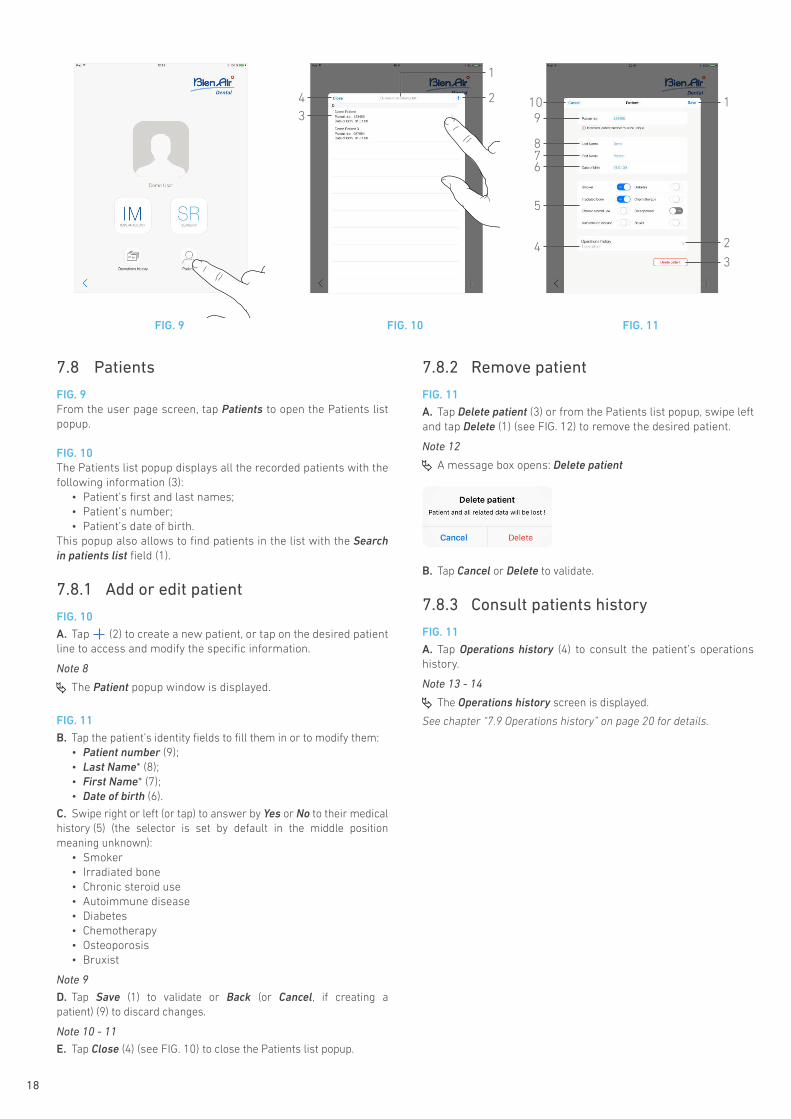
FIG. 9From the user page screen, tap Patients to open the Patients list popup.
FIG. 10The Patients list popup displays all the recorded patients with the following information (3):
• Patient’s first and last names;• Patient’s number;• Patient’s date of birth.
This popup also allows to find patients in the list with the Search in patients list field (1).
7.8.1 Add or edit patient
FIG. 10
A. Tap (2) to create a new patient, or tap on the desired patient line to access and modify the specific information.
Note 8
The Patient popup window is displayed.
FIG. 11
B. Tap the patient’s identity fields to fill them in or to modify them:• Patient number (9);• Last Name* (8);• First Name* (7);• Date of birth (6).
C. Swipe right or left (or tap) to answer by Yes or No to their medical history (5) (the selector is set by default in the middle position meaning unknown):
• Smoker• Irradiated bone• Chronic steroid use• Autoimmune disease• Diabetes• Chemotherapy• Osteoporosis• Bruxist
Note 9
D. Tap Save (1) to validate or Back (or Cancel, if creating a patient) (9) to discard changes.
Note 10 - 11
E. Tap Close (4) (see FIG. 10) to close the Patients list popup.
7.8.2 Remove patient
FIG. 11
A. Tap Delete patient (3) or from the Patients list popup, swipe left and tap Delete (1) (see FIG. 12) to remove the desired patient.
Note 12
A message box opens: Delete patient
B. Tap Cancel or Delete to validate.
7.8.3 Consult patients history
FIG. 11
A. Tap Operations history (4) to consult the patient’s operations history.
Note 13 - 14
The Operations history screen is displayed.
See chapter “7.9 Operations history” on page 20 for details.
FIG. 9 FIG. 10 FIG. 11
1
2
3
4 1
2
6
5
4
78
9
10
3
EN
G
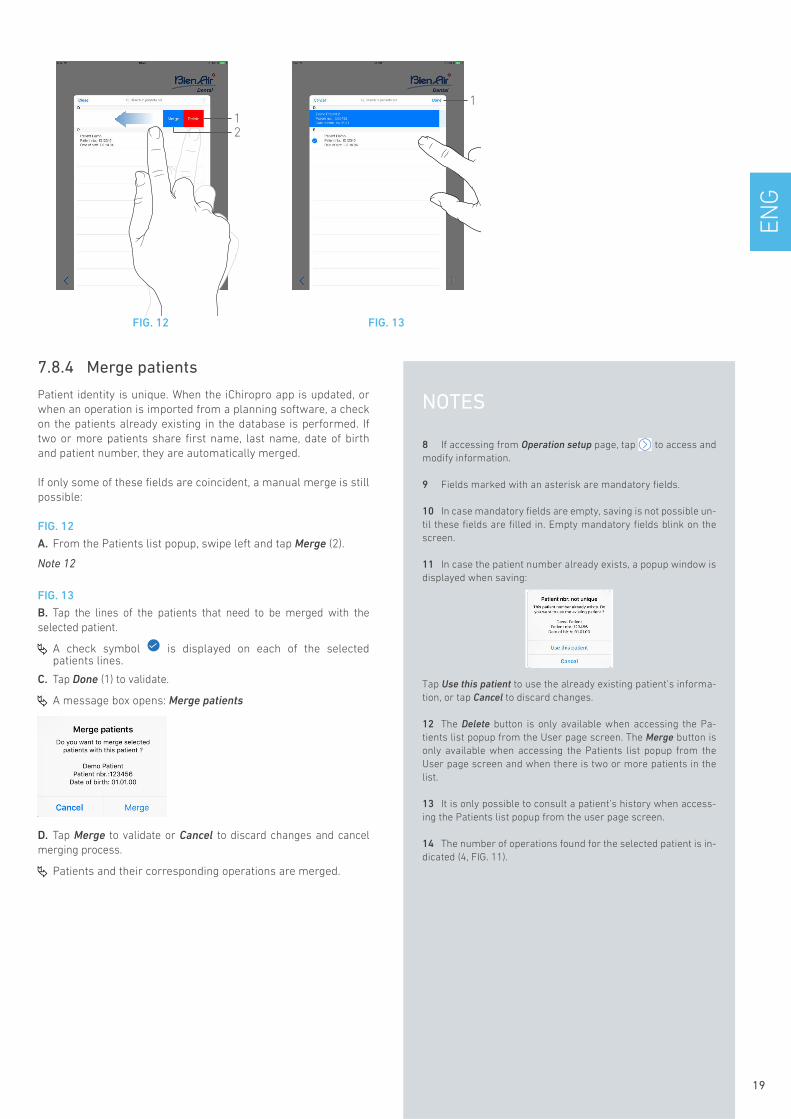
7.8.4 Merge patients
Patient identity is unique. When the iChiropro app is updated, or when an operation is imported from a planning software, a check on the patients already existing in the database is performed. If two or more patients share first name, last name, date of birth and patient number, they are automatically merged. If only some of these fields are coincident, a manual merge is still possible:
FIG. 12
A. From the Patients list popup, swipe left and tap Merge (2).
Note 12
FIG. 13
B. Tap the lines of the patients that need to be merged with the selected patient.
A check symbol is displayed on each of the selected patients lines.
C. Tap Done (1) to validate.
A message box opens: Merge patients
D. Tap Merge to validate or Cancel to discard changes and cancelmerging process.
Patients and their corresponding operations are merged.
19
NOTES
8 If accessing from Operation setup page, tap to access and modify information.
9 Fields marked with an asterisk are mandatory fields.
10 In case mandatory fields are empty, saving is not possible un-til these fields are filled in. Empty mandatory fields blink on the screen.
11 In case the patient number already exists, a popup window is displayed when saving:
Tap Use this patient to use the already existing patient’s informa-tion, or tap Cancel to discard changes.
12 The Delete button is only available when accessing the Pa-tients list popup from the User page screen. The Merge button is only available when accessing the Patients list popup from the User page screen and when there is two or more patients in the list.
13 It is only possible to consult a patient’s history when access-ing the Patients list popup from the user page screen.
14 The number of operations found for the selected patient is in-dicated (4, FIG. 11).
FIG. 12 FIG. 13
12
1

20
FIG. 14 FIG. 15 FIG. 16
1
6
10
5
2
11
78
9
3
4
6
10
5
2
11
34
127
89
1
9
4
1
8
76
23
5
7.9 Operations history
The Operations history screens can differ whether they are displayed from the User page screen (see FIG. 14) or the Patient popup window (see FIG. 15).
This page displays all the recorded operations with the following information:
FIG. 14• Patient’s first and last names (8);• Patient’s number (7);• Patient’s date of birth (6);• Operation’s date (3);• Operation type (implantology or surgery) (4);• Planning software used (9) (see chapter “8.4 Import an
operation” on page 28).
Note 15
FIG. 15• Patient’s first and last names (9);• Patient’s number (8);• Operation’s date (3);• Operation type (implantology or surgery) (4);• Operation recorded by another user (12);
Note 16
• Placed implants identification numbers or surgery operations and their teeth positions (7);
• Planning software used (6) (see chapter “8.4 Import an operation” on page 28).
Note 15 and 17
FIG. 14 & FIG. 15This page also allows to:
• Filter operations by type, by tapping IM (implantology), SR(surgery) or ALL (surgery and implantology) (10);
• Filter operations by user, by tapping (current user
only) or (all users) (11); • Find specific information in the list with the Search button
(1) (see chapter “7.9.1 Search operations history” on page 20);• Export all filtered operations data in a .zip file containing .csv
or .pdf data for each operation, with the Export all button (5) (see chapter “7.9.4 Export all operations reports” on page 22);
• Sort patients names and operations dates by tapping on their respective columns titles (2),
Note 18
E. Tap on the desired operation line to access and modify the specific information through the Operation data page.
The Operation data page screen is displayed.
Note 16
See chapter “7.9.2 Operation data” on page 21.
7.9.1 Search operations history
FIG. 16
Tap (1) to display the search popup showing the following fields:
• By patient name (2);• By patient number (3);
Note 19
• By date range (start – end) (8).These fields can be edited in order to define search criteria (4).
In addition to this, it is possible to automatically filter operations displaying only those performed:
• This week (7);• This month (6);• This year (5).
EN
G
FIG. 17 FIG. 18 FIG. 19
7
9
11
24
3
1
8
678
5
24
3
1
10
11
9
1
5
6
24
3
7
11
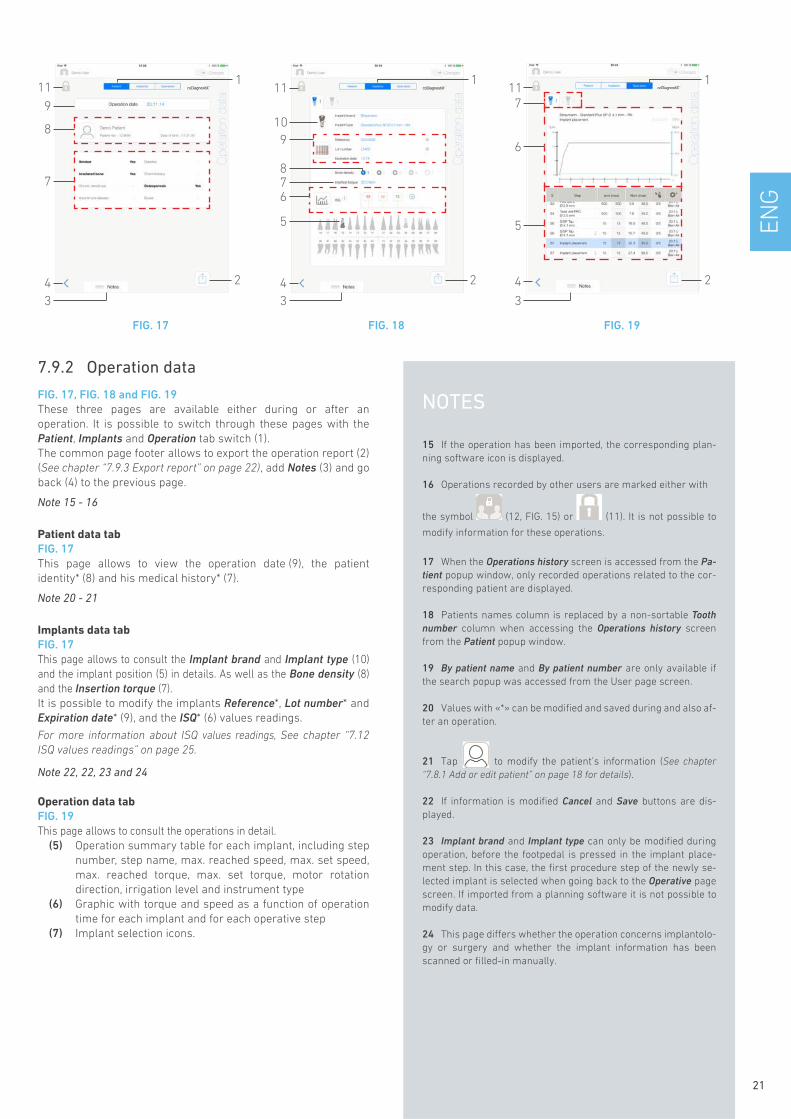
7.9.2 Operation data
FIG. 17, FIG. 18 and FIG. 19These three pages are available either during or after an
operation. It is possible to switch through these pages with the
Patient, Implants and Operation tab switch (1).
The common page footer allows to export the operation report (2)
(See chapter “7.9.3 Export report” on page 22), add Notes (3) and go
back (4) to the previous page.
Note 15 - 16
Patient data tabFIG. 17This page allows to view the operation date (9), the patient
identity* (8) and his medical history* (7).
Note 20 - 21
Implants data tabFIG. 17This page allows to consult the Implant brand and Implant type (10)
and the implant position (5) in details. As well as the Bone density (8)
and the Insertion torque (7).
It is possible to modify the implants Reference*, Lot number* and
Expiration date* (9), and the ISQ* (6) values readings.
For more information about ISQ values readings, See chapter “7.12 ISQ values readings” on page 25.
Note 22, 22, 23 and 24
Operation data tabFIG. 19This page allows to consult the operations in detail.
(5) Operation summary table for each implant, including step
number, step name, max. reached speed, max. set speed,
max. reached torque, max. set torque, motor rotation
direction, irrigation level and instrument type
(6) Graphic with torque and speed as a function of operation
time for each implant and for each operative step
(7) Implant selection icons.
21
NOTES
15 If the operation has been imported, the corresponding plan-
ning software icon is displayed.
16 Operations recorded by other users are marked either with the symbol (12, FIG. 15) or (11). It is not possible to
modify information for these operations.
17 When the Operations history screen is accessed from the Pa-tient popup window, only recorded operations related to the cor-
responding patient are displayed.
18 Patients names column is replaced by a non-sortable Tooth number column when accessing the Operations history screen
from the Patient popup window.
19 By patient name and By patient number are only available if
the search popup was accessed from the User page screen.
20 Values with «*» can be modified and saved during and also af-
ter an operation.
21 Tap to modify the patient’s information (See chapter “7.8.1 Add or edit patient” on page 18 for details).
22 If information is modified Cancel and Save buttons are dis-
played.
23 Implant brand and Implant type can only be modified during
operation, before the footpedal is pressed in the implant place-
ment step. In this case, the first procedure step of the newly se-
lected implant is selected when going back to the Operative page
screen. If imported from a planning software it is not possible to
modify data.
24 This page differs whether the operation concerns implantolo-
gy or surgery and whether the implant information has been
scanned or filled-in manually.
22
FIG. 20 FIG. 21
1
2
3
1
2
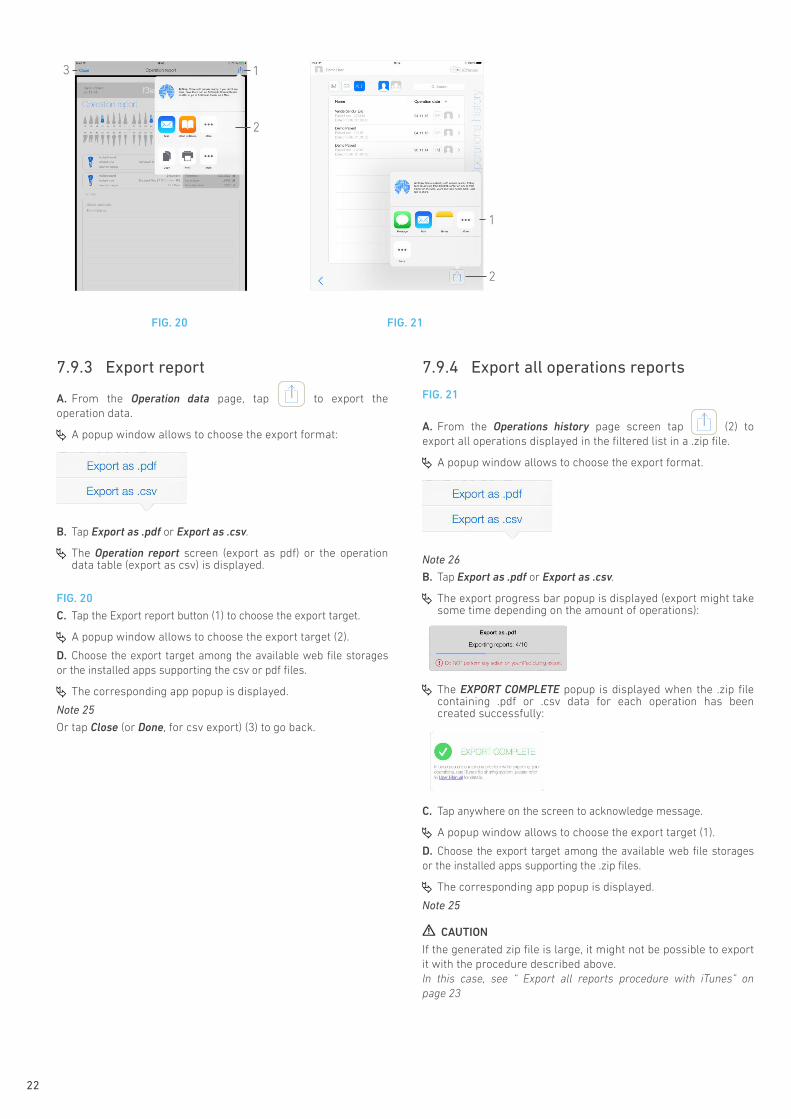
7.9.3 Export report
A. From the Operation data page, tap to export the operation data.
A popup window allows to choose the export format:
B. Tap Export as .pdf or Export as .csv.
The Operation report screen (export as pdf) or the operation data table (export as csv) is displayed.
FIG. 20
C. Tap the Export report button (1) to choose the export target.
A popup window allows to choose the export target (2).
D. Choose the export target among the available web file storages or the installed apps supporting the csv or pdf files.
The corresponding app popup is displayed.
Note 25
Or tap Close (or Done, for csv export) (3) to go back.
7.9.4 Export all operations reports
FIG. 21
A. From the Operations history page screen tap (2) to export all operations displayed in the filtered list in a .zip file.
A popup window allows to choose the export format.
Note 26
B. Tap Export as .pdf or Export as .csv.
The export progress bar popup is displayed (export might take some time depending on the amount of operations):
The EXPORT COMPLETE popup is displayed when the .zip file containing .pdf or .csv data for each operation has been created successfully:
C. Tap anywhere on the screen to acknowledge message.
A popup window allows to choose the export target (1).
D. Choose the export target among the available web file storages or the installed apps supporting the .zip files.
The corresponding app popup is displayed.
Note 25
CAUTION
If the generated zip file is large, it might not be possible to export it with the procedure described above.In this case, see “ Export all reports procedure with iTunes” on page 23
EN
G
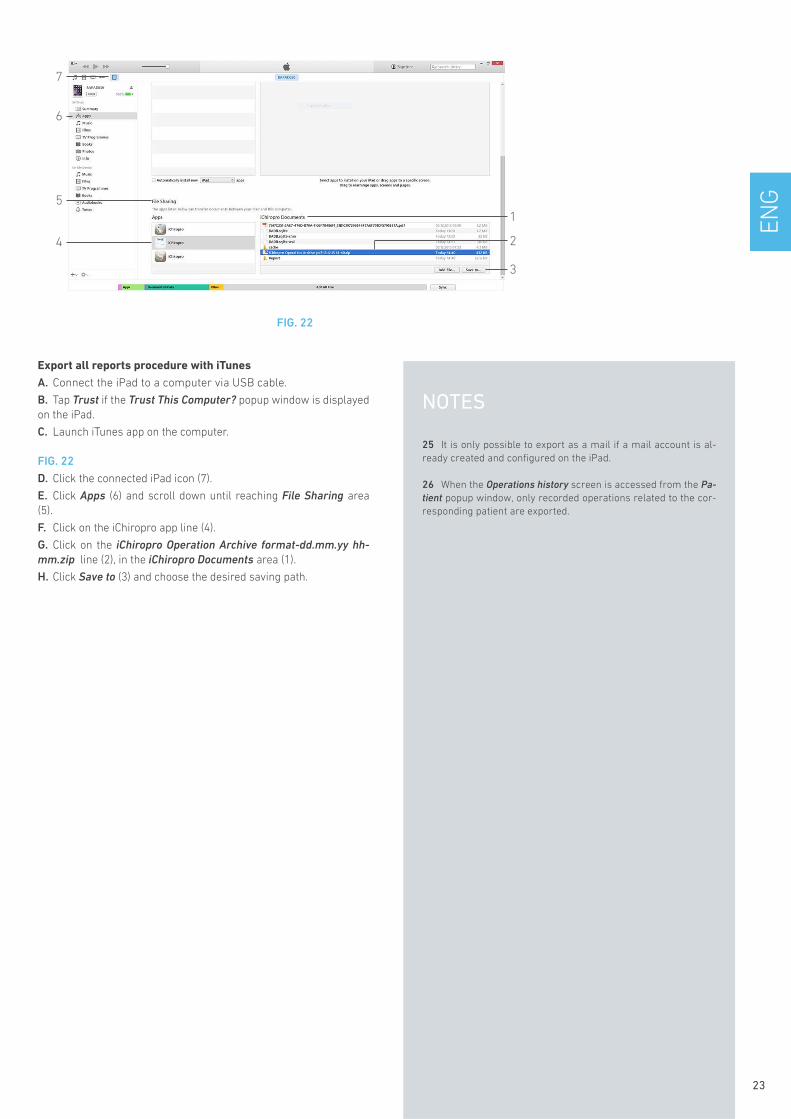
FIG. 22
7
6
5
4 2
3
1
Export all reports procedure with iTunesA. Connect the iPad to a computer via USB cable.
B. Tap Trust if the Trust This Computer? popup window is displayed on the iPad.
C. Launch iTunes app on the computer.
FIG. 22
D. Click the connected iPad icon (7).
E. Click Apps (6) and scroll down until reaching File Sharing area (5).
F. Click on the iChiropro app line (4).
G. Click on the iChiropro Operation Archive format-dd.mm.yy hh-mm.zip line (2), in the iChiropro Documents area (1).
H. Click Save to (3) and choose the desired saving path.
23
NOTES
25 It is only possible to export as a mail if a mail account is al-ready created and configured on the iPad.
26 When the Operations history screen is accessed from the Pa-tient popup window, only recorded operations related to the cor-responding patient are exported.
24
FIG. 23 FIG. 24 FIG. 25
1
2
3
4
5
6
7.10 iChiropro App update
FIG. 23When the application is launched, it will check whether a new version is available on the App Store ©. If a new update is available, a message box will be displayed on Disclaimer screen to notify the user should download the application.
Note 27
• Download: user can automatically access App Store ©application page.
• Remind Me Later: user can delay the update and continue to work with currently installed app version (the message appears once a day).
• Ignore: User can ignore the update and continue to work with currently installed app version (the message reappears only if a new version is available).
7.11 Information
FIG. 24
A. Tap to open the Information screen (it is also possible to access it from the home page screen).
FIG. 25
This screen allows to navigate to the following pages:
• Latest news (1) (opens Bien-Air website latest news page);• User manual (2) (application detects the language of the iPad
and downloads the User Manual in the same language);
Note 28 - 29
• Catalogue (3) (opens online catalogue (pdf file));• Web TV (4) (opens Bien-Air web TV);• About (5) (See chapter “7.11.1 About” on page 25);• Contact us (6) (opens email application with predefined
email address [email protected]).
Note 30
EN
G
FIG. 26 FIG. 27 FIG. 28
1
2
3
4
5
6
1
2
35
4
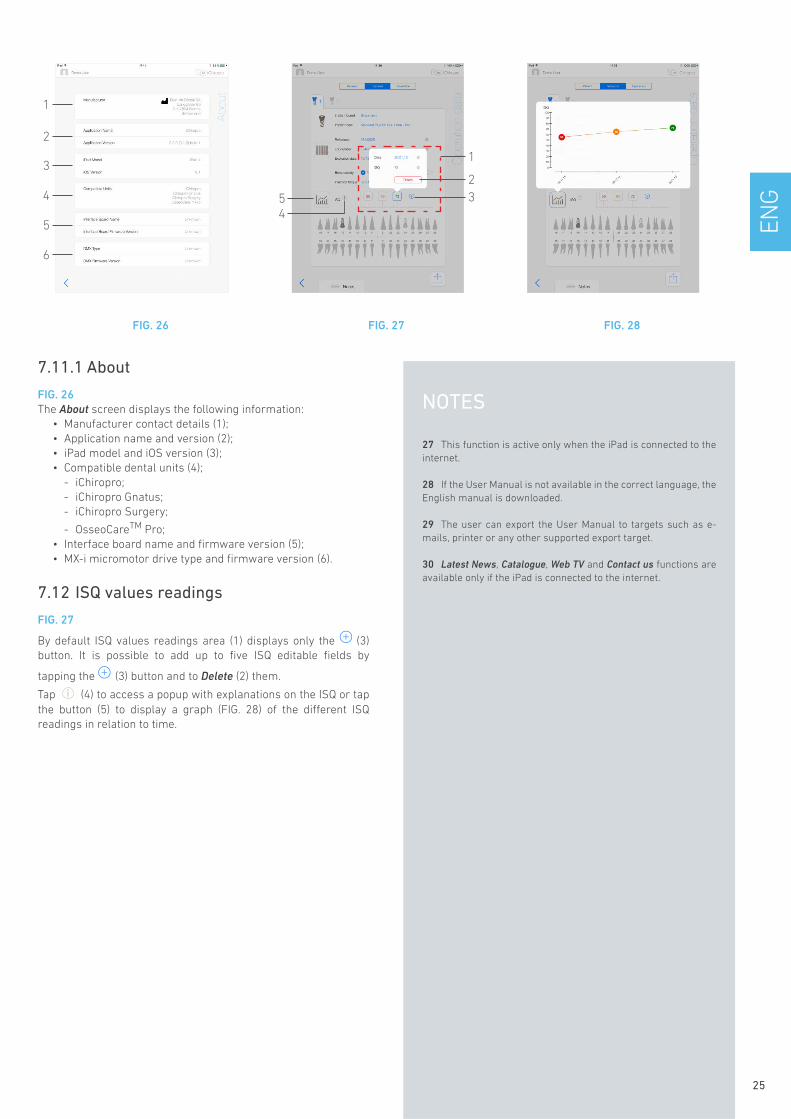
7.11.1 About
FIG. 26The About screen displays the following information:
• Manufacturer contact details (1);• Application name and version (2);• iPad model and iOS version (3);• Compatible dental units (4);
- iChiropro;- iChiropro Gnatus;- iChiropro Surgery;
- OsseoCareTM Pro;• Interface board name and firmware version (5);• MX-i micromotor drive type and firmware version (6).
7.12 ISQ values readings
FIG. 27
By default ISQ values readings area (1) displays only the (3) button. It is possible to add up to five ISQ editable fields by
tapping the (3) button and to Delete (2) them.
Tap (4) to access a popup with explanations on the ISQ or tap the button (5) to display a graph (FIG. 28) of the different ISQ readings in relation to time.
25
NOTES
27 This function is active only when the iPad is connected to the internet.
28 If the User Manual is not available in the correct language, the English manual is downloaded.
29 The user can export the User Manual to targets such as e-mails, printer or any other supported export target.
30 Latest News, Catalogue, Web TV and Contact us functions are available only if the iPad is connected to the internet.

26
FIG. 1 FIG. 2 FIG. 3
6
4
3
1
25
12
4
6
3
5
7
8 Operation - Implantology mode
8.1 Enter implantology mode
FIG. 1
Tap IM to enter the implantology mode.The implantology mode allows to perform operations consisting of placing up to 8 implants. Each implant placement is made up of several steps that can be edited by the user.
The Setup page screen is displayed.
8.2 Setup screen description
FIG. 2The Setup screen allows to plan an operation, start a planned operation or select a single implant for direct placement:
(1) Search field (to find specific information in the planned operations list)
(2) Import an operation from a planning software (see “8.4 Import an operation” on page 28)
(3) Back to the previous screen(4) Direct operation area(5) Plan a new operation (see “8.3 Plan an operation” on
page 26)(6) Planned operations area
Note 1
8.3 Plan an operation
A. From the Setup screen, tap Add new operation to add a new operation.
The Operation setup page screen is displayed.
FIG. 3
B. Tap (6) to access the Patients list popup.
The Patients list popup is displayed.
EN
G
27
NOTES
1 Patients’ names and operation’s dates can be sorted by tap-ping on their respective columns titles (6).
2 Fields marked with an asterisk must be filled in before saving.
3 User-defined implants are represented by .
Default implants are represented by .
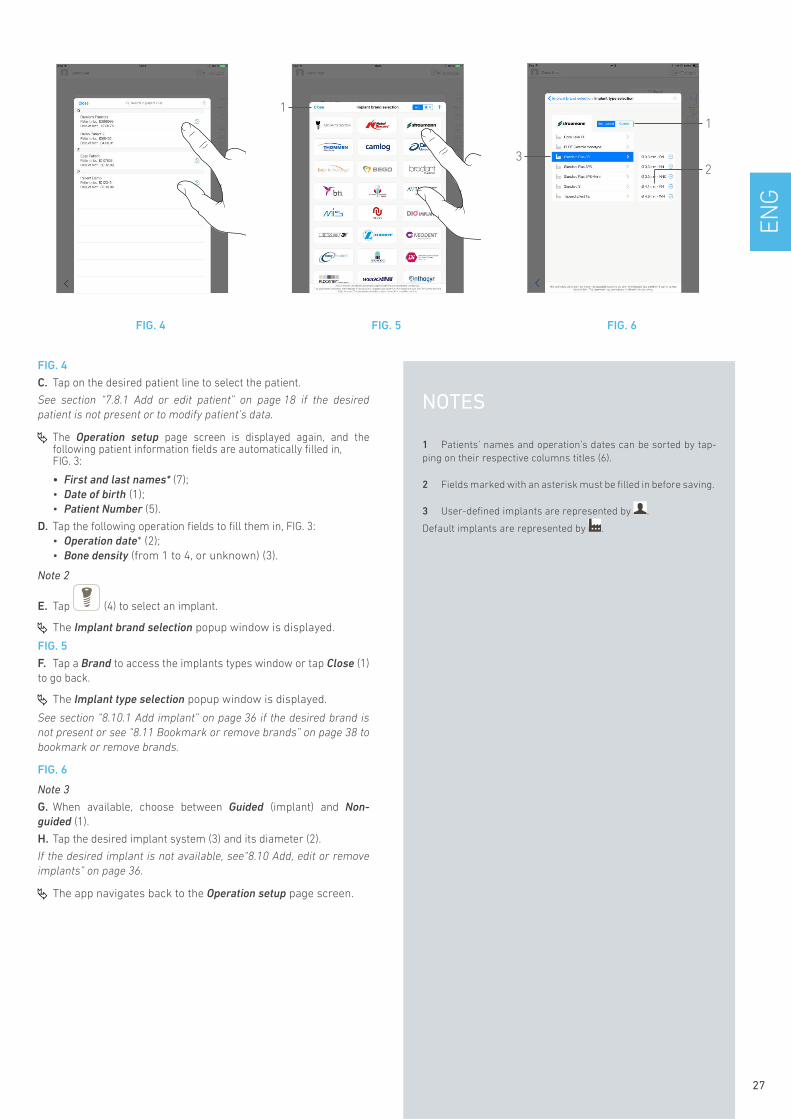
FIG. 4
C. Tap on the desired patient line to select the patient.
See section “7.8.1 Add or edit patient” on page 18 if the desired patient is not present or to modify patient’s data.
The Operation setup page screen is displayed again, and the following patient information fields are automatically filled in, FIG. 3:
• First and last names* (7);• Date of birth (1);• Patient Number (5).
D. Tap the following operation fields to fill them in, FIG. 3:• Operation date* (2);• Bone density (from 1 to 4, or unknown) (3).
Note 2
E. Tap (4) to select an implant.
The Implant brand selection popup window is displayed.
FIG. 5
F. Tap a Brand to access the implants types window or tap Close (1) to go back.
The Implant type selection popup window is displayed.
See section “8.10.1 Add implant” on page 36 if the desired brand is not present or see “8.11 Bookmark or remove brands” on page 38 to bookmark or remove brands.
FIG. 6
Note 3
G. When available, choose between Guided (implant) and Non-guided (1).
H. Tap the desired implant system (3) and its diameter (2).
If the desired implant is not available, see“8.10 Add, edit or remove implants” on page 36.
The app navigates back to the Operation setup page screen.
FIG. 4 FIG. 5 FIG. 6
1
3
1
2
28
FIG. 7 FIG. 8 FIG. 9
8
26
3
9
1
5
7
4
1
FIG. 7
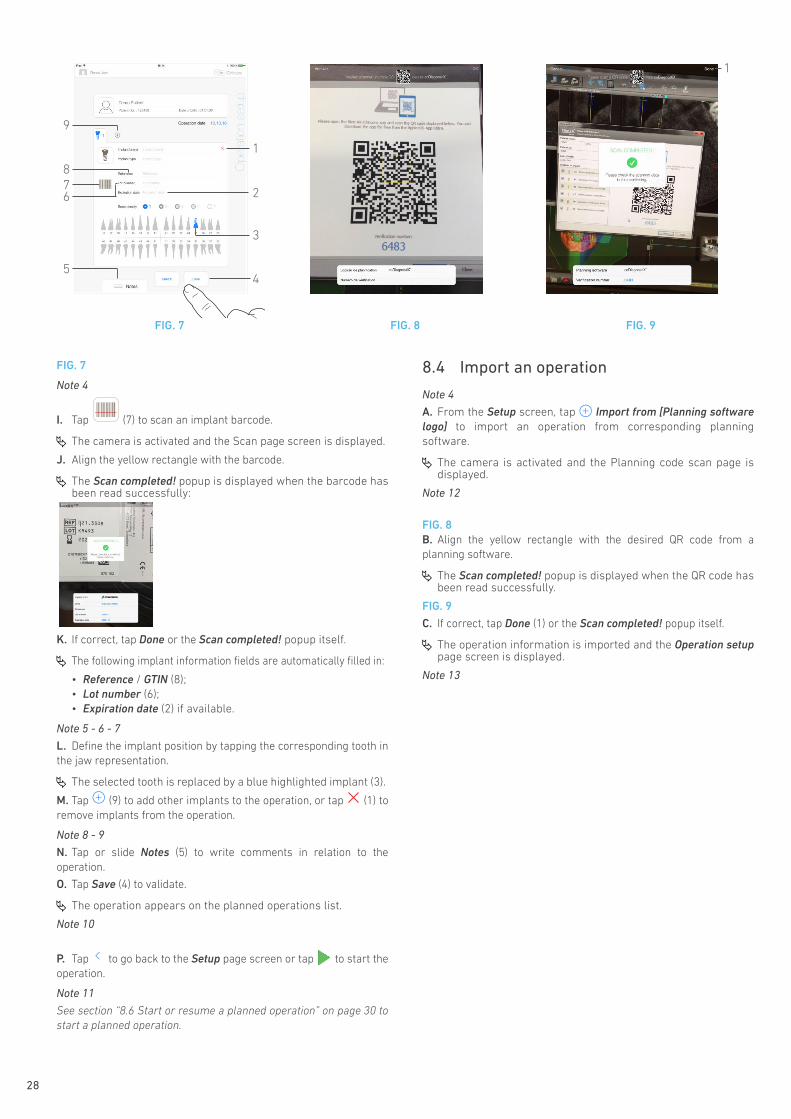
Note 4
I. Tap (7) to scan an implant barcode.
The camera is activated and the Scan page screen is displayed.
J. Align the yellow rectangle with the barcode.
The Scan completed! popup is displayed when the barcode has been read successfully:
K. If correct, tap Done or the Scan completed! popup itself.
The following implant information fields are automatically filled in:
• Reference / GTIN (8);• Lot number (6);• Expiration date (2) if available.
Note 5 - 6 - 7
L. Define the implant position by tapping the corresponding tooth in the jaw representation.
The selected tooth is replaced by a blue highlighted implant (3).
M. Tap (9) to add other implants to the operation, or tap (1) to remove implants from the operation.
Note 8 - 9
N. Tap or slide Notes (5) to write comments in relation to the operation.
O. Tap Save (4) to validate.
The operation appears on the planned operations list.
Note 10
P. Tap to go back to the Setup page screen or tap to start the operation.
Note 11
See section “8.6 Start or resume a planned operation” on page 30 to start a planned operation.
8.4 Import an operation
Note 4
A. From the Setup screen, tap Import from [Planning software logo] to import an operation from corresponding planning software.
The camera is activated and the Planning code scan page is displayed.
Note 12
FIG. 8B. Align the yellow rectangle with the desired QR code from a planning software.
The Scan completed! popup is displayed when the QR code has been read successfully.
FIG. 9
C. If correct, tap Done (1) or the Scan completed! popup itself.
The operation information is imported and the Operation setuppage screen is displayed.
Note 13
EN
G
FIG. 10
11
9
12
10
7
8
6
1
3
13
2
5
4
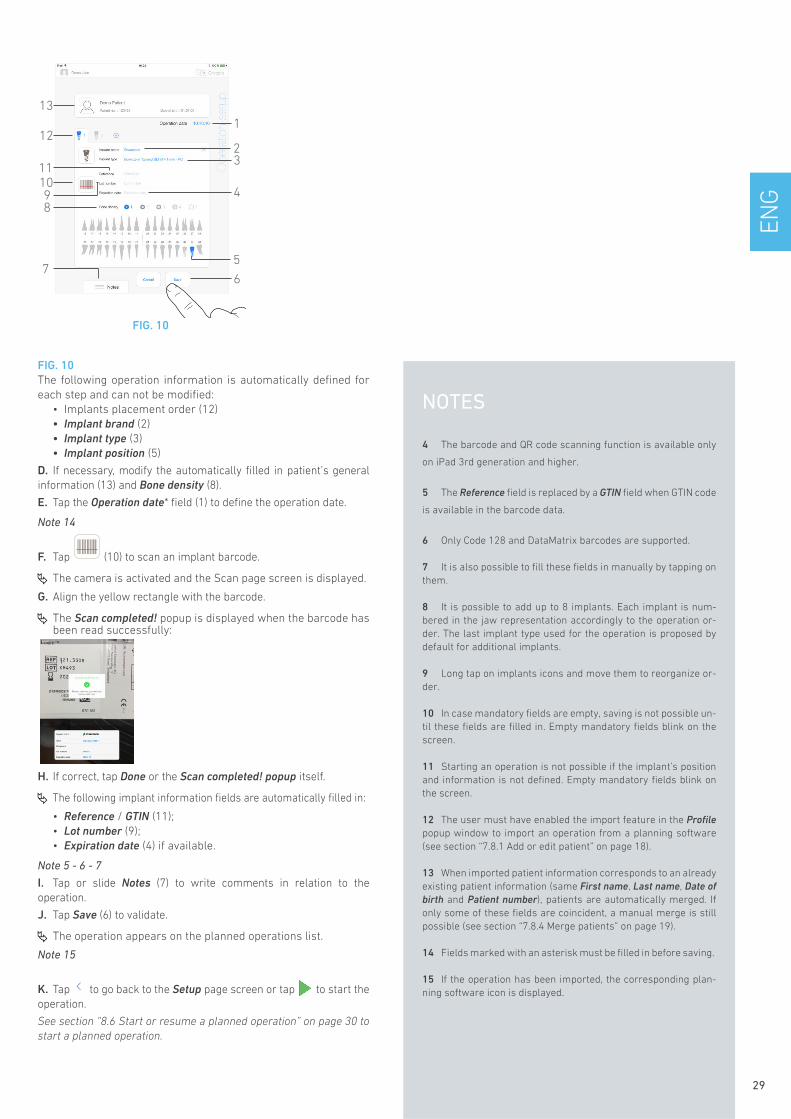
FIG. 10The following operation information is automatically defined for each step and can not be modified:
• Implants placement order (12)• Implant brand (2)• Implant type (3)• Implant position (5)
D. If necessary, modify the automatically filled in patient’s general information (13) and Bone density (8).
E. Tap the Operation date* field (1) to define the operation date.
Note 14
F. Tap (10) to scan an implant barcode.
The camera is activated and the Scan page screen is displayed.
G. Align the yellow rectangle with the barcode.
The Scan completed! popup is displayed when the barcode has been read successfully:
H. If correct, tap Done or the Scan completed! popup itself.
The following implant information fields are automatically filled in:
• Reference / GTIN (11);• Lot number (9);• Expiration date (4) if available.
Note 5 - 6 - 7
I. Tap or slide Notes (7) to write comments in relation to the operation.
J. Tap Save (6) to validate.
The operation appears on the planned operations list.
Note 15
K. Tap to go back to the Setup page screen or tap to start the operation.
See section “8.6 Start or resume a planned operation” on page 30 to start a planned operation.
29
NOTES
4 The barcode and QR code scanning function is available only
on iPad 3rd generation and higher.
5 The Reference field is replaced by a GTIN field when GTIN code
is available in the barcode data.
6 Only Code 128 and DataMatrix barcodes are supported.
7 It is also possible to fill these fields in manually by tapping on them.
8 It is possible to add up to 8 implants. Each implant is num-bered in the jaw representation accordingly to the operation or-der. The last implant type used for the operation is proposed by default for additional implants.
9 Long tap on implants icons and move them to reorganize or-der.
10 In case mandatory fields are empty, saving is not possible un-til these fields are filled in. Empty mandatory fields blink on the screen.
11 Starting an operation is not possible if the implant’s position and information is not defined. Empty mandatory fields blink on the screen.
12 The user must have enabled the import feature in the Profilepopup window to import an operation from a planning software(see section “7.8.1 Add or edit patient” on page 18).
13 When imported patient information corresponds to an already existing patient information (same First name, Last name, Date of birth and Patient number), patients are automatically merged. If only some of these fields are coincident, a manual merge is still possible (see section “7.8.4 Merge patients” on page 19).
14 Fields marked with an asterisk must be filled in before saving.
15 If the operation has been imported, the corresponding plan-ning software icon is displayed.
30
FIG. 11 FIG. 12 FIG. 13
1
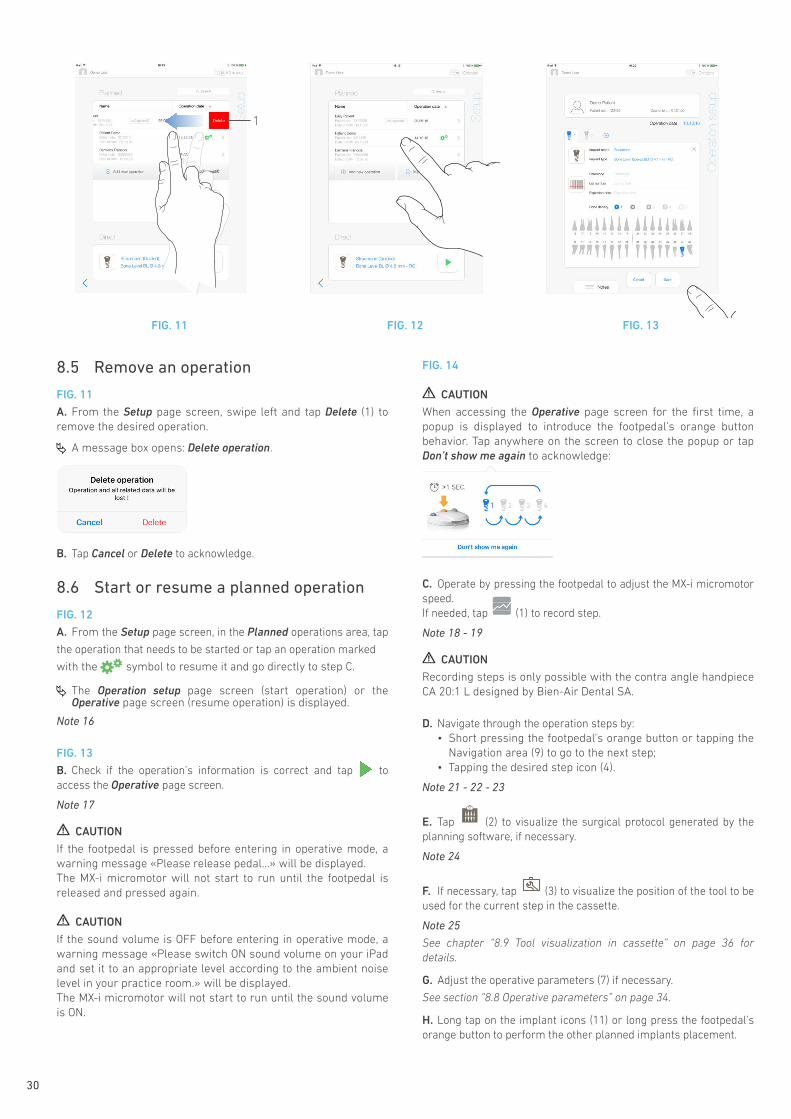
8.5 Remove an operation
FIG. 11
A. From the Setup page screen, swipe left and tap Delete (1) to remove the desired operation.
A message box opens: Delete operation.
B. Tap Cancel or Delete to acknowledge.
8.6 Start or resume a planned operation
FIG. 12
A. From the Setup page screen, in the Planned operations area, tap
the operation that needs to be started or tap an operation marked with the symbol to resume it and go directly to step C.
The Operation setup page screen (start operation) or the Operative page screen (resume operation) is displayed.
Note 16
FIG. 13
B. Check if the operation’s information is correct and tap to access the Operative page screen.
Note 17
CAUTION
If the footpedal is pressed before entering in operative mode, a warning message «Please release pedal…» will be displayed.The MX-i micromotor will not start to run until the footpedal is released and pressed again.
CAUTION
If the sound volume is OFF before entering in operative mode, a warning message «Please switch ON sound volume on your iPad and set it to an appropriate level according to the ambient noise level in your practice room.» will be displayed.The MX-i micromotor will not start to run until the sound volume is ON.
FIG. 14
CAUTION
When accessing the Operative page screen for the first time, apopup is displayed to introduce the footpedal’s orange button behavior. Tap anywhere on the screen to close the popup or tap Don’t show me again to acknowledge:
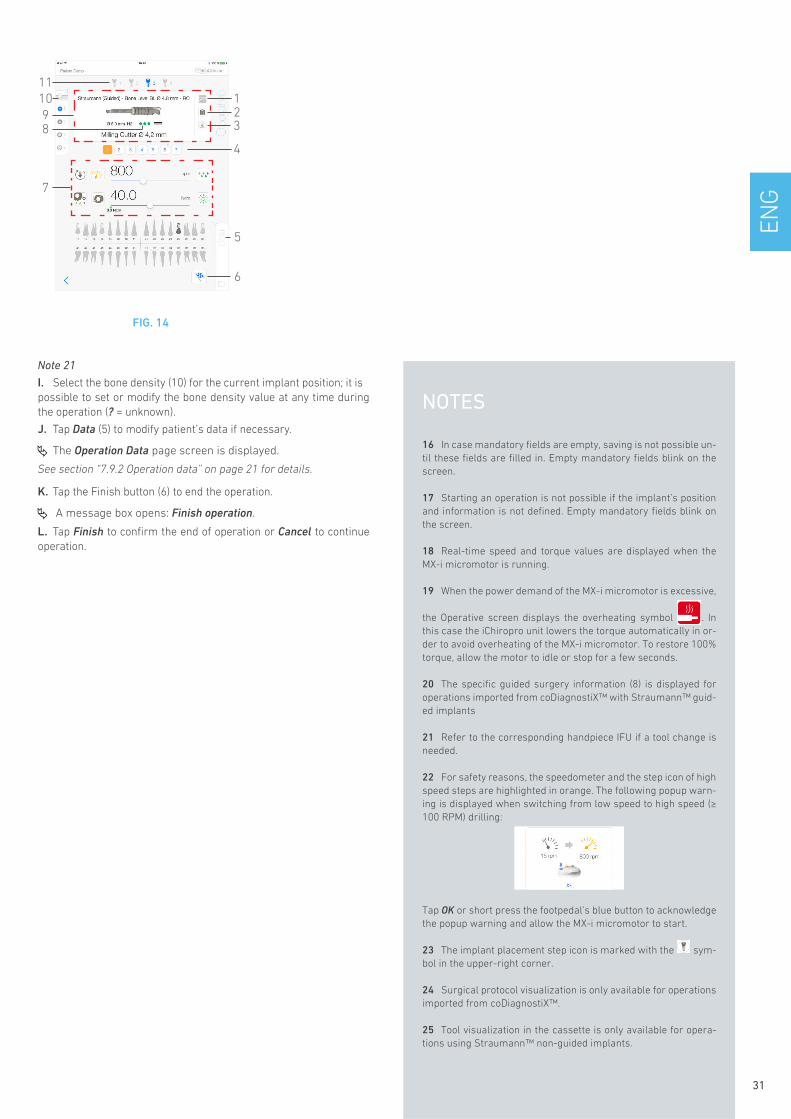
C. Operate by pressing the footpedal to adjust the MX-i micromotor speed. If needed, tap (1) to record step.
Note 18 - 19
CAUTION
Recording steps is only possible with the contra angle handpiece CA 20:1 L designed by Bien-Air Dental SA.
D. Navigate through the operation steps by:• Short pressing the footpedal’s orange button or tapping the
Navigation area (9) to go to the next step;• Tapping the desired step icon (4).
Note 21 - 22 - 23
E. Tap (2) to visualize the surgical protocol generated by the planning software, if necessary.
Note 24
F. If necessary, tap (3) to visualize the position of the tool to be used for the current step in the cassette.
Note 25
See chapter “8.9 Tool visualization in cassette” on page 36 for details.
G. Adjust the operative parameters (7) if necessary.
See section “8.8 Operative parameters” on page 34.
H. Long tap on the implant icons (11) or long press the footpedal’s orange button to perform the other planned implants placement.
EN
G
Note 21
I. Select the bone density (10) for the current implant position; it is possible to set or modify the bone density value at any time during the operation (? = unknown).
J. Tap Data (5) to modify patient’s data if necessary.
The Operation Data page screen is displayed.
See section “7.9.2 Operation data” on page 21 for details.
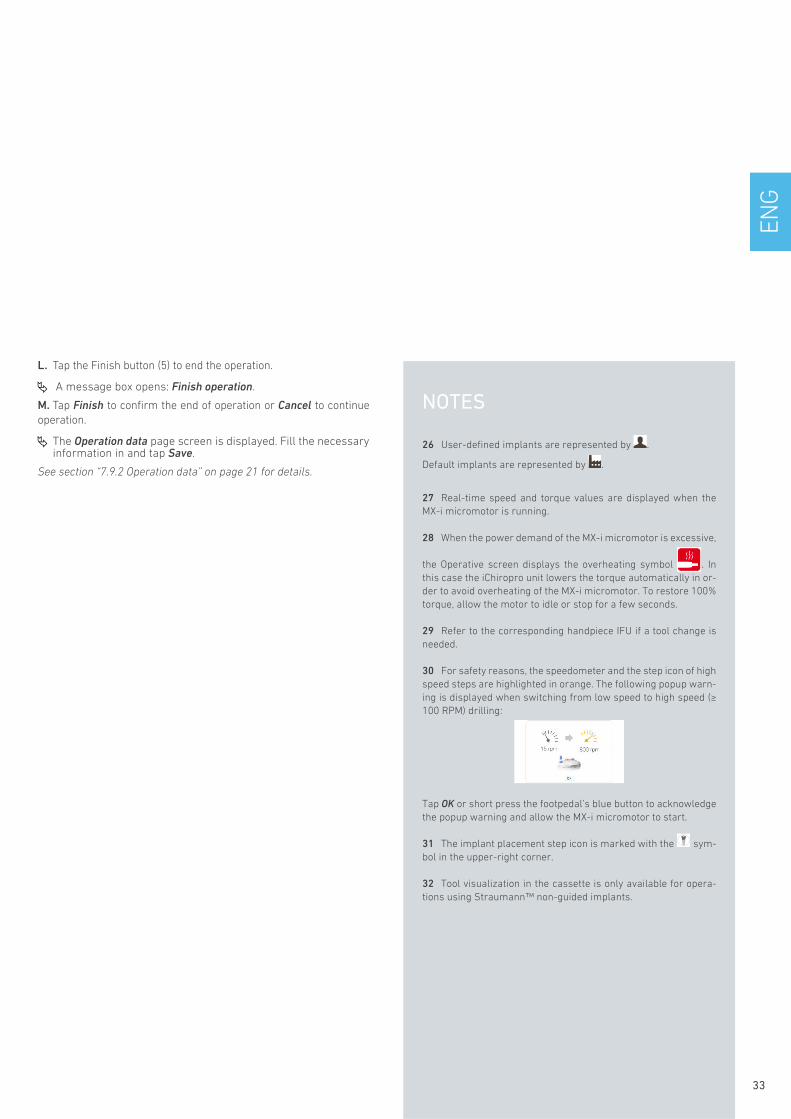
K. Tap the Finish button (6) to end the operation.
A message box opens: Finish operation.
L. Tap Finish to confirm the end of operation or Cancel to continue operation.
FIG. 14
4
7
5
1
11
6
29
10
38
31
NOTES
16 In case mandatory fields are empty, saving is not possible un-til these fields are filled in. Empty mandatory fields blink on the screen.
17 Starting an operation is not possible if the implant’s position and information is not defined. Empty mandatory fields blink on the screen.
18 Real-time speed and torque values are displayed when the MX-i micromotor is running.
19 When the power demand of the MX-i micromotor is excessive, the Operative screen displays the overheating symbol . In this case the iChiropro unit lowers the torque automatically in or-der to avoid overheating of the MX-i micromotor. To restore 100% torque, allow the motor to idle or stop for a few seconds.
20 The specific guided surgery information (8) is displayed for operations imported from coDiagnostiX™ with Straumann™ guid-ed implants
21 Refer to the corresponding handpiece IFU if a tool change is needed.
22 For safety reasons, the speedometer and the step icon of high speed steps are highlighted in orange. The following popup warn-ing is displayed when switching from low speed to high speed (≥ 100 RPM) drilling:
Tap OK or short press the footpedal’s blue button to acknowledge the popup warning and allow the MX-i micromotor to start.
23 The implant placement step icon is marked with the sym-bol in the upper-right corner.
24 Surgical protocol visualization is only available for operations imported from coDiagnostiX™.
25 Tool visualization in the cassette is only available for opera-tions using Straumann™ non-guided implants.
32
FIG. 15 FIG. 16 FIG. 17
2 1
1
3
2
1
6
4
2
3
5
7
8
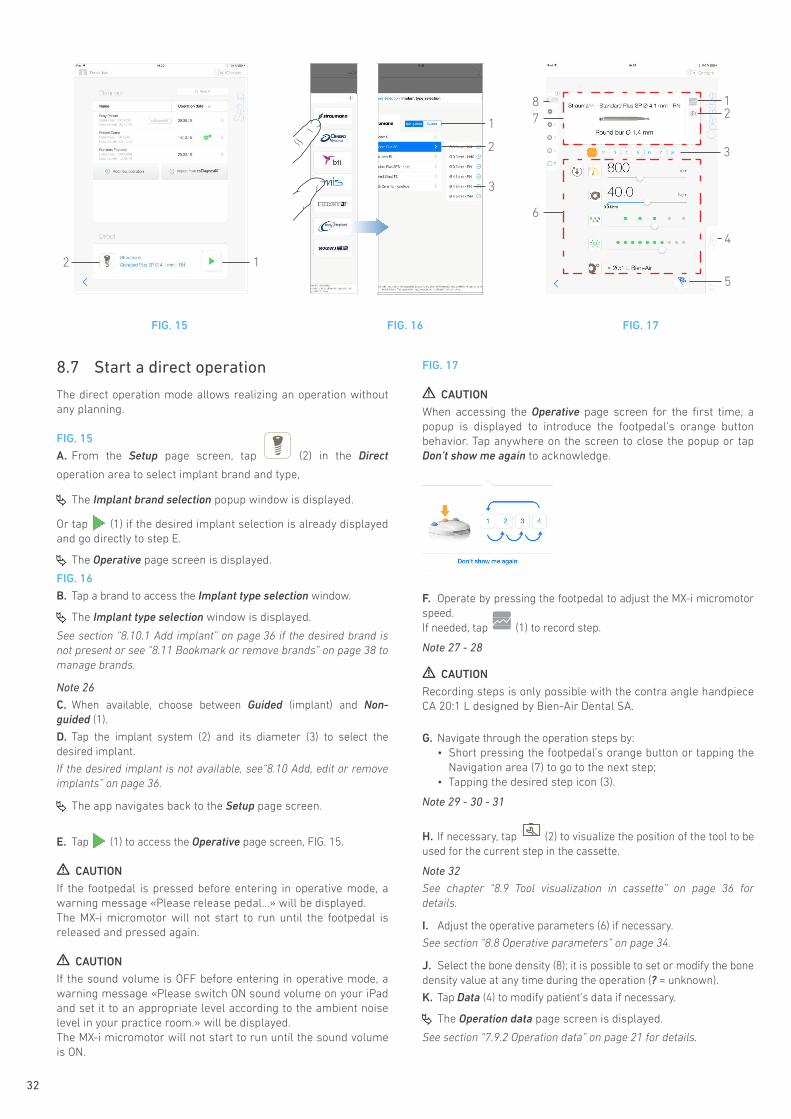
8.7 Start a direct operation
The direct operation mode allows realizing an operation without any planning.
FIG. 15
A. From the Setup page screen, tap (2) in the Direct
operation area to select implant brand and type,
The Implant brand selection popup window is displayed.
Or tap (1) if the desired implant selection is already displayed and go directly to step E.
The Operative page screen is displayed.
FIG. 16
B. Tap a brand to access the Implant type selection window.
The Implant type selection window is displayed.
See section “8.10.1 Add implant” on page 36 if the desired brand is not present or see “8.11 Bookmark or remove brands” on page 38 to manage brands.
Note 26
C. When available, choose between Guided (implant) and Non-guided (1).
D. Tap the implant system (2) and its diameter (3) to select the desired implant.
If the desired implant is not available, see“8.10 Add, edit or remove implants” on page 36.
The app navigates back to the Setup page screen.
E. Tap (1) to access the Operative page screen, FIG. 15.
CAUTION
If the footpedal is pressed before entering in operative mode, a warning message «Please release pedal…» will be displayed. The MX-i micromotor will not start to run until the footpedal is released and pressed again.
CAUTION
If the sound volume is OFF before entering in operative mode, a warning message «Please switch ON sound volume on your iPad and set it to an appropriate level according to the ambient noise level in your practice room.» will be displayed. The MX-i micromotor will not start to run until the sound volume is ON.
FIG. 17
CAUTION
When accessing the Operative page screen for the first time, a popup is displayed to introduce the footpedal’s orange button behavior. Tap anywhere on the screen to close the popup or tap Don’t show me again to acknowledge.
F. Operate by pressing the footpedal to adjust the MX-i micromotor speed. If needed, tap (1) to record step.
Note 27 - 28
CAUTION
Recording steps is only possible with the contra angle handpiece CA 20:1 L designed by Bien-Air Dental SA.
G. Navigate through the operation steps by:• Short pressing the footpedal’s orange button or tapping the
Navigation area (7) to go to the next step;• Tapping the desired step icon (3).
Note 29 - 30 - 31
H. If necessary, tap (2) to visualize the position of the tool to be used for the current step in the cassette.
Note 32
See chapter “8.9 Tool visualization in cassette” on page 36 for details.
I. Adjust the operative parameters (6) if necessary.
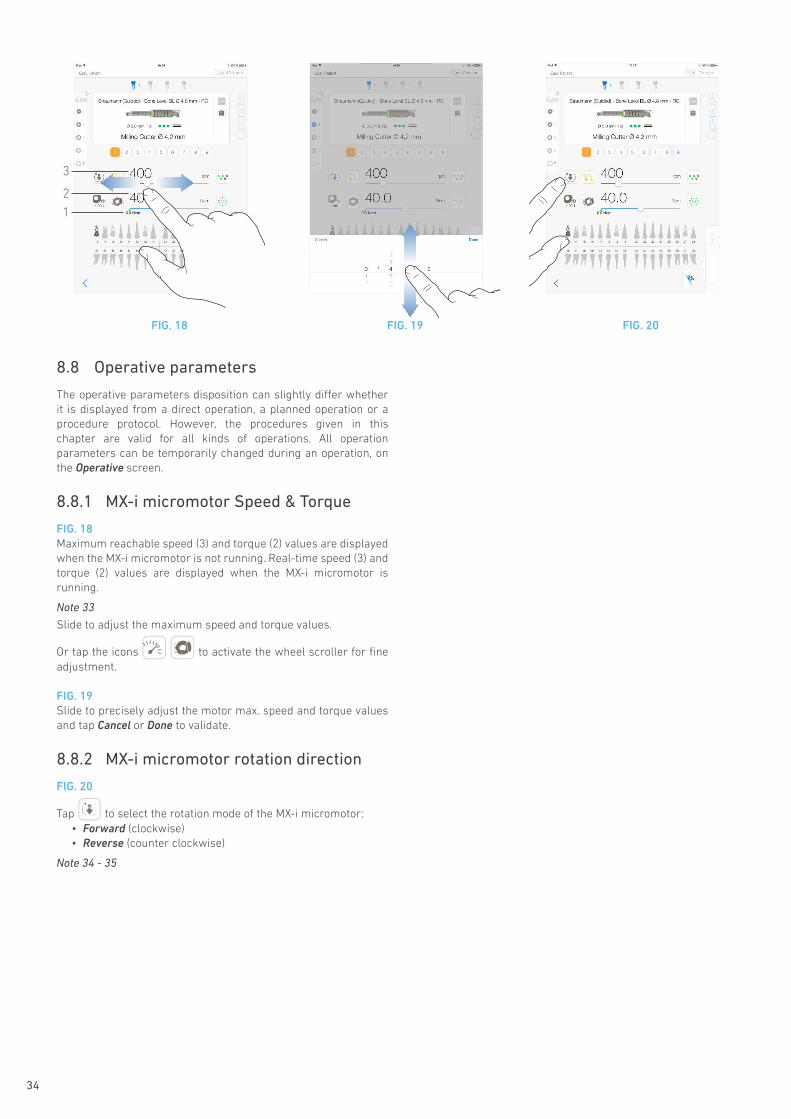
See section “8.8 Operative parameters” on page 34.
J. Select the bone density (8); it is possible to set or modify the bone density value at any time during the operation (? = unknown).
K. Tap Data (4) to modify patient’s data if necessary.
The Operation data page screen is displayed.
See section “7.9.2 Operation data” on page 21 for details.
EN
G
33
NOTES
26 User-defined implants are represented by .
Default implants are represented by .
27 Real-time speed and torque values are displayed when the MX-i micromotor is running.
28 When the power demand of the MX-i micromotor is excessive, the Operative screen displays the overheating symbol . In this case the iChiropro unit lowers the torque automatically in or-der to avoid overheating of the MX-i micromotor. To restore 100% torque, allow the motor to idle or stop for a few seconds.
29 Refer to the corresponding handpiece IFU if a tool change is needed.
30 For safety reasons, the speedometer and the step icon of high speed steps are highlighted in orange. The following popup warn-ing is displayed when switching from low speed to high speed (≥ 100 RPM) drilling:
Tap OK or short press the footpedal’s blue button to acknowledge the popup warning and allow the MX-i micromotor to start.
31 The implant placement step icon is marked with the sym-bol in the upper-right corner.
32 Tool visualization in the cassette is only available for opera-tions using Straumann™ non-guided implants.
L. Tap the Finish button (5) to end the operation.
A message box opens: Finish operation.
M. Tap Finish to confirm the end of operation or Cancel to continue operation.
The Operation data page screen is displayed. Fill the necessary information in and tap Save.
See section “7.9.2 Operation data” on page 21 for details.
34
FIG. 18 FIG. 19 FIG. 20
1
2
3
8.8 Operative parameters
The operative parameters disposition can slightly differ whether it is displayed from a direct operation, a planned operation or a procedure protocol. However, the procedures given in this chapter are valid for all kinds of operations. All operation parameters can be temporarily changed during an operation, on the Operative screen.
8.8.1 MX-i micromotor Speed & Torque
FIG. 18Maximum reachable speed (3) and torque (2) values are displayed when the MX-i micromotor is not running. Real-time speed (3) and torque (2) values are displayed when the MX-i micromotor is running.
Note 33
Slide to adjust the maximum speed and torque values.
Or tap the icons to activate the wheel scroller for fine adjustment.
FIG. 19Slide to precisely adjust the motor max. speed and torque values and tap Cancel or Done to validate.
8.8.2 MX-i micromotor rotation direction
FIG. 20
Tap to select the rotation mode of the MX-i micromotor:• Forward (clockwise)• Reverse (counter clockwise)
Note 34 - 35
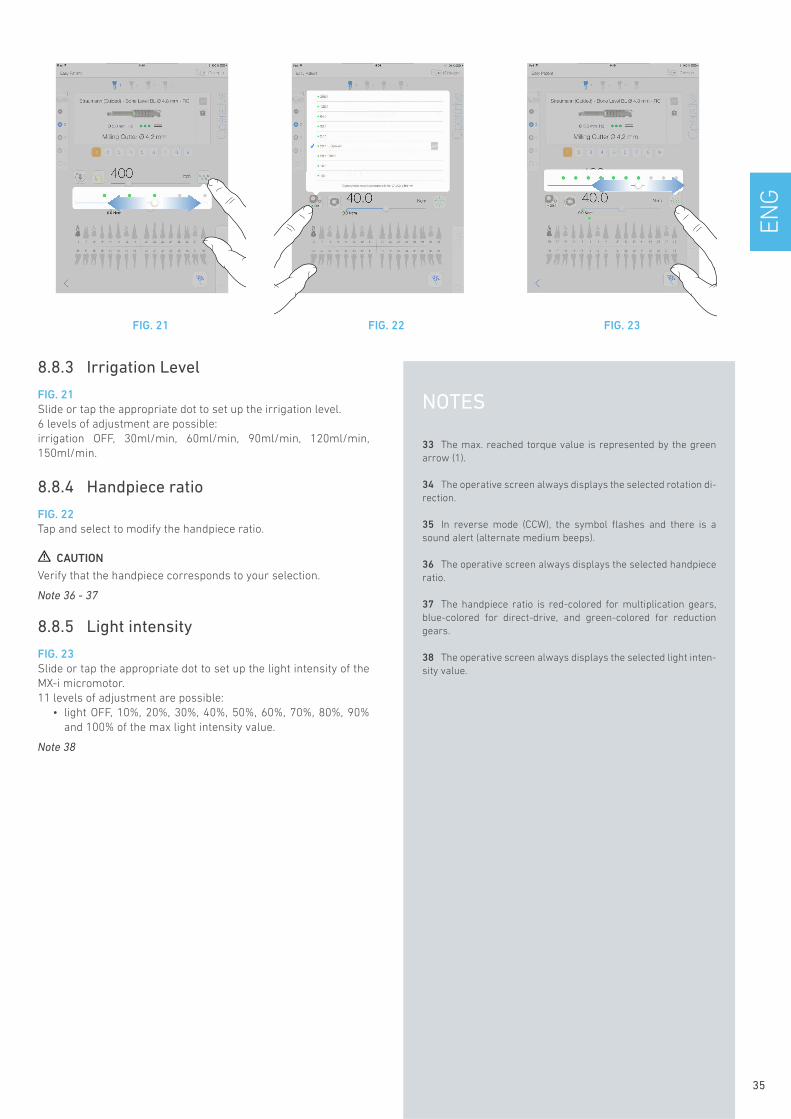
EN
G
FIG. 21 FIG. 22 FIG. 23
8.8.3 Irrigation Level
FIG. 21Slide or tap the appropriate dot to set up the irrigation level. 6 levels of adjustment are possible:irrigation OFF, 30ml/min, 60ml/min, 90ml/min, 120ml/min, 150ml/min.
8.8.4 Handpiece ratio
FIG. 22Tap and select to modify the handpiece ratio.
CAUTION
Verify that the handpiece corresponds to your selection.
Note 36 - 37
8.8.5 Light intensity
FIG. 23Slide or tap the appropriate dot to set up the light intensity of the MX-i micromotor. 11 levels of adjustment are possible:
• light OFF, 10%, 20%, 30%, 40%, 50%, 60%, 70%, 80%, 90% and 100% of the max light intensity value.
Note 38
35
NOTES
33 The max. reached torque value is represented by the green arrow (1).
34 The operative screen always displays the selected rotation di-rection.
35 In reverse mode (CCW), the symbol flashes and there is a sound alert (alternate medium beeps).
36 The operative screen always displays the selected handpiece ratio.
37 The handpiece ratio is red-colored for multiplication gears, blue-colored for direct-drive, and green-colored for reductiongears.
38 The operative screen always displays the selected light inten-sity value.

36
FIG. 24 FIG. 25 FIG. 26
3
4
5 1
2
1
2
8.9 Tool visualization in cassette
FIG. 24
From the Operative screen, tap to visualize the position of the tool to be used for the current step in the cassette.
The tool visualization page screen is displayed.
FIG. 25This page allows to locate the needed tool in the cassette:
(1) Complete / Basic switch
Note 39
(2) Current step tool to be used(3) Tools identification table(4) Cassette picture(5) Close button
A. Find the current step tool number (2) in the tools identification table (3). If necessary, swipe down or up to access the tool in the tools identification table (3).
B. Locate the current step tool number in the cassette picture (4).
C. Tap Close to go back to the Operative page screen.
The Operative page screen is displayed.
8.10 Add, edit or remove implants
8.10.1 Add implant
FIG. 26
A. From the Implant type selection popup window tap (2) to
create a copy of a factory implant, or tap (1) to create an implant
named after an existing Implant Brand, with operation parameters
assigned by default.
Note 40
It is also possible to add a new brand by tapping in the Implant brand selection popup window.
The Drill protocol page screen is displayed. If creating an implant as a copy of a factory implant or named after an existing Implant Brand, go directly to step E.
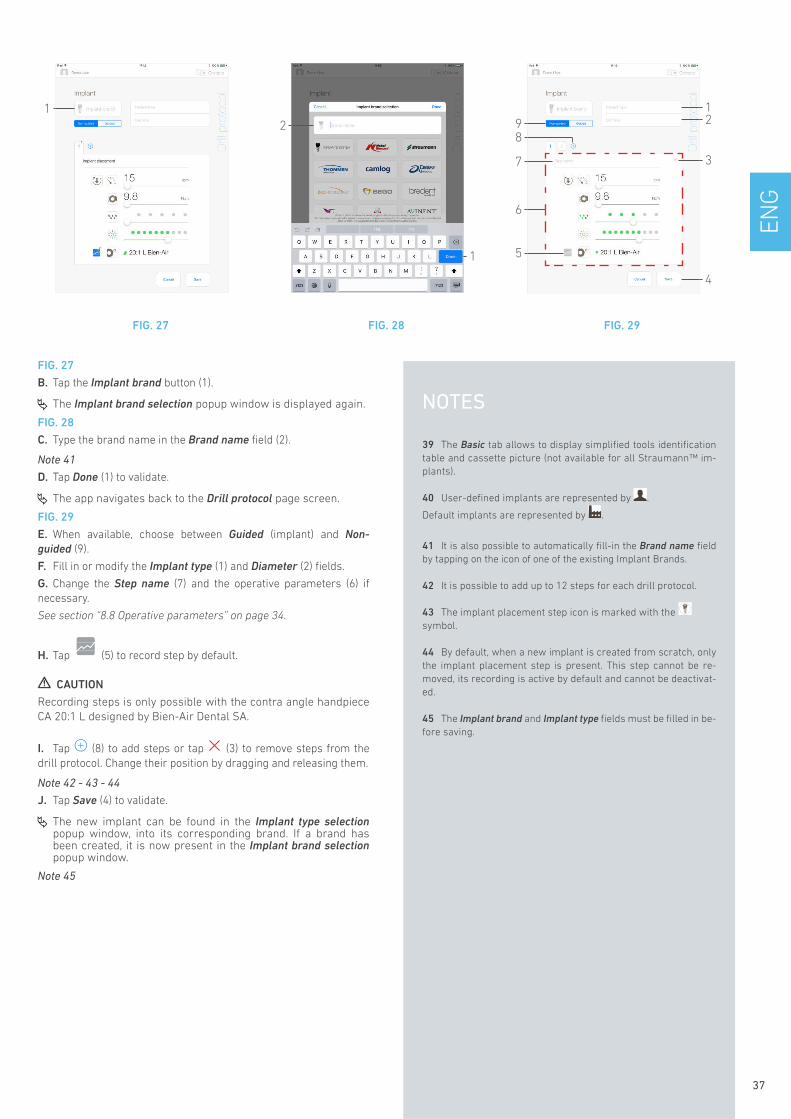
EN
G
FIG. 27 FIG. 28 FIG. 29
1
2
1
8
12
3
4
5
6
7
9
FIG. 27
B. Tap the Implant brand button (1).
The Implant brand selection popup window is displayed again.
FIG. 28
C. Type the brand name in the Brand name field (2).
Note 41
D. Tap Done (1) to validate.
The app navigates back to the Drill protocol page screen.
FIG. 29
E. When available, choose between Guided (implant) and Non-guided (9).
F. Fill in or modify the Implant type (1) and Diameter (2) fields.
G. Change the Step name (7) and the operative parameters (6) if necessary.
See section “8.8 Operative parameters” on page 34.
H. Tap (5) to record step by default.
CAUTION
Recording steps is only possible with the contra angle handpiece CA 20:1 L designed by Bien-Air Dental SA.
I. Tap (8) to add steps or tap (3) to remove steps from the drill protocol. Change their position by dragging and releasing them.
Note 42 - 43 - 44
J. Tap Save (4) to validate.
The new implant can be found in the Implant type selectionpopup window, into its corresponding brand. If a brand has been created, it is now present in the Implant brand selectionpopup window.
Note 45
37
NOTES
39 The Basic tab allows to display simplified tools identification table and cassette picture (not available for all Straumann™ im-plants).
40 User-defined implants are represented by . Default implants are represented by .
41 It is also possible to automatically fill-in the Brand name field by tapping on the icon of one of the existing Implant Brands.
42 It is possible to add up to 12 steps for each drill protocol.
43 The implant placement step icon is marked with the symbol.
44 By default, when a new implant is created from scratch, only the implant placement step is present. This step cannot be re-moved, its recording is active by default and cannot be deactivat-ed.
45 The Implant brand and Implant type fields must be filled in be-fore saving.

38
FIG. 30 FIG. 31
1
6
5
123
4
8.10.2 Edit (user-defined) implant
FIG. 30
A. From the Implant type selection popup window, tap (1) on the user-defined implant to be modified.
The Drill protocol page screen is displayed.
B. Change the desired operative parameters.
See section “8.8 Operative parameters” on page 34.
C. Tap Save to validate or Cancel to discard changes.
8.10.3 Remove (user-defined) implant
Swipe left to remove the desired user-defined implant:
8.11 Bookmark or remove brands
FIG. 31
A. From the Implant brand selection popup window, long tap on a brand in the ALL tab (1) to activate the bookmark or remove brands function.
Note 46
The brands icons are greyed out when the bookmark or remove brands function is activated.
B. Tap (5) to bookmark a brand or tap (4) to remove a brand.
Note 47
C. Tap Done (3) to validate or Cancel (6) to discard changes.
Bookmarked brands are displayed in the favorite brands tab (1). To unbookmark brands, apply reverse procedure (possible on both ALL and favorite brands tab).
EN
G
39
NOTES
46 When displaying the Implant brand selection popup window for the first time, the favorite brands tab (2) is selected. In this case, a tutorial explaining how to bookmark brands is displayed.
47 The brands present by default in the app (factory ones) cannot be removed.
40
FIG. 1 FIG. 2 FIG. 3
5
4
3
1
2
12
4
3
567
9 Operation - Surgery mode
9.1 Enter surgery mode
FIG. 1
Tap to enter the surgery mode.
Note 1
The surgery mode allows to perform operations which do not include implants placement.
The Setup page screen is displayed.
9.2 Setup screen description
FIG. 2The Setup screen allows to plan an operation, start a planned operation or start a direct operation:
(1) Search field (to find specific information in the planned operations list)
(2) Plan a new operation (see “9.3 Plan an operation” on page 40)
(3) Back to the previous screen(4) Direct operation area(5) Planned operations area
Note 2
9.3 Plan an operation
A. From the Setup screen, tap to add a new operation.
The Operation setup page screen is displayed.
FIG. 3
B. Tap (6) to access the patients list.
The Patients list popup is displayed.
FIG. 4
C. Tap on the desired patient line to select the patient.
See section “7.8.1 Add or edit patient” on page 18 if the desired patient is not present or to modify patient’s data.
The following patient information fields are automatically filled in, FIG. 3:
• First and last names* (7);• Date of birth (1);• Patient Number (5).
D. Tap the following operation fields to fill them in:• Operation date* (2);• Bone density (from 1 to 4, or unknown) (3).
Note 3
E. Tap (4) to choose the procedure.
The Procedure popup window is displayed.
FIG. 5
Note 4
F. Tap the desired procedure or tap Close (1) to go back.
The app navigates back to the Operation setup page screen.
See “9.8.1 Add procedure” on page 48 to create an user-defined procedure.
EN
G
FIG. 6
G. In the jaw representation, tap the desired tooth emplacement to affect the procedure to it.
The tooth is highlighted in blue (4).
H. Tap (5) to add other procedures to the operation, or tap (1) to remove procedures from the operation.
Note 5 - 6
I. Tap or slide Notes (3) to write comments in relation to the operation.
J. Tap Save (2) to go back to the Setup page screen.
The operation appears on the planned operations list.
Note 7
See section “9.5 Start or resume an operation” on page 42 to launch a planned operation.
FIG. 4 FIG. 5 FIG. 6
1
4
3
1
2
5
41
NOTES
1 In the USA and Canada, the surgery mode is available only on the iChiropro Surgery unit (REF 1600883-001).
2 Patients’ names and operation’s dates can be sorted by tap-ping on their respective columns titles (6).
3 Fields marked with an asterisk must be filled in before saving.
4 User-defined procedures are represented by .
Default procedures are represented by .
5 It is possible to add up to 8 procedures per operation. Each procedure is numbered in the jaw representation accordingly to the operation order.
6 Long tap on procedure icons and move them to reorganize or-der.
7 In case mandatory fields are empty, saving is not possible un-til these fields are filled in. Empty mandatory fields blink on the screen.
42
FIG. 7 FIG. 8 FIG. 9
1
9.4 Remove an operation
FIG. 7
A. From the Setup page screen, swipe left and tap Delete to remove the desired operation:
A message box opens: Delete operation.
B. Tap Cancel or Delete to acknowledge.
9.5 Start or resume an operation
FIG. 8
A. From the Setup page screen, in the Planned operations area, tap
the operation that needs to be started or tap an operation marked
with the symbol to resume it and go directly to step C.
The Operation setup page screen (start operation) or the Operative page screen (resume operation) is displayed.
FIG. 9
B. Check if the operation’s information is correct and tap (1) to access the Operative page screen.
Note 8
CAUTION
If the footpedal is pressed before entering in operative mode, a warning message «Please release pedal…» will be displayed. The MX-i micromotor will not start to run until the footpedal is released and pressed again.
CAUTION
If the sound volume is OFF before entering in operative mode, a warning message «Please switch ON sound volume on your iPad and set it to an appropriate level according to the ambient noise level in your practice room.» will be displayed.The MX-i micromotor will not start to run until the sound volume is ON.
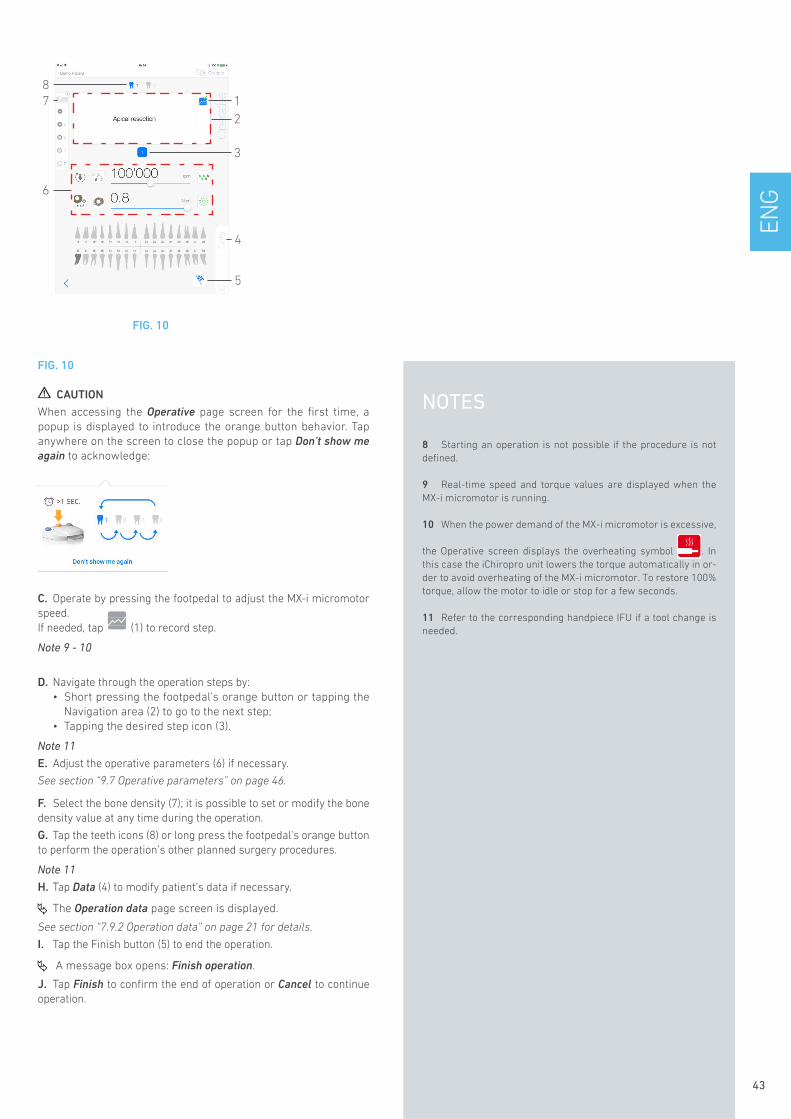
EN
G
FIG. 10
CAUTION
When accessing the Operative page screen for the first time, a popup is displayed to introduce the orange button behavior. Tap anywhere on the screen to close the popup or tap Don’t show me again to acknowledge:
C. Operate by pressing the footpedal to adjust the MX-i micromotor speed. If needed, tap (1) to record step.
Note 9 - 10
D. Navigate through the operation steps by:• Short pressing the footpedal’s orange button or tapping the
Navigation area (2) to go to the next step;• Tapping the desired step icon (3).
Note 11
E. Adjust the operative parameters (6) if necessary.
See section “9.7 Operative parameters” on page 46.
F. Select the bone density (7); it is possible to set or modify the bone density value at any time during the operation.
G. Tap the teeth icons (8) or long press the footpedal’s orange button to perform the operation’s other planned surgery procedures.
Note 11
H. Tap Data (4) to modify patient’s data if necessary.
The Operation data page screen is displayed.
See section “7.9.2 Operation data” on page 21 for details.
I. Tap the Finish button (5) to end the operation.
A message box opens: Finish operation.
J. Tap Finish to confirm the end of operation or Cancel to continue operation.
43
NOTES
8 Starting an operation is not possible if the procedure is not defined.
9 Real-time speed and torque values are displayed when the MX-i micromotor is running.
10 When the power demand of the MX-i micromotor is excessive, the Operative screen displays the overheating symbol . In this case the iChiropro unit lowers the torque automatically in or-der to avoid overheating of the MX-i micromotor. To restore 100% torque, allow the motor to idle or stop for a few seconds.
11 Refer to the corresponding handpiece IFU if a tool change is needed.
FIG. 10
2
3
6
7
4
1
8
5

44
9.6 Start a direct operation
The direct operation mode allows realizing an operation without any planning.
FIG. 11
A. From the Setup page screen, tap (2) in the Direct
operation area to select surgery procedure. The Procedure popup
window is displayed.
Note 12
Or tap (1) if the desired operation is already displayed and go directly to step E.
The Operative page screen is displayed.
FIG. 12
B. Tap the desired procedure or tap Close (1) to go back.
The app navigates back to the Setup page screen.
See chapter “9.8.1 Add procedure” on page 48 to create an user-defined procedure.
C. Tap (1) to access the Operative page screen, FIG. 11.
CAUTION
If the footpedal is pressed before entering in operative mode, a warning message «Please release pedal…» will be displayed.The MX-i micromotor will not start to run until the footpedal is released and pressed again.
CAUTION
If the sound volume is OFF before entering in operative mode, a warning message «Please switch ON sound volume on your iPad and set it to an appropriate level according to the ambient noise level in your practice room.» will be displayed.The MX-i micromotor will not start to run until the sound volume is ON.
FIG. 13
CAUTION
When accessing the Operative page screen for the first time, a popup is displayed to introduce the orange button behavior. Tap anywhere on the screen to close the popup or tap Don’t show me again to acknowledge:
D. Operate by pressing the footpedal to adjust the MX-i micromotor speed. If needed, tap (1) to record step.
Note 13 - 14
E. Navigate through the operation steps by:• Short pressing the footpedal’s orange button or tapping the
Navigation area (2) to go to the next step;• Tapping the desired step icon (3).
Note 15
F. Adjust the operative parameters (6) if necessary.
See section “9.7 Operative parameters” on page 46.
G. Select the bone density (7); it is possible to set or modify the bone density value at any time during the operation.
H. Tap Data (4) to modify patient’s data if necessary.
The Operation data page screen is displayed.
See section “7.9.2 Operation data” on page 21 for details.
I. Tap the Finish button (5) to end the operation.
A message box opens: Finish operation.
J. Tap Finish to confirm the end of operation or Cancel to continue the operation.
The Operation data page screen is displayed. Fill the necessary information in and tap Save.
See section “7.9.2 Operation data” on page 21 for details.
FIG. 11 FIG. 12 FIG. 13
2 1
12
3
6
7
4
1
5
EN
G
45
NOTES
12 User-defined procedures are represented by .
Default procedures are represented by .
13 Real-time speed and torque values are displayed when the MX-i micromotor is running.
14 When the power demand of the MX-i micromotor is excessive, the Operative screen displays the overheating symbol . In this case the iChiropro unit lowers the torque automatically in or-der to avoid overheating of the MX-i micromotor. To restore 100% torque, allow the motor to idle or stop for a few seconds.
15 Refer to the corresponding handpiece IFU if a tool change is needed.

46
FIG. 14 FIG. 15 FIG. 16
1
2
9.7 Operative parameters
The operative parameters disposition can slightly differ whether it is displayed from a direct operation, a planned operation or a procedure protocol. However, the procedures given in this chapter are valid for all kinds of operations. All operation parameters can be temporarily changed during an operation, on the Operative screen.
9.7.1 MX-i micromotor Speed & Torque
FIG. 14Maximum reachable speed (2) and torque (1) values are displayed when the MX-i micromotor is not running. Real-time speed (2) and torque (1) values are displayed when the MX-i micromotor is running.Slide to adjust the maximum speed and torque values.
Or tap the icons to activate the wheel scroller for fine adjustment.
FIG. 15Slide to precisely adjust the motor max. speed and torque values and tap Cancel or Done to validate.
9.7.2 MX-i micromotor rotation direction
FIG. 16
Tap to select the rotation mode of the MX-i micromotor:• Forward (clockwise)• Reverse (counter clockwise)
Note 16 - 17
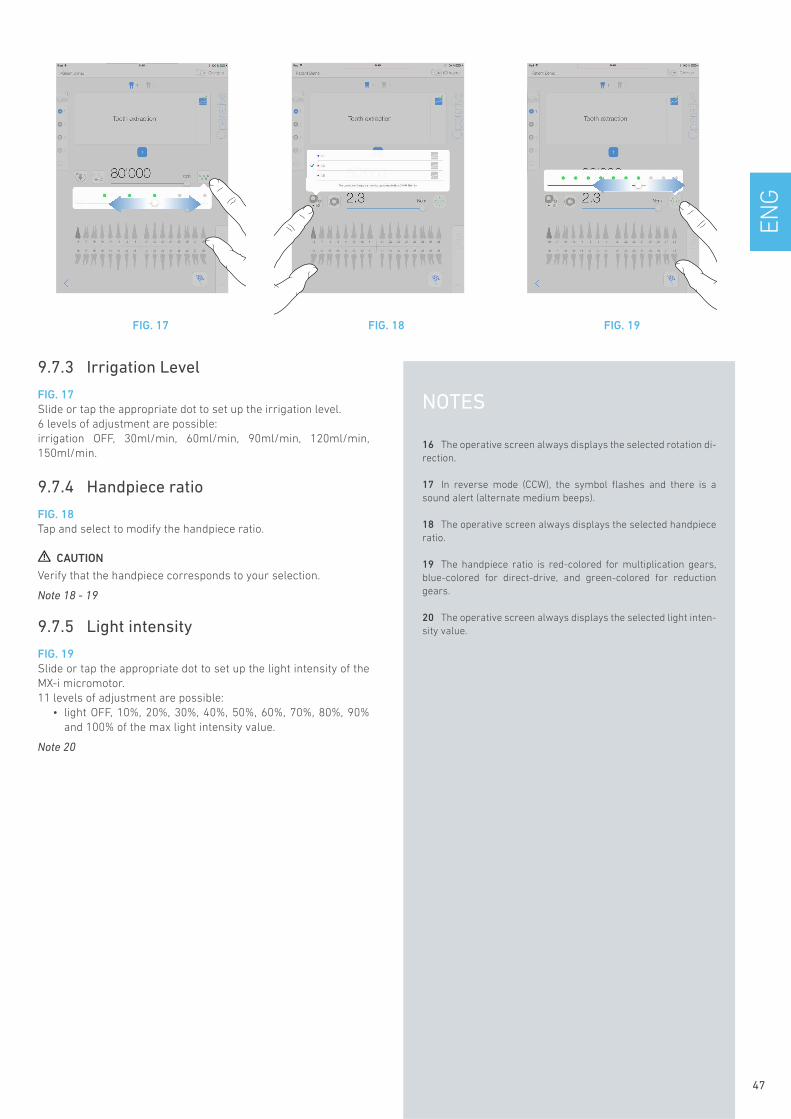
EN
G
9.7.3 Irrigation Level
FIG. 17Slide or tap the appropriate dot to set up the irrigation level. 6 levels of adjustment are possible:irrigation OFF, 30ml/min, 60ml/min, 90ml/min, 120ml/min, 150ml/min.
9.7.4 Handpiece ratio
FIG. 18Tap and select to modify the handpiece ratio.
CAUTION
Verify that the handpiece corresponds to your selection.
Note 18 - 19
9.7.5 Light intensity
FIG. 19Slide or tap the appropriate dot to set up the light intensity of the MX-i micromotor. 11 levels of adjustment are possible:
• light OFF, 10%, 20%, 30%, 40%, 50%, 60%, 70%, 80%, 90% and 100% of the max light intensity value.
Note 20
FIG. 17 FIG. 18 FIG. 19
47
NOTES
16 The operative screen always displays the selected rotation di-rection.
17 In reverse mode (CCW), the symbol flashes and there is a sound alert (alternate medium beeps).
18 The operative screen always displays the selected handpiece ratio.
19 The handpiece ratio is red-colored for multiplication gears, blue-colored for direct-drive, and green-colored for reduction gears.
20 The operative screen always displays the selected light inten-sity value.
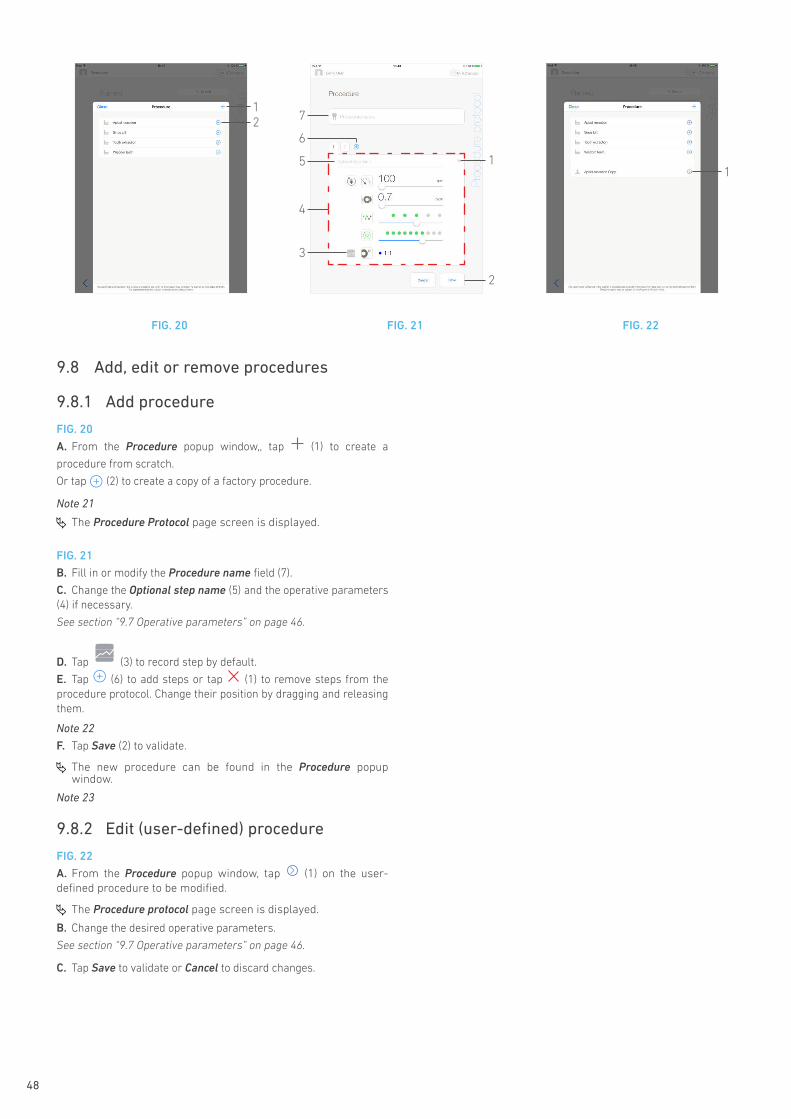
48
FIG. 20 FIG. 21 FIG. 22
2
1
2
3
4
5
6
7
11
9.8 Add, edit or remove procedures
9.8.1 Add procedure
FIG. 20
A. From the Procedure popup window,, tap (1) to create a
procedure from scratch. Or tap (2) to create a copy of a factory procedure.
Note 21
The Procedure Protocol page screen is displayed.
FIG. 21
B. Fill in or modify the Procedure name field (7).
C. Change the Optional step name (5) and the operative parameters (4) if necessary.
See section “9.7 Operative parameters” on page 46.
D. Tap (3) to record step by default.
E. Tap (6) to add steps or tap (1) to remove steps from the procedure protocol. Change their position by dragging and releasing them.
Note 22
F. Tap Save (2) to validate.
The new procedure can be found in the Procedure popup window.
Note 23
9.8.2 Edit (user-defined) procedure
FIG. 22
A. From the Procedure popup window, tap (1) on the user-defined procedure to be modified.
The Procedure protocol page screen is displayed.
B. Change the desired operative parameters.
See section “9.7 Operative parameters” on page 46.
C. Tap Save to validate or Cancel to discard changes.
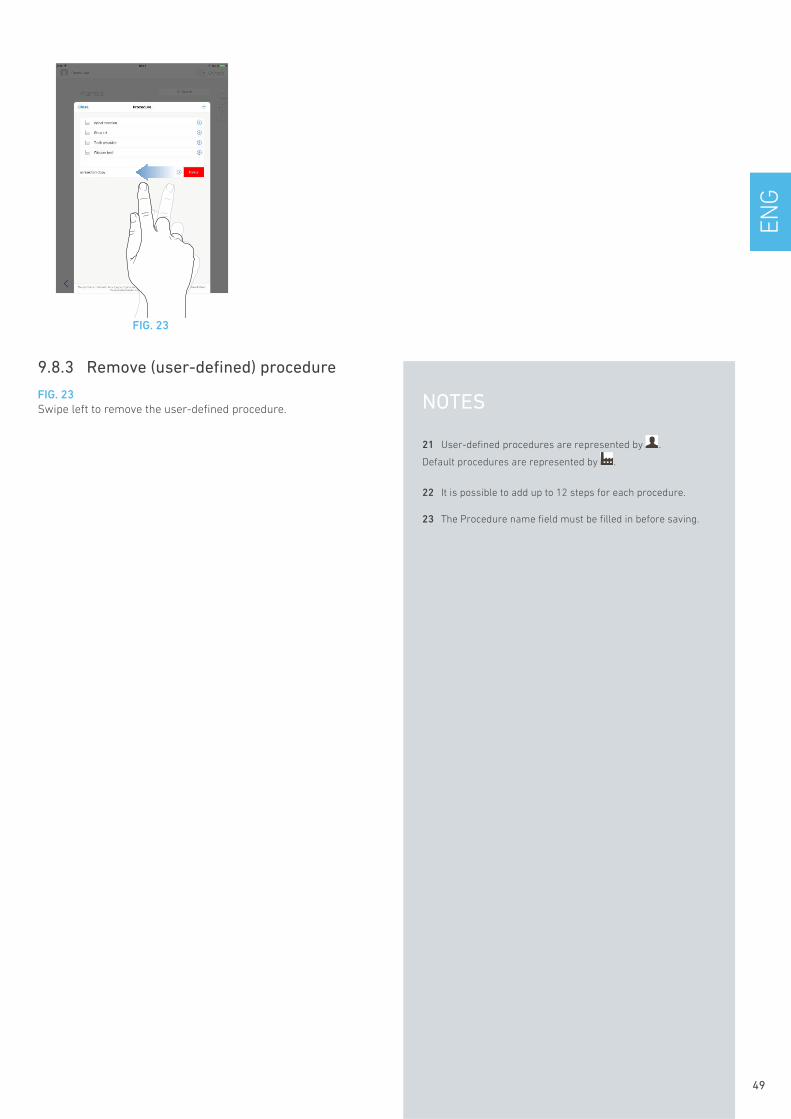
EN
G
FIG. 23
9.8.3 Remove (user-defined) procedure
FIG. 23Swipe left to remove the user-defined procedure.
49
NOTES
21 User-defined procedures are represented by .
Default procedures are represented by .
22 It is possible to add up to 12 steps for each procedure.
23 The Procedure name field must be filled in before saving.

50
10 List of errors & Troubleshooting
10.1 Safety warning (operating)Warning description Message Cause of warning Action
Footpedal to be released Please release pedal …
Pedal is pressed when accessing operative page.Pedal remains pressed when acknowledging any system notification.Motor is jammed for more than 2 seconds.
Release footpedal and press it again.
Motor torque limitation activeMotor drive limits delivered torque to prevent motor over-heating.
Avoid extended use. Let system cool down.
Low to high speed drilling transition
User switches from low speed to high speed (≥ 100 RPM) drill-ing during implant procedure.
Confirm transition and acknowledge message.
iPad speaker OFF
Please switch ON sound vol-ume on your iPad and set it to an appropriate level accord-ing to the ambient noise level in your practice room.
iPad speaker was switched OFF, or sound volume was disabled by user. It is necessary to have iPad speaker turned ON so that sys-tem sound notifications and alarms may be heard distinctly.
Turn iPad speaker ON and set sound volume to an appropriate level.
Non-verified iOS version in use
iOS version installed on the iPad has not been verified according to Bien-Air validation protocols. Therefore it is NOT recommended to use the sys-tem with this configuration.
Do NOT update iPad with new iOS versions unless Bien-Air recommends to do so.If the iPad has been updated with a new iOS ver-sion despite everything, do not use the system until Bien-Air has verified and approved the new iOS version.
User Manual has been updated
User Manual has been updated, and may be con-sulted in the Information page.
An update of the User Manual is available on Bien-Air web-site, and has been automati-cally downloaded on the iPad.
It is highly recommended to consult the updated User Manual before using the system.
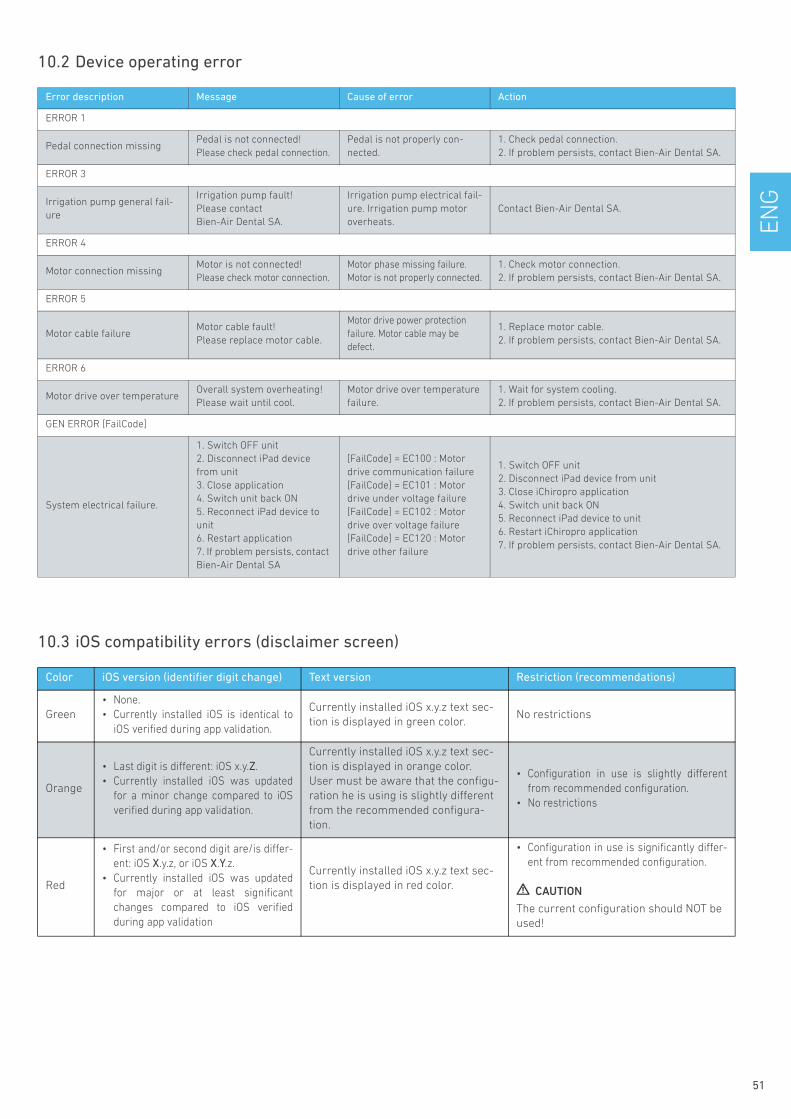
EN
G
10.2 Device operating error
10.3 iOS compatibility errors (disclaimer screen)
Error description Message Cause of error Action
ERROR 1
Pedal connection missingPedal is not connected!Please check pedal connection.
Pedal is not properly con-nected.
1. Check pedal connection.2. If problem persists, contact Bien-Air Dental SA.
ERROR 3
Irrigation pump general fail-ure
Irrigation pump fault!Please contact Bien-Air Dental SA.
Irrigation pump electrical fail-ure. Irrigation pump motor overheats.
Contact Bien-Air Dental SA.
ERROR 4
Motor connection missingMotor is not connected!Please check motor connection.
Motor phase missing failure. Motor is not properly connected.
1. Check motor connection.2. If problem persists, contact Bien-Air Dental SA.
ERROR 5
Motor cable failureMotor cable fault!Please replace motor cable.
Motor drive power protection failure. Motor cable may be defect.
1. Replace motor cable.2. If problem persists, contact Bien-Air Dental SA.
ERROR 6
Motor drive over temperatureOverall system overheating!Please wait until cool.
Motor drive over temperature failure.
1. Wait for system cooling.2. If problem persists, contact Bien-Air Dental SA.
GEN ERROR [FailCode]
System electrical failure.
1. Switch OFF unit2. Disconnect iPad device from unit3. Close application4. Switch unit back ON5. Reconnect iPad device to unit6. Restart application7. If problem persists, contact Bien-Air Dental SA
[FailCode] = EC100 : Motor drive communication failure[FailCode] = EC101 : Motor drive under voltage failure[FailCode] = EC102 : Motor drive over voltage failure[FailCode] = EC120 : Motor drive other failure
1. Switch OFF unit2. Disconnect iPad device from unit3. Close iChiropro application4. Switch unit back ON5. Reconnect iPad device to unit6. Restart iChiropro application7. If problem persists, contact Bien-Air Dental SA.
Color iOS version (identifier digit change) Text version Restriction (recommendations)
Green• None. • Currently installed iOS is identical to
iOS verified during app validation.
Currently installed iOS x.y.z text sec-tion is displayed in green color.
No restrictions
Orange
• Last digit is different: iOS x.y.Z. • Currently installed iOS was updated
for a minor change compared to iOS verified during app validation.
Currently installed iOS x.y.z text sec-tion is displayed in orange color. User must be aware that the configu-ration he is using is slightly different from the recommended configura-tion.
• Configuration in use is slightly different from recommended configuration.
• No restrictions
Red
• First and/or second digit are/is differ-ent: iOS X.y.z, or iOS X.Y.z.
• Currently installed iOS was updated for major or at least significant changes compared to iOS verified during app validation
Currently installed iOS x.y.z text sec-tion is displayed in red color.
• Configuration in use is significantly differ-ent from recommended configuration.
CAUTION
The current configuration should NOT be used!
51
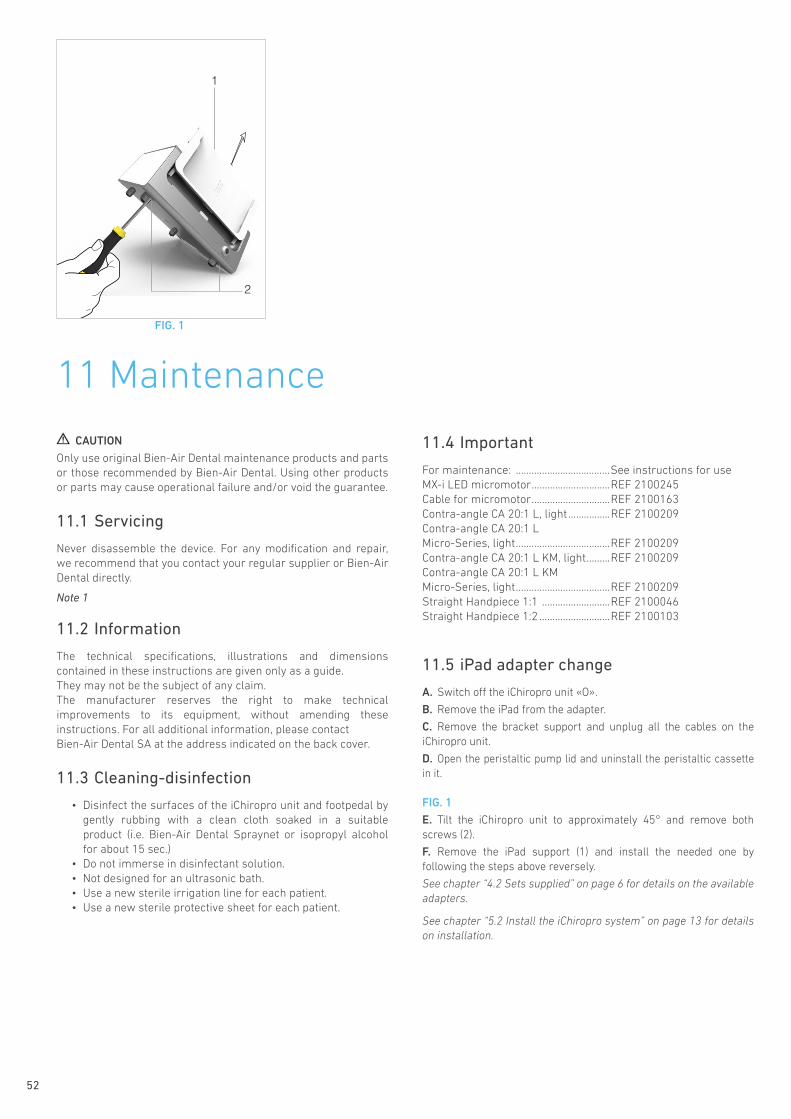
52
FIG. 1
1
2
11 Maintenance
CAUTION
Only use original Bien-Air Dental maintenance products and parts or those recommended by Bien-Air Dental. Using other products or parts may cause operational failure and/or void the guarantee.
11.1 Servicing
Never disassemble the device. For any modification and repair, we recommend that you contact your regular supplier or Bien-Air Dental directly.
Note 1
11.2 Information
The technical specifications, illustrations and dimensions contained in these instructions are given only as a guide.They may not be the subject of any claim.The manufacturer reserves the right to make technical improvements to its equipment, without amending these instructions. For all additional information, please contactBien-Air Dental SA at the address indicated on the back cover.
11.3 Cleaning-disinfection
• Disinfect the surfaces of the iChiropro unit and footpedal by gently rubbing with a clean cloth soaked in a suitable product (i.e. Bien-Air Dental Spraynet or isopropyl alcohol for about 15 sec.)
• Do not immerse in disinfectant solution.• Not designed for an ultrasonic bath.• Use a new sterile irrigation line for each patient.• Use a new sterile protective sheet for each patient.
11.4 Important
For maintenance: ....................................See instructions for useMX-i LED micromotor..............................REF 2100245Cable for micromotor..............................REF 2100163Contra-angle CA 20:1 L, light................REF 2100209Contra-angle CA 20:1 L Micro-Series, light....................................REF 2100209Contra-angle CA 20:1 L KM, light.........REF 2100209Contra-angle CA 20:1 L KM Micro-Series, light....................................REF 2100209Straight Handpiece 1:1 ..........................REF 2100046Straight Handpiece 1:2 ...........................REF 2100103
11.5 iPad adapter change
A. Switch off the iChiropro unit «O».
B. Remove the iPad from the adapter.
C. Remove the bracket support and unplug all the cables on the iChiropro unit.
D. Open the peristaltic pump lid and uninstall the peristaltic cassette in it.
FIG. 1
E. Tilt the iChiropro unit to approximately 45° and remove both screws (2).
F. Remove the iPad support (1) and install the needed one by following the steps above reversely.
See chapter “4.2 Sets supplied” on page 6 for details on the available adapters.
See chapter “5.2 Install the iChiropro system” on page 13 for details on installation.
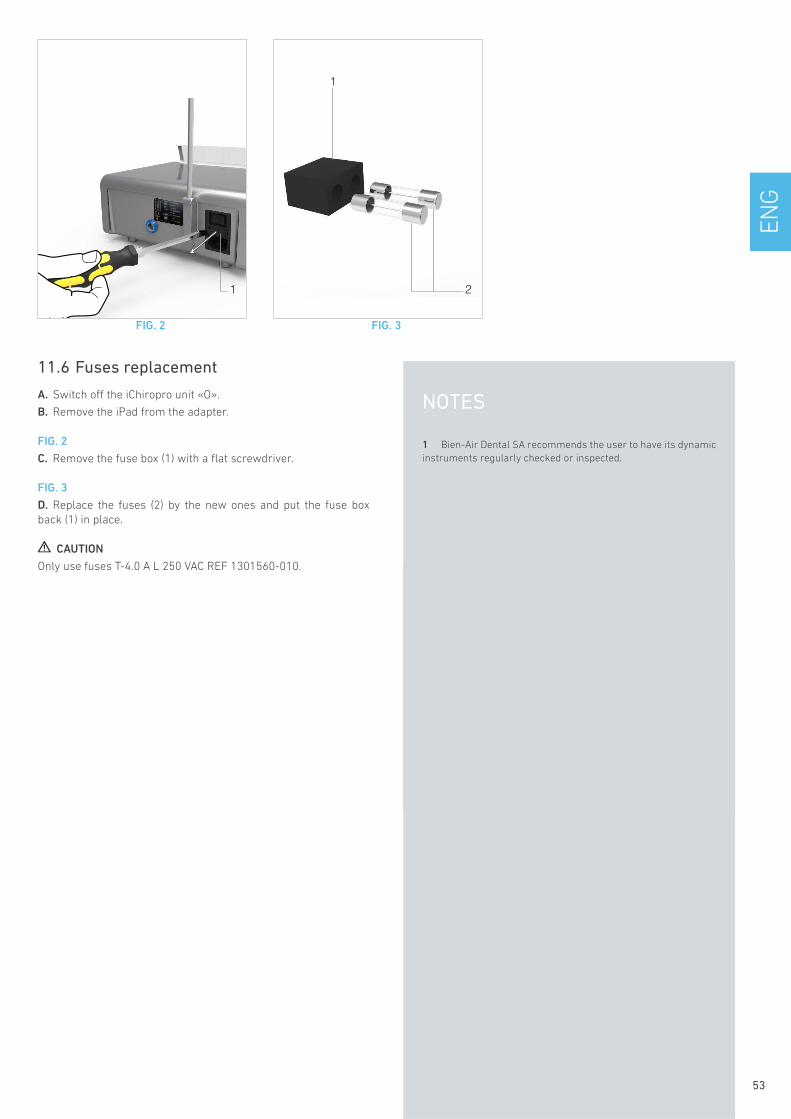
EN
G
NOTES
1 Bien-Air Dental SA recommends the user to have its dynamic instruments regularly checked or inspected.
11.6 Fuses replacement
A. Switch off the iChiropro unit «O».
B. Remove the iPad from the adapter.
FIG. 2
C. Remove the fuse box (1) with a flat screwdriver.
FIG. 3
D. Replace the fuses (2) by the new ones and put the fuse box back (1) in place.
CAUTION
Only use fuses T-4.0 A L 250 VAC REF 1301560-010.
FIG. 2 FIG. 3
1 2
1
53

54
12 General information and guarantee12.1 General information
The device must be used by qualified professionals in compliance with the current legal provisions concerning occupational safety, health and accident prevention measures, and these instructions for use. In accordance with such requirements, the operators:
• must only use devices that are in perfect working order; in the event of irregular functioning, excessive vibration, abnormal heating or other signs that may indicate malfunction of the device, the work must be stopped immediately; in this case, contact a repair center that is approved by Bien-Air Dental SA;
• must ensure that the device is used only for the purpose for which it is intended, must protect themselves, their patients and third parties from any danger.
12.2 Terms of guarantee
Bien-Air Dental SA grants the user a guarantee covering all functional defects, material or production faults.
The device is covered by this guarantee from the date of invoicing for:
• 12 months for the hose;• 24 months for the iChiropro unit and CA 20:1 L Micro-Series;• 36 months for the MX-i micromotor.
In case of justified claim, Bien-Air Dental SA or its authorized representative will fulfill the company’s obligations under this guarantee by repairing or replacing the product free of charge.Any other claims, of whatever nature, in particular in the form of a claim for damages and interest, are excluded.
Bien-Air Dental SA shall not be held responsible for damage or injury and the consequences thereof, resulting from:
• excessive wear and tear• improper use• non-observance of the instructions for installation,
operation and maintenance• unusual chemical, electrical or electrolytic influences• poor connections, whether of the air, water or electricity
supply.
The guarantee does not cover flexible “fiber optic” type light conductors, or any parts made of synthetic materials.The guarantee shall become null and void if the damage and its consequences are due to improper manipulation of the product, or modifications to the product carried out by persons not authorized by Bien-Air Dental SA.
Claims under the terms of the guarantee will be considered only on presentation, together with the product, of the invoice or the consignment note, on which the date of purchase, the product reference and the serial no. should be clearly indicated.
Please refer to the General Terms and Conditions of Sale on www.bienair.com.

EN
G
NOTES................................................................................................................................................................................................................................................................................................................................................................................................................................................................................................................................................................................................................................................................................................................................................................................................................................................................................................................................................................................................................................................................................................................................................................................................................................................................................................................................................................................................................................................................................................................................................................................................................................................................................................................................................................................................................................................................................................................................................................................................................................................................................................................................................................................................................................................................................................................................................................................................................................................................................................................................................................................................................................................................................................................................................................................................................................................................................................................................................................................................................................................................................................................................................................................................................................................................................................................................................................................................................................................................................................................................................................................................................................................................................................................................................................................................................................................................................................................................................................................................................................................................................................................................................................................................................................................................................................................................................................................................................................................................................................................................................................................................................................................................................................................................................................................................................................................................................................ ................................................................................................................ ................................................................................................................ ................................................................................................................ ................................................................................................................ ................................................................................................................ ................................................................................................................ ................................................................................................................ ................................................................................................................ ................................................................................................................ ................................................................................................................ ................................................................................................................ ................................................................................................................ ................................................................................................................ ................................................................................................................ ................................................................................................................ ................................................................................................................ ................................................................................................................ ................................................................................................................
NOTES................................................................................................................................................................................................................................................................................................................................................................................................................................................................................................................................................................................................................................................................................................................................................................................................................................................................................................................................................................................................................................................................................................................................................................................................................................................................................................................................................................................................................................................................................................................................................................................................................................................................................................................................................................................................................................................................................................................................................................................................................................................................................................................................................................................................................................................................................................................................................................................................................................................................................................................................................................................................................................................................................................................................................................................................................................................................................................................................................................................................................................................................................................................................................................................................................................................................................................................................................................................................................................................................................................................................................................................................................................................................................................................................................................................................................................................................................................................................................................................................................................................................................................................................................................................................................................................................................................................................................................................................................................................................................................................................................................................................................................................................................................................................................................................................................................................................................................................................................................................................................................................................................................................................................................................................................................................................................................................................................................................................................................................................................................................................................................................................................................................................................................................................................................................................................................................................................................................................................................................................................................................................................................................................................................................................................................................................................................................................................................................................................................................................................................................................................................................................................................................................................................................................................................................................................................................................................................................................................................................................
55

56
NOTES................................................................................................................................................................................................................................................................................................................................................................................................................................................................................................................................................................................................................................................................................................................................................................................................................................................................................................................................................................................................................................................................................................................................................................................................................................................................................................................................................................................................................................................................................................................................................................................................................................................................................................................................................................................................................................................................................................................................................................................................................................................................................................................................................................................................................................................................................................................................................................................................................................................................................................................................................................................................................................................................................................................................................................................................................................................................................................................................................................................................................................................................................................................................................................................................................................................................................................................................................................................................................................................................................................................................................................................................................................................................................................................................................................................................................................................................................................................................................................................................................................................................................................................................................................................................................................................................................................................................................................................................................................................................................................................................................................................................................................................................................................................................................................................................................................................................................................................................................................................................................................................................................................................................................................................................................................................................................................................................................................................................................................................................................................................................................................................................................................................................................................................................................................................................................................................................................................................................................................................................................................................................................................................................................................................................................................................................................................................................................................................................................................................................................................................................................................................................................................................................................................................................................................................................................................................................................................................................................................................................
NOTES................................................................................................................................................................................................................................................................................................................................................................................................................................................................................................................................................................................................................................................................................................................................................................................................................................................................................................................................................................................................................................................................................................................................................................................................................................................................................................................................................................................................................................................................................................................................................................................................................................................................................................................................................................................................................................................................................................................................................................................................................................................................................................................................................................................................................................................................................................................................................................................................................................................................................................................................................................................................................................................................................................................................................................................................................................................................................................................................................................................................................................................................................................................................................................................................................................................................................................................................................................................................................................................................................................................................................................................................................................................................................................................................................................................................................................................................................................................................................................................................................................................................................................................................................................................................................................................................................................................................................................................................................................................................................................................................................................................................................................................................................................................................................................................................................................................................................................................................................................................................................................................................................................................................................................................................................................................................................................................................................................................................................................................................................................................................................................................................................................................................................................................................................................................................................................................................................................................................................................................................................................................................................................................................................................................................................................................................................................................................................................................................................................................................................................................................................................................................................................................................................................................................................................................................................................................................................................................................................................................................


Bien-Air Dental SALänggasse 60
Case postale
2500 Bienne 6, Switzerland
Tel. +41 (0)32 344 64 64
Fax +41 (0)32 344 64 91
Bien-Air Deutschland GmbHJechtinger Strasse 11
79111 Freiburg, Deutschland
Tel. +49 (0)761 45 57 40
Fax +49 (0)761 47 47 28
Bien-Air España, SAU Entença, 169 Bajos
08029 Barcelona, España
Tel. +34 934 25 30 40
Fax +34 934 23 98 60
Bien-Air USA, Inc.5 Corporate Park
Suite 160
Irvine, CA 92606 USA
Phone +1 800-433-BIEN
Phone +1 949-477-6050
Fax +1 949-477-6051
Bien-Air France Sàrl19-21, rue du 8 Mai 1945
CS 30310
94113 Arcueil, France
Tel. +33 (0)1 49 08 02 60
Fax +33 (0)1 46 64 86 58
Bien-Air Italia S.r.l.Via Vaina 3
20122 Milano, Italia
Tel. +39 (02) 58 32 12 51
Fax +39 (02) 58 32 12 53
Bien-Air UK Ltd Arundel House
Whitworth Road
Crawley, West Sussex
RH11 7XL, England
Tel. +44 (0)1293 550 200
Fax +44 (0)1293 520 481
Bien-Air Asia Ltd.Nishi-Ikebukuro
Daiichi-Seimei Bldg. 10F
2-40-12 Ikebukuro, Toshimaku
Tokyo, 171-0014, Japan
Tel. +81 (3) 5954-7661
Fax +81 (3) 5954-7660
Beijing Bien-AirMedical Instrument
Technology Service Co. Ltd.
Room 1415,
Block B Lucky Tower,
No 3 Dongsanhuan Beilu,
Chaoyang District,
Beijing 100027, China
Tel. +86 10 6567 0651
Fax +86 10 6567 8047
www.bienair.com
33BB 14151415
REF 2100291-0003/2016.12 © Bien-Air Dental www.bienair.com