Embed Size (px)
Citation preview


Icing your own cake
Have you ever iced and decorated a cake? Well with a little practice and a Tala Icing Set you will soon be able to ice cakesfor any festive occasion.
This book is aimed at the beginner and takes you, step-by-step,through the process of decorating a cake. You can also ice yourown biscuits – which can be a fun way to start as a beginner.Once you have mastered some of the basic techniques you willwant to expand your skills and experiment with some of yourown ideas.
The CakeYou can choose to ice a sponge cake or a fruit cake depending onthe occasion and your own preference. Very rich cakes such astraditional wedding or christmas cakes improve by being storedfor some weeks or even months. They should be well wrappedin greaseproof paper and stored in a cold, dry place.
Your cake should be well proportioned and have a level top. Ifthe cake is slightly domed you can either use the bottom of thecake for the top or level it with marzipan before applying a layerof marzipan icing.
EquipmentYou will need a Tala Icing Syringe Set or Icing Bag Set with aselection of nozzles to create different decorative designs. Youwill also find that a Tala turntable, whilst not essential, willmake decorating your cake much easier.
In addition you will need a sieve, a palette knife (or steel rule),mixing bowls and a wooden spoon or spatula.

The first step . . .
Iced cakes usually have a layer of marzipan under the icing.Marzipan can be shop bought or you can follow our recipe:
Marzipan (almond paste)250g icing sugar 2 small eggs, lightly beaten 250g caster sugar Small lemon, juice only500g ground almonds 5ml pure almond essence
Method ✸ Sift the icing sugar into a mixing bowl and stir in thecaster sugar and ground almonds. ✸ Add the lemon juice andalmond essence and stir in the eggs, bit by bit, to make a stiffdough. ✸ Roll into a ball and knead lightly. The paste should bepliable but not overworked or oozing oil.
To apply the marzipan✸ Brush the surface of your cake with warmed, sieved apricotjam to help the marzipan stick.
✸ Halve the almond paste. Sprinkle icing sugar on a board toprevent sticking. Roll out one half to a strip as wide as the cakeand long enough to go round it (measure the circumference witha piece of string). Fit around the edge of the cake using a rollingpin to help it adhere. Make sure it is just above the edge on the top, trim the bottom.
✸ Roll out the other half into a roundto fit the top of the cake. Turn thecake upside down onto the marzipanand trim round the cake. Turn backover and roll the top with the rollingpin to adhere.
Royal icing
Royal icing has a hard, glossy surface perfect for cake decoration.This traditional recipe uses raw egg white, if you prefer use a pre-mixed royal icing sugar which contains dried egg white.
375g icing sugarEgg whites from 2 large or 3 medium eggs Optional: glycerine, colourings and flavourings such as lemonjuice and rosewater (see method)
Method ✸ Sift the icing sugar through a fine sieve into a mixingbowl. ✸ Lightly beat the egg white in a separate bowl using awooden spoon or spatula. ✸ Gradually beat in the icing sugarwith the wooden spoon until the icing is light and pliable.
✸ For coating the cake the icing should be easy to spread but notrun of its own accord. For piping the icing must be stiff enough toform peaks and remain upright. If the consistency is too thin addmore icing sugar; if it is too stiff add a little more egg white. Forsofter icing add a teaspoon of glycerine.
✸ Ingredients to flavour or colour the icing are added last. Liquid colourings should be added carefully, drop by drop, on the end of a skewer. Mix thoroughly to see the effect of thecolouring before adding more. Repeat the process until youcreate the desired shade.
✸ When the icing has the righttexture, scrape the sides of thebowl clean and cover with a dampcloth to prevent crusting. Beat theicing once again before use.

First efforts in decoration
Perfect piping is a question of practice so don’t despair if youfind it difficult at first. Before starting on your cake practice yourpiping on a plate or piece of paper until you get used to theprocess. For decorative piping the icing should stand up in peaks.
Using a Tala syringeUsing a teaspoon or palette knife fill the syringe, about halfway,replace the plunger and secure it with a sharp turn to the right.Press down with the plunger and, as soon as the icing appears atthe opening, screw on a nozzle.
Insert your thumb into the ring at the end of the plunger andyour index and third fingers will slip quite naturally into the otherrings. A slight pressure with the thumb will now be sufficient toeject icing. Support the syringe body with your other hand.
Using a Tala icing bagFit a nozzle to your icing bag. Scoop up some icing on a paletteknife and place it deep into the bag, it may help to fold the bagback to do this. Hold the bag together as you carefully withdrawthe knife. When the bag is one quarter full twist it togetherbehind the icing. Hold the bag with your leading hand and gentlysqueeze down towards the nozzle to release the icing. Supportthe bag with your other hand.
Tip The heat from your hands may effectthe consistency of the icing as you pipe,causing it to dry and crack. To avoid thisuse small amounts and re-fill often.
Icing the top and sides
You will need a palette knife and a Tala turntable or, failingthis, an upturned cake tin on which to stand the cake. Every time,before using it, the palette knife should be dipped into hot waterand shaken afterwards.
Top Put some icing on the cake and spread it with the paletteknife all over the top, right to the edge.To level and smooth thesurface take the knife with both hands, and holding it quitestraight, draw the edge of the blade right across the top. Putsurplus icing back into the bowl.
Sides Spread icing roughly over the sides of the cake. To smooththe sides of a round cake stand the damp palette knife with itsedge against the cake and revolve the Tala turntable. Whenfinished lift the knife off gently. Without a turntable, or with asquare cake you have to rely on the steadiness of your hand andthe accuracy of your eye. Take special care of the edge and makeit as neat as possible. Remove any excess from the bottom edgeof the cake.
Allow to dry in a dust-free, airy and not-too-warm place for24 hours. After this you can apply a second coat or placethe cake on a cake board ready for decorating.

Piping techniques
Here are a few tips to get you started…
To pipe a straight line✸ Place the tip of nozzle no. 2 at the place where you want tobegin. As you squeeze out the icing lift the nozzle slightly awayfrom the surface and, still squeezing, move the nozzle steadily inthe direction of the line to be piped, keeping the icing flowingevenly. ✸ Lower the tip of the nozzle gently on to the surfacewhere you want the line to end and release the pressure. Never attempt to pipe a line with the nozzle touching the surfaceas this will result in an uneven finish.
Stars and shells✸ Attach a star nozzle. Hold the syringe in an upright positionwith the nozzle about 3mm away from the surface. Press out alittle icing, release the pressure and quickly lift off the syringe. Theresult will be a little star. ✸ Shell patterns can be formed usingthe same nozzle but holding the syringe at 45 degrees. Squeezethe icing on to the surface, lift the tube slightly, guide it awayfrom you then back towards you and finish down on the surface.
Borders✸ Borders can be created bypiping rows of dots, shells andstars. ✸ Continuous bordersand ribbons are more difficultbut a Tala turntable can makethis task easier. Garlands andlooped ribbons allow you tomake breaks in the border andthis gives you more control.
WritingYou can use nozzle no.2 (supplied with your Tala icing set) or a Tala Icing Pen. The icing should be softer for writing – butstiff enough to hold a round shape when piped. First write yourmessage on paper and practice piping over it. You will need tokeep the icing flowing for each stroke or letter to achieve asmooth line. Once you are satisfied with the result write themessage again on paper and place it in position on the cake. Usea pin to prick through the key points of the letters on to thesurface of the cake and then ice over your template.
Icing Syringe SetFive nozzles are included with the Tala Icing Syringe Set:
No.2Writer
No.5Rope
No.8Star
No.12Shell
No.36Flower
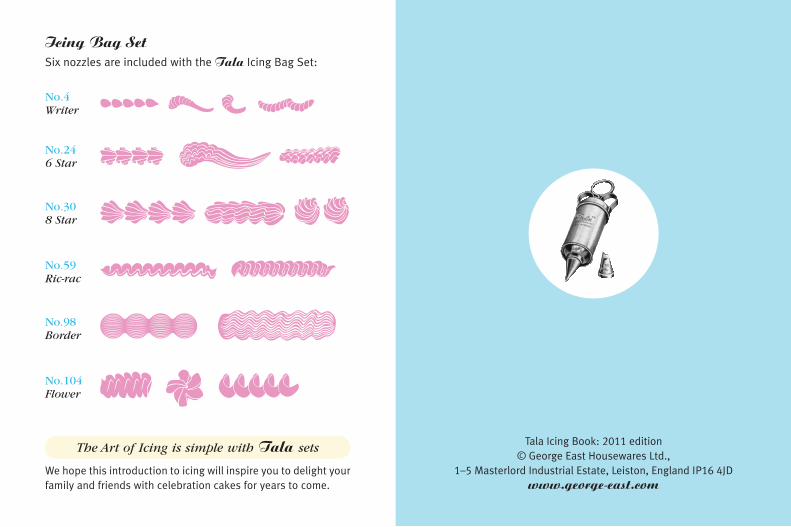
Icing Bag SetSix nozzles are included with the Tala Icing Bag Set:
We hope this introduction to icing will inspire you to delight yourfamily and friends with celebration cakes for years to come.
No.4Writer
No.246 Star
No.308 Star
No.59Ric-rac
No.98Border
No.104Flower
The Art of Icing is simple with Tala sets Tala Icing Book: 2011 edition© George East Housewares Ltd.,
1–5 Masterlord Industrial Estate, Leiston, England IP16 4JDwww.george-east.com

Printed in England