Embed Size (px)
Citation preview
iClicker Integration with
OU Canvas
Instructor Guide
August 2017

Integrate for OU Canvas 2.2 Instructor Guide
2
Table of Contents
Overview ..................................................................................... 3
Step 1: Download your iClicker Classic Software ........................................ 4
Step 2: Configure your iClicker Classic Software ....................................... 5
Step 3: Enable Student Registration in Canvas ................................ 9
Step 4: Synchronize Your Roster ................................................... 10
Step 5: Upload iClicker Polling Data ............................................. 11
Step 6: Review iClicker Scores in Canvas ..................................... 13
3
Integrate for OU Canvas 2.2 Instructor Guide
Overview
This guide provides instructions for integrating your iClicker Classic polling data with the OU Canvas gradebook. The iClicker integration with Canvas:
• Enables students to register their iClicker remotes directly within OU Canvas.
• Allows you to easily download your class roster and student registrations from OU Canvas into the iClicker Classic software.
• Allows you to easily upload your iClicker session data into your OU Canvas gradebook.
Guide Objectives
This guide will show you how to:
• Obtain iClicker Classic configured for OU Canvas (Windows or Mac).
• Direct students to register their iClicker remotes within OU Canvas.
• Download your OU Canvas student roster and registrations into the iClicker Classic gradebook.
• Upload your iClicker session data to your OU Canvas gradebook.
Integrate for OU Canvas 2.2 Instructor Guide
4
Step 1: Download your iClicker Classic Software
TIP: Your administrator has provided you with pre-configured iClicker software (for Windows or Macintosh) customized for your campus.
Please visit the following links to obtain the necessary iClicker software.
Windows:
• http://files.iclicker.com/support/OU/OU_iclicker_win7.zip
Macintosh:
• http://files.iclicker.com/support/OU/OU_iclicker_mac7.zip

5
Integrate for OU Canvas 2.2 Instructor Guide
Step 2: Configure your iClicker Software
The pre-configured software allows you to choose which LMS you are using. You must match each Canvas course to each iClicker course (for the courses in which you plan to use the integration).
To specify your Canvas course in iClicker:
1. Double-click the iClicker icon within your iClicker folder to start the iClicker application.
2. When you open iClicker, you will see the Welcome Screen with no courses listed. Click the + Create button to add your course.
iClicker Classic Welcome window
NOTE: If you already see your course in the course list, go to step 5.
3. The Create New Course window appears. Enter your Course Name. This information
will serve as the unique identifier for your course.
iClicker New Course window
4. Click the Create button. iClicker automatically creates a new course folder in your
iClicker Classes folder. The New Course window closes and you are returned to the Welcome Screen with your course name in the list of courses.
5. Select your course name from the course list and click Settings.
Integrate for OU Canvas 2.2 Instructor Guide
6
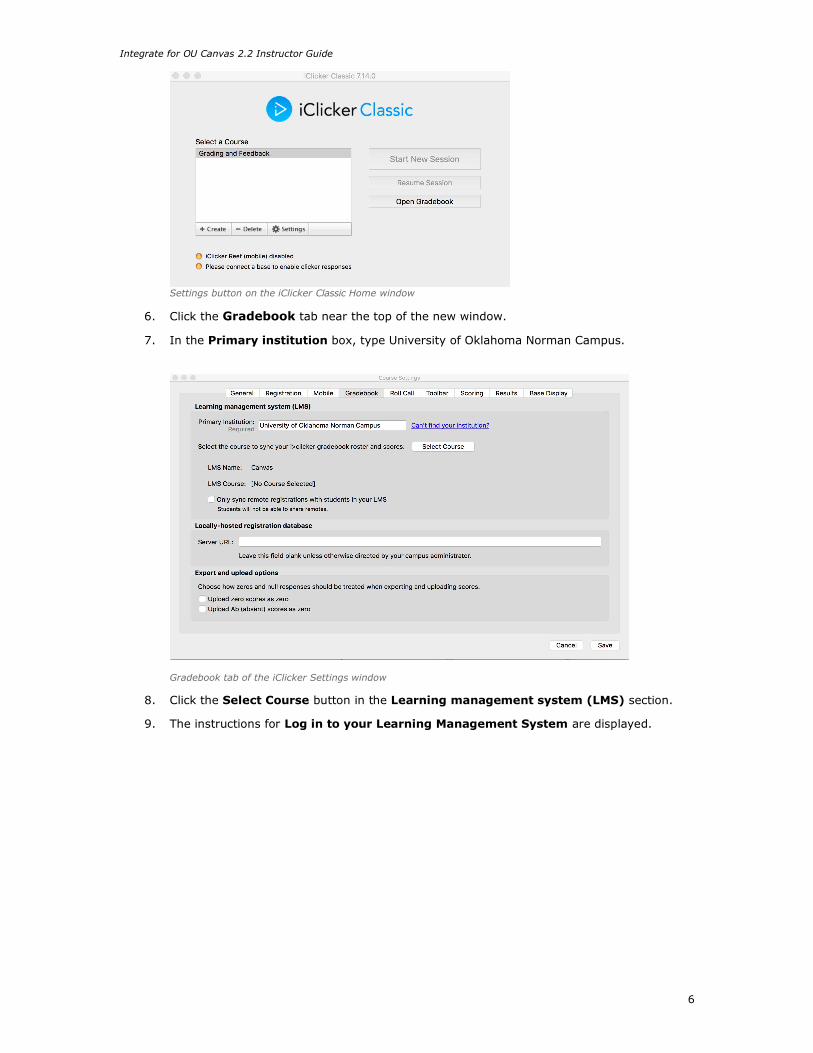
Settings button on the iClicker Classic Home window
6. Click the Gradebook tab near the top of the new window.
7. In the Primary institution box, type University of Oklahoma Norman Campus.
Gradebook tab of the iClicker Settings window
8. Click the Select Course button in the Learning management system (LMS) section.
9. The instructions for Log in to your Learning Management System are displayed.
Integrate for OU Canvas 2.2 Instructor Guide
7
Log in to Canvas
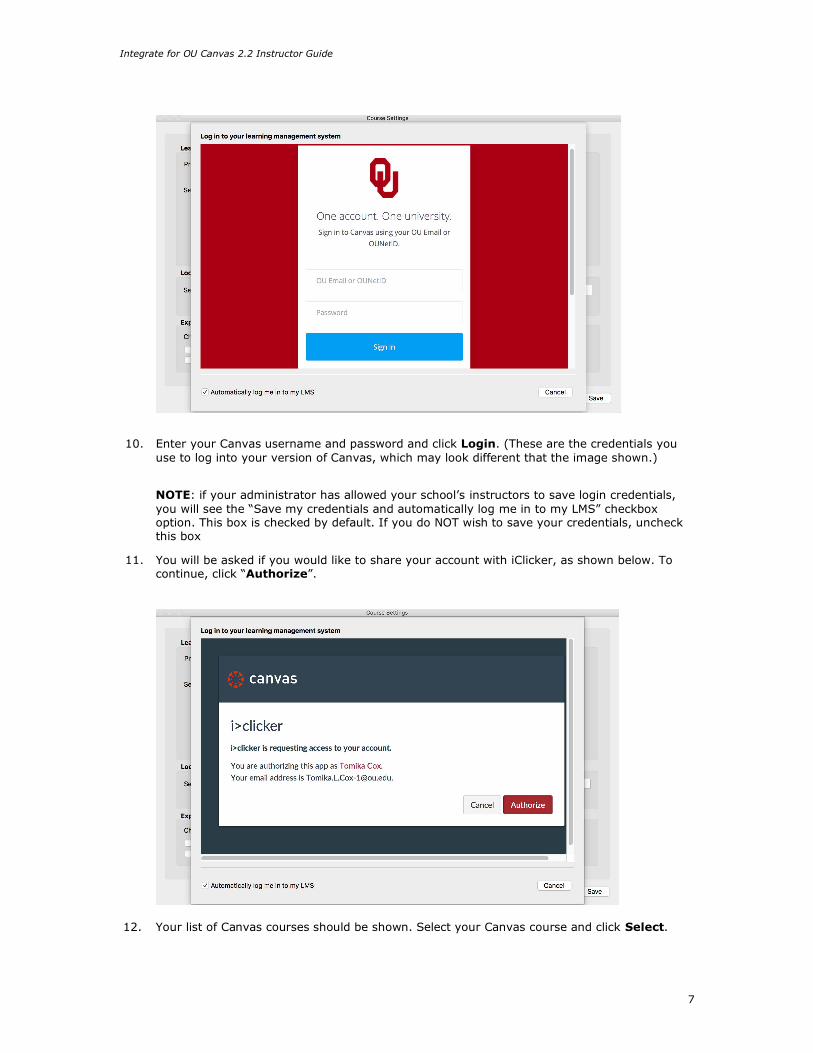
10. Enter your Canvas username and password and click Login. (These are the credentials you
use to log into your version of Canvas, which may look different that the image shown.)
NOTE: if your administrator has allowed your school’s instructors to save login credentials,
you will see the “Save my credentials and automatically log me in to my LMS” checkbox option. This box is checked by default. If you do NOT wish to save your credentials, uncheck this box
11. You will be asked if you would like to share your account with iClicker, as shown below. Tocontinue, click “Authorize”.
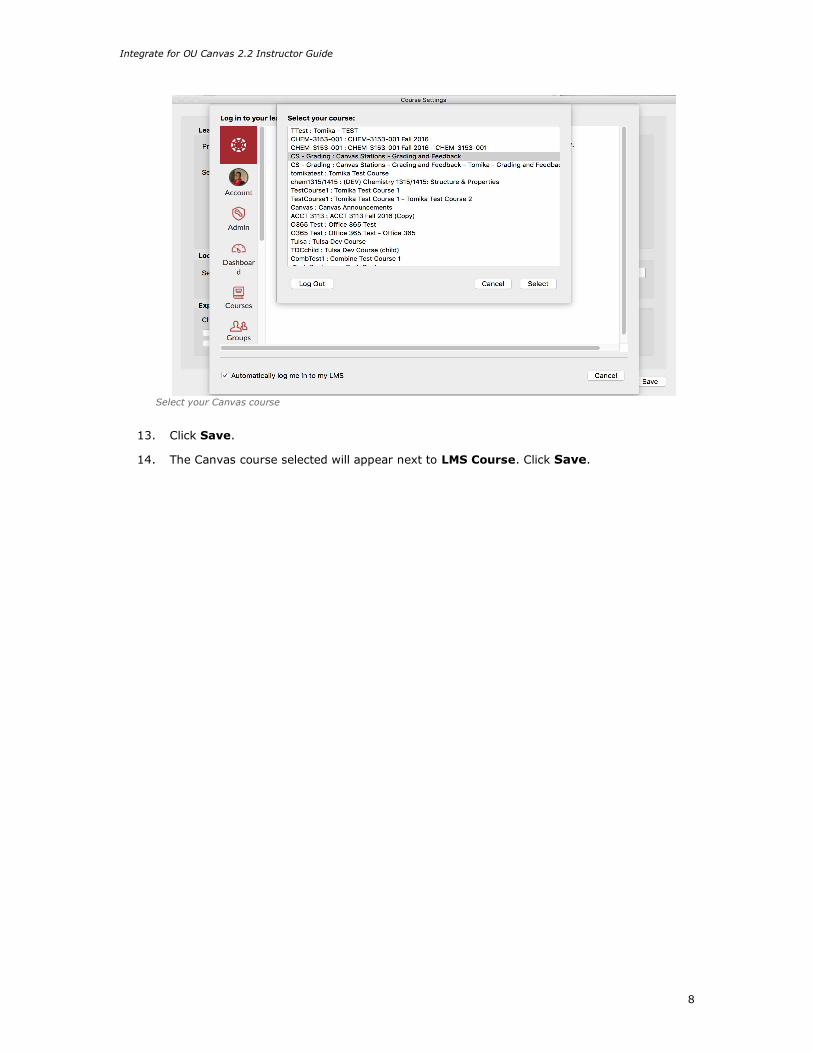
12. Your list of Canvas courses should be shown. Select your Canvas course and click Select.
Integrate for OU Canvas 2.2 Instructor Guide
8
Select your Canvas course
13. Click Save.
14. The Canvas course selected will appear next to LMS Course. Click Save.
9
Integrate for OU Canvas 2.2 Instructor Guide
Step 3: Enable Student Registration in Canvas
To receive credit for their iClicker responses, students must register their iClicker remotes (i.e., tie their clicker ID to their student ID).
To enable iClicker remote registration in Canvas:
1. Log into Canvas (https://canvas.ou.edu) using your OUNetID (4x4) and password.
2. Click the Courses icon, then select the course to which you want to enable i>clicker
registration.
3. Once in the course, click the Settings link in the navigation bar.
4. From the Settings section, click the Navigation tab. Drag the iClicker registration link
to the top list in order to make it visible to students, then click the Save button.
5. The iClicker registration link should now appear in the navigation bar. You can reorder
the items in your navigation bar by visiting the Navigation tab under Settings.
Directions for STUDENTS to register their iClicker remotes:
1. Log into OU Canvas (https://canvas.ou.edu) with your OUNetID (4x4) and password, then
select your course.
2. Once in your course, click the iclicker registration link in the Navigation bar.
3. The Register Your iClicker Remote page appears. Enter your iClicker remote ID and
click Register.
4. Your remote is now registered. You can remove your remote registrations from Canvas at any
time by clicking Remove on the Register Your iClicker Remote page.
Other relevant facts for students about registration:
• Even if students are using iClicker for more than one course, they only need to register their clickers in one course. Their registration data will automatically be applied to all of their other OU Canvas courses using iClicker. This is true if instructors are using
Clicker; if a student’s instructor is using iClicker Cloud (formerly REEF Polling), the
student will need to register the remote in their REEF Polling.• Students can share clickers with a friend/roommate as long as they are not using
i>clicker in the same courses.
• Students can register more than one clicker in OU Canvas. If, for example, students break a clicker, they can register additional clickers through the same tool and all of their registered clickers (and their votes) will be tied to their OU Canvas ID.
• If students are voting using the iClicker Cloud app, they should be sure to enter their OUNetID (4x4) as their student ID. If students do not enter their student IDs as they
are listed in your roster file, their account will not synchronize with iClicker.
10
Integrate for OU Canvas 2.2 Instructor Guide
Step 4: Synchronize Your Roster
Once your students have registered their iClicker remotes within OU Canvas, you can import your
student roster (complete with registration data) into iClicker so polling data can be credited to your
students.
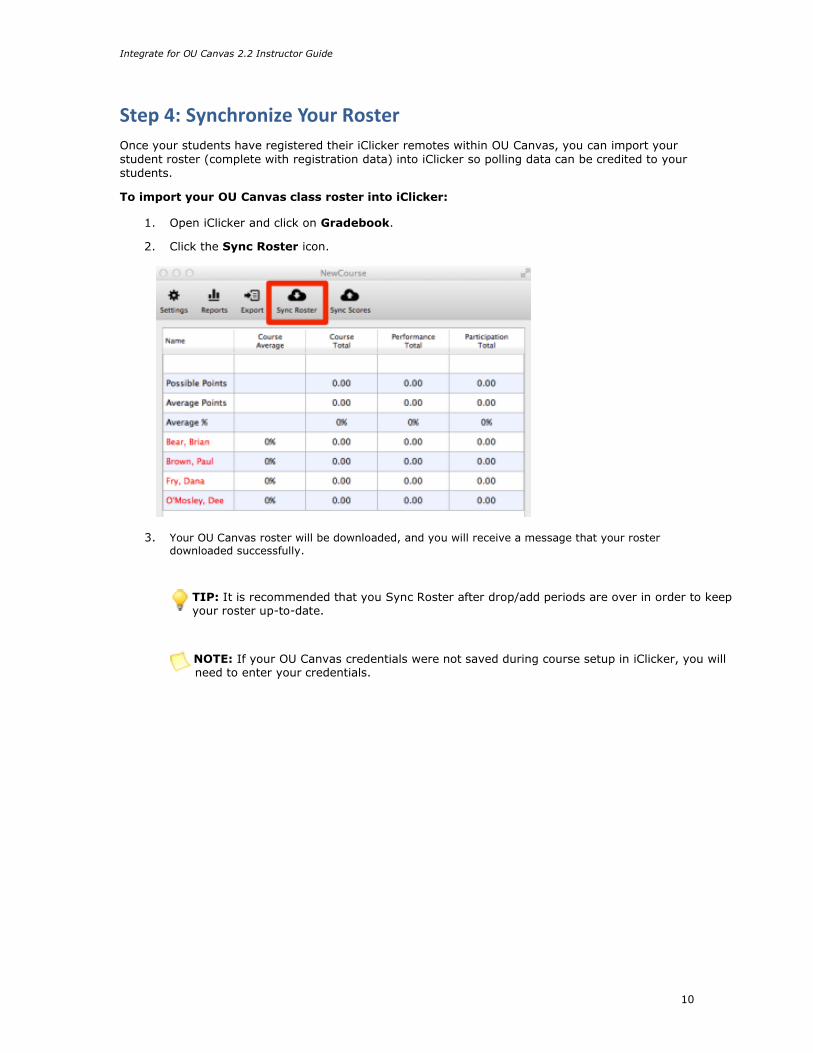
To import your OU Canvas class roster into iClicker:
1. Open iClicker and click on Gradebook.
2. Click the Sync Roster icon.
Sync Roster in iClicker Classic gradebook
3. Your OU Canvas roster will be downloaded, and you will receive a message that your roster
downloaded successfully.
TIP: It is recommended that you Sync Roster after drop/add periods are over in order to keep your roster up-to-date.
NOTE: If your OU Canvas credentials were not saved during course setup in iClicker, you will need to enter your credentials.
11
Integrate for OU Canvas 2.2 Instructor Guide
Step 5: Upload iClicker Polling Data
After you’ve polled your students in class, your polling data will appear in the iClicker gradebook.
You can view students’ points, adjust scores, delete questions, synchronize registrations and
export/upload student polling data into your OU Canvas gradebook.
To upload iClicker scores into your OU Canvas gradebook:
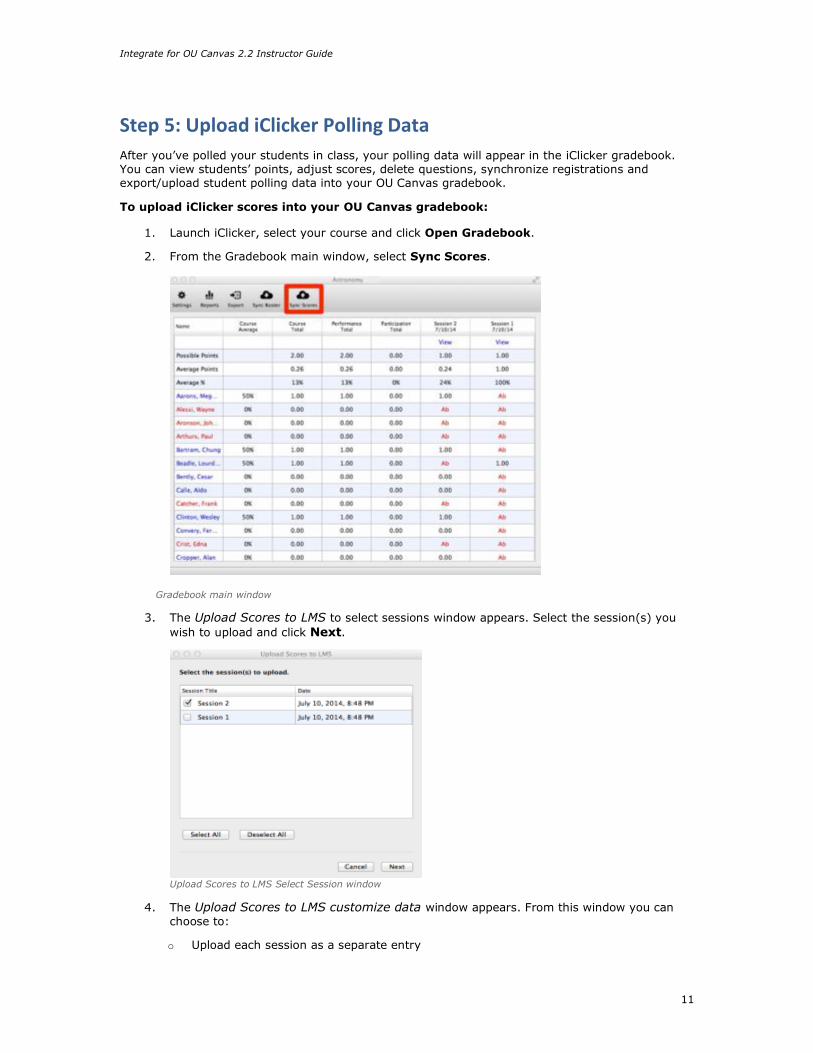
1. Launch iClicker, select your course and click Open Gradebook.
2. From the Gradebook main window, select Sync Scores.
Gradebook main window
3. The Upload Scores to LMS to select sessions window appears. Select the session(s) you
wish to upload and click Next.
Upload Scores to LMS Select Session window
4. The Upload Scores to LMS customize data window appears. From this window you can
choose to:
o Upload each session as a separate entry
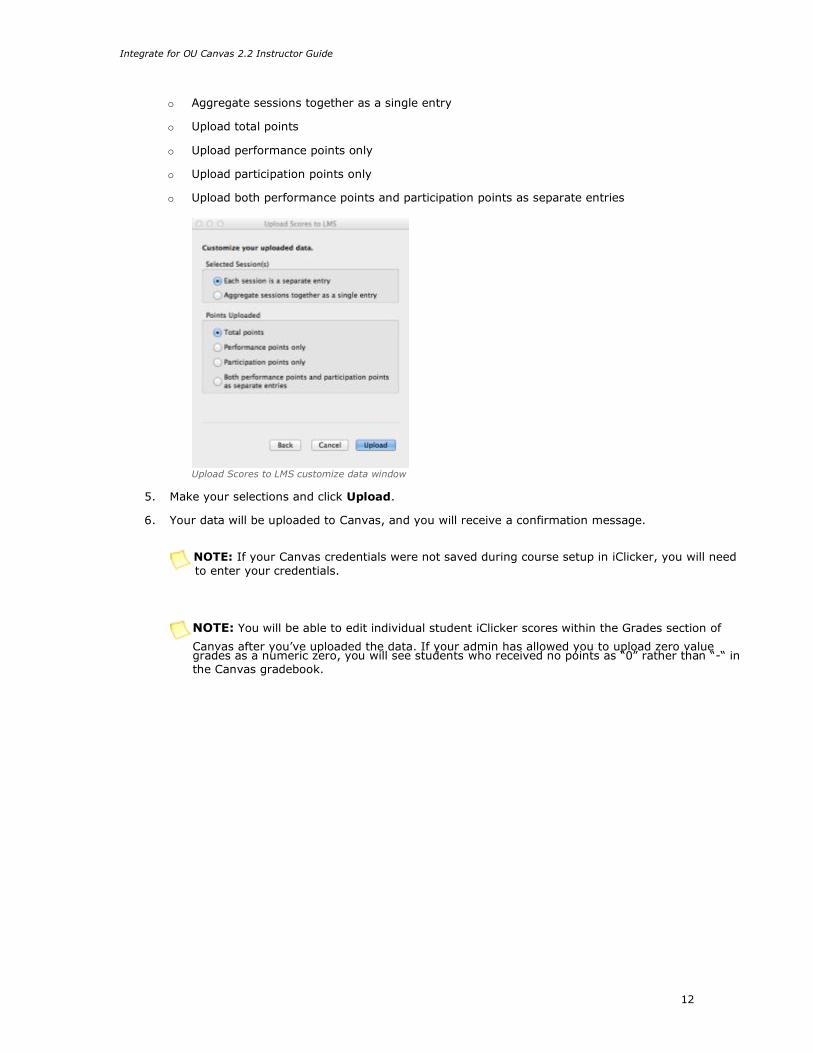
Integrate for OU Canvas 2.2 Instructor Guide
12
o Aggregate sessions together as a single entry
o Upload total points
o Upload performance points only
o Upload participation points only
o Upload both performance points and participation points as separate entries
Upload Scores to LMS customize data window
5. Make your selections and click Upload.
6. Your data will be uploaded to Canvas, and you will receive a confirmation message.
NOTE: If your Canvas credentials were not saved during course setup in iClicker, you will need
to enter your credentials.
NOTE: You will be able to edit individual student iClicker scores within the Grades section of
Canvas after you’ve uploaded the data. If your admin has allowed you to upload zero value grades as a numeric zero, you will see students who received no points as “0” rather than “-“ in the Canvas gradebook.
13
Integrate for OU Canvas 2.2 Instructor Guide
Step 6: Review iClicker Scores in Canvas
Once you have uploaded your i>clicker polling data to your OU Canvas course, you can review the scores within the LMS.
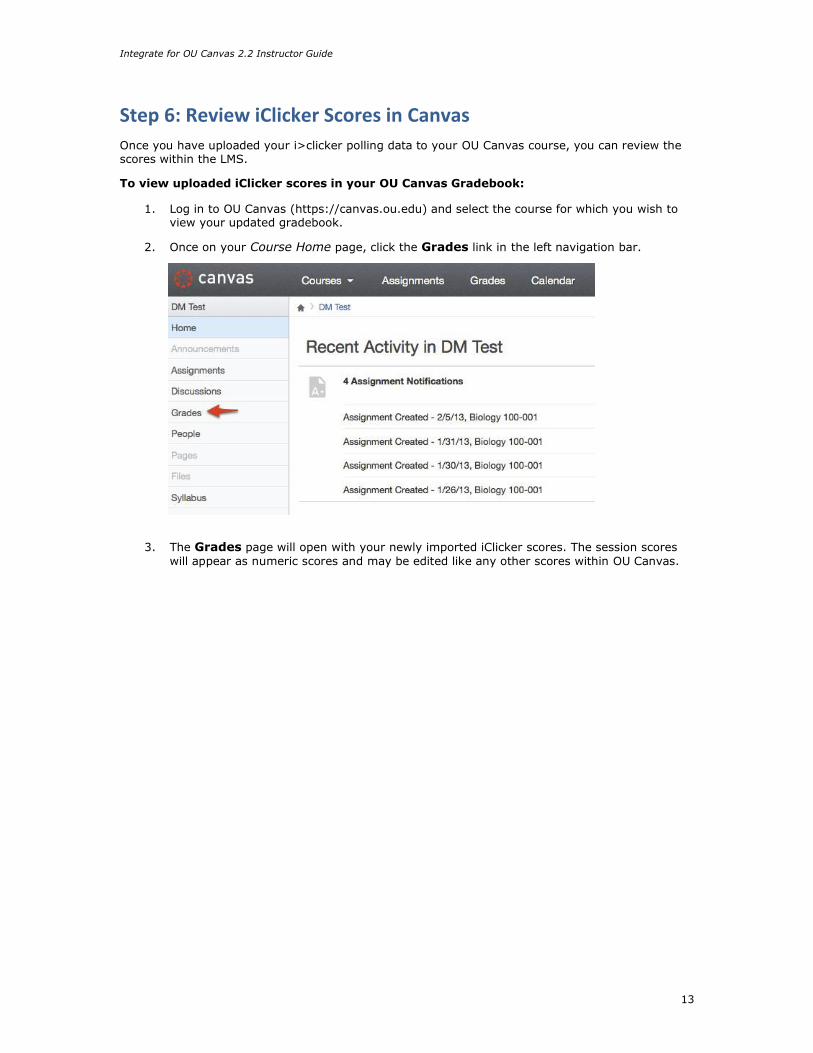
To view uploaded iClicker scores in your OU Canvas Gradebook:
1. Log in to OU Canvas (https://canvas.ou.edu) and select the course for which you wish to view your updated gradebook.
2. Once on your Course Home page, click the Grades link in the left navigation bar.
3. The Grades page will open with your newly imported iClicker scores. The session scores
will appear as numeric scores and may be edited like any other scores within OU Canvas.