Embed Size (px)
Citation preview
ICTWEB301
Create a simple markup language document
Learner Guide
© Copyright, 2016 by North Coast TAFEnow
Date last saved: 1 February 2016 by Power, Rachael Version: 0.4 # of Pages = 31
CHECH IT Teachers – Content writer and course adviser
TAFEnow Resource Development Team – Instructional and
graphic design
Copyright of this material is reserved to the Crown in the right of the State of New South Wales.
Reproduction or transmittal in whole, or in part, other than in accordance with the provisions of the Copyright Act, is
prohibited without written authority of North Coast TAFEnow.
Disclaimer: In compiling the information contained within, and accessed through, this document ("Information")
DET has used its best endeavours to ensure that the Information is correct and current at the time of publication but
takes no responsibility for any error, omission or defect therein. To the extent permitted by law, DET and its
employees, agents and consultants exclude all liability for any loss or damage (including indirect, special or
consequential loss or damage) arising from the use of, or reliance on, the Information whether or not caused by any
negligent act or omission. If any law prohibits the exclusion of such liability, DET limits its liability to the extent
permitted by law, to the re-supply of the Information.
Third party sites/links disclaimer: This document may contain website contains links to third party sites. DET is not
responsible for the condition or the content of those sites as they are not under DET's control. The link(s) are
provided solely for your convenience and do not indicate, expressly or impliedly, any endorsement of the site(s) or
the products or services provided there. You access those sites and use their products and services solely at your
own risk.

Contents Getting Started .................................................................................................................................. i
About this unit .................................................................................................................................................................... i
Elements and performance criteria ............................................................................................................................. i
Icon Legends....................................................................................................................................................................... ii
Topic 1 – Review requirements ........................................................................................................ 1
What is markup language? ............................................................................................................................................ 1
Topic 2 – Create the document structure ........................................................................................ 9
Topic 3 – Validate documents ........................................................................................................ 22
Client Validation ..............................................................................................................................................................22
Standards Validation ......................................................................................................................................................23
Browser Validation..........................................................................................................................................................25


i | P a g e I C T W E B 3 0 1 _ L G _ V 1
T A F E n o w
Getting Started
About this unit
This unit describes the performance outcomes, skills and knowledge required to design,
create and save a basic markup language document, using a text editor.
Elements and performance criteria
Elements define the essential outcomes of a unit of competency. The Performance Criteria
specify the level of performance required to demonstrate achievement of the Element. They
are also called Essential Outcomes.
Follow this link to find the essential outcomes needed to demonstrate competency in this
Unit: http://training.gov.au/Training/Details/ICTWEB301
ii | P a g e I C T W E B 3 0 1 _ L G _ V 1 T A F E n o w
Icon Legends
Learning Activities
Learning activities are the tasks and exercises that assist you in gaining a
clear understanding of the content in this workbook. It is important for you
to undertake these activities, as they will enhance your learning.
Activities can be used to prepare you for assessments. Refer to the
assessments before you commence so that you are aware which activities
will assist you in completing your assessments.
Case Studies
Case studies help you to develop advanced analytical and problem-solving
skills; they allow you to explore possible options and/or solutions to
complex issues and situations and to subsequently apply this knowledge
and these newly acquired skills to your workplace and life.
Discussions/Live chat
Whether you discuss your learning in an online forum or in a face-to-face
environment discussions allow you to create and consolidate new
meaningful knowledge.
Readings (Required and suggested)
The required reading is referred to throughout this Learner Guide. You will
need the required text for readings and activities.
The suggested reading is quoted in the Learner Guide, however you do not
need a copy of this text to complete the learning. The suggested reading
provides supplementary information that may assist you in completing the
unit.
Reference
A reference will refer you to a piece of information that will assist you with
understanding the information in the Learner Guide or required text.
References may be in the required text, another textbook on the internet.
Self-check
A self-check is an activity that allows you to assess your own learning
progress. It is an opportunity to determine the levels of your learning and to
identify areas for improvement.
Work Flow
Shows a logical series of processes for completing tasks.

iii | P a g e I C T W E B 3 0 1 _ L G _ V 1
T A F E n o w


1 | P a g e I C T W E B 3 0 1 _ L G _ V 1
T A F E n o w
Topic 1 – Review requirements
The first step in building a simple website is to clarify why the website is needed and what
functions it needs to perform.
You need to understand the purpose of the website, the audience you are trying to attract
and the design elements that will be needed to meet these requirements. This information is
included in a requirements (or design) document.
This section will look at the different markup languages available for website development
and cover things to consider in the design of a website.
What is markup language?
A markup language is a combination of text and information describing the text. This extra
information explains how the text should be displayed on a page. Markup languages for the
web use tags to tell a browser how to display text on a page.

2 | P a g e I C T W E B 3 0 1 _ L G _ V 1 T A F E n o w
Markup languages for the web
HTML — HyperText Mark-up Language
HTML is a very simple language used to describe the logical structure and layout of a web
document. It describes which parts of the text the web browser should emphasise, which text
should be considered body text and which text should be headings.
READINGS RECOMMENDED 1
The World Wide Web Consortium (or ‘W3C’—see their website: www.w3.org) issues
recommendations about standards for HTML. The latest standard is HTML 4.01.
XML — Extensible Mark-up Language
This very versatile metalanguage (a language that describes another language) is used to
describe what data is rather than just the way it looks. This means it is a semantic language
rather than just a presentation language (like HTML).
XML lets the coder create their own tags to describe the data.
XML is a complement to HTML. It can be used to describe the data, while HTML can be used to
format and display the data. Languages for handheld devices such as mobile phones are
based on XML.
XHTML — Extensible HyperText Markup Language
XHTML is a combination of HTML and XML.
XHTML has begun to replace HTML. It is a stricter and cleaner version of HTML. In fact the
World Wide Web Consortium defines XHTML as the latest version of HTML and it is almost
identical to HTML 4.01.
3 | P a g e I C T W E B 3 0 1 _ L G _ V 1
T A F E n o w
DHTML — Dynamic HTML
Not really a language in its own right, DHTML is actually a combination of HTML (or XHMTL),
JavaScript and Cascading Style Sheets. It is used to create web pages with dynamic content
such as animation, pop-up windows and drop down menus. A DHTML web page can produce
a response to a user’s action (such as a mouse click) without having to communicate with the
server to have the page resent to the user’s browser.
WML — Wireless Mark-up Language
Used for handheld devices such as mobile phones and PDAs (Personal Digital Assistants).
LEARNING ACTIVITIES ACTIVITY 1
Research markup languages
Use your favourite search engine to find out what these markup languages are used for:
> RSS
> MathML
> TML
> SVG
Which language should you use?
There a few things you need to consider when selecting a markup language:
1 Website purpose
The key element in choosing an appropriate mark-up language will be the purpose of the website.
If you are building a single ‘brochure-style’ website that displays straightforward information including graphics, some Flash animation and maybe some sound, you could use straightforward HTML. Most smaller websites are constructed this way.
If your site relies heavily on graphic design and animated menus and buttons you may consider using DHTML to liven up the user experience with interactive elements.
4 | P a g e I C T W E B 3 0 1 _ L G _ V 1 T A F E n o w
The flexibility of XML allows developers to create their own unique tags and classes of information. This is one of the reasons that XML in various forms is used in the creation of many larger dynamic websites.
2 Website audience
Determining how to meet your audience’s needs and expectations will help to define the type of mark-up language to use.
> Who are your website users?
> What do your users want to do on your website (e.g. purchase goods, make
bookings, find information, etc.)?
> What kind of computer will your user have?
> How will accessibility for vision-impaired users be addressed?
> What about accessibility for users with slow modem connections?
> Are there any business advantages in using features such as animation and sound?
> Will the site need to be accessed using a range of devices (for example handheld
devices or mobile phones)?
> If your site requires the latest plug-ins (e.g. Flash) how will the user find them?
3 Standards and best practice
Standards for the web are developed by the World Wide Web Consortium (W3C). The W3C website (www.w3.org) is the hub for standards information and includes technical guidelines, educational information and code-checking tools called ‘validators’ that allow developers to ensure their sites meet required web standards.
Look at other websites that are similar in function to the one you will build and keep up to date with best practice for web design.
LEARNING ACTIVITIES ACTIVITY 2
Best practice checklist
Use your favourite search engine to find a web best practice checklist. Bookmark the site for future
reference.

5 | P a g e I C T W E B 3 0 1 _ L G _ V 1
T A F E n o w
LEARNING ACTIVITIES ACTIVITY 3
Scenario
Read the following scenario and decide which markup language you will use to build a website for
this client.
Pixel Digital Products is a manufacturer and distributor of digital cameras, equipment and accessories.
The web site will be a place for customers to see Pixels products, look for frequently asked questions and
obtain product user manuals. The company would like the first page to display only their logo, but
would like to incorporate company information within the site.
The company colours are reflected in their logo:
They have 3 sample products: DC100 (a simple digital camera), DC250 (their next step up in digital
cameras) and DC500 (their best digital camera)
The site does not need to incorporate animated design features, but the code used to create the site
must be well formed and adhere to the latest standards.
Design Requirements
Once you have made a decision about the markup language you will use to create a website,
you need to consider how the website will be designed. There are two aspects of website
design: the folder structure for the website and the storyboard for the website.
Folder Structure
Before starting out on a website project, you should create a folder structure to contain all the
files for your website. It is essential that all your web page files, graphics and other files are
collected in the same place right from the start of your project.
6 | P a g e I C T W E B 3 0 1 _ L G _ V 1 T A F E n o w
Minimum best practice for website development is that you have a 'root' folder to store your
pages and a separate folder under the 'root' folder, usually called images or graphics, where
you store all the graphics you use on the website. This minimum structure allows you to move
the website to a different location (for example your USB storage device or a web server)
without causing the links on your pages to stop working.
The larger the website the more complex the folder structure will be. Often there will be
folders to store related pages, style sheet files and other files such as animations.
LEARNING ACTIVITIES ACTIVITY 4
Create Pixel Digital Products folder structure
On your computer, create the minimum best practice folder structure for the Pixel website. Call
your ‘root’ folder pixel.
Website Storyboard
It is best practice to create website story board before you start creating individual web pages.
A web storyboard is an outline of the pages required for the site (also called a website
structure) and the layout, content, navigation and design elements of the pages (also called
page structure).
Each page in your site should have a descriptive file name (see example storyboard below)
and the home page should be called index.html or default.html.
LEARNING ACTIVITIES ACTIVITY 5
Research more things to consider when creating storyboards
Visit http://www.ehow.com/how_2003268_storyboard-your-website.html
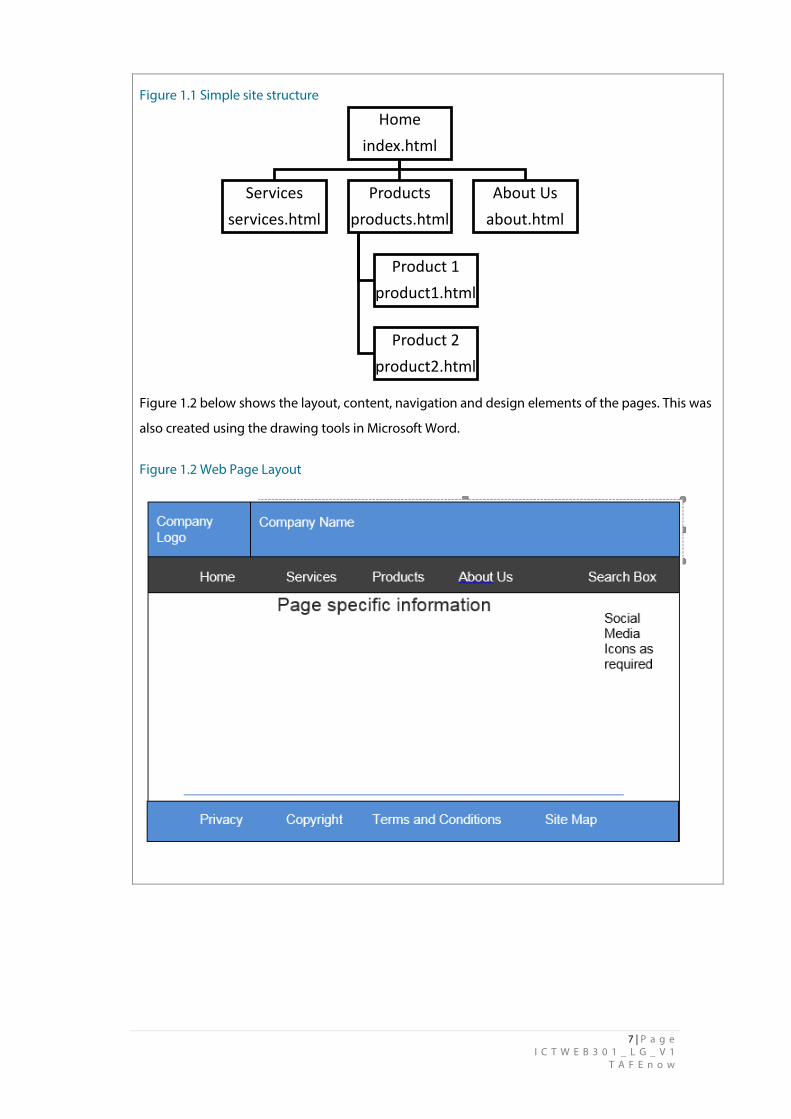
You can use any software application to produce a storyboard. For example, Figure 1.1 shows a
simple site structure part of a storyboard created using the drawing tools in Microsoft Word. It
could also be created using the SmartArt options in Microsoft Word.
7 | P a g e I C T W E B 3 0 1 _ L G _ V 1
T A F E n o w
Figure 1.1 Simple site structure
Figure 1.2 below shows the layout, content, navigation and design elements of the pages. This was
also created using the drawing tools in Microsoft Word.
Figure 1.2 Web Page Layout
Homeindex.html
Servicesservices.html
Productsproducts.html
Product 1product1.html
Product 2product2.html
About Usabout.html
8 | P a g e I C T W E B 3 0 1 _ L G _ V 1 T A F E n o w
LEARNING ACTIVITIES ACTIVITY 6
Requirements document
Complete the following steps to create a Requirements document for Pixel:
1 Create a new word processing document called Pixel_Website.
2 Include a Title page with the Company Name and the company logo (the logo file can be
found in the Additional Resources page in the Learning Content and Activities tab on the
course website).
3 Create a Table of Contents.
4 Include the following headings and content:
> Overview – put in your own words what you understand the website is meant to do, who
might use the website and what markup language you have chosen and why
> Folder structure – show the folder structure you created in Activity 1.4. You can use a
screen shot for this.
LEARNING ACTIVITIES ACTIVITY 7
Create the Pixel Digital Products storyboard
Review the scenario in Activity 3 and add your storyboard for the Pixel website to the document
created in Activity 6.
Where there will be images on pages, simple show a box with the name of the image e.g.
DC100.gif.
9 | P a g e I C T W E B 3 0 1 _ L G _ V 1
T A F E n o w
Topic 2 – Create the document structure When you have completed a storyboard it is time to create the web pages. In this unit we will
create HTML pages and then look at converting them to XHTML.
Web pages can be created in a variety of software applications, many of which automate the
generation of HTML or XHTML code. To meet the requirements of this unit you need to create
your pages using a text editor. A text editor is used to create plain text files that have minimal
formatting.
Creating web pages in a text editor means that you will gain a good understanding of HTML
and XHTML and how it works. Notepad is the text editor that comes with the Windows
operating system and will be used in the activities in this section.
10 | P a g e I C T W E B 3 0 1 _ L G _ V 1 T A F E n o w
Create a blank HTML file
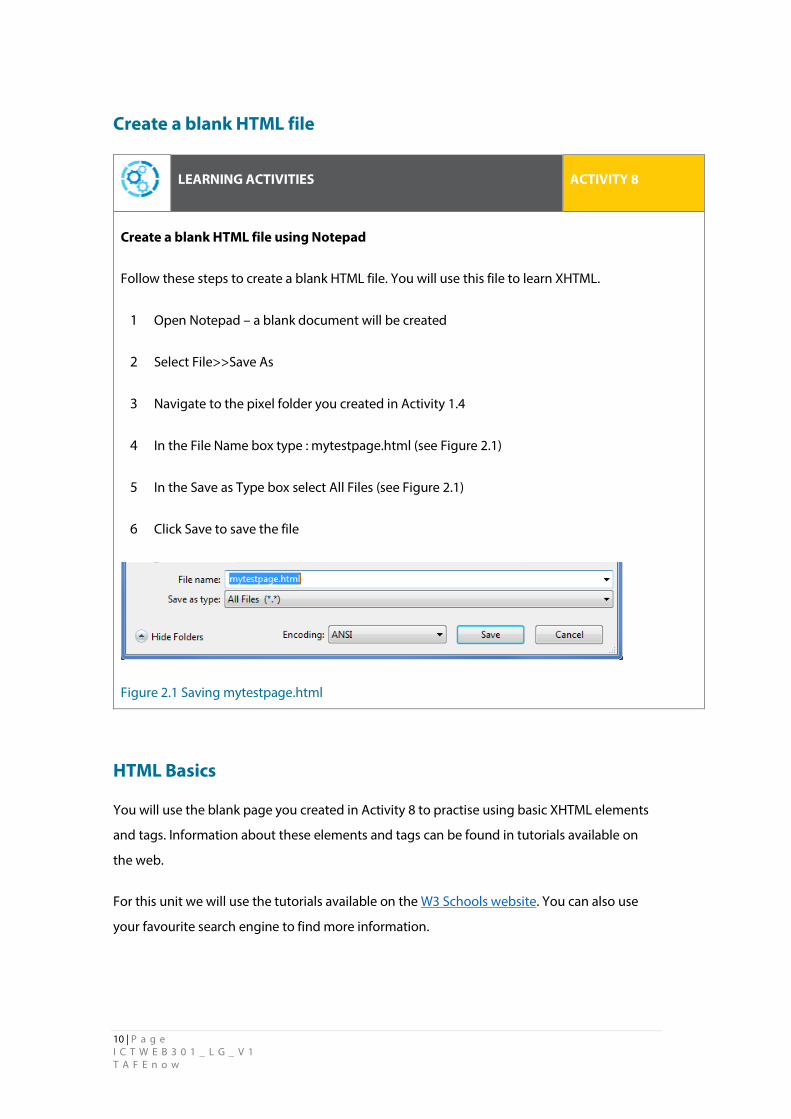
LEARNING ACTIVITIES ACTIVITY 8
Create a blank HTML file using Notepad
Follow these steps to create a blank HTML file. You will use this file to learn XHTML.
1 Open Notepad – a blank document will be created
2 Select File>>Save As
3 Navigate to the pixel folder you created in Activity 1.4
4 In the File Name box type : mytestpage.html (see Figure 2.1)
5 In the Save as Type box select All Files (see Figure 2.1)
6 Click Save to save the file
Figure 2.1 Saving mytestpage.html
HTML Basics
You will use the blank page you created in Activity 8 to practise using basic XHTML elements
and tags. Information about these elements and tags can be found in tutorials available on
the web.
For this unit we will use the tutorials available on the W3 Schools website. You can also use
your favourite search engine to find more information.
11 | P a g e I C T W E B 3 0 1 _ L G _ V 1
T A F E n o w
LEARNING ACTIVITIES ACTIVITY 9
Introduction to HTML
1 Complete the following HTML tutorials at:
http://www.w3schools.com/html/default.asp
> Introduction
> Get started
> Basic
> Elements
> Attibutes
2 Answer these questions:
> What is HTML?
> What are HTML tags?
> What tags describe an entire web page?
> What tags enclose the visible content of a web page?
> What tag is used for images?
> Give an example of an HTML Element
> What is an Attribute?
LEARNING ACTIVITIES ACTIVITY 10
Add the first tags to your test page
Open mytestpage.html in Notepad and complete the following:
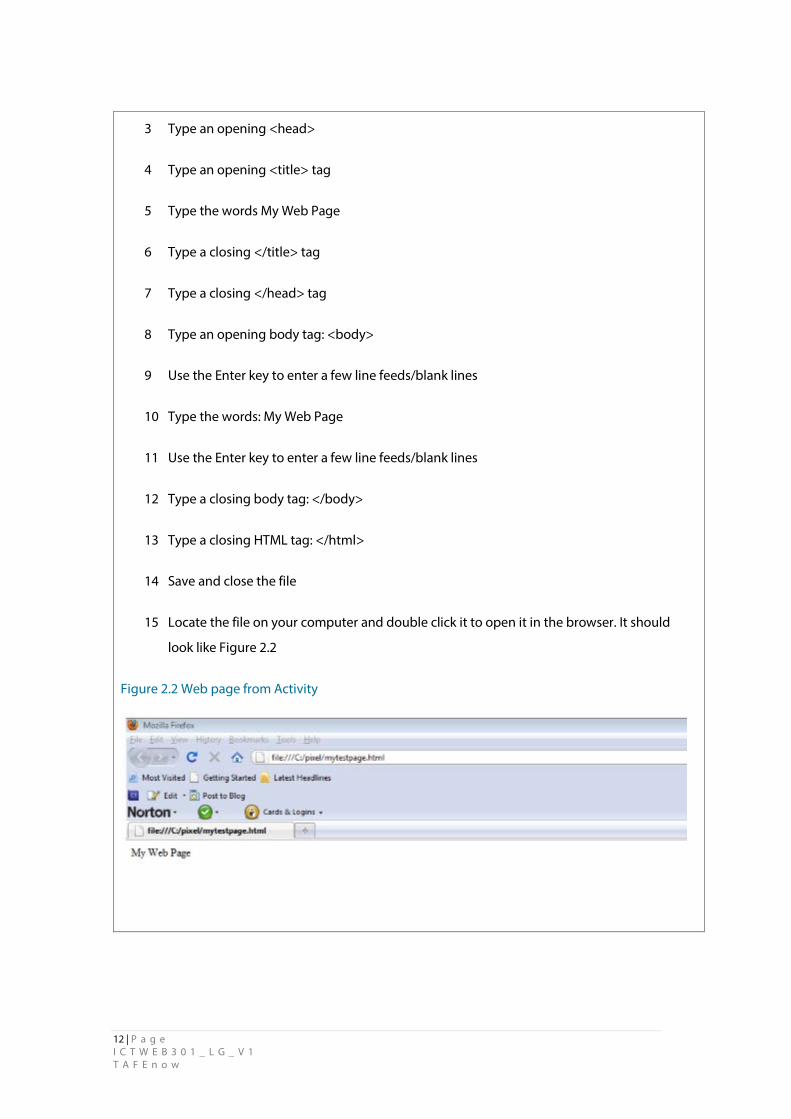
1 Type an opening HTML tag: <html>
2 Use the Enter to enter a few line feeds/blank lines
12 | P a g e I C T W E B 3 0 1 _ L G _ V 1 T A F E n o w
3 Type an opening <head>
4 Type an opening <title> tag
5 Type the words My Web Page
6 Type a closing </title> tag
7 Type a closing </head> tag
8 Type an opening body tag: <body>
9 Use the Enter key to enter a few line feeds/blank lines
10 Type the words: My Web Page
11 Use the Enter key to enter a few line feeds/blank lines
12 Type a closing body tag: </body>
13 Type a closing HTML tag: </html>
14 Save and close the file
15 Locate the file on your computer and double click it to open it in the browser. It should
look like Figure 2.2
Figure 2.2 Web page from Activity
13 | P a g e I C T W E B 3 0 1 _ L G _ V 1
T A F E n o w
Now that you have an understanding of HTML elements, tags and attributes you can move on
to learning about individual tags that markup common HTML elements.
As you go through each Activity below you will complete a tutorial on W3 Schools and then
practice what you have learnt by modifying the mytestpage.html file.
Once you have completed all these activities you will create web pages for Pixel Digital
Products from your design in the Topic 1.
As you complete the following activities, leave mytestpage.html open in Notepad and in your
browser window. As you make changes, save them in Notepad. Go to the page in your
browser and click the Refresh button.
You should be able to see your changes.
LEARNING ACTIVITIES ACTIVITY 11
Headings and Paragraphs
1 Complete the following HTML tutorials at: http://www.w3schools.com/html/default.asp
> Headings
> Paragraphs
2 Using mytestpage.html in Notepad, complete the following:
> Insert this comment after the opening html tag: this is my first attempt at a web page
> Make the words My Web Page a Heading 1
> Insert a horizontal line beneath this heading
> Add a paragraph with these words, using a line break to separate the sentences:
> My name is (yourname) and this is my first web page.
> I will practice the basic tags on it!

14 | P a g e I C T W E B 3 0 1 _ L G _ V 1 T A F E n o w
LEARNING ACTIVITIES ACTIVITY 12
Formatting, Fonts and Styles
1 Complete the following HTML tutorials at: http://www.w3schools.com/html/default.asp
> Formatting
> Fonts
> Styles
2 Using mytestpage.html in Notepad, complete the following:
> Use the style attribute to set the background colour of the body tag to a colour of your
choice
> Use the style attribute to make the h1 tag a font colour of your choice and align it in the
centre of the page
> Modify the paragraph tag to have:
> a background colour of your choice, using the style attribute
> font Verdana, size 3, a contrasting font colour, using the style attribute
> make the entire paragraph bold
LEARNING ACTIVITIES ACTIVITY 13
More About Styles
1 Complete the following HTML tutorial:
> HTML CSS: found at this link http://www.w3schools.com/html/html_css.asp
2 Using mytestpage.html in Notepad, complete the following:
> Create an Internal Style sheet to replace all the formatting you did using the style
attribute in Activity 12 above
> Delete all the style attributes you used in Activity 12 above

15 | P a g e I C T W E B 3 0 1 _ L G _ V 1
T A F E n o w
LEARNING ACTIVITIES ACTIVITY 14
Links and Images
1 Complete the following HTML tutorials at: http://www.w3schools.com/html/default.asp
> Links
> Images
2 Using mytestpage.html in Notepad, complete the following:
> Insert an image of your choice with these attributes:
> Alt – Useful Links
> Width and height – 50
> No border
> Text – Click the image for Useful Links
> Text should be on the left of the image
> Insert an anchor called usefullinks on the page (Hint: add a number of </br>'s to put the
named anchor much further down the page after the image)
> Modify the image to be a link to the named anchor
> After the named anchor add external links to the following sites:
> Google or your favourite search engine
> Your favourite news website
> You favourite social networking site
> Add a style attribute to these links that takes away the underline
> Insert an image in front of each link and align the text to the top
> Include correct alt text
> Use the same width, height and border as the first image above
> Create a mailto link to your own email address
16 | P a g e I C T W E B 3 0 1 _ L G _ V 1 T A F E n o w
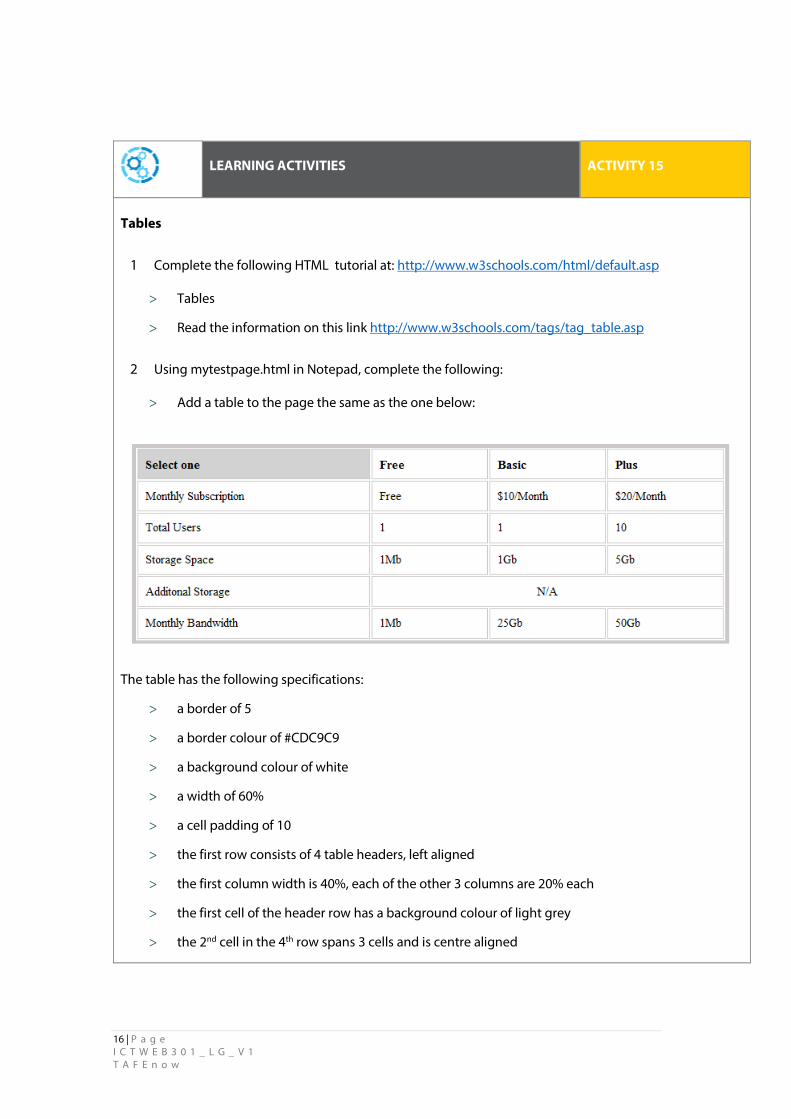
LEARNING ACTIVITIES ACTIVITY 15
Tables
1 Complete the following HTML tutorial at: http://www.w3schools.com/html/default.asp
> Tables
> Read the information on this link http://www.w3schools.com/tags/tag_table.asp
2 Using mytestpage.html in Notepad, complete the following:
> Add a table to the page the same as the one below:
The table has the following specifications:
> a border of 5
> a border colour of #CDC9C9
> a background colour of white
> a width of 60%
> a cell padding of 10
> the first row consists of 4 table headers, left aligned
> the first column width is 40%, each of the other 3 columns are 20% each
> the first cell of the header row has a background colour of light grey
> the 2nd cell in the 4th row spans 3 cells and is centre aligned
17 | P a g e I C T W E B 3 0 1 _ L G _ V 1
T A F E n o w
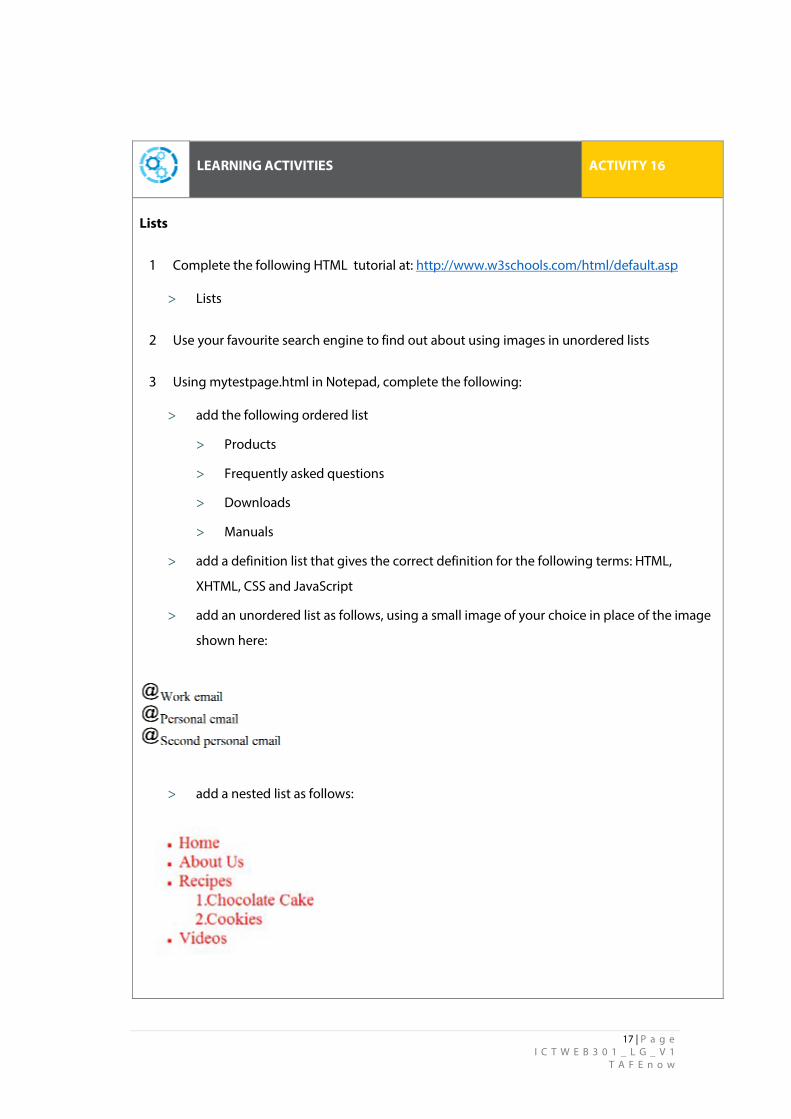
LEARNING ACTIVITIES ACTIVITY 16
Lists
1 Complete the following HTML tutorial at: http://www.w3schools.com/html/default.asp
> Lists
2 Use your favourite search engine to find out about using images in unordered lists
3 Using mytestpage.html in Notepad, complete the following:
> add the following ordered list
> Products
> Frequently asked questions
> Downloads
> Manuals
> add a definition list that gives the correct definition for the following terms: HTML,
XHTML, CSS and JavaScript
> add an unordered list as follows, using a small image of your choice in place of the image
shown here:
> add a nested list as follows:
18 | P a g e I C T W E B 3 0 1 _ L G _ V 1 T A F E n o w
LEARNING ACTIVITIES ACTIVITY 17
Advanced Styles
An in depth explanation of Cascading Style Sheets is outside the scope of this unit, however the
following tutorial will explain how to use styles for simple page layout.
1 Complete the tutorial on CSS found here: http://www.w3.org/Style/Examples/011/firstcss ,
creating the example web page and CSS file, and storing them in your folder with
mytestpage.html.
2 Experiment with the CSS file by changing the way the links look and the colours used on the
page.
LEARNING ACTIVITIES ACTIVITY 18
Colours
1 Complete the following HTML tutorials at: http://www.w3schools.com/html/default.asp
> Colors
> Colornames
> Colorvalues
2 What is the Hex value for Red, Black, Green and Blue?
3 What is the colour name for this Hex value #4B0082?
4 What is the Hex value for the colour you chose as the background for your page?
19 | P a g e I C T W E B 3 0 1 _ L G _ V 1
T A F E n o w
XHTML
XHTML stands for Extensible Hypertext Markup Language and is a stricter version of HTML. It
is a W3C recommendation and should be used as best practice.
If you have completed the activities for mytestpage.html correctly you will not need to make
many changes to make it a XHTML page.
LEARNING ACTIVITIES ACTIVITY 19
Convert HTML to XHTML
1 Complete the following XHTML tutorials at http://www.w3schools.com/html/html_xhtml.asp
> Introduction
> Why
> XHTML vs HTML
> Syntax
> DocTypes
2 Using mytestpage.html in Notepad, complete the following:
> Check to make sure all your html tags are properly closed and nested
> Check that all attribute names are in lower case
> Decide which DocType you should use and add the appropriate code to the top of your page
Accessibility
By making your website accessible you are increasing its potential audience.
For many people with disabilities, the internet is an important tool for interacting with the
world. People with visual, motor skill, cognitive, hearing and other disabilities can encounter
problems when using websites that have not been designed in an appropriate way.
20 | P a g e I C T W E B 3 0 1 _ L G _ V 1 T A F E n o w
Many visually impaired people use a screen reader or Braille reader to interpret web pages.
Others may just need very large text. It’s important to write your pages using clean, standard
HTML and to separate content from presentation by using Cascading Style Sheets (CSS) so
that pages can be read easily.
Under Australian law it is illegal to discriminate against anyone because of disability. The
Commonwealth Disability Discrimination Act states that websites must adhere to the Web
Content Accessibility Guidelines (WCAG) version 1.0 devised by W3C.
You can find more information on the Disability Act and web access at:
www.humanrights.gov.au/disability_rights/standards/www_3/www_3.html.
You can view the full WCAG at: http://www.w3.org/TR/WAI-WEBCONTENT/.
LEARNING ACTIVITIES ACTIVITY 20
Accessibility checklist
1 Read the web accessibility checklist found on WebAim site:
http://webaim.org/standards/wcag/checklist
2 Review your test page to see if you have included accessibility options appropriate for the
content.
LEARNING ACTIVITIES ACTIVITY 21
Consolidation
Using your Pixel storyboard from Activity 1.7, create the Pixel website using XHTML. Incorporate
the various elements you practiced in the Activities in these notes. Use an external style sheet for all
colours, fonts etc. As a minimum you should have the following pages:
> A startup page with the company logo only, linking to a Home page
> A Home page that has information about the company

21 | P a g e I C T W E B 3 0 1 _ L G _ V 1
T A F E n o w
> A Products page (use named hyperlinks to link to each product)
> A Frequently Asked Questions page
> A page where people can download user manuals
> Use a list to provide navigation on each page and an external style sheet for colours, layout
and fonts
> Include appropriate accessibility options
All files to be used on the site, including example user manual files, found in the Additional
Resources page in the Learning Content and Activities tab on the course website.
22 | P a g e I C T W E B 3 0 1 _ L G _ V 1 T A F E n o w
Topic 3 – Validate documents The final step in creating your website is to validate the web pages. Web pages are validated
for these reasons:
> To make sure they are what the client wanted
> To make sure they comply with W3C standards, including accessibility
> To make sure they display correctly in a variety of browsers
Client Validation
A set of specifications for your website should be agreed upon between you and your client.
These specifications would be contained in a requirements document.
Keep these in mind and check that your work complies with them as you develop your
markup language documents.
23 | P a g e I C T W E B 3 0 1 _ L G _ V 1
T A F E n o w
Specifications could include:
> The style or formatting of elements such as text
> Style guidelines to fit in with organisation 'branding'
> The positions of elements on the page
> The structure of the page
> Web browsers that the web page must work on
> Size limits for files, especially images
Read the requirements document carefully and communicate with your client to verify their
expectations.
LEARNING ACTIVITIES ACTIVITY 22
Validate against requirements
1 Review the requirements document for the Pixel website that you created in Activities 6
and 7
2 Compare the requirements with the pages you created in Activity 18. Do the pages reflect
the requirements e.g. colours, styles?
3 Modify the site if required
Standards Validation
You need to validate your web pages to ensure that the markup is correct, error free and
complies with Accessibility Standards. The recommendations from the World Wide Web
Consortium (www.w3.org) are widely accepted as the international standards for web mark-
up languages.
The easiest and most thorough way to check your pages is to use one of the free validation
tools available on the internet or for download. These will check your web page and give you
a list of errors that are found on the page.
24 | P a g e I C T W E B 3 0 1 _ L G _ V 1 T A F E n o w
You can also download Accessibility Toolbars that you can use to check your pages while they
are displayed in the browser. Use your favourite Search Engine to locate sites you where you
can download these toolbars.
A few common HTML/XHTML errors that you might encounter are:
> No DTD: You should make the first line of your HTML a 'document type definition' (DTD)
so that the validator knows what version and type of markup language you are using - for
example:
<!DOCTYPE HTML PUBLIC '-//W3C//DTD HTML 4.01 Transitional//EN'>
> Missing alt tags - all graphics in your website should include "alt" tags to provide a text
alternative to users with vision impairment
> Improper nesting of elements - tags need to be opened and closed in the correct order.
For example <p><b> will be followed by </b></p> (not </p></b>)
> Not closing tags - missing quote marks, brackets or colons
> Using spaces in document titles - use an underscore "_" instead
> Missing title - HTML/XHTML documents must have a "title" element in the head of the
document
> Using upper case tags - XHTML is case sensitive (use <body> not <BODY>)
> Missing quotes - attributes should have quotation marks surrounding them. For example
<font color="#003366">
LEARNING ACTIVITIES ACTIVITY 23
Research validator tools
Visit these websites to learn more about validator tools:
> World Wide Web Consortium (W3C): validator.w3.org
> Total Validator: http://www.totalvalidator.com/
> CSE HTML Validator Lite: http://www.freehtmlvalidator.com/

25 | P a g e I C T W E B 3 0 1 _ L G _ V 1
T A F E n o w
LEARNING ACTIVITIES ACTIVITY 24
Validate against standards
1 Use an online or free to download validator or validation toolbar to validate each of the pages
in the Pixel website
2 What types of errors did you get?
3 Fix the errors and re validate the pages until they are error free
Browser Validation
Different bowsers can interpret markup code in different ways. It's important to be confident
that your web pages will display correctly in all the browsers specified by the client.
Browser popularity changes as new browsers come onto the market and older browsers are
no longer supported.
LEARNING ACTIVITIES ACTIVITY 25
Validate against browsers
Use your favourite search engine to research which browsers are popular at the time you are doing
this unit.
Here is a sample of a simple HTML page shown side-by-side in two different browser windows
(Firefox Version 1.5 and Internet Explorer Version 6 - both on Windows XP).

26 | P a g e I C T W E B 3 0 1 _ L G _ V 1 T A F E n o w
Figure 3.1 Comparison of the same HTML page in two different browsers
Both browsers display the page clearly but there are small differences, even in this very basic
mark-up document. The most noticeable differences include:
> Page margins - IE places the H1 text 2 pixels right and 7 pixels down from where Firefox
places the same text
> Paragraphs - paragraphs are spaced further apart in IE than Firefox
> Tables- table borders display slightly differently and table cells are more widely spaced in
IE.
For a professional web designer, these small differences can make or break a site design.
There are many strategies that designers use in their markup to ensure consistent appearance
across browsers (and platforms). These strategies are outside the scope of this unit. You
should, however, view your web pages in different browsers to make sure everything you
have put on the page is displayed correctly.

27 | P a g e I C T W E B 3 0 1 _ L G _ V 1
T A F E n o w
LEARNING ACTIVITIES ACTIVITY 26
Validate in different browsers
1 View your Pixel web pages in at least 3 different browsers.
2 Which browsers did you use?
3 Were there any differences in the way the pages displayed?

![1 Hyper Text Markup Language (HTML) UNIT- 02 Hyper Text Markup Language (HTML) UNIT-02/LECTURE-01 Introduction to Hyper Text Markup Language (HTML) About HTML: [RGPV/Dec 2013(4)] So](https://img.pdfslide.net/doc/110x75/5aae4bc17f8b9a25088c15fa/1-hyper-text-markup-language-html-unit-02-hyper-text-markup-language-html-unit-02lecture-01.jpg)
![[ (Hyper Text Markup Language(html · [ (Hyper Text Markup Language(html] ٣Page [ﮫﻣودﻟا نﻣﺣرﻟا ﺢﺗﻓ /قﯾﺳﻧﺗ]:ﮫﻐﻠﻟا تاﺰﯿﻤﻣ ﺂﯿﻧﺎﺛ:ﮫﻐﻠﻟا](https://img.pdfslide.net/doc/110x75/5ee0292cad6a402d666b6611/-hyper-text-markup-languagehtml-hyper-text-markup-languagehtml-page-iii.jpg)

![[ (Hyper Text Markup Language(html (Hyper Text Markup Language(html] ٣Page [ﮫﻣودﻟا نﻣﺣرﻟا ﺢﺗﻓ /قﯾﺳﻧﺗ]:ﮫﻐﻠﻟا تاﺰﯿﻤﻣ ﺂﯿﻧﺎﺛ:ﮫﻐﻠﻟا](https://img.pdfslide.net/doc/110x75/5aae4bc17f8b9a25088c15d3/-hyper-text-markup-languagehtml-hyper-text-markup-languagehtml-page-.jpg)


![แนะนำการเขียน HTML [2] (Hyper Text Markup Language)](https://img.pdfslide.net/doc/110x75/56815e80550346895dcd0dd2/-html-2-hyper-text-markup-language.jpg)
