Embed Size (px)
Citation preview

© 2019 Cisco and/or its affiliates. All rights reserv ed. This document is Cisco Public Inf ormation. Page 1 of 35
Identity Awareness and Control on Cisco Firepower NGFW
Guide

© 2019 Cisco and/or its affiliates. All rights reserv ed. This document is Cisco Public Inf ormation. Page 2 of 35
Contents
Overview ....................................................................................................................................................................................... 3
Passive identity with Cisco ISE overview ........................................................................................................................... 5 Active Directory (AD) .............................................................................................................................................................. 7 SPAN ........................................................................................................................................................................................ 7 Syslog ....................................................................................................................................................................................... 7 API ............................................................................................................................................................................................. 7 Passive ID provider/subscriber scaling matrix ................................................................................................................... 8
Components used...................................................................................................................................................................... 9
Prerequisites ............................................................................................................................................................................... 9
ISE-PIC configuration and integration.................................................................................................................................. 9 Joining ISE-PIC to Active Directory domain ....................................................................................................................... 9 AD integration with ISE/PIC ................................................................................................................................................14 WMI as probe: Directly monitoring DC using WMI ..........................................................................................................14 WMI as probe: Monitoring of DC running as Windows Event Collector (WEC)..........................................................16 ISE-PIC agent: Directly monitoring DC using agent........................................................................................................21 ISE-PIC agent: Agent installed on and monitoring DC running as Windows Event Collector (WEC).....................24 ISE-PIC agent: Agent installed on member server and monitoring DC running as Windows Event Collector (WEC) .....................................................................................................................................................................................25
FMC configuration and integration .....................................................................................................................................26 Configuring AD Realm..........................................................................................................................................................27 Configuring ISE as identity source .....................................................................................................................................29 Configuring access policies to be user identity aware ....................................................................................................34
Conclusion .................................................................................................................................................................................35

© 2019 Cisco and/or its affiliates. All rights reserv ed. This document is Cisco Public Inf ormation. Page 3 of 35
Overview
The Cisco Firepower® Next-Generation Firewall (NGFW) provides an additional layer of network security and
visibility by associating user identity to traffic flows.
The Firepower Management Center (FMC) receives the following information as a part of the identity integration:
1. User identity information from configured identity sources: This provides the live user with IP address mapping
to the FMC and is updated frequently.
2. User and group information using the Lightweight Directory Access Protocol (LDAP) or from an Active
Directory server: Realms are configured to provide the user and group data that the FMC stores in its user
database. Realms are connections between the FMC and the user accounts on the servers that are
monitored.
When the FMC detects user data from a user login, from any identity source, the user from the login is checked
against the list of users in the FMC user database. If the login user matches an existing user , the data from the
login is assigned to the user. Logins that do not match existing users cause a new user to be created.
Figure 1. Identity policy management on FMC.
Cisco Firepower supports different user identity sources to determine identity for network traff ic flowing through the
system. Each identity source provides a store of users for user awareness. These users can then be controlled
with identity and access control policies. The following table highlights these different identity sources:

© 2019 Cisco and/or its affiliates. All rights reserv ed. This document is Cisco Public Inf ormation. Page 4 of 35
Table 1. FMC user identity sources.
User identity source
Policy Server requirements Type Authentication type User awareness?
User control?
Cisco® Identity
Services Engine (ISE)/ ISE
Passive Identity
Connector (ISE-PIC)
Identity Microsof t Activ e
Directory
Authoritativ e logins Passiv e Yes Yes
Captive portal Identity LDAP or
Microsof t Activ e Directory
Authoritativ e logins Activ e Yes Yes
TS agent Identity Microsof t and Citrix
terminal serv ers
Authoritativ e logins Passiv e Yes Yes
Sourcefire user
agent*
Identity Microsof t Activ e
Directory
Authoritativ e logins Passiv e Yes Yes
Traffic-based detection
Network discov ery
N/A Nonauthoritativ e logins
N/A Yes No
*ISE/ISE-PIC preferred
In the above table, we can see that there are two authentication types defined:
1. Passive authentication: Passive identity learning is the technique wherein a security tool will passively learn
the username and IP address of users on the network from a third party, such as Microsoft Active Directory
(AD). The methods used for learning the identities of the users on a network will vary based on the identity
source and the use case. In all the passive identity sources above, there is no additional end user interaction
required to receive identity and the firewall is able to transparently authenticate users.
2. Active authentication: The user authenticates through preconfigured managed devices through some form of
interaction (such as a captive portal). The Domain Controller (DC) is the AD server component that performs
the authentication of the user. That is, it receives the user’s username and password hash and validates that
against the AD database.
This document is a high-level reference guide to integrating Cisco ISE with Cisco Firepower for passive user
identity awareness and control.

© 2019 Cisco and/or its affiliates. All rights reserv ed. This document is Cisco Public Inf ormation. Page 5 of 35
Passive identity with Cisco ISE overview
Figure 2. ISE pxGrid provider/subscriber ecosystem.
Cisco ISE or ISE-PIC, referred to together as ISE/PIC in this document, is an authoritative identity source and
provides user awareness data for users who authenticate using AD, LDAP, RADIUS, or RSA (Rivest–Shamir–
Adleman). ISE/PIC then uses Cisco pxGrid services in order to publish authenticated user identities collected from
a variety of providers and stored by the Cisco ISE/PIC session directory to the Cisco FMC. All the testing in this
document has been done with ISE versions 2.4 and later, but most scenarios will work with 2.2 and later unless
explicitly mentioned.
ISE/PIC is uniquely positioned to be source of passive identity due to a variety of reasons. As a multivendor
security ecosystem, it can connect subscribers like FMC, Cisco Stealthwatch®, Cisco DNA Center
™, and Web
Security Appliance (WSA) to third-party identity provider products like Active Directory, Splunk, and Infoblox
for identity sharing. We are constantly adding more products to this list.
In a full ISE deployment (not ISE-PIC), you can additionally use 802.1X user information from wired and wireless
networks, and additional integration with profiling and Cisco TrustSec® can be done, allowing for firewall policies
that include the device type and Scalable Group Tag (SGT).

© 2019 Cisco and/or its affiliates. All rights reserv ed. This document is Cisco Public Inf ormation. Page 6 of 35
ISE/PIC creates a session directory that exposes the authenticated user’s session attribute information including
username, domain, and so on. pxGrid then publishes these session directories as topics to subscribers such as
FMC. When the FMC subscribes to these session topics, then ISE/PIC directs it to download the bulk session data
from the Monitoring node (MnT). When updates to the session information are discovered, the corresponding
session directory is updated and published to the FMC in real time. ISE-PIC does not provide ISE attribute data or
support ISE EPS remediations (Endpoint Protection Services).
Figure 3. FMC-ISE w orkflow.
© 2019 Cisco and/or its affiliates. All rights reserv ed. This document is Cisco Public Inf ormation. Page 7 of 35
The different types of providers and probes include:
Active Directory (AD)
AD is the most common source from which to receive user identity information, including username, IP address,
and domain name. ISE/PIC version 2.2 through v2.4 supports Microsoft AD servers 2003 and 2003 R2 (both
deprecated by Microsoft), 2008, 2008 R2, 2012, 2012 R2, and 2016 at all functional levels. It also supports
multidomain and multiforest integration with AD infrastructures to support authentication and attribute collection
across large enterprise networks and supports up to 50 join points. The two types of AD-based probes are
detailed below:
Windows Management Instrumentation (WMI)
WMI is a Microsoft communication mechanism that allows ISE/PIC to allow ISE/PIC to remotely subscribe to
security events generated for Kerberos authentication ticket generation and renewals. Put simply, ISE/PIC can use
WMI to be notified of domain user logins and renewals without needing an external agent to be installed on the AD
domain controller or member server.
ISE-PIC agent
The ISE/PIC agent is a native Windows 32-bit application introduced with ISE/PIC 2.2 that can be installed on
Active Directory domain controllers or on member servers. The agent probe is a quick and efficient solution when
using Active Directory for user identity information and when WMI is not a preferred option. The agent installation
on the AD server has also been greatly simplified by allowing remote install from the ISE/PIC administrative GUI.
SPAN
SPAN allows you to quickly and easily enable ISE/PIC to listen to the network and retrieve user information without
having to configure Active Directory to work directly with ISE/PIC. SPAN monitors network traffic, specifically
examining Kerberos messages, extracting user identity information - username, IP address, and domain name.
Syslog
This feature parses syslog messages from any client (identity data provider) that delivers RFC-compliant syslog
messages, including event-style syslog messages from providers such as InfoBlox, Blue Coat, BlueCat, and
Lucent as well as DHCP syslog messages. Those syslog messages are parsed for user identity information,
including MAC addresses that are then added to the session directory.
API
The API providers feature in Cisco ISE/PIC enables you to push user identity information from your customized
program or from Cisco’s Terminal Server (TS) agent to the built-in ISE/PIC REST API service. In this way, you can
customize a programmable client from your network to send user identities that were collected from any Network
Access Control (NAC) system to the service. Furthermore, the Cisco ISE/PIC API provider enables you to interface
with network applications such as the TS agent on a Citrix server, where all users have the same IP address but
are assigned unique ports.

© 2019 Cisco and/or its affiliates. All rights reserv ed. This document is Cisco Public Inf ormation. Page 8 of 35
Passive ID provider/subscriber scaling matrix
Table 2. Passive ID scaling matrix.
Scenario 3515/3595 virtual appliance
Max AD domain controllers supported via WMI or ISE AD Agent 100
Max ISE-PIC agents (assuming 1:1 agent to DC) 100
Recommended # DCs per agent (agent on DC) 1
Recommended # DCs per agent (agent on member server) 10
Recommended # Policy Service Nodes (PSNs) enabled for WMI (passive ID service) 2
Max REST API providers 50
Max REST API EPS 1,000
Max syslog providers 70
Max syslog EPS 400
Max endpoints probed per interval 100,000
Max pxGrid subscribers 20
Bindings (IP address, MAC address, and username) 300,000
Table 3. User limits by FMC.
Management center model Concurrent users Total users
MC750 2,000 2,000
MC1000 50,000 50,000
MC1500 50,000 50,000
FS2000 64,000 150,000
MC2500 64,000 150,000
MC3500 64,000 300,000
MC4000 64,000 600,000
MC4500 64,000 600,000
Virtual 50,000 50,000
ASA (Adaptive Services Engine) with Firepower services 2,000 2,000
FDM (Firepower Device Manager) onbox manager 2,000 2,000
Each AD realm on the FMC points to a single domain. While there are no hard limits on the number of AD realms,
keep in mind that the total number of users downloaded do not exceed the limits given i n the above table. As of
FMC version 6.2.3, you can add only one ISE/PIC integration points. The FMC supports Microsoft AD servers
2008, 2008 R2, 2012, 2012 R2, and 2016 at all functional levels for passive identity.
As you will see in the following sections, with ISE/PIC integration to your FMC, you will have a variety of options,
including scalable deployments for your passive identity needs.

© 2019 Cisco and/or its affiliates. All rights reserv ed. This document is Cisco Public Inf ormation. Page 9 of 35
Components used
● FMC and virtual Firepower Thread Defense (FTD) running 6.2.3
● Single-node ISE-PIC running 2.4
● AD domain Controllers and member servers running Windows Server 2012 R2
Prerequisites
● Working knowledge of ISE, ISE-PIC, and AD domain administration. For initial setup information, please
refer to configuration guides and the ISE Integration guides at https://community.cisco.com/t5/security-
documents/ise-design-amp-integration-guides/ta-p/3621164.
● Working knowledge of Cisco Firepower. More details can be found on the NGFW Communities.
● AD credentials with the required permissions (different depending on deployment scenario).
● Verify the version of ISE/PIC is compatible with the FMC using the Cisco Firepower Compatibility Guide.
ISE-PIC configuration and integration
The following sections contain the steps to configure and setup passive identity with ISE-PIC but can also be used
with an ISE standalone or distributed deployment since the UI that you see here is the same as the passive identity
work center on ISE.
Joining ISE-PIC to Active Directory domain
Before you begin
● Ensure that the Microsoft Active Directory server does not reside behind a network address translator and
does not have a Network Address Translation (NAT) address.
● Ensure that the Microsoft Active Directory account intended for the join operation is valid and is not
configured with the Change Password on Next Login.
● Ensure that ISE-PIC has an entry in the Domain Name Server (DNS). Ensure you have properly configured
reverse lookup for the client machine from ISE-PIC.
● The AD user used to perform the join operation does not need to be a domain administrator but needs to
have the following permissions. This is true irrespective of using WMI or ISE-PIC agent:
Table 4. AD account permissions.
Join operations Leave operations Cisco ISE machine accounts
For the account that is used to perf orm the join operation, the f ollowing permissions are
required:
● Search Activ e Directory (to see if a Cisco ISE machine account already exists)
● Create Cisco ISE machine account to
domain (if the machine account does not already exist)
● Set attributes on the new machine
account (f or example, Cisco ISE machine account password, SPN, and
dnsHostname)
It is not mandatory to be a domain administrator to perf orm a join operation.
For the account that is used to perf orm the leav e operation, the
f ollowing permissions are required:
● Search Activ e Directory (to see if a Cisco ISE machine account
already exists)
● Remov e Cisco ISE machine account f rom domain
If y ou perf orm a f orce leav e (leav e
without the password), it will not remov e the machine account f rom
the domain.
For the newly created Cisco ISE machine account that is used to communicate to the Activ e Directory connection, the
f ollowing permissions are required:
● Ability to change own password
● Read the user/machine objects corresponding to
users/machines being authenticated
● Query some parts of the Activ e Directory to learn about required inf ormation (f or example, trusted domains,
alternativ e UPN suf f ixes, and so on)
● Ability to read tokenGroups attribute
You can precreate the machine account in Activ e Directory ,
and if the samAccountName name matches the Cisco ISE
appliance hostname, it should be located during the join operation and reused.
If multiple join operations are perf ormed, multiple machine
accounts are maintained inside Cisco ISE, one f or each join.

© 2019 Cisco and/or its affiliates. All rights reserv ed. This document is Cisco Public Inf ormation. Page 10 of 35
ISE-PIC makes the process of joining an AD domain easy by providing a step-by-step wizard to quickly setup AD
as a provider.
Figure 4. ISE-PIC PassiveID w izard.
For the purposes of this guide, we will not be using this wizard and will be configuring each element separately.
1. Navigate to Providers -> Active Directory. This will take you to the Active Directory landing page where we
can add, edit, view, and delete AD identity providers.
Figure 5. AD provider.
2. Click on Add.
Figure 6. AD join point.

© 2019 Cisco and/or its affiliates. All rights reserv ed. This document is Cisco Public Inf ormation. Page 11 of 35
3. In the dialog box that appears, enter a unique name that distinguishes this configured Active Directory join
point quickly and easily in the Join Point Name field. Enter the AD domain name in the Active Directory
Domain field. Click on Submit.
Figure 7. AD join point configuration.
4. You will be prompted to join the ISE nodes to the configured AD domain. Click on Yes.
Figure 8. AD join prompt.
5. Enter the User Principle Name (UPN) of a domain user with privileges as mentioned previously in the
Domain Administrator field. Enter this user’s password in the Password field. You will notice that these
credentials are stored on the system by default. This is specific to standalone ISE-PIC deployments and
reduces the overhead of having to re-enter the domain credentials for any future changes. Storing credentials
is essential to allow the ISE endpoint probe to function and detect user logoffs. In ISE (not ISE-PIC), specific
subnets can be mapped to different PSNs especially in geographically widespread deployments. The AD
credentials are also used by WMI to collect AD events to send to ISE. You can also enter the OU of the
domain administrator in the Specify Organizational Unit (OU) field if the user’s OU is other than
CN=Computers,DC=someDomain,DC=someTLD. Click on OK.
Figure 9. Domain admin credentials.
6. At this point, the ISE node will attempt to join the AD domain with the credentials provided. Once the status
shows as completed, click on Close.

© 2019 Cisco and/or its affiliates. All rights reserv ed. This document is Cisco Public Inf ormation. Page 12 of 35
7. Let’s configure the AD user groups that will be used. Edit the join point created. Click the Groups tab.
Figure 10. Edit join point.
8. You can either manually add a group or retrieve and select existing groups. In this example, we will be
choosing the latter option. Click on Retrieve Groups to view user groups on this domain. You can also use a
filter to retrieve a subset of the groups. Check all the groups that are relevant. Click OK and Save.
Figure 11. Select groups from directory.
Figure 12. Select groups from directory.

© 2019 Cisco and/or its affiliates. All rights reserv ed. This document is Cisco Public Inf ormation. Page 13 of 35
9. Next, we will add the domain controllers that you would like to add to the join point for monitoring. Navigate to
Providers -> Active Directory and edit the join point created.
Figure 13. Edit AD join point.
10. After joining the AD and adding the DCs, let’s navigate to Providers -> Endpoint Probes. The endpoint probe
functionality gets enabled automatically after AD join and runs on every user session with last update time of 4
hours to check whether the user is still logged in and its MAC address and OS version. This requires port 445
to be enabled on the endpoints and allows the FMC subscriber to be notified if the user is still active or has
disconnected.
Figure 14. Endpoint probes.
11. Let’s also look at the Passive ID settings. The history interval in minutes specifies the time interval for which
the Passive ID service reads back login information, while the user session aging time determines how long
to keep the user id session alive if the endpoint probe does not disconnect the session earlier.
Figure 15. PassiveID settings.
12. There are a few more steps to achieving ISE AD integration but these vary depending on the type of probe
used and the source of the AD domain login events. We will explore these options in the upcoming sections.

© 2019 Cisco and/or its affiliates. All rights reserv ed. This document is Cisco Public Inf ormation. Page 14 of 35
Configuring event forwarding with AD
Windows Event Forwarding (WEF) is an existing Windows service that allows a designated collector to receive
and store events from a remote source. While centralized events are an important element of incident response, in
our case, event forwarding is especially important to allow a scalable method in obtaining user IP mappings in a
distributed AD environment. Event forwarding requires one or more servers that are the event collectors to serve
as subscription managers and allow an administrator to configure which event subscriptions will get sent to the
server. These events are sent over WinRM, requiring no extra log forwarder software, and WEF can be configured
easily using Windows Group Policy Object (GPO). For more details, please refer to
https://blogs.technet.microsoft.com/jepayne/2015/11/23/monitoring-what-matters-windows-event-forwarding-for-
everyone-even-if-you-already-have-a-siem/.
AD integration with ISE/PIC
In this section, we will walk through the AD deployment options that are possible when integrating ISE/PIC and
FMC. You can adopt any method listed below depending on the size of your AD infrastructure and type of probe
that you want to use. The choice of probe used is typically a matter of administrato r preference.
Table 5. ISE-AD deployment support matrix.
Deployment method WMI on ISE 2.4 Agent on ISE 2.4 WMI (upcoming in future
release)
Agent (upcoming in
future release)
Direct DC monitoring ✓ ✓ ✓ ✓
Events forwarded to DC,
monitored on DC
✓ ✓* ✓ ✓
Events forwarded to DC,
monitored on member
server
N/A ✓* N/A ✓
Events forwarded to
member server,
monitored on member server
N/A N/A ✓ ✓
*Due to CSCvj41029, use ISE/PIC version 2.3 p5, 2.4 p3.
WMI as probe: Directly monitoring DC using WMI
Figure 16. Direct DC monitoring.

© 2019 Cisco and/or its affiliates. All rights reserv ed. This document is Cisco Public Inf ormation. Page 15 of 35
ISE communicates directly to the DCs via WMI and subscribes to the DC’s security events. This type of connection
was introduced back in ISE 1.3 and requires you to set up WMI on each DC in your AD infrastructure. Beginning in
ISE 2.1, the WMI setup was made much easier. Steps to set this up are as follows:
1. Edit the AD join point created in step 7 of Joining ISE-PIC to Active Directory domain. Navigate to the passive
ID tab and click on Add DCs. Select the DCs, and click on OK.
Figure 17. Add domain controllers.
2. After adding the required DCs, you will see them listed in the PassiveID Domain Controllers list. Select the
DCs, and click on Config WMI.
Figure 18. Config WMI.
3. The “Config WMI in process” message is displayed.
Figure 19. WMI config in process.
During this step, the following actions are happening in the background:

© 2019 Cisco and/or its affiliates. All rights reserv ed. This document is Cisco Public Inf ormation. Page 16 of 35
a) Add the ID of the WMI client used by ISE (76A64158-CB41-11D1-8B02-00600806D9B6) to the DC’s registry
in two locations: HKEY_CLASSES_ROOT\CLSID\ and HKLM\Software\Classes\Wow6432Node\CLSID\.
This allows the WMI to be recognized as a valid application by the Distributed Component Object Model
(DCOM).
b) Set permissions to use DCOM for a Windows account.
c) Set permissions to use WMI remotely by enabling the Execute Methods and Remote Enable permissions.
d) Allow read access to the Windows account to the security event log by adding the user to the Event Log
Readers and Distributed COM Users Group.
e) Configure the Windows firewall to allow communication to and from ISE.
4. After the configuration process is complete, a success message is displayed.
Figure 20. WMI configured successfully.
5. At this point, you can navigate to the Live Sessions screen on ISE/PIC to view the AD domain login events
that you are subscribing to.
Figure 21. ISE live logs.
WMI as probe: Monitoring of DC running as Windows Event Collector (WEC)
Figure 22. Events forwarded to DC, monitored on DC.

© 2019 Cisco and/or its affiliates. All rights reserv ed. This document is Cisco Public Inf ormation. Page 17 of 35
In this scenario, all the domain logon event logs are forwarded to a Domain Controlle r designated as a WEC. This
method requires ISE/PIC version 2.2 or later and allows you to scale monitoring without having to set up WMI on
all the DCs in your AD infrastructure. Steps to set this up are as follows:
1. Let’s first set up a selected DC as a WEC:
a) Open up an administrative command prompt on the DC and enable the WEC service using Windows
Event Collector utility. The command to do so is wecutil qc. Type Yes when prompted.
b) To allow remote server management and open the required ports on the Windows firewall, we’ll use the
WinRM utility. On the administrative command prompt, type in winrm qc. When the utility created the
WinRM listener, it also created a Service Principal Name for Kerberos authentication to the service.
Figure 23. Configure WinRM.
c) Navigate to the Event Viewer. From the left-hand pane, right click on Subscriptions and select Create
Subscription.
Figure 24. Create Window s subscription.

© 2019 Cisco and/or its affiliates. All rights reserv ed. This document is Cisco Public Inf ormation. Page 18 of 35
d) Enter a name for the subscription. Destination log needs to be set to either Application or System.
Subscription type and source computers in our example will be Source computer initiated. Click on
Select Computer Groups, and add a computer group or individual DCs. Click on OK.
Figure 25. Subscription properties.
Figure 26. Add DCs to subscription.

© 2019 Cisco and/or its affiliates. All rights reserv ed. This document is Cisco Public Inf ormation. Page 19 of 35
e) Next click on Select Events and check all the event levels. Change the By log filter to Security. You can
filter for specifically the following event IDs: 4624, 4768, 4769, and 4770. Click on OK.
Figure 27. Subscription query f ilter.
f) Lastly, click on Advanced for Configure advanced settings and select Minimize Latency. Click on OK
and OK.
Figure 28. Advanced subscription settings.

© 2019 Cisco and/or its affiliates. All rights reserv ed. This document is Cisco Public Inf ormation. Page 20 of 35
g) To allow the WEC’s WinRM service to access the security events on the DCs, we will need to copy the
following line from the output of wevtutil gl security on the WEC. This is the Service Principle of the
Event Log Readers group. If the line does not have the string (A;;0x1;;;NS) append that in Notepad to the
below string for use in the next step. This string adds READ access to the network service account (used
by WinRM) to read the security event logs.
Figure 29. Copy security principle to access security log.
2. Leveraging GPO, we will configure the other DCs to forward their events to the designated WEC.
a) Launch the group policy utility and right click on the computer OU. Click on Create GPO in this domain
and link it here. Provide it with a name and click OK. Assign this GPO to all the DCs that will be
forwarding events to the WEC server.
b) Edit the newly created GPO and modify the target subscription manager at Computer -> Policies ->
Admin Templates -> Windows Components -> Event Forwarding -> Configure target subscription
manager and populate the Server Address field with
Server=http://<fqdnofsubscriptionserver>:5985/wsman/SubscriptionManager/WEC.
c) Allow security event access by the subscription manager. This is where the string copied in step 1g will
come handy. Edit Computer -> Policies -> Admin Templates -> Windows Components -> Event Log
Service -> Security -> Configure log access and paste the O:BAG:SYD line from above.
d) Your GPO should look like this:
Figure 30. GPO configuration.

© 2019 Cisco and/or its affiliates. All rights reserv ed. This document is Cisco Public Inf ormation. Page 21 of 35
e) After a group policy update on all the DCs, you should start seeing domain login events in the specified
destination (Application/System) on the WEC.
3. On ISE/PIC, you will have to configure WMI on the WEC. To do this, please follow the steps at WMI as Probe:
Directly monitoring DC using WMI.
ISE-PIC agent: Directly monitoring DC using agent
Figure 31. Directly monitoring DC.
All the domain logon events are forwarded to the Domain Controller. The ISE-PIC agent is installed either using
remote or local install on the Domain Controller itself and monitors these events to pass back on to the ISE/PIC
node. The steps to do this are as follows:
1. Edit the AD join point created in step 7 of Joining ISE-PIC to Active Directory domain. Navigate to the passive
ID tab, and click on Add DCs. Select the DCs and click on OK.
Figure 32. Add Domain Controllers.
© 2019 Cisco and/or its affiliates. All rights reserv ed. This document is Cisco Public Inf ormation. Page 22 of 35
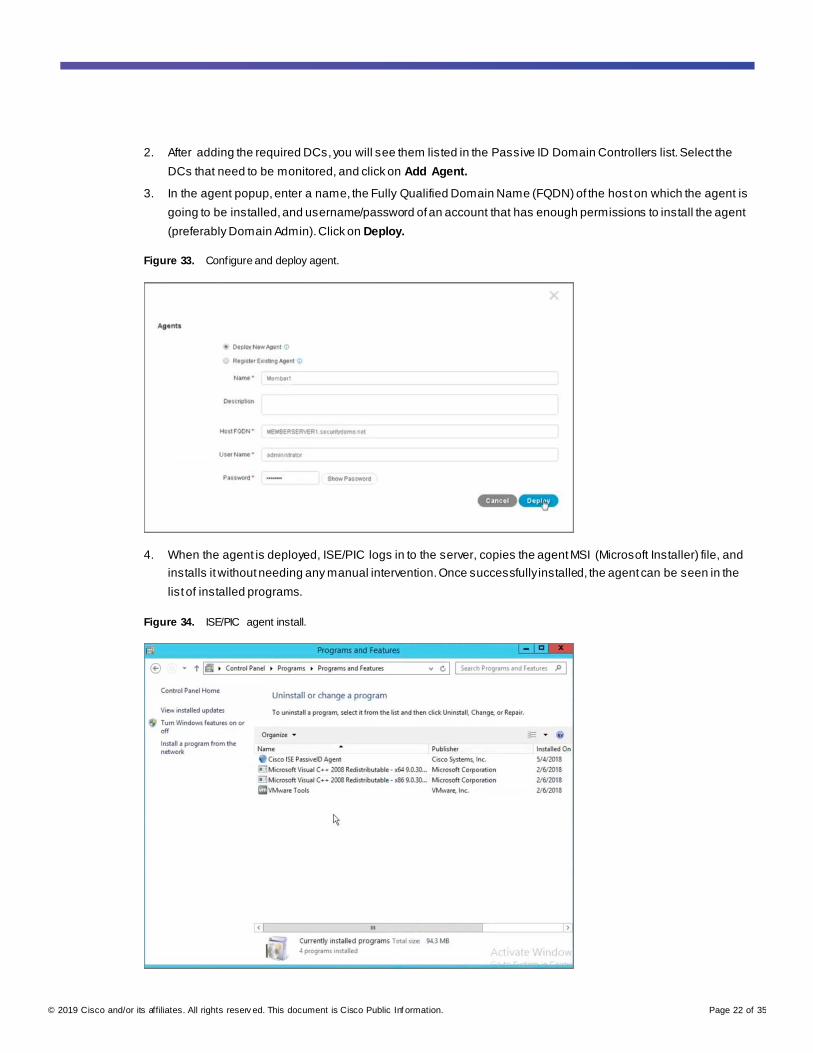
2. After adding the required DCs, you will see them listed in the Passive ID Domain Controllers list. Select the
DCs that need to be monitored, and click on Add Agent.
3. In the agent popup, enter a name, the Fully Qualified Domain Name (FQDN) of the host on which the agent is
going to be installed, and username/password of an account that has enough permissions to install the agent
(preferably Domain Admin). Click on Deploy.
Figure 33. Configure and deploy agent.
4. When the agent is deployed, ISE/PIC logs in to the server, copies the agent MSI (Microsoft Installer) file, and
installs it without needing any manual intervention. Once successfully installed, the agent can be seen in the
list of installed programs.
Figure 34. ISE/PIC agent install.

© 2019 Cisco and/or its affiliates. All rights reserv ed. This document is Cisco Public Inf ormation. Page 23 of 35
5. You can also see the ISE-PIC agent local config and log files at Program Files/Cisco/Cisco ISE PassiveID
Agent.
Figure 35. ISE/PIC agent config and log f ile location.
6. At this point, with the agent configured and running on the DC, you can navigate to the Live Sessions screen
on ISE/PIC to view the AD domain logon events that you are subscribing to.
Figure 36. ISE live logs.

© 2019 Cisco and/or its affiliates. All rights reserv ed. This document is Cisco Public Inf ormation. Page 24 of 35
ISE-PIC agent: Agent installed on and monitoring DC running as Windows Event Collector
(WEC)
Figure 37. Events forwarded to DC, monitored on DC.
In this scenario, all the domain logon event logs are forwarded to a Domain Controller designated as a WEC. The
ISE-PIC agent is installed on the same DC and monitors these events to pass back on to the ISE node. The s teps
to do this are as follows:
1. Set up Windows Event Forwarding to the designated DC using steps 1 and 2 from WMI as probe: Monitoring
of DC running as Windows Event Collector (WEC).
2. On the ISE/PIC server, install the agent on the designated DC and monitor the same DC using steps 1 through
4 from ISE-PIC agent: Directly monitoring DC using agent.
3. At this point, with the agent configured and running on the DC, you can navigate to the Live Sessions screen
on ISE/PIC to view the AD domain logon events that you are subscribing to.
Figure 38. ISE live logs.

© 2019 Cisco and/or its affiliates. All rights reserv ed. This document is Cisco Public Inf ormation. Page 25 of 35
ISE-PIC agent: Agent installed on member server and monitoring DC running as Windows Event
Collector (WEC)
Figure 39. Events forwarded to DC, monitored on member server.
All the domain logon events are forwarded to a Domain Controller designated as a WEC. The ISE-PIC agent is
automatically or manually installed on a member server and monitors the events on the WEC to pass back on to
the ISE node. This allows event monitoring without having to install the agent on the DC itself. The steps to do this
are as follows:
1. Set up Windows Event Forwarding to the designated DC using steps 1 and 2 from WMI as probe: Monitoring
of DC running as Windows Event Collector (WEC).
2. On the ISE/PIC server, install the agent on the member server and monitor the WEC DC using steps 1 through
4 from ISE-PIC agent: Directly monitoring DC using agent.
3. At this point, with the agent configured and running on the member server, you can navigate to the Live
Sessions screen on ISE/PIC to view the AD domain logon events that you are subscribing to.
Figure 40. ISE live logs.
© 2019 Cisco and/or its affiliates. All rights reserv ed. This document is Cisco Public Inf ormation. Page 26 of 35
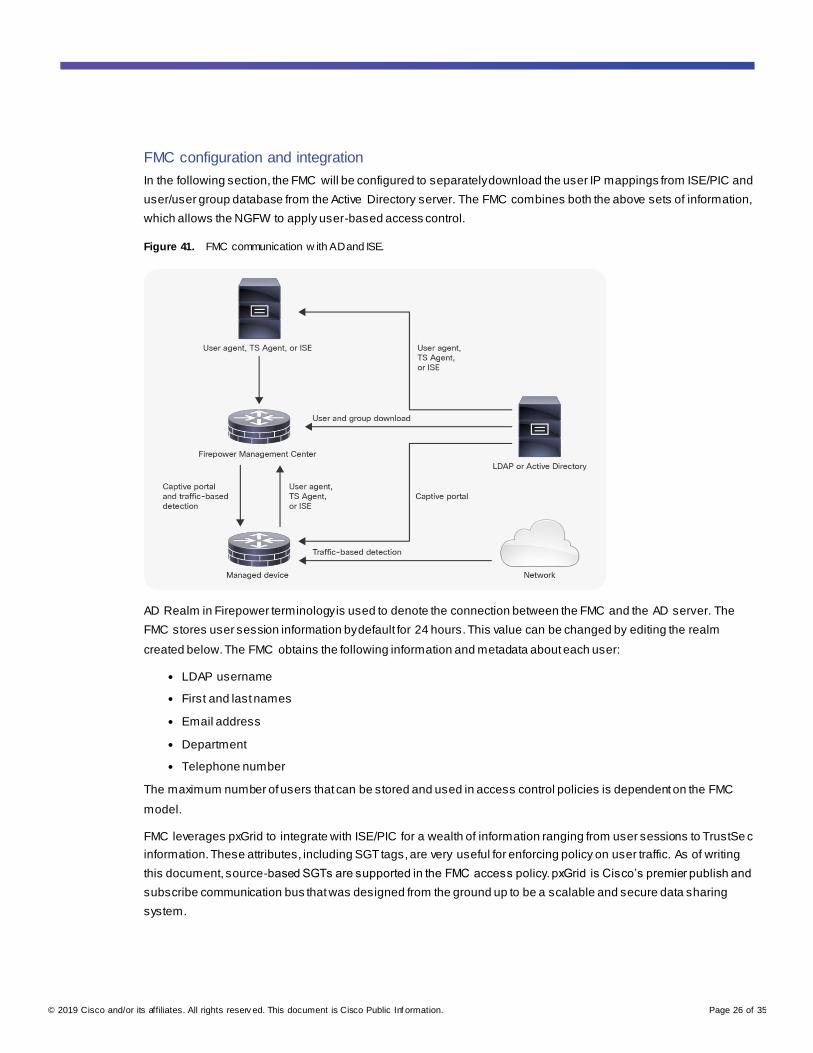
FMC configuration and integration
In the following section, the FMC will be configured to separately download the user IP mappings from ISE/PIC and
user/user group database from the Active Directory server. The FMC combines both the above sets of information,
which allows the NGFW to apply user-based access control.
Figure 41. FMC communication w ith AD and ISE.
AD Realm in Firepower terminology is used to denote the connection between the FMC and the AD server. The
FMC stores user session information by default for 24 hours. This value can be changed by editing the realm
created below. The FMC obtains the following information and metadata about each user:
● LDAP username
● First and last names
● Email address
● Department
● Telephone number
The maximum number of users that can be stored and used in access control policies is dependent on the FMC
model.
FMC leverages pxGrid to integrate with ISE/PIC for a wealth of information ranging from user sessions to TrustSe c
information. These attributes, including SGT tags, are very useful for enforcing policy on user traffic. As of writing
this document, source-based SGTs are supported in the FMC access policy. pxGrid is Cisco’s premier publish and
subscribe communication bus that was designed from the ground up to be a scalable and secure data sharing
system.

© 2019 Cisco and/or its affiliates. All rights reserv ed. This document is Cisco Public Inf ormation. Page 27 of 35
Before you begin
● The FMC and ISE/PIC server must have their time synchronized to avoid unexpected user timeouts.
● The following table lists the ports needed by different identity services on the FMC:
Service Ports that need to be opened
AD Realm TCP 389 outbound—Unencry pted
TCP 636 outbound—Encry pted
Can be customized
ISE/PIC TCP 5222 outbound—pxGrid communication
TCP 8910 outbound—pxGrid bulk download
Configuring AD Realm
1. On the FMC, navigate to System -> Integration -> Realms.
2. To create a new realm, click New Realm.
3. In the Add New Realm popup, use the following guidelines to fill the fields:
a) Provide a Name and Description and set the Type to AD.
b) The AD Primary Domain is the unique domain.
c) The AD Join username and password will be used to join the AD Realm and should have enough
permissions to create a domain computer account on the AD domain. The username should be fully
qualified.
d) The Directory username and password are the credentials of a user account with enough permissions
to read the relevant user and user groups. The username should be fully qualified. The same credentials
as the above step can be used here.
e) The Base DN is the directory tree on the server where the FMC should begin searching for user data.
f) The Group DN is the directory tree on the server where the FMC should begin searching for group data.
g) A Group attribute such as Member or Unique Member can also be specified.
Figure 42. Adding new AD Realm.

© 2019 Cisco and/or its affiliates. All rights reserv ed. This document is Cisco Public Inf ormation. Page 28 of 35
4. Click on OK.
5. At this point, the FMC will redirect you to the AD directory configuration page. Click on Add directory.
6. Enter the following field details:
a) The Hostname/IP Address field is the host name or IP address of an Active Directory domain controller.
If you specify an encryption method, you must specify a host name in this field.
b) You can change the port used for the connection between FMC and the DC. By default, this is set to 389
for unencrypted connection.
c) The encryption protocol for the connection between FMC and the DC can be set to either STARTTLS or
LDAPS. If no encryption is done, this is set to NONE.
d) The SSL (Secure Sockets Layer) certificate of the DC can also be specified if using encryption.
e) To test the connection, click Test. The FMC will then try to send an LDAP query to the server, and if this
is successful, the test succeeds.
Figure 43. Add DC.
7. Click on OK.
8. Click Save. You are returned to the realms tab page. On this page, enable the realm by sliding the state toggle
so that the AD join can happen and user/user groups can be downloaded.
9. Edit the realm and navigate to User Download. Here you should see that the FMC has automatically
downloaded all users and groups from the AD domain. You can specify which users and groups are to be
downloaded. Filtering the relevant users and groups is recommended for better performance on the FMC.

© 2019 Cisco and/or its affiliates. All rights reserv ed. This document is Cisco Public Inf ormation. Page 29 of 35
Figure 44. Filter AD users and groups.
10. The download can be customized to start at a particular time and repeat at configurable intervals.
11. Click on Save.
Configuring ISE as identity source
1. The FMC needs to be able to securely communicate with ISE/PIC using pxGrid. To do so, a certificate trust
relationship should be established. This can be done easily using ISE/PIC as the Certificate Authority (CA) for
the FMC certificate.
2. On ISE/PIC, navigate to Subscribers -> Certificates and enter the following fields:
a) From the I want to dropdown, select the Generate a single certificate without a certificate signing
request option.
b) Enter the Common Name (CN) that you want to assign to the FMC’s certificate. You can add an optional
description. To avoid confusion with other certificates generated for the FMC, you can prefix the CN with
pxgrid-.
c) The pxGrid certificate template based on which the certificate will be generated can be viewed and edited.
The FMC certificate must include clientAuth extended key usage value, or it must not include any
extended key usage values.
d) Optionally, you can specify the Subject Alternative Name (SAN) to be added to the certificate if the CN
does not contain the FQDN of the FMC.
e) From the Certificate Download Format drop-down list, select the option Certificate in Private
Enhanced Electronic Mail (PEM), and key in the PKCS8 PEM format (including certificate chain).
f) Enter an encryption password for the private key.
g) Click on Create.

© 2019 Cisco and/or its affiliates. All rights reserv ed. This document is Cisco Public Inf ormation. Page 30 of 35
Figure 45. Generate FMC pxGrid certif icate.
3. There will be a popup to download the certificate bundle zip file. Save and extract this bundle. You will be able
to see the certificate and key generated for FMC along with the root and sub CA (Certificate Authority)
certificates used by ISE services.
Figure 46. Contents of certif icate bundle.
4. Navigate to Subscribers -> Settings. Under pxGrid Settings, check Automatically approve new certificate-
based accounts. This will allow the ISE/PIC server to automatically approve the incoming connection from the
FMC.
Figure 47. pxGrid settings.

© 2019 Cisco and/or its affiliates. All rights reserv ed. This document is Cisco Public Inf ormation. Page 31 of 35
5. On the FMC, navigate to System -> Integration -> Identity Sources. Click on Identity Services Engine.
6. In the fields that appear, enter the following details:
a) Enter a primary host name/IP address and, optionally, a secondary host name/IP address of the pxGrid
controller.
b) In the pxGrid server CA dropdown, click on the + symbol to import the root CA of the pxGrid controller.
Click on Browse and navigate to the folder that was extracted in step 3. Select the pxGrid root CA
certificate from here. Enter a name for this certificate.
Figure 48. Import pxGrid root certif icate.
Figure 49. Import pxGrid root certif icate.

© 2019 Cisco and/or its affiliates. All rights reserv ed. This document is Cisco Public Inf ormation. Page 32 of 35
c) Starting from ISE 2.2, all pxGrid communications occur within the secure pxGrid channel. This means that
all bulk downloads from the MnT node are secured using the pxGrid certificate and not the admin
certificate. Go ahead and select the same pxGrid certificate from the step above for the MNT Server CA
field.
d) Click on the + sign next to the FMC Server Certificate field. Click on Browse next to Certificate Data
and select the FMC PEM certificate. Click on Browse next to Key and select the FMC PKCS#8 key. Enter
the private key password in the field below. Click on Save.
Figure 50. Import FMC certif icate and key generated by pxGrid.

© 2019 Cisco and/or its affiliates. All rights reserv ed. This document is Cisco Public Inf ormation. Page 33 of 35
e) The ISE Network Filter instructs the FMC to download user data only for the IPv4 address block(s)
provided.
Figure 51. FMC ISE/PIC integration configuration.
f) You can test the connection to the ISE/PIC server by clicking on the Test button.
Figure 52. ISE integration test.
g) Once the test is successful, navigate to Analysis -> Users -> Active Sessions and you should start
seeing domain logon events.
Figure 53. FMC user activity events.

© 2019 Cisco and/or its affiliates. All rights reserv ed. This document is Cisco Public Inf ormation. Page 34 of 35
You can also view the active sessions from the FMC CLI sudo mode using the following command:
root@firepower:~# adi_cli session
Configuring access policies to be user identity aware
1. Navigate to Policies -> Access Control -> Identity and click New Policy.
2. Enter a Name and, optionally, a Description. Click on Save.
3. Click on Add New Rule to configure an identity rule.
4. Enter a Name. Keep the Enabled field checked and Action set to Passive Authentication.
5. Navigate to Realm & Settings. From the realm dropdown list, select the Security_Demo AD realm. Click on
Add.
Figure 54. Add identity rule.
6. Navigate to Policies -> Access Control -> Access Control and edit the access policy.
7. Click on Identity Policy and select the policy name from the dropdown list. Click on OK.
Figure 55. Add identity policy.

© 2019 Cisco and/or its affiliates. All rights reserv ed. This document is Cisco Public Inf ormation. Page 35 of 35
8. Within the same access policy, click on Add Rule. To be able to use the downloaded users and groups,
navigate to Users and select Security_Demo from the Available Domains. This will populate the Available
Users list from where the required users can be selected as shown.
Figure 56. Add user identity to access policy.
9. Click on Add.
10. Click on Save.
11. Deploy this configuration to the FTD.
Conclusion
The integration of FMC-ISE pxGrid-AD as shown above provides a powerful capability for administrators to gain
user context awareness and control. This solution can also be tailored to scale from small to large Active Di rectory
domain and forest environments.
Printed in USA C07-742017-00 03/19