Embed Size (px)
Citation preview

Topics Covered Web Address / Popup Blockers
How to Sign On
Main Toolbar Overview
Order Guides / Placing Orders
Confirmations
Reports
User / Admin Options
Custom Order Guides
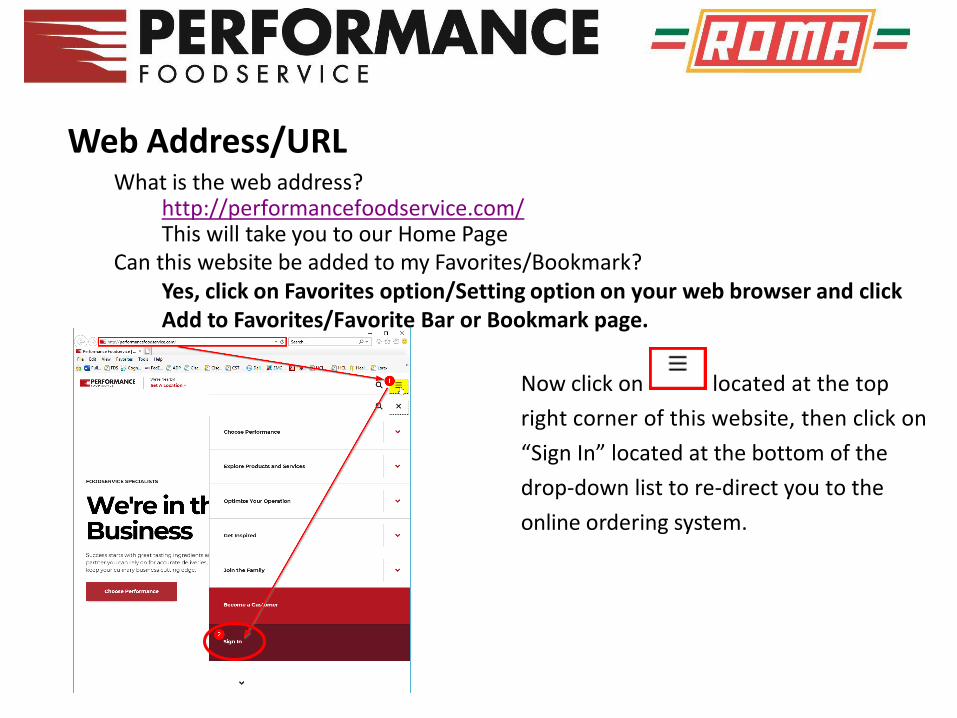
Web Address/URL What is the web address?
http://performancefoodservice.com/ This will take you to our Home Page
Can this website be added to my Favorites/Bookmark? Yes, click on Favorites option/Setting option on your web browser and click Add to Favorites/Favorite Bar or Bookmark page.
Now click on located at the top
right corner of this website, then click on
“Sign In” located at the bottom of the
drop-down list to re-direct you to the
online ordering system.

***It is also very possible that you have a landscape monitor/screen so your view of our
webpage may possibly look like this instead (the “Sign in” option will be located at the
bottom left as shown here and you won’t need to click on the 3 lines as mentioned above):

Pop-Up Blockers / Internet Explorer 11 If prompted about Pop-up Blocker, follow these steps:
1. On the notification bar, click the dropdown arrow on the Options for thissite button and select Allow Always from the list.
2. If prompted to confirm selection to allow, click Yes.
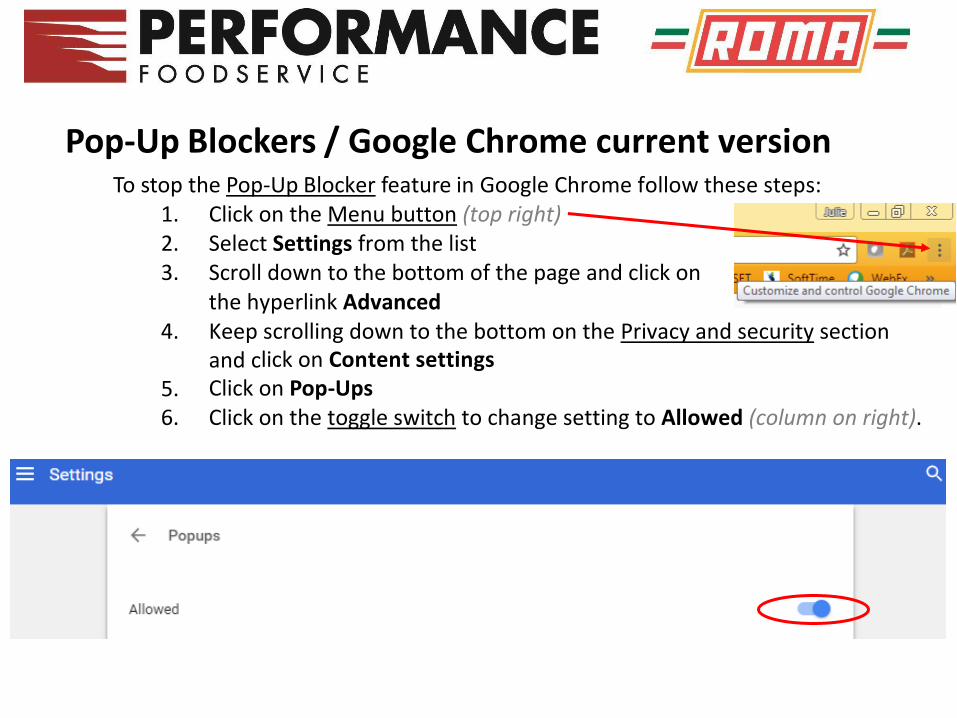
Pop-Up Blockers / Google Chrome current version To stop the Pop-Up Blocker feature in Google Chrome follow these steps:
1. Click on the Menu button (top right)2. Select Settings from the list3. Scroll down to the bottom of the page and click on
the hyperlink Advanced4. Keep scrolling down to the bottom on the Privacy and security section
and click on Content settings5. Click on Pop-Ups6. Click on the toggle switch to change setting to Allowed (column on right).

Pop-Up Blockers / Yahoo Toolbar
To disable the Pop-Up Blocker feature in the Yahoo Toolbar follow these steps: 1. Click on the dropdown arrow beside the Pop-Up Blocker icon 2. To disable, click on Enable Pop-Up Blocker in the
dropdown menu to uncheck it. 3. To configure enabling specific websites, keep
checkmark on Enable Pop-Up Blocker and click on Always Allow Pop-Ups from... on the same dropdown menu to check it.
4. In the Yahoo! Pop-Up Blocker dialog screen, select ctimls.com in the Sources of Recently Blocked Pop-Ups
5. Click the Allow button and then the Close button.

How to Sign On Enter your supplied Username and Password and click on Sign In button. *Please Note the “Announcements” at the bottom regarding when the system will be unavailable.

Main Page
Panel 1
Panel 2 Panel 3
This is a Dashboard with different Panels. Panel 1 displays all orders, placed and pending/in-use. Panel 2 displays all invoice statements and credits. Panel 3 displays important messages from Performance Foodservice.

Main Toolbar Overview
Status – Power Net Orders shows pending orders, previously submitted orders and order header status. Account – Statement Status shows invoices and credits; Statement Panel shows more on main page Reports – View/print item usage reports and order guides *Customer – if you have the ability to place orders for multiple customers, this is where you select each customer. Admin – Create/edit custom order guides, inventory lists, par lists, and critical item lists. Items – View/print new and/or discontinued items and do an item search Links – Opens Quick Start Guide pdf file.

Order Guides / Placing Orders Select Create Order from the main page (top right).
Choose the method for placing your order from the following: History – items purchased in the last 13 weeks. Standard Guides – bids that are maintained at Performance Foodservice. Custom Guides – order guides that are created and maintained by the
customer or sales rep. Quick Add – enter item # and Qty. Previous Order – select a previously placed order.
When placing orders by any Guide - Standard or Custom, a list of the items in the guide will display on the order form screen. This allows you to view the items, descriptions, and simply place Qty to be ordered in the proper column.
When placing orders by Quick Add, it is a simple entering of the item# and Qty. There is a Check Items option to ensure proper item# is entered.

Order Guides / Placing Orders using Guides
Guides show the Item #, Pack, Size, Brand, Description, and your Price (not shown on this screen). It will also display the last time you ordered that item (Last Date) and extended price on the far right. To place an order, simply scroll through the item list and enter the Qty you would like to order in the proper column. Once completed, click on Place Order. If it is taking some time to complete an order or it is a large order, remember to Save often, just in case Click on the Cart to get a Total Amount for the order.

Order Guides / Placing Orders – Quick Add If you know the item #’s, you can use the Quick Add feature to place orders. Type in the item # and Qty. After all items are entered, click on Check Items button to verify item #’s are valid
Once all items are confirmed valid, you will have a Save option (will appear next to Check items) to save these items to your order. Then click on Order Form (upper left) to return to your order. If there are invalid items, you will need to remove the invalid item #’s before returning to the order.

Order Guides / Placing Orders – Product Search If you need an item that is not on your guide, type in a “keyword” in the search field and press Enter or click on the Search button (magnify glass icon).
This will initiate a search for that item in the order guide and give search options (next page).
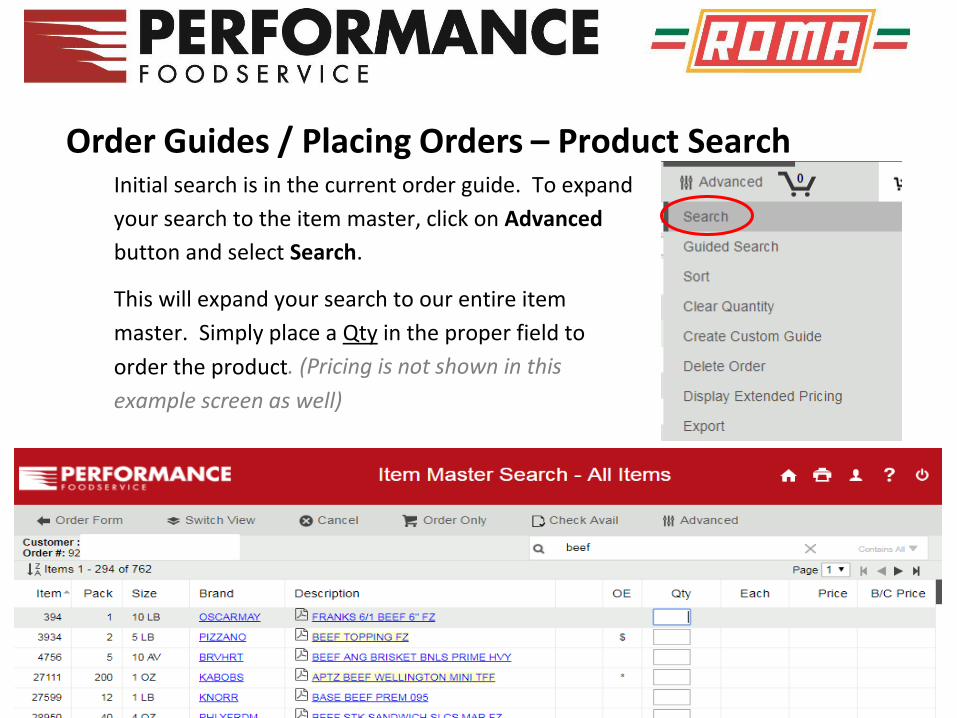
Order Guides / Placing Orders – Product Search Initial search is in the current order guide. To expand
your search to the item master, click on Advanced
button and select Search.
This will expand your search to our entire item
master. Simply place a Qty in the proper field to
order the product. (Pricing is not shown in this
example screen as well)

Order Guides / Placing Orders – Item Information To get additional information on the item, click on the description. This will display the screen to the left. Two tabs (Summary and Detail) will show the following:
Manufacturer On Hand Qty On Order Qty / Due Date Serving Information Vendor Item # Substitute Item
Information

Order Guides / Placing Orders – Order Summary Once you are satisfied with your order, you should review the order by clicking on Summary.
This will summarize your order with Qty and Price. Also, by clicking on the cart, it
will display the Total Amount for the order.

Order Guides / Placing Orders – Submit your Order If you are satisfied, you can click on to submit the order for processing.
If you are not satisfied / need to add more items, click on Order From (top left) to go back to the order. Make your changes, summarize again, and Place Order again.
When you select Place Order, one more screen appears to confirm delivery date and allow a PO# to be entered (if needed). Click on Submit Order button to place the order.

Order Guides / Placing Orders - Confirmation Once you click on Submit Order, it will place you on the main Status screen, showing all of your orders with this one in Submitting status.
Click on Refresh button (up at the top left or function key “F5”) to refresh the screen and it should change to a Confirmed status, which means it is in our system.

Order Guides / Placing Orders – Pending Orders Once you start an order, it is saved in the Dashboard Orders panel (main screen). To Edit the order, click on the blue hyperlinked “Order#” To Delete it, Click on Status to display just the orders in the Status screen.
You can Delete orders in “Pending” status that you no longer want to keep by
placing a check in the Delete box and then clicking on Advanced, Delete (top right).

Confirmations There are 2 ways to confirm your order as follow:
1. On the Dashboard, click on the Order# to view the order.

Confirmations 2. Receiving your order confirmations via email, this shows the same
information as on-screen. This is based on the email address(es) entered into additional emails discussed in the User Options section.

Reports Reports consist of Usage / Movement and Item reports. To access the Reports, simply click on the Reports button. The dropdown shows the available options (shown on right).
Item Usage report: Enter the date range for the usage report and select the various parameters (as needed).
Once the options are set, click on Generate to view the report.
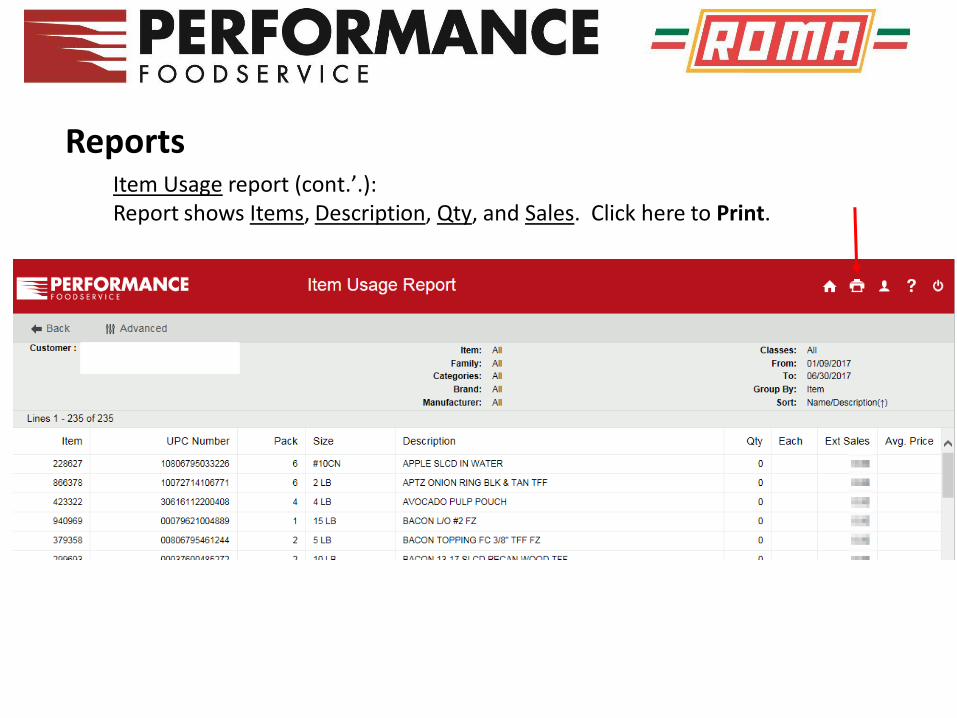
Reports Item Usage report (cont.’.): Report shows Items, Description, Qty, and Sales. Click here to Print.

Reports Guides Select which guide you want to review / print: History, Bid, Standard, or Custom.
Click here to Print

Reports When printing an order guide, it will prompt you to enter the # of qty fields to display on
the print screen.
The printed Guide Report shows the # of qty fields to display on print screen for placing orders
For all of the reports, to Export, click on Advanced, Export, then Excel or other available options provided.

Items There are 2 Item reports available: New or Discontinued. Click on the Item button from the main screen and select “New or Discontinued”. You will have the option to change the # of days whether to review added items or removed items.
You also have the option to show your pricing on these items. Click on the Advanced option to select whether or not to show prices.
You also have the option to Print these item lists.
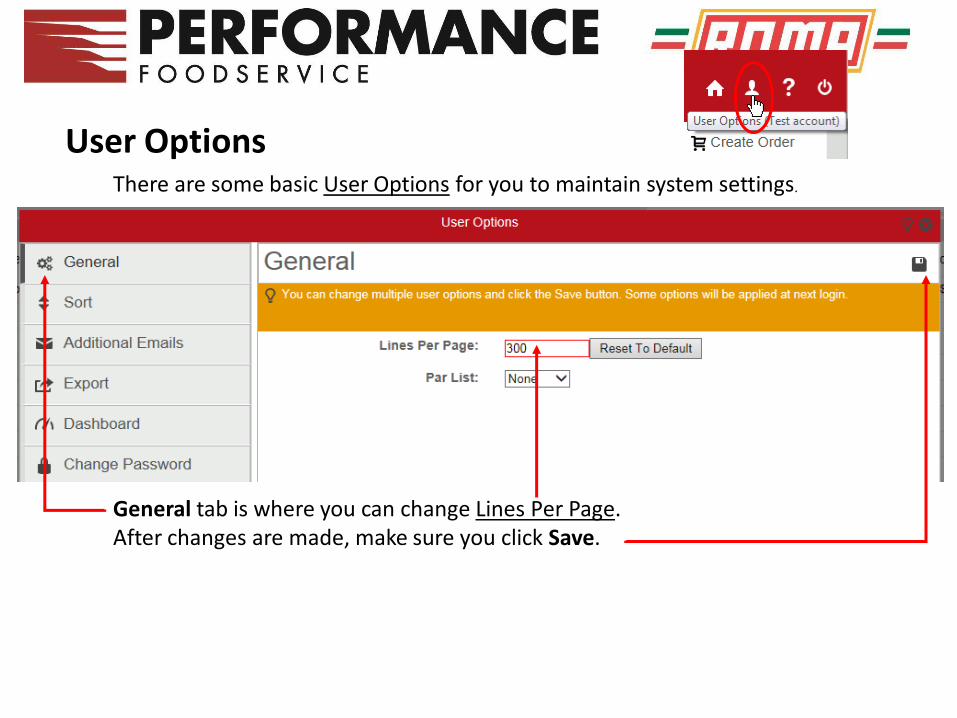
User Options There are some basic User Options for you to maintain system settings.
General tab is where you can change Lines Per Page. After changes are made, make sure you click Save.

User Options There are some basic User Options for you to maintain system settings.
Sort tab is where you can change your default sort options when entering your orders. Change sort type by selecting the type of order guide sort to be changed to. After changes are made, make sure you click Save.

User Options There are some basic User Options for you to maintain system settings.
Additional Emails tab is where you can add additional email addresses to receive the order confirmations. To Add a new email address, click on the + icon in the upper right corner. After changes are made, make sure you click Save

User Options There are some basic User Options for you to maintain system settings.
Change Password tab is where you can update the current password. Enter the Old (current) Password, then enter a New Password and “Confirm New Password” (enter new password twice). After changes are made, make sure you click Save. *If you have forgotten your password, on the sign-in screen there is a "Forgot password?" link. Click on link, input Username (customer account#), click on "Submit" button, and then check for email (image shown on the left).

Admin Functions There are some basic functions for you to maintain system settings.
Order Guide Maintenance
Inventory Options
Create/Edit Par lists
Create/Edit Critical Item lists
*If you manage multiple accounts, you can create messages to these accounts.
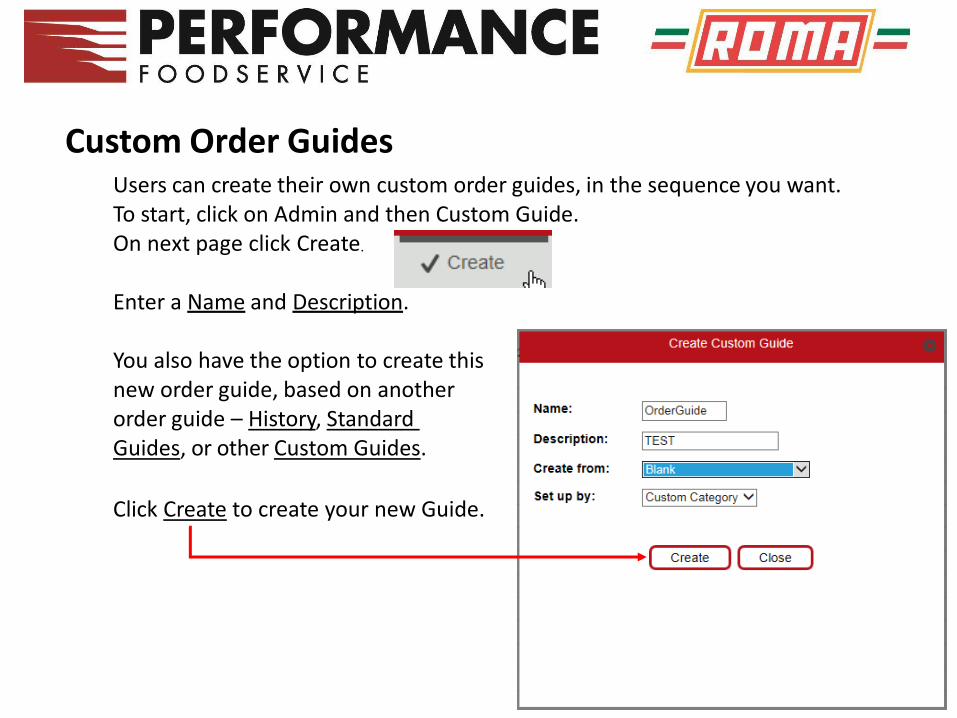
Custom Order Guides Users can create their own custom order guides, in the sequence you want. To start, click on Admin and then Custom Guide. On next page click Create.
Enter a Name and Description.
You also have the option to create this new order guide, based on another order guide – History, Standard Guides, or other Custom Guides.
Click Create to create your new Guide.

Custom Order Guides To Edit your new guide, click on Admin, Custom Guide. Find your new guide and click on the Edit icon.
This brings up the Custom Guide by “…”- Edit screen (blank if you did not create from another guide)

Custom Order Guides To start, you need to create at least one Category to place your items in. (If you do not want to sort by custom categories, click Advanced, Change Setup to and select the available options to sort your order guide).
Enter a name for your New Category and click on Create.
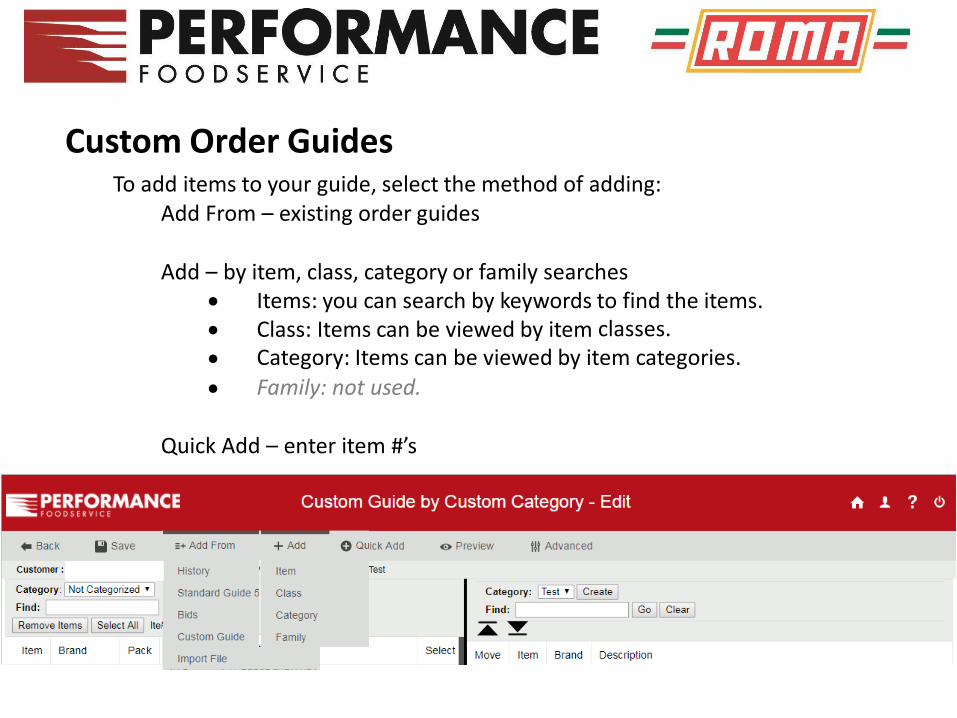
Custom Order Guides To add items to your guide, select the method of adding:
Add From – existing order guides
Add – by item, class, category or family searches Items: you can search by keywords to find the items. Class: Items can be viewed by item classes. Category: Items can be viewed by item categories.
Family: not used.
Quick Add – enter item #’s

Custom Order Guides – adding items Selecting by Item will show all items based on your search word entered. To select the items to add to your guide, click on the Select box and then click on either the Up or Down arrow to move it to your guide, into the selected Category.
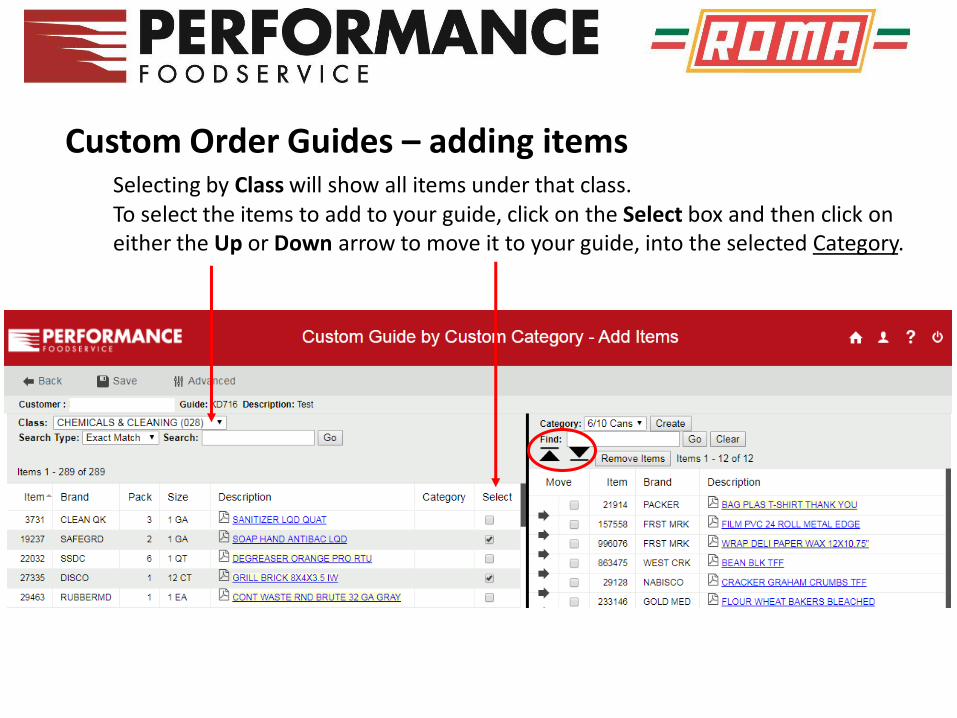
Custom Order Guides – adding items Selecting by Class will show all items under that class. To select the items to add to your guide, click on the Select box and then click on either the Up or Down arrow to move it to your guide, into the selected Category.
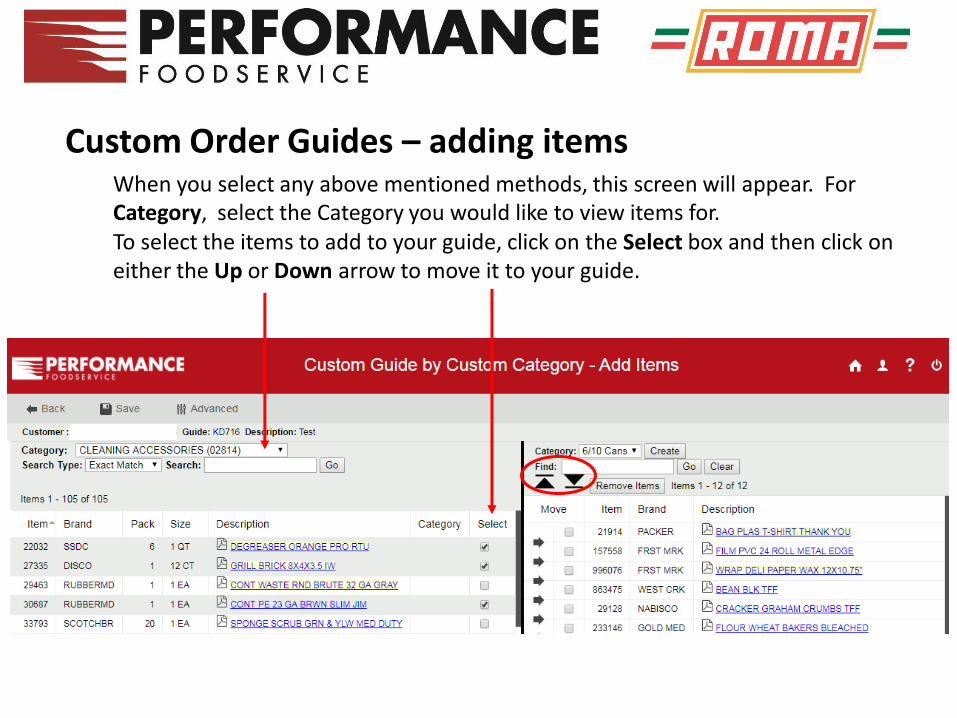
Custom Order Guides – adding items When you select any above mentioned methods, this screen will appear. For Category, select the Category you would like to view items for. To select the items to add to your guide, click on the Select box and then click on either the Up or Down arrow to move it to your guide.

Custom Order Guides – adding items To add items to your guide, select the method of adding. Quick Add – by Item or Customer Item. If you know the item #’s, use this method to enter the item #’s and then verify them. Enter the item # and click Check Items button. This will show if the item # entered is valid. If so, you can Select it to add to your guide. Once the item is selected, click on the Up or Down arrows to add them to the correct sequence on the guide.
Custom Order Guides – Viewing Guide
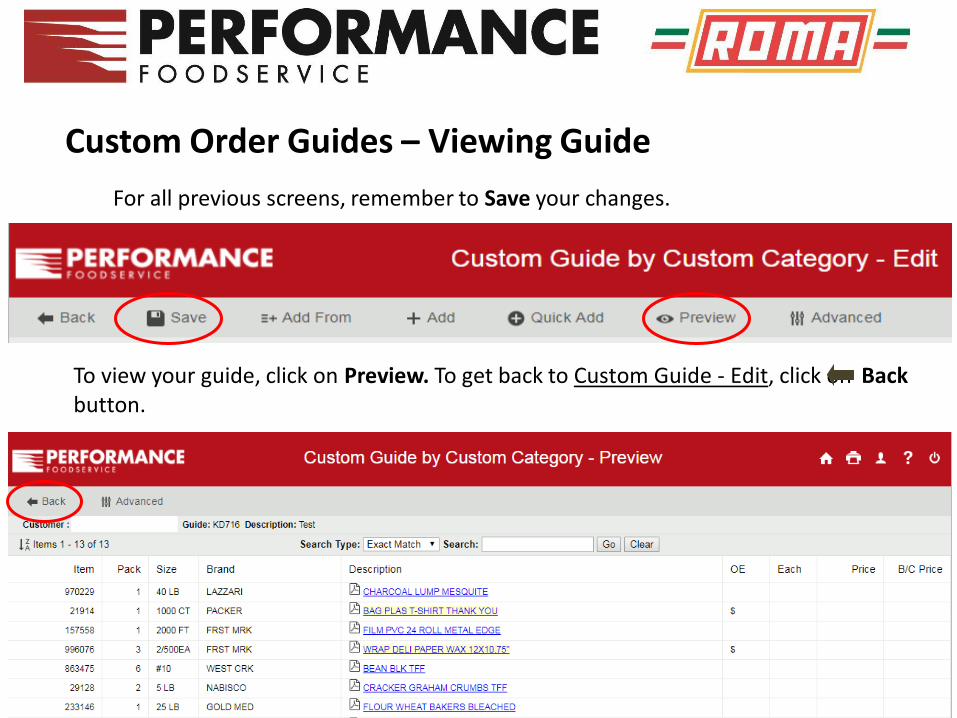
For all previous screens, remember to Save your changes.
To view your guide, click on Preview. To get back to Custom Guide - Edit, click on Back button.
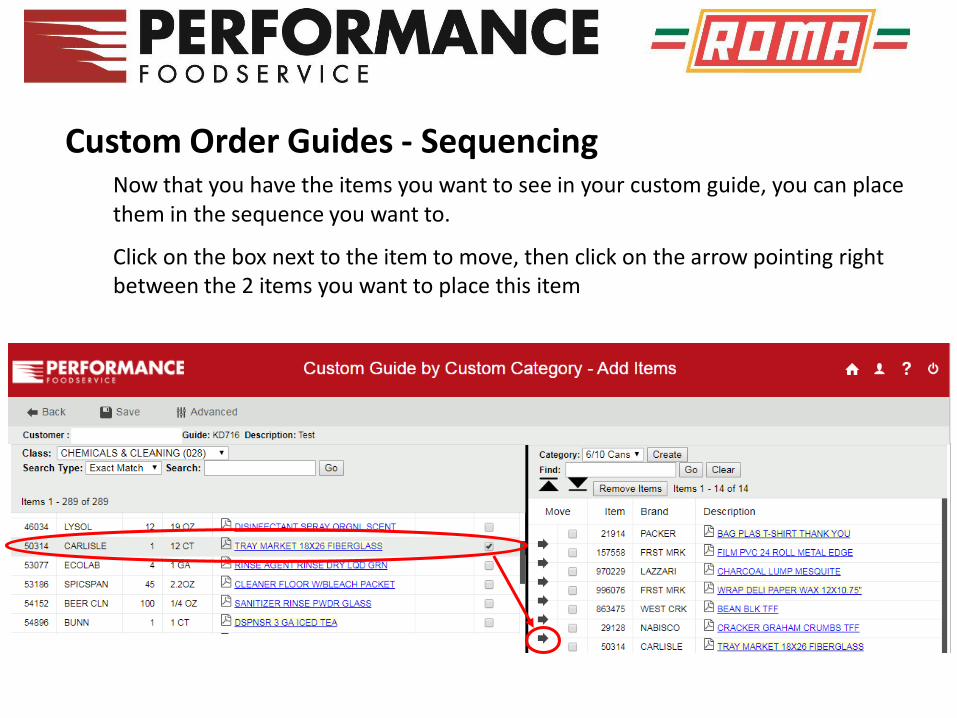
Custom Order Guides - Sequencing Now that you have the items you want to see in your custom guide, you can place them in the sequence you want to.
Click on the box next to the item to move, then click on the arrow pointing right between the 2 items you want to place this item

Custom Order Guides - Ordering Always remember to save your changes
Now, when placing orders, you have this new guide to order from
Click on Create, Custom Guide, and find your newly create guide in the list
The order form is now your new guide

Inventory Works similar to Custom Order Guides To start, create a new Inventory Template. Click Admin, Inventory, Inventory Templates, and Create.
It will prompt you for a Name, Description, and if you want to Create from an existing order guide, select the specific order guide. Click Create.
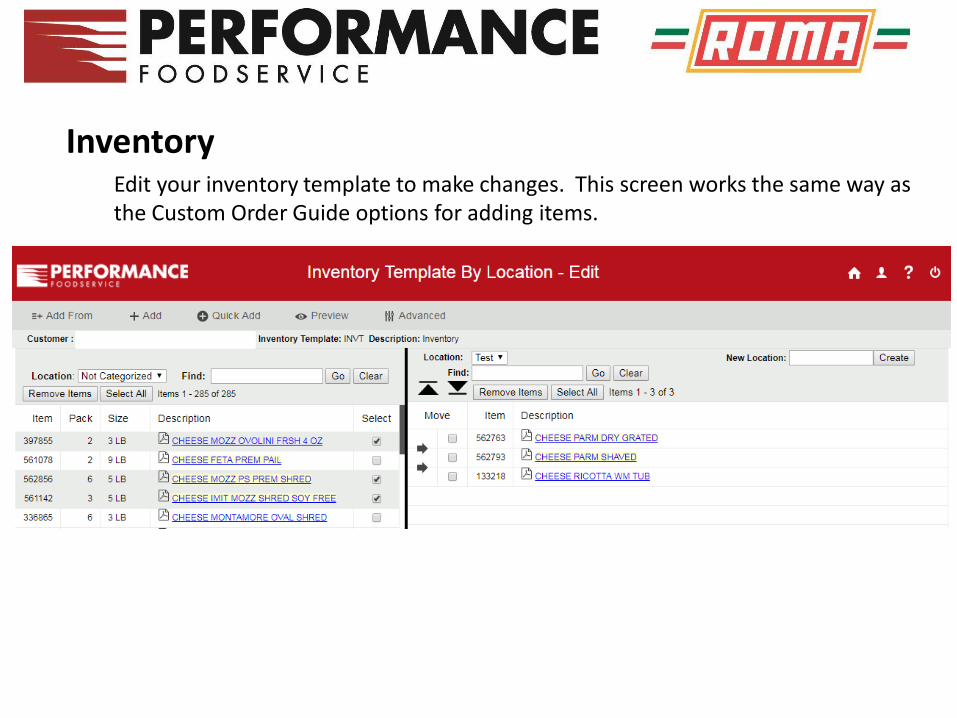
Inventory Edit your inventory template to make changes. This screen works the same way as the Custom Order Guide options for adding items.

Inventory To enter inventory values into your new template, click on Admin, Inventory, Valuation, and Inventory.
The Inventory Template created earlier will appear with your items. Enter the Case Quantity and Each Quantity on hand and click Save to save your inventory list.

Par Lists Works in conjunction with your Inventory. To create a new Par List, click on Admin and Par Lists. On next page click Create button (top left).
It will prompt you for a Name. Enter a name and click Create and then select Edit.

Par Lists Click Add From and select what you want to create your Par List based on. You can choose an Order Guide or an Inventory Sheet (shown to the left).
It will load the items from guide or inventory sheet. Then set the Par level in the proper column. Par is what you always need to have on hand. Once completed, click Save button.

Par Lists Now when Creating Orders, you will have a new option – Par List. This will load your Par List and all you need to do here is enter your current inventory on hand and based on the Par you entered, it will create the order Qty.
Any questions or issues pertaining to
PerformanceNet online order system,
feel free to contact Performance
Foodservice Help Desk at
(770) 718-3585