Embed Size (px)
Citation preview
BOSTON, MA │ GLASGOW, SCOTLAND │ DUBLIN, IRELAND │ LONDON, ENGLAND │ MELBOURNE, AUSTRALIA │ SAN FRANCISCO, CA │ DUBAI, UAE
IESVE Revit Plug-in User Guide<VE> 6.1
INTEGRATED ENVIRONMENTAL SOLUTIONS LIMITEDDevelopers of the IES <Virtual Environment>

Contents
page 2
IESVE Revit Plug-in<VE> 6.1 User Guide
Introduction .......................................................................................................................................... 3
IESVE Revit Plug-in.......................................................................................................................... 3
Access .............................................................................................................................................. 3
User Settings and Information.............................................................................................................. 3
Settings and Info............................................................................................................................... 3
Settings ......................................................................................................................................... 3
Help .................................................................................................................................................. 4
Guidance .......................................................................................................................................... 4
IES Website...................................................................................................................................... 5
Set Model Properties............................................................................................................................ 6
Check Model..................................................................................................................................... 6
Building Data .................................................................................................................................... 7
Building Type ................................................................................................................................ 8
Building Constructions .................................................................................................................. 8
Building Service ............................................................................................................................ 9
Place and Location........................................................................................................................ 9
Room Data ..................................................................................................................................... 10
Room Type ................................................................................................................................. 11
Room Constructions.................................................................................................................... 11
Building Service .......................................................................................................................... 12
VE-Ware............................................................................................................................................. 12
VE-Toolkits......................................................................................................................................... 13
Sustainability VE-Toolkit ................................................................................................................. 13
Overview ..................................................................................................................................... 14
Sustainability ............................................................................................................................... 15
VE-Toolkit for LEED-USA ............................................................................................................... 16
VE-Toolkit for LEED-INDIA............................................................................................................. 17
VE-Toolkit for Green Star Australia................................................................................................. 18
<Virtual Environment>........................................................................................................................ 18
IESVE Revit Plug-in
page 3
IESVE Revit Plug-in<VE> 6.1 User Guide
Introduction
IESVE Revit Plug-inThe IESVE Revit Plug-in provides a link between Autodesk® Revit® Architecture and MEP and IESVE-Ware, VE-Toolkits and VE-Pro. This plug-in provides an easy interface between RevitArchitecture and MEP 2008/2009/2010 and the IES suite of tools to allow sustainable performanceanalysis.
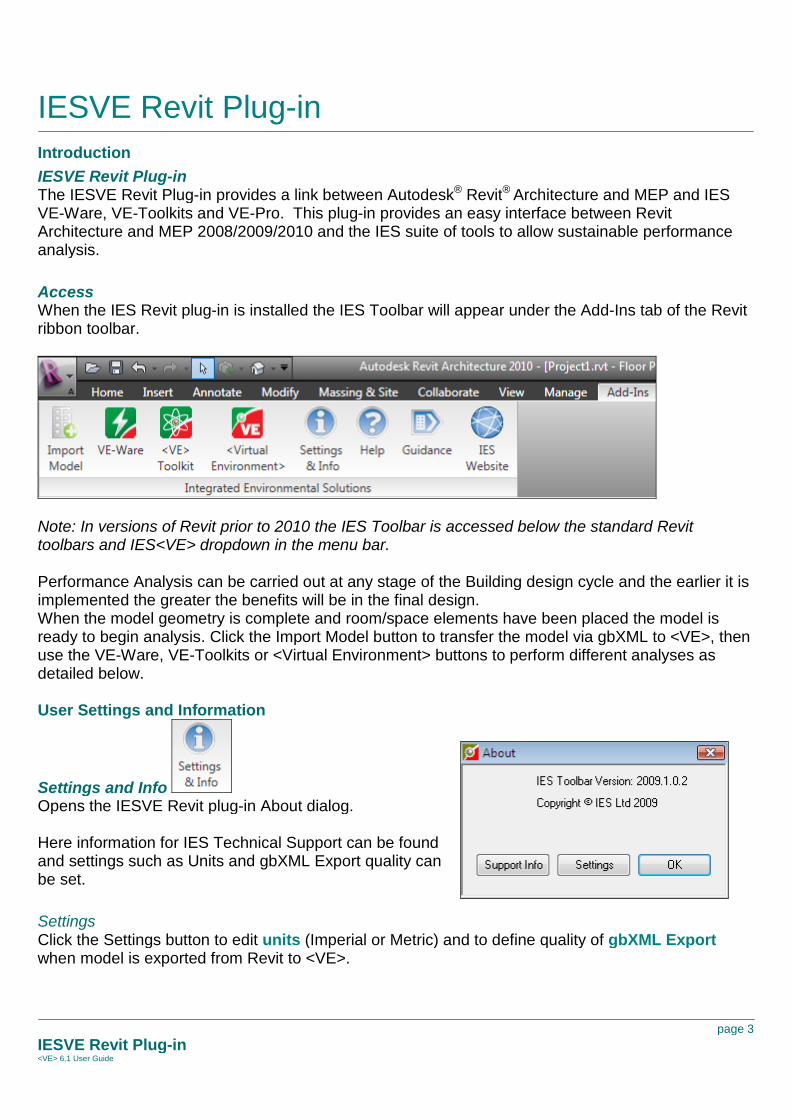
AccessWhen the IES Revit plug-in is installed the IES Toolbar will appear under the Add-Ins tab of the Revitribbon toolbar.
Note: In versions of Revit prior to 2010 the IES Toolbar is accessed below the standard Revittoolbars and IES<VE> dropdown in the menu bar.
Performance Analysis can be carried out at any stage of the Building design cycle and the earlier it isimplemented the greater the benefits will be in the final design.When the model geometry is complete and room/space elements have been placed the model isready to begin analysis. Click the Import Model button to transfer the model via gbXML to <VE>, thenuse the VE-Ware, VE-Toolkits or <Virtual Environment> buttons to perform different analyses asdetailed below.
User Settings and Information
Settings and InfoOpens the IESVE Revit plug-in About dialog.
Here information for IES Technical Support can be foundand settings such as Units and gbXML Export quality canbe set.
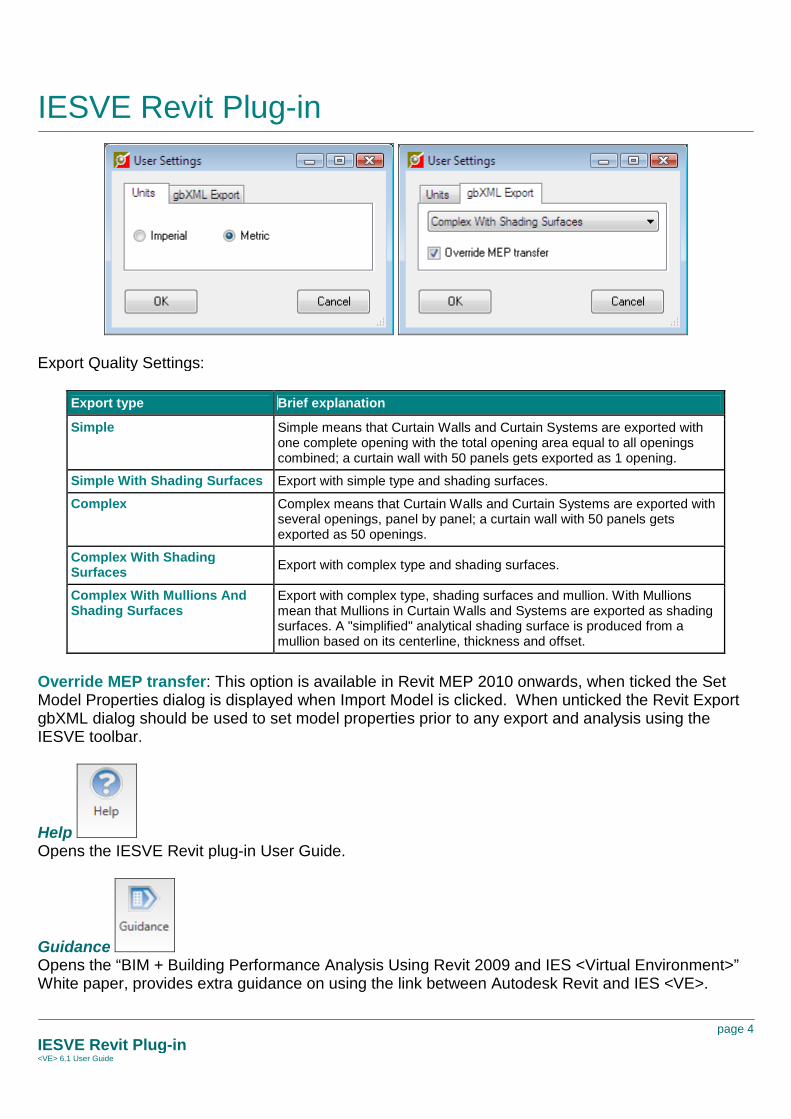
SettingsClick the Settings button to edit units (Imperial or Metric) and to define quality of gbXML Exportwhen model is exported from Revit to <VE>.
IESVE Revit Plug-in
page 4
IESVE Revit Plug-in<VE> 6.1 User Guide
Export Quality Settings:
Export type Brief explanation
Simple Simple means that Curtain Walls and Curtain Systems are exported withone complete opening with the total opening area equal to all openingscombined; a curtain wall with 50 panels gets exported as 1 opening.
Simple With Shading Surfaces Export with simple type and shading surfaces.
Complex Complex means that Curtain Walls and Curtain Systems are exported withseveral openings, panel by panel; a curtain wall with 50 panels getsexported as 50 openings.
Complex With ShadingSurfaces
Export with complex type and shading surfaces.
Complex With Mullions AndShading Surfaces
Export with complex type, shading surfaces and mullion. With Mullionsmean that Mullions in Curtain Walls and Systems are exported as shadingsurfaces. A "simplified" analytical shading surface is produced from amullion based on its centerline, thickness and offset.
Override MEP transfer: This option is available in Revit MEP 2010 onwards, when ticked the SetModel Properties dialog is displayed when Import Model is clicked. When unticked the Revit ExportgbXML dialog should be used to set model properties prior to any export and analysis using theIESVE toolbar.
HelpOpens the IESVE Revit plug-in User Guide.
GuidanceOpens the “BIM + Building Performance Analysis Using Revit 2009 and IES <Virtual Environment>”White paper, provides extra guidance on using the link between Autodesk Revit and IES <VE>.
IESVE Revit Plug-in
page 5
IESVE Revit Plug-in<VE> 6.1 User Guide
IES WebsiteLaunches the IES website in an internet browser
Set Model Properties
page 6
IESVE Revit Plug-in<VE> 6.1 User Guide
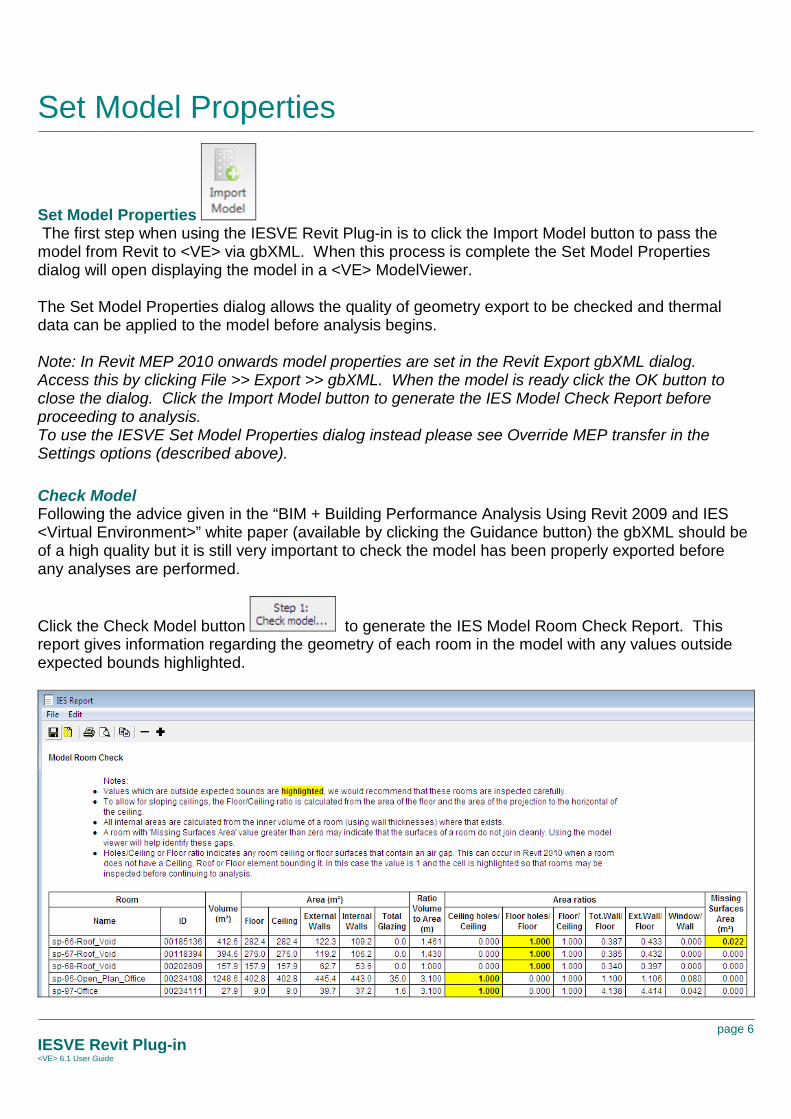
Set Model PropertiesThe first step when using the IESVE Revit Plug-in is to click the Import Model button to pass the
model from Revit to <VE> via gbXML. When this process is complete the Set Model Propertiesdialog will open displaying the model in a <VE> ModelViewer.
The Set Model Properties dialog allows the quality of geometry export to be checked and thermaldata can be applied to the model before analysis begins.
Note: In Revit MEP 2010 onwards model properties are set in the Revit Export gbXML dialog.Access this by clicking File >> Export >> gbXML. When the model is ready click the OK button toclose the dialog. Click the Import Model button to generate the IES Model Check Report beforeproceeding to analysis.To use the IESVE Set Model Properties dialog instead please see Override MEP transfer in theSettings options (described above).
Check ModelFollowing the advice given in the “BIM + Building Performance Analysis Using Revit 2009 and IES<Virtual Environment>” white paper (available by clicking the Guidance button) the gbXML should beof a high quality but it is still very important to check the model has been properly exported beforeany analyses are performed.
Click the Check Model button to generate the IES Model Room Check Report. Thisreport gives information regarding the geometry of each room in the model with any values outsideexpected bounds highlighted.
Set Model Properties
page 7
IESVE Revit Plug-in<VE> 6.1 User Guide
Missing Surfaces shows rooms that may have gaps where surfaces do not join correctly. It isimportant these problems are identified and corrected as the missing area may allow light, solar
radiation and air flow thermal transfer between zones. This would affect the calculation results.
Ratios and areas of walls, floors etc should be compared to original designs to ensure all data hasbeen correctly transferred to the <VE> model.
Holes to Ceiling/Floor can highlight rooms that are not properly bounded by a floor or ceiling/roof.
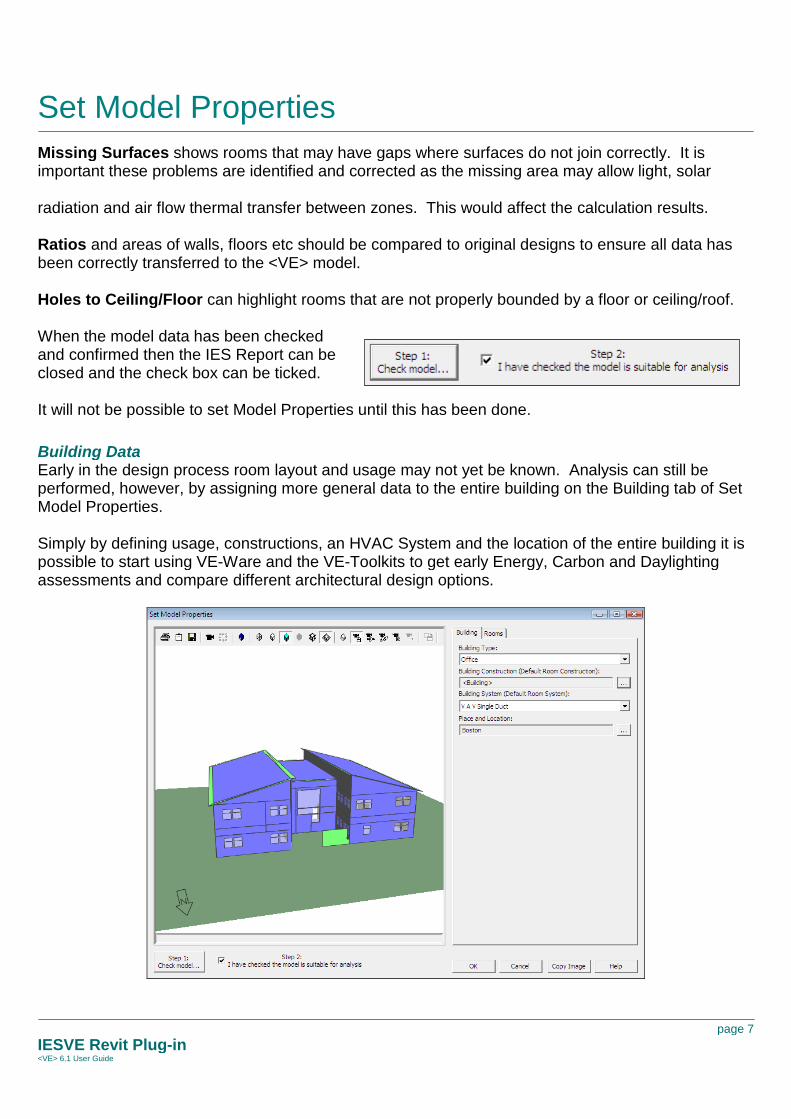
When the model data has been checkedand confirmed then the IES Report can beclosed and the check box can be ticked.
It will not be possible to set Model Properties until this has been done.
Building DataEarly in the design process room layout and usage may not yet be known. Analysis can still beperformed, however, by assigning more general data to the entire building on the Building tab of SetModel Properties.
Simply by defining usage, constructions, an HVAC System and the location of the entire building it ispossible to start using VE-Ware and the VE-Toolkits to get early Energy, Carbon and Daylightingassessments and compare different architectural design options.
Set Model Properties
page 8
IESVE Revit Plug-in<VE> 6.1 User Guide
Building TypeDefine the primary use of the building from the list which includes Office, Hotel and University/Schoolamongst others. This is used to apply thermal template data including Heating and Cooling SetPoints, Internal Gains and Infiltration rates.
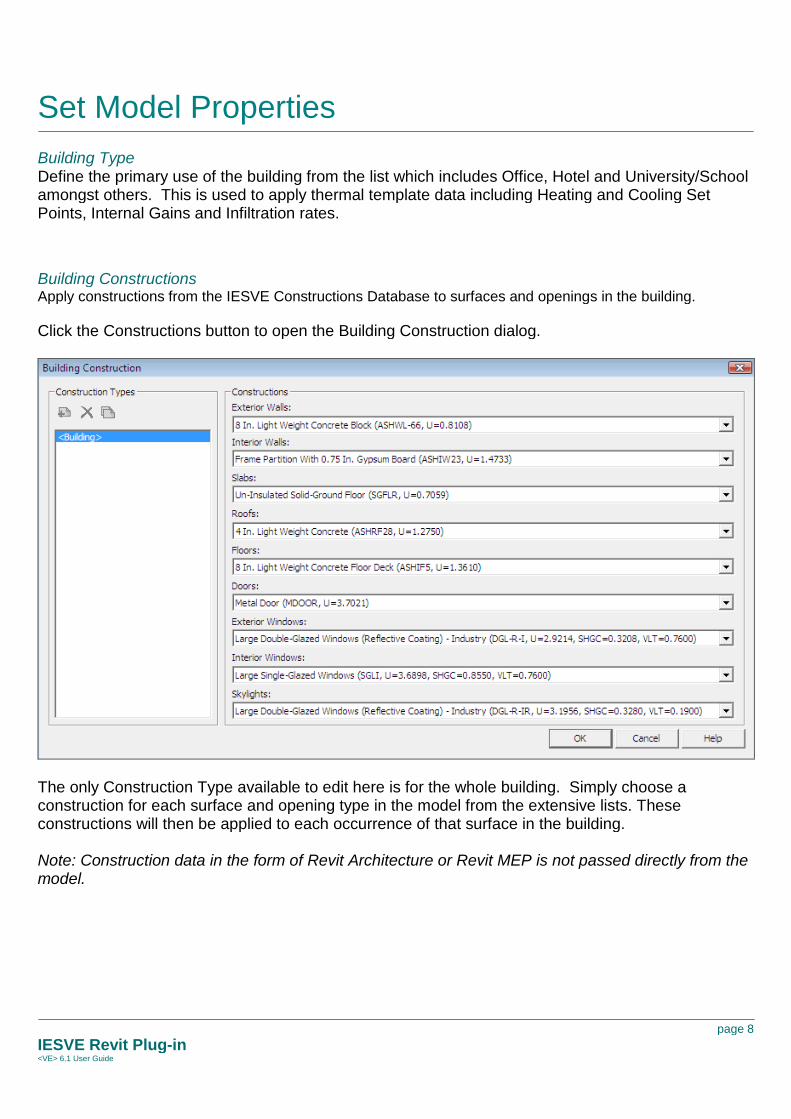
Building ConstructionsApply constructions from the IESVE Constructions Database to surfaces and openings in the building.
Click the Constructions button to open the Building Construction dialog.
The only Construction Type available to edit here is for the whole building. Simply choose aconstruction for each surface and opening type in the model from the extensive lists. Theseconstructions will then be applied to each occurrence of that surface in the building.
Note: Construction data in the form of Revit Architecture or Revit MEP is not passed directly from themodel.

Set Model Properties
page 9
IESVE Revit Plug-in<VE> 6.1 User Guide
Building ServiceThis is used to select an HVAC System for the entire building.
Building System MechanismActive Chilled Beam Heating and coolingCentral Heating Convectors Heating onlyCentral Heating Hot Air Heating onlyCentral Heating Radiant Floors Heating onlyCentral Heating Radiators Heating onlyConstant Volume Dual Duct Heating and coolingConstant Volume Fixed O A Heating and coolingConstant Volume Terminal Reheat Heating and coolingConstant Volume Variable O A Heating and coolingFan Coil System Heating and coolingMultizone Hot Deck Cold Deck Heating and coolingOther Room Heater Heating onlyRadiant Cooled Ceilings Cooling onlyRadiant Heater Flued Heating onlyRadiant Heater Multiburner Heating onlyRadiant Heater No Flued Heating onlySplit Systems With Mechanical Ventilation Heating onlySplit Systems With Mechanical Ventilation With Cooling Heating and coolingSplit Systems With Natural Ventilation Heating onlyV A V Dual Duct Heating and coolingV A V Indoor Packaged Cabinet Heating and coolingV A V Single Duct Heating and coolingVariable Refrigerant Flow Heating and coolingWater Loop Heat Pump Heating and cooling
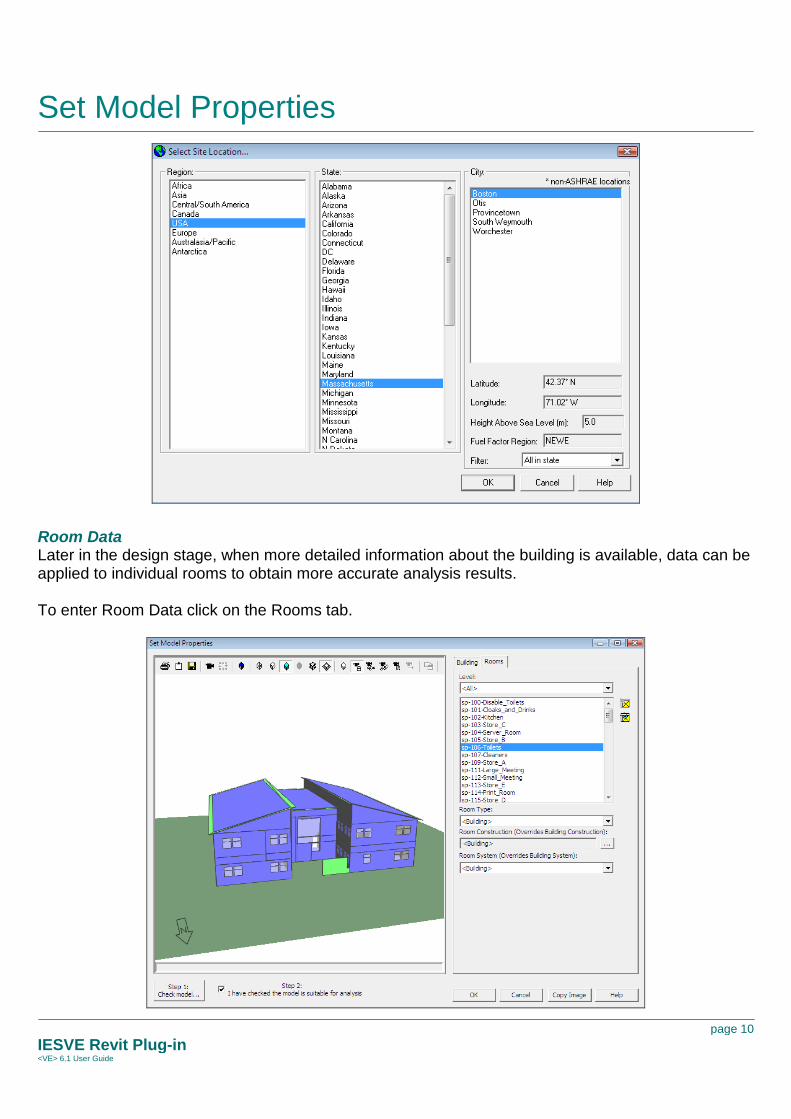
Place and LocationSet the geographical location of the building. This defines the Weather, Climate data, Sun Path andlight across the building that are used in Sustainability Calculations.
Latitude and Longitude informationabout the current location can beviewed by clicking the Place andLocation button.
To change location click the Selectbutton. This opens the Select Site Location dialog which shows the locations available in eachContinent. Choose the location which is nearest to where the building will be constructed.
Set Model Properties
page 10
IESVE Revit Plug-in<VE> 6.1 User Guide
Room DataLater in the design stage, when more detailed information about the building is available, data can beapplied to individual rooms to obtain more accurate analysis results.
To enter Room Data click on the Rooms tab.
Set Model Properties
page 11
IESVE Revit Plug-in<VE> 6.1 User Guide
Level - Select rooms by storey i.e. ground floor, first floor, second floor.
Select - When the Select Button is pressed the Modelviewer will display the building as an x-raywith any selected rooms highlighted Red.
Isolate - When the Isolate Button is pressed the Modelviewer only displays the rooms that areselected on the list.
Room Type, Room Construction and Room (HVAC) System can be used to apply data to theselected room(s). This will override the Building Type data applied for the selected rooms.
Room TypeDefine the use of the room by selecting an option from the list. This is used to apply thermal templatedata including Heating and Cooling Set Points, Internal Gains and Air Exchanges.
Select <Building> to make the Room Activity the same as is set for the Building.
Note: Spaces whose room type is chosen as “unoccupiable” or “plenum” will NOT be considered“habitable area” therefore will not be part of the area calculations of the building for the Energy UseIntensity.
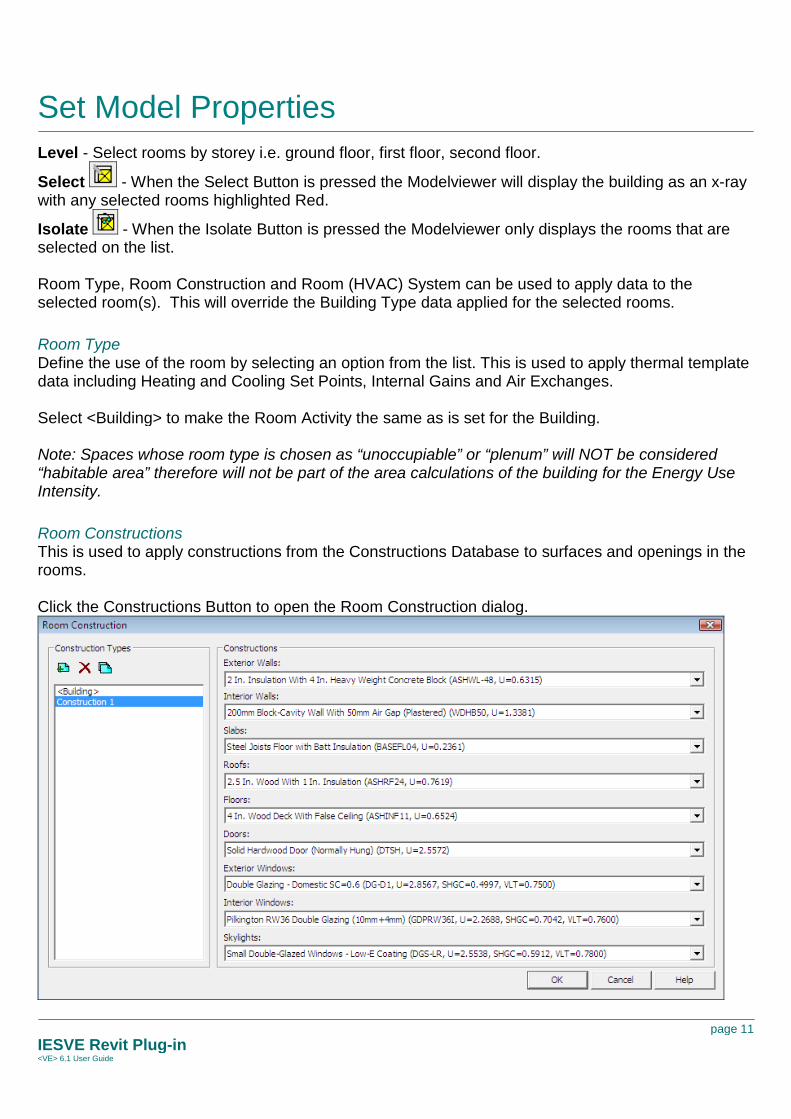
Room ConstructionsThis is used to apply constructions from the Constructions Database to surfaces and openings in therooms.
Click the Constructions Button to open the Room Construction dialog.
Set Model Properties
page 12
IESVE Revit Plug-in<VE> 6.1 User Guide
Note: this differs from Building Construction as multiple Construction Types can now be created andapplied to different rooms.
New - adds a new Construction Type with default constructions.
Delete - Deletes the currently selected Construction Type.
Duplicate - Copies the currently selected Construction Type.
Building ServiceIf any rooms use a different HVAC System from the one selected for the building this can be specifiedhere. Select <Building> to use the same system as the Building.
VE-WareThe VE-Ware button runs a dynamic thermal Apache simulation and generates whole-building annualenergy and carbon usage results. A report is generated showing details of total Energy usage,Energy breakdown by usage, total Carbon Emissions and, depending on location, comparisonagainst NZBC Clause H1 Compliance (New Zealand) or Architecture 2030 Challenge targets (rest ofworld) .
Further information is available from the IES VE-Ware User Guide and the IES website.
VE-Toolkits
page 13
IESVE Revit Plug-in<VE> 6.1 User Guide
VE-ToolkitsThe IES VE-Toolkits are a set of analyses that can be run to help influence and direct early stagebuilding designs. These fast analyses can be run with basic model inputs to allow indicativeassessment of design options taking into account climate, building fabric, energy & carbon, thermalloads, daylighting and solar shading. Further options offer an assessment of the potential for Low orZero Carbon technologies and water reduction.
Using the VE-Toolkits for LEED the building model can be appraised against LEED credits to give anindicative result based on credits that cover daylighting, comfort, water and Renewables.
Click the Guidance button to open the VE-Toolkits User Guide for more detailed help and alsosee the IES website.
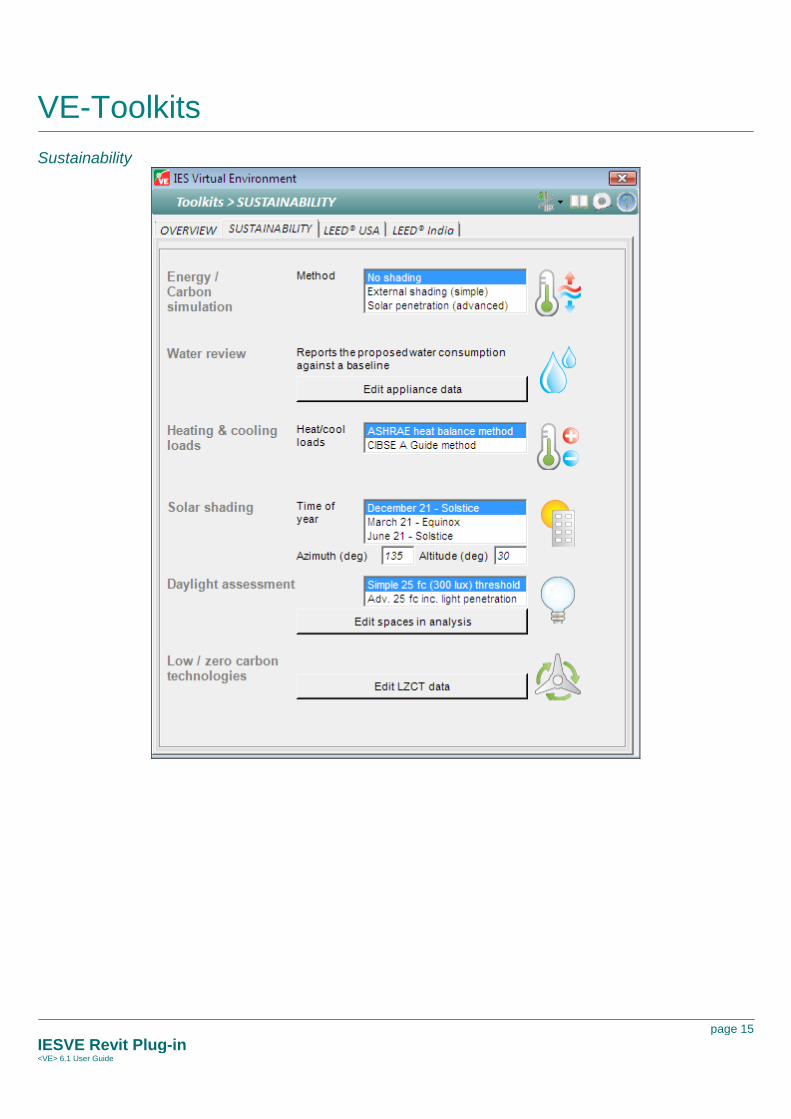
Sustainability VE-ToolkitThe Sustainability VE-Toolkit is divided over two tabs; Overview and Sustainability.
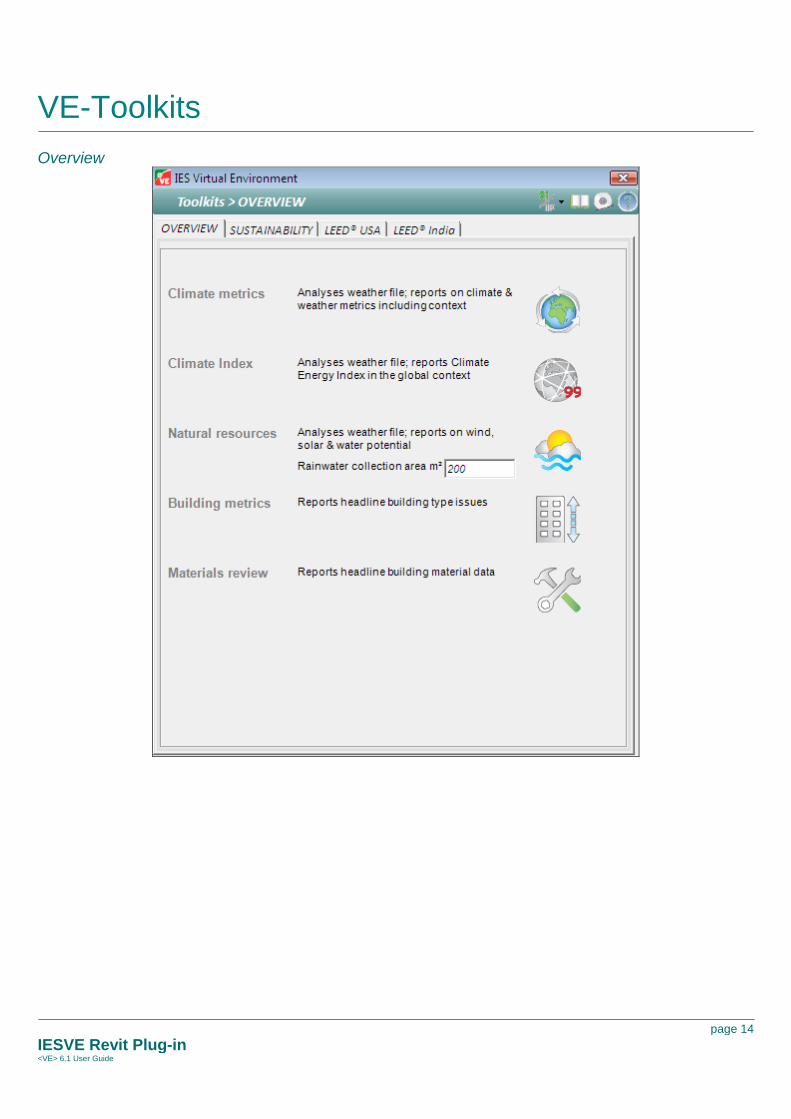
The Overview tab can be used to give a greater understanding of the implications of the buildinglocation by understating climate and uses this information to offer guidance on building fabric design,materials and potential strategies for further investigation.
The Sustainability tab allows early stage analysis of Energy and Carbon emissions, Heating andCooling Loads, solar shading and daylight assessment and Water and Low or Zero CarbonTechnologies reviews based on building design and simple inputs.
VE-Toolkits
page 14
IESVE Revit Plug-in<VE> 6.1 User Guide
Overview
VE-Toolkits
page 15
IESVE Revit Plug-in<VE> 6.1 User Guide
Sustainability
VE-Toolkits
page 16
IESVE Revit Plug-in<VE> 6.1 User Guide
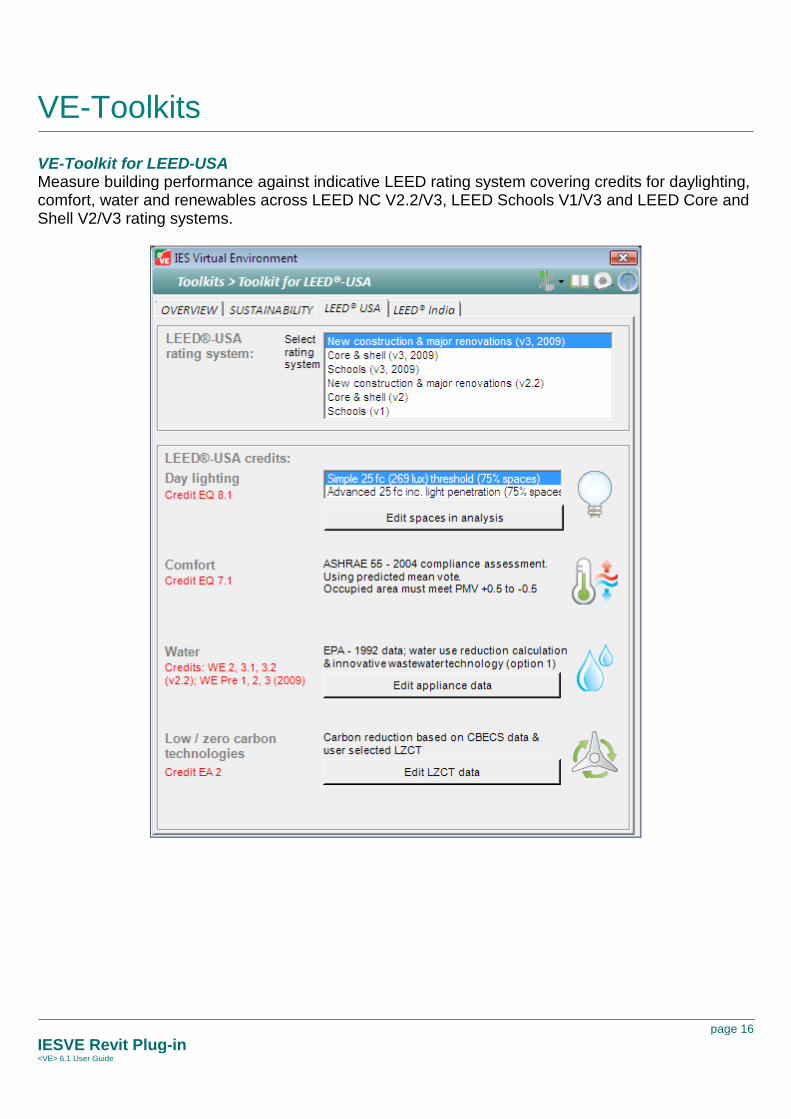
VE-Toolkit for LEED-USAMeasure building performance against indicative LEED rating system covering credits for daylighting,comfort, water and renewables across LEED NC V2.2/V3, LEED Schools V1/V3 and LEED Core andShell V2/V3 rating systems.
VE-Toolkits
page 17
IESVE Revit Plug-in<VE> 6.1 User Guide
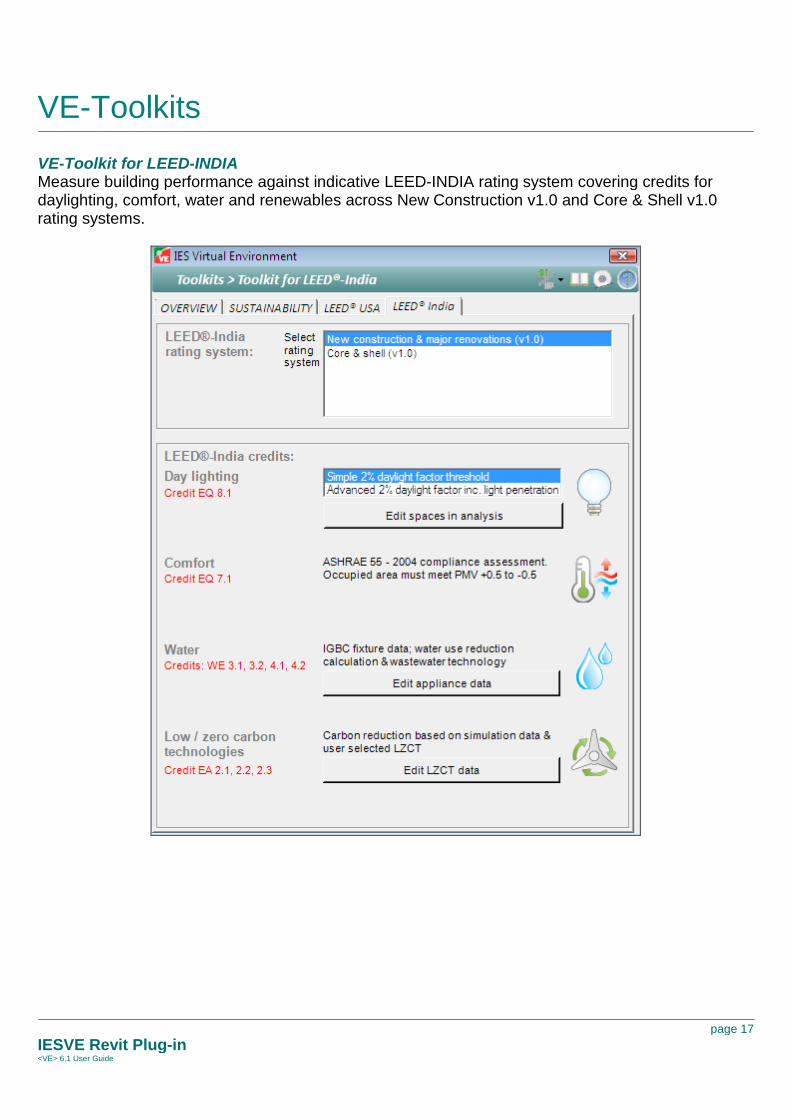
VE-Toolkit for LEED-INDIAMeasure building performance against indicative LEED-INDIA rating system covering credits fordaylighting, comfort, water and renewables across New Construction v1.0 and Core & Shell v1.0rating systems.
VE-Toolkits
page 18
IESVE Revit Plug-in<VE> 6.1 User Guide
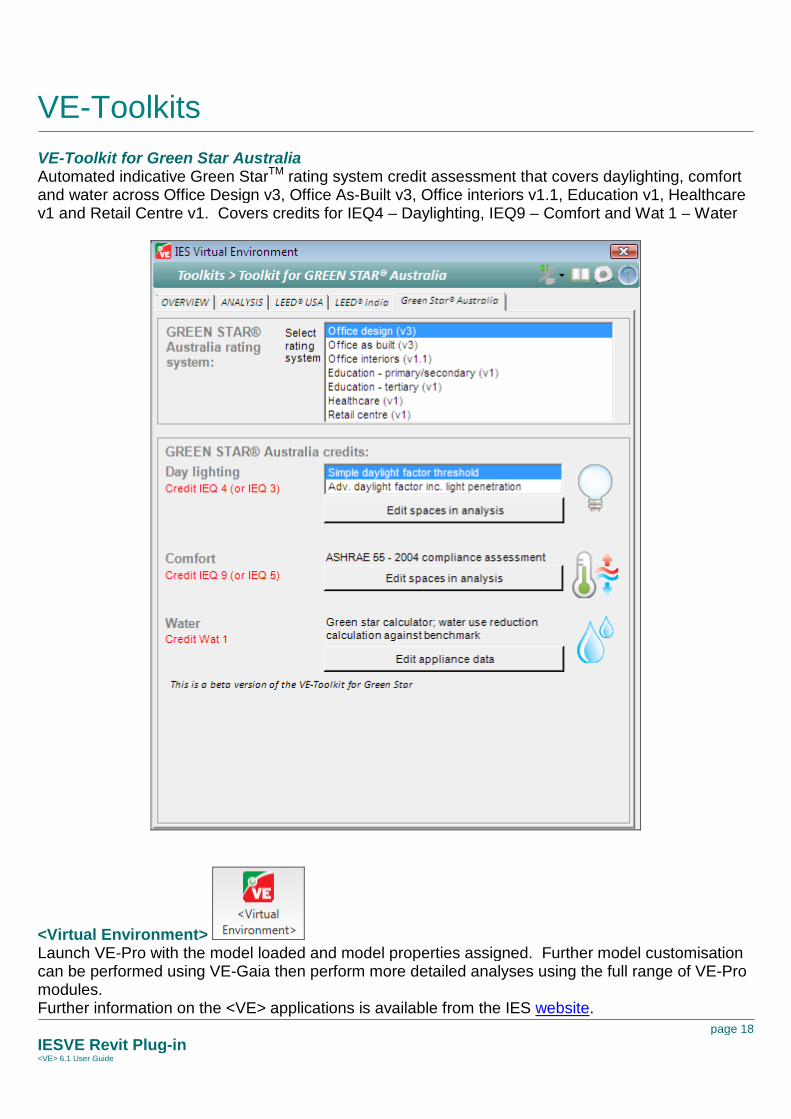
VE-Toolkit for Green Star AustraliaAutomated indicative Green StarTM rating system credit assessment that covers daylighting, comfortand water across Office Design v3, Office As-Built v3, Office interiors v1.1, Education v1, Healthcarev1 and Retail Centre v1. Covers credits for IEQ4 – Daylighting, IEQ9 – Comfort and Wat 1 – Water
<Virtual Environment>Launch VE-Pro with the model loaded and model properties assigned. Further model customisationcan be performed using VE-Gaia then perform more detailed analyses using the full range of VE-Promodules.Further information on the <VE> applications is available from the IES website.