Embed Size (px)
Citation preview

II. BUILD PROPER TECHNIQUE
S A X O P H O N E
BREATHING & AIR SUPPORT
II. BUILD PROPER TECHNIQUE // BREATHING & AIR SUPPORT
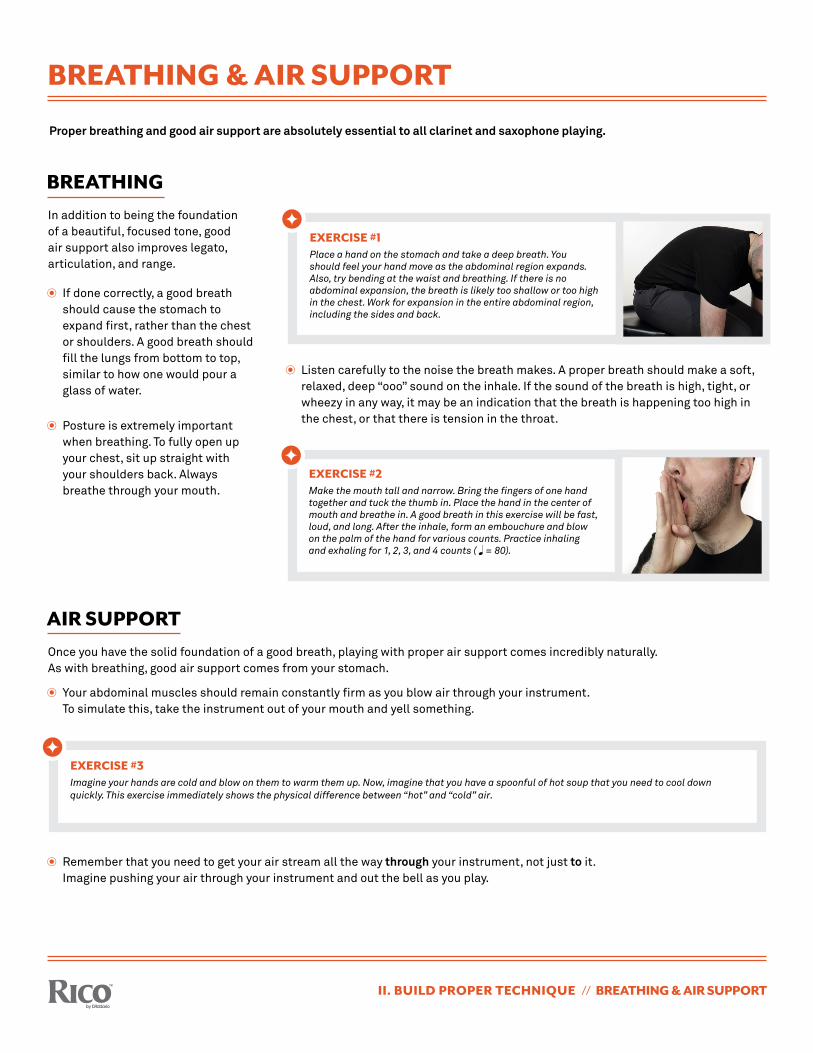
EXERCISE #1
EXERCISE #2
BREATHING
Place a hand on the stomach and take a deep breath. You should feel your hand move as the abdominal region expands. Also, try bending at the waist and breathing. If there is no abdominal expansion, the breath is likely too shallow or too high in the chest. Work for expansion in the entire abdominal region, including the sides and back.
Make the mouth tall and narrow. Bring the fingers of one hand together and tuck the thumb in. Place the hand in the center of mouth and breathe in. A good breath in this exercise will be fast, loud, and long. After the inhale, form an embouchure and blow on the palm of the hand for various counts. Practice inhaling and exhaling for 1, 2, 3, and 4 counts ( = 80).
Proper breathing and good air support are absolutely essential to all clarinet and saxophone playing.
In addition to being the foundation of a beautiful, focused tone, good air support also improves legato, articulation, and range.
If done correctly, a good breath should cause the stomach to expand first, rather than the chest or shoulders. A good breath should fill the lungs from bottom to top, similar to how one would pour a glass of water.
Listen carefully to the noise the breath makes. A proper breath should make a soft, relaxed, deep “ooo” sound on the inhale. If the sound of the breath is high, tight, or wheezy in any way, it may be an indication that the breath is happening too high in the chest, or that there is tension in the throat. Posture is extremely important
when breathing. To fully open up your chest, sit up straight with your shoulders back. Always breathe through your mouth.
EXERCISE #3
AIR SUPPORT
Imagine your hands are cold and blow on them to warm them up. Now, imagine that you have a spoonful of hot soup that you need to cool down quickly. This exercise immediately shows the physical difference between “hot” and “cold” air.
Once you have the solid foundation of a good breath, playing with proper air support comes incredibly naturally. As with breathing, good air support comes from your stomach.
Your abdominal muscles should remain constantly firm as you blow air through your instrument. To simulate this, take the instrument out of your mouth and yell something.
Remember that you need to get your air stream all the way through your instrument, not just to it. Imagine pushing your air through your instrument and out the bell as you play.
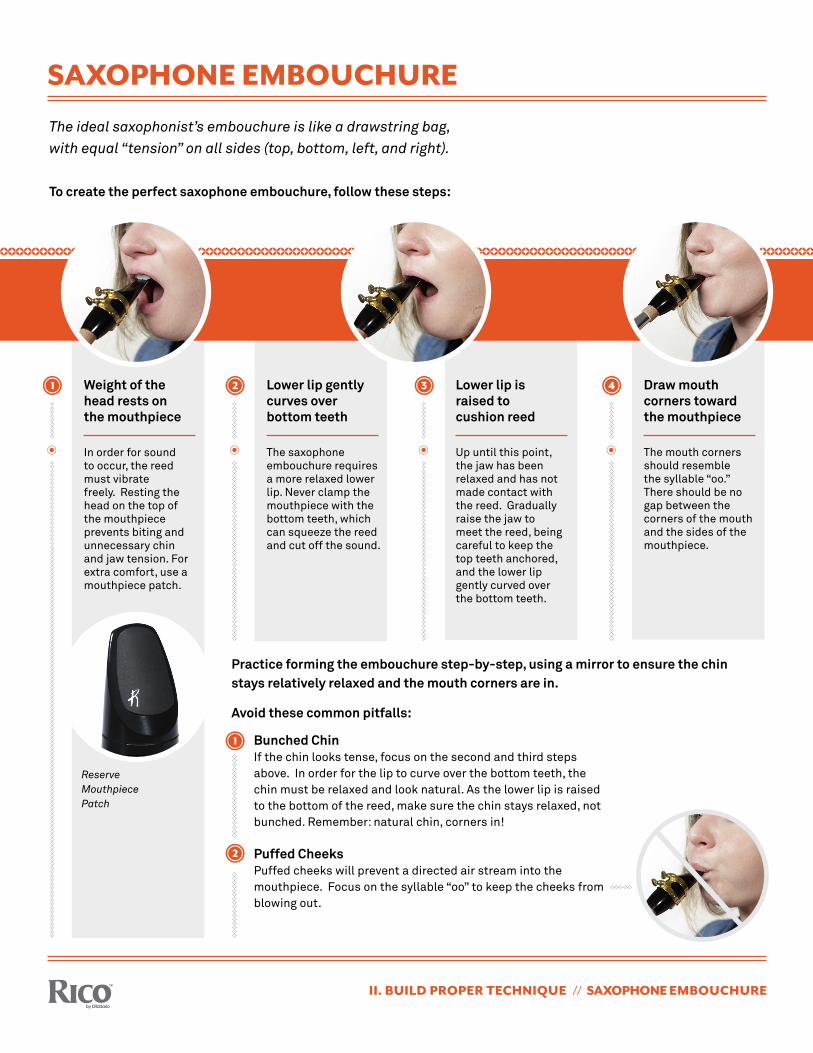
The ideal saxophonist’s embouchure is like a drawstring bag, with equal “tension” on all sides (top, bottom, left, and right).
To create the perfect saxophone embouchure, follow these steps:
SAXOPHONE EMBOUCHURE
II. BUILD PROPER TECHNIQUE // SAXOPHONE EMBOUCHURE
In order for sound to occur, the reed must vibrate freely. Resting the head on the top of the mouthpiece prevents biting and unnecessary chin and jaw tension. For extra comfort, use a mouthpiece patch.
The saxophone embouchure requires a more relaxed lower lip. Never clamp the mouthpiece with the bottom teeth, which can squeeze the reed and cut off the sound.
Up until this point, the jaw has been relaxed and has not made contact with the reed. Gradually raise the jaw to meet the reed, being careful to keep the top teeth anchored, and the lower lip gently curved over the bottom teeth.
The mouth corners should resemble the syllable “oo.” There should be no gap between the corners of the mouth and the sides of the mouthpiece.
1 2
1
2
3 4Weight of the head rests on the mouthpiece
Lower lip gently curves over bottom teeth
Lower lip is raised to cushion reed
Draw mouth corners toward the mouthpiece
Practice forming the embouchure step-by-step, using a mirror to ensure the chin stays relatively relaxed and the mouth corners are in.
Avoid these common pitfalls:
Bunched ChinIf the chin looks tense, focus on the second and third steps above. In order for the lip to curve over the bottom teeth, the chin must be relaxed and look natural. As the lower lip is raised to the bottom of the reed, make sure the chin stays relaxed, not bunched. Remember: natural chin, corners in!
Puffed CheeksPuffed cheeks will prevent a directed air stream into the mouthpiece. Focus on the syllable “oo” to keep the cheeks from blowing out.
Reserve MouthpiecePatch
SAXOPHONE ARTICULATION
II. BUILD PROPER TECHNIQUE // SAXOPHONE ARTICULATION
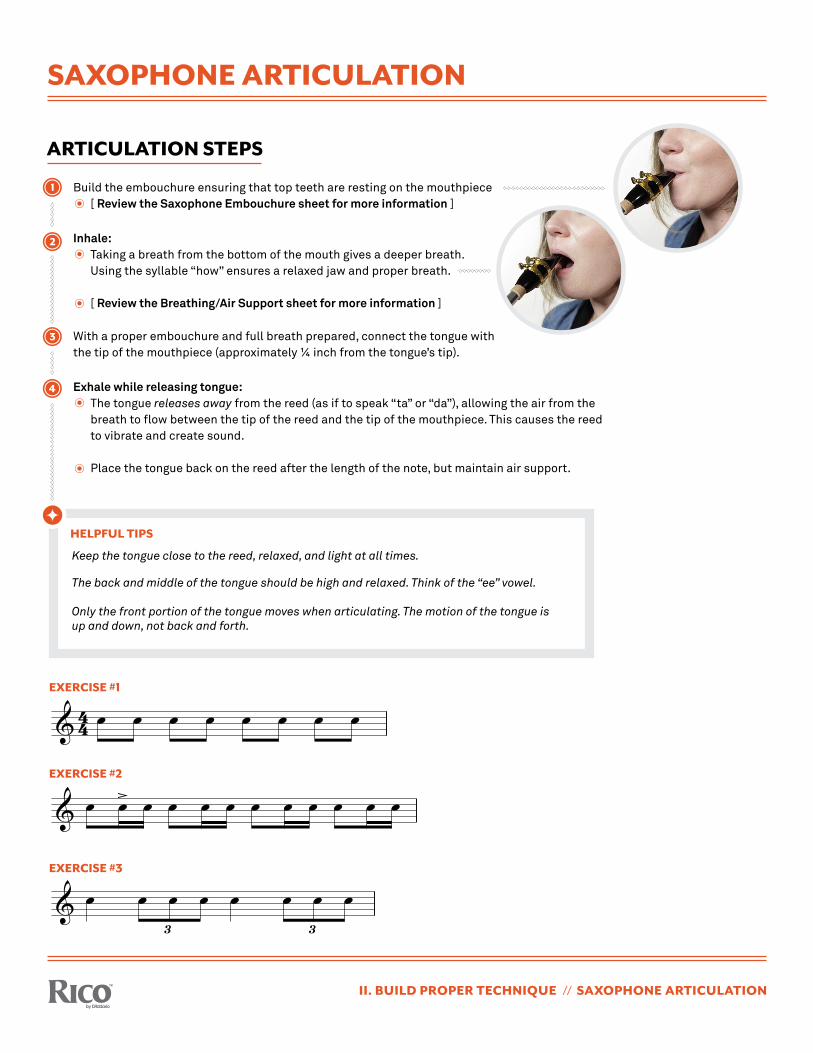
HELPFUL TIPS
EXERCISE #1
EXERCISE #2
EXERCISE #3
ARTICULATION STEPS
Keep the tongue close to the reed, relaxed, and light at all times.
The back and middle of the tongue should be high and relaxed. Think of the “ee” vowel.
Only the front portion of the tongue moves when articulating. The motion of the tongue is up and down, not back and forth.
Build the embouchure ensuring that top teeth are resting on the mouthpiece[ Review the Saxophone Embouchure sheet for more information ]
With a proper embouchure and full breath prepared, connect the tongue with the tip of the mouthpiece (approximately ¼ inch from the tongue’s tip).
Exhale while releasing tongue:The tongue releases away from the reed (as if to speak “ta” or “da”), allowing the air from the breath to flow between the tip of the reed and the tip of the mouthpiece. This causes the reed to vibrate and create sound.
Place the tongue back on the reed after the length of the note, but maintain air support.
Inhale:Taking a breath from the bottom of the mouth gives a deeper breath. Using the syllable “how” ensures a relaxed jaw and proper breath.
[ Review the Breathing/Air Support sheet for more information ]
1
2
3
4
4
4&
Anticipate fatigue! Patience (work in 5-minute intervals)
Relax the tongue
Experiment with various syllables (especially in double-tonguing)
1.
1. Work for clarity of sound
2. Slowly increase tempo in two-beat increments
3. Use these patterns to practice scales
‘
accel
‘
Study in Articulation
&2.
>
‘
accel
‘
&3.
>
‘
accel
‘
&4.
> >
‘
accel
&5. ‘
accel
‘
&6.
‘
accel
‘
&7.
‘
accel
‘
3 3
œ œ œ œ œ œ œ œ
œ œ œ œ œ œ œ œ œ œ œ œ
œ œ œ œ œ œ œ œ œ œ œ œ œ œ
œ œ œ œ œ œ œ œ œ ™ œ œ œ œ œ œ œ œ œ ™ œ œ œ œ œ œ œ œ œ ™
œ œ œ œ œ œ œ œ œ œ
œ œ œ œ œ
J
‰œ œ œ œ œ
J
‰
œ œ œ œ œ œ œ œ
SAXOPHONE HAND & FINGER PLACEMENT
II. BUILD PROPER TECHNIQUE // SAXOPHONE HAND & FINGER PLACEMENT
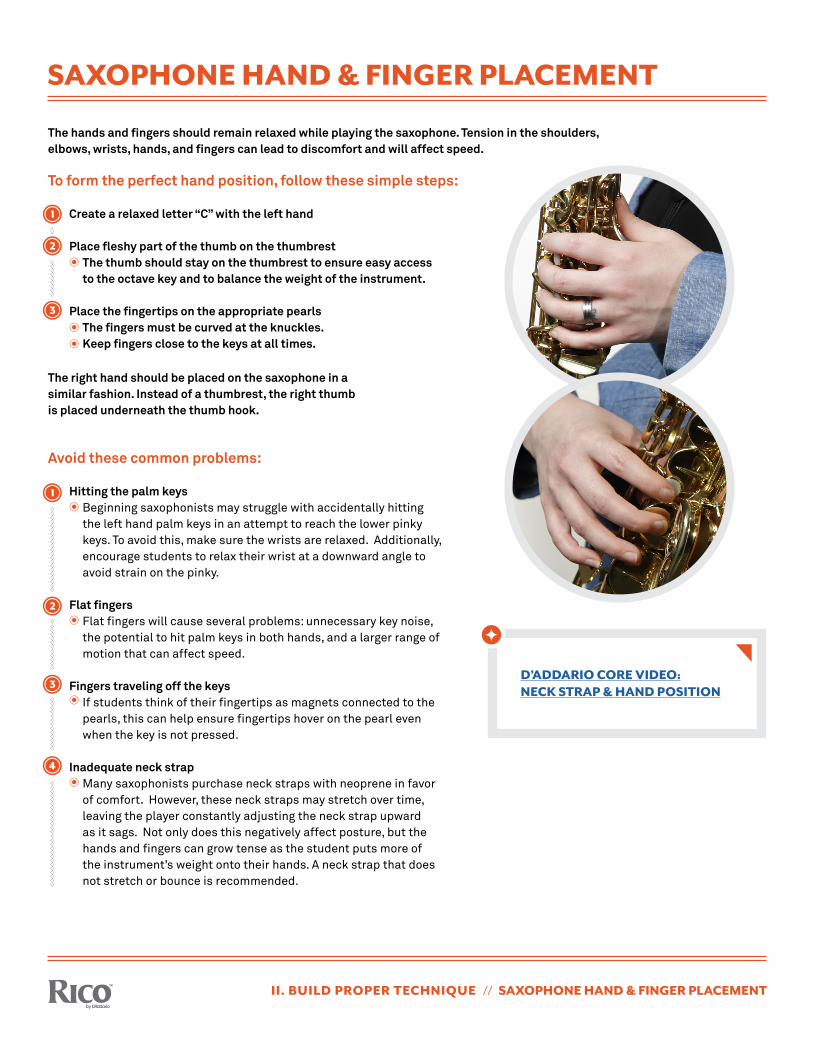
The hands and fingers should remain relaxed while playing the saxophone. Tension in the shoulders, elbows, wrists, hands, and fingers can lead to discomfort and will affect speed.
To form the perfect hand position, follow these simple steps:
Create a relaxed letter “C” with the left hand Place fleshy part of the thumb on the thumbrest
The thumb should stay on the thumbrest to ensure easy access to the octave key and to balance the weight of the instrument.
Place the fingertips on the appropriate pearlsThe fingers must be curved at the knuckles. Keep fingers close to the keys at all times.
The right hand should be placed on the saxophone in a similar fashion. Instead of a thumbrest, the right thumb is placed underneath the thumb hook.
Avoid these common problems:
Hitting the palm keysBeginning saxophonists may struggle with accidentally hitting the left hand palm keys in an attempt to reach the lower pinky keys. To avoid this, make sure the wrists are relaxed. Additionally, encourage students to relax their wrist at a downward angle to avoid strain on the pinky.
Flat fingersFlat fingers will cause several problems: unnecessary key noise, the potential to hit palm keys in both hands, and a larger range of motion that can affect speed.
Fingers traveling off the keys
If students think of their fingertips as magnets connected to the pearls, this can help ensure fingertips hover on the pearl even when the key is not pressed.
Inadequate neck strapMany saxophonists purchase neck straps with neoprene in favor of comfort. However, these neck straps may stretch over time, leaving the player constantly adjusting the neck strap upward as it sags. Not only does this negatively affect posture, but the hands and fingers can grow tense as the student puts more of the instrument’s weight onto their hands. A neck strap that does not stretch or bounce is recommended.
1
1
2
2
3
3
4
D’ADDARIO CORE VIDEO:NECK STRAP & HAND POSITION
SAXOPHONE WARM-UPS
II. BUILD PROPER TECHNIQUE // SAXOPHONE WARM-UPS
f
A
B
C
4
4&
∑ ∑ ∑ ∑
Saxophone Yoga
Daily Long-Tone Warmup for Beginner and Intermediate Students
Exercises A-E focus on tone development.
1. With excellent posture and hand position, inhale for 2 full counts.
2. Sustain each note for the entire bar loudly, concentrating on
keeping embouchure muscles and airstream steady.
3. During rests, take 2 counts to rest/recover by exhaling any excess air,
4. Then breathe deeply for 2 full counts to prepare for the next note(s).
&
∑
&
∑ ∑ ∑
&
∑ ∑
Remember to relax jaw
and use warm air
∑
&
∑ ∑
&
∑ ∑
&
∑ ∑
ww
ww
w˙
™
Œw
˙™
Œ
ww w
w ww w
w ww w
w ww
ww wb wb
ww# w# wn
w# w# wnw w
w# wn
ww# wn w
w wb
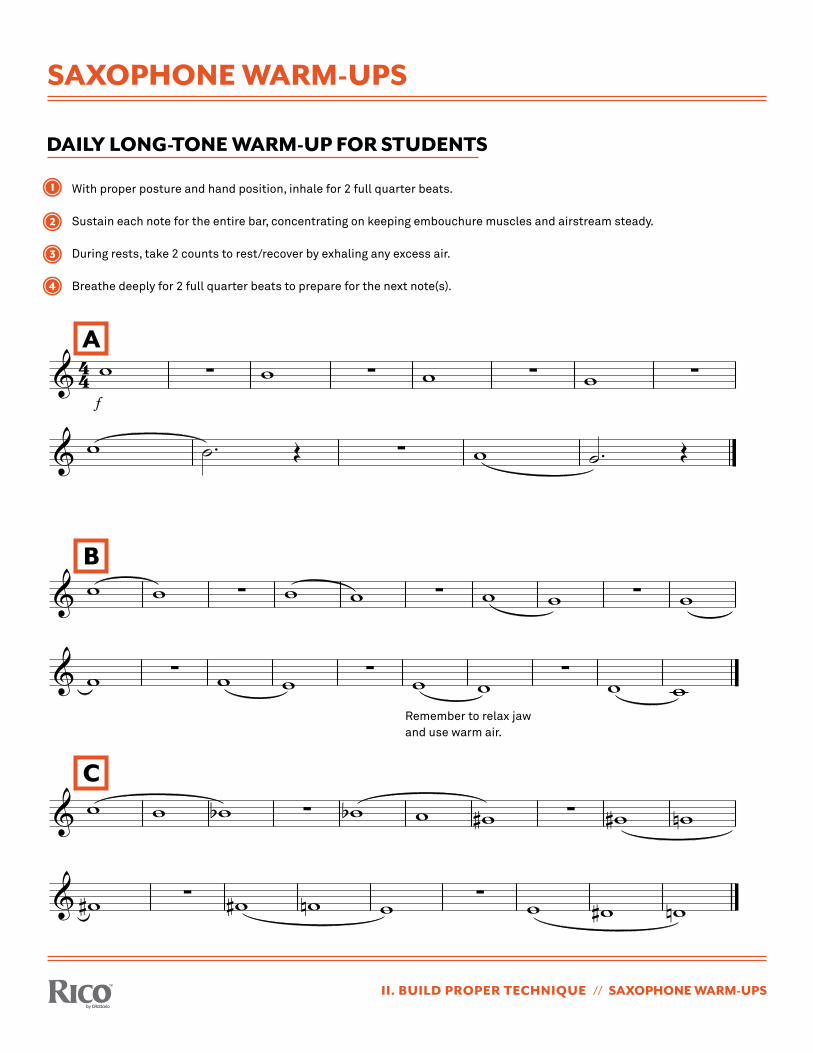
DAILY LONG-TONE WARM-UP FOR STUDENTS
With proper posture and hand position, inhale for 2 full quarter beats.
Sustain each note for the entire bar, concentrating on keeping embouchure muscles and airstream steady.
During rests, take 2 counts to rest/recover by exhaling any excess air.
Breathe deeply for 2 full quarter beats to prepare for the next note(s).
1
2
4
3
A
B
C
Remember to relax jawand use warm air.