Embed Size (px)
Citation preview

i

ii
Philippine Copyright 2015by Rex Book Store, Inc.
RBS Science and Technology SeriesCyber Science 3Revised Editi on 2015ISBN 978-971-23-6781-6Classifi cati on: Teacher’s Resource Material (52-SB-00167-1)
Published, copyrighted 2015, and distributed by Rex Book Store, Inc. (RBSI) with main offi ce at 856 Nicanor Reyes Sr. St., Sampaloc, Manila/Tel. Nos.: 735-1364, 736-0567
RBSI Branches:LUZON
•MORAYTA: 856 N. Reyes Sr. St., Sampaloc, Manila / Tel. Nos.: 736-0169, 733-6746; Telefax: 736-4191 •RECTO: 2161-65 Freedom Building, C.M. Recto Avenue, Sampaloc, Manila / Tel. Nos.: 522-4521, 522-4305, 522-4107, 733-8637 •RECTO (La Consolacion): Mendiola, Manila • MAKATI: Unit UG-2, Star Centrum Bldg., Sen. Gil Puyat Ave., Makati City / Tel. No.: 818-5363; Telefax: 893-3744 •ROCKWELL: 1st Floor, Ateneo Professional School, Rockwell Center, Bel-Air, Makati City / Tel. No.: 729-2015 •CUBAO: Unit 10 UGF, Doña Consolacion Bldg., Gen. Santos Ave., Araneta Center, Cubao, Quezon City /Telefax: 911-1070 •ORTIGAS: G/F East Tower, Philippine Stock Exchange Center, Exchange Road, Orti gas Center, Pasig City / Tel. No.: (02) 650-4347 •CAVITE: Block 4, Lot 20 Don Gregorio Heights 2, Zone 1-A Aguinaldo Highway, Dasmariñas, Cavite / Telefax: (046) 416-1824 •CAVITE (Tanza): (Display Area) Block 5, Lot 6, City View 4 and 5, Brgy. Tanauan, Tanza, Cavite •NAGA: 1-1A Geronimo Bldg., Barlin St., Sta. Cruz, Naga City, Camarines Sur/Telefax: (054) 811-6878 •LEGAZPI: Unit 6, 3rd Floor, A. Bichara Silverscreen, Legazpi City, Albay / Telefax: (052) 480-2244 •CALAPAN: Brgy. Salong, Nati onal Highway, Calapan City, Oriental Mindoro / Telefax: (043) 288-1650 •BATANES: L. Lopez St., Kayvalugan, Basco, Batanes •TUGUEGARAO: 10 Arellano Ext., Brgy. Ugac Sur, Tuguegarao, Cagayan / Telefax: (078) 844-8072 •CABANATUAN: Fontelera Building, 1271 Del Pilar Ext., Sangitan East, Cabanatuan City, Nueva Ecija / Tel. No.: (044) 464-2151; Telefax: (044) 600-5684 •URDANETA: Zone 6, Pinmaludpod, Urdaneta City, Pangasinan / Telefax: (075) 568-3975 •ANGELES: Unit H, JMS Bldg., MacArthur Highway, Brgy. Salapungan, Angeles City, Pampanga/Telefax: (045) 887-5371 • BAGUIO: Rex Hall Student Residences, Upper Gen. Luna cor. A. Bonifacio St., Baguio City, Benguet / Tel. No.: (074) 422-0574
VISAYAS•TACLOBAN: Brgy. 74 Marasbaras, Tacloban City, Leyte / Tel. No.: (053) 323-8976; Telefax: (053) 523-1784 •ILOILO: 75 Lopez Jaena St., Brgy. San Isidro, Jaro, Iloilo City, Iloilo / Tel. No.: (033) 329-0332; Telefax: (033) 329-0336 •BACOLOD: 28 Brgy. 36, Purok Immaculada, Quezon Ave., Bacolod City, Negros Occidental •CEBU: 11 Sanciangko St., Cebu City / Tel. Nos.: (032) 416-9684, 254-6773, 505-4313; Telefax: (032) 254-6466
MINDANAO•CAGAYAN DE ORO: J. Seriña St. cor. Vamenta Blvd., Carmen, Cagayan de Oro City, Misamis Oriental / Telefax: (088) 858-6775, 309-5881 •DAVAO: 156 C.M. Recto St., Davao City, Davao / Tel. Nos.: (082) 300-5422, 305-5772; Telefax: (082) 221-0272 •GENERAL SANTOS: Aparente St., Dadiangas Heights, General Santos City, South Cotabato / Telefax: (083) 554-7102 • ZAMBOANGA: San Francisco Loop, Mayor Agan Ave., Camino Nuevo B, Zamboanga City / Tel. No.: (062) 955–0887
www.rexpublishing.com.ph
No porti on of this book may be copied or reproduced in books, pamphlets, outlines, or notes—whether printed, mimeographed, typewritt en, photocopied, or in any form—for distributi on or sale, without the writt en permission of the Publisher and Author/s. The infringer shall be prosecuted in compliance with copyright, trademark, patent, and other perti nent laws.
RBSI’s Book Associati on Memberships: Philippine Booksellers Associati on, Inc. (PBAI); Book Development Associati on of the Philippines (BDAP); Philippine Educati onal Publishers Associati on (PEPA); Book Exporters Associati on of the Philippines (BEAP); Academic Booksellers Associati on of the Philippines (ABAP); Children’s Literature Associati on of the Philippines, Inc. (CLAPI); Asian Publishers Resources Center (APRC)
PEPA’s Internati onal Book Associati on Memberships: Internati onal Publishers Associati on (IPA); Asia Pacifi c Publishers Associati on (APPA); ASEAN Book Publishers Associati on (ABPA); Philippine Book Publishing Development Federati on (Philbook)
Printed by rex printing company, inc.
84-86 P. Florenti no St., Sta. Mesa Heights, Quezon City / Tel. No.: 857-7777
137
UNIT III: Detecting Force, Describing Motion, Using Energy
I. INTRODUCTION
Children possess a lot of energy to move about in the surroundings. They use their energy to satisfy their curiosity and explore the materials around them. They discover that forms of energy such as heat, electricity, sound, and light are important and necessary, useful, and make their life comfortable. Children wonder where heat, electricity, sound, and light energy come from. As they move around, they become aware that they can move objects by using force from their body. They also discover that there are other forces that exist that can make other things in motion.
In this unit, you will help the learners demonstrate understanding by describing and observing a moving object and the di� erent forces that make objects move. The activities will help the learners observe di� erent reference points in the surroundings that can be used to describe a moving object and the di� erent ways to make objects move. They will compare a moving object from a stationary object. They will also � nd out why some objects move faster than the other. As a teacher, you will help the learners observe and describe the sources of heat energy, light energy, sound, and electricity. The lessons will also lead the learners to understand the importance or the uses of heat, light, sound, and electricity.
The activities and exercises in the di� erent lessons are intended to help develop the basic science skills such as observing, classifying, and describing. You help the learners acquire knowledge and understanding about basic facts, concepts, and generalizations through direct observations, hands-on activities, reading of content, and conducting a whole class questioning strategy. You will guide them to become scienti� cally literate individuals and critical thinkers using some learning tools such as digital images that are presented as slides in a PowerPoint presentation, interactive activities from the science websites, charts and pictures, and real objects. You can help the learners gain more understanding of the concepts by using all the available print and non-print media in the community and follow the suggested activities in this Teacher’s Resource Material.
II. CONTENT STANDARDS: The learner…
• demonstrates understanding of motion.
• demonstrates understanding of the sources and uses of light, sound, heat, and electricity.
III. PERFORMANCE STANDARDS: The learner…
• describes when an object has moved.
• practices safe and wise use of light, sound, heat, and electricity in daily life.
138
IV. LEARNING PLAN
Lesson 27 – How Do You Describe a Moving Object?
Worktext, pages 197–203
Time Allotment: 2 days
A. Speci� c Objectives:
At the end of the lesson, the learner…
• observes and describe objects in motion.
• identi� es and describe the di� erent reference points.
• describes the position of a person or an object in relation to a reference point (e.g., manifest interest in observing things in motion).
B. Concepts (Key Understandings)
• Any moving object changes its position.
• A push or pull applied on any object sets the object in motion.
• A reference point is any stationary object in the surroundings that can be used to describe a moving object.
C. Learning Resources
• Real objects for hands-on activities like doors, toy cars, or model pupils and other materials in the classroom
• Slide presentation of objects in motion
• Worktext
• http://www.bbc.co.uk/schools/scienceclips/ages/10_11/science_10_11.shtml
139
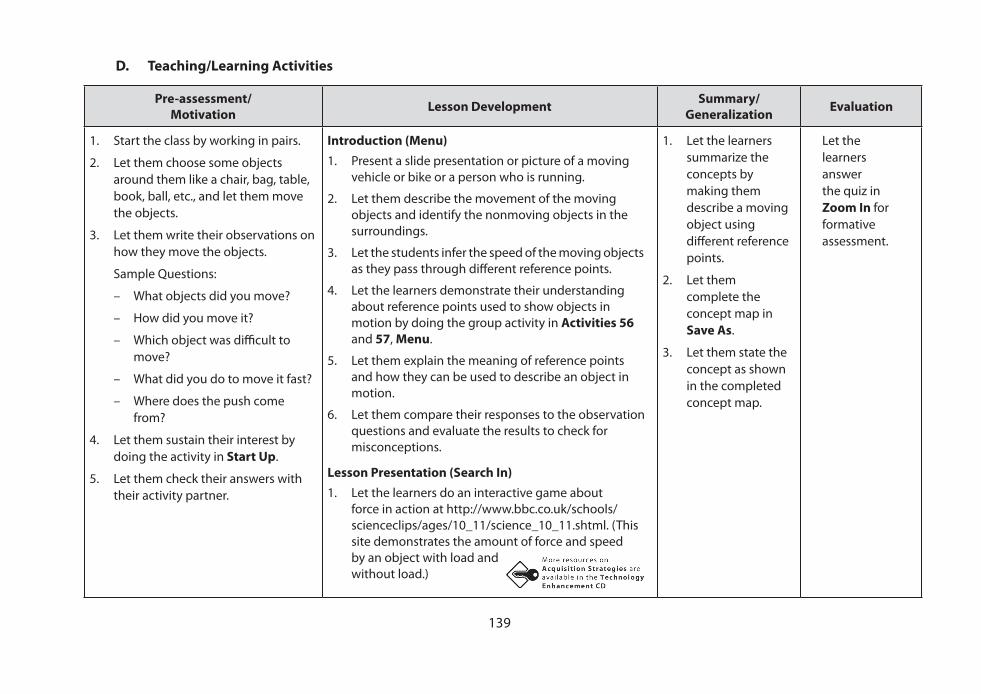
D. Teaching/Learning Activities
Pre-assessment/Motivation Lesson Development Summary/
Generalization Evaluation
1. Start the class by working in pairs.
2. Let them choose some objects around them like a chair, bag, table, book, ball, etc., and let them move the objects.
3. Let them write their observations on how they move the objects.
Sample Questions:
– What objects did you move?
– How did you move it?
– Which object was di� cult to move?
– What did you do to move it fast?
– Where does the push come from?
4. Let them sustain their interest by doing the activity in Start Up.
5. Let them check their answers with their activity partner.
Introduction (Menu)1. Present a slide presentation or picture of a moving
vehicle or bike or a person who is running.
2. Let them describe the movement of the moving objects and identify the nonmoving objects in the surroundings.
3. Let the students infer the speed of the moving objects as they pass through di� erent reference points.
4. Let the learners demonstrate their understanding about reference points used to show objects in motion by doing the group activity in Activities 56 and 57, Menu.
5. Let them explain the meaning of reference points and how they can be used to describe an object in motion.
6. Let them compare their responses to the observation questions and evaluate the results to check for misconceptions.
Lesson Presentation (Search In)1. Let the learners do an interactive game about
force in action at http://www.bbc.co.uk/schools/scienceclips/ages/10_11/science_10_11.shtml. (This site demonstrates the amount of force and speed
by an object with load and without load.)
1. Let the learners summarize the concepts by making them describe a moving object using di� erent reference points.
2. Let them complete the concept map in Save As.
3. Let them state the concept as shown in the completed concept map.
Let the learners
answer the quiz in Zoom In for formative assessment.
140
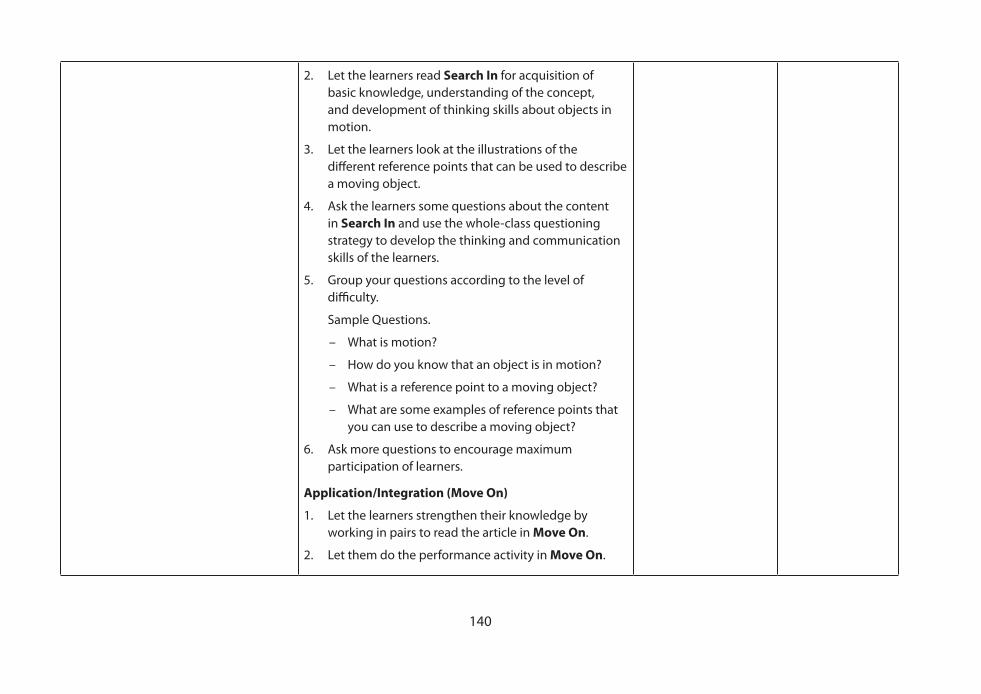
2. Let the learners read Search In for acquisition of basic knowledge, understanding of the concept, and development of thinking skills about objects in motion.
3. Let the learners look at the illustrations of the di� erent reference points that can be used to describe a moving object.
4. Ask the learners some questions about the content in Search In and use the whole-class questioning strategy to develop the thinking and communication skills of the learners.
5. Group your questions according to the level of di� culty.
Sample Questions.
– What is motion?
– How do you know that an object is in motion?
– What is a reference point to a moving object?
– What are some examples of reference points that you can use to describe a moving object?
6. Ask more questions to encourage maximum participation of learners.
Application/Integration (Move On)
1. Let the learners strengthen their knowledge by working in pairs to read the article in Move On.
2. Let them do the performance activity in Move On.
141
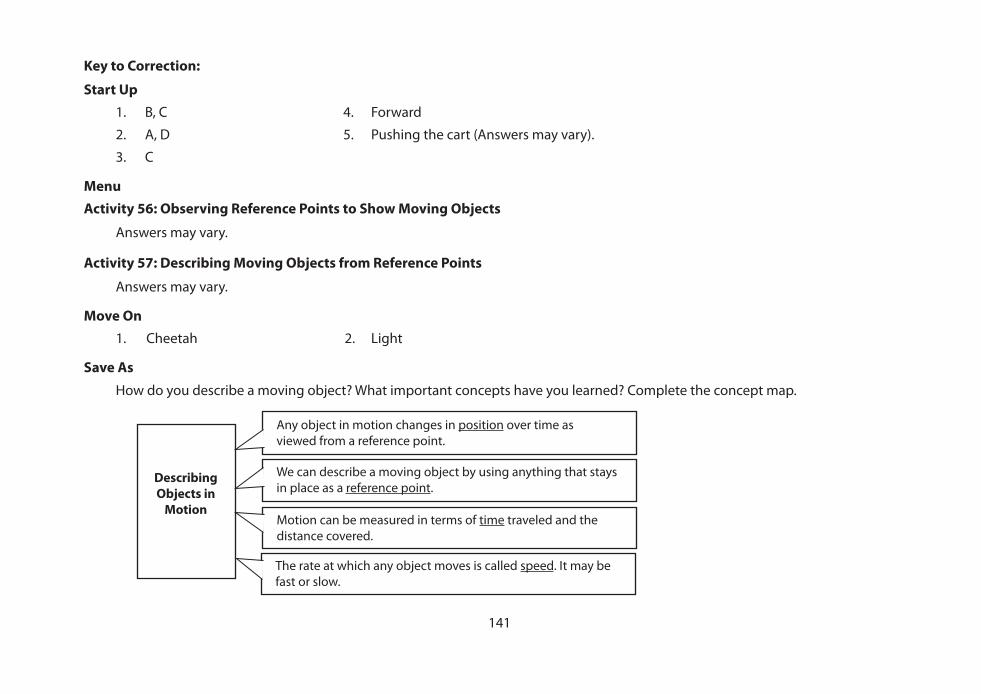
Key to Correction:
Start Up 1. B, C 4. Forward
2. A, D 5. Pushing the cart (Answers may vary).
3. C
Menu Activity 56: Observing Reference Points to Show Moving Objects
Answers may vary.
Activity 57: Describing Moving Objects from Reference Points
Answers may vary.
Move On1. Cheetah 2. Light
Save As
How do you describe a moving object? What important concepts have you learned? Complete the concept map.
Any object in motion changes in position over time as viewed from a reference point.
Describing Objects in
Motion
We can describe a moving object by using anything that stays in place as a reference point.
Motion can be measured in terms of time traveled and the distance covered.
The rate at which any object moves is called speed. It may be fast or slow.
142
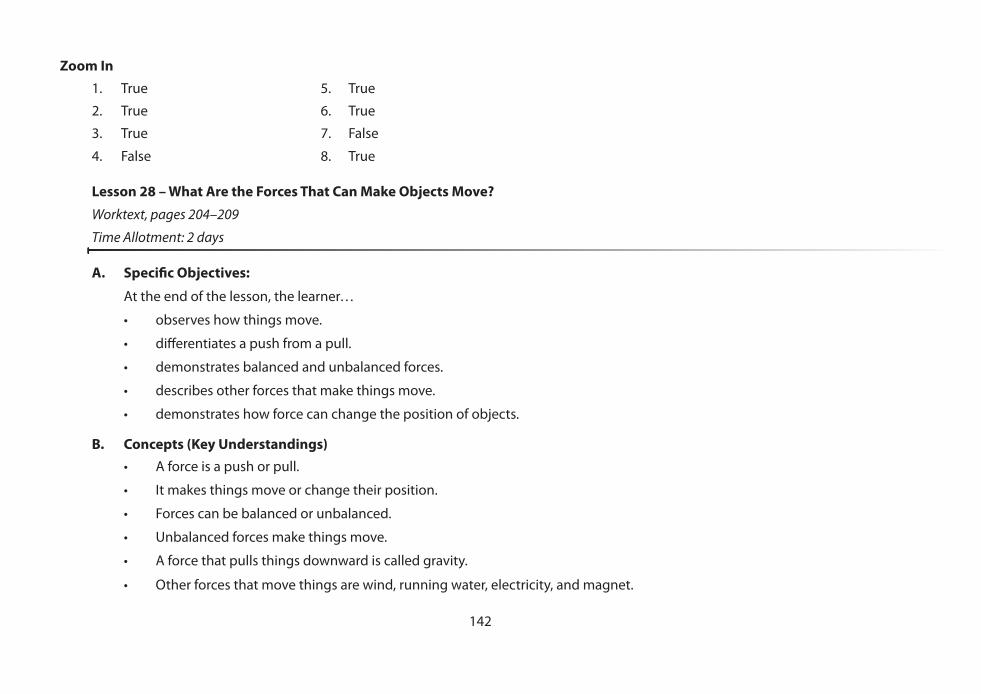
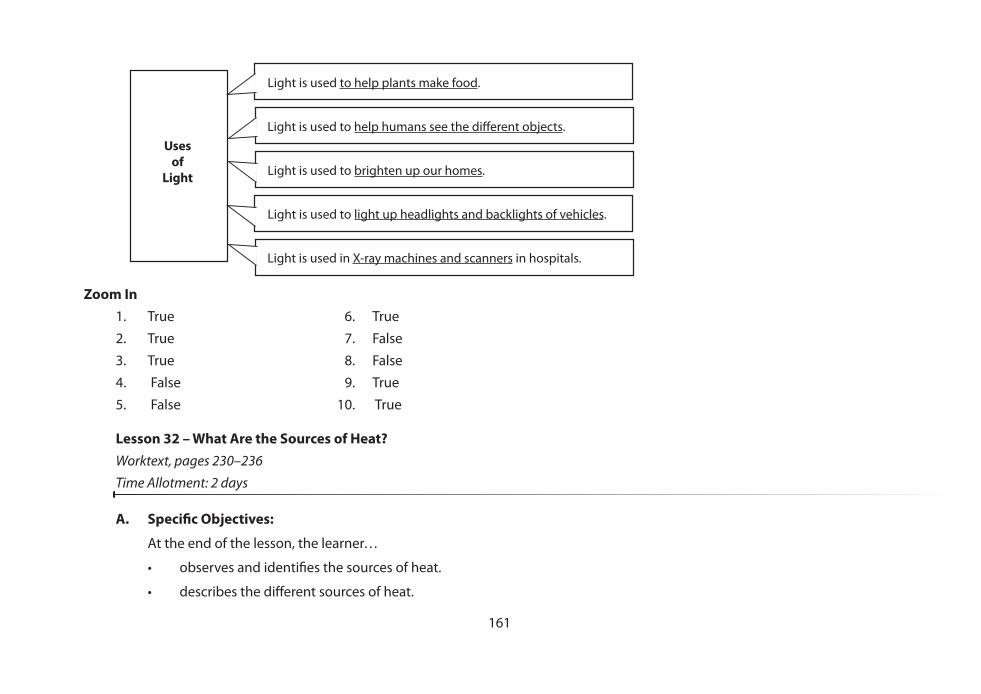
Zoom In1. True 5. True
2. True 6. True
3. True 7. False
4. False 8. True
Lesson 28 – What Are the Forces That Can Make Objects Move?
Worktext, pages 204–209
Time Allotment: 2 days
A. Speci� c Objectives:
At the end of the lesson, the learner…
• observes how things move.
• di� erentiates a push from a pull.
• demonstrates balanced and unbalanced forces.
• describes other forces that make things move.
• demonstrates how force can change the position of objects.
B. Concepts (Key Understandings)• A force is a push or pull.
• It makes things move or change their position.
• Forces can be balanced or unbalanced.
• Unbalanced forces make things move.
• A force that pulls things downward is called gravity.
• Other forces that move things are wind, running water, electricity, and magnet.
143
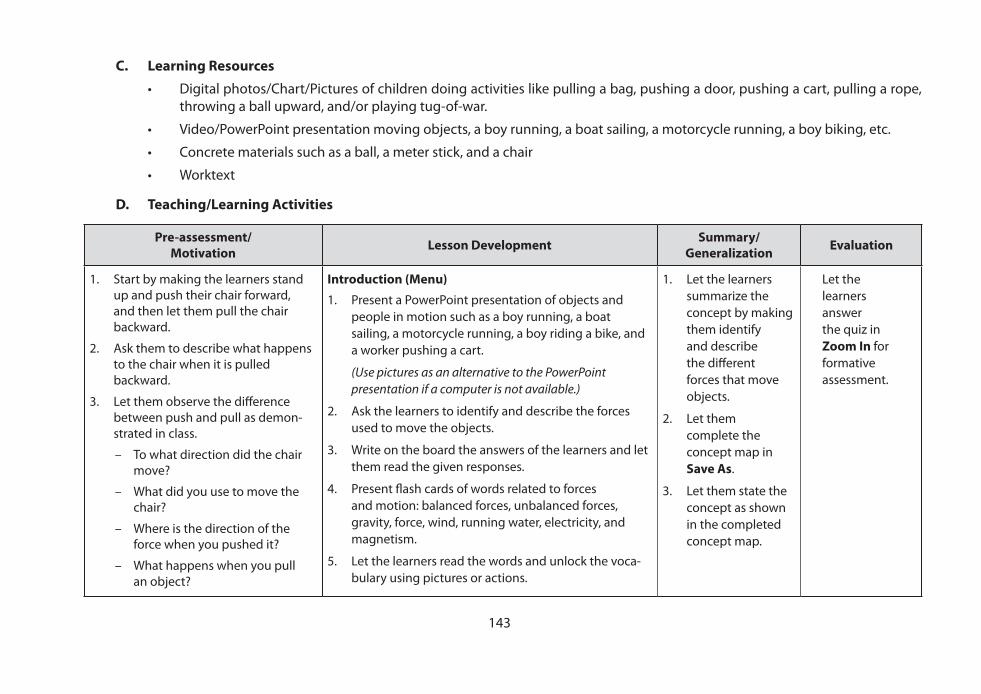
C. Learning Resources
• Digital photos/Chart/Pictures of children doing activities like pulling a bag, pushing a door, pushing a cart, pulling a rope, throwing a ball upward, and/or playing tug-of-war.
• Video/PowerPoint presentation moving objects, a boy running, a boat sailing, a motorcycle running, a boy biking, etc.
• Concrete materials such as a ball, a meter stick, and a chair
• Worktext
D. Teaching/Learning Activities
Pre-assessment/Motivation Lesson Development Summary/
Generalization Evaluation
1. Start by making the learners stand up and push their chair forward, and then let them pull the chair backward.
2. Ask them to describe what happens to the chair when it is pulled backward.
3. Let them observe the di� erence between push and pull as demon-strated in class.
– To what direction did the chair move?
– What did you use to move the chair?
– Where is the direction of the force when you pushed it?
– What happens when you pull an object?
Introduction (Menu)
1. Present a PowerPoint presentation of objects and people in motion such as a boy running, a boat sailing, a motorcycle running, a boy riding a bike, and a worker pushing a cart.
(Use pictures as an alternative to the PowerPoint presentation if a computer is not available.)
2. Ask the learners to identify and describe the forces used to move the objects.
3. Write on the board the answers of the learners and let them read the given responses.
4. Present � ash cards of words related to forces and motion: balanced forces, unbalanced forces, gravity, force, wind, running water, electricity, and magnetism.
5. Let the learners read the words and unlock the voca-bulary using pictures or actions.
1. Let the learners summarize the concept by making them identify and describe the di� erent forces that move objects.
2. Let them complete the concept map in Save As.
3. Let them state the concept as shown in the completed concept map.
Let the learners
answer the quiz in Zoom In for formative assessment.
144
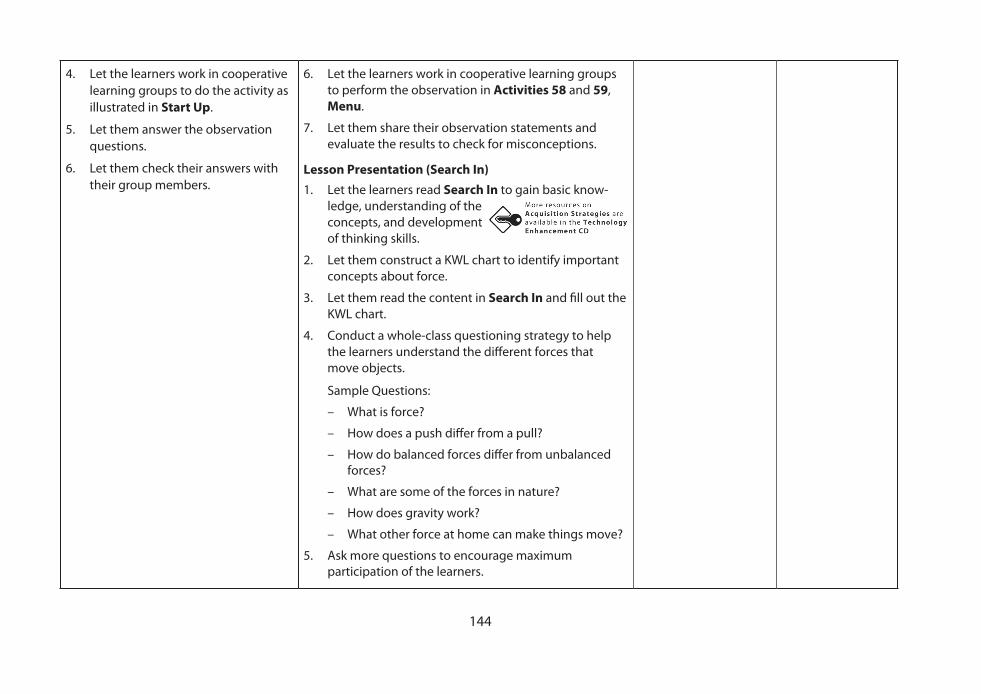
4. Let the learners work in cooperative learning groups to do the activity as illustrated in Start Up.
5. Let them answer the observation questions.
6. Let them check their answers with their group members.
6. Let the learners work in cooperative learning groups to perform the observation in Activities 58 and 59, Menu.
7. Let them share their observation statements and evaluate the results to check for misconceptions.
Lesson Presentation (Search In) 1. Let the learners read Search In to gain basic know-
ledge, understanding of the concepts, and development of thinking skills.
2. Let them construct a KWL chart to identify important concepts about force.
3. Let them read the content in Search In and � ll out the KWL chart.
4. Conduct a whole-class questioning strategy to help the learners understand the di� erent forces that move objects.
Sample Questions:
– What is force?
– How does a push di� er from a pull?
– How do balanced forces di� er from unbalanced forces?
– What are some of the forces in nature?
– How does gravity work?
– What other force at home can make things move?
5. Ask more questions to encourage maximum participation of the learners.

145
Application/Integration (Move On)
1. Let the learners reinforce their knowledge and challenge their understanding by reading the article in Move On.
2. Let them answer some questions about the article.
Key to Correction:
Start Up
– The children will not move.
– The children on the left will win.
Menu
Activity 58: Observing Push and Pull
Let’s state our observations:
1. The chair moved.
2. The cabinet moved.
3. They exerted unbalanced forces.
4. It exerted balanced forces.
Let’s share our knowledge:
Force is a push or pull exerted on an object.
Activity 59: Observing Friction
Let’s state our observations:
1. Answers in the table may vary.
2. There is lesser friction on the smooth surface than on the rough surface.

146
Let’s share our knowledge:
Friction is a force that is produced when two surfaces are rubbed together.
Save As
Zoom In
I. 1. b 4. b
2. b 5. b
3. c
II. 1. Gravity 4. Friction
2. Friction 5. Friction
3. Friction
Objects move when the forces are unbalanced.
Kinds of
Forces
Objects cannot move when the forces are balanced.
The force exerted by Earth on falling bodies is gravity.
The force of two objects rubbed together is friction.
The force that moves the leaves of trees is wind.
Your body exerts force by doing push and pull.
147
Lesson 29 – How Do Objects Move?
Worktext, pages 210–215
Time Allotment: 2 days
A. Speci� c Objectives:
At the end of the lesson, the learner…
• observes how di� erent objects move.
• describes the force and motion of objects when pushed and pulled.
• demonstrates the di� erent ways of moving objects.
• compares and contrasts the movements of objects.
• participates actively in the activity.
B. Concepts (Key Understandings)
• Force is applied on an object to make it move faster or slower.
• The movement of any object depends on the amount of force applied on the object and the mass of the object.
• Some objects with � exible and elastic properties can move by stretching or compressing.
C. Learning Resources
• Digital photos/Chart/Pictures of objects that are in motion
• Concrete materials such as spring, rubber band, stones, ball, marble, table, chair, and other materials
• Worktext
148
D. Teaching/Learning Activities
Pre-assessment/Motivation Lesson Development Summary/
Generalization Evaluation
1. Start by letting the learners work in pairs and � nd out how di� erent objects with di� erent properties can move.
Example:
Pencil, rubber band, marble, and window
2. Ask them to describe how they made the objects move.
3. Let them study the pictures in Start Up and describe the di� erent ways of moving a ball.
4. Let them answer the observation questions.
5. Let them check their answers with their group members.
Introduction (Menu)
1. Present some objects with di� erent properties and let them work in cooperative learning groups to discuss the ways and demonstrate how
they can make the objects move.
2. Let them share their responses with the other members of the class.
3. Let the learners work in cooperative learning groups to perform the observation activities in Activity 59, Menu.
4. Let them share their observation statements and evaluate the results to check for misconceptions.
5. Let the learners describe the di� erent ways on how objects can move.
6. Let them identify other examples of objects that move in similar ways to objects in the activity.
7. Let them discuss and investigate how some objects can move faster or slower.
8. Let them compare the movements of di� erent objects and the force applied on the objects.
Lesson Presentation (Search In) 1. Let the learners read Search In for acquisition of basic
knowledge, understanding of the concepts, and development of thinking skills.
1. Let the learners summarize the concept by making them identify and describe the di� erent ways of moving objects with di� erent properties.
2. Let them complete the concept map in Save As.
3. Let them state the concept as shown in the completed concept map.
Let the learners
answer the quiz in Zoom In for formative assessment.
149
2. Conduct a whole-class questioning strategy to help the learners understand the di� erent forces that moves objects.
Sample Questions:
– What are the di� erent ways of making objects move?
– How can you make a big and heavy object move?
– How can you compare the amount of force needed to push a light object with a heavy object?
– How can you move an elastic object like a rubber band?
– What should be done to stretch the rubber band to a longer size?
– What force is acting on objects lying steadily on the ground?
– How can you move objects that are pulled by gravity?
3. Ask more questions to encourage maximum participation of the learners.
Application/Integration (Move On)
1. Let the learners apply their knowledge and challenge their understanding by performing the activity in Move On.
2. Let them describe how they move the objects.
150
Key to Correction:
Start Up
A. 1. By tossing the ball
2. Because of gravity
3. By catching the ball with the hand
B. 1. By kicking the ball on the ground
2. The ball rolls on the ground
3. Forward
4. The ball rolls on the cemented ground
Menu
Activity 60: Describing the Ways of Moving Objects
Let’s state our observations:
a. Answers to the data on the table may vary.
b. Answers may vary. (Possible answers: by pushing, pulling, stretching, compressing, and rolling)
c. Chair, table
d. Forward
e. They are big and heavy.
f. Stretch the spring
g. The spring returned to its original shape and size.
Let’s share our knowledge:
Objects can move by pushing, pulling, stretching, or compressing.
151
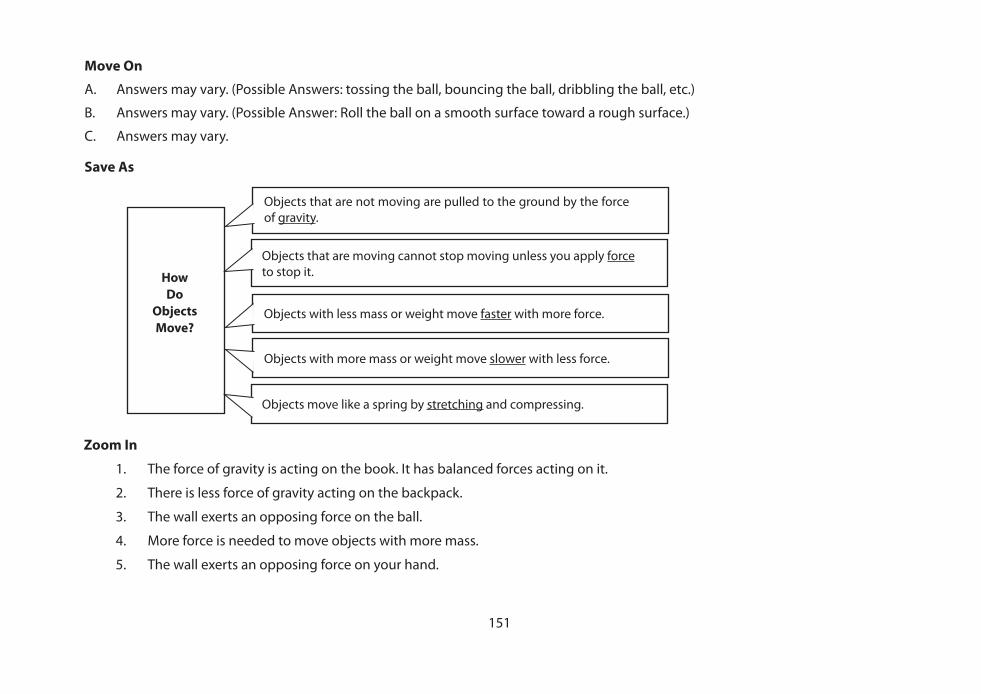
Move On
A. Answers may vary. (Possible Answers: tossing the ball, bouncing the ball, dribbling the ball, etc.)
B. Answers may vary. (Possible Answer: Roll the ball on a smooth surface toward a rough surface.)
C. Answers may vary.
Save As
Zoom In
1. The force of gravity is acting on the book. It has balanced forces acting on it.
2. There is less force of gravity acting on the backpack.
3. The wall exerts an opposing force on the ball.
4. More force is needed to move objects with more mass.
5. The wall exerts an opposing force on your hand.
Objects that are not moving are pulled to the ground by the force of gravity.
HowDo
ObjectsMove?
Objects that are moving cannot stop moving unless you apply force to stop it.
Objects with less mass or weight move faster with more force.
Objects with more mass or weight move slower with less force.
Objects move like a spring by stretching and compressing.

152
Lesson 30 – What Are the Di� erent Sources of Light Energy?
Worktext, pages 216–223
Time Allotment: 2 days
A. Speci� c Objectives:
At the end of the lesson, the learner…
• observes and identi� es the sources of light.
• describes the di� erent sources of light energy.
• di� erentiates natural light sources from arti� cial light sources.
• participates actively in the activity.
B. Concepts (Key Understandings)
• The sun is the greatest source of natural light on Earth.
• Natural light may come from stars, bioluminescence substances, and natural forces such as volcanic eruptions and lightning.
• Some objects are called re� ectors of light.
• Arti� cial sources of light come from electricity and burning of combustible materials.
• Moonlight is a re� ected light from the sun.
C. Learning Resources
• Digital photos/Pictures/Cutouts of pictures showing the natural and arti� cial sources of light energy
• Concrete examples of materials: matches, lamp, candle, torch, solar calculator, � ashlight, bulb
• Video/PowerPoint presentation of di� erent sources of light energy
• Worktext
153
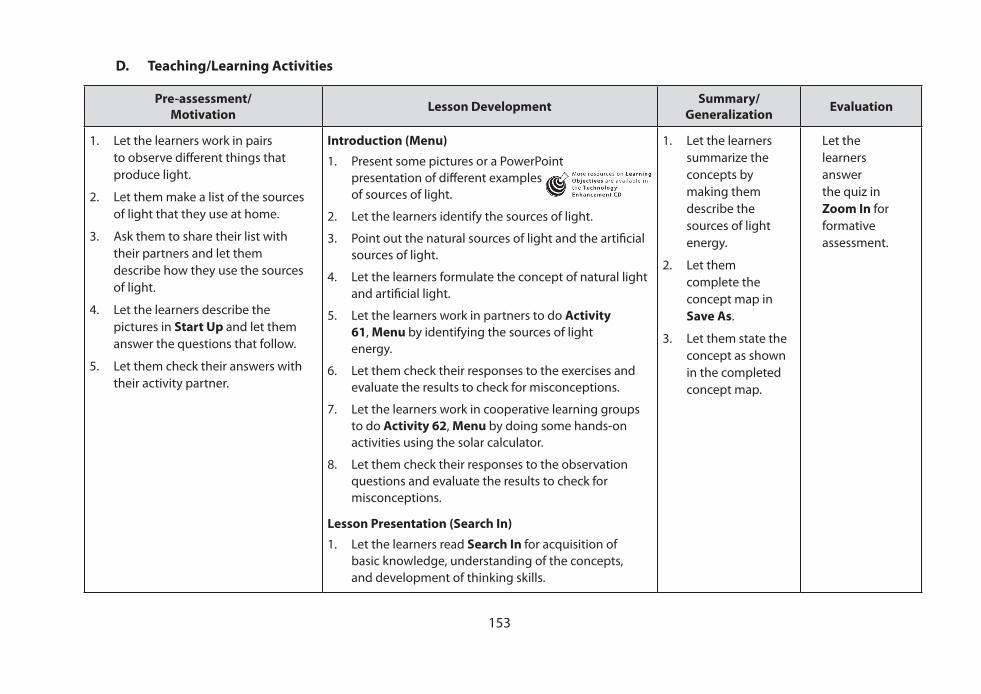
D. Teaching/Learning Activities
Pre-assessment/Motivation Lesson Development Summary/
Generalization Evaluation
1. Let the learners work in pairs to observe di� erent things that produce light.
2. Let them make a list of the sources of light that they use at home.
3. Ask them to share their list with their partners and let them describe how they use the sources of light.
4. Let the learners describe the pictures in Start Up and let them answer the questions that follow.
5. Let them check their answers with their activity partner.
Introduction (Menu)
1. Present some pictures or a PowerPoint presentation of di� erent examples of sources of light.
2. Let the learners identify the sources of light.
3. Point out the natural sources of light and the arti� cial sources of light.
4. Let the learners formulate the concept of natural light and arti� cial light.
5. Let the learners work in partners to do Activity 61, Menu by identifying the sources of light energy.
6. Let them check their responses to the exercises and evaluate the results to check for misconceptions.
7. Let the learners work in cooperative learning groups to do Activity 62, Menu by doing some hands-on activities using the solar calculator.
8. Let them check their responses to the observation questions and evaluate the results to check for misconceptions.
Lesson Presentation (Search In)
1. Let the learners read Search In for acquisition of basic knowledge, understanding of the concepts, and development of thinking skills.
1. Let the learners summarize the concepts by making them describe the sources of light energy.
2. Let them complete the concept map in Save As.
3. Let them state the concept as shown in the completed concept map.
Let the learners
answer the quiz in Zoom In for formative assessment.
154
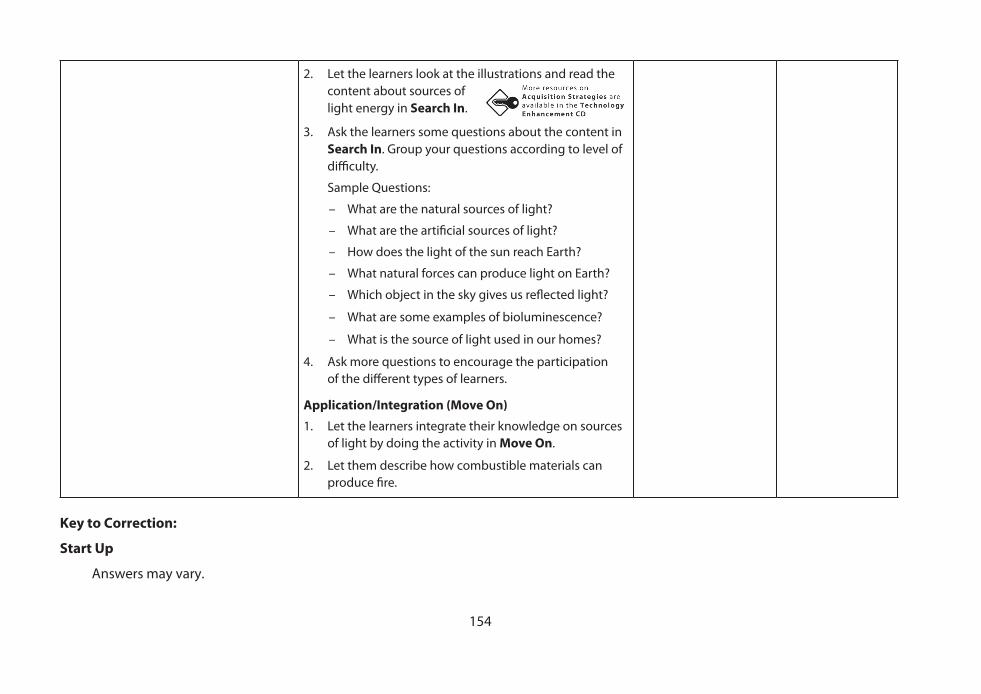
2. Let the learners look at the illustrations and read the content about sources of light energy in Search In.
3. Ask the learners some questions about the content in Search In. Group your questions according to level of di� culty.
Sample Questions:
– What are the natural sources of light?
– What are the arti� cial sources of light?
– How does the light of the sun reach Earth?
– What natural forces can produce light on Earth?
– Which object in the sky gives us re� ected light?
– What are some examples of bioluminescence?
– What is the source of light used in our homes?
4. Ask more questions to encourage the participation of the di� erent types of learners.
Application/Integration (Move On)
1. Let the learners integrate their knowledge on sources of light by doing the activity in Move On.
2. Let them describe how combustible materials can produce � re.
Key to Correction:
Start Up
Answers may vary.
155
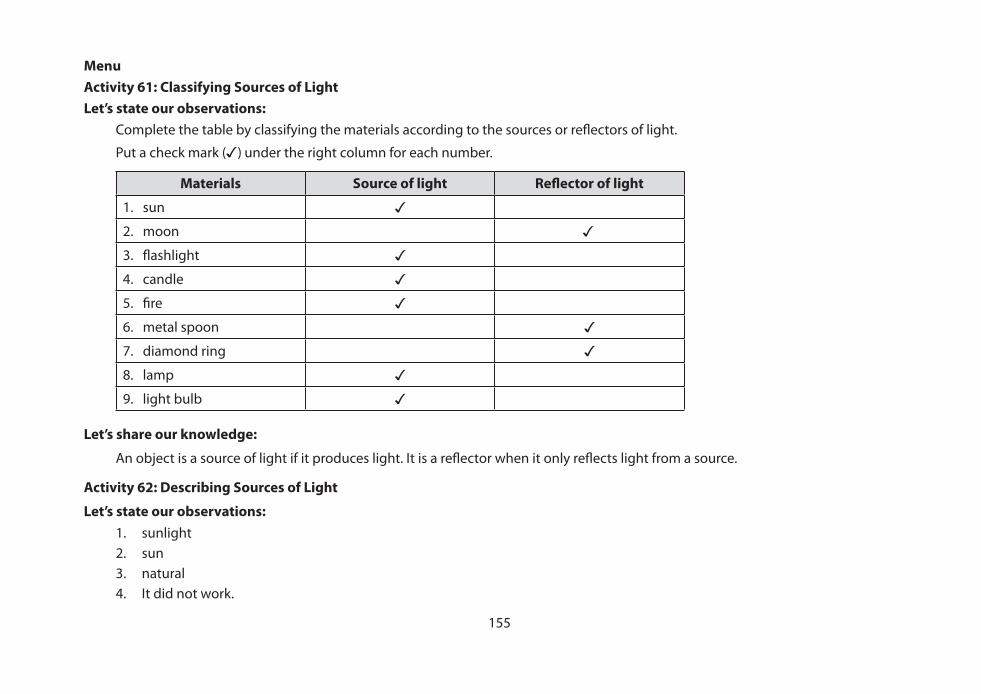
MenuActivity 61: Classifying Sources of LightLet’s state our observations: Complete the table by classifying the materials according to the sources or re� ectors of light.
Put a check mark () under the right column for each number.
Materials Source of light Re� ector of light
1. sun
2. moon
3. � ashlight
4. candle
5. � re
6. metal spoon
7. diamond ring
8. lamp
9. light bulb
Let’s share our knowledge:
An object is a source of light if it produces light. It is a re� ector when it only re� ects light from a source.
Activity 62: Describing Sources of Light
Let’s state our observations: 1. sunlight 2. sun 3. natural 4. It did not work.
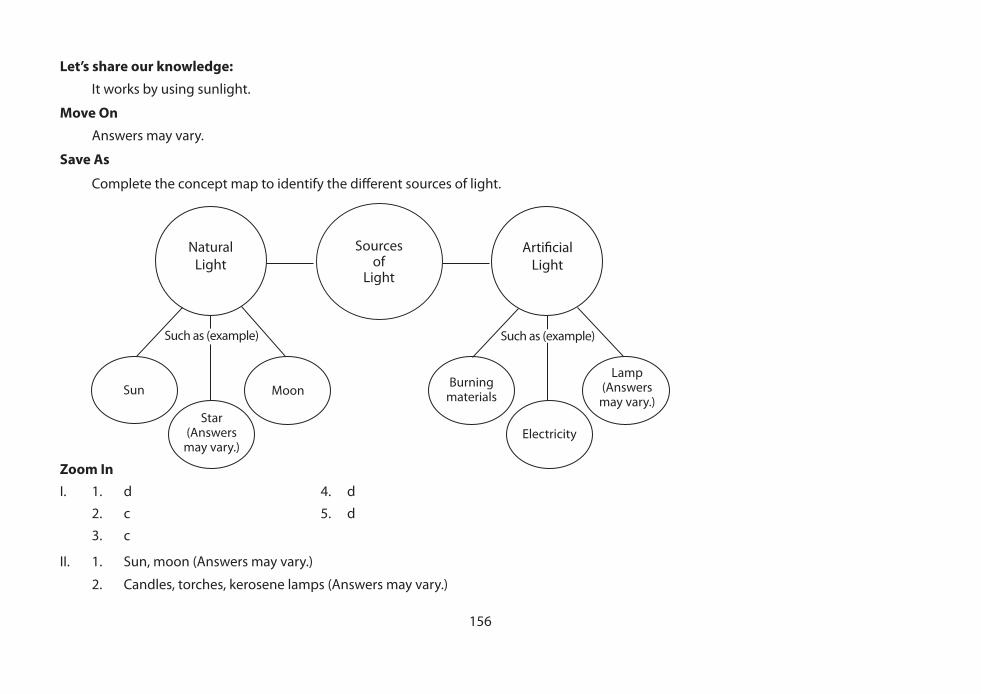
Natural Light
Sources of
Light
Arti� cialLight
Sun Moon
Star(Answers
may vary.)
Burning materials
Electricity
Such as (example)Such as (example)
Lamp(Answers
may vary.)
156
Let’s share our knowledge: It works by using sunlight.
Move OnAnswers may vary.
Save As
Complete the concept map to identify the di� erent sources of light.
Zoom InI. 1. d 4. d
2. c 5. d
3. c
II. 1. Sun, moon (Answers may vary.)
2. Candles, torches, kerosene lamps (Answers may vary.)
157
Lesson 31 – What Are the Uses of Light?
Worktext, pages 224–229
Time Allotment: 2 days
A. Speci� c Objectives:
At the end of the lesson, the learner…
• observes and identi� es the uses of light.
• describes the di� erent uses of light energy.
• investigates how plants use light.
• describes how people use light that are produced by electricity.
• participates actively in the activity.
B. Concepts (Key Understandings)
• Light is used to see things around us.
• Natural light from the sun is used in the food-making process of plants.
• Light produced by electricity is for lighting our homes.
• Light is used in making calculators, cameras, cell phones, television, and other electronic gadgets.
C. Learning Resources
• Digital photos/Pictures/Cutouts of pictures showing the uses of light energy from di� erent sources
• Concrete examples of material: camera, calculator, laptop, light bulbs, plants
• Video/PowerPoint presentation of di� erent uses of light energy
• Worktext

158
D. Teaching/Learning Activities
Pre-assessment/Motivation Lesson Development Summary/
Generalization Evaluation
1. Start the class with the lights turned o� and let the learners close the windows and doors.
2. Ask them to get their book and � nd page 233.
3. Tell them to stop when they hear the bell ring or clap your hands even if they had not found the page yet.
4. Turn on the lights and open the windows and doors and let them search for page 100.
5. Let the learners state their observa-tions when the room was darkened and when the room was lighted.
– How would you compare the speed of searching page 233 and page 100?
– Why did it take you so long to � nd page 233?
– Where did the light come from?
– How was light used in this activity?
6. Let the learners work in pairs and describe the pictures in Start Up.
Introduction (Menu)
1. Present some pictures or a PowerPoint presentation of the di� erent examples of the sources of light.
2. Let the learners identify the sources of light and how the sources of light are used in the pictures.
3. Let the learners observe the surroundings and make them identify how natural sources of light are used in the surroundings.
4. Let them infer the e� ects of the absence of the sun.
– What things will people miss if there is no sunlight? (No plants, no colors, no rainbow, no school, no day, and no night)
5. Let the learners work in cooperative learning groups to do Activity 63, Menu by investigating the e� ect of sunlight in plants.
6. Let them check their observations and evaluate the results to check for misconceptions.
7. Let the learners work in cooperative learning groups to do Activity 64, Menu to describe the uses of light that come from di� erent sources.
8. Let them check their responses to the exercises and evaluate the results to check for misconceptions.
1. Let the learners summarize the concepts by making them identify and describe the uses of light energy.
2. Let them complete the concept map in Save As.
3. Let them state the concept as shown in the completed concept map.
Let the learners
answer the quiz in Zoom In for formative assessment.
159
7. Let them answer the questions that follow.
8. Let them check their answers with their activity partner.
Lesson Presentation (Search In)1. Let the learners read Search In for acquisition of
basic knowledge, understanding of the concepts, and development of thinking skills.
2. Let the learners study the illustrations and read the content about uses of light
energy in Search In.
3. Ask the learners some questions about the content in Search In. Group your questions according to the level of di� culty.
Sample Questions:– How is light useful to plants? – How is light useful to animals and people? – How is light used in the daily activities of people? – How is light useful to scientists and doctors?
4. Ask more questions to encourage the participation of the di� erent types of learners.
Application/Integration (Move On) Let the learners integrate their knowledge on the uses of light by making a group presentation of the activity in Move On. (Use the rubric for the group presentation to evaluate the creative output of the group.)
Key to Correction:Start Up
1. A 3. C 2. B 4. D
160
Menu
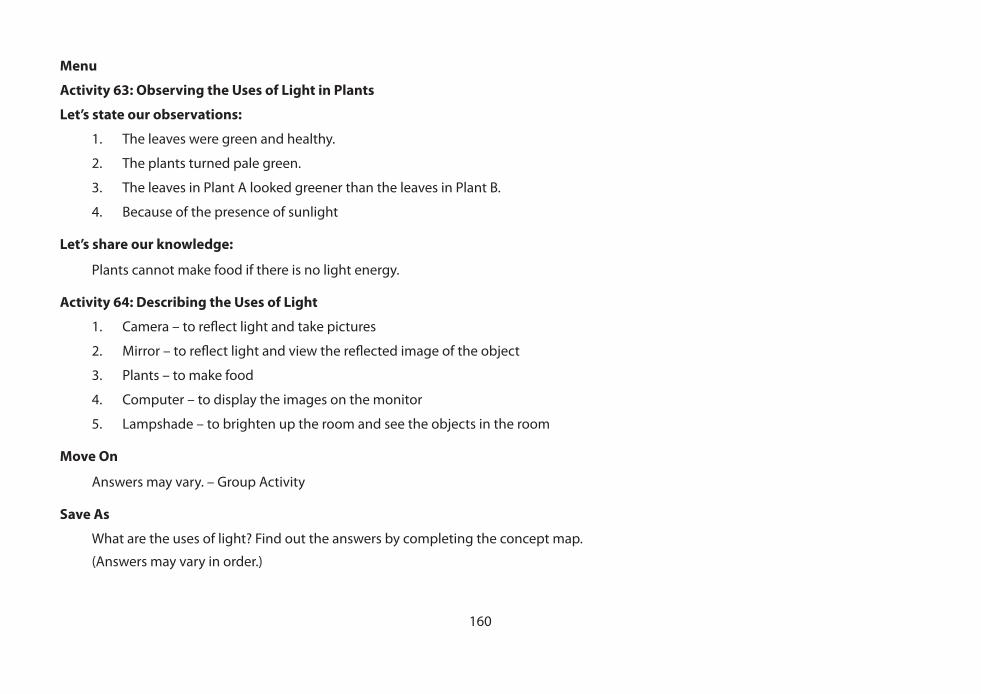
Activity 63: Observing the Uses of Light in Plants
Let’s state our observations:
1. The leaves were green and healthy.
2. The plants turned pale green.
3. The leaves in Plant A looked greener than the leaves in Plant B.
4. Because of the presence of sunlight
Let’s share our knowledge:
Plants cannot make food if there is no light energy.
Activity 64: Describing the Uses of Light
1. Camera – to re� ect light and take pictures
2. Mirror – to re� ect light and view the re� ected image of the object
3. Plants – to make food
4. Computer – to display the images on the monitor
5. Lampshade – to brighten up the room and see the objects in the room
Move On
Answers may vary. – Group Activity
Save As
What are the uses of light? Find out the answers by completing the concept map.
(Answers may vary in order.)
161
Zoom In1. True 6. True
2. True 7. False
3. True 8. False
4. False 9. True
5. False 10. True
Lesson 32 – What Are the Sources of Heat? Worktext, pages 230–236
Time Allotment: 2 days
A. Speci� c Objectives:
At the end of the lesson, the learner…
• observes and identi� es the sources of heat.
• describes the di� erent sources of heat.
Uses of
Light
Light is used to help plants make food.
Light is used to help humans see the di� erent objects.
Light is used to brighten up our homes.
Light is used to light up headlights and backlights of vehicles.
Light is used in X-ray machines and scanners in hospitals.

162
• demonstrates how heat is produced by friction.
• participates actively in the activity.
B. Concepts (Key Understandings)
• The sun is the greatest source of heat on Earth.
• Some materials can give o� heat while some materials produce heat.
• The di� erent sources of heat include the sun, geothermal energy from the interior of Earth, burning fuels, electricity, pressure applied on objects, and friction.
C. Learning Resources
• Digital photos/Pictures/Cutouts of pictures showing the sources of heat
• Concrete examples of materials: matches, lamp, candle, torch, bamboo sticks, stones
• Video/PowerPoint presentation of di� erent sources of heat energy
• Worktext
D. Teaching/Learning Activities
Pre-assessment/Motivation Lesson Development Summary/
Generalization Evaluation
1. Let the learners work in pairs to make a list of things that they think can burn their hand.
2. Let them identify the source of the heat that can burn their hand.
3. Ask them to share their list with their partners.
4. Let the learners describe the pictures in Start Up and let
Introduction (Menu)1. Present some pictures or a PowerPoint presentation
of di� erent examples of sources of heat.
2. Let the learners identify the sources of heat.
3. Point out the natural sources of heat from the environment and man-made sources of heat.
4. Let the learners rub their palms together for 5 minutes and allow them to state their observations.
1. Let the learners summarize the concepts by making them describe the sources of heat energy.
2. Let them com-plete the concept map in Save As.
Let the learners
answer the quiz in Zoom In for formative assessment.
163
them answer the questions that follow.
5. Let them check their answers with their activity partner.
5. Let the learners work in partners to do Activity 65, Menu by identifying the sources of heat energy.
6. Let them check their responses to the exercises and evaluate the results to check for misconceptions.
7. Let the learners work in cooperative learning groups to do Activity 66, Menu to observe how friction produces heat.
8. Let them check their responses to the observation questions and evaluate the results to check for mis-conceptions.
Lesson Presentation (Search In)1. Let the learners read Search In for acquisition of
basic knowledge, understanding of the concepts, and development of thinking skills.
2. Let the learners look at the illustrations and read the content about sources of
heat energy in Search In.
3. Ask the learners some questions about the content in Search In. Group your questions according to the level of di� culty.
Sample Questions:– What are the greatest sources of heat on Earth? – What is solar energy? – What energy from the interior of Earth produces
heat? – What are some of the burning fuels that produce
heat? – How is heat produced in our body?
3. Let them state the concept as shown in the completed concept map.
164
– What are some electrical appliances that give o� heat?
– What are the other sources of heat?
4. Ask more questions to encourage the participation of the di� erent types of learners.
Application/Integration (Move On)1. Let the learners challenge their understanding by
reading articles about heat and temperature in Move On.
2. Let them do a group activity to prove the relationship of heat and temperature.
Key to Correction:
Start Up1. A, D 3. Burning fuel (match or wood)
2. B, C 4. Burning fuel (gas, kerosene)
MenuActivity 65: Identifying the Sources of HeatA. 1. Hot gases 4. Electricity
2. Burning wood 5. Lique� ed petroleum gas
3. Burning candle 6. Electricity
B. 1. Number 1, sun
2. Number 4, oven; number 6, electric stove
3. Number 2, burning wood
4. Number 1, sun
165
Activity 66: Observing Friction as a Source of Heat
Let’s state our observations: 1. The hands felt hot. 2. They felt hot. 3. They move fast. 4. hot 5. No, because the crayons were not hard.
Let’s share our knowledge: Rubbing two objects make the particles faster to produce heat.
Move On Answers may vary.
Save As
What are the sources of heat? Complete the concept map.
Zoom In1. c 4. b2. b 5. b 3. a
Sources of Heat
Electricity
Burning fuels
SunFriction
(Answers may vary.)
Geothermal Energy
166
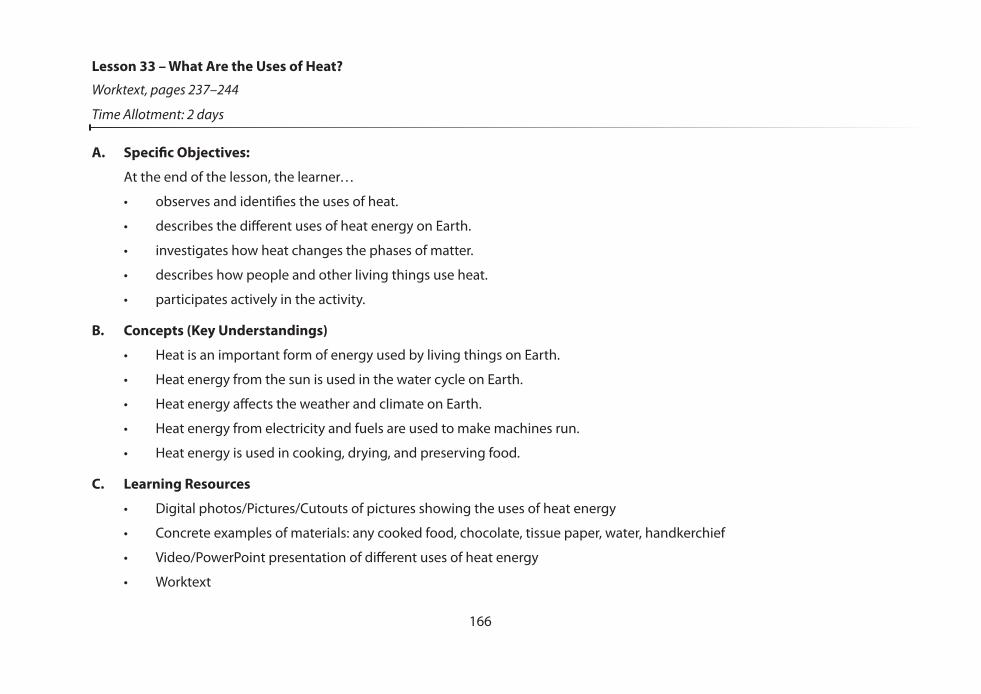
Lesson 33 – What Are the Uses of Heat?
Worktext, pages 237–244
Time Allotment: 2 days
A. Speci� c Objectives:
At the end of the lesson, the learner…
• observes and identi� es the uses of heat.
• describes the di� erent uses of heat energy on Earth.
• investigates how heat changes the phases of matter.
• describes how people and other living things use heat.
• participates actively in the activity.
B. Concepts (Key Understandings)
• Heat is an important form of energy used by living things on Earth.
• Heat energy from the sun is used in the water cycle on Earth.
• Heat energy a� ects the weather and climate on Earth.
• Heat energy from electricity and fuels are used to make machines run.
• Heat energy is used in cooking, drying, and preserving food.
C. Learning Resources
• Digital photos/Pictures/Cutouts of pictures showing the uses of heat energy
• Concrete examples of materials: any cooked food, chocolate, tissue paper, water, handkerchief
• Video/PowerPoint presentation of di� erent uses of heat energy
• Worktext
167
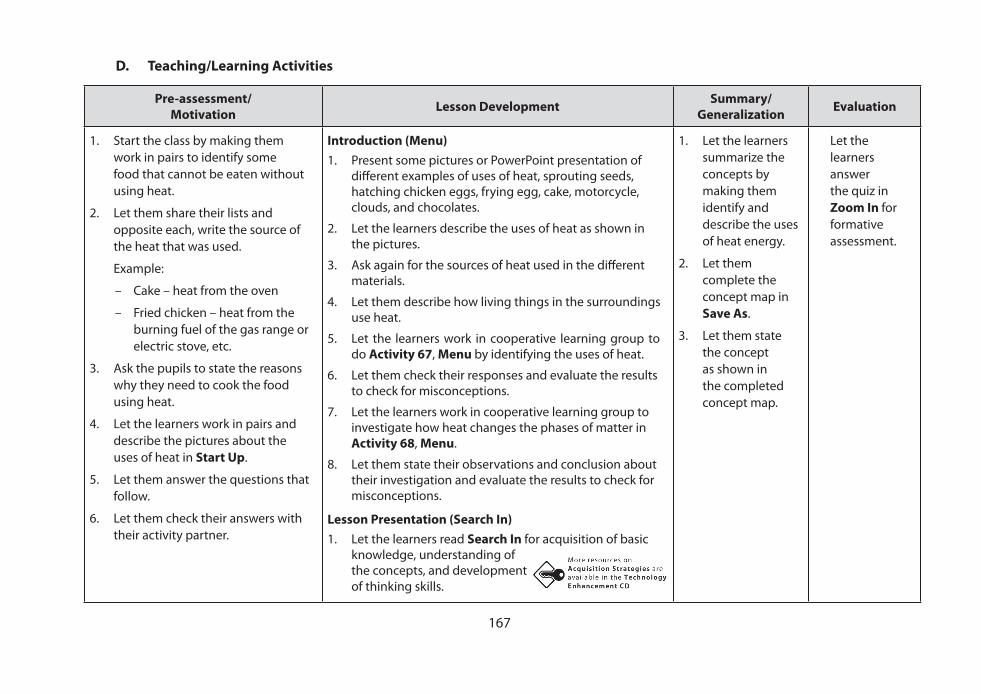
D. Teaching/Learning Activities
Pre-assessment/Motivation Lesson Development Summary/
Generalization Evaluation
1. Start the class by making them work in pairs to identify some food that cannot be eaten without using heat.
2. Let them share their lists and opposite each, write the source of the heat that was used.
Example:
– Cake – heat from the oven
– Fried chicken – heat from the burning fuel of the gas range or electric stove, etc.
3. Ask the pupils to state the reasons why they need to cook the food using heat.
4. Let the learners work in pairs and describe the pictures about the uses of heat in Start Up.
5. Let them answer the questions that follow.
6. Let them check their answers with their activity partner.
Introduction (Menu)1. Present some pictures or PowerPoint presentation of
di� erent examples of uses of heat, sprouting seeds, hatching chicken eggs, frying egg, cake, motorcycle, clouds, and chocolates.
2. Let the learners describe the uses of heat as shown in the pictures.
3. Ask again for the sources of heat used in the di� erent materials.
4. Let them describe how living things in the surroundings use heat.
5. Let the learners work in cooperative learning group to do Activity 67, Menu by identifying the uses of heat.
6. Let them check their responses and evaluate the results to check for misconceptions.
7. Let the learners work in cooperative learning group to investigate how heat changes the phases of matter in Activity 68, Menu.
8. Let them state their observations and conclusion about their investigation and evaluate the results to check for misconceptions.
Lesson Presentation (Search In)1. Let the learners read Search In for acquisition of basic knowledge, understanding of the concepts, and development of thinking skills.
1. Let the learners summarize the concepts by making them identify and describe the uses of heat energy.
2. Let them complete the concept map in Save As.
3. Let them state the concept as shown in the completed concept map.
Let the learners
answer the quiz in Zoom In for formative assessment.
168
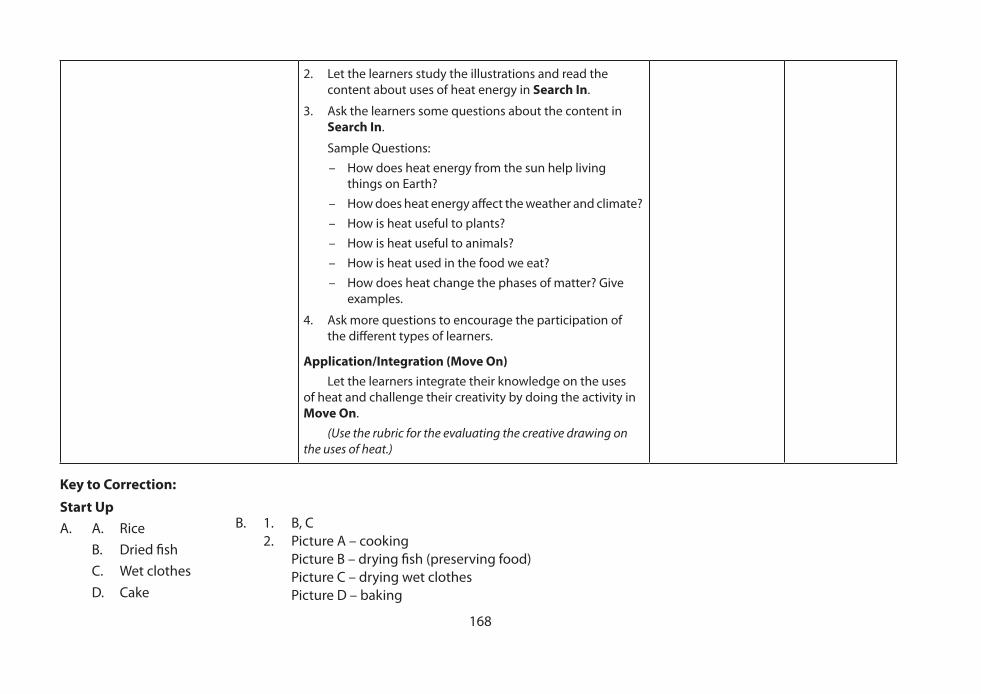
2. Let the learners study the illustrations and read the content about uses of heat energy in Search In.
3. Ask the learners some questions about the content in Search In.
Sample Questions:– How does heat energy from the sun help living
things on Earth? – How does heat energy a� ect the weather and climate? – How is heat useful to plants? – How is heat useful to animals? – How is heat used in the food we eat? – How does heat change the phases of matter? Give
examples.
4. Ask more questions to encourage the participation of the di� erent types of learners.
Application/Integration (Move On) Let the learners integrate their knowledge on the uses of heat and challenge their creativity by doing the activity in Move On. (Use the rubric for the evaluating the creative drawing on the uses of heat.)
Key to Correction:Start UpA. A. Rice B. Dried � sh C. Wet clothes D. Cake
B. 1. B, C 2. Picture A – cooking Picture B – drying � sh (preserving food) Picture C – drying wet clothes Picture D – baking
169
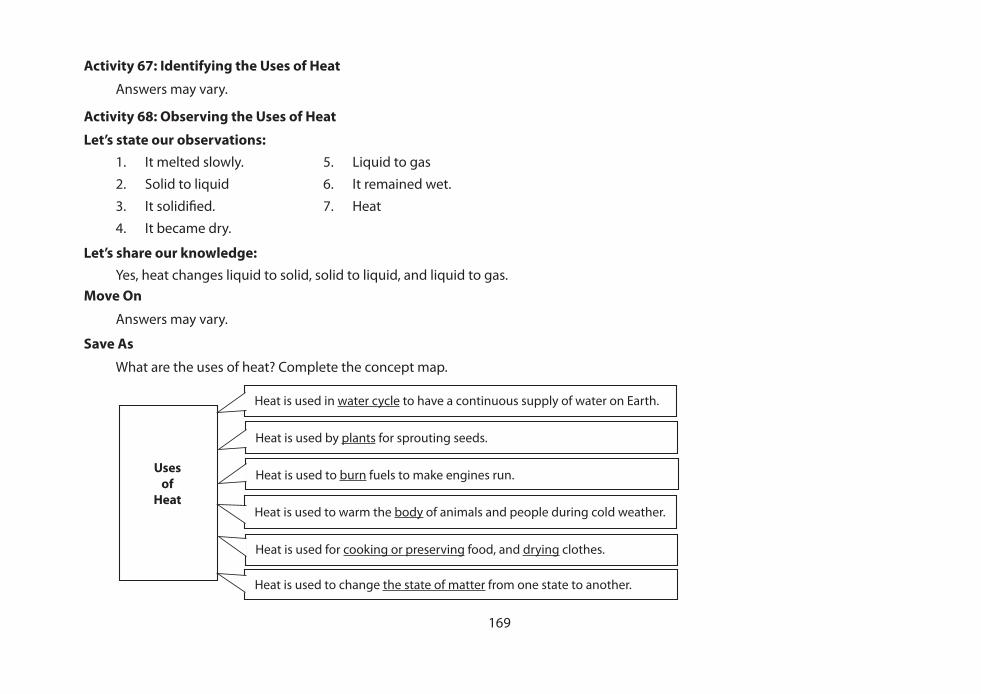
Activity 67: Identifying the Uses of Heat
Answers may vary.
Activity 68: Observing the Uses of Heat
Let’s state our observations: 1. It melted slowly. 5. Liquid to gas
2. Solid to liquid 6. It remained wet.
3. It solidi� ed. 7. Heat
4. It became dry.
Let’s share our knowledge: Yes, heat changes liquid to solid, solid to liquid, and liquid to gas.Move On
Answers may vary.
Save As
What are the uses of heat? Complete the concept map.
Uses of
Heat
Heat is used in water cycle to have a continuous supply of water on Earth.
Heat is used by plants for sprouting seeds.
Heat is used to burn fuels to make engines run.
Heat is used to warm the body of animals and people during cold weather.
Heat is used for cooking or preserving food, and drying clothes.
Heat is used to change the state of matter from one state to another.
170
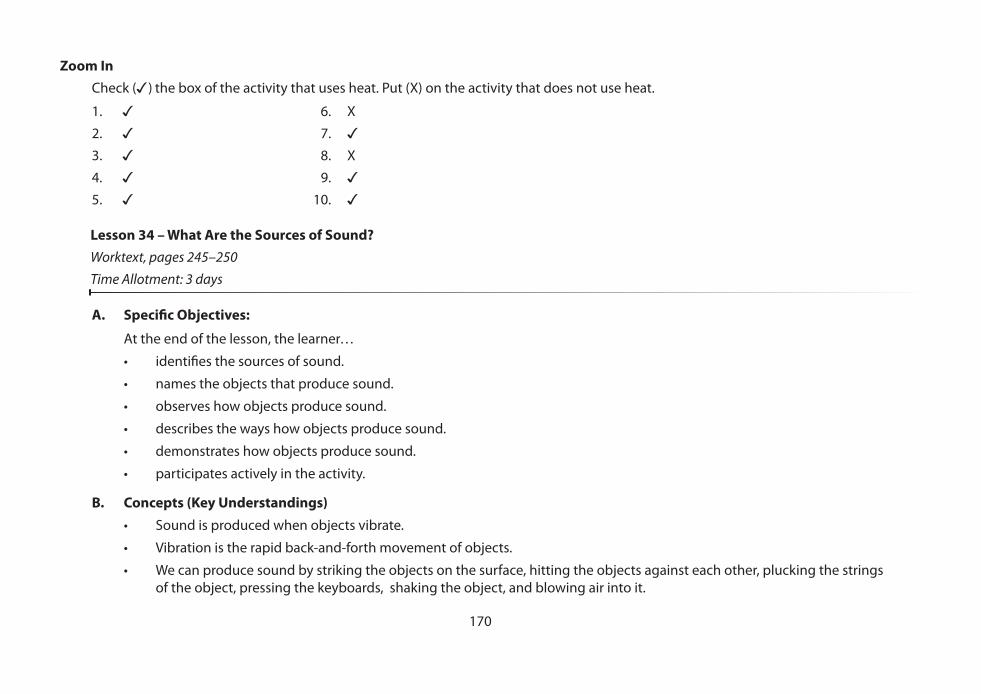
Zoom In Check () the box of the activity that uses heat. Put (X) on the activity that does not use heat.
1. 6. X
2. 7.
3. 8. X
4. 9.
5. 10.
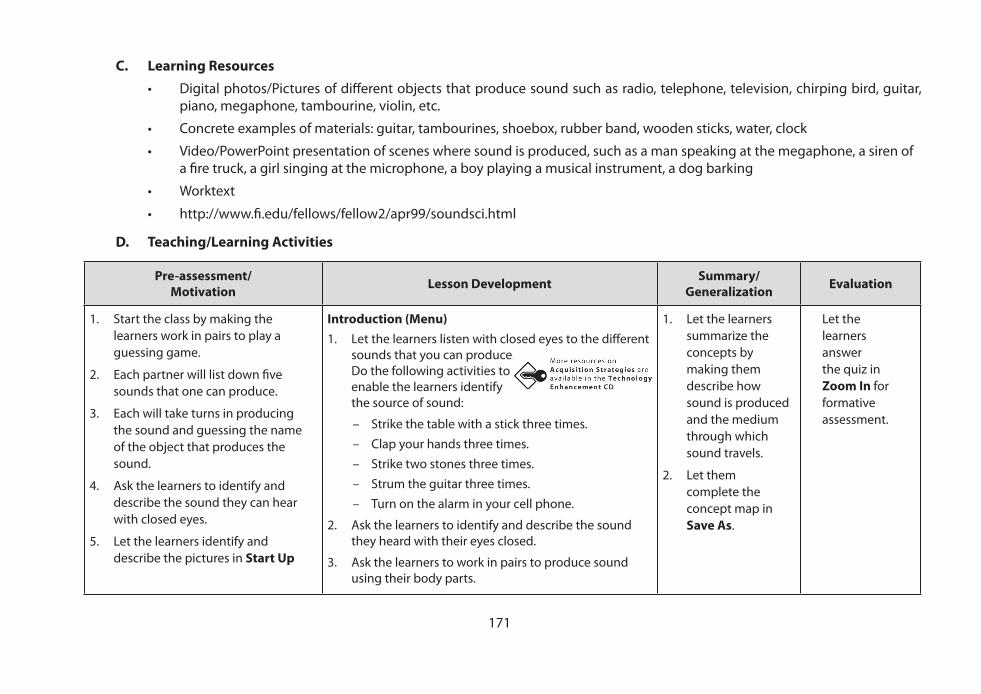
Lesson 34 – What Are the Sources of Sound? Worktext, pages 245–250
Time Allotment: 3 days
A. Speci� c Objectives:
At the end of the lesson, the learner…
• identi� es the sources of sound.
• names the objects that produce sound.
• observes how objects produce sound.
• describes the ways how objects produce sound.
• demonstrates how objects produce sound.
• participates actively in the activity.
B. Concepts (Key Understandings)• Sound is produced when objects vibrate.
• Vibration is the rapid back-and-forth movement of objects.
• We can produce sound by striking the objects on the surface, hitting the objects against each other, plucking the strings of the object, pressing the keyboards, shaking the object, and blowing air into it.
171
C. Learning Resources • Digital photos/Pictures of di� erent objects that produce sound such as radio, telephone, television, chirping bird, guitar,
piano, megaphone, tambourine, violin, etc.
• Concrete examples of materials: guitar, tambourines, shoebox, rubber band, wooden sticks, water, clock
• Video/PowerPoint presentation of scenes where sound is produced, such as a man speaking at the megaphone, a siren of a � re truck, a girl singing at the microphone, a boy playing a musical instrument, a dog barking
• Worktext
• http://www.� .edu/fellows/fellow2/apr99/soundsci.html
D. Teaching/Learning Activities
Pre-assessment/Motivation Lesson Development Summary/
Generalization Evaluation
1. Start the class by making the learners work in pairs to play a guessing game.
2. Each partner will list down � ve sounds that one can produce.
3. Each will take turns in producing the sound and guessing the name of the object that produces the sound.
4. Ask the learners to identify and describe the sound they can hear with closed eyes.
5. Let the learners identify and describe the pictures in Start Up
Introduction (Menu)1. Let the learners listen with closed eyes to the di� erent sounds that you can produce.
Do the following activities to enable the learners identify the source of sound:
– Strike the table with a stick three times.– Clap your hands three times.– Strike two stones three times. – Strum the guitar three times.– Turn on the alarm in your cell phone.
2. Ask the learners to identify and describe the sound they heard with their eyes closed.
3. Ask the learners to work in pairs to produce sound using their body parts.
1. Let the learners summarize the concepts by making them describe how sound is produced and the medium through which sound travels.
2. Let them complete the concept map in Save As.
Let the learners
answer the quiz in Zoom In for formative assessment.
172
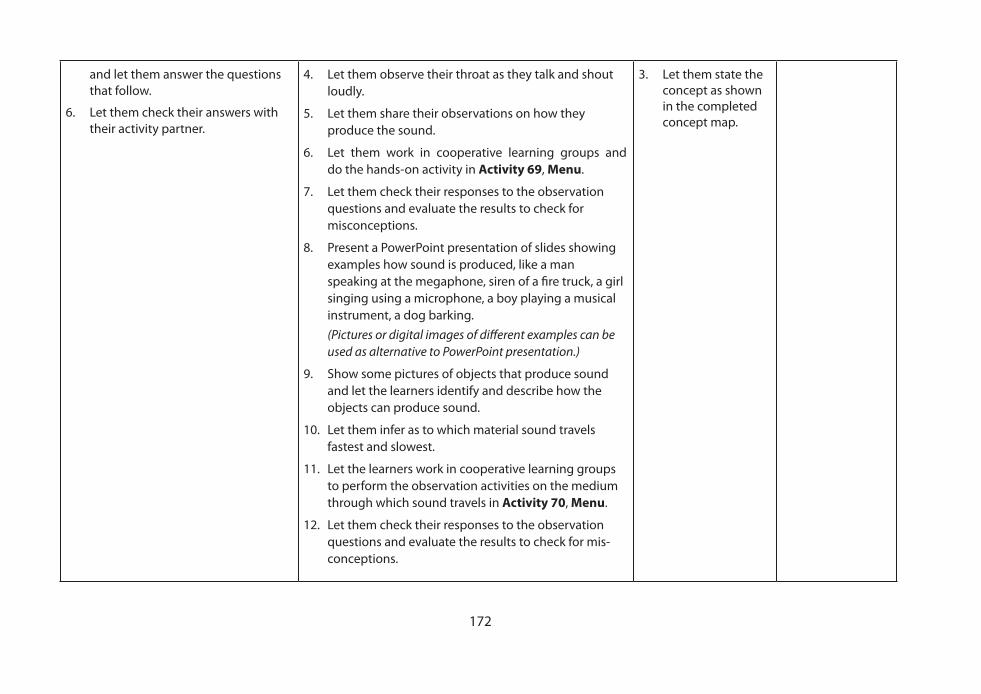
and let them answer the questions that follow.
6. Let them check their answers with their activity partner.
4. Let them observe their throat as they talk and shout loudly.
5. Let them share their observations on how they produce the sound.
6. Let them work in cooperative learning groups and do the hands-on activity in Activity 69, Menu.
7. Let them check their responses to the observation questions and evaluate the results to check for misconceptions.
8. Present a PowerPoint presentation of slides showing examples how sound is produced, like a man speaking at the megaphone, siren of a � re truck, a girl singing using a microphone, a boy playing a musical instrument, a dog barking.
(Pictures or digital images of di� erent examples can be used as alternative to PowerPoint presentation.)
9. Show some pictures of objects that produce sound and let the learners identify and describe how the objects can produce sound.
10. Let them infer as to which material sound travels fastest and slowest.
11. Let the learners work in cooperative learning groups to perform the observation activities on the medium through which sound travels in Activity 70, Menu.
12. Let them check their responses to the observation questions and evaluate the results to check for mis-conceptions.
3. Let them state the concept as shown in the completed concept map.
173
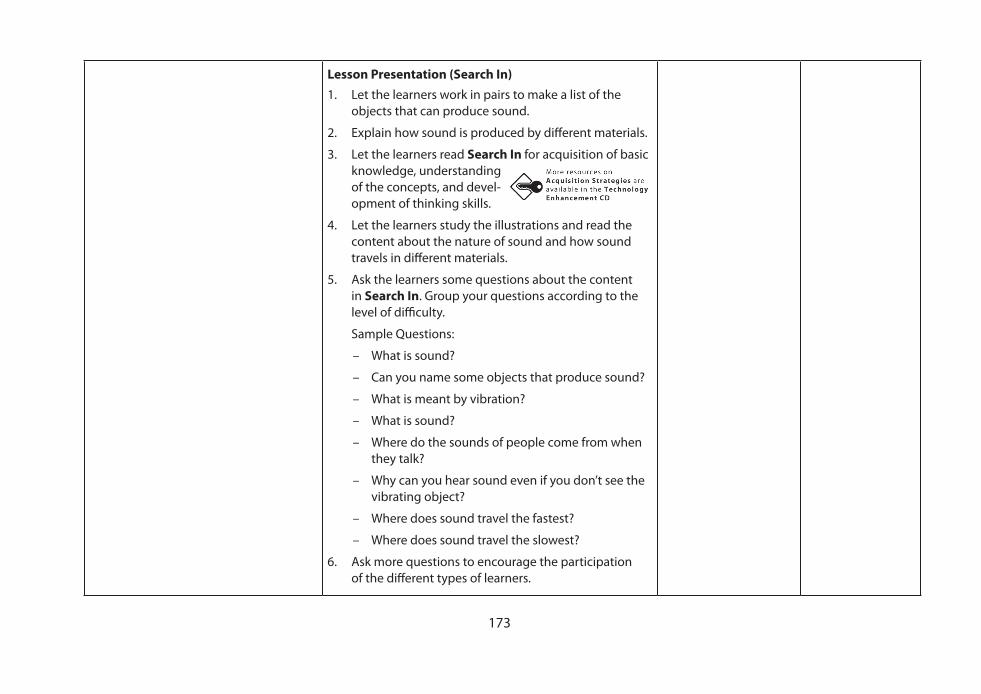
Lesson Presentation (Search In)1. Let the learners work in pairs to make a list of the
objects that can produce sound.
2. Explain how sound is produced by di� erent materials.
3. Let the learners read Search In for acquisition of basic knowledge, understanding
of the concepts, and devel- opment of thinking skills.
4. Let the learners study the illustrations and read the content about the nature of sound and how sound travels in di� erent materials.
5. Ask the learners some questions about the content in Search In. Group your questions according to the level of di� culty.
Sample Questions:
– What is sound?
– Can you name some objects that produce sound?
– What is meant by vibration?
– What is sound?
– Where do the sounds of people come from when they talk?
– Why can you hear sound even if you don’t see the vibrating object?
– Where does sound travel the fastest?
– Where does sound travel the slowest?
6. Ask more questions to encourage the participation of the di� erent types of learners.
174
Application/Integration (Move On)1. Let the learners enhance their knowledge and under-
standing by making them read and watch this website: http://www.� .edu/fellows/fellow2/apr99/soundsci.
html (This website contains articles with illustrations about how sound is produced.)
2. Let them challenge their understanding and enrich their knowledge by reading the related article in Move On.
3. Ask them some questions on how sound can be useful to navigators.
Key to Correction:Start Up 1. by crying 2. by singing 3. from the vocal cord 4. clapping of hands, stomping of feet (Answers may vary.) 5. Answers may vary.
MenuActivity 69: Observing the Sources of Sound Answers may vary.
Let’s state our observations: 1. The rubber band vibrates or moves back and forth.2. Yes. The movement vibrates and moves back and forth. 3. The sound was soft and low. (Answers may vary.)4. Answers may vary.5. The vibration from the rubber band.
175
Let’s share our knowledge:
Sound is produced by the vibration of particles in an object.
Activity 70: Identifying the Sources of Sound
1. Cell phone – man-made 4. Bus – man-made
2. Rooster/Hen – natural 5. Wave – natural
3. Whistle – man-made 6. Pig – natural
Move On
Answers may vary.
Save As
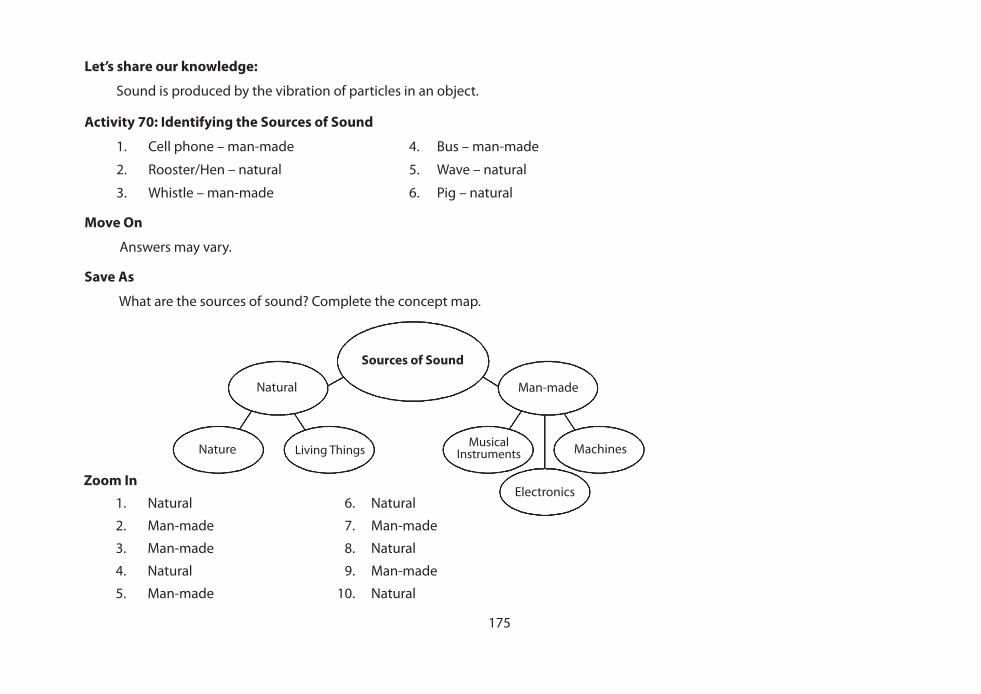
What are the sources of sound? Complete the concept map.
Sources of Sound
Natural
Nature Living Things
Man-made
Musical Instruments Machines
Electronics Zoom In
1. Natural 6. Natural
2. Man-made 7. Man-made
3. Man-made 8. Natural
4. Natural 9. Man-made
5. Man-made 10. Natural
176
Lesson 35 – What Are the Uses of Sound?
Worktext, pages 251–255
Time Allotment: 2 days
A. Speci� c Objectives:
At the end of the lesson, the learner…
• describes how sound is used by people in di� erent places.
• describes the importance of sound to animals.
• describes how doctors and scientists use sound.
• participates actively in doing the activity.
B. Concepts (Key Understandings)
• Sound is a form of energy that is used for communication by people.
• Sound is used by some animals to � nd food through echolocation.
• Ultrasound is a form of sound used in medicine.
• Sound is used by scientists to detect the depth of the ocean.
C. Learning Resources
• Digital photos/Pictures/Cutouts of pictures of di� erent scenes where people use sound for communication such as children singing or reciting in the class, a mother talking to the child, a policeman blowing his whistle, a boy selling newspapers, a running motorcycle, etc.
• Concrete examples of materials: whistle, drum, guitar, sticks, megaphone
• Worktext
177
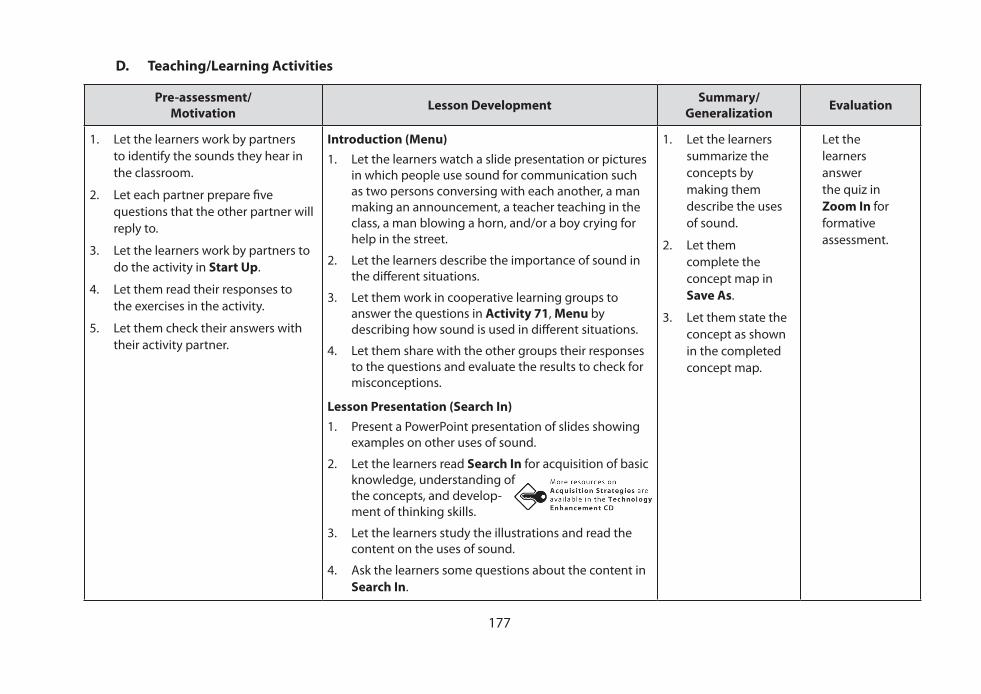
D. Teaching/Learning Activities
Pre-assessment/Motivation Lesson Development Summary/
Generalization Evaluation
1. Let the learners work by partners to identify the sounds they hear in the classroom.
2. Let each partner prepare � ve questions that the other partner will reply to.
3. Let the learners work by partners to do the activity in Start Up.
4. Let them read their responses to the exercises in the activity.
5. Let them check their answers with their activity partner.
Introduction (Menu)1. Let the learners watch a slide presentation or pictures
in which people use sound for communication such as two persons conversing with each another, a man making an announcement, a teacher teaching in the class, a man blowing a horn, and/or a boy crying for help in the street.
2. Let the learners describe the importance of sound in the di� erent situations.
3. Let them work in cooperative learning groups to answer the questions in Activity 71, Menu by describing how sound is used in di� erent situations.
4. Let them share with the other groups their responses to the questions and evaluate the results to check for misconceptions.
Lesson Presentation (Search In)1. Present a PowerPoint presentation of slides showing
examples on other uses of sound.
2. Let the learners read Search In for acquisition of basic knowledge, understanding of
the concepts, and develop- ment of thinking skills.
3. Let the learners study the illustrations and read the content on the uses of sound.
4. Ask the learners some questions about the content in Search In.
1. Let the learners summarize the concepts by making them describe the uses of sound.
2. Let them complete the concept map in Save As.
3. Let them state the concept as shown in the completed concept map.
Let the learners
answer the quiz in Zoom In for formative assessment.
178
Sample Questions:
– How does everybody use sound?
– What are the di� erent ways in which sound is used for communication?
– How do singers and artists use sound?
– How do motorists in the street use sound?
– Why is sound important in school?
– How do some animals like bats and dolphins use sound?
– How does ultrasound help people?
– How is sound used with technology?
5. Ask more questions to encourage the participation of the di� erent types of learners.
Application/Integration (Move On)
1. Let the learners integrate and apply their understanding about sound by doing the group activity in Move On.
2. Let them choose one presentation that shows the uses of sound.
(Use the rubrics to evaluate their creative presentation.)
Key to Correction:
Start Up
Answers may vary.
179
Menu
Activity 71: Describing the Uses of Sound Answers may vary.
Move On Answers may vary.
Save As
What are the uses of sound? Complete the concept map.
Zoom In1. True 6. True 2. False 7. True3. False 8. True4. True 9. True5. False 10. True
Usesof
Sound
Animals use re� ected sound to � nd food and sense other things in the environment through echolocation.
Sound is used to measure the depth of the ocean by using SONAR (sound navigation and ranging).
Sound is used to clean jewelry and to detect cracks in metals.
Doctors use sound in the form of ultrasound to scan the di� erent parts of the body.
People use sound for communication by talking to one another or by singing.
180
Lesson 36 – What Are the Sources of Electricity?
Worktext, pages 256–261
Time Allotment: 2 days
A. Speci� c Objectives:
At the end of the lesson, the learner…
• observes the sources of electricity.
• identi� es the di� erent sources of electricity.
• describes the di� erent sources of electricity.
• describes how electricity is generated by renewable and nonrenewable resources.
• manifests enthusiasm in observing electricity at home.
B. Concepts (Key Understandings)• Electricity is a form of energy that can make things work.
• The battery is the handiest form of electricity.
• Electricity that � ows through the wire is current electricity.
• Electricity is produced in power plants that use renewable and nonrenewable resources.
• Nonrenewable resources used by power plants include fossil fuels.
• Renewable resources used by power plants include the sun, water, wind, and heat.
C. Learning Resources• Digital photos/Pictures/Cutouts of pictures showing the renewable and nonrenewable sources of electricity
• Concrete examples of materials: � ashlight, bulb, electrical plug, switch, outlet, electric wire, battery, and electrical appliances
• Video/PowerPoint presentation of the di� erent sources of electricity such as power plants and solar panels
• Worktext
181
D. Teaching/Learning Activities
Pre-assessment/Motivation Lesson Development Summary/
Generalization Evaluation
1. Let the learners work in pairs and make a list of gadgets or devices that they have already plugged in to an electrical outlet.
2. Let them describe how the devices work.
3. Present to them a � ashlight, turn it on, and let them describe how the � ashlight works.
4. Ask the learners how electricity from the � ashlight di� ers from the electricity used to light a bulb in the room.
5. Ask them the sources of electricity from the � ashlight and the source of electricity of the lighted bulb.
6. Let the learners identify the pictures in Start Up and let them answer the questions to describe the pictures.
7. Let them check their answers with their activity partner.
Introduction (Menu)1. Present some pictures or slides in a PowerPoint
presentation of di� erent materials that use electricity. (Example: Computer)
2. Let the learners describe the source of electricity used by the object as a battery or an electrical outlet.
3. Point out that electricity is a � ow of electrons or very small particles through some metal conductors that can be supplied by hydroelectric plants or chemicals from batteries.
4. Explain to the learners the meaning of renewable and nonrenewable resources as used by power plants to produce electricity.
5. Let the learners work in partners to do Activity 72, Menu by identifying the sources of electricity that make the di� erent objects work.
6. Let them check their responses to the exercises and evaluate the results to check for misconceptions.
Lesson Presentation (Search In)1. Present some slides to show the di� erent renewable
and nonrenewable resources that are used in power plants to produce electricity.
2. Let the learners read Search In for acquisition of basic
1. Let the learners summarize the concepts by making them identify and describe the renewable and nonrenewable sources of electricity.
2. Let them complete the concept map in Save As.
3. Let them state the concept as shown in the completed concept map.
Let the learners
answer the quiz in Zoom In for formative assessment.
182
knowledge, understanding of the concepts, and development of thinking skills.
3. Let the learners study the illustrations and read the content about the sources of electricity.
4. Ask the learners some questions about the content in Search In.
– Where does electricity from the � ashlight come from?
– How would you compare electricity from the � ashlight with electricity that turns on the TV?
– Can you describe how electricity reaches your home?
– What renewable resources do power plants use to produce electricity?
5. Ask more questions to encourage the participation of the di� erent types of learners.
Application/Integration (Move On)1. Let the learners enrich their knowledge by doing the
research activity and interview about hydroelectric plants in the Philippines in Move On.
2. Let them share the research output to the class.
Key to Correction:Start UpA. Electric lamp Electrical switch Electrical outlet
Electric post
183
B. 1. Electrical switch
2. Insert the plug to connect the appliances.
3. Electric wires
4. Electric current
5. They are used with electricity.
Menu
Activity 72: Observing the Sources of Electricity
A. 1. Flashlight – A
2. Electric fan – B
3. Motorcycle – C or B (Answers may vary.)
4. Cell phone – A
5. Electric lamp – B
6. Radio – B
B. Answers may vary.
C-D. Answers may vary.
Move On
Answers may vary. (Group Activity)
Save As
What are the sources of electricity? Find out the answer by completing the concept map.
184
Zoom In
1. True
2. True
3. True
4. True
5. False
6. False
7. False
8. True
9. True
10. False
Sources of
ElectricityRenewable
Sun Wind
Water
Nonrenewable
Coal Petroleum
Kerosene/Natural Gas
185
Lesson 37 – What Are the Uses of Electricity?
Worktext, pages 262–267
Time Allotment: 2 days
A. Speci� c Objectives:
At the end of the lesson, the learner…
• observes and identify the uses of electricity.
• describes the di� erent uses of electricity.
• identi� es useful devices that make use of electricity.
• demonstrates how to conserve electricity.
• participates actively in the activity.
B. Concepts (Key Understandings)
• Electricity is an important form of energy that is very useful in many ways such as for lighting, transportation, preparation and preservation of food, entertainment, recreation, manufacturing industries, and hospital equipment.
• Electricity helps us make our life comfortable.
C. Learning Resources
• Digital photos/Pictures/Cutouts of pictures showing the uses of electricity
• Concrete examples of materials: lights, electric fan, bulb, laptop, and other devices that are operated by electricity
• Video/PowerPoint presentation of the di� erent uses of electricity
• Worktext
186
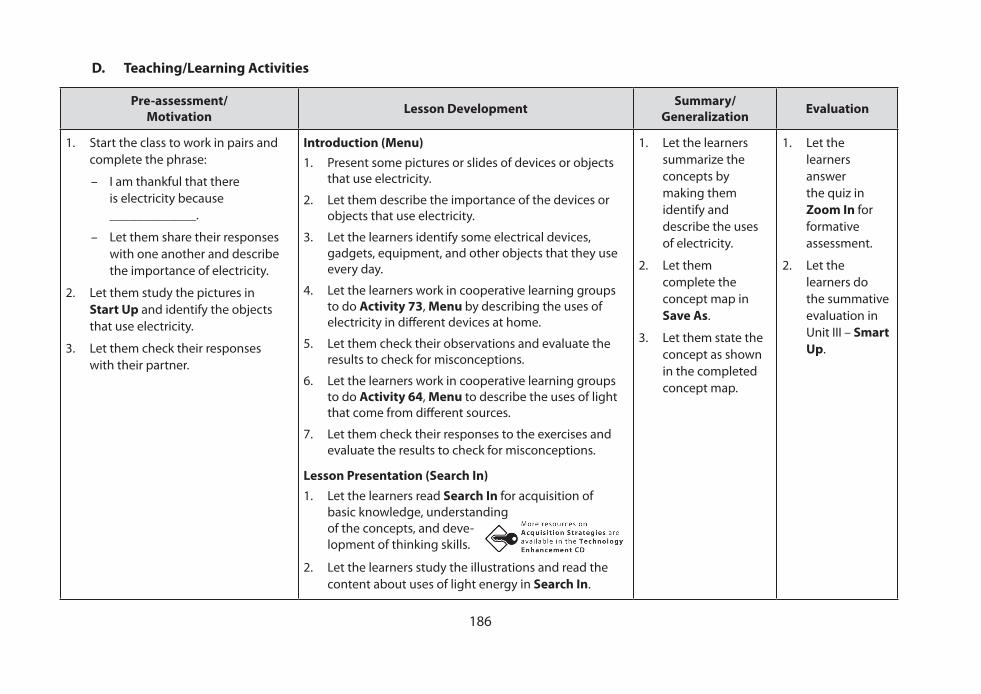
D. Teaching/Learning Activities
Pre-assessment/Motivation Lesson Development Summary/
Generalization Evaluation
1. Start the class to work in pairs and complete the phrase:
– I am thankful that there is electricity because _____________.
– Let them share their responses with one another and describe the importance of electricity.
2. Let them study the pictures in Start Up and identify the objects that use electricity.
3. Let them check their responses with their partner.
Introduction (Menu)1. Present some pictures or slides of devices or objects
that use electricity.
2. Let them describe the importance of the devices or objects that use electricity.
3. Let the learners identify some electrical devices, gadgets, equipment, and other objects that they use every day.
4. Let the learners work in cooperative learning groups to do Activity 73, Menu by describing the uses of electricity in di� erent devices at home.
5. Let them check their observations and evaluate the results to check for misconceptions.
6. Let the learners work in cooperative learning groups to do Activity 64, Menu to describe the uses of light that come from di� erent sources.
7. Let them check their responses to the exercises and evaluate the results to check for misconceptions.
Lesson Presentation (Search In)1. Let the learners read Search In for acquisition of basic knowledge, understanding of the concepts, and deve-
lopment of thinking skills.
2. Let the learners study the illustrations and read the content about uses of light energy in Search In.
1. Let the learners summarize the concepts by making them identify and describe the uses of electricity.
2. Let them complete the concept map in Save As.
3. Let them state the concept as shown in the completed concept map.
1. Let the learners answer the quiz in Zoom In for formative assessment.
2. Let the learners do the summative evaluation in Unit III – Smart Up.
187
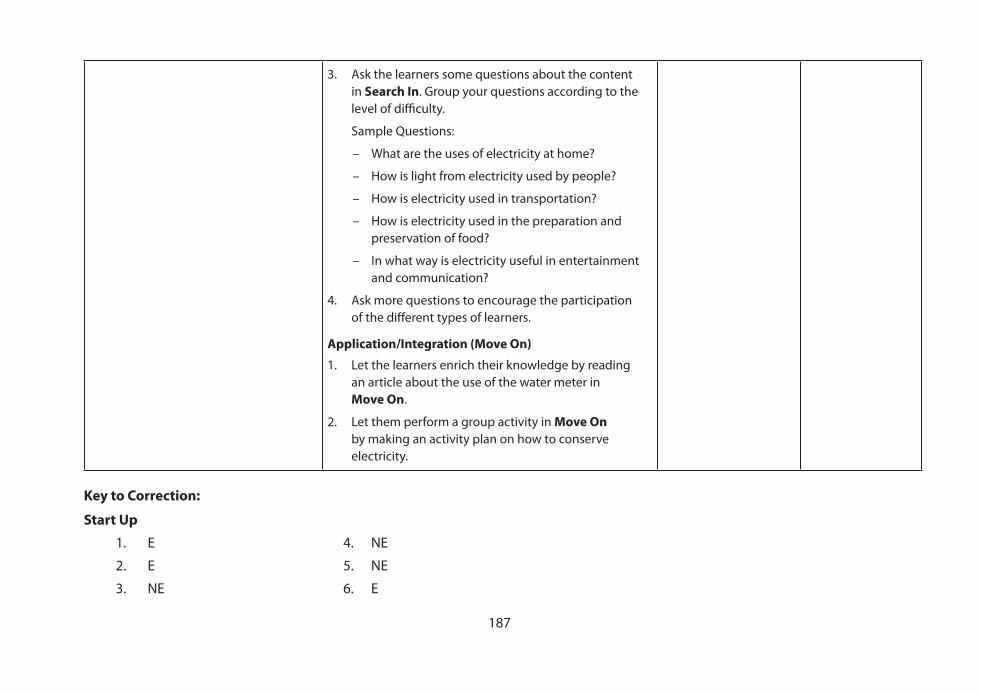
3. Ask the learners some questions about the content in Search In. Group your questions according to the level of di� culty.
Sample Questions:
– What are the uses of electricity at home?
– How is light from electricity used by people?
– How is electricity used in transportation?
– How is electricity used in the preparation and preservation of food?
– In what way is electricity useful in entertainment and communication?
4. Ask more questions to encourage the participation of the di� erent types of learners.
Application/Integration (Move On)
1. Let the learners enrich their knowledge by reading an article about the use of the water meter in Move On.
2. Let them perform a group activity in Move On by making an activity plan on how to conserve electricity.
Key to Correction:
Start Up
1. E 4. NE
2. E 5. NE
3. NE 6. E
188
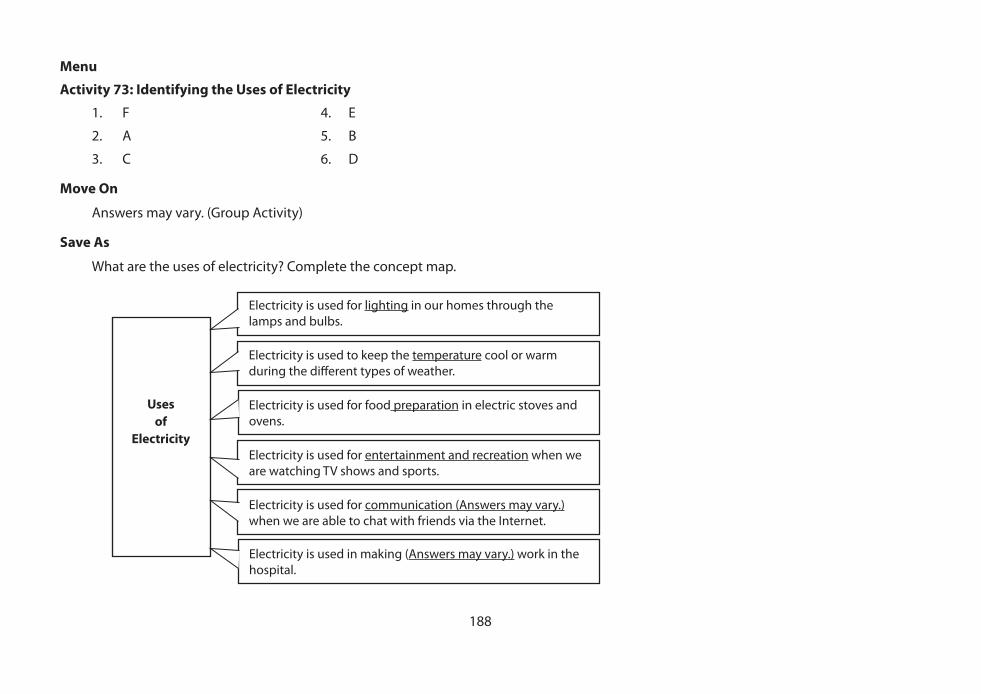
Menu
Activity 73: Identifying the Uses of Electricity
1. F 4. E
2. A 5. B
3. C 6. D
Move On
Answers may vary. (Group Activity)
Save As
What are the uses of electricity? Complete the concept map.
Electricity is used for lighting in our homes through the lamps and bulbs.
Usesof
Electricity
Electricity is used to keep the temperature cool or warm during the di� erent types of weather.
Electricity is used for food preparation in electric stoves and ovens.
Electricity is used for entertainment and recreation when we are watching TV shows and sports.
Electricity is used for communication (Answers may vary.) when we are able to chat with friends via the Internet.
Electricity is used in making (Answers may vary.) work in the hospital.
189
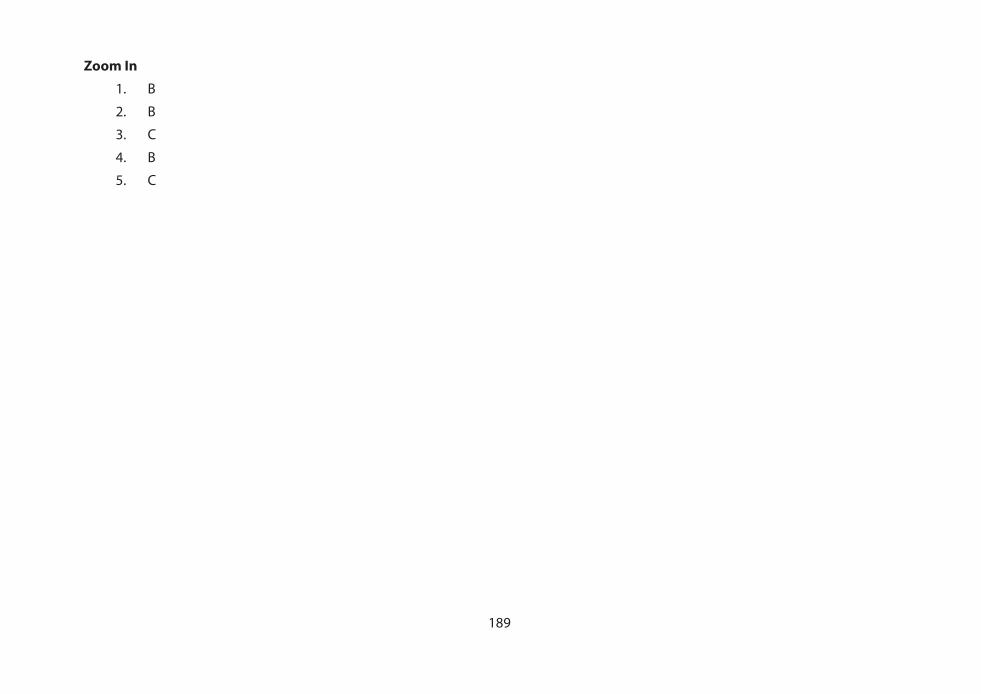
Zoom In
1. B
2. B
3. C
4. B
5. C
190
Key to Correction
UNIT III – SUMMATIVE ASSESSMENT
Smart Up
I. 1. a
2. b
3. d
4. a
5. a
II. 1. The sun is a natural source of solar energy produced from hot gases.
2. Light energy of the sun is important because plants cannot make its own food. Living things will die without food.
3. Electricity produced from batteries is transformed to light energy in a � ashlight.
4. An electric meter is a device that measures the amount of electricity used or consumed in a household or any area for a month.
5. Bats and dolphins use sound energy through the process called echolocation to � nd food in the distant area.
III. Answers may vary. Writing a short paragraph on how to conserve electricity at home. (Possible content of the paragraph.)
* Turn o� lights when not in use.
* Close refrigerator doors tightly.
* Turn on electric fan instead of the air-conditioning unit.
* Turn o� TV or any appliances when not in use.
IV. Performance Assessment
Group activity (Answers may vary.)
Presentation of energy conservation, poster making, comic strips. (Use rubrics for evaluation of output.)