Embed Size (px)
DESCRIPTION
Contents—IllustratorLesson 1: Beginning Successfully• Tools• Palettes• Artwork WindowsLesson 2: Working in Illustrator• Artwork• DrawingLesson 3: Applying and Using Color• Color Modes and Models• Applying Color• Modifying ColorLesson 4: Graphics for the Web• Prepare Graphics• Linking Objects• Optimizing• Saving Images from Export& more
Citation preview

IllustratorCurriculum
Guide
AdobeWeb Project

Illustrator Overview 2
Adobe Web Project ILLUSTRATOR OVERVIEW
Contents—Illustrator
Lesson 1: Beginning Successfully
• Tools• Palettes• Artwork Windows
Lesson 2: Working in Illustrator
• Artwork• Drawing
Lesson 3: Applying and Using Color
• Color Modes and Models• Applying Color• Modifying Color
Lesson 4: Graphics for the Web
• Prepare Graphics• Linking Objects• Optimizing• Saving Images from Export
Lesson 5: Saving, Exporting, and Printing Artwork
• Saving Artwork in a Variety of Files• Exporting Artwork• Printing Artwork
The Movie Project Begins…

Illustrator Overview 3
Adobe Web Project ILLUSTRATOR OVERVIEW
Introduction—IllustratorWelcome to Adobe ®Illustrator®, the industry-standard illustration program for print, multimedia, and onlinegraphics. Illustrator excels as an art production tool for designers or illustrators who produce artwork for printpublishing, multimedia graphics, or for Web pages or online content.
This introduction to Illustrator will afford your students an understanding of the precision and control over theirartwork plus the flexibility to produce anything from small designs to large projects. Students will be introducedto tools, palettes, drawing, and working in Illustrator, colors, and Web publishing. The emphasis of this lesson ison preparing students to use the basic tools of Illustrator and to apply them in preparation of basic Web design.
As an educator, you will appreciate that Illustrator also provides a consistent work environment with otherAdobe applications including Adobe Photoshop® with ImageReady™, Adobe GoLive®, and Adobe LiveMotion™.
Other learning resources
Classroom in a Book
The official training series for Adobe graphics and publishing software. This book is developed by expertsat Adobe and published by Adobe Press. Adobe Illustrator Classroom in a Book® includes lessons on usingIllustrator software. Instructors can download individual chapters from the Adobe in Education web site(www.adobe.com/education) for free to supplement their lessons. For information on purchasing AdobeIllustrator Classroom in a Book, visit www.adobe.com/education/educators/books.html, contact your localAdobe Authorized Education Reseller at www.adobe.com/education/purchasing/resellers.html, or contactyour local book distributor.
Official Adobe Print Publishing Guide
Provides in-depth information on successful print production, including topics such as color management,commercial printing, constructing a publication, imaging and proofing, and project management guidelines. Forinformation on purchasing the Official Adobe Print Publishing Guide, visit the Adobe Web site at www.adobe.com.
Official Adobe Electronic Publishing Guide
Tackles the fundamental issues essential to ensuring quality online publications in HTML and PDF. Using simple,expertly illustrated explanations, design and publishing professionals tell you how to design electronicpublications for maximum speed, legibility, and effectiveness. For information on purchasing the Official AdobeElectronic Publishing Guide, visit the Adobe Web site at www.adobe.com.
SAMS Teach Yourself Adobe Illustrator 9 in 24 Hours
This is a great learning tool and resource of curriculum ideas for educators because it follows the structure of 24one-hour lessons in order to make the content manageable. It's easy to learn Adobe Illustrator 9 with this bookbecause each hour-long lesson is full of step-by-step instructions, screenshots, tips, and tricks. To order a copy,visit http://www.adobe.com/education/educators/books.html.
Other learning resources are available but are not included with your application.

Illustrator Overview 4
Adobe Web Project ILLUSTRATOR OVERVIEW
Adobe, the Adobe logo, Acrobat, Acrobat Reader, Classroom in a Book, Illustrator, ImageReady, LiveMotion, Photoshop, and PostScript areeither registered trademarks or trademarks of Adobe Systems Incorporated in the United States and/or other countries. Mac is a trademark ofApple Computer, Inc., registered in the United States and other countries. Microsoft, Windows NT, and Windows are either registeredtrademarks or trademarks of Microsoft Corporation in the United States and/or other countries. All other trademarks are the property of theirrespective owners.
© 2001 Adobe Systems Incorporated. All rights reserved.

Beginning Successfully 1
Adobe Web Project ILLUSTRATOR LESSON 1
Beginning Successfully
Level
Advanced beginner. Students are assumed to have basic-level understanding of the use of computersand computer applications. Students are also assumed to have a familiarity with the Web and onlineresources.
Summary and Overview
The purpose of Adobe®Illustrator®/ Lesson One is to introduce students to the Adobe interface(command menus, artwork window, toolbox, and floating palettes) through identification as well ashands-on use of the tools and palettes.
1. Students will be able to select, draw, paint, and edit their basic artwork within the Illustrator artworkwindow.
2. Students will also begin to design free-form paths in the artwork window using the pencil tool(round and sharp-cornered rectangles, ellipses, polygons, spirals), and start using preset shape toolsand then be able to modify and combine the shapes.
3. Using the pen tool, students will be able to draw straight lines and flowing curves. The pen tool isless intuitive than the pencil tool—however, with practice, students will be able to drawcombinations of straight and curved segments to create flexible, smoothly shaped illustrations.
4. Students will also learn to access Help in the Illustrator program.
➤ Lesson One is designed to be taught in approximately one class hour. Depending on the teacher’s pace ofinstruction and the prior knowledge of the students, Lesson One may take more than one class hour.
What Students Will Learn: Assessable Outcomes from the Five Exercises
In this lesson, your students will learn…
• To use the Illustrator interface• To select and display tools• To display and hide the palettes• To arrange the toolbox and the palettes• To view, create, and edit artwork inside the Illustrator artwork window• To draw basic paths and shapes with the pencil tool• To draw basic paths and shapes with the pen tool• To get more information about the Illustrator program and Help resources for Adobe Web Project
Students will open a document, change the view of a document, identify and use the tools and palettes, andmove the toolbar and palettes. Students will also be able to get more information about the Illustrator program.

Beginning Successfully 2
Adobe Web Project ILLUSTRATOR LESSON 1
Teacher Orientation for Lesson One
Key Definitions for Lesson One
Tool: used to draw and paint your artwork.
Artboard: the Artboard displays the maximum printable area but does not define the size of the printed page.The printable area of the page is derived from the printer driver and ppd of the printing device. The page sizesettings can only be changed if the printer(s) will accept custom pages.
Palette: floating boxes that contain the colors and textures that monitor, modify, and enhance the artwork.
Work area: the work area occupies the entire space within the Illustrator window and includes more than justthe printable page containing your artwork. The printable and nonprintable areas are represented by a series ofsolid and dotted lines between the outermost edge of the window and the printable area of the page.
➤ Tools and palettes can be hidden and re-arranged to organize the work area as needed.

Beginning Successfully 3
Adobe Web Project ILLUSTRATOR LESSON 1
Exercise One: Tools
Selecting and Displaying Tools:
The first time your students start Illustrator, the toolbox appears on the left side of the screen. The tools in thetoolbox let your students create, select, and manipulate objects in Illustrator.
Want students to select a particular tool? Simply instruct them to CLICK! its icon in the toolbox. As an exercisethat your students will enjoy, some of the tools have additional hidden tools. See if your students can find them.
➤ Hidden tools can be selected by holding down the mouse button, dragging the move over the new tool, andletting go.
Moving the toolbox to optimize the work area:
Moving a toolbox in Illustrator consists of SELECTING and DRAGGING the toolbox by the paletteheader bar to a new location.
➤ If students CLICK! on “Venus,” they will launch the Adobe Web site.
Showing or hiding the toolbox:
To show the toolbox, choose Window > Show Tools; to hide the toolbox, choose Window > HideTools.
Closing a detached toolbar:
CLICK! the close box.
Changing the pointer to a precision pointer:
Do one of the following:1. While the tool is selected, press Caps Lock on the keyboard.2. Choose Edit > Preferences > General, select Use Precise Cursors, and CLICK! OK.
Adding and displaying hidden tools on-screen:
1. Press a tool in the toolbox that has hidden tools underneath it. (Toolsthat have hidden tools are identified by a triangle in the lower rightcorner.)
2. When the toolbar of hidden tools appears, hold down the mouse buttonand drag to the arrow at the end of the toolbar. The toolbar detachesfrom the toolbox.

Beginning Successfully 4
Adobe Web Project ILLUSTRATOR LESSON 1
Exercise Two: Palettes
Displaying and Hiding the Palettes:
Adobe Illustrator includes a number of palettes to help students monitor and modify their work. By default,these palettes appear stacked together in several groups. Students can display and hide these palettes as theywork. Students can also dock palettes so that students can move them together.
Displaying (showing) or hiding a palette:
Ask students to do one of the following:• Choose Window > Show or Window > Hide. Show displays the selected
palette at the front of its group; Hide conceals the entire group.• Press Tab to hide or show all palettes and the toolbox.• Press Shift+Tab to hide all palettes except for the toolbox.
When Illustrator is first started, your students will see that the floating palettesappear stacked in default groups. The following techniques are used to showand hide palettes:
• To make a paletteappear at the front ofits group, CLICK! thepalette’s tab.
• To move an entire palette group, drag its title bar.
• To rearrange or separate a palette group, drag a palette's tab. Dragging a palette outside of an existinggroup creates a new palette window.
• To display a palette menu, position the pointer on the triangle ( ) in the upper right corner of the paletteand hold down the mouse button.
• To change the size of a resizable palette, drag the lower right corner of the palette (Windows®) or drag thesize box at the lower right corner of the palette (Mac OS).
➤ A few palettes, such as the Color palette, cannot be resized by dragging.

Beginning Successfully 5
Adobe Web Project ILLUSTRATOR LESSON 1
Activities:
1. Have students move the mouse to the palette’s tab and CLICK! to bring the palette to the front of itsgroup.
2. Students will need to show or hide a palette as work proceeds. Choose the appropriate window and usethe mouse to select show or hide. Show displays the selected palette at the front of its group; hideconceals the entire group.
3. If students want to cycle through the minimized, compact, or expanded views of the palette, theyshould move the mouse to the small triangle pair that appears in the palette tab and CLICK!.
4. Do students need to hide or display all open pallettes and the toolbox? CLICK! Tab. Pressing Shift+Tabwill hide or display the palettes only.
Your students will have different work preferences and encounter such problems as limited screen area.Therefore, palettes may be repositioned and regrouped for efficiency.
How?
Students can take the mouse and change the palette’s location by dragging a palette’s Tab. Students can alsodrag a palette to another group or to its own separate group.

Beginning Successfully 6
Adobe Web Project ILLUSTRATOR LESSON 1
Exercise Three: Work Area
Setting Up the Work Area:
Once students have created a document and understand basic tool and palette use, they can then set up theirwork area to organize their work and streamline the workflow. For example, students can change the size of theartboard, tile their workspace, or move their page boundaries.
Opening a new file:
1. Choose File > New, and then enter a name inthe Name text box.
2. Select the CMYK or RGB color mode. (See Colormodes and models in Lesson Three.)
3. If necessary, enter a height and width for theartboard.
Opening an existing file:
1. Choose File > Open.
2. Select the name of the file you want to open, andCLICK! Open.
Closing a file and quitting Illustrator:
1. Choose File > Exit (Windows) or File > Quit (Mac OS).
2. If the file has not yet been saved or named, the Savedialog box appears. To save the file, enter a name in theName text box (if necessary) and then CLICK! OK.
Showing or hiding the artboard:
To show the artboard, choose View > Show Artboard; to hide the artboard, choose View > Hide Artboard.

Beginning Successfully 7
Adobe Web Project ILLUSTRATOR LESSON 1
➤ Adobe Illustrator gives your class great flexibility in viewing their artwork. Your students can view different areasof the artwork at different magnifications, use simplified views for tasks such as editing paths, and preview how theartwork will appear in a Web browser or in print.
➤ Your students can open additional windows to display several views at once, so that they can quickly switchamong view modes or magnifications. For example, students can set one view highly magnified for doing close-upwork on some objects and create another view less magnified for laying out those objects on the page.
Changing the screen mode for illustration windows:
CLICK! a screen mode button in the toolbox:• The left button ( ) displays artwork in a standard window, with a menu bar at the top
and scroll bars on the sides.
• The center button ( ) displays artwork in a full-screen window with a menu bar but withno title bar or scroll bars.
• The right button ( ) displays artwork in a full-screen window, but with no title bar,menu bar or scroll bars.
Opening a new window:
Choose Window > New Window.
A new window of the same size appears on top of the previously active window. The two windows are identicalexcept for their window numbers. The new window is now the active window.
Closing windows:
Do one of the following:• Choose File > Close to close the active window.• Press Alt (Windows) or Option (Mac OS) and choose File > Close to close all document windows.
Arranging multiple windows (Windows only):
Do one of the following:• Choose Window > Cascade to display windows stacked and
cascading from the top left to the bottom right of the screen.• Choose Window > Tile to display windows edge to edge.• Choose Window > Arrange Icons to arrange minimized windows
within the program window.
When working in Illustrator, students can open additional windows todisplay several views at once, so that they can quickly switch between view modes or magnifications. Forexample, your students can set one view highly magnified for doing close-up work on some objects and createanother view less magnified for laying out those objects on the page.

Beginning Successfully 8
Adobe Web Project ILLUSTRATOR LESSON 1
Creating a view:
1. Set up the view that is wanted.
2. Choose View > New View.
3. Enter a name for the new view, and CLICK! OK.
The view names, along with keyboard shortcuts forchoosing them, appear at the bottom of the View menu. To retrieve a view, select the name of the view youwant to use. It is possible to create and store up to 25 views for each document.
Renaming or deleting a view:
1. Choose View > Edit Views.
2. Select the view you want to edit, andrename it or CLICK! Delete.
Scrolling the view with the hand tool:
1. Select the hand tool ( ).
2. Move the pointer onto the artwork, and drag in the direction in which you want the artwork to move.
➤ To switch to the hand tool when using another tool, hold down the spacebar.

Beginning Successfully 9
Adobe Web Project ILLUSTRATOR LESSON 1
Exercise Four: Working the Artboard
Changing the size of the artboard:
1. Choose File > Document Setup. Then chooseArtboard from the pop-up menu at the top leftof the Document Setup dialog box.
2. Students can do one of the following:
• Choose a preset size from the Size pop-upmenu.
• Choose Custom from the Size pop-up menu,and enter the dimensions you want in thetext boxes, up to 227 inches by 227 inches.
Students can change the units of measure for the current document in Preferences. Changing this willnot change the size of the artboard. Students can set specific units by typing the new size in pixels or ininches in the height and width dialog.
• Select Use Print Setup (Windows) or Use Page Setup (Mac OS) to set the size of the artboard to matchthe page size set in the Print Setup (Windows) or Page Setup (Mac OS) dialog box. The size of theartboard then changes whenever students choose a new page size in the Print/Page Setup dialog box.
3. CLICK! OK.

Beginning Successfully 10
Adobe Web Project ILLUSTRATOR LESSON 1
Exercise Five: Additional Skill-Building Activities for Students
➤ This is an optional activity for your class depending on the skill level of your students and the time you have available. However, it may be useful as a brief review of Online Help for all skill levels.
Online Help
Online Help has complete information about using palettes and tools. Also included are keyboard shortcuts andadditional information, including full-color galleries of examples not included in the printed lesson plans. All ofthe illustrations in Online Help are in color.
Online Help is easy to use, because you and your students can look for topics in these ways:
• Scan a table of contents• Search for keywords or phrases• Use an index• Jump from topic to topic using related topic links
Displaying the Online Help contents
➤ To properly view Online Help topics, you and your students need Netscape Communicator 4.0 (or later) orMicrosoft® Internet Explorer 4.0 (or later) and an Internet connection. JavaScript must be active.
First your students will look for a topic using the Contents screen:
1. To display the Help Contents menu, choose Help >Illustrator Help, or press F1 (Windows).
2. Drag the scroll bar or CLICK! the arrows to navigate through thecontents. The contents are organized in a hierarchy of topics,much like the chapters of a book.
3. For example, position the pointer on the “Looking at the WorkArea” chapter, and CLICK! it to display its contents.
4. Locate the ToolboxOverview (1 of 5)
topic, and CLICK! to display it. An illustration of the selectiontools and shortcut information appears.
➤ The Online Help system is interactive and therefore veryuseful for advanced beginners and intermediate users. Youand your students can CLICK! any blue text, called a link, tojump to another topic. The pointer icon indicates links andappears when the mouse pointer is moved over a link.
Beginning Successfully 11
Adobe Web Project ILLUSTRATOR LESSON 1
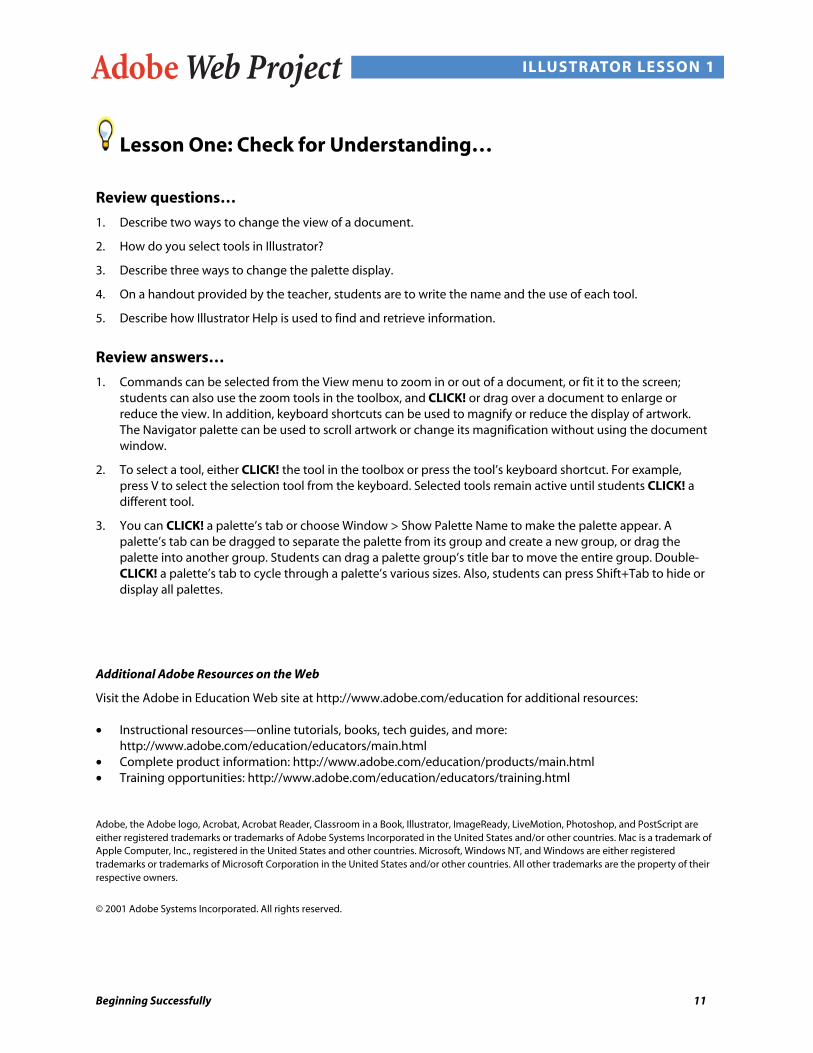
Lesson One: Check for Understanding…
Review questions…
1. Describe two ways to change the view of a document.
2. How do you select tools in Illustrator?
3. Describe three ways to change the palette display.
4. On a handout provided by the teacher, students are to write the name and the use of each tool.
5. Describe how Illustrator Help is used to find and retrieve information.
Review answers…
1. Commands can be selected from the View menu to zoom in or out of a document, or fit it to the screen;students can also use the zoom tools in the toolbox, and CLICK! or drag over a document to enlarge orreduce the view. In addition, keyboard shortcuts can be used to magnify or reduce the display of artwork.The Navigator palette can be used to scroll artwork or change its magnification without using the documentwindow.
2. To select a tool, either CLICK! the tool in the toolbox or press the tool’s keyboard shortcut. For example,press V to select the selection tool from the keyboard. Selected tools remain active until students CLICK! adifferent tool.
3. You can CLICK! a palette’s tab or choose Window > Show Palette Name to make the palette appear. Apalette’s tab can be dragged to separate the palette from its group and create a new group, or drag thepalette into another group. Students can drag a palette group’s title bar to move the entire group. Double-CLICK! a palette’s tab to cycle through a palette’s various sizes. Also, students can press Shift+Tab to hide ordisplay all palettes.
Additional Adobe Resources on the Web
Visit the Adobe in Education Web site at http://www.adobe.com/education for additional resources:
• Instructional resources—online tutorials, books, tech guides, and more:http://www.adobe.com/education/educators/main.html
• Complete product information: http://www.adobe.com/education/products/main.html• Training opportunities: http://www.adobe.com/education/educators/training.html
Adobe, the Adobe logo, Acrobat, Acrobat Reader, Classroom in a Book, Illustrator, ImageReady, LiveMotion, Photoshop, and PostScript areeither registered trademarks or trademarks of Adobe Systems Incorporated in the United States and/or other countries. Mac is a trademark ofApple Computer, Inc., registered in the United States and other countries. Microsoft, Windows NT, and Windows are either registeredtrademarks or trademarks of Microsoft Corporation in the United States and/or other countries. All other trademarks are the property of theirrespective owners.
© 2001 Adobe Systems Incorporated. All rights reserved.

Working in Illustrator 1
Adobe Web Project ILLUSTRATOR LESSON 2
Working in Illustrator
Level
Advanced beginner. Students are assumed to have mastered tools, palettes, and the concept of artworkwindows. Students are assumed to have a familiarity with the Web and online resources.
Summary and Overview
The purpose of Adobe® Illustrator®/Lesson Two is to introduce students to three fundamentalcomponents of using a successful Adobe project in designing basic Web sites:
1. Setting up artworkIllustrator allows you to create artwork or import artwork from other applications. To createeffective artwork, students must understand some basic concepts about graphics and bitmapimages, resolution, and color.
2. DrawingDrawing and modifying paths can be accomplished with Illustrator using tools found also in AdobePhotoshop® and in LiveMotion™. Paths can be freely pasted between programs.
3. Working with objectsEditing in Illustrator allows you and your students to select, move, and arrange objects precisely.Tools are available that let you measure and align objects, group objects, and selectively lock andhide objects.
➤ A note about graphics and images: Computer graphics fall into two main categories—vector graphics andbitmap images (more on this topic in a future lesson). Understanding the difference between the two helps as youinstruct your class to create, edit, and import artwork. In Illustrator, the type of graphic image can have importanteffects on your students’ workflow. For example, some file formats only support bitmap images and others onlyvector graphics. Graphic image types are particularly important when importing or exporting graphic images toand from Illustrator. Linked bitmap images cannot be edited in Illustrator. Graphic formats also affect howcommands and filters can be applied to images; some filters in Illustrator will only work with bitmap images.
➤ Lesson Two is designed to be taught in approximately one class hour. Depending on the teacher’s pace ofinstruction and the prior knowledge of the students, Lesson Two may take more than one class hour.
What Students Will Learn: Assessable Outcomes from the Exercises
In this lesson, your students will learn…
• To set up the work area• To design paths• To change a tool pointer• To draw more sophisticated paths and shapes with the pen tool• To draw and edit free-form paths• To draw and edit brushed paths

Working in Illustrator 2
Adobe Web Project ILLUSTRATOR LESSON 2
Teacher Orientation for Lesson Two
Key Definitions for Lesson Two…
Brushed Paths: adds art (calligraphic, scatter, art, pattern) to paths
CMYK: cyan, magenta, yellow, black
HSB: hue, saturation, brightness
Path: string or curved segments that begin and end in anchor points
Pen tool: more precise tool for drawing than the pencil tool
RGB: red, green, blue
Working in Illustrator 3
Adobe Web Project ILLUSTRATOR LESSON 2
Exercise One: Setting Up the Work Area in an Open DocumentReview from Lesson One, Exercise Three: Once your students have created a document, they can then set up awork area to organize their work and streamline their workflow. For example, students can change the size ofthe artboard, tile their workspace, or move their page boundaries.
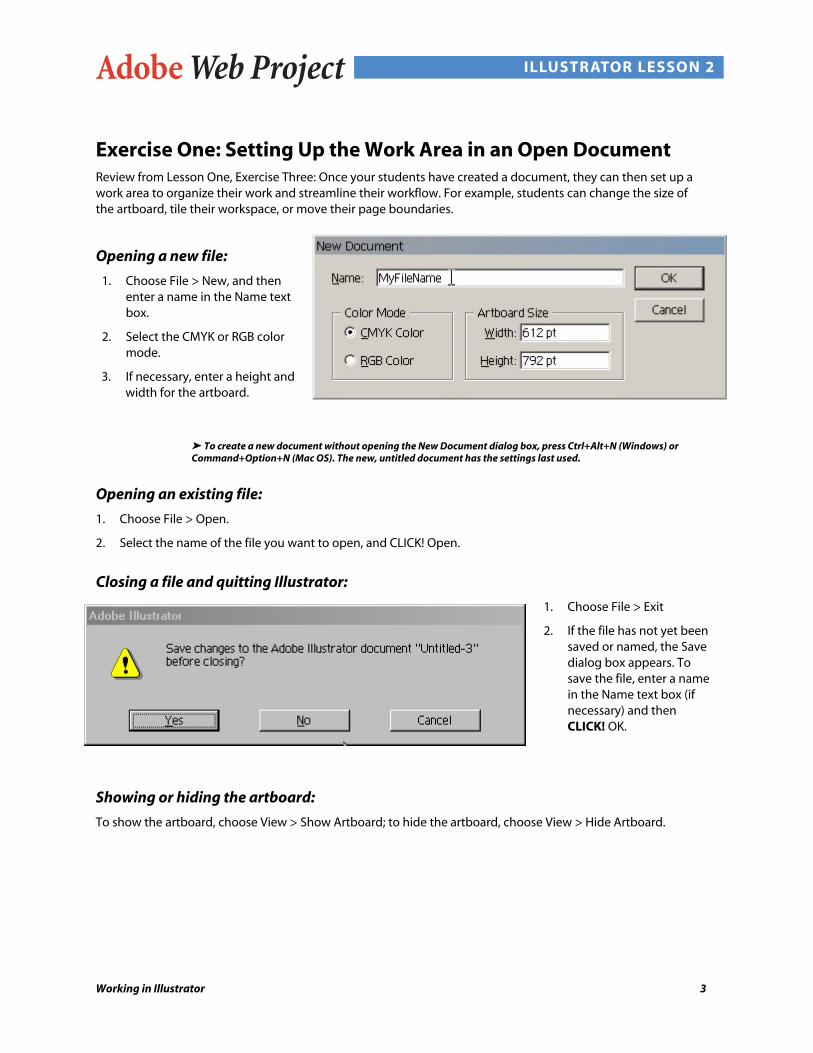
Opening a new file:
1. Choose File > New, and thenenter a name in the Name textbox.
2. Select the CMYK or RGB colormode.
3. If necessary, enter a height andwidth for the artboard.
➤ To create a new document without opening the New Document dialog box, press Ctrl+Alt+N (Windows) orCommand+Option+N (Mac OS). The new, untitled document has the settings last used.
Opening an existing file:
1. Choose File > Open.
2. Select the name of the file you want to open, and CLICK! Open.
Closing a file and quitting Illustrator:
1. Choose File > Exit
2. If the file has not yet beensaved or named, the Savedialog box appears. Tosave the file, enter a namein the Name text box (ifnecessary) and thenCLICK! OK.
Showing or hiding the artboard:
To show the artboard, choose View > Show Artboard; to hide the artboard, choose View > Hide Artboard.
Working in Illustrator 4
Adobe Web Project ILLUSTRATOR LESSON 2
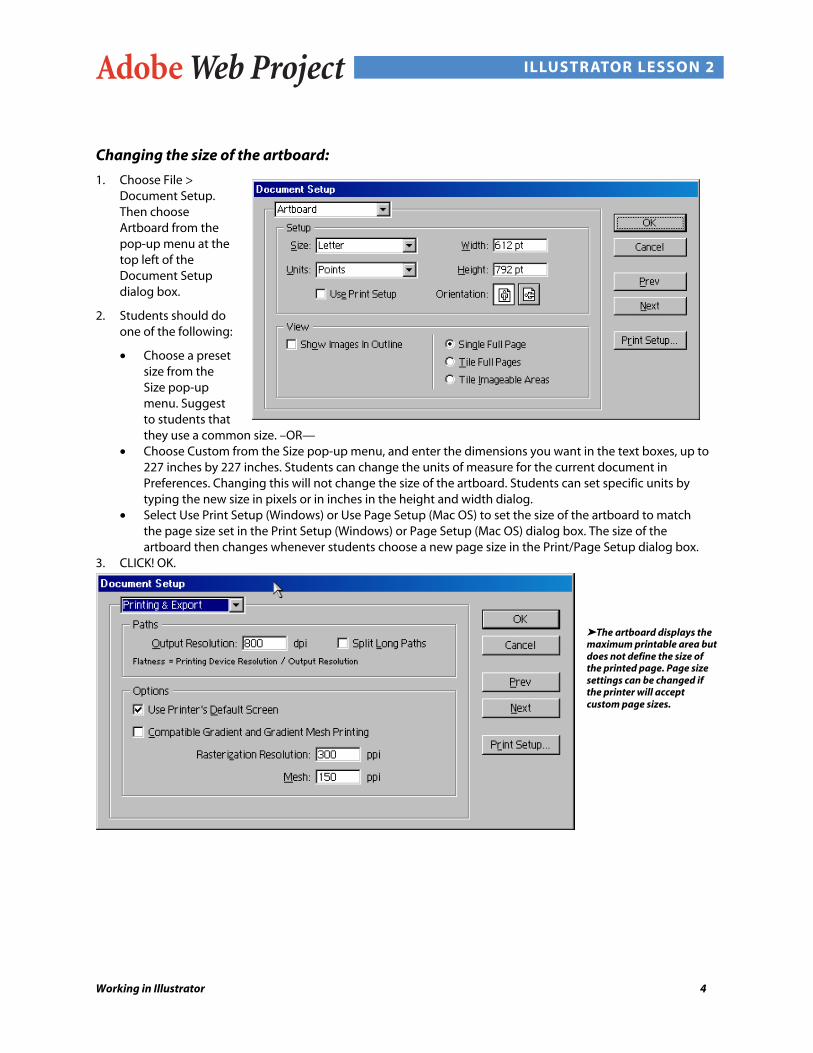
Changing the size of the artboard:
1. Choose File >Document Setup.Then chooseArtboard from thepop-up menu at thetop left of theDocument Setupdialog box.
2. Students should doone of the following:
• Choose a presetsize from theSize pop-upmenu. Suggestto students thatthey use a common size. –OR—
• Choose Custom from the Size pop-up menu, and enter the dimensions you want in the text boxes, up to227 inches by 227 inches. Students can change the units of measure for the current document inPreferences. Changing this will not change the size of the artboard. Students can set specific units bytyping the new size in pixels or in inches in the height and width dialog.
• Select Use Print Setup (Windows) or Use Page Setup (Mac OS) to set the size of the artboard to matchthe page size set in the Print Setup (Windows) or Page Setup (Mac OS) dialog box. The size of theartboard then changes whenever students choose a new page size in the Print/Page Setup dialog box.
3. CLICK! OK.
➤The artboard displays themaximum printable area butdoes not define the size ofthe printed page. Page sizesettings can be changed ifthe printer will acceptcustom page sizes.

Working in Illustrator 5
Adobe Web Project ILLUSTRATOR LESSON 2
Exercise Two: About PathsIntroduce the exercise by explaining that a path is made up of one or more straight or curved segments. Thebeginning and end of each segment is marked by anchor points, which work like pins holding wire in place. Notethat your students change the shape of a path by editing its anchor points. Your students can also control curvesby dragging the direction points at the end of direction lines that appear at anchor points.
Explain that a path is either open, like an arc, or closed, like a circle. For an open path, the starting and endinganchor points for the path are called endpoints.
Reproduce on the whiteboard or on paper these diagrams in order to clarify the various ideas of paths for yourstudents.
➤ Students should be given an opportunity to create paths and manipulate them in ways similar to thediagrams below:
Diagram A
A. Selected (solid) endpoint B. Selected anchor point C. Curved path segment D. Direction line E. Direction point
Paths can have two kinds of anchor points—corner points and smooth points. At a corner point, a path abruptlychanges direction. At a smooth point, path segments are connected as a continuous curve. Students can draw apath using any combination of corner and smooth points. And, if students draw the wrong kind of point, thepoint can always be changed!

Working in Illustrator 6
Adobe Web Project ILLUSTRATOR LESSON 2
Diagram B
A. Four corner points B. Same point positions using smooth points C. Same point positions combining corner andsmooth points
➤Do not let students confuse corner and smooth points with straight and curved segments. A corner point canconnect any two straight or curved segments, while a smooth point always connects two curved segments:
Diagram C
A corner point can connect both straight segments and curved segments.

Working in Illustrator 7
Adobe Web Project ILLUSTRATOR LESSON 2
Exercise Three: Changing a Tool Pointer, Drawing with a Pen Tool,and Drawing and Editing Free-Form PathsStudents can change the appearance of the pointer from the tool pointer to a cross hair for more precise control.Why? When the pointer is a cross hair, more artwork is visible. This is convenient when students are doingdetailed drawing and editing.
Making a drawing tool pointer appear as a cross hair:
Do one of the following:
• Choose Edit > Preferences >General. Select Use PreciseCursors, and CLICK! OK.
• Press Caps Lock beforebeginning to draw with thetool.
Drawing with the pen tool:
Students should use the pen toolto draw a path that cannot bedrawn using the simpler drawingtools. The pen tool lets yourstudents create straight lines andsmooth, flowing curves with greatprecision.
Drawing and editing free-form paths:
Tell your students that if they want to draw and edit free-form paths, they should use the pencil tool. They canalso smooth out and erase segments of a free-form path with the smooth tool and erase tool.
Anchor points are set down as they are drawn with the pencil tool; students do not need to determine wherethey are positioned. However, points can be adjusted once the path is complete. The number of anchor pointsset down is determined by the length and complexity of the path and by the tolerance values set in the PencilTool Preferences or Smooth Tool Preferences dialog box for either tool.
➤ Students can draw and edit brushed paths with the paintbrush tool by using the same methods as for pathsdrawn with the pencil tool.

Working in Illustrator 8
Adobe Web Project ILLUSTRATOR LESSON 2
Drawing a free-form path with the pencil tool:
1. Ask students to select the pencil tool ( ).
2. Tell them to position the pointer where they want the path to begin, and drag to draw a path. The penciltool displays a small x to indicate drawing a free-form path. As students drag the pointer, a dotted linefollows the pointer. Anchor points appear at both ends of the path and at various points along it. The pathtakes on the current paint attributes, and the path remains selected by default.
3. To continue the existing free-form path, tell students to select the path, and then position the pencil tipon an end-point of the path and drag.
Drawing a closed path with the pencil tool:
1. Instruct students to select the pencil tool.
2. Students should position the pointer where they want the path to begin, and start dragging to draw apath.
3. As students drag, instruct them to hold down Alt (Windows®) or Option (Mac OS). The pencil tooldisplays a small loop, and its eraser will be solid indicating a closed path is being drawn.
4. Let students know that when the path is the size and shape they want, they should release the mousebutton (but not the Alt or Option key). After the path closes, release the Alt or Option key.
Changing a path with the pencil tool:
1. Tell students that if there is a path they want to change, that they should select it with the selection tool( ).
➤ Or Ctrl-click (Windows) or Command-click (Mac OS) the path to select it.
2. Students should position the pencil tool on or near the path to redraw, and drag the tool until the path isthe desired shape. Use the following example:
Using the pencil tool to edit a closed shape
➤ Depending on where your students begin to redraw the path and in which direction students drag, they may getunexpected results. For example, students may unintentionally change a closed path to an open path, change anopen path to a closed path, or lose a portion of a shape.

Working in Illustrator 9
Adobe Web Project ILLUSTRATOR LESSON 2
Exercise Four: Adjusting Path Segments, Drawing Shapes, andDrawing and Editing Brushed Paths
Adjusting path segments:
The shape of the path can be changed by adding, deleting, or moving the path's anchor points. To adjust acurved segment, students can move one or more of its anchor points or direction points. Your students can alsoadjust a path by converting smooth points to corner points and vice versa.
Drawing shapes:
Many objects in Adobe Illustrator can be created by starting with basic shapes. Thetools in Illustrator let students easily create rectangles, ellipses, polygons, spirals, andstars.
Drawing and editing brushedpaths:
The Brushes palette in Illustrator containsfour brush types—Calligraphic, Scatter, Art, and Pattern brushes—touse in adding art to paths. Students can choose from the brusheffects that have been preloaded into the Brushes palette.
Show your students that they can also modify these brushes, create brushes, or import a brush from the BrushLibraries to the Brushes palette. Brushes created and stored in the Brushes palette are associated only with thecurrent file.
After brushes have been applied to a path, they can modify the attributes of the path in several ways.
To import a brush from a Brush Library tothe current Brushes palette:
1. Make sure the Brushes palette into whichstudents want to import a brush is open.
2. Choose Window > Brush Libraries > BrushLibrary name. To locate a Brush Library notstored in the Brush Libraries folder, chooseWindow > Brush Libraries > Other Library.
3. Have students select a brush, and theninstruct students to do one of the following:
• Use the selected brush in the current artwork (recommended for one or two brushes at a time). Once itis used in the artwork, the brush is copied from the Brush Library to the Brushes palette.
• Drag the selected brush to the current Brushes palette (recommended for multiple brushes at a time).
• Choose Add to Brushes from the Brushes palette menu.

Working in Illustrator 10
Adobe Web Project ILLUSTRATOR LESSON 2
➤ Note to your students: each Illustrator file can have a different set of brushes in its Brushes palette.
Your students can achieve the following effects using the four brush types. It would be a good idea todemonstrate to your students the various brush types:
• Calligraphic brushes create strokes that resemble strokes drawn with the angled point of a calligraphic pen,drawn along the center of the path.
• Scatter brushes disperse copies of an object (such as a ladybug or a leaf) along the path.• Art brushes stretch an object or artwork (such as an arrow or dog bone) evenly along the length of the path.• Pattern brushes paint a pattern—made of individual tiles—that repeats along the path. Pattern brushes can
include up to five tiles, for the sides, inner corner, outer corner, beginning, and end of the pattern.
A. Calligraphic brush B. Scatter brush C. Art brush D. Pattern brush
To create a brushed path with a drawing tool:
1. Students should draw a path using a drawing tool, including the pen or pencil tool or a basic shape tool.
2. Choose a method for applying a brush to the path:
• Select the path that is to be brushed. In the Brushes palette, select a brush with which to brush the path.• Drag a brush from the Brushes palette onto a path.
To remove a brush from a path:
1. Students should select the path to change.
2. Then do one of the following:
a. In the Brushes palette, choose Remove Brush Strokes from the palette menu or CLICK! the RemoveBrush Strokes button ( ).
b. In the toolbox or the Color palette, CLICK! the Stroke box and apply a stroke of None.
c. The brush is removed and the path remains.

Working in Illustrator 11
Adobe Web Project ILLUSTRATOR LESSON 2
To draw a path with the paintbrush tool:
1. Students choose Window > View Brushes to display the Brushespalette, and select a brush from the Brushes palette.
2. Students double- CLICK! the paintbrush tool ( ), set preferences,and CLICK! OK:
• In the Smoothness text box, enter a value (0% to 100%) for the percentage stroke and curve smoothness, oruse the slider. The higher the value, the smoother the stroke or curve.
• In the Fidelity text box, enter the number of pixels (from 0.5 to 20) for the number of pixels the stroke canstray from the path to produce smooth curves, or use the slider. The higher the value, the smoother thestroke or curve.
• Select Fill New Brush Strokes to have paths drawn by the brush filled. When the option is unselected, pathsare unfilled.
• Select Keep Selected to keep the path just drawn with the brush selected.
➤ Note: the above may require additional demonstration from the teacher. By default, the path is selected whenyou release the mouse button.
To draw a closed path with the paintbrush tool:
1. Students select the paintbrush tool.
2. Students position the pointer where they want the path to begin, and start dragging to draw a path.
3. As students drag, hold down Alt (Windows) or Option (Mac OS). The paintbrush tool displays a small loop toindicate drawing a closed path.
➤ It is very important that you do not hold down the modifier key until after you start drawing to create aclosed loop.
4. When the path is the size and shape wanted, release the mouse button (but not the Alt or Option key). Afterthe path closes, release the Alt or Option key.
To edit a brushed path with the paintbrush tool:
1. Students select the path to edit with the selection tool ( ), or Ctrl-click (Windows) or Command-click(Mac OS) the path to select it.
2. Position the paintbrush tool on or near the path to redraw, and drag the tool until the path is the desiredshape.

Working in Illustrator 12
Adobe Web Project ILLUSTRATOR LESSON 2
Lesson Two: Check for Understanding…
Review questions…
1. Describe two ways to change the size of your artboard.
2. There are two kinds of paths in Illustrator:
a. ______________b. ______________
3. How are Illustrator paths changed in shape?
4. How are the curves of an Illustrator path controlled?
5. What are the advantages of doing work with the pen tool?
6. What are the four brush types in Illustrator and what are their optimal uses?
Review answers…
1. a. Commands can be selected from Choose File > Document Setup. Choose the artboard from the pop-upmenu. b. Students may choose Custom from the Size pop-up menu and enter the dimensions they want.
2. a. “Open” like an arc.b. “Closed” like a circle.
3. The shape of a path can be changed by editing (moving) its anchor points.
4. Curves of a path can be controlled by dragging the direction points at the end of direction lines thatappear at anchor points.
5. The pen tool is a more sophisticated tool that allows students to create straight lines and smooth, flowingcurves with very great precision. It is somewhat more difficult to use than the pencil tool. The pencil toolshould be used generally for drawing free-form paths, for example.
6. Calligraphic brushes create strokes varying between light- and heavily angled. Scatter brushes disperse copies of an object along a path. Art brushes stretch an object or artwork. Pattern brushes paint a pattern that repeats along a path.
Additional Adobe Resources on the Web
Visit the Adobe in Education Web site at http://www.adobe.com/education for additional resources:
• Instructional resources—online tutorials, books, tech guides, and more:http://www.adobe.com/education/educators/main.html
• Complete product information: http://www.adobe.com/education/products/main.html• Training opportunities: http://www.adobe.com/education/educators/training.html

Working in Illustrator 13
Adobe Web Project ILLUSTRATOR LESSON 2
Adobe, the Adobe logo, Acrobat, Acrobat Reader, Classroom in a Book, Illustrator, ImageReady, LiveMotion, Photoshop, and PostScript areeither registered trademarks or trademarks of Adobe Systems Incorporated in the United States and/or other countries. Mac is a trademark ofApple Computer, Inc., registered in the United States and other countries. Microsoft, Windows NT, and Windows are either registeredtrademarks or trademarks of Microsoft Corporation in the United States and/or other countries. All other trademarks are the property of theirrespective owners.
© 2001 Adobe Systems Incorporated. All rights reserved.

Applying and Using Color 1
Adobe Web Project ILLUSTRATOR LESSON 3
Applying and Using Color
Level
Advanced Beginner. Students are assumed to have mastered tools, palettes, and the concept ofartwork windows. The exercises in Lesson Two should have been mastered. Students areassumed to have a familiarity with the Web and online resources.
Summary and Overview
The purpose of Adobe® Illustrator®/Lesson Three is to introduce students to applying andusing color in a successful project of designing basic Web sites using Adobe tools.
1. Color modes and modelsIllustrator bases its color modes on established models for describing and reproducingcolor. Students will be introduced to these models.
2. Applying colorStudents will use the Fill and Stroke boxes in the toolbox to select an object’s fill andstroke, to swap the fill color with the stroke color, and to return the fill and stroke to theirdefault colors.
3. Modifying colorStudents will use the color picker to select the fill or stroke color by choosing from thecolor spectrum or by defining colors numerically. Students will also be able to use thepaint bucket and eyedropper tools to copy paint attributes from one object to another.
➤ Lesson Three is designed to be taught in approximately one class hour. Depending on the teacher’space of instruction and the prior knowledge of the students, Lesson Three may take more than one classhour.
What Students Will Learn: Assessable Outcomes from the Exercises
In this lesson, your students will learn…
• To use color modes and models• To apply color using the toolbox• To use the color palette• To apply color by dragging and dropping• To display the color picker• To use the Color Picker• To modify colors in Illustrator
Applying and Using Color 2
Adobe Web Project ILLUSTRATOR LESSON 3
Teacher Orientation for Lesson Three
Key Definitions for Lesson Three:
Color mode: a color mode In Illustrator determines the color model used to display and print Illustratorfiles. Illustrator bases its color modes on established models for describing and reproducing color.Common models include HSB, RGB, and CMYK.
Fill attributes: in graphics applications, fill is used to paint the inside of an enclosed object. Typically, acolor and pattern can be chosen, and then the object painted with a fill tool. The area that is painted iscalled the fill area.
Grayscale: an image that only uses black, white, and shades of gray to represent color.
Palettes and colors: the palette may be only a subset of all the colors that can be physically displayed.For example, SVGA systems can display 16 million unique colors, but a given program would use only256 of them at a time if the display is in 256-color mode. In paint and illustration programs, a palette is acollection of symbols that represent drawing tools. As demonstrated in Lesson One: a simple palettemight contain a paintbrush, and a pencil.
Stroke: defines or paints outside border for a filled or open path.
Web-safe palette: also called a Browser-Safe Palette; only contains 216 colors out of a possible 256.That is because the remaining 40 colors on Macs are different from those on PCs. By eliminating the 40variable colors, this palette is optimized for cross-platform use.

Applying and Using Color 3
Adobe Web Project ILLUSTRATOR LESSON 3
Exercise One: Applying Color and Changing Fill or StrokeAttributes
Applying color using the toolbox:
Explain to the students that they will use the Fill and Stroke boxes in the toolbox to select an object's filland stroke, to swap the fill color with the stroke color, and to return the fill and stroke to their defaultcolors.
➤ To switch between fill and stroke as the active selection, press x on the keyboard. To swap the fill andstroke colors of a selected object, press Shift+x. Below the Fill and Stroke boxes are the Color, Gradient,and None buttons. These buttons are used to change the selected fill or stroke to a color, to change a fillto a gradient, or to remove the fill or stroke from the selected object.
Changing fill or stroke attributes using the toolbox:
1. Demonstrate to students how to select an object using any selection tool.
2. Then students should do one of the following (write on whiteboard or overhead):
• CLICK! the Swap Fill and Stroke button ( ), or press Shift+x to swap colors betweenthe fill and the stroke.
• CLICK! the Default Fill and Stroke button ( ) to return to the default color settings(white fill and black stroke).
• CLICK! the Color button ( ) to change the currently selected stroke or fill tothe last-selected solid color in the Color palette.
• CLICK! the Gradient button ( ) to change the currently selected fill to thelast-selected gradient in the Gradient palette.
• CLICK! the None button ( ) to remove the object's fill or stroke.
➤ Use keyboard shortcuts to switch to Color, Gradient, or None: Press < to change the selection to acolor; > to change the selection to a gradient; to change to None.
Using the Color palette:
Students will use the Color palette to apply color to an object's filland stroke, and also to edit and mix colors—either colors thatstudents create or colors that students select from the Swatchespalette, from an object, or from a color library.
Applying and Using Color 4
Adobe Web Project ILLUSTRATOR LESSON 3
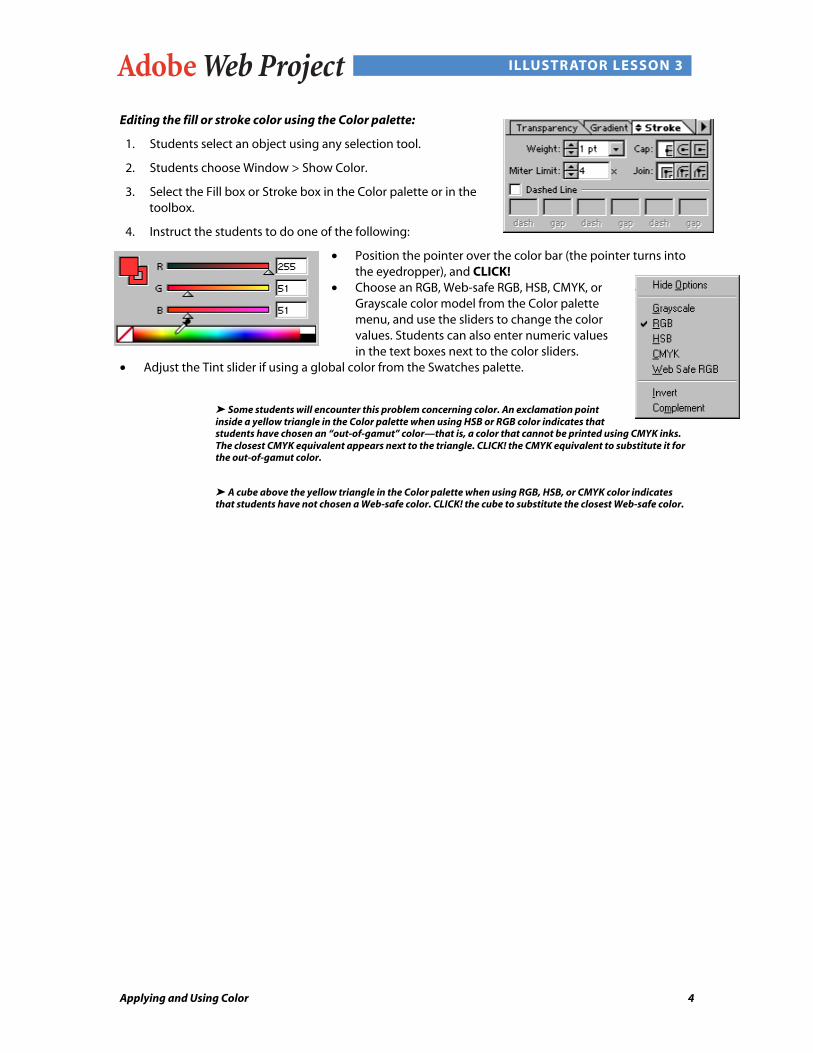
Editing the fill or stroke color using the Color palette:
1. Students select an object using any selection tool.
2. Students choose Window > Show Color.
3. Select the Fill box or Stroke box in the Color palette or in thetoolbox.
4. Instruct the students to do one of the following:
• Position the pointer over the color bar (the pointer turns intothe eyedropper), and CLICK!
• Choose an RGB, Web-safe RGB, HSB, CMYK, orGrayscale color model from the Color palettemenu, and use the sliders to change the colorvalues. Students can also enter numeric valuesin the text boxes next to the color sliders.
• Adjust the Tint slider if using a global color from the Swatches palette.
➤ Some students will encounter this problem concerning color. An exclamation pointinside a yellow triangle in the Color palette when using HSB or RGB color indicates thatstudents have chosen an “out-of-gamut” color—that is, a color that cannot be printed using CMYK inks.The closest CMYK equivalent appears next to the triangle. CLICK! the CMYK equivalent to substitute it forthe out-of-gamut color.
➤ A cube above the yellow triangle in the Color palette when using RGB, HSB, or CMYK color indicatesthat students have not chosen a Web-safe color. CLICK! the cube to substitute the closest Web-safe color.

Applying and Using Color 5
Adobe Web Project ILLUSTRATOR LESSON 3
Exercise Two: Applying and Modifying Color
Applying color by dragging and dropping:
Students will be interested in knowing that an easy way to paint an object is to drag a color directlyfrom the Fill box or Stroke box in the toolbox, the Color palette, or the Gradient palette and drop thecolor onto the object, or to drag a swatch from the Swatches palette and drop it on an object. Draggingand dropping lets students paint objects without first selecting them. You can also drag and drop colorsfrom the Swatches palette to the Fill box or Stroke box in the toolbox, the Color palette, or the Gradientpalette.
When students drag color, the color is applied to either the object's fill or stroke, depending on whetherthe Fill box or Stroke box is currently selected. (For example, if students drag a red color to anunselected object when the stroke box in the toolbox is selected, the object's stroke is painted red.)
Displaying the Color Picker:
In order to display the ColorPicker, students should doone of the following:
• Double-CLICK! the Fill orStroke color selectionbox in the toolbox.
• Double-CLICK! the activecolor selection box in theColor palette.
Using the Color Picker:
Tell students that they can use the Color Picker to select the fill or stroke color by choosing from a colorspectrum or by defining colors numerically. In addition, they can select colors based on the HSB, RGB,and CMYK color models.
Modifying colors:
Illustrator provides a wide variety of tools to modify and edit colors in your file. Ask students to
experiment with the paint bucket and eyedropper tools to copy paint attributes from one
object to another.

Applying and Using Color 6
Adobe Web Project ILLUSTRATOR LESSON 3
Lesson Three: Check for Understanding…
Review questions…
1. Name two uses of the Color palette in applying color.
2. In terms of color, what do the initials RGB stand for?
3. In terms of color, what do the initials CMYK stand for?
4. What is the primary purpose of the Color Picker?
5. Name one tool that allows you to modify or edit colors.
6. How many colors are there in the Web-safe palette?
7. How are Web-safe colors represented?
Review answers…
1. Answers may include: apply color to an object’s fill and stroke; edit colors; mix colors.
2. Red, green, blue.
3. Cyan, magenta, yellow, black.
4. The Color Picker allows students to select the fill or stroke color by choosing a color spectrum ordefining colors numerically.
5. The two tools mentioned most often are: paint bucket and eyedropper.
6. The Web-safe palette contains 216 colors.
7. Web-safe colors are represented in hexadecimal code with a separate two-digit value for red,green and blue.
Additional Adobe Resources on the Web
Visit the Adobe in Education Web site at http://www.adobe.com/education for additional resources:
• Instructional resources—online tutorials, books, tech guides, and more:http://www.adobe.com/education/educators/main.html
• Complete product information: http://www.adobe.com/education/products/main.html• Training opportunities: http://www.adobe.com/education/educators/training.html
Adobe, the Adobe logo, Acrobat, Acrobat Reader, Classroom in a Book, Illustrator, ImageReady, LiveMotion, Photoshop, andPostScript are either registered trademarks or trademarks of Adobe Systems Incorporated in the United States and/or othercountries. Mac is a trademark of Apple Computer, Inc., registered in the United States and other countries. Microsoft, Windows NT,and Windows are either registered trademarks or trademarks of Microsoft Corporation in the United States and/or other countries.All other trademarks are the property of their respective owners.
© 2001 Adobe Systems Incorporated. All rights reserved.

Graphics for the Web 1
Adobe Web Project ILLUSTRATOR LESSON 4
Graphics for the Web
Level
Advanced beginner to intermediate. Students are assumed to have mastered tools, palettes, and theconcept of artwork windows. The application of colors is a critical component of graphics in a Webenvironment. The exercises and projects in Lessons Two (artwork and windows) and Three (colors)should have been mastered. Students are assumed to have a familiarity with graphics, the Web, andonline resources.
Summary and Overview
The purpose of Adobe® Illustrator®/Lesson Four is to introduce students to creating small graphics filesto distribute images on the World Wide Web. With smaller files, Web servers can store and transmitimages more efficiently, and viewers can download images more quickly. Teachers and students willfind that Illustrator provides a variety of tools for creating and viewing Web graphics as well asoptimizing and saving graphics for use on the Web.
➤ Lesson Four is designed to be taught in approximately one class hour. Dependingon the teacher’s pace of instruction and the prior knowledge of the students, Lesson Fourmay take more than one class hour.
What Students Will Learn: Assessable Outcomes from the Exercises
In this lesson, your students will learn…
• To prepare graphics for the Web using a variety of Illustrator tools• To use a variety of graphics file formats (JPG, GIF, PNG)• To link objects to URLs for Web pages• To view the project in various optimized formats• To save images for export

Graphics for the Web 2
Adobe Web Project ILLUSTRATOR LESSON 4
Teacher Orientation for Lesson Four
Key Definitions for Lesson Four
GIF: pronounced jiff or giff (hard g) stands for Graphics Interchange Format, a bitmapped graphics file formatused by the World Wide Web, CompuServe, and many bulletin board services. GIF supports color and variousresolutions. It also includes data compression and transparency. The GIF format is most often used for drawingsand illustrations.
HTML: a markup language used to structure text and multimedia documents and to set up hyperlinks betweendocuments. HTML is used extensively on the World Wide Web.
Image map: a single graphic image containing more than one hot spot. For example, imagine a graphic of abowl of fruit. When you CLICK! on a banana, the system displays the number of calories in a banana and whenyou CLICK! on an apple, it displays the number of calories in an apple.
JPG: short for Joint Photographic Experts Group, and pronounced jay-peg, sometimes spelled JPEG (except as afile-name extension). JPG is a lossy compression technique for color images (see definition below). Although itcan reduce file sizes to about 5% of their normal size, some detail is lost in the compression. The JPG format isthe most common format used for photographs because of its ability to create sharp images with small file sizes.
Lossy Compression: Refers to data compression techniques in which some amount of data is lost. Lossycompression technologies attempt to eliminate redundant or unnecessary information. Most video compressiontechnologies, use a lossy technique.
Optimizing: special features in Illustrator to select an image for export in GIF, JPEG, or PNG file, and to previewthe optimized images in different Web graphics file formats.
Pixels: the smallest image-forming unit of a video display.
PNG: short for Portable Network Graphics, and pronounced “ping,” a new bitmapped graphics format similar toGIF. In fact, PNG was approved as a standard by the World Wide Web consortium to replace GIF because GIF usesa patented data compression algorithm called LZW. In contrast, PNG is completely patent- and license-free. Themost recent versions of Netscape Navigator and Microsoft Internet Explorer now support PNG.
Rasterize: This is the process of converting vector objects, those created in Illustrator, to a resolution-dependentgraphic format. The rasterized image will not scale or resize as the user’s screen size changes.
URL: abbreviation for Uniform Resource Locator, the global address of documents and other resources on theWorld Wide Web. The first part of the address indicates what protocol to use, and the second part specifies the IPaddress or the domain name where the resource is located.
Vector Object: A resolution-independent graphic format that has the ability to resize itself to match theresolution of the views monitor.

Graphics for the Web 3
Adobe Web Project ILLUSTRATOR LESSON 4
Exercise One: Preparing and Linking Web Graphics
Preparing Web graphics in Illustrator:
Your students can make use of a variety of Illustrator tools to ensure that graphics created for the Web displaycorrectly in a Web browser. Be sure that you emphasize that students should keep the following in mind as theyprepare graphics for use on the Web:
• When your students first start the Illustrator application, they can choose between the RGB and CMYK colormodes for their files; if they are creating Web-based graphics, they should choose the RGB color mode.
• To preview the artwork as it would display if rasterized for use on the Web, students should use the PixelView mode. While they work in Pixel View mode, artwork that is created will snap to a pixel grid. To create alink from an object in the artwork to a Uniform Resource Locator (URL), students will use the image mapoption in the Attribute palette.
• To apply Web-safe colors to artwork, students will use the Web-safe color options in the Color palette or theColor Picker. See Using the Color palette and Using the Color Picker in Lesson Three.
• To export images in specialized Web formats such as Scalable Vector Graphics (SVG) format or MacromediaFlash (SWF) format, as well as other formats for the Web, use the Export command.
• To optimize images in several graphic file formats used on the Web, such as Graphics Interchange Format(GIF), Joint Photographic Experts Group (JPEG), and Portable Network Graphics (PNG-8 or PNG-24), use theSave for Web command.

Graphics for the Web 4
Adobe Web Project ILLUSTRATOR LESSON 4
Linking objects to URLs for Internet Web pages:
The following is for more advanced students or to challenge all students if there is sufficient class time:
Any object your students create in Adobe Illustrator can be linked to a Uniform Resource Locator (URL) string,transforming the object into a button that links the user to an Internet Web site. This feature is useful whencreating artwork for Web pages, allowing students to pre-attach Web links to individual objects beforeimporting the artwork into a Web page design application.
After assigning a URL to an object in an illustration, more advancedstudents can verify that the URL is valid by using the LaunchBrowser button in the Attributes palette. If your computer systemshave an Internet browser (such as Netscape Navigator or MicrosoftInternet Explorer), clicking the Browser button automaticallyconnects to the URL you or your students have defined as theobject's link.
To activate URL links to objects, students must designate the objectas an image map using the Attributes palette. The image mapdefines the shape of the button that links to the assigned URL. Theimage map can be assigned a shape such as a rectangle, or as afree-form polygon that follows the outline of the selected object.See the illustration below:
Imagemap set to Rectangle and to Polygon in Attributes palette

Graphics for the Web 5
Adobe Web Project ILLUSTRATOR LESSON 4
Exercise Two: Optimizing and Saving In Illustrator
Optimizing in Illustrator:
For basic image optimization tasks, your students can export an image in Illustrator as a GIF, JPEG, or PNG file.Students can use the special optimization features in Illustrator to preview optimized images in various Webgraphics file formats and with different file attributes. They can view multiple versions of an imagesimultaneously and modify optimization settings before previewing the image and select the best combinationof settings.
➤ In Illustrator, preferences can be set for saving image previews, using file extensions, and maximizingfile compatibility.
To set file saving preferences:
Have students choose Edit > Preferences > Saving Files, and set the following options:
Image Previews:
Students should choose an option for saving image previews: Never Save to save files without previews, AlwaysSave to save files with specified previews, or Ask When Saving to assign previews on a file-by-file basis.
(In Mac OS, you can select one or more of the following preview types—to speed the saving of files andminimize file size, select only thepreviews needed:
• Icon to use the preview as afile icon on the desktop.
• Macintosh Thumbnail todisplay the preview in theOpen dialog box.
• Windows Thumbnail to savea preview that can display onWindows systems.
• Full Size to save a 72-ppi(pixels per inch) version ofthe file for use in applicationsthat can only open low-resolution Photoshopimages. For non-EPS files, thisis a PICT preview.)
File Extension (Windows):
Students should choose an option for the three-character file extensions that indicate a file's format: Use UpperCase to append file extensions using uppercase characters or Use Lower Case to append file extensions usinglowercase characters.

Graphics for the Web 6
Adobe Web Project ILLUSTRATOR LESSON 4
Append File Extension (Mac OS):
File extensions are necessary for files that students want to use on or transfer to a Windows system. Choose anoption for appending extensions to filenames: Never to save files without file extensions, Always to append fileextensions to filenames, or Ask When Saving to append file extensions on a file-by-file basis. Select Use LowerCase to append file extensions using lowercase characters.
In Mac OS, to append a file extension to the current file only, hold down Option and choose a file format fromthe Save As or Save a Copy dialog box.
To display a preview file icon (Windowsonly):
1. Students Save the file in Photoshopformat with a thumbnail preview.
2. Right-CLICK! the file on the desktop(or in any Windows or Photoshopdialog box that displays a file list),and choose Properties from thecontext menu that appears.
3. CLICK! the Photoshop Image tab.
4. Select an option for generatingthumbnails, and CLICK! OK.
➤ Preview icons appear on the desktop and infile lists (when the view is set to Large Icons).

Graphics for the Web 7
Adobe Web Project ILLUSTRATOR LESSON 4
Viewing the Save for Web dialog box:
Instruct students to choose File > Save for Web.
Optimizing files and choosing options:
Instruct your students that they can use the Settings panel of the Save for Web dialog box to select the filecompression format and other optimization settings for an image. They can also optimize an image to aspecified file size, using current optimization settings or automatically generating a GIF or JPEG file.

Graphics for the Web 8
Adobe Web Project ILLUSTRATOR LESSON 4
Saving optimized images:
Students can save an optimized image in Illustrator in its current state, and save the HTML file for the image inthe same folder. The HTML file also includes the image name, the image dimensions, and other code necessaryto specify the image for display on a Web site. This code can than be cut and pasted in the students’ Web page.
Finally, saving an optimized file:
1. To save an optimized file, students should CLICK! OK in the Save for Web dialog box.
2. In the Save Optimized As dialog box, type a filename, and choose a location for the file. The file is saved inthe format specified in the Settings panel of the Save for Web dialog box.
3. Select Save HTML File to save the HTML file with the image file, and CLICK! Save.
Graphics for the Web 9
Adobe Web Project ILLUSTRATOR LESSON 4
Lesson Four: Check for Understanding…
Review questions…
1. What is the benefit of selecting the Web palette when preparing images for publication on the World WideWeb?
2. For each of these types of files, what file type would be best for the Web? Photo, line art, etc.
3. How is a file saved for publication to the Web?
4. What optimization benefits does Illustrator offer as part of its features?
Review answers…
1. Selecting the Web palette ensures that the images are displayed using the same color palette, regardless ofthe platform on which the image is displayed.
2. Answers may vary. Example: The style of artwork being worked with determines the file format that shouldbe used to save an image for publication on the Web. In addition, file size and image integrity may alsoaffect which file format is used. In general, the integrity of the image should be maintained and the file sizeshould be kept small.
3. Choose File > Save for Web.
4. Illustrator allows images to be previewed in various Web-graphics file formats and with various fileattributes. This allows for viewing of multiple versions of an image simultaneously and modification ofoptimization settings before previewing the image.
Additional Adobe Resources on the Web
Visit the Adobe in Education Web site at http://www.adobe.com/education for additional resources:
• Instructional resources—online tutorials, books, tech guides, and more:http://www.adobe.com/education/educators/main.html
• Complete product information: http://www.adobe.com/education/products/main.html• Training opportunities: http://www.adobe.com/education/educators/training.html
Adobe, the Adobe logo, Acrobat, Acrobat Reader, Classroom in a Book, Illustrator, ImageReady, LiveMotion, Photoshop, and PostScript areeither registered trademarks or trademarks of Adobe Systems Incorporated in the United States and/or other countries. Mac is a trademark ofApple Computer, Inc., registered in the United States and other countries. Microsoft, Windows NT, and Windows are either registeredtrademarks or trademarks of Microsoft Corporation in the United States and/or other countries. All other trademarks are the property of theirrespective owners.
© 2001 Adobe Systems Incorporated. All rights reserved.

Saving, Exporting and, Printing Artwork 1
Adobe Web Project ILLUSTRATOR LESSON 5
Saving, Exporting, and, Printing Artwork
Level
Advanced beginner to intermediate. Students are assumed to have mastered tools, palettes, andthe concept of artwork windows. The application of colors is a critical component of graphics in aWeb environment. The exercises in Lessons Two (artwork), Three (colors), and Four (graphics)should have been mastered. Students are assumed to have a familiarity with graphics, the Web, andonline resources as well as basic Save and Print commands.
Summary and Overview
The purpose of Adobe® Illustrator®/Lesson Five is to introduce students to saving artwork in avariety of formats through using Illustrator. Artwork can be saved in PDF and EPS formats—and canbe exported in a variety of other common graphic file formats. Students will want to print artworkas a way to “take it home,” to put it in a portfolio, or to show it to other students. Artwork usuallyprogresses through a variety of stages before a final printing, and students will often want tomaintain a record of the progression of the artwork.
➤ Lesson Five is designed to be taught in approximately one class hour.Depending on the teacher’s pace of instruction and the prior knowledge ofthe students, Lesson Five may take more than one class hour.
What Students Will Learn: Assessable Outcomes from the Exercises
In this lesson, your students will learn…
• To understand the different graphic-file formats• To save artwork files in several formats: PDF, EPS, AI• To export artwork files for use in other applications including the Web• To print artwork files

Saving, Exporting and Printing Artwork 2
Adobe Web Project ILLUSTRATOR LESSON 5
Teacher Orientation for Lesson Five
Key Definitions for Lesson Five
There are a number of terms with which both teachers and students should be familiar. While some teachersand students will know (or remember) these terms, they are provided here for reference and review.
About graphic file formats:
Adobe Illustrator can import and export many common file formats. Graphic file formats are distinguishedby the way they represent graphic information. Graphic information can be represented as either vectordrawings or bitmap images. Some graphic file formats contain only vector drawings or only bitmap images,but many can include both in the same file.
Bitmap images
Paint and image-editing software, such as Adobe Photoshop®, generate bitmap images, also called rasterimages. The images use a grid (also known as a bitmap or raster) of small squares, known as pixels, torepresent graphics. Each pixel in a bitmap image has a specific location and color value assigned to it. Forexample, a bicycle tire in a bitmap image is made up of a collection of pixels in that location, with each pixelpart of a mosaic that gives the appearance of a tire. When working with bitmap images, you edit pixelsrather than objects or shapes.
Bitmap images are the most common electronic medium for continuous-tone images, such as photographsor images created in painting programs, because they can represent subtle gradations of shades and color.Bitmap images are resolution dependent—that is, they represent a fixed number of pixels. As a result, theycan appear jagged and lose detail if they are scaled on-screen or if they are printed at a higher resolution thanthey were created for.
Resolution in bitmap images
Resolution is the number of dots or pixels per linear unit used to reproduce artwork and images. Outputdevices display images as groups of pixels. The resolution of vector graphics, such as Illustrator artwork,depends on the device used to display the artwork. The resolution of bitmap images, such as digitalphotographs, depends on both the display device and the inherent resolution of the bitmap image.
Pixel dimensions the number of pixels along the height and width of a bitmap image. The display size of animage on-screen is determined by the pixel dimensions of the image plus the size and setting of themonitor.
A typical 13-inch monitor displays 640 pixels horizontally and 480 vertically. An image with pixel dimensionsof 640 by 480 would fill this small screen. On a larger monitor with a 640 by 480 setting, the same image(with pixel dimensions of 640 by 480) would still fill the screen, but each pixel would appear larger.Changing the setting of this larger monitor to 1152 pixels by 870 pixels would display the image at a smallersize, occupying only part of the screen.
When preparing an image for online display (for example, a Web page that will be viewed on a variety ofmonitors), pixel dimensions become especially important. Because your image may be viewed on a 13-inchmonitor, you will probably want to limit the size of your image to a maximum of 160 pixels by 120 pixels.

Saving, Exporting and Printing Artwork 3
Adobe Web Project ILLUSTRATOR LESSON 5
Image resolution the number of pixels displayed per unit of printed length in an image, usually measured inpixels per inch (ppi). Two images of the same pixel dimension of different resolutions would be two differenton-screen sizes when scaled to 100%. For example, a 1-inch by 1-inch image with a resolution of 72 ppicontains a total of 5184 pixels (72 pixels wide x 72 pixels high = 5184). The same 1-inch by 1-inch image witha resolution of 300 ppi would contain a total of 90,000 pixels.
Monitor resolution the number of pixels or dots displayed per unit of length on the monitor, usuallymeasured in dots per inch (dpi). Monitor resolution depends on the size of the monitor plus its pixel setting.The typical resolution of a PC monitor is about 96 dpi, of a Mac OS monitor 72 dpi. Understanding monitorresolution helps explain why the display size of an image on-screen often differs from its printed size.
Vector graphics
Drawing programs such as Adobe Illustrator create vector graphics, made of lines and curves defined bymathematical objects called vectors. Vectors describe graphics according to their geometric characteristics.For example, a bicycle tire in a vector graphic is made up of a mathematical definition of a circle drawn witha certain radius, set at a specific location, and filled with a specific color. You can move, resize, or change thecolor of the tire without losing the quality of the graphic.
A vector graphic is resolution independent—that is, it can be scaled to any size and printed on any outputdevice at any resolution without losing its detail or clarity. As a result, vector graphics are the best choice fortype (especially small type) and bold graphics that must retain crisp lines especially when scaled to varioussizes—for example, logos.
Because computer monitors represent images by displaying them on a grid, both vector and bitmap imagesare displayed as pixels on-screen.
Common Web Graphic Formats:
Encapsulated PostScript (EPS)
The EPS file format is used to transfer post-script language artwork between applications and is supportedby most illustration and page layout programs. Typically, EPS files represent single illustrations or tables thatare placed onto a host page, but an EPS file can also represent a complete page.
Because EPS files are based on the PostScript language they can contain both vector and bitmap graphics.
Flash (SWF) format
The Flash format is a version of the Macromedia Flash Player vector-based graphics format for interactive,animated Web graphics. Students can export artwork to the Flash format for use in Web design, and viewthe artwork in any browser equipped with the Macromedia Flash Player plug-in.

Saving, Exporting and Printing Artwork 4
Adobe Web Project ILLUSTRATOR LESSON 5
Graphics Interchange Format (GIF)
GIF is a popular Web graphic format. GIFs contain a maximum of 256 colors. This format offers good imagecompression, but if the image contains more than 256 colors quality is significantly reduced. GIFs can alsocontain a transparent area and multiple frames for animation.
Images compressed with lossless compression normally lose no image quality. A GIF compresses byscanning horizontally across a row of pixels, finding solid areas of color, and then abbreviating identicalareas of pixels in the file. GIFs are only lossless if the image contains very few colors, as line or geometric artusually does.
Therefore, images with areas of solid color compress best when exported as GIFs. A GIF is usually ideal forcartoon-like graphics, logos, graphics with transparent areas, and animations. Vector objects are often savedas GIFs.
Joint Photographic Experts Group (JPEG)
JPEG was developed by the Joint Photographic Experts Group specifically for photographic or high-colorimages. JPEG supports millions of colors (24-bit), whereas GIF supports only 256 colors. JPEG alwaysproduces higher quality for photographic image data. JPEG is a lossy format, which means that some imagedata is discarded when it is compressed, reducing the quality of the final file.
However, image data can sometimes be discarded with little or no noticeable difference in quality. Whenexporting a JPEG, use the Quality slider pop-up menu in the Optimize panel to control how much quality islost when compressing the file.
A high percentage setting maintains image quality but compresses less, producing larger files. A lowpercentage setting yields a small file, but produces a lower-quality image.
Use the 2-Up and 4-Up previews to test and compare the appearance and estimated file size with differentQuality settings for an exported JPEG.
The JPEG format is best for scanned photographs, images using textures, images with gradient colortransitions, and any images that require more than 256 colors.
Portable Document Format (PDF)
The PDF format is used by Adobe Acrobat®, Adobe's electronic publishing software for Macintosh, Windows,UNIX, and DOS. You can view PDF files using the Acrobat Reader™ software included on your AdobeIllustrator CD.
PDF can represent both vector and bitmap graphics. PDF pages are identical to PostScript® pages, but PDFfiles can also contain electronic document search and navigation features. PDF files, for example, cancontain hypertext links and an electronic table of contents.

Saving, Exporting and Printing Artwork 5
Adobe Web Project ILLUSTRATOR LESSON 5
Because Illustrator can open a PDF file, you can use the vector artwork or bitmap images from any PDF file inan Illustrator file.
Students can also use Illustrator to make changes to individual PDF pages. To modify a page within a PDFfile, open the PDF file, select the page to modify, make changes, and save the modified PDF file. Themodified page is restored to its original position in the PDF file.
Portable Network Graphic (PNG)
PNG is a versatile Web graphic format. However, not all Web browsers can take full advantage of PNGcharacteristics without using plug-ins. Therefore it is not a common file format for the Web. A PNG cansupport up to 32-bit color, can contain transparency or an alpha channel, and can be progressive.
PNG compression is lossless, even in high color depths. It compresses across rows and columns of pixels. Forhigh-color images, JPEG produces a superior quality. PNG allows transparency with 32-bit color images, butthe image size is large.
The PNG format is best for creating complex live transparency, high-color graphics, and better compressedlow-color graphics.
Scalable Vector Graphics (SVG) and Scalable Vector Graphics Compressed (SVGZ) formats
The Scalable Vector Graphics formats are a World Wide Web Consortium (W3C) specification for a standard,two-dimensional vector graphics language for the Web. SVG works well with HTML and JavaScript, givingWeb designers creative control in designing an interactive and dynamic Web experience. The scalablevector-graphic plug-in is required.
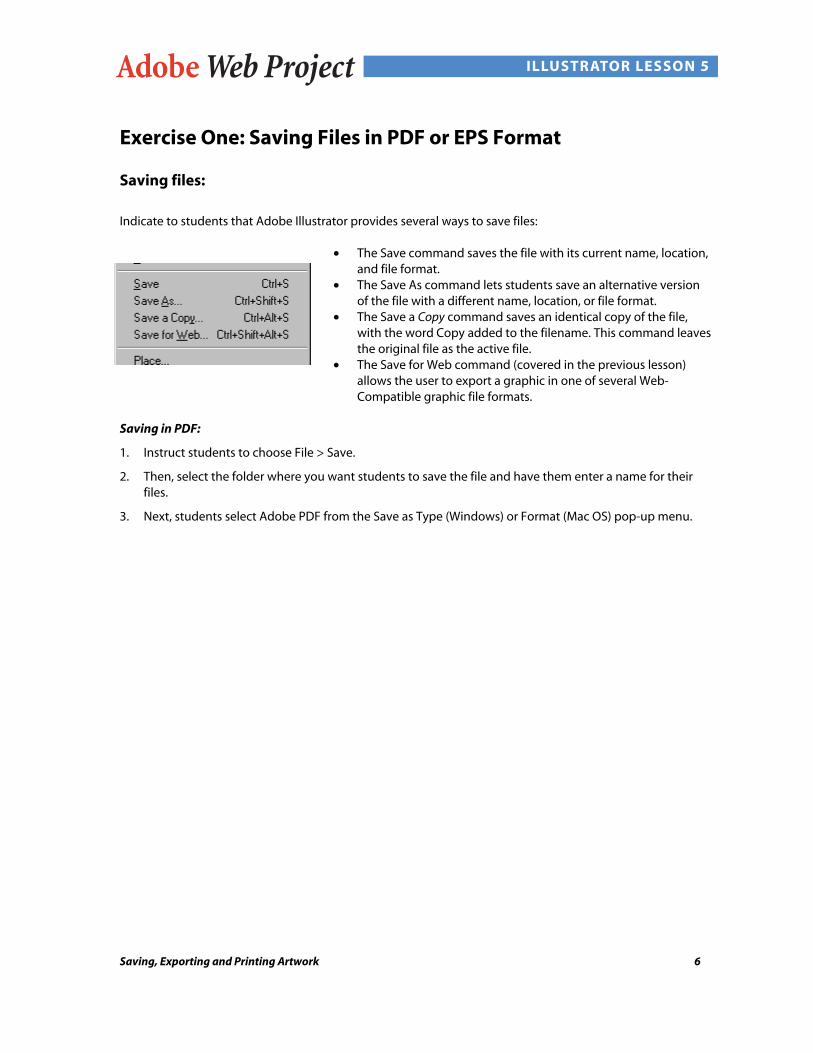
Saving, Exporting and Printing Artwork 6
Adobe Web Project ILLUSTRATOR LESSON 5
Exercise One: Saving Files in PDF or EPS Format
Saving files:
Indicate to students that Adobe Illustrator provides several ways to save files:
• The Save command saves the file with its current name, location,and file format.
• The Save As command lets students save an alternative versionof the file with a different name, location, or file format.
• The Save a Copy command saves an identical copy of the file,with the word Copy added to the filename. This command leavesthe original file as the active file.
• The Save for Web command (covered in the previous lesson)allows the user to export a graphic in one of several Web-Compatible graphic file formats.
Saving in PDF:
1. Instruct students to choose File > Save.
2. Then, select the folder where you want students to save the file and have them enter a name for theirfiles.
3. Next, students select Adobe PDF from the Save as Type (Windows) or Format (Mac OS) pop-up menu.

Saving, Exporting and Printing Artwork 7
Adobe Web Project ILLUSTRATOR LESSON 5
4. There are options that you will want to explain to students:
In the Adobe PDF Format Options dialog box, students may select from the following options in the Options
Set menu:
• Select the Default option to use the default PDF general settings and compression settings.• Select either Acrobat 5.0 or 4.0 in the File Compatibility panel. Transparent artwork will be preserved
only when saved in the Acrobat 5.0 format.• Select Preserve Illustrator Editing Capabilities to export the file in a Acrobat PDF format that allows you
to reopen and edit the file in Adobe Illustrator.• Select the Embed All Fonts option to save the fonts used in the file with the saved file. (Protected
Japanese fonts cannot be embedded in the file.)• Select the Subset Fonts When Less Than _ % of the Characters are Used option to minimize the PDF file
size by embedding only those characters of the font that are used in the document—that is, a subset ofthe font. This option is available when you select Embed All Fonts. Type the character threshold thatdetermines when a font subset is created. If the percentage of characters used in the document exceedsthis setting, then the entire font is embedded in the file rather than a subset of the font.
• Select the Embed ICC profile option to embed a color profile into the saved file. The color profile isdetermined in the Color Settings dialog box. This embedded color profile is then applied to the filewhen the file is reopened in Adobe Illustrator.
• Select the Generate Thumbnails option to save a thumbnail image of the artwork with the saved file.
➤ When working with images optimized for the Web, select Screen Optimized to use default settingsappropriate for use on the Web. When selecting Screen Optimized, the file is automatically converted to theRGB color mode .

Saving, Exporting and Printing Artwork 8
Adobe Web Project ILLUSTRATOR LESSON 5
Exercise Two: Exporting Artwork
Exporting artwork:
To use an Adobe Illustrator file in another application, students must save or export their files in a graphicsfile format that the other application can use.
Instruct students that if they want to save a file as an Illustrator file (AI), an Illustrator EPS file, or a PDF file,they use the Save, Save As, or Save a Copy command. To save files in an optimized Web format (JPEG, GIF, orPNG), use the Save for Web command. All other file formats are exported using the Export command.
In order to export an Illustrator file to another file format:
1. Student choose File > Export.
2. Students select the folder where they want to save thefile, and type a name for the file in the Name text box.
3. Students choose a file format from the Save as Type(Windows®) or Format (Mac OS) pop-up menu.
4. CLICK! Save (Windows) or Export (Mac OS).

Saving, Exporting and Printing Artwork 9
Adobe Web Project ILLUSTRATOR LESSON 5
Exercise Three: Printing
Improving printer performance:
➤ Students should be informed of the following: Objects that contain overly complex paths are a main causeof printing problems. A path's complexity is determined by the number of line segments and anchor points itcontains. The more complex the path, the longer it takes to print. Before printing, make sure that pathscontain only the necessary anchor points.
Here are some suggestions for your students to simplify paths:
• Use the pen tool instead of the pencil tool, when possible. Drawings made with the pen tool typicallycontain fewer points than those created with the pencil tool.
• Use the Object > Path > Simplify command to simplify the path.• Remove unnecessary points. Delete stray points. Change the output resolution.• Increase the flatness of curves.• Split overly complex paths.
Printing a file:
1. Instruct students to choose File >Print.
➤ The number of pages thatIllustrator will be printingdetermined by the View options selected in the Artboard panel of the Document Setup dialog box. If the SingleFull Page option in the Document Setup dialog box is selected, a single page prints. If any other View option isselected, for example, the Tile Full Pages option, you can specify a page or a range of pages to print byentering beginning and ending page numbers in the From and To text boxes.
2. Students need to indicate which pages they want printed.
➤ If fonts print diagonally and do not show the correcttypeface, the fonts are not stored on the printer. Forcing thefonts to download allows you to print them (with reduced printquality). For better print quality, install the fonts on the printer.
3. CLICK! OK (Windows) or Print (Mac OS).
➤ Important: Adobe Illustrator does not support PDF Writer format; if you attempt to print to PDF Writer youmay experience delays or errors in printing.

Saving, Exporting and Printing Artwork 10
Adobe Web Project ILLUSTRATOR LESSON 5
Lesson Five: Check for Understanding…
Review questions…
1. What is a common way to save artwork files so that they can be shared with other applications?
2. What are the commands used to save a file as an Illustrator file, an Illustrator EPS file, or a PDF file?
3. What is the command used to save files in an optimized Web format (JPEG, GIF, or PNG)?
4. What is the command used to export to all other file formats?
5. What is a main cause of printer problems in printing artwork?
➤ Note: For this Lesson, teachers may wish to include questions concerning common Web graphic formatsand/or graphic file formats.
Review answers…
1. A common way of sharing Illustrator artwork is to save the artwork as an EPS file. Virtually all pagelayout, word processing, and graphic applications accept imported EPS files.
2. Students should use the Save, Save As, or Save a Copy command.
3. Save for Web command.
4. File > Export.
5. Objects that contain overly complex paths are the main cause of printing problems.
Additional Adobe Resources on the Web
Visit the Adobe in Education Web site at http://www.adobe.com/education for additional resources:
• Instructional resources—online tutorials, books, tech guides, and more:http://www.adobe.com/education/educators/main.html
• Complete product information: http://www.adobe.com/education/products/main.html• Training opportunities: http://www.adobe.com/education/educators/training.html
Adobe, the Adobe logo, Acrobat, Acrobat Reader, Classroom in a Book, Illustrator, ImageReady, LiveMotion, Photoshop, and PostScriptare either registered trademarks or trademarks of Adobe Systems Incorporated in the United States and/or other countries. Mac is atrademark of Apple Computer, Inc., registered in the United States and other countries. Microsoft, Windows NT, and Windows are eitherregistered trademarks or trademarks of Microsoft Corporation in the United States and/or other countries. All other trademarks are theproperty of their respective owners.
© 2001 Adobe Systems Incorporated. All rights reserved.

The Movie Project Begins… 1
Adobe Web Project ILLUSTRATOR THE MOVIE PROJECT
The Movie Project Begins…Almost every commercial movie has a marketing campaign that starts publicly with the poster/playbill. You arethe Director of the Marketing Team working for a large Hollywood studio (“Palisades Pictures”). As the Director, ithas fallen on your shoulders to design and create the advertising poster/playbill for the soon-to-be released filmdescribed below. The head of the studio has made it clear that she expects an outstanding advertising campaigncentered on your poster/playbill. In short, the commercial success of this film is YOUR responsibility.
Here is an example of the vital statistics for the film you are working on (you may create your own with yourteacher’s guidance and permission):
Working Title: Once Upon a Day in Wonderland
Starring: John Revath, Charlize Sheron, Gregg German, and Christine Grant
Directed by: Tim O'Connors
Assumed Rating: PG-13 / PG
Final Cut Running Time: 160 minutes (two hours, forty minutes)
Synopsis of the Script: Tom Jeever's rather creepy mission is to create a new virtual world called Wonderland.But others are out to stop this new virtual paradise. When Tom meets Christine Grant, another virtual realityprogrammer working for the enemy, all madness breaks loose. Will the two live “happily ever after” in charmedbliss? Or will Christine’s deep, dark secret throw a wrench into the works?
Using the above example (or your own vital statistics) and the information learned from your Illustrator lessons,you will create one or more movie posters to advertise Palisades Pictures’ new film. Of course, your poster will becreated on the computer you use employing Illustrator as your tool. The studio has high hopes for “Once Upon aDay in Wonderland” (or your title). As the Director of Marketing, you are to make those hopes come true.
Your teacher will tell you the time/class periods you have to create your poster.
Assignment: Design a poster to advertise “Once Upon a Day in Wonderland” (or your title).
Necessary procedures:
1. Use Illustrator to create the desired graphic elements for the poster.
2. Use the Internet to locate other resources, if needed, to use in your poster.
3. Use Illustrator to lay out the poster using color, text, and graphics.
4. Save your poster as a PDF file and as a JPG file.
5. Print your poster and turn it in to your teacher.

The Movie Project Begins… 2
Adobe Web Project ILLUSTRATOR THE MOVIE PROJECT
Sample movie posters that can be created using Illustrator:
Adobe, the Adobe logo, Acrobat, Acrobat Reader, Classroom in a Book, Illustrator, ImageReady, LiveMotion, Photoshop, and PostScript are eitherregistered trademarks or trademarks of Adobe Systems Incorporated in the United States and/or other countries. Mac is a trademark of AppleComputer, Inc., registered in the United States and other countries. Microsoft, Windows NT and Windows are either registered trademarks ortrademarks of Microsoft Corporation in the United States and/or other countries. All other trademarks are the property of their respective owners.
© 2001 Adobe Systems Incorporated. All rights reserved.

Illustrator Toolbox Overview 1
Adobe Web Project ILLUSTRATOR TOOLBOX OVERVIEW
The selection tool(V) selects entireobjects.
The direct-selection tool(A) selectspoints or pathsegmentswithin objects.
The group-selection tool(Shift+A) selectsobjects andgroups withingroups.
The lasso tool(Y) selects entireobjects.
The direct-selectlasso tool (Q)selects points orpath segmentswithin objects.
The rotate tool(R) rotatesobjects around afixed point.
The twirl tool(Shift+R) twirlsobjects around afixed point.
The scale tool(S) resizesobjects arounda fixed point.
The reshape tool(Shift+S)smoothes orchanges a pathwhile retainingthe path's overallshape.
The reflect tool(O) flips objectsover a fixed axis.
The shear tool(Shift+O) skewsobjects around afixed point.
The pen tool (P)draws straightand curved linesto create objects.
The add-anchor-point tool (+) addsanchor points topaths.
The delete-anchor-pointtool (-) deletesanchor pointsfrom paths.
The convert-anchor- pointtool (Shift+P)changes smoothpoints to cornerpoints and viceversa.
The type tool (T)createsindividual typeand typecontainers andlets you enterand edit type.
The area typetool (Shift+T)changes closedpaths to typecontainers andlets you enter andedit type withinthem.
The path-typetool (Shift+T)changes paths totype paths, andlets you enter andedit type onthem.
The vertical typetool (Shift+T)creates verticaltype and verticaltype containersand lets you enterand edit verticaltype.
The verticalarea-type tool(Shift+T)changes closedpaths to verticaltype containersand lets youenter and edittype withinthem.
The verticalpath-type tool(Shift+T)changes paths tovertical typepaths and letsyou enter andedit type onthem.
The ellipse tool(L) draws circlesand ovals.
The polygon tool(Shift+L) drawsregular, multi-sided shapes.
The star tool(Shift+L) drawsdifferent sorts ofstars.

Illustrator Toolbox Overview 2
Adobe Web Project ILLUSTRATOR TOOLBOX OVERVIEW
The spiral tool(Shift+L) drawsclockwise andcounterclockwisespirals.
The rectangletool (M) drawssquares andrectangles.
The rounded-rectangle tool(Shift+M) drawssquares andrectangles withrounded corners.
The pencil tool(N) draws andedits freehandlines.
The paintbrushtool (B) drawsfreehand andcalligraphic lines,as well as art andpatterns on paths.
The scissors tool(C) splits paths.
The knife tool(Shift+C) slicesobjects and paths.
The measuretool (Shift+H)measures thedistancebetween twopoints.
The eyedroppertool (I) samplespaint or typeattributes fromobjects.
The paintbucket tool (K)fills objects withthe current paintor typeattributes.
The gradientmesh tool (U)createsmulticoloredobjects andapplies a mesh foradjusting colorshading.
The gradienttool (G) adjuststhe beginningand endingpoints and angleof gradientswithin objects.
The auto tracetool (Shift+W)traces the outlinesof objects inplaced images.
The blend tool(W) creates ablend betweenthe color andshape ofmultipleobjects.
The page tool(Shift+H) adjuststhe page grid tocontrol whereartwork appearson the printedpage.
The columngraph tool (J)positionscolumnsvertically.
The stackedcolumn graphtool (Shift+J)stacks columns ontop of oneanother.
The bar graphtool (Shift+J)positionscolumnshorizontally.
The stacked bargraph tool(Shift+J) stackscolumns andpositions themhorizontally.
The line graphtool (Shift+J)shows the trendof one or moresubjects overtime.
The area graphtool (Shift+J)emphasizes totalsas well aschanges invalues.
The scattergraph tool(Shift+J) plotsdata as pairedsets of x and ycoordinates.
The pie graphtool (Shift+J)creates a circlegraph withwedges showingrelativepercentages ofthe comparedvalues.
The radar graphtool (Shift+J)uses a circle tocompare sets ofvalues at givenpoints in time orin particularcategories.

Illustrator Toolbox Overview 3
Adobe Web Project ILLUSTRATOR TOOLBOX OVERVIEW
The hand tool (H)moves the AdobeIllustrator®artboard withinthe illustrationwindow.
The zoom tool(Z) increasesand decreasesthe magnify-cation in theillustrationwindow.
The freetransform tool(E) scales, rotates,or skews aselection.
The smooth tool(Shift+N)removes excessanchor points tosmooth a pathwhile retainingthe overallshape.
The erase tool(Shift+N) erasespaths and anchorpoints from theartwork.
Adobe, the Adobe logo, Acrobat, Acrobat Reader, Classroom in a Book, Illustrator, ImageReady, LiveMotion, Photoshop, and PostScript are either registeredtrademarks or trademarks of Adobe Systems Incorporated in the United States and/or other countries. Mac is a trademark of Apple Computer, Inc., registered inthe United States and other countries. Microsoft, Windows NT, and Windows are either registered trademarks or trademarks of Microsoft Corporation in the UnitedStates and/or other countries. All other trademarks are the property of their respective owners.
© 2001 Adobe Systems Incorporated. All rights reserved.

Using the Pen Tool 1
Adobe Web Project ILLUSTRATOR USING THE PEN TOOL
Using the Pen Tool
Drawing with the pen tool
Use the pen tool to draw a freeform path. The pen tool lets you create straight lines and smooth, flowing curveswith great precision.
A path is made up of one or more straight or curved segments. The beginning and end of each segment aremarked by control points, which work like pins holding wire in place. You change the shape of a path by editingits control points.
A path is either open, like an arc, or closed, like a circle. For an open path, the starting and ending control pointsfor the path are called endpoints. You can control curves by dragging the direction points at the end of directionlines that appear at control points that form curves.
A. Selected endpoint B. Selected control point C. Curved path segment D. Direction line E. Direction point
Paths can have two kinds of control points--corner points and smooth points. At a corner point, a path abruptlychanges direction. At a smooth point, path segments are connected as a continuous curve. You can draw a pathusing any combination of corner and smooth points. If you draw the wrong kind of point, you can alwayschange it.
A. Four corner points B. Same point positions using smooth points C. Same point positions combining cornerand smooth points
A corner point can connect any two straight or curved segments, while a smooth point always connects twocurved segments.

Using the Pen Tool 2
Adobe Web Project ILLUSTRATOR USING THE PEN TOOL
A corner point can connect both straight segments and curved segments.
Note: The default fill property of any line drawing is Fill, which fills in the area between path points to createsolid shapes. If you want to make an unfilled line drawing, choose Window > Properties and click Outline. Usethe slider to determine the width of the line.
Drawing straight segments
The simplest path you can draw with the pen tool is a straight line, made by clicking the pen tool to create twocontrol points. By continuing to click, you create a path made of straight line segments connected by cornerpoints.
To draw straight segments with the pen tool:
1. Select the pen tool ( ).
2. Position the tip of the pen point where you want the straight segment to begin, and click to define the firstcontrol point (do not drag). The control point remains selected (solid) until you add the next point.
Note: The first segment you draw will not be visible until you click a second control point. Also, if direction linesappear, you have accidentally dragged the pen tool; choose Edit > Undo and click again.
3. Click again where you want the segment to end. This creates another control point.
4. Continue clicking the pen tool to create additional straight segments.The last control point you add appears as a solid square, indicating that it is selected. Existing control pointsbecome deselected as you add more control points.
5. Complete the path by doing one of the following:
• To close a path, position the pen pointer over the first (hollow) control point. A small loop appears nextto the pen tool ( ) when it is positioned correctly. Click to close the path.
• To leave the path open, Ctrl-click (Windows®) or Command-click (Mac OS) anywhere away from allobjects, or choose Edit > Deselect All, or select a different tool in the toolbox.
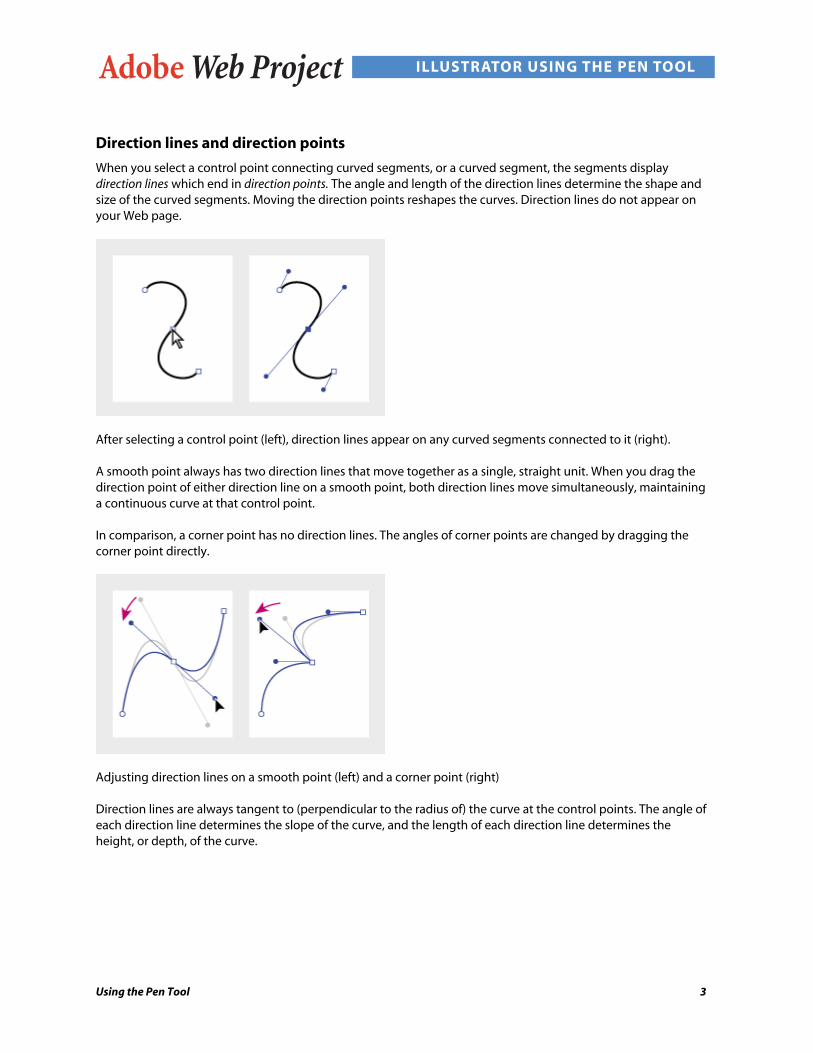
Using the Pen Tool 3
Adobe Web Project ILLUSTRATOR USING THE PEN TOOL
Direction lines and direction points
When you select a control point connecting curved segments, or a curved segment, the segments displaydirection lines which end in direction points. The angle and length of the direction lines determine the shape andsize of the curved segments. Moving the direction points reshapes the curves. Direction lines do not appear onyour Web page.
After selecting a control point (left), direction lines appear on any curved segments connected to it (right).
A smooth point always has two direction lines that move together as a single, straight unit. When you drag thedirection point of either direction line on a smooth point, both direction lines move simultaneously, maintaininga continuous curve at that control point.
In comparison, a corner point has no direction lines. The angles of corner points are changed by dragging thecorner point directly.
Adjusting direction lines on a smooth point (left) and a corner point (right)
Direction lines are always tangent to (perpendicular to the radius of) the curve at the control points. The angle ofeach direction line determines the slope of the curve, and the length of each direction line determines theheight, or depth, of the curve.

Using the Pen Tool 4
Adobe Web Project ILLUSTRATOR USING THE PEN TOOL
Moving and resizing direction lines changes the slopes of curves.
Drawing curved segments
You create curves by using the pen tool to add control points where a curve changes direction, and to drag thedirection points that shape the curves.
Curves are easier to edit and your system can display them faster if you draw them using as few control points aspossible. Using too many points can also introduce unwanted bumps in a curve. Instead, draw widely spacedcontrol points, and practice shaping curves by adjusting the length and angles of the direction lines.
To draw a curved segment:
1. Select the pen tool ( ).
2. Position the pen tip where you want the curve to begin. Hold down the mouse button. The first controlpoint appears.
3. Drag to set the slope of the curve segment you are creating. In general, extend the direction line about onethird of the distance to the next control point you plan to draw.
A. Positioning pen tool B. Starting to drag (mouse button pressed) C. Dragging to extend direction lines

Using the Pen Tool 5
Adobe Web Project ILLUSTRATOR USING THE PEN TOOL
4. Release the mouse button.
Note: The first segment will not be visible until you draw the second control point.
5. Position the pen tool where you want the curve segment to end, and then do one of the following:
• To create a "C"-shaped curve, drag in a direction opposite to the previous direction line.• To create an "S"-shaped curve, drag in the same direction as the previous direction line.
A. Starting to drag second smooth point B. Dragging away from previous direction line, creating a "C" curveC. Result after releasing mouse button
A. Starting to drag new smooth point B. Dragging in same -direction as previous direction line, creating an "S"curve C. Result after releasing mouse button
6. Continue dragging the pen tool from different locations to create additional smooth points.
7. Complete the path by doing one of the following:
• To close the path, position the pen tool over the first (hollow) control point. A small loop appears nextto the pen tip when it is positioned correctly. Click or drag to close the path.

Using the Pen Tool 6
Adobe Web Project ILLUSTRATOR USING THE PEN TOOL
• To leave the path open, Ctrl-click (Windows) or Command-click (Mac OS) anywhere away from allobjects, or choose Edit > Deselect All, or select a different tool in the toolbox.
Adobe, the Adobe logo, Acrobat, Acrobat Reader, Classroom in a Book, Illustrator, ImageReady, LiveMotion, Photoshop, and PostScript areeither registered trademarks or trademarks of Adobe Systems Incorporated in the United States and/or other countries. Mac is a trademark ofApple Computer, Inc., registered in the United States and other countries. Microsoft, Windows NT and Windows are either registeredtrademarks or trademarks of Microsoft Corporation in the United States and/or other countries. All other trademarks are the property of theirrespective owners.
© 2001 Adobe Systems Incorporated. All rights reserved.
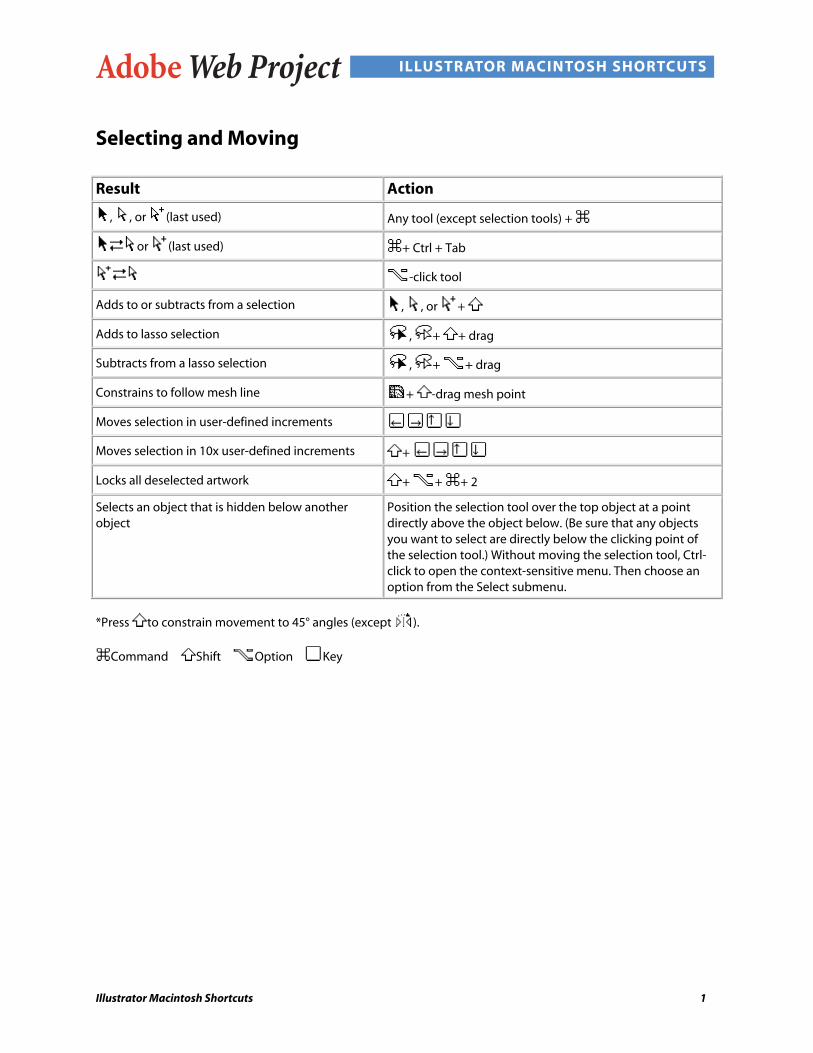
Illustrator Macintosh Shortcuts 1
Adobe Web Project ILLUSTRATOR MACINTOSH SHORTCUTS
Selecting and Moving
Result Action
, , or (last used) Any tool (except selection tools) +
or (last used) + Ctrl + Tab
-click tool
Adds to or subtracts from a selection , , or +
Adds to lasso selection , + + drag
Subtracts from a lasso selection , + + drag
Constrains to follow mesh line + -drag mesh point
Moves selection in user-defined increments
Moves selection in 10x user-defined increments +
Locks all deselected artwork + + + 2
Selects an object that is hidden below anotherobject
Position the selection tool over the top object at a pointdirectly above the object below. (Be sure that any objectsyou want to select are directly below the clicking point ofthe selection tool.) Without moving the selection tool, Ctrl-click to open the context-sensitive menu. Then choose anoption from the Select submenu.
*Press to constrain movement to 45° angles (except ).
Command Shift Option Key

Illustrator Macintosh Shortcuts 2
Adobe Web Project ILLUSTRATOR MACINTOSH SHORTCUTS
Painting and Transforming
Result Action
Switch between the paint bucket and theeyedropper
Samples intermediate color from gradient +
Samples style and appends appearance ofcurrently selected item
+ + -click
Sets origin point and opens dialog box , , , or + -click
Duplicates and transforms selection , , , or + -drag
Transforms patterns (independent of object) , , , , or + ~ -drag
Rotates selection -click and then drag anywhere outside of bounding box
Skews selection (after mouse down only)+ -drag handles ( + + -drag handles to
skew from center)
Changes perspective (after mouse down only) + + + -drag corner handle
Resizes selection proportionally or + -drag bounding box handle
Resizes selection from center or + -drag bounding box handle
Command Shift Option Key

Illustrator Macintosh Shortcuts 3
Adobe Web Project ILLUSTRATOR MACINTOSH SHORTCUTS
Shapes
Result Action
Sets center point and opens dialog box Shape tools + click
Constrains proportion , , or + -drag
Constrains orientation , , or + -drag
Repositions object while it is being drawn , , , , , or + spacebar-drag while drawing
Changes to minimum/maximum radius +
Maintains inner radius + -drag
Adds/subtracts sides, corner radius, star points, orspiral coils , , , or +
Adds/subtracts coils while increasing spiral length + -drag
Changes decay + -drag
Draws circle, polygon, rectangle, roundedrectangle, or star from center
, , , , or + -drag ( + -drag to
constrain from center)
Command Shift Option Key

Illustrator Macintosh Shortcuts 4
Adobe Web Project ILLUSTRATOR MACINTOSH SHORTCUTS
Path Editing
Result Action
(convert-anchor-point tool) +
+
Edits existing path -drag (while drawing over or near selected path)
Closes path over start point Click start point with the pen
(smooth tool) +
Moves anchor point and handles while drawing + spacebar
Creates closed path while drawing or + -drag
Connects path to end of another path + -drag
Cuts along straight line +
Cuts at 45° /90° increments + +
Moves mesh point along path + -drag mesh point
Adds mesh point using existing object color + -click path
Removes mesh point + -click mesh point
Command Shift Option Key

Illustrator Macintosh Shortcuts 5
Adobe Web Project ILLUSTRATOR MACINTOSH SHORTCUTS
Viewing
Result Action
Fits imageable area in window Double-click
100% magnification Double-click
spacebar (when not in text focus)
+ spacebar
+ + spacebar or +
Adjusts zoom marquee position Drag ; then press spacebar and continue dragging
Hides unselected artwork + + + 3
Toggles between horizontal and vertical guide -drag guide
Releases guide + -double-click guide
Command Shift Option Key

Illustrator Macintosh Shortcuts 6
Adobe Web Project ILLUSTRATOR MACINTOSH SHORTCUTS
Type
Result Action
Aligns left, right, or center + + L, R, or C
Justifies + + J
Inserts soft return + Return
Highlights kerning + + K
Resets horizontal scale to 100% + + X
Resets tracking/kerning to 0 + + Q
Increases/decreases point size* + + > or <
Increases/decreases leading* +
Sets leading to the font size Double-click the leading icon in the Character palette
Increases/decreases kerning/tracking* +
Increases/decreases baseline shift* + +
Selects word, paragraph Double-click word, triple-click word
Moves pointer left/right one word or up/down oneparagraph
+ or **
Switches between type and vertical type, area typeand vertical area-type, and path type and verticalpath-type tools
Toggles between area type and type, path typeand area type, and vertical path-type and verticalarea-type tools
+ click
*Amount is set in File > Preferences > Type & Auto Tracing.
**Press Shift to select or extend existing selection.
Command Shift Option Key
Adobe, the Adobe logo, Acrobat, Acrobat Reader, Classroom in a Book, Illustrator, ImageReady, LiveMotion, Photoshop, and PostScript areeither registered trademarks or trademarks of Adobe Systems Incorporated in the United States and/or other countries. Mac is a trademark ofApple Computer, Inc., registered in the United States and other countries. Microsoft, Windows NT, and Windows are either registeredtrademarks or trademarks of Microsoft Corporation in the United States and/or other countries. All other trademarks are the property of theirrespective owners.
© 2001 Adobe Systems Incorporated. All rights reserved.

Illustrator Windows Shortcuts 1
Adobe Web Project ILLUSTRATOR WINDOWS SHORTCUTS
Selecting and Moving
Result Action
, , or (last used) Any tool (except selection tools) + Ctrl
or (last used) Ctrl + Tab
Alt-click tool
Adds to or subtracts from a selection , , or +
Adds to lasso selection , + + drag
Subtracts from a lasso selection , + Alt + drag
Constrains to follow mesh line + -drag mesh point
Moves selection in user-defined increments
Moves selection in 10x user-defined increments +
Locks all deselected artwork + Alt + Ctrl + 2
Selects an object that is hidden below anotherobject
Position the selection tool over the top object at a pointdirectly above the object below. (Be sure that any objectsyou want to select are directly below the clicking point ofthe selection tool.) Without moving the selection tool,right-click to open the context-sensitive menu. Thenchoose an option from the Select submenu.
*Press to constrain movement to 45° angles (except ).
Shift Key
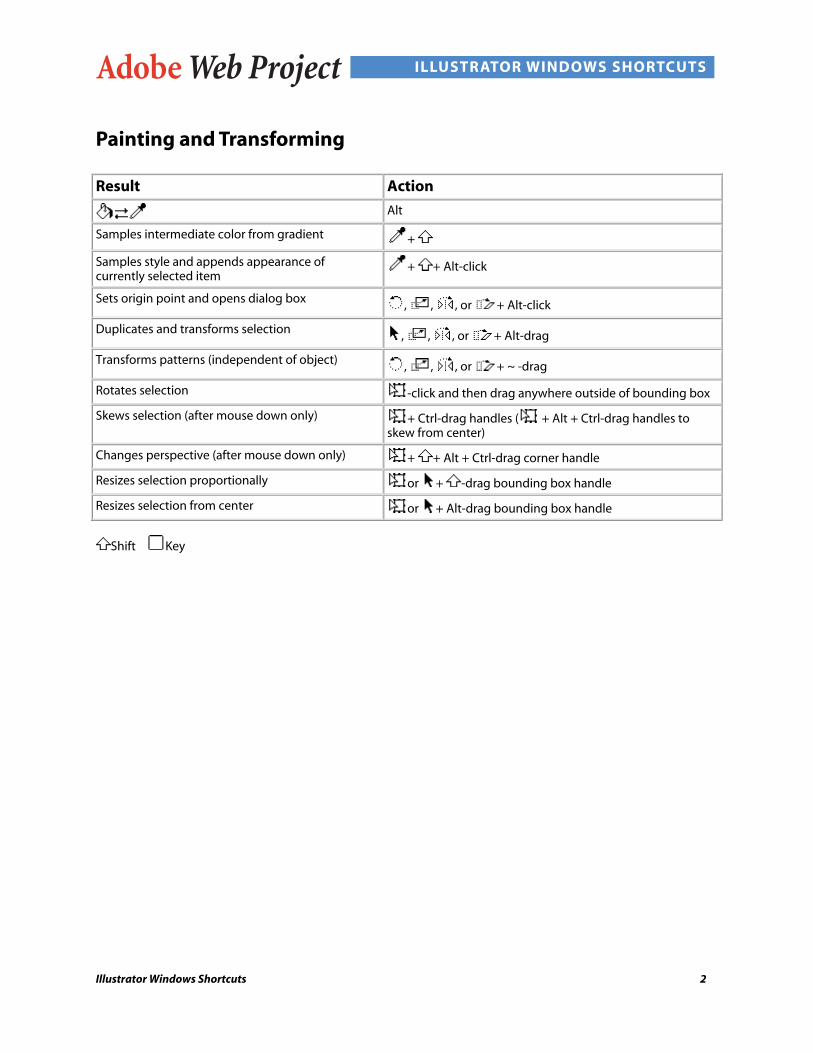
Illustrator Windows Shortcuts 2
Adobe Web Project ILLUSTRATOR WINDOWS SHORTCUTS
Painting and Transforming
Result Action
Alt
Samples intermediate color from gradient +
Samples style and appends appearance ofcurrently selected item
+ + Alt-click
Sets origin point and opens dialog box , , , or + Alt-click
Duplicates and transforms selection , , , or + Alt-drag
Transforms patterns (independent of object) , , , or + ~ -drag
Rotates selection -click and then drag anywhere outside of bounding box
Skews selection (after mouse down only) + Ctrl-drag handles ( + Alt + Ctrl-drag handles toskew from center)
Changes perspective (after mouse down only) + + Alt + Ctrl-drag corner handle
Resizes selection proportionally or + -drag bounding box handle
Resizes selection from center or + Alt-drag bounding box handle
Shift Key

Illustrator Windows Shortcuts 3
Adobe Web Project ILLUSTRATOR WINDOWS SHORTCUTS
Shapes
Result Action
Sets center point and opens dialog box Shape tools + click
Constrains proportion , , or + -drag
Constrains orientation , , or + -drag
Repositions object while it is being drawn , , , , , or + spacebar-drag while drawing
Changes to minimum/maximum radius +
Maintains inner radius + Ctrl-drag
Adds/subtracts sides, corner radius, star points, orspiral coils , , , or +
Adds/subtracts coils while increasingspiral length
+ Alt-drag
Changes decay + Ctrl-drag
Draws circle, polygon, rectangle, roundedrectangle, or star from center
, , , , or + Alt-drag ( + Alt-drag to constrainfrom center)
Shift Key

Illustrator Windows Shortcuts 4
Adobe Web Project ILLUSTRATOR WINDOWS SHORTCUTS
Path Editing
Result Action
(convert-anchor-point tool) + Alt
Alt
+ Alt
Edits existing path -drag (while drawing over or near selected path)
Closes path over start point Click start point with the pen
(smooth tool) + Alt
Moves anchor point and handles while drawing + spacebar
Creates closed path while drawing or + Alt-drag
Connects path to end of another path + Ctrl-drag
Cuts along straight line + Alt
Cuts at 45° /90° increments + + Alt
Moves mesh point along path + -drag mesh point
Adds mesh point using existing object color + -click path
Removes mesh point + Alt-click mesh point
Shift Key

Illustrator Windows Shortcuts 5
Adobe Web Project ILLUSTRATOR WINDOWS SHORTCUTS
Viewing
Result Action
Fits imageable area in window Double-click
100% magnification Double-click
spacebar (when not in text focus)
Ctrl + spacebar
Alt + Ctrl + spacebar or + Alt
Adjusts zoom marquee position Drag ; then press spacebar and continue dragging
Hides unselected artwork + Alt + Ctrl + 3
Toggles between horizontal and vertical guide Alt-drag guide
Releases guide + Ctrl-double-click guide
Shift Key

Illustrator Windows Shortcuts 6
Adobe Web Project ILLUSTRATOR WINDOWS SHORTCUTS
Type
Result Action
Aligns left, right, or center + Ctrl + L, R, or C
Justifies + Ctrl + J
Inserts soft return + Enter
Highlights kerning Alt + Ctrl + K
Resets horizontal scale to 100% + Ctrl + X
Resets tracking/kerning to 0 + Ctrl + Q
Increases/decreases point size* + Ctrl + > or <
Increases/decreases leading* Alt +
Sets leading to the font size Double-click the leading icon in the Character palette
Increases/decreases kerning/tracking* Alt +
Increases/decreases baseline shift* + +
Selects word, paragraph Double-click word, triple-click word
Moves pointer left/right one word or up/down oneparagraph
Ctrl + or **
Switches between type and vertical type, area typeand vertical area-type, and path type and verticalpath-type tools
Switches between area type and type, path typeand area type, and vertical path-type and verticalarea-type tools
Alt + click “T”
*Amount is set in File > Preferences > Type & Auto Tracing.
**Press Shift to select or extend existing selection.
Shift Key
Adobe, the Adobe logo, Acrobat, Acrobat Reader, Classroom in a Book, Illustrator, ImageReady, LiveMotion, Photoshop, and PostScript areeither registered trademarks or trademarks of Adobe Systems Incorporated in the United States and/or other countries. Mac is a trademark ofApple Computer, Inc., registered in the United States and other countries. Microsoft, Windows NT and Windows are either registeredtrademarks or trademarks of Microsoft Corporation in the United States and/or other countries. All other trademarks are the property of theirrespective owners.
© 2001 Adobe Systems Incorporated. All rights reserved.