Embed Size (px)
Citation preview
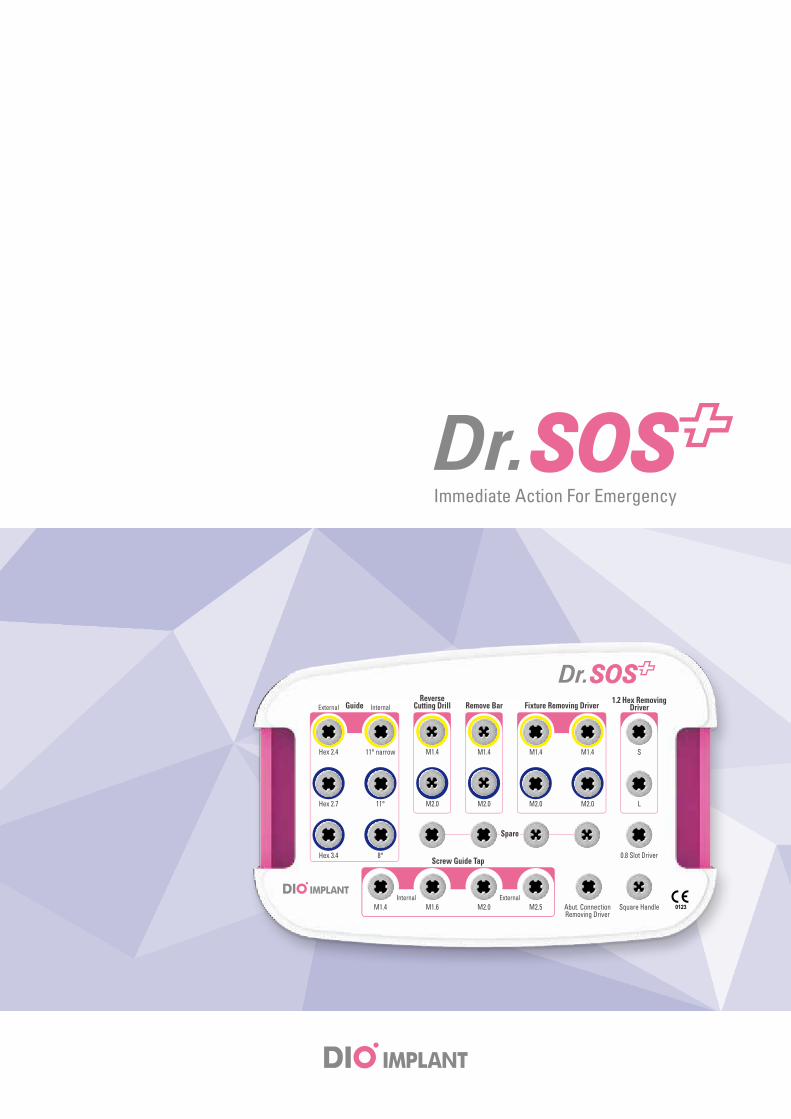
Immediate Action For Emergency
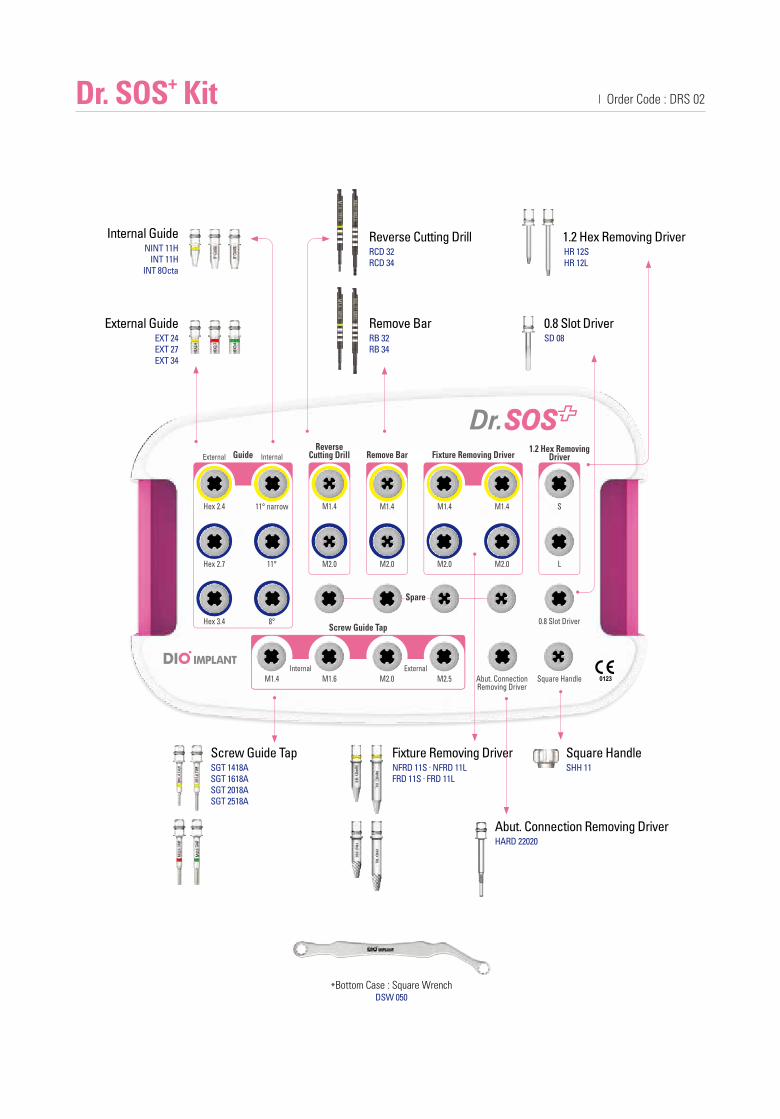
*Bottom Case : Square WrenchDSW 050
Square HandleSHH 11
Fixture Removing DriverNFRD 11S · NFRD 11LFRD 11S · FRD 11L
Abut. Connection Removing DriverHARD 22020
Screw Guide TapSGT 1418ASGT 1618ASGT 2018ASGT 2518A
Reverse Cutting DrillRCD 32RCD 34
1.2 Hex Removing DriverHR 12SHR 12L
Internal GuideNINT 11H
INT 11HINT 8Octa
Remove BarRB 32RB 34
External GuideEXT 24EXT 27EXT 34
0.8 Slot DriverSD 08

Immediate Action For Emergency
Dr.SOS+ Kit will safely and quickly solve your problems such as screw fracture, abrasion on the connection area, and wedged debris due to excessive torque during implant placement.
*Bottom Case : Square WrenchDSW 050
Square HandleSHH 11
Fixture Removing DriverNFRD 11S · NFRD 11LFRD 11S · FRD 11L
Abut. Connection Removing DriverHARD 22020
Screw Guide TapSGT 1418ASGT 1618ASGT 2018ASGT 2518A
Reverse Cutting DrillRCD 32RCD 34
1.2 Hex Removing DriverHR 12SHR 12L
Internal GuideNINT 11H
INT 11HINT 8Octa
Remove BarRB 32RB 34
External GuideEXT 24EXT 27EXT 34
0.8 Slot DriverSD 08
Dr. SOS+ Kit Order Code : DRS 02
Dr. SOS+ Product Catalog
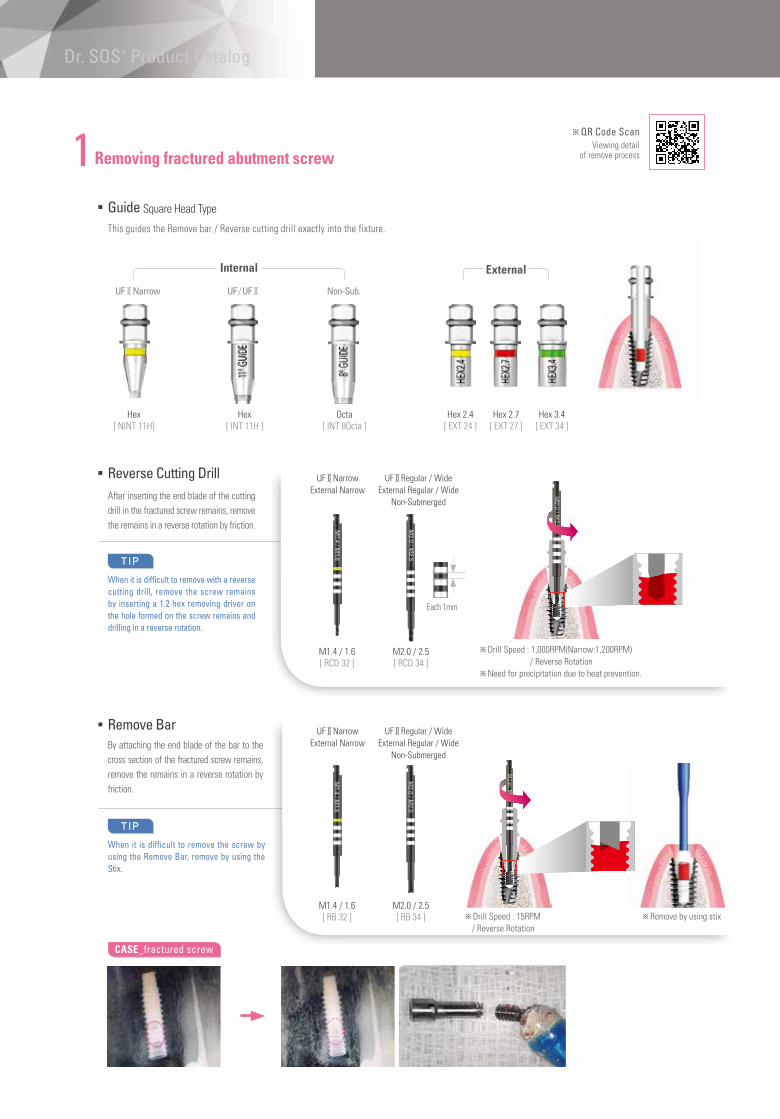
Removing fractured abutment screw1This guides the Remove bar / Reverse cutting drill exactly into the fixture.
Guide Square Head Type
Hex[ NINT 11H]
UFⅡNarrow
Hex[ INT 11H ]
UF /UFⅡ
Octa[ INT 8Octa ]
Non-Sub.
Hex 2.4[ EXT 24 ]
Hex 3.4[ EXT 34 ]
Hex 2.7[ EXT 27 ]
Internal External
After inserting the end blade of the cutting drill in the fractured screw remains, remove the remains in a reverse rotation by friction.
Reverse Cutting Drill
T IP
When it is difficult to remove with a reverse cutting drill, remove the screw remains by inserting a 1.2 hex removing driver on the hole formed on the screw remains and drilling in a reverse rotation.
M1.4 / 1.6[ RCD 32 ]
M2.0 / 2.5[ RCD 34 ]
Each 1mm
Remove BarBy attaching the end blade of the bar to the cross section of the fractured screw remains, remove the remains in a reverse rotation by friction.
T IP
When it is difficult to remove the screw by using the Remove Bar, remove by using the Stix.
※Drill Speed : 15RPM / Reverse Rotation
※Remove by using stixM1.4 / 1.6[ RB 32 ]
M2.0 / 2.5[ RB 34 ]
CASE_fractured screw
UFⅡNarrowExternal Narrow
UFⅡRegular / WideExternal Regular / Wide
Non-Submerged
UFⅡNarrowExternal Narrow
UFⅡRegular / WideExternal Regular / Wide
Non-Submerged
※QR Code Scan Viewing detail
of remove process
※Drill Speed : 1,000RPM(Narrow:1,200RPM) / Reverse Rotation※Need for precipitation due to heat prevention.
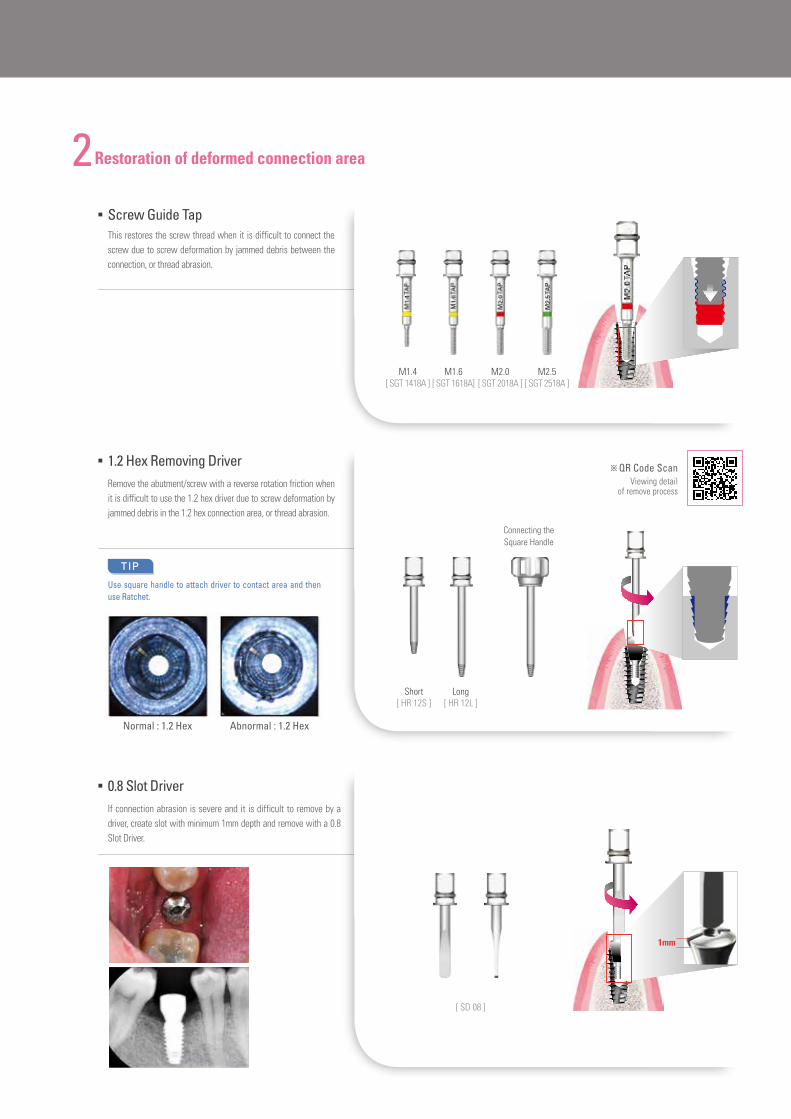
Restoration of deformed connection area2Screw Guide TapThis restores the screw thread when it is difficult to connect the screw due to screw deformation by jammed debris between the connection, or thread abrasion.
M1.4[ SGT 1418A ]
M1.6[ SGT 1618A]
M2.0[ SGT 2018A ]
M2.5[ SGT 2518A ]
1.2 Hex Removing Driver
T IP
Use square handle to attach driver to contact area and then use Ratchet.
Short[ HR 12S ]
Long[ HR 12L ]
Connecting the Square Handle
Normal : 1.2 Hex Abnormal : 1.2 Hex
Remove the abutment/screw with a reverse rotation friction when it is difficult to use the 1.2 hex driver due to screw deformation by jammed debris in the 1.2 hex connection area, or thread abrasion.
0.8 Slot Driver
[ SD 08 ]
If connection abrasion is severe and it is difficult to remove by a driver, create slot with minimum 1mm depth and remove with a 0.8 Slot Driver.
1mm
※QR Code Scan Viewing detail
of remove process
※Drill Speed : 1,000RPM(Narrow:1,200RPM) / Reverse Rotation※Need for precipitation due to heat prevention.
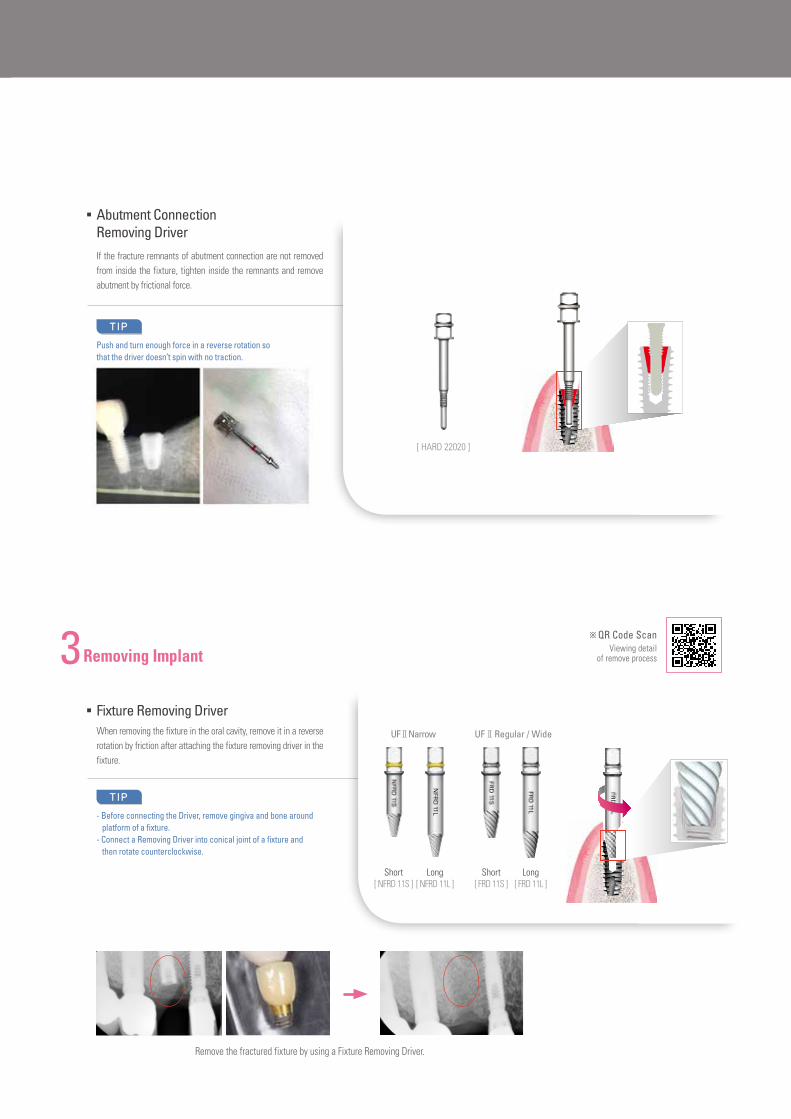
Abutment ConnectionRemoving DriverIf the fracture remnants of abutment connection are not removed from inside the fixture, tighten inside the remnants and remove abutment by frictional force.
T IP
Push and turn enough force in a reverse rotation sothat the driver doesn’t spin with no traction.
Remove the fractured fixture by using a Fixture Removing Driver.
Fixture Removing DriverWhen removing the fixture in the oral cavity, remove it in a reverse rotation by friction after attaching the fixture removing driver in the fixture.
Removing Implant3
T IP
- Before connecting the Driver, remove gingiva and bone around platform of a fixture. - Connect a Removing Driver into conical joint of a fixture and then rotate counterclockwise.
ShortNFRD 11S
LongNFRD 11L
UFⅡNarrow
Short[ FRD 11S ]
Short[ NFRD 11S ]
Long[ FRD 11L ]
Long[ NFRD 11L ]
UFⅡRegular / Wide
[ HARD 22020 ]
※QR Code Scan Viewing detail
of remove process

Remove the remains in a reverse rotation by friction using a Abutment Removing Driver and Ratchet.
Fractured #27 Abutment Connection (Hex)
Fractured #26 Abutment Connection (Hex) and ScrewFractured #27 Abutment Connection (Hex)
Connecting the H-Scan Body
Fractured #26 Screw and Abutment Connection (Hex)
After connecting the Fixture Removing Driver, remove with a Crown Remover.
Remove the fractured screw by using a Remove Bar
After removing, connect the H-Scan Body
Fractured screw in the fixture
Using Reverse Cutting Drill for removal when it is difficult to connect the Abutment due to remains.
Removed the fractured screw
Connecting the final prosthetics.
Applications
1-1
1-2
1-3
1-4
1-5 2-1
1-6 2-2
1-7 2-3
1-8 2-4
Case / 1 Case / 2

DR, SOS PLUS VER.3_E 2017.12
www.dioimplant.com


![SAPUA EMERGENCY ACTION PLAN DAM [OR10MH0067] … Action Plan/Emergency... · 2019-12-20 · Ashoknalla Dam Project ID Code [OR10MH0106] Approval & Implementation This Emergency Action](https://img.pdfslide.net/doc/110x75/5e7b43d48966ac20fe1d9676/sapua-emergency-action-plan-dam-or10mh0067-action-planemergency-2019-12-20.jpg)