Embed Size (px)
Citation preview
Implementing High Availability for SAP Business Objects CMS Repository and Audit Database An introduction to CMS and Audit database mirroring to achieve high
availability during server failover
2
Table of Contents Introduction .................................................................................................................................................. 3
Software Prerequisites .................................................................................................................................. 3
Default Credentials ....................................................................................................................................... 4
Database Mirroring ArchiTecture ................................................................................................................. 5
Database Mirroring Setup ............................................................................................................................. 7
Setting up the Mirror Partners for the CMS Database ............................................................................. 7
Setting up the Mirror Partners for the Audit Database .......................................................................... 14
Starting up the Mirror and Arbiter Database Servers ............................................................................. 20
Changing the ODBC DSN Connections ........................................................................................................ 22
Adding Services to Sybase Central .............................................................................................................. 26
Confirming Mirroring Database Servers ..................................................................................................... 41
Summary & Additional Resources .............................................................................................................. 44
3
INTRODUCTION
SAP SQL Anywhere is used as the default database server for the Central Management Server (CMS) and
Audit data stores in SAP Business Objects 4.1 (or higher), 4.0 (SP7 or higher), and 3.1 (SP5 or higher).
One of the many advantages of using SAP SQL Anywhere (SQLA) in SAP Business Objects (BOBJ) is its
high availability (HA) capability. With the growing need of 24x7 operations and minimal downtime, it is
vital for BOBJ administrators to account for high availability during deployment. Key features of a high
availability environment include system backups, data storage, and failover processing. This document
strictly focuses on implementing failover processing by mirroring the CMS and Audit databases.
There are three components required to have a successful mirroring configuration: a Primary database
server, a Mirror database server and an Arbiter database server - they all communicate together to
make sure that the CMS and Audit databases are always active. To find more information on general
database mirroring, please refer to SQLA’s documentation. Please note that it is equally important to
safeguard other components of BOBJ such as the In/Out File Repository Systems (FRS) and BOBJ server.
More information about other high availability options such as BOBJ server clustering can be found on
the SAP Business Objects Deployment and Configuration Guide. Users interested in learning how to back
up the CMS and Audit databases to prevent data loss can take a look at the article: Backing Up the CMS
and Audit Databases Using SQL Anywhere Maintenance Plans.
SOFTWARE PREREQUISITES
• SAP Business Objects 3.1 (SP5 or higher), 4.0 (SP7 or higher), or 4.1 (or higher).
• The SQLA 12.0.1 database administration tools Sybase Central and Interactive SQL – included in
the SAP SQL Anywhere 12.0.1 installation media.
• SQL Anywhere database server with high availability option enabled (see important note below).
The edition of SQL Anywhere 12.0.1 used in this document is the free Developer Edition as it
includes the high availability option. The Developer Edition is perfect for development and
testing purposes. You can download a copy of SQL Anywhere 12.0.1 Developer Edition here:
http://scn.sap.com/docs/DOC-31795.
4
DEFAULT CREDENTIALS
Throughout this document there are many steps where the user is asked for credentials such as
hostname, database user ID & password, CMS cluster name, ODBC data source information, etc. The
credentials used are listed below for reference.
• Default database server name: BI4
• Default database server port: 2638
• Default database server password: pASSWORD1
• Copy database server name: BI4copy
• Copy database server port: 2639
• Copy database server password: pASSWORD1
• Arbiter database server name: arbiter
• Arbiter database server port: 2637
• Arbiter database server password: pASSWORD1
• CMS cluster name: BaseW2k8r2EnterpriseSeldon:6400
• CMS ODBC DSN name: BI4_CMS_DSN
• Audit ODBC DSN name: BI4_Audit_DSN
Important note for implementing high availability in a production BOBJ
environment
The bundled edition of SQLA that is provided with BOBJ does not include the high availability
option. You can use the SQLA Developer Edition to test your HA implementation, but you cannot
use that edition in production environments. To do so, you must purchase SAP SQL Anywhere
12.0.1 Standard Edition or SAP SQL Anywhere 12.0.1 Advanced Edition as they include the high
availability option. To view the differences between those two editions, please refer to
http://scn.sap.com/docs/DOC-54533.
Please visit the SAP Store or contact your SAP sales representative to obtain that product

5
DATABASE MIRRORING ARCHITECTURE
Below is an architecture diagram showing how an SAP Business Objects HA deployment would look. The
three key components include a clustered BOBJ server setup, CMS/Audit database server mirroring
setup and an Active/Passive File Repository Server setup. Once again, this document strictly focuses on
implementing failover processing by mirroring the CMS and Audit databases.
Clustering more than one BOBJ server increases the number of available machines working together to
maintain a system database. Clustering nodes provides failover support in the case of a BOBJ server
going down. The duplicate BOBJ server continues to process requests with no impact to the system.
A deployment can have multiple File Repository Servers to store files, usually on a Storage Area Network
(SAN). The active FRS is the one that first registers to the BOBJ server cluster. In the case that the active
FRS fails, the passive FRS registered with the cluster is changed to active status. FRS can be replicated for
backup purposes using a RAID array.

6
Load Server
BOBJ Server/Node 1
FRS
(Active)
FRS
(Passive)
BOBJ Server/Node 2
Database
Server 1
(Primary)
Audit
Repository Database
Server 2
(Mirror)
Arbiter
Server
CMS
Repository
Audit
Repository
CMS
Repository
Icons provided by
Open Security Architecture
7
DATABASE MIRRORING SETUP
In a BOBJ deployment, there are two important databases (BI4_CMS and BI4_Audit) that always connect
to a running database server. If this database server were to ever shutdown or fail, these databases
would be inaccessible resulting in data loss. SQLA database mirroring allows the user to create an
alternate database server that automatically connects to these databases if this were to occur.
There are some preliminary steps that must be completed before the setup can be started.
1. The BOBJ CMS server needs to be shutdown (use the Central Configuration Manager to stop the
Service Intelligence Agent). It is recommended this is done when the BOBJ server load is low.
2. Stop the SQLA database service via the Services applet in Administrative Tools. The SQLA
database service name is “SQL Anywhere for SAP Business Intelligence”.
3. There should be an existing directory with the SQLA databases and transaction log files. The
default location for these files are:
• Location: C:\Program Files (x86)\SAP Business Objects\sqlanywhere\database.
• File names: BI4_CMS.db, BI4_CMS.log, BI4_Audit.db, and BI4_Audit.log.
4. The user must create similar directories for the mirror and arbiter database servers to hold
additional databases. The directories used for this paper are:
• C:\arbiter
• C:\t1
5. Ensure your machine’s PATH environment variable lists the SQLA folders before the BOBJ
folders, as follows:
C:\Program Files\SQL Anywhere 12\bin64;C:\Program Files\SQL Anywhere
12\bin32;C:\Program Files (x86)\SAP
BusinessObjects\sqlanywhere\bin64;C:\Program Files (x86)\SAP
BusinessObjects\sqlanywhere\bin32
Setting up the Mirror Partners for the CMS Database
Please note that this paper assumes the user is comfortable using the Command Prompt and SQL
Anywhere commands. The first step to database mirroring is to start up the default database server with
its mirroring properties.
1. Open an elevated Command Prompt (Run as administrator) and start the default database with
the following command:
dbspawn –f dbsrv12 -n BI4 -x tcpip(PORT=2638) -su pASSWORD1
"C:\Program Files (x86)\SAP
BusinessObjects\sqlanywhere\database\BI4_CMS.db" -xp on
"C:\Program Files (x86)\SAP
BusinessObjects\sqlanywhere\database\BI4_Audit.db" -xp on
8
The “-xp on” switch indicates that the server is participating in database mirroring.
Note: If the High Availability option is not enabled in your edition of SQLA, the use of the “-xp”
switch in the command above will return an error!
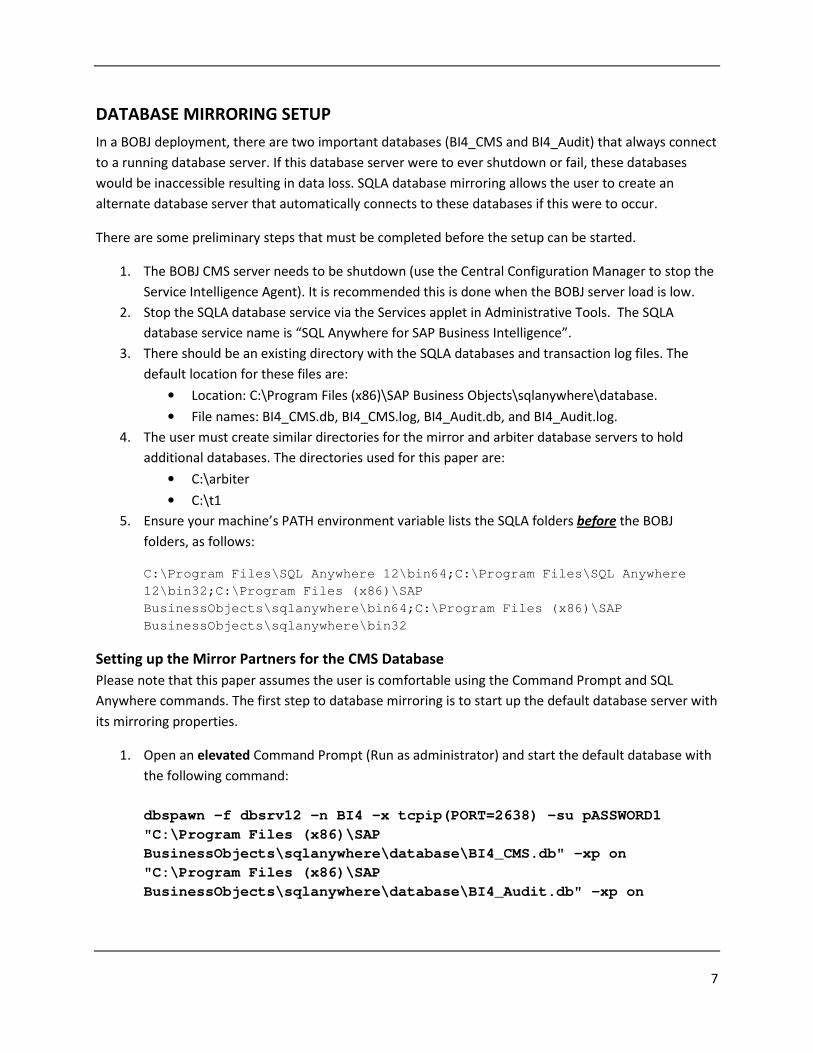
2. Connect to the default CMS database from Interactive SQL (ISQL) to define the mirroring
parameters:
dbisql -c "UID=DBA;PWD=pASSWORD1;SERVER=BI4;DBN=BI4_CMS"
An Interactive SQL (ISQL) window opens like the following:
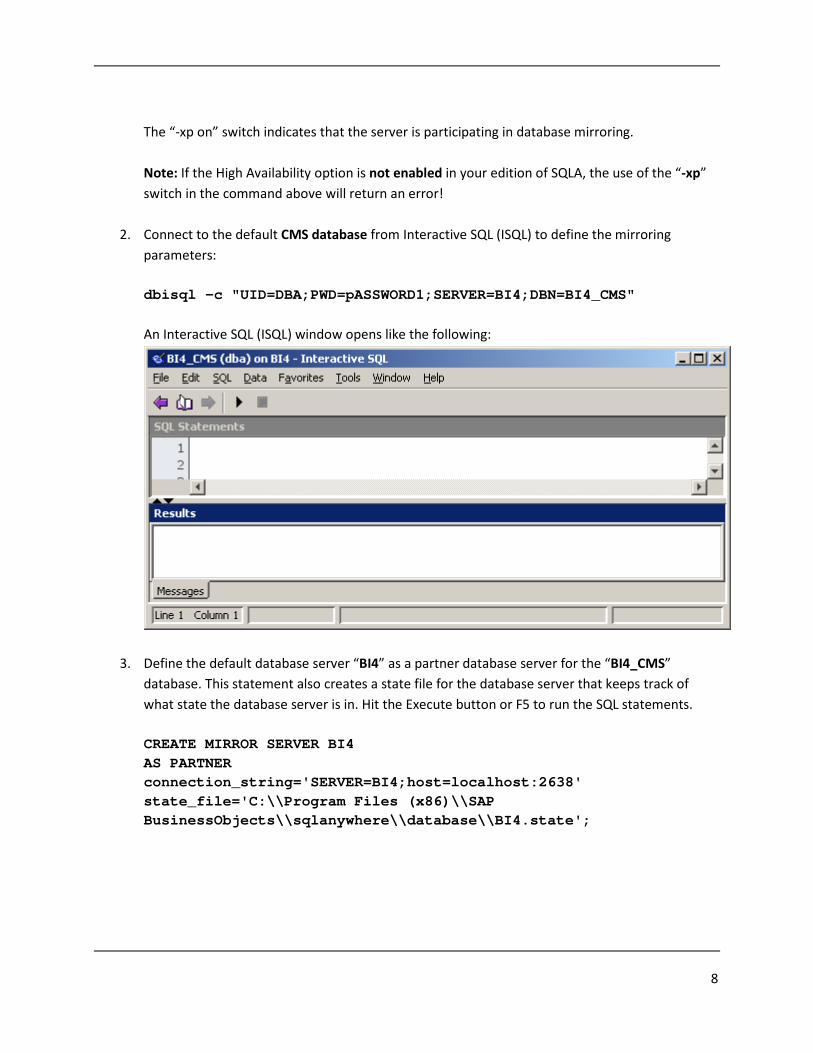
3. Define the default database server “BI4” as a partner database server for the “BI4_CMS”
database. This statement also creates a state file for the database server that keeps track of
what state the database server is in. Hit the Execute button or F5 to run the SQL statements.
CREATE MIRROR SERVER BI4
AS PARTNER
connection_string='SERVER=BI4;host=localhost:2638'
state_file='C:\\Program Files (x86)\\SAP
BusinessObjects\\sqlanywhere\\database\\BI4.state';
9
10
4. Create a database server and define it as a partner to the original database server. This will be
the database server that will act as a mirror and will become the active database server in the
case of failover. Please make sure this database server starts on a different host port.
CREATE MIRROR SERVER BI4copy
AS PARTNER
connection_string='SERVER=BI4copy;host=localhost:2639'
state_file='c:\\t1\\BI4copy.state'
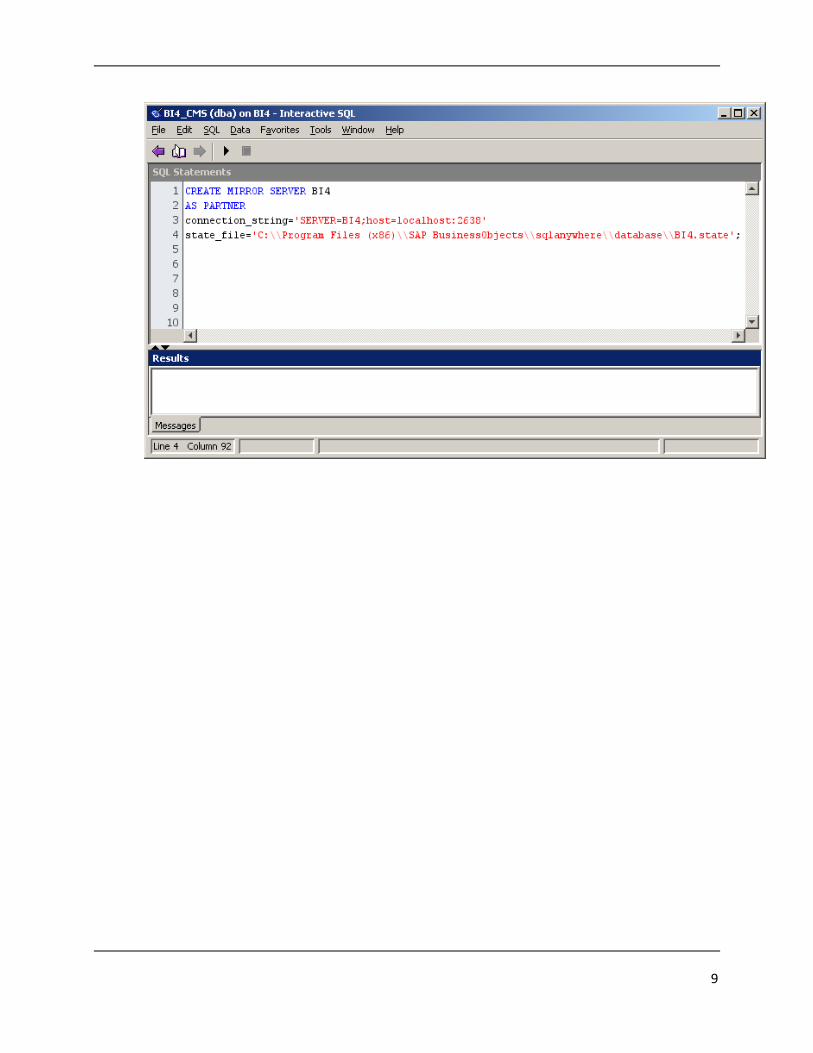
TROUBLESHOOTING ISQL
A common error that can occur when defining a database server as a partner, a primary or
mirror is that a database server with that attribute might already exist for that database.
Error windows that pop up can look like the ones below.
There is a very easy solution to resolve such problems and requires two steps:
1. Use this command to see all the database servers running and their server types:
SELECT * FROM SYS.SYSMIRRORSERVER
2. Identify the server type and server name that currently exist and use this command
to drop the server:
DROP MIRROR SERVER {SERVERNAME}
11
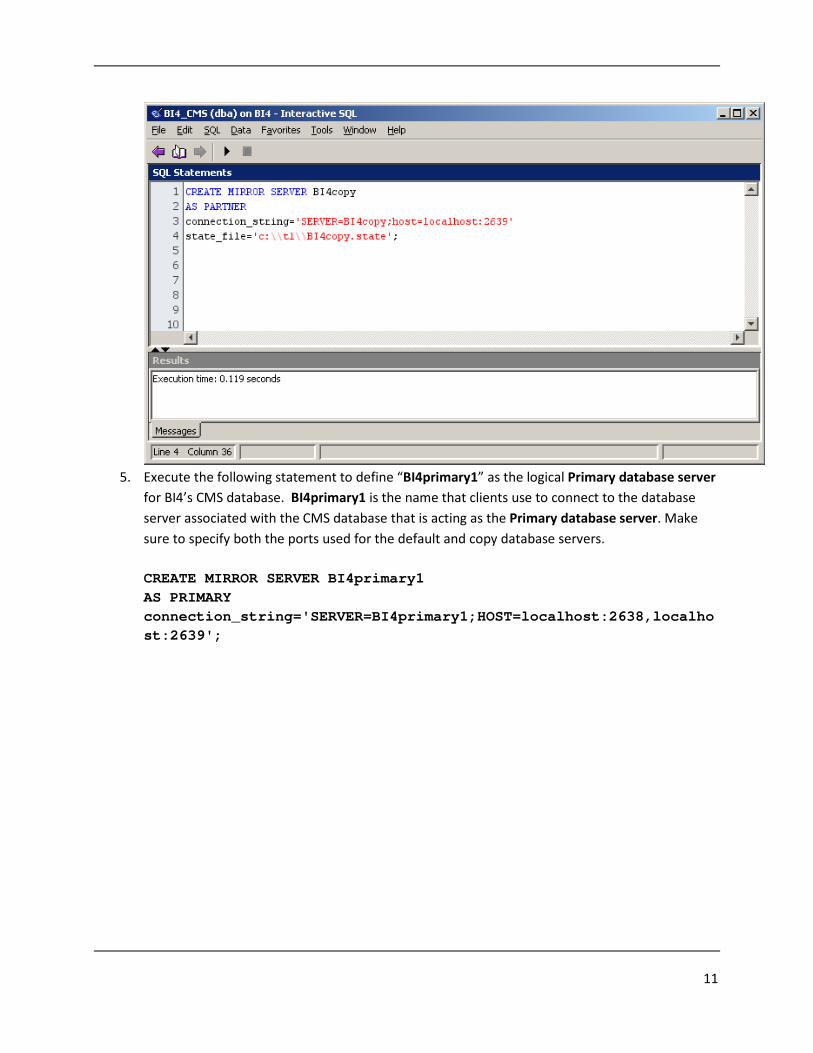
5. Execute the following statement to define “BI4primary1” as the logical Primary database server
for BI4’s CMS database. BI4primary1 is the name that clients use to connect to the database
server associated with the CMS database that is acting as the Primary database server. Make
sure to specify both the ports used for the default and copy database servers.
CREATE MIRROR SERVER BI4primary1
AS PRIMARY
connection_string='SERVER=BI4primary1;HOST=localhost:2638,localho
st:2639';
12
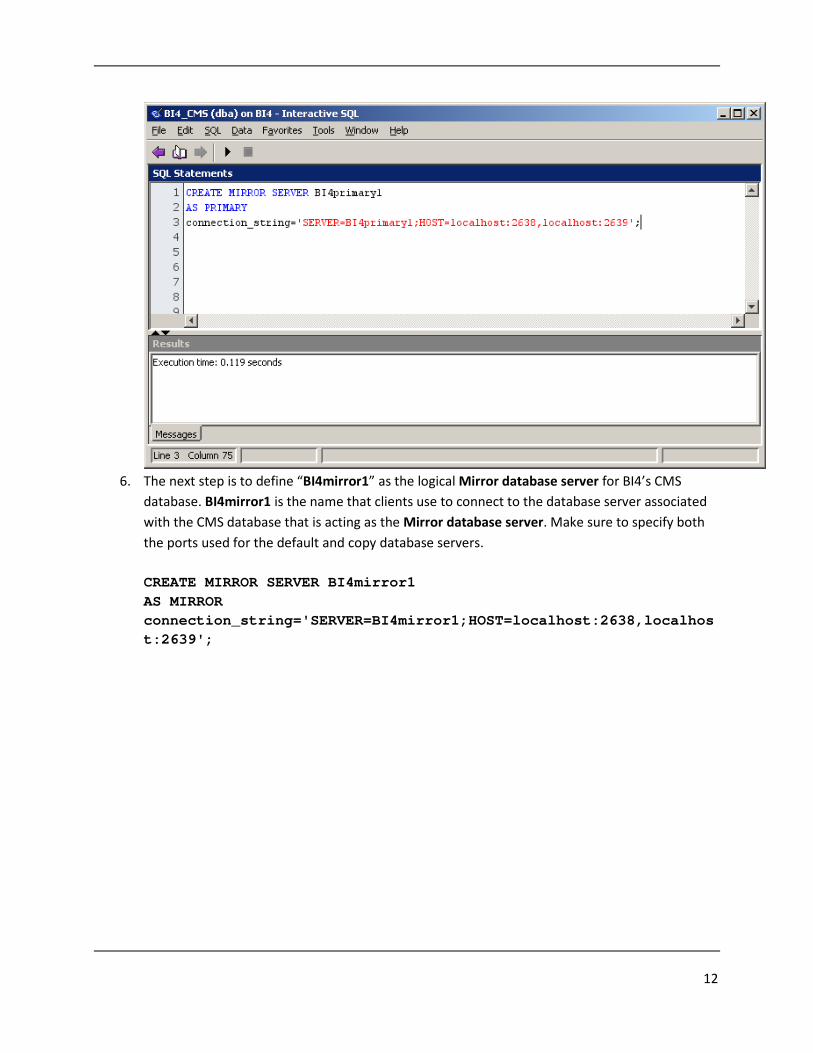
6. The next step is to define “BI4mirror1” as the logical Mirror database server for BI4’s CMS
database. BI4mirror1 is the name that clients use to connect to the database server associated
with the CMS database that is acting as the Mirror database server. Make sure to specify both
the ports used for the default and copy database servers.
CREATE MIRROR SERVER BI4mirror1
AS MIRROR
connection_string='SERVER=BI4mirror1;HOST=localhost:2638,localhos
t:2639';
13
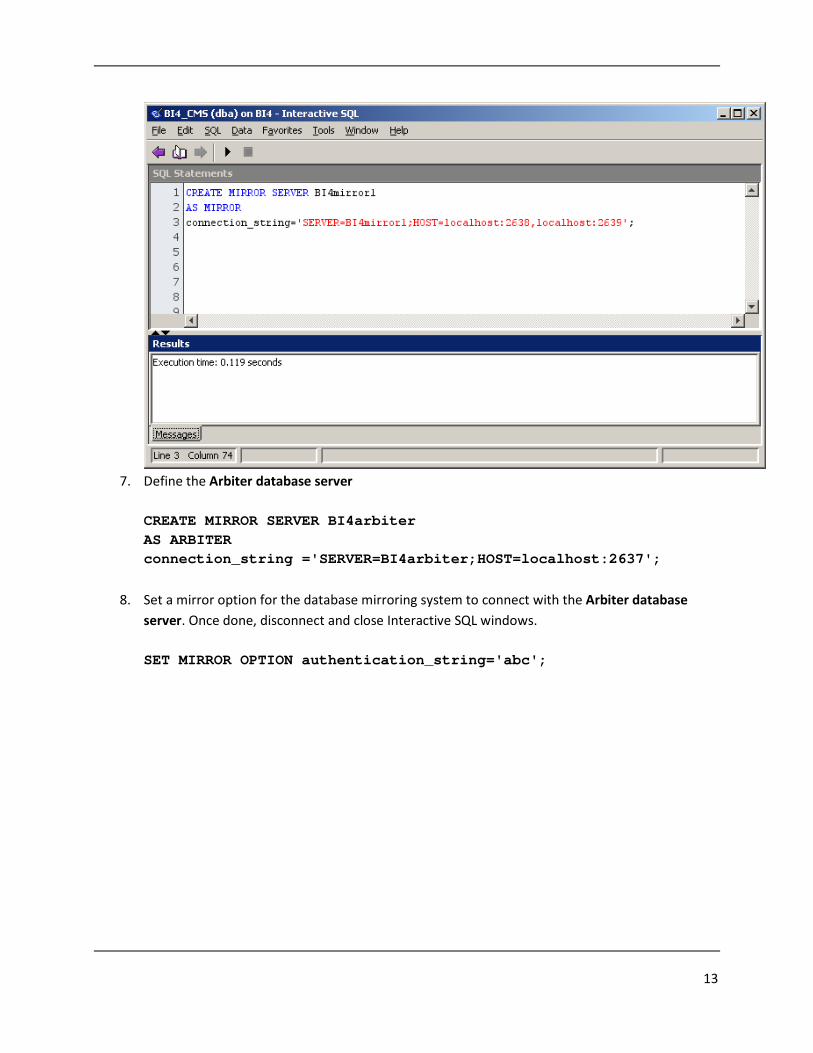
7. Define the Arbiter database server
CREATE MIRROR SERVER BI4arbiter
AS ARBITER
connection_string ='SERVER=BI4arbiter;HOST=localhost:2637';
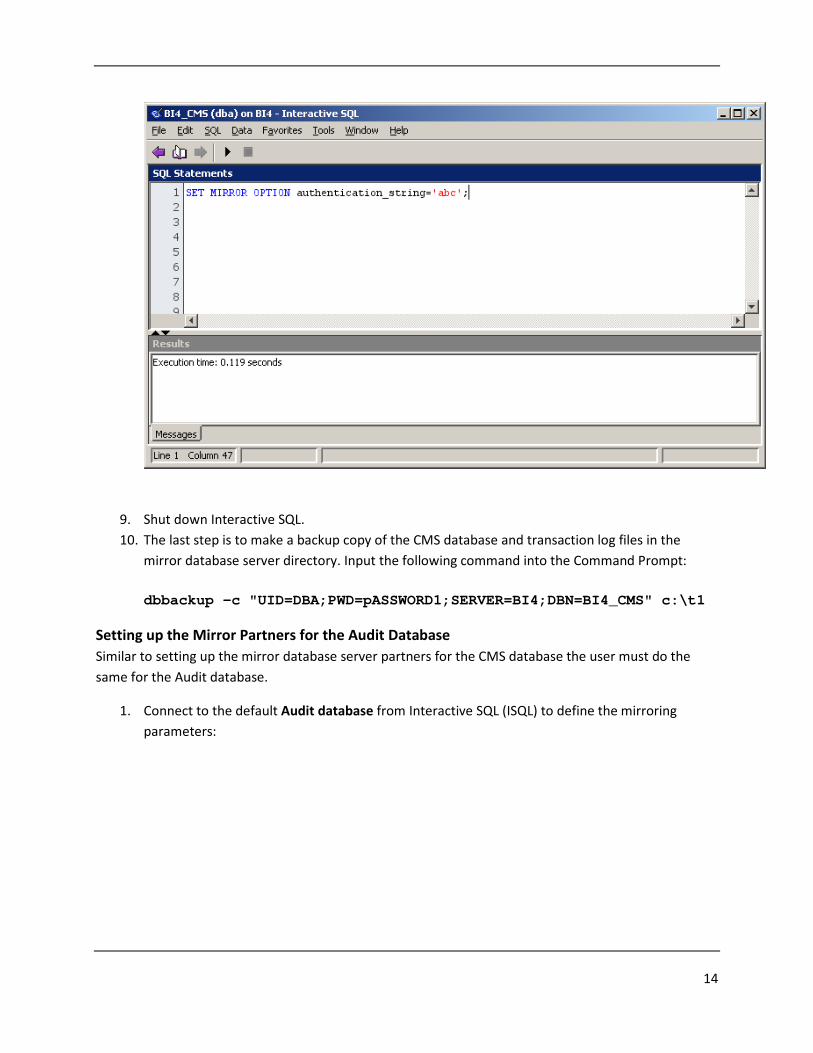
8. Set a mirror option for the database mirroring system to connect with the Arbiter database
server. Once done, disconnect and close Interactive SQL windows.
SET MIRROR OPTION authentication_string='abc';
14
9. Shut down Interactive SQL.
10. The last step is to make a backup copy of the CMS database and transaction log files in the
mirror database server directory. Input the following command into the Command Prompt:
dbbackup -c "UID=DBA;PWD=pASSWORD1;SERVER=BI4;DBN=BI4_CMS" c:\t1
Setting up the Mirror Partners for the Audit Database
Similar to setting up the mirror database server partners for the CMS database the user must do the
same for the Audit database.
1. Connect to the default Audit database from Interactive SQL (ISQL) to define the mirroring
parameters:
15
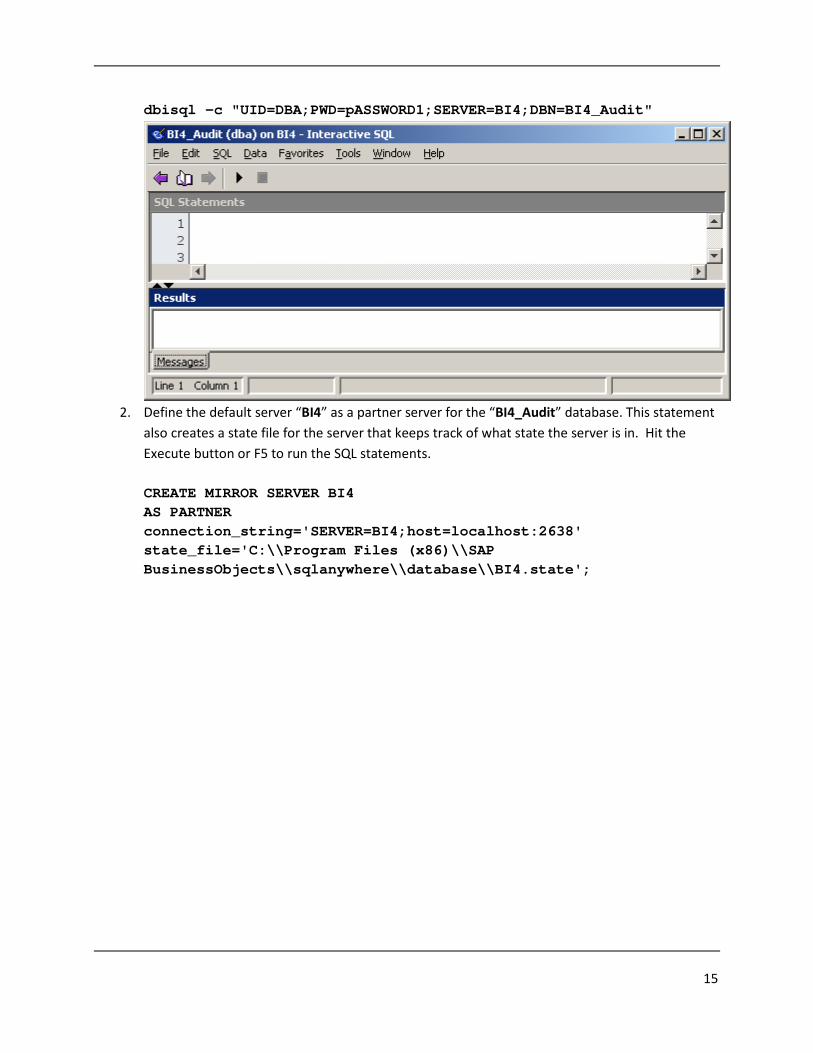
dbisql -c "UID=DBA;PWD=pASSWORD1;SERVER=BI4;DBN=BI4_Audit"
2. Define the default server “BI4” as a partner server for the “BI4_Audit” database. This statement
also creates a state file for the server that keeps track of what state the server is in. Hit the
Execute button or F5 to run the SQL statements.
CREATE MIRROR SERVER BI4
AS PARTNER
connection_string='SERVER=BI4;host=localhost:2638'
state_file='C:\\Program Files (x86)\\SAP
BusinessObjects\\sqlanywhere\\database\\BI4.state';
16
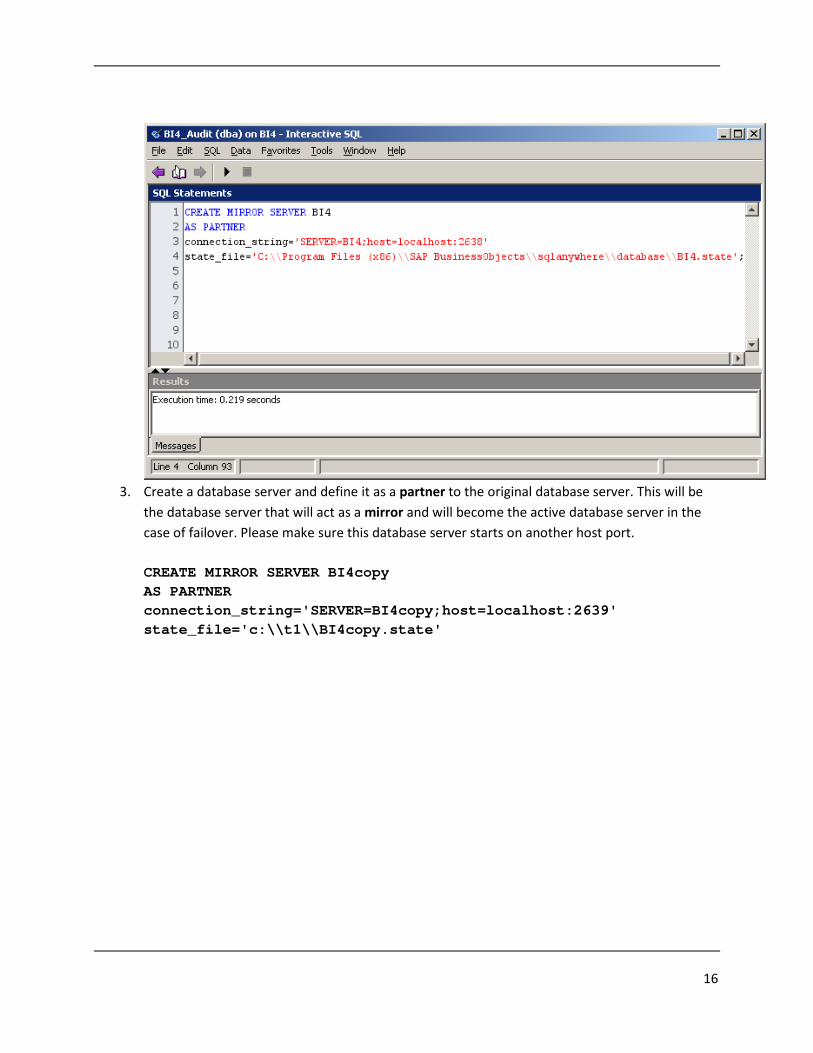
3. Create a database server and define it as a partner to the original database server. This will be
the database server that will act as a mirror and will become the active database server in the
case of failover. Please make sure this database server starts on another host port.
CREATE MIRROR SERVER BI4copy
AS PARTNER
connection_string='SERVER=BI4copy;host=localhost:2639'
state_file='c:\\t1\\BI4copy.state'
17
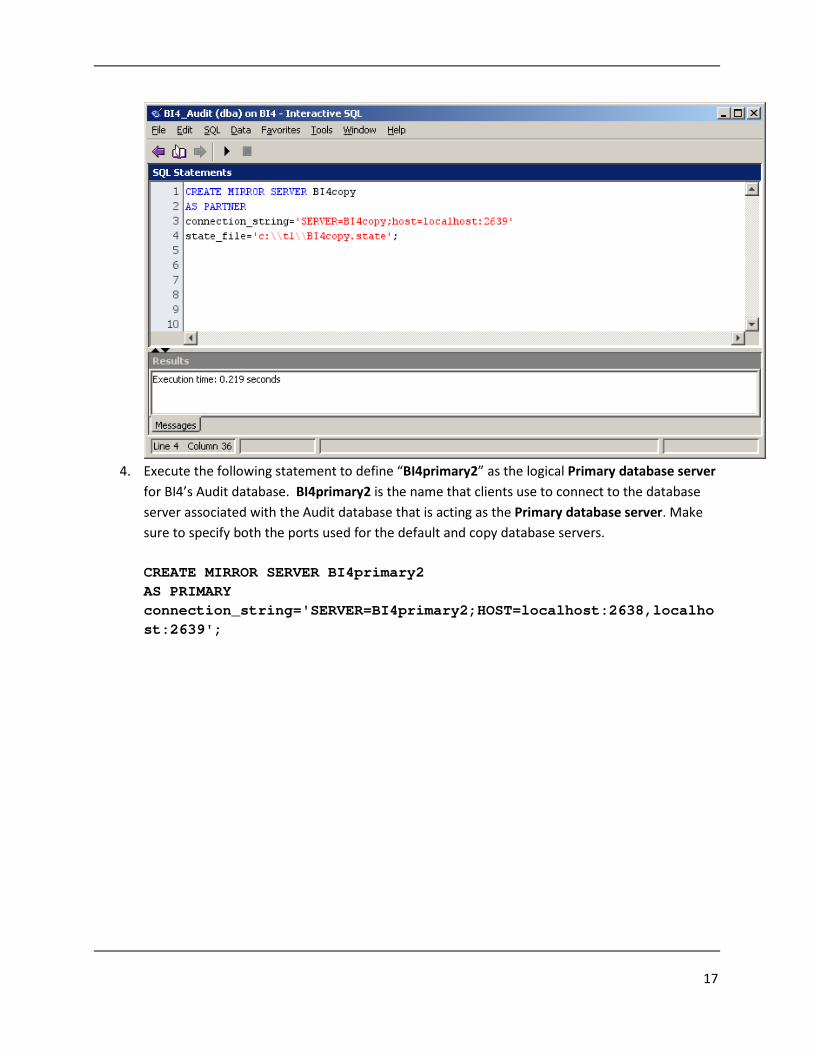
4. Execute the following statement to define “BI4primary2” as the logical Primary database server
for BI4’s Audit database. BI4primary2 is the name that clients use to connect to the database
server associated with the Audit database that is acting as the Primary database server. Make
sure to specify both the ports used for the default and copy database servers.
CREATE MIRROR SERVER BI4primary2
AS PRIMARY
connection_string='SERVER=BI4primary2;HOST=localhost:2638,localho
st:2639';
18
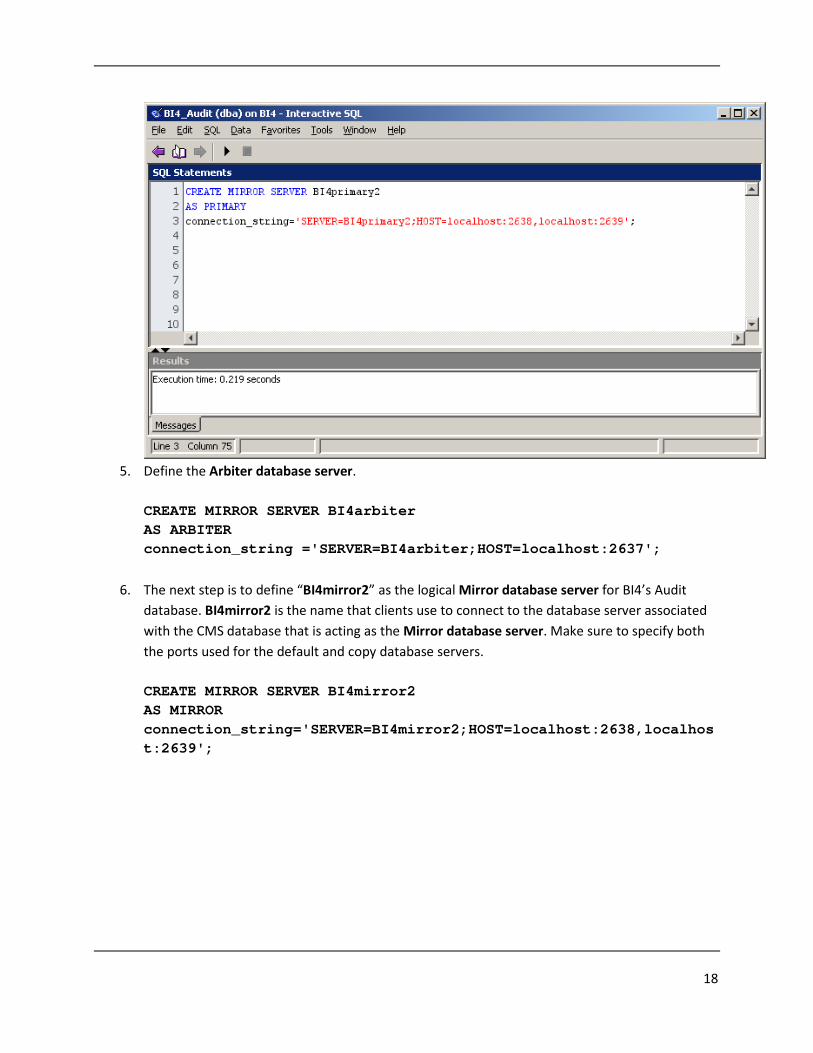
5. Define the Arbiter database server.
CREATE MIRROR SERVER BI4arbiter
AS ARBITER
connection_string ='SERVER=BI4arbiter;HOST=localhost:2637';
6. The next step is to define “BI4mirror2” as the logical Mirror database server for BI4’s Audit
database. BI4mirror2 is the name that clients use to connect to the database server associated
with the CMS database that is acting as the Mirror database server. Make sure to specify both
the ports used for the default and copy database servers.
CREATE MIRROR SERVER BI4mirror2
AS MIRROR
connection_string='SERVER=BI4mirror2;HOST=localhost:2638,localhos
t:2639';
19
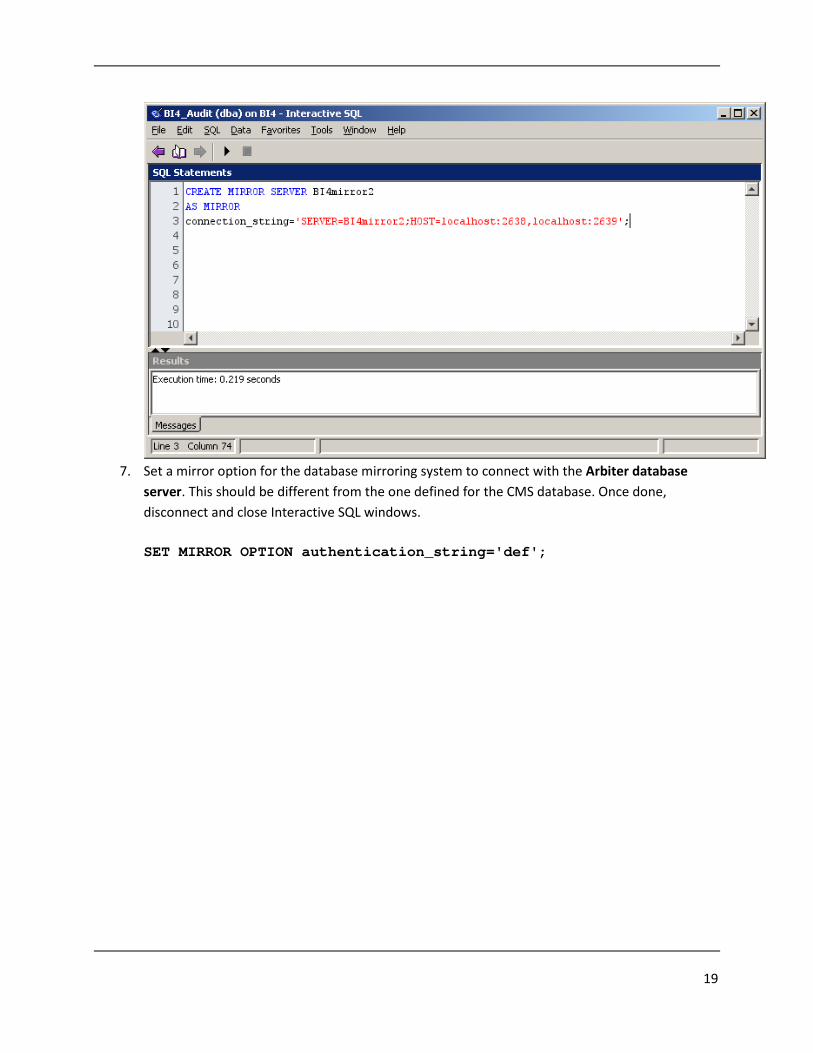
7. Set a mirror option for the database mirroring system to connect with the Arbiter database
server. This should be different from the one defined for the CMS database. Once done,
disconnect and close Interactive SQL windows.
SET MIRROR OPTION authentication_string='def';
20
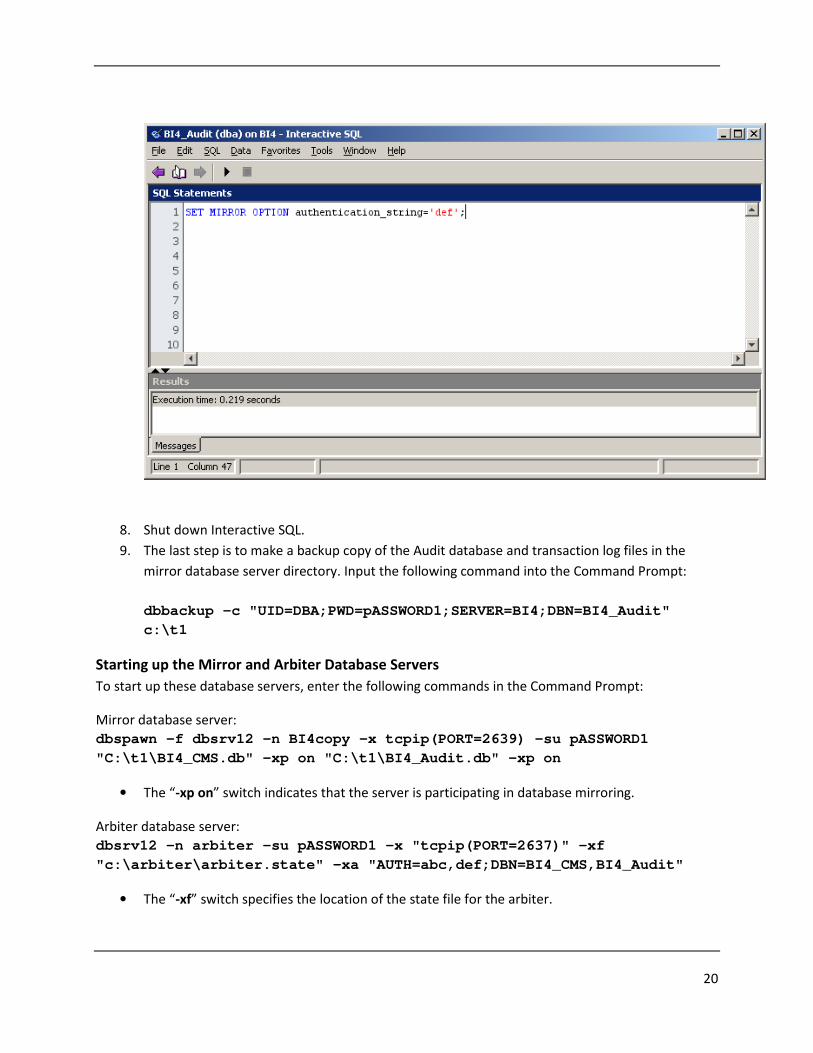
8. Shut down Interactive SQL.
9. The last step is to make a backup copy of the Audit database and transaction log files in the
mirror database server directory. Input the following command into the Command Prompt:
dbbackup -c "UID=DBA;PWD=pASSWORD1;SERVER=BI4;DBN=BI4_Audit"
c:\t1
Starting up the Mirror and Arbiter Database Servers
To start up these database servers, enter the following commands in the Command Prompt:
Mirror database server:
dbspawn –f dbsrv12 –n BI4copy -x tcpip(PORT=2639) -su pASSWORD1
"C:\t1\BI4_CMS.db" -xp on "C:\t1\BI4_Audit.db" -xp on
• The “-xp on” switch indicates that the server is participating in database mirroring.
Arbiter database server:
dbsrv12 –n arbiter -su pASSWORD1 -x "tcpip(PORT=2637)" -xf
"c:\arbiter\arbiter.state" -xa "AUTH=abc,def;DBN=BI4_CMS,BI4_Audit"
• The “-xf” switch specifies the location of the state file for the arbiter.
21
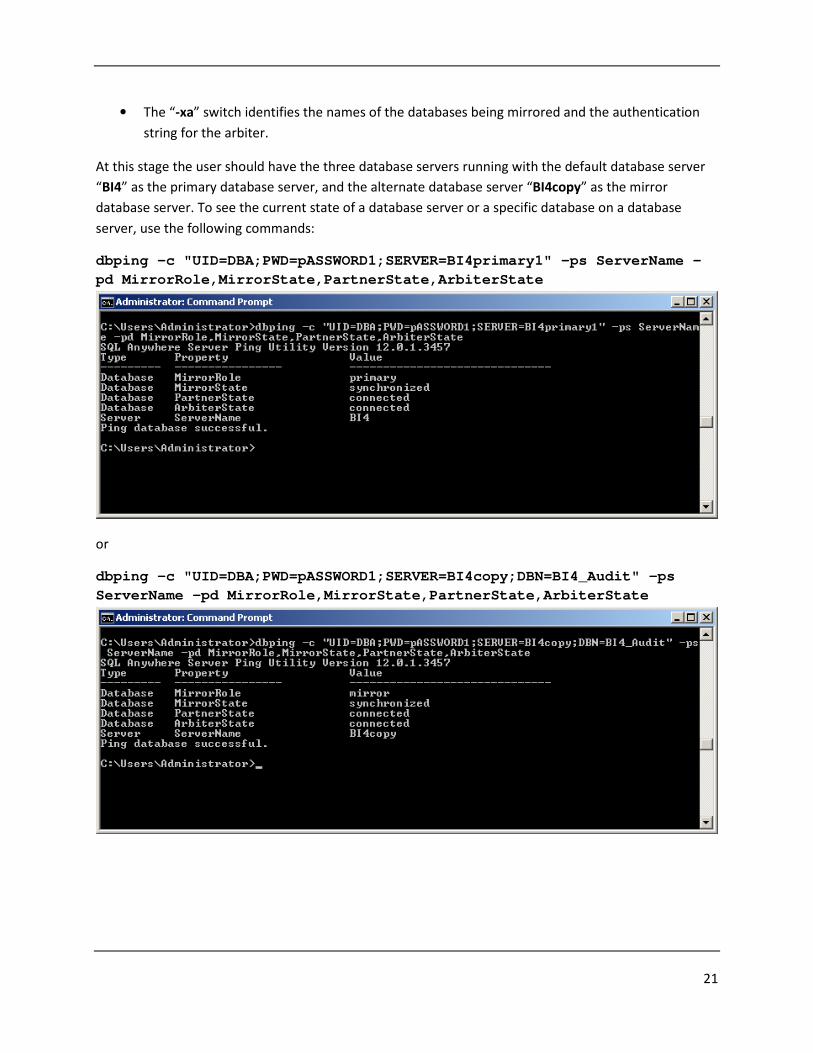
• The “-xa” switch identifies the names of the databases being mirrored and the authentication
string for the arbiter.
At this stage the user should have the three database servers running with the default database server
“BI4” as the primary database server, and the alternate database server “BI4copy” as the mirror
database server. To see the current state of a database server or a specific database on a database
server, use the following commands:
dbping -c "UID=DBA;PWD=pASSWORD1;SERVER=BI4primary1" -ps ServerName -
pd MirrorRole,MirrorState,PartnerState,ArbiterState
or
dbping -c "UID=DBA;PWD=pASSWORD1;SERVER=BI4copy;DBN=BI4_Audit" -ps
ServerName -pd MirrorRole,MirrorState,PartnerState,ArbiterState
22
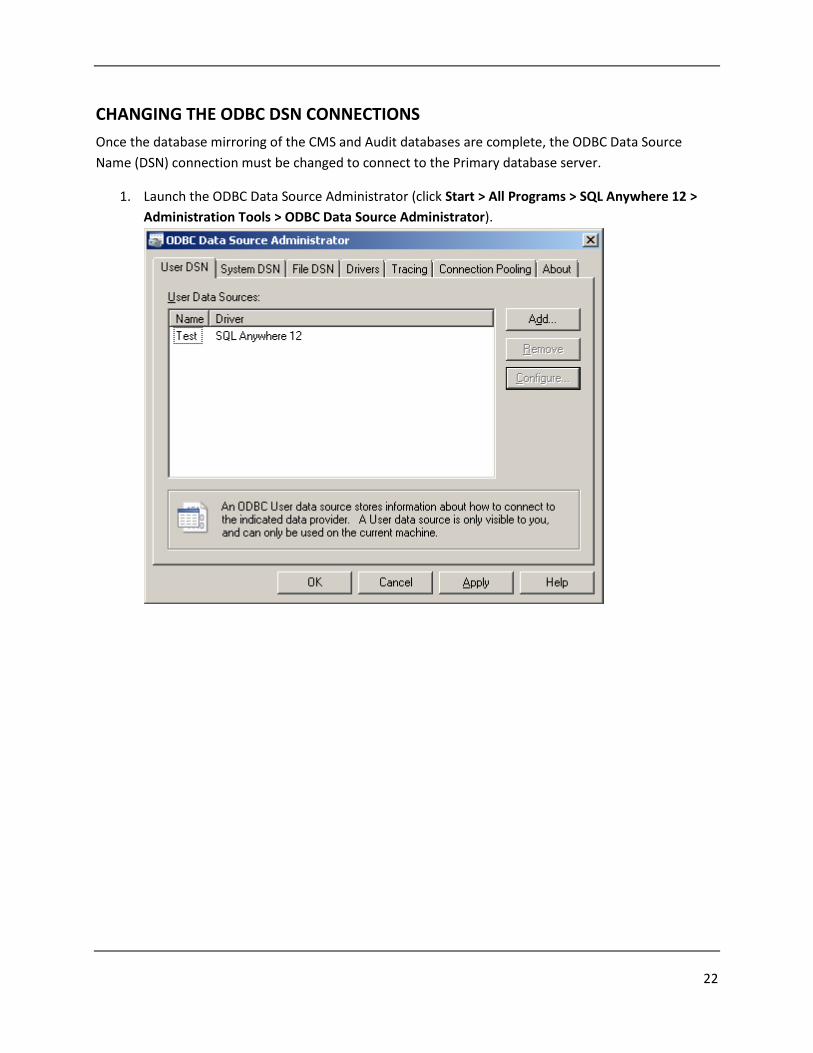
CHANGING THE ODBC DSN CONNECTIONS
Once the database mirroring of the CMS and Audit databases are complete, the ODBC Data Source
Name (DSN) connection must be changed to connect to the Primary database server.
1. Launch the ODBC Data Source Administrator (click Start > All Programs > SQL Anywhere 12 >
Administration Tools > ODBC Data Source Administrator).
23
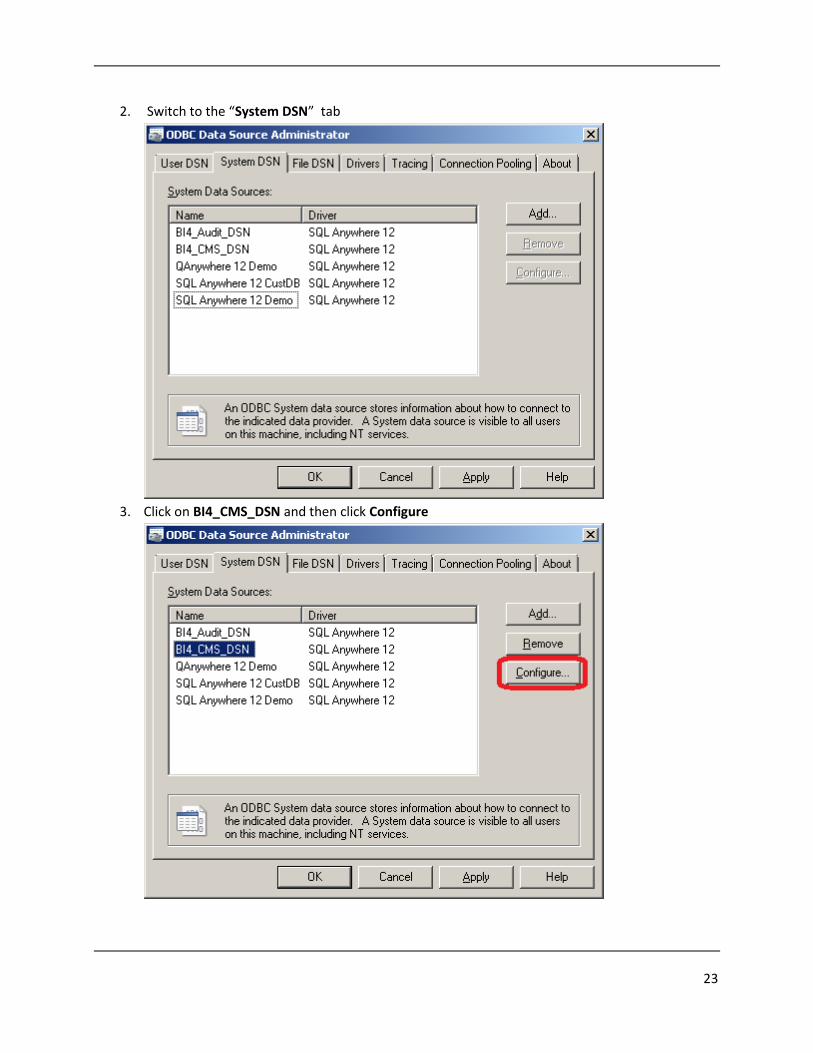
2. Switch to the “System DSN” tab
3. Click on BI4_CMS_DSN and then click Configure

24
4. The ODBC configuration dialog for SQLA appears. Switch over to the “Login” tab
5. There are two changes that need to be made. The first is that the Port must be left blank and
the second is to change the Server Name to the name given to the Primary database server. For
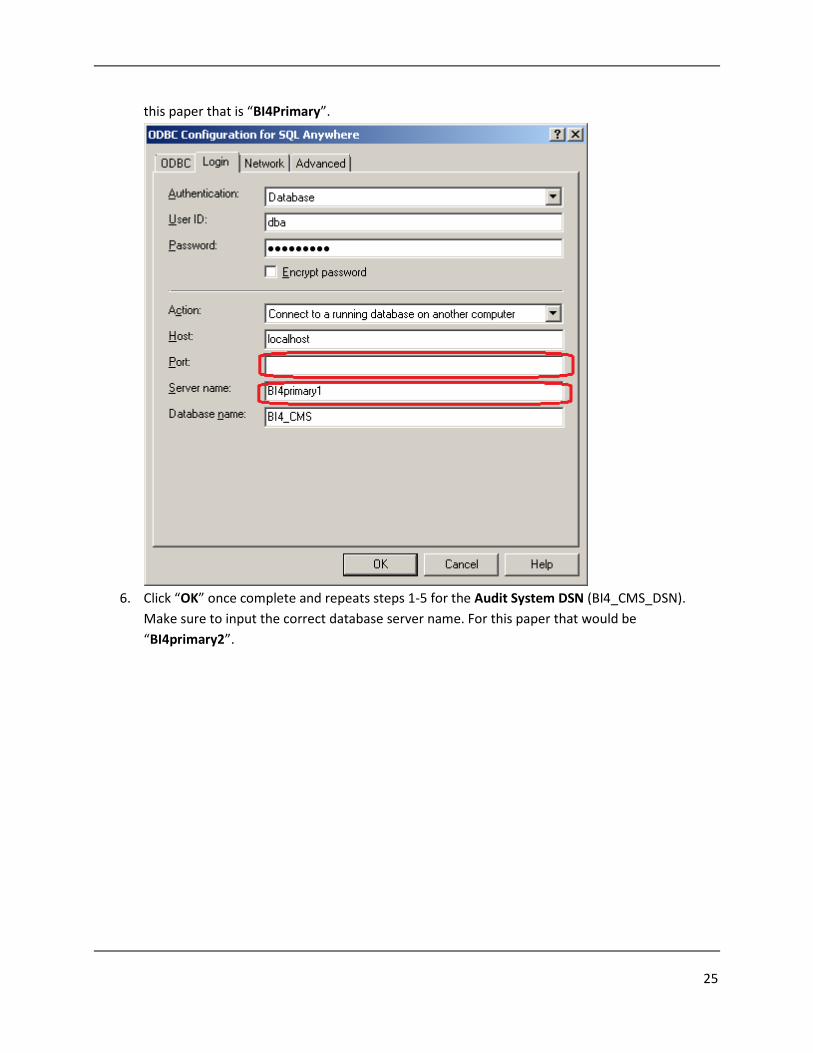
25
this paper that is “BI4Primary”.
6. Click “OK” once complete and repeats steps 1-5 for the Audit System DSN (BI4_CMS_DSN).
Make sure to input the correct database server name. For this paper that would be
“BI4primary2”.
26
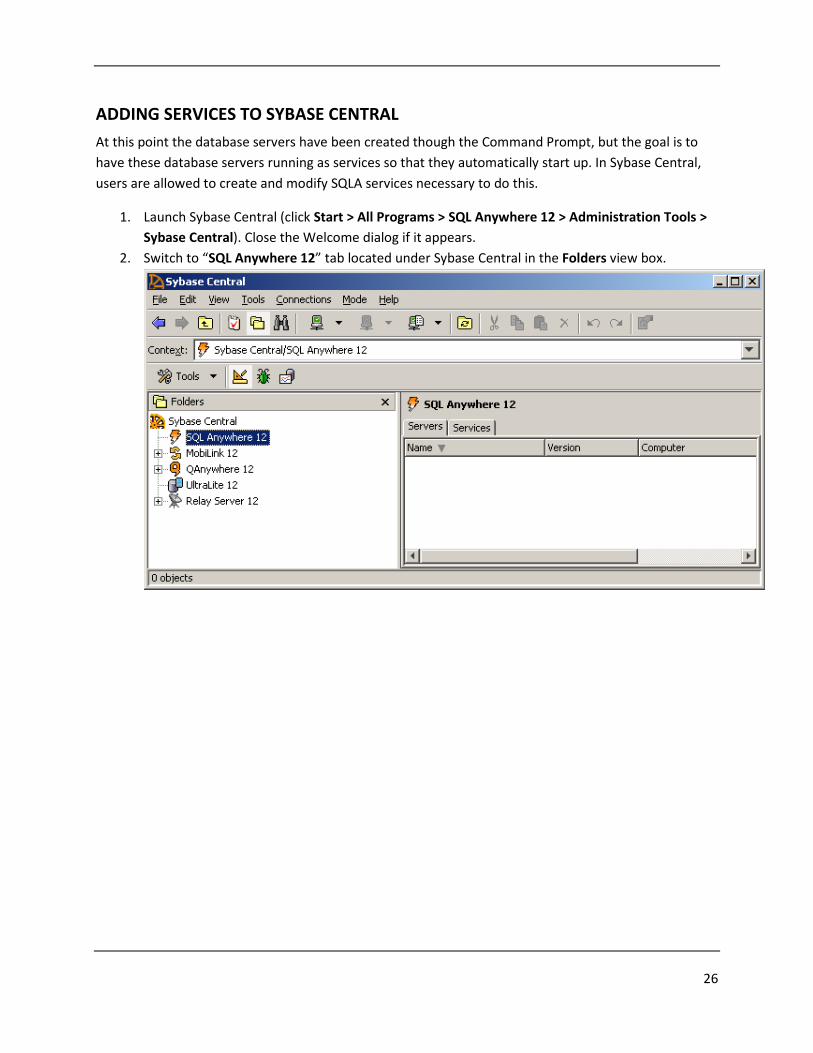
ADDING SERVICES TO SYBASE CENTRAL
At this point the database servers have been created though the Command Prompt, but the goal is to
have these database servers running as services so that they automatically start up. In Sybase Central,
users are allowed to create and modify SQLA services necessary to do this.
1. Launch Sybase Central (click Start > All Programs > SQL Anywhere 12 > Administration Tools >
Sybase Central). Close the Welcome dialog if it appears.
2. Switch to “SQL Anywhere 12” tab located under Sybase Central in the Folders view box.
27
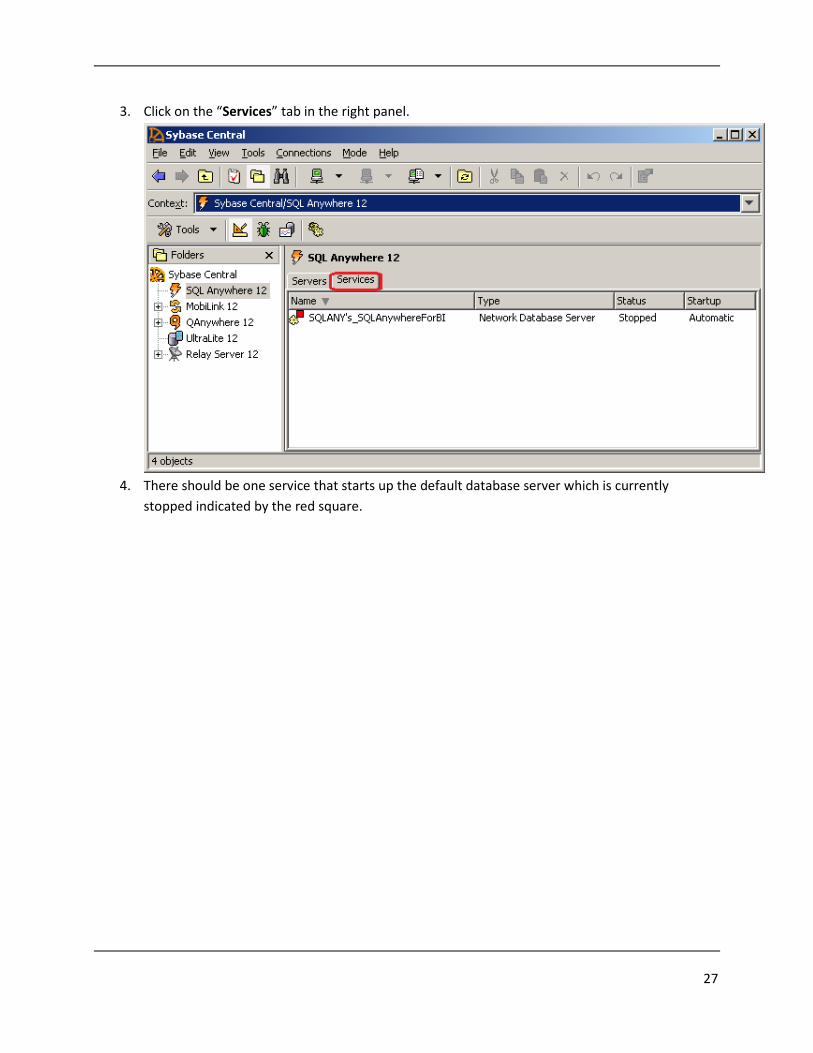
3. Click on the “Services” tab in the right panel.
4. There should be one service that starts up the default database server which is currently
stopped indicated by the red square.
28
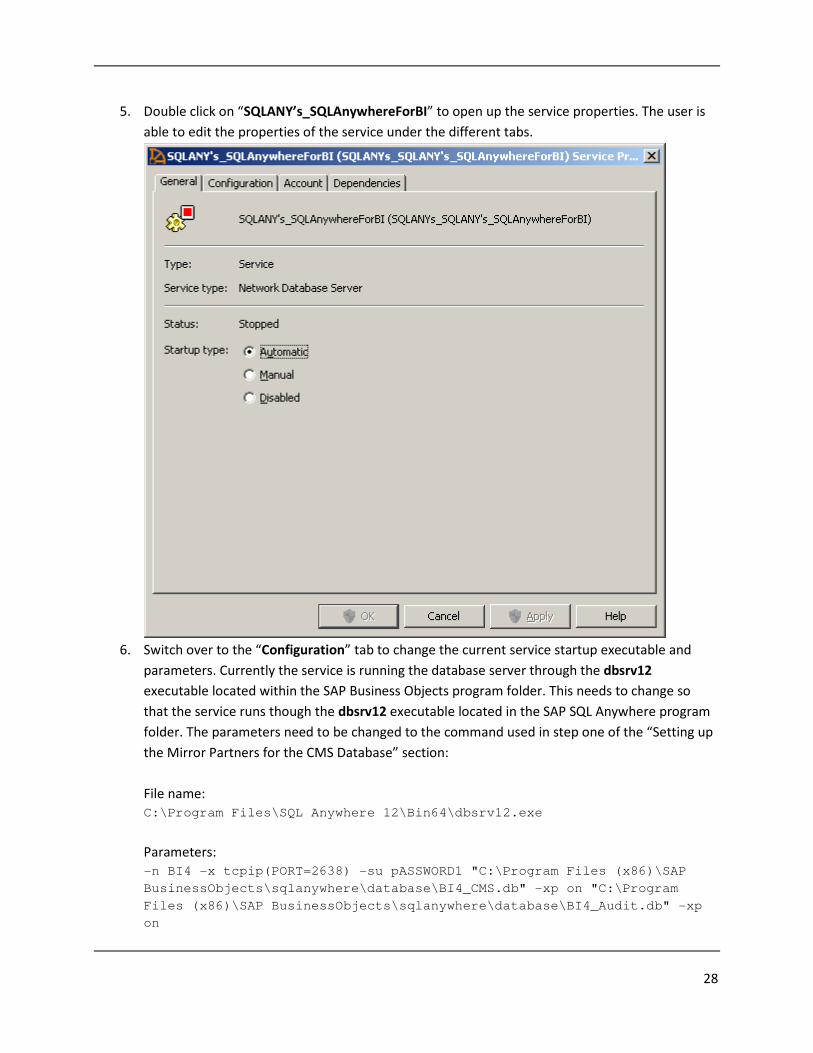
5. Double click on “SQLANY’s_SQLAnywhereForBI” to open up the service properties. The user is
able to edit the properties of the service under the different tabs.
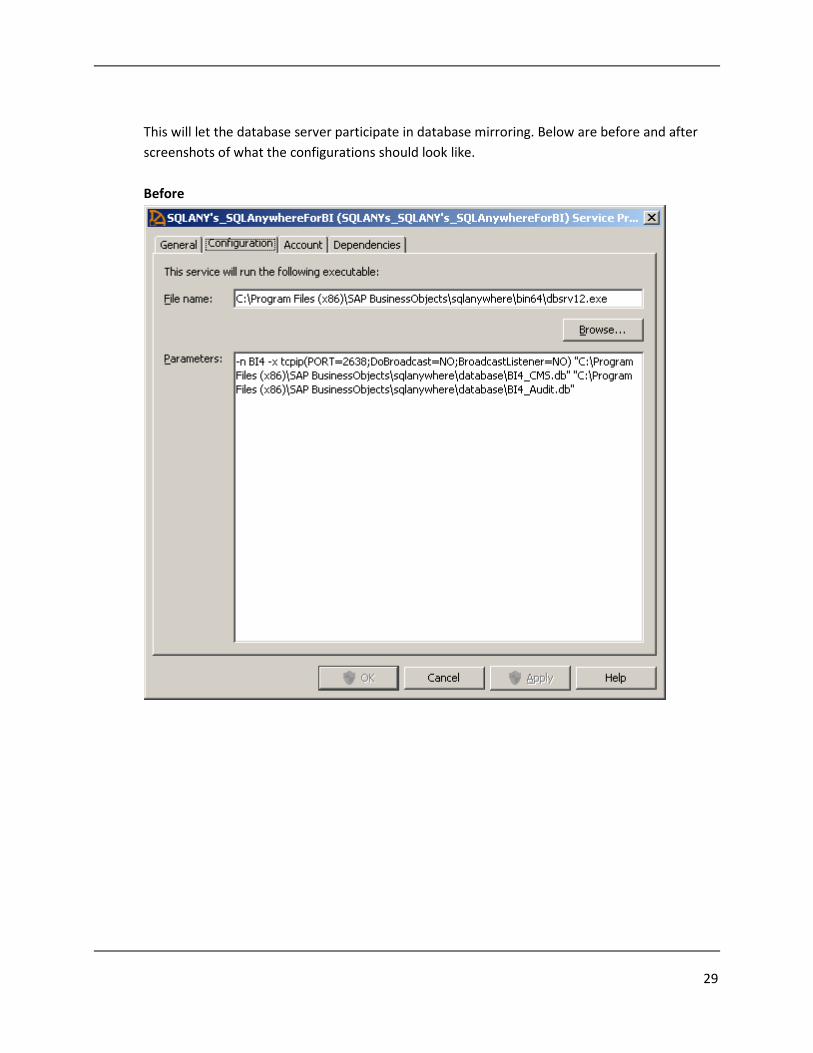
6. Switch over to the “Configuration” tab to change the current service startup executable and
parameters. Currently the service is running the database server through the dbsrv12
executable located within the SAP Business Objects program folder. This needs to change so
that the service runs though the dbsrv12 executable located in the SAP SQL Anywhere program
folder. The parameters need to be changed to the command used in step one of the “Setting up
the Mirror Partners for the CMS Database” section:
File name:
C:\Program Files\SQL Anywhere 12\Bin64\dbsrv12.exe
Parameters:
-n BI4 -x tcpip(PORT=2638) -su pASSWORD1 "C:\Program Files (x86)\SAP
BusinessObjects\sqlanywhere\database\BI4_CMS.db" -xp on "C:\Program
Files (x86)\SAP BusinessObjects\sqlanywhere\database\BI4_Audit.db" -xp
on
29
This will let the database server participate in database mirroring. Below are before and after
screenshots of what the configurations should look like.
Before
30
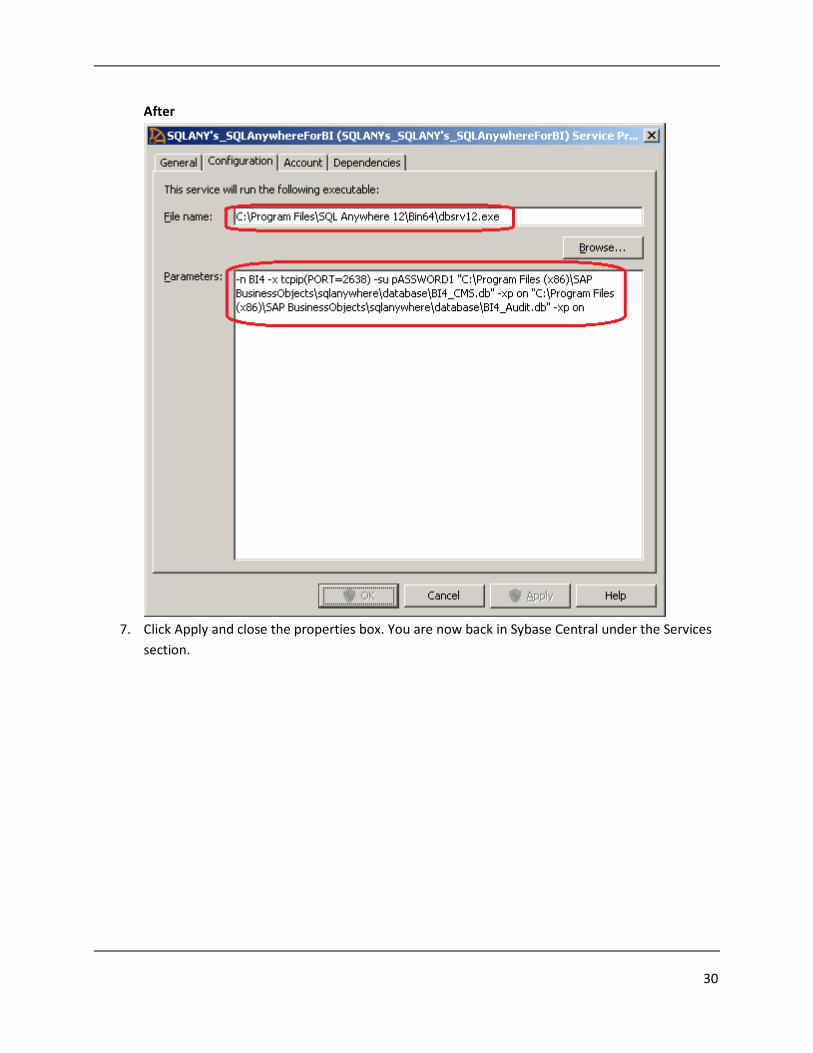
After
7. Click Apply and close the properties box. You are now back in Sybase Central under the Services
section.
31
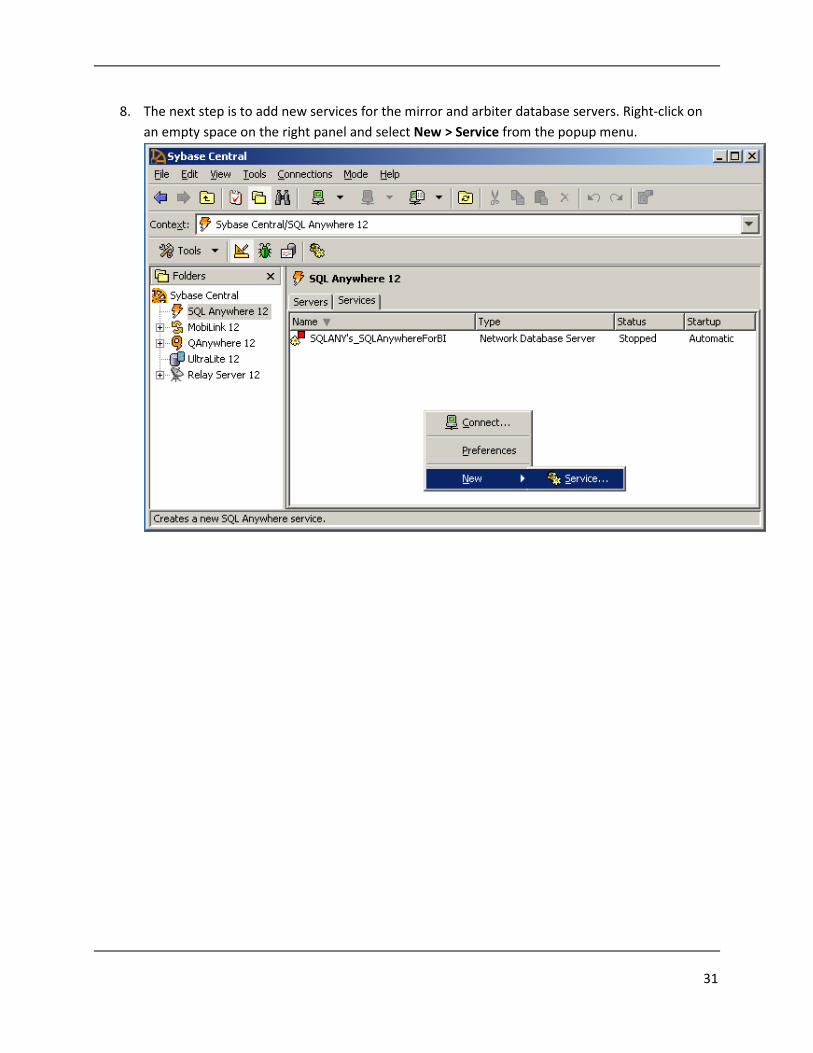
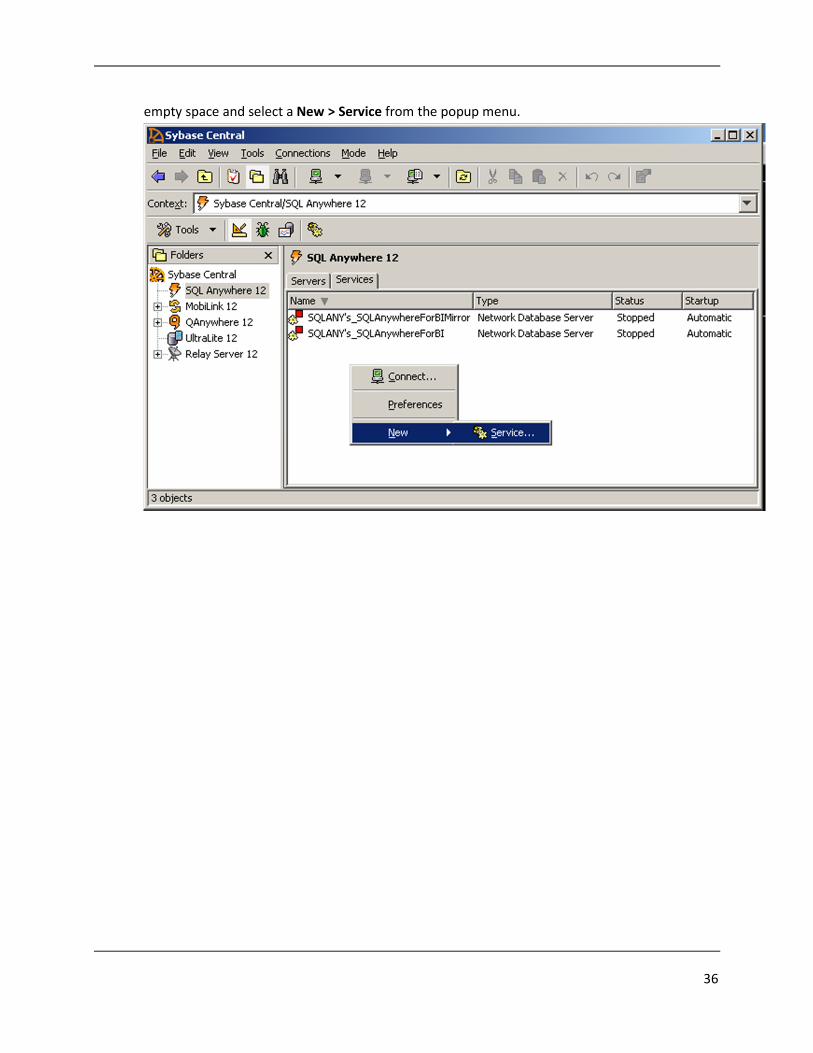
8. The next step is to add new services for the mirror and arbiter database servers. Right-click on
an empty space on the right panel and select New > Service from the popup menu.
32
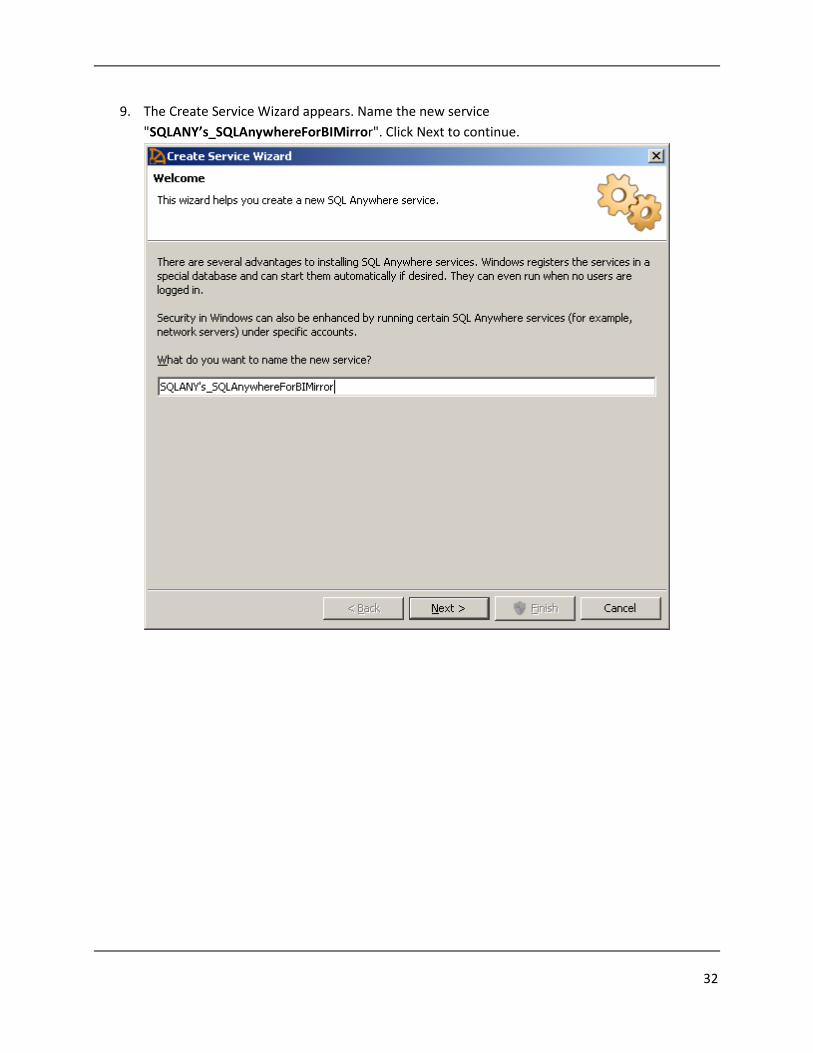
9. The Create Service Wizard appears. Name the new service
"SQLANY’s_SQLAnywhereForBIMirror". Click Next to continue.
33
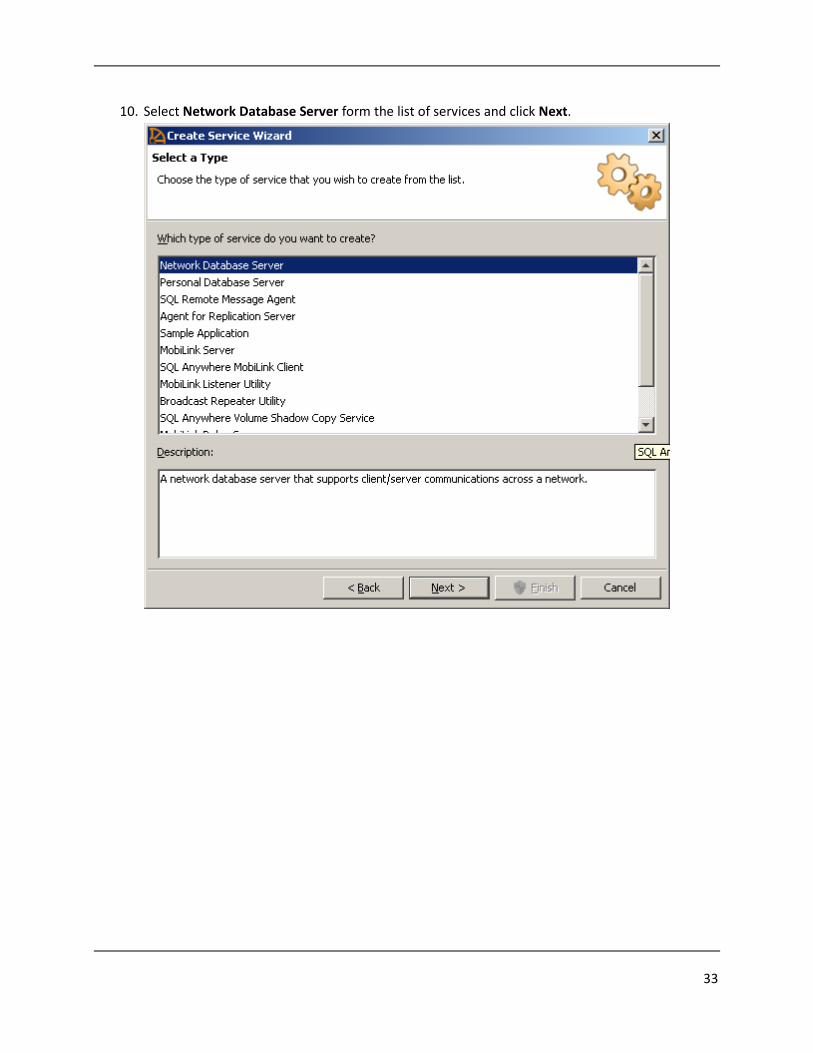
10. Select Network Database Server form the list of services and click Next.

34
11. Enter the directory path to dbsrv12.exe within the SQL Anywhere 12 program folder. Click Next
to continue.
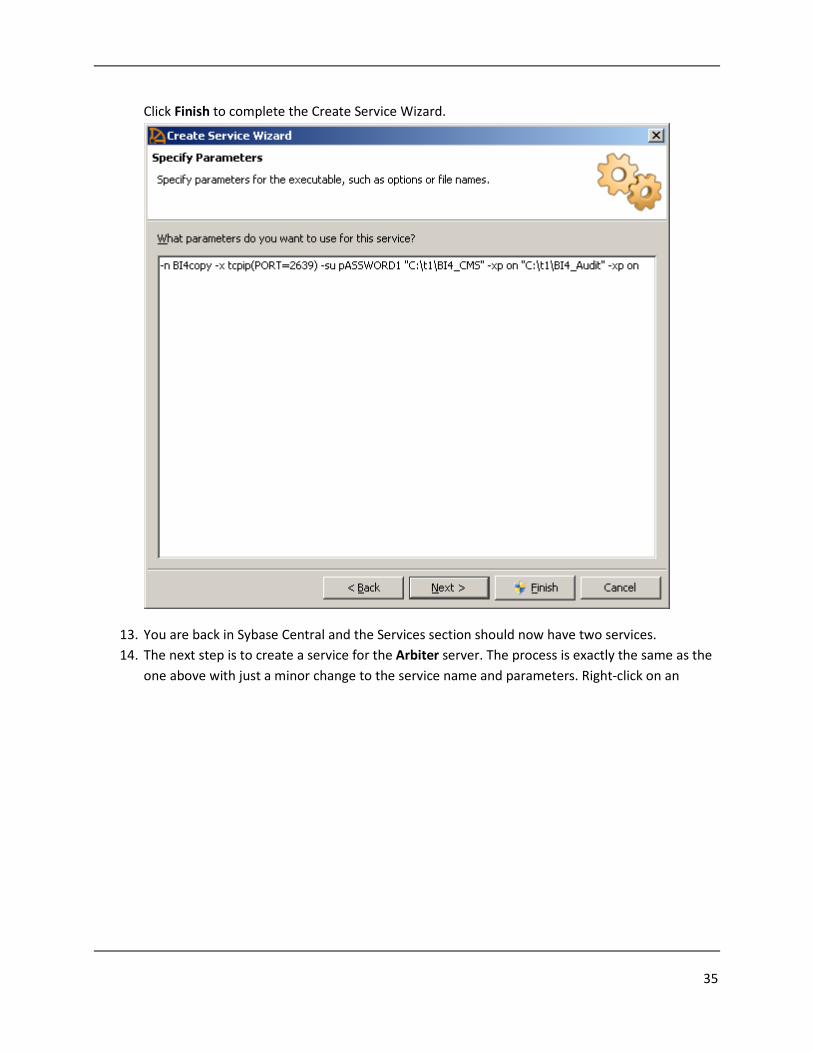
12. The user needs to specify the parameters for the mirror database server. These parameters will
be the exact same to the ones used in the section “Starting up the Mirror and Arbiter Servers”:
-n BI4copy -x tcpip(PORT=2639) -su pASSWORD1 "C:\t1\BI4_CMS.db" -xp on
"C:\t1\BI4_Audit.db" -xp on
35
Click Finish to complete the Create Service Wizard.
13. You are back in Sybase Central and the Services section should now have two services.
14. The next step is to create a service for the Arbiter server. The process is exactly the same as the
one above with just a minor change to the service name and parameters. Right-click on an
36
empty space and select a New > Service from the popup menu.

37
15. The Create Service Wizard appears. Name the new service
"SQLANY’s_SQLAnywhereForBIArbiter". Click Next to continue.
38
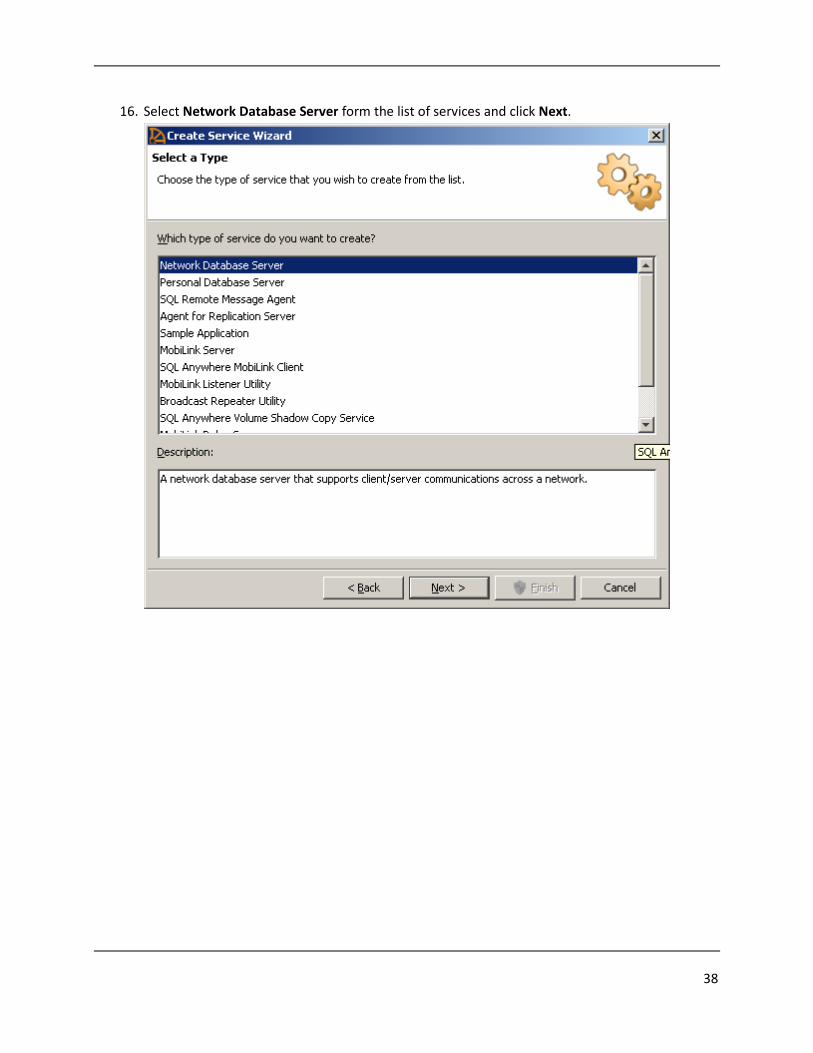
16. Select Network Database Server form the list of services and click Next.
39
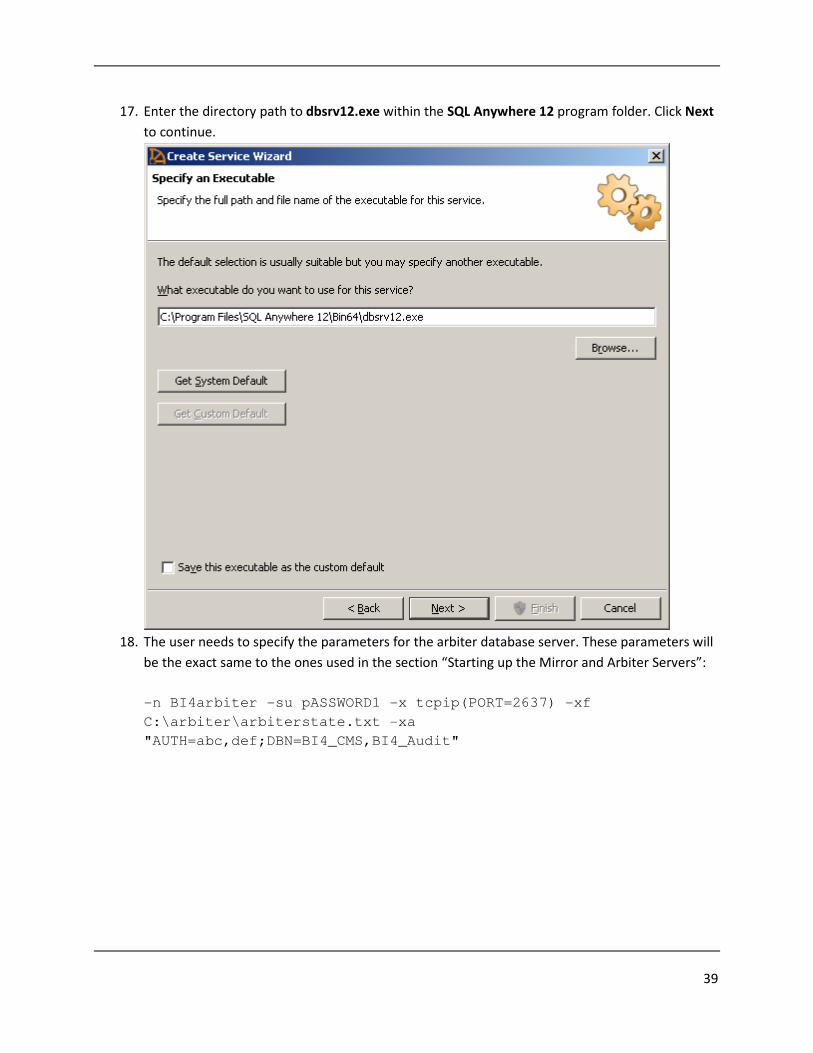
17. Enter the directory path to dbsrv12.exe within the SQL Anywhere 12 program folder. Click Next
to continue.
18. The user needs to specify the parameters for the arbiter database server. These parameters will
be the exact same to the ones used in the section “Starting up the Mirror and Arbiter Servers”:
-n BI4arbiter -su pASSWORD1 -x tcpip(PORT=2637) -xf
C:\arbiter\arbiterstate.txt -xa
"AUTH=abc,def;DBN=BI4_CMS,BI4_Audit"

40
Click Finish to complete the Create Service Wizard.
19. Now you are back in Sybase Central and within the Services section there are three sevices. One
for each of the database servers.
At this point, the three SQLA database servers are still running due to the setup steps performed
earlier. Shut down each SQLA database server by either:
• Clicking “Shut down” in the database server dialog (launch via System Tray)
-or-
• Running these three commands in the Command Prompt:
dbstop -c "uid=dba;pwd=pASSWORD1;dbn=utility_db;links=tcpip" BI4copy
dbstop -c "uid=dba;pwd=pASSWORD1;dbn=utility_db;links=tcpip" BI4
dbstop -c "uid=dba;pwd=pASSWORD1;dbn=utility_db;links=tcpip" BI4arbiter
You may now close the Command Prompt.
41
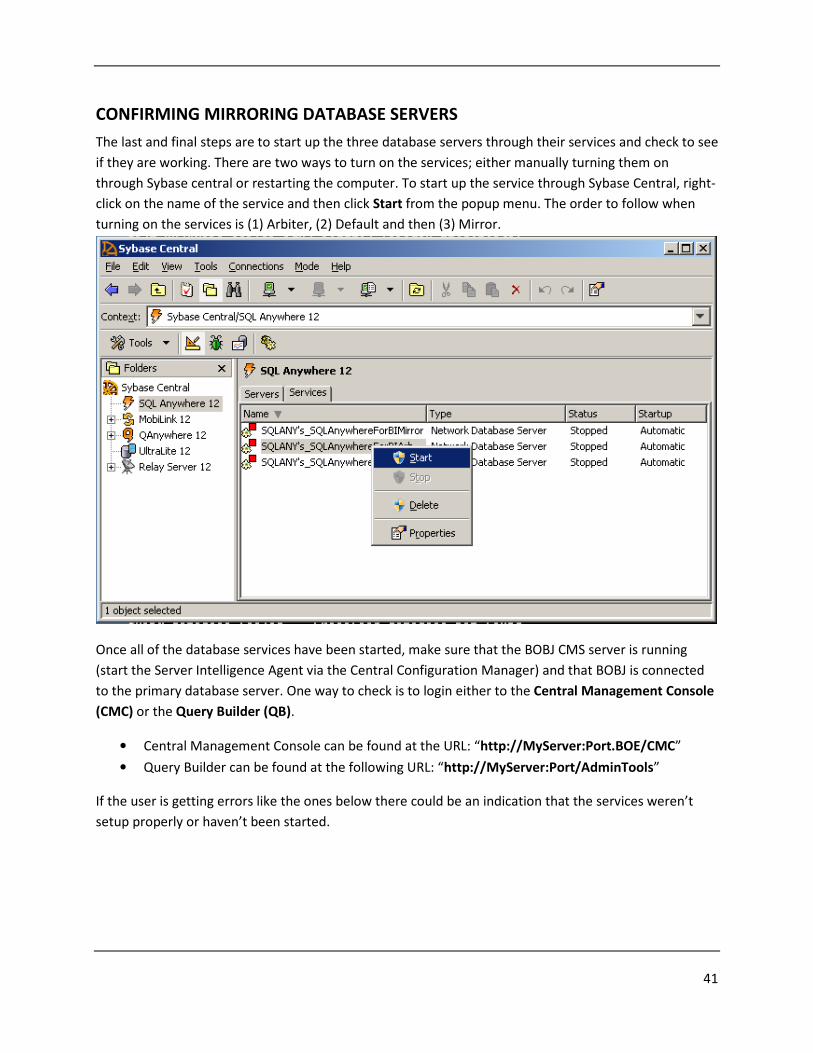
CONFIRMING MIRRORING DATABASE SERVERS
The last and final steps are to start up the three database servers through their services and check to see
if they are working. There are two ways to turn on the services; either manually turning them on
through Sybase central or restarting the computer. To start up the service through Sybase Central, right-
click on the name of the service and then click Start from the popup menu. The order to follow when
turning on the services is (1) Arbiter, (2) Default and then (3) Mirror.
Once all of the database services have been started, make sure that the BOBJ CMS server is running
(start the Server Intelligence Agent via the Central Configuration Manager) and that BOBJ is connected
to the primary database server. One way to check is to login either to the Central Management Console
(CMC) or the Query Builder (QB).
• Central Management Console can be found at the URL: “http://MyServer:Port.BOE/CMC”
• Query Builder can be found at the following URL: “http://MyServer:Port/AdminTools”
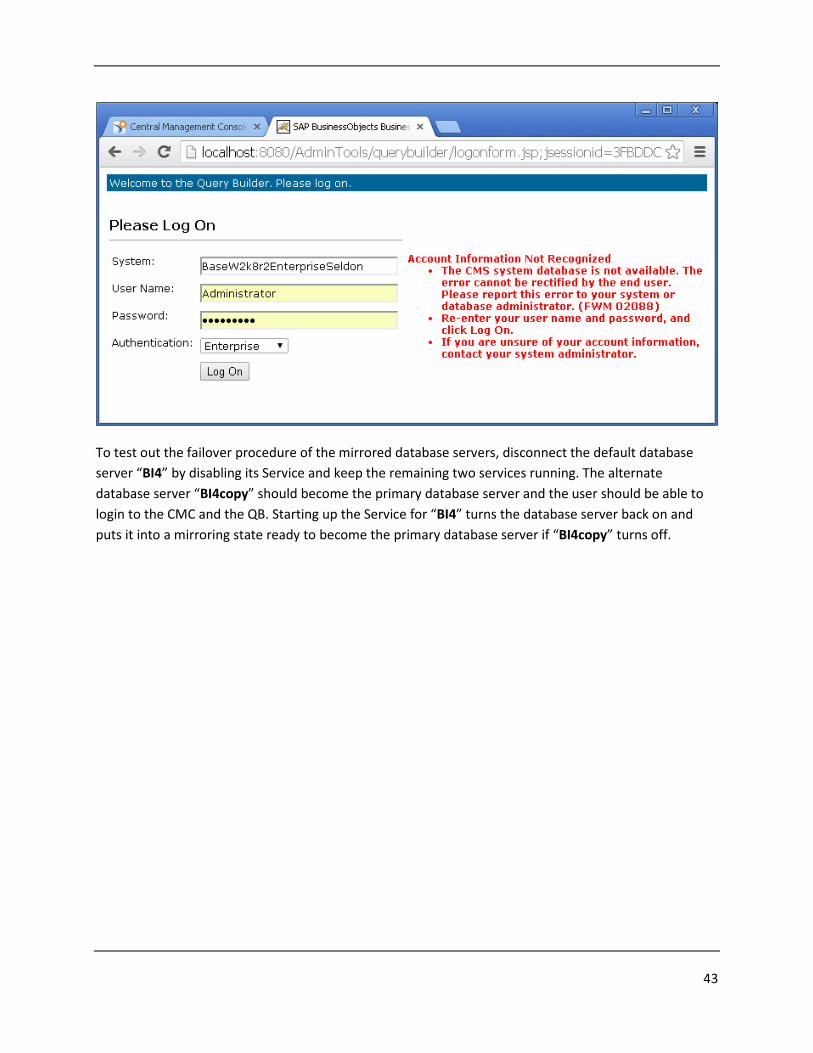
If the user is getting errors like the ones below there could be an indication that the services weren’t
setup properly or haven’t been started.

42
43
To test out the failover procedure of the mirrored database servers, disconnect the default database
server “BI4” by disabling its Service and keep the remaining two services running. The alternate
database server “BI4copy” should become the primary database server and the user should be able to
login to the CMC and the QB. Starting up the Service for “BI4” turns the database server back on and
puts it into a mirroring state ready to become the primary database server if “BI4copy” turns off.
44
SUMMARY & ADDITIONAL RESOURCES
Implementing database mirroring for the CMS repository and Audit database can be a very helpful tool
when considering a high availability environment within SAP Business Objects. It is important to make
sure that the Arbiter database server is always running so that the mirroring database servers know
which state they are in. Don't forget to test your mirroring system to ensure the procedure executes
properly and behaves as expected.
Additional Resources:
SQL Anywhere Database Mirroring Tutorial: http://dcx.sybase.com/index.html#1201/en/dbadmin/da-
highavailability-s-4980336.html
Business Intelligence Help Portal: http://help.sap.com/bobi
SQL Anywhere Community: http://scn.sap.com/community/sybase-sql-anywhere

© 2014 SAP AG or an SAP affiliate company. All rights reserved.
No part of this publication may be reproduced or transmitted in any form or for any purpose without the express permission of SAP AG. The information contained herein may be changed without prior notice.
Some software products marketed by SAP AG and its distributors contain proprietary software components of other software vendors. National product specifications may vary.
These materials are provided by SAP AG and its affiliated companies (“SAP Group”) for informational purposes only, without representation or warranty of any kind, and SAP Group shall not be liable for errors or omissions with respect to the materials. The only warranties for SAP Group products and services are those that are set forth in the express warranty statements accompanying such products and services, if any. Nothing herein should be construed as constituting an additional warranty.
SAP and other SAP products and services mentioned herein as well as their respective logos are trademarks or registered trademarks of SAP AG in Germany and other countries.
Please see
http://www.sap.com/corporate-en/legal/copyright/index.epx#trademark
for additional trademark information and notices.