Embed Size (px)
Citation preview
Important InformationThe Polaris Vac-Sweep® 380 automatic pool cleaner comes ready to connect to a threaded 1-1/2"female pipe fitting on a dedicated cleaner line. Other connections are possible, but they require addi-tional fittings (see Section B on page 4).
The Polaris 380 is intended for use with a Polaris Booster Pump. You should have a licensed electricianinstall the cleaner's booster pump. The booster pump must be installed according to the electricalcodes applicable in your area. Improper installation can result in serious or even fatal injury.
The following are important points to remember when installing and operating the Polaris 380.
• Always turn the filtration pump on before turning on the booster pump.• Always disconnect the Polaris from the pool wall when cleaning or backwashing the pool filter.• After cleaning or backwashing, let the filtration system run for at least five minutes before
reconnecting the Polaris.• New plumbing lines should be flushed out before installing the Polaris.• The Polaris should not be used to remove plaster dust in new pools.• Always remove the Polaris before swimmers enter the pool.• Always handle the Polaris with care. Do not let children or pets play with the Polaris; it is not a toy.• Except when checking the wheel RPM, do not handle the Polaris while it is operating (see page 7).• Never pick up the Polaris by the head float.• Always remove the Polaris from the pool before chemical shock treatments. As a general rule, any
pool water that is unsafe for swimming is unsafe for the Polaris.• Carefully cut the hoses following the instructions on page 5.
By following these simple guidelines, you can help protect against injury and prolong the life of your newPolaris 380.
Polaris 380 U.S. Patents: 4,618,420; D 288,373. Unique product shape is a registered trademark.
Before the Polaris is installed, please take a moment to record the serial number. For the location ofthe serial number, refer to the Exploded Parts Diagram on page 14. You will be asked for thisnumber when you contact our Customer Service Department.
Serial # K ______________________

Table of ContentsI. Introduction . . . . . . . . . . . . . . . . . . . . . . . . . . . . . . . . . . . . . . . . . . . . . . . . . . . . . . . . . . . . . . . . . . . 3
II. Installation Instructions . . . . . . . . . . . . . . . . . . . . . . . . . . . . . . . . . . . . . . . . . . . . . . . . . . . . . . . . . . 4
A. Polaris 380 Components . . . . . . . . . . . . . . . . . . . . . . . . . . . . . . . . . . . . . . . . . . . . . . . . . . . . . . . . 4
B. Possible Pool Connections . . . . . . . . . . . . . . . . . . . . . . . . . . . . . . . . . . . . . . . . . . . . . . . . . . . . . . 41. Dedicated Cleaner Line . . . . . . . . . . . . . . . . . . . . . . . . . . . . . . . . . . . . . . . . . . . . . . . . . . . . . . . 42. Over-the-deck Installation . . . . . . . . . . . . . . . . . . . . . . . . . . . . . . . . . . . . . . . . . . . . . . . . . . . . . 4
C. Installing the Universal Wall Fitting . . . . . . . . . . . . . . . . . . . . . . . . . . . . . . . . . . . . . . . . . . . . . . . . 4
D. Cutting the Feed Hose . . . . . . . . . . . . . . . . . . . . . . . . . . . . . . . . . . . . . . . . . . . . . . . . . . . . . . . . . . 5
E. Assembling the Polaris . . . . . . . . . . . . . . . . . . . . . . . . . . . . . . . . . . . . . . . . . . . . . . . . . . . . . . . . . 6
F. Checking Operation . . . . . . . . . . . . . . . . . . . . . . . . . . . . . . . . . . . . . . . . . . . . . . . . . . . . . . . . . . . . 6
G. Fine Tuning . . . . . . . . . . . . . . . . . . . . . . . . . . . . . . . . . . . . . . . . . . . . . . . . . . . . . . . . . . . . . . . . . . 61. Thrust Jet Adjustment . . . . . . . . . . . . . . . . . . . . . . . . . . . . . . . . . . . . . . . . . . . . . . . . . . . . . . . . 62. Sweep Hose Adjustment . . . . . . . . . . . . . . . . . . . . . . . . . . . . . . . . . . . . . . . . . . . . . . . . . . . . . . 73. Universal Wall Fitting Pressure Restrictors . . . . . . . . . . . . . . . . . . . . . . . . . . . . . . . . . . . . . . . . 74. Checking Wheel RPM . . . . . . . . . . . . . . . . . . . . . . . . . . . . . . . . . . . . . . . . . . . . . . . . . . . . . . . . 7
III.Operation and Maintenance . . . . . . . . . . . . . . . . . . . . . . . . . . . . . . . . . . . . . . . . . . . . . . . . . . . . . . 8
A. What to Expect From Your Polaris 380 . . . . . . . . . . . . . . . . . . . . . . . . . . . . . . . . . . . . . . . . . . . . . 8
B. Turning On/Off the Polaris . . . . . . . . . . . . . . . . . . . . . . . . . . . . . . . . . . . . . . . . . . . . . . . . . . . . . . . 8
C. Operating Time . . . . . . . . . . . . . . . . . . . . . . . . . . . . . . . . . . . . . . . . . . . . . . . . . . . . . . . . . . . . . . . 8
D. Connecting/Disconnecting the Polaris . . . . . . . . . . . . . . . . . . . . . . . . . . . . . . . . . . . . . . . . . . . . . . 8
E. Cleaning the Filter Bag . . . . . . . . . . . . . . . . . . . . . . . . . . . . . . . . . . . . . . . . . . . . . . . . . . . . . . . . . 8
F. Periodic Maintenance . . . . . . . . . . . . . . . . . . . . . . . . . . . . . . . . . . . . . . . . . . . . . . . . . . . . . . . . . . 91. Filter Screen . . . . . . . . . . . . . . . . . . . . . . . . . . . . . . . . . . . . . . . . . . . . . . . . . . . . . . . . . . . . . . . 92. Wear Rings . . . . . . . . . . . . . . . . . . . . . . . . . . . . . . . . . . . . . . . . . . . . . . . . . . . . . . . . . . . . . . . . 93. Tires . . . . . . . . . . . . . . . . . . . . . . . . . . . . . . . . . . . . . . . . . . . . . . . . . . . . . . . . . . . . . . . . . . . . . . 94. Sweep Hose Scrubber . . . . . . . . . . . . . . . . . . . . . . . . . . . . . . . . . . . . . . . . . . . . . . . . . . . . . . . . 9
G. Backwashing the Pool Filter . . . . . . . . . . . . . . . . . . . . . . . . . . . . . . . . . . . . . . . . . . . . . . . . . . . . . 9
H. Storage . . . . . . . . . . . . . . . . . . . . . . . . . . . . . . . . . . . . . . . . . . . . . . . . . . . . . . . . . . . . . . . . . . . . . 10
I. Winterizing . . . . . . . . . . . . . . . . . . . . . . . . . . . . . . . . . . . . . . . . . . . . . . . . . . . . . . . . . . . . . . . . . . . 10
J. Accessories . . . . . . . . . . . . . . . . . . . . . . . . . . . . . . . . . . . . . . . . . . . . . . . . . . . . . . . . . . . . . . . . . . 101. Sweep Hose Weight . . . . . . . . . . . . . . . . . . . . . . . . . . . . . . . . . . . . . . . . . . . . . . . . . . . . . . . . . 102. Ladder Guard Kit . . . . . . . . . . . . . . . . . . . . . . . . . . . . . . . . . . . . . . . . . . . . . . . . . . . . . . . . . . . . 103. Filter Bags . . . . . . . . . . . . . . . . . . . . . . . . . . . . . . . . . . . . . . . . . . . . . . . . . . . . . . . . . . . . . . . . . 104. WaterStars and WaterStars WF . . . . . . . . . . . . . . . . . . . . . . . . . . . . . . . . . . . . . . . . . . . . . . . . 105. SpaWand . . . . . . . . . . . . . . . . . . . . . . . . . . . . . . . . . . . . . . . . . . . . . . . . . . . . . . . . . . . . . . . . . 10
IV.Troubleshooting the Polaris . . . . . . . . . . . . . . . . . . . . . . . . . . . . . . . . . . . . . . . . . . . . . . . . . . . . . . 11
A. Problems and Solutions . . . . . . . . . . . . . . . . . . . . . . . . . . . . . . . . . . . . . . . . . . . . . . . . . . . . . . . . . 11
B. Troubleshooting Worksheet . . . . . . . . . . . . . . . . . . . . . . . . . . . . . . . . . . . . . . . . . . . . . . . . . . . . . . 12
Polaris Booster Pump . . . . . . . . . . . . . . . . . . . . . . . . . . . . . . . . . . . . . . . . . . . . . . . . . . . . . . . . . . . . . 13
Exploded Parts Diagram . . . . . . . . . . . . . . . . . . . . . . . . . . . . . . . . . . . . . . . . . . . . . . . . . . . . . . . . . . . 14
Warranty . . . . . . . . . . . . . . . . . . . . . . . . . . . . . . . . . . . . . . . . . . . . . . . . . . . . . . . . . . . . . . . . . . . . . . . . 17

I. IntroductionCongratulations on the purchase of your newautomatic pool cleaner, and thank you forchoosing a Polaris Vac-Sweep 380. The Polaris380 is designed to give you years of dependableand efficient service. With the Polaris 380, youand your family can spend more time enjoyingyour pool and less time cleaning it.
The Polaris has been built with the finest mate-rials available. The Polaris 380 is backed by thePolaris limited warranty that protects againstdefects in parts and workmanship (see the war-ranty on page 17). Like most mechanical devices,it will require periodic adjustments, routine main-tenance, and the replacement of certainhardworking parts. Be sure to have the Polarischecked occasionally by your local Polaris dealer.
Always insist on genuine Polaris replacementparts. You can be sure you are buying genuinePolaris parts if they come in Polaris part bags orhave the Polaris logo on them. Non-Polaris partsare not made to our specifications. They mayhave an adverse effect on the operation of yourPolaris or may even damage it. If you are unable
to find genuine Polaris parts in your area, contactus at 1-800-VAC-SWEEP (USA and Canada only)to receive the name of the participating Polarisdealer nearest you.
For best results, the Polaris 380 should beinstalled by a pool professional. For those withexperience and confidence in handling plumbingand mechanical equipment, installation instruc-tions are included in this manual.
Please Note: Installation instructions for thePolaris Booster Pump are included with thepump.
➔ Look for this symbol throughout the owner's manual for helpful hints in the use of your new Polaris 380.
The numbers in parentheses found throughoutthe manual refer to the index numbers in theExploded Parts Diagram on pages 14-16. Thereare also part numbers listed in parentheses tohelp identify the replacement parts available atyour participating Polaris dealer.
Once again, thank you for choosing a Polaris.
3

II. Installation InstructionsA. Polaris 380 ComponentsThe Polaris 380 box contains:
1. Sweep Hose with Sweep Hose Scrubber2. Head Float3. All Purpose Bag4. Cleaner Head5. Complete Feed Hose with Back-up Valve6. Quick Disconnect7. Universal Wall Fitting with Pressure
Restrictors (one red and one blue)
B. Possible Pool Connections
1. Dedicated Cleaner LineA 1-1/2" dedicated cleaner line is recommended.It should be approximately 6" below the waterlevel and have 1-1/2" female threads. If it has 1/4"female threads, you will need to purchase the3/4" x 1-1/2" coupling (part #G-9).
2. Over-the-deck InstallationIf the pool does not have a dedicated cleanerline, the Polaris can be installed by obtaining an
over-the-deck kit (part #G-12) and running anaboveground feed line from the booster pumpover the pool deck to the pool wall.
C. Installing the Universal Wall Fitting
1. Turn on the filtration pump and flush out theplumbing line.
2. Remove the universal wall fitting from thequick disconnect. The universal wall fitting has ablue pressure restrictor installed to help thePolaris operate at its optimum level of efficiency.Screw the universal wall fitting and the bluerestrictor into the return line by hand.
3. Turn the quick disconnect into the universalwall fitting clockwise and pull away to secure.
4. Turn the quick disconnect by hand to tightenthe universal wall fitting; do not overtighten. Oncethe universal wall fitting is secure, the quick dis-connect can be removed without removing theuniversal wall fitting.
4
4
23
6
5
17
UniversalWall Fitting
QuickDisconnect
Pressure ReliefValve
Pool Wall
Universal WallFitting Pressure
Restrictor
Universal WallFitting
White Hoses Are Cut to Equal LengthsClear Hose is Equal toGreatest Depth of Pool
Entire Feed Hose Reaches Within 6" of Farthest Point of Pool*
Floats Are Evenly Distributed(1-1/2 to 3 Feet Apart)
2-3 Feet Apart
*Please Note: The illustrations in this section do not necessarily represent the farthest point for every pool. Youmust determine where the farthest point is in your pool.
Properly Sized Feed HoseFor proper cleaner performance, the hose must be sized to fit your pool. To size correctly, follow the steps in Section D. Once sized, the feed hose should look like the one below.
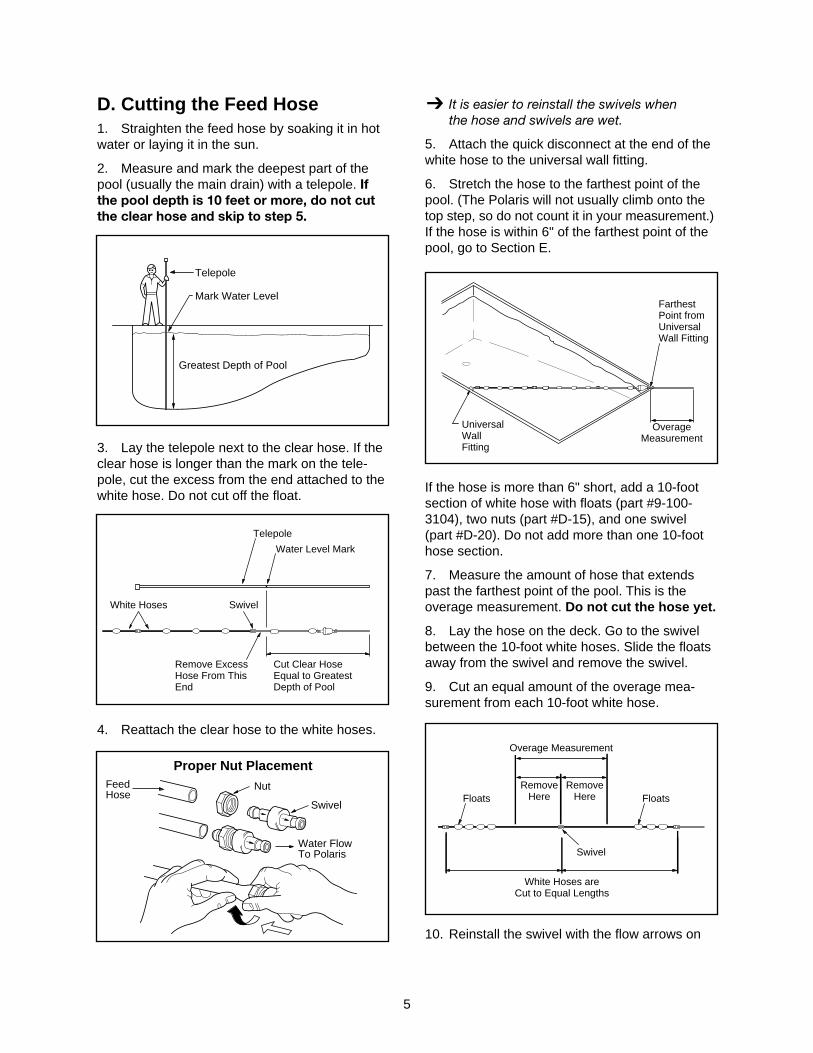
D. Cutting the Feed Hose 1. Straighten the feed hose by soaking it in hotwater or laying it in the sun.
2. Measure and mark the deepest part of thepool (usually the main drain) with a telepole. Ifthe pool depth is 10 feet or more, do not cutthe clear hose and skip to step 5.
3. Lay the telepole next to the clear hose. If theclear hose is longer than the mark on the tele-pole, cut the excess from the end attached to thewhite hose. Do not cut off the float.
4. Reattach the clear hose to the white hoses.
➔ It is easier to reinstall the swivels when the hose and swivels are wet.
5. Attach the quick disconnect at the end of thewhite hose to the universal wall fitting.
6. Stretch the hose to the farthest point of thepool. (The Polaris will not usually climb onto thetop step, so do not count it in your measurement.)If the hose is within 6" of the farthest point of thepool, go to Section E.
If the hose is more than 6" short, add a 10-footsection of white hose with floats (part #9-100-3104), two nuts (part #D-15), and one swivel(part #D-20). Do not add more than one 10-foothose section.
7. Measure the amount of hose that extendspast the farthest point of the pool. This is theoverage measurement. Do not cut the hose yet.
8. Lay the hose on the deck. Go to the swivelbetween the 10-foot white hoses. Slide the floatsaway from the swivel and remove the swivel.
9. Cut an equal amount of the overage mea-surement from each 10-foot white hose.
10. Reinstall the swivel with the flow arrows on
5
OverageMeasurement
UniversalWallFitting
FarthestPoint fromUniversalWall Fitting
Greatest Depth of Pool
Mark Water Level
Telepole
Cut Clear HoseEqual to Greatest Depth of Pool
Water Level Mark
Telepole
SwivelWhite Hoses
Remove ExcessHose From ThisEnd
FeedHose
Nut
Swivel
Water FlowTo Polaris
Overage Measurement
RemoveHere
White Hoses areCut to Equal Lengths
Floats
Swivel
FloatsRemove
Here
Proper Nut Placement

the swivel pointing toward the Polaris. (Refer tothe “Proper Nut Placement” diagram.)
11. On the clear hose, make sure one float isagainst the back-up valve on the side oppositethe cleaner and another float is upstream within 2-3feet. On the white hoses, space the floats no lessthan 1-1/2 feet and no more than 3 feet apart, so thatthe white hoses do not sag. It may be necessary toremove floats to maintain proper spacing.
12. When the feed hose has been cut properly, itshould look like the one in the “Properly SizedFeed Hose” diagram on page 4.
E. Assembling the Polaris1. Put the nut on the feed pipe. Attach the clearhose to the feed pipe and tighten the nut. If thereis a curve at the end of the hose, align it with thecurve of the feed pipe.
2. Pull out the bag. With the bag on the single-wheel side of the feed hose, snap the bag collaronto the feed hose.
3. Turn on the pool filtration pump. Wait at least30 seconds and turn on the booster pump.
F. Checking OperationWhen operating correctly, the Polaris 380 willtravel randomly throughout the pool, vacuuming,sweeping and scrubbing the bottom, sides, andmost of the steps and swimouts. The Polaris willclean an average pool in 3 hours or less.
The Polaris comes equipped with an automaticpressure relief valve in the quick disconnect. Ifthe Polaris is receiving too much water pressure,it will release water at the quick disconnect.
The wheel RPM of the Polaris should be between28 and 32.
Approximately every 2 minutes the Polaris 380will go into back-up mode. At this time the back-up valve will pull the Polaris away from potentialobstacles and increase its random pattern.
The sweep hose operates in a gentle sweepingmotion to prevent debris from becoming trappedin hard-to-reach corners of the pool.
If the Polaris does not operate as describedabove, turn off the pumps and make the neces-sary adjustments below.
G. Fine Tuning
1. Thrust Jet AdjustmentThe position of the thrust jet determines thedirection of the Polaris. Its standard position iseleven o'clock. See the “Assembling the Polaris”diagram for the location of the thrust jet.
6
Clear Hose
Nut
Head Float
Thrust Jet
SweepHose Sweep Hose
Adjustment Screw
Feed Pipe
PU
SHES
UNIT LEFT PUSHES UNITRIG
HT
12
6
9 3
INCREASES CLIMBING
DECREASES CLIMBIN
G
11
Assembling the Polaris

2. Sweep Hose AdjustmentThe sweep hose should move in a gentlesweeping motion. To decrease its motion, turnthe sweep hose adjustment screw clockwise. Seethe “Assembling the Polaris” diagram on page 6.Make sure the sweep hose scrubber does notblock the water flowing from the sweep hose.
3. Universal Wall Fitting Pressure Restrictors
The universal wall fitting comes with a bluerestrictor installed and an optional red restrictorfor use if needed. These special restrictors aredesigned to work in combination with the pres-sure relief valve. Together they will releaseex-cess water pressure so the Polaris canoperate at its optimum level of efficiency. The redrestrictor provides maximum water restriction,while the blue restrictor provides less restriction.
To determine whether a restrictor is needed,follow the instructions below.
4. Checking Wheel RPMTo determine whether the Polaris is receiving pro-per water pressure, turn off and carefully removethe Polaris from the pool. Mark the outer edge ofa tire. Place the Polaris back in the pool and turnon the pumps.
Hold the Polaris by the blue top, suspended onits side just below the water level.
➔ Hold the sweep hose to avoid being squirted.
Count the revolutions of the marked wheel forexactly one minute, beginning after the Polarishas completed a back-up cycle. This gives you thecleaner's wheel Revolutions Per Minute (RPM).
For proper operation, the wheel RPM should bebetween 28 and 32.
If the Polaris is operating above 32 RPM:
• Remove the universal wall fitting by attachingthe quick disconnect. Pull it away from the poolwall as you unscrew the universal wall fitting.
• Push the blue restrictor out of the universalwall fitting and snap in the red restrictor.
• Reinstall the universal wall fitting.
• Recheck the wheel RPM.
If the Polaris is still operating above 32 RPM, unscrew the pressure relief valve (#45 on page16) until the proper RPM are reached.
If the Polaris is operating below 28 RPM:
• Remove the universal wall fitting by attachingthe quick disconnect. Pull it away from the poolwall as you unscrew the universal wall fitting.
• Push the blue restrictor out of the universal wall fitting.
• Reinstall the universal wall fitting.
• Recheck the wheel RPM.
If you still have less than 28 RPM:
• Clean the filter screen in the quick discon-nect. A dirty filter screen will restrict the waterflow from the pump to the Polaris.
• Check the hoses, connections, and swivelsfor leaks that could cause loss of water pressure.
• If there is a gate valve installed on thebooster pump or the Polaris cleaner line, open itcompletely so water can flow freely to the Polaris.
• Clean the skimmer and pump baskets.
Please Note: If the above suggestions do notwork, contact our Customer Service Departmentat 1-800-VAC-SWEEP (USA and Canada only).
7
Blue Top
Sweep Hose
��
����
����
��
����

A. What to Expect From Your Polaris 380
When operating correctly, the Polaris 380 willtravel randomly throughout the pool, vacuuming,sweeping and scrubbing the bottom, sides, andmost of the steps and swimouts. The Polaris willclean an average pool in 3 hours or less.
The Polaris comes equipped with an automaticpressure relief valve in the quick disconnect. Ifthe Polaris is receiving too much water pressure,it will release water at the quick disconnect.
The wheel RPM of the Polaris should be between28 and 32.
Approximately every 2 minutes the Polaris 380will go into back-up mode. At this time the back-up valve will pull the Polaris away from potentialobstacles and increase its random pattern.
The sweep hose operates in a gentle sweepingmotion to prevent debris from becoming trappedin hard-to-reach corners of the pool.
B. Turning On/Off the PolarisNever run the booster pump without the poolfiltration pump running. Turn on the filtrationpump. Wait at least 30 seconds and turn on thebooster pump. If the Polaris has been installedwith time clocks, set them so the Polaris is turnedon at least one half hour after the filtration pumphas been turned on and shuts off one half hourbefore the filtration pump shuts off. Failure tofollow these instructions could cause pumpdamage not covered in the Polaris warranty.
C. Operating TimeTo find the optimum running time for your pool,start by running the Polaris for 3 hours. Decreasethe time until you notice that your pool is not get-ting clean.
➔ If you have a lot of debris in your pool (i.e. after a storm), you can run the Polaris in two shorter cycles per day and empty the filter bag between cycles.
D. Connecting/Disconnecting the Polaris
To connect, turn off both pumps. Turn the quickdisconnect clockwise into the universal wall fittingand pull away from the pool wall to secure. Todisconnect, turn off both pumps. Push the quickdisconnect in and turn counterclockwise.
➔ To make connecting and disconnecting the quick disconnect even easier, periodically lubricate the quick disconnect o-ring with o-ring lubricant.
E. Cleaning the Filter Bag1. Remove the bag collar from the feed hose.Depress the prongs and remove the bag from thecleaner. There is no need to remove the bagcollar from the bag.
8
Universal WallFitting (Installed)
Quick Disconnect
Peg
Filter Bag
Depress Here
Prong
III.Operation and Maintenance

2. Open the velcro closure and dump out thedebris.
➔ If the velcro closure begins to lose its “grip”, rinse it, let it dry and clean it with a stiff brush.
3. Position the velcro closure on the bag closestto the feed hose, align the prongs and snap thebag to the cleaner. With the bag on the single-wheel side of the feed hose, snap the bag collaronto the feed hose.
➔ Some Polaris owners have told us it is easier to empty the filter bag when it is dry. They alternate between two filter bags. When one becomes full, they remove it and put on the clean bag. They let the full bag dry com-pletely before emptying it.
F. Periodic MaintenanceThe following parts are wear items that should beperiodically checked and replaced as needed.Please Note: Wear items are not covered underwarranty.
1. Filter Screen (#43)Inside the quick disconnect there is a filterscreen. It acts as a safety filter to keep any debristhat is not caught by the pool filtration system outof the Polaris. If the filter screen clogs often, con-sult your pool professional.
Please Note: Running the Polaris without thefilter screen can damage the Polaris.
To clean the filter screen, pull it out of the quickdisconnect, rinse it and press it firmly back intoplace. See the diagram at the top of the nextcolumn.
2. Wear Rings (#38)The sweep hose is fitted with rolling wear ringsthat protect the sweep hose. Replace thembefore the weights on either side of the wearrings begin to wear.
➔ To maximize the life of the wear rings, we recommend that you rotate them as they wear.
3. Tires (#6)The tires provide traction and protect both thePolaris and the bottom of your pool. Replace thetires when the edges become rounded.
4. Sweep Hose Scrubber (#30)The sweep hose scrubber helps keep the bottomand sides of your pool clean. It also helps pre-vent the sweep hose from spraying water out ofthe pool. Replace the scrubber when it becomesworn. The scrubber may need to be replacedoften depending on the surface of your pool.
➔ To maximize the life of the sweep hose scrubber, we recommend that you turn it as it wears.
G. Backwashing the Pool FilterAlways disconnect the Polaris from the pool wallbefore cleaning or backwashing the pool filter.After cleaning or backwashing, let the pool filtra-tion system run for at least five minutes to flushout the return lines before reconnecting thePolaris.
9
Quick Disconnect
Slot
Tab
Filter Screen
VelcroClosure
Bag Collar

H. StorageNever store the Polaris in direct sunlight or withthe feed hose coiled.
➔ If coils do form, lay the hose in the sun or soak it in hot water to help straighten it before reinstalling.
I. WinterizingFreeze damage is not covered under warranty.Remove the Polaris from the pool and drain allthe water before storing for the winter. Also, drainall the water out of the booster pump by removingthe drain plug (see index number 14 on page 13).Use the quick disconnect to remove the universalwall fitting. Attach the quick disconnect, pull itaway from the pool wall and unscrew. In somecases, it may be necessary to use the universalwall fitting removal tool (part #10-102-00) avail-able from your participating Polaris dealer.
Please Note: If quick freeze conditions exist, besure the filtration pump is running and forcingwater through the booster pump. If there is a gatevalve installed, open it completely so water willflow through the booster pump.
J. Accessories
1. Sweep Hose Weight (Part #B-2)If the sweep hose or the thrust jet tend to breakthe surface of the water – squirting nearby win-dows, pool decking, or innocent bystanders – asweep hose weight can be installed.
2. Ladder Guard Kit (Part #G-21)The ladder guard kit will help prevent the Polarisfrom getting hung up around the pool ladder orhandrails.
3. Filter BagsThe Polaris comes with an all-purpose bag forgeneral use in all pools. You may want to
purchase one of our special bags listed belowand rotate between them as needed.
Sand/Silt Bag (Part #9-100-1015)
The sand/silt bag is made of a mesh materialdesigned to trap very fine silt and dust. The bagprovides a secondary filtering system, removingdebris as small as 9/1000 of an inch.
Leaf Bag (Part #9-100-1012)
The leaf bag is a large bag made of a moredurable material. It is specifically designed to col-lect larger, heavier types of debris such as largequantities of leaves and acorns.
Disposable All-Purpose Bag (Part #9-100-1013)
The disposable all-purpose bag is a convenientand efficient alternative to the all-purpose bag.Just let the bag fill, then simply throw it away.Sold in packages of three.
Disposable Sand/Silt Bags (Part #G-45)
These bags are designed to be used in conjunc-tion with any of the other bags. They are made ofan ultra fine material that will help catch even thefinest silt. They also make cleaning your bageven easier. Sold in packages of four.
4. WaterStars (Part #7-400-00) and WaterStars WF (Part #11-100-00)
Both of the Polaris WaterStars fountains comeequipped to connect to a universal wall fitting.Once the Polaris 380 is installed with the uni-versal wall fitting, you can quickly and easilyswitch from pool cleaner to Polaris fountain andback again.
5. SpaWand (Part #5-100-00)This simple, effective hand cleaning deviceallows you to rapidly clean your spa and poolsteps without hoses or hook-ups. It's also greatfor fish ponds and other bodies of water.
10

A. Problems and SolutionsFor best results, follow the troubleshooting solu-tions in the order they are listed below. The num-bers in parentheses refer to the Exploded PartsDiagram on pages 14-16.
Problem: Hangs up on corners or obsta-cles longer than 2 minutes.
Solution: 1. Check the wheel RPM. See page 7.
2. With the Polaris turned off, spin each wheel. All of the wheels should turn together. If they do not, contact your participating Polaris dealer.
3. Verify the back-up valve is cycling. The jet should come on and go off. It should stay off longer than it stays on.
4. Remove unnecessary pool hard-ware or install a ladder guard kit (part#G-21). See page 10.
Problem: Sweep hose sprays too much water out of the pool.
Solution: 1. Check the sweep hose scrubber (#30) and replace it if it's worn or missing (part #9-100-3105).
2. Decrease the sweep hose action. See “Sweep Hose Adjust-ment” on page 7.
3. Add a sweep hose weight (part B-2). See page 10.
Problem: Polaris goes in circles and does not clean the entire pool.
Solution: 1. Check the wheel RPM. See page 7.
2. With the Polaris turned off, spin each wheel. All of the wheels should turn together. If they do not, contact your participating Polaris dealer.
3. Verify proper hose cutting andfloat placement. See page 5.
4. Adjust the thrust jet (#21) to make the Polaris go in more of a straight direction. See page 6.
Problem: Polaris moves too slowly.
1. Check the wheel RPM. See page 7.
2. Clean the filter screen (#43) in the quick disconnect, if necessary. See page 9.
3. Clean the skimmer, pool filter and pump basket, if necessary.
4. Check all the hoses for holes that could cause loss of water pressure.
5. Verify the back-up valve is cycling. The jet should come on and go off. It should stay off longer than it stays on.
Problem: Polaris will not climb walls.
Solution: 1. Check the wheel RPM. See page 7.
2. Clean the filter screen (#43) in the quick disconnect, if necessary. See page 9.
3. With the Polaris turned off, spin each wheel. All of the wheels should turn together. If they do not, contact your participating Polaris dealer.
4. Position the thrust jet (#21) bet-ween 11:00 and 1:00 o'clock for maxi-mum climbing ability. See page 6.
Problem: Sweep hose is sucked into the vacuum tube.
Solution: 1. Make sure the opening at the end of the sweep hose (#37) is not block-ed by the sweep hose scrubber (#30).
2. Adjust the sweep hose (#37) to a gentle sweeping motion. See page 7.
Problem: Polaris runs on its side.
Solution: 1. Empty the bag (#1).
2. Check the head float (#35). If it's full of water, remove and replace it (part #A-20).
3. Check the floats (#50) to make sure they are floating and spaced properly. See number 11 on page 6.
Problem: Feed hose tangles or ties itself in knots.
Solution: 1. Make sure the feed hose hasbeen cut properly. See page 5.
2. Check the floats (#50) to make sure they are floating and spaceproperly. See number 11 on page 6.
3. Check the wheel RPM. See page 7.
4. Make sure the swivels (#49) are turning freely and the flow arrows on all of the swivels are pointing toward the cleaner.
11
IV.Troubleshooting the Polaris

12
Please Note: It is important to use genuinePolaris replacement parts, because non-Polaris parts may adversely affect the unit'sperformance. Filter bags are an excellentexample; “generic” bags are not specificallydesigned to work with the Polaris and cancause operating problems.
B. Troubleshooting WorksheetIf none of the troubleshooting solutions worked,please fill in the following information and eithercontact your participating Polaris dealer or ourCustomer Service Department at 1-800-VAC-SWEEP (USA and Canada only) or (760)599-9600, Monday through Friday, 7:30 a.m. -5:00 p.m. PST.
In order to provide faster and more convenientservice, have the following information avail-able at the time of your call or when taking thePolaris in for service.
1. Serial #: ___________________(See page 14 for the location of the serial #.)
2. Wheel RPM:________________(See page 7.)
3. Is the back-up valve cycling?(Watch the jet on the back-up valve. It should comeon and go off. It should stay off longer than it stays on.)
Yes No
4. Is the hose the proper length?(See the diagram at the bottom of page 4.)
Yes No
Length of the clear hose: _____________
Length of the white hoses:____________
5. Is the hose floating properly?(See number 11 at the top of page 6.)
Yes No
6. How often do you clean the filter screen inside the quick disconnect? (See page 9.)
Never Once a week
Twice a week Once a month
7. Are the vacuum jets obstructed?(While the cleaner is operating, hold it upside downand look into the vacuum tube. There should be three distinct, even jets of water.)
Yes No
8. Is the drive train functioning?(As you spin each wheel independently, all the wheels should spin.)
Yes No

13
Polaris Booster Pump - Sold Separately
Minimumof 3 feet
FromPool
Filtration Pump Pool Filter Heater
Polaris
Booster PumpNote: Plumb the booster pump up-stream of all air inducing equipment.
ToPool
Chlorinator
SolarSystem
ROTATIO
N
PUMPSUPPLY
PUMPDISCHARGE
13
1
3
5
6
2
8
9
10
12
11
914
4
7
No. Part # Description Qty1 P-5 Volute (Includes drain plug) 12 P-15 Impeller 13 P-55 Seal, Stainless Steel Cup/Spring 14 P-95 O-ring, Bracket 15 P-10 Bracket 16 P-35 Bolt, Stainless, Bracket to Motor 27 P-40 O-ring for Shaft 18 P-61 Motor, 3/4 HP, Threaded Shaft 19 P-25 Bolt/Nut, Stainless, for Volute to Bracket 6
10 P-80 Rubber Strip, Motor/Bracket 111 P-70 Pump Stand with Feet, Strip 112 P-75 Rubber Feet 413 P-65 Bolt, Stainless, Stand to Bracket and Motor 214 P-20 1/8" NPTM Plug, Plastic 1
Typical Installation
PLEASE NOTE All of the parts fit the PB3 Booster Pump produced in 1978 except P-20 and P-25. Call 1-800-VAC-SWEEP formore information on the Polaris Booster Pump.

1
39
2
20
21
2322
24
28
29
11
32
Serial Number
54
3
27
25
26
16
1710
876
13
11
12
15
9
Shown fromopposite side.
4
15
19
18
14
To insure proper operation and long life forthe Polaris, be sure to insist on genuinePolaris parts.

No. Part # Description Qty
1 9-100-1014 All Purpose Bag 12 9-100-1152 Housing, Turbine Upper 13 9-100-1114 Hub Cap 34 9-100-5107 E-clip, Stainless Steel 105 9-100-1108 Ball Bearing 86 C-10 Tire, White 37 9-100-1008 Wheel, Double-side 28 9-100-1017 Belt Kit, Small and Large 19 9-100-7011 Shield, Bearing 3
10 9-100-1005 Frame, Exchange Only 111 9-100-5117 Screw, 8-32 x 3/8" SS Pan Hd 1112 9-100-1139 Axle Block Assembly 213 9-100-1010 Belt Divider, Transfer Pulley 114 B-25 Orifice Tip w/Orifice Tip Guard 115 9-100-1007 Transfer Pulley/Drive Shaft Assy 116 9-100-5115 Screw, 8-32 x 3/4" SS Pan Hd 517 9-100-5130 Lock Washer, Axle Block 418 9-100-1132 Drive Train Gear Kit w/Turbine 1
Bearing19 9-100-1103 Turbine Wheel with Bearing 120 9-100-1116 Wheel, Single-side 121 C-131 Thrust Jet Kit 122 9-100-7008 Sweep Hose Barb Complete 123 B-20 Adjustment Screw, Sweep Hose 124 B-15 Sweep Hose Attach Clamp, White 125 9-100-9004 Base Weight 126 9-100-7170 Hose Clamp for WMS 627 9-100-7009 Jet Retainer 228 9-100-7010 Water Management System 129 9-100-1155 Housing, Turbine Lower 130 9-100-3105 Sweep Hose Scrubber 131 9-100-5132 O-ring, In-head Timer/Feed 1
Pipe Assembly32 9-100-7016 Base Assembly for In-line 1
Back-up Valve, White33 9-100-1141 Top Cover, Double Wheel Side 134 9-100-7003 Feed Pipe/Timer Blank Assy 135 A-20 Float, Head 136 9-100-1140 Top Cover, Single Wheel Side 137 B-5 Sweep Hose Complete 138 B-10 Wear Rings 839 9-100-1018 Bag Collar 136
33
16
34
11
35
31
30
37
14
38
15

No. Part # Description Qty
40 9-100-9001 UWF Connector Assembly 141 10-108-00 UWF Restrictor Kit 142 6-500-00 Universal Wall Fitting (UWF) 143 6-504-00 Filter Screen, UWF/QD 144 6-505-00 O-ring, UWF/QD 145 9-100-9002 Pressure Relief Valve, Black 146 D-29 Quick Disconnect, UWF 147 D-15 Nut, Feed Hose 1248 * Adapter Hose, 8 1/2" 149 D-20 Swivel, Ball Bearing 450 D-10 Float, Feed Hose 951 D-45 Feed Hose, White, 10 Ft, Hard 252 D-50 Feed Hose, Clear, 10 Ft, Soft 153 G-52 Back-up Valve Kit 154 G-54 Case Kit for G-52 155 G-57 Collar, Back-up Valve 156 G-53 Mechanism for G-52 1
Parts Not ShownB-2 Weight, Sweep HoseC-11 Tire, BlackG-5 Feed Hose Complete w/UWF,
No Back-up ValveG-9 Coupling, 1 1/2" NPTF x 3/4" NPTMG-12 Over-the-deck Kit, UWFG-21 Ladder Guard Set, 2 PanelsG-45 Disposable Sand/Silt Bags, Pkg. 4,
6-550-00 Universal Wall Fitting, Black9-100-1012 Leaf Bag9-100-1013 Disposable All-Purpose Bag, Pkg. 39-100-1015 Sand/Silt Bag9-100-1142 Top Cover, Single Wheel Side, Black9-100-1143 Top Cover, Double Wheel Side, Black9-100-3104 Feed Hose with Floats, White9-100-3108 Feed Hose with Floats, Clear9-100-9003 Street Ell9-100-9010 Polaris 380/360 Factory Tune-up Kit9-100-9030 Polaris 380 Factory Rebuild Kit10-102-00 UWF Removal Tool, Plastic11-203-00 Adjustable Plug, UWF
16
PoolWall
Second 10-footWhite Hose
10-foot Clear Hose
First 10-footWhite Hose
40
50 51 51
52 52
45 46444341 47 48 47 49
To ThePolaris
55 56
53
42
54
*Not sold separately.

17
Limited WarrantyPolaris Vac-Sweep 380 Automatic Swimming Pool CleanerThis limited warranty is extended to the original consumer purchaser of this Polaris Vac-Sweep 380
Automatic Swimming Pool Cleaner manufactured by Polaris Pool Systems, Inc., 2620 Commerce Way,Vista, California 92083-8438, USA.
Polaris warrants the cleaning unit it manufactures, including all parts and components thereof, to befree of defects in material and workmanship. The booster pump is excluded in this warranty and carriesits own separate warranty. We do not cover bags, tires, sweep hoses or sweep hose scrubbers which havebeen worn out by use. These are normal replacement items. We do not cover improper installation of thePolaris 380, but our instruction manual is complete enough to solve any problems — particularly if it isread before, rather than after, the installation. If you have any questions regarding your Polaris 380, pleasefeel free to write us. Be sure to include the serial number of your unit.
The warranty commences on the date of installation of the Polaris. The Polaris 380 frame is warrantedfor a period of ten years. The rest of the Polaris parts are warranted for a period of one year, but in noevent shall be in effect for more than two years from the date of manufacture of the unit as established bythe serial number. The one year limited warranty will be extended to two years from the date of installa-tion if you return your completed warranty registration card to Polaris.
This limited warranty does not apply if the failure is caused or contributed to by any of the following:improper handling, improper storage, winter freezing, abuse, improper installation, removal of the UWFfilter screen, unsuitable application of the unit, lack of reasonable and necessary maintenance, or repairsmade or attempted by other than Polaris or one of its Authorized Service Centers. Polaris will repair orreplace, at its option, a unit or part proved to be defective within the warranty period and under the con-ditions of the warranty.
The consumer must deliver or ship the unit or warranty parts freight prepaid to the nearest PolarisAuthorized Service Center or return it freight prepaid (after proper authorization) to the plant of manu-facture. Authorization to return a unit or part to the plant of manufacture must be obtained from thePolaris Customer Service Department. Check with your dealer for the local procedure before exercisingthis warranty. If further directions or instructions should be required, contact the Customer ServiceDepartment at 1-800-VAC-SWEEP (USA and Canada only) or (760) 599-9600. Be sure you insure yourshipments against loss or damage in transit.
Polaris is not responsible for the cost of removal of the unit or part, damages due to removal, or anyother expenses incurred in shipping the unit or part to or from the factory or its Authorized Service Cen-ters, or the installation of the repaired or replacement unit. The consumer must bear these expenses.
This warranty does not cover repair or replacement of a unit or part except at our factory or a PolarisAuthorized Service Center.
THIS LIMITED WARRANTY IS IN LIEU OF ALL OTHER WARRANTIES, EXPRESS OR IMPLIED,INCLUDING THE IMPLIED WARRANTIES OF MERCHANTABILITY AND FITNESS FOR A PARTIC-ULAR PURPOSE, AND ALL SUCH OTHER WARRANTIES ARE DISCLAIMED EXCEPT TO THEEXTENT ANY IMPLIED WARRANTY MAY BE IMPOSED BY STATE CONSUMER LAW. ANY SUCHIMPLIED WARRANTY IMPOSED BY STATE CONSUMER LAW IS LIMITED IN DURATION TO ONE (1)YEAR FROM DATE OF PURCHASE.
IN NO EVENT SHALL POLARIS BE LIABLE FOR INCIDENTAL OR CONSEQUENTIAL DAMAGESOF ANY NATURE OR KIND OR FOR DAMAGES TO PERSONS OR PROPERTY, INCLUDING ANYDAMAGE RESULTING FROM THE USE OF THE POLARIS 380 AUTOMATIC POOL CLEANER WITHA SUBSTANDARD POOL CIRCULATION SYSTEM.
Some states do not allow limitations on how long an implied warranty lasts, or the exclusion or limita-tion of incidental or consequential damages, so the above limitations may not apply to you.
This limited warranty is valid only in the United States of America, Canada and Australia, and it doesnot apply to Polaris 380 Automatic Swimming Pool Cleaners sold or installed in any other country.

18

19