Embed Size (px)
Citation preview
1
IMPORTANT SAFETY INSTRUCTIONS
WARNING – When using electric products, basicprecautions should always be followed, including thefollowing:
1) Read all the instructions before using the product.
2) Do not use this product near water – for example,near a bathtub, washbowl, kitchen sink, in a wetbasement, or near a swimming pool or the like.
3) This product, in combination with an amplifier andheadphones or speakers, may be capable ofproducing sound levels that could cause permanenthearing loss. Do not operate for a long period of time ata high volume level or at a level that is uncomfortable.If you experience any hearing loss or ringing in yourears, you should consult an audiologist.
4) The product should be located away from heatsources such as radiators, heat registers, or otherproducts that produce heat.
5) The product should be connected to a power supplyonly of the type described in the operating instructionsor as marked on the product.
6) The power-supply cord of the product should beunplugged from the outlet when left unused for a longperiod of time.
7) Care should be taken so that objects do not fall andliquids are not spilled into the enclosure throughopenings.
8) The product should be serviced by qualifiedpersonnel when:
a) The power-supply cord or the plug has beendamaged; or
b) Objects have fallen, or liquid has beenspilled onto the product; or
c) The product has been exposed to rain; ord) The product does not appear to operatenormally or exhibits a marked change inperformance; ore) The product has been dropped or theenclosure damaged.
2
9) Do not attempt to service the product beyond thatdescribed in the user-maintenance instructions. All otherservicing should be referred to qualified servicepersonnel.
DANGER: INSTRUCTIONS PERTAINING TORISK OF FIRE, ELECTRIC SHOCK, OR INJURYTO PERSONS: Do not open the chassis. There are nouser serviceable parts inside. Refer all servicing toqualified personnel only.
GROUNDING INSTRUCTIONS:This product must be grounded. If it should malfunctionor breakdown, grounding provides a path of leastresistance for electrical current to reduce the risk ofelectric shock. The plug must be plugged into anappropriate outlet that is properly installed andgrounded in accordance with all local codes andordinances.
DANGER – Improper connection of the equipment-grounding connector can result in a risk of electricshock. Check with a qualified electrician or servicemanif you are in doubt as to whether the product is properlygrounded. Do not modify the plug provided with this
product – if it will not fit in the outlet, have a properoutlet installed by a qualified electrician.
SAVE THESE INSTRUCTIONS
3
Table of contents1) Introduction ……………………………… 42) Getting started ………………………...… 7 A) PianoBar Components……………….. 7 B) Piano Considerations …………......... 9 C) Installing and Calibrating the PianoBar …..…. 12 D) Using the PianoBar for the First Time
……… 153) The PianoBar’s Controls, Connections and Menus.. ……… 17 A) Front Panel Controls/ ……………….. 17 B) Rear Panel Connections…….……… 18 C) Navigating the menus……………… 19 D) Main Setup Page…………………… 20 E) Edit Menu…………………………….. 23
F) Library………………………………… 24 G) Channel Setup……………………… 26 H) Controllers…………………………… 28 I) Effects…………………………………. 29 J) Channel Route……………………….. 29 K) Options……………………………….. 304) About MIDI………………………………. 315) Creating your own Setups……………… 34
Appendix A –MIDI Implementation Chart ……………. 39Appendix B –User and Factory Setup Chart ……………. 41Appendix C –Sound Cart ……………………………… 51Appendix D –MIDI CC Chart ……………………... 58Appendix E –Service and techsupport info ………….. 60
4
1. INTRODUCTION
Congratulations! By purchasing the Moog PianoBaryou have recognized you CAN teach an old dognew tricks…
Of course we mean no disrespect referring tothe modern acoustic piano as an old dog; it has along and distinguished history. Adapted from theHarpsichord and other early keyboard instruments,the forte-piano, produced around 1708 byBartolomeo Cristofori of Padova, Italy, was the firstkeyboard instrument to feature a wide dynamicresponse to a player’s touch. Composers began toflock to the instrument as it became more widelyavailable to take advantage of its capability formusical expression. A number of technologicalinnovations led to the modern piano – aninstrument capable of whispery soft playing orthunderous passages. The piano has an impressiverepertoire – from the highest statements ofclassical artistic purity to the greasiest boogie-
woogie to elegant and complex jazz voicings. Thepiano is a sound that will forever be etched in ourconsciousness – and one always worth exploring. Today, music is a varied and complexendeavor, often utilizing the latest in technology.Piano players and composers have often found afrustrating gap between the true touch, feel andvoice of the piano and the technology of modernmusic making. In fact many have resorted tocompromised means – digital instruments withplastic keys that lack the touch and sound of thepiano. This is where the PianoBar comes to therescue.
What does the PianoBar Do?
The PianoBar is a portable device designed toscan the keys of the piano and the pedals andtransmit the playing of the piano as MIDIinformation. If you are unfamiliar with MIDI, there isdetailed information in chapter 4. Simply put, MIDIis a method of capturing a musical performance;
5
it can be used to simultaneously play sounds otherthan the sound of the instrument being played, orrecord that performance information for laterplayback. The PianoBar extracts the information about yourpiano playing by means of a Scanner Bar whichrests above the keys of the piano and out of theway of the player’s fingers. Yet it requires notechnician to install it, it’s portable, and IT SETS UP INJUST A FEW MINUTES…. When you are done youcan leave it installed or remove it.
With the Piano Bar, you can:
- Play sounds when you depress a key on thepiano – combine and layer sounds with theacoustic piano sound for rich new timbres. This is agreat way to explore sounds and add new spice toyour piano performances.- Capture your piano playing in a computer, in aMIDI sequencer or notation software. This is a greatway to increase productivity while composingmusic at the piano.
- Play MIDI music files into the PianoBar foreducation or entertainment. LEDs above the keyscan be enabled to light up showing the notesbeing played.- Whatever else your imagination can dream up!
How does it do it?
How does the PianoBar extract MIDI data fromthe keyboard and pedals? If you study themechanics of a piano key and its action, you willfind that the loudness of a tone produced byplaying a key is closely related to the VELOCITY ofthe key being pressed. Therefore, by lookingsimply at the motion of the keys, you can get ahighly accurate representation of the notes andloudness of the notes that are played. The ScannerBar uses patented Infrared Scanning technology tomeasure the movement of the keys and transmitthat information to the Control Module, where it isconverted to MIDI.
6
The Pedal Sensor contains a pair of proximitysensors, which respond to the depression of theSoft and Sustain Pedals.
Why Moog and why the PianoBar?
Moog is concerned with the production ofsoulful and innovative music utilizing the bestelectronic design. The Piano is an instrument thatcan possess a depth of expression that is unrivalledby many instruments. The PianoBar is the fruit ofcollaboration between Don Buchla and MoogMusic. Buchla is an important name in electronicmusic history – as he was working on synthesizerson the West Coast around the same time BobMoog was working on the East Coast. Hisdevelopments over the years include pioneeringsynthesizer designs and a number of innovativeMIDI controllers – including the PianoBar. Bycreating an accessory that taps into theexpressiveness of the piano, we hope that many
piano players, casual or serious, may find new joyin a timeless instrument.
The following will explain fully the installation,function and possible uses for the Moog PianoBar.If you don’t like reading manuals, “Getting Started”on p. 7 covers the installation and basic operation.It is highly recommended that you read themanual in order to obtain the maximum resultsfrom this product. We at Moog Music extend toyou our sincerest hopes that your muse isawakened by this remarkable device. We know you are itching to get started so hereit is…
7
2. GETTING STARTED
PIANOBAR COMPONENTS
The PianoBar is shipped inside its own carryingcase. Upon opening your new PianoBar, inspectthe contents to ensure that all the components arepresent.The PianoBar package contains the followingcomponents:
• Power Supply: Wall transformer connectsthe PianoBar to a source of AC.
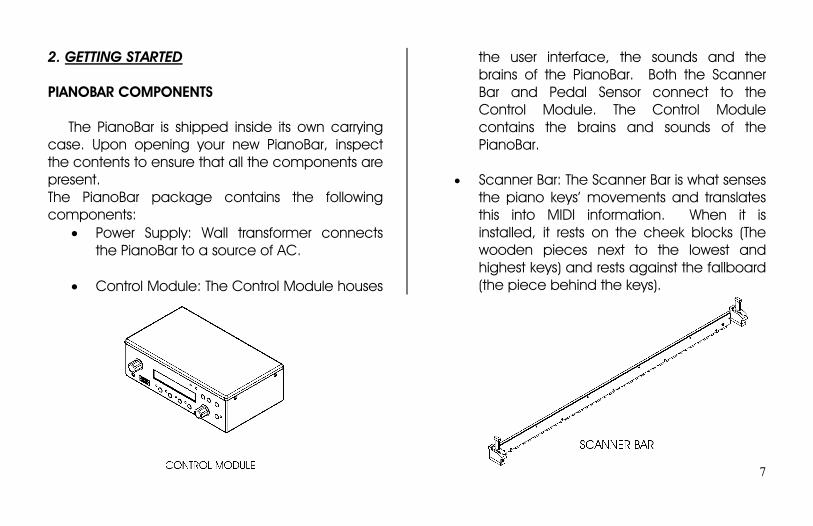
• Control Module: The Control Module houses
the user interface, the sounds and thebrains of the PianoBar. Both the ScannerBar and Pedal Sensor connect to theControl Module. The Control Modulecontains the brains and sounds of thePianoBar.
• Scanner Bar: The Scanner Bar is what sensesthe piano keys’ movements and translatesthis into MIDI information. When it isinstalled, it rests on the cheek blocks (Thewooden pieces next to the lowest andhighest keys) and rests against the fallboard(the piece behind the keys).
8
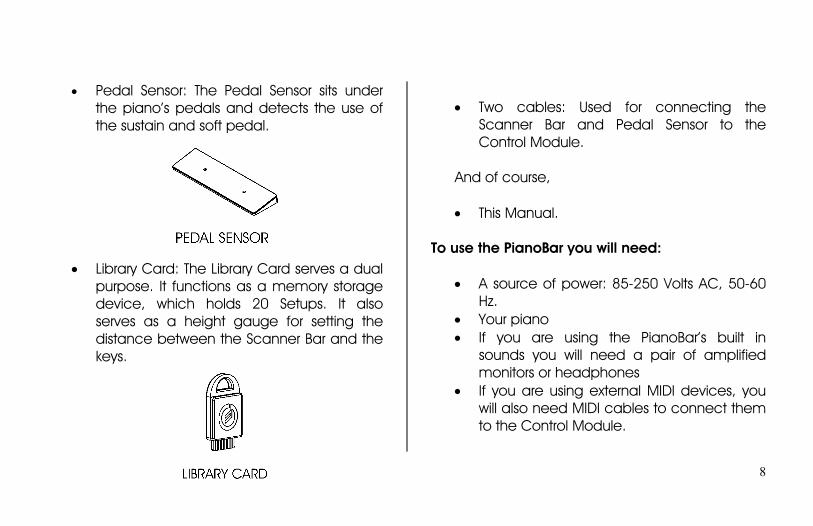
• Pedal Sensor: The Pedal Sensor sits underthe piano’s pedals and detects the use ofthe sustain and soft pedal.
• Library Card: The Library Card serves a dualpurpose. It functions as a memory storagedevice, which holds 20 Setups. It alsoserves as a height gauge for setting thedistance between the Scanner Bar and thekeys.
• Two cables: Used for connecting theScanner Bar and Pedal Sensor to theControl Module.
And of course,
• This Manual.
To use the PianoBar you will need:
• A source of power: 85-250 Volts AC, 50-60Hz.
• Your piano• If you are using the PianoBar’s built in
sounds you will need a pair of amplifiedmonitors or headphones
• If you are using external MIDI devices, youwill also need MIDI cables to connect themto the Control Module.

9
PIANOBAR CONSIDERATIONS - What you shouldknow about the piano on which you areinstalling the PianoBar
Please note that we have stated that thePianoBar works on virtually every 88-key acousticpiano.There are some exceptions, and features that mayaffect the performance of the PianoBar.
• The piano must have 88 keys.• Cheek-blocks that have unusual shaping,
or are too skinny.• Black Keys that end more than ¼” from the
fallboard• Non-Vertical fallboards – these pianos are
not excluded from being used with thePianoBar, but their performance may becompromised if the Scanner Bar is allowedto flex.
What you don’t have to worry about:
• Key span (the width of keys) – a lot ofresearch went into determining theextremes of key span. The Scanner Bar canbe adjusted to accommodate a largevariety of key spans.
• Uneven key height – when installed andcalibrated, the Scanner Bar’s sensorscompensate for any unevenness of the keyheight.
Other considerations:
• Tuning and condition of piano – The MoogPianoBar is used in conjunction with thesound and feel of the acoustic piano. Forlayering sounds from the Control Modulewith the acoustic piano, we assume thatthe piano in question is in reasonablecondition and tuning. The PianoBar doesnot provide a method of muting theacoustic piano’s sound, so if the piano isout drastically of tune, it will not be in tunewith the sounds in the Control Module. Also,
10
if a piano is poorly regulated, the velocity ofthe keys may not be closely related to theloudness of the tone produced. In thiscircumstance, it is possible that thePianoBar will have keys that produce MIDIvelocity information that is not the same asthe loudness of the piano tone. In any casewe highly recommend regular tuning andmaintenance from a qualified PianoTechnician. Your piano will love you for it.
• Pedal sensor height – Every piano sits at adifferent height in relation to the floor. Somepianos may be situated on a dolly, whichraises the pedal height substantially. ThePedal Sensor must be at a distance of ½”to 1” from the pedals when they aredepressed. For raising the Pedal sensor, werecommend the Pedal Height adjustmentaccessory (available from Moog Music pnPB-PS-HA). In a pinch you can use a book. Ifthe Piano is too close to the pedal sensordue to placement on a carpet, we
recommend a set of caster cups, availablefrom your piano dealer. These will raise yourpiano.
• External MIDI devices – The PianoBar has awealth of applications as a MIDI controller.If you plan on using the PianoBar with anexternal MIDI device – please consult thesections on the Channel Setup andChannel Route functions to learn how toconfigure the PianoBar with External MIDIdevices.
• USB Cables – The PianoBar comes suppliedwith two USB-type cables. There is a 6’cable, to make the connection betweenthe Scanner Bar and the Control Module.Do not substitute longer USB cables or USBcables that have smaller diameter wires.There is a 16’ cable that is used to connecthe Pedal Sensor to the Control Module. Thecables are not interchangeable, alwaysuse the shorter cable to connect the
11
Scanner Bar to the Control Module. ThePianoBar is not a standard USB device.
• Care of the PianoBar – The PianoBar isdesigned as all Moog equipment is –robust. However, Care should be taken withthe Scanner Bar’s lower edge, whichcontains the infrared sensors that detectthe motion of the keys. In general don’t restit in a manner that could cause wear tothese components, and don’t lean theScanner where it can fall and possibly bedamaged.
12
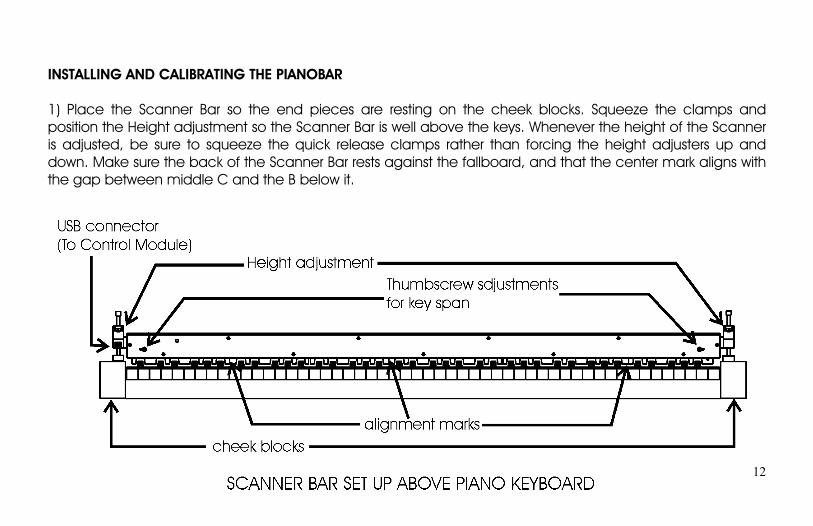
INSTALLING AND CALIBRATING THE PIANOBAR
1) Place the Scanner Bar so the end pieces are resting on the cheek blocks. Squeeze the clamps andposition the Height adjustment so the Scanner Bar is well above the keys. Whenever the height of the Scanneris adjusted, be sure to squeeze the quick release clamps rather than forcing the height adjusters up anddown. Make sure the back of the Scanner Bar rests against the fallboard, and that the center mark aligns withthe gap between middle C and the B below it.
13
2) For the outside sections of the Scanner Bar,locate the thumbscrews on the front. Loosen them.Adjust the outside sections so the alignment marksline up with the gaps between their respective Bsand Cs. Once the alignment marks are set, tightenthe thumbscrews.
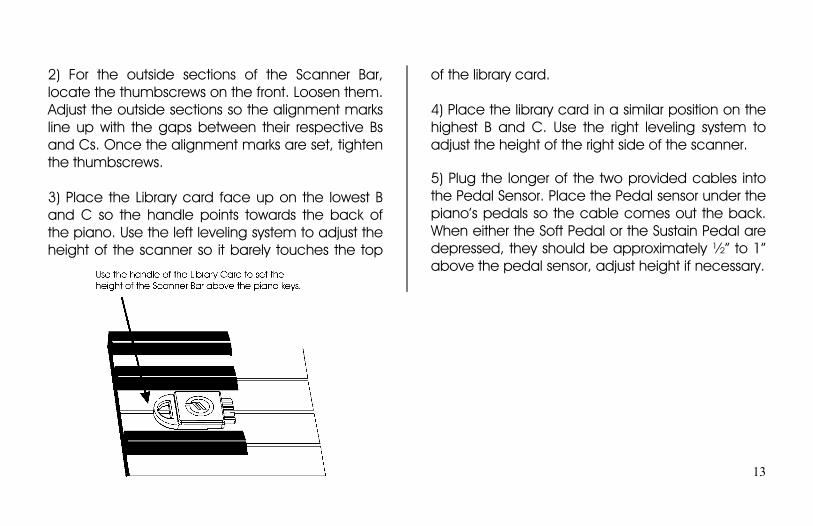
3) Place the Library card face up on the lowest Band C so the handle points towards the back ofthe piano. Use the left leveling system to adjust theheight of the scanner so it barely touches the top
of the library card.
4) Place the library card in a similar position on thehighest B and C. Use the right leveling system toadjust the height of the right side of the scanner.
5) Plug the longer of the two provided cables intothe Pedal Sensor. Place the Pedal sensor under thepiano’s pedals so the cable comes out the back.When either the Soft Pedal or the Sustain Pedal aredepressed, they should be approximately ½” to 1”above the pedal sensor, adjust height if necessary.
14
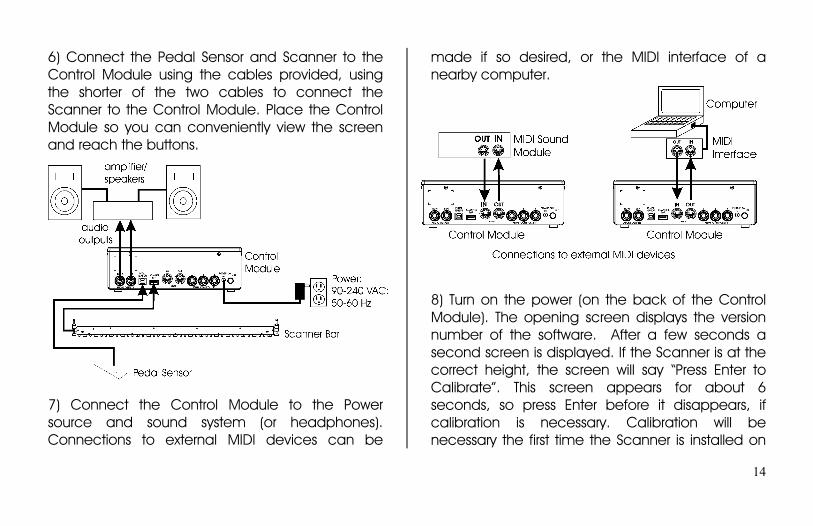
6) Connect the Pedal Sensor and Scanner to theControl Module using the cables provided, usingthe shorter of the two cables to connect theScanner to the Control Module. Place the ControlModule so you can conveniently view the screenand reach the buttons.
7) Connect the Control Module to the Powersource and sound system (or headphones).Connections to external MIDI devices can be
made if so desired, or the MIDI interface of anearby computer.
8) Turn on the power (on the back of the ControlModule). The opening screen displays the versionnumber of the software. After a few seconds asecond screen is displayed. If the Scanner is at thecorrect height, the screen will say “Press Enter toCalibrate”. This screen appears for about 6seconds, so press Enter before it disappears, ifcalibration is necessary. Calibration will benecessary the first time the Scanner is installed on
15
a piano – to skip calibration, simply wait for thescreen to change to the Main Setup Page. If theScanner is set too high or low, the screen willdisplay prompts in the left and right upper cornersof the screen to raise or lower the left or rightlevelers, respectively, until the Scanner is at thecorrect height. When done, press Enter and youwill see the “Press Enter to Calibrate” screen – doso. The display now prompts the user to play allthe keys on the piano. Calibration merely requiresthe playing of all the keys on the piano. Take careto depress the keys fully, and make sure the keysdon’t bounce. Once you have pressed all the keysdown, press escape, and installation is complete!Please note that if you press Enter and enter thecalibration page, you must play all the keys, or theScanner will be “confused” and send incorrectdata.
USING THE PIANOBAR FOR THE FIRST TIME
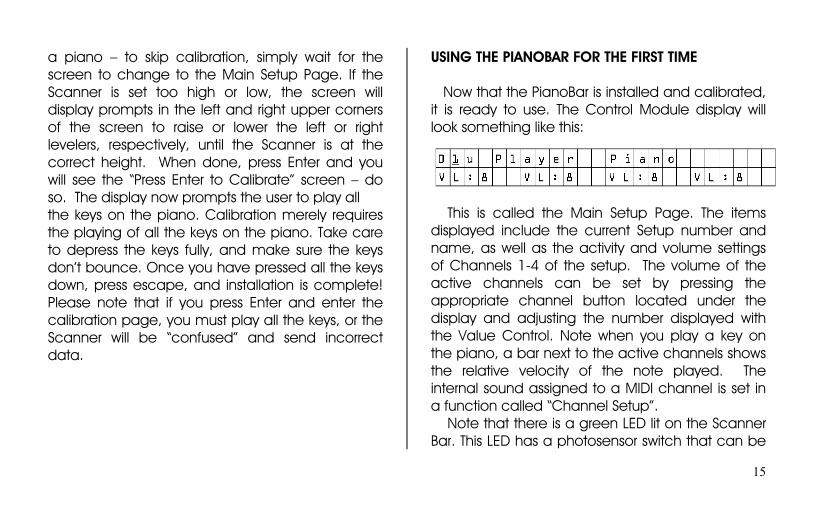
Now that the PianoBar is installed and calibrated,it is ready to use. The Control Module display willlook something like this:
This is called the Main Setup Page. The itemsdisplayed include the current Setup number andname, as well as the activity and volume settingsof Channels 1-4 of the setup. The volume of theactive channels can be set by pressing theappropriate channel button located under thedisplay and adjusting the number displayed withthe Value Control. Note when you play a key onthe piano, a bar next to the active channels showsthe relative velocity of the note played. Theinternal sound assigned to a MIDI channel is set ina function called “Channel Setup”. Note that there is a green LED lit on the ScannerBar. This LED has a photosensor switch that can be
16
used to change Setups. Simply cover the LED withyour finger. You will notice that an LED will light upabove a key on the piano that corresponds to thenumber of the current Setup. (#1 is the lowest A onthe Keyboard). Simply press another key, and thecurrent Setup will be changed to the number thatmatches that key (for instance – middle C is 40).This allows quick access to any Setup from 1 to 88.Another way to change Setups is with the Valuerotary control on the front of the Control Module.There are 100 Setup memory locations: 60 userSetups, 20 library card Setups, and 20 factorySetups. The user Setups are shipped with Setupsfrom the factory. These can be edited to suit theneeds of the user. The library card Setups areempty until a library card with Setups is installed inthe slot on the front panel of the control module.The factory Setups are permanently installed. By taking a tour of the Setups, you can quicklysee the variety of sounds and effects that you canadd to the sound of a piano. Keep in mind that aSetup can contain the complete configuration of16 MIDI channels – both in and out. There is a
wealth of possibilities contained in the PianoBar –to discover them let’s continue.
17
3. THE PIANOBAR’S CONTROLS, CONNECTIONSAND MENUS
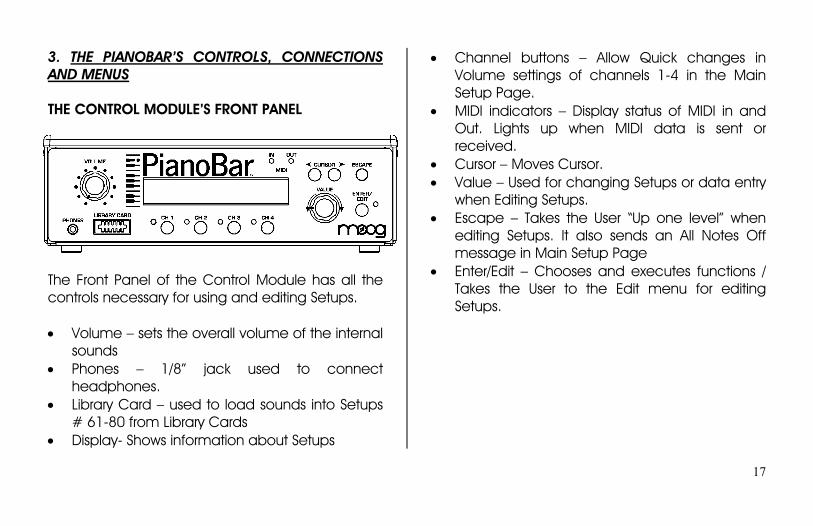
THE CONTROL MODULE’S FRONT PANEL
The Front Panel of the Control Module has all thecontrols necessary for using and editing Setups.
• Volume – sets the overall volume of the internalsounds
• Phones – 1/8” jack used to connectheadphones.
• Library Card – used to load sounds into Setups# 61-80 from Library Cards
• Display- Shows information about Setups
• Channel buttons – Allow Quick changes inVolume settings of channels 1-4 in the MainSetup Page.
• MIDI indicators – Display status of MIDI in andOut. Lights up when MIDI data is sent orreceived.
• Cursor – Moves Cursor.• Value – Used for changing Setups or data entry
when Editing Setups.• Escape – Takes the User “Up one level” when
editing Setups. It also sends an All Notes Offmessage in Main Setup Page
• Enter/Edit – Chooses and executes functions /Takes the User to the Edit menu for editingSetups.
18
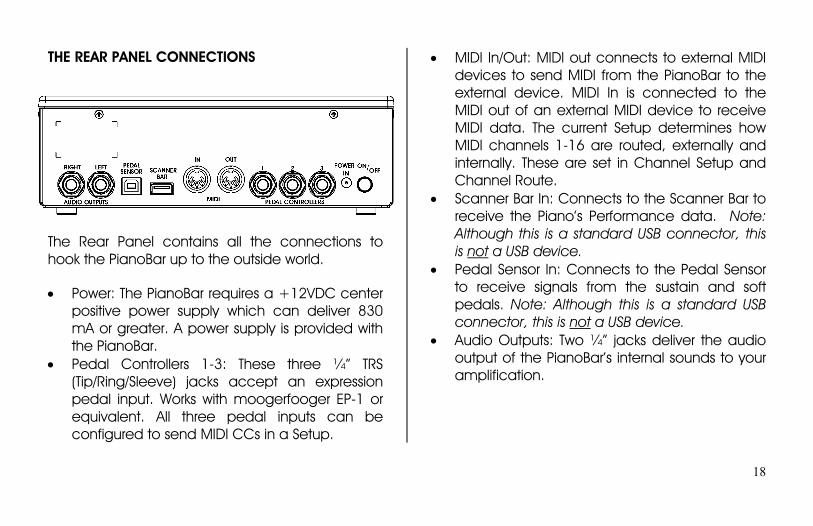
THE REAR PANEL CONNECTIONS
The Rear Panel contains all the connections tohook the PianoBar up to the outside world.
• Power: The PianoBar requires a +12VDC centerpositive power supply which can deliver 830mA or greater. A power supply is provided withthe PianoBar.
• Pedal Controllers 1-3: These three ¼” TRS(Tip/Ring/Sleeve) jacks accept an expressionpedal input. Works with moogerfooger EP-1 orequivalent. All three pedal inputs can beconfigured to send MIDI CCs in a Setup.
• MIDI In/Out: MIDI out connects to external MIDIdevices to send MIDI from the PianoBar to theexternal device. MIDI In is connected to theMIDI out of an external MIDI device to receiveMIDI data. The current Setup determines howMIDI channels 1-16 are routed, externally andinternally. These are set in Channel Setup andChannel Route.
• Scanner Bar In: Connects to the Scanner Bar toreceive the Piano’s Performance data. Note:Although this is a standard USB connector, thisis not a USB device.
• Pedal Sensor In: Connects to the Pedal Sensorto receive signals from the sustain and softpedals. Note: Although this is a standard USBconnector, this is not a USB device.
• Audio Outputs: Two ¼” jacks deliver the audiooutput of the PianoBar’s internal sounds to youramplification.
19
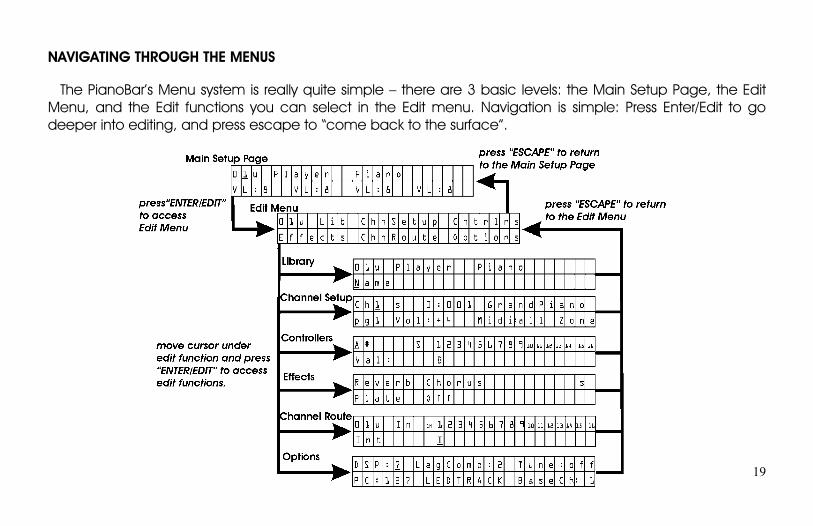
NAVIGATING THROUGH THE MENUS
The PianoBar’s Menu system is really quite simple – there are 3 basic levels: the Main Setup Page, the EditMenu, and the Edit functions you can select in the Edit menu. Navigation is simple: Press Enter/Edit to godeeper into editing, and press escape to “come back to the surface”.
20
There are a few instances where the Enter/Editbutton serves a different purpose, such aschanging between two pages (such as ChannelRoute), or initiating a process (such as formatting alibrary card). The actual parameters and functionsare frequently abbreviated. The following is acomprehensive guide to the Menus and Functionsof the Control Module.
MAIN SETUP PAGE
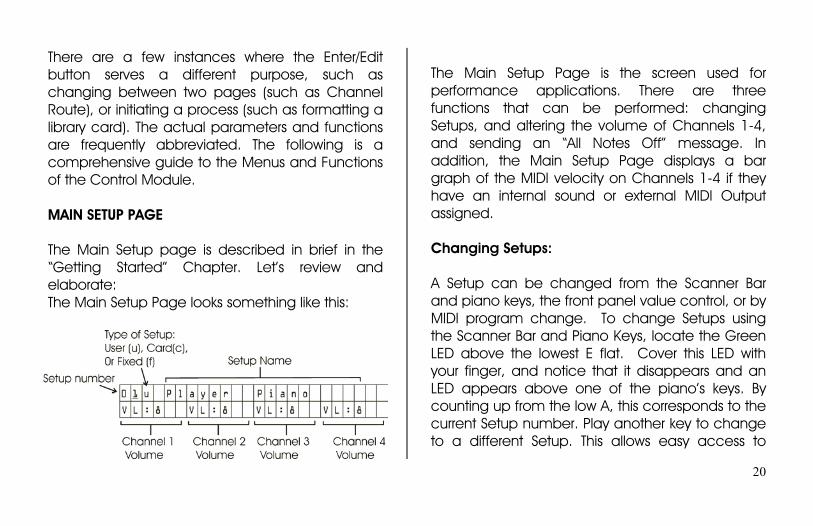
The Main Setup page is described in brief in the“Getting Started” Chapter. Let’s review andelaborate:The Main Setup Page looks something like this:
The Main Setup Page is the screen used forperformance applications. There are threefunctions that can be performed: changingSetups, and altering the volume of Channels 1-4,and sending an “All Notes Off” message. Inaddition, the Main Setup Page displays a bargraph of the MIDI velocity on Channels 1-4 if theyhave an internal sound or external MIDI Outputassigned.
Changing Setups:
A Setup can be changed from the Scanner Barand piano keys, the front panel value control, or byMIDI program change. To change Setups usingthe Scanner Bar and Piano Keys, locate the GreenLED above the lowest E flat. Cover this LED withyour finger, and notice that it disappears and anLED appears above one of the piano’s keys. Bycounting up from the low A, this corresponds to thecurrent Setup number. Play another key to changeto a different Setup. This allows easy access to
21
Setups 1-88. Changing Setups with the Valuecontrol is simply a matter of placing the cursorunder the current Setup number and rotating theknob – clockwise to increase, counterclockwise todecrease. The PianoBar can also respond to MIDIProgram Change commands – setting the basechannel on which it responds is set in “Options” (p.30); default is MIDI channel 16.
Changing Volume on Channels 1-4:
The Volume of channels 1-4 can be set bypressing the corresponding channel button belowthe display and using the Value knob to changethe value. The Values are 1 to 10. This is useful forquick adjustment of a Setup’s sounds during aperformance. When in the Main Setup page,pressing a channel button “solos” that channel(turns off all other channels) as well as providesaccess to the volume adjustment for that channel.Be aware that if you are holding a note and pressa channel button, that note will not turn off,because the MIDI channel it is on is deactivated
and can’t receive the information that the notehas been released. Simply put, don’t use theChannel buttons while playing, or you are likely toget hung notes. If this does happen, pressingEscape will turn the hung notes off.
All Notes Off:
In case of stuck notes, in the Main Setup Page, theEscape button doubles as an “All Notes Off”button. All Notes Off is a MIDI command that doesjust that – turn off any notes that are on, on anyactive channels.
What is a Setup?
A Setup determines what happens to the PianoBarwhen a key on the Piano is played. A Setup can beconfigured to play the PianoBar’s internal sounds,or send MIDI through the MIDI output. There ismuch more to what can be in a Setup. A Setupcontains the following global parameters that areindependent of the 16 MIDI channels:
22
• Setup Number• Setup Name (accessed in the Library
function)• Effects: Reverb type, Chorus type (defined
with the Effects function)• Assignment of Controllers A through F:
Continuous Controller Numbers, and theirvalues. (defined with the Controllersfunction)
• Assignment of Pedals 1 to 3: CC Numbers(defined with the Controllers function)
A Setup also contains a number of parameters foreach MIDI Channel. There are 16 MIDI channelssupported, and each can be Setup differentlyresulting in complex Setups. These parameters aredefined in the Channel Setup pages or theChannel Route function:
• Bank Select• Program Number• Volume• Zone• Velocity Curve
• Pan• Transpose• Reverb amount• Chorus Amount• MIDI sent to internal sounds, MIDI out, or
both• MIDI In off, routed to internal sounds,
Scanner LEDs, or both.
There are three types of Setup: User, Card, andFactory. The current Setup on the Main Setup pagehas a super script character: u, c, or f, identifyingthese types of Setups. User Setups are stored in locations 1-60.Changes made to these Setups are instantlyremembered; no saving process is required. Thereis no “Factory Reset” feature for these Setups.Should you wish to return the PianoBar to theoriginal settings, you will have to back these Setupsto Library Cards (60 Setups require 3 Library Cards).Backing up the Setups is performed with the LibraryFunction “Setups _ to _ Copy to _ to _” describedon page 25 of the manual. Before copying Setups
23
to a Library Card, it must be formatted, done withthe Library Function “Format Card”. A 3-pack ofLibrary Cards (part no. PB-LC-3PK) is available for$34.95. Card Setups are in locations 61-80. TheseSetups are blank unless a PianoBar Card withSetups stored on it is inserted in the card slot on thefront of the Control Module. To store Setups on acard, simply copy a Setup to a location from 61-80 with a formatted Library Card inserted in theCard slot. Factory Setups are in locations 81-100. They arestored in permanent memory.
EDIT MENU
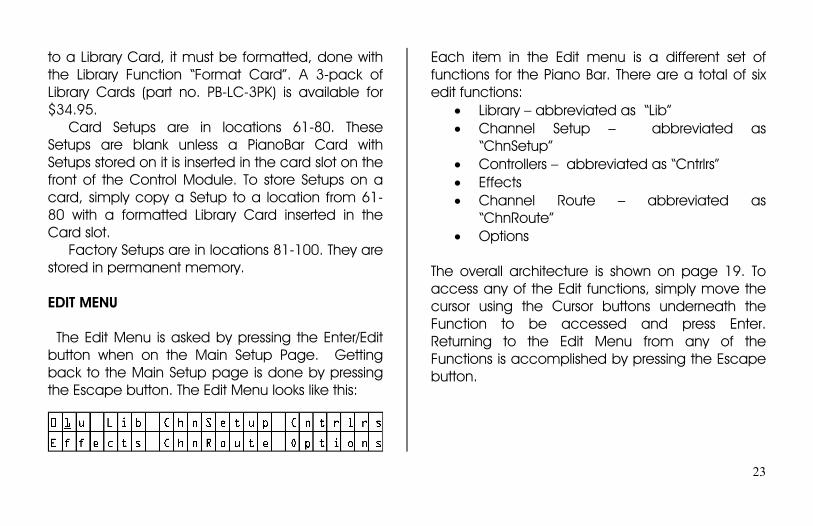
The Edit Menu is asked by pressing the Enter/Editbutton when on the Main Setup Page. Gettingback to the Main Setup page is done by pressingthe Escape button. The Edit Menu looks like this:
Each item in the Edit menu is a different set offunctions for the Piano Bar. There are a total of sixedit functions:
• Library – abbreviated as “Lib”• Channel Setup – abbreviated as
“ChnSetup”• Controllers – abbreviated as “Cntrlrs”• Effects• Channel Route – abbreviated as
“ChnRoute”• Options
The overall architecture is shown on page 19. Toaccess any of the Edit functions, simply move thecursor using the Cursor buttons underneath theFunction to be accessed and press Enter.Returning to the Edit Menu from any of theFunctions is accomplished by pressing the Escapebutton.
24
LIBRARY
The Library Edit function is used to name andmanage the location of Setups and Create LibraryCardsThere are a total of 10 Library functions. Placing thecursor under the function and rotating the Valuecontrol selects the different functions. The followingare the functions and how they work:
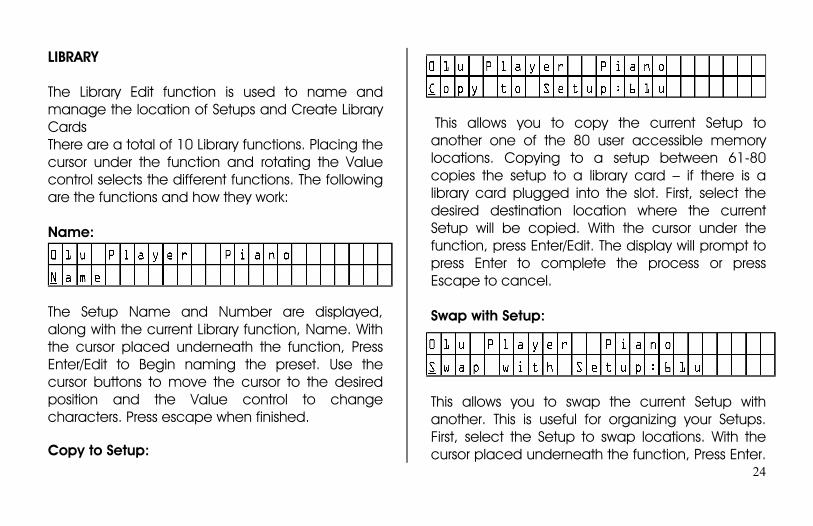
Name:
The Setup Name and Number are displayed,along with the current Library function, Name. Withthe cursor placed underneath the function, PressEnter/Edit to Begin naming the preset. Use thecursor buttons to move the cursor to the desiredposition and the Value control to changecharacters. Press escape when finished.
Copy to Setup:
This allows you to copy the current Setup toanother one of the 80 user accessible memorylocations. Copying to a setup between 61-80copies the setup to a library card – if there is alibrary card plugged into the slot. First, select thedesired destination location where the currentSetup will be copied. With the cursor under thefunction, press Enter/Edit. The display will prompt topress Enter to complete the process or pressEscape to cancel.
Swap with Setup:
This allows you to swap the current Setup withanother. This is useful for organizing your Setups.First, select the Setup to swap locations. With thecursor placed underneath the function, Press Enter.
25
You will be prompted to press Enter to complete,or press Escape to cancel.
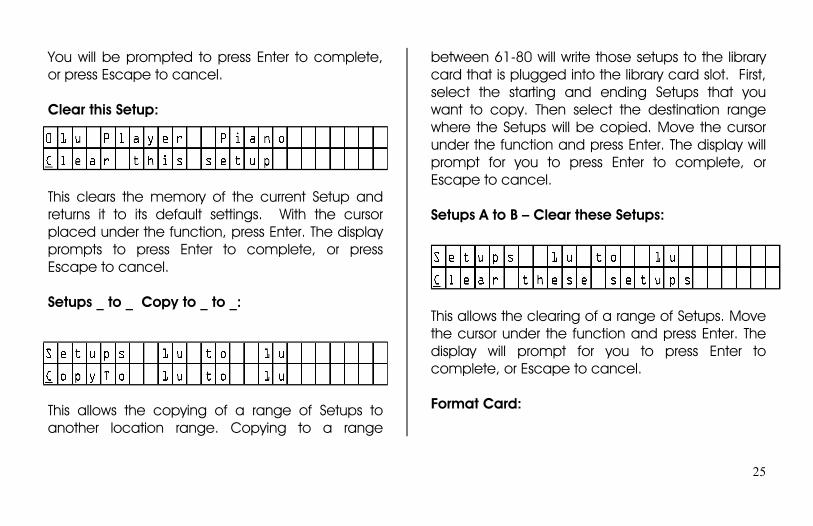
Clear this Setup:
This clears the memory of the current Setup andreturns it to its default settings. With the cursorplaced under the function, press Enter. The displayprompts to press Enter to complete, or pressEscape to cancel.
Setups _ to _ Copy to _ to _:
This allows the copying of a range of Setups toanother location range. Copying to a range
between 61-80 will write those setups to the librarycard that is plugged into the library card slot. First,select the starting and ending Setups that youwant to copy. Then select the destination rangewhere the Setups will be copied. Move the cursorunder the function and press Enter. The display willprompt for you to press Enter to complete, orEscape to cancel.
Setups A to B – Clear these Setups:
This allows the clearing of a range of Setups. Movethe cursor under the function and press Enter. Thedisplay will prompt for you to press Enter tocomplete, or Escape to cancel.
Format Card:
26
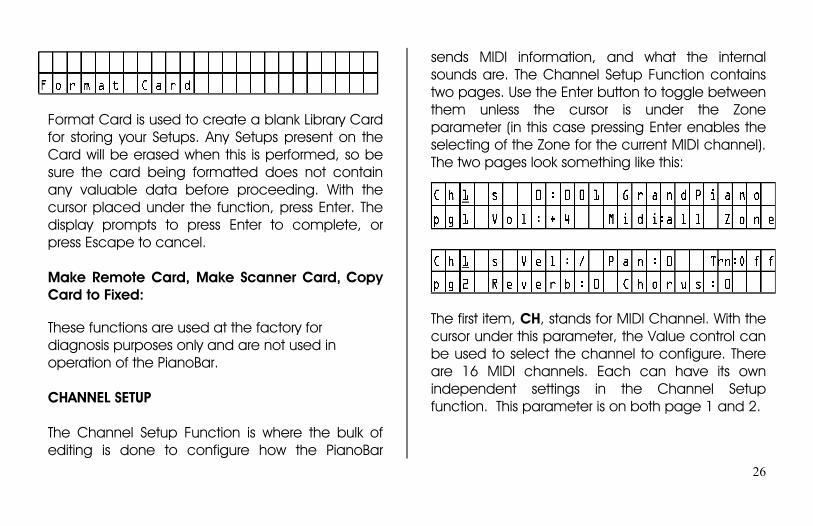
Format Card is used to create a blank Library Cardfor storing your Setups. Any Setups present on theCard will be erased when this is performed, so besure the card being formatted does not containany valuable data before proceeding. With thecursor placed under the function, press Enter. Thedisplay prompts to press Enter to complete, orpress Escape to cancel.
Make Remote Card, Make Scanner Card, CopyCard to Fixed:
These functions are used at the factory fordiagnosis purposes only and are not used inoperation of the PianoBar.
CHANNEL SETUP
The Channel Setup Function is where the bulk ofediting is done to configure how the PianoBar
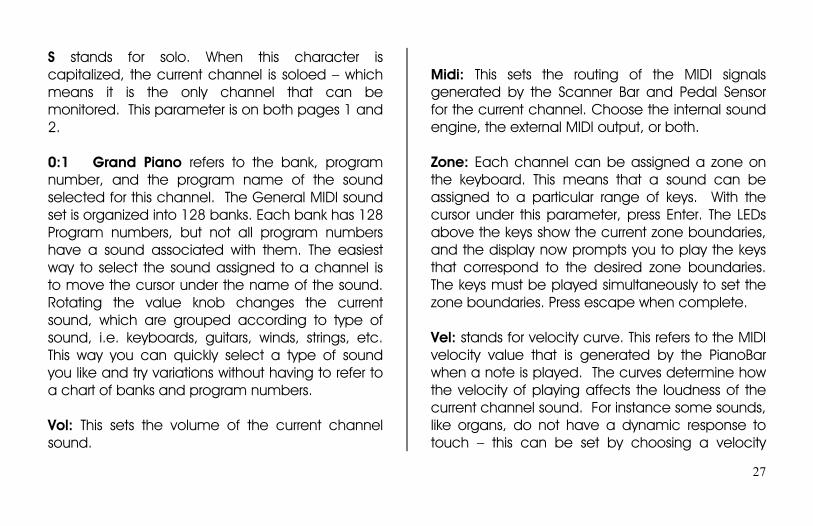
sends MIDI information, and what the internalsounds are. The Channel Setup Function containstwo pages. Use the Enter button to toggle betweenthem unless the cursor is under the Zoneparameter (in this case pressing Enter enables theselecting of the Zone for the current MIDI channel).The two pages look something like this:
The first item, CH, stands for MIDI Channel. With thecursor under this parameter, the Value control canbe used to select the channel to configure. Thereare 16 MIDI channels. Each can have its ownindependent settings in the Channel Setupfunction. This parameter is on both page 1 and 2.
27
S stands for solo. When this character iscapitalized, the current channel is soloed – whichmeans it is the only channel that can bemonitored. This parameter is on both pages 1 and2.
0:1 Grand Piano refers to the bank, programnumber, and the program name of the soundselected for this channel. The General MIDI soundset is organized into 128 banks. Each bank has 128Program numbers, but not all program numbershave a sound associated with them. The easiestway to select the sound assigned to a channel isto move the cursor under the name of the sound.Rotating the value knob changes the currentsound, which are grouped according to type ofsound, i.e. keyboards, guitars, winds, strings, etc.This way you can quickly select a type of soundyou like and try variations without having to refer toa chart of banks and program numbers.
Vol: This sets the volume of the current channelsound.
Midi: This sets the routing of the MIDI signalsgenerated by the Scanner Bar and Pedal Sensorfor the current channel. Choose the internal soundengine, the external MIDI output, or both.
Zone: Each channel can be assigned a zone onthe keyboard. This means that a sound can beassigned to a particular range of keys. With thecursor under this parameter, press Enter. The LEDsabove the keys show the current zone boundaries,and the display now prompts you to play the keysthat correspond to the desired zone boundaries.The keys must be played simultaneously to set thezone boundaries. Press escape when complete.
Vel: stands for velocity curve. This refers to the MIDIvelocity value that is generated by the PianoBarwhen a note is played. The curves determine howthe velocity of playing affects the loudness of thecurrent channel sound. For instance some sounds,like organs, do not have a dynamic response totouch – this can be set by choosing a velocity
28
curve that is not affected by the velocity of youractual playing. There are 10 curves, their responsesare displayed graphically.
Pan: This is the left/right balance of the soundassigned to the current channel.
Trn: This refers to the transposition of the soundassigned to the current channel. Transposition canbe applied in semitones – up to 99 semitones upor down from the key being played.
Reverb: This is the amount of Reverb applied tothe current channel sound.
Chorus: This is the amount of chorus applied to thecurrent channel sound.
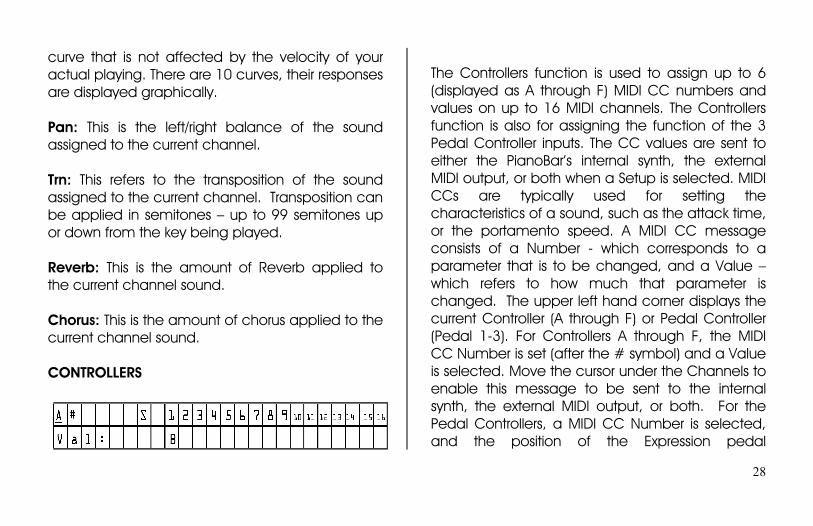
CONTROLLERS
The Controllers function is used to assign up to 6(displayed as A through F) MIDI CC numbers andvalues on up to 16 MIDI channels. The Controllersfunction is also for assigning the function of the 3Pedal Controller inputs. The CC values are sent toeither the PianoBar’s internal synth, the externalMIDI output, or both when a Setup is selected. MIDICCs are typically used for setting thecharacteristics of a sound, such as the attack time,or the portamento speed. A MIDI CC messageconsists of a Number - which corresponds to aparameter that is to be changed, and a Value –which refers to how much that parameter ischanged. The upper left hand corner displays thecurrent Controller (A through F) or Pedal Controller(Pedal 1-3). For Controllers A through F, the MIDICC Number is set (after the # symbol) and a Valueis selected. Move the cursor under the Channels toenable this message to be sent to the internalsynth, the external MIDI output, or both. For thePedal Controllers, a MIDI CC Number is selected,and the position of the Expression pedal
29
connected to that Pedal Controller inputdetermines the value sent. The Pedal Controllerscan be used as real time controllers. A very usefulapplication for this is to control the Volume of thePianoBar’s sound with an Expression pedal.
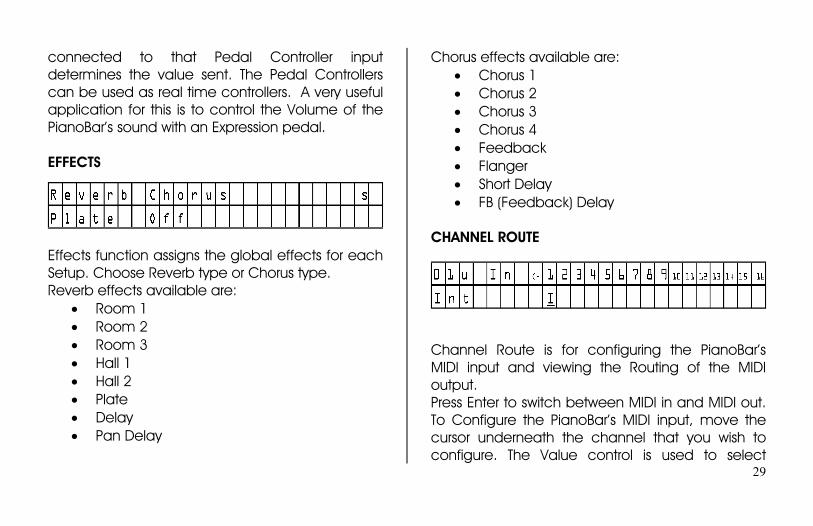
EFFECTS
Effects function assigns the global effects for eachSetup. Choose Reverb type or Chorus type.Reverb effects available are:
• Room 1• Room 2• Room 3• Hall 1• Hall 2• Plate• Delay• Pan Delay
Chorus effects available are:• Chorus 1• Chorus 2• Chorus 3• Chorus 4• Feedback• Flanger• Short Delay• FB (Feedback) Delay
CHANNEL ROUTE
Channel Route is for configuring the PianoBar’sMIDI input and viewing the Routing of the MIDIoutput.Press Enter to switch between MIDI in and MIDI out.To Configure the PianoBar’s MIDI input, move thecursor underneath the channel that you wish toconfigure. The Value control is used to select
30
whether the MIDI input is sent to the Internalsounds, the scanner bar LEDs, Both, or neither.When viewing the MIDI out Routing for a Setup, thesettings can be viewed in this screen, but notchanged. The routing of MIDI out is done on page1 of the Channel Setup function.
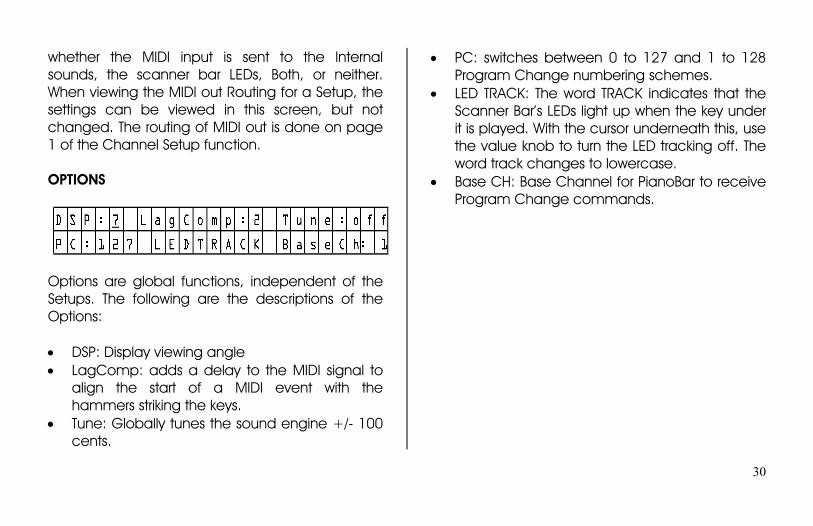
OPTIONS
Options are global functions, independent of theSetups. The following are the descriptions of theOptions:
• DSP: Display viewing angle• LagComp: adds a delay to the MIDI signal to
align the start of a MIDI event with thehammers striking the keys.
• Tune: Globally tunes the sound engine +/- 100cents.
• PC: switches between 0 to 127 and 1 to 128Program Change numbering schemes.
• LED TRACK: The word TRACK indicates that theScanner Bar’s LEDs light up when the key underit is played. With the cursor underneath this, usethe value knob to turn the LED tracking off. Theword track changes to lowercase.
• Base CH: Base Channel for PianoBar to receiveProgram Change commands.
31
4. ABOUT MIDI
For those who know MIDI, you may want to skipthis section and go to the next. However, if you arenew to MIDI or a bit rusty, this section is for you. Acomplete tutorial on MIDI is beyond the scope ofthis program. We recommend The MIDI Manual, byDavid Huber, published by Butterworth-Heinemann.
MIDI is an acronym for Musical Instrument DigitalInterface. It is a communication standard by whichaspects of a musical performance can berecorded or transmitted between electronicmusical devices, such as synthesizers, in order totrigger sounds, alter sounds, begin sequences ofevents, and so on.
Musical performances consist of the SOUND of theMusic being performed, as well as the ACTIONS ofthe musician on his instrument that produce thesound. MIDI translates the ACTIONS that a musiciantakes when he/she performs a piece of music intodata that represent them. For instance – When you
play a key on a piano you start a musical event –a note. MIDI defines the beginning of a new notea “NOTE ON” message. Similarly, when you releasea key, that musical event ends. MIDI defines theend of a note as “NOTE OFF”. This allows for twovery important functions:
• A NOTE ON produced on a MIDI keyboardcan be sent to a different MIDI device toplay a sound.
• A NOTE ON message can be recorded andplayed back in MIDI compatible software,without recording the sound of theperformance. Thus the ACTIONS of theperformance are recorded and can beplayed back or edited.
There are many more aspects to MIDI than just aNOTE ON Message, for instance, every NOTE ONhas a VELOCITY value. Velocity corresponds to howfast a key is pressed down which usually, as in aPiano, corresponds to the loudness of the note thatsounds.
32
MIDI also allows for more than one instrument tosound at the same time, as in an ensemble or anorchestra. A single MIDI cable can send messageson up to 16 channels at a time, allowing for up to16 different “instruments” to sound at once. AGeneral MIDI synthesizer (like the sounds in theControl Module) contains a standard set of soundsthat are arranged in a standard list, called a bank.Each bank has 128 sounds, called Programs. AMIDI message called a “Program change”message allows the selection of one of thesesounds. A Program change message consists of aChannel number, and a program number.Furthermore, most synthesizers have more than128 sounds, so MIDI allows for multiple banks – upto 128.A sound played by MIDI can be varied after it isstarted, just like on many acoustic instruments.Performance effects such as vibrato can beapplied using a type of message called“Continuous Controller”, or CC for short. A MIDI CCmessage consists of a CC Number, from 0-127,
which identifies the type of change that is to bemade to the sound, then a value from 0 to 127that determines the amount of the change to thesound. Types of changes include changes to theVolume (CC#7) and Pan or Left Right position(CC#10). Some MIDI CC numbers are specified todo particular musical functions, others are not. Alist of the MIDI CCs that the PianoBar’s soundengine responds to is included in Appendix B.MIDI messages can be recorded by a computerprogram called a Sequencer, which records MIDIdata. The MIDI data can be played back into aMIDI device and will sound like the originalperformance. Because MIDI data is arepresentation of a musical performance, it is easyto edit MIDI events in a sequencer, or to displaythem as notes on a staff – like sheet music.Programs such as Sibelius® combine MIDIrecording as well as sophisticated notationcapability in order to aid with composition.
MIDI’s capabilities are vast – and the power ofadding MIDI capability quickly to an acoustic
33
piano with the PianoBar will open many creativedoors to pianists and composers who explore thepossibilities.
34
CREATING YOUR OWN SETUP
The following will walk you through the steps tocreating your own Setups with two examples. Thefirst example is a simple 1-layer Setup withExpression Pedal control of the Volume. Thesecond example walks you through some of themore advanced features of the PianoBar.
Example 1 – String Ensemble
A common accompaniment to an acoustic pianosound in music is the sound of a string ensemble.The characteristics of this sound are that it startssomewhat slowly, sustains as long as a note isplayed (as opposed to a piano tone which fadesout) and fades out somewhat slowly.
Step 1 – Clear Setup - First, we will create a default Setup. Choose aSetup that you don’t plan on using.
- Press the Enter/Edit button. Move the cursor under“Lib” and press Enter.- Move the Cursor under “Name”. Use the Valuecontrol to advance through the functions until youreach “Clear this Setup”.- Move the cursor under and press Enter. Thedisplay will prompt you to press Enter for Yes, orEscape for No – press Enter.- The Setup will now contain all the default settings.
Step 2 – Name Setup- Now let’s go ahead and name this Setup. Withthe Cursor moved under the “Clear this Setup”, usethe Value control togo back to the “Name” function.- Move the cursor under the Setup Name, whichshould be blank. Use the Value control to selectthe first Character – “S” – then move the cursor tothe next character and select a “t”. Repeat thisuntil you have spelled “String Ensemble”.- Press Escape to return to the Edit Menu.
35
Step 3 – Channel Setup- Now it’s time to get the sound we’re after. Movethe cursor under Channel Setup and press Enter.- Move the cursor underneath the name of thesound, which should be “Grand Piano”.- Use the Value control to scroll through the soundsuntil you reach “String Ens 1”
Step 4 – Effects- Let’s add some Reverb to our String Ensemblesound. Press Enter. You will now see page 2 of theChannel Setup function. Move your cursor underthe Reverb amount, and increase this to 5- Press Escape, Move the cursor to “Effects” andpress Enter.- Move the cursor under Reverb. Use the Value toselect “Hall1”
You have now created a simple 1-layer Setup.
Let’s make another Setup, this time let’s use someof the PianoBar’s powerful MIDI possibilities to makea 3-layer Setup that illustrates the use of Zones,
Panning, Transposing, Velocity Curves, andControllers.
Example 2 – Bass and Vibe Space
Step 1 – Clear Setup- First, we will create a default Setup. Choose aSetup that you don’t plan on using. - Press the Enter/Edit button. Move the cursor under“Lib” and press Enter.- Move the Cursor under “Name”. Use the Valuecontrol to advance through the functions until youreach “Clear this Setup”.- Move the cursor under and press Enter. Thedisplay will prompt you to press Enter for Yes, orEscape for No – press Enter.- The Setup will now contain all the default settings.
Step 2 – Name Setup- Now let’s go ahead and name this Setup. Withthe Cursor moved under the “Clear this Setup”, usethe Value control to go back to the “Name”function.
36
- Move the cursor under the Setup Name, whichshould be blank. Use the Value control to selectthe first Character – “B” – then move the cursor tothe next character and select a “a”. Repeat thisuntil you have spelled “Bass and Vibe Space”.- Press Escape to return to the Edit Menu.
Step 3 – Building the Layers
- First we’ll configure Channel 1. Move the cursorunder Chn Setup and press Enter.- Move the cursor underneath the name of thesound. Use the Value control to scroll through thenames, until you reach “Vibraphone”.- Move the cursor underneath “Zone” and pressEnter. The display now prompts you to “Play Zoneboundaries”, which means the highest and lowestnote of the Zone. The boundary notes must beplayed at the same time. Let’s set this Zone toextend from the D flat below middle C to thehighest note on the piano. Play these two notessimultaneously and then press Escape.
- Move the cursor back to “Midi: int” and pressEnter – page 2 of Channel Setup will now bedisplayed.- Move the cursor under the “Pan” setting, and usethe Value control to increase the pan to R6.- Move the cursor under Reverb amount and set itto 7. Press Enter to return to Page 1.- Move the cursor under the Channel. Use theValue control to increase the Channel number toChannel 2.
- Now we’ll set up Channel 2. Move the cursorunderneath the name of the sound. Use the Valuecontrol to scroll through the sounds until you reach“Acoustic Bass”.- Move the cursor underneath “Zone” and pressEnter. Play the C 1 octave below middle C and thelowest A simultaneously to set the Zoneboundaries. Press Escape.- Move the cursor back to “Midi: int” and pressEnter – page 2 of Channel Setup will now bedisplayed.
37
- Move the cursor under the “Pan” setting, and usethe Value control to decrease the pan to L6.- Move the cursor under the Channel. Use theValue control to increase the Channel number toChannel 3.
- On to Channel 3! So far we have a Bass soundpanned to the Left from the Low A to the C anoctave below middle C, and a Vibraphone soundpanned to the right above that. Let’s add asynthesizer sound that fades in a perfect fifthabove the note played as the Vibraphone fadesout, and features portamento, or glide, in betweenthe notes. Further more this layer will only come inwhen the piano is played with more velocity.- Move the cursor underneath the name of thesound. Use the Value control to scroll through thesounds until you reach “Warm Pad”.- Move the cursor underneath “Zone” and pressEnter. Play the D flat below middle C and thehighest note on the piano simultaneously and thenpress Escape.
- Move the cursor back to “Midi: int” and pressEnter – page 2 of Channel Setup will now bedisplayed.- Move the cursor under the Velocity curve. Use theValue Control to advance to the 6th Velocity curve( _/ ) which means this sound will begin to beheard at medium velocities.- Move the cursor to the Transpose setting. Use theValue control to increase the number displayed to+7. This makes the sound pitched 7 semitones, ora perfect fifth, higher than the note played.- Press Escape to return to the Edit menu- Finally, we will add portamento to Channel 3’s“Warm Pad” with the Controllers function – this willrequire programming two MIDI CC messages.Move the cursor underneath the Controller functionand press Enter.- Move the cursor next to A#. Use the Value controlto increase the number displayed to 65. This is theMIDI CC number for turning portamento in or off.- Advance the cursor to the Value. Use the Valuecontrol to increase the MIDI CC value to 64. This isthe Value that turns portamento on.
38
-Advance the cursor to the Channel 1 location itshould say “B”. Use the Value control to turn this off.Move the cursor to the Channel 3 location set thisto “I” for internal.- Now, move the cursor back to the “A#”. Use theValue control to change this to “B#”.- Move the cursor to the right of “B#” and increasethe MIDI CC number to 5. This corresponds to theMIDI CC number for portamento rate.- Move the cursor to the MIDI CC Value. Use theValue control to change this to 64.-Advance the cursor to the Channel 1 location itshould say “B”. Use the Value control to turn this off.Move the cursor to the Channel 3 location set thisto “I” for internal.
Now we’re done! Now you have learned how tomake a complex Setup.
39
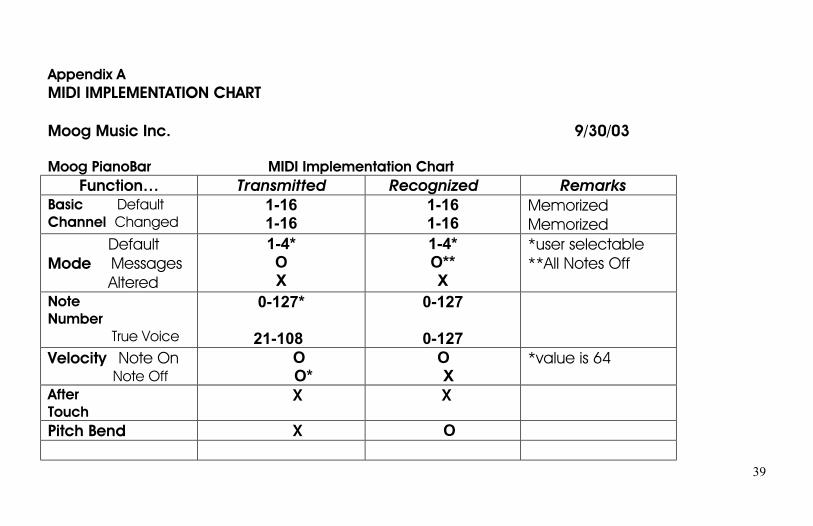
Appendix AMIDI IMPLEMENTATION CHART
Moog Music Inc. 9/30/03
Moog PianoBar MIDI Implementation ChartFunction… Transmitted Recognized Remarks
Basic DefaultChannel Changed
1-161-16
1-161-16
MemorizedMemorized
DefaultMode Messages Altered
1-4*OX
1-4*O**X
*user selectable**All Notes Off
NoteNumber True Voice
0-127*
21-108
0-127
0-127Velocity Note On Note Off
O O*
O X
*value is 64
AfterTouch
X X
Pitch Bend X O
40
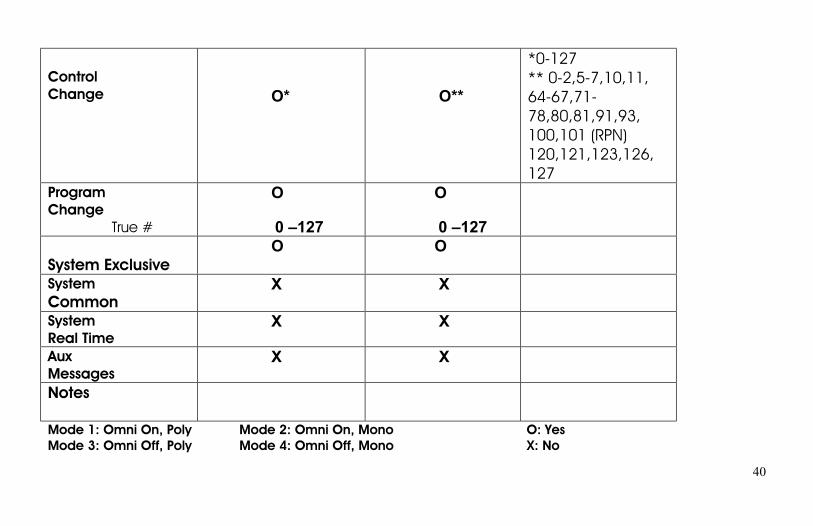
ControlChange O* O**
*0-127** 0-2,5-7,10,11,64-67,71-78,80,81,91,93,100,101 (RPN)120,121,123,126,127
ProgramChange True #
O
0 –127
O
0 –127
System Exclusive O O
SystemCommon
X X
SystemReal Time
X X
AuxMessages
X X
Notes
Mode 1: Omni On, Poly Mode 2: Omni On, Mono O: YesMode 3: Omni Off, Poly Mode 4: Omni Off, Mono X: No
41
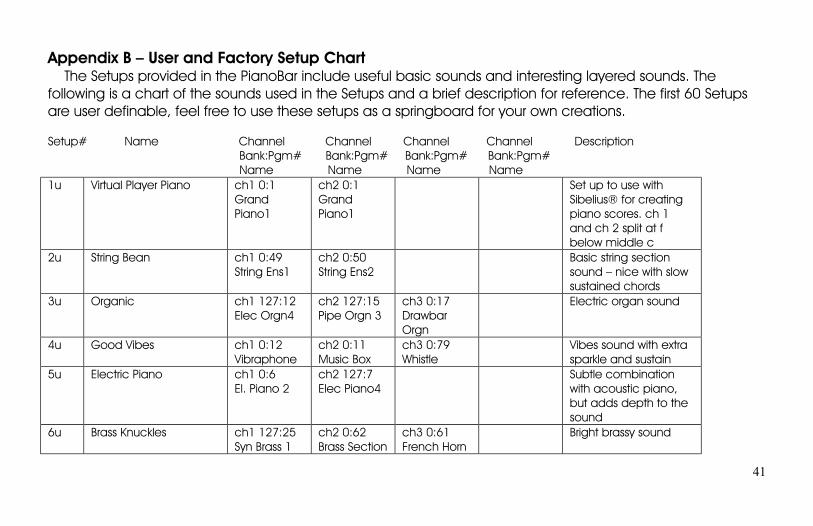
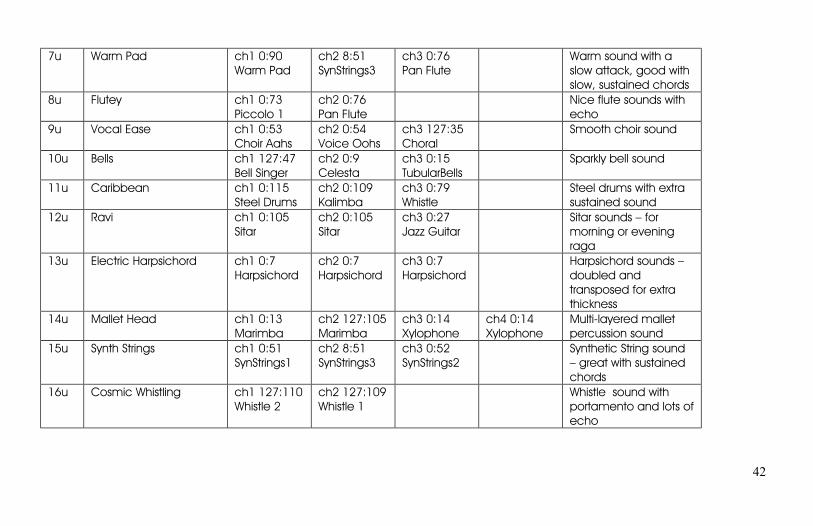
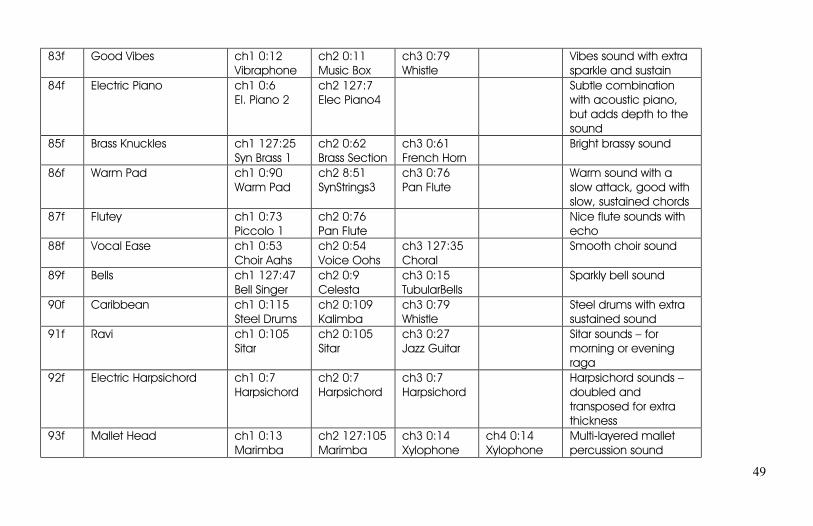
Appendix B – User and Factory Setup Chart The Setups provided in the PianoBar include useful basic sounds and interesting layered sounds. Thefollowing is a chart of the sounds used in the Setups and a brief description for reference. The first 60 Setupsare user definable, feel free to use these setups as a springboard for your own creations.
Setup# Name Channel Channel Channel Channel DescriptionBank:Pgm# Bank:Pgm# Bank:Pgm# Bank:Pgm#Name Name Name Name
1u Virtual Player Piano ch1 0:1GrandPiano1
ch2 0:1GrandPiano1
Set up to use withSibelius® for creatingpiano scores. ch 1and ch 2 split at fbelow middle c
2u String Bean ch1 0:49String Ens1
ch2 0:50String Ens2
Basic string sectionsound – nice with slowsustained chords
3u Organic ch1 127:12Elec Orgn4
ch2 127:15Pipe Orgn 3
ch3 0:17DrawbarOrgn
Electric organ sound
4u Good Vibes ch1 0:12Vibraphone
ch2 0:11Music Box
ch3 0:79Whistle
Vibes sound with extrasparkle and sustain
5u Electric Piano ch1 0:6El. Piano 2
ch2 127:7Elec Piano4
Subtle combinationwith acoustic piano,but adds depth to thesound
6u Brass Knuckles ch1 127:25Syn Brass 1
ch2 0:62Brass Section
ch3 0:61French Horn
Bright brassy sound
42
7u Warm Pad ch1 0:90Warm Pad
ch2 8:51SynStrings3
ch3 0:76Pan Flute
Warm sound with aslow attack, good withslow, sustained chords
8u Flutey ch1 0:73Piccolo 1
ch2 0:76Pan Flute
Nice flute sounds withecho
9u Vocal Ease ch1 0:53Choir Aahs
ch2 0:54Voice Oohs
ch3 127:35Choral
Smooth choir sound
10u Bells ch1 127:47Bell Singer
ch2 0:9Celesta
ch3 0:15TubularBells
Sparkly bell sound
11u Caribbean ch1 0:115Steel Drums
ch2 0:109Kalimba
ch3 0:79Whistle
Steel drums with extrasustained sound
12u Ravi ch1 0:105Sitar
ch2 0:105Sitar
ch3 0:27Jazz Guitar
Sitar sounds – formorning or eveningraga
13u Electric Harpsichord ch1 0:7Harpsichord
ch2 0:7Harpsichord
ch3 0:7Harpsichord
Harpsichord sounds –doubled andtransposed for extrathickness
14u Mallet Head ch1 0:13Marimba
ch2 127:105Marimba
ch3 0:14Xylophone
ch4 0:14Xylophone
Multi-layered malletpercussion sound
15u Synth Strings ch1 0:51SynStrings1
ch2 8:51SynStrings3
ch3 0:52SynStrings2
Synthetic String sound– great with sustainedchords
16u Cosmic Whistling ch1 127:110Whistle 2
ch2 127:109Whistle 1
Whistle sound withportamento and lots ofecho

43
17u Sweet Harp ch1 0:47Orc Harp
ch2 127:59Harp 2
Nice harp sound –play arpeggiatedchords with this one
18u Accordionly ch1 0:24TangoAccord
ch2 127:16Accordion
ch3 8:22ItalianAccordion
Big accordion sound
19u Organism ch1 127:11Elec Orgn3
ch2 0:19Rock Organ
ch3 8:17DetunedOrg
ch4 0:18Perc Orgn
Big organ sound withvibrato, echo
20u Voices in the Mist ch1 0:89New Age
ch2 0:101Brightness
ch3 0:93Bowed Pad
Pretty breathy sound
21u Bass and Strings ch1 0:49String Ens 1
ch2 0:50String Ens 2
ch3 0:33AcousticBass
Bass up to an octavebelow middle C,Strings above that
22u Bass and Vibes ch1 127:98Vibe 1
ch2 127:99Vibe 2
ch3 0:33AcousticBass
Bass up to an octavebelow middle C, Vibesabove that
23u Bass and Voices ch1 0:54Voice Oohs
ch2 0:53Choir Aahs
ch3 0:35Picked Bass
ch4 0:33AcousticBass
Bass up to an octavebelow middle C, Choirabove that
24u Bass and Organ ch1 0:19Rock Organ
ch2 127:9Elec Orgn1
ch3 0:18Perc Orgn
ch4 0:33AcousticBass
Bass up to an octavebelow middle C,Organ above that
25u Bass and Smooth Pad ch1 0:90Warm Pad
ch2 127:36Glasses
ch3 0:36FretlessBass
Bass up to an octavebelow middle C,Smooth pad abovethat
44
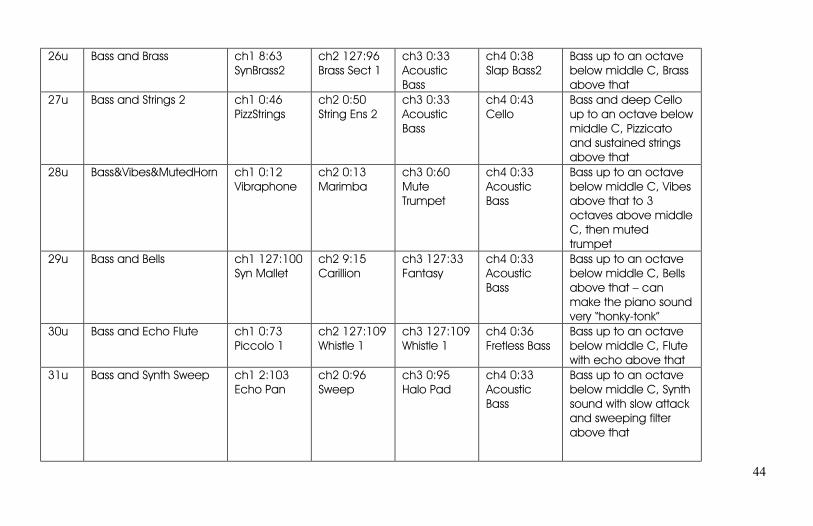
26u Bass and Brass ch1 8:63SynBrass2
ch2 127:96Brass Sect 1
ch3 0:33AcousticBass
ch4 0:38Slap Bass2
Bass up to an octavebelow middle C, Brassabove that
27u Bass and Strings 2 ch1 0:46PizzStrings
ch2 0:50String Ens 2
ch3 0:33AcousticBass
ch4 0:43Cello
Bass and deep Celloup to an octave belowmiddle C, Pizzicatoand sustained stringsabove that
28u Bass&Vibes&MutedHorn ch1 0:12Vibraphone
ch2 0:13Marimba
ch3 0:60MuteTrumpet
ch4 0:33AcousticBass
Bass up to an octavebelow middle C, Vibesabove that to 3octaves above middleC, then mutedtrumpet
29u Bass and Bells ch1 127:100Syn Mallet
ch2 9:15Carillion
ch3 127:33Fantasy
ch4 0:33AcousticBass
Bass up to an octavebelow middle C, Bellsabove that – canmake the piano soundvery “honky-tonk”
30u Bass and Echo Flute ch1 0:73Piccolo 1
ch2 127:109Whistle 1
ch3 127:109Whistle 1
ch4 0:36Fretless Bass
Bass up to an octavebelow middle C, Flutewith echo above that
31u Bass and Synth Sweep ch1 2:103Echo Pan
ch2 0:96Sweep
ch3 0:95Halo Pad
ch4 0:33AcousticBass
Bass up to an octavebelow middle C, Synthsound with slow attackand sweeping filterabove that
45
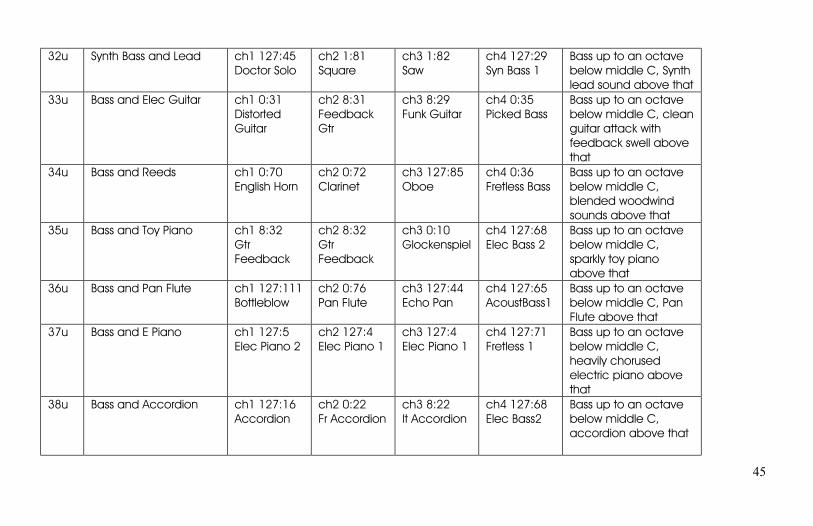
32u Synth Bass and Lead ch1 127:45Doctor Solo
ch2 1:81Square
ch3 1:82Saw
ch4 127:29Syn Bass 1
Bass up to an octavebelow middle C, Synthlead sound above that
33u Bass and Elec Guitar ch1 0:31DistortedGuitar
ch2 8:31FeedbackGtr
ch3 8:29Funk Guitar
ch4 0:35Picked Bass
Bass up to an octavebelow middle C, cleanguitar attack withfeedback swell abovethat
34u Bass and Reeds ch1 0:70English Horn
ch2 0:72Clarinet
ch3 127:85Oboe
ch4 0:36Fretless Bass
Bass up to an octavebelow middle C,blended woodwindsounds above that
35u Bass and Toy Piano ch1 8:32GtrFeedback
ch2 8:32GtrFeedback
ch3 0:10Glockenspiel
ch4 127:68Elec Bass 2
Bass up to an octavebelow middle C,sparkly toy pianoabove that
36u Bass and Pan Flute ch1 127:111Bottleblow
ch2 0:76Pan Flute
ch3 127:44Echo Pan
ch4 127:65AcoustBass1
Bass up to an octavebelow middle C, PanFlute above that
37u Bass and E Piano ch1 127:5Elec Piano 2
ch2 127:4Elec Piano 1
ch3 127:4Elec Piano 1
ch4 127:71Fretless 1
Bass up to an octavebelow middle C,heavily chorusedelectric piano abovethat
38u Bass and Accordion ch1 127:16Accordion
ch2 0:22Fr Accordion
ch3 8:22It Accordion
ch4 127:68Elec Bass2
Bass up to an octavebelow middle C,accordion above that

46
39u Bass and Pipe Organ ch1 0:21Reed Organ
ch2 127:13Pipe Orgn 1
ch3 0:20ChurchOrgan
ch4 0:36FretlessBass
Bass up to an octavebelow middle C, pipeOrgan above that
40u Bass and Bell Strings ch1 0:50String Ens 2
ch2 127:36Glasses
ch3 127:33Fantasy
ch4 0:33AcousticBass
Bass up to an octavebelow middle C,Strings layered withBells above that
41u Zen Garden ch1 8:108Taisho Koto
ch2 0:108Koto
ch3 0:107Shamisen
ch4 127:107Sho
Japanese instrumentslayered together for abright plucked sound
42u Kalimba Pad ch1 0:109Kalimba
ch2 127:100Syn Mallet
ch3 0:101Brightness
ch4 0:55Synth Voices
Kalimba (thumb piano)layered with vocalsounding pad
43u Steel&Wood&Warmth ch1 0:26Steel Guitar
ch2 8:27Hawaiian Gtr
ch3 0:96Sweep
ch4 0:14Xylophone
Layered sound withacoustic guitar,xlophone andsustained synth
44u Cool Copland ch1 0:50String Ens 2
ch2 0:51SynStrings 1
ch3 127:36Glasses
ch4 127:35Choral
Sustained string/choralsound with layerstransposed in 5ths
45u Guitar Fantasy ch1 0:29Muted El Gtr
ch2 8:29Funk Guitar
ch3 0:32GuitarHarmonics
ch4 8:32GtrFeedback
Clean guitar attackwith feedback andharmonics fading in
46u Full Orchestra ch1 0:48Timpani
ch2 0:49String Ens 1
ch3 0:62BrassSection
ch4 8:49Orchestra
Timpani in the lefthand, strings and brassin the right, fullorchestra all across fora big orchestra sound
47
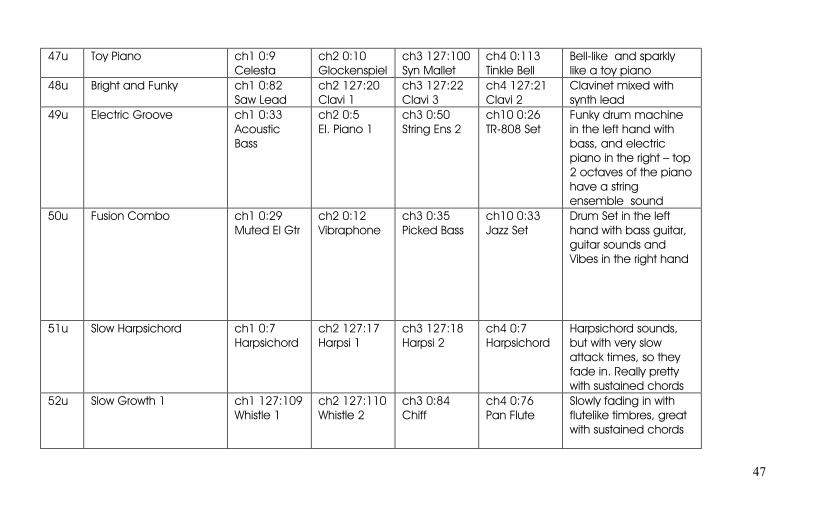
47u Toy Piano ch1 0:9Celesta
ch2 0:10Glockenspiel
ch3 127:100Syn Mallet
ch4 0:113Tinkle Bell
Bell-like and sparklylike a toy piano
48u Bright and Funky ch1 0:82Saw Lead
ch2 127:20Clavi 1
ch3 127:22Clavi 3
ch4 127:21Clavi 2
Clavinet mixed withsynth lead
49u Electric Groove ch1 0:33AcousticBass
ch2 0:5El. Piano 1
ch3 0:50String Ens 2
ch10 0:26TR-808 Set
Funky drum machinein the left hand withbass, and electricpiano in the right – top2 octaves of the pianohave a stringensemble sound
50u Fusion Combo ch1 0:29Muted El Gtr
ch2 0:12Vibraphone
ch3 0:35Picked Bass
ch10 0:33Jazz Set
Drum Set in the lefthand with bass guitar,guitar sounds andVibes in the right hand
51u Slow Harpsichord ch1 0:7Harpsichord
ch2 127:17Harpsi 1
ch3 127:18Harpsi 2
ch4 0:7Harpsichord
Harpsichord sounds,but with very slowattack times, so theyfade in. Really prettywith sustained chords
52u Slow Growth 1 ch1 127:109Whistle 1
ch2 127:110Whistle 2
ch3 0:84Chiff
ch4 0:76Pan Flute
Slowly fading in withflutelike timbres, greatwith sustained chords

48
53u Floating Atmosphere ch1 127:38Atmosphere1
ch2 0:100Atmosphere2
ch3 0:32GtrHarmonics
ch4 0:32GtrHarmonics
Guitar-like atack withnice “floating”harmonics fading in
54u Floating Bells ch1 127:47Bell Singer
ch2 0:93Bowed Pad
ch3 127:36Glasses
ch4 0:10Glockenspiel
Pretty sustaining bell-like timbre
55u Long Time Growth ch1 8:81Sine
ch2 8:81Sine
ch3 8:81Sine
ch4 8:81Sine
4 pure tones layeredwith differenttranspositions (root, 4th,
5th ) inner voices fadein slowly
56u Smooth Background ch1 127:108Shakuhachi
ch2 0:52SynStrings 2
ch3 0:51SynStrings 1
ch4 0:96Sweep
Nice pad sound forplaying sustainedchords
57u Very Electric ch1 127:21Clavi 2
ch2 127:40Funny Vox
ch3 127:69Slap Bass 1
ch4 127:31Syn Bass 3
Bright and bold leadsound
58u On the Mountain ch1 0:124Bird Tweet
ch2 127:108Shakuhachi
ch3 8:81Sine
ch4 0:51SynStrings 1
Pretty pastoral padwith almost subliminalbird song
59u Reedy ch1 0:65Soprano Sax
ch2 0:66Alto Sax
ch3 0:71Bassoon
ch4 0:70English Horn
Nice blendedwoodwind sound
60u Did We Break It! ch1 9:126Burst Noise
ch2 8:126Starship
ch3 2:128Laser Gun
ch4 5:125Wind Chime
Wild sound effect!
81f String Bean ch1 0:49String Ens1
ch2 0:50String Ens2
Basic string sectionsound – nice with slowsustained chords
82f Organic ch1 127:12Elec Orgn4
ch2 127:15Pipe Orgn 3
ch3 0:17DrawbarOrgn
Electric organ sound
49
83f Good Vibes ch1 0:12Vibraphone
ch2 0:11Music Box
ch3 0:79Whistle
Vibes sound with extrasparkle and sustain
84f Electric Piano ch1 0:6El. Piano 2
ch2 127:7Elec Piano4
Subtle combinationwith acoustic piano,but adds depth to thesound
85f Brass Knuckles ch1 127:25Syn Brass 1
ch2 0:62Brass Section
ch3 0:61French Horn
Bright brassy sound
86f Warm Pad ch1 0:90Warm Pad
ch2 8:51SynStrings3
ch3 0:76Pan Flute
Warm sound with aslow attack, good withslow, sustained chords
87f Flutey ch1 0:73Piccolo 1
ch2 0:76Pan Flute
Nice flute sounds withecho
88f Vocal Ease ch1 0:53Choir Aahs
ch2 0:54Voice Oohs
ch3 127:35Choral
Smooth choir sound
89f Bells ch1 127:47Bell Singer
ch2 0:9Celesta
ch3 0:15TubularBells
Sparkly bell sound
90f Caribbean ch1 0:115Steel Drums
ch2 0:109Kalimba
ch3 0:79Whistle
Steel drums with extrasustained sound
91f Ravi ch1 0:105Sitar
ch2 0:105Sitar
ch3 0:27Jazz Guitar
Sitar sounds – formorning or eveningraga
92f Electric Harpsichord ch1 0:7Harpsichord
ch2 0:7Harpsichord
ch3 0:7Harpsichord
Harpsichord sounds –doubled andtransposed for extrathickness
93f Mallet Head ch1 0:13Marimba
ch2 127:105Marimba
ch3 0:14Xylophone
ch4 0:14Xylophone
Multi-layered malletpercussion sound
50
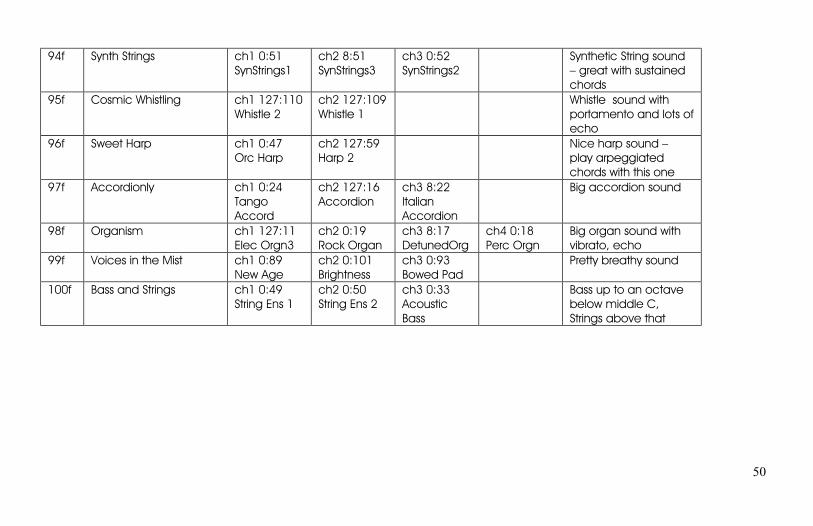
94f Synth Strings ch1 0:51SynStrings1
ch2 8:51SynStrings3
ch3 0:52SynStrings2
Synthetic String sound– great with sustainedchords
95f Cosmic Whistling ch1 127:110Whistle 2
ch2 127:109Whistle 1
Whistle sound withportamento and lots ofecho
96f Sweet Harp ch1 0:47Orc Harp
ch2 127:59Harp 2
Nice harp sound –play arpeggiatedchords with this one
97f Accordionly ch1 0:24TangoAccord
ch2 127:16Accordion
ch3 8:22ItalianAccordion
Big accordion sound
98f Organism ch1 127:11Elec Orgn3
ch2 0:19Rock Organ
ch3 8:17DetunedOrg
ch4 0:18Perc Orgn
Big organ sound withvibrato, echo
99f Voices in the Mist ch1 0:89New Age
ch2 0:101Brightness
ch3 0:93Bowed Pad
Pretty breathy sound
100f Bass and Strings ch1 0:49String Ens 1
ch2 0:50String Ens 2
ch3 0:33AcousticBass
Bass up to an octavebelow middle C,Strings above that
51
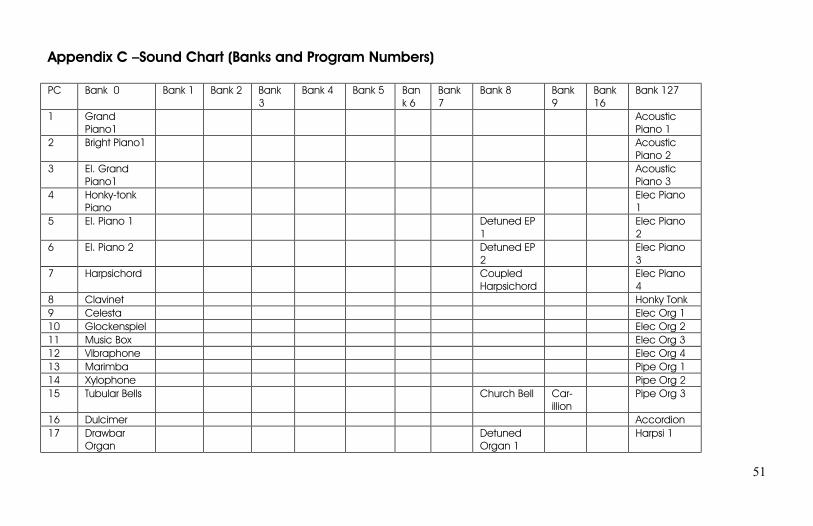
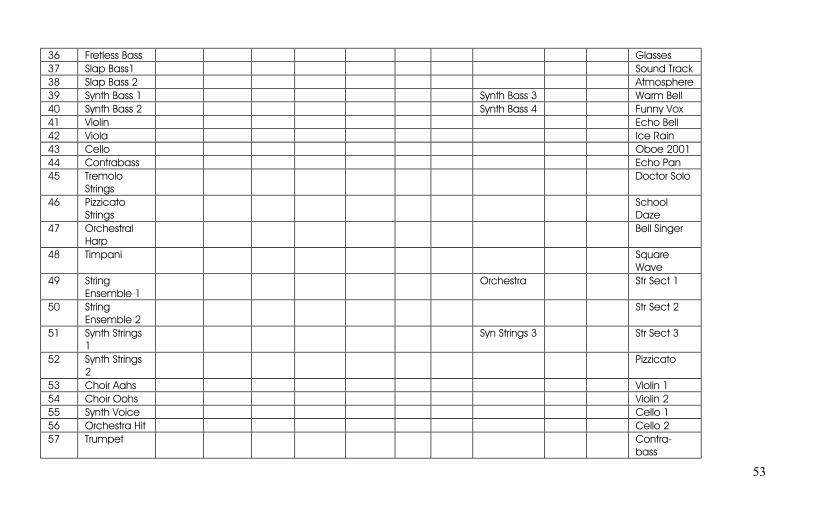
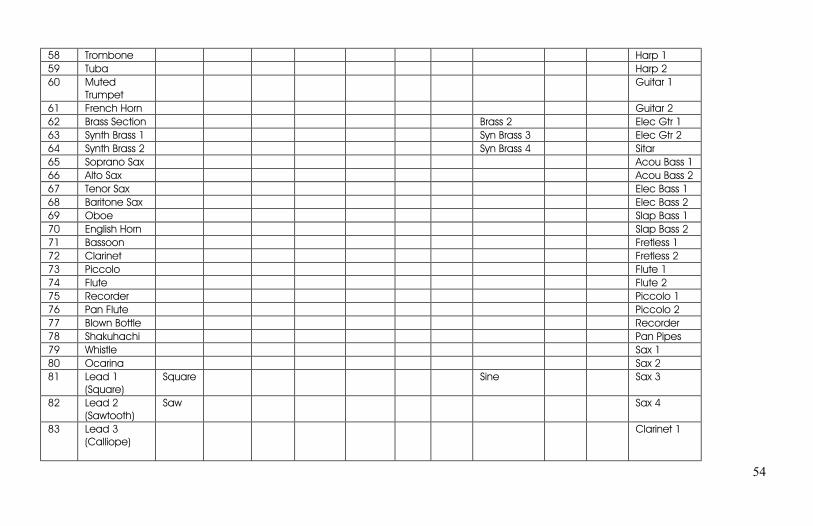
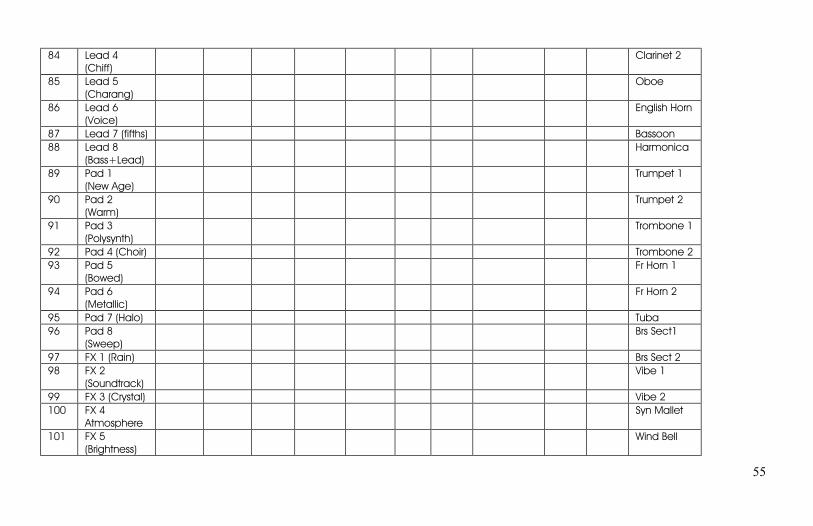
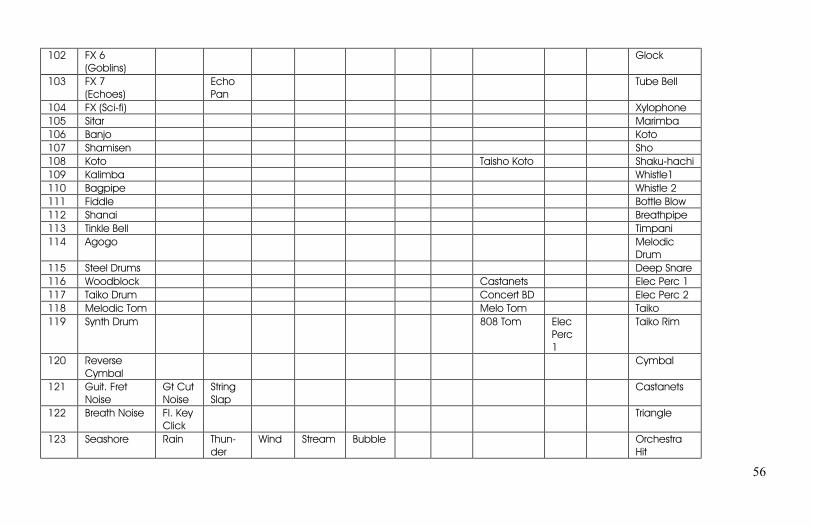
Appendix C –Sound Chart (Banks and Program Numbers)
PC Bank 0 Bank 1 Bank 2 Bank3
Bank 4 Bank 5 Bank 6
Bank7
Bank 8 Bank9
Bank16
Bank 127
1 GrandPiano1
AcousticPiano 1
2 Bright Piano1 AcousticPiano 2
3 El. GrandPiano1
AcousticPiano 3
4 Honky-tonkPiano
Elec Piano1
5 El. Piano 1 Detuned EP1
Elec Piano2
6 El. Piano 2 Detuned EP2
Elec Piano3
7 Harpsichord CoupledHarpsichord
Elec Piano4
8 Clavinet Honky Tonk9 Celesta Elec Org 110 Glockenspiel Elec Org 211 Music Box Elec Org 312 Vibraphone Elec Org 413 Marimba Pipe Org 114 Xylophone Pipe Org 215 Tubular Bells Church Bell Car-
illionPipe Org 3
16 Dulcimer Accordion17 Drawbar
OrganDetunedOrgan 1
Harpsi 1
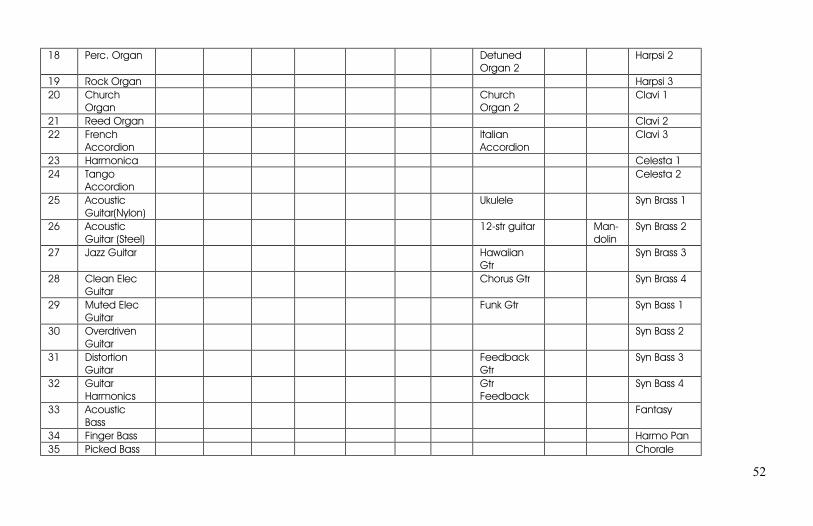
52
18 Perc. Organ DetunedOrgan 2
Harpsi 2
19 Rock Organ Harpsi 320 Church
OrganChurchOrgan 2
Clavi 1
21 Reed Organ Clavi 222 French
AccordionItalianAccordion
Clavi 3
23 Harmonica Celesta 124 Tango
AccordionCelesta 2
25 AcousticGuitar(Nylon)
Ukulele Syn Brass 1
26 AcousticGuitar (Steel)
12-str guitar Man-dolin
Syn Brass 2
27 Jazz Guitar HawaiianGtr
Syn Brass 3
28 Clean ElecGuitar
Chorus Gtr Syn Brass 4
29 Muted ElecGuitar
Funk Gtr Syn Bass 1
30 OverdrivenGuitar
Syn Bass 2
31 DistortionGuitar
FeedbackGtr
Syn Bass 3
32 GuitarHarmonics
GtrFeedback
Syn Bass 4
33 AcousticBass
Fantasy
34 Finger Bass Harmo Pan35 Picked Bass Chorale
53
36 Fretless Bass Glasses37 Slap Bass1 Sound Track38 Slap Bass 2 Atmosphere39 Synth Bass 1 Synth Bass 3 Warm Bell40 Synth Bass 2 Synth Bass 4 Funny Vox41 Violin Echo Bell42 Viola Ice Rain43 Cello Oboe 200144 Contrabass Echo Pan45 Tremolo
StringsDoctor Solo
46 PizzicatoStrings
SchoolDaze
47 OrchestralHarp
Bell Singer
48 Timpani SquareWave
49 StringEnsemble 1
Orchestra Str Sect 1
50 StringEnsemble 2
Str Sect 2
51 Synth Strings1
Syn Strings 3 Str Sect 3
52 Synth Strings2
Pizzicato
53 Choir Aahs Violin 154 Choir Oohs Violin 255 Synth Voice Cello 156 Orchestra Hit Cello 257 Trumpet Contra-
bass
54
58 Trombone Harp 159 Tuba Harp 260 Muted
TrumpetGuitar 1
61 French Horn Guitar 262 Brass Section Brass 2 Elec Gtr 163 Synth Brass 1 Syn Brass 3 Elec Gtr 264 Synth Brass 2 Syn Brass 4 Sitar65 Soprano Sax Acou Bass 166 Alto Sax Acou Bass 267 Tenor Sax Elec Bass 168 Baritone Sax Elec Bass 269 Oboe Slap Bass 170 English Horn Slap Bass 271 Bassoon Fretless 172 Clarinet Fretless 273 Piccolo Flute 174 Flute Flute 275 Recorder Piccolo 176 Pan Flute Piccolo 277 Blown Bottle Recorder78 Shakuhachi Pan Pipes79 Whistle Sax 180 Ocarina Sax 281 Lead 1
(Square)Square Sine Sax 3
82 Lead 2(Sawtooth)
Saw Sax 4
83 Lead 3(Calliope)
Clarinet 1
55
84 Lead 4(Chiff)
Clarinet 2
85 Lead 5(Charang)
Oboe
86 Lead 6(Voice)
English Horn
87 Lead 7 (fifths) Bassoon88 Lead 8
(Bass+Lead)Harmonica
89 Pad 1(New Age)
Trumpet 1
90 Pad 2(Warm)
Trumpet 2
91 Pad 3(Polysynth)
Trombone 1
92 Pad 4 (Choir) Trombone 293 Pad 5
(Bowed)Fr Horn 1
94 Pad 6(Metallic)
Fr Horn 2
95 Pad 7 (Halo) Tuba96 Pad 8
(Sweep)Brs Sect1
97 FX 1 (Rain) Brs Sect 298 FX 2
(Soundtrack)Vibe 1
99 FX 3 (Crystal) Vibe 2100 FX 4
AtmosphereSyn Mallet
101 FX 5(Brightness)
Wind Bell
56
102 FX 6(Goblins)
Glock
103 FX 7(Echoes)
EchoPan
Tube Bell
104 FX (Sci-fi) Xylophone105 Sitar Marimba106 Banjo Koto107 Shamisen Sho108 Koto Taisho Koto Shaku-hachi109 Kalimba Whistle1110 Bagpipe Whistle 2111 Fiddle Bottle Blow112 Shanai Breathpipe113 Tinkle Bell Timpani114 Agogo Melodic
Drum115 Steel Drums Deep Snare116 Woodblock Castanets Elec Perc 1117 Taiko Drum Concert BD Elec Perc 2118 Melodic Tom Melo Tom Taiko119 Synth Drum 808 Tom Elec
Perc1
Taiko Rim
120 ReverseCymbal
Cymbal
121 Guit. FretNoise
Gt CutNoise
StringSlap
Castanets
122 Breath Noise Fl. KeyClick
Triangle
123 Seashore Rain Thun-der
Wind Stream Bubble OrchestraHit
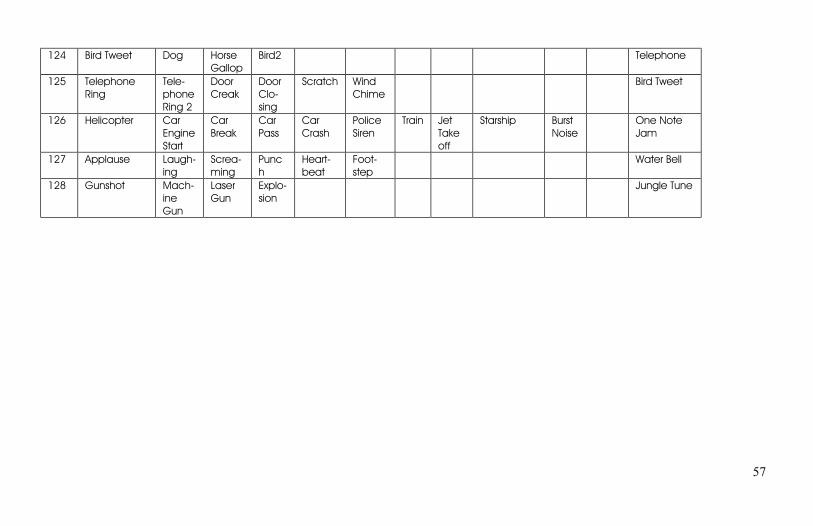
57
124 Bird Tweet Dog HorseGallop
Bird2 Telephone
125 TelephoneRing
Tele-phoneRing 2
DoorCreak
DoorClo-sing
Scratch WindChime
Bird Tweet
126 Helicopter CarEngineStart
CarBreak
CarPass
CarCrash
PoliceSiren
Train JetTakeoff
Starship BurstNoise
One NoteJam
127 Applause Laugh-ing
Screa-ming
Punch
Heart-beat
Foot-step
Water Bell
128 Gunshot Mach-ineGun
LaserGun
Explo-sion
Jungle Tune
58
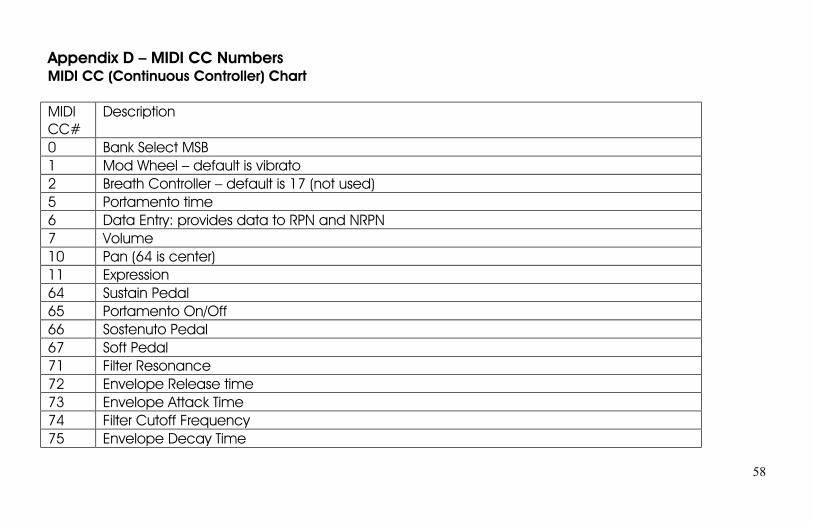
Appendix D – MIDI CC NumbersMIDI CC (Continuous Controller) Chart
MIDICC#
Description
0 Bank Select MSB1 Mod Wheel – default is vibrato2 Breath Controller – default is 17 (not used)5 Portamento time6 Data Entry: provides data to RPN and NRPN7 Volume10 Pan (64 is center)11 Expression64 Sustain Pedal65 Portamento On/Off66 Sostenuto Pedal67 Soft Pedal71 Filter Resonance72 Envelope Release time73 Envelope Attack Time74 Filter Cutoff Frequency75 Envelope Decay Time
59
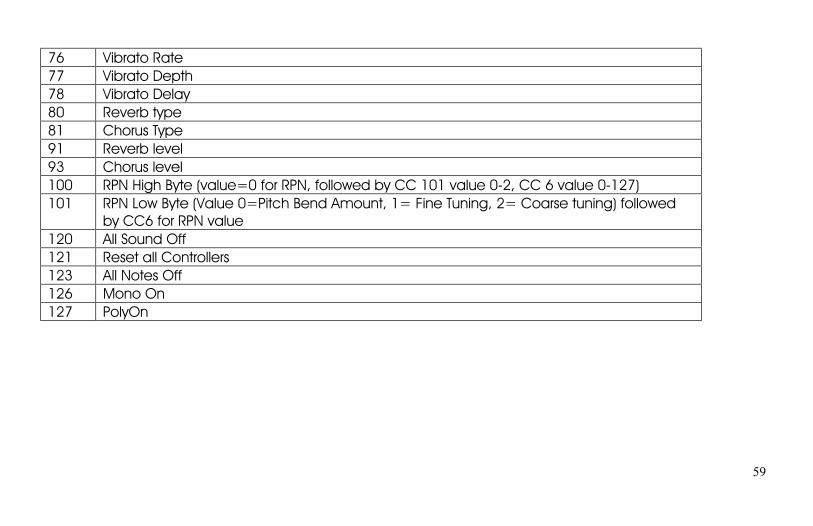
76 Vibrato Rate77 Vibrato Depth78 Vibrato Delay80 Reverb type81 Chorus Type91 Reverb level93 Chorus level100 RPN High Byte (value=0 for RPN, followed by CC 101 value 0-2, CC 6 value 0-127)101 RPN Low Byte (Value 0=Pitch Bend Amount, 1= Fine Tuning, 2= Coarse tuning) followed
by CC6 for RPN value120 All Sound Off121 Reset all Controllers123 All Notes Off126 Mono On127 PolyOn
60
Appendix E - Service and techsupport info
The PianoBar should serve you well for a long timewithout trouble. If the unit develops a fault, youcan contact [email protected], orphone 800-948-1990 for assistance. We ask thatyou have a detailed explanation of your problem,and that you have sought assistance from thismanual or our online support. If the unit isdetermined to be defective, for units sold in the US,an RMA (return materials authorization) number willbe issued and the product can then be returnedto the factory for service. Warranty service will beprovided only in the case that the unit suffers adefect in materials or workmanship. Moog Musicreserves the right to refuse Warranty service if, afterinspection, the unit appears to have beendamaged by misuse, such as dropping the unit.
All PianoBar materials ©2003 Moog Music Inc.Specifications subject to change without notice
Moog Music Inc.554C Riverside Dr.
Asheville NC USA 28801800-948-1990
www.moogmusic.com

61


![Welcome [c3.zzounds.com]](https://img.pdfslide.net/doc/110x75/61d4435749c94f7e226cea97/welcome-c3-.jpg)